#only thing is i need it to be a computer program i can download and use all my own fonts with.
Text
This may be a long shot but does anyone here know about free (or cheap) programs that will let you create text on a curved/round path? Think the sort of text you'd see going around the edge of a round pinback button.
I'm a Clip Studio Paint user so the text tool I have is pretty primitive 😔
#I did a littke bit of research last night and apparently GNU Image Manipulation Program-#allows curved paths. So if there's nothing better I might have to see if that'll be suitable for my needs.#figured id ask tho 😳 if someone more knowledgeable has wisdom id love to hear it#only thing is i need it to be a computer program i can download and use all my own fonts with.#i know there are some free online tools but youre generally stuck with whatever fonts they have#but yeah i literally just need to be able to place text in a circle a few times lmao#grafftalk#delete later
23 notes
·
View notes
Text
The batfam as things on my computer before I go and clear up my storage
Dick: an MP4 of that Boston cop getting launched out of that slide ass first at mach 7
Jason: drum tabs that I had to heavily revise because they were written by a guitarist and I would need 3 hands to play them otherwise
Tim: codes copied and pasted from GitHub because that's the only way I would've gotten my degree
Damian: several pictures of my dog that I plan to print and put in an album
Duke: a bunch of sci-fi fonts I downloaded to play with
Cullen: kinda blurry pictures of My Chemical Romance when I saw the reunion tour
Stephanie: one of my college textbooks that I checked out of the library and scanned instead of buying
Cassandra: enough pirated music for the FBI to actually spare a glance
Barbara: a program I made to appear like I was at home on my computer that I can use as an alibi in case I get accused of something
Harper: a note where I made fun of the Titan submersible because it wasn't socially acceptable to do so in public
Carrie: a folder of blank meme templates
Kate: a detailed calendar reminder from when I had to dispute a parking ticket
Helena: a beginner's guide to the Korean alphabet because my last job had half its employees in Seoul and I needed to know who was who on Zoom calls
Luke: workout notes and routines that I never actually stick to
Bette: a VPN because sometimes American Netflix just doesn't cut it
Alfred: a lot of emailed receipts—basically half my inbox is receipts
Selina: a copy of my friends' Amazon wishlists
Bruce: my account passwords but they're written in a cipher
#dick grayson#jason todd#tim drake#damian wayne#duke thomas#cullen row#stephanie brown#cassandra cain#barbara gordon#harper row#carrie kelley#kate kane#helena bertinelli#luke fox#bette kane#alfred pennyworth#selina kyle#bruce wayne#batman#batfamily#batfam#batboys#batgirls#batkids#batsiblings#batman family#dc comics#headcanon#list#tw swearing
677 notes
·
View notes
Text
INSTALLING// GShade + ReLight for The Sims 4
I've been getting a lotta asks about how I got the up to date GShade working with ReLight ( ALPHA ), so here's a mostly quick tutorial, that will hopefully get it working properly for you too!
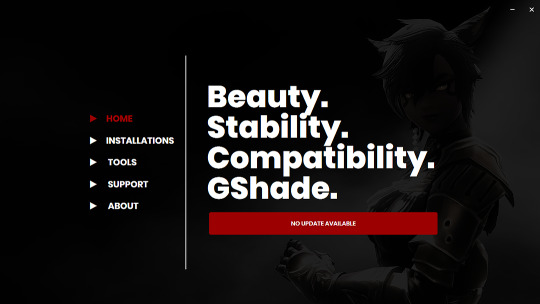
Firstly, download and install GShade, unless you've already got it installed, then just be sure it's up to date.
Click, or right click pics below and open in a new window to see them in more detail.
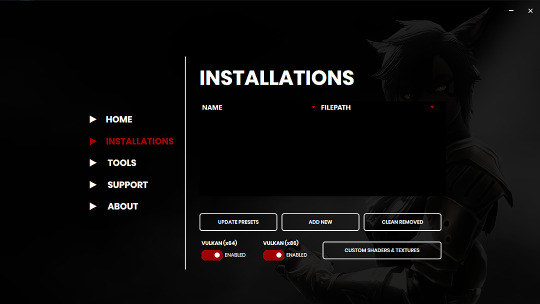
Now I don't currently have it installed into any of my games, bc I mainly use Reshade 2, so if you need to know how to do that, you're in luck!
I'll walk you through it.
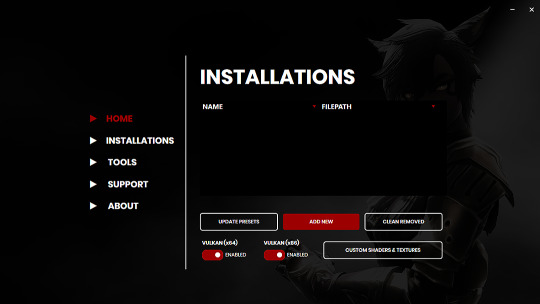
Click Add New.
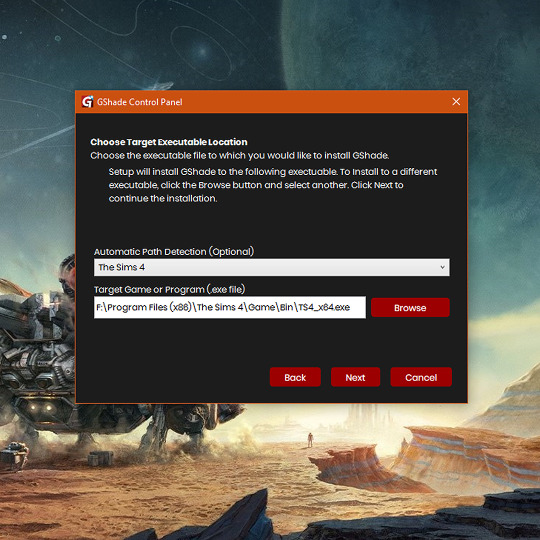
Then locate your TS4_x64.exe, and click Next.
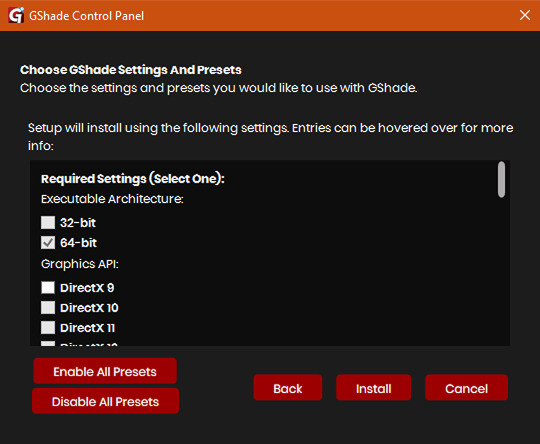
This will open another window with a bunch of ticked boxes, and tbh I didn't mess with any of these. Many them are greyed out anyway, and it all works fine for me.
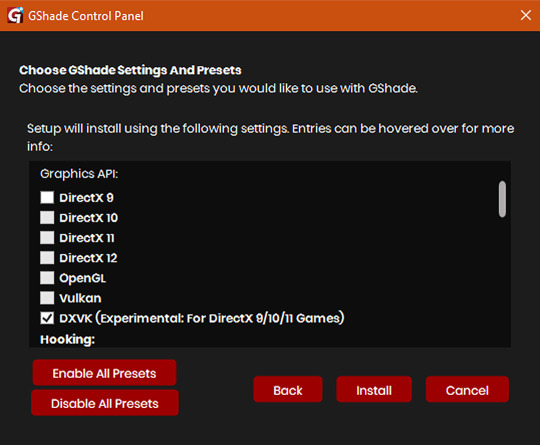
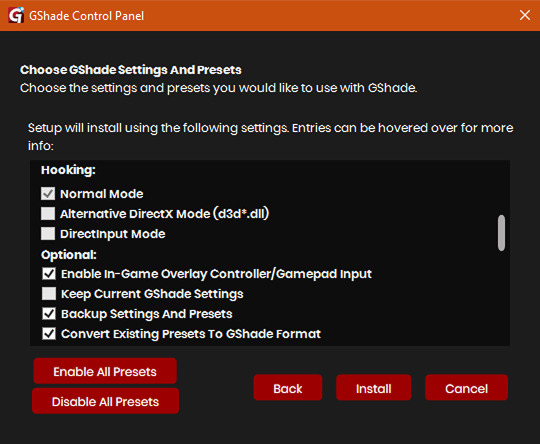
So if yours look like this, then you should be fine too.
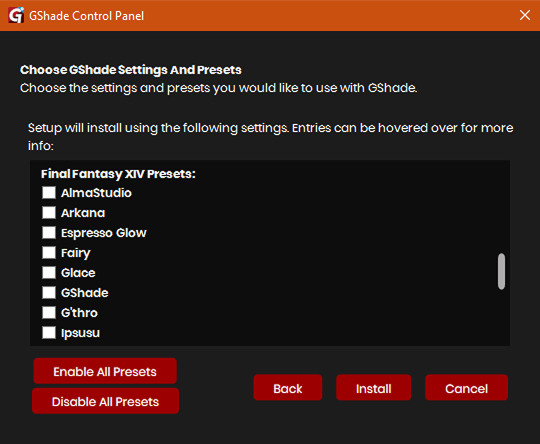
Lastly, at the bottom you can preload some presets if you like, but it's purely up to you. They aren't required.
When done, click Install.
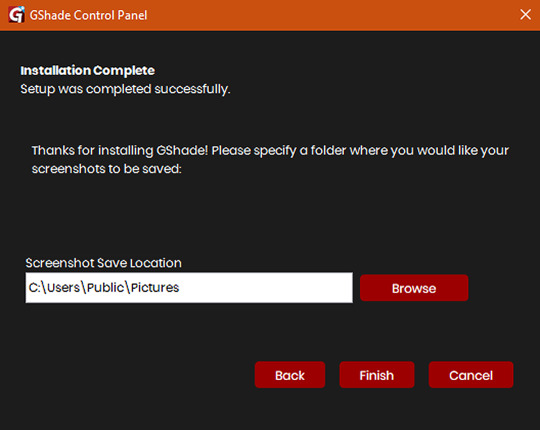
There will be another window that asks you where you'd like to save your pictures. Once again, this is purely up to you, click Browse to locate your preferred folder, or if you use programs like Nvidia for screenshots, just ignore it, and click Finish.
Then when it asks if you're okay with the chosen location, click Yes.
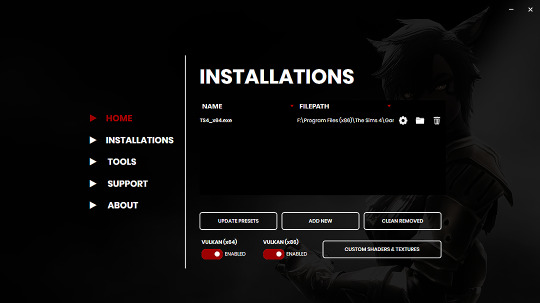
Once you've finished, TS4_x64.exe should show up in the Installations tab of your GShade installer, which means you're part way there!
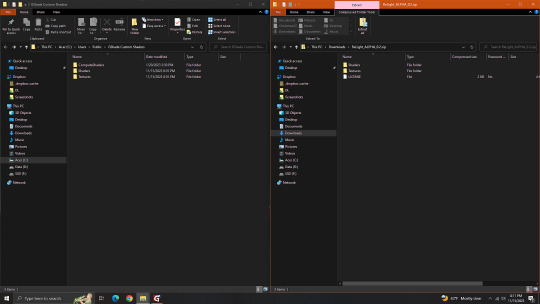
Now, click on the Custom Shaders & Textures button at the bottom, this will open the folder where you need to install ReLight.
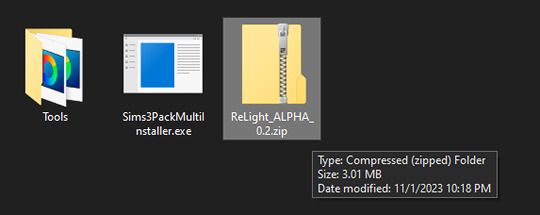
Locate your ReLight_ALPHA_0.2 download. Mine was in my Downloads folder.
Double click it, or unzip it, and you'll find a couple folders inside it.
Click or right click pics below and open in a new tab for more detail.
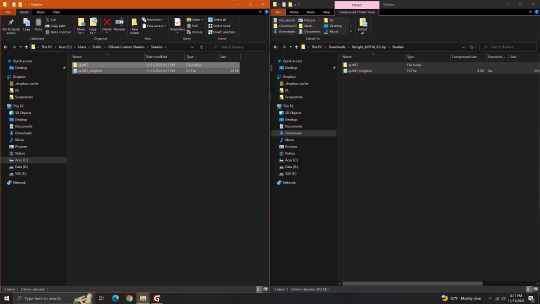
Here's a side by side comparison of the GShade Custom Shaders folder we just opened, and the ReLight_ALPHA_0.2 folder we unzipped and opened, so you can see how there are two identically named folders.
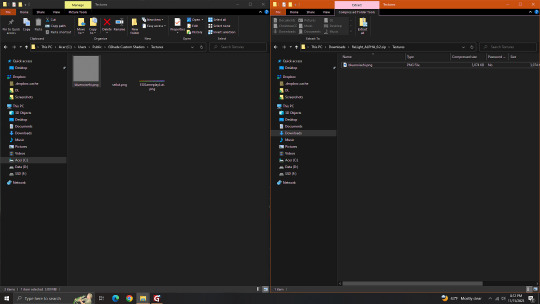
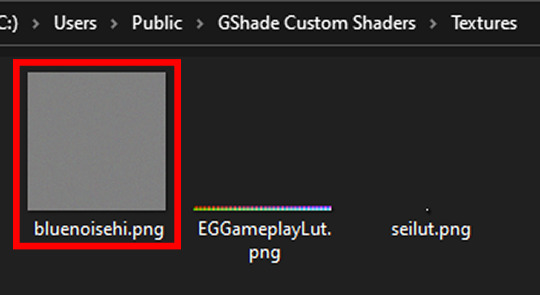
The goal is to put whatever is in the Shaders folder of the ReLight folder, into the Shaders folder of the Custom Shaders folder, and then repeat this process again for both Textures folders, until they end up looking like this...
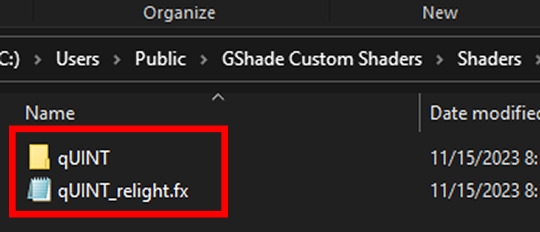
In conclusion, your GShade Custom Shaders > SHADERS folder should have these two files in it...
While your GShade Custom Shaders > TEXTURES folder should have this .png in it...
Good? Now let's turn on The Sims 4.
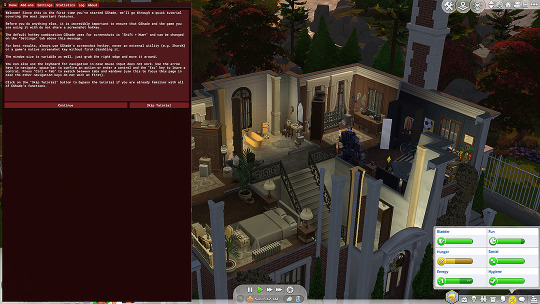
When you've opened you game, load your save ( idkw, but the GShade UI won't open in the menu screen ), then hit Shift + Backspace on your keyboard to open up the GShade UI.
You can choose to go through the tutorial, or skip it. Either way just keep clicking continue or OK until you get to the Home panel.
Now, I've got a preset already, if you've got one too, good, activate it, if you don't there should be like a default one you can use until you create one or get one.
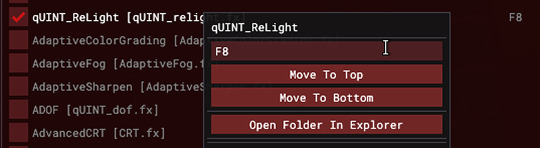
Main goal at this moment is to find ReLight in the list of shaders, and activate it so we know it works.
Tick the Performance Mode box at the bottom, and scroll down 'til you find this...

This list should be alphabetized so just scroll down to the Q's, then tick the box beside it.
Then click Active to Top, and scroll back to it.
One thing I would suggest is binding it to a key ( right click while hovering over it ), this will make it easier to find if you lose it again, since clicking Active to Top also recalls any shaders that are bound, even if their box isn't ticked ( isn't active ).

I've bound mine to F8, but it's up to you what you wanna use, I only suggest it be F6 or above, since The Sims 4 already uses F1-F5 I believe.
Oh, and whenever you're done messing around with it, be sure to untick Performance Mode, so your computer won't beat your ass.
273 notes
·
View notes
Note
love love LOVE your The Sign gifsets. im still a newbie in giffing lmao and your gifs are like reaaally pretty so i was wondering how you do your gifs? i really like how it's sharp and the colors pop up beautifully (only if you don't mind sharing ofcc <333)
bun this is the kindest thing you could have said to me, thank you so much <3 i wanted to write down my giffing process for a while in case anyone would find anything in it helpful, so thanks for giving me a push!
guzhu-furen's photoshop gifmaking process (kinda oriented on saving up time)
from

to

1. Downloading a video. i prefer to download video files instead of making screen recordings because the latter usually leaves watermarks/captions and makes image quality lower. i will not be linking the downloading websites themselves directly, but they are all easy to find through search engines if you know what to search for! i download ql dramas from:
youtube:
if the video you need is above 1080p quality, search for youtube4kdownloader
if the video is age restricted, search for 9xbuddy
both these websites work for normal videos too!
mkvdrama usually has 1080p episodes of most asian dramas.
dramacool also has downloading options in case the show is not available on other websites!
2. Screencapping (i learned it through this tutorial)
i screencap using KMPlayer. here is the installer i used, but you can find versions of this program on various websites and torrents too! install the program and proceed.
screencapping steps: open KMPlayer > press "CTRL + G" to summon the Frame Extraction window > set identical settings to these:
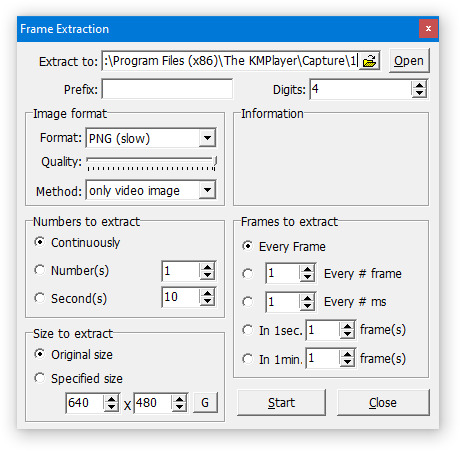
note which computer folder the screencaps will go to (it has a label "Extract to") > go to that folder on your computer and create a bunch of numbered folders there, for example ten folders named from 1 to 10, these would be our separate folders for ten gifs > write "1" or a name of another numbered folder after the backslash in "Extract to" bar in kmplayer > go the timestamp that will be the beginning of your gif in KMPlayer > press "Start" in the Frame Extraction window and press play on the video > when the moment you need to gif is over, press pause on the video and press "Stop" in the Frame Extraction window. great, you now have your folder of screencaps!
3. Importing screencaps to Photoshop
i use Adobe Photoshop 2023, but had used Adobe Photoshop CS5 for a long time before that, so you can use any version you have or find! it's available on various websites and torrents.
open Photoshop > Scripts > Load Files into Stack > press Browse in the "Load Layers" window that was opened
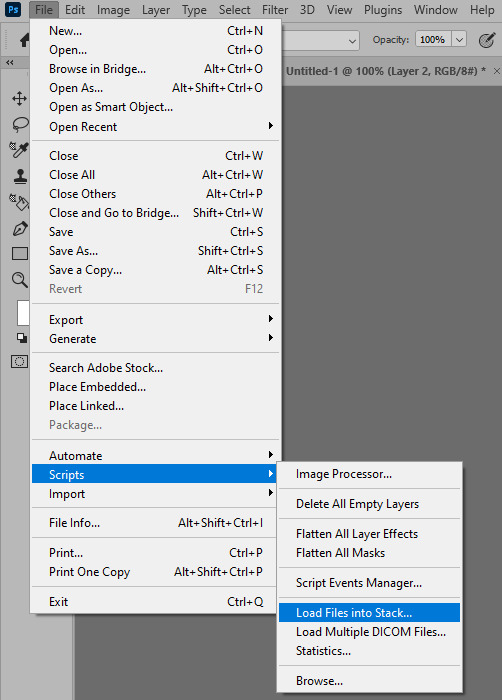
open your screencaps folder (and pin the KMPlayer Capture folder for faster future access) > pick the screencaps you want for your gif by clicking on the first one, and then clicking on the finishing one while pressing Shift on the keyboard > click OK and let them load for some time! i have 65 screencaps loading at the moment
when the screencaps finish loading go to Window > press Timeline > press Create Video Timeline in the opened sidebar > press three dots that will say "Convert to frame animation"


4. Sizing & making the base of a gif
next part will be automatic. i use actions for almost everything from this moment. download the basic action pack here and my additional action pack that we will need here. load them in your photoshop actions window (Actions > Load Actions).
play the Script action to create frames.
now onto sizing your gif. these are tumblr's width dimensions for 3 types of gifs
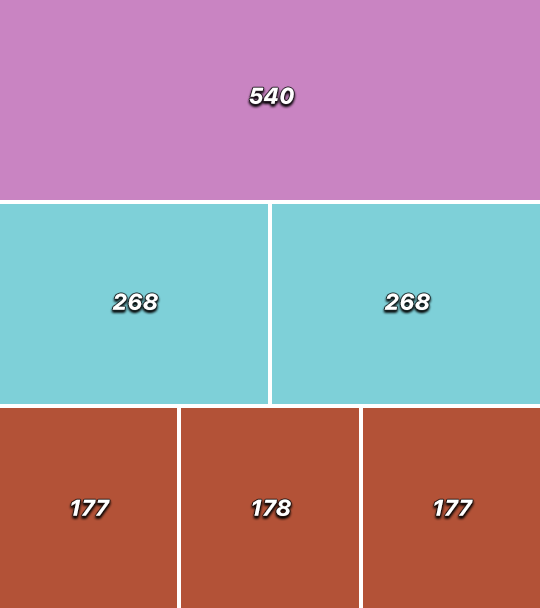
my gifs are usually 540 px in width and 640, 400 or 345 px in height. i added a 400 px action (Sizing 400) in the action pack, you can use it! or you can follow the steps by hand:
Image > Image Size > put in the height you want and add 4-6 pixels there (mine will be 406 for a 400 px high gif) > OK

now we need to crop the gif for it to fit tumblr's dimensions:
Image > Canvas Size > change Width to 540 (or 268 or 177) and take away the 4-6 pixels that we left in the previous step in Height
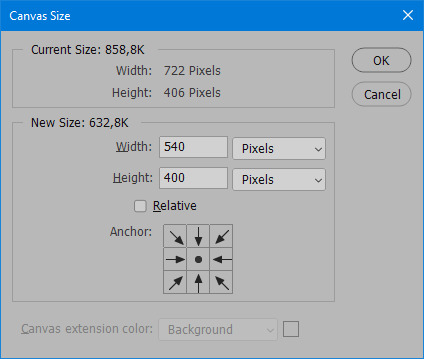
when you figure out which gif dimensions work best for you, record an action and use it to save up time!
after sizing use the action Smart Object. now we have the base of our gif!

you can move your gif left or right if you want! i will be doing this because i would like to show more hips in the gif.
press Ctrl + T > move the layer however you need (not in height though) > press Enter to save
i moved it to the right and my gif looks like this now:
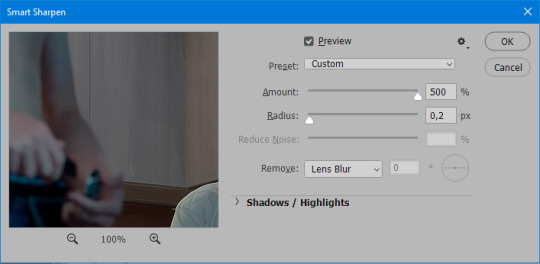
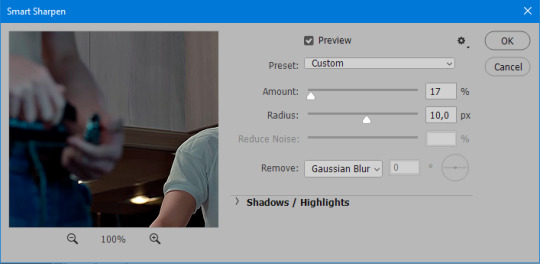
5. Sharpening (i use Tan's sharpening settings explained here)
i added two sharpening actions in the pack, they are called Sharpen Spicy and Sharpen Spicy 12. you can use one of them or you can sharpen your gif by hand, i will explain how to do it below.
Filter > Sharpen > Smart Sharpen > 500% amount, 0,2 px radius > OK
Filter > Sharpen > Smart Sharpen > 17% amount, 10,0 px radius > OK (you can change 17% to lesser or bigger, depending how intense you want your sharpening to look. i use 17% for 4k footage and 12% for 1080 px or less videos)
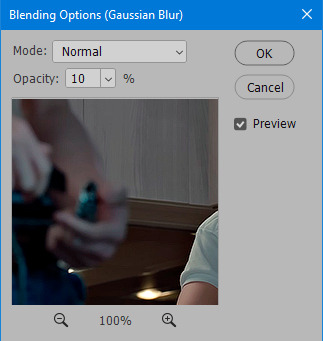
to smooth the sharpening a bit i use Gaussian Blur (this is optional, you can leave the sharpening as it is if you want your gif to be sharper).
Filter > Blur > Gaussian Blur > Radius 1,0 pixels > OK
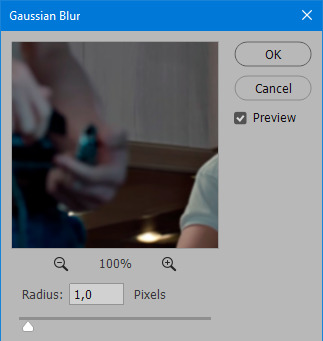
now change blending intensity to let only a bit of the blurring effect stay (you need to change this by hand if you used the sharpening action also).
press Blending Options (the highlighted place) twice > change Opacity to 10%

this is what my gifs looks like with sharpening now!

6. Colouring (i learned how to colour the way i do through this tutorial)
to make it easier for you to learn i will share my blank colouring file. i created it to save as much time while giffing as possible, so whenever i need to colour a gif i simply duplicate all the blank adjustment layers to the base of my every gif and start colouring! once you figure out which adjustment layers work for you best, i recommend creating a blank colouring file too to save time.
if you want to go the easy way, open my colouring file and duplicate selected layers to your gif file by Layer > Duplicate Layer > insert gif's document name

if you want to learn by hand, create the adjustment layers that i will be naming in the process on your own, you can find them all in Layer > New Adjustment Layer
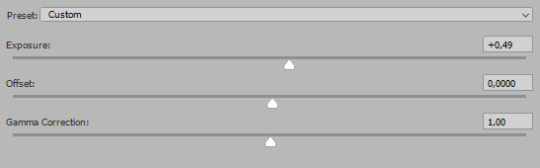
now we will use adjustment layers for our colouring from the bottom to the top! first, Exposure layer to add a bit of light to the gif. i don't always use Exposure because sometimes shots are bright enough on their own. i will, however, use it here. don't use it on your gif too much, because in the next few steps we will also be brightening the gif with other adjustment layers. i added +0,49:

next, Hue/Saturation layer. i use it in gifs with neon lighting to color correct overly bright colours. for example if your characters are standing in neon pink, you might want to lessen Saturation in Magentas and Reds to make the final gif less pixelated, and etc. i will not use Hue/Saturation on this gif, cause it doesn't need it.
proceed to the layer Levels. this layer usually does most of my colouring. click on the lowest white dropper in your Levels window:
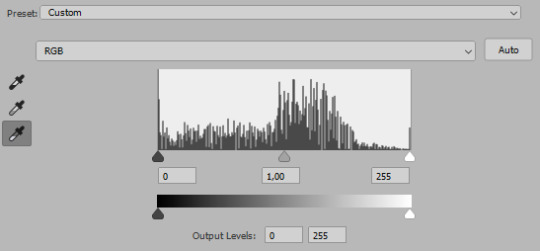
now choose a light place on your gif and click on it with the white dropper. it works especially well if you use the white dropper on the lightened parts of face skin. you can play around by choosing different bright spots and seeing what works best. here is the spot i chose and the resulting colouring:


this is too light, so now we need to balance it out with the black dropper:

choose one of the darkest places this time and click it with black dropper! once again, you can play around and click different spot to see what works best. i will be clicking the highlighted spot and you can see what my gif will look like with this Levels settings


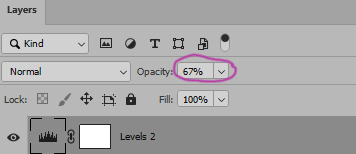
as you can see, darkest places became darker and other colours were corrected a bit! now, this is still too bright, so i will be decreasing the opacity of Levels layer from 100% to a smaller number:

i will have to continue in another post because tumblr only allows 30 pictures per one post in the new editor now and i'd like to explain everything in visuals. click to continue
78 notes
·
View notes
Text
Getting Linux-y (for Windows refugees)
a casual users' GUIDE to the basics
Linux ? isn't that for nerds ??
yes. no. we're breaking down stereotypes here !! this post is aimed at casual users who care about freedom + privacy, are sick of the direction Windows is heading, or just curious c:
i'm talking social media, email, web browsing, online shopping, pdfs, document writing, funny meme edits, youtube/netflix/plex, spotify, dvds + cds + mp3s etc.
i'll mention gaming and running specific Windows-only software briefly, but that's outside the casual scope i'm going for d:
Arm thyself ! and decipher !! arcane secrets be upon ye !!
it's key knowledge time !! ^w^
Linux isn't Windows, but it's not completely alien :o
much like Tumblr, one curates their Linux experience. there are flavours of Linux (terminology: distribution/distro) aimed at power users who like to DIY, and there's ones aimed at normal folk that are ready to go. for the sake of this GUIDE i'm recommending Linux Mint:
its interface is similar to Windows,
it's popular as a user-friendly choice
and it has both excellent support and software
(note: i ran Mint for years, and when coming back to Linux i chose it for my gaming pc because it's easy to set up and well-supported)
key information:
Linux doesn't use drive letters :o
your C: drive is / (terminology: root directory)
your personal files (C:\Users\Username) live under /home/username (terminology: home directory)
other drives (internal and USB drives) live under /mnt/drive-label or /media/username/drive-label (terminology: mount point)
Technical Note: all hard drives and SSDs, before they get a mount point, are referred to as /dev/sdX (eg /dev/sda, /dev/sdb etc.) for HDDs and SATA SSDs (partitions are /dev/sda1, /dev/sda2 etc.), and /dev/nvmeXn1 (/dev/nvme0n1, /dev/nvme1n1 etc.) for NVMe drives (partitions are /dev/nvme0n1p1, /dev/nvme0n1p2)
however, Mint manages all this for us and stuff just shows up in your File Manager much like they do in Windows Explorer c:
Software is typically managed similar to the way App Stores work; Mint has Software Manager that lets you install common programs
the only wrinkle here is Mint supports both Mint-specific sources and a thing called Flatpak, which is like a universal App Store for all Linux distros
the Update Manager keeps both your core system and your programs up-to-date. unlike Windows, by default it will only update when you tell it to ! no more rebooting into Windows Update and waiting 10 years ^w^
it's possible to have both Linux and Windows on the same laptop (terminology: dual-booting); you choose which one each time you turn your laptop on
the Linux Mint Forums are a good place to ask questions, seek advice, and maybe even offer your own !!
additional places: Official Community Website, community-maintained subreddit, community-maintained Discord Server, Official Troubleshooting Guide
i think that's the basic info taken care of.
Let's start with the preparation, or PRE-paration
for this GUIDE you'll need:
a USB drive (4GB+)
Linux Mint ISO file
Balena Etcher (to put the ISO file on the USB drive)
i recommend reading through the info on the Mint homepage and following their installation guide for good step-by-step guide w/ screenshots ^^'
we're gonna make a 'Live Image' on our USB drive - this means we can testdrive the system before we install it. try before you buy !! wait, it's free -- uhh.. walk before you run ??
Download the ISO file using the above link. i recommend the Cinnamon Edition, unless you have a very old PC, in which case pick XFCE
Download Balena Etcher
Plug in your USB drive and open Etcher
Follow the onscreen prompts to select the ISO file and your USB drive
Alright, let's fire her up ! ^u^
now we have our USB drive it's time to boot it. because Windows is, well, Windows, you may need to disable Fast Boot in order to access the BIOS/UEFI. :c you may also have to disable Secure Boot in the BIOS/UEFI depending on your computer. this is usually found in the Boot, Security, or Authentication tab.
now we're ready !!
Power on your computer and press F1/F2/F6/F10/F12/DEL to access your BIOS or Boot Menu
Select your USB drive
A screen will come up where you can select Linux Mint (or will say Automatic Boot in X seconds)
You shall be greeted by a desktop that looks something like this

have a look around !! there's a menu in the bottom left that has programs and system settings and logout/reboot/shutdown options. the taskbar at the bottom displays icons of running apps (and pinned ones). the bottom right has your clock and system tray w/ network, audio etc.
this is a great time to get a feel for how everything works ! open some programs !! investigate the System Settings. connect to your WiFi (in the system tray next to the sound and clock).
when you're ready, double-click the "Install Linux Mint" icon on the desktop. the installer will walk you through setting everything up. i recommend following the official installation guide's walkthrough as it explains everything from setting your timezone to installing Mint by itself or alongside Windows, with screenshots showing each step. it also has an important section on installing drivers. the slideshow during installation also does a good job at showcasing the available software.
Welcome Screen
after installing and rebooting, a Welcome Screen pops up that offers a nice interface for picking a system theme/colour, installing drivers, and setting up backups etc.
Let's talk software !! :D
Mint comes with some software pre-installed. these are probably the main ones:
Archive Manager (like 7-Zip or WinRAR)
Celluloid (a video player; VLC is available to install if you prefer)
Drawing (an image editor similar to Paint)
Document Viewer (PDF viewer)
Firefox (Tumblr's favourite web browser)
LibreOffice (like MS Office - it even supports MS Office file format !)
Rhythmbox (like Windows Media Player or iTunes)
Software Manager (like the Microsoft Store/App Store; GET OTHER PROGRAMS HERE !)
System Monitor (like Task Manager)
System Settings (like Control Panel)
Terminal (like Powershell/Command Prompt; outside the scope of this post but good to have)
Text Editor (like Notepad)
Timeshift (like System Restore points, or macOS Time Machine)
Web Apps (similar to an old iOS feature - make Netflix.com into an app etc.)
Update Manager (manages updates)
Available in Software Manager:
Audacity
Discord
DOSbox
Dropbox
OBS
Spotify
Transmission (torrent client)
VLC
and much more !
these are all official apps !
How's that checklist ?
i mentioned some casual tasks at the start of this post. let's work through them !
Social Media, Online Shopping, Youtube/Netflix/Plex and general Web Browsing
Difficulty: easy
Windows Similarity: identical
Method: open Firefox. browse to your_site.com.
note: i recommend the web version of Plex as the app can be buggy
Email
Difficulty: easy (webmail), medium (mail client)
Windows Similarity: identical (webmail) or similar (mail client)
Method: webmail - open Firefox. browse to your_email_site.com. sign in
client - open Software Manager. search for Geary (similar to Mac Mail), Evolution (similar to Outlook), or Thunderbird (same as on Windows). click Install. open Geary/Evolution/Thunderbird, follow the first-time setup.
PDFs
Difficulty: easy
Windows Similarity: similar
Method: open Document Viewer from the application menu. File -> Open, browse for your PDF. OR, open File Browser, browse for your PDF, double-click to open
Document Writing
Difficulty: easy
Windows Similarity: similar
Method: open LibreOffice Writer from the application menu. on first launch it may ask if you want a traditional (Office 2003) or Ribbon (Office 2007 onwards) layout. use it as you would MS Word. there's also Calc (Excel), Impress (Powerpoint), Draw (Publisher) and Base (Access)
Funny Meme Edits (aka MS Paint level of image editing)
Difficulty: medium
Windows Similarity: similar
Method: open Drawing from the application menu. File -> Open for your image. the left toolbar provides options to resize, add text, crop etc. pro tip: remember to click the tick button on the bottom right when you do anything !
Spotify
Difficulty: easy
Windows Similarity: identical
Method: open Software Manager, search for Spotify, click Install. then open it from the application menu.
DVDs
Difficulty: easy
Windows Similarity: similar
Method: insert your DVD. Mint may ask what you want to do (choose play/open with Celluloid). if it doesn't, then open Celluloid from the application menu, click the + icon in the top left, click "Open Disc" and choose the DVD you inserted.
CDs and MP3s
Difficulty: easy
Windows Similarity: similar
Method: CDs - insert your CD. Mint may ask what you want to do (choose play/open with Rhythmbox). if it doesn't, then open Rhythmbox from the application menu. it should automatically see your CD.
MP3s - double-click your MP3 file.
Gaming and Windows-only programs
i said i'd briefly mention this (probably good bc the post is getting loonnggggggg), so here we go.
gaming on Linux has come a long way. Steam can be installed from Software Manager and supports a few titles natively, as well as the option to run some Windows-only games using compatibility software called Proton. the website ProtonDB is very handy for looking up compatibility for specific games. i'll drop a proper GUIDE on Linux gaming another time.
Windows-only programs. sometimes you need specific software and it only has a Windows version. it happens. there's similar compatibility software that allows eg Photoshop to run, called WINE (Proton is actually based on this). again, this is outside the casual scope of this post, but i'll drop a GUIDE on this too (as i use the same software to manage both my Windows-only programs and my Windows-only games).
Finale !! FINI !! Fuck me that's a lotta words !!
okay, we got to the end ! you should have Linux Mint installed, you should have your basic programs ready to rock (and know where to get more !!), and know where to get help from official Linux Mint sources as well as community-run ones <3
please drop any questions in the notes, or as an ask. i shall tag those asks #DATA_REQUESTS/GUIDES/LINUX in addition to my usual #DATA_REQUEST tag
i'll also provide the following GUIDEs/REPOs as i have time:
Flatpak (that universal App Store i mentioned earlier)
Gaming (including using Proton + Bottles for Windows games)
Windows software (using WINE + Bottles)
and if there are any specific GUIDEs (eg terminal basics, how to configure xyz in System Settings etc.) or REPOs (eg links to other people's GUIDEs, software recs, screenshot galleries etc.) i'm happy to provide those as and when i have the time !! have fun !!~
#daemon.md#GUIDES#GUIDES/LINUX#linux mint#linux#free software#foss#open source#this post is like 5x the length i expected it to be bc brevity ain't my style#oopsie#i know i should provide more screenshots but i'm tired after writing this#so i'll include some in a reblog ??
867 notes
·
View notes
Text
hello baldurs gate 3 community again: This time im talking about modding!
hello adventurers and shifty-eyed people, I bring to you some important stuff.
Mod compilations!
Below the cut, if you are interested, I have compiled a few things for what I think the bg3 tumblr modding community wants (based on me being in the tag for a month straight).
Things I have compiled include:
- Super basic install of baldur's gate 3 mod manager (and a bit of vortex) (9 Easy Steps!)
- My OWN special "Computer helper" mod bundle with super easy installations (helps it run on my piece of crap laptop who hates me so much but I love her <3)
- Companion and player mods (visuals only, and like de-ab-ing and stuff, I'm not going around adding all the extra eye colour mods)
INCLUDING TRANS TOP SCARS AND DADBOD MODS + MORE
- Some personal favourite mods that really helped enhance my experience.
Enjoy!
(if you enjoy bg3 modding, please consider reblogging because I think posts with links are still shadowbanned in the tag lol)
HOW TO GET THE MOD LOADER FOR BG3 IN 3 EASY STEPS
go to the github download page and scroll down until you see the first downloadable file that reads "BG3ModManager_Lastest.zip"
extract the file into an accessible area (your downloads folder should work fine, I just put it on my desktop) (just anything that won't require you to give admin permissions to download it. I would also keep this off Local Disc (C:) for convenience)
You can use any free extractor program, 7zip works, i used to use Peazip and now I use Breezip and that works well.
Tada! You should have an open folder in your extracted location.
2 things may happen here: You will get the extracted folder with the other documents inside. Congrats, you're done! If you have an extracted folder with ONLY the .exe file in it, go back into the zip file and drag the other files into the folder. This should fix the problem, all files from the zip need to be there to work.
(OPTIONAL) you CAN use Vortex mod manager to manage your bg3 mods on there, in which case any nexusmods mod will have a direct download button for you. Personally I have my subnautica mods loaded from there so bg3 is unavailable.
HOW TO MOD BALDURS GATE 6 IN EASY STEPS + SCRIPT EXTENDER
Make sure you have Baldur's Gate 3 Installed. I have it on steam, I don't know how to help with EA, sorry.
open your file explorer/documents. Go to Admin -> AppData -> Local -> Larian Studios* -> Baldur's Gate 3 (leave launcher alone). Create a mods folder if you don't already have one, but one should have been created on your first bootup.
DO NOT CLOSE THIS TAB. THIS TAB STAYS OPEN UNTIL YOU ARE DONE MODDING.
* I also just search Larian Studios in Local Disc (C:) but that does take some time to load
Congrats, you're ready to mod! Now, most good mods will need something called the Baldur's Gate 3 Script Extender. You can find the download page here, and this time you're going to hit the green "code" button. Ignore everything else. Hit download zip
Extract the file again, but this time into Local Disc (C:) -> Program Files (86x) -> Steam -> Steamapps -> common -> Baldur's Gate 3 -> bin* **
* MAKE SURE to extract it to the bin folder. Some other mesh and texture mods use the data bin, so confusing them is bad.
** you CAN directly extract the folder to the bin, but I personally find it easier to extract the zip back into downloads, then open my other file explorer and click and drag the whole extracted file into the bin folder
The fun part begins! Go find some mods you like (nexusmods mostly, gamebanana MAY have some). Extract folder to your mods folder in larian studios -> baldur's gate 3 -> mods. ONLY DRAG THE .PCK FILE. YOU DO NOT NEED ANY OTHER FILES UNLESS THE MOD MAKER SAYS SO.
USING THE MOD LOADER: you are done with file explorers! Go ahead and boot up the bg3modmanager.exe file from earlier. Any INACTIVE MODS must be CLICKED AND DRAGGED over to the ACTIVE MODS side. If you don't see any mods, hit the blue circle refresh button. After that, hit the "export order to game" button right beside "export". If you see a green popup at the bottom, you are good to go!
All done! You are now on your modding journey! (if you have any outlying problems, my dms are open and there is a whole host of modders out there with answers!)
NOW TO THE FUN PART: MOD PACKS!
My own Game Optimizer Pack (basic): includes General Fixes (general bug fixes), Improved UI & Improved UI Assets (necessary for customization mods), and Mod Fixer (necessary for mods to work)
*you CAN download all of these files individually from https://www.nexusmods.com but this is basically. a short version of that.
My own Game Optimizer Pack (deluxe): includes all previous mods as well as 5e Spells (spell fixer), Additional Backgrounds, Customizer Compendium, Show approval ratings in dialogue, Purchase camp clothes from merchants, Tav's hairpack
COMPANION MODS:
No Abs for companions/pcs
"oops all futas" (all female companions have penises, if you want like an all transfem run or something)
Customizable Origins (lets you customize if you play as an origin character)
Astarion:
Astarion Moles and blemishes mod
Vampire Ascendant (ability fixer mod)
TAV MODS:
Freckles and Moles as Tattoo replacers
Trip's Accessory Collection (has glasses & monacles)
Ophelia's Body Shop (top heavy/bottom heavy/chubby body alternatives)
Stronger Tav - Muscular Upper Body Mod
Top Surgery Scars
Alternate Top Surgery Scars mod for bodys 1 and 3
Strongfat body - humans and half orcs
Tav's Dadbod Mod
Softie Body - Tiefling 2
New Eye Colours and Blindess for all eyes
Transmasc Clothing options
Actually feminine and lore friendly dragonborn legs
Femme obese dragonborn body (no clothing options developed yet)
Chubby/thick/bbw body mods and clothes
Big gut dragonborn (male)
Female muscle mod
Less defined abs for male bodies
Game Enhancing Mods that I recommend!
(if I have one marked starting spoiler! just. just download it and ad it just trust me dont look to far into it I promise it will be good. If I have one marked late spoiler! you can look at it and decide if you want it or later)
Faithful & Faithless - no mandatory choice of god
Mundane Blindfold (one eye cover)
No Romance Limit (polyamory mod)
highlight everything tooltip
Party Limit begone
No more spiders (all spider models replaced with dogs)
Ritual spells for rp fun
Colourblind friendly spell slots
Camp event notifications
Autosaver/Save timer (GET THIS IT SAVED MY LIFE SO MUCH)
Histories & Occupations - new backgrounds
Scratch colour variety (late spoiler!/not spoiler heavy)
Just Story (for those who just want the story. every enemy has 1 hp)
Wyll's Devil Form (starting spoiler!)
Eyes of the beholder (eye alts + scleras)
#lying flat on my back after typing this i think it took like 3 hours to compile everything#my neck hurts OTL#bg3#baldurs gate 3#baldur's gate 3#baldur's gate iii#bg3 mod#bg3 mods#baldurs gate 3 mods#modding#mods#modblr
55 notes
·
View notes
Text
Alright. I'm making this post because I was unpleasantly surprised to find Microsoft had forcibly downloaded an """"ai assistant"""" onto my computer (called Copilot), and because finding a site that actually told me how to kill it for good -- in clear, truly step-by-step terms -- was way harder than it needed to be.
Preface: this is only relevant if you're running Windows 11.
Here is your target:

If you see this logo on your taskbar -- or... have Edge installed on Windows 11 -- you've got Copilot. You can't delete it on its own, Microsoft has integrated it into the OS as best they can. The most you can do is disable it (instructions for which are at the very end of this post).
So... to REALLY get rid of it you need to uninstall Microsoft Edge, because it's a part of/reliant on Edge. A lot of bells and whistles of Windows are also reliant on Edge, like widgets, but I never use those. I use my PC almost exclusively for gaming, and I don't want this slimy "ai" shit on my computer. I use Firefox anyway. Edge can go die as far as I'm concerned.
Here's the actual steps, copy-pasted from a website that took me way too long to find. It also really makes my browser chug for some reason, which is why I'm copy-pasting the whole thing. If you still want to look at the site itself, put it in reader view as fast as you can (link to site).
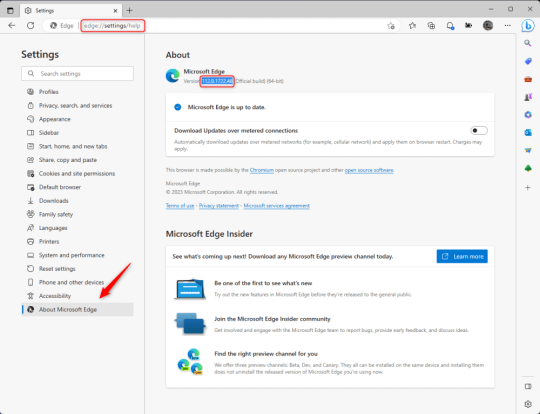
1.) Open Microsoft Edge, type "edge://settings/help" in the address bar, and then press Enter.
2.) Click "About Microsoft Edge" at the bottom of the left-hand pane. Copy the version number at the top of the screen, under Microsoft Edge.
3.) Press Windows Key + S to open Windows Search.
4.) Type "Command Prompt", right-click the result, and then select "Run as Administrator".
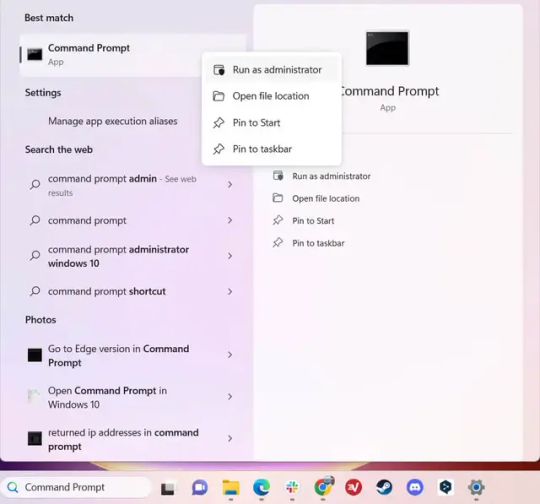
5.) The User Account Control (UAC) prompt will appear. Click "Yes".
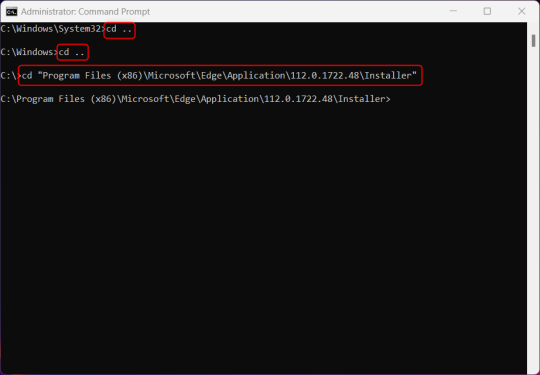
6.) Navigate to Edge’s “Installer” directory by using the cd command. Depending on which directory your Command Prompt opens in by default, you may need to use the "cd .." command to go back a level or two.
Once ready, run this command:
cd “Program Files (x86)\Microsoft\Edge\Application\Version Number\Installer”
Replace "Version Number" with your actual version number copied earlier.
7.) Next, run this command to uninstall Microsoft Edge:
setup –uninstall –force-uninstall –system-level
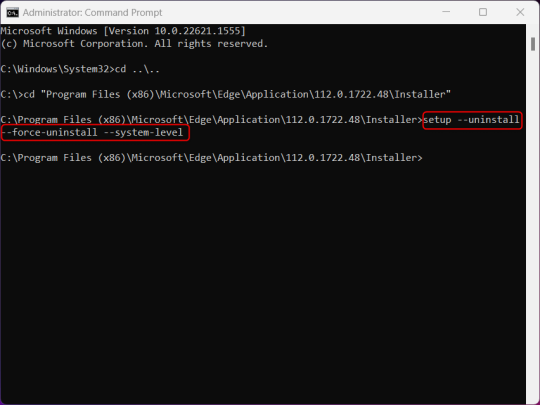
((It will look like nothing happened! Don't worry!))
8.) Restart your PC for the changes to take place.
((HOWEVER, Windows will try to reinstall it the next time your PC updates (or whenever it feels like it lol) so there's a second half to this))
1.) Press Windows Key + R to open Run.
2.) Type "regedit" in the text box and click OK to open the Registry Editor.
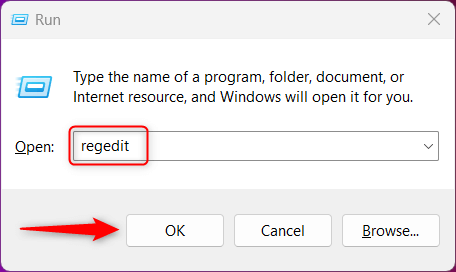
3.) The User Account Control (UAC) prompt will appear. Click "Yes".
4.) In the Registry Editor, navigate to HKEY_LOCAL_MACHINES\SOFTWARE\Microsoft.
5.) Right-click the "Microsoft" folder, hover your cursor over "New", and then select "Key".
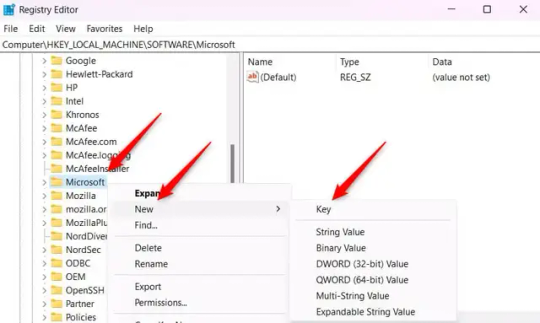
6.) Rename the new Key to "EdgeUpdate".
7.) Right-click EdgeUpdate, hover your cursor over "New", and then select "DWORD (32-bit) Value".

8.) Right-click the new value, which is currently named "New Value #1".
9.) Select "Rename" from the context menu.
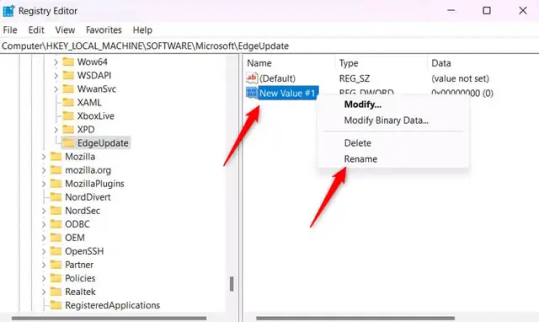
10.) Rename the value to "DoNotUpdateToEdgeWithChromium".
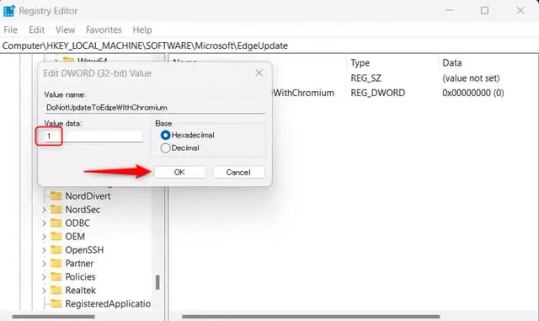
11.) Right-click the newly-named DoNotUpdateToEdgeWithChromium value and select "Modify" from the context menu.
12.) The Edit DWORD (32-bit) Value window will appear. Change the Value data to "1" and then click OK.
((You are now free. If you ever run into a really serious, unavoidable issue with your OS that's clearly a result of Edge being gone, you can redownload it like a regular app. But you should be fine.))
((And, if for some reason you want still want Edge around but just want the copilot thing gone, here's what you do:
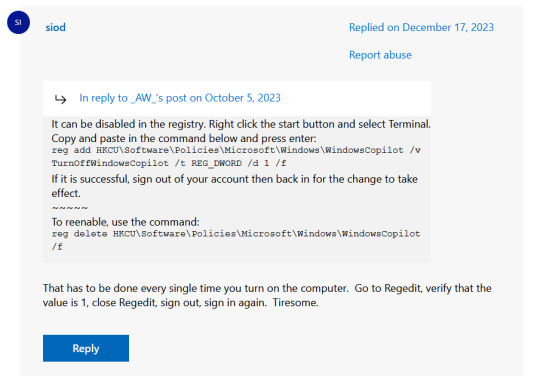
The command, for ease of copy-pasting: reg add HKCU\Software\Policies\Microsoft\Windows\WindowsCopilot /v TurnOffWindowsCopilot /t REG_DWORD /d 1 /f
You can't actually truly delete Copilot (without deleting Edge), only disable it. And as the reply says, you do have to do this every time you turn the computer on. I haven't tested that myself, but I believe it. I assume/hope that excludes just waking the computer up after it goes to sleep, but I don't know for sure.))
38 notes
·
View notes
Text
Want to play old flash games and animations? Here are a few ways.
Note: links are underlined, all links are to webpages except for the two purple links where noted. These link to directly to file downloads. This isn't an install guide, just a list of resources and the occasional tip. Please use caution. I cannot stress this enough. Flash was killed as it had a lot of security issues and a lot of work to fix. Some of these solutions are still just as dangerous as ever.
TLDR Quick Links: Red links are not secure. Use caution.
Ruffle // Flashplayer Executable (needed to run most of the red or orange things) // Waterfox Classic // Pale Moon // Basilisk* // Danknet Explorer // Standalone Player // Newgrounds Player // Puffin Browser // Windows 7 ISO (for flash security, see below, but also be careful. ISO's are dangerous) // BlueMaxima's Flashpoint (actually has a player which I missed. See my reblog.)
Ruffle
Ruffle is a flash emulator that seeks to run flash with higher security than old flash player. This is much safer than the other ways listed below but for now it doesn't have an amazing range. Basically nothing developed in 2010s is certain to run and much of it doesn't work. But it's a cool project so if you can consider donating to them as that can seriously help speed the development along. This is the only Linux solution.
Classic Browsers
There are a few browsers that still support the flash plugin. Since these use the original flash program, they are far less secure than before so please know the risks. Flash was a poorly-sandboxed monstrosity and that has not changed in the slightest.
First, you'll need to download and install flash player: (note: these links will start downloading immediately) Win Mac
(courtesy of Gaia Online. I'm sure they're also archived somewhere.)
Waterfox Classic
Waterfox is a really good browser that I use on some of my computers. It has a really clean UI. Classic, however is similar to the two below. It is also the only apple friendly option (y'all have gotta stop buying apple products I swear to god you're killing indie devs). Do not try to update Waterfox classic as that will remove flash support.
Pale Moon / Basilisk
These two are more or less the same and are developed by the same team(Basilisk is now developed by a different team). They are forked from an old Firefox repository and are built up to work with modern systems. There are differences between them but those aren't really relevant. Both have flash support. In cases where Waterfox classic hasn't worked, these browsers have worked (like for me).
Update: Pale Moon, as I have recently discovered, has a flash sandboxing tool that you can install that was apparently integrated into the browser. You can still use the tool, but they state it isn't necessary. This means that flash should be a lot more secure than it used to be! Pale Moon is perhaps the best option, though note that it still depends on the original flash application meaning that while running flash in Pale Moon is secure other applications could still take advantage of the flash software.
*basilisk is no longer being developed so no idea how long it will last.Basilisk is now being maintained by a different team but as I understand no major features have been added.
Danknet Explorer
Those of you who follow me have heard me bring this up a few times now. I'm working on a clone of the Pale Moon browser that revives old IE6/7 aesthetic and features. Of course, as a result of being a Pale Moon clone, using their exact code base, DNE runs flash also! So, really, this is the best browser to play flash on >.> I'm want the browser to bolster the indie web community so if you are a webmaster or a frequenter of the indie web, suggest a feature through this google form or do so as an issue on the github repository and I'll try to make it happen!
Honorable Mention: Puffin Browser
Puffin is a really safe solution to flash. As far as I understand it they basically play the flash animation/game on their servers and return the results to you. This makes it safer for you as none of the flash stuff is ever handled on your computer. So why did I only give this an honorable mention? I haven't used it myself so I can't confirm anything about it really and I've heard that this is only available through a subscription service. There may also be other limitations. I don't know what's true but I wanted to give it a mention. I just don't know enough about it so you will have to look into that yourself. It felt wrong to not include it though.
Standalone Players
Flash Standalone Player
Flash had a standalone player mostly for debugging. If you download the SWF file of a game you can open it with the standalone player. I think you need the flash program installed so see above. Keep in mind this is also original flash player so it is just as unsafe as with the classic Browsers. Use at your own risk.
Newgrounds Player
Another standalone player, this one is a little nicer. Probably recommend it more than the official flash one. No certainty on how sandboxed it is.
Final Note
For future proofing, consider downloading and setting up a Windows 7 virtual box and running through that. Action/timing flash games will suffer a lot but at least many games will be playable via the above methods. If you want to get around action/timing game issues consider dual booting an old system or getting an garbage laptop that runs an old windows version. Here's a Windows 7 iso from internet archive.
Windows 7 also has security issues since it's past end of life so use cautiously. Safest bet is just to have it on a completely different system.
All you have to do now is find things to play
Feel free to reblog with anything I've missed
#flash#tutorial#shockwave#adobe flash#old internet#old web#2000s internet#y2kcore#internet nostalgia#2000s web#early internet#webcore#ruffle#pale moon#basilisk#flashpoint#waterfox#old tech
787 notes
·
View notes
Text
i don't know if anyone is interested in this but i wrote a little guide for how to get the facegen params from elden ring, both of the NPCs actually used in the game and all the others, whatever their purpose might've been
it's a little long so i'm putting it under a cut
for this, you need two things: Elden Ring the game for the PC, and the program DSMapStudio.
so first thing in order: get DSMapStudio here. download the .zip from the github and extract it wherever you want. inside are two version of the program - the regular version (DSMapStudio.exe), and the low requirements version (DSMapStudio_LowRequirements.exe) that only has the param and text editing functions and not the map viewing/editing function. if your computer can handle it, i would still recommend using the regular version as it shows the names of the known NPCs when you look at the faceparams.
open the program, and in the file menu, pick "New project". in the window that opens, give the project a name of your choosing in Project Name; click the icon of a paper next to the Project Directory box to pick where to save that project (do not make it the same folder as the game executable is in, the program will warn you about it if you do); and finally click on the icon of a paper next to Game Executable box to locate your eldenring.exe. then press create. you will only have to do this once, and the program will remember and automatically open whatever project you had open last.
now, immediately below the task bar are four tabs: Map Editor, Model Editor, Param Editor, and Text Editor. go to the Param Editor tab, and in the list that appears on the left, go to FaceParam. you now get a long list of numbers in the middle, and these are the faces and characters. if you're using the regular version of the program, you'll see names of the games NPCs if you scroll down to the 23000 range of entries.
click on any entry, and in the right window you will see the parameters. for the most part these are self-explanatory and the values can be put into the game's character creator as they are, but there are a few tricky bits:
EDIT: first of all, the value for Nose Ridge - Nose Protrusion (faceGeoData60) - is incorrect! the actual value for Nose Protrusion is in faceGeoData53, which you will find after the Alter Body values:

all the other slider values are correct as far as i know.
the information for the character's age, musculature and bone structure are all contained in the fourth entry from the top, Adjust Face Template - Bone Structure (Parts ID) (face_partsId). it basically goes like this:
0 in param editor = in-game bone structure 1
10 in param editor = in-game bone structure 2
20 in param editor = in-game bone structure 3
30 in param editor = in-game bone structure 4
40 in param editor = in-game bone structure 5
50 in param editor = in-game bone structure 6
+100 = muscular
+1 = mature
+2 = aged
in other words, if the parameter is, say, 152, then that means that the character is muscular, aged, and uses the bone structure 6. if the parameter is 1, that means the character is mature and uses the bone structure 1, and has standard musculature. if the parameter is 0, the character is young with standard musculature and uses the bone structure 1.
(to my knowledge whether the character is type A or B is not stored in the faceparams, you're just going to have to guess)
the character's eyebrows and eyelashes are the number in the param editor plus 1. so if the params say that their eyebrows are 0, that correlates to in-game eyebrows preset 1; if the params say the eyebrows are 5, then the eyebrows in-game are preset 6. same with the eyelashes.
the hair style numbers do not follow any kind of formula, they're just random, so i made myself a cheat sheet - the red number is the number in param editor, the white number is the number in character creator:

tattoos/marks work with the same formula as the eyebrows and eyelashes - param editor number +1 = number in character creator - up to 18 (19 in charactor creator). from 20 onwards the number is the same in both the param editor and character creator, so if the params say the tattoo/mark is 22, then it is 22 in the character creator as well. the Tweak Tattoo/Mark - Flip (decal_mirror) being 0 means the tattoo/mark is mirrored, while 1 means that it is not (to my knowledge).
eyepatches work with teh same formula as eyebrows and eyelashes: param editor number +1 = number in character creator.
here are some guys and gals i've found so far (going through them is very slow because you have to input every slider value manually):


18 notes
·
View notes
Text
Tech Trouble
Damn. A good, techie kinda person with a wide knowledge of doodads and thingamabobs could have such a great small business. For example:
Go Pro camera, not cheap, that I bought for my mountainbike-riding son. We cannot get it to connect with his laptop AT ALL. It claims it will only connect to a phone. Why would a camera ONLY connect to phones? We obviously need to download Something onto the laptop but cannot figure out what. The $$$ camera sit, unused, because we cannot make it connect.
A computer tech, visiting my late father's house, told me that if I bought a certain cable I could connect a laptop to the large tv. (Obviously, I cancelled his tv service once he passed away, but it would be nice to be able to watch Netflix or Youtube on the bigger screen). I bought Cable, but . . we cannot Make Things Work.
Printers. Jesus.
The app for online banking refuses to install an update on both my kids' phones. Ergo they can no longer check their balance or transfer funds unless they come home and do it on the desktop. Neither the bank nor the phone provider will help with this, because it's 'not their job'.
Photo storage. All their photos should NOT be on their (loseable, breakable) phones. Phone company will not help with this issue; only tell us that photos taken by the phones are 'stored on THE CLOUD.' "Where," I asked, "do we find them on THE CLOUD." The phone company person gave me a deer-in-the-headlights stare. "They're ON THE CLOUD," he carefully repeated. I don't honestly think he actually knew the answer to the question. Just had a programmed response.
I sure wish there was someone who could literally come to my house, sit down with the offending cables and devices, and SHOW me how to make things work. Or, if it's a one-time issue, just do it for me. The guys from Computer Store only want to touch computers, not other devices/phones/printers . . and the guys from the phone store will only help with the phone, but not help with misbehaving apps or connections to other devices. It's . . maddening.
25 notes
·
View notes
Text
BRAAAHHHZZZZ!!!! BRAAHHZZZ!!!!!
You guys seriously need to check out this radical, bombastic, unique totally scrumdiddlyumptious game ever!!!
→This program← made by @venelona-turtle-den is so much fun! I love it.
Usually I'm a little hesitant whenever it comes to bots/ghosts/ais. They're pretty much a hit or miss experience for me. Like don't get me wrong I understand they're not gonna be perfect buuuuttt, sometimes the occ-ish-ness can be a little too much.
Though I gotta give props to anyone who takes the time to build these things cause I know for a fact I wouldn't be able to.
Anyways!—
You guys gotta download this! It's definitely a one of a kind deal and best of all it's future Leo! Who might I add feels so spot on sometimes it's crazy.
I really enjoy this. I spent my whole day yesterday after work testing out the functions and guys—
Shit is fire.
It's like a Sans situation where he has knowledge and access to a lot of shit. Dude breaks the fourth wall a lot.
This is a great au created by @venelona-turtle-den and what's great about this program is how the ghost reveals what happened little by little after you gain Leo's trust slowly but surely.
They do it by dropping hints in-between comments here and there. And guys this shit is like Steven Universe where it begins all cute but, as you get deeper you learn more of the darker truths about old friends and the Mad Dog Crew....
Here's some examples that I've come across so far(Definitely not all of them)↓
*Spoiler Alert for ROTTMNT series/movie*

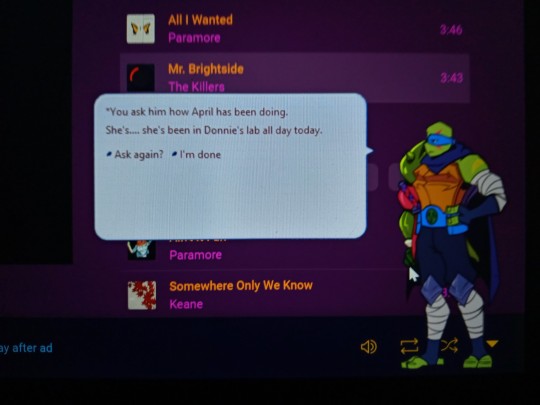

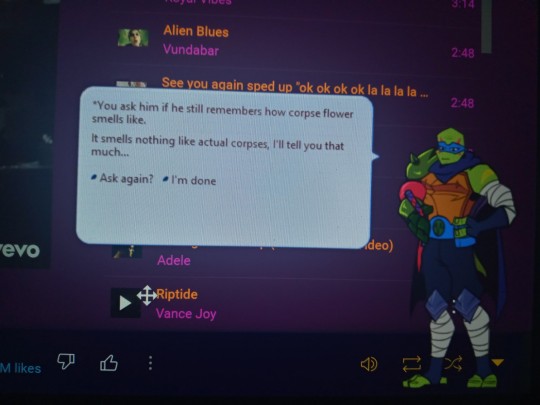
Though it's not all sad times around here.
There's even cute little quips like these↓


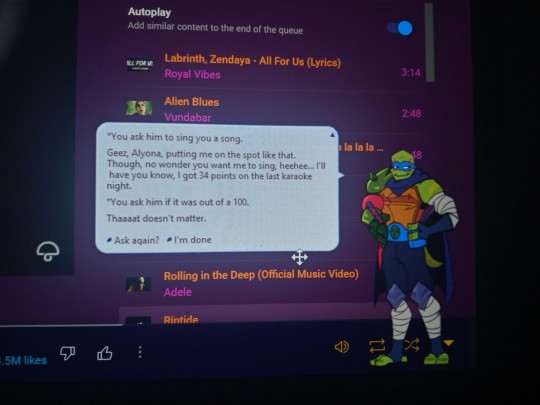
And these are not all of them! I wanted to add more buuuuttt, Tumblr only permits ten per post sadly.
Though guys it's a lot more fun experiencing it for yourself. What's radical about this is that you can download this on your phone or computer/laptop! Although tbh it's a lot better experience on a laptop/computer. Trust me I tried both.
Thank you guys for looking!
I hope you guys have a great week!
#im a simp#tmnt#tmnt fandom#tmnt ai#tmnt ghost#rottmnt#rottmnt x reader#trash's recs#yandere#male yandere#yandere tmnt#yandere rottmnt#yandere x reader#I wanna write for this au#not my au#love the concept#rise of the teenage mutant ninja turtles#teenage mutant ninja turtles#interactive#you gotta love him#future leo#Adult Leo#future leonardo#tmnt 2018#tmnt 2022#Seperates the boys from the men#good show jolly good show#takes dedication#idk what else to tag#rottmnt au
72 notes
·
View notes
Text
The Nightshade Anti-AI Tutorial Sort Of For Those Who Asked
These instructions are for Windows users. I don't own a mac so I have no idea how it runs there.
1. Download the software package. It's hard to find via Google for some reason. You can find it here: https://nightshade.cs.uchicago.edu/whatis.html
Make sure you have at least 3 gigs of space on your hard drive (not that Nightshade takes up this much when done, but it will save you heartache later. Trust me.)
2. It will download an archived folder. Make a new folder on your system (call it whatever you want). Then (right-click the archived folder and choose "extract". When prompted, choose the folder you just made as the location to extract the stuff to. This takes a while.
3. Now look in that new folder. There should be a folder in there called "Nightshade". Look in there for an icon - the thing you double click on to launch the program. The icon is half a skull and a leaf.
4. NOW this program is a resource hog. Close all programs and reboot BEFORE trying to launch the program. If you open it and get a warning that the program "needs more resources", open the task manager. Look for any applications that are running behind the scenes - Bing is a big offender. Click on those and stop the process. Then try again.
5. The program will take some time to get ready. When open it will say "loading resources". Let this finish.
6. When it's done loading, look on the left side of the program. First, set the two sliders there all the way to the left. If the program runs smoothly like this, you can increase the poison level and the processing speed later.
7. On the top left there's a button to click to select the image you want to poison. You can select more than one, but start with a single image until you see how your computer handles it.
8. On the bottom left, click the button that will let you select where to save the file. Save it wherever you will be able to find it later.
9. On the top right, the program will select a keyword that it thinks describes the picture. If you don't think it's accurate, change it to a word that better describes the image - one word only!
10. Click the button to start the program - it's on the right, you can't miss it.
11. Let it run. This takes a long time. I'd suggest letting it run overnight - start it when you go to bed. The program will tell you if it was successful or not.
12. If the program failed, it will say so. No files will be created.
If the program succeeds it will say so. It will create 2 files. One is the poisoned image, the other is a text file. In the text file is a web address. When you post the image, post this address into the alt text for the image. The alt text is a feature that lets you put in a description of the image for visually impaired folks. Different social media has different ways to apply this.
And.....that's it!
It's not terribly streamlined yet, but in the future it will likely become a web feature or app, but for now, it's better than nothing.
19 notes
·
View notes
Note
After pulling my hair out getting a VM of Win95 running, only to forget to install the graphics drivers and wonder why the colours of my game were all wrong, i can only marvel at your soft-hardware necromancy. How do you learn this stuff? What do you do when you encounter a filetype you've never seen before? (What do i even do with the file CD_AUDIO.kpx?) Can you download all your knowledge into my brain?
I mainly learned this stuff by just fucking around with computers for a long time (I think I got my first computer in 1993, so I'm coming up on my 30th anniversary of being a Big Nerd). You pick up stuff eventually.
Also yes. Setting up Win95 VMs is hard (real hardware is also hard, for the record) . The bearsoftware VBE drivers seem to have some glitches but they work well enough, and the scitech display doctor drivers work better... If they work. Sometimes they are a nightmare to get working. My advice is start your win95 VM setup, immediately work on getting everything working (graphics/sound/networking drivers), then clone or savestate that shit. Then you have a working base to build on. Don't dirty your clean base, just clone it when you need to start fresh because you've messed it up somehow.
As for an unknown file, my first approach is usually a hex editor. Look for signature info towards the top of the file, Google that. I find that's more useful than searching on the extension, because extensions are reused too often. Sometimes you can search the full filename or game name plus extension and hit gold, but sometimes you just get nothing, and then it's up to you to figure it out.
So the first step is make sure you have a hex editor that can do integer decoding. I usually use HxD. See the data inspector on the right?
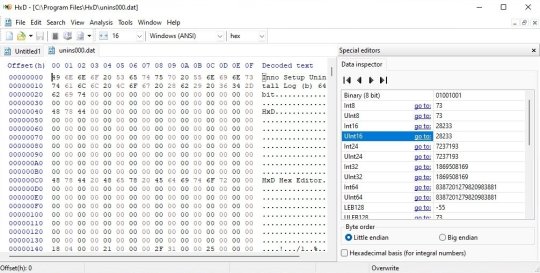
It's decoding the value of the number at the position of the cursor. This is very handy. File formats tend to have commonalities, like a count of how many sub-files there are, either right up front or at the end. (up front is more common these days, but in the Old Times it was easier to put them at the end, because of RAM limitations. That's why Zip has the index at the end)
That's a good place to start, because once you know how many subfiles are in there, you can figure out where they are, and deal with them separately. Often you only care about one part, so this lets you ignore most of the bits.
The other big tip I can give you for figuring out files is to be hands on. You don't have to just stare at a file and go WHAT DOES THIS MEAN?!
Change the file. Make a backup and then edit parts of it. See what changes in the program when you do that. Or if it's something the program writes out, save a basic file, than change something minor, then save it out again to a different file. Now you can compare the two and see what changed!
The next step up for figuring out an unknown file format is to reverse engineer the program that reads/writes them. Use a tool like Ghidra/Ida Pro, and disassemble the EXE. Figure out where it reads and writes the datafiles. This is often easy to find, you can look for imports on CreateFile/OpenFile or search for strings like the filename.
Another option is to hybridize your tools: use a debugger (I use OllyDbg usually, but it is getting long in the tooth sadly) and set a breakpoint on file opening. Run the program and step through all the files it opens and then you'll find the time it opens the file you care about. Now that you know where it is, you can locate that same function in the disassembler/decompiler.
Anyway. There's a bunch of tools and they all can help with different parts of this sort of reverse engineering, and it's often just about collecting as much info as you can, and then trying to compile it together. I usually have a text editor open on another monitor, and just keep a sort of running journal of anything I learn, so I can easily refer back and cross-reference things.
Also keep in mind that even if you can't solve the whole problem, you can learn some things, and it's useful to share that with the world. Sometimes just getting part of the solution means it'll inspire others to help finish the work, or point out stuff you missed.
111 notes
·
View notes
Note
Sorry if I bother you, but I really love your gif sets! Do you know some tutorials or, app, or anything, to learn how to make good gif? I am learning and I feel very stupid because all my gifs are shit. (if my ask is inappropriate or anything, please ignore me)
you're not bothering and none of this is inappropriate, you're more than welcome in my inbox! as for your questions, let's see what i can do.
1) tutorials — i've been doing this for long enough that i don't really have much to recommend here, the only tutorials i use nowadays are all about specific things and not how to make gifs as a whole. that being said i've linked this one before, i personally do some things differently but it's a very good tutorial, well-received by gifmakers who are just starting and well written, from what i've skimmed through.
another good post to look through is this one, not a gifmaking tutorial per se but it goes into sizes, sharpening, and how to get neat & clear gifs. two of the main points are A) while you can get away with making gifs out of a 720p quality video, 1080p is what is usually recommended. you could use 4k as well, but a 1080p video is usually easier to find, will take less space in your storage, and will give you really good results already. no need for overkill <3 as for B) size matters here on tumblr dot com, mostly width. the op of the post linked in this paragraph has included a nice graphic for the size limits for gifs, you can refer to it as you make your gifs so that whatever you make won't turn out pixelated once you upload it to tumblr.
if you're curious, i've been asked about my sharpening settings here and i spoke before on tumblr sizing here
2) software — you mentioned app, if by app you mean mobile stuff then i'm sorry, i can't help you! i've never made gifs through mobile and i wouldn't even know which direction to point towards for you to find more information. as for computers, if you mean programs then these are what i use to make my gifs: potplayer (for taking screencaps) and photoshop cc 2020 (for making the actual gifs, this is the post i used but here's one with more links)
now i'd like to mention something my grandma always used to say: no one is born learned. you're not stupid just because it's taking you a while to do something, learning is a process and everyone has their own pace. i've been making gifs for a decade now and i know there are things i could do better! i'm also still learning, i make plenty of "shit" gifs before stumbling my way to something i am okay with posting, and sometimes i'm really proud of what i've made and other times i think it's just "good enough". i understand feeling disheartened but please do not feel stupid about any of this!
no use in putting yourself down, now hold my hand and let's add the finishing touches on this long ass reply <3
3) tips — we've mentioned video quality, sharpening, and sizing. what else, what else. personally i would start simple (and i did, way back when, and still do!! most of my gifs are quite simple). so: cropping/resizing + coloring + sharpening. it'll help get the basics down and then you'll have a good foundation for everything else you might want to learn. i mentioned in another ask, almost two years ago now lmao, that i used to download other people's free psds (that is, pre-made settings and layers to color your gifs) and instead of using them i would open them up and pick them apart to see how people were coloring things, which layers they used, in which order, stuff like that.
remember: there is no right or wrong to do this! you could ask ten different people how they make their gifs, and their preferences for any specific part of the process, and you'd get ten different answers. if you find a tutorial and don't vibe with it, throw that aside and look for another. pick and choose, find what works for you and what doesn't! and that means do not be afraid to experiment and try things out.
also, don't like photoshop? no problem! i started with gimp, now personally i wouldn't recommend it over ps but it's a good program, it taught me a lot, and there's really nothing to hate about it. it might have less functions than ps though, and already a decade ago there weren't that many tutorials/resources for it.
don't like photoshop AND don't want to download a program? try photopea, i haven't used it but it works directly from your browser and it should do everything photoshop does!
let me know if there's anything else i can help with <3
17 notes
·
View notes
Note
You are the mutual I know who uses linux, and I have a half-broken dinosaur of a laptop I want to see if linux would make usable again.
Its 8+ years old, cannot connect to the internet for a reason that may be software related or might not(its a mystery), and has other various issues.
My use of it would Primarily be as a on-the-go text & html editor and if I can get the internet running on it then also firefox as well. Maybe some offline emulation of some older games or a simple linux supported drawing program but that isnt essential.
The question is Thus: If I download a linux mint installer and copy to a flashdrive(presuming you can download the file without it starting to set up the OS instantly), is that all thats necessary to upload linux mint onto a laptop that has no internet capabilities?
Also which version of linux mint should I use? I see there are several. This laptop 3 years ago ran windows 10 ok enough to boot up chrome and use the internet, but now it takes like 15 mins to finish loading enough that you can open programs, as a metric.
Thanks and hope you have a nice day!
Yes, most linux distros will run on a machine that age, and with a surprising degree of vitality. Game emulation should work just fine, unless the computer was very low power even for 2015.
On a mech that old, I'd suggest just checking if the tiny wire for the wifi card has popped loose over time. They are snap-on wire heads that don't lock, so especially with laptops, disconnections like that happen.
Your wifi card should look a lot like this:

I've circled the two tiny ports, and drawn arrows to identify which cables. The whole wifi card will be about an inch across, and is the ONLY thing that uses those kind of wires, so it's very identifiable.
Linux mint is designed to install offline, and includes a wide variety of open source and generic drivers for just.... so much hardware. When you begin installation, it will ask you if you want to use, "third party, private and proprietary drivers." If you say yes, it will want an internet connection to download those drivers. If you say no, it will install entirely offline without issue.
As for which version: the only difference is the visuals. I, personally, like XFCE because it has very minimal visual noise. Everything is simple rectangles with sharp corners and clear boundaries. This lack of visual flair also means it uses the least resources to run the OS, leaving more hardware power available for actual tasks. However, it's a very intimidating desktop. If you liked Windows XP but haven't enjoyed much since, grab XFCE.
If you are a Mac/apple user, I actually recommend Kubuntu instead of Mint, because it has the most similar interface visually and will cause the least transition pains. Kubuntu has equally if not even more robust hardware support to Mint, as both of them are built on top of the Ubuntu framework.
For everyone else, I suggest starting with Mint Cinnamon. I have actually, with no reservations, had way better results teaching confused retirees to run Cinnamon than Windows or Mac. It's a very user friendly interface.
The start bar search, for example, literally just shows results for files/programs installed to your computer, none of this bs about integrated web searching.
As for installation tools:
You must burn the ISO file to the flashdrive as a bootable disk, rather than simply copying the file to it. I'm sure you know that; it's the same for installing windows. But! People often forget that detail and wonder why their computer keeps booting to windows instead of the installation media.
I personally use LiLiUSB because I'm stuck mentally in the year 2014 which is when it stopped updating. For a more sane approach, try Balena Etcher. Or whatever bootable drive software you like; it doesn't really matter. You just need to make the drive bootable before installation.
47 notes
·
View notes
Note
I hope you like this idea. Could you do a scenario for Sonic. EXE with a reader who's not afraid of him, even after his carnage. Reader's is like: "You are no God, you're just a monster and i will do everything to destroy you".
To make this work I had to alter some things. Oof, I remember when I was so scared of the fan game when I was younger. I'm quite happy Sonic.EXE is making a come back with much higher quality games.
A/N: Oops, strangely my Sonic.EXE personality is a mix between Sonic and Pennywise, my bad.
Tormented Mind
Yandere! Sonic.EXE Scenario/Short
Pairing: Romantic
Possible Trigger Warnings: Gender-Neutral Darling, Yandere-like behavior, Sadism, Implied murder, Demons, Fourth wall breaking, Corpses, Blood mention.
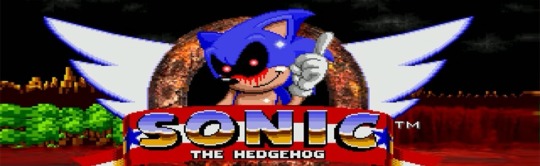
"You are no God..." You seethe at your computer screen, the corrupted hedgehog's face blankly staring at you. "You are just a monster, a cruel prank to scare anyone who downloads you. You can't hurt me! None of this will affect me in the future and I'll destroy you."
Nothing happens, you think you're going crazy until the bloodied hedgehog in your screen frowns. Those eyes stare straight at you, and for a moment, you hesitate on the meaning of your words.
"A prank? Oh really? That tough act you have is funny! I didn't know you hated my little puppet show THAT much? Did your favorite character die? Are you sure you aren't a little sad?"
You then see the hedgehog give you a mocking pout, fake crying before smirking devilishly at you.
"You aren't funny either."
"Which means I'm not a prank, right? Pranks are supposed to be funny."
You groan. This corrupted pile of code even had a cruel sense of humor. You regretted even downloading the game.
"Don't take my threats lightly. I'll break your disc... then I'll wipe this computer clean."
The horrific form of Sonic laughs, your speakers vibrating at the volume.
"Oh! You are a FUNNY one! You can't do anything as long as I have control over your computer. I mean TOTAL control, too. Want to test out how much electricity I can send through these ports? You'll certainly feel it from here."
You grimace at his threat, deep down wonder if what he said could be true.
Did this virus really have this much power...? It seemed sentient so maybe it could.... However, you wouldn't give in.
"I'd rather not."
"Good. It'd be a shame to get rid of a wonderful player such as yourself! You've been the best one so far to play with. Even better than these puppets!"
With that said, Sonic moves out of the way to show the disgusting 'corpses' of Tails, Knuckles, and Robotnik. It was hard to call them corpses... were they even truly alive?
This was still just a game/virus....
"They got so boring... don't you agree? Even when I used them with you they were boring! Their torment was the same as the countless other times I played with them. You're a nice chance for something new, though."
Something... new?
"Elaborate."
"Got fancy words, hm? Just because I'm a computer program doesn't mean you have to break out the thesaurus on me!"
Another laugh vibrates through your ears.
"You MUST know what I'm talking about, dear! The fact I get to speak with you even even you're not scared is entertaining! I look forward to our round 2~!"
You scoff.
"Rounds 2? More of your little puppets?"
That grin nearly sent chills down your spine.... They looked so bloodied.
"You really DO underestimate me, hm?"
You feel yourself jolt. You weren't scared... just something felt, off
"Do you really believe I'm just a game? That's what most think...."
Static appeared on your computer, by the time it ended the hedgehog was gone. You though your computer crashed.
Although when you went to touch it, something touched your back.
Now you were scared.
"They never assume demon. That I could just be a deity in a vessel. It just so happens to scare others you need to make yourself look like something from their childhood, then TWIST it into something horrific to scare them."
You hesitantly turn around, only to be met with a hedgehog-like creature sitting on your bed. His pose was casual, grin large and filled with teeth. He taps his foot idly before laughing at your bewildered expression.
You doubted he was real... it looked like static surrounded him.
"Well? Impressed? No need to just sit there looking so surprised! Not many make it this far, you know~!"
"You can't be..."
"You keep saying such things. Can't you tell it's useless? In a way, with my powers, I really am a God."
That grin never left his face when he stood up.
"This isn't my true form. However, since you like those hedgehog games so much, this form appeals to you, doesn't it?"
A gloved yet clawed hand traces patterns on your arms and back while walking around you. He was no game....
"I want to keep your attention for as long as I possibly can! So..."
His speed is bewildering, truly like the real Sonic from the games. He stops in front of you, red eyes fixated on your own.
"Why don't we continue our game! I look forward to winning against my favorite player~"
294 notes
·
View notes
Last Seen Blogs

holtsemotions
I was pronounced legally dead for 2 full minutes.

glindyupland
Stage Lights and Pixie Dust

your-fave-is-plus-sized
Your Faves Are Plus Sized!

midnight-liquor
Don’t You Know I Want You So Bad?

lunapalida
Luna pálida❤