#spell tutorial
Text
Super Easy Money Bowl Tutorial:
You are welcome to swap out some of the ingredients with anything else you feel is money or abundance attracting or calls to you. A few suggestions are:
Alfalfa… quick witch tip: store some in your cabinet so you never go hungry!
Basil… if you’re trying to attract money for your business
Blackberry… leaves and berries attract wealth
Blue violet… for good fortune
Buckeye… good luck and attracts money and wealth
Clover… luck and attracting money
Comfrey… use the root for money
Dill… money and luck
High John… obtaining success, to win at gambling, luck and money
Irish Moss… luck herb, gamblers herb and ensures a steady flow of money
Jasmine… draws wealth and money
Jezebel root… money and achievement
Job’s tears… attracts luck, wishes and money
Lo John… money, success and luck
Mandrake… prosperity
Mint… draws in customers into a business, brings wealth and prosperity if you rub it on money
Nutmeg… attracts prosperity, brings luck, and money
Oak moss… luck and money
Oat straw… draws in money
Patchouli… draws in money
Peony… good luck, good fortune prosperity and business success
Periwinkle..: attract money
Red clover… money
Rice… attracts money
Star Anise… brings luck
Some crystals you can add are:
Pyrite
Green Jade
Clear quartz
Tigers eye
Amazonite
Rutilated quartz
Ametrine
Emerald
Peridot
Carnelian
Moss Agate
Amethyst
Hematite
Garnet
Turquoise
And as mentioned in the video, you don’t have to use real money until you acquire some. You can use play money or coins. Just replenish whenever you obtain money and constantly feed your bowl.
Add anything else that resonates with you and obtaining your goal for this bowl. Instead of salt on the bottom, you can replace with rice. You don’t have to sprinkle cinnamon, you can use the sticks just the same.

I hope this inspires you to make your own bowl and you receive all the blessings you deserve. If you have questions or if I left something out, please let me know!
Love and light witches! Follow for witchy vibes full of spells, tips, and loads of information!
Oh and this is literally my first voice over EVERRRRR so please be easy on me I was trying to speak clearly and I was nervous bc I hate my voice. Haha
#witchy#witchcraft#witch#witchblr#magick#crystals#moon#witches of tumblr#witchcore#witch tips#spellwork#witch spells#simple spells#my spells#daily spells#spells#money spells#spell tutorial#tutorial#money spell tutorial#easy spells
95 notes
·
View notes
Text

suit tutorial
#my art#please don't repost#tony stark#ironman#ironman suit#tutorial#i've been summoned#i'm just as clueless as you guys but there you go#im sure there are spelling mistakes but what can i do#the secret spice is that i make shit up while i paint#i wasn't aware drawing his suit was a flex#i do it bc of his slutty waist#im bad at explaining shit to people does it show ???
790 notes
·
View notes
Photo
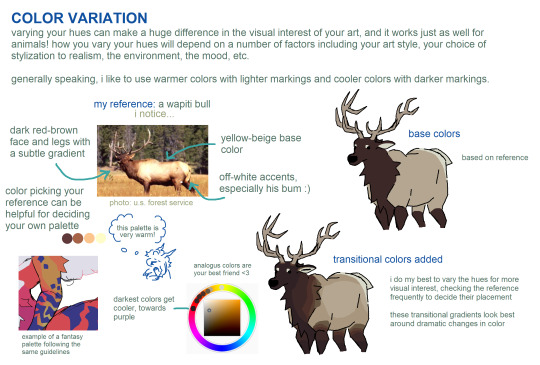
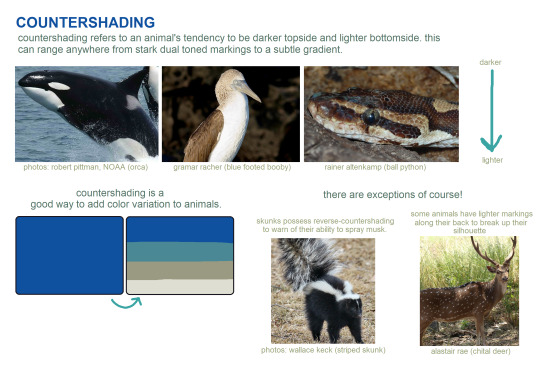
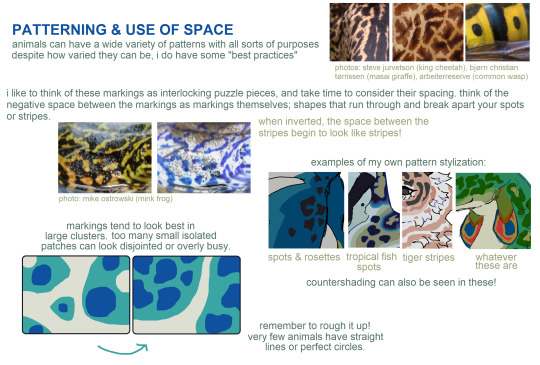

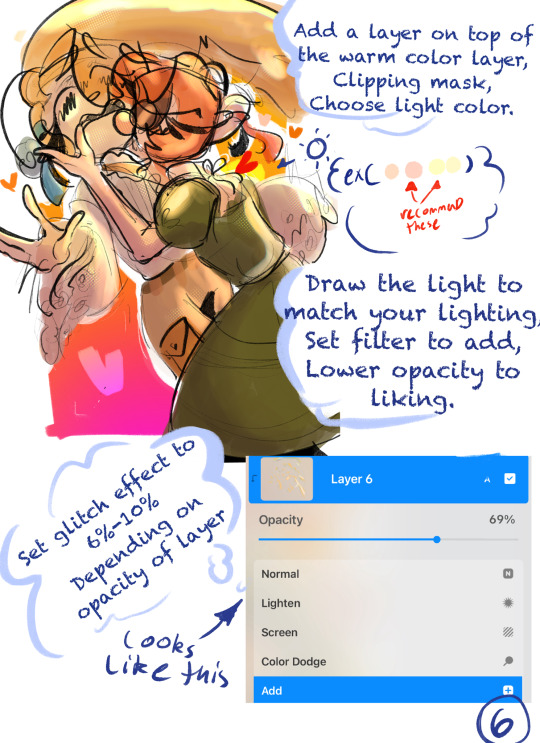
something i get asked about a lot, i hope i did alright explaining my thought process and that its helpful to people. i am opening to answering further questions if you have any. thanks!
#tutorial#sorry for spelling mistakes it already has a couple hundred reblogs i just have to make peace with them.
3K notes
·
View notes
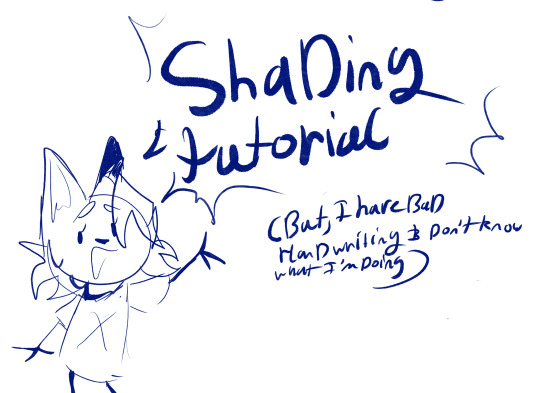
Note
Can you give a tutorial on how you render the Lamb's bell/shiny metal in general?
I'm not really the best at doing it myself but i can try!!
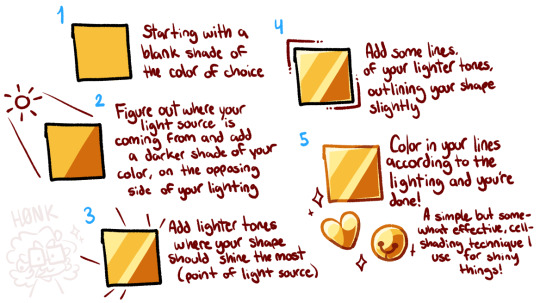
I am very much self taught and I learned visually, so it might not be accurate all much but it's just what I'm using at the moment!! I hope it make sense!
#also look out for spelling errors juhyHYJ#its cold so my hands are kinda shaky and i rushed the writing a lil bit!!!#But i tried to break it down as best i could :D#also i use rounder shading depending on what the shape is!!#as shown in the bell + heart i did at the end there#asks#rubyjane2003#honk doodles#artists on tumblr#tutorial#art reference#???? i suppose
84 notes
·
View notes
Text
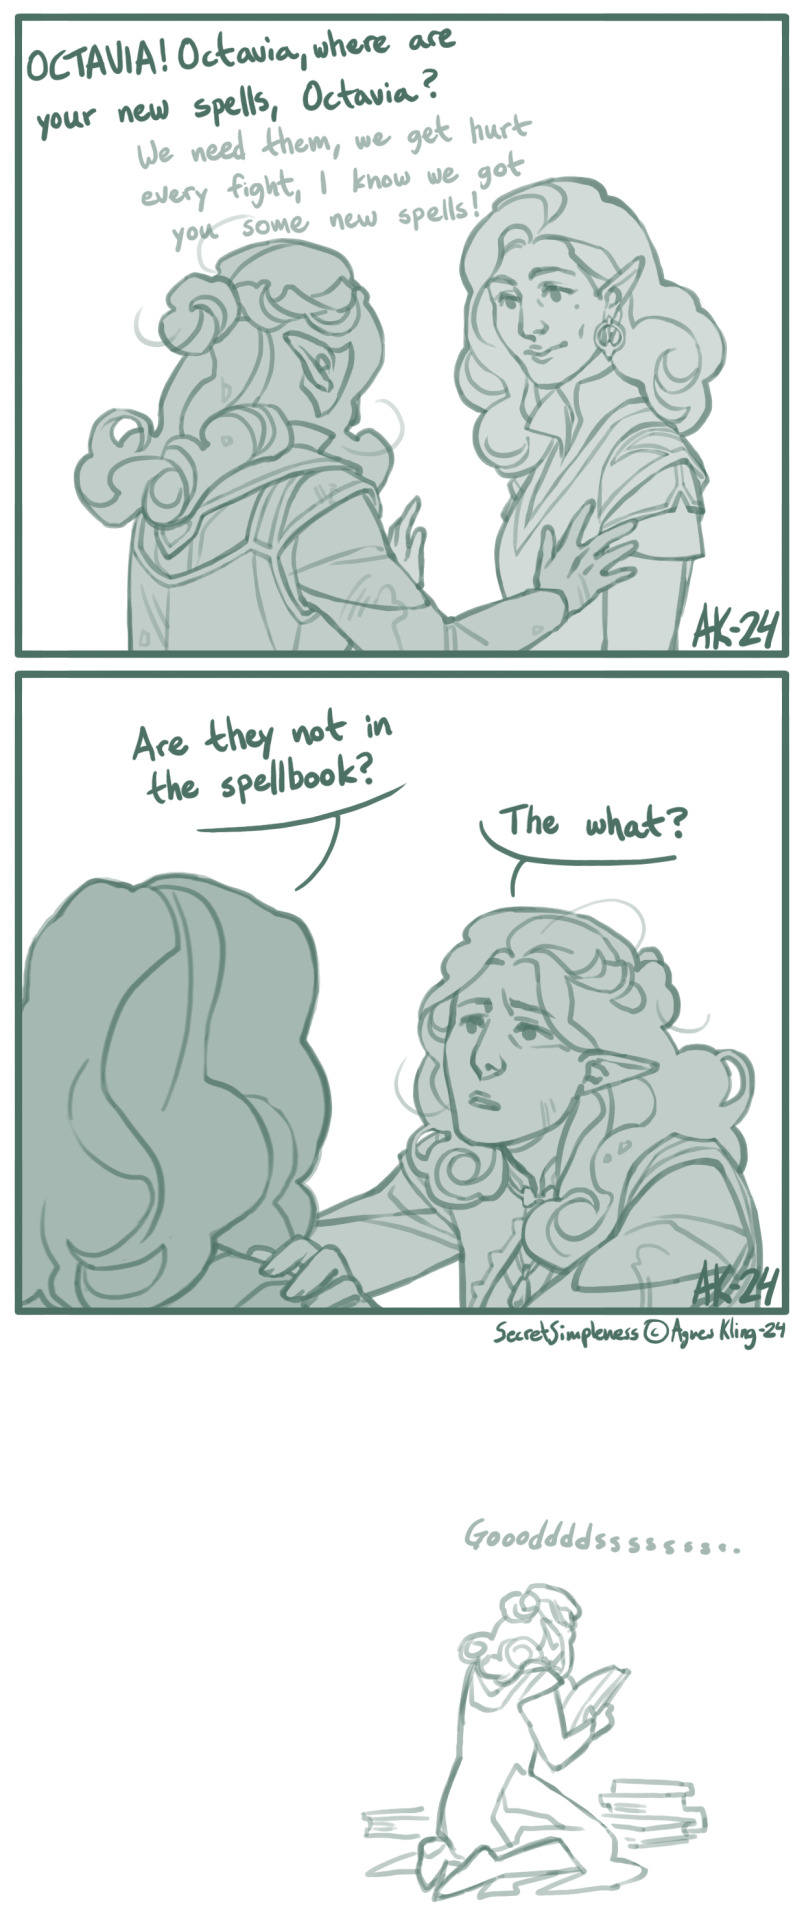
I figured this out somewhere along the second-to-last act.
Octavia, the Baroness / Pathfinder Kingmaker (c) Owlcat Games
#pfkm#pfkm baroness#octavia#comic#pathfinder kingmaker fanart#pathfinder kingmaker#owlcat games#oc ailcha#spellbook#game mechanics#I tend to re-read tutorial messages for all sorts of things but this one apparently passed me right by. whoosh. gone.#“this class needs to prepare their spells” what like at camp or? and then I just forgot and was a tad annoyed after each level up.#almost all of the companions only had their level 1 and basic stuff. for most of the game. great. it was a great experience.
121 notes
·
View notes
Photo

Witch’s homes are alive!
There is a reason why in most stories, Witch’s homes are alive. So every time you enter your house say “hello” and every time you leave the house say “thank you”. Start talking to it and if your house needs some repairs, do so.
Houses that have been ignored tend to be unhealthy and attract negative energies and spirits. If you want to give your house extra protection during this autumn equinox, make it a protective symbol. And the easy way to make one is by making a sigil.
So go to our patreon to know how to make one step by step! The Witchy Stuff
#the witchy stuff#modern witches#witchy#witches#witchcraft#sigils#spells#modern witch#autumn#witch tutorials
1K notes
·
View notes
Text


Have at it freaks. /j
#there’s probably so many spelling mistakes and most things probably don’t make sense but whatever#artists on tumblr#digital art#my art#digital illustration#drawing#artwork#doodle#digital painting#tutorial#nerfietxt#nerfieart#cuphead#cuphead au#cddwtd#mlp oc#oc shit
27 notes
·
View notes
Text
🟨 Modding Poses for Cyberpunk 2077 (and general modding reminders!)
It's really exciting to see everyone getting into modding latetly, especially pose making 🤏
I want to throw a couple of resources into One Big Post to make sure everyone has everything to get started- BUT FIRST
a couple of general Modding Reminders 🤲
━━━━━━━━━━━━━━━━━━━━━━━━━━━━━━
▶ Remember that modding, just like any other creative outlet, is supposed to be fun!
When a project start to frustrate you, make you doubt your ability/skills, when you start comparing yourselves to others-
Stop! Disconnect, and take a break, walk a bit, splash water on your face, eat something! It's really easy to spiral down (been there, done that)
It's important to remind yourself of why you're modding in the first place! Take a look at your inspiration, your blorbos
Don't lock your brain into One Frustrating Project; have a couple of smaller projects or ideas on the side that you can go to when the creative juice is flowing to not get stuck on one particular project
▶ Modding is exciting, and you want to mod ALL the things asap! Other do as well, and might have the same ideas
It can be frustrating to see someone else release a mod that you thought of doing, that might've been sitting in your to-do list for a long time. That's ok! It's normal to feel that way, but don't let that sap your creativity
Someone made a pose/pose pack that is similar to what you wanted to make? Do it anyway! It won't be the same, because it comes from you! This applies to general modding as well, to clothes, to recolors
Everyone have their own vision of things. It might be a similar pose, but the body language is different, the hands sit on the skin differently... The model you want to port won't have the same materials, normal map, or colors as the one that is already available!
Modding is accessible by everyone. Nobody owns ideas, or references, or models available on the internet. Don't let anyone tell you otherwise, and mod what you want, when you want to, and how you want to!
━━━━━━━━━━━━━━━━━━━━━━━━━━━━━━
▶ Tutorials and Resources for pose making
With the reminders out of the way, here's everything you'll need to get into Pose Making! I see this is something that a lot of you want to tackle, and it's better to have everything ready to get started 🤲
The tutorials are in order of workflow!
🔹 XbaeBsae's Tutorial - Custom Poses and Animation
This is the first step!
With those templates, you'll be able to start creating the poses in Blender using the Cyberpunk's body models (Woman, Man, Man Big...) ⚠ Be sure to get the proper requirements and versions!
🔹 PinkyDude's Tutorial - Retargeting Animations
OPTIONAL
If you want your poses to be available for other rigs (Man poses for Man Big, or Woman poses for Man, etc) this is how you achieve that! You'll learn all about retargeting.
It's also useful if you want to import other games's animation/poses into CP77
🔹 Halkuonn's Tutorial - Importing Poses into CP77
An important step;
getting your poses from Blender to an .anim file!
🔹 ManaVortex's Resources - Poses for AMM
🔹 ManaVortex's Resources - Poses for Photomode
Both type of additions are compatible with each others!
I personally recommend working on the AMM addition first, as you'll be able to use the same files and mod structure later for the Photomode addition :D
🔹 XbaeBsae's Resources - Nibble to NPCs 2.0
OPTIONAL
The Nibble to NPC 2.0 mod has a resource pack for modder to make their poses pack compatible with the Nibble Replacer! Make sure to update all of the requirements, and AMM, to have the ability to pose NPCs using custom poses in Photomode
━━━━━━━━━━━━━━━━━━━━━━━━━━━━━━
⚠ KNOWN ISSUE | T-posing
You probably saw me and a couple of other pose modders and users complain about the T-posing issue- it's sadly still ongoing, and no real fix has been found so far.
We tried using unique workspots and entities for each packs, but they somehow keep overwriting one another in really random ways (MA and MB are compatible, but sometimes MA and WA won't be useable together? Sometimes you won't be able to use different packs from a same modder, etc)
Once (if!) we find a fix, we'll be sure to update our mods and to share the knowledge with y'all 😩 for now, we make do
As always, don't take this post as THE modding method! I'm simply an old modder sharing my two cents for all the new baby modders rolling in, hyped as fuck 🤲 Welcome to the modding side 🧡
#Cyberpunk 2077#Cyberpunk 2077 Modding#Tutorial#Pose Making#UUHHH Idk how to tag this but Yeah!!#Please don't overwhelm yourselves- it can happen even unconsciously! Take breaks and be gentle with yourselves 🤏#and don't hesitate to ask around for help! There is a lot of resources and tutorials#and good people willing to answer questions or share knowledge as well :3#long post#text#apologize for any typo or spelling ITS GETTING LATE and I didn't re-read myself 👁👄👁 ahgfhhgf
73 notes
·
View notes
Note
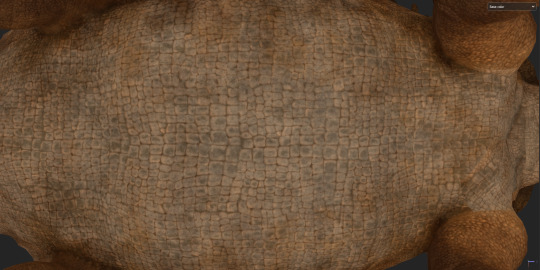
whats your general work flow in zbrush to make your realistic dinosaur textures, im still trying to figure out how to make my dinosaur textures look realistic ;w;
Hey, thanks for the ask! I saw your edit where you meant substance painter instead of zbrush so I will do a breakdown on my texturing workflow in there.
I find the key to realism is a lot of contrast, noise, variation and randomness!
I always start with just the base colours where I remember the above keys and fill in the patterns on the animal. Some colours are also just easier to make look realistic on dinosaurs than others! I find browns just about always look good while blues as an ex can be much harder to make work.

Using my Tarchia as a reference this is how it appeared after I painted just the colours, which I did using mostly the default dirt brush and a few other dot, mold, dust and other dirt default brushes. Afterwards I also go over with a few dirt and noise textures set to overlay to add more variation.
My next step is to add in ambient occlusion and curvature generators. I usually do 4-8 set at different colours, balances and some at multiply and others at overlay. This automatically puts in any ambient occlusion and natural fading to the scales that helps in final rendering.
During this process I also add lots of variation in the roughness maps! Keratin especially should have a very shiny base and then have lots of dirt generators over the top to add sharp variation while between the cracks have little to no reflectivity, which I also apply to the scales.
Now my final and favourite part... Cement das conk creet baybee!!

I literally just put a cement dirt generator over the top of the colour and as a high roughness. I don't always do this but usually I find it helps give the appearance of dirt and dust that's gathered in between the scales. a lighter colour brings more attention to the individual scales and a dustier appearance instead of just blending into the shadows and AO. It also adds extra noise detail for when you zoom in that is basically impossible to achieve at such high detail in the sculpt alone.
Extra things that can help are adding a specular map on top of the roughness with lots of noise breakup. If you're doing close up shots, UDIMs and splitting the head and body can help too like I did with my Tarchia. Most of the texture quality comes from the colour and normal map in my experience.
Best of luck! And remember good lighting can make even the least realistic textures look real!
#leave my spelling alone im australian its right in my country#my art#paleoart#art tutorial#i guess#me talk#3d#3d art#dinosaurs#palaeoart
33 notes
·
View notes
Text
here’s a really simple lipstick spell i made up a while ago <33!! i think this counts as glamour magick? anyway, you don’t need much and i think it’s beginner friendly.
you need:
- lipstick
- sugar (or honey)
- a mirror
- Pick a lipstick of a colour that calls to you (if its charmed thats even better)
- Go to your mirror
- Put the honey/sugar inside your mouth (around one teaspoon)
- Put on your lipstick (semi slowly)
- Repeat affirmations in your head
"I am (trait)"
"Others perceive me as (how you want to be perceived)"
"My energy is mine to change"
"My energy changes with my will"
"My aura changed with my will"
"My energy and aura are what i want"
And any other affirmations you want to use!!
You can also repeat key words in your head (pretty, charming, bubbly, seductive, petals, airy, etc)
- Visualise your intent coming out from your hand, into your lipstick, and onto your lips/your energy, visualise your energy/aura changing how you wish.
- Do this and keep repeating until the sugar/honey is completely dissolved in your mouth. then you may simply close your lipstick, do whatever you regularly do at the end of a spell, or you may simply say "It is done".
you're done!!
#vivsiemon.txt#quizzes#astrology observations#astrology#witchcraft#pagan#wicca#glamour magick#self love#spell#tutorial#spirituality#glamour magic#spells#rituals#ritual#simple#vivsiemon.witchy
582 notes
·
View notes
Text
Made a tutorial how I paint fabric in still life studies for my friends but y’all can have it too

#my art#art#art tutorial#fabric#fabric tutorial#paint#painting#painting tutorial#if you see any spelling errors no you don't
191 notes
·
View notes
Text
i don't get how fights in bg1 work and at this point i'm too afraid to ask <3
#it's not true i'm reading tutorials on the clock#so i have to pause the game. okay. still not sure about how spells work but i need to add keybinds for them anyway#love the advice i read that was like. take it easy. use melee during your first playthrough and you'll do fine <3#which *I* am. but xsar and his 4hp are not. doing so fine.
7 notes
·
View notes
Text
#beltane#witches sabbath#blessings#spell#tutorial#witchcraft#witchblr#pagan#witch#spells#magic#baby witch#wicca#magick#village witch
23 notes
·
View notes
Text
no option for "i didn't do that wtf" because this is not for you go away you don't have to vote on every poll. bitch. sorry. bitch.
#personally i was doing werewolf spells but i did do wikihow mermaid tutorials as well#i kind of just pretended to be a vampire i didn't think i would actually become one. sad..
17 notes
·
View notes
Text
I would just like to personally thank the Zombies 3 Exceptional Zed dance tutorial for helping me stay grounded to reality during my really bad dissociative episodes. Ur a real one <3
#this post is /hj but like#the power of Milo Manhiem is lowkey the only thing keeping me tethered to my body as of late#zombies#disney zombies#z-o-m-b-i-e-s#zombies 3#exceptional zed#milo manheim#oh god damnit I spelled his name wrong earlier-#dissociation#derealisation#depersonalization#depersonalisation and derealisation#grounding#srsly if yall need a new grounding technique try out any dance tutorial at all#its rlly helpful :)
7 notes
·
View notes
Note
You should put capitol letters at the beginning of your gifs
you should make your own gifs if it bothers you that much
#no really lmao u want me to link u some tutorials?#🙄#ugh if you notice an actual mistake in my gifs -#like a spelling mistake or inconsistent capitalisation or something wrong with the looping -#then PLEASE by all means tell me so i can fix it#but not tHis fjsmxnakd get out of my house!!#🙄🙄#i prefer the way it looks to use mostly lower case and only capitalise ‘I’ and proper nouns in gif subtitles#it’s just an aesthetic decision i’ve made and! i don’t care what you think about it! make ur own gifs!#ask
11 notes
·
View notes
Last Seen Blogs

supersixliv
Untitled
uizado
o' h̲e̲a̲r̲t̲l̲e̲s̲s̲ man.

zyseazephyr
Phantasmagoria

inkdoll20
Ventressink

brandinight
A.