#circular needles and rows of knit stitch here i come
Text

I HAVE DONE IT I HAVE KNIT MY FIRST SOCK !!!!!!!!!!!!!!!!!!!! OVER THE MOON ABOUT IT !!!!!!
#yarnblr#knitblr#knitting#sockblr#knit socks#dpns#double pointed needles#IM SOOOO PROUD BC THIS IS MY FIRST TIME KNITTING SO LIKE I LEARNED ON THIS AND !!!!! HELL YEAH#IT CAME OUT SO GOOD#if i can knit socks on dpns i can do anything#incidentally im starting a super super simple cowl on circular needles so i can have a mindless tv knit project while i work on the second#bc what ive learned from crochet is its really helpful to have both a focus project and a mindless project going at once#circular needles and rows of knit stitch here i come#ugh im so proud
247 notes
·
View notes
Text
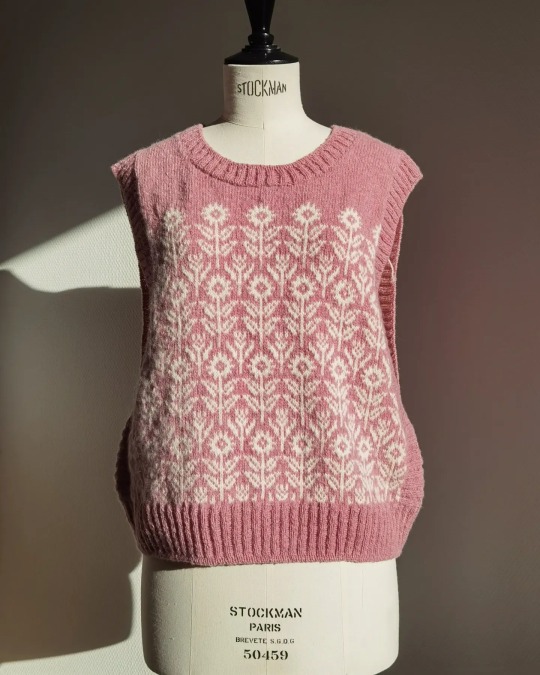
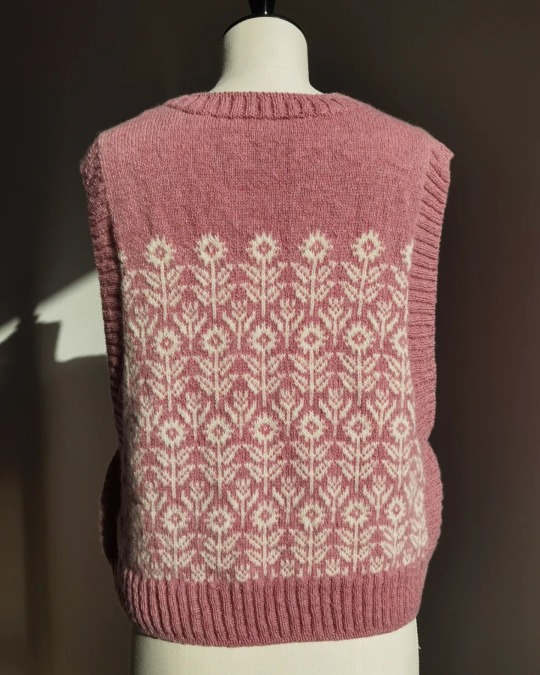
Floral vest | November, 2023

This vest is a Frankenstein of two patterns—the construction is from the Ophelia Slipover by Toshiyuki Shimada 嶋田俊之and the floral pattern from the Flower Yoke Pullover by Erika Tokai 東海えりか (@erika_tokai on Instagram). Both patterns are listed on Ravelry but only available in printed books.
Now, it is not my genius idea to piece these two together. I think it was first done by a fellow Chinese knitter and designer, who is XS KNITTING on RED and XS_KNITTING on Wechat. I have both pattern books but she did provide very detailed instructions on how to combine the two patterns for this vest. I mostly followed her notes – see modifications below.
Overview of the construction
Make a provisional cast on with a waste yarn.
Knit colourwork in the round from bottom up, ending at approx. underarm level. Decrease on the sides as instructed. You will later steek the fabric at the sides so the pattern includes the additional allowance for steeking.
Knit the front and back yoke sections flat, following the instructions for neck and shoulder shaping. (There is no armhole shaping in the yoke part.)
Sew together the front and back yoke parts, pick up stitches to make the neckband.
Reinforce the steek and cut. Pick up stitches from the steeked edges to make the side bands. Sew the bottom bit of the side bands together.
Pick up stitches to make the hem.
Needles
(all 80cm circulars)
Colourwork: 3.00mm
Yoke: 2.75mm
Neckband: 2.75mm, bind off with 2.5mm
Side bands: 2.5mm, bind off with 2.25mm
Hem: 2.75mm, bind off with 2.5mm
Yarn
Biches & Bûches Le Petit Lambswool 248m/50g, in white and light pink. This is a 2-ply woolen spun, slightly rustic but soft yarn. It softens even more after washing and blooms too, making an incredibly light but hearty fabric. I always thought it was produced in Europe since this is a French brand, but the Lambswool range is actually spun and dyed in Scotland. Hence it is a little less local than I thought (and their website doesn’t say where the wool material comes from), but I’m also happy to support Scottish mills that produce less chemically treated yarns in small batches.
Another nice thing is that each of my skeins/balls actually weighed 55g, so there was a little surplus than what I paid for.
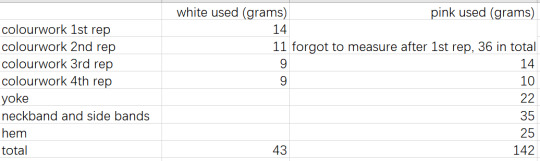
Yardage
I took detailed measurements just in case you (or future me) are worried about having enough yarn, or thinking about doing differently coloured bands, etc.
As can be seen, the bands and hem take up quite a bit of yardage.
Modifications
Colourwork
I think I followed the instructions entirely for the colourwork.
Yoke
I knitted one more row at the bottom of the front and back yokes respectively, because I somehow started from the wrong side and the pattern started from the right side. The shoulder seams are done with Kitchener stitch instead of a three-needle bind-off. Therefore I think I had about 104 rows in the yoke instead of 100 in the pattern, which means I picked up 84 stitches instead of 80 for the side band at the yoke section.
First block and felting
After I finished the yoke, the colourwork looked rather uneven. Since the yarn I used was thinner than the Shetland yarn in the pattern and I knitted the colourwork loosely to match the instructed gauge, the fabric was also quite loose and not as supple as I wanted. The good thing is that the finished garment (using the required gauge) had quite a lot of positive ease for my body measurements. So I decided to shrink the garment slightly by hand-felting it.
To felt a wool garment, you need one or more of the following: high temperature, moisture, agitation, soap. Here’s what I did to felt it as gently as possible. The half-finished main body had no live stitches at this point so I just soaked it in icy cold water as how you would normally block a knitted garment, but without soap. Then I just use my hands to agitate the fabric until I felt that it had first evened out and then tightened up. Trust me, without hot water or soap you need quite a lot of agitation to felt a garment—not just swishing it around.
I’ve also seen people putting their work into a pillow case into the washing machine on a hot drying cycle and stopping every few minutes to check if it’s felted enough. I have no confidence in operating my washing machine but you can try.
The result was satisfactory enough for me to go ahead.
Neckband
Neckband was finished with a tubular bind off with two rows, i.e. one pair, of reinforcement (the ‘tubular’ bit’). To do this, you would first use a slightly smaller needle to switch the ribbing from 2*2 to 1*1 as you knit across (see Suzanne Bryant’s video). I used a needle one size smaller but I think I could’ve gone down two sizes, as the finished neckband feels a little too loose.
Side bands
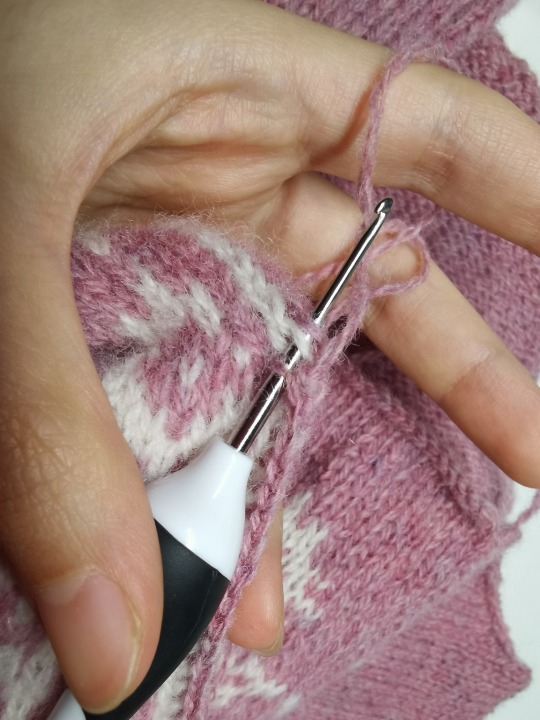
I reinforced the fabric using the crochet method and then steeked it. Some people recommend the hook to be one size smaller than the knitting needles, but I used a 1.5mm and it worked well for me. It;s absolutely possible to steek with an even number of stitches (many tutorials say you can only do an odd number of stitches).

Using a 2.5mm circular I picked up stitch for stitch for the colourwork and 84 for 104 for the yoke. One stitch is added at either ends. There was no stitch decrease after picking up. I finished with Italian bind off which is another kind of invisible bind off like tubular bind off, just without the ‘tubular’ bit.
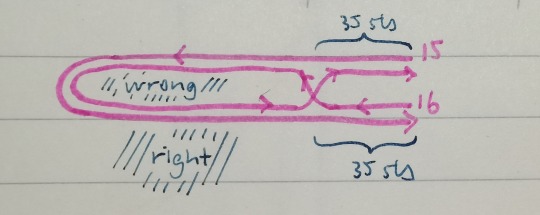
To do this: On the 15th row (wrong side), I knitted the first 35 sts (which were not bound off) using the 2.5mm needle in 2*2 ribbing. Then I switched to 2.25mm and switched the ribbing to 1*1 as I knitted across, and finished by knitting the last 35 sts using the 2.5mm needle again in 2*2 ribbing. On the 16th row (right side), I knitted the first 35sts in the 2.5mm needle and 2*2 ribbing as usual. Then I adjusted how I held the project so that I could pull the working yarn to the opposite side (front/back side) of the garment and start the sewn bind off from the wrong side.
It is absolutely not necessary to do all this. Some people make a very simple knitted bind off. This is purely because I want an invisible bid off and the ribbing pattern made it easier to do it this way. Also see illustration.
Then I Kitchener-stitched the 2*2 ribbing to make the side seam.
Hem
I took out the provisional cast on and transfer sts to a 2.75mm needle. My side bands were slightly wider than instructed so I picked up more side stitches for the hem too. 336 sts I think. I did 2*2 ribbing and finished with a tubular bind-off with four rows, i.e. two pairs, of reinforcement.
And that's it! I'm really pleased about this little vest and might make more in different colour schemes in future.
166 notes
·
View notes
Text
FO: time flies by in the yellow and green...
...Stick around and you'll see what I mean
(there will also be more pictures under the cut)
Remember literally yesterday when I mentioned I was doing a stretchy bind-off purlwise, and I loved the fluidity of it? Well, obviously a bind off pretty much heralds the end of a project in sight so here we are. I was so eager for this one to be completed that I lightly washed the shawl and pinned it overnight so that, by today, I'd have my first finished, knitted shawl.

Pattern: Mara Shawl by Madelinetosh, available here through Ravelry
Yarn: Arcane Fibre Works, "Calm Waters" -80/20 Extra Fine Merino Nylon Super Wash Fingering Weight. (2 Skeins)
Tools: Clover Takumi Bamboo Circulars - US 5 3.75mm, Eucalan Lavender Wash for blocking
This shawl is a garter stitch shawl with yarn overs down the center and sides to both increase and add a bit of lacy interest. I had actually started on this before I finished the throw blanket, so these two pieces together were so critical for my knitting journey thus far, and I've learned so much already.
While the throw maintained the upward structure of its rows, this shawl gave me the experience of increasing along the center and sides, working outward as well as up. Once I figured out the yarn-over and the cadence from row to row, the location of the yarn-overs was easy to remember. Simple, but elegant on the piece. It did take me a few rows in to figure out that a stitch marker for the RS vs WS would probably be helpful, and from there it was smooth sailing.
Almost too smooth, because I just kept going. I don't remember the cord size I used, but eventually working the stitches scrunched up on the needles, and the work curled into itself. Once that started, I had a hard time imagining what it would look like finished. I had no idea what the shaping would look like once it was off the needles, so my plan was to hope I just figured out when would be a good time to stop. Low stakes winging it, if you will.

She's big. This is no shawlette you behold. The length surpasses my wingspan on both sides, and the drape down the back is lovely and full while the fabric itself is light and breathable between the stitches. I think because the needles were a bit bigger than recommended size for fingering weight, this resulted in some space between the stitches.
I'm dreaming of that first cool day of fall, and wrapping myself up with her covering my shoulders pinned with a nice brooch, or rolled into a scarf around my neck over denim. She's going to be a wonderful addition to my wardrobe, and I am ecstatic with the final length and look.
I mentioned above I used two skeins. Another learning curve for me - one I intentionally played with here - was the way the colors fell. I don't think it's a crochet thing specifically because I know opinions still vary, but coming from a craft that tends to create potentially less ordered fabrics with variegated yarns, I'm kind of open to color pooling at times. It's not for everyone, but I think there's a fun little magic in letting the colors land the way they want to in both crafts it seems.
I started with one skein, then switched to alternating after a while to learn that technique, then ended with one skein again as I finished out the project. I was nervous about this choice, especially as I started seeing entire blocks of yellow forming. But in the final garment, I don't feel like these larger streaks take away from the color combination. I'm loving that it's not uniform and there's a bit of fun and randomness to how the colors fall.

Towards the final rows, the pattern switched from garter to 1x1, then 2x2 ribbing, which I could see being a great opportunity to switch out to another color to complement. But I really wanted to have my yellow and green shawl, so I decided to keep working up with the same yarn. Plus I am kind of in love with seeing how different stitches create a new texture that gives the colors in a variegated yarn a bit of a different life to them.
Now - I do have one more skein of this colorway, as I had bought a just-in-case extra. I am thinking my big shawl needs a little something else to go with it - maybe a hat or some fingerless gloves, oooh! or some socks.
Now, I have... how many more months till I can wear this?
60 notes
·
View notes
Text
WIP Wednesday
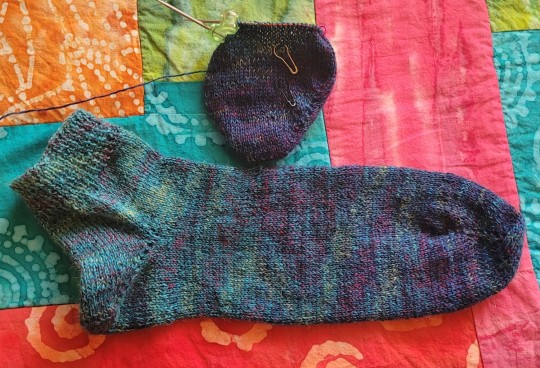
One sock is done, and I couldn't be happier with that gradient! It's really making me excited to finish the second sock so I can actually wear these (though It's getting a bit warm here for wool socks). I feel like I've really gotten used to using the 9" circulars, so now I'm really flying through the start of the second sock.
No pattern, they're just vanilla socks with pinned short row toes and heels.
Yarn is Willow Duo Sox in color 3 Aegean. I originally got it for 2aat (since it comes with 2 balls of yarn to make matching socks) but I think I like my 9" circulars better.
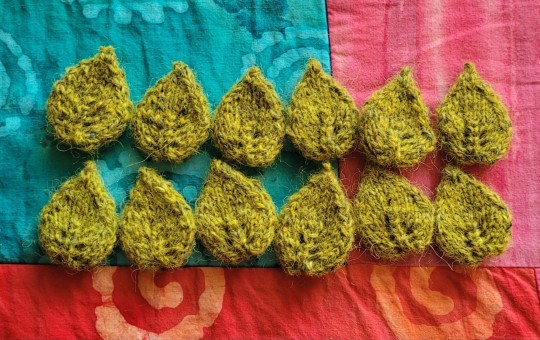
The leafs have multiplied! I've been doing one or two a day to keep myself from getting tired of knitting leaves, while still making progress. I also looked up different ways for how to make leaf garland, and I think I'm going to connect these with a crochet chain (inserting the hook through the bottom of a leaf when I want to attach one, then making the next chain by pulling the yarn through both the leaf and the chain) and then slip stitch along the chain to make it sturdier.
Pattern I'm using is below the cut, and I'd love to see if anyone else makes some leaves or a leaf garland from them!
The Leafy Leaf cowl was frogged and put in time out. I dropped the center stitch in between a line of yarn overs and ended up losing stitches and couldn't figure out how to get them back without making that leaf's lace a lot more open, so I decided to restart it later. Or not! I wasn't in love with how it was working up, so if I find a better use for that yarn I'll use it there instead.
This does mean that I'm back down to one project with the ace hat having been finished as well. Which means I'm all clear to (re)start the burgundy cardigan! I'm using a different pattern than last time I started it, and looking at it, I think the sleeves will end up too big if I follow the decreases as written, so I am probably going to wing that section and just take super careful notes so I can repeat it for the second sleeve. We're aiming for an end product I love here, that's why I've restarted this one so much.
Leaf pattern:
CO 6 stitches using Judy's magic CO or your favorite cast on for knitting from the center out. Divide the stitches so you have 3 on each needle, then knit a round.
1. *k1, yo, k1, yo, k1* ×2 (5st/needle, 10st total)
2 (and all even rounds) knit around
3. *k2, yo, k1, yo, k2* ×2 (7st/needle)
5. *k3, yo, k1, yo, k3* ×2 (9st/needle)
6. *k4, yo, k1, yo, k4* ×2 (11st/needle)
7. *ssk, k7, k2tog* ×2 (9st/needle)
9. *ssk, k5, k2tog* ×2 (7st/needle)
11. *ssk, k3, k2tog* ×2 (5st/needle)
13. *ssk, k1, k2tog* ×2 (3st/needle)
15. cdd ×2, break yarn and pull through remaining 2 loops twice, then hide tail inside the leaf
#crafts#description in alt text#knitting#knitblr#trans#trans fiber artist#trans knitter#long post#sorry yall it's a long one this week!#no sunk cost fallacy here if im making the cardigan im making one ill wear#and if i don't like the pattern ill just frog it and restart it or make something else ill actually use with the yarn
14 notes
·
View notes
Text
Vintage knitting patterns
Let’s use two vintage knitting patterns to discuss how a modern (or of the era knitter) might look at them.
First off, let’s look at a dressing jacket. This is something that might also be called a bed jacket. Most patterns have them tied shut with ribbons, but covalescent / male versions sometimes had buttons on the shoulder, and a shortened back (so the sweater wouldn’t catch under the body, or overheat the bits of you that were warm from the covers.
Here’s the Ravelry link for this jacket, and the actual pattern on Trove. The needle size is an interesting thing since you have no way of knowing if you’re talking UK needle sizes, millimeter sizes, or US sizes save by the origin of the pattern, the era, and the yarn. In baby weight yarn, this will come out to a generous 52″ chest with no waist shaping on US 3 needles (less about 2″ if you put in buttons along the front band instead of ribbon.) Since it’s garter stitch, it will stretch in length and in size easily, so the original size would be quite forgiving.
40″ in this time period was often a plus size, or a “matron” size. In 30′s to 40′s patterns, a matron was someone who was married and had children, versus a college aged student or an older teen. 34 to 36″ was a “generic” woman’s size, and a 38″ chest was a common man’s size. While clothing sizes aren’t particularly useful, a size 4 to 8 would be your generic, and a 12 would be your matron.
Now, before you say that this is the Depression and you’re dealing with starving skinny people, bear in mind that you’re coming out of the 20′s, and a lot of fashionable women are still wearing corsets in some manner and low flattening bust support. This would draw your shoulders back (changing how your sleeves fit, and the resulting width of them) and reduce your bust measurement.
A 1950′s sweater, in comparison, would be sized for the pointy bust support that you would see in that era, and a 1940′s man’s sweater will often end “high” compared to what you might expect. This is due to high waistlines on trousers, and yarn shortages leading to reduced sizing. A good example of this would be these make do and mend socks made by Retro Claude. Note the very short height of the socks. While they use very little yarn, and allow you to use scraps, they’re also clearly designed to be the minimum height possible.
Moving past sizing and design concerns, one simple sign that this is a vintage pattern is that it’s designed to be a seamed garment. Double pointed needles and circular needles were not usually used in garment knitting in the 30′s, so you often knit things in pieces and then seam them together. A seamed garment does gain some structure and strength from seams, and it’s a lot easier to steam / press a flat shape rather than a tube.
There’s also some out of the ordinary knitting terminology with using “Wool forward” or “make one” instead of yarn over, and one immediately obvious probable typo (you knit 10 stitches to make the front band, but the purl row on row 4 does not mention avoiding purling in the front band.)
Swapping over to a man’s pattern, here’s the Ravelry link to a man’s vest. Here’s the original pattern from Trove. Sizing wise, this is fairly close to the actual chest size it says it should be in the original gauge. Vests are often knitted at 1 - 2″ smaller than the listed chest size to provide some trim smooth lines under a jacket and to not stretch to fit poorly over the shoulders. The back pattern piece makes it clear that the diagonal ribbing is a sort of two stitch wide ribbing knit in an angled V pointed at the center, so you would get some pulling in and smoothness from the ribbing wanting to contract, but not as much as if it was simple vertical ribbing.
When I first looked at the pattern, I was baffled. It starts with casting on two stitches, then you knit in the back of the cast on while you twist your stitches (this tightens your cast on to make your stitches appear more even and smooth.) Then the next row says you cast on two more, then knit two stitches and purl two stitches.
It took an embarassingly long time to realize they meant you cast on stitches on the left needle (resulting in four stitches,) and then continue to knit those two new stitches and your two older stitches in the pattern.
As a fun game for new knitters, the pattern also assumes that by row 12 you can read the stitch pattern, and you know where to put your knits and purls to continue it, even when increasing the number of added stitches per row. (The pattern, mind you, is simply moving one stitch over every other row, but I could not have discovered that without seeing the actual pattern in the yarn.)
There is some shaping in this garment, so you’d be advised to check your gauge against the stitch count before the armhole, the one at the button band (since that would be roughly a waist measurement, but remember to subtract the size of the buttonband once to account for the overlap) and the same for the back at the cast on and the armholes.
1 note
·
View note
Text
Easy knitted gloves
Introduction:
Got some 4-ply yarn lying around? Why not knit a pair of gloves? I promise these are easy ones! No double-pointed needles or magic loops required.
The pattern:
Shara Lambeth has been so kind as to put a free pattern online for simple 4-ply sideways knitted gloves. You can find the pattern on both her blog and on Ravelry.
If you want to support her work, you can also buy her 8-ply gloves pattern.
These gloves are knit sideways on straight needles, then sewn together at the end. The techniques needed to make these are casting on, the knit stitch, increases (kfb), decreases (ssk and k2tog), casting off, sewing (ladder stitch), and short rows which I know sound intimidating but are actually really simple.
Check out this written tutorial for short rows and this video tutorial for short rows.
You'll find more info on the required knitting and sewing stitches in my blog posts "Knitting 101" and "Let's talk stitches".
Here's my own take on these gloves, knit with Scheepjes' Stardust yarn as part of an accessories set I made to match my coat.
I added a little purled edge at the bottom using double-pointed needles, but this is totally optional.

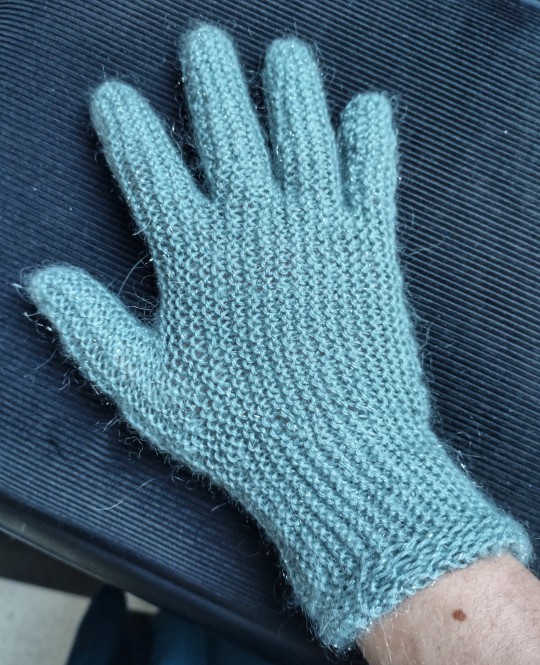
[ID: a green pair of sideways knit gloves on a black background.] [ID: a green sideways knit glove, worn.]
Conclusion:
If you've always been too intimidated by circular knitting to make your own gloves, or if you want to learn how to knit short rows, try out this pattern.
Knit accessories always make for fun gifts. These gloves have some stretch to them, so you don't have to be too precise when it comes to gauge.
If you really love making them, you could always check if there are any local charities looking for gloves to hand out in winter.
#knitting#knitting pattern#knitting for beginners#knitting 101#stash buster#fibre craft#craft#knit#mend#sewing#global warming#climate change#slow fashion#fast fashion#wasteless crafts#gloves#knitting gloves#easy gloves#shara lambeth#free knitting pattern#sideways knitting#diy#upcycling#handmade gifts#homemade gifts#tutorial#short rows#sideways goves#garter stitch
65 notes
·
View notes
Text
I wanna make headphone covers for my daughter's Beats, which still work just fine, but the material that covered the foam over her ears completely disintegrated.
Found a knitting pattern online: Yay!
This is how it begins:
Cast on 9 stitches using Emily Ocker's Circular Beginning (if you don't have Knitter's Almanac by Elizabeth Zimmermann, shame on you, both the pi shawl, from which this pattern is heavily borrowed, and this cast on is described in that book)
Why do I come across this kind of bullshit so often in the knitting "community"? Knitblr is the only place online I've found so far where knitters aren't stewing each other in moral self-righteousness.
It is a free pattern. I guess being scolded by a complete stranger for not owning a book I've never heard of is the price I have to pay for using it.
Or I could use another free pattern I found (which as far as I can tell is effectively the same pattern), whose instructions begin:
CO 8 sts over 4 ndls;
Which I think means, "Use whatever cast on you like to cast on 8 stitches and then distribute those stitches over four double pointed needles." I'm hoping I can use magic loop because I don't have dpns.
ETA:
Here's a tutorial from one of my favourite knitting YouTubers on how to do a pinhole cast-on without a crochet hook:
#knitting#knitblr#learning to knit#headphone covers#casting on#Emily Ocker's Circular Beginning#pinhole cast-on#10 rows a day#i ❤️#Maryna Shevchenko
4 notes
·
View notes
Text
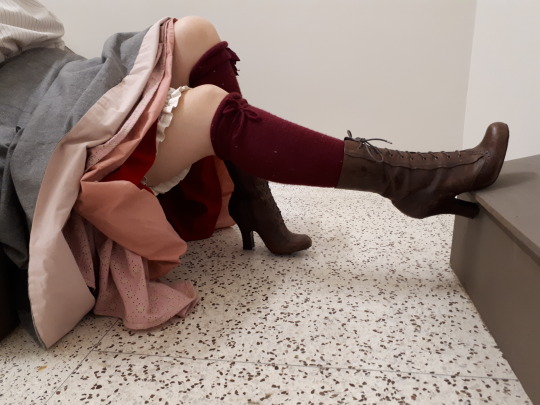
Amelye’s Red Wool Clocked Stockings
Ravelry is a land of frustration right now, so I’ll just share the damned pattern here.

These stockings should be long enough to come over the knee, but are held with garters (bias tape, I-cord, or fancy knitted garters) just under the knee. While not 100% accurate, they will pass pretty well for mid-1500s to early 1900s. The angled ankle/heel stretches nicely, and the heel and toe, while strange to modern sock knitters, fit well and have worn better than any other sock I’ve made. These were knitted with two 100g balls of fingering weight sock yarn, though I think I only used about 150g. Any extra can be used to knit I-cord garters, long enough to go twice around under the knee and tie. In my gauge, these fit a tall person with muscular calves and large feet, but be sure to check your fit and make changes where necessary.
Cast on 100 on 2.25 mm needles
Knit plain for 115 rounds.
Calf decreases: Decrease 2 stitches at centre back (ssk, k1, k2tog) every 6 rounds 10 times (80 stitches).
Redistribute stitches (N1:21, N2:19, N3:19, N4:21). Knit 4 rounds plain, then begin 13-row flower clock centred on N2 stitch 1 and N3 stitch 19 (ie backmost stitch of front/instep needles), while continuing back decreases.
On 13th set of decreases, begin gusset (increase 1 every 6 rounds, on same round as centre back decreases), centred under flower (76 stitches). Overall stitch count remains the same, while stitches increase on front two needles and decrease on back two needles. This slants the knitting for the somewhat odd heel shape to come.
Continue decreases at centre back and increases at gusset until 24 decreases total at back (7 stitches on N1 and N4), then knit 5 rounds plain and 3 needle bind off 7 stitches on each heel needle. You will need to borrow one stitch from an instep gusset, but it will be replaced with the former centre back stitch, as 3-needle bind off works on an odd number of stitches. The welt created by the bind off will felt down and is not uncomfortable, I promise. (62 stitches)
Foot: Knit plain for 50 rounds.
Toe decreases: Decrease every 6 stitches (rest 2). Knit 3 rounds plain, then decrease every 5 stitches. Continue in this manner until 22 stitches, then k2tog across, knit one round plain, then k2tog across. Cut and pull end through remaining stitches. This style of circular decrease distributes wear more evenly across the toe, rather than the way a flat toe will sometimes pull ladders at the sides.
34 notes
·
View notes
Text
Lived-In Skin
Avengers!!!
Prompt: A million and one years ago I saw a post from @itsallavengers about the Avengers doing a body positivity ad, and I just ran with it. Find the full original post here! So dear, thank you for the inspiration!
When: This takes place after Endgame i guess, because tony’s got a kid but tbh I’m ignoring every single other thing that happened lmao
Warnings: A little bit of negative talk about body image, some cursing

“I’ll start,” Tony Stark announces, getting up from his seat, leaving his teammates and friends looking wearily at one another as they remain seated. The idea for the campaign seemed to duly unsettle and inspire them, and they settle in to listen to Stark’s interview.
First question: How many scars, approximately, do you think you have?
Stark has a great laugh, and it comes out easy at the prospect of the question.
“How many scars,” He repeats, eyes tilted up in thought. “Not as much as some of these other guys, honestly. But, I mean, probably at least a hundred,” He shrugs.
What do you dislike about your body?
Stark lets out a whistle. “Layin’ in hard,” He says, and a chuckle comes from his team. “Let’s see. I’m pretty short. That makes me a little self-conscious. It’s hard to be a commanding presence when you’re short. I’m slowly getting old, even though I look so beautifully young, and I’m just starting to get...wrinkly. Like, skin, it just, sags. It does everything you don’t want it to do. And it goes without saying that the hole in my chest is pretty ugly. Blue thing is pretty though,” He says, tapping where the former mini-Arc Reactor sat, once circular, now replaced with a triangle of glowing blue nanite technology.
Time to get naked, Mr. Stark.
Another laugh as he stands and unbuttons his shirt, babbling all the while about how fun he finds interviews, especially when he, quote, “Tells the truth”. His wife Pepper takes the shirt and Tony squares up to begin speaking.
“So, the obvious,” He begins, gesturing to his chest with a hand. I ask him to talk about it as our photographer gets up close and personal with the camera. “Well, the thing about having a huge hole in your chest, really, is that it always hurts a little to breathe. Not matter what. And, it’s an eighth of an inch off center, which really pisses me off.” It’s not noticeable to anyone else. But to Stark it is. “The scar tissue around the triangle, that actually used to look worse. And look, if I turn to the side, you can see how sunken in my chest really is. Something like this, damages the bone.”
Tony continues by explaining that when the first arc reactor was put into his chest, his skin was raw from the surgery, and the scarring is, “Mostly a result of me fucking with the thing for so long. Removing it and scratching myself in the process. Messy stuff.”
Turning, Tony brings a hand up to tap the back of his head. “See the bald spot?” He begins, “I’ve smashed the back of my head so many times in my stupid helmet, this spot is just permanently done growing hair. Not really noticeable unless you’re looking,” It’s true, the spot is small, but there are lines of scarring that run parallel to his spine beneath a tuft of hair.
“Other than that, got a few scars on my face from various things. Calluses all over, especially on my hands. The very first Iron Man suit was clunky, you know, and I didn’t wear the right clothing underneath all the time, and I rubbed my elbows and knees raw every time I put it on. You can kinda see,” He presents his elbows, covered in what looks like rug burn scars. “Told you, not that many.”
When do you feel the most beautiful?
The room was expecting Tony Stark to laugh. Instead, he cocks an eyebrow as he buttons up his shirt, eyes cast downward in thought.
“When my daughter tells me she loves me. Or, one of these idiots,” He motions to the Avengers, sitting in quiet, “When one of them, you know, smiles or laughs at me and they really mean it. There’s a lot of love there, so, I guess that makes me feel good.”
The Captain volunteers to go next. He and Tony knock shoulders as they trade places, both sharing a smile and a laugh as Steve Rogers takes Tony’s place. I ask if he’s ready, and he gives a shy nod.
What do you dislike about your body?
Steve takes a deep breath before beginning. “You know, when I was a kid growing up in Brooklyn, I should have never even left the house, I was so bad. Asthma, chronic pain, fatigue, anxiety, high blood pressure - I could barely breathe. At all. Ever,” He laughs a little. “I hated it then. I remember that all I ever wanted to do was be able to run. Just, take off flyin’ and see how it felt.”
And now?
“Now,” Steve starts, “Now I’ve got stretch marks everywhere that haven’t gone away. They probably won’t,” He shrugs. “No matter what I do, I can’t fill out my waist. You know, that Dorito meme?” (He pronounces meme ‘Me-me’ - Sam Wilson quickly corrects him.) “In all honesty, I’m pretty fuckin’ lucky. There’s not a whole lot I’d care to change if I could. I’ve got some ugly scars because, I don’t know, my cells regenerate too fast and I never have time to get stitches before they’re already closed up. So, they end up looking gross.”
When asked how many scars he thinks he has, Captain Rogers chuckled and said, “I’d have way more if I weren’t a lab experiment.”
Shirt stripped off, Steve shows us an old scar from his childhood, when he’d broken his arm and the bone had stuck through. The stretch marks on his biceps (which don’t make them any less impressive), and his stomach, even his inner thighs. “They’re on my ass too, but I won’t frighten anyone with that,” He jokes.
A few gunshot scars to the sternum, that Steve says likely still have bullets behind them. “I never know if they’ve come out.” The scars without stitches are jagged and wide, like badly-knitted fabric. “Basically took a chunk outta my leg with this one,” Steve says, presenting his calf, where a patch of skin seems as though it’s been completely carved out. “Alien weapon, really fuckin’ hot.” He says.
What makes you feel beautiful?
He seems to have anticipated the question, because his answer comes quickly. “Laughing. I always feel good when I laugh. And running. It’s weird but, I got this body mostly through science, and it’s kind of amazing what it can do. I can jump over twelve foot walls, that’s insane,” he shakes his head with a blinding grin. “So, yeah, when I think about what my body can do, it feels pretty beautiful.”
Clint Barton, better known as Hawkeye, takes Steve’s place. He sits with a mocking groan and complains that he’s aging, but his smile says differently.
So, how many scars?
“Oh, shit, tons,” He says, “Not a whole lot of big ones. Lots of bullet holes, unfortunately, but I get them stitched, unlike some people. There’s a nasty one on my leg that I had to sew shut myself - that looks like a toddler got its hands on a needle and thread. Nah, I’m mostly deaf though,” Clint says, and reaches behind his ear to pop out a hearing aid, holding it up.
“Sorta how I got my nickname. When you lose some of your senses, other ones get better. So, my eyesight is damn good.” He states. “It sucks, sometimes. I got shit a lot as a kid, cause I couldn’t hear a damn thing. Sometimes my wife still has to scream at me. But, Stark and Banner put their heads together and these hearing aids are fucking awesome. Way better now than it’s ever been.”
And the beauty of it?
Clint smiles. “These fuckers learned ASL for me,” He nods to his friends. “So did my kids and my wife. And you know, that makes me feel good. To be loved enough that they put forth that amount of effort.”
He signs his name and an “I love you”, to the camera.
Barnes is up next, with a slap on the shoulder from his best and oldest friend, Steve. Shyly, James Barnes, better known as “Bucky”, and to the intelligence community as “The Winter Soldier”, sits down before the camera and shoots everyone a smile. Frightening as he may be in uniform, in real life Barnes has a pretty smile and kind eyes, rivaling even Captain America in his politeness.
“Four hundred and thirteen,” He says, “That’s how many stitches I’ve gotten over the years, but I have fifty-three noticeable scars.”
I ask if he’s keeping a count.
“Yeah, I keep count,” He admits, “Some stuff I just don’t remember, but the ones I do, there’s a lot.
Are your scars the thing you dislike the most about your body?
A solid answer of no. “No,” He says, “No, the thing I dislike the most is my brain,” Even though it’s said with a laugh, the energy in the room turns immediately somber with Barnes’ confession. “But, physically, it’s not having lost my arm that I dislike, it’s the scars around it. The first few years I sort of, kept waking up and trying to claw it off,” He continues.
I ask if he’ll show us the scars, and Barnes immediately stands and slides his shirt off, revealing an expanse of skin dotted with large and small scars - bullet wounds, a pristine row of knife slots down his stomach, and his shoulder, devoid of the usual prosthetic limb the word has come to know. Turning to the side, Barnes presents what’s left of his left arm to the camera, shy as it snaps away. He explains in a quiet voice the scars that litter his body, some of them attached to more amusing stories than others.
How often do you forego the prosthetic?
Barnes shrugs. “Not as much anymore. Shuri and the doctors in Wakanda made something really amazing, and I love wearing it. For a few years there I just had to get used to being all me again, before I felt comfortable with it.”
What makes you feel beautiful?
“It sounds really stupid but, being able to make a choice, you know, about anything. I make mistakes a lot, but now I can apologize for them. It’s nice to have all that back,” Barnes says, grinning as the camera flashes.
All things said and done, he’s got the one-armed thing down.
Natasha Romanoff is next up, a sideways smirk squinting her eyes as she plops down, one leg crossed over the other and as intent upon me as I am on her. Hailed by the media for years now as beautiful, Natasha up close is just that, and more.
How many scars do you think you’ve got?
“You know, I couldn’t even begin to count every individual one, but so many. My body isn’t quite as bulletproof as some of the rest of my friends,” She shoots a glance at Captain Rogers and Barnes before continuing, “But it’s withstood a lot, that’s for sure.”
And what do you dislike about it?
Natasha takes a deep breath and folds her hands over her knees. “Not the scars, not even really anything noticeable. But, I can’t have children,” The words come out tight, a confession that she doesn’t want to make. “And to some people that’s a silly thing to be upset about but, the choice was taken away from me before I could even make it. And I really hate that. I hate that for most of my life, I didn’t have choices about what happened to my body, and I do have scars to show for that.”
Asking her to show those scars made her chuckle nervously before presenting her back, that bears a long, jagged scar that runs up her spine. Then, a bullet wound to the hip, courtesy of a “friend”, she says. It seems to be an inside joke. She turns a hip out to show a long scar on her inner thigh, and another on her leg.
So, what makes you feel beautiful?
Natasha smiles a little, sticking a bare foot out and flexing her toes. “My feet are messed up, because I used to be a ballerina, just another one of those things that I didn’t have a choice in. But, I did love it. And dancing still makes me feel beautiful.”
A shout comes from Tony Stark as he says, “Go bendy for us, Nat!!”
With a grin, Natasha stands from the seat and takes a breath, body claiming a position so naturally you would think she was floating. Another breath, and Natasha’s leg lifts, her knee elevated to her ribs before her foot extends and she rises onto her toes, smiling all the while. The fluidity of it is something you have to see to believe.
Doctor Banner appears next, shuffling quietly past Natasha and plopping down onto the school.
“I’m green,” He says with a grin. “But only sometimes.”
Have any scars?
“No, not really. I’m sorry, these things make me so uncomfortable, can I just rapid-fire my answers at you?” He says, and I gesture for him to go right ahead. “I used to hate the other part of me, you know, the one everybody seems to care about more. But I don’t hate him so much now, because it’s just there. I obviously can’t get rid of him, so I had to learn to live with him. I really like my brain - it knows a lot. And I feel beautiful when I find the right solution to a problem, because that’s what I’m good at. Using my brain to its full potential, that’s the best thing I have to offer, I think.”
“I feel cheated,” Calls Tony Stark, “I thought I made you feel beautiful, Bruce!”
Doctor Banner grins and blushes as he makes his way back to his seat, and the final Avenger of the day takes his place. Thor immediately begins to speak.
“On Asgard, we celebrate scars. Here, people seem to wish to cover them. But where I’m from, we bare them proudly, no matter their circumstance. You see, my brother has stabbed me multiple times,” Thor says, standing and removing his shirt to gesture to a few small wounds in his torso.
Out of love?
“Oh, of course! I’ve been shot at, stabbed, broken bones, I’ve even been blown up - but I’m not dead yet! My personal favorite is the eye, though,” Thor leans down to show the photographer his eye after popping out the prosthetic, to which a chorus of groans can be heard from his friends, a loud that’s fucking disgusting, coming from Barton. Thor winks with his good eye.
And what makes you feel beautiful?
Thor grins wildly. “I’m alive. Is there any other way to feel but beautiful?”
All things considered, the Avengers are a mess of personalities and abilities just as much as they are a mess of scars, missing limbs, and prosthetics. Perhaps you’d expect the humans and superhumans who protect our galaxy to be in peak physical condition - and in a lot of ways, they are. In most ways, though, they are just like us.
No one is perfect - not even a superhero.
#avengers#avengers headcanon#avengers fiction#avengers fanfiction#fanfic#age of ultron#endgame#tony stark#bruce banner#bucky barnes#steve rogers#natasha romanoff#thor odinson#loki#pepper potts
868 notes
·
View notes
Photo

Here is the second hat I designed using @sionnachyarns beautiful new Aran base (which is coming soon). I called this one the Burren Beanie, in a nod to Sionnach Yarns' location 🙂 Would anyone fancy test-knitting it? It's quite a quick knit, as the pattern repeats over 8 rows (and 8 stitches). It's knit on circular needles, and takes 100g of Aran weight yarn. (And you can use this very yarn if you get in touch with @sionnachyarns ...) #aranknitting #aranaccessories #sionnachyarns #testknitterswanted #testknitting #testknittersneeded #nevernotknitting #knittingdesign #knitstagram #instaknit #tricot #sticka #strikking #strikk #knitting #irishknitting #burrenbeanie #cableknit #cableknithat #makersgonnamake #newdesign #irishdesign https://www.instagram.com/p/CHsmVdqpLv2/?igshid=33hha8oikych
#aranknitting#aranaccessories#sionnachyarns#testknitterswanted#testknitting#testknittersneeded#nevernotknitting#knittingdesign#knitstagram#instaknit#tricot#sticka#strikking#strikk#knitting#irishknitting#burrenbeanie#cableknit#cableknithat#makersgonnamake#newdesign#irishdesign
1 note
·
View note
Note
Hey Jo, how does one get into knitting or embroidery or crocheting????? You talk about it sometimes and I would love to get into it but alas I know nothing
Thank you so much for asking this question! I loooove talking about this stuff.
The best way to learn any of these crafts is directly from someone else, because you can have your questions answered right away, and they can help you fix your mistakes before they become problems. If you know someone who crafts in the ways you’re interested in, don’t be afraid to ask if they’re willing to teach you! I personally love showing people how to knit/crochet.
But if you don’t know anyone (and you can afford it), places like JoAnn’s or your local yarn store often offer beginner classes. Youtube is also great!! I’m currently learning how to make socks from a youtube series. Just be sure that if you go this route, you’re watching videos that correspond to your handedness until you’ve got it down pat.
I haven’t done much embroidery. I mostly just admire it, because I find it beautiful but exhausting. It’s significantly more time consuming than knitting or crochet – you sit for hours and only get a few square inches of color out of it. (This is also true of knitting socks, however.) You’ll probably stab yourself much more frequently, too. But if you find such things fulfilling and that’s where you want to invest your time and money, there are plenty of how-to’s on youtube!
I’ll let you choose what you think would be best to start with. Here are the basic materials you’ll need for each!
Knitting:
Knitting needles! I recommend starting with straight needles in size 8 or thereabouts if you’re just wanting to try it out. They come in metal, bamboo, and acrylic. Which you go with doesn’t really matter, but some people have complained that metal is too slippery for their taste, and I’ve snapped several acrylic needles by accident.
Worsted weight yarn in your preferred color. Here’s a good guide to yarn weights – the little skein with the number is a symbol you’ll find printed on most (branded, not handspun/small batch) labels. I would start with acrylic yarn, since it’s cheap, but you can use whatever you’re drawn to.
Tapestry/Yarn needles, which are fat silver needles with a dull point and an eye big enough to draw yarn through. You’ll use it to weave your tails in after you’re done.
OPTIONAL: Point protectors, stitch markers, and a small crochet hook. Point protectors are little rubber stoppers for the ends of your needles. It saves you from stabbing yourself in the butt, and also from dropping stitches when you aren’t working. You don’t usually need them; I generally just stab my needles through the skein of yarn. As for stitch markers, they help you keep track of knitting/purling/turns/etc. You probably won’t need them until you want to start making things like socks, sweaters, etc. And you don’t have to get anything costly – I use tiny split keyrings and small safety pins. The crochet hook is especially helpful for picking up dropped stitches – I use my smallest hook for that, 1.5mm, but you can also muddle through with your fingers, or rip out a row.
How to cast on + How to knit + How to purl + How to cast off = Now you can make a simple scarf!
Note: There are two ways of knitting – English and Continental [comparison video]. I learned English, and am re-learning Continental because it’s faster.
Crochet:
Crochet hook(s). 4mm is a good middle-of-the-road size to start with. Unlike knitting needles, you only need one full set because they don’t come in different lengths, only different diameters. They’re usually about $2 per hook, but if you want chunky, easy-to-hold handles then the price can hike up to $7 each, and even more if they’re handmade.
Worsted weight yarn, see above.
Tapestry/Yarn needles, see above.
Stitch markers are, again, optional. They’re usually only necessary for circular/tube crochet, which is something you probably won’t start off with (but you can!)
How to chain, How to single crochet, How to double crochet
How to make a granny square. Make a few hundred of these and you’ve got yourself a blanket!
Embroidery:
Embroidery needles
DMC thread (draw an arm’s length out and separate the strands – six is almost always too many)
Fabric [how to choose a fabric]
Embroidery hoops. Wood is cheaper than plastic, but plastic doesn’t loosen as much while you work.
Thimble
Optional but recommended items include such things as a pin cushion, a needle minder, and a water-soluble pen for transferring designs onto fabric. I use a pencil.
Other advice:
The absolute best place to find knitting and crochet patterns is ravelry.com. You have to sign up to search patterns, but it doesn’t cost you anything, many of the patterns are free, and it’s a great way to organize your projects!
One thing to take into consideration is that if you’re a person with a somewhat short attention span, or who just prefers to have multiple projects going at once for whatever reason, knitting can be a huge pain. Your work has to stay on your needles until you’re done with the project, and since a lot of patterns use the same size needles, you either gotta buy multiples or you sit around working on a project until you loathe looking at it. With crochet, however, you only have one active stitch at a time, so you can just pull the working yarn out into a big loop, wrap it around your skein, and use the hook for something else without fear of it all unravelling!
If you’re planning on shopping at a big yarn store, Michael’s is almost always cheaper than JoAnn’s, and they always always always have coupons on their website. (As does Hobby Lobby, but they’re expensive and mean so like. Shop at your own risk lol.) Local yarn stores tend to be hecking expensive (needles I pay $8 for at a craft store cost $15 at my LYS) and they’re also often…..elitist. You wouldn’t expect something like this to be clique-y, but here we are.
If you want a low-key place to knit or crochet with other people, public libraries almost always have a group that meets every week or two. Look it up online or ask your local librarian!
I hope you find a craft that suits your fancy! Feel free to ask me more specific questions if you have them. :)
#that goes for everyone#i love helping people get started with stuff like this!#knitting#crochet#needlework#anonymous#replies
36 notes
·
View notes
Text
How to Knit a Scarf
• Number 6 super bulky Bernat yarn 108 yds. / 98 m two rolls 6.6$ ea. They're from Walmart. The 1st is blue green (royal blue) still know because I kept the paper. Second is rainbow of green. I don't know the color cause I threw the paper away. The name of the brand is Loops nd Threads. I returned it and got a second one of the same first one from michael’s for 10.81. Its 220 yrds.
• Size U.S. 11 (6.5milimeters) Boye needles fuisha walmart They don't need to be circular needles and they are 14 in. long I think.
• Two triangles to save your work 🔺️ 🔺️ mine are orange nd they cum with 4 -Michael's
• One yarn needle too sew $.99 (weave and knit) in your 2 tails (from the slip knot and) (I don't know what to call the other tail) at the end of the project. My needles are by loops and threads. Itll come with 2 They are plastic and baby blue from michael’s.
• I dont have a counter but if you want buy one so you know how many rows you have done. I don't have a gauge either. I'm pretty sure u don't need one. I think it's 8 Sts in 10 cm. for the top and bottom (length) so 8 = 10 x 10 cm in G & P stitch and 13 Rows in 4 in. for the two sides (widths) so 13Rs = 4 in. in. G & P stitch or just purl Stitch unstretched. Gauge is not fatal but it will affect finished size and yarn requirements
I dont know how long it is going to take but it should take you like 7 too 9 months. I've been working on it since Dece. 24, 2020 lol so almost 13 months
Here are links from YouTube that taught me how to make a slip knot, cast on, do the garter stitch, and cast off. https://m.youtube.com/watch?v=lsrAA4djRlA&list=LL&index=100&t=2s https://m.youtube.com/watch?v=KCgEUwESYZk&list=LL&index=99
https://m.youtube.com/watch?v=6dAE8o59Z8M&list=LL&index=98 https://m.youtube.com/watch?v=hM5M2Fu0RtY&list=LL&index=70 https://m.youtube.com/watch?v=ebNPtVePrh0&list=LL&index=68
https://m.youtube.com/watch?v=g07WscKAW-c&list=LL&index=66 https://m.youtube.com/watch?v=xJx5krxtPsI&list=LL&index=65
1. Cast On 20 - 22 stitches I recommend 19 or 20. *If you want too use a gauge after you have casted on 7 or 9 stitches and have used the basic knit stitch (GS) Too knit 8 or 10 rows to have 4-5 GRows to check if ur doing it right. in the video it says 3 inches* *and don't forget to cast off and sew in the beginning tail and the end one* To check if ur doing it right it should tell you on the paper when u buy your yarn. It's next to the size of needles you need to use. Now I never used a ruler to check with Number 6 yarn but, I did use a ruler to check with number 1 or 3 yarn. I did it correctly.
2. Garter stitch 4 GarterRows = 8 rows
3. Purl stitch 80 times = 40 PRs if u have 20 stitches or 22 like me. If you have all of your yarn and want too use it all you should have 80 = 40PRs I'll probably have 38 PRs = 76Rs Make sure to leave a long enough tail of yarn to add the new ball 4=2 - 84=42 = 80=40
4. Since you don't have any yarn anymore add your second ball. Change color or keep it the same. I'm having trouble adding new yarn to my scarf. But if you know how to plzz let me know and repeat step 3 BTW I've been ribbing on my 29th row or doing 2G,2P on the 28th nd 27th row. Okay I found out how too. Make sure you have 10 inches from ur first ball. Make a knot using the magic knot. The knot should be close too your first color. So 6 or 7 inches the knot and the first color should have a 5 inch tail too weave in the 2 tail ends at the end of the project. Then continue knitting. Here is the video that made this possible. thanks Bella Coco <3 https://m.youtube.com/watch?v=15hqoR0KJHA
5. PS 100 times or 120 to have 50 or 60 purl ridges. you can purl 2 rows and then garter stitch one and then purl 10 and soo on. Now I only did that one time and the second time I did that I messed up so, I don’t think you should do that. (If you want you can garter stitch 4 garter ridges to match the beginning of the project.)
6. Bind off all 22 stitches and; on the last stitch make a knot and; make sure you leave it long enough to weave in your 4 ends.
And I think ur done and you just finished my project (:
0 notes
Photo
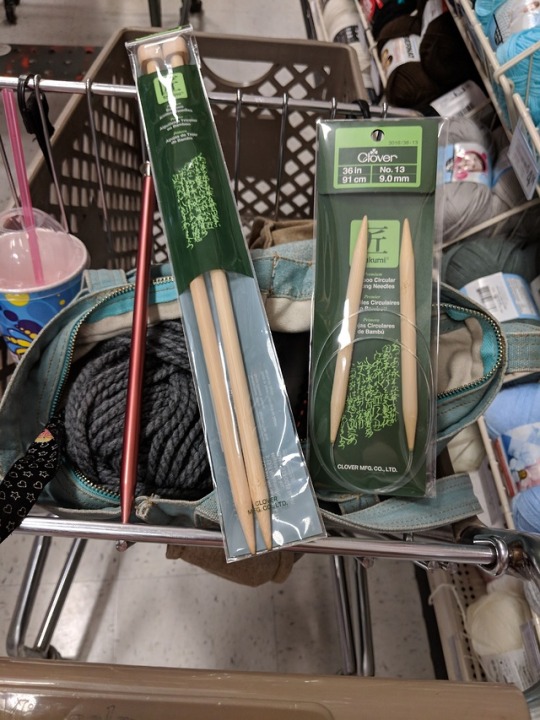
Yeah yeah I am spamming you guys today :p I don't care...lol Maybe I'll get a note before I finish shopping for the recommendation... But I definitely know I need a longer knitting needle because my current project needles are little short and while I project stays on the needles it's only a matter of time before I mess up because I wasn't paying attention... And have dropped stitches... Or I forgot to put a little rubber cap on my needle and come back to my project and find a quarter of the row off the needle But I can't decide if I should get the really long 36 cm- 14 in bamboo knitting needles or if I should go with the circular ones... I've never used circular needles before but I've heard they can be a godsend when knitting needles get too long and you end up poking yourself in the face... Or poking other bits of your body I'm assuming knitting a scarf with circular needles is no different than regular needles as far as the process goes... Because I figure I'll be here for a while (is there so much stuff I want to grab at but I have to show some self-control LOL) so feel free to give me any pros or cons or recommendations...
5 notes
·
View notes
Text
Hand-knitted socks "ESTERXAZI".

how to knit is available here
https://youtu.be/J-9gX2NQPm0
=======================
She:
Fortunately, the principle can be applied to virtually any size of sock, although it has not been tested
comprehensively, and extremely small or large sizes may produce unexpected results. I will refer to
a sock with 64 sts throughout the instructions, but I will give instructions on how to calculate the
design for a different stitch count. Please note that your chosen number of stitches should be a mul—
tiple of 4. If you have knitted a well fitting plain stocking stitch sock before use that as your base.
Gauge:
I have knitted my sample with a gauge of 8 sts and 11 rows per inch, but I think it is more impor—
tant that you should create a fabric that you are comfortable with rather than trying to match my
gauge.
Material:
This is a perfect chance to use up lots of leftovers of as many or as few colours as you prefer (and
of as many ends as you are prepared to sew in afterwards...). However, a self striping yarn with a
strongly defined stripe will also highlight the construction very well and will not leave you with any
additional ends to dam in. My sample sock weighs 35 gr, but you can make yours longer in the leg
if you prefer. If you are using a self striping yarn 100 gr will be plenty for a pair of socks.
Needles:
2 circulars in 2.5 mm or size needed to achieve the required result. I would not suggest to use DPNs,
and I probably would also not do them on magic loop, but feel free to try it out...
Cuff:
Using your preferred method, cast on 64 sts (or the number needed). Although I worked a 64 st
sock I actually cast on 72 sts for my cuff, as I prefer more sts in that area. The sock you see on the
front page has a long cuff of 40 rounds, but you could do a shorther cuff and work the upper part
of the leg just in plain stocking stitch if you prefer.
Leg:
If you have worked the cuff with additional sts, K 1 round decreasing these. Since I have worked
my cuff with 72 sts, I worked 1 round [K7, k2tog] 8 times to bring me to 64 sts. If your cuff already
has the correct number of sts just knit 1 round.
Round 2: P6, k to end
Round 3: K all sts
Round 4: P6, k to end
Garter heel strap:
You will now work the narrow heel strap over the first 6 sts of the round. To calculate how many
rows you need to work of the strap you need two bits of information:
- a quarter of your total st count minus 3. In my 64 sts sock, this means 13 (64/4 -3=13).
- the number of sts you would pick up along the flap of a regular sock. I normally pick up 20 sts
either side on my socks. If you have a preferred alternative use that, otherwise work with 20,
it should be ok for most sizes.
Add these two together and double it. In my case, this was 66 ((13+20)x2=66). That’s the magic
number you need.
row 1: SH, K5.turn
Repeat this until you have worked as many rows as we have just calculated. You should be ending
after a WS row, ready to work on the RS, and you should have half your magic number in garter
rows showing on the strap.
Sll, K2. This is the centre of the strap and the new beginning of your rounds.
Gusset, part 1:
With your first circular needle, k3. Place your first heel marker. Pick up a st in each of the slipped
stitches along the side of the strap, until you have picked up half your magic number of sts (33 in my
sample). Mark the next st with a piece of waste yarn. (This st will become very easy to identify after
a few rounds, as it forms the centre of the centred double decreases, but it helps to mark it in the
first few rounds.) Including the st you have just marked, K half the sts remaining from the leg. With
needle 2, K the remaining half of the leg sts and mark the last of these sts also with a piece of yarn.
Along the second side of the strap, pick up one st in each slipped sts, taking care you get the same
number as on the opposite side, i.e. half your magic number. Place your second heel marker, K3.
If you are working your socks in leftover stripes, the next round is the point to start working in
stripes. The width is totally up to you, but I worked my sample sock in stripes of 5 rounds. Continue
striping all through the gusset and the foot.
You will now increase between the heel markers in every other round, and perform a CDD for the
gusset in two out of three rounds. This will work as follows:
Round 1:
Round 2:
Round 3:
Round 4:
Round 5:
Round 6:
K to first heel marker, M1, sl marker, K to 1 st before first marked st, CDD, K to 1
st before second marked st, CDD, K to second heel marker, sl marker, M1, k to end.
K to 1 st before first marked st, CDD, K to 1 st before second marked st, CDD, K to
end (slip markers as you come to them)
K to first heel marker, M1, sl marker, K to second heel marker, sl marker, M1, k
to end.
as round 2
as round 1
K to end (slip markers as you come to them)
Work according to this 6-round repeat until you have reached 18 sts between your heel markers (or
2 more than a quarter of your original st number).
Continue in the sequence, but do not increase any further. You can discard the heel markers as well.
Effectively, you will work Round 2 twice, followed by Round 6 once. Do this until you have decreased
your instep sts to half your desired total number. This means the sts in between and including the
marked sts either side. By now, these will stand out prominently as ridges, so they should be easy
to identify. In my example I have worked until I had 32 sts over the instep including these two ridge
sts.
Gusset, part 2:
You will now work a classic sock gusset that will line up with the decreases formed in part 1.
Round 1: K to prominent ridge st. K that st, place first gusset marker, K to second ridge st,
place marker, K ridge st and K to end.
Round 2: K to 2 sts before first marker, K2tog, sl marker, K to next marker, sl marker, SSK, K
to end
Round 3: K to end
Repeat rounds 2 and 3 until you have decreased your sts to the number desired, Le. 64 or whatever
number you have decided on at the beginning.
Work the rest of the foot in plain stocking stitch, until you have about 2 inches/ 5 cm less than your
required foot length. I have stopped my leftover stripes 20 rows after the gusset decreases, but feel
free to stripe all the way to the toe or even through to the end of the sock.
Toe:
To place your markers for the toe decreases (if you prefer to use them), work first round as fol-
lows:
K 13 (or a quarter of your total minus 3), K2tog, K1, place marker, K1, SSK, K 13 (as before). Repeat
on Needle2
Round2: K
Round3: K
Round4: K
RoundS: [K to 3 sts before marker, K2 tog, K1, 5! marker, K1, SSK, K to end] on each needle
Round6: K
Round7: K
Round8: as Round 5
Round9: K
Round10: K
Roundllz as Round5
Round12: K
Round13: as Round5
Round14: K
Round15: as Round5
Round16: K
Round17: as Round5
Keep working Round 5 until you have a total of 16 sts. With a DPN, K 4 sts from needlel. Move the
remaining 4 sts from needlel and the first 4 sts from needle2 onto a second DPN. Move the last 4
sts from needle2 onto the first DPN. Cut yarn, leaving about 10 inches / 25 cms and graft the toe
closed. Turn sock inside out and dam in all loose threads.
. As I said before, the sequence and width of your stripes is up to you, they don’t even
have to be the same throughout the sock.
. You could work a regular cuff and work a bit of regular leg already in stripes, but keep
the first 6 sts in garter st to retain the coherence, and work the strip in the same colour
as the last stripe worked.
Glossary:
youtube
0 notes
Text
The Knitting and Crochet Post
Alright, so I’ve been posting a lot of my nerdy knitting and crochet lately and several followers have been curious about getting into knitting and crochet so here my own little master post about how to get started! Now this is just a very basic post just to help you get started, but all the sites I've used are great resources where you can learn everything else you need!
(List of resources at bottom!)
The beginning
So first things first, needles and hooks. Most craft store are going to carry 3 types: wood, plastic, and metal, as to what is best it’s going to be all personal preference. The first pair of needles I ever bought were wood so I just kept buying different sizes from the same brand (Clover). Some people swear by their needle/hook material, but really it’s just about what you get used to so just get whatever you feel like for now.
Knitting needles come in different sizes (they’ll have a number and a size in millimeters on them), crochet hooks have a letter and a size in millimeters.
Bigger is better to start (to a point). For knitting starting with something from 8 to 12 is probably best because it’ll be easier to see what you’re doing with bigger needles. Crochet hooks usually come in beginner packs with sizes f, g, h, i, j, and k, start with i, j, or, k.
There are also straight needles (exactly what you’d picture when someone says knitting needles), double pointed needles (pointy on both ends, used for making tube shaped things like socks, mittens, etc), and circular needles (like double pointed, but with a cord connecting them, great for tube things and blankets).
Yarn comes in standard weights too, you’ll see things like worsted or medium, but on the back of a skein of yarn you’ll see a picture of a yarn ball with a number printed on it (1 to 6+) along with what size hook/needle that particular manufacturer recommends for it. For now just buy a yarn in category 4, 5, or 6 and whatever size hook/needle they recommend.
Starting to knit
So you got some yarn and needles, now what?
Now you cast on your first row. Newstitchaday has a nice video here but it’s a little long and he does have a habit of over explaining, though it is the easiest way to cast on.
There’s a lot of ways to cast on
Here’s a guide with pictures for the basic cast on and it also explains the two basic stitches (knit and purl)
Here’s a video of how to knit the first row after casting on (with knit stitches)
Here’s the same thing but with purls
This shows how to bind off/cast off your work when you’re done
You can make a lot of things with just knowing how to cast on, knit, purl, and cast off. Yarnspirations.com has a lot of good free patterns and you can search by a lot of different factors. Here’s 203 free beginner patterns from them.
Ravelry is also a great site for finding patterns.
Knitting in the round is pretty simple too and you can start to make easy socks and what not pretty quickly.
How to knit in the round with double pointed needles
How to knit in the round with circular needles
How to do the invisible join in the round
You can do the basic cast on and off the exact same way as on straight needles.
Increases and decreases
Sometimes you need to add more stitches or take away stitches in a work to shape it or create gaps in it. Here’s the most basic ways to do that.
Basic increase (yarn over/YO)
Knit front back increase (KFB)
Knit 2 together
Don’t be afraid of patterns with other stitches! Knits, purls, YOs, KFBs, and K2togs are just the beginning! Newstitchaday and Craftyarncouncil both have great tutorials for literally everything.
Crochet basics
So many people start with crochet before knitting, supposedly it’s easier than knitting but I learned to knit first and I think they’re the same difficulty and its ll about what you get used to.
One of the main differences between the two is that in knitting you have an entire row of open stitches just on your needle vs in crochet each time you make a stitch (called a crochet) it’s a complete and closed stitch, ergo there’s not need to bind off.
Casting on is (predictably) very different, it’s called chaining (ch) in crochet and here’s how to do it (also used to make cords/ropes in a pattern)
Slip stitch (ss)
How to do a single crochet (sc)
Half double crochet (hdc)
Double crochet (dc)
Treble (tr)
Double Treble (dtr)
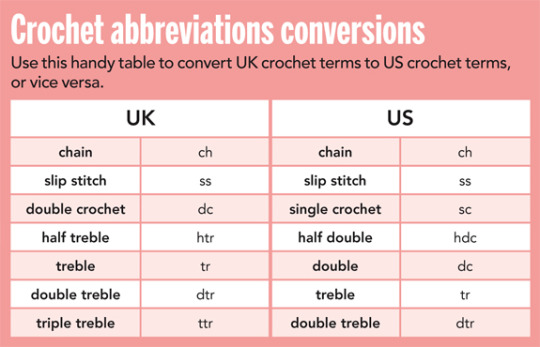
Treble vs double treble vs triple treble, what’s the difference? Mostly semantics, in the US we call it a treble (or triple), though in the UK it’s usually called a double treble. Make sure you always know if your pattern is in US or UK terms! Here’s handy chart of conversions (stitches I listed above are all in US terms)
Crochet in the Round
Crochet in the round can be used to make plushies, rugs, and a million other things and it’s just as easy as doing rows!
How to crochet in the round
There’s a million things I haven’t touched on, but all the sites used above have tutorials for everything. This is just a quick guide on how to start and some basic techniques to get you going.
Feel free to message me about anything and I can see if I can help with questions!
Resources
newstitchaday (how to’s)
lionbrand (how to’s and patterns)
craftyarncouncil (how to’s and patterns)
yarnspirations (patterns)
annie’s catalogue (how to’s and patterns)
ravelry (patterns)
46 notes
·
View notes
Last Seen Blogs

trcquotes
Tsubasa Reservoir Chronicle Quotes

plltheorymaster
Pll Theories

alexmonkey
Alex🎀

sidpah
Sidpah - Years of Onanism and Barbarism From This Distant Shore

qualitiesoftaste-blog
Qualities of Taste