#acrylic protective coat
Text

sulfurous in process


2 notes
·
View notes
Text
Discover the Power of CERA WALL PRIMER – A water-thinnable primer designed for cement and putty surfaces, perfect for elevating interior applications. Unleash the potential of decorative painting and acrylic polymer-based coatings with enhanced quality and exceptional coverage.
CERA WALL PRIMER: Elevate Interior Applications
User-Friendly & Easy to Apply
Alkali Resistance for Long-Lasting Protection
Superior Sealing Property for Flawless Base
Economical & Durable Choice
Good Moisture Resistance
Ideal Substrate for Acrylic Coatings
Enhanced Coverage & Stunning Finish
Unveil the beauty of CERA WALL PRIMER, your ultimate solution for captivating interior transformations. Unlock the potential of every surface, as it paves the way for extraordinary decorative painting and resilient acrylic coatings. With its remarkable advantages, this primer stands as a beacon of excellence.
E-mail us at: [email protected] or
contact us at 098404 80307
Cerachem #CERAJointcrylshine #Constructionchemicals #Environmentalfriendly #innovation #Economical #WaterproofingAdvantages #Durability #Protection #BuildingMaterials #Tileadhesives #Jointfillers #Drymixmortars #Waterproofingsystems #Admixtures #Repairrehabilitation #Flooringsystem #Protectivecoating #Marblerenewal #Sealercoats #ConstructionAids #Waterproofing #ConcreteEnhancement #ProtectiveCoating #ConcreteProtection #HighPerformanceFlooring #EnvironmentallyFriendlySolutions #TileGrout #EnhancedTileExperience #EnhancedBonding #ConcreteSolutions #FlexibleSurface #WaterproofingSolutions
#Discover the Power of CERA WALL PRIMER – A water-thinnable primer designed for cement and putty surfaces#perfect for elevating interior applications. Unleash the potential of decorative painting and acrylic polymer-based coatings with enhanced#CERA WALL PRIMER: Elevate Interior Applications#User-Friendly & Easy to Apply#Alkali Resistance for Long-Lasting Protection#Superior Sealing Property for Flawless Base#Economical & Durable Choice#Good Moisture Resistance#Ideal Substrate for Acrylic Coatings#Enhanced Coverage & Stunning Finish#Unveil the beauty of CERA WALL PRIMER#your ultimate solution for captivating interior transformations. Unlock the potential of every surface#as it paves the way for extraordinary decorative painting and resilient acrylic coatings. With its remarkable advantages#this primer stands as a beacon of excellence.#E-mail us at: [email protected] or#contact us at 098404 80307#Cerachem#CERAJointcrylshine#Constructionchemicals#Environmentalfriendly#innovation#Economical#WaterproofingAdvantages#Durability#Protection#BuildingMaterials#Tileadhesives#Jointfillers#Drymixmortars#Waterproofingsystems
0 notes
Text
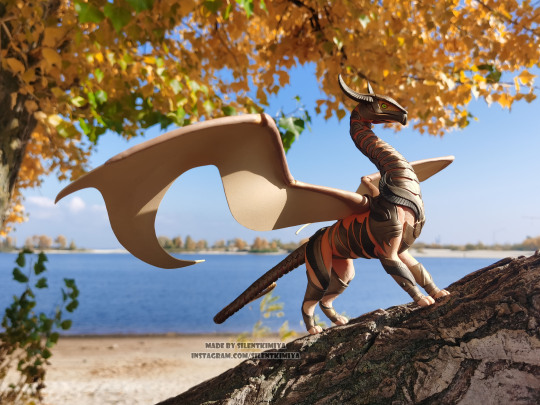
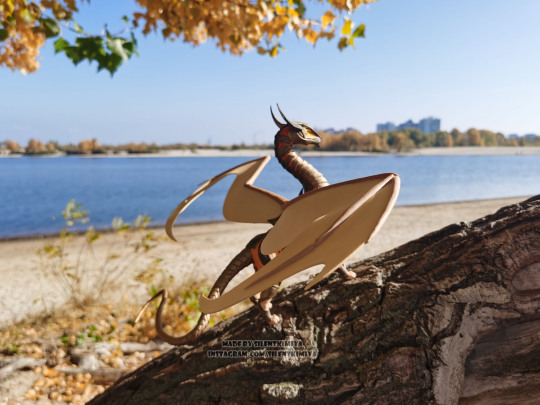
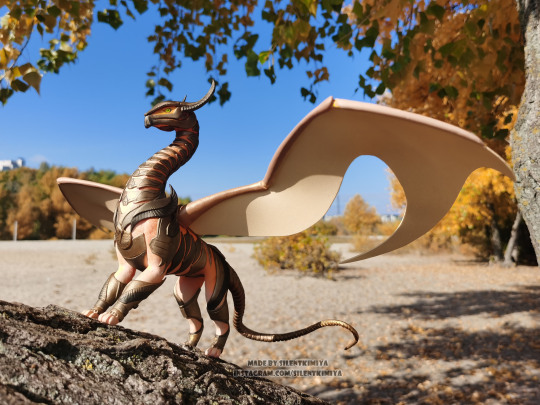
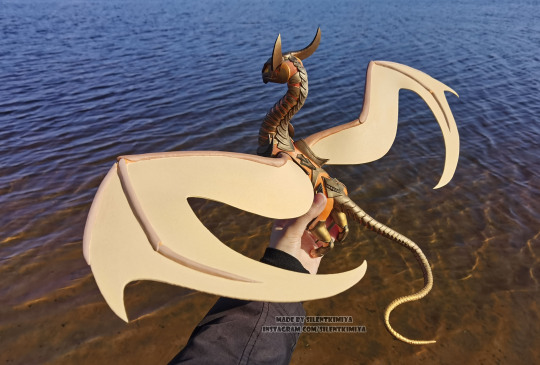
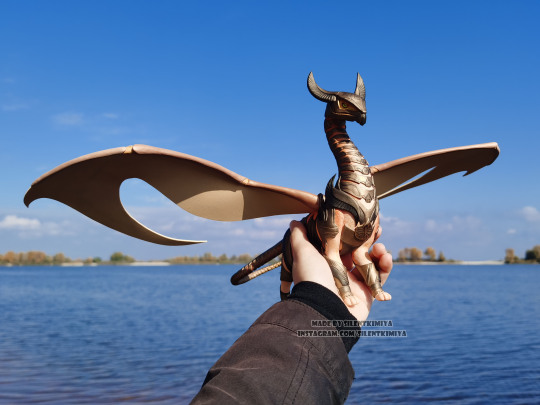
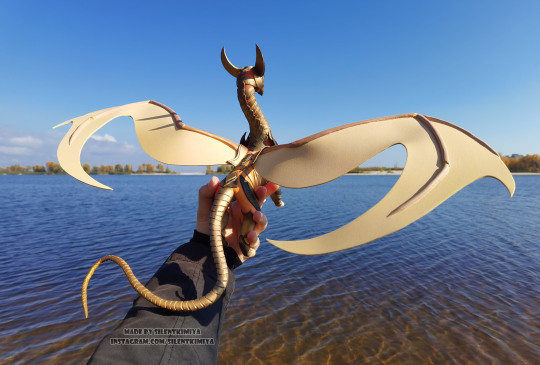


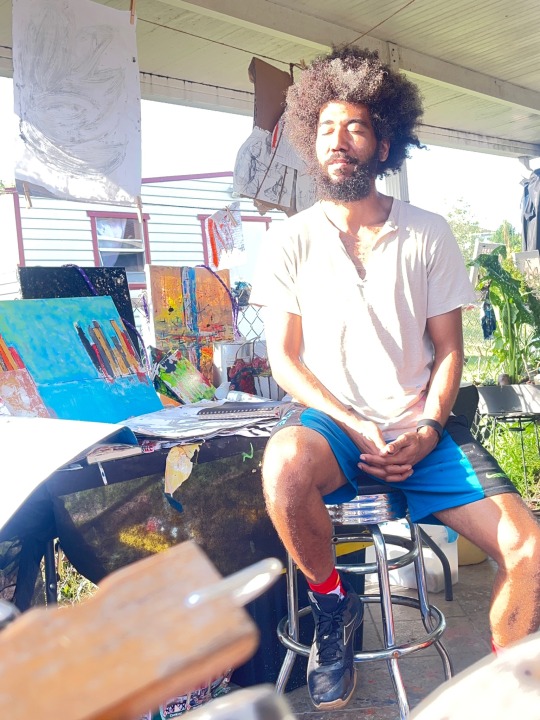
I just really loved his outdoor photo-shoot, so I just can't help but share these photos with you <3
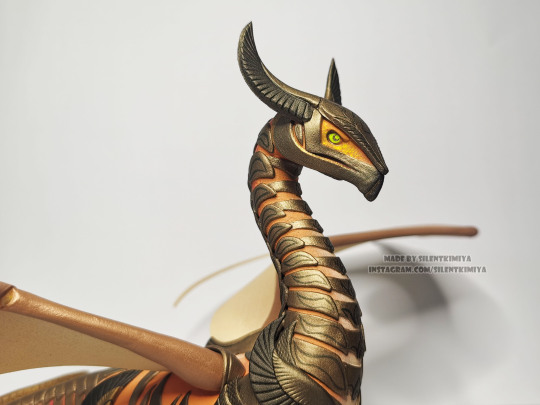
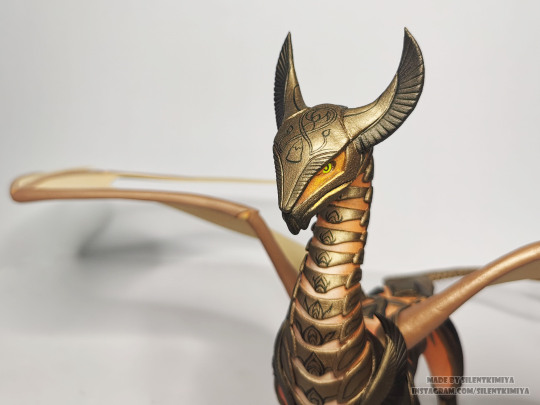
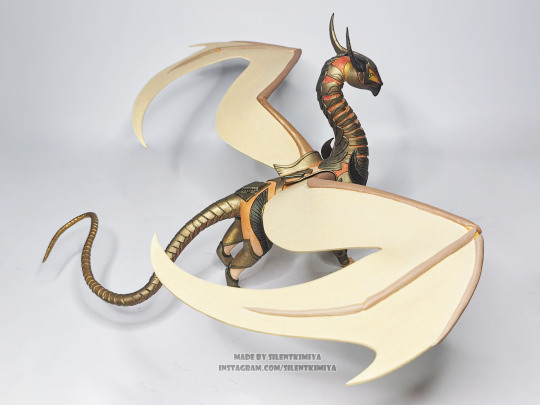
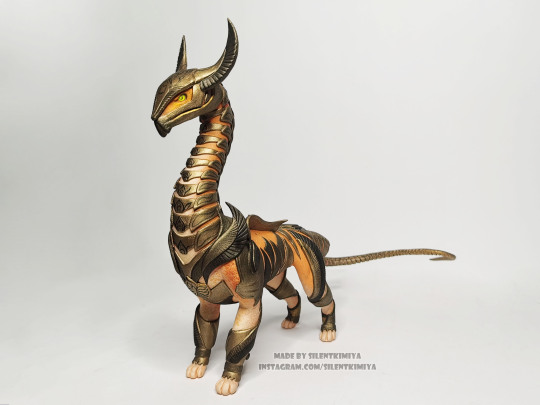
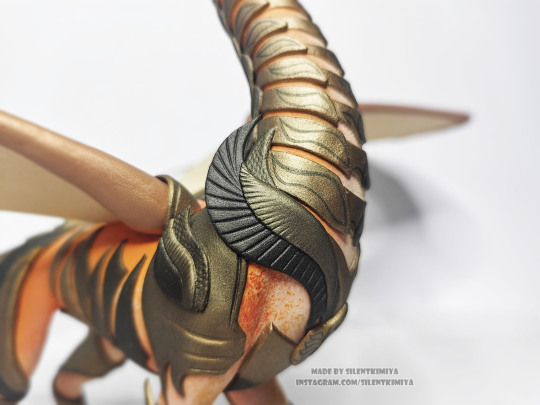
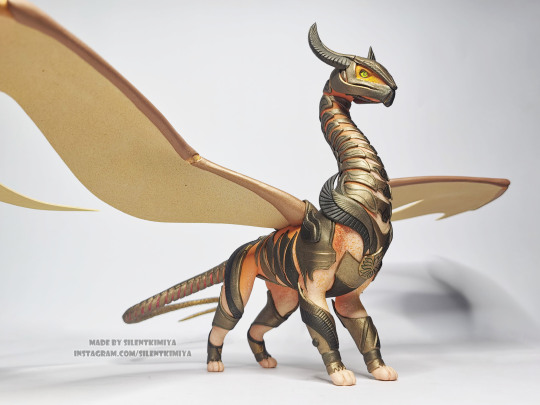
Ramos, Dragon Engine from Magic: the Gathering. One of the biggest sculptures I've worked on! 🐉
Made of air-dry clay, painted with acrylic paints and coated with a protective matte varnish. The sculpture was made to order.
Dimensions: 31 x 55 x 23 cm = 12.2 x 21.7 x 9.1 inches (length x wingspan x height).
#silentkimiya#sculpture#sculpture art#handmade#figurine#figure#outdoors#street art#statue#statuette#art#ooak#dragon#dragon art#dragon oc#ramos#magic#magic the gathering#mtg#mtg art#wow#ooakartist
132 notes
·
View notes
Note
Look. Just admit you're anti kink and fucking go. That's all your argument is. You're just pulling the "Oh think of the children" like conservatives do but using progressive language to hide it. You know damn well you don't actually care; you've just found an easy way to hide you being anti kink by coating it in feminist, progressive language
I helped run a monthly public kink demonstration with open play at a local bar for half a year. I am a regular member of an invite only pop up play dungeon, regularly attend the public dungeons, and have been invited into the private homes and parties of dommes who appear on the covers of magazines. I am in talks with the leader of the pop up group about using my perspective to teach classes about consent and acutally, edgeplay, the by in large topic of my post. I am not anti kink. I have a permanent mark on my ass from heavy impact play, and have been suspended. We own a strip of leather with a channel full of bird shot and Ive been wrapped by acrylic cans. I have discussed at length on this blog cnc and other forms of edgeplay and my understanding of safe kink in the past.
I was also groomed when I was 16 by adults who exploited my young interest in sadomasochism to get pictures of my pussy. Instead of excluding me from adult spaces, they encouraged me to identify with age play and pet play and use my naievitity to make a victim of me. When I was 18, I by my own will at the time considering kink to be a huge part of who I was, went to a munch. A 30 year old man propositioned me for play and sex even after I said "it's a school night". I did not realize that night why I deleted my Fetlife and felt so wrong, but it continued to haunt me for months later that Id felt so uncomfortable and the fact I was in highschool didnt perturb him. I am so greatful for my younger self, because I realized over the next few months that I couldnt jack off without tying myself off and Id never even had my first kiss. I did not return to kink for 3 years.
In that time I did exactly what I said in my post. I had shitty hook up sex with girls out of my league, gave bad blow jobs, went on cheesy dates at parks in midnight, showed off my dagger to a punk masc in the trunk of my moms tahoe 50 miles from home and went home at 7am. I had my first kiss, I realized I wanted flowers not just subjugation, and I realized when girls told me they wanted to date me for the first time ever- people loved me. I didnt jack off with rope for years. Until I was sure that I actually liked it, not just my groomers.
I realized I hate age play, its unsafe and gross. Its often used for exactly that, to groom young women, like I was. I cant get my pictures of my pussy back. I realized I love gay leather and it makes me feel masc in a way not a lot of things do. I found at the end of it all, restraint still turned me on, but this time I was gonna be safe. The first time I went back to the dungeon in 3 years was to a rope class. I wanted to learn shibari so I wouldn't hurt myself.
I dont always advertise all this, but I also have no shame admitting it, because I was the person I was referring too. I didn't take it too far, and allow my entire sexual life to be dominated by racism, rape culture, and pedophilia. I actually realized all the ways I had had my sexual freedom ripped from me. Kink is actually a massive part of my life, and I will always advocate for safe, healthy, responsible, and ethical kink. I will not be called a puritan or a reactionary for protecting what I love from a complete disregard for everything moral, and I will never EVER stop advocating for young people to come into their own not with the expectation that to be attractive is to take or to be taken from, but to give and receive equally, which youll find good kink is just this. Its not having a public ask blog at 19 asking strangers to send you death threats. Thats not kink its self harm.
27 notes
·
View notes
Text
Sandman, Morpheus, Dream Of The Endless sculpture.
This is a handmade figurine of Morpheus, also known as Sandman, a character from DC Comics. Measuring 9 cm in height, 9 cm in length, and 6 cm in width, this figurine is crafted from polymer clay and hand-painted with acrylic paints. Every detail of the character has been carefully sculpted to capture his essence. After painting, the figurine was coated with varnish to protect its colors and ensure longevity.
#thesandman#the sandman#morpheus#thesandmansculpture#neil gaiman#the sandma nart#dream of the endless#sandman fanart#sandman
20 notes
·
View notes
Text


ONE BREATH !!
!! kth x m!reader
!! wc | 2.9k
!! tags | artist!tae, athlete!reader, high-school!au, swearing, talk of death, suggestive

[ event masterlist ]
non-believer soulmates
fake not-dating
“give me your hands. i don’t care. give them to me.”

at the edge of the city, where the thick blue haze of a late spring evening drapes over skyscrapers and bright company logos like a winter coat, kim taehyung kisses a pretty boy. he has a gorgeous laugh, and a slightly too-tight white shirt that rides up to reveal a sliver of hip above a black leather belt, and he's spent so long pressed against taehyung that he smells like him. the boy has the same deep constellation of dark gold freckles on the edge of his knuckles as taehyung does, but does not paint over them with makeup like taehyung.
"you're amazing," you whisper, eyes locked on his as he hovers above you, one hand on your chest and the other arm braced against the cool grass. the picnic blanket exists for a reason, but taehyung doesn't wish to move.
"thanks," he chuckles, tracing the outline of your jaw with a touch as light as air. it tickles. his smile glows in the moonlight. "i could kiss you forever."
"forever sounds like a long, long time. you think they'd find our bodies up here?" you ask.
he smiles and sits up, placing your head on his thigh. "no. this is our place. our secret. above the city, off a hiking trail on a ledge that might crack off and kill both of us without remorse..."
he plays with your hair. "i would jump off a cliff if it meant jumping off with you."
"that's dangerous talk, baby," you murmur, gazing up at him. "if both of us die, how are we supposed to be together?"
he loves with his whole body – he loves with tight muscles wound like springs, with giggles and whispers behind palms, with steady breaths turned wobbly from a glance.
"how do you know we won't be?" he retorts. his gaze flickers to the old wooden fence along one edge of the small clearing, overburdened with vines and wild berries. "if i have to be mentioned, i would like it to be in the same breath as your name. that way, we would be together forever. we come as a package."
you gaze up at him, all bright smiles and wondrous laughter, and catch his hand to place over your heart. "only you can make a vicious death full of shattered bones sound so romantic. wanna make out?"
"absolutely," taehyung replies breathlessly. "but if we do fall, don't let go of me. i won't let go of you. promise me."
artists love like death loves, and you seal the promise with a kiss.
—
"you know, taehyung-ah, you should bring that boy around," his mother suggests idly, reaching across the table to place another dinner roll on his plate. he accepts one, but she tries to give him another, and he protects his plate with an alarmed flash of his hand. she pushes the lightly-golden roll against his knuckles until he caves and she smiles victoriously.
"who?" taehyung ventures. beneath the dinner table, he rubs his palm against the crinkled acrylic smears of colour on his jeans.
"the one you're daydreaming about right now, of course," she says, so matter-of-fact that taehyung almost forgets to blush. she takes the bread taehyung's younger siblings are squabbling over and breaks it in two without so much as a blink. they quieten and she hums. "he's such a sweetheart. he picks you up every single day, honey, and he's not at all hard on the eyes – you must think so too, or you wouldn’t have painted him like that on your sketchbook. oh, what's his name, again?" she snaps her fingers. "yn! that's it, isn't it? the lovely boy with your freckles on his hand?"
she draws a circle on the side of her hand. taehyung places his under the table, away from her prying gaze, and sighs. "he's just a friend – seriously. you're reading into this way too much. so what if we have similar marks? don't tell me that i have to marry the girl at the grocery store with a freckle on her lip."
she waves her hands, dispelling his arguments like a cloud of cigarette smoke. "that's not the same, dear. you and that boy – when you get married, you come and tell me first, okay? i want to hear all about it!"
"eomma," he whines, "we are friends. please don't make this weird."
"and what should i tell our friends – that my handsome eldest son is an available bachelor? they'll be swarming us – swarming you – with their most compatible daughters, and you will have to tell them that you don't like girls two hundred times. can you keep the smile on your face for so long?"
he sighs, cracking open the bread roll with his knife and buttering its warm inner goodness. "i don't know."
"well, with that attitude, you'll be marrying their daughters in a week." here it comes. "you should really bring him to the party."
"eomma, i told you—"
"just as friends, then!" the inflection on friends twitches slightly, and taehyung wonders if she suspects. "you would look so handsome on his arm, taehyung-ah. i'll come suit-shopping with you – and your father, too, if he can find some time away from work."
he munches on the dinner roll sullenly, teeth ripping at the fluffy white bread and shredded meat. "i'm just arm-candy? smile and wave, let hyung do the talking for me?"
"you must admit, you'd do a fine job at it," she teases, and he scoffs a laugh. her voice softens. "i'm being serious, taehyung. you should bring him to meet us sometime – he's such a big part of your life, yet i haven't exchanged more than a single word with him. at least do your mother this one favour, honey?"
he sets down the stuffed bread, running his thumb over the edge of the scattered freckles. he purses his lips, a transparent play at annoyance.
"fine," he says, and his mother's face lights up. "on one condition. i won't pretend to date him, and i have no concerns about starting arguments regarding who i might marry."
"that's two conditions," she notes, "but all right. i can work with that. you tell that good-looking friend of yours to match his tie with your suit."
his brow furrows. "why can't my tie match his suit?"
—
"i look like a bitchy ken doll."
"don't be so negative, baby," you whisper in his ear, smiling at a passing elderly man. he strolls by on his walker and grins with missing teeth, lifting a wrinkled hand in a wave. you lean towards taehyung again. "you look stunning."
he rolls his eyes and hides a smile in your bicep, both hands hooked loosely over your forearm. "is that why you insisted on walking behind me?"
"oh, yeah. absolutely ravishing view."
"shameless," he murmurs, straightening up and loosening his grasp. he places them in the pockets of his slim, hot-pink trousers, casting a careless gaze over the sunny mixture of family and friends. your fingers graze the curls at the back of his neck and he knows you feel his shiver – that playful smirk tells it all.
instead of reprimanding you – as he has been for the last thirty minutes for dropping your gaze too low and staring at him lovingly from across the yard – he smiles and steps closer. he fixes the knot of your pink tie and smooths slender fingers over your notched lapels.
his tongue darts out over his lower lip, no more than a tease of rosy pink. his gaze flickers up through his lashes, his hands still on your chest.
"you clean up well," he hums, sliding his hands over your stomach and sides with the guise of smoothing the dark jacket. "but i think you look a thousand times more dashing in your leathers. that helmet, too – makes me surprisingly warm, given that i can't even see your face under the visor."
after a quick glance around, your easy grin drops once into something darker, heavier. you place a hand on the side of his ribs – not too low to be immediately romantic, but intimate all the same.
"really?" you say thoughtfully, though your gaze promises something far more exciting. you run a finger along the collar of his ribbed black turtleneck. "well, we've been here long enough. i'm sure we can get back before your mother notices us – we'll pretend i had a wardrobe malfunction."
taehyung nearly purrs and rakes his nails down the centre of your chest, catching on the buttons of your shirt. his breath is warm on your neck. "oh, after me, you won't have to pretend..."
"taehyung-ah, where are you? i want you to meet my daughters!"
you jump apart just as one of the family friends steps around the door to taehyung's bedroom. the woman glances between you, puzzlement flickering over her features, but taehyung gives her a dazzling smile, stepping away from you and hovering a hand over her shoulder blades.
"of course. i'll be right along with you."
he pauses in the doorway, glancing back with a meaningful eye-widening and a finger pressed to his lips. later, he mouths, before disappearing around the corner and down the stairs.
you sigh and lean against the windowsill, glancing out into the backyard below. taehyung, a sparkling hot-pink star, speaks to two sweet-looking girls while a carousel of children whoops and screams around his ankles. one grabs his belt with surprising speed and force and he keeps one hand gripping his belt ferociously as he pries the child's chubby fingers off.
you watch with a small smile as he bobs down to the boy's level, hands on his small shoulders. his expression is firm but gentle as his mouth moves, and the child slowly shakes his head. they pinky-promise, and taehyung lets him run back to his big sister.
"you're good with children," you comment the next time you find him, huddled away on the veranda with a can of coca-cola in one hand.
he turns with a growing smile. "you think so?"
"of course," you say, coming to stand next to him with your hands in your pockets. he crouches to watch a ladybug shuffle slowly across the step towards a flowering bush. you glance down at him, tilting your head to catch a glimpse of his face.
he's smiling, rather too broadly to be at a simple ladybug. shifting your weight onto the other foot, you rest against the rail and don't mention it, though your chest warms.
"i think my mother knows," taehyung says eventually. the last sliver of red disappears under a leaf and he brushes off his thighs as he stands.
"knows what?"
"about us," he clarifies, swirling his can of cola like a glass of wine. he taps the rim gently, gnawing on his bottom lip. "she always wants to meet you."
"she did, today," you hum. "she's really nice. i don't know why you didn't introduce her to me earlier – she practically glows when she talks about you."
"but she adores the whole 'soulmate' bullshit," he mutters, kicking a pebble with the tip of his glossy black shoe. "she'll obviously point out our hands and say that we were destined to be together."
your smile softens. you nudge his shoulder with your own. "we can always insist we're not dating. i'll go kiss a few people, you'll go kiss a few people, and voila."
"i don't want to kiss other people," he mumbles sulkily. "i wanna kiss you. besides, even if we kiss randoms and then tell everyone we're together, she'll just say 'i told you so' even louder."
he shakes his head and lifts the can to his lips. "i don't want everyone to think we're only dating because we're 'soulmates'." he crooks his fingers in air quotations. "love is a lot more than finding the other end of the red string. it's hard. it's a choice. i can keep loving you, for years and years and years, because i choose to keep going and work things out, but i can't do the same with infatuation – because what do you do when the puppy love fades and the arguments get sharper? stop loving them? break up? be sad forever because your soulmate eats like a camel and you can't stand it anymore? the idea of soulmates is an obstructive crutch."
your arm snakes around his shoulders. he sighs heavily against you, curling into your shoulder. "do you feel better, now?"
he nods, dark-chocolate curls nudging your chin.
"are you talking about me?" you tease. "do i eat like a camel?"
he exhales softly. "no... you have good table manners." his mouth twists. "eomma would love that about you."
the suburban streets are peaceful. the occasional car pulls out of a driveway. someone in shorts and sandals drags their bins up the side of their house.
he hums and stands on his own. your hand slips down to his waist. "thanks for listening to my monologue. you must think i'm crazy, ranting about love like i've lived an entire life full of it."
"you have." you laugh gently at his startled look. "eighteen years is an entire life. your entire life – up to this very second. i don't know about you, but i've been hopelessly in love with you since we were kids."
shyly, he runs his thumb over the cold rim of the can. "i love being in love with you," he whispers, finally glancing up. "is that a weird thing to say? i'm sorry. y'know, seeing you at school, playing soccer and rugby and running track or whatever else... i wondered, sometimes, if i had it all backwards. really – i don't like running. i hate being tackled. why would a greater being put us together when we barely have anything in common?"
it takes a while for you to respond. "we don't. not anymore. but i broke my green crayon and you let me borrow yours, and i still love you for it. you didn't know who i was – i could've broken yours as well, but you still lent it to me."
"you're over-analysing it," he says, but the words are thick in his throat with emotion. he leans into your warmth as a breeze wafts by, placing his can on the railing. "i was four and always taught to share my things."
"i'm happy that you were the one who happened to have a spare." you smile, but it's almost a wince. "ouch. i'm starting to sound like your parents, huh?"
"it's okay, hyung. it... almost sounds good when it comes from you."
his eyes are liquid gold in the sunset. his lips are strawberry clouds. he grabs your lapels and tugs you in – you melt like sugar at the warm sticky sweetness of him, and the summer heat wraps around your bodies as he pulls at his turtleneck.
"it's so hot in this," he murmurs, tilting his head to the side and loosing a content sigh as your lips trail up to his earlobe. "can we go, please? we'll go to our spot. they won't notice – they've got ten sugar-fuelled children to chase after."
"can i change your mind?" you end your journey at his lips. he hums, fingers hooked in your belt loops. "baby, you can't keep running forever. do you ever want to introduce me to your parents properly? because, yeah, i'll go rock climbing with you, but i also want to kiss you when we reach the top, and you've always said you hate having to hide it. hide us. why don't we just... show them? who cares what they think?"
"'who cares', hyung...?" he turns his temple into yours, closing his eyes. "i want them to know we're more than some stupid matching freckles. i don't want a novelty soulmate relationship where the only thing people talk about is the proof of compatibility. i want people to see us, and i want them to know that i'd love you just as deeply without these marks."
you cup his cheek and he kisses the softness of your palm, pushing into it. "they will, taehyung. i promise – they'll see us and jealousy will grab them by the throat. i swear it."
taehyung lifts his pinky. you grin and hook yours around his, shaking on it with great gravitas.
he inhales deeply and holds out his hands, palms up. he shakes them impatiently. "come on, then – give me your hands. i don't care. give them to me."
you slide your hands into his and he squeezes them, lips tightening with resolute determination. he presses a kiss to your cheek.
"they'll know who we are," he whispers, "and what we are. they'll know our names and how they fit perfectly together – all in the same breath."
you laugh softly, swinging your hands between your bodies. the identical freckles seem to shimmer but all you can think about is the soft, saccharine taste of his lips. he grins, too, reckless and bright. "don't let go of me."
"i won't let go of you," he promises, and the sweet ring of it against the glass echoes deep in the lava-white bones of your souls.
#1k event#taehyung#kim taehyung#taehyung x male reader#kim taehyung x male reader#taehyung x reader#bts x male reader#bts x reader#kpop x male reader#x male reader#male reader#m!reader#bts fanfic
244 notes
·
View notes
Text
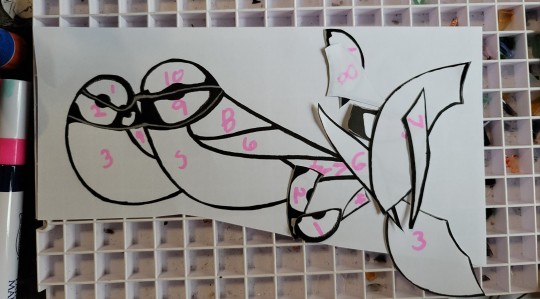
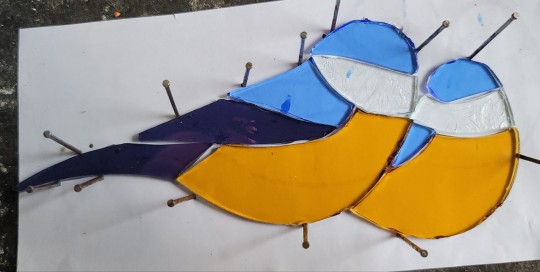
Stained glass tutorial bc the birds are good for it.
The tldr with more resources and a few video tutorial links is here (link)
this is our target and this is our pattern:

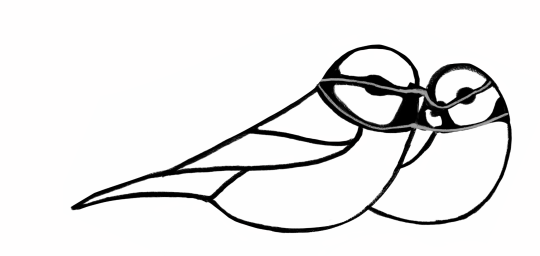
if you're wondering why I'm just handing out the pattern to a piece i plan on selling, the answer is because all stained glass pieces are their own pattern. By posting the image of the piece i already gave you the pattern to it.
What you need:
1 sheet of printer paper,
scissors,
glue stick or a washable marker that works on glass,
grozier pliers,
curved jaw pliers,
glass cutter,
flux and something to apply it with,
60/40 acid free solder,
copper tape,
gloves,
eye protection,
soldering iron with stand and rheostat,
water proof sand paper or waterproof nail file,
black patina or black acrylic paint,
some kind of heat proof surface to work on. I use asphalt coated compressed fiber board because it was cheap and easy to get at the hardware store
a well ventilated area to work in. or a table set up outside, which is the most well ventilated area you probably can access without a key card to a chemistry lab.
finally: 1+ panes of translucent/cathedral glass.
if something is not pictured in the below image it's because getting it meant fighting my cord management or standing up to go get it. The white waffle grid thing is not necessary. It just makes clean up easier so I'm using it and also i was too lazy to move it. a box of nails is pictured, they are also helpful but also not necessary. especially if you are not using something you can easily push them into as a work surface

I'm just using my normal glasses for eye protection, you don't need anything super fancy but you do need something to stop any flying shards.
Anyways. Soldering and finishing is in a reblog of this. i needed more pictures than you can put in a single Tumblr post
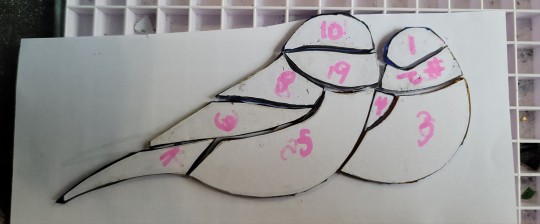
Step 1 Pattern Prep
print your pattern out. once if you are just going to use a marker to copy it onto your glass, twice if you are going to glue it down to use that way.
you may notice my pattern is backwards. That's because i printed it out wrong and can't be fucked to go fix it. Anyways.
Number your pieces in the same order on both copies if you are using the glue method, for such a simple pattern it's not uber necessary but it's a good habit to get into. Larger and more complicated pieces rapidly become broken glass jigsaw puzzles if you don't.
Step 2 putting the pattern on the glass
the way you make the glass the right shape is by using a glass cutter, that bronzy thing with all the tape around the barrel to make it easier for me to grip. the way it works is it holds a very thin metal disk that you press into the glass to introduce a fault line the glass will hopefully want to break along. I said hopefully for a reason.
All cuts have to go from one edge of the glass to the other because that's what the crack will do when you break it. Keep that in mind while you lay down your pieces. I've used a marker to show how i plan to cut this pane but unless you're doing a tricky cut order you don't really have to do that
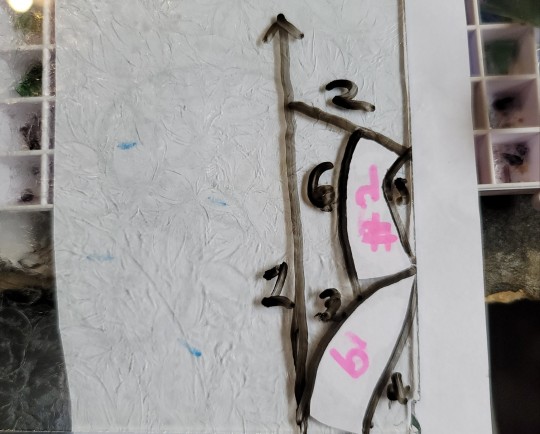
I'm using what i have on hand so how you lay your pieces out will probably be different if you've bought whole panes to work with. This is a much more wasteful way of doing it than i normally would, but the goal with this one was to produce a piece that doesn't require a glass grinder as those are an expensive thing to get when you're just starting out.
Also plan to cut on the Less textured side of the glass, the texture can get in the way. if you would like the texture to be on the front of your finished piece simply glue your pieces upside down onto the smoother side. also know that less textures glass is easier to use
I didn't have any more of that darker grey blue so I'm using a light bluish lavender piece instead. it looks brown because of the the yellow underneath it
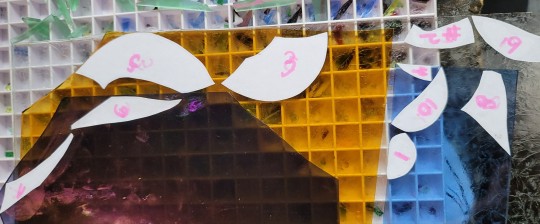
step 3 cut the glass
take a piece of preferably translucent glass and practice this step a few times before doing it on your project.
Press the wheel at the end of the stylus firmly against the glass at one edge, the keep pressure as you push or pull your line. you will know if you're using enough force because clear glass makes a very specific noise when it's being scored. I can't describe it but you'll know it when you hear it. you'll also be able to see the score line from some angles, it should look like a very fine crack in the glass. I've also heard it described as "like a white hair has been set on top of the glass". do not stop, lift your cutter, or go backwards over the scorline you have already made. The crack is a Lot more likely to go off course and destroy your piece if you do.
do only one line at a time before using the grozier pliers to break the glass.
there should be a line on the silicone protector things on the edge of you pliers, hold them so that that mark lines up with your score line and apply pressure , start light and slowly increase until it begins to crack. If the crack immediately runs the whole length of the pane then your done, if it doesn't, rotate the pane and do the same thing on the other edge of the glass until it starts cracking from there too. if it Still doesn't meet in the middle help it along by tapping along the uncracked part of the score line with the tip of your pliers handle until the crack finishes the job. If it's a very long straight one you can also use the edge of a table to encourage the crack to form in the right place.
if the crack decides to go off your scorline just finish breaking that score line and then peel off your pattern piece and reposition it to try again. if you used something like an Elmer's glue stick you can reactivate the glue with a Small amount of water dabbed over the pattern piece with your finger.
Once you have most of the glass broken off use your curved jaw pliers to very carefully nip away at any extra bumps. like half a millimeter at a time, don't just bite into a big chunk, itll shatter the piece. The flat side of the jaws is used to leverage the piece against to break it that way. it's helpful to pick an orientation for your pliers and just commit to always holding them like that. with the flat jaw either up or down. It'll help you build the muscle memory and learn to use them faster.
enjoy your pile of broken glass and dream about the grinder that wouldve made this easier.
Step 4 grinding deburing.
use your water proof file or sand paper to to knock any little bits of broken glass off. it is Vitally important that you do this with the file Wet. glass dust likes to float on any little draft and it's Super not good for your eyes lungs throat or nose.
You can also take the time now to refine the shapes and sand off any little nubbins that are in the way.
once you're done use a little dish soap to remove the pattern and any grease or glue left on the piece. if you need to re number the pieces.
Step 5 Foil
foil comes in a handful of sizes, and in silver, black, and copper backed. The sizes determine how thick your leading will be, thinner foil, thinner lines. With art glass or very textured glass you may need to go up a few sizes to make it fit. The color on the back will be visible through clear glass so you might want to pick one that vibes with your colors. I'm using what i had, so i don't actually know the thickness. It is copper backed tho.
take your piece and your roll of foil and place the edge of the piece in the center of the tape so that there's an equal amount of hangover on either side. then carefully roll your piece to wrap the edges in tape. being sure to keep it centered the entire way around. when you get back to where you started let the tape overlap itself by at least a quarter of a centimeter or like 1/8th of an inch. then cut the foil.
use your fingers to smooth the foil down over either side of the glass. and then the handle of your scissors or any hard plastic object to firmly press out any creases in the foil. The smoother you can get it the better. because that will make the solder sit flatter.
use the second/primary copy of your pattern for reference and lay out your pieces on top of it. If you're using nails and and a softer work surface you can press them into it around the edges of your pattern to keep the pieces from shifting. for a piece as simple as this it's not necessary but it still might help.
Soldering is next up but I'm posting from mobile and have an image limit to keep in mind. so that will be posted as a reblog in a bit.

117 notes
·
View notes
Note
How’d you get your nails to grow so long and healthy?
so, sorry in advance, this is gonna be a bit long.
First thing would be to avoid acrylics and other nail extensions that involve filing the nail bed. That fucks up your nails so much, even if your nail tech says it doesn't, it really does, they can become extremely weak. And I'm saying this from personal experience, I've only ever gotten acrylics once and it took me about a year and a half, perhaps more, after that and a lot of patience to get back to where my natural nails were before that. And the only way out once you've done that is cutting and starting from 0.
I think press ons are fine as long as you or your nail tech are really careful with how you do them. I mention this mostly because I understand how frustrating it can be to wait for your nails to grow, so press ons can help with that frustration without messing up your nails in the same way extensions do.
Oiling your nails helps a lot too, I use coconut oil on my nails, but I know jojoba oil is also really good.
The shape is kind of important as well, in my experience square shaped nails are more likely to break, I think it puts more stress on the nails, so I like to go for a nice almond shape as soon as they get long enough to shape.
I'm very careful with my manicuring, I change my nail polish multiple times a week and I can't guarantee mine is the best way to do it, but this is what works for me:
- I always start with removing the nail polish, washing my hands and cleaning my nails and then oiling them all over (and on the back of the nail) for at least 30 minutes before wiping off the oil;
- then I apply a base coat and mine is supposed to help keep the nails strong and help them grow (I don't know how much of that is true, but it works for me). Overall start with a good base coat.
- next is my colour, I apply no less than 3 coats of colour, every single time, no matter how sheer or how pigmented. I also don't use gel varnish, I use one that's a two step kind, so there's the colour -step 1- and the top coat -step 2-, the top coat helps it dry (it dries so quickly!! And stays shiny the whole time). *
- I'd keep your manicuring to 5 to 7 layers, 5 works just fine for me (1 of base coat, 3 of colour, 1 of the top coat). It gives me some security with using my hands (adding a little strength to my nails, because of the amount of layers, so it kind of protects them a bit from impact) and it lasts a decent amount of time. **
Oiling your nails at least once a day. I do it before I go to bed and it helps a bunch because I don't like the feeling of the oil on my skin.
Now, taking a "from the inside to the outside" approach:
if you can, check which vitamins your body might be needing, that might be in the way of your nails growing and making them weak. My body is always low on iron, vitamin d and vitamin c, so I've been adding them to my diet through supplements. If you can't be specific like that (I mostly am, because I have to see my endocrinologist for my diabetes regularly and he always asks for blood tests), there are supplements that are more general for nail and hair growth.
I hate saying this, but my diet has also been significantly better along with exercising, so that might have contributed to it.*** Which is to say:
eat some veggies if you can, drink your water, you know, keep it simple so it doesn't become overwhelming and don't restrict yourself (that can be a slippery slope), baby steps are already good enough.
Oh, also avoid opening things with your nails, like soda cans etc, use a spoon or something like that.
Also, if you can, leave your cuticles alone.
I think that's it and if I remember something else I'll add, sending you so much love ♥️
*this two step situation is slightly pricier than classic/regular polish, but way way way cheaper than nail extensions and even gel. So overall, maybe more steps, but also cheaper and I really enjoy having a "me time" doing my nails and use it as self care, so I think it's fun.
**I don't do my layers too thick, so they don't look weird, just enough to cover the nail.
*** I didn't start exercising and eating better for the nails, I'm just aware that that might have helped.
20 notes
·
View notes
Text
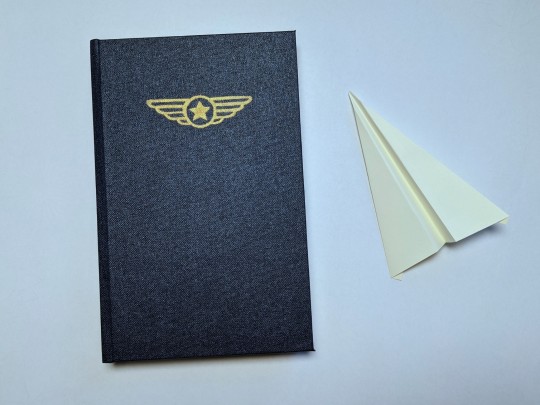


would you worship gravity by bitethehands
another steddyhands classic for the bookshelf.... really outing myself as an izzy enjoyer here hahaha
very very happy with how this boy turned out!! the airplane/pilot/airport motif really came through for me. i think these chapter titles are the funniest joke ever
the cover is "metallic midnight" bookcloth - another one i accidentally ordered So Much of bc i had no reference for how big a yard of bookcloth was... but actually i'm not too fussed because it's totally awesome! the metallic coating makes it feel much more protective than regular bookcloth and when i made mistakes the glue and paint could be scraped right off.
the endpapers are a marbled paper with the "bird wing" marble pattern (hehe get it.... its another plane joke...) and the cover design is gold acrylic i painted on with a hand cut stencil.
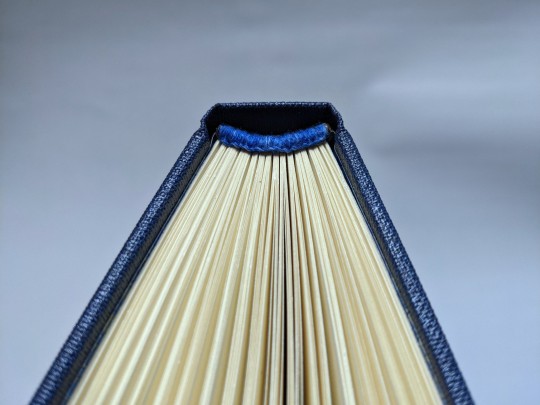
and the best part of the whole book!!!! i finally taught myself how make sewn-on endbands!!! and it was actually so easy!! i feel so bad i didn't do this for all my other books now haha but i guess that's just how learning works or whatever 🙄
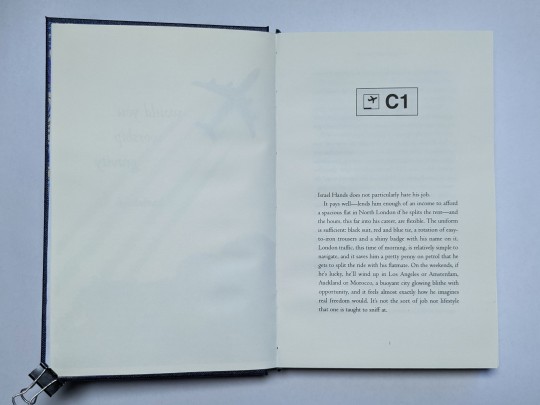
text is set in 12pt centaur with 16pt line spacing and 1-inch margins (1.25 on the bottom). i drew the title page art in procreate with my risograph brushes!
59 notes
·
View notes
Text
any ways
i really wanna decorate my cane
i wanna paint it but acrylic hardly sticks and im not even going to try watercolour or gouache
my friend did suggest using nail polish like a base to give the paint to stick on but im not sure how well that would work and i done exactly have a lot of nail polish i can spare like that.
i dont have stickers to cover it in either plus they dont last too long
anyone got any ideas?
the cane is a foldable metal cane, i can get some of the paint to stick for acrylic but it takes several layers and i only have so much
edit: thanks for input but im flat broke and sanding the surface is the only option i have ^^;
im gonna see about finding the sandpaper whenever i have the energy for it because i know my parents have some somewhere, then i can go back to painting my cane with acrylics

[ID: banner reading "This blog is protected by the De Rolo family and co." in all caps. It has an orange cloud background. On the left is the De Rolo coat of arms and on the right is the symbol of Vox Machina]
#cane user#disabled#physical disability#physically disabled#actually disabled#disability blogging#mobility aid#cripplepunk blog#cpunk blog#cripple punk#cpunk#cripplepunk#mobility aid user#mobility aids#mobility aid customizing#cane customizing
57 notes
·
View notes
Text
Okay, I could talk about each of these topics in greater depth, but I'll keep it boiled down or else I'll be typing for a loooong time. If anyone wants elaboration on the following steps or on any particular pieces I've done, let me know and I'll give more tips and tricks later :)
Apologies for the formatting, I'm still getting used to posting on Tumblr
-------------------------
Step 1: Clean up and prep
I start by sanding down leftover pieces and flaws in the model caused by the production process.
In traditional model kits, these are pour tabs, flash and seam lines.
For 3D printed, these would be pits or bumps left behind from supports and layers lines.
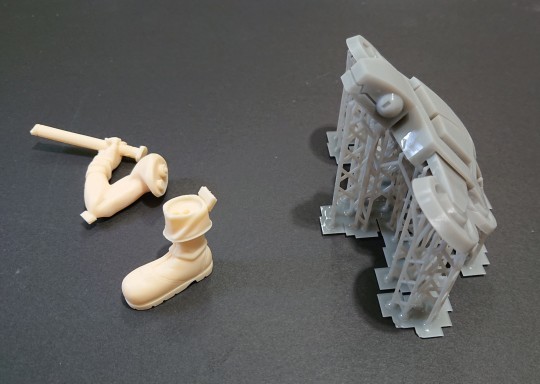
The arm and boots on the left are from a traditional model kit, and have visible tab chunks that will need snipping then sanding. S.H.E.L.L.D.O.N on the right needs his supports removed, then sanding.
Every piece (minus those with fine texture) gets buffed with 240, 320, 600 and 1000 grit sandpaper/sanding sponges (clear parts and any pieces intended to be painted with clear paints, such as character skin, are additionally polished with a melamine sponge, also known as a magic eraser).
This is to make sure the surface is level and uniform. Any bumps or scratches that aren't removed will show up in the final paint job.
(Note for beginners: It's fine to just remove production remnants and do a little clean up before going to the next step. All that prep is tedious! Just have fun with it for now!)
Step 2: Make sure the model parts fit well together.
It's very common for a model to not fit together perfectly right away. Dipping the model in hot water to soften it, then pressing the pieces together usually fixes this. Be careful not to burn yourself! Sometimes drilling and sanding is required.
At this point, larger model kits will require drilling and pinning, though most are fine being assembled later just with glue.
Step 3: Primer
I secure the pieces on clips to keep them elevated, and spray them in thin, even layers of primer. Primer is essential, as it is what makes the paint stick to the model.
- White primer: Best for anime and cartoon figures, makes colors pop
- Grey: For realistic characters, dulls colors down a little.
- Black: For metal or specialty products, like Armored Komodo pigments
Primer will make any unresolved blemishes become more visible, so I usually go back to step 1 until I get them all.
Step 4: Clear coat
For an even, level paint job, I spray a layer of Gloss clear coat on every piece, to smooth the surface even more. I skip this for finely textured pieces, so the details don't get filled in. Spray in a well ventilated area with protection!

There are many brands of clear coats. These are my favorites!
Step 5: Paint
I use three kinds of paint:
Lacquer: Expensive, take a little while to cure, must be thinned with a solvent. Sometimes hard to find. Offers lovely effects, is durable and sticks very well. Can be difficult to correct if something goes wrong. *HAZARDOUS, use in a well ventilated or outside area and use breathing protection!*
Enamel: A little easier to find, takes a long time to cure, which sometimes is a benefit, as it can level itself and provide a smoother surface. Must be thinned with a solvent, sticks very well. Most importantly, enamel can be used on top of lacquers and erased without damaging the lacquer layer. *HAZARDOUS, use in a well ventilated or outside area and use breathing protection!*
Acrylic: Great, vibrant colors, easy to find, very affordable! Dries very fast, even faster if you lightly use a hair dryer. Very delicate, prone to scratches and chips. Can be easily stained by other acrylic color. You only need water to thin it!
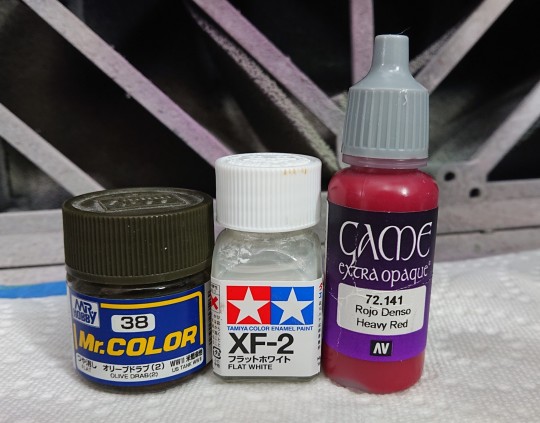
Left to right: Creos Mr Hobby Lacquers, Tamiya Enamel, Vallejo Acrylics
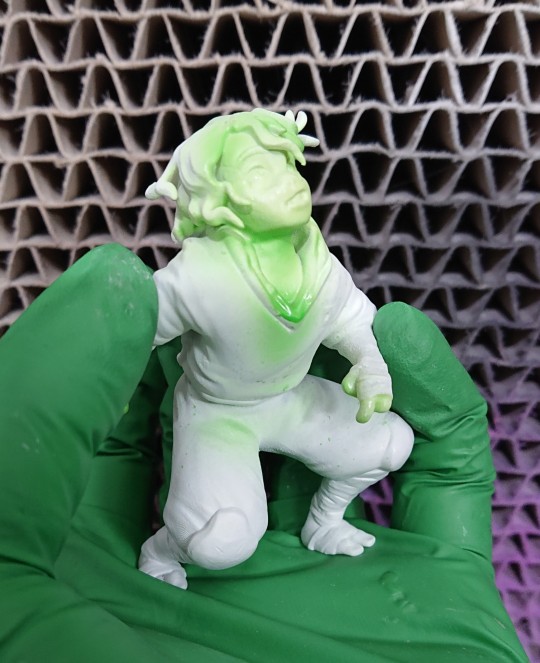
I usually start with the character's skin first. This is because I paint skin using built up layers of clear colors, to get a sort of 'glow' that shines through to the primer and differentiates the skin from clothing and hair pieces.
Afterwards and throughout the project, I 'save' my work by spraying a layer of clear Gloss or Matte spray. I use an airbrush, so to further protect other parts of my work, I cover the finished pieces in masking liquid and/or masking tape, before spraying the next color. Because Enamel can be easily wiped off of lacquers without affecting the lower color layers, I use this type of paint second. If you use Enamel first, you may run into issues with the underlying lacquer causing paint cracking in the future.
(Note for beginners: Using just acrylics is fine. :) I have painted entire models with acrylic paints obtained from craft stores and Walmart, and had very good results.)
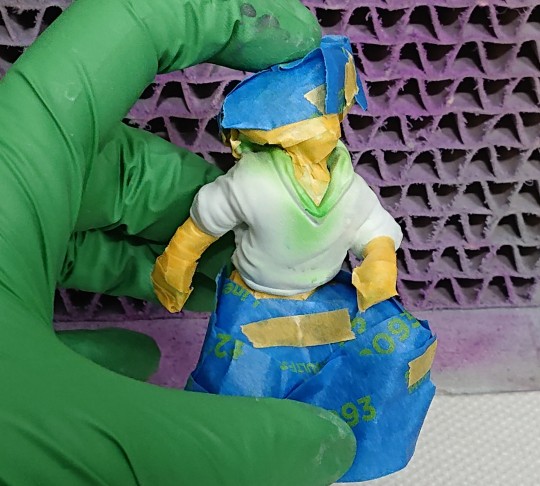
Despite my masking, some enamel paint leaked through on Casey's neck. Masking is rarely perfect, so expect to do touch ups after removal.
Step 6: Face eyes and details
...this is an entire essay on it's own, which will require another post. But I use layers of enamel for eyes, water color pencils for eyebrows, chalk pastels for makeup/shading and acrylics for eye lashes.
I have shaky hands sometimes, so the ability to erase my work and start again is very helpful here, hence why I don't use lacquers for this part.
There are... So many products and colors in this one piece...
Step 7: Touch ups then gluing
I typically do touch ups as I go, but now is the last chance to correct anything. Once it's ready, 2-part epoxy or crazy glue (sometimes both) will be enough to get most models together entirely.
----------------------------
That's a basic breakdown for my process, though for things like effects, clear pieces and fancier/realistic models, it can get quite elaborate. I don't want to scare anyone away from the hobby, so I'll just say this...
You don't have to do allllll this stuff!! Find a model you love (repainting dollar store figures is a great place to start!), prime it, and slap some paint on it! Just have fun, and then go from there!! My first model was lumpy, and looked like she was painted with nail polish, but I kept going and just enjoyed myself, trying new tips and tricks along the way. The point is to have fun! Make sure to take proper precautions and read product instructions as well, if you choose to use the more toxic products.
If anyone decides to give figure painting a shot, send pics of your projects my way, I'd love to see them!! :D It's always great to have more people in the hobby! And I'm always up for more questions, they might just take me a little while to get to replying.
16 notes
·
View notes
Photo


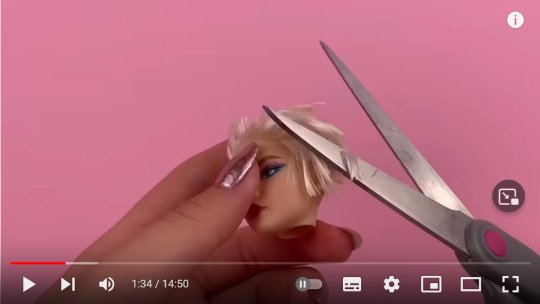


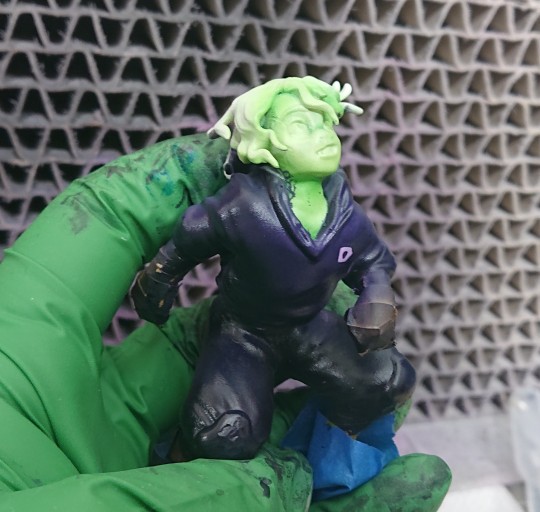
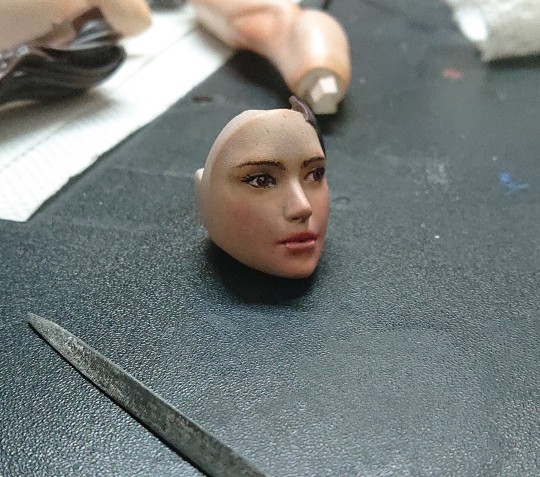
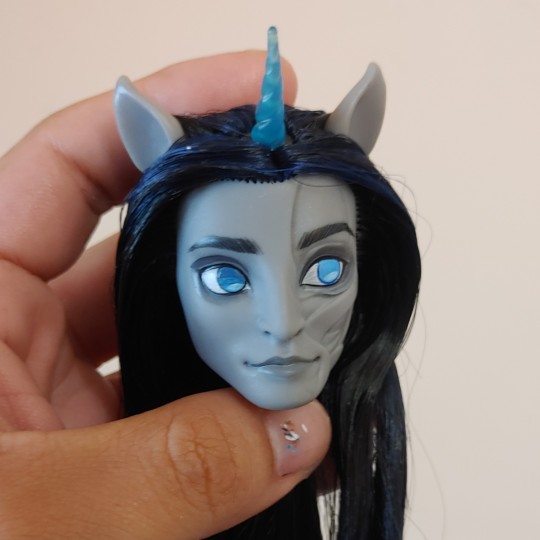
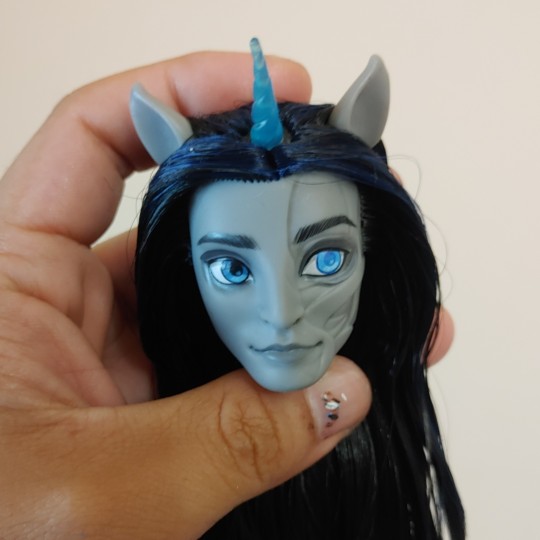
Last night I did a five minute youtube search of doll repair and doll custom. Just super fast. These aren’t terrible in of themselves.
First two are not going to do much except make the hair sticky.
Cutting with big sharp scissors is fine you just have to be super careful, it is really easy to nick the ears or ever the scalp itself if you’re doing a close cut.
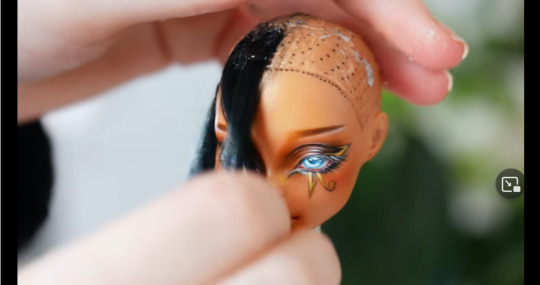
The last three are being applied to a face that’s been coated with MSC, so those layers of thin resin will protect from any nail varnish damage, from those shiny nail arts melting to the vinyl, from the black yarn+ glue turning the vinyl blue (though I suspect Cleo’s ears could go grey or blue if the glue used is anything non water based).
The problem is that if you do those things without MSC, you can end up with staining. Acrylic yarn is plastic, AB coated nail art is plastic, cheap ribbon is often plastic and nail varnish has some solvent in it so applying glitter to the eyebrow for a piercing could possibly damage the eyebrow paint.
Not a huge deal unless you have a strong attachment to that doll or plan on selling customs.
I used to use nail art quite a bit before I knew it could leech into the plastic. I once had a yarn reroot stain the head (it was a vivid purple acrylic yarn). It was disappointing but fixable.
It’s just that if you don’t fully understand what MSC is, and you watch these high-traffic “customize your doll” videos, well, you have no idea that you can’t jazz up your own dolls like that until you notice that your Bratzillaz with a nail art beauty mark now has a big grey patch underneath or the ribbon rose stained the pale hair or the stretch fabric has melted to the doll’s legs etc etc...
We don’t have much of low to mid tier customizing and repair apart from myfroggystuff and I don’t expect the entertainment custom doll creators to specify that these methods won’t hold up without the specific materials but again, without a base like a forum, people can’t check in and ask “what glue is safest to do some euphoria styles makeup with nail art?” or “the scrunchy left a blue mark on the blonde hair, how do i fix this?” or “why did my Frankie’s blue streak turn into frizz when I ironed them, I can’t get it straight again?”
61 notes
·
View notes
Video
youtube
Tutorial - How to Paint doll lips. Fashion doll custom! DIY face up tech...
How To Paint Doll Lips
Supplies:
Acrylic paint
Liner brush (other brushes are too big)
Paper towel
Q-tips
Water
Doll!
Optional:
Acrylic Sealer (top coat)
Acrylic paint thinner (or use water)
Instructions:
1. Using a good quality acrylic paint, use water or acrylic paint thinner to thin the paint a little. If you want to mix two colors of paint together, do that now.
2. Dab your liner brush with a little paint and start painting the outline of the lips, filling in as you go. Paint around the inside of the lips but avoid the teeth. Or fill in the teeth with paint for an easier closed mouth look. Over paint the lip edges to change the lip shape.
3. When you mess up, use a wet Q-tip to wipe the paint away, then dry the lips with a little paper towel before you start painting again.
4. Keep redoing it until you are happy with it. Let it dry completely.
5. Apply an acrylic sealer the same way as the paint. Matte and gloss are popular options. Sealer protects the paint but it can still get scratched so treat your doll gently!
Never use sharpies or nail polish on your dolls! If you want to remove dried acrylic paint or the stock lip paint use a little acetone on a Q-tip to wipe it away. Then neutralize with water. Be careful because it does eat plastic so use cautiously.
Tips:
+ Leave the original lip paint, use it as a guide for the lip shape and paint over it!
+ It's ok to redo it 15 times, your first tries might not look great. Keep practising!
+ Nail art brushes work well!
This tutorial uses a Rainbow High doll but a lot of other fashion dolls can be your muse! Check into your specific doll. I'm not responsible if you mess up your dolly!
#youtube#dolls#doll customizing#doll diy#tutorial#diy#custom#ainsley slater#fashion dolls#barbie#paint#painting#rainbow high#rhys darby#shadow high
7 notes
·
View notes
Text


Ramos, Dragon Engine from Magic: the Gathering. One of the biggest sculptures I've worked on! 🐉
Made of air-dry clay, painted with acrylic paints and coated with a protective matte varnish. The sculpture was made to order.
Dimensions: 31 x 55 x 23 cm = 12.2 x 21.7 x 9.1 inches (length x wingspan x height).

Just want to show you the size of Ramos in comparison to the standard-sized Funko Pop Simba ^^
And here's a video review of the sculpture:
youtube
#silentkimiya#sculpture#handmade#figurine#figure#statuette#art#ooak#dragon#engine#mecha#mecha art#ramos#magic#magic the gathering#magic the card game#card game art#mtg#mtg art#custom commission#commission#art commisions#custom sculpture#Youtube
107 notes
·
View notes
Note
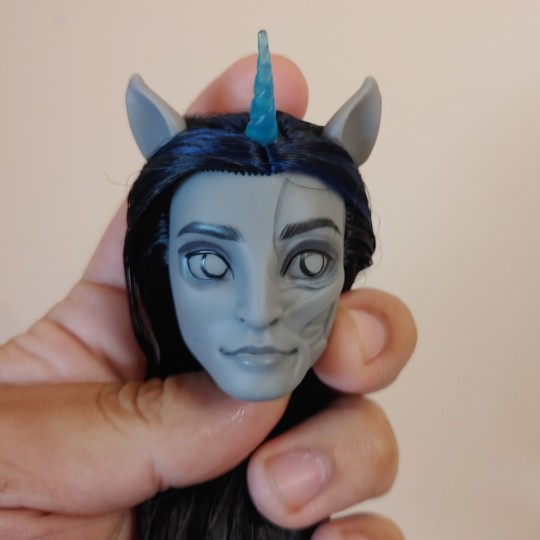
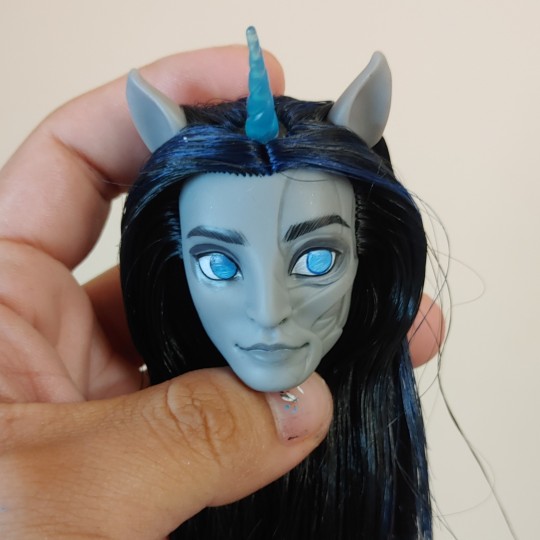
Hey John! I love your repaints, especially the comparison shots of your first attempts vs the revisitations you've been doing lately. I wanted to ask -- how do you achieve such neat, graphic looking colors, especially for their eyes? Is it all acryllic or gouache? I've worked with watercolor pencil and pastel but can't achieve the clarity I want (might be inexperience though, ha!)
It's all acrylic paint. I post progress pics of how i paint my dolls on my Patreon. They're really unpolished and messy which is why I never publish them publicly but i'll post Neighthan's to give an example of how I use acrylic paint nowadays. Watercolour pencils I can never get the clarity and saturation without using a shit ton of sealant while acrylic paint I just spray a base layer and a top coat to protect the paint lol.

73 notes
·
View notes
Note
🌈QUESTIONS!! TIPS!!
if someone like myself wanted to star customizing the little dolls like you do, what would you recommend doing? Are there any tips or tricks you have? Or supply’s you recommend?
Hello hello!!! Thank you for the ask!!
First!! I would go watch some videos from “dollightful” on YouTube! I use all her materials and techniques!!! Second, I use nendoroid parts to customize, so I would search this app called Mercari for nendoroid parts, nendoroid face plates, nendoroid hair. Stuff like that! Lots of people sell in peices on her for customs! Also you can try to check Amazon for nendoroid parts too!
Etsy also has nendoroid parts!
You can buy the art supplies needed for customizjng from dollightsfuls list off Amazon!
I mostly use any acrylic paints mixed with half or more water, reeeeeaaallly tiny paintbrushes, and faber castell watercolor pencils. I also use 100 percent acetone to take off factory paint from the nendoroids.
Last, the most important part is Mr.super clear Matt varnish! This is what protects and keeps in all the pencil marks and paints for ur customs! After you take off the factory paint, wash the area with warm soapy water and spray with a coat of Mr super clear! After that dries for 30 mins you can start making the face with ur color pencils or paint! Then if the pencil/paint won’t add anymore color, that’s when you know to add another spray of super clear!
I hope this helps!! Dollighfuls videos show you how do to these steps perfectly and she’s a wonderful artist to check out anyways!
27 notes
·
View notes
Last Seen Blogs

gallinaxxa
Gallinaxxa

evermoreweekendpacks
Skyler

ichooseviolencetoday
quin

myfavoritemoviewardrobe
Brainstorming Never Ends