#Or maybe they do I CAN HOPE
Text
i LOVEEEEE The qsmp but one thing i do hope returns after the break is over is the islanders actually finding and solving lore on their own rather than it always being scripted events and qsmp channel streams. i miss the whole maze thing i miss ordos theoritas i miss them gathering and just Talking about whatever the fuck they found doesnt matter if its actually relevant or not MAYBE IM CLOUDED BY NOSTALGIA I DONT KNOW and i dont mind scripted global lore at all!! But i do wish player participation when it comes to getting information amps up again
#SORIN TALKS#QSMP#not quite critique but its a big want#i definitely understand that Minecraft roleplay is very different from other types of roleplay plus the very vast timezones#i noticed it /kind/ of returning with the prison arc but it was still very all over the place#im sure theyd be able to figure out how to incorporate that type of intrigue again :)#But I Very much doubt qsmp admins look at tumblr for feedback. it seems more like a twitter thing but i Dont Use twitter other than to rt#Or maybe they do I CAN HOPE
385 notes
·
View notes
Text
something so fucked up about Chat Noir’s whole deal is that he is in a lot of ways Adrien playing a character. Like Adrien picked up his miraculous and was told he’d be a superhero so he was like “ok, time to act like a superhero!” and he lets himself have fun w it and play up the role and let loose and kind of just allow himself to be silly and goofy and have fun and for once in his life not care about performing Perfection™.
But. But none of the other characters KNOW THAT. So everyone just sees Chat Noir and is like “look at this guy’s ego. He’s so full of himself. Surely it’d be fair to knock him down a few pegs” without being aware of how few pegs he actually HAS. He’s like the “insecure character who overcompensates in ego” trope except he’s really not doing it unironically, he’s just having a fun LARP pretending to have self worth in his off-hours but nobody else is on the same page about it being a game and he refuses to tell them. He just dramatically pouts about it and lets them laugh and pretends like he’s not internalizing it and it is almost 3 am and my brain forced me to write this instead of sleeping I’m gonna take a melatonin
#writing this my brain was like: what if he actually likes it?#what if he likes people openly criticizing him in ways nobody actually does to Adrien agreste?#because Adrien Agreste is perfect and can do no wrong. maybe he enjoys being insulted or something#and then I remembered chat noirs multiple breakdowns about feeling unworthy and yknow what yeah I don’t think he likes it LOL#do normal people actually fall asleep when they lie down#if you can’t tell I recently decided to make my random ml musings your guys’ business instead of keeping it to myself#hope you enjoy
13K notes
·
View notes
Text
but it ain’t called love without a little tragedy 🍁
#my art#a love letter to betty and simon#getting to explore simon’s journey post AT finale and the nuances of his relationship with Betty has been an experience#I don’t know what’s next but we can only hope closure for them#that betty maybe learns to put herself first after putting every ounce of herself in simon#or that simon learns to let go? or both of them do#assuming we do see Betty again#i am preparing to say farewell to the series once again after the finale#thank you adventure time crew#fionna and cake#fionna and cake spoilers#simon petrikov#betty grof#petrigrof#adventure time#I forgot to mention#this animation was inspired by ‘autumn leaves’ by yves montand#but a cover of it#I was listening to the song because I wanted to learn it on an instrument#it’s a melancholy song about autumn and lost love#and as I heard the lyrics of course I instantly thought of these guys#and then I started drawing#inspiration had a strong grip on me#thank you for reading#and your support#I hope you guys have had as much fun with this show as I have#I’m grateful for it
8K notes
·
View notes
Text
yk when you see someone share a finished handmade item that they clearly spent a lot of time and money on and it's just. The absolute tackiest thing you have seen in your life. And then you ask yourself why someone would waste all those resources on such an eyesore.
(no, of course you can't relate to that because you're a much nicer person than me)
In any case.
BEHOLD!
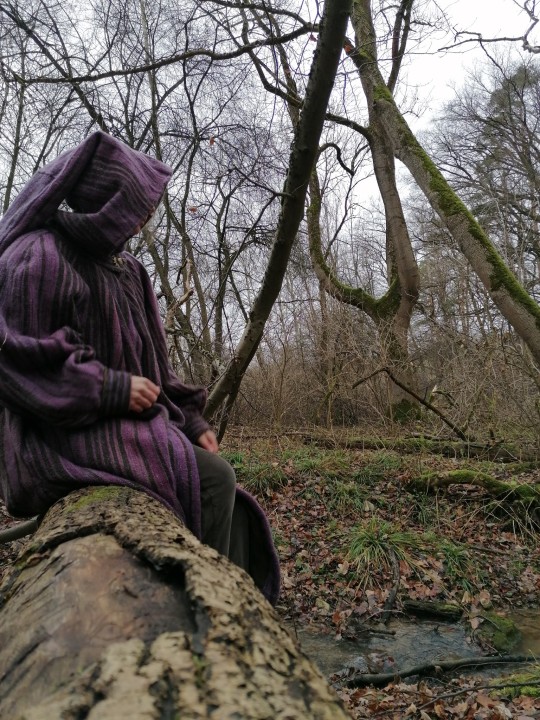
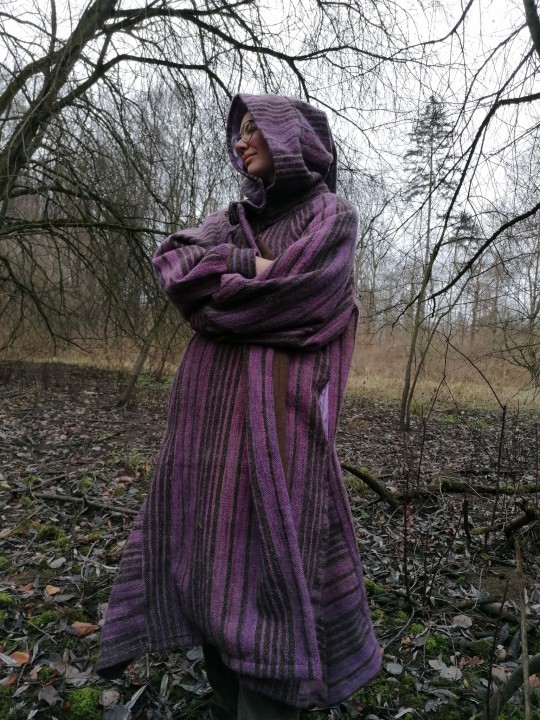
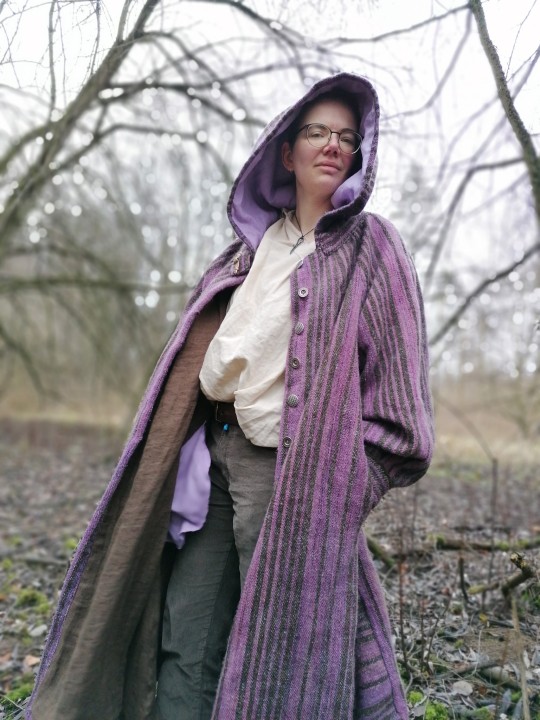
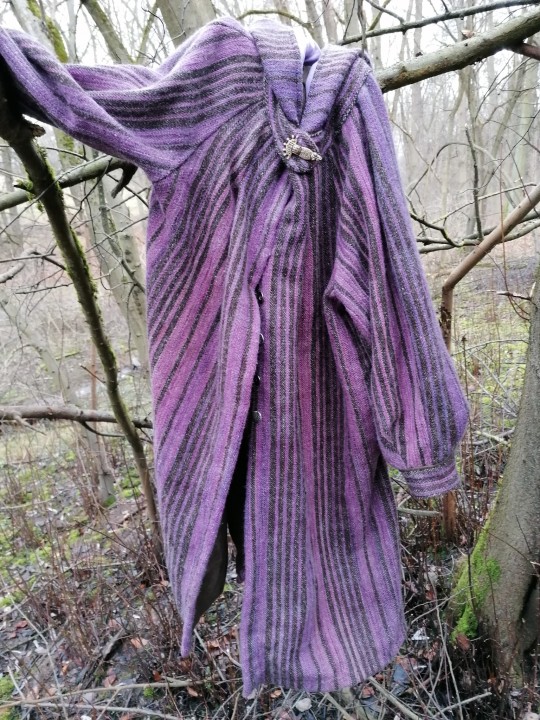
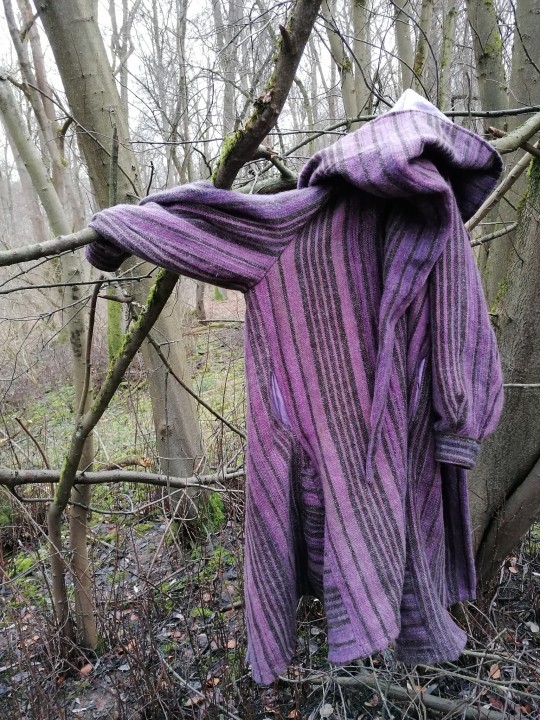
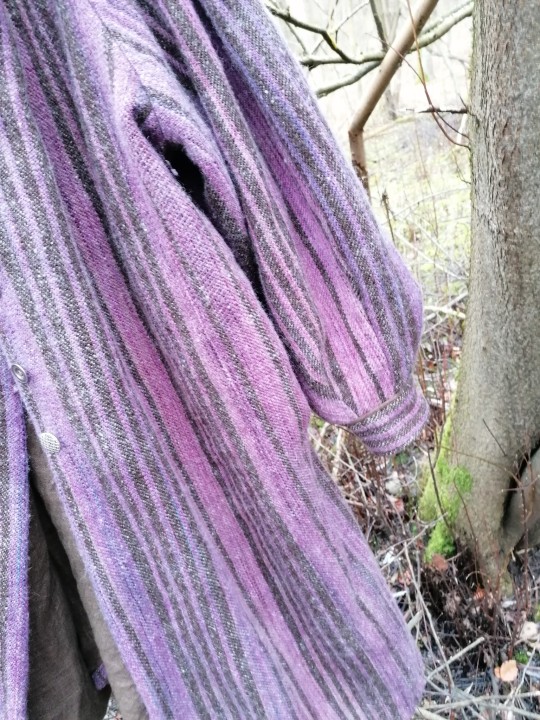
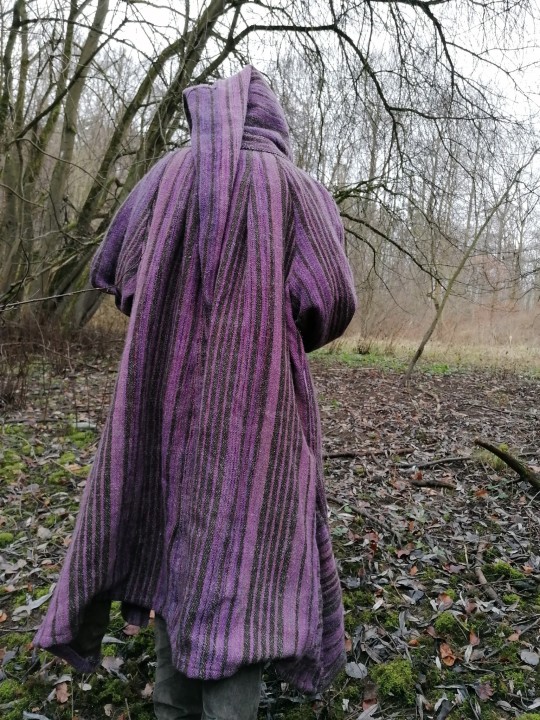
A wool coat!
The top fabric is handwoven and handspun, the whole thing is sewn by hand, too.
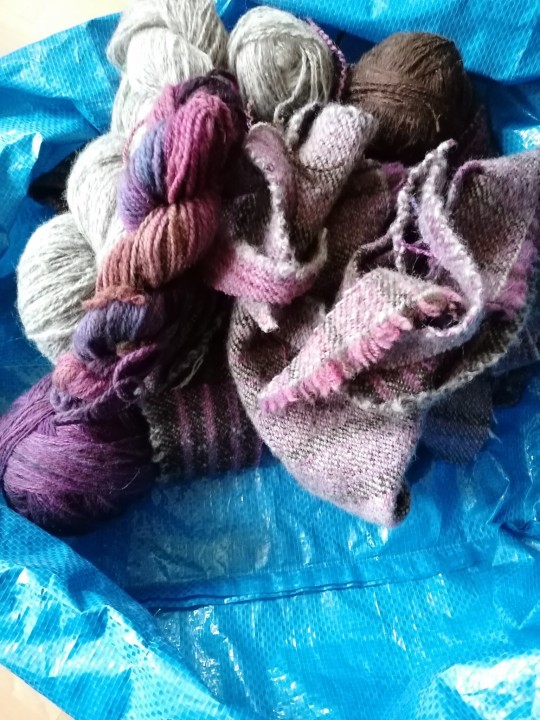
Leftovers. Barely anything, all things considered, which is very satisfying.
This thing took me well over 3 years to make, on and off. And now I'm done.
Thank you for your attention.
#carry on XD#i hope y'all realize that when I say tacky it's with nothing but love in my heart#yes it's ugly. that's the whole point.#everyone should have an item in their wardrobe that will get Looks and raised eyebrows#it's good for you#anyway can't believe I'm done! this is a huge boost to my crafting hubris I CAN DO ANYTHING#wizard bathrobe adventures#handweaving#handspinning#hand sewing#look what i made#crafts#overall I'm happy with it even though there's. things that aren't ideal#the pockets are set a bit too low#and i should have made it a tiny bit longer not much but maybe like 5cm#anyway#overall it's a nice coat i think#Now That's What I Call Slow Fashion
4K notes
·
View notes
Note
Any tips on learning to make buttonholes? I've been putting it off for.... *checks notes* like three years.... but better late than never and all that. I don't have any fancy machines so I gotta do it by hand but that seems right up your alley.
Thanks!
It IS up my alley, yes, I do most of my buttonholes by hand!
I'm actually part way through filming an 18th century buttonhole tutorial, but I expect it'll be a few more weeks before I finish that and put it on the youtubes, so in the meantime here's the very very short version. (The long version is looking like it'll probably be about 40 minutes maybe, judging by how much script I've written compared to my last video?)
Mark your line, a bit longer than your button is wide. I usually use a graphite mechanical pencil on light fabrics, and a light coloured pencil crayon on dark ones. (I have fabric pencils too, but they're much softer and leave a thicker line.)
You may want to baste the layers together around all the marked buttonholes if you're working on something big and the layers are shifty and slippery. I'm not basting here because this is just a pants placket.

Do a little running stitch (or perhaps a running backstitch) in fine thread around the line at the width you want the finished buttonhole to be. This holds the layers of fabric together and acts as a nice little guide for when you do the buttonhole stitches.

Cut along the marked line using a buttonhole cutter, or a woodworking chisel. Glossy magazines are the best surface to put underneath your work as you push down, and you can give it a little tap with a rubber mallet if it's not going through all the way.

I'm aware that there are some people who cut their buttonholes open using seam rippers, and if any of them are reading this please know that that is abhorrent behaviour and I need you to stop it immediately. Stop it.
Go get a buttonhole cutter for 10 bucks and your life will be better for it. Or go to the nearest hardware store and get a little woodworking chisel. This includes machine buttonholes, use the buttonhole cutter on them too. If you continue to cut open buttonholes with a seam ripper after reading this you are personally responsible for at least 3 of the grey hairs on my head.
Do a whipstitch around the cut edges, to help prevent fraying while you work and to keep all those threads out of the way. (For my everyday shirts I usually do a machine buttonhole instead of this step, and then just hand stitch over it, because it's a bit faster and a lot sturdier on the thin fabrics.)

I like to mark out my button locations at this point, because I can mark them through the holes without the buttonhole stitches getting in the way.
For the actual buttonhole stitches it's really nice if you have silk buttonhole twist, but I usually use those little balls of DMC cotton pearl/perle because it's cheap and a good weight. NOT stranded embroidery floss, no separate strands! It's got to be one smooth twisted thing!
Here's a comparison pic between silk buttonhole twist (left) and cotton pearl (right). Both can make nice looking buttonholes, but the silk is a bit nicer to work with and the knots line up more smoothly.

I've actually only used the silk for one garment ever, but am going to try to do it more often on my nicer things. I find the cotton holds up well enough to daily wear though, despite being not ideal. The buttonholes are never the first part of my garments to wear out.
I cut a piece of about one arm's length more or less, depending on the size of buttonhole. For any hole longer than about 4cm I use 2 threads, one to do each side, because the end gets very frayed and scruffy by the time you've put it through the fabric that many times.
I wax about 2cm of the tip (Not the entire thread. I wax the outlining/overcasting thread but not the buttonhole thread itself.) to make it stick in the fabric better when I start off the thread.
I don't tend to tie it, I just do a couple of stabstitches or backstitches and it holds well. (I'm generally very thorough with tying off my threads when it comes to hand sewing, but a buttonhole is basically a long row of knots, so it's pretty sturdy.)

Put the needle through underneath, with the tip coming up right along that little outline you sewed earlier. And I personally like to take the ends that are already in my hand and wrap them around the tip of the needle like so, but a lot of people loop the other end up around the other way, so here's a link to a buttonhole video with that method. Try both and see which one you prefer, the resulting knot is the same either way.


Sometimes I can pull the thread from the end near the needle and have the stitch look nice, but often I grab it closer to the base and give it a little wiggle to nestle it into place. This is more necessary with the cotton than it is with the silk.
The knot should be on top of the cut edge of the fabric, not in front of it.

You can put your stitches further apart than I do if you want, they'll still work if they've got little gaps in between them.
Keep going up that edge and when you get to the end you can either flip immediately to the other side and start back down again, or you can do a bar tack. (You can also fan out the stitches around the end if you want, but I don't like to anymore because I think the rectangular ends look nicer.)
Here's a bar tack vs. no bar tack sample. They just make it look more sharp, and they reinforce the ends.

For a bar tack do a few long stitches across the entire end.

And then do buttonhole stitches on top of those long stitches. I also like to snag a tiny bit of the fabric underneath.

Then stick the needle down into the fabric right where you ended that last stitch on the corner of the bar tack, so you don't pull that corner out of shape, and then just go back to making buttonhole stitches down the other side.
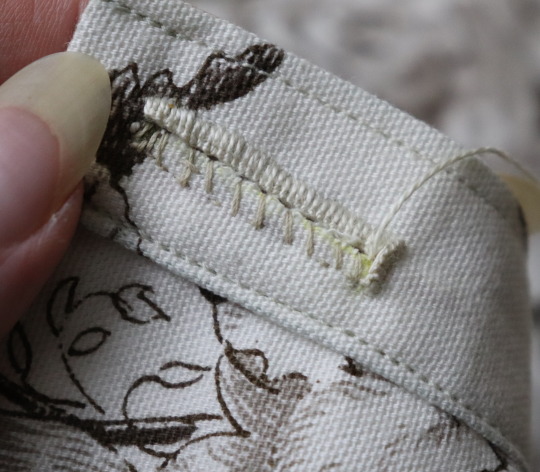
Then do the second bar tack once you get back to the end.

To finish off my thread I make it sticky with a bit more beeswax, waxing it as close to the fabric as I can get, and then bring it through to the back and pull it underneath the stitches down one side and trim it off.


In my experience it stays put perfectly well this way without tying it off.
Voila! An beautiful buttonholes!


If you want keyhole ones you can clip or punch a little rounded bit at one end of the cut and fan your stitches out around that and only do the bar tack at one end, like I did on my 1830's dressing gown.

(I won't do that style in my video though, because they're not 18th century.)
Do samples before doing them on a garment! Do as many practice ones as you need to, it takes a while for them to get good! Mine did not look this nice 10 years ago.
Your first one will probably look pretty bad, but your hundredth will be much better!
Edit: Video finished!
youtube
And here's the blog post, which is mostly a slightly longer version of this post.
#ask#buttonholes#sewing#hand sewing#sewing tutorial#I've been procrastinating on the video this week#I want it done! I don't want to work on it I want new projects! I want to cut out more gloves!#currently forcing myself to do the last few buttonholes on these pants and then maybe I can cut out new gloves? as a treat?#but I hope I get some filming done tomorrow too
3K notes
·
View notes
Text
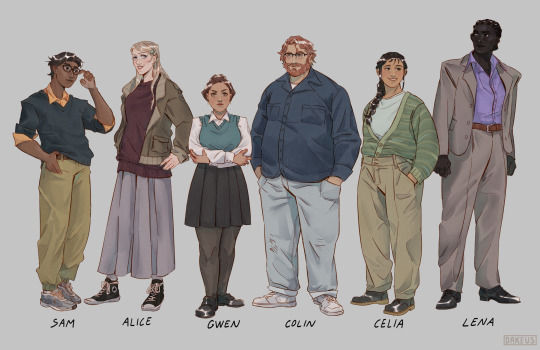
My take on the new cast!
#maybe Lena’s design is just a bit too self indulgent#but I’m the one holding the apple pencil#I can do what I want#I hope I didn’t miss any canon descriptions#if I did I blame it on the fact that english isn’t my first language#my art#tmagp#tmagp fanart#tmagp cast#the magnus protocol#digital art#character design
2K notes
·
View notes
Text
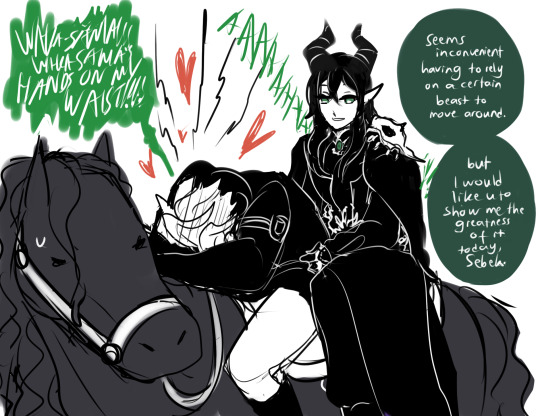
ᕙ(‾̀◡‾́)ᕗ
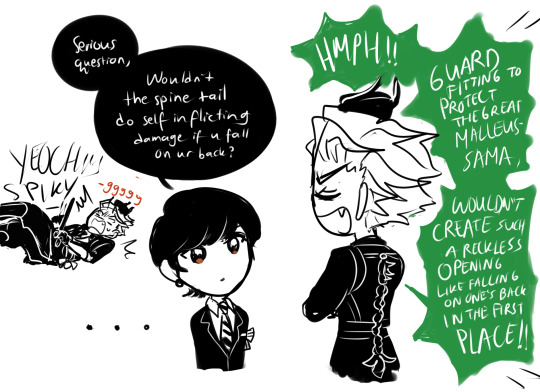
#twst#twisted wonderland#sebek zigvolt#malleus draconia#rook hunt#twst yuu#twst mc#fanart#i hope the people who have me on friend list and putting masquerade malleus up as main would never put him down#so i can keep listening to sebek's voice quivering when doing duo with malleus when the chances let me#his voice actor did so great#that quiver is so heartfelt#random thought on the spine tail today#it aesthetically pleasing#but surely it's a pain for combat#maybe only highly skilled students wear those spine tail#seriously it would be painful to fall on that wouldn't it
1K notes
·
View notes
Text
i hope any non-english speakers on qsmpblr know that they are welcome here, and that they are not obligated to speak english to be part of this community. anyone who tells you otherwise can go fuck themselves. no one should feel scared or ashamed in speaking their native language. the qsmp is about breaking language barriers, forming bonds with people that we might not have communicated with before, and despite everything going on right now, that has not changed. we had a language day last month, where everyone wrote posts in their first language, and it was fantastic and maybe we can have another day like this in the future, but we should also encourage more people so they can feel comfortable doing this every day.
#qsmp#qadmin situation#anyway xenophobes can go run into traffic (in minecraft)#also looking at this i do hope i don't come across too 'white savior' here :/#if i do lemme know maybe i can adjust my wording. there IS only so much i can say as a white american haha
662 notes
·
View notes
Text
Gege make these two interact i dare you
+bonus

#jujutsu kaisen spoilers#jjk spoilers#jjk#maki zenin#mai zenin#nobara kugisaki#momo nishimiya#nobamaki#momomai#nobamai if you squit#i think they're funny#maki and momo are grieving and mai and nobara are just shit talking together in hell#i miss my girls#do i still have hopes of nobara coming back? maybe#never back down never what?#anyway yesterday i realized maki and momo should be friends and cried#bc maki of course looks so much like mai#and momo can be brash an outspoken just like nobara#its like they're trying to fill a void#you can pretend im not myself only if i can pretend you're not yourself type of shit#they make me mentally ill#im making this a thing#i dont care if its platonic or romantic i just know its sad#i wanted to call them momomaki but its already a ship in another fandom i think so#makimomo it is#makimomo
1K notes
·
View notes
Text
i see matt posted again
#i have Thoughts but i am at work and about to jump into a meeting so#maybe in 3 hours#tony muses#also. sorry to my little cluster of mutuals from Before All This when i reblogged cats mostly#i hope you're all doing well#and sorry to everyone who's like 'mate you never told us in all these years that the job you were bitching about was at The Tumblr Company'#but i think you can probably see why#tumblr meta
910 notes
·
View notes
Photo

asking and receiving (bonus below readmore)
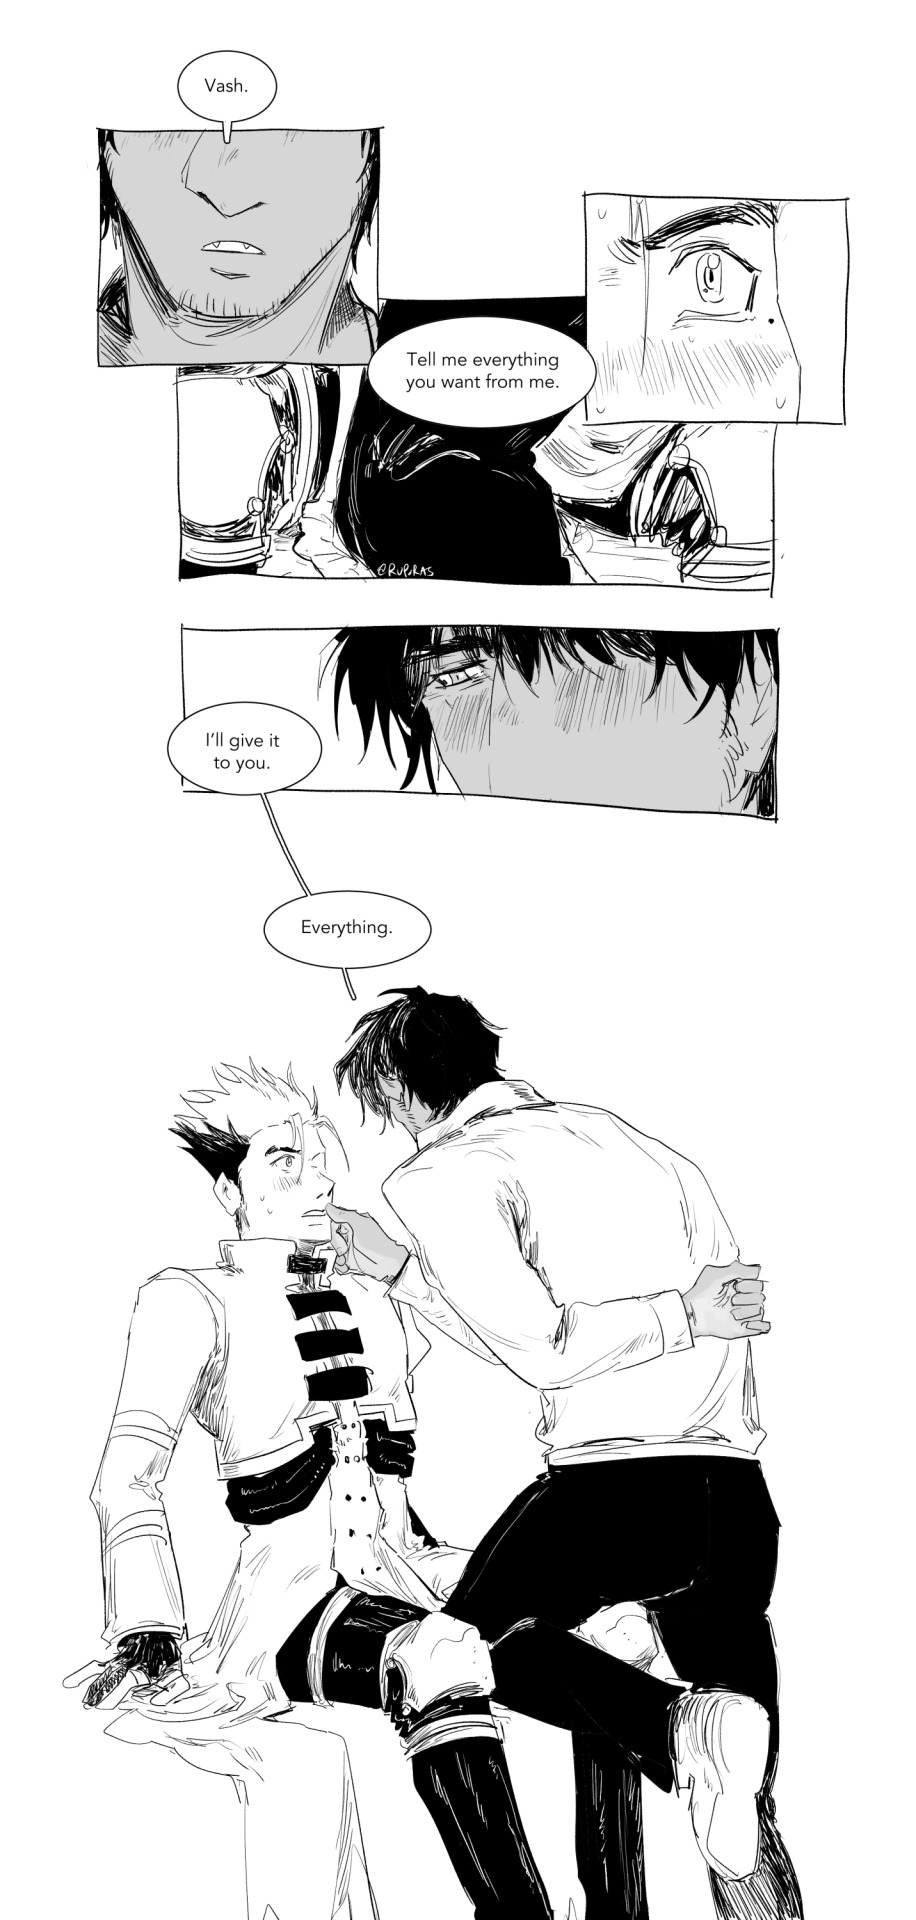
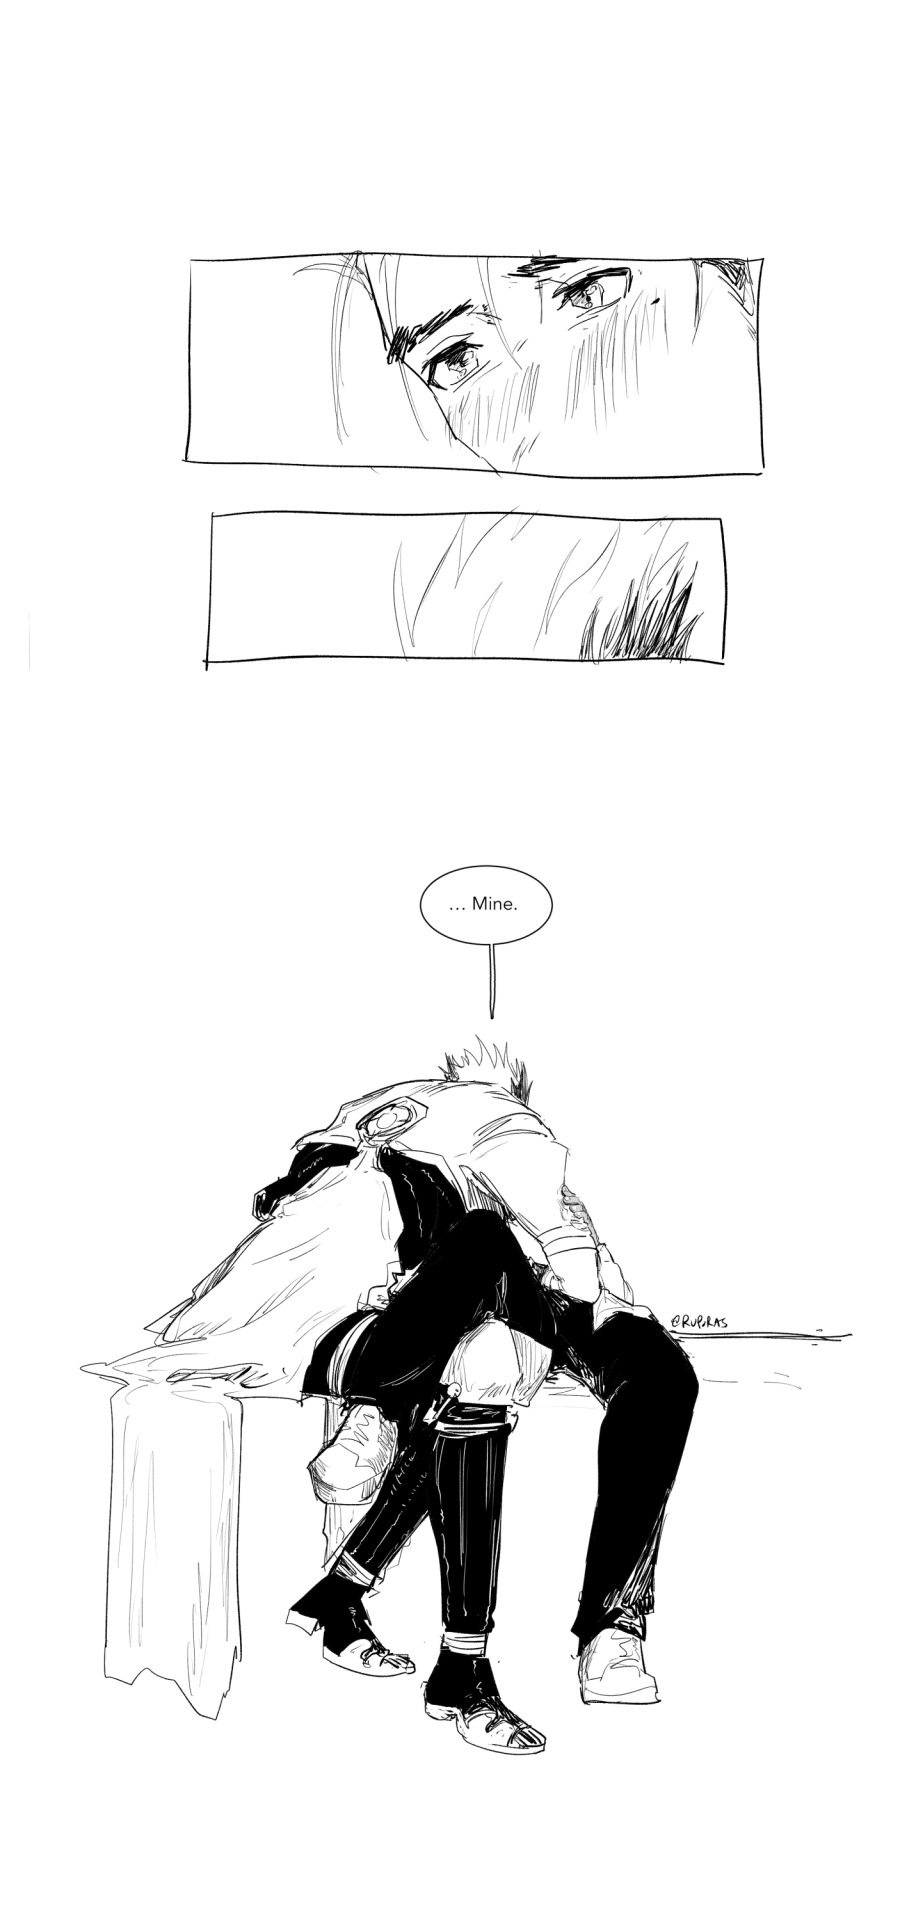
[ID: A black and white, digital Trigun comic of Vash and Wolfwood. In the first panel is a close up of Wolfwood's mouth as he says, "Vash". Accompanying it is a close up shot of Vash's eye, widen and cheeks flushed. Wolfwood presses a knee against the open space between Vash's legs and says, "Tell me everything you want from me." Wolfwood's face is equally as flushed. He continues to say, "I'll give it to you. Everything." As he talks, a wide shot shows the both of them in white space. Vash is sitting, leaning a little back with both hands pressed against the surface he's sitting on. Wolfwood is in his white dress shirt, stripped of the blazer. He's still leaning in with one knee in between Vash's spread legs, his right hand touching Vash's lips and his left hand behind his back.
The shot closes in on Vash's mouth and Wolfwood's hand against it, pressing down on the lower lip as he says, "You have to ask though. Go on." His hand moves down to Vash's chin, gently holding it. With a shy and uncertain expression, Vash hesitantly asks, "Um... K... Kiss... Please?" Wolfwood, without wasting a second, leans in and kisses him and indulges by pressing deeper, eliciting a small noise of surprise from Vash.
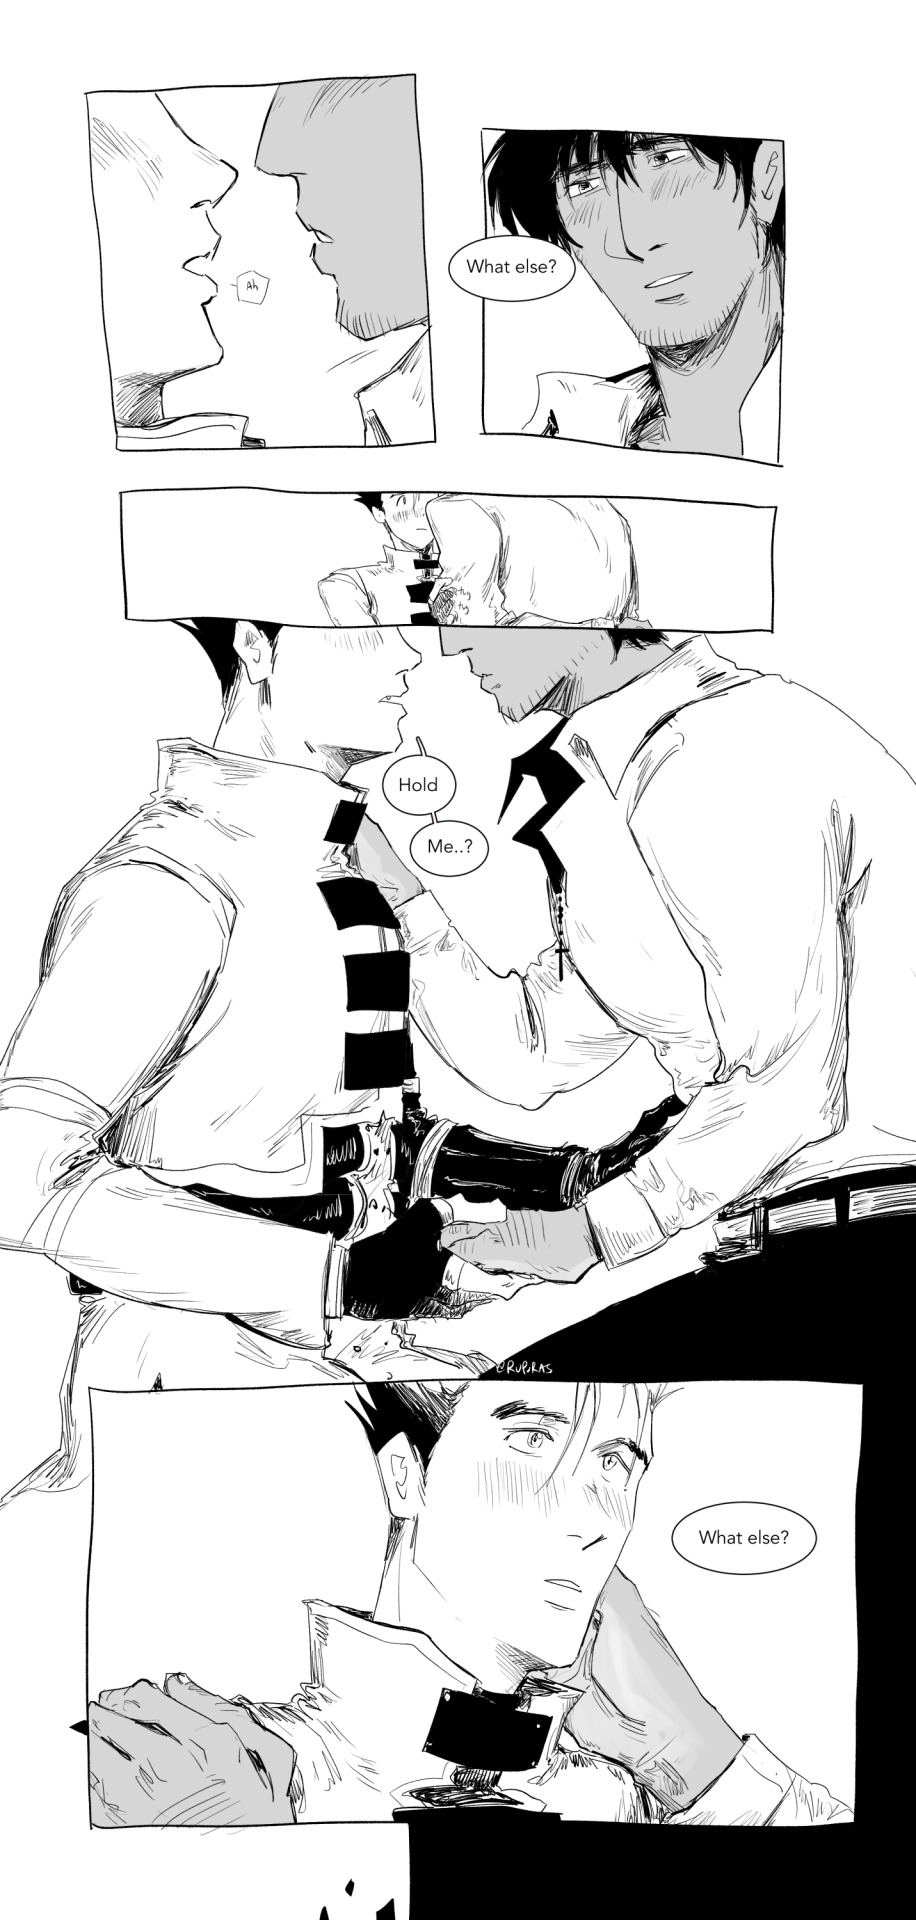
Wolfwood moves away from Vash first and with a smile, asks, "What else?" Vash tugs on Wolfwood's left sleeve, wordlessly budging Wolfwood to give him his hand that was still behind his back. In the next panel, Vash utters, "Hold me..?" He's holding Wolfwood's left hand with his own while his right hand is reaching for his waist. Wolfwood complies, moving his left hand to Vash's shoulder and his right hand continues to touch Vash's cheek. Wolfwood asks again, "What else?"
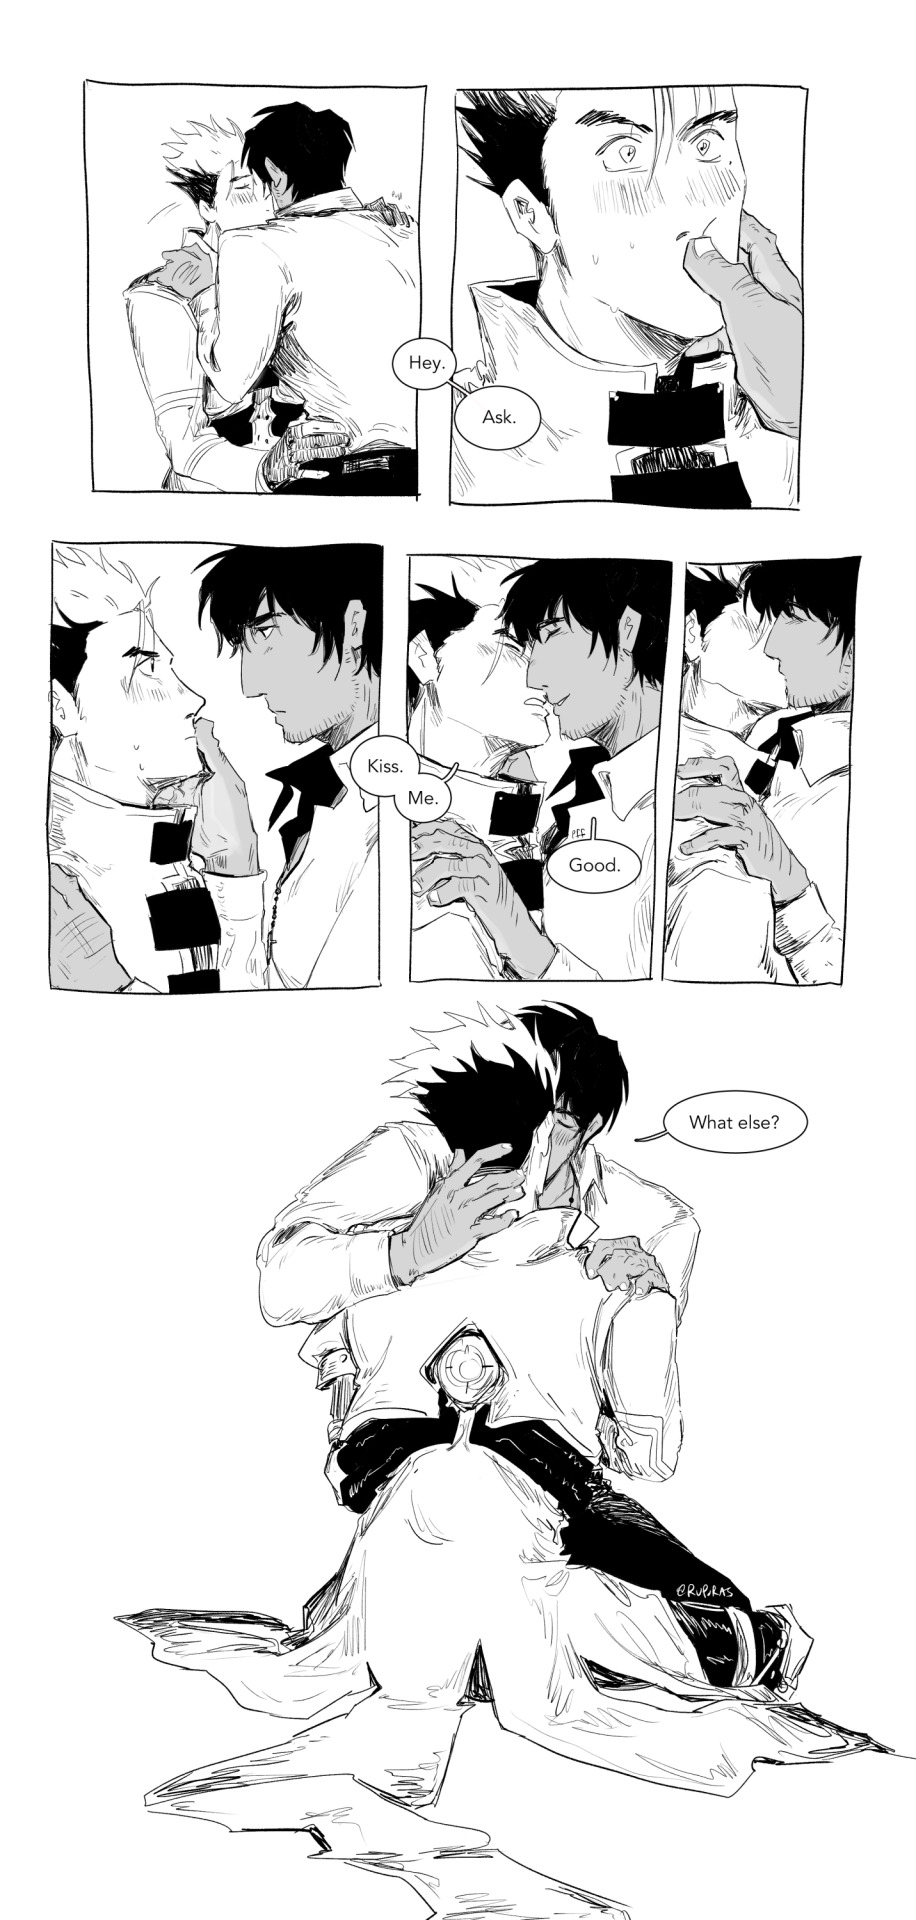
More comfortable now, Vash leans in to kiss Wolfwood. Wolfwood catches him immediately, pressing his thumb against Vash's lips to stop him before demanding, "Hey. Ask." Vash looks back in surprise and Wolfwood meets his eye with a quiet, insistent look. They're quiet for a moment before Vash leans in again and curtly requests, "Kiss. Me." Wolfwood says "Good", smiling as he lifts his hand away, and meets Vash's lips. In the next shot, Wolfwood had adjusted his position, sitting on Vash's thigh. The hand that was once on Vash's cheek has moved its way to Vash's nape, pushing away the collar of his jacket with his pinky. His other hand continues to grip on Vash's shoulder. Still kissing, Wolfwood asks again, "What else?"
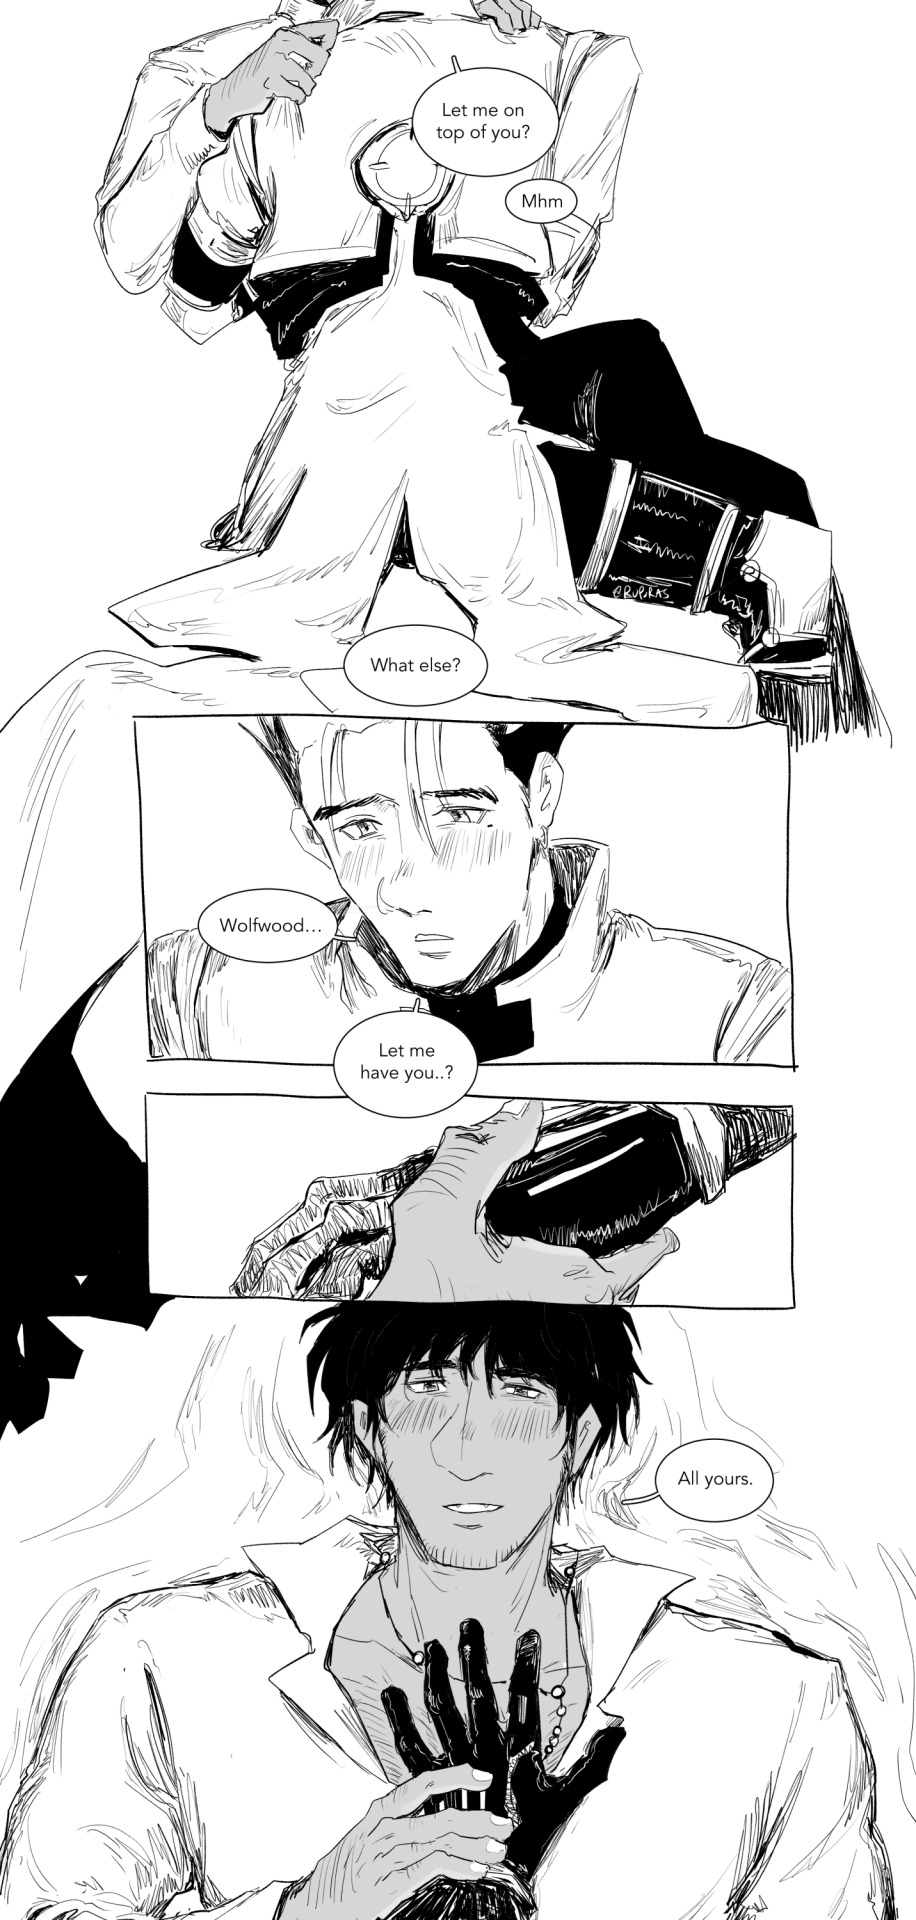
In the next shot, Vash is starting to turn, moving Wolfwood with him. Vash asks, "Let me on top of you?" Wolfwood says, "Mhm" before asking again, "What else?" The next panel shows a close look of Vash's face. He's looking down, flushed and shy just as he had been at the beginning, but now, more decisive. Vash asks, "Wolfwood... Let me have you..?" A panel of Wolfwood taking Vash's hand into his, pulling it towards his chest. The next panel shows Wolfwood lying down where Vash had laid him. Vash's hand is on Wolfwood's chest, covering the cross of his rosary while Wolfwood's hand lingers against his, loosely pressing Vash's hand in place. He looks up at Vash with a shy smile of his own, flushed cheeks. He says, "All yours."
A panel shows a close up of Vash's tender gaze before he leans down to be closer to Wolfwood. The final shot is a front view of their positions, Vash's face turned away from the viewer; Vash is leaning over Wolfwood who's lying down with his right leg draped over Vash's legs. Wolfwood's left hand holds onto Vash's left arm. With finality, Vash says, "...Mine." End ID]
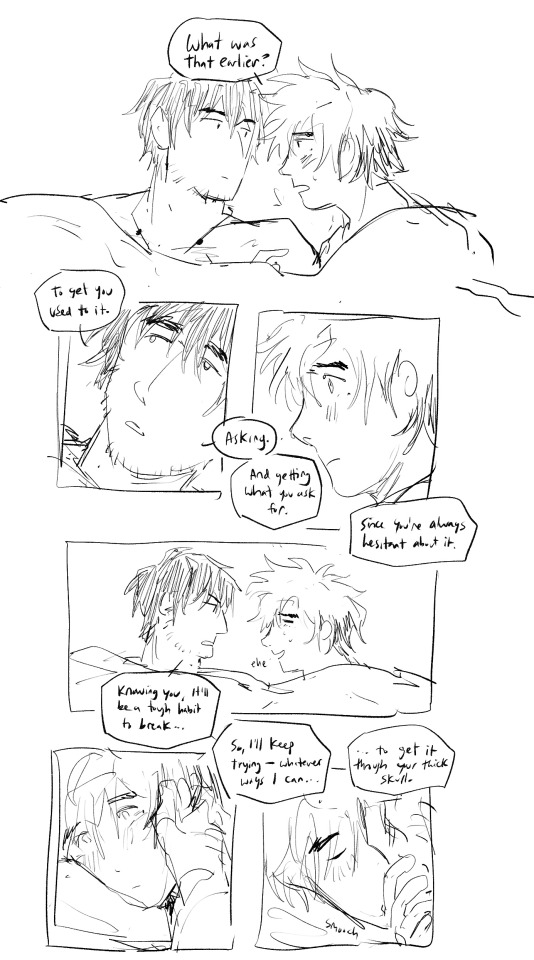
[ID: A follow up bonus comic in a looser, sketchier style. They're laying comfortably in bed when Vash asks, "What was that earlier?" referecing to the start of the previous comic. Wolfwood glances away and says, "To get you used to it. Asking. And getting what you ask for. Since you're alwasy hesitant about it." Vash's eyes widen, tight lipped. Wolfwood continues, "Knowing you, it'll be a tough habit to break..." When he says this, Vash can't help but laugh, unable to deny it. Wolfwood slowly brings a hand to Vash's cheek and continues to say, "So I'll keep trying -- whatever ways I can... to get it through your thick skull." Vash takes Wolfwood's hand with his, kissing the the palm gently. Wolfwood's eyes soften and holding onto Vash's cheek, he leans in to try for a kiss. Vash says, "Hey..." before stopping Wolfwood's lips with the back of his hand, a smug look on his face, "Ask." Wolfwood's embarrassed and with little irritation, asks, "Really?" Vash smiles, saying, "You're in need of practice too." They pause for a moment, Wolfwood looking contemplatively, before he's leaning in again, asking, "May I please kiss you?" Vash looks him in the eyes and says, "Yes." The comic ends with a "chu", indicating an off-panel kiss. End ID]
#vashwood#vash the stampede#nicholas d wolfwood#trigun#trigun maximum#it took me so long to post this even after getting clarification about the maturity warning and stuff#bc i am so shy about it. SDGMKDSGMKSD I LIKE THIS COMIC BUT IM ALSO SO LIKE... AUGHHHH....#when i posted this on twitter though it was like... a few days after ep 11? ive always had the thought circling about vash deserving of#asking for things... and getting what he wants bc he never gets both. doesn't get the opportunity to ask and hardly does he get what he want#maybe the results can go in his favor but at some point along the way he'll still lose something bc nothing can ever go perfectly for him...#and he's usually the one begging and pleading with people to not. do something. it's not even asking at that point it's just straight up#please believe me. please trust me. please don't shoot that person. please don't kill anyone. please don't do it.#and wolfwood.... it was not always this lovey dovey ok. he wouldv noticed this habit miles away and they got into a fight about it the first#time they talked about it bc wolfwood is being hypocritical too. as he always is!!!! but i think as they get more intimate#wolfwood finds ways to make vash understand. smth smth insatiable want and love and desire for wolfwood that makes it much easier to ask.#wolfwood can also just be so compliant. sometimes. which is also an issue in of itself that id love to explore at some point#but he also just enjoys giving into vash fully and completely.#bc he loves him a lot. but anyway#i hope the id is comprehendible.... please lmk if there's something wrong with how im doing it asfdgkdsmgs#ruporas art
3K notes
·
View notes
Text
Low level/continuous pain tips for writing
Want to avoid the action movie effect and make your character's injuries have realistic lasting impacts? Have a sick character you're using as hurt/comfort fodder? Everyone has tips for how to write Dramatic Intense Agony, but the smaller human details of lasting or low-level discomfort are rarely written in. Here are a few pain mannerisms I like to use as reference:
General
Continuously gritted teeth (may cause headaches or additional jaw pain over time)
Irritability, increased sensitivity to lights, sounds, etc
Repetitive movements (fidgeting, unable to sit still, slight rocking or other habitual movement to self-soothe)
Soft groaning or whimpering, when pain increases or when others aren't around
Heavier breathing, panting, may be deeper or shallower than normal
Moving less quickly, resistant to unnecessary movement
Itching in the case of healing wounds
Subconsciously hunching around the pain (eg. slumped shoulders or bad posture for gut pain)
Using a hand to steady themself when walking past walls, counters, etc (also applies to illness)
Narration-wise: may not notice the pain was there until it's gone because they got so used to it, or may not realize how bad it was until it gets better
May stop mentioning it outright to other people unless they specifically ask or the pain increases
Limb pain
Subtly leaning on surfaces whenever possible to take weight off foot/leg pain
Rubbing sore spots while thinking or resting
Wincing and switching to using other limb frequently (new/forgettable pain) or developed habit of using non dominant limb for tasks (constant/long term pain)
Propping leg up when sitting to reduce inflammation
Holding arm closer to body/moving it less
Moving differently to avoid bending joints (eg. bending at the waist instead of the knees to pick something up)
Nausea/fever/non-pain discomfort
Many of the same things as above (groaning, leaning, differences in movement)
May avoid sudden movements or turning head for nausea
Urge to press up against cold surfaces for fever
Glazed eyes, fixed stare, may take longer to process words or get their attention
Shivering, shaking, loss of fine motor control
If you have any more details that you personally use to bring characters to life in these situations, I'd love to hear them! I'm always looking for ways to make my guys suffer more write people with more realism :)
#voidrambles#writing#whump#does this count as that? whatever those folks will probably enjoy it at any rate#this is honestly mostly for my own reference but i hope it can maybe help some other people too :)#I'm so pulled in by books that write pain in a human and detailed way and not just when it's dramatic or intense#would love to see more of that and incorporate it into my own writing#oh i should have added. distraction seeking to that list#like writing a really long post about.#...yes i may be chronically ill and having a flare today and yes i may be farming myself for writing tips for Future Me hdgfhfhsjs#but hey gotta do your research somewhere babeyyy it all goes in the creativity soup#tw injury#tw illness
8K notes
·
View notes
Text
SHUT UP ABOUT THE ICE TWINK!!!! SHUT UP ABOUT THE ICE TWINK!!!!!
SOMEONE ELSE TALK ABOUT THE IMPLICATIONS OF THIS LITTLE GIRL!!!!!!
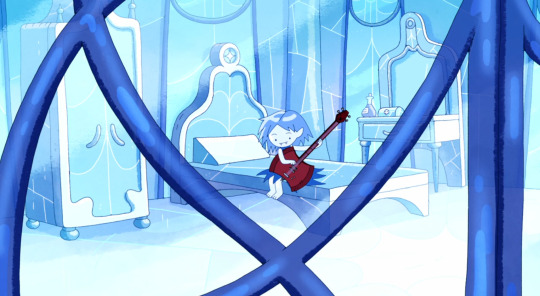
#this is a joke I'm just going insane over that twink going “haha love of my life??? forgot about her Anyway I remade my daughter out of ice'#and he was still fucking insane just less so so i am also staring intently at that window/maybe doors and wondering if she can get out#man do i tag this....#meh#fionna and cake spoilers#fionna and cake#I'm only awake so early because i wanted to watch these episodes Im gonna pass out and hope someone else is going insane over her
3K notes
·
View notes
Text
“nobody understands me” but not in the “edgy suffering from teenager syndrome mad at mom” kind of way, but the “lonely isolating young adult realization that the specific combination of mental illnesses and past experiences i’ve had have resulted in a pattern of behaviors that are often misinterpreted and misconstrued by others” type of way
#maybe it’s the mental illness but boy howdy do i feel like an outsider#as a teenager it’s usually the feeling that everybody else is a stick in the mud and stupider than you kind of stuff#now i’m feeling like everybody else is a real person while i’m only partially a person#like there’s so much of myself missing and i can’t seem to relate with anybody else#it’s lonely feeling like nobody would understand how my brain works even if i tried to explain it to them#idk how to tag this but i hope anybody else can relate#actually neurodivergent#actually neurodiverse#adhd#actually adhd#ocd#mental illness#mentally ill#neurodivergent#👁🗨#🌀
5K notes
·
View notes
Note
kamen rider shion was just revealed for ride kamens, and he looks like he's themed after the... horse orphnoch? this is an even bigger surprise than the jin and woz homages
trying to speculate on Ride Kamens characters pre-reveal really is like


#ride kamens#not art sorry#(still gotta draw something for SUPER POSITIVE MAN too whoops)#joseimuke games are serious business#i am NOT complaining i think it's great that they're not restricting themselves to main riders or even like...main characters#but horse orphnoch feels like...an extremely weird pull#i have not seen faiz so i don't know anything about him as a character beyond a quick google#still feels weird to do a non-rider though?#i mean shion seems very lovable and i do enjoy having a character i can just shout HORSEBOOOOOY about#he was the one i was convinced was brave though! DANGIT#the specter of a possible ikemen poppy looms closer...#though any ex-aid rep won't be poppy let's be real here#at this rate it's going to be like. burgermon.#do i dare hope for such a miracle#(is that one guy with the wolf/dog tail going to be garulu then)#(or maybe he's thouser's dog robot WHO KNOWS)#truly ride kamens is a kingdom of infinite possibilities
405 notes
·
View notes
Text
Tubbo buys a mask for Chunsik (춘식) as a note they all cost a hundred coins and Tubbo didn’t even want to pay the 5 for teleporting, because he’s saving.
#qsmp#qsmp chunsik#qsmp 춘식#qsmp tubbo#qsmp clips#qsmp videos#This was meant to be posted earlier but it didn’t go through#I hope everyone’s doing okay maybe this can make you feel at least little better#But take all the time you need that document is very rough
500 notes
·
View notes
Last Seen Blogs


massontree
MassonTree

ataash-adaar
Kata esaam Qun, anaan esaam vashoth.
flowers-for-my-old-bones
Welcome To My Garden