#this time with the video tutorial attached
Text
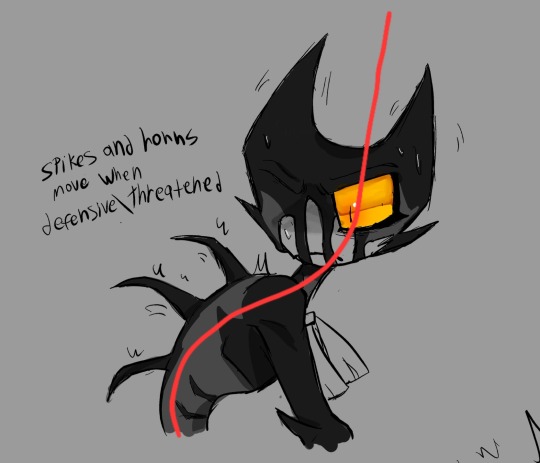
Every bookbinding tutorial i found online: "DO NOT TRY THE COPTIC STITCH AS A BEGINNER ITS TOO ADVANCED"
Me who has only bound one book before and used a completely different method: "ehh it can't be that hard"
2 hours later

.....I was right. Its not that hard.
#its technically slightly wrong cuz i dont have signatures#im just doing one folded piece of paper at a time#which does take longer#but i was expecting that#doing actual signatures would have a. been way too thick cuz im using watercolor paper and getting them to lay flat wouldve been annoying#and also i wouldve had to pay a lot more attention to how the pages were actually laid out#and this project was already kinda overwhelming without that added in#im also combining methods a bit cuz im also gonna glue the spine with wood glue for extra support#and i also dont want the stitching to be visible#every tutorial was also like ''coptic stitch is great for exposed stitching!!!'' like cool story. not why im using it. gonna cover that shit#also finding one that wasnt in video form AND actually showed everything i needed to know was completely impossible apparently#i needed to know how to attach a fresh string when i run out cuz i always struggle with that in any sewing project#and generally need a refresher each time#and all the written ones were just like ''just make sure your string is long enough before hand!!! but not so much that it becomes#tangled!!!'' bitch im making a much thicker book than you. i cannot just use ONE string. it b#absolutely WILL become tangled if i make it long enough to finish the binding in one go.#yall are WEAK#my book is 3 times thicker than yours#i need to know how to attach a fresh string#the video tutorials cover that but i had to fast forward through most of it#im running out of steam for tonight (hence why im here and not working on it) so ill be finishing this tomorrow#was hoping to get this part done over the weekend but i ended up not getting a lot of the writing done on friday as i intended#cuz i ended up having to play tech support for my friend so she could update her sims mods
37 notes
·
View notes
Text
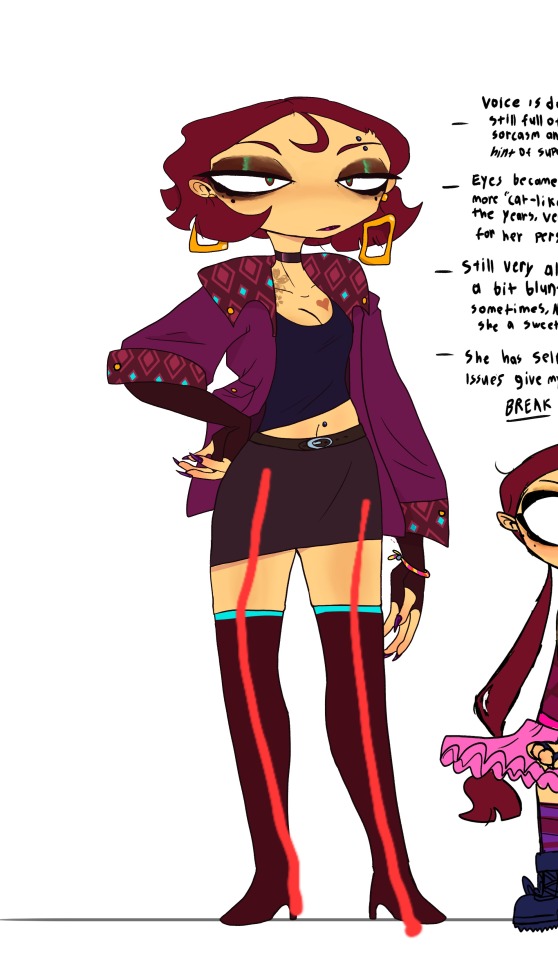
most important thing i've learned through my years of drawing is YOU DON'T HAVE TO KEEP THE FIRST DRAFT/ATTEMPT. if it doesn't feel right just throw it away! try again! just kill it! try again! 9/10 trying again gets me the results than just cleaning the first one over and over.
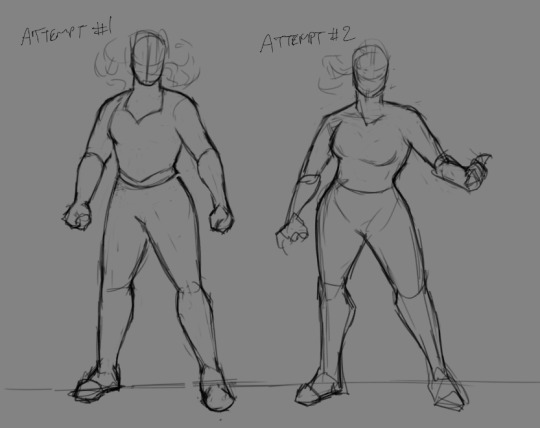
this already feels a lot better. the first one felt like she was floating but when i decided to just stop trying to fix it and just start over, i got IMMEDIATE results.
#bheart talks#a youtube video tutorial i saw years ago said ''you have to kill your babies'' like as in the things you draw/create#it sounds very harsh but the wording is like that cause. you drew something write. you created something. maybe even wrote it#so you're going to feel very attached to it you're not going to want to throw it out ESPECIALLY once sunk cost fallacy kicks in#and the best advice is just: don't be afraid. kill it. let it go. you HAVE to let it go#delete it start over try again start over do it as many times as you can#you're not STUCK on the FIRST draft of anything you make. you can always try again#don't FORGET that you can try again#the more i've started listening to this advice the better my art has gotten
13 notes
·
View notes
Text
so, you wanted to start bookbinding?
so @princetofbone mentioned on my post for "factory settings" about wanting to know more about the binding style that i used for it. so i thought i might make a post about it.
i was as terrible as i always am for taking in progress shots, but i can link you to the resources i used in order to make my book. i would also like to point out that "factory settings" is my 120th bind, and i have been doing bookbinding as a hobby for just over 3 years now. unfortunately this means some of the methods that i used for that bind aren't particularly beginner friendly, just in terms of the tools and methods i have used, but i would love to point you in the right direction when it comes to resources. i dont say this to sound pretentious which i fear i might come across, just so that youre fully informed. getting into this hobby is fun and rewarding, but it can definitely be intimidating.
with that caveat, heres a list of links and resources that i have used for bookbinding in general, with additional links to methods i used specifically in regards to this bind.
ASH's how to make a book document. it gives you a great introduction into typesetting fics (where you format the text of fics to look like a traditionally published books) and then turning them into a case-bound book (the style i used for "factory settings"). it is comprehensive, and explains how to use microsoft word to do your bidding. it was invaluable to me when i was just starting out! currently i use affinity publisher to typeset/format my fics for printing, but i only bought and learned how to use that after i had been binding books for a year and a half. i made some beautiful typesets with word, and some of my close friends use it still and design stuff that i never would be able to in my wildest dreams (basically anything by @no-name-publishing)
DAS Bookbinding's Square Back Bradel Binding. a great style to do your first bind in! this method requires, when making the case, to attach the cover board and the spine board to a connecting piece of paper, which makes it so much easier to match the size of the case to the size of the text block (your printed out and sewn fic). using this method is what allowed me to get much more accurately fitting cases, and made me much more confident with the construction of the books i was making. a well-made book is something that is so wonderful to hold in your hands!
DAS Bookbinding's Rounded and Backed Cased Book. This is the specific method that i used to create my bind for "factory settings"! even before i could back my books, i found that watching DAS's videos in particular helped me see how books were traditionally made, and i was able to see different tips and tricks about how to make nicer books.
Book Edge Trimming Without... i trim the edges of my text block using my finishing press and a chisel i have sharpened using a whetstone and leather strop with buffing compound on it. i follow the method for trimming shown in this video!
Made Endpapers. i follow this method for my endpapers, as i used handmade lokta endpapers, and they can be quite thin, but they look beautiful! i used "tipped on" endpapers (where you have your endpaper and then put a thin strip of glue on the edge and attach it to your text block) i used for a very long time before this, but these feel like they are much more stable, as they are sewn with your text block.
Edge Sprinkling. this is the method that i used for decorating the edges of my text block. but the principle is basically clamping your text block tight and then sprinkling the edges. i do not believe you need to trim the edges in order to do sprinkles on the edges, and that's what makes it accessible! i personally just use really cheap acrylic paint that i water down and then flick it onto the edges with my thumb and a paint brush.
Double-Core Endbands. i sew my own endbands, which i followed this tutorial for. that being said, it's kind of confusing, and this video is a bit easier to follow, but it is a slightly different type of endband.
Case decoration. i used my silhouette cameo 4 to cut out my design for "factory settings" in htv (heat transfer vinyl). i also used my cameo 4 to cut out the oval of marbled paper on the front, as i honestly didn't want to try my hand at cutting an oval lol. i also glued some 300 gsm card with an oval cut out of the centre of it onto the cover before covering it with bookcloth, to get a kind of recess on the cover. i then glued the oval of marbled paper onto the top of the recessed area once it was covered with bookcloth, so that it was protected. the images i used were sourced from a mix of rawpixel, canva and pixabay. a more accessible way to get into cover decoration is by painting on a design for your cover as described in @a-gay-old-time's tutorial just here. or even doing paper labels, which look classy imo.
physical materials. sourcing these will depend on your country. i am located in australia, and have compiled a list with some other aussie bookbinders of places to buy from. here is a great post describing beginning materials for getting started binding.
@renegadepublishing. this tumblr is great! its what got me started bookbinding, and being in the discord has been inspiring, motivating, and honestly just one of the best online experiences i have ever had. it is full of resources, and most people in there are amateur bookbinders, with a couple of professionals thrown in. the discord is 18+, and anyone can join!
i'm sorry this post got so long, but i hope that this has a lot of information for you if you would like to get started bookbinding. its one of the best hobbies ive ever had, and i genuinely believe i will have it for the rest of my life.
3K notes
·
View notes
Text
How To Get Your Character Models Out Of A Game: Tips And Tricks For Bitches That Have Never Used Blender
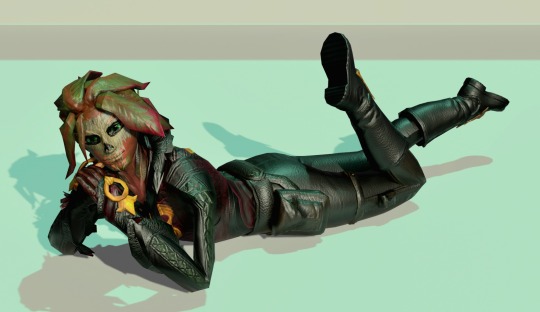
(it's me, i'm bitches)
(also ignore how messy that lighting is it's 1am and i should have been asleep hours ago. he's there for proof of concept 💕)
a couple people (specifically @forsaken-constellation and @ratasum) asked for a tutorial on how to rip models out of the game. this is not that, but it is a compilation of resources i used to learn about ripping, blender, and 3d modeling in general. i desperately wanted a post like this to exist when i was trying to figure this out, so here we go! all the resources below are completely free, with the exception of a link to the patreon of the person that created ninjaripper.
disclaimers:
there are probably more efficient ways to do the things i am doing. i watched a tutorial to learn shortcuts and then skipped to character models. if you have tips to add, corrections to make, or other thoughts, please feel free to share! i'll link to your post here. ^^
i do not know if any of this will get your account banned. i've ripped several models, so i'm going to assume it's fine as long as you don't try to make money off of it. use your best judgment, be an adult, etc etc etc
last updated: april 2, 2023
PROGRAMS & WEBSITES
ninjaripper 1.7.1 - there's a newer version on the creator's patreon, presumably with support for newer versions of blender and fewer bugs, but i haven't tried that
blender 2.79 - the import addon that comes with ninjaripper 1.7.1 is outdated for the current version of blender (3.5 as of this post), so 2.79 is needed to combine the .RIP files into a .BLEND (blender) file
noesis - ninjaripper saves your textures as .DDS files, noesis lets you view them and export them as .PNGs
blender 3.5 (optional?) - i just like it better than 2.79. if you're completely new it might not matter to you. all of the tutorials linked later are for later versions, though.
mixamo (optional) - rigs your character for you and lets you put them in Situations (like my guy above.) there's a whole library of free animations and poses you can try!
TUTORIALS
how to use ninjaripper - most of what you need to know about actually ripping the files and using ninjaripper is covered here. do not skip this one.
how to use blender 3.5 - full disclosure i haven't finished this series because it's uhhhh many hours long. but if you are a complete newbie to blender, i do recommend at least the first few videos; you'll learn about shortcuts that will make your life easier, how to unfuck your model when it fucks itself for no reason, and different terms that will help you google things you don't know later on. possibly he even covers some of the things i'm about to link! anyway.
what's a uv map?
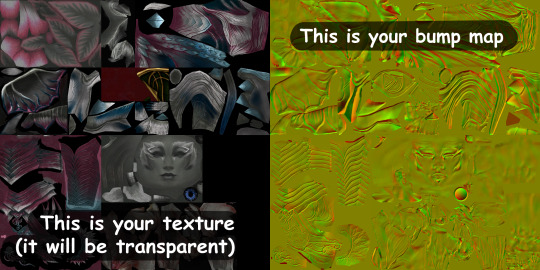
how to apply textures
how to apply bump maps (note: for our purposes, you wouldn't add a color ramp node, you would add an image node with your bump map, and attach it to the bump node as the person does in the video)
there should be stuff here about weight painting, cloth physics, emission maps (makes your sylvari glow), and other stuff, but um. i haven't figured those out <3
TIPS
TURN UP YOUR GRAPHICS BEFORE YOU RIP - if you don't, you might end up missing certain textures/glows/etc. HOWEVER, you should turn animations down, because apparently high animation can make your meshes misplace themselves
rip from the character select screen, rather than an instance, because you will have 100 meshes to sort through instead of 1400. i am not exaggerating either of those numbers. if you are new to blender, please love yourself and start with character select.
your textures will be fucked up the first time you try to apply them. this is because the UV maps (the things that tell your textures where to go) of your models are flipped upside down in relation to the texture image. you can flip them back over manually, ooooor you can just flip the entire texture file in something like CSP or photoshop.
for some reason all eyes are red in the texture files. i have not figured out why. i recommend editing the .PNG to have the correct eye color before applying the texture.
mixamo only works for humanoid characters with tight clothing (or without clothing at all). if you try to use it to rig a charr or asura, or someone with a skirt or big sleeves, you will most likely be disappointed.
that's all i can think of for now - if you have other questions, feel free to shoot them my way, although i can't promise i'll have a straight answer ^^;;
information from bookahlogy about character proportions, fixing normals, and other fun tips
447 notes
·
View notes
Note
Could you do something involving Kid and Killer for that one piece crossing au please 👀
Separate or poly, whichever you want to do ~
I think that I have just the thing for them and I’m pretty sure that I might be able to handle the two of them being poly, my apologies though in advance if I don’t do them right
But let’s get into it before I potentially start rambling about something! And I hope that this is good! I tried my best!
!-MINORS DO NOT INTERACT AT ALL-!
!-POTENTIAL TRIGGER WARNINGS-!
Violence, Murder, Sentient Video Games, Kid being Kid, Stalking, Writing Similar to Old Creepypasta, Obsessiveness, Noncon, Loss of Hope
!-POTENTIAL TRIGGER WARNINGS-!
!-MINORS DO NOT INTERACT AT ALL-!
So honestly I can imagine that you’re the next person to wind up with the One Piece Crossing game and let’s say that like how you got your hands on it was that it appeared in a used games store for dirt cheap and you were hoping to get your hands on at least something like Animal Crossing
You returned home and you got comfy before booting up the game, you did the typical stuff of customizing your character and setting the time and all that but eventually it came time to pick your villagers
You hit the random button so many times as you had picked pirates over marines, you hoped to find something that fit your aesthetic but none of them really stood out to you
Shanks and Benn, Luffy and Zoro, Roger and Rayleigh, Omatsuri and Muchigoro, Bear King and Honey Queen, Doflamingo and Crocodile
None of them seemed to fit your type until you pressed random one last time and wound up with not Kid and Killer but two other characters instead, the two of them seemed like they would be pretty alright and match your aesthetic
Like let’s say that your aesthetic is like soft and cute, these two fit it pretty well however when you go to press confirm that these are the villagers you want
Random gets hit one more time by accident and suddenly you don’t know who you’re heading out with until you arrive at the island and dread fills you when you see who you got. Two punk looking guys who look like they don’t at all match your aesthetic
It’s disappointing but it is too late to go back and change it so you’ll just have to make do with these two as you go through the tutorial and figure out how to do things
As you go through the tutorial, you talk to what’s going to be your fellow islanders and find out that although Kid is rather grumpy and makes fun of you for having trouble with certain parts of the game. Killer is at least chill as he does make comments like “You really can’t get it?” before sighing and slightly assisting to get it out of the way
Eventually when your individual homes are set up and the tutorial has ended, you’re free to start having as much fun as you’d like here on this island
You make progress through the game and start trying to customize the island to fit your aesthetic, you start around your home with a very soft almost Sanrio esque aesthetic that just feels pleasant to look at but as you start stretching it out
That’s when trouble arises as you place down an item just a bit too close to what Kid must deem as his territory causing him to rather aggressively and rudely kick it over telling you to not put that kind of shit near his and Killer’s part of the island
These are just characters in a video game so you decide to wait until Kid isn’t around to place it down again only to be stopped this time by Killer who picks it up and gives it right back to your character with a “Don’t…”
It’s getting irritating as all that you want to do is decorate your island so you reload the game when it’s late at night and when the game indicates that the two men are asleep, you decorate and put the game down for the night when you’re done
The next time that you pick up the game… Guess what’s waiting for you in your mailbox? It’s a letter from Kid and Killer with a gift attached! You open it up only to find that it’s an item labeled as “Ruined Object” and the letter simply states “Don’t try that shit again!”
It took a long time to get this item in the game so you decided to talk to them only to find a new option for conversation in the dialogue box when you spoke to Kid called “I have a suggestion” and when you picked it. He told you to be quick
You were then presented with two options one that suggested you halve the island with them and the other being to insult him but considering how he and Killer ruined your object, you could not see that going well for you so you picked the first one
“Finally you’re talking sense… What do you have in mind?”
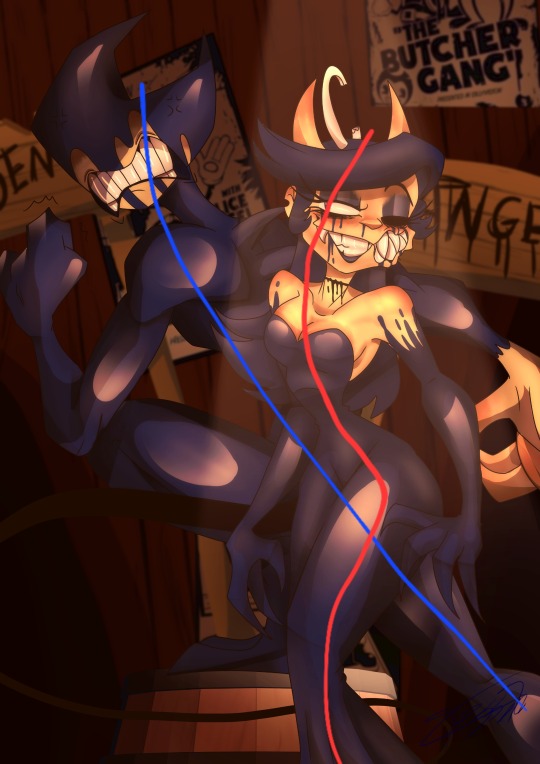
This brought up the in game map showing the island, Kid gave his suggestion first of very little of the island for you but you gave yours and drew a line down the middle of the game map. He didn’t sound happy but he told you to keep your shit on your side now
You continued the game after that and it seemed like everything was going well, you decorated your side of the island exactly how you wanted and they decorated their side too to fit their own style
When you would wander your island, you would occasionally see them on your side usually just wandering or needing to talk to you about something like “I found *insert object* and it looked like something you might want” or “Have you seen Kid anywhere? I can’t find him…”
These conversations would typically be short and the items that they gave you usually were your aesthetic but customized to be more in their style causing you to usually store it in your home inventory space or just get rid of it altogether
Eventually though you opened the game map one day to see that Kid and Killer had moved in with each other as there was one less house on the map, you went to see what was up thinking maybe one of their houses burnt down but when your character knocked and went in
You almost immediately turned around and left with a face bright red in real life the two of them were currently engaged in some very passionate activities with each other in their home, it was safe enough to say that you had your answer as to what was going on to make them move in together
They entered a relationship with one another and the game made it so that they moved in with each other as a result of it
You really weren’t expecting that sort of graphic scene to be in a game like this but then again, it wasn’t exactly straight up animal crossing so you just tried to forget it until you got a letter telling you to take a picture next time as it’ll last longer…
The game continued on after that with you hopping on for at least an hour everyday to do stuff, a few more villagers even moved in as well. Heat, Wire, and a few other people as well who all choose to live on Kid and Killer’s side of the island
It didn’t bother you though considering they much more fit in with their aesthetic anyways
There were a few days where you didn’t play as you were busy and whenever you returned, the two of them almost seemed slightly curious like “Where were you yesterday?” and “Don’t sleep so much… I’m not gonna wake you up if you do…”
But it was one day however when you and a friend of yours decided to try something as they had a copy of animal crossing and wanted to see if they could visit your island
So you did and your friend’s character was soon running around your island with you, the two of you were having quite a bit of fun as you both played around in every way that you both could think of but that fun started to come to an end when one of your villagers wandered onto your side of the island
It was just Killer at first who came up to you and asked who that guy was when you choose the dialogue option of him being your friend, Killer’s model visibly looked your friend up and down before turning back towards you and telling you to straight up ditch them before ending the conversation
After that, you continued to hang out with your friend but oddly enough you kept running into your villagers. It wasn’t just Kid and Killer who you kept running into either as you even encountered a few of the other villagers
All of whom told you that Kid and Killer were looking for you like “Killer wants to talk to you about something” or “Kid has something for you” but you always just ignored them thinking you could see them later
Eventually though, Kid came out of nowhere and entered a conversation with you while you were in the middle of something. You tried to speed through his dialogue by mashing the button but by the end of the conversation, he looked visibly pissed
Once that was done, you couldn’t get rid of him as he followed you and your friend everywhere like were you and your friend just trying to fish together to catch something? There’s Kid standing right in between the two of you
Honestly he almost seemed to be trying to get your attention too as he would make jokes about the small fish that your friend would pull up but if you pulled up a small one then he would give a gruff “Nice job”
This only ended when your friend finally left and you both agreed to meet up on his island next time due to the actions of your villagers
And when you did, you had a ton of fun but when you had your character return to your island. Almost immediately they were practically swarmed by Kid and Killer who demanded to know where you had been
Then after you selected the dialogue option to tell them, they looked visibly angry like “Didn’t we tell you to ditch that guy? They’re not good for you…” among other things
Eventually you got tired of it and decided to shut the game off while they were speaking as it wasn’t like you were going to lose any progress and besides you needed a break from that shit…
Especially when you hopped on the next day only to find your house that you had worked so hard on looking absolutely trashed
So you took a break for a good long while and played on your other consoles whenever you got the urge to play something, you even spent time with your friend in real life and the two of you got closer. You didn’t start dating but it could be assumed that you were
When your friend told you that they had something to give you on the game, you booted up your console at the same time that they did only for something that made you scream bloody murder to happen
Almost as if you had suddenly stepped into a horror movie, a large metal hand shot out of the screen and grabbed you in its grasp, your friend tried to pull you out of its grasp as you were pulled in but wound up getting sucked in too
Once you both had crash landed, you saw that you were being held by Kid as he wrapped one arm around you that kept you pressed tightly into him no matter how much you struggled
Your friend was lying on the floor looking dazed and confused, they barely even got a chance to register anything before they were suddenly cut down by Killer and as their blood was splattered across the floor, you found yourself as the center of their attention
“What do you think you were doing cutting us off like that when we were trying to talk to you?”
“We told you to ditch that guy and you brought them over… You mind as well have fucked them right in front of us with how close you two were!”
You of course tried to fight against the two of them with tears in your eyes as they both dragged you home, your island had been completely changed as well by them and the others. It was practically unrecognizable
Your home was no better as it had changed for the worse, the entire thing was completely in their style compared to yours as they dragged you upstairs. They threw you onto what used to be your bed and suddenly you were seeing notifications pop up in front of you
All things saying that while you’ve been asleep, Kid and Killer took over the island as its new leaders and completely got rid of the fact that you halved the island with them. They renamed the island as well and not only that but apparently entered a relationship with you as well
With eyes wide, you read all of them and didn’t quite know what to think but you didn’t have much time to think as you were slammed back onto the bed quite roughly to the point where you were sure you would have a nasty bruise
”If you want to cheat in front of us with someone like that then we’ll just have to remind you of who exactly you belong to…”
And it was after that when your outfit was completely ripped away from your body as they held you down and used your body like it was a sex doll as they made you move into so many positions and made you do so many things
By the very end of it… You were so relieved that it was over as you were covered in sweat, tears, bruises, bites, and a lot of cum…
“Better not try anything like that ever again…”
There was no escape from this game and you were stuck here forever with the two of them, they forced you to dress in a style exactly the same as them and treated you like a toy
They would tell you that they loved you dearly so there was no reason to act like you were trapped in some kind of horrible situation, you just needed to be reminded of who you belonged to is all and they were sure that you would be good now
Over time, they did start to become more kind with you even if just a little bit as Kid did start actually allowing you to leave the house without one of them. It wasn’t like you could go anywhere but they did tell you that these things could be revoked if you acted up
Eventually once you were good enough, Killer even allowed you to have something from your aesthetic and despite the slight bit of comfort that you felt when you held it
You knew that it could be easily taken away from you at a moments notice especially if they ever saw you trying to find a way out of the video game and back to the real world
Really truly… You just needed to accept that you would be here forever… There was no way out with them…
They had taken over your island, they had forcefully started a relationship with you, and they had shown what they were willing to do if you ever misbehaved too much
Plus what would you tell the police about what happened if you ever made it back? Your friend had been pulled into a video game with you and murdered by the characters? Like they would ever believe you
So… You were going to stay here forever and simply hope that maybe one day just one day, you would potentially free
Although you knew you never would be
#minors dni#the rain talks back#yandere#yandere one piece#reader insert#read the trigger warnings#yandere male#Yandere Eustass Kid#Yandere Killer#Yandere Kid Pirates#One Piece Crossing AU
20 notes
·
View notes
Note
i just got a funny ass idea for a request
nagi who got bored one night and decided to summon an angel at like 3am but gave up half way through the ritual because it was too much work so he just ended up conjuring an angel-demon reader instead
Real canon actually happened
Requests open! - event list
Tags: gn!angel-demon!reader x Nagi, this is before Nagi became friends with Reo
First meeting
Although being with others is exhausting and a pain for him, Nagi can't help but grow to hate the feeling of loneliness. But due to him having zero social skills he already knows he can't just make friends in school. One night, he comes across a "How to summon an angel" tutorial on YouTube. He doesn't completely believe it'll work, but he decides to try it anyways. Although in the middle of it, he realizes how much work he has to do for it and just gives up. What he didn't know is how this results in summoning an angel-demon. Nagi doesn't even bother cleaning up the mess he caused, he just decides to go back to bed. But he's wide awake again the moment he sees you standing in the middle of his room. "You... summoned me...?" You ask, a little unsure of how to act around a human.
General headcanons
-most of your time is spent just sitting next to Nagi and watching him play video games. It's rare for you to have conversations, but you don't really mind that. The silent time spent together is kind of nice
-although, you also spend a lot of time trying to get Nagi out of his bed. You want him to at least clean his place every now and then. He only agrees if you promise to help him and take a nap together afterwards
-Nagi really likes your wings. From the front, they look like regular demon wings but on the back, they're full of soft feathers. Nagi really enjoys touching them because the contrast is interesting to him
-one time Nagi pulled on your tail to get your attention and you had to try really hard to not yell at him. It didn't hurt, but it still felt very uncomfortable
How you fell in love with each other
You got attached to Nagi very quickly, but it took a few more weeks for your feelings to turn into romantic love. Nagi fell for you a little faster, but he only recognized those feelings when you confessed your love to him.
Taglist (sign-up link): @zyuuuu @luvcalico @remy-roll @rienniey @kalinkavx @deerangle3 @acacIa @kermitslefteyeball11 @futuristicxie @bluelock4life @blueberrryui @sagejin @https-archangel @ririgards @kaiserkisser @userwithlotsoftime @chaosinanutshell @mang05 @peachesncats @0rah-s @isagikisser @starchivves @arxliana
#💟 love between heaven and hell#💟 maochira writes#blue lock#bllk#bllk x reader#blue lock x reader#blue lock x you#bllk x you#bllk headcanons#blue lock headcanons#seishirou nagi#nagi seishirou#nagi x reader#nagi x you#seishirou nagi x reader#seishirou nagi x you
71 notes
·
View notes
Note
hello, i am a big fan of your gifs & am teaching myself to make my own! just wondering - when you want to make a gif that is one column wide (540px for tumblr) how do you keep them looking so crisp? i find that im struggling with landscape videos because they are so wide, i'd like a more square shaped gif but it ends up as a rectangle. if i try to size it down to a square the quality is skewed 🙃 hopefully this makes sense! xx
anon im so honored here is a little Gif Sharpening Tutorial !!!

this is the first gif making question ive ever gotten so unfortunately this will also be the first time i try to verbalize these gif making stuff. if there are things i haven't explained clearly please do follow up (my dm is open too!!)
the thing with wide (3:2, 16:9) gifs is that you normally obtain this kind of ratio by shrinking the clip (1920px width and up) down to 540px without any cutting, which is about 1/4 of it's original width that you'd end up with, which means you're losing 3/4 of the pixels in it's width, which is a LOT of details lost in the process, which is why we can't sharpen wide gifs the same way we sharpen square/squarer gifs, and i feel like we should talk about these two scenarios separately. (with square gifs, assuming we're working with 1080p, we'll cut it from 1920x1080 to 1080x1080 or less, and then shrink it down to 540px. this way we'd only lose less than half of the pixels. it's a lot less details we're losing here. as a result it's more tolerating towards sharpening techniques)
ok this is where i take a pause and ask myself when tf did i get so technical about moving picture making on tumblr dot com... ok let's keep going...
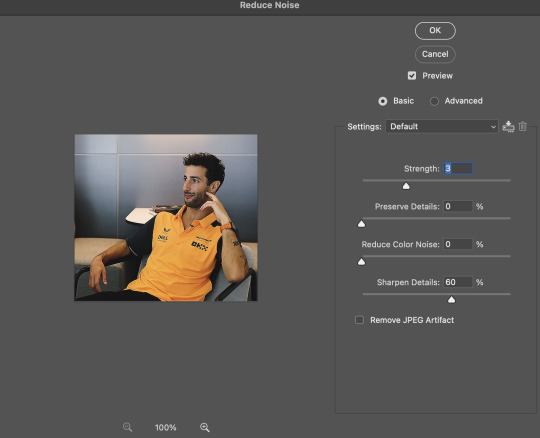
Basic Sharpening
soo how i normally sharpen my gifs (which are more often on the squarer side) is based on this awesome gif tutorial, the idea here is that we smart sharpen our gifs first, which will inevitably result in pixelation (over sharpening) to some extent, so then we use a semi transparent gaussian blurred layer to repair these pixelation and hopefully make it smooth and sharp. in addition to following this tutorial you'll also want to play around w the parameters (radius, transparency, sharpening amount, etc) as there is no one size fits all.
after following these steps, if i want to smooth things out even more, i'll use a layer of denoise (see below for setting i normally go with). if i want things even sharper, I will add another small amount of sharpening (again, see below). these two methods can be used together. imo they are what make a gif go from "omg it's crisp" to "i feel like im looking at daniel ricciardo in person what the fuck". the two gifs i attached at the beginning can hopefully showcase the difference <3

2. Sharpening Wide/Landscape Gifs
ok, at this point you've imported a 1920x1080px footage into ps and made it into a timeline, you've resized it to 540p and if you're using the gif tutorial above, you'll start off your sharpening process by doing a 500% 0.4px smart sharpen. after the basic gif making steps, this is gonna be the result:

it's pretty sharp, but it doesn't look as good as the ones at the beginning of this post. in this part we'll attempt to minimize this difference as much as possible.
first we take a closer look at how 'radius' in photoshop's smart sharpen works. to my understanding, radius is the width at which photoshop recognize an edge as "an edge that needs sharpened". in this example, you'll see that at 0.4px, the edges stand out the most, but the gif is not as crisp/fine as that of 0.3px (since a 0.4px edge is thicker than a 0.3 px edge). a 0.4px radius for this gif is what i'd say is over sharpened. on the other hand, if we go further down to 0.2px, the image is basically left unsharpened bc photoshop failed to recognize most of the edges this image contains (as they're mostly 0.3px and up)

so in the next step, we set the initial smart sharpen radius to 0.3px instead of 0.4px:
which is much better. but still doesn't solve the loss of detail problem as it's still pretty far away from top left. so then what i would do is that, when shrinking the image down from 1920px, i don't go to 540px directly. i will instead go to 1080px or 720px first, sharpen as i normally do to preserve as much detail as possible, then further downsize to 540px, and then add a small amount of sharpening to finish off. it'll look something like this:
720px w/ regular sharpening ⬇️

resize to 540px ⬇️

smart sharpen, amount: 90%, radius: 0.9px ⬇️
which will be the end result!!
this gives us way finer edges than what we started with (500% 0.4px) let me actually insert that one again ⬇️
however... (this is gonna be the last part i swear). even tho this is how i would do a 540px wide landscape gif, i feel like with 16:9 or similar ratio gifs, tumblr gif size limit is rarely a concern so why not leave the gifs at 720p so there isn't even additional detail loss to begin with. ik every gif tutorial is likely telling you to resize to 540p but, in a lot of the cases the less extremely you shrink down an image, the less detail you lose, the better it's gonna look on the screen. here is a comparison between the 720px gif (top) and the 540px gif (bottom) we ended up with where the 720px one looks a lot nicer (esp around the curls)
to sum up! with larger ratio/wide gifs, if the original video is of nice quality, i would stick to large sizes (720px and up) as much as i can. if that's not doable, i will sharpen the gifs at a larger size before shrinking it down to 540px so the details are better preserved.
---
Hope this is helpful! again ty for this ask and my ask box and dm are always open <3
109 notes
·
View notes
Note
Your rendering talent is out of this world, I am stunned by your feed 🤍🩶🖤
Do you have any particular tutorial(s) you found useful in this matter ? Thank you very much !
Hi ! I'm little late ...... but so heartwarming words, thank you so much ! 🥹
1 ) all of my renders are eevee, but there aren't many videos with both Sims rendering and also blender tips :( So I'll just attach a video that I briefly referenced, plz understand !
[ video link ]
2 ) I think one of the most important things about blenders is lighting. But I can't see the video I used to refer to in the past 🥲..... (+ it's all korean videos) so i found other similar video, there is eng sub so hope it helps!
[ video link ]
When starting the blender for the first time and don't know how to put the lights, i think this would be little bit nice to refer to this video.. I'm still newbie in blender 😅 but still, let me know if you have any questions! I'll reply anytime.
20 notes
·
View notes
Text
WELCOME BACK, TF2 COMMUNITY!
We want to apologize for the period of inactivity. We did not publish anything since the main amdin presented psychological difficulties, but, we are back.
It's been a while since our last post. However, we have not been able to collect much information but we have something that will surely interest you.
Many would think that hackers and people who hire bots like to remain incognito, however, we found a YouTube Video which took us to an account of a person whose sole purpose is to ruin games from tf2.
The account is called "rosne gaming" and has a total of 55 videos, as well as a Discord server and 15 lives.
We ask you please not to use this information in a bad way. However, this YouTube account has more than one tutorial, explaining how to hire bot services. Lately we have been reviewing and monitoring tf2 games, and we noticed that the tricks that this user affects are usually tfort, and hightower.
Below we attach screenshots.
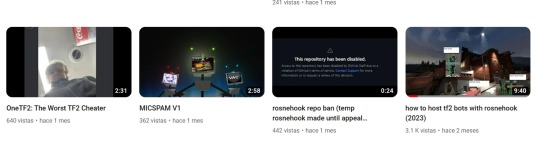

We ask that you please report this account, and if possible, make sure to expel, pop songs that you see from all the servers, these bots hired by this user usually join, they have a link with the name of their channel, so remember to report them.
The following months we will be more active and bring constant updates on the various issues affecting the community. Tf2. Thank you for the support you have given us and until next time.
25 notes
·
View notes
Note
How do you make gifs?
Hi! The process I use is done completely online using several websites (which will be attached here). In fact my process probably makes things a bit more complicated than it really should but tbf I don't know how else to do it pff
First of all, you'll need to download whatever you want to make gifs from in a mp4 format. If you're grabbing a video off of YouTube there are plenty of YouTube to mp4 websites available online. However, if you were to download from a different website (such as Newgrounds, for example) then you'll likely have to install a browser extension to download videos. For example, since I use Firefox I use the Video DownloadHelper extension.
Once I have the video I need I drop it into Canva, though any video editing website/software works. All you need is a program that allows you to crop videos and export them in a gif format. If not then you can export the cropped video in an mp4 format and use a website/program that allows you to convert mp4 files to gif. I recommend the following sites:
Ezgif
CloudConvert
FreeConvert
However, I'm going to use Canva for this tutorial since it's how I work.
First of all, you gotta upload your video to Canva (it will appear beside the blank 'canvas').
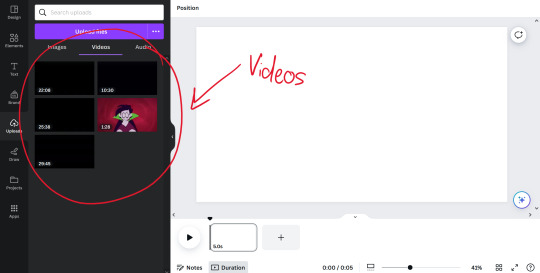
Once you've uploaded the video(s) you want to make gifs with, all you need to do is drag and drop them onto the blank canvas. It should automatically fit it to fill the whole canvas if you drag the video to the edge of the canvas instead of the middle.
All you have to do from here is figure out which part you want to crop out! The great thing about Canva (and some other programs, though not all) is you can search through the timeline frame by frame with the arrow keys to make sure you get the exact part you want (just make sure you click on the timeline before you start touching the arrow keys, because if the video is still selected you'll just end up moving the video across the canvas pixel by pixel).
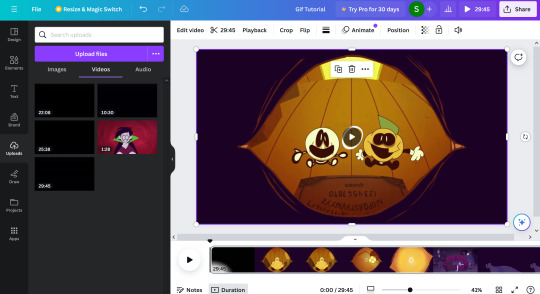
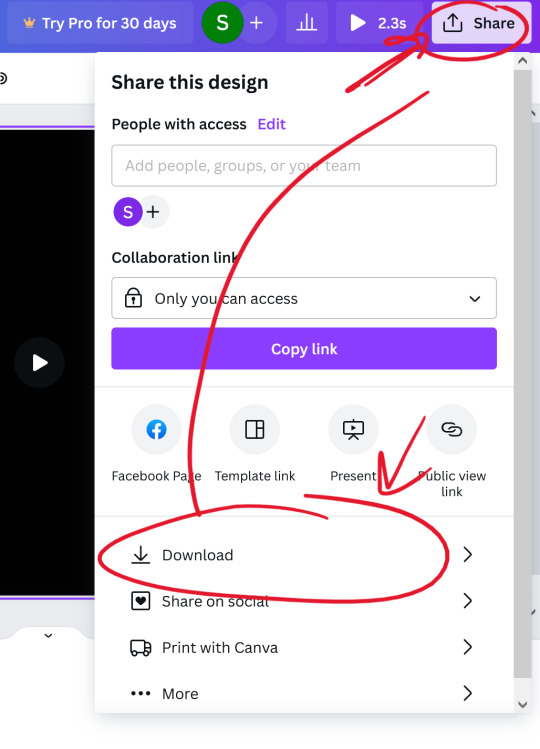
Once you've cropped out the part you want, all you have to do is export it as a gif. You do this by going to 'share', 'download', and choosing gif under the 'file type' dropdown.

(Once you select the gif option, don't worry about adjusting the size of the video.)
Once you have your gif you can stop there! Unless you want to crop the gif to focus on a specific character or section of the scene, for example. If you plan on making a gifset just remember to keep the same aspect ratio for each gif.
I use Ezgif to crop my gifs. It makes the process extremely simple and has several presets for the aspect ratio too!!
And yeah! That's about it! I hope this tutorial makes sense,, it's my first time making one qwq but if you have any questions just lmk!!
10 notes
·
View notes
Text

* ( ❀ ˆ꒳ˆ˵ ) ♡ Ꮺ 𝗧𝗜𝗡𝗬𝗧𝗢𝗪𝗡𝗦 — 𝖩𝖤𝖮𝖭𝖦𝖧𝖠𝖭.𝖠𝖳𝖭 ੭

— introducing jeonghan.atn version 01 & 02 , this is a photoshop action that uses topaz clean and is designed for medium reaction gifs with a sizing of 268x151 but can probably go up to 268x165 ! this is my first time messing with topaz clean by myself so it's not going to be perfect , which is why i included two versions + feedback is heavily appreciated ♡ download is in the source link + below the read more along with a known bug & fix. please like & reblog if you plan on using this action ! it will not work unless you have topaz clean , but to my understanding it is now free so i'll link it below and hopefully it works for you ( ˘͈ ᵕ ˘͈ ♡) ~
❀ DOWNLOAD + DISCLAIMER.
download the action file - here
you require topaz clean otherwise this action will not work. from what i've been told topaz clean is now free and you can get it here by scrolling down to "classic plugin downloads" and downloading "clean" for either windows or mac.
❀ APPLYING THE ACTION + BUGFIX.
it's not always obvious , but if you observe the top and left side of your gif you may notice a strange line where the clean doesn't seem to have applied. this has an easy fix ! it's not actually prominent on the gif i used for this example but i've attached a video tutorial on how to fix it if it effects you.
watch the tutorial - here
from 00:00 - 00:56 the video shows you how to apply the action.
but make sure "actions" is ticked in the windows tab and that you've actually loaded the downloaded action; you can load the action by clicking on the four lines in the corner of the action tab and selecting "load actions".
from 00:56 to 01:55 the video shows you how to fix the bug if you encounter it - just drag the rectangle selection tool down to where you see the bug end. it's not the proper way to fix it but it works at least. looking back , i can see that 0.4 on gaussian blur looked a little strange so i would fiddle with the number again and see what looks best.
❀ RECOGNITION.
this action was inspired by xb3/apa/nd/4's own topaz action , but was never reuploaded by them when their account got deleted. you can view their remade deviantart by searching the name above without the "/s"

what the gifs look like with colour if anybody's curious </3 this will always vary of course but i happened to think the black and white version showed what it actually looks like in photoshop more effectively.
#photoshop action#action#rph#rpc#gif action#resources#rph resource#rpc resource#action resource#rph action#rpc action#free rpc#free rph#free#tinytowns#m: resources#gif resources#gif resource#ps action
102 notes
·
View notes
Text
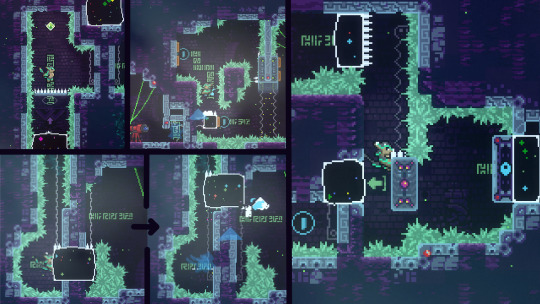
Shade World by coffe is a low-intermediate map published in March of 2021. It is one of the definitive experiences of the Celeste modding community, immediately going down as an instant classic on launch and being one of the all-time most popular mods to date. It is my personal comfort mod, something I can always come back to and enjoy when I can't pick up anything else. All that praise, and it's coffe's first published mod!
Do you want to know what I thought about this map when it first released? Back in those days, I was still a fledgeling modder, without a lot of the skills and experiences I have today. I watched an iamdadbod video, I heard him talk about it, but I was skeptical.
'Is Shade World really that good? This looks like something that I could make. It seems a bit much to call this the Map Of The Year.'
It took me a while to actually play it myself. Well, here we are. Now I'm here about to tell you in no small amount of words why Shade World really is 'that good'.
I. Gameplay
Shade World starts off with two central mechanics: jump refills and swap blocks. The very first room shows off the jump refills as a way to stall, waiting for the swap block to return. The player is then allowed to stand and think before doing the swap block part of the room. The next room adds springs (an excellent addition to all maps) and uses the jump refills in almost exactly the same way. To reinforce the learning, the same setup of using two jump refills to wait for a swap block to move is used, this time using the swap block as a hazard rather than a platform. From here, gameplay is allowed to become more fluid, with a focus on swap blocks. coffe has more or less established jump refills as a "standard" mechanic, on par with regular refills or springs. There is now space for more mechanics to fill in the spotlight.
And that is exactly what comes next, in the form of wall boosters. The "intro" room is again split into two different sections: a standard wall booster walljumping section collecting touch switches, then a showcase of attached wall boosters. Wall boosters don't attach to entities in vanilla; this is actually a case of another custom mechanic introduction! The wall boosters are attached to falling blocks, with placement in a way that guides you in the right direction even if you don't know what to expect. The next room uses the attachment even more clearly: placing it on a swap block at the very beginning of the room. The block has the wall booster on the left and springs on the right, which acts as both an addition of familiarity (the player already knows springs can be attached and understands this behavior) and a clever re-use of the swap block in the gameplay.
The final room of this checkpoint brings jump refills back into the spotlight, where the player must smuggle four jump refills to the very end of the room through some platforming. This is the first instance of preserving jumps like this; with only one exception so far, jump refills are used immediately after they're collected up until this point. The way that the level is constructed has an interesting callback to hint at this solution. That one exception was on the first screen of this checkpoint, where an extra jump is held through a dash and a wall climb over a wall booster. That room and this room both end like this:

The first with two jumps, the last with four. The spinner gaps are familiar and tell the player how many jumps are required (the same as the number of refills in the room). It's a helpful detail, but if that's not enough this room also comes with another hint I'll get into later.
Checkpoint 3 changes scenery with a dive into the temple, introducing dream blocks as another mechanic. Following this is an introduction to dreamgrabs, complete with bird tutorial. Here, dream grabs are followed by a wall booster. This pattern actually continues through the entire map; every required dream grab is on a wall booster! This is a great pattern for several reasons. One, it adds a distinct visual cue to each instance, as an inexperienced player might not be able to read them when "naked". Two, it gets the player moving again, keeping the gameplay fluid and interesting.
Next comes dream swap blocks. This is the spiciest mechanic of the map, and is introduced in a fairly sterile environment. The player is immediately shown how you can get pushed while in the dream state, and that it spits you out somewhere that doesn't really feel expected. The next room kind of uses dream swap blocks in a way that would feel basic for its component mechanics, as a way to ease the player in. After that the setup from the "sterile" introduction is used to kick off gameplay, where the gameplay after this setup is back to familiar territory. It's a good way of taking a complex mechanic and showing it off step-by-step.
The next step is mixing dream grabs into the dream swap blocks and showing off the momentum that they can give, which more or less completes the library of tech this map uses and brings it all full circle. With that, the final few rooms show off everything that coffe has been building up to. The last room (almost) starts off with a recap of each mechanic in order, then after some more gameplay ends with a triumphant launch to the end of the map.
Let's not forget that, underneath this all, the gameplay is built upon base swap blocks. And that works really well because swap blocks are fun! It's one of everyone's favorite mechanics, so I know I don't need to explain in detail why they're so great. I just want to point out that, with all the thought I've given the mechanics, that I haven't forgotten that the core of what makes good gameplay is that it's fun.
All in all, it's a great progression of mechanics with introductions built on familiarity. More complex ideas are given more time and explanation than others, meaning time and space is well used. Each mechanic is given its space in the spotlight and on the sidelines, avoiding a clutter of too many mechanics too soon. Everything is kept within the same realm of difficulty, with the map's ending using presentation and a combination of all mechanics instead of spiking difficulty for content.
II. Strawberries
Shade World has a few different kind of strawberries in the map, which I think is notable enough to briefly cover in its own section. Usually in custom maps, I think of strawberries as extra challenge rooms, with gameplay a step up from the any% route or sometimes using a silly mechanic or interaction. Shade World, with its 14 berries, only uses 5 in this format. What does it do differently?
Three more berries are in offshoot rooms as well, but with no gameplay inside of them. Instead, the challenge (usually a very light challenge) is to get to the room in the first place. Inside is the berry, as well as some "lore", in the form of dialogue with statues.
The rest of the berries are in the main gameplay rooms, usually at the end, requiring just a little bit of extra gameplay to get. I feel like these berries work the best. Rather than requiring more knowledge or technical skill, it just needs a bit of confidence. They're more appetizing to try and get when they're placed in the main rooms, but juuust out of the way, compared to placed in a side room almost as an afterthought. The style fits an easier map as well, where difficulty is not a defining feature of the map, making difficult side rooms feel out of place.
Of course, the best thing about the berries is that there's variety between them. Each type of placement has its ups and downs, and Shade World capitalizes on this by using all of them in decent quantities.
What Shade World doesn't have are winged berries and seeded berries. If you're using the map as an example, don't forget about these options to make your berries even more interesting.
III. Atmosphere
Shade World has a very distinct and unique visual style, but nearly exclusively uses vanilla assets and recolors.
To start off, foreground tiles are summit and temple, summit being a recolor and temple being vanilla. The "summit" background tiles are actually custom, although I always thought it was an edit of bgSummit or bgLostLevels. bgTemple is also used (not sure if A or B). Most decals are farewell plants, reflection crystals, or temple decals, usually recolored as well. The first styleground is an edit of the chapter 6 plateau styleground that loops, plus some summit mountains; the second styleground is a temple recolor. Most of the few custom things are decals, with some extra ferns, hint markers, and secrets.
The entire deco is built around the same color scheme: purple and green. Tiles and backgrounds are the duller but more comforting purple, and hazards and highlights are a very punctual green. Even jump refills, normally blue, are green like dash refills to fit in the color scheme. It is always very easy to see what needs to be seen.
There are layers and layers of detail poured into the deco, each of them small and simple but compounding to mean a lot more. Plant decals wave in the wind (something they don't normally do in vanilla). A foreground dust styleground starts blowing leftward in checkpoint 2. Bird entities are present at the beginning of checkpoint 2. Vine decals are used in both the foreground and background. Spinners are slightly rainbow-ified, and I think the colors slightly change between some checkpoints. The plateau styleground has two animated frames instead of being static. I'm sure there are more details I've missed.
The three "lore" berry rooms also add to the atmosphere with the small bits of dialogue. They're vague and sometimes a bit silly, but they add charm to the map. At the very least, it shows that coffe did not forget about the dialogue cutscene features of Celeste, which many standard gameplay mods don't have!
And the music, oh the music. SO good. Phenomenal. It begins as mostly ambient synth, some basic chords. It layers in piano, bass, and a lead once gameplay starts. These layers will come in and out depending on where you are in the map, instead of merely always building up. Once you reach the temple, the halfway turning point of the map, the music fades before coming in with a new pattern. Layers continue to come in and out as appropriate, before the music fades once again and comes in with its final progression for the last room. I love the music so much. Listen to it here and follow the composer at @neozoid. :)
I will also briefly mention the overworld colorgrade and custom heart UI in the chapter complete screen, as well as the endscreen being a combination of custom art and a vanilla endscreen layer.
The Shade World atmosphere is built off of a lot of small, reasonable edits to what is already given by the base game. The deco is based around a clear and high-contrast color scheme, which makes gameplay easy to read. Any screenshot from the map is easily recognizable as being from Shade World. Details in decals, in entity deco, in stylegrounds, and in dialogue all compound to add a lot of depth to the presentation. All while an absolutely banger track plays in the background.
IV. Hints
Shade World uses a few different visual indicators for different reasons, but they all offer an unintrusive way of leading the player in the right direction without explicitly saying anything (most of the time).
First off, lightbeams indicating side rooms. In custom maps, sometimes lightbeams are used for side rooms and sometimes they're used for main rooms, which can cause confusion. Shade World's first branching room has the lightbeams on the harder to reach transition, which is the berry. Even if the player goes on the main room first, they are given the option to go backwards, and both rooms have watchtowers so it can be seen whether the room ends with a berry or with more rooms. This is immediately built upon as this next main room has a hidden side room, the first statue berry. The lightbeams come out of the fake wall, but it's still out of the way enough to not be overly obvious. It's a great reinforcement of the standard the map uses and a pleasant reward to those who pay attention.
Checkpoint 2's final room, the extra jump smuggle room, has a hint dialogue option in addition to the passive hint in its structuring, as previously discussed. The first interaction explains that this is a hint to use if you get stuck, preventing the player from accidentally spoiling themselves the solution if they don't want to. When the hint is actually read, it is worded in a way that isn't just the solution. "Save [extra jumps] until you really need them" is a more elegant way of saying "Save all four extra jumps until the end of the room".
The dream swap blocks become relatively more complex in routing, and temple decals help point the player in the right direction in various forms. Symbols always path the player's trajectory. Arrows are placed in helpful spots, but subtly. Here are a few examples:
All of these instances make the playing experience easier without being intrusive. It works really well in this style of map that's built to be approachable but uses a complex and nuanced mechanic. It also goes to show that hints aren't always explicit and separate from the rest of the map.
V. Conclusion
Why go through this map in such detail in the first place? Well, I want to show that, when I said 'this looks like something that I could make', I was right. I can make this, and almost anyone can. By breaking down the map into its component parts, I hope that I revealed that its just a collection of very simple and very achievable design elements. Gameplay is built upon a straightforward introduction of several mechanics, which all have intuitive ties to vanilla mechanics. Decoration is almost all vanilla recolors, centered around a visual identity in purple and green. Level design is fun because it's friendly, not because it's over-the-top.
I should also state here that Shade World was not a one person project. The music was made by neozoid as I said earlier, and the bgtiles were an edit of Nikko's, the overworld stuff was two more people, neozoid and one other did some art, and playtesting feedback was received from several people before and after the map released. Anyone can ask for help! Know your strengths and play to them, and never be afraid to reach out to others to fill in for things that you can't do yourself.
This isn't a complete tutorial on how to make a map, or how to do level design, or how to deco, or whatever. I'm just going off this one piece of material, and I can't say it does absolutely everything perfectly. But good maps succeed for a reason, so if you're a mapmaker I definitely encourage you to play the maps you like over and over again to try and spot what makes it tick.
Basically, I like Shade World a lot.
Remember to leave a like on the GameBanana page if you enjoyed! It really, really helps.
24 notes
·
View notes
Text
Things I love about Ahsoka Ep. 7: Dreams and Madness
Anakin making holo-recordings for Ahsoka.
All I see is Anakin making video diaries and tutorials for his little sister. We hadn’t hear him say it, but he absolutely loves her and cares a lot for her. The question now is, how the hell did she get hold of those holo-recordings? Also, we need to see all 20 of them. I also think she had probs shown it to Luke and Leia at some point.
Leia saves Hera.

Of course, Leia would save everyone’s ass from trouble. It has always been her thing. C-3PO's timing was perfect. Also, Senator Xiono can go fuck himself. Chopper ready to throw hands at a senator is icing on the cake. And if they translate what he said, the entire thing would probably be bleeped out.
Huyang is an Obi-Wan Kenobi droid version.
Huyang complaining about Ahsoka’s reckless actions is so funny to me, honestly. In a way, she's being the Anakin to Huyang, being that Voice-of-Reason Obi-Wan persona to contradict to.
Thrawn’s mini-heart attack when he finds out who Ahsoka’s master was.

Thrawn, externally: *pokerface*
Thrawn, internally: What? No. That togruta bitch was trained by Anakin fucking Skywalker?! Omfg, this changes things.
So, a little background, Thrawn had always admired Anakin Skywalker and had worked alongside him since the clone wars, then as Darth Vader during the empire era. And to put it on modern terms, Thrawn was his biggest fan. He knows how powerful Anakin was and what he was capable of doing. So knowing that Anakin taught Ahsoka is information that could either make him or break him.
Ezra’s reaction to Sabine telling her about Ahsoka taking her as her padawan.
His reaction is the most Ezra thing ever. Obviously, he didn't expected Ahsoka to take on Sabine as her padawan considering she isn't force-sensitive. And Ezra is literally all of us when when we first watched the show, btw.
Ahsoka and Sabine’s Force bond.
It’s natural for the master and padawan to have a bond through the Force, regardless if jedi or sith. But with Sabine’s lack of force-sensitivity, this was something I did not expect. But nevertheless, I’m extremely happy about it.
Ezra and Sabine’s chaotic sibling energy.
We all know Ezra and Sabine go way back. They’ve been friends for a long time, they radiate chaotic sibling energy (sorry, sabezra/ezrabine shippers), even to the point of arguing while fighting for their lives. It's good to see that some things haven't changed.
Ahsoka and Ezra’s hug.
The last time these two met each other was in the World between Worlds, after Ezra saved Ahsoka from Darth Vader. Ahsoka had promised to find him when they get of there. But then again, they were at different points in time and Ezra disappeared with Thrawn to another galaxy. That makes this hug much more heartfelt and meaningful.
Ahsoka Tano of the Disaster Lineage™
• Unpredictable
• Reckless
• Purposely coming in late just to make a dramatic grand entrance and/or exit
• Never runs out of sassy comebacks when talking to the enemy
• Annoying the crap out of the people around them
• Has the signature troublemaker smirk 😏
• Expert lightsaber duelist
• Not following the no-attachment-rule
• Having good friendship with their padawans
Yep, she checks all the boxes and just further cements herself as part of the infamous Disaster Lineage™. Not to mention that she's indirectly teaching Sabine the same stuff. I can already hear Force Ghost Anakin cheering her on.
There are a lot of loose ends to tie in the season finale. Let's hope they'll give us an epic one and an interesting plotline for season 2.
#star wars#ahsoka series#ahsoka spoilers#ahsoka episode 7#dreams and madness#ahsoka tano#sabine wren#ezra bridger#hera syndulla#leia organa#luke skywalker#anakin skywalker#obi wan kenobi#huyang#c3po#chopper#shin hati#thrawn#star wars ahsoka#ahsoka
42 notes
·
View notes
Note
👁👁 i recall you bookbinding at one point in time, what would i need in order to do the very basics?
So I have great news for you: bookbinding is SHOCKINGLY ACCESSIBLE and very very easy to pick up as a hobby! (But it's an unusual enough hobby that everyone around you will just ASSUME you have highly specialized and developed skills, hahaha).
I made my last few bookbinding projects out of stuff I had around the house. But prior to that, I got almost all of my supplies from the dollar store.
You will need:
-Paper (any. Big enough to fold to whatever size you want your book to be)
-Some sort of chip board or cardboard (I like buying dollar store sketchbooks...the backs are this perfect dense-but-thin cardboard, and I tear out the pages for my paper. I basically flip a cheap generic sketchbook into a unique hardcover sketchbook!)
-Acid-Free White Glue (Elmer's makes a good cheap one. Scrapbooking glue is great too. Anything that dries clear and is suitable for archival, meaning it won't degrade the paper over time. Some people even mix their own!)
-Needle and Thread. (Any. Curved needles are easiest, but straight needles work just fine. Use those until you can find the curved variety. Any thread works, but pro-tip: get ahold of some cheap wax --beeswax probably-- and then run the length of your thread along it to smooth the fibers. Do that, and your thread will never tangle, which saves a lot of time. It also helps prevent your paper from tearing!)
-Something to wrap around the cover. (You can get really creative with this. You can use paper or fabric or leather or cardstock or basically anything that you can wrap and glue down to the board of your cover. I've seen people use old jeans: I've seen people use giftwrap. Experiment!)
-Something to puncture the signature holes (the actual tool for this is something called an awl, and I have one at this point, but dollar store push-pins work fabulously if you're just giving it a try)
-Something to fold your signatures (you can use your hands, but it's much easier with a tool called a bone folder. Craft stores sell them. A small ruler made of wood or plastic works very well, too.)
And that's it!
There are a few other things (like book paper for the covers, corner protectors, book tongues, ribbon for attached bookmarks, cheese cloth to strengthen the spine, etc.), but I don't consider those the absolute BASICS needed for a first project. All the things I've listed are cheap, easy to find, or easy to substitute. Try it out before you decide if you wanna invest in the fancier stuff!
Sea Lemon on YouTube makes great, easy to follow tutorials for the actual construction. I also recommend watching a few bookbinding ASMR videos; watching someone apply their skills in a relaxed but steady way is a great way to learn, imo.
If you give it a try, let me know how it goes!
17 notes
·
View notes
Note
I have concrete evidence--not even concrete, more like steel reinforced BRICKwork with scaffolding support level of evidence that Taekook isn't real. Okay, like I promise I'm not a Kookminer. I'm really not. My bias is actually Suga and I used to like Yoongmin so I have no dog in this fight BUT---
I accidentally watched five Kookjiminie videos on YouTube and I saw something that now has me questioning; was Taekook ever real !?? In these videos (I wish I could find them but I can't sorry and they seem to have disappeared from my YouTube history) but I noticed a disturbing pattern. In one of these video clips, I noticed that Jimin's husband, Jungkook, blinked three times in a row at Jimin and only two times in a row at Taehyung and that's when I knew, Taekook was over. This might surprise some people who don't know me but I actually studied Body Language Language to an FBI level and I specialised specifically in Blinkage and Morse Code of The Eye. I have attended every YouTube tutorial video in that free online course so I can assure you my skills are legit.
Don't get me wrong. I do think Taekook dated when they were like 17 or something but then I also think Taehyung's soulmate and Tae's boyfriend fell in love with each other and just couldn't help but have an affair or maybe Tae and Jimin's lover, Jungkook, broke up and then Jimin decided to swoop in then and steal his soulmate + best friend's ex boyfriend because hoes before bros and dates before soulmates, right?
I know it might seem like I ship Jiminie❤️Kookie but I swear on my mother's grave that I don't. I'm actually more of a Jihopie shipper but listen, I grew up in an orphanage since birth and I've never had any family but myself so even before I became an expert Body Language expert, I knew better than anyone how to observe people's intentions and I hate (honestly I HATE) to say this but I think the real ship might be JiminKook4eva. I really do. I swear on my father's life that I don't ship it but I can't deny it that there's a LOT of evidence that they got married in Japan.
They were both in Japan for a start.
I know I probably won't convince you and I'm honestly not here to try to but I've got five more essays lined up about why you should listen to me and believe what I'm saying and stop shipping Taekook because let's be real, Taehyung has literally said that he hates it--and I know some people think he was talking about the fan fantasising about Jimin's life partner, Jungkook, but that's only one interpretation so he literally hates it.
Please, please listen to me for some reason. I don't really know what that reason is because I swear I'm not a J+M+RingFinger=JikookieMarried shipper at all!!
Just listen to me because you're going to be sorry and crying if you don't when you read my 10900 word dissertation of PURE concrete evidence with compiled pictures, videos, fanart and fan theory that I have attached to this ask. I used an AI program to help me put this portfolio together so obviously, you know that it's legit and 100% correct (Hopefully the attachment shows up but if not then I think it sadly might have disappeared with the YouTube videos)
Lots of love from ~Turn the V upside down and you get A for ARMY~ xx
Omg anon… you totally opened my eyes!
25 notes
·
View notes
Note
*Cracks knuckles* alright Doodle, the day has come...🫵 YOU 🫴 GIVE 🤲 ME ✍️ ART TIPS/POINTERS
(Cuz ur art is amazing)

I AM HERE (also thanks youuuuu)
AHEM okay, let me think for a sec....
Line of action. You might have heard of it, but the best way I can describe it is- well in the name! It's great for helping with poses n'stuff, the best way I can describe it is using some pictures below
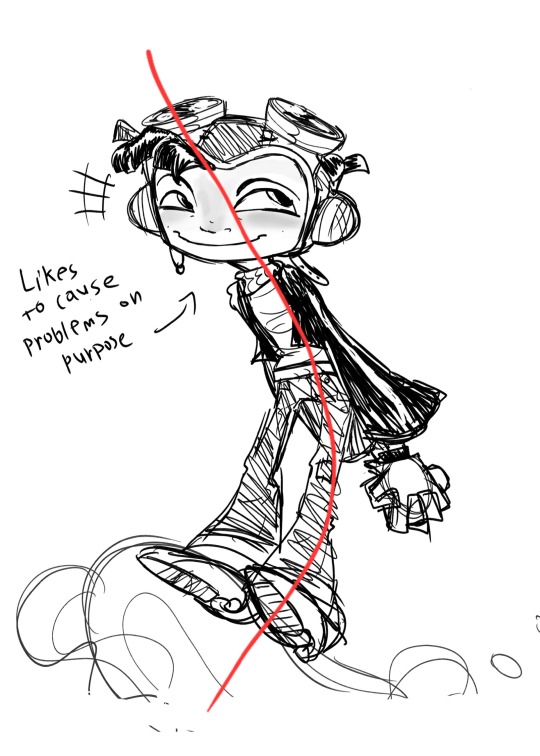
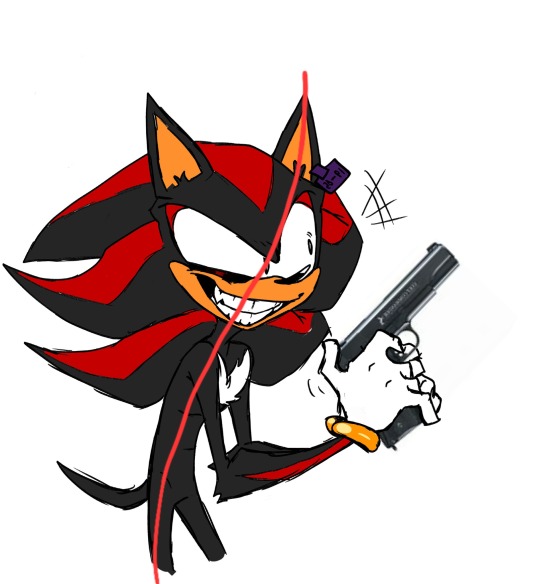

See how all the characters seem to follow in the shape of the line? That's basically what the line of action is! It's sort step one before you get into the blocking and details of sketching. It helps add fluidity. Of course this isn't to say you have to use the line of action all the time, but it's really handy when trying to draw something and you don't know where to start!
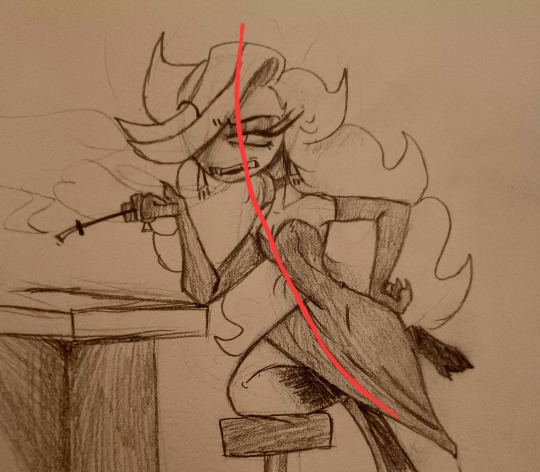
You also can use the line of action for limbs! Not everything is a straight line when building a skeleton/base. I wish I would've known this earlier, because almost allll of my how to draw books would have everything be perfectly straight, and while some poses and stuff require it, yes, it tends to make poses rather stiff.


SKETCH LIGHTLY! This is mostly for traditional, but I find sketching lightly makes it easier to erase, as well as making the final drawing clearer. Also, sketch loosely! The random strands and sketches can help add some extra details and ideas as you work on the fianl peice, if you want.
I might get swarmed for this take, but I really don't think you need that deep of an understanding of anatomy. Now, you should still study and reference it, but I don't think you need to be able to name every bone or muscle in the body if you dont want to. Just have a basic understanding of it! It's good to know what areas can twist and bend, and knowing what's attached to what, and how it affects the pose. One thing that helps is 3D rigging videos. Here's one that explains it perfectly in a matter of seconds, and introduces so.ething called "skeleton hierarchy" or just hierarchy
Get out of your comfort zone!! It's scary yes, and 9 times out of 10, it's not gonna look good at a first attempt! BUT YOU GOTTA DO IT MAN ITS THE ONLY WAY TO IMPROVE!!
Thats all I've got!! I'm really tired because I got back from a family trip, but if you have anymore specific questions feel free to ask!
13 notes
·
View notes
Last Seen Blogs

777fawn
༺♰༻

minimstories
MiniMStories
eddsworld-the-masquerade
The World of Darkness
ratstuckinamarble
number one dracugoona shipper

monsieuroverlord
Monsieur Overlord