#5 minute recipes Indian recipes
Text
Food is pretty feaster. No matter what is happening in your life, food has the capability of fixing anything and everything. However, cooking can be daunting. Moreover, when you have a lot of foodies at home, it’s head throbbing to decide what and how to cook. Keeping the same in mind, here are some easy 5 minute recipes Indian recipes from our end that can steal the heart of your loved ones in a minute. Happy serving and eating!
1 note
·
View note
Text
5 Indian breakfast recipes you can make in 30 minutes
These 5 Indian breakfast recipes, you can make in 30 minutes are healthy and can give a twist to your boring old time-consuming breakfast recipes. Read the blog and try these recipes.

Read To Know : 5 Indian breakfast recipes you can make in 30 minutes
0 notes
Text

[ID: A greyish brown stew presented alongside flatbread, red pepper paste, green peppers, and carrot sticks. End ID]
سماقية / Summagiyya (Gazan stew with chard, chickpea, sumac, and 'lamb')
Summagiyya (سُمَّاقِيَّة; also translitered "sumagiyya", "sumaghiyyeh" or "sumaqiyya") is one of the signature dishes of the Gaza strip, in particular Gaza City. It consists of lamb, chard, and chickpeas in a sumac-infused broth; savor and zest is added by a dagga of dill seeds, garlic, and peppers, and nutty depth by a generous drizzle of red tahina. The resulting stew is thick, earthy, and slodgily grey (due to the green chard and red sumac)—it also has the characteristic sourness of much Gazan cuisine.
Summagiyya is most often prepared during holidays, especially Eid al-Fitr; it's an excellent make-ahead dish for these occasions, since it's even better once its flavors have had time to meld and mellow overnight. It is served cold alongside fresh vegetables, and eaten by using flatbread to scoop up each bite. This recipe provides a spiced seitan recipe to replace the lamb, but you may also use any lamb or beef substitute of your choice.
Today, summagiyya is often prepared with Israeli white tahina, as decades of punitive import laws, taxes, and restrictions have enforced Palestine's status as a consumer, rather than an producer, of food products. Israeli tariffs on, and confiscations of, Palestinian goods have forced those tahina factories that survived to import sesame seeds rather than using locally grown crops, even as they export the best of their product to Israel. The dubbing of foods such as tahina and hummus as culturally "Israeli" cuisine works to hide this exploitative relationship, and cement an Israeli national identity through the subsuming and erasure of Palestinian existence. It is for this reason that Emad Moussa writes that Palestinian cuisine has a role in "protecting against a people's very extinction."
Medical Aid for Palestinians (MAP) has put out an urgent call for donations to provide medical supplies to Palestinian hospitals when supply lines reopen. Also contact your representatives in the USA, UK, and Canada.
Ingredients:
For the soup:
500g (2 large bunches) chard (شلق), diced
80g Levantine sumac berries (Rhus coriaria)
1/2 cup soaked and boiled chickpeas, mostly cooked (40g dry / scant 1/4 cup)
1/4 cup red tahina
1/2 cup (60g) all-purpose flour
1 large yellow onion
1/4 cup olive oil
1 tsp kosher salt
2 cardamom pods (optional)
2 allspice berries (optional)
More olive oil, to fry
Sumac berries can be found in the spice section of a halal grocery store. If you're unable to locate whole berries, pre-ground will do.
For the dagga:
1 1/2 Tbsp dill seeds
5 cloves garlic
1/2 green cubanelle pepper
2-3 dried red chilis (optional)
1/2 tsp black pepper
1/4 tsp cumin
Dill seeds may be found at a halal, south Asian, or speciality European grocery store. They are commonly used in Indian food and as a pickling spice. At a south Asian grocery store they may be labelled soyo, suva, shepu, or savaa.
For the lamb:
1 cup (120g) vital wheat gluten, aka gluten flour
1/2 Tbsp ground sumac
1/2 tsp ground caraway
1 tsp onion powder
1 tsp Palestinian 7-spice
1/2 tsp garlic powder
1/2 tsp sea salt
1/2 tsp ground black pepper
1/2 tsp ground cumin
1/2 tsp ground aniseed
1/2 tsp turnermic
1 tbsp olive oil
1/2 tsp soy sauce
1 tsp miso paste
2 cloves garlic, grated
2 tsp pomegranate molasses
1 Tbsp white or red tahina
About 1/2 cup vegetarian 'beef' stock from concentrate, or vegetable stock
Pomegranate molasses is simply pomegranate juice that has been reduced to a thick consistency. It may be found in the sauces section of a halal grocery store.
Instructions:
For the soup:
1. Soak dried chickpeas in cool water overnight, or in just-boiled water for an hour. Drain and re-cover with water, and boil for 30-45 minutes, until almost fully cooked. Drain and set aside.
2. Simmer sumac seeds in enough water to cover by a couple inches for about an hour, until the water is dark red. Blend the seeds and water together, then strain the mixture through a cheesecloth.
If you're using ground sumac, skip the blending step. Use a cheesecloth or very fine metal sieve (such as one intended for brewing tea) to remove the ground spice from the water.
3. Whisk the flour into the sumac-infused water.
For the lamb:
1. Combine all dry ingredients in a large mixing bowl. Add wet ingredients other than stock and stir briefly. Add enough stock to produce a soft, smooth dough.
2. Knead by hand on a clean surface, or put in a stand mixer with paddle attachment on medium-low, for about 5 minutes. You should see stringy strands begin to form in the dough.
3. Allow to rest, covered, for 5-10 minutes to encourage gluten formation. Knead for another 3 minutes. Do not over-knead.
4. Tear the dough into bite-sized pieces.
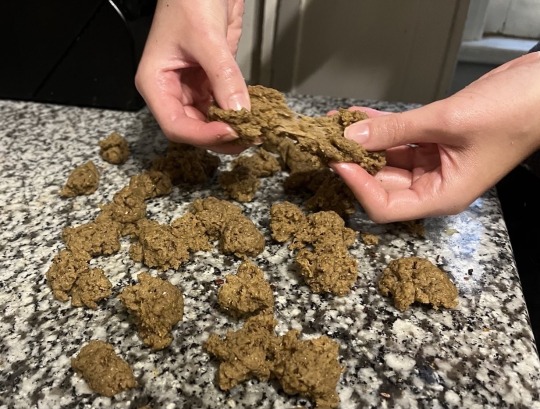
Stringy seitan being pulled apart into pieces.
You may also shape the dough into a slab and cube it with a sharp knife—the lamb or beef used in summagiyya is usually cubed—but I prefer the texture of torn seitan to sliced.
5. Steam the seitan pieces for 10 minutes in a bamboo steamer or using a metal steamer basket. Place the bamboo steamer in the bottom of a wok and cover its base by about 1/2" (1 cm), then raise the heat to boil the water; lower the heat to keep the water at a simmer. If using a steamer basket, place it over the opening of a pot containing a couple inches of water and bring it to a simmer. Start the timer when the water begins simmering.
6. Heat olive oil on medium-high and sear the steamed seitan pieces, turning as necessary, until deeply browned on all sides. Set aside.
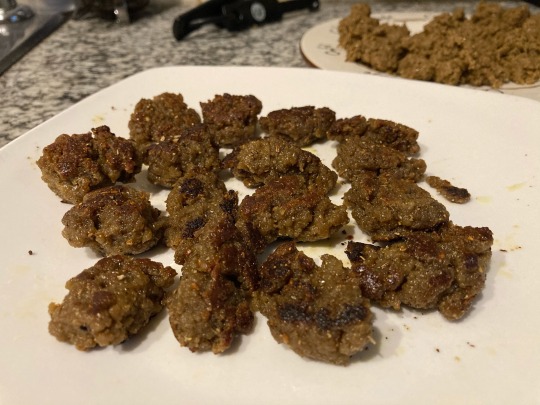
Fried seitan pieces.
You can save a step here by searing the raw seitan, then returning it to the pot after you've fried the onions to simmer it rather than steaming. I found that this produced a mushier texture.
For the dagga (دقة):
1. Grind cumin and black pepper thoroughly in a mortar and pestle, then add dried red pepper and dill seed and crush coarsely. Add green sweet pepper and garlic and pound until a coarse mixture forms.
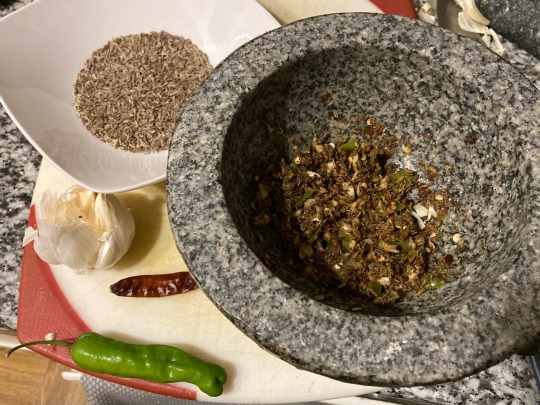
Dill seeds, green sweet pepper, garlic, and dried red chili on a cutting board, alongside dagga in a large granite mortar.
You may also use a spice mill or food processor.
To assemble:
1. Chop the onion. Wash the chard and slice it thinly in one direction; turn it ninety degrees and slice thinly again.

Diced chard, fried seitan, dagga, and sumac-infused water with flour.
2. In a large pot, heat a couple tablespoons of olive oil on medium. Fry chopped onion, cardamom pods, and allspice berries for a minute until fragrant. Add half of the dagga and fry until fragrant.
3. Add chard and fry, mixing often, until wilted.
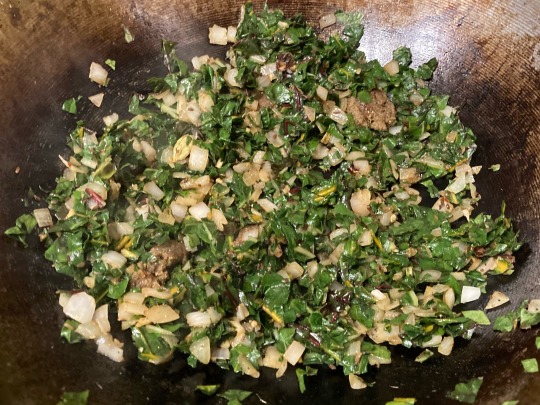
Wilted chard in a wok.
4. Add sumac mixture, chickpeas, and water to cover. Bring to a boil, then lower heat to a simmer. If you didn't steam your seitan earlier, add it now.
5. Continue to stir and simmer until the stew is thick, homogenous, and greyish-brown, about 15 minutes.
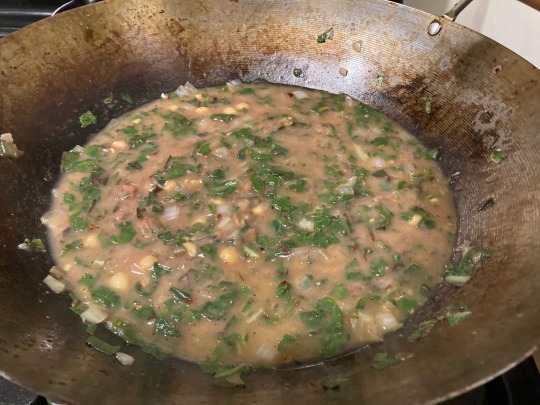
Simmered stew.
6. Add the remainder of the garlic mixture, the red tahina, a pinch of ground cumin, the 1/4 cup olive oil, and salt to taste. Return the steamed and seared seitan to the pot and mix.
Serve cool with flatbread, sweet green peppers, bitter green and black olives, carrots, leafy greens, and/or pickles.
#vegetarian recipes#vegan recipe#vegan cooking#Palestinian#Gazan#chickpeas#lamb#seitan#chard#dill seeds#pomegranate molasses
478 notes
·
View notes
Text
Indian Frybread Recipe 😍
Ingredients:
3 cups all-purpose flour
1 tablespoon baking powder
1 teaspoon salt
1 cup warm water
Vegetable oil, for frying
Instructions:
In a large bowl, combine the flour, baking powder, and salt.
Gradually add the warm water, stirring until the dough comes together.
Knead the dough on a floured surface until smooth, about 5 minutes.
Let the dough rest, covered, for about 30 minutes.
Divide the dough into small balls, then flatten each ball into a disc about 1/4 inch thick.
Heat a large skillet with about 1 inch of vegetable oil over medium heat.
Fry each piece of dough for 2-3 minutes on each side or until golden brown.
Drain on paper towels and serve warm.

10 notes
·
View notes
Text
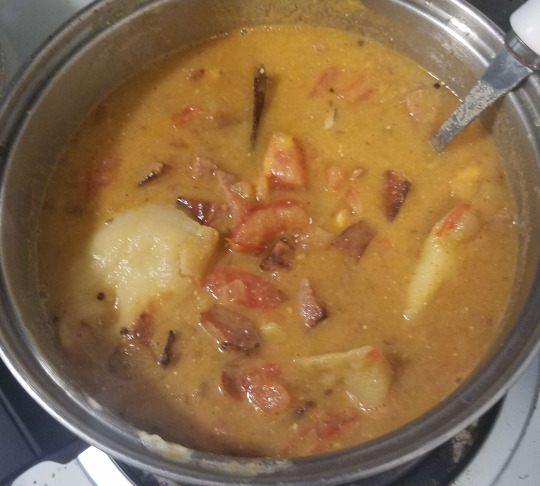
Pierogi & Kielbasa Curry
This is a Polish-Indian fusion dish that is one of my favorite meals to make. The Gujarati spice base with Polish staples makes for a very tasty and hearty stew-like curry. Enjoy :)
NB: If an ingredient doesn't have an amount next to it, it is intended to be eyeballed to the maker's preference. Additionally, be sure to check the footnotes at the bottom before asking any questions. My inbox is always open.
Ingredients
Vaghar
Vegetable Oil
1 Cinnamon stick
5-10 Cloves
Cumin seeds
Black mustard seeds
Fenugreek seeds
1 Dash of hing (asafoetida) (1)
Contents
1 Onion
Garlic (2)
12 Potato & Farmer's Cheese Pierogi (3)
1 Kielbasa (14 oz.) (4)
2 Tomatos
Water
~1 tsp. Tomato paste
Spices and Thickeners
Cumin powder
Coriander powder
Paprika
Garam masala (5)
Chili powder (6)
~1 cup Sour cream (7)
Potato Flakes
Instructions
Start by mincing the garlic and dicing the onions and tomatos. Then Put them to the side. To make the vaghar, put the vegetable oil in a large pot over medium heat. After about a minute of letting it heat up, add all of the whole spices to the pot (cinnamon, cloves, cumin seeds, mustard seeds, and fenugreek seeds). Stir the spices a little to make sure they are coated in the oil. Once the cumin seeds begin to toast and change color, add the hing and stir again. The goal here is to infuse the oil with the flavor of the spices, so once you feel that has been accomplished(8), add the garlic and onions and begin sauteing(9).
Once the onions start to brown, add the kielbasa and all of the pierogi. Be sure to stir carefully so as to not poke holes in the pierogi, and make sure there is enough oil to prevent the pierogi from sticking and tearing open. If you notice things starting to stick, add more vegetable oil. Ultimately, the goal at this stage is to fry the pierogi skins to prevent them from becoming soggy after you add the water and infuse the pierogi and kielbasa with the flavor of the spices. Once you feel that is done, add the diced tomatos (juice and all) to the pot, and fill with water until everything is covered. add the tomato paste and stir.
Add all of the ground spices (cumin, coriander, paprika, and garam masala, and chili powder(10)) and stir. Turn the stove up to high, and stir. Continue to stir carefully so as to avoid tearing pierogi, and try diligently to keep things off the bottom of the pot because they will stick easily. Once the curry starts to boil, turn the heat down to low/simmer and add the sour cream. Once you are happy with the amount of sour cream you have added, thicken the curry the rest of the way to your preference with the potato flakes.
Footnotes
Ingredients
(1) If you cannot obtain the hing or garam masala, don't sweat it. They are not integral parts of the recipe.
(2) Feel free to economize anything in this recipe. I frequently use garlic powder instead of garlic and canned diced tomatos when I am busy. The recipe above in its current form is intended to represent the freshest possible version of it. Do not drive yourself crazy trying to make it perfect.
(3) Be careful with pierogi that simply call themselves "potato and cheese." I know at least in the United States a lot of the potato and cheese pierogi use cheddar, which would not work for this recipe. Alternatively, you could use plain potato pierogi and make the farmer's cheese yourself (to my knowledge all you have to do is boil milk, add sour cream till it curdles, and strain the curds) and add it seperately to the curry.
(4) Preferably, use turkey or chicken kielbasa to avoid accidentally committing a heresy against one of the two cultures this dish is from.
(5) Generally, its highly unusual for turmeric to be lacking from the list of spices in a curry like this, but in my earliest attempts with this recipe, I noticed it was clashing with the spices usually found in kielbasa. If you want to try adding it anyways, be my guest.
(6) I actually usually don't add chili powder since this curry is already naturally so mild I most often make it for spice-averse audiences, but hypothetically just chili powder shouldn't really increase the heat much because of all the dairy. Therefore, if you're interested in making this recipe with all the heat of a traditional indian curry, I recommend adding a few whole, dried red chilis to the vaghar as well as a tablespoon of chili garlic sauce when you start cooking the onions.
(7) 1 cup is what i most commonly add, but really how much you want to add is entirely dependent on how much you like sour cream. You could easily put in 2 cups as well. You could also put in 1/2 a cup and and have sour cream available for people to add to their individual bowls.
Instructions
(8) the other goal here is to not burn the spices. It can be a fine line trying to infuse as much of their flavor as possible into the oil without overheating them. All you can do is try to gauge if its infused by smell. Ultimately, if the scent of the vaghar becomes smoky, just add the onions immediately to prevent any further burning.
(9) I also like to add a small amount of all the ground spices (cumin, coriander, paprika, and garam masala) or a teaspoon of curry paste to the onions here as well. This helps give the onions, kielbasa and pierogi more of that flavor, but it also absorbs oil and makes things easier to stick the bottom of the pot, so judge for yourself whether its worth it.
(10) see 6. It is not necessary to add the chili powder unless you like heat.
26 notes
·
View notes
Text

Indian Coconut Rice Recipe is made with grated coconuts, cashews, and cooked rice. The recipe is so simple it takes less than 5 minutes to make effortlessly. The best satisfying food for busy days or weeknight dinners.
13 notes
·
View notes
Text

Christmas Punch
Some point to the ancient Hindustani word "paanstch", which means five: a great drink prepared from five key elements - sweet, sour, alcohol (arrak), water and spices. Some, however, attribute it to English merchant sailors who, though they did not invent the punch, very much drank it. Men working on British East India Company ships used it as a beer alternative in the 17th century. The sailors were known to consume large quantities of beer on their voyages, but when the ships reached the warmer waters of the Indian Ocean, the beer in the cargo bays became rancid and stale. Once the ships reached the coast, the sailors created new drinks from ingredients native to their destination: Arrack, citrus fruits and spices. Back at sea or at home, rum or brandy or other wines were more likely to be used.

Naval Officers and a Bowl of Punch by Thomas Rowlandson c.1790 (x)
The sailors brought punch back with them to Britain. With its exotic flavours and expensive ingredients, it became a fixture in the elite homes of 17th-century England and then a staple. Some parties, however, tended to get out of hand. Like the celebration of Edward Russel, captain-general and commander in chief in the Mediterranean. On 25 October 1694 he had a garden party for 6000 guests in his villa, and had his marble fountain filled with punch. For this, 4 hogsheads (c. 960l) of brandy, 8 hogsheads of water, 25000 lemons 75l of lime juice. 560kg of sugar, 3kg of nutmeg, 300 toasted biscuits and a pipe of dry mountain Malaga. The punch was served by a ship's boy who rowed through the fountain in a small boat.

Sailors sharing both punch and wenches. Taken from “Grog on Board” by Thomas Rowlandson, 1789 (x)
Punch entered the middle class as ingredients became more affordable during the 18th century. Punch was ubiquitous in the British Atlantic world and spread to the American colonies. So why is it considered more of a Christmas drink. It was because many of the merchants stayed at home during the winter months and made punch for the family on Christmas Day with the spices they had bought for themselves locally. This made it something special and is therefore often associated with the Christmas season, even though it was served all year round, especially when the spices became affordable for many.
And if you want to make now your own punch here is a nice recipe.
Bombay Presidency Punch in Bombay Government, August 13, 1694
Servings: 2
Prep Time: 5 minutes
2 Tbsp sugar
2 Tbsp lime or lemon juice
1/2 cup rum
3/4 cups water
nutmeg
In a non-reactive bowl or pitcher, mix together the sugar and the juice and stir until dissolved. (Please use a glass, pottery, or stainless steel bowl or pitcher. Copper, cast iron, and aluminum will react with the acid in the lemon juice.)
Remove any seeds that may have made their way into the bowl. Blend in the rum, and then the water.
Add ice. Then grate nutmeg over the top.
Enjoy your tipple!
73 notes
·
View notes
Text
Chickpea and vegetable korma with brown rice.
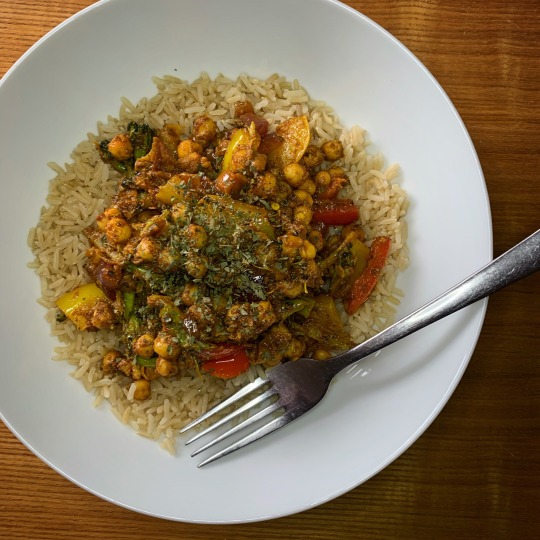
Are you looking for a flavourful and nutritious vegan meal that is easy to make? Look no further than this chickpea vegetable korma with brown rice recipe. This dish is packed with protein, fibre, and a variety of colourful vegetables that provide essential vitamins and minerals. The creamy coconut-based sauce is spiced with a blend of aromatic Indian spices, making this korma a delicious and satisfying option for lunch or dinner.
Before we jump into the recipe, let's talk about some of the health benefits of the ingredients in this dish. Chickpeas are an excellent source of plant-based protein and fiber, which can help you feel full and satisfied for longer. They are also rich in folate, iron, and zinc, which are essential minerals for maintaining good health. Broccoli is a cruciferous vegetable that is high in vitamin C, vitamin K, and fiber. Red and yellow bell peppers are rich in antioxidants and vitamin C, while red onions are a good source of quercetin, a flavonoid that has anti-inflammatory properties.
Ingredients
For the korma:
1 can of chickpeas, drained and rinsed
1 head of broccoli, cut into florets
1 red bell pepper, sliced
1 yellow bell pepper, sliced
1 red onion, sliced
3 cloves of garlic, minced
1 tablespoon of grated fresh ginger
1 tablespoon of curry powder
1 teaspoon of ground cumin
1 teaspoon of ground coriander
1/2 teaspoon of ground turmeric
1/4 teaspoon of cayenne pepper (optional)
1 can of coconut milk
1 tablespoon of olive oil
Salt and pepper to taste
Fresh cilantro for garnish
For the brown rice:
1 cup of brown rice
2 cups of water
1/4 teaspoon of salt
Instructions
Step 1: Cook the brown rice
Combine the brown rice, water, and salt in a medium-sized saucepan and bring to a boil. Reduce the heat to low, cover, and simmer for 45 minutes or until the water is absorbed and the rice is tender. Fluff with a fork and set aside.
Step 2: Prepare the vegetables
Heat the olive oil in a large skillet over medium-high heat. Add the garlic and ginger and sauté for 1-2 minutes until fragrant. Add the sliced onions and bell peppers and sauté for 5-7 minutes until slightly softened. Add the broccoli florets and sauté for an additional 3-4 minutes.
Step 3: Make the korma sauce
Add the curry powder, cumin, coriander, turmeric, and cayenne pepper (if using) to the skillet and stir to combine with the vegetables. Add the chickpeas and coconut milk and stir well. Reduce the heat to low and let the korma simmer for 10-15 minutes until the sauce thickens and the vegetables are tender. Season with salt and pepper to taste.
Step 4: Serve
Serve the chickpea vegetable korma over the brown rice and garnish with fresh cilantro. Enjoy!
This vegan chickpea vegetable korma with brown rice is a delicious and nutritious meal that is easy to make at home. The combination of chickpeas, broccoli, red and yellow bell peppers, and red onion provides a variety of essential vitamins and minerals, while the creamy coconut-based sauce is spiced with a blend of aromatic Indian spices that will tantalize your taste buds. So next time you're looking for a plant-based meal that is both healthy and flavourful, give this recipe a try!
#food#plant based#vegan#what vegans eat#foodpics#vegancommunity#foodie#veganism#vegano#vegetarian#curry
28 notes
·
View notes
Text

It’s now a weekly habit for me to make my own plant milk as it takes about 5 minutes with the aid of a good blender. I’d never made chickpea milk before let alone a curd/yogurt though.
I found a very easy to follow along recipe video on YT by Priyan Kan Jain but me being me I couldn’t just make it, I had to get an Indian Curd Pot, literally from India. Why do I do this to myself (I blame the ASD).
I will say this it was worth the investment, practically got it for free in the end (long story) and it makes all the difference to getting the desired results.
The recipe is simple, easy and overnight it does all the magic so you have a curd or yogurt by morning.
You can keep a little of the curd liquid back as a starter for every batch you do after your first. I feel like I could do with a mini fridge for all my different starters 😂 a lack of space saves me from all my special interests taking over entirely.
youtube
#vegan#food#organic#fermenting#plant based#crueltyfree#govegan#healthy#fermentation#curd recipe#vegan yogurt#indian curd pot#No nuts#No soya#Only 1 ingredient#Priyan Kan Jain#chickpeas#chickpea curd#Youtube
3 notes
·
View notes
Photo
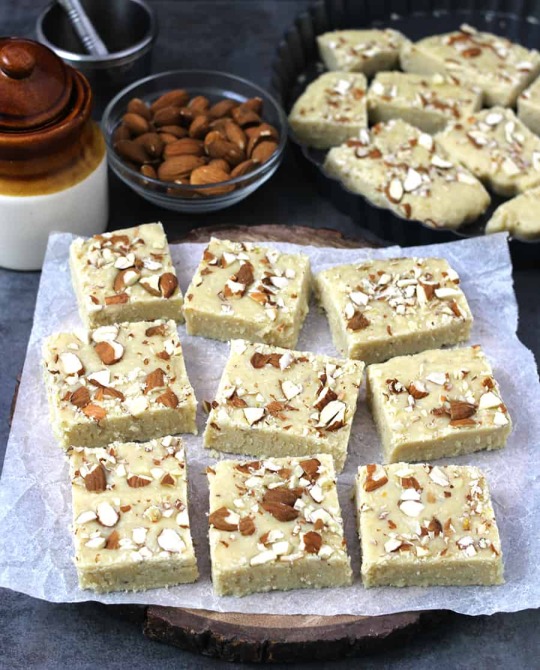
Indian no bake fudge - 5 ingredients and 30 minutes. Milk Barfi https://www.cookwithkushi.com/milk-barfi-burfi-recipe-milk-powder-barfi/
#milkburfi#milkbarfi#burfi#barfi#desserts#sweets#milk#milk powder#mithai#meetha#fudge#no bake#holiday#food#recipes
33 notes
·
View notes
Note
So in conversation with the housemates this evening, it came up that heat is not flavor. I was asked if I had that conversation with you and that you have a whole rant about it. Could you reprise that rant for tumblr?
Is this the rant in question?
I have definite opinions about any food made ridiculously hot for the sake of posturing, and even more definite notions about it being done secretly for “fun”.
Done properly is another matter. Here’s a link from that rant which reviews my encounter in Dublin with Thai food “spiced home style”. It was Serious Business, yes; and it was also absolutely delish.
*****
Some cuisines come by their heat naturally - that Thai dish was one example - and as I found out, the blend of other spices will always hold their end up. Each mouthful will be fiery, but also fragrant, complex and worth savouring even as the sweat-beads pop out on forehead and upper lip.
The same applies to Sichuan (mapo dofu, yum!), Hunan, Korean (buldak, yes please!), Thai, Ethiopian (sik-sik wat, rowr!), Mexican and Indian (where proper Goan Vindaloo is nothing like the restaurant version, no potatoes for one thing and made with pork for another).
*****
Hot-spiced dishes like those, with everything else in balance, is a long way from this lunatic laddish recipe found on the Internet about 20 years ago (I can’t remember where). So many onions suggest this might have started as a Dopiaza, but then it got into seriously bad company.
Serves 1-4
Ingredients:
2 lbs Chicken joints, or boneless breast meat roughly cubed
6 Medium Onions, sliced
4 Cloves Garlic, finely chopped
8 Tbsp Ghee or Vegetable Oil
2 Pints of water
24 fresh Habanero Chilies, finely chopped
30 dried red chilies, crushed, or an equivalent amount (about 5 Tbsp) of ready-crushed chilies
2 tsp Red food coloring
Spices:
2 tsp ground turmeric
2 tsp ground cumin
2 tsp ground coriander
5 tsp ground hot chili powder
1 tsp dried fenugreek leaves
A couple of capsicum pods
Optional:
¼ bottle of Tabasco® sauce (Most likely the standard sauce since I don’t think the Habanero version was available in the UK at time of writing.)
¼ bottle Encona West Indian Hot Pepper sauce. (This is considerably hotter than regular Tabasco. Trust me.)
Method:
Stir enough water into the dry spices to make a stiff paste. Heat half of the oil or ghee over medium heat, then add the spice paste.
Fry the paste for a few minutes until the water has evaporated and the mixture takes on a smooth, glossy, oily appearance
Now heat the other half of the oil in a large pot or casserole, and fry the onions and garlic until soft and golden.
Put the remaining ingredients into the pot and stir well to combine them, then put the lid on, reduce the heat, and let the whole thing simmer gently for about 90 minutes.
About 15 minutes before it’s done, add another 3 Tbsp chili powder and about a dozen more dried red chilies.
When it’s done, remove from the heat, sprinkle with 1 tsp garam masala, and allow to sit for a few minutes before serving on a bed of rice.
*****
I have no idea if this was meant as a joke - 24 fresh Habs, 30 dried chillis? Really? - but if it’s serious, there’s no point in the coriander, cumin etc. because there’s no way anyone will taste them.
As for the day afterwards, make sure some loo roll is in the freezer because...


37 notes
·
View notes
Text

Restaurant-Style Pickled Radish Recipe: Refreshing and Appetizing #trending #trendingshorts
Learn how to make a refreshing and appetizing pickled radish recipe that's perfect for winter. #pickledradish #winterrecipes #food #restaurantrecipe #easyrecipe #refreshing #appetizing #healthy #yummy #delicious #money #real #review #genuine #online #trendingvideo #trending #trendingshorts This recipe is so easy to follow, even beginners can make it! I'll show you how to pickle radishes using a special restaurant technique that results in a flavorful and crunchy pickle. Plus, I'll share some tips on how to store your pickled radishes so that they last for months. Disclaimer: This video is for informational purposes only. Please use caution when handling hot ingredients and sharp knives. Follow all safety instructions when cooking. Hashtags: #pickledradish #winterrecipes #food #restaurantrecipe #easyrecipe #refreshing #appetizing #healthy #yummy #delicious Category: Food Subcategories: Food challenge, street food, food shorts, food vlogs, beard meets food, Chinese food, popi kitchen with village food, eating food, asmr food, best ever food review show, food eating, ding dong girls food challenge, classic mini food, viwa food world, village food channel, food asmr, 5 minute crafts food, food theory, china food, vismai food, spicy food, indian street food, street food india, food recipes, food videos, food eating challenge, people vs food
#food challenge#food#street food#food shorts#food vlogs#beard meets food#chinese food#popi kitchen with village food#eating food#asmr food#best ever food review show#food eating#ding dong girls food challenge#classic mini food#viwa food world#village food channel#food asmr#5 minute crafts food#food theory#china food#vismai food#spicy food#indian street food#street food india#food recipes#food videos#food eating challenge#people vs food#guga food#mini food
2 notes
·
View notes
Text

Cranberry chutney
Sweet, tart, jammy cranberries evolve into the subtle aromatics of cumin, mustard, and bay leaf before rounding off into a smooth, even chili heat in this Anglo-Indian-style chutney. It's excellent in place of cranberry sauce on all kinds of roasts, meat pies, flatbreads, sandwiches, and charcuterie boards.
The cooked fruit-and-vinegar chutneys made by English cooks during the British colonization of India were inspired by the fresh and pickled Indian condiments that English traders and soldiers—including those in the East India Company's military arm—had acquired a taste for, but substituted locally familiar produce and cooking methods for Indian ones. "Indian" recipes began appearing in English cookbooks in the mid-18th century, inspiring and fulfilling a desire for the exotic and, effectively, advertising colonial goods. The domestic kitchen thus became a productive site for the creation and negotiation of colonial ideology: the average English housekeeper could feel a sense of ownership over India and its cultural and material products, and a sense of connection to the colonial endeavor desite physical distance.
This sauce, centered around a tart fruit that is simmered with sugar and savory aromatics and spices, is similar in composition to an Anglo-Indian chutney, but some Indian pantry staples that British recipes tend to substitute or remove (such as jaggery, bay leaf, and mustard oil) have been imported back in. The result is a pungent, spicy, deeply sweet, slightly sour topping that's good at cutting through rich, fatty, or starchy foods.
Recipe under the cut!
Patreon | Tip jar
Ingredients:
1/2 cup dried cranberries (krainaberee), or 1 cup fresh or frozen
5 curry leaves (kari patta), or 1 Indian bay leaf (tej patta)
1/2 tsp cumin seeds (jeera)
1/2 tsp black mustard seeds (rai)
3 Tbsp jaggery (gur / gud)
1-3 small red chili peppers (kali mirch), to taste
1/2” chunk (5g) ginger (adarakh), peeled
1 clove garlic (lahsun)
1/2 red onion (pyaaj) or 1 shallot
1 Tbsp mustard oil (sarson ke tel)
1/3 cup (80 mL) water
Pinch black salt (kala namak)
Curry leaves can be purchased fresh at a South Asian grocery store. If you can't find any, Indian bay leaves can be used as a substitute (the flavor isn't per se similar, but it would also be appropriate in this dish). Indian bay leaves are distinct from Turkish or California laurel bay leaves and have a different taste and fragrance. They will be labelled “tej patta” in an Asian or halaal grocery store, and have three vertical lines running along them from root to tip, rather than radiating out diagonally from a central vein.
Instructions:
1. Pound onion, garlic, ginger, and chili to a paste in a mortar and pestle; or, use a food processor.
2. In a thick-bottomed pot, heat mustard oil on medium. Add curry leaves or tej patta and fry until fragrant.
3. Add cumin and mustard seed and fry another 30 seconds to a minute, until fragrant and popping.
4. Lower heat to low. Add aromatic paste and fry, stirring constantly, for about 30 seconds, until fragrant.
5. Add cranberries, jaggery, black salt, and water. Raise heat and bring to a boil. Reduce to a simmer and cook uncovered, stirring often, until thick and jammy. Remove from heat a bit before it reaches your desired consistency, since it will continue to thicken as it cools.
Store in a jar in the refrigerator for 2-3 weeks.
#Anglo Indian#fusion#Christmas#cranberries#dried cranberries#curry leaves#tej patta#mustard oil#jaggery#cooking#gluten free#condiments#Indian
147 notes
·
View notes
Text
28 Failed Attempts and 1 Heist Later- Chapter 1
Ao3 link: https://archiveofourown.org/works/50958199/chapters/128740585
It was obvious, if you paid attention that is, that Hobie Brown's love language towards others was Acts of Service. It's how he showed he cared. Such as when he made his own interdimensional watch to help Gwen rescue Miles and let her crash in his dimension, or when he tried to give Miles advice on his electrical powers, or even when he looked after Mayday when Peter got busy or just needed a break. Really it wasn't difficult to see that when Hobie cared about someone he tried to do things that would help them or make them happy. That's why when he finally got the bottle to confess to his best spider-mate, Pavitr Prabhakar, he decided to do a meaningful gesture to confess his fancy.
Pavitr was a bloody amazing lad in his eyes: brilliant, full of beans, incredibly strong, a real ace Spider-Man, and a right-fit bloke as well. He never seemed to let life get him down too long, always looking for a positive and keeping good humor about him. He knew when to get serious and deeply cared for his friends. When Pav had learned he didn't always have steady meals back in his dimension not only did he give Hobie an open invitation to pop in for a meal whenever he fancied but insisted on teaching him some proper Indian dishes so he could feed himself. Who wouldn't fall for a boy like that?
This led him to where he was now, in his kitchen a month before his planned confession trying to figure out how to not muck up a simple dal recipe. Masoor daal, or red lentils, was a relatively simple recipe Pav made for him before, so he thought he'd give it a go. All he really had to do was wash the lentils, fry up his aromatics, add in the lentils with water and some seasonings (Pav had stressed to him just salt and pepper was in no way enough seasoning), and cook until they reached the desired soft daal texture. Easy right? What could possibly go wrong?
-15 minutes later-
BEEEP! BEEEP! BEEEP! BEE-
Hobie frantically pushed open a window, coughing and trying to get the smoke and smell out of his kitchen. How did I even manage to burn the aromatics three seconds after putting them in? I thought oil boiled not burned! A quick consultation with the internet and the old Punjabi couple living a few blocks down revealed he should adjust the heat level and peel his ginger before use, or substitute it with ginger paste, which he decided to forgo wanting the dish to be as close to Pavi's daal as possible well there was still time to try to perfect it.
-5 days later-
On his next attempt, Hobie forgets to add the aromatics altogether and while edible the dish is rather lacking
-1 week later-
On his 12th attempt, Hobie get runs out of spices and the daal comes out just a touch too bland. He sighs to himself and resolves to acquire more before his next attempt.
-the next day-
On his 13th attempt, Hobie is reequipped with spices. Unfortunately for him, he goes a little heavy-handed with the garam masala. Even the Cheema's ( the old Punjabi couple) find it a bit difficult to choke down.
-1 lifetime later-
It is Hobie's 21st attempt and he thinks he's really got it this time. That is until his spider-hearing picks up a kerfuffle that sounds like the beginnings of a brawl. He takes glance a at the stove, telling himself he'll only be gone jiffy before swinging out the window. By the time he gets back, the daal is pitifully mushy and unappetizing.
-1 eternity later-
It is Hobie's 29th and final practice attempt before he confesses to Pavitr in three days. He finds himself saying a little prayer to the food gods that this attempt is successful. He carefully prepped his ingredients, adjusted the heat, and figured out the spice ratio and the exact cook time. All that was left to do was pray he hadn't managed to fuck up in some new way this time. Upon the taste test, Hobie nearly cries tears of joy. It was nowhere near as good as Pav made it, the cumin tasted slightly burnt, there were small chunks of garlic in it, and it was just a tad too soft but it was edible and tasted like daal, admittedly subpar daal, but daal none the less.
Hobie reveled in his victory, giggling to himself while packing some up for the Cheema's to try, the sweet couple gave him some surprisingly harsh feedback and great advice on cooking in the last month. Just as he was about to leave he got a notification on his watch, a message from Pav reminding him that the gang would be having a meet-up today "where the British stole all our stuff". Suddenly, a light bulb went off in Hobie's head. A devilish grin spread across his face. Well, now there's an idea that's more my speed.
~~~
British Slang Glossary:
Bottle- courage or bravery
Fancy- used as a verb "to fancy", meaning to like or want something, usually expressing a crush or craving food
Bloody- used to emphasize a point
Full of Beans- full of energy
Fit bloke- attractive man
Ace- amazing
Muck up- make a mess of, fail miserably
Kerfuffle- a fuss or commotion
Jiffy- a short amount of time
#across the spiderverse#atsv#hobie brown#chaipunk#pavitr x hobie#cooking fails#cooking#romantic gestures#comedy#goldenpunk#pavitr prabhakar x hobie brown#long post
5 notes
·
View notes
Text

Indian Recipes
Hey! Try the delicious :
------ Recipe ------
Cinnamon Flavored Fruit Pastry
------ Ingredients ------
1. Apples - 3.0 pc
2. Dried figs - 8.0 pc
3. Sugar - 0.25 cup
4. Butter - 2.0 tbsp
5. Cinnamon powder - 0.5 tsp
6. Water - 0.25 cup
7. Puff pastry - as required
8. Egg - 1.0 pc
------ Method ------
1. Peel the apples. Slice up figs into small pieces.
2. Cook the apples and figs in butter with sugar, cinnamon and water over medium heat, stirring often!
3. When the apples are almost cooked, mash them with a fork until to get a fine paste.
4. Roll the puff pastry till it gets medium thin. It has to be cold or it will become sticky.
5. Using a cup or a cookie cutter cut circles of dough. Separate the egg white from the egg yolk, and brush the edges of the dough with egg white.
6. Put a tsp of filling in the middle of the dough circle, and close the dough creating a half-circle.
7. Shape up the edges by pressing them with a fork.
8. Mix the rest of egg white with the egg yolk, and add 1/2 tbsp of water. Apply egg wash on the pastry.
9. Preheat the oven to 400°F. Bake the pastries for 20-30 minutes or until golden brown.
10. Serve the pastries warm or cold. Enjoy!
__________________________
Find more delicious recipes at: indian-recipes
8 notes
·
View notes
Text
Makes: 6 naans, ~15-16cm / 6 - 7" diameter
Prep Time20 mins
Cook Time10 mins
Dough rising:2 hrs
Ingredients
1 tsp instant / rapid rise yeast (Note 1)
1/2 cup warm tap water (~40°C/105°F in temperature)
1 tbsp white sugar
2 tbsp milk , full fat (low fat ok too)
1 1/2 tbsp whisked egg , at room temp (around 1/2 an egg, Note 2)
1/2 tsp salt , cooking / kosher
1 3/4 cups bread flour , or all-purpose/plain (Note 3)
30g / 2 tbsp ghee or unsalted butter , melted (Note 4)
Instructions
Bloom yeast: Mix yeast with warm water and sugar in a small bowl. Cover with cling wrap, leave for 10 minutes until foamy.
Egg and milk: Whisk milk and egg together.
Flour: Sift flour and salt into a separate bowl.
Add wet ingredients: Make a well in the flour, add yeast mixture, and butter and egg mixture. Mix together with a spatula. Once the flour is mostly incorporated, switch to your hands and bring it together into a ball. No kneading is required.
Proof 1: Cover the bowl with cling-wrap, then leave in a warm place for 1 - 1.5 hrs until it doubles in size. (Note 7)
Cut into 6 pieces: Place the dough on a lightly floured surface. Cut into 6 equal pieces, then shape into balls into spheres with a smooth surface by stretching the surface and tucking it under (see video).
Proof 2: Place balls on a lightly-floured tray or plate. Sprinkle lightly with flour, cover loosely with a lightweight tea towel. Put in a warm place to rise for 15 minutes until it increases in size by about 50%.
Roll out: Place a round on a lightly-floured work surface, flatten with your hand. Roll out into 3 - 4mm / 0.12 - 0.16" thick rounds (about 16cm / 6.5" wide).
Heat skillet: Rub a cast iron skillet with a very light coat of oil using 1/2 tsp oil on a paper towl (unless already well seasoned). Set over high heat until you see wisps of smoke. (Note 8 for other pans)
Cook naan: Place a naan dough in the skillet and cook for 1 to 1 1/2 minutes until the underside is deep golden / slightly charred – the surface should get bubbly. Flip then cook the other side for 1 minute until the bubbles become deep golden brown.
Cook remaining naan: Remove, set aside, and repeat with remaining naan, taking care to regulate the heat of the skillet so it doesn't get too hot.
Finishing: Brush freshly cooked naan with melted butter or ghee (or garlic butter, Note 5). Sprinkle with nigella seeds and coriander. Serve hot!
Notes
1. Yeast – This recipe works with dry active yeast too, but the naan is not quite as soft. Follow recipe as written, including yeast quantity. Also note, rapid-rise/instant yeast normally does not need to activated in warm water but it's a very specific step for this recipe because it yields a softer naan than adding the instant yeast directly into the dough. (Yes, we made a LOT of naan to try out all the various combinations to figure out the best one!).
2. Egg – I know this sounds strange, but we need 1/2 a large egg for one batch of this naan! Any more and it dries out the inside too much.
Just crack an egg in a bowl, whisk, then measure out 1 1/2 tbsp. OR just make a double batch of this naan so you can use one whole egg!
3. Flour – Bread flour makes the softest, fluffiest naan. But all-purpose/plain flour is very nearly as good. I wouldn't make a special trip to the supermarket just to get bread flour. But if you've got it, use it!
4. Ghee is clarified butter, one of the traditional fats used in Indian cooking. It is simply butter without the water and milk solids, so you have pure butter fat. It has a more intense flavour than butter. Either buy it, make it (it’s easy and keeps for months) or just use normal butter!
5. Garlic butter: Place 2 tbsp/30g salted butter or ghee and 1/2 tsp crushed garlic* in a small bowl. Microwave until butter has melted (do it in bursts so it doesn't explode!!). Stand for a couple of minutes to let the garlic flavour infuse before using.
* Garlic crushed using a garlic crusher or microplane
6. Cheese – Any melting cheese works fine here, though bear in mind if you use mozzarella it doesn't have much flavour. Monterey Jack is a good option that has flavour and stretches nicely!
7. How to promote dough rising – One of my favourite places to proof dough is in my dryer!!! Draught proof, easy to heat up a small space. Just run it for a couple of minutes, put the bowl in, close the door and leave it. Just don't turn it on!
8. Cooking pan – If you don't have a cast iron pan, you can use another type of skillet. Pour 1/2 tsp oil on a paper towel then lightly rub the base. DO NOT use a non-stick pan – the high heat required to properly cook naan will destroy the non-stick coating!
Here is the cast iron skillet I use - it's a Lodge (excellent value, indestructible!)
9. Make ahead naan – A last-minute discovery was that naan is great for making ahead! In fact, the bread flavour improves overnight, which is typical of most breads.
Make the dough up to the end of Step 5 - Proof 1. Then after the dough has doubled in size, put the bowl with the dough it in the fridge overnight (I've done 24 hours). Do not punch dough down or touch it – just put it in as is. The fridge stops the dough from rising any further.
Take the bowl out of the fridge at least a couple of hours before cooking. We need to take the fridge chill out of it completely otherwise the dough won't rise for Proof #2 (Step 6). Cut into 6 pieces, then proceed with recipe from Step 6 onwards.
10. Nutrition per naan – Excludes extra ghee or butter brushed on top (and certainly excluding the cheese – I have not control over how much you choose to stuff it with!)
3 notes
·
View notes
Last Seen Blogs

tradingjackbs
Jack

nonenglishsongs
non english music

knottybeehandmade
Knotty Bee Handmade

that-floating-ghost-key
Keys Random Stuff

memeschinazzo
Nathalia Chinazzo