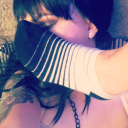
#the app i used is colors!3d
Text
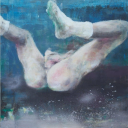
messing around on 3ds
#im currently Unmedicated so i havent really been able to work on my au or anything the last few days unfortunately#the fact that ive still been drawing at all is actually kind of crazy#whysopasta art#marble hornets#brian thomas#hoody#totheark#mh#digital art#fan art#sketch#3ds art#the app i used is colors!3d#which is. ok
493 notes
·
View notes
Text
Help I found my first ever art account on an obscure 3ds drawing app from when I was like 10 what is this caption lol
#I think this is the most likes I’ve ever gotten on there and it was a shitty traced image#no wait my most liked was a picture of a shark. also traced lmao#in retrospect every popular hyper realism picture was traced and color picked. I used to be so amazed by them 😭#it tells you when they used a picture like. it’s not hard to tell. and still we all ate it up#i wonder if my 32 followers miss me 😔#I should post again…I’m still logged in#not from the 3ds tho that thing is on its last legs#it’s on ios and I think android too. wowing everyone with my apple pencil and large screen#man I used to draw constantly on my shitty tiny as fuck 3ds touch screen…how did I do that#wait omg it’s not even on the app store anymore…I shall cherish it forever and never delete it
21 notes
·
View notes
Note
I'm sorry if you've talked about this before, but how would you recommend someone get into VR art? What tools would be best for artists with no VR experience, and are there any other skills that would be useful like coding or anything like that? Your art is very beautiful and inspiring, and seeing what you're able to make come alive makes me want to try, but I don't really know where to start or what resources are worth the time investment.
no need to apologize, you're actually the first person to ask!
the best and most cost-effective starter route would be to buy a used Quest 2 from either Ebay or Facebook Marketplace. you can get one for between $200-300 this way, and it works completely stand-alone - meaning you don't need a PC to use it.
two of the main VR art applications I use (Gravity Sketch & Open Brush) are 100% free. their UI is intuitive and fun to learn via just natural exploring, but both programs have a wealth of tutorial videos available on YouTube.
Figmin XR is the program I use to bring things to life, and it costs $19.99 to buy. you don't need any coding experience to create animated, interactive scenes within Figmin - it's all done via Physics sliders within the app that are designed to be accessible to everyone and learned through exploration. (there's less tutorial videos for Figmin because I'm still making them LOL 😅)
there are accessibility options built into the Quest 2 also - the lenses can be adjusted for people with impaired vision, and glasses spacers can be bought and used with it as well.
for those with motion sickness, Gravity Sketch, Open Brush, and Figmin XR can all be used with a mode called 'passthrough' turned on, which activates outer cameras that show you a black & white* view of your surroundings and helps reduce disorientation. (passthrough availability depends on your headset, but it works with the Quest 2!)
as for other useful skills that translate well to VR - I'd say sculpting! if you already enjoy making 3D artworks with real material, you'll find a lot of similarities when working in VR.
*black & white passthrough is the only option for Quest 2, but the upcoming Quest 3 should have color passthrough like in the videos I post. I don’t know how much the Quest 3 will cost, though.
#auropost#knowing how to sculpt is not a requirement by any means though#you can start out in vr by just sketching as usual#with brushes that lend themselves to sketching#and with time you'll get more spatial awareness as you work#and leaning into the more sculptural elements of creating in 3d will just come naturally#also for anyone who wants to learn the specifics of how i work in particular#i explain my process 3x a week during my livestreams!#the format for my streams is just bob ross#i start by explaining what i'm going to do and what tools i plan on using#and then i narrate everything as i work and explain how and why i'm using which tools/brushes/colors/etc.#also everything i make for figmin is published under creative commons#so anyone with the app is free to download my work and use it however they want for their own stuff!
18 notes
·
View notes
Text
Every fun post on here that encourages people to have hobbies/be creative always gets an avalanche of "Some people are poor Karen" type reactions and respectfully, you're all super annoying. I've never lived above the poverty line and this is a list of hobbies I have that were cheap or entirely free:
Read books: Go to the library, lend a book from a friend
knitting, crochet, embroidery: Get some needles from the bargan store and ask around, people have leftovers from projects they'll happily give you. Thrift stores also often carry leftover fabric and other supplies. And talk about your hobby loud enough and an old lady will show up and gift you their whole collection, because there are way more old ladies with a closet full of wool than there are grandchildren who want to take up the hobby.
Origami/paper crafts: get some scrap paper and scissors, watch a youtube tutorial
walking: put on shoes open door
pilates/yoga/etc: get a mat or just use your carpet, watch a youtube tutorial
Houseplants: look online for people that swap plant cuttings. There are always people giving out stuff for free to get you started. If you're nice enough you'll probably get extra
gardening: You're gonna need some space for this one of course but you can just play around with seeds and cuttings from your grocery vegetables.
aquarium keeping is a bit of an obscure one but I got most of my stuff second hand for cheap or free and now I have a few thousand euro worth of material and plants.
drawing/art: You get very far just playing with bargan store materials. I did my entire art degree with mostly those.
writing: Rotate a cow in your head for free
cooking: again one you can make very expensive, but there are many budget recipes online for free. Look for African or Asian shops to get good rice and cheap spices.
Join a non-profit: Cities will have creative organisations who let you use woodworking machines or screen presses or laser cutters or 3D printers etc etc etc for a small fee. Some libraries also lend out materials.
candle making: You need some molds (cheap), wick, two old cooking pots for au bain marie melting and a ton of scrap candles, ask people to keep them aside for you.
a herbarium, flower pressing: Leaves are free, wildflowers too, ask if you can take from peoples gardens.
puzzles: thrift stores, your grandma probably
Citizen science: look for projects in your area or get the iNaturalist app
And lastly and most importantly: Share! Share your supllies, share your knowledge. Surround yourself with other creative people and before you know it someone will give you a pot of homemade jam and when you want to paint your kabinet someone will have leftover paint in just the right color and you can give them a homemade candle in return and everyone is having fun and building skills and friendships and not a cent is exchanged. We have always lived like this, it's what humans are build to do.
And all of it sure beats sitting behind a computer going "No stranger, I refuse to let myself have a good time."
Anyway I'm logging off bc I'm making some badges for a friend who cooked for me and then I'm going to fix some holes in everyones clothes.
20K notes
·
View notes
Text
With less than 2 weeks before the Nintendo 3DS eShop closes, this short uses apps only available through the eShop, as a love letter to those apps.
This was a slooow-burn film I worked on over 22 months, on and off, to pass the time while waiting in public, like waiting at the doctor’s office, waiting for food take-out, or waiting while my kids ice skate.
The animation was done using the Butterfly Animation app. The backgrounds were painted using the Colors! 3D app, which was then imported into Butterfly. The frog croak sound is from Flipnote, another drawing app on the DS. The music is from the Nintendo eShop theme, and the music from the chase shot was created using the Korg M01D music synthesizer app.
UPDATE: I saw Catsuka did a nice shout out to my film! :)
Catsuka Twitter
Catsuka Website

#nintendo#nintendo 3ds#3ds eshop#animation#2d animation#butterflyanimation#colors3ds#colors 3d#Korg M01D#nintendo 2ds#artists on tumblr#animators on tumblr
1K notes
·
View notes
Note
What art program do you use?
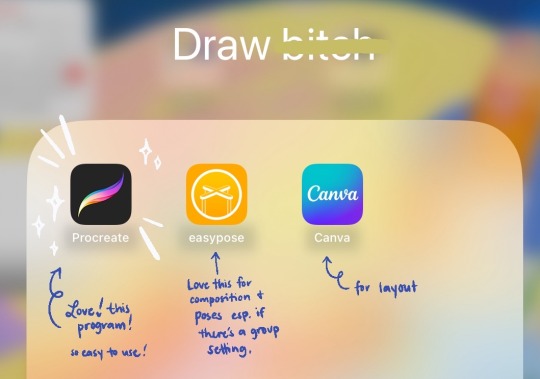
These are my top 3 programs in my art process! Ignore the name of the app folder. It helps with MY motivation to draw lmao
1. Procreate ($12.99 as of Feb 2024)
My main drawing program! Its so easy to use and the UI is simple. What really sold me to procreate is the default brushes and the time lapse! if you’d like I made a post a while back on the brushes i use for lineart! Sooooo worth the investment honestly. also you can animate on it too! but Procreate released Dreams recently. I’m just saving up for it oneday!
2. Easypose (FREE)

I love using this for composition, perspective and poses especially in group setting which I really struggle with. The proportions are very much anime but nothing anatomy studies can’t fix!! Also love that its free and isnt subscription based. Lil warning though the asset library is very limited. there are DLCs but they’re not as detailed as what you’d see in Magic poser and/or Clip studio. But still the basic shapes still help a lot! and I wish i can change the color and move the light but it only has the one light source.
3. Canva (Free & Paid Subscription)
THE Graphic Design for dummies!!! /lh No but fr it has helped me a lot in clutch especially for merch layout when I used to do a lot of conventions
Honorable Mentions for References that helps me a lot (aside from Pinterest):
Sketchfab.com - lots of 3D assets that you can rotate around and use as references especially when you can’t find the right stock photo!!! (Some of the Assets are free or you can buy them!)
Line of Action - been using this a lot for studies! (free or you can subscribe to them!)
Clipdrop Relight - When I’m struggling to light a scene. Very helpful for color studies cause you can set up 3 lights at once for that bisexual lighting~
#anon#narwhal speaks#art programs i use#man if i still have access to a computer/laptop…#i would be able to list cr4k3d photoshop#and i’d be more powerful lmaoooo#i wish i could be using Clip Studio#they have more stuff in there but i got really overwhelemed by the UI and i think it would be easier for me to use as a desktop app#rather than on an ipad#maybe oneday when i finally save enough for a really good laptop#cause i wanna learn how to 3D sculpt lmao
118 notes
·
View notes
Note
Holy crap I am sure I’m not the only one but please allow me to add my voice to the chorus of people asking you HOW you did that incredible mecha animation!!!
thanks so much for the ask!
unfortunately it’s really hard to explain exactly how in words. i can try to show you though!

here are the storyboards! i explained in another ask how i did the moving background, but i did not use any 3D software! i did the boards in an ipad app called ToonSquid, but it could’ve been done in any animation software that has layers and keyframing.

I exported all of the layers seperately (12 in total!!) to Clip Studio Paint, I then cleaned up the backgrounds and did my first round of keys and in betweens. the focus here was on keeping everything as on-model as possible, which was exceedingly difficult, because i didn’t actually make a model sheet because i am lazy.
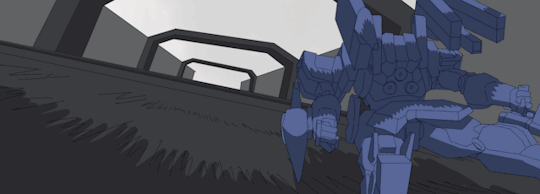
then i did inks and shadows. this was by far my least favorite part of the process. i hate inking. it is boring and takes fucking forever. i think the results paid off tho!!

from there, i colored everything in CSP, and then imported each animated layer as an image sequence to adobe after effects, where i did all of the compositing! this is the final result!
66 notes
·
View notes
Text
SO! You've seen these little things I do sometimes and you want to know the process!

It's genuinely super simple, so here goes! Apologies by the way if anything is unclear or glossed over. A lot of this is personal taste and such so I hope this can be a nice boost to create something!

RESOURCES AND THINGS TO KNOW!
To preface this little guide already assumes you have basic knowledge of color distribution, lineless art, or breaking up art into proper layers for later processing! I am also assuming that your art program has access to scatter brushes and tiling textures. Personally I use Clip Studio Paint, but this can work on other apps. Anyways, here are some good sites for this:
EZGIF - Free, easy gif maker for assembling any kind of gif*! It also has stuff like converting those damn WEBP's back into png.
*PLEASE KNOW THAT YOU CANNOT MAKE GIFS THAT ARE PARTIALLY TRANSPARENT. YOU MUST USE A SOLID COLOR UNDER ANY PART THAT IS OVER BARE CANVAS
Transparent Textures - Free to use source for HQ transparent textures that tile! Amazing for finding a paper texture for these if you commit to the paper doll look. Best results for textures that are in white or black!
So! You have a finished, prepared piece that you want to glitterfy. Well I'm not covering that right now so you can scroll down to That part if you came just for the glitter. This next section is for...
PREPARING THE PAPER DOLL
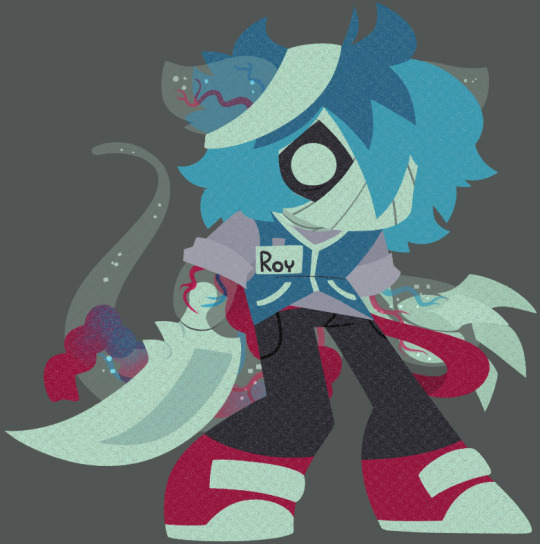
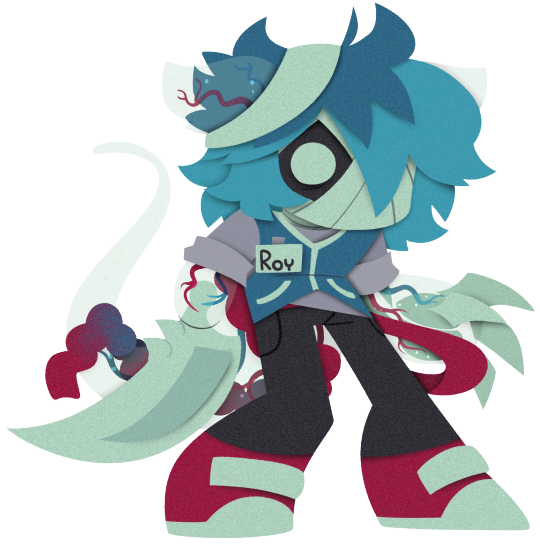
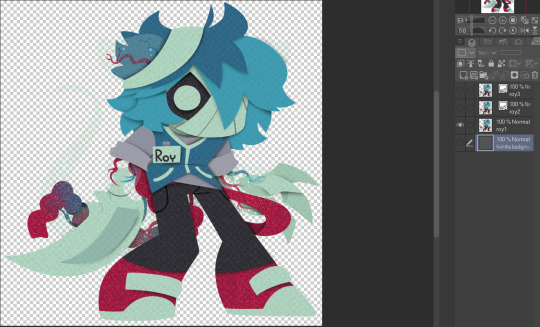
To start, your piece should already be separated into respective layers in any order you'd like! We're about to use a ton of clipping masks so Make sure you know your program before starting! So, as my example we have my oc Roy, resized to around... 1500x1500 or the nearest equivalent Smaller is better because it brings out the texture! He looks a little ah...Flat, though right now?

I'm using this guy for a couple different reasons! Those being:
Roy has translucent bodyparts! Just so you will know what to do with characters who are translucent! I'll get to this in a moment so sit tight
He has a clear, defined, and distinct palette that is easy to pick a color to slap the glitter on! This is important because I personally find balance to be the most appealing part of the finished art.
He also just has a lot of doohickeys on his design.
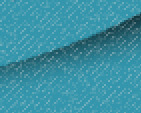
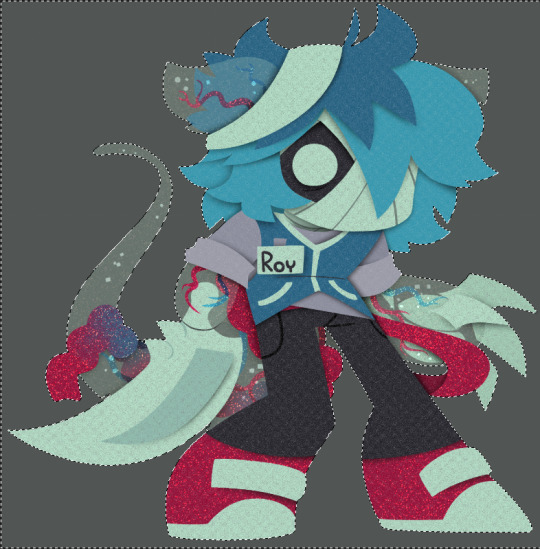
This is where you need your transparent texture! You can use any kind of texture and I encourage experimentation and such, but I personally use a simple paper texture. What we are going to do is go through and clip our imported and tiled texture to each applicable layer! (Make sure to just Copy and Paste the layer you do NOT need to repeatedly go through this menu...)
And... When you are done, you should have something like this:
"But why don't I just clip the texture to the entire piece through a folder? Why go through the hassle of clipping to each individual layer?"
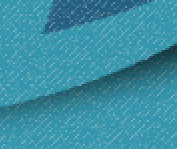
Well that's because of the next step, where we will be adding the shadows. If we don't clip each individual layer, your shadows will look like this example on the left which sort of just ruins the 3D effect and kinda just looks icky, as opposed to this, which is nicer and smoother.
Now I'm no lighting wiz! In fact I'm rather mediocre at best but some general tips for adding the shadows:
Try to keep your shadows going all in one direction mostly! It gives the effect of one light source and generally just looks better than if you shaded around ALL edges everywhere.
Try to only shade where there are parts overlapping that need the dimension! Overdoing it can make the piece look odd. It's especially helpful to separate any details like different shades of hair, layers of hair, etc so that you can put as much volume as you want.
Once the shadows are all added in you should have something that looks like this:
Which looks good! Now I'd sometimes stop here if I can't pinpoint how I'd like the glitter to sit or if I think the piece just doesn't need it, but we're moving on to the big important steps!
ADDING GLITTER
This part is entirely up to your taste! But I'll describe how I do my glitter stuff. Firstly I start out by identifying which color I want to pop out. For Roy here I chose the red parts! For your character it may be different. Experimentation is key!
This is also, however where you need that scatter brush I mentioned earlier. Personally I just use the default CSP spray brush, but again go wild!
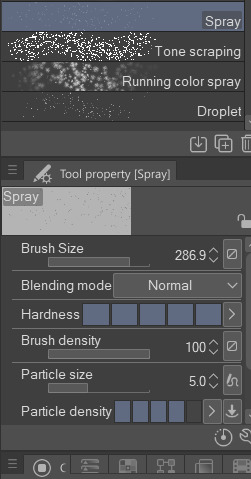
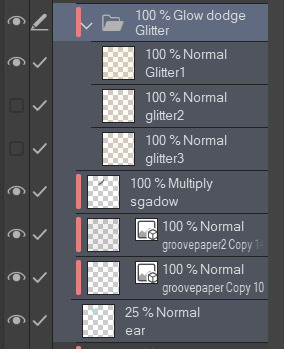
Make a folder above your piece, set its blending mode to glow dodge (or add, or add glow depending on what options you have), and create three layers inside of this folder. Setting the folder to clip is optional right now but will be needed later.

Then, fill each glitter layer with your choice of particle in whatever color looks good! Yes, you can do gradients and other stuff on the particles too! World's your oyster.
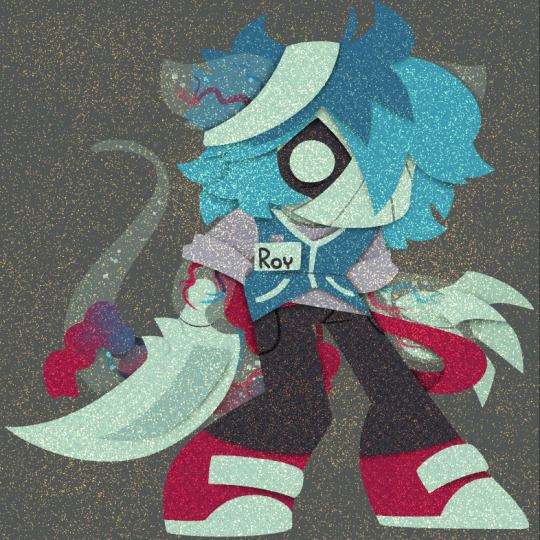
^ Unclipped example of a glitter layer.
Glitter tips for the early 2000's webcore enthusiast:
Use different strokes and patterns for the glitter distribution! This helps it animate better by moving around. For example this time I went diagonally for the first, horizontally for the second, and then in loose circles for the third. Particle density and stuff is also completely up to you.
Use a color that would pop against the intended area! For Roy I used an orange-ish yellow since it compliments both blue and red.
So now we have the layers! This is where clipping is our best friend once again! You're just going to go in and clip the glitter to whatever layers you want it on. Entire folder, not just one of the layers!
Once that's all done, go through and toggle the respective glitter layer for the frame, saving individual copies when done. You should end up with 3 identical images with different glitter distribution.
"BUT WAIT! JONES, THE TRANSLUCENCY!!" I hear you call! Yes, this is where we handle that! If your character is NOT translucent, you can scroll past this section.
Open up your frames all in one canvas, stacked on top of eachother (no jittering or slight displacement! ON TOP of eachother!)
Our layout should look something like this...Note how the translucent parts are rather hard to see, well if you took your frames and put them in EZgif, they'd be gone entirely! That's because you physically cannot have a partially translucent gif due to technology limitations. So an easy little cleanup thing I did was:
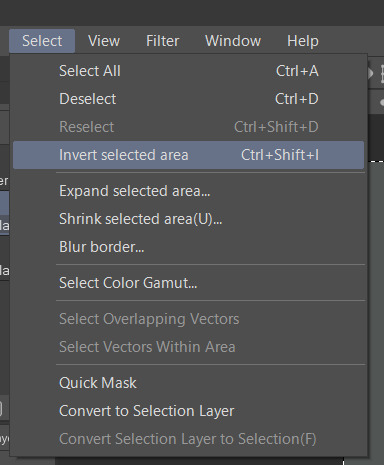
1. SELECT THE CANVAS AROUND THE CHARACTER WITH THE MAGIC WAND TOOL. Do not have any expansion settings on or it probably won't look right in the end.
Make sure you do not miss any gaps! I personally missed the gap between the arm, leg, and lanyard and I had to redo this next step...
2. SELECT -> INVERT SELECTION

3. FILL SELECTION WITH THE DESIRED COLOR. IT MUST BE OPAQUE. I personally picked this cloudy gray color.
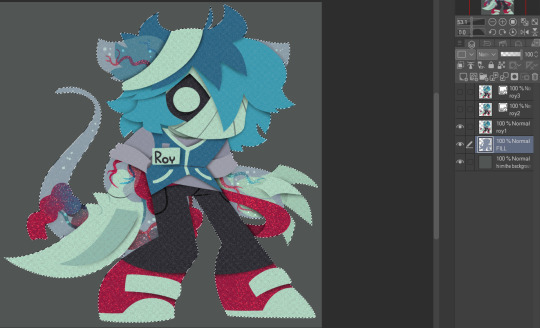
You can now save individual frames of your character with the fill so that they don't go bald when you move on to the next step! Again, you should have 3 frames.
FINISHING UP
This is nice and easy. Upload your three frames into EZGIF and wait for it to process. It'll look like this if you're in the right place.
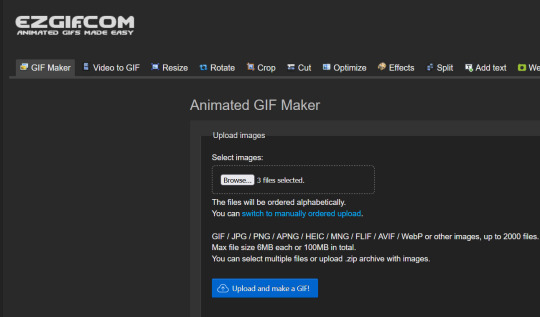
Once things have loaded, make sure to change the settings to the following:
FRAME DELAY: 0 (this is how fast the frames move.)
DON'T STACK FRAMES: ENABLED
You can play around with this but I generally leave everything else alone because you don't need it. Just hit the make a gif button and you're all done!

Aaaand that's it! If you've read this far...Firstly thank you for dealing with my rambliness and horrible explanation skills. Secondly, I hope that this can come in handy for anyone interested! Would love to see if anyone puts this to use. n_n
#tutorial#art tutorial#art tips#art#flashing lights#i dont know what other things to add. ummm#bookmark#<- for myself later so i can find this if i need to#long post
364 notes
·
View notes
Text
some fun therian stuff to do
journaling or scrapbooking about your thoughts, feelings, and experiences as a therian. lmk if you want me to make a post going more in depth abt this
yarn tails!! their are many ways to do this, i like to look for tutorials on pinterest
decorate old clothing you don't use anymore with stuff that reminds you of your kin type. ex: i like to distress old clothes and use fabric paint or markers to add stuff such as pawprints, sketches resembling canines, canine puns, etc. i can also go more in depth if you want
make arm warmers with toe beans! there are plenty of tutorials for arm warmers made from socks and sweater sleeves, i suggest following those. for the toe beans you could simply draw them on or paint them using fabric markers or paint. a sharpie might work too. or!! you could use stuffing and some extra fabric to make 3d toe beans. also foam! lmk if you want more ideas for the toe beans or a tutorial on how i do it
decorate your collars! add pins, patches, charms, etc
decorate your food bowl using paint
sew simple fabric ears or clip on ears to a hoodie
go for walks in areas that remind you of your element and identify the plants and creatures around. i like to use books and apps for this
make nature potions! get mason jars and just have fun adding various stuff such as grass, rocks, mud, etc.
make embroidery bracelets or kandi bracelets! add little charms or lettering to them centered around therian stuff. i have some kandi bracelets that say stuff such as "woof" on them :) i also make embroidery bracelets with colors reminding me of my kintypes and element
make a kandi collar!!
decorate a simple backpack with markers!! add some fabric ears at the top or add a little yarn tail. i also love to make patches and pins :) charms are fun as well. just go ham!
paint or sketch pictures of your kintype(s). how you imagine yourself looking, etc.
#lmk if you want me to make a post going into de-tail abt any of these :)#caninekin#dog therian#dogkin#canine therian#therian#nonhuman#otherkin#wolf therian#wolfkin#therian stuff#puppyboy#dogboy#doghearted#feline therian#felinekin#fox therian#foxkin
1K notes
·
View notes
Note
Hey! I love your art so much 💖 I wanted to ask what program you use for 3D modelling?
aw thank you!! :3
and to answer your question i’m going to warn you this is going to be kinda long because i’m gonna use this post as an excuse to show my 3D models that aren’t awful (sorry lol).
i actually use two different programs, both for different purposes, but you don’t need to get both, it really depends on which kind of modeling you want to do.
1) the first is called Nomad Sculpt on the iPad, you do have to pay for it unfortunately but it’s definitely one of the best modeling apps for the iPad. i know Blender is free but my computer is really old and doesn’t run the program very well, and at this point i’ve already gotten used to nomad sculpt.
anyway tho, i use it for art-related things like the obvious 3D models, but recently i’ve been playing around with just making scenes to use as references for my drawings. they’re not anything impressive, most of the time i actually use it to make little figurines to print and turn into earrings/little friends that sit in my room just for fun.
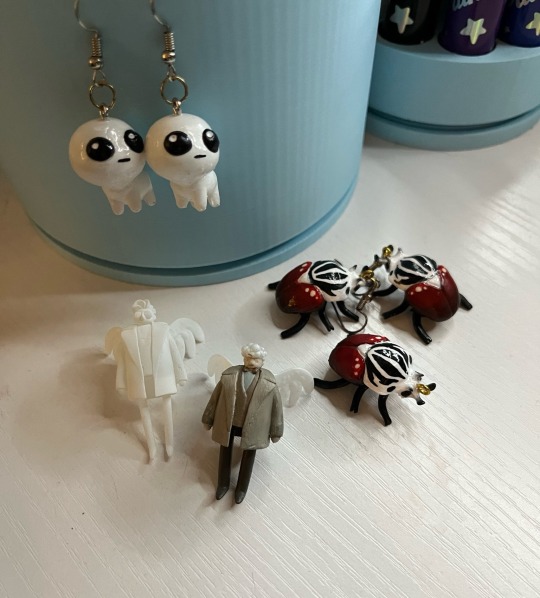
i’m gonna show this first bc they look cooler once they’re printed and colored (also you can tell i printed mini crowley and aziraphale when my sonadow hyperfixation started bc i never actually painted crowley) (he’s just kinda sitting there oops).
the little red guys are actually my favorite bugs (goliath beetles), i made them about a year ago but i still wear them like every day.
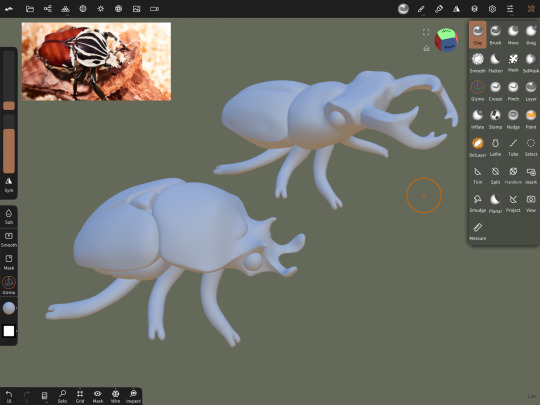

and here’s what they look like in the app, it’s a little intimidating but once you get used to it it’s actually kinda fun just playing around and seeing what you can do.
2) the second program i use is Shapr3D (also for the iPad, but i think they made an update where you can run it on windows/mac). you also have to pay for this as a subscription which sucks, i’m only able to use it since the engineering program i’m in pays for it.
Shapr3D is one of the many CAD software programs out there, but it’s nice bc it’s very beginner friendly and very easy to use. CAD is mainly for architecture/engineering but i honestly think more 3D artists should give it a try. it’s really nice once you get the hang of it and (i’m probably biased bc i’m a student) i honestly prefer it over just normal modeling software because i feel like you can be a lot more creative with it.
right now for my engineering class, our semester final is to design and present something that’s functional, and we can either explain the math behind it or just 3D print it and demonstrate how it works, and i’m making a functional mini model of “the rack” trap from Saw III (i’m not psychotic i swear i’ve just had a Saw hyperfixation for 5 years).
i’m definitely gonna post it when it’s finished just bc i’m already excited with how it’s turning out, but for now here’s a couple at-home projects i’ve done:
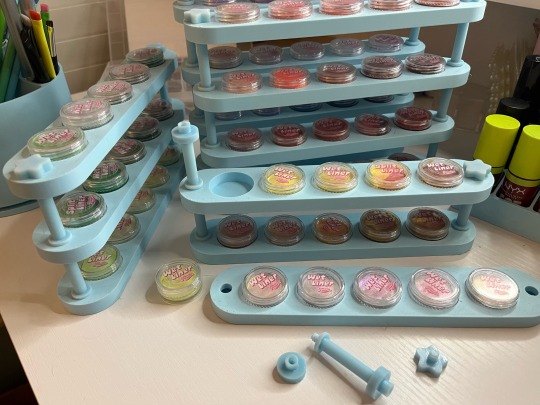
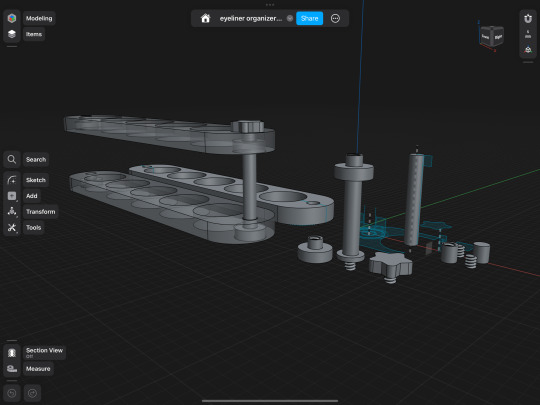
(above) i have a bunch of wet liners and i designed a stackable holder thingy with bolts between the shelves and a little cute star screw to fasten it at the top.

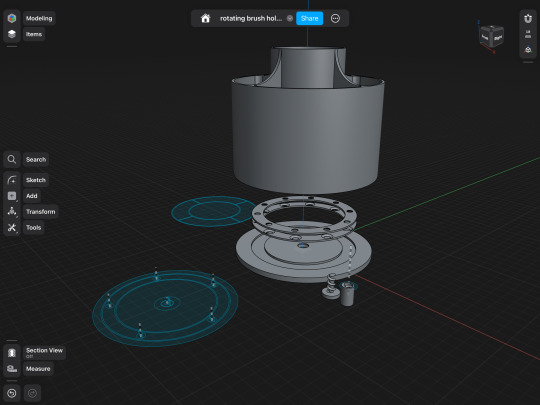
(above) i also made a few rotating brush holders at home (bc the ones that actually rotate are like $40 for some reason) by buying a set of small sphere bearings at home depot for like $5 (that’s what those little metal things are inside the third one, i took it apart bc i don’t know how to put a video and a picture in the same post) (just pretend they’re spinning rn).
anyway that’s all!! if you actually read this whole thing i love you so much bc engineering and design is one of my special interests so thanks for letting me tell you about the silly things i’ve made :3
#asks#3d art#3d model#engineering#infodump#special interest#ermmmmm not sure what else to tag#this was just a really long post lol#bugs#good omens#autism creature
56 notes
·
View notes
Note
Hey, do you mind if I ask what your process is for drawing scenes/rooms? They have such a nice flow and soft feeling to them that I admire so much. My own scenes get a very stiff and naked-looking perspective, and I'd like to improve on that.
Hello! Thank you! <3
For complicated perspective shots I use very basic 3d models, it helps a lot in figuring out the right angle. I'm not good with perspective myself and I have too many ideas that needs to jump over my head and do it FAST before inspiration fades. So this is the good tool.
(obviously, I start with thinking out the idea and composition first, and then figuring out perspective. The app is called design doll)
Then I sketch over
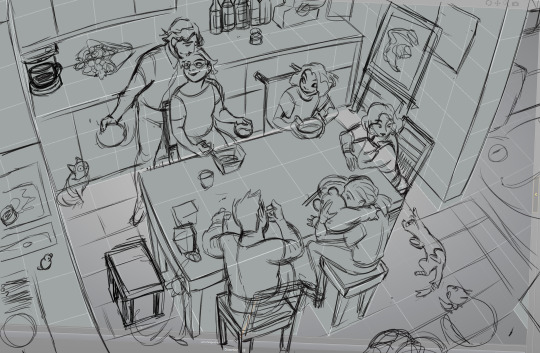
then *draw the damn owl* XD
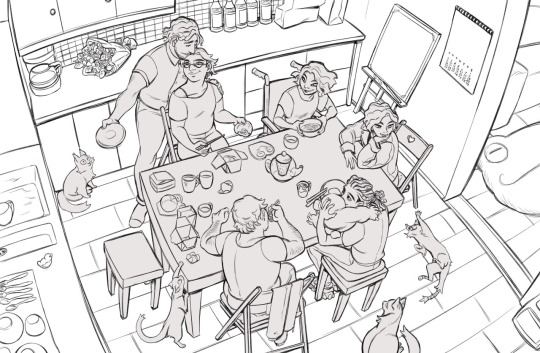
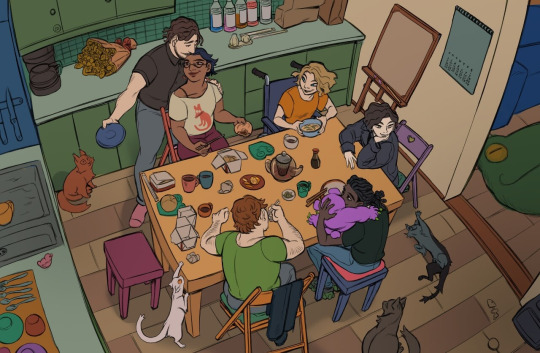


The biggest part is to think about characters on the picture, where they are, what they like, what are they doing etc.
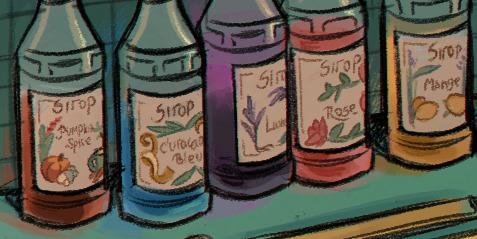
This exact picture is a small celebration of ressurection of that little pink bear-chimera. All of the kids are living hard life, more or less they are all warriors (a werewolf, 2 changelings (and Glinda) and a vampire, Prince's adopted daughter).But Charlie want to let them be kids as long as they can. And then the details comes from the understanding of the characters. Werewolf kid has 2 boxes of noodles (and probably finishing up 3rd) because they eat A LOT and use a ton of energy. Vampire kid has no food because vampires rarely can eat food, Charlie is a special bean. They left a bun for Charlie because he doesn't like to eat much (he doesn't need too), but still enjoys the taste and sharing meal. He is busy changing plates and washing tho. There are werewolf's hoodie on the chair and a backpack, because it's Charlie's and Glinda's home, everyone but Monica are guests. There are coffee machine because Glinda works A LOT during the day and also wants to hang out with her new found family at nights. Each syrup bottle picked according to Glinda's and Monica's taste. a ton of frogs stuff- Glinda loves them. An unfinished painting-the abandoned woods in Umbra. Halloween lights-it's Charlie's favorite holiday. Little duck - one of the first things Charlie saw when he first come to Glinda's house (it sit in the sink, drifting in pink colored water). A bouquet of raspberry - Charlie gave it to Glinda in the first days of dating to impress her ( he also thought it had a good symbolism). he killed people to get this bouquet (no joke!!)
I'm sorry, I got carried away! But if your question was only about perspective, you have the answer!
71 notes
·
View notes
Text
some of my new manifesting “techniques” 🦥
( I WROTE EVERYTHING OUT ONCE THEN ACCIDENTALLY CLOSED THE APP AND LOST IT ALMOST CRIED SO HERE I AM RE WRITING EVERYTHING.)
now these are just some things that i added to my new routine to help me in my journey that helps ME personally if you like anything i list in the post you are more then welcome to add it to your own routine our switch it up a bit to your liking :) now to the post we go
💟 : manifesting something new each week.
so for this what i am gonna do is target something each week to get by the end of the week (friday) for example. say i wanted to manifest finding 20 dollars on the sidewalk on friday ill assume/affirm, “on friday i will find 20 dollars on the side walk” “on friday when i go outside i will find 20 dollars”. this will help keep manifesting fun and keep it from turning into feeling like a chore & it will boost my faith in the LOA and my faith in my power.
💟: manifesting something labeled “small” for me everyday.
by this i mean something smaller to me, because i know labeling your desires “big” and “small” can be harmful i simply mean things that arent as big, important or exciting as me manifesting my desired face. now for example say for today i wanna manifest seeing a rainbow colored car ill affirm “i just saw a rainbow colored car pass by” , “subconscious i command you to show me a rainbow colored car” etc. this ties in with keeping manifesting fun and also boosting my faith in the law and my own power.
💟: not writing out my desires/affirmations
now not everyone needs to do this as i used to write out my desires and affirmations almost everyone does i just want to stop doing this because i realize how much stress,doubts, and overcomplicating the LOA i do when i do this. instead i’ll simply just write out self concept affirmations and thats it, for any of my desires like df or db ill just affirm i have that when im in the mood to or when i want to saturate my mind OR if i think of it. writing out my desires or affirmations on a list makes it feel like im doing this as a chore or im in a lack of want by writing out everything and opening it everyday to read it. so by not doing this it can help me get into a state or knowing or a state of wish fulfilled easier.
💟: sticking to the basics and only using subliminals, affirmations,sats, and a mental diet.
if you dont know what subliminals are they’re just videos with hidden affirmations with music layered on top so you cant hear them, i only wanna stick with three things affirmations, subliminals and ONE AND ONLY METHOD sats. i want to do this because it keeps manifesting simple and not me doing 293893 methods to “try” and manifest my desires. and by sticking to the basics i mean simply remembering this picture which simplifies manifesting. and lastly a mental diet which is literally just flipping any and every thought u can and making them into thoughts that work in your favor its that simple it can be difficult at first to watch ur thoughts not at all times just when needed and instantly changing an unfavorable thought into a good one can be tricky but all you have to do is persist and you will not regret it

now here are just some things im gonna be doing to my routine to help me with my journey. these are the things ik will help me stay on track and actually keep me persisting, on track and not giving up until i get what i want. if you like anything i said once again dont be shy to add it to your routine. make your journey fun take care of urself just because you can get anything you want dont stop taking care of urself do ur makeup, even if ur manifesting clear skin do ur skin care BUT only if you want to because it will make you feel good not because you feel like you have to change the 3d. do things that will keep you in a good mood because even tho high vibrations and good moods aren’t needed for the law of assumption its better to have a higher self concept to help you manifest more easy rather then having a low self concept and just make manifesting more difficult for you, so make a routine , go shopping, get that job DO things that will make you feel happy dont do things because you feel like you have the change ur 3d no let your 4d and the law handle that :))
#law of assumption#law of manifestation#law of attraction#manifesation#manifest#neville goddard#manifesting#subliminals#sammy ingram#self concept#subliminal#affirm and persist#sub user#369 method#loa affirmations#affirmations#master manifestor#revision#loa#manifestation results#law of karma#law of desire#desires#manifesting method
452 notes
·
View notes
Note
Maybe you have some drawing tips for beginners?
Your style is incredibly beautiful and it just inspires this thing inside me to grab my iPad and start drawing but unfortunately I have no idea where to even begin
Or maybe you have some recs where to look to learn how to draw stuff?
But I understand completely that it’s your thing and artists should never feel pressured to share all their techniques and secrets, you worked hard on it!
I just really really love your art to the point where I just look at it for 30 minutes straight with this big feeling in my chest
<3
ah it was never about being secretive, i'm pretty open about my drawing process since gatekeeping knowledge is a big pet peeve of mine. It was more like,, laziness because writing a cohesive and helpful drawing tutorial is pretty difficult and i wouldn't even know where to start; i'm afraid i'll get maybe too technical and what have you.
As for tips for beginners, i've shared plenty on my couriouscat so you can scroll through the answers there, i also have some drawing timelapses on my twitter account as well (albeit you'll have to scroll a little)
I'm very flattered you feel that way about my art, it really means a lot to me and i'm glad to have inspired you to draw as well that's awesome and i wish you best of luck!
I actually don't know how different drawing on an iPad is compared to a graphic tablet+desktop, so I am actually pretty clueless in that regard. I think Procreate is the most used digital art app for iPad so you can start by getting it and familiarizing yourself with the UI. I think this step is often overlooked. The brushes and the chosen program can make or break the drawing experience. If you simply find yourself not enjoying Procreate, experiment with other apps or maybe try switching to a graphic tablet, maybe that feels better and is more suited to your tastes.
To be completely honest, one "bad" piece of advice that i should probably keep to myself is to draw something you actually enjoy: fanart, Pretty Girl Portrait(tm), your cat, landscapes etc even if it's above your skill level (becoming obsessed/ fixated on some character from a piece of media also works wonders i'm just gonna throw that out there). The main point is to actually care about your chosen subject in order to get inspired and to have that inner desire of "doing them justice" aka drawing them well. The traditional art learning route probably involves studying the fundamentals, shading spheres and cones and simple 3D forms blablbablah which. Yeah ! sure that's probably better advice but i'm telling you what will make you want to keep going and not get discouraged after a few failed attempts.
As for the drawing subject, I highly recommend having photo references to guide you.. you always need refs it's a recurring thing. My fastest artworks are the ones where I have the right references. the less references the more difficult it is to draw something
As a beginner it is also a good practice to draw OVER your photo reference to get the proportions right ( i'm not talking about literally tracing the contour of a face or limb ( just an example ), but moreso identifying the Main shape which makes up that body part and observe how long is it in respect to the other components, how does it connect to the other parts etc - big difference. Tracing won't help you in the long run).
Another thing you can do is to study your favourite artists and see how They tackle whatever it is that you like in their work. how do they simplify facial features? what about anatomy? color/ light etc and kinda reverse engineer your way through their process. ( but i highly recommend to just keep these practice sketches to yourself, and to not share them on social media- unless you get the artist's permission)
This is how i got into drawing and what i did back then, again, for more technical hands-on information i did answer similar CCs before so with a little bit of stalking you'll find them in no time
I wanna finish this with some resources that helped me:
>youtube guys - sinix, ahmed aldoori, marco bucci, and also just speedpaints in general i highly recommend watching those
>for simplified anatomy i found @/ taco1704 's ref sheets to be very helpful but ........... I'm pretty dry here i just look up refs on Pinterest tbvh
speaking of, here's my pinterest i have a bunch of art related boards board cool stuff overall maybe they can help guide you towards some direction or inspire you in some way idk
ok i kinda suck in the resource department listeN. im starving too just.................. watch youtube speedpaints ok
SORRY IT'S SO LONGGGBGGG i hope it was at least a bit helpful? this was all over the place... I'll try to come up with a tutorial as well but i really gotta be careful with how i go about it. I'll leave you with this for the time being. Again, thank you a lot for the kind words, I really am very grateful and touched esp by that last part about staring with the big feeling stuff eeeeeeeeeeeeee really wow T T that's so lovely and a big compliment thanks ty ly
#long post#this is so messy...... sorry anon#i don't have a very. linear thought process as the kids would call it#you should see my lit essays back in the day lmfao#anyways#if there are typos i'll fix them later#ASK IZTEA#they call me the tutor the way rial my way through the .....#ok nevermind
35 notes
·
View notes
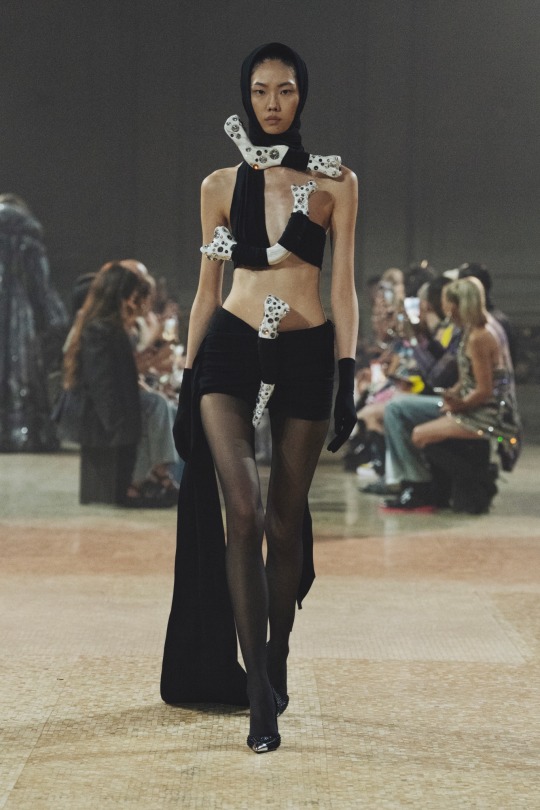
Text
Hi (nyfw thoughts)
Ok so first I just want to say that this fashion week was so boring and really sums up the kind of good idea drought we’re living in. BUT there was a fair share of discussion over some things so! instead of trying to fit my thoughts about everything on the app formerly known as twitter, I’m just gonna tell y’all here.
Shows talked about in this post; Proenza Schouler, Eckhaus Latta, AREA, Luar, Helmut Lang, Elena Velez and Tory Burch
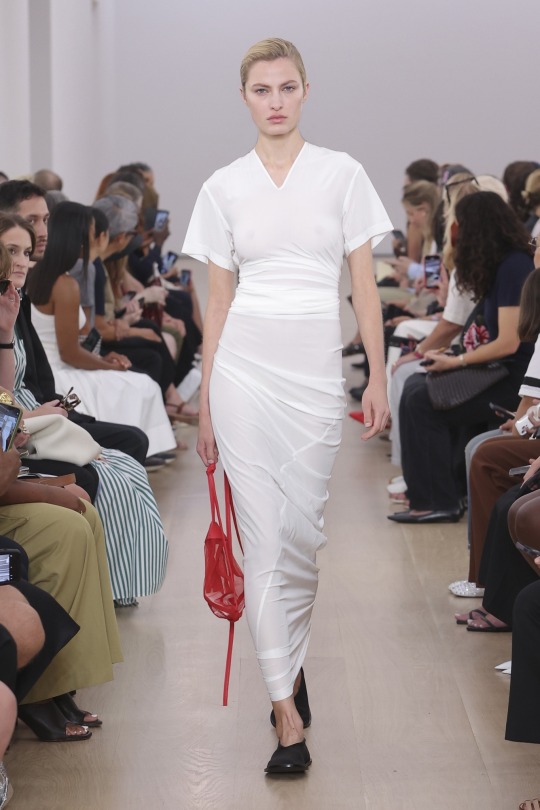
Proenza Schouler
There’s no way Proenza was going to ruffle any feathers this season. They have a loyal following (which I’m sure has nothing to do with the celebrity affiliations of the brand) and a consistent history of people pleasing so they’ll always get their praise from Vogue. They dropped a new monogram which is the only “newness” they wanted to introduce. Jack McCollough said they wanted to continue last seasons narrative and they sure did! (Only thing different was no Sevigny). The clothes are obviously well made and evoke wealth in that special kind of iykyk way. Many people said this looked more like Helmut Lang than Helmut lang did (I’ll get to that later) and they’re not entirely wrong. Not gonna act like I wouldn’t wear this collection but definitely nothing groundbreaking.

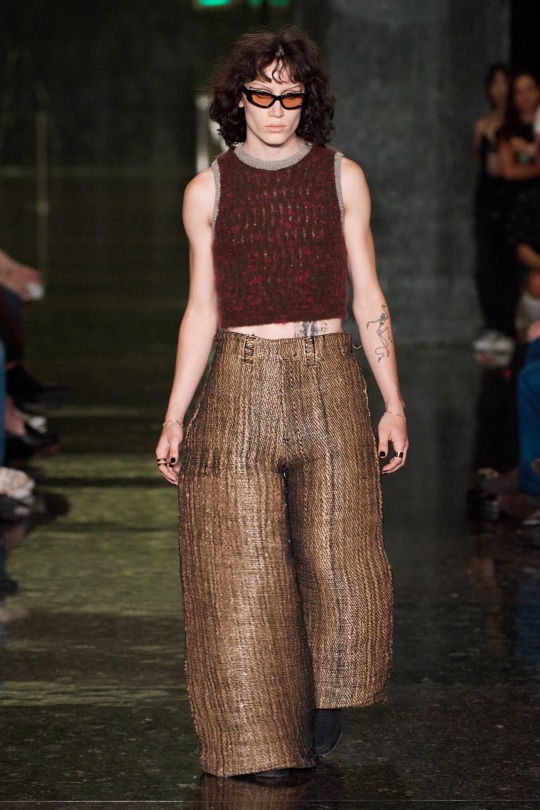
Eckhaus Latta
Eckhaus latta is a brand that has always had a special place in my heart (maybe because I’m from the city that the two designers met and started the brand together in)(maybe). My style has definitely evolved since I first became aware of the brand but I’m always interested in what they’re doing. This season they got experimental! They worked with a 3D printing company named “Unspun” where they came up with jeans made from all different materials like hardware store twine and ikea plastic bags. The way they combined tech innovation and sustainability is not just commendable, it’s very forward thinking, which is a staple in the brands identity. With that being said some of the collection felt directionless in comparison to all of the innovation. The sheer (which dawned their new EL monogram) was very MNZ store to me but not in a bad way. I like that they’re not trying to be trendy and come up with new things however a-lot of brands were doing that so it makes me wonder if that’s a good thing or not.
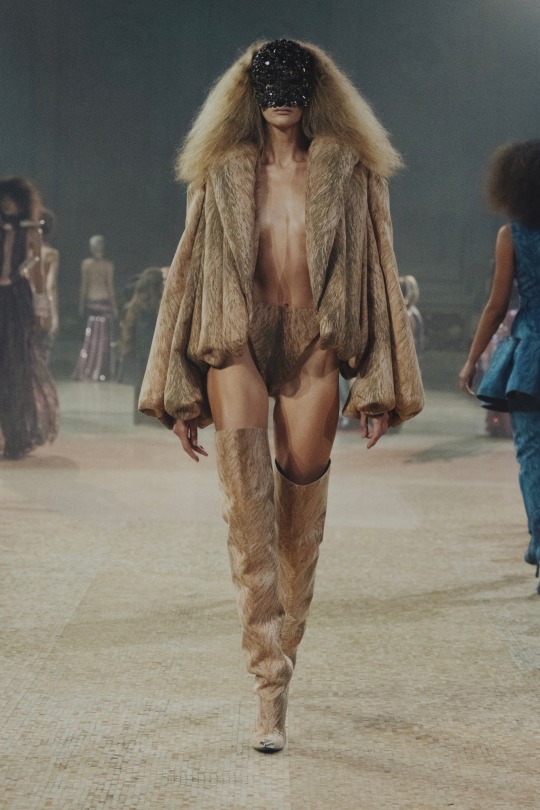
AREA
I loved their modern Stone Age ladies. I think it was one of the only luxury focused shows where I was like wow! This is different. The fur printed coats were so gaudy and held its shape in the way good ol’ fur coats used to. I think this collection was really cohesive, adventurous, new. Everyone saw Saweetie wear it at the VMAs and even the unfashionable general public could see the yabba dabba reference. The prehistoric influence was chosen because as Piotrek Panscyzk said “pelts and bones were the first things humans had to build an identity around”. There’s definitely a case for a narrative about how much luxury (the hunger, the status) mirrors pre historic, pre civilized behaviors.
Luar
Raul Lopez is a diamond. This collection kind of came of as a continuation of last season as well but I like this brand so much that it feels good to me. I feel like Raul is constantly playing with this really restrictive, God-fearing way of being and an inhibition-less eternality. Padded shoulders, the top draped from the eyewear, perfect collared shirts, jeans and leather, it had all the perfect Luar moments for me. No notes.

Ok.. now on to the “controversial” shows
Helmut Lang
When Peter Do was announced as the new creative director of Helmut Lang, everyone rejoiced. Why? His strengths as a designer seemed like a natural fit for the brand. Expert tailoring, black and white as a main color palette, maybe a little overlap in philosophy.. but as the outfits came out people’s reactions… were… unfavorable to say the least. People saw the reference to key Lang moments like seat belt bondage, the use of Ocean Vuongs poetry (which I felt was terribly misunderstood), the classic button up and jeans as disappointing instead of nostalgic. For me, personally, I think everyone’s expectations were rooted in something that Peter Do could not have delivered. That expectation being Helmut Lang himself. People saw Do as the second-coming and that’s just the truth but where do we draw the line with our expectations on reliving the past and how do we honor the kind of openness necessary to evolution? I myself had to sit with the collection and came to the conclusion that maybe Peter is just defining a clear end to the Helmut era of yesterday and the start of his own journey now. After closely looking at the collection and it’s details you can see how wonderful the clothes really are. It is everyone’s responsibility to question and examine the things they “care” about and I think this fashion public is not patient enough for that. It wasn’t the greatest debut but it also wasn’t the worst. Anyway we’ll see what comes next.

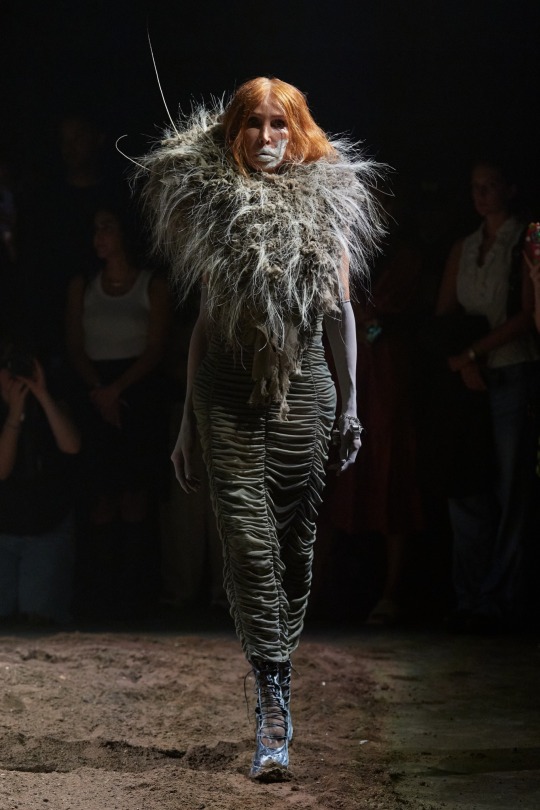
Elena Velez
Mud gate ss24! Since her NYT article last year, people have been really fed up with Elena (I learned only after the mud fight started to circulate) and she doesn’t really seem to mind, she seems to like it actually. She argues online, she argues IN lines, she doesn’t pay people adequately and the list apparently goes on and on. This collection is called “the longhouse” and in her press release she says a lot of things about the commercialization, sanitization, condemning and control of womanhood, she talks about anti-heroines and contemporary female evil (which she loves to embody I guess) and she says that this show was ritualistic catharsis from oversocialization. I think it’s pretentious when someone has to use so many complex, institutionalized words to convey their message. She’s speaking in code. To be honest I like her clothes but I don’t think her designs are that original. I really want to raise the question who does her message benefit? We should all be allowed our multiplicity in this life, that’s true, but being a bad person in practice is something I’m personally not attracted to. I’m a little confused but it is what it is.
SPECIAL SHOUT OUT TO TORY BURCH!!!!
Who I think should be receiving a cease and desist from Miuccia Prada any moment now. This collection is such a departure from the Tory Burch we all grew up with. This must be that post divorce clarity. I like it! It’s 60s. It’s Prada. It’s miu miu. It’s Tory Burch now too!

If you made it this far I really appreciate you ♡ this was just for ki’s sake. It’s not my most critical thinking to date but there was discussion and I loved that. I wanted to contribute and this was the best way I could think of. Lmk if I should do this again with lfw!!
#nyfw#new york fashion week#eckhaus latta#proenza schouler#area#ss24#spring summer 2024#helmut lang#peter do#elena velez#luar#tory burch
46 notes
·
View notes
Text
Ranking ten Thomas the Tank Engine designs 🚂
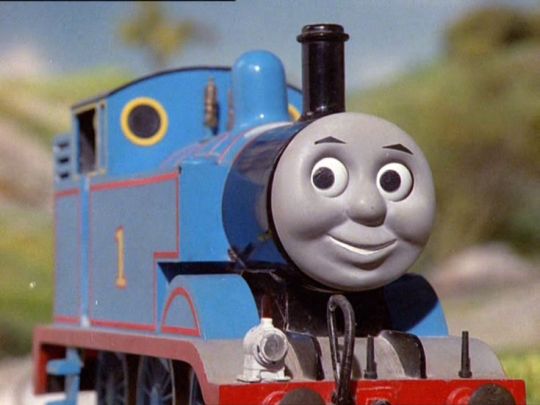
Bear with me I'm not super deep into Thomas Lore like that so I'm only doing the shows and books. These are 5000% my opinions so if you like them - great! I'd like to start the new year on a positive note. Also it's Thomas Day too, talk about Two for One! Heh. Now let's get into my top ten as that is the limit the app allows.
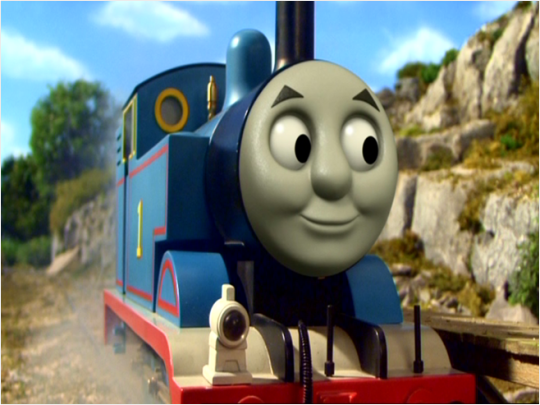
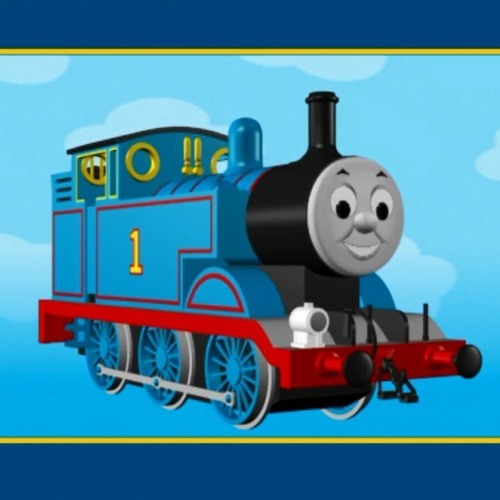
First on my list is the version that started it all - good ol' classic Thomas! With six small wheels and a short stumpy funnel, you can't deny this is one of the most iconic designs ever put to screen. What makes this design great is the use of real materials like plasticine and metal. It makes him feel that much more real. Like he's more than just a toy he's a working engine. 9/10
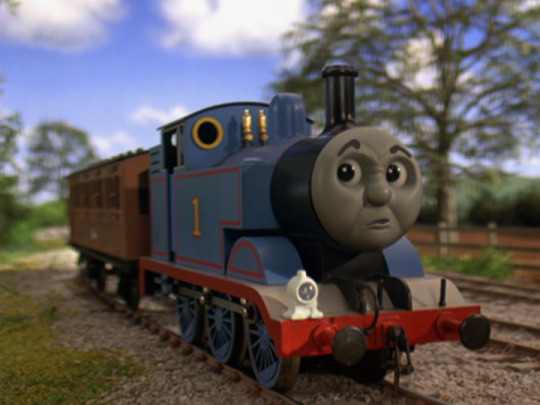
This halfway design from season 12. When I saw this for thr first time as a kid it threw me off. I was so used to static faces, seeing them move their mouths all of a sudden was jarring to say the least. Not to mention the PHYSICAL model makes it even more uncanny. Over time I got used to it. Still it was just weird change. 5/10
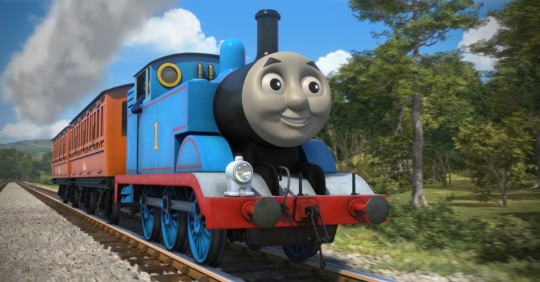
Now I'm counting all the CGI since it's all one big era (yes even BWBA). I think it's a great update on an already classic design, with none of the physical limitations. The bouncing did come off random though, and sometimes the CGI lacks the charm that makes the traditional model endearing. Overall I give it an 8/10

This artstyle on the Anchor Bay/Gullane media is simple yet it does a good job conveying that 3d low poly look. 6/10j

Now we get to the era succeeding it. This HIT model looks great except the face is sort of uncanny to look like. Like he's celebrating a win after running over a cop. Good job Thomas - cops have no rights. 6/10

Jumping back in time we have the TATMR model. Yes they made new models (well new at the time) to fit the American gauge standards. Don't ask me how that works I have no experience in modelling. But I've always liked his movie design plus I consider his acting to be the definitive voice that I imagine he'd have. 10/10 for devious design and brutal friendliness.
I don't mind the shape or the color, but his face is putting me off. Like I know Thomas is basically a GILF at this point in our time but he's known for his youthfulness. His face makes him looks old. Must be the eyes. 4/10.
Ooooh yall knew this was coming! I'm well aware of how controversial this show is. I have my own gripes but I actually don't hate this design. It follows the basics and it's adorable. But it's attached to a show that ignores almost everything that made the original so appealing. Also a bit of nitpick but since he's already blue, shouldn't his eyes be a different color to stand out? Preferably change it to brown or hazel. I rank it 3/10.
I would get bored when those Learning segments came on, i could tell even as a kid they were a forced attempt to make the show more educational to fit PBS standards. But this model has a certain charm to it that I can't bring myself to hate. Perhaps its the nostalgia talking. 4/10.
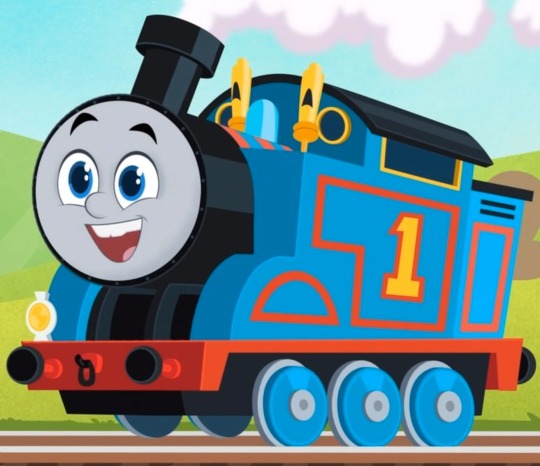
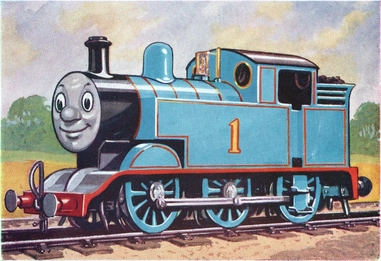
I like this depiction of Thomas. Don't know who the artist is but whoever painted it done a great job with his design. He looks so friendly too, and I love how vibrant the colors are. 8.5/10.
That's it! That's all I have for my top ten Thomas designs. Feel free to comment I love to hear YOUR rankings and any thoughts about the franchise in general. Thank you to any and all who supported my blog! Here's to a better new year and hopefully 40 more years of fun - Mattel not included. 💙💙💙
#ttte#thomas and friends#thomas the tank engine#tatmr#character designs#ranking#childhood#nostalgia#thomas day#1/1#new years day
26 notes
·
View notes
Text
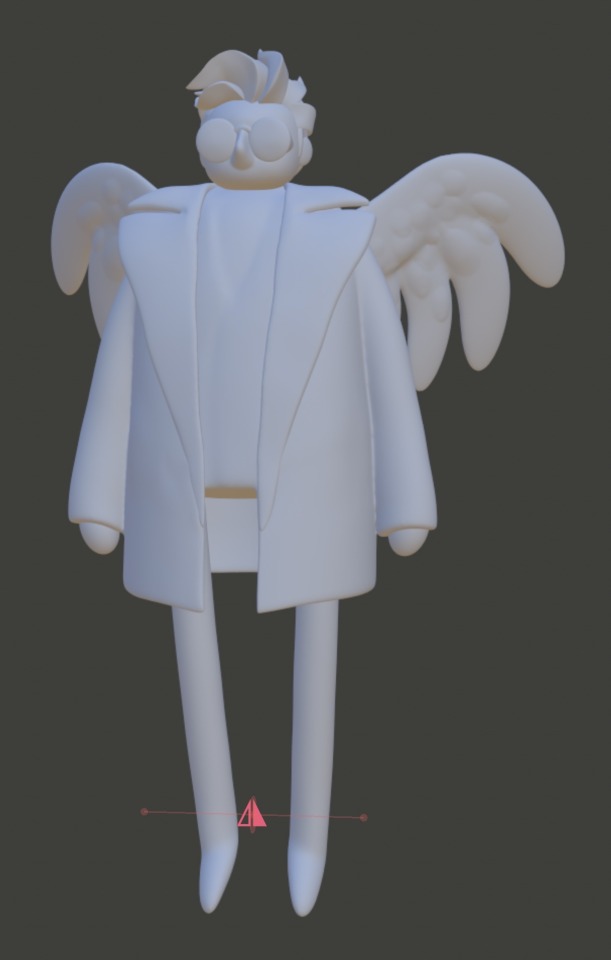
YOU WANT TO MAKE A COOL STYLIZED 3D MODEL LIKE ME?
hell yes i am glad i inspired you to try new things lets go.
firstly, i am assuming you know how to sculpt or went to this awesome tutorial (1) and learned the basics. GREAT! i am going to be showing you how to set up painting in nomad sculpt, and i'll probably come back and do one for blender in the future!
note: nomad sculpt is around $10 on ipad. i think theres an android phone version that is the same app and free? but its practically unusable due to the size of the screen and stuff.
so we have a sculpt. great! it looks WEIRD with the matcap. too shiny and not stylized. not what i want.
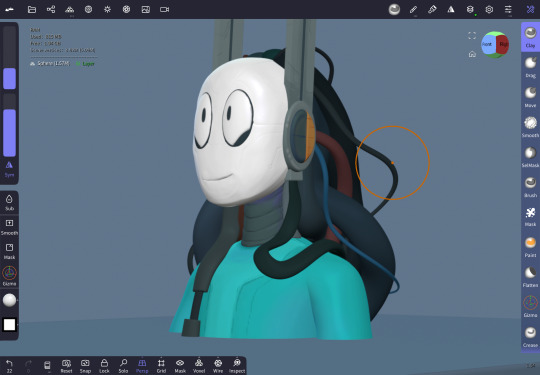
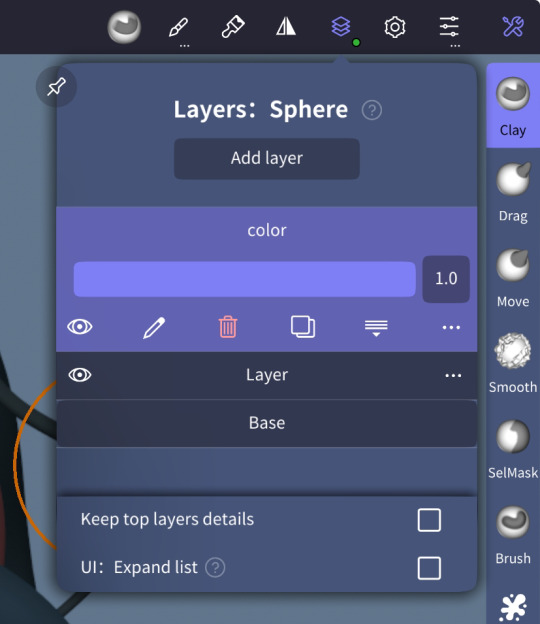
let's get a base color on. i like to use layers to paint non-destructively.
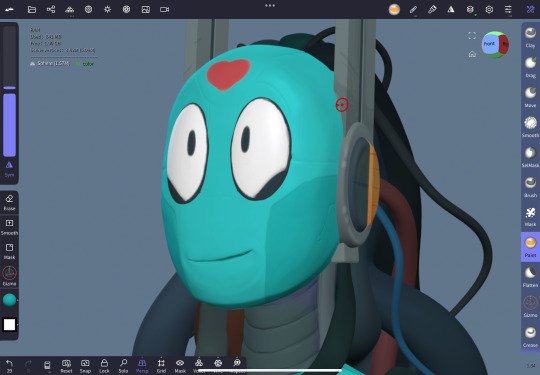
use the paint tool and stick some color on! i paint in this view to start out, because you are going to find out that unlit models are kind of hard to paint.

matcap is what we usually use when sculpting. we are going to enable unlit mode.

wow, its like lights give us a lot of important clues as to how something is shaped! if you didn't notice up above, i actually have a cube in the scene that is the same color as the background to create a very crude and easy flat edge to the base of the model. because there are no lights, there are no shadows! i have fooled you all.
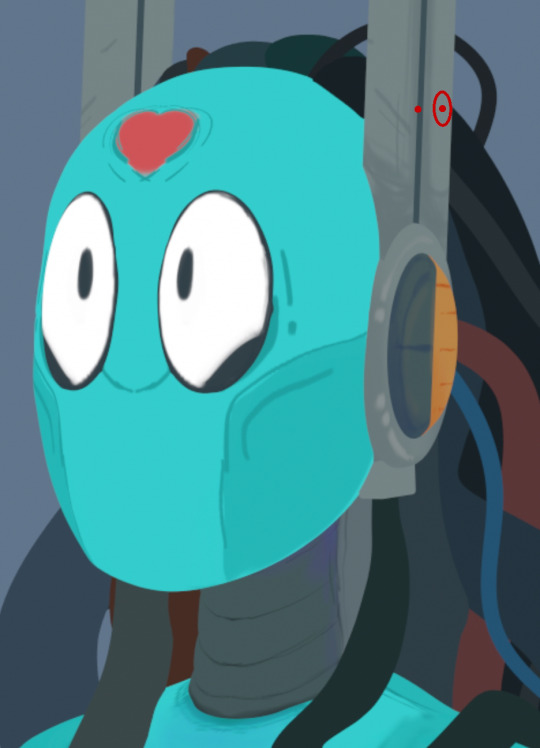
we can now add in more lines and stuff. switch between matcap and unlit, so that you can use the features of the model to define where colors go.
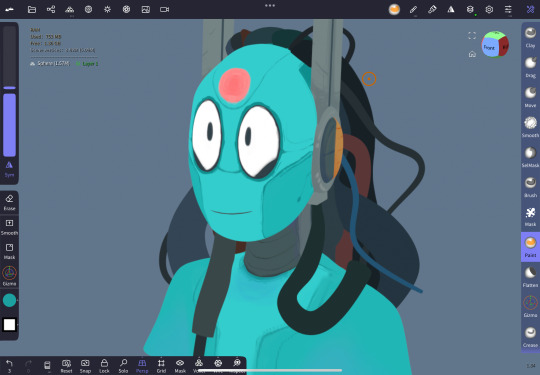

here is the actual painting, without my shadows on the head, next to the one WITH shadows! you can see how the painting gives a flat color model depth, with complete control over how the light works!
and as a fun bonus, an actual WIP from when i was making this model! you can see how the antenna started as just rectangles, and she has NO ARMSS. i was still fleshing out the wires here as well!
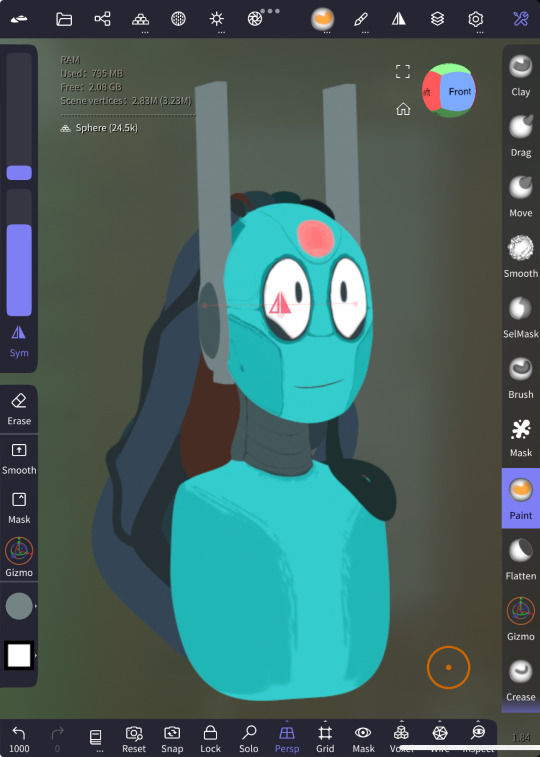
in blender, its a bit more complicated, as you have to go to shaders and plug your texture directly into the material output, with no principled bsdf or anything. that's a discussion for another time lmao.
i hope you learned something!
plaintext link here!
(1) https://www.youtube.com/playlist?list=PLuJsxA8NIizg2kUkf5NxJi68dIxCEKpSd
#tanz talks#tanz art#3d sculpting#nomad sculpt#y'all enjoy! i love doing models like this so so much.#3d art
16 notes
·
View notes
Last Seen Blogs
badgurl234
Humiliate Me
moonrise-crossing
moonrise kingdom crossing
piccolaanima01
Parzialmente stremata
batfleshh
Rocket King