#stencil tutorial
Text
Easy Paper and Tape Stencil Tutorial
made one for reddit so I might as well post it here as well
Materials
writing utensil (pen, pencil, marker, etc)
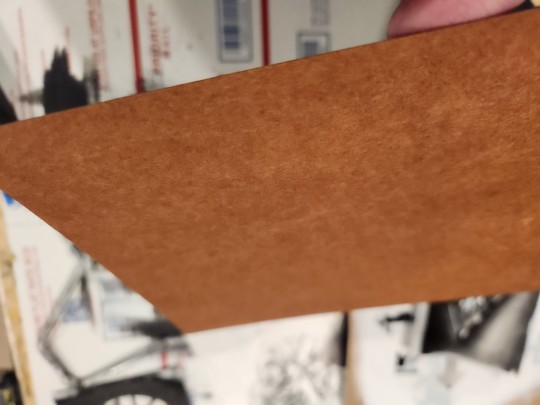
paper (i usually use plain printer paper but most other scrap paper works fine as well, just be aware that thicker paper makes it harder to trace existing designs/logos)
clear packing tape
scissors and/or exacto knife (those little scissors you can get in cheap nail care kits work great
Optional Materials: Device w/ screen of your choice, printer

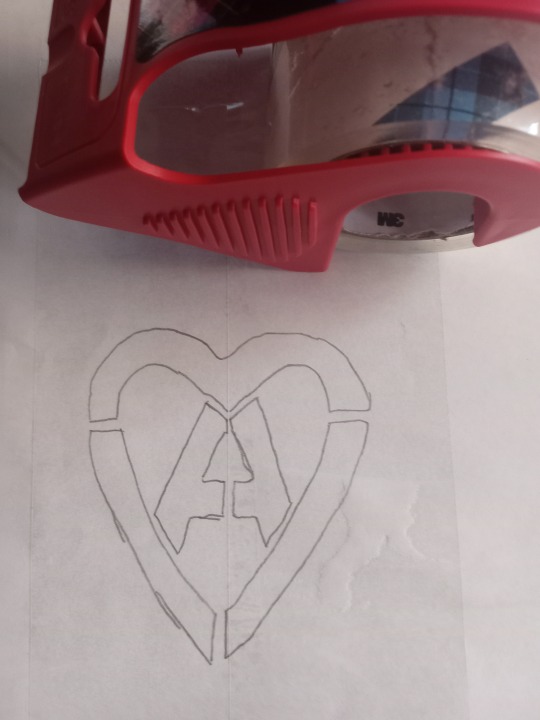
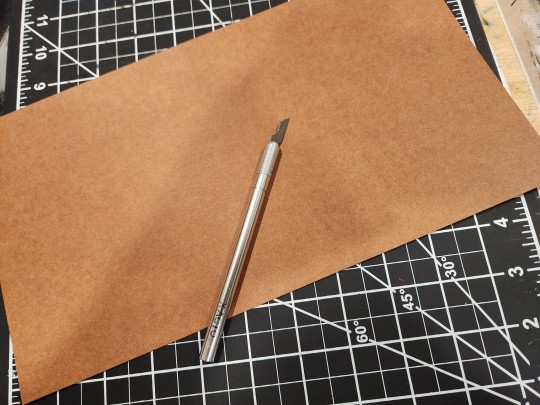
Step 1:
Draw out your design, trace from device, or print out design
(in example image I am tracing from a screen)
r/AnarchoStencilism (Deviantart link if you prefer) is great for free stencil designs

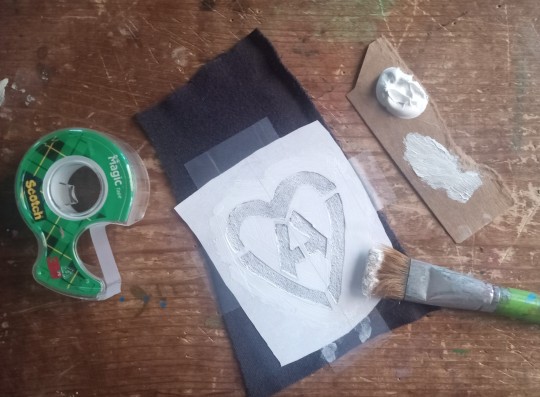
Step 2:
Cover both sides (front and back) of the design in packing tape
Step 3:
Cut it out
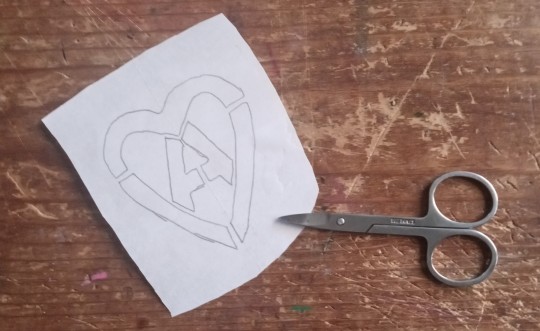
Step 4:
Use your exacto knife/scissors to cut out the design

Step 4:
Apply to whatever you want!
Happy DIYing!

#kahvi draws#patches#stencil#diy stencils#diy tutorial#punk diy tutorial#stencil tutorial#punk diy#folk punk#diy patches#pat the bunny
241 notes
·
View notes
Text
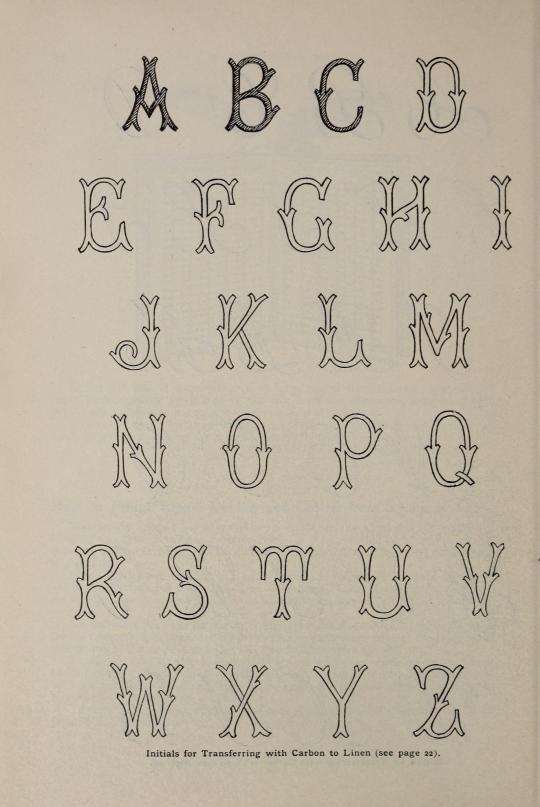
Part 4 of A Treatise of Embroidery, crochet, and knitting with illustrations
By George C. Perkins, Anna Grayson Ford, and M. Heminway & Sons Silk co circa 1899.


A content warning : Please note, that there is use of racist terminology at the bottom of the first page.
Also, victorian's sucked, fyi.
An added note:
If you spot racist stuff that I miss in any of my posts or that I have forgotten to add content warnings for (I'm sorry, blame the memory loss), please let me know and I will make sure to add them.
I do not censor as we must confront history head on. It's an injustice to erase history, and try to downplay it, no matter how uncomfortable it can make us to acknowledge the harms done.
Anyways, I skipped forward a few pages as it was just an advert for picture frames and I prefer to just stick to the parts of texts that actually teach stuff or show examples of things.I may post later a dump of some of the adverts after I've finished with all the teaching sections of this text. Specifically if there's any interest on those however.
I've been feeling much better lately, but there's gonna be a brief pause on posts here as I will be out of town this weekend. Posting will resume sometime next week!
Part 1.
Part 2.
Part 3.
Happy Weekend!
~Tweedle

11 notes
·
View notes
Note
How do you make your stencils? Assuming you do it without fancy equipment just like the sewing
Your assumption is correct. Nothing fancy here. Everything is done the old school way.
It's pretty simple but takes patience and skill with a Xacto knife. My process may be more involved but gives me the best results and stencils I can reuse many times.
First up, stencil board options. I'm currently using this oil board but you can use 4 mil. mylar, bristol board, watercolor paper, postcard stock, thick envelopes, thin cardboard, poster board or even a soda can box. The material you choose will determine the lifespan of the stencil!
Now select your stencil image. Since I just made this DRI stencil I will use it for example.
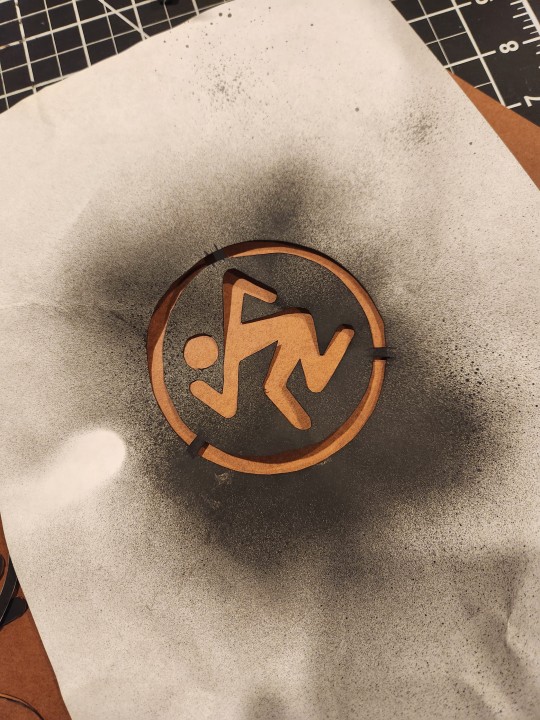
I first draw it out on scratch paper or you could print an image. Then cut out the paper stencil. This is basically to test the design, transfer it to a different medium and make adjustments like line thickness and separations.
I use spray paint to transfer the paper stencil image to the oil board or thicker material.
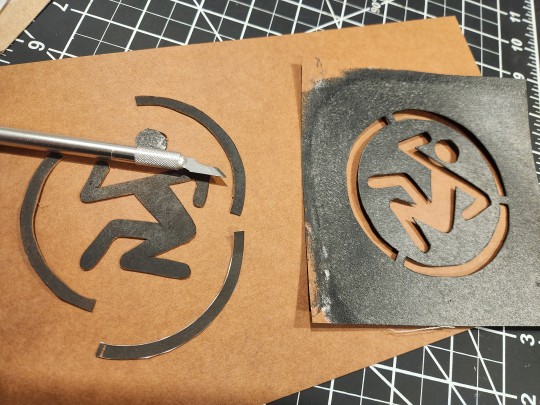
Now you can see what your stencil image will look like and can tweak it before committing to the thicker hard to cut material. You can see here I use this specific smaller blade and the cutting matt underneath also helps.
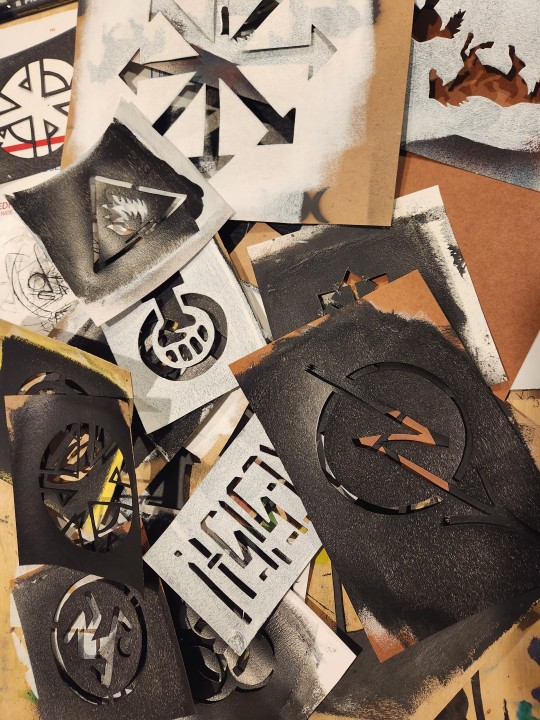
Cut out your final image and bam.

I'm using a roller brush and acrylic paint but you can use spray paint or that leftover house paint in the shed.
Not every image will come out exactly the same but for me that's the magical part I like because it makes each one unique/special.
*pro-tip: If you really like how your new stencil came out, stencil it onto another piece of your thicker material but don't cut it out. That way when your first stencil dies you can cut out another one just like it but with less steps involved.*
#diy#punk#stencil#how to#fyi#knowledge#the more you know#old school cool#handmade#mine#work in progress#questions#answers#tutorial#pictorial
10 notes
·
View notes
Text
STENCIL SHADOWS WITHOUT STENCILS PART 3 A TUTORIAL
this morning, someone in the game maker studio discord asked for some help understanding a step, so i drew this up for them
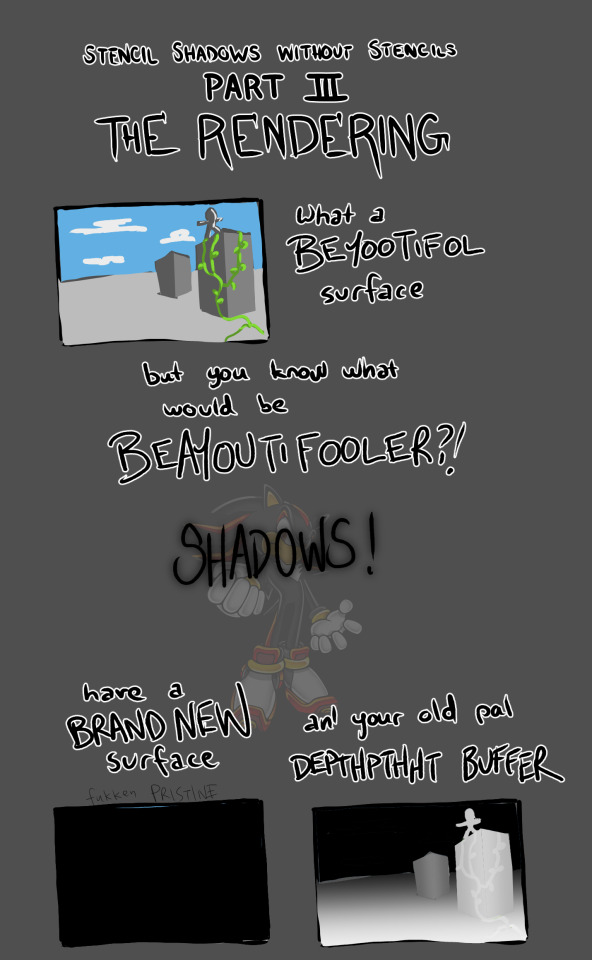
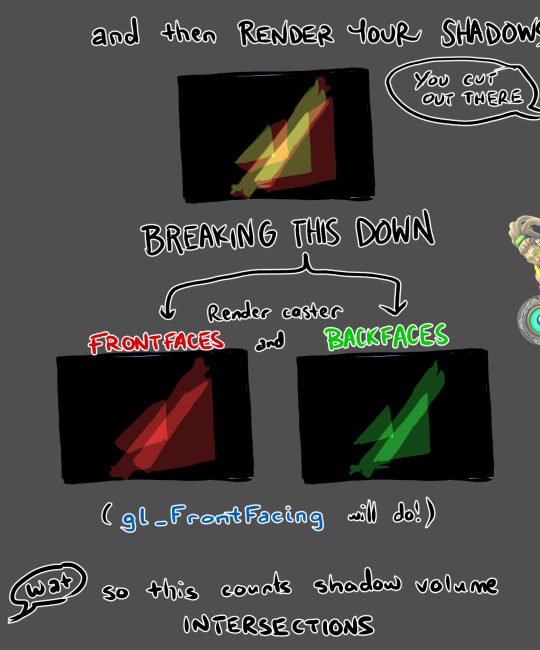

there will not be a part 4
#gamedev#game development#tutorial#graphics#rendering#graphics breakdown#stupid#frog#toad#shaders#what is the limit on tags#STENCIL SHADOWS WITHOUT STENCILS#WOW COOL
4 notes
·
View notes
Text
hey if any of you have ideas for crafts that you would’ve been really into as a 5-15 year old kid, especially if you’re someone who grew up not doing a ton of crafts, i’d loooooooove suggestions. my mom n i are running the arts and crafts class at a music camp this summer and all my ideas were killed with my old phone. and we have no practical knowledge of what kids who don’t do zillions of crafts starting as soon as they can stop sticking literally everything in their mouths think is fun/cool/achievable
#crafts#ink post#anywhere in that age range at all obvs its quite wide#finding things we can generalize to the entire range is our problem 🤣 and that one we're much better equipped for#we'll almost definitely paint a canvas- come up w a bob ross kinda tutorial then the littlest ones can just mash paint around#and the older ones can do stuff without feeling talked down to#last time we did this we made laminated stencils that could b used as the base for a unicorn or dragon portrait
5 notes
·
View notes
Text
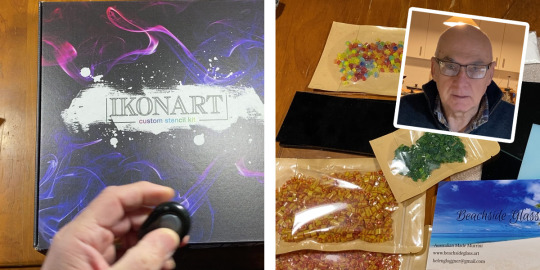
Ikonart Stencils, COE 96 Glass and a Showcase! Phew!
This is a preview into what's in the plan for future glass fusing videos. Sort of! I never quite know what's going to come up and hence there are usually surprises.
This is a preview into what’s in the plan for future glass fusing videos. Sort of! I never quite know what’s going to come up and hence there are usually surprises.
So I’m going to talk about Iconart stencils and etching glass with cream, COE 96 glass, which I’m unfamiliar with, and I’ll be showing some photos that on of you artists has kindly provided.
Continue reading Untitled
View On WordPress
#Bullseye glass#fused glass ideas#fused glass project#fused glass techniques#fused glass tutorial#fusing projects#fusing techniques#glass fusing project#glass fusing tutorial#ikonart stencil
0 notes
Text
Link looks weird, but click it for info about my first painting class!

#artists#artist#art tutorial#artwork#art#art class#montana#great falls montana#great falls#great falls mt#great falls montana art#brush crazy#brushcrazy#paint and sip#sip and paint#rainbow#stencil
0 notes
Text
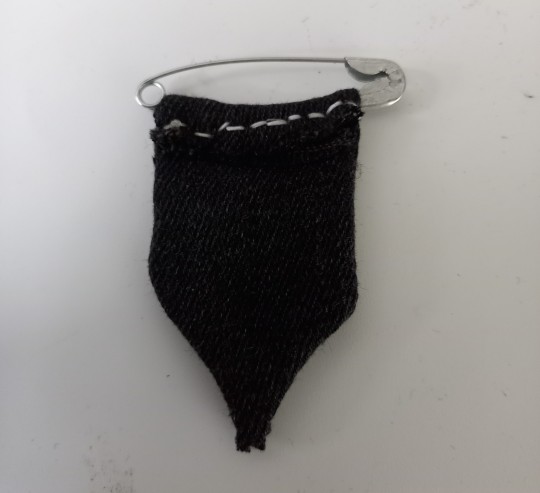
new tutorial, this time for "fake" medals you can use to decorate your jacket or any stuff really.
give yourself a weird award you yourself came up with, coorperations do it all the time!

stuff you will need:
-scissors
-variation of pliers
-a stencil, the shape you want the fabric part of ur medal to be, make it a bit bigger so youll have room to sew
-piece of fabric two times the size of your stencil
-sewing needle
-sewing thread, i use dental floss
-safety pin
-paperclip, or just iron wire, around 1 mm Ø
-bottlecap
start with cutting out the two pieces of fabric for your medal using a stencil

pin em to eachother, with the sides you want to be on the outside, facing inwards.
sew along the side but keep the top open, so you can flip it inside out.
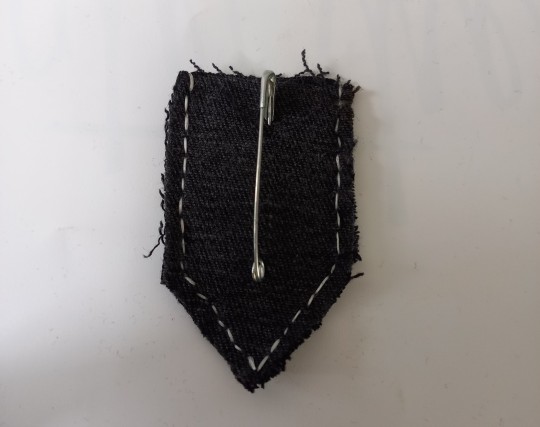
now you can flip in inside out, and fold the top around the safety pin, and sew it down
make sure the side of the pin that doesnt open is the one being sewn down. the opening part should be on top.
bend the paperclip into something resembling the shapes in the pic below using the pliers, doesnt need to look good, mine sure dont
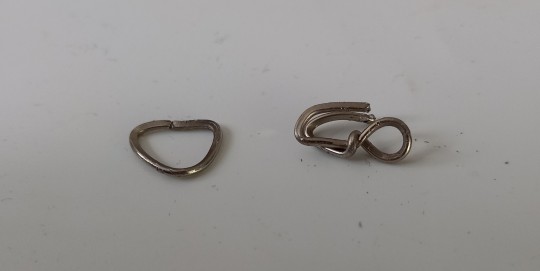
bend the edges of the bottlecap to the inside, and pin the hook part of the right iron wire thing down under the edge
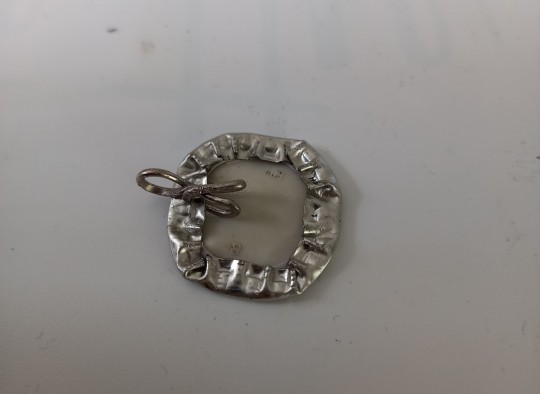
connect the iron wire hoop you made (left in picture) to the piece of iron wire on the bottlecap. fold the point of the fabric part of the metal around the hoop and sew it down.
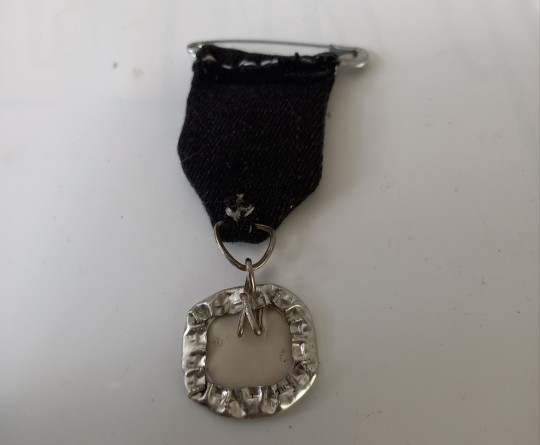
should look something like this.

now you can add decorations, you can paint the cap aswell as the fabric part, using patterned fabrics can also make ur medals look nicer.
ive seen people advise using modgepodge to seal the painted cap, instead of nailpolish, i dont have modpodge where i live but use that if youre able to get ur hands on it.
i hope this was clear, let me know if you want tutorials on any other stuff. i like doing them a lot.
3K notes
·
View notes
Text
An "Illuminated" Pattern
I have a new "Illuminated Bee" pattern for you to paint!
“I am the brightest light beaming from the darkest depths. A dichotomy. I am . . . Illumination.” Jaeda Dewalt
Not too long ago on one of my travels through Instagram, I came across some artwork that caught my attention. Somehow, something that I had been browsing was somewhat linked to some “Illuminated Lettering.” Instagram being what it is, introduced me to an artist that painted…

View On WordPress
0 notes
Text
Cyber goth dress + my favourite way to make patches
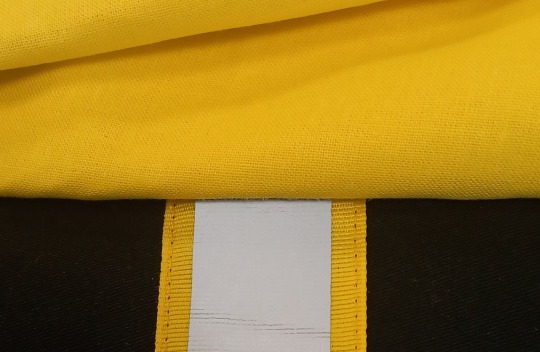
I thrifted this dress a couple of weeks ago for £1. I believe it started life as some sort of costume, possibly a sexy firefighter, but the fabric is really good quality cotton, and I thought it had some cybergoth potential with the yellow and reflective bits. I also really like the metal fastenings.
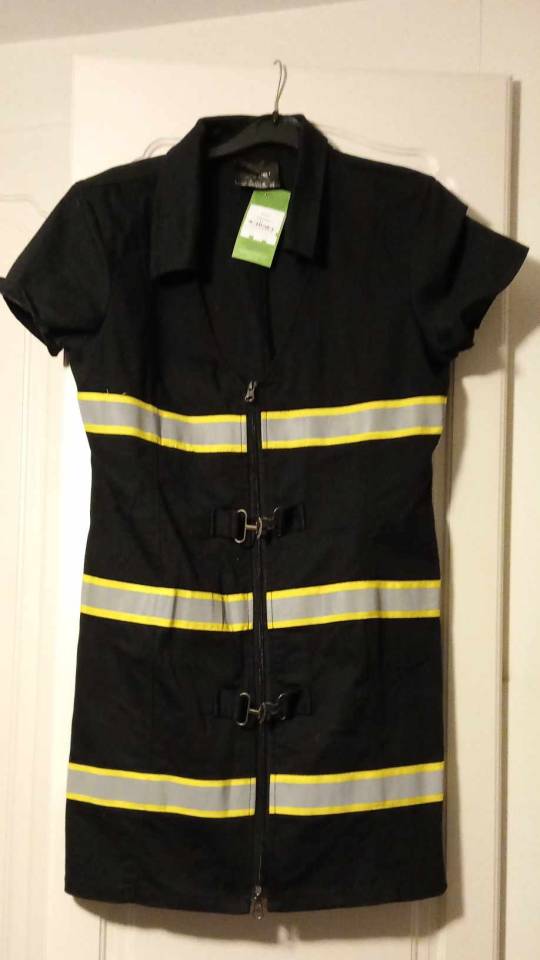
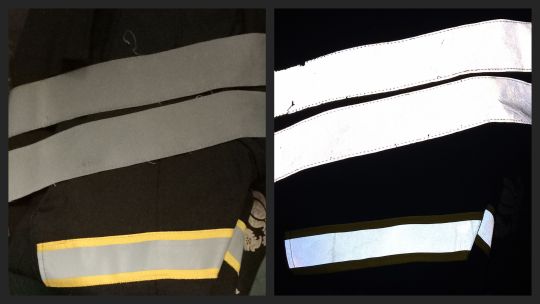
I already had a high-viz coat in my wardrobe from when I used to go bicycling more often, so I was able to steal more reflective bits from that. Not yet sure what I'll do with them, probably cut interesting shapes and glue or sew them on. Photos with and without flash.
And then yesterday I got a half meter of cotton fabric for £1 which is an almost exact colour match, so I can make some stencilled patches.
I already had fabric paint at home, so this entire outfit has only cost me £2! Cybergoth clothing is usually super expensive.
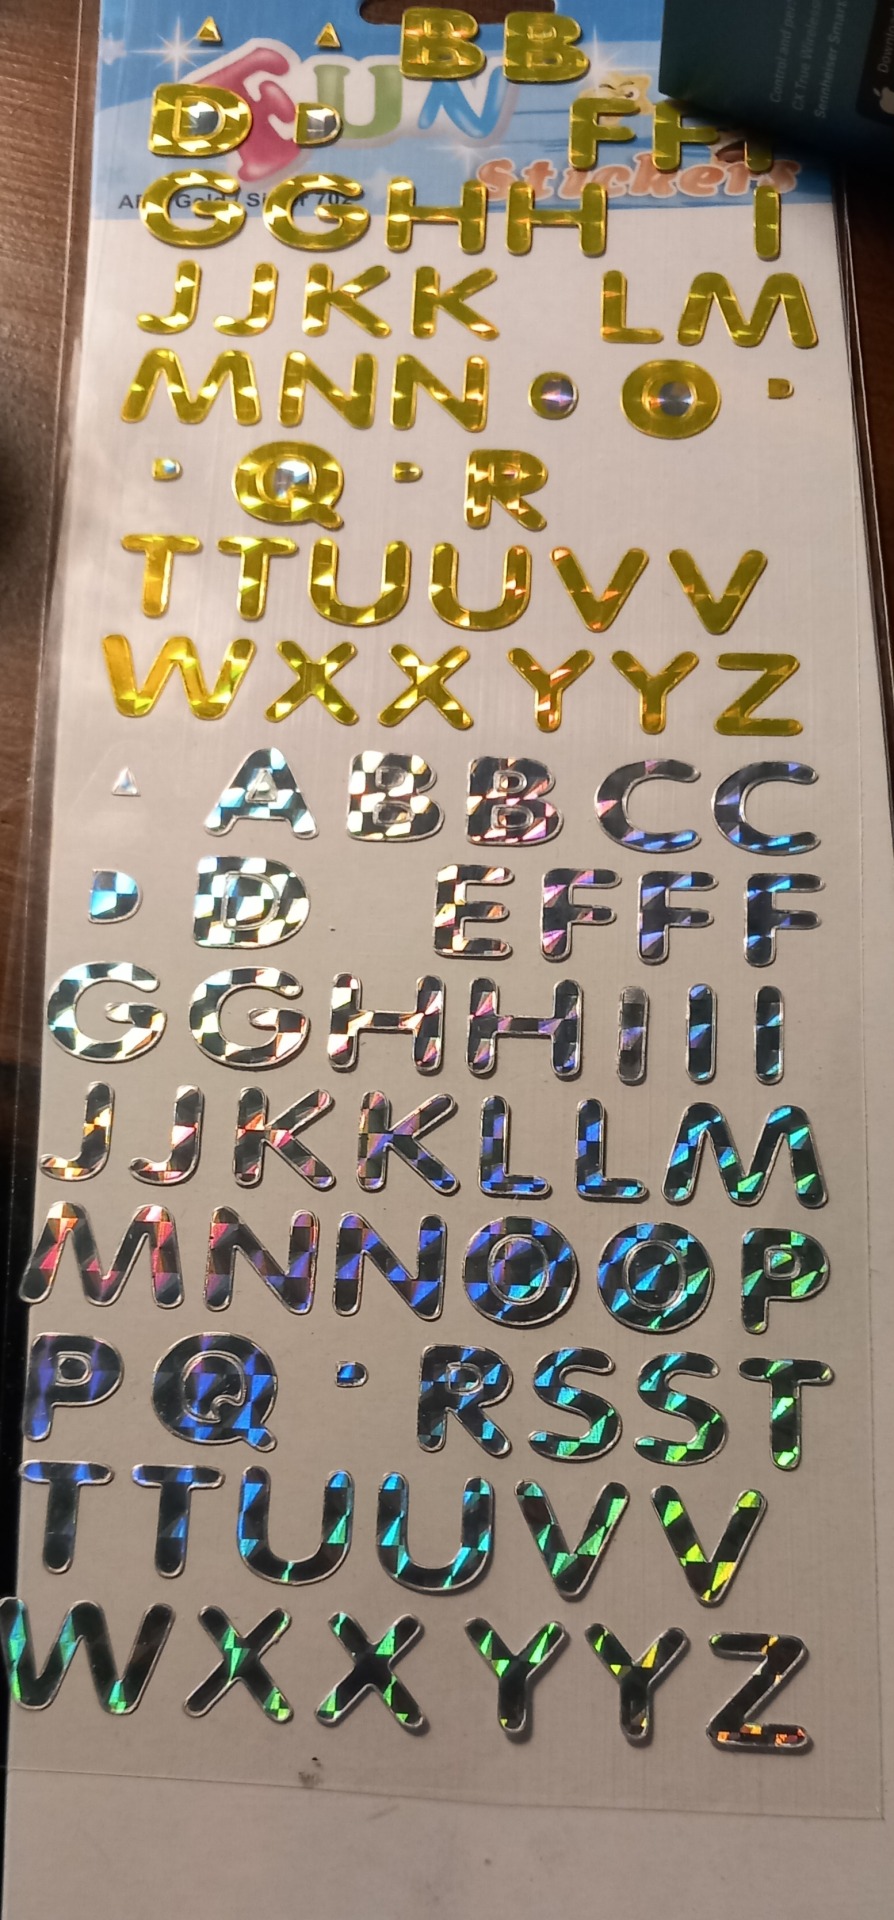
There are lots of tutorials for making stencilled patches on YouTube, (@rattusrattus3 has some excellent ones) but I lack patience and don't like cutting out intricate pieces, especially for lettering, so I had the idea to use alphabet stickers. You can pick these up really cheap from your local pound shop or dollar store depending on where you're from. I think mine were 40p a packet.
Stick them to your fabric, use fabric paint and a sponge, then when you peel the stickers off you'll have the words in relief. You can go thicker than I have here to make the surrounding area totally opaque, but I like the edges being messy and faded out. These are both song titles from cyber/industrial bands that I like.
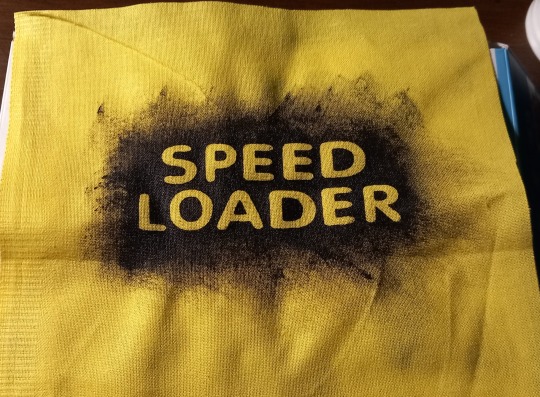
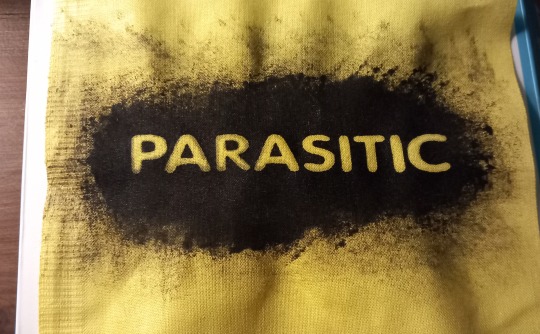
Here are some other examples that I've done in the past. These were all done with pound shop spray paint which isn't ideal for fabric, but it's cheap! You'll also get more of the original fabric colour showing through with this kind of paint, which is nice.
If you're using black fabric, gold or silver paint will generally work better than white. These are all Devin Townsend song lyrics.
The only negative to this method for some people may be that the letters will be very uniform, but I like that. And if you want to you can space them irregularly to break things up a bit. Or you might be able to find more interestingly shaped alphabet stickers than I did!
#goth diy#cybergoth#goth sewing#goth upcycling#upcycle#upcycling#punk patches#stencil#goth#industrial#electronic music#alternative fashion#alternative#diy craft#diy sewing#diy projects#cyber goth#goth subculture#thrifting#thrifted#goth thrifting#goth charity shopping#charity shop finds
149 notes
·
View notes
Text
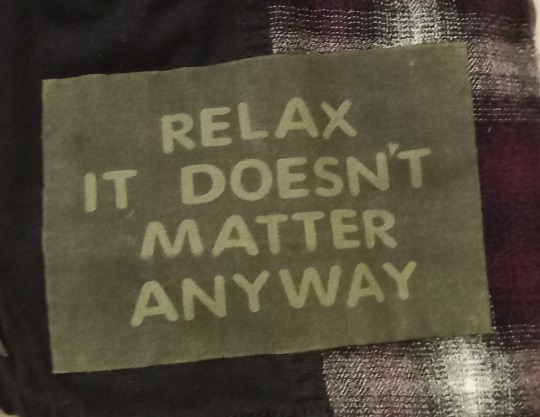
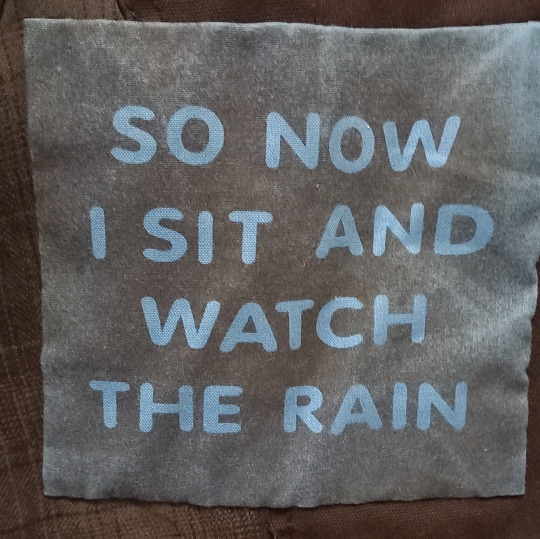
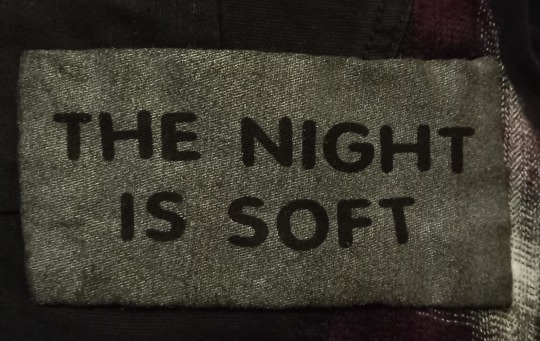
stencils
ah i did the stencils on tuesday and i forgot to post about it! i have been Out Of Sorts lately and also i remembered how to post on instagram so i put it there and then forgot i had not put it here.
BEHOLD
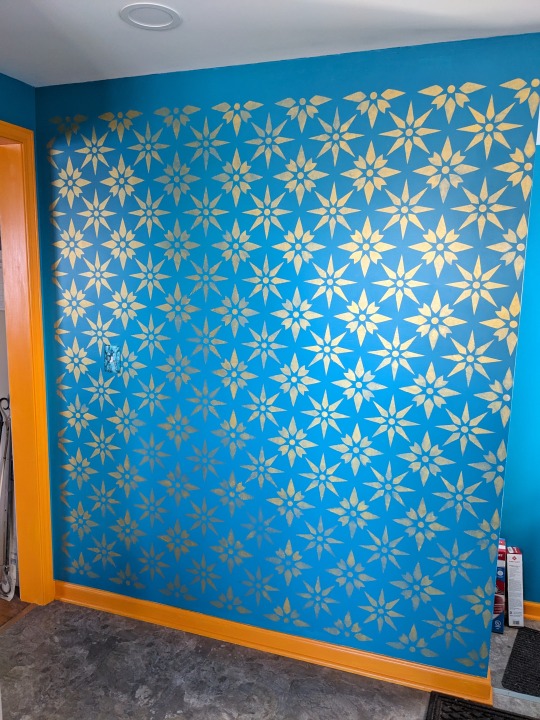
[image description: a teal wall with yellow-orange trim, stenciled with a tiled pattern of metallic gold stars over the entire surface]
I bought this stencil and some metallic gold "stencil creme" paint, and a stencil brush, and just spent an entire day doing it.
Yeah I should've started at the top left and worked over, but I started at the middle right and worked out instead. i might go back and add points to the top border and circles to the left border. Not sure. Not urgent either way.
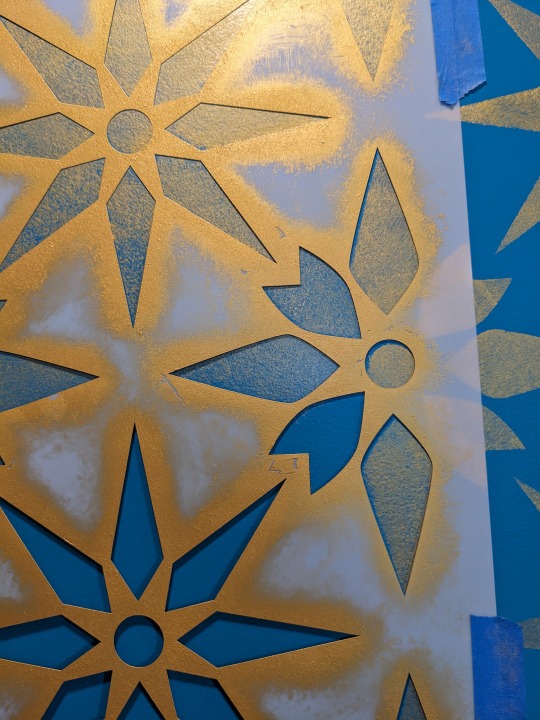
The directions they give you on the website mention that a dry brush is critical to stenciling success, and this is a thing I did already know; i have stenciled mostly t-shirts in my time, with dumb bullshit stencils I cut out of manila folders. But they tell you to load up the brush and then take most of the paint off the brush with paper towels, and let me tell you my stencil creme pot barely covered this wall and would not have if I'd put most of the paint onto perfectly good paper towels. So what I did instead is, I went to the grocery store and I got a cannoli, and then I washed out the container it came in, and then I cut the container at the hinges and made myself two paint trays, and one of them I used as a pallette to mix the paints for the outlet covers, and the other half I used as a roller tray to paint the windowsill, then rinsed and used for this. I had that plastic tray nice and dry and I loaded up the brush and then worked that brush around on the plastic, and it was good and dry and then when I came back I could pick up the paint I'd offloaded onto that plastic, and use almost all of it. And later in the process I added a few drops of water to that pallette, and I was able to thin the paint just a tiny bit, just enough to get it to flow a little better but not so much it went under the edges of the stencil.

[image description: a white-stained clear plastic tray with a pot of gold paint sitting in it, a stencil brush propped on the edge, faint traces and blobs of gold paint swirled around it.] when I added a few drops of water they'd collect in the fluted bits around the edges, so if I wanted them I could go swipe the brush there, and if I didn't they stayed out of the way.
I could have been more exacting and precise in my stencil placement, but I knew I had to just do it, so I just did it. Used a level, discovered that the level disagreed with the ceiling and the floor, remembered that this house like all houses is in fact handmade, and so my imperfections would just have to harmonize with the imperfections built in by the builders and the 75 years of settling and whatnot. So I was Zen about it and it worked out.

[image description: a wide shot of the kitchen showing gray cabinets and unadorned blue wall: the stencil is spotless, taped up with blue painter's tape, a stepladder beneath it with a yellow level sitting on it.]
I used painter's tape. The tutorials say you can spray the back of the stencil with spray adhesive to keep it tight against the wall and reduce bleed at the edges. I own spray adhesive, and I know it's sticky as hell and gets on everything. No thanks, I figured I didn't need it, and I don't regret that, I had no problems. I have, as it happens, stenciled a lot of things in my life.
I should make some more stupid stenciled t-shirts, they've been fun.
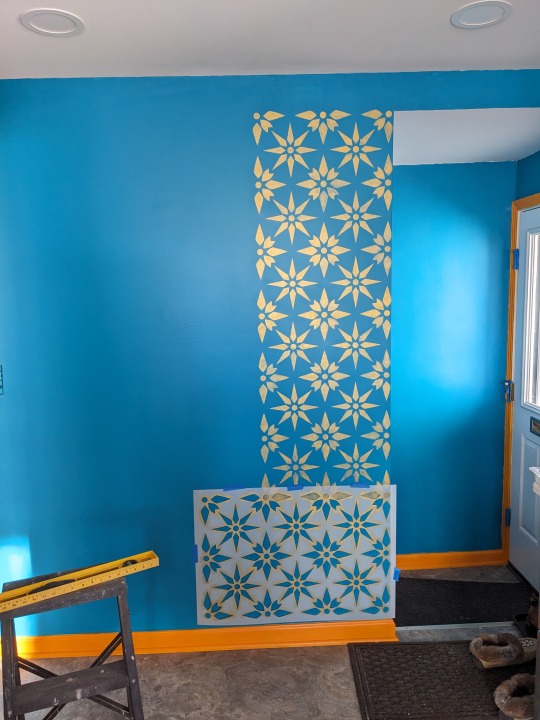
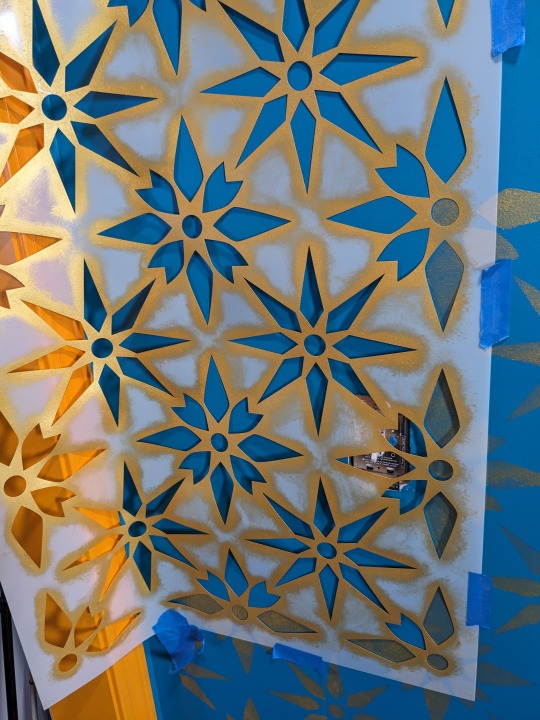
[image source: two repeats of the stencil have been applied to the wall, and now the plastic stencil template is taped sideways at the bottom of the wall.]
It's a well-designed stencil, and the way you lined it up is that some of the elements are designed to repeat so you just plop them over the previous version. I hadn't premeditated or measured this, but it turned out the last repeat, I could just turn it sideways and it tiled beautifully that way too. No problems. Worked great. The stencil creme paint dried fast enough that there was no problem overlaying it like this either, though I did make a point of doing the ones I was going to overlap first so they'd have the longest to dry. I doubt that mattered.
[image description: the stencil template laid over the edge of a previous repeat, showing a blue edge where the previous repeat doesn't quite align with the new placement.]
This is where me not doing math was maybe a problem. I was not perfectionist about this, I just sometimes accepted that the template had shifted slightly on the previous repeat, and while it lined up perfectly in one spot, it would not quite line up in another. I gambled that this would not matter, and in fact took this photo to check. After I removed the template this time, I went back to photograph this spot to see how the misalignment looked, and... couldn't find it. Could not tell, even though I knew where it had been. So obviously it did not matter. (In these cases, I did not touch up the edges of the misaligned bits, I left them as they'd originally been stenciled. The other elements were not far enough off the anticipated alignment for it to be noticeable. A touch-up would have been more noticeable, an element becoming oversized or slightly misshapen or having a visible edge of layered pigment in it.)
[image description: the stencil template crammed against the edge of the wall, bent and roughly taped in place, and the light switch, plate removed, poking through one of the holes at the right.]
This was the trickiest bit. I just held one hand against wherever I was working, flattening that bit of the stencil to the wall as I worked, and then I'd let go and put my hand on the next bit, and maybe they weren't perfectly in alignment with the previous bits but as long as the stencil was touching the wall well right where I was working, it was a good enough result. The light switch was a bit of a problem and i should properly have removed it but I wasn't about to do that so I didn't. I did the inward-facing points of the leftmost stars, and then did not try to do the upward-downward points or the circles, because it was too hard to get the stencil flat right there. I could go back and add them now, and I might yet, using the very edge of the template, We'll see if I do. It looks fine as it is.
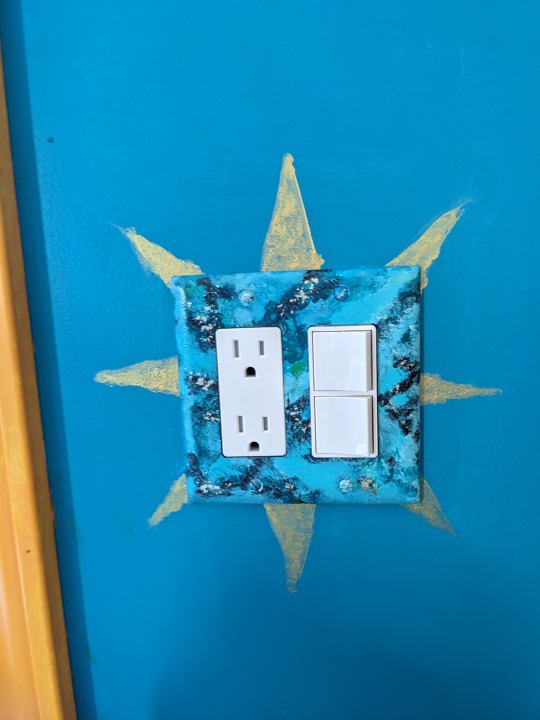
[image description: a plain blue wall with a double outlet plate in it, and the points of the eight-pointed star are around it, protruding from behind the lightswitch plate.]
I had always intended to stencil an element behind the light switch plates on the plain walls, because I felt they don't stand out enough against the teal. I did one, and then realized it was impossible to center it and hard not to get paint on other bits of the walls, since the stencil template is so huge and was covered in paint from doing the whole wall. I realized then that it's just points and I could freehand those. So I did, this is me freehand faux-stenciling the star around this outlet plate, LOL.
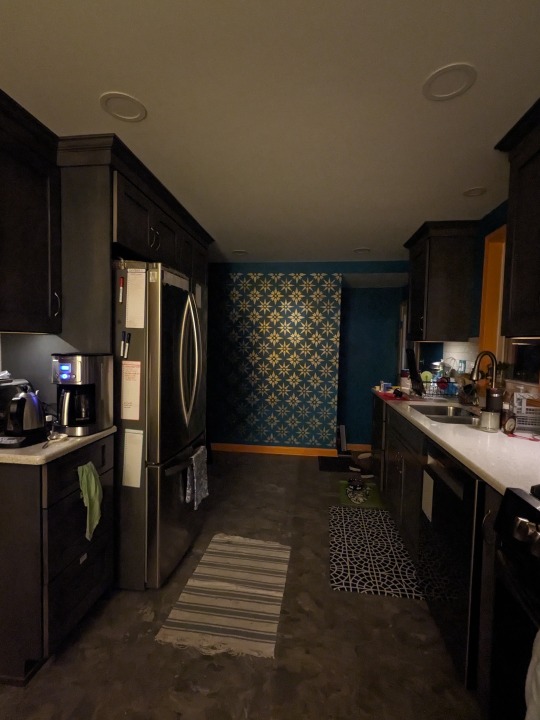
[image description: the darkened kitchen early in the morning, under-cabinet lights on but the room dim, and in the distance the wall is shining]
anyway so the next morning i went out and was sitting at the window and turned around and was like "this looks amazing" so I am well pleased with how it turned out, really and truly.
125 notes
·
View notes
Text
My Guide to Patch/Crust DIY Pants That No One Asked For:
(If you see this guide go through changes, you’re not crazy, I update it all the time)
I’ve noticed that my DIY pants had been noticed on here, so I’d thought I make a guide for new punks getting into the scene 💖
I’ve been in the punk scene for a little over two years now, so don’t take everything I say to heart, I’ve got lots to learn.
Typically, you want to start out with a good base. For instance, the pants you choose can make or break your project. I don’t suggest buying super expensive pants, but don’t buy them super low quality either. You want something that lasts, as crust or patch pants are meant to be your only pair.
EDIT: Before I start any new project, I look around my stuff to see if I can repurpose anything. Old T shirts, bed sheets, bags, you name it. It’s so much easier to repurpose your stuff before buying new things, and you save money doing it. Before you buy pants, see if you can find a pair you already own! I had to buy new ones because I only had one other pair of jeans that I wear to work.
I’ve seen some tutorials floating around for DIY can spikes. Please be very careful doing this. If you’re moshing in a vest made with cut up aluminum, you can seriously hurt someone if you’re not careful. Be on the safe side and either borrow/buy pre made studs and spikes or save the DIY can spikes for non-moshing vests/pants/cuffs.
If you’re moshing with any studs or spikes at ALL, they should be blunt!!!
Good places to buy pants
Thrift (it’s a bit of a crapshoot if you have a hard time finding sizes, but if they’ve lasted long enough to end up in a thrift store, then it means they’re more likely good quality. Check the tags!!)
Edited above, been informed of how Goodwill treats disabled employees
ASOS (I recommend if you have a hard time finding your size. I can’t guarantee the sustainability of this site though.)
Mercari (Like an online goodwill. I find a lot of awesome clothes on here. You can download the app.)
Depop (I seldom shop on here, but similar to Mercari with a wider range of brands.)
How the Pants Should Fit
The fit of your pants can also affect how they lay on you. I suggest buying pants slightly larger on you, if you’re covering them in patches. When you start sewing, you’re going to find that they’re going to shrink a little bit. So please avoid tight fitting jeans if you can! Straight or relaxed fit are the best.
EDIT: If skinny/fitting pants are all you got, sometimes making relief cuts at the knees help when you try to bend down.
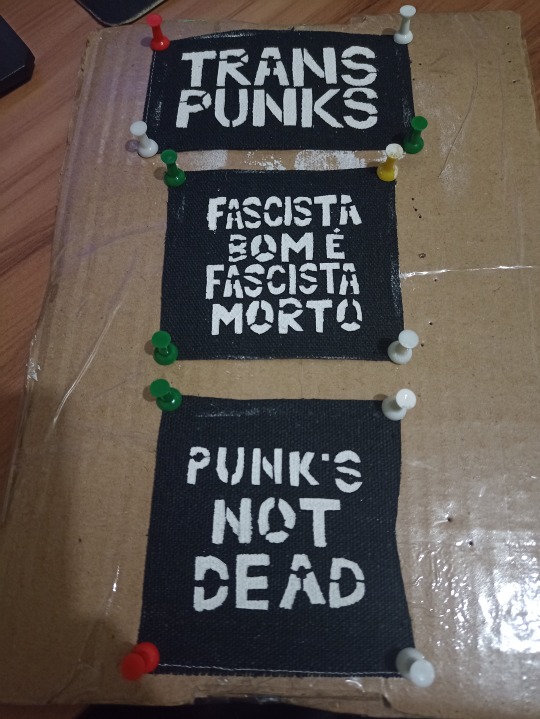
Patches
Patches are going to be what makes your pants unique! There’s quite a few you can choose from: plain patches, band patches, politics patches, etcetera. If you’re going to cover the entirety of your pants, I suggest going to Joann’s or Michaels (fuck Hobby Lobby) for fabric. Buy a yard or two canvas or pleather (or both). Otherwise, I usually cut up old T-shirts for my fabric.
How to Make Your Own Patches
Stencil (very straightforward, here’s a guide) (please check out Anarchostensilism on insta/Tiktok/Deviantart)
Paint (Buy white/black stencil fabric paint. I don’t suggest acrylic, since it’s not made to move with fabric)
Where to Buy Pre Printed Patches
crustpunks.com (Hella good, fast shipping, affordable!! Made by punks for punks)
nuclearwasteunderground.com (I found this one randomly)
Etsy (While I hate them for the way they treat their sellers, unfortunately this can be a main source of income for some.)
Shows, punk meets, friends
If you’re going to make crust pants, it’s imperative that you have crust bands on your patches, that’s what makes them crust! (Apart from never washing them)
Edit: I would do your own research on the crust punk subculture, there’s a lot of discourse out there on what makes punks crust punks and so on.
Washing your pants is not a black and white rule, but you can ruin the integrity of your work if you carelessly throw them in the washer. Like if you were to throw a suede jacket into the washer, there’s certain steps to take!
Here’s an enlightening guide on crust.
Here’s some crust band recs!
Nausea
Anti Cimex
Dystopia (my favorite)
disrupt
Doom
Heresy
Discharge
Amebix
Things to Add to Your Pants
Buttons (you can buy or make your own. Here’s a guide for DIY bottle cap buttons)
Pockets (easy to monkey wrench with a few spare patches, but here’s a pattern)
Handkerchiefs (the hankey code, much like the lace code, is pretty much dead. But it’s up to you if you want to signal something with it.)
Wallet chains (here’s a cool guide to making your own!)
Bum flap (by far the coolest thing on this list. Makes your ass not hurt when you sit on the sidewalk. Here’s a video)
Make them convertible (I made mine into zip off shorts. Here’s a video)
I made this up, but I added removable knee pads to mine.
Pant Inspiration
Have no shame in taking reference! Here’s are some cool accounts with awesome pants!
carnifexofhate
dontditchitstitchit
no_name_no_reason
okshrimpet
annals_of_the_crustwar
a_lifeisabuse_e
That’s all I got! Remember to never wash your pants ✨
#diy punk#punk fashion#punk style#crust punk#crust punx#crustpants#punk aesthetic#punk#diy fashion#diy or die#guide#punk rock#patches#punx#crust pants#crustcore#spechpunkshit
461 notes
·
View notes
Text
Baby punks!
Listen up. I got a few tips and stuff.
1: Thrift everything. I'm not even remotely kidding. You can go MILES with the shit available at thrift stores and only spend like 10 bucks. I go to Goodwill about once a week and I find more than I even really need.
If you wanna make patches but don't have anything to cut up, just buy like 3 pairs of jeans for like 3 dollars and you'll be set up for a while. Cloth, clothes, gadgets, wallets, jackets, even shoes. If you're worried that punk is "expensive", you're not looking in the right places.
2: Five Below. They have really solid fabric paints and stencils you can get. Also check out Joann's and Michael's. They got needles, embroidery floss, fabric paints, fabrics, etc. But be wary about those two, prices are up due to inflation.
3: YouTube tutorials are your friend!! If you're confused about how to do something, take to the web. You won't get all your answers, but you sure will find how to attach a zipper to your pants.
4: Dental floss. This is brought up every time in these discussions because it works. If you need to sew something onto your pants, jacket, whatever, use dental floss. You can snatch some up at CVS. It is very helpful.
5: Find a jacket with wide armpits. Especially if it's denim and especially if you plan on adding zip-off sleeves. ESPECIALLY if you have armpit hair. Just trust me on this.
6: Do you drink soda/beer/other canned beverages? Because if you do, save them. The cans, the tabs, all of it. It can be very useful. The cans, you can turn into spikes. The tabs can be helpful for zippers, chainmail, whatever you might use them for.
7: Believe in what you're saying. Don't just claim you stand for human rights, put it into action. Learn. Understand that some women, black people, and/or other minorities are gonna be hesitant to trust you and understand why. Know when it is your turn to participate in a conversation, and don't force your way into a community or conversation that isn't yours. You're going to be in a strange place where you've been pushed away from all the bigots in your life but can't go to other minority communities because they don't know whether or not you can be trusted. And don't try to make them know that you're "one of the good whites/men/etc". You're gonna need to find community and put weight behind your words. A friend or a relative says something just a little bit off? Don't laugh it off, make them know it was wrong (my go-to is to stare at them in silence the moment they say it and not budge until they repent the comment). Nobody's gonna trust you unless you mean what you say.
8: Don't listen to the gatekeepers. Anybody who tells you "oh well, that's not really punk, you're a poser!" Is missing the point and is hence the real poser.
9: Participate in the culture! Really! Go to playlists, find local bands. Go to a punk show. Make friends, participate in rallies/protests.
10: Be you! Seriously, be you. Whatever you think would look cool or would be comfy, do it. Literally, if you wanna turn a winter coat into a battle jacket, go for it. The key to punk is expression. Don't feel like you've gotta meet up to everyone else's standards. Punk fashion should be a tool to help you find yourself and what you're comfortable in, what you enjoy. If you're doing something to fit in, you're doing it wrong, and you're doing yourself a disservice.
#11: punch a Nazi#punk#punk fashion#punk tips#punk diy#goodwill#diy#rally#protest#dont tolerate intolerance#spiderpunk#crust punk#baby punk#new punk#battle jacket#punk patches#thrifting#down with capitalism
362 notes
·
View notes
Text
BB's Sims 4 Horse Shine Stencil
Hey there,
I finally feel confident enough to give you a first run of my shine stencil. Am I absolutely satisfied with it? Nah. Will I tweak it? Yep. But for now this is what you have from me. ♥
In this preview I'm using a simple black coat as default. I use @minervamagicka's new eyes (they are stunning!!) and I use the notail mod from @yolosimcc.
Also big thanks to @h-emera for your tutorials. Otherwise I would have not been able to make this.
update: I am now at SFS and updated the download link and I also added a little bit of shine to the hocks because it bothered me (you can see that in the last screenshot). There's still visible seams on the insides of the legs, but it's hard to get them right because I don't know how to change the lighting in PS (it's very dark). If anyone knows how to do that, teach me please! ♥
Download SFS

182 notes
·
View notes
Text
Learning how to make patches
Based on the tutorial by the wonderful @coveredinredpaint
I started following his tutorial, but the initial results weren't super good so I'm sharing some thoughts on it.
1: Don't use a sponge. At least in my experience the results with those ended up disastrous. A cheap dabbing brush will do you wonders.
2: Add two layers of tape per side of the stencil. It'll make cutting it a little finnickier but will keep it more rigid during painting which will lessen the amount leaking paint under it.
3: I couldn't find denim so I grabbed some canvas, worked just fine.
Here's the results:
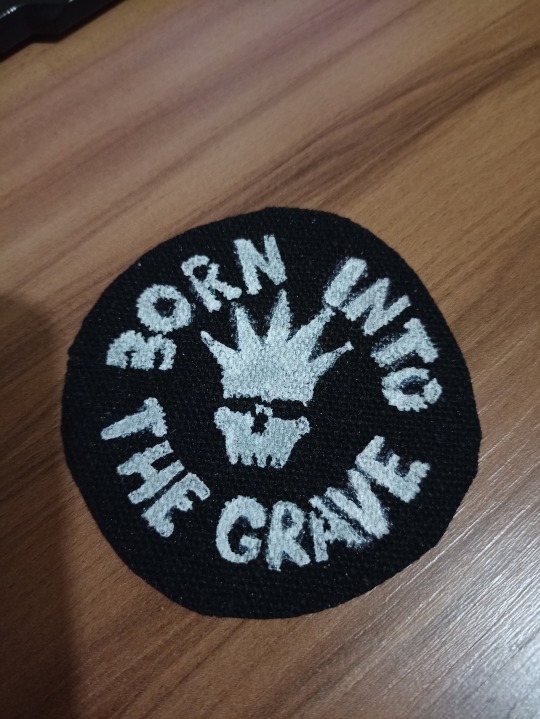
I already sewed those first two onto my battle jacket, the middle two are ready for it and the latter three need a layer of varnish first. Notice how there's a bit of bleed on the last three ones, I experimented with one layer of tape per side for those and found it bends too easily when pinned down and risks exactly that happening.
Anyway, thanks for the tutorial, gonna be making tons of these now.
108 notes
·
View notes
Text
ok I'm feeling a bit better atm and I've been thinking, as much as I DO have a tutorial up on my tik tok for how I personally make my stencils and patches n t-shirts it's not massively in-depth due to time constraints on there so I was wondering if people would possibly be interested in a proper full-length tutorial on youtube?
I know I could do a text-based tutorial post on here but I struggle a fair bit with explaining how I'm doing things through just text and image alone, so I feel like a full length video tutorial would most likely be better?
Anyways just rb/reply or whatever to lmk if you'd be interested!!!
54 notes
·
View notes
Last Seen Blogs

drunkregina
watch the queen conquer
weighted-blanket
Comfort Zone

anderka
Andra Wiśniewska

bigpaperbear
Untitled