#diy stencils
Text
Easy Paper and Tape Stencil Tutorial
made one for reddit so I might as well post it here as well
Materials
writing utensil (pen, pencil, marker, etc)
paper (i usually use plain printer paper but most other scrap paper works fine as well, just be aware that thicker paper makes it harder to trace existing designs/logos)
clear packing tape
scissors and/or exacto knife (those little scissors you can get in cheap nail care kits work great
Optional Materials: Device w/ screen of your choice, printer

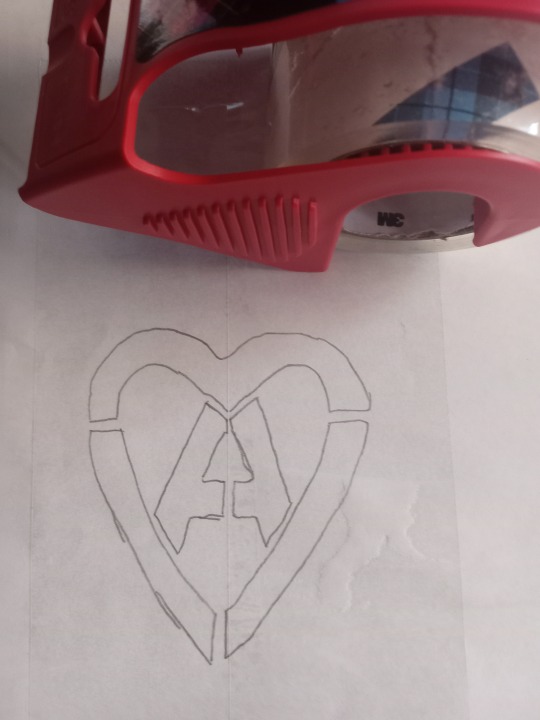
Step 1:
Draw out your design, trace from device, or print out design
(in example image I am tracing from a screen)
r/AnarchoStencilism (Deviantart link if you prefer) is great for free stencil designs

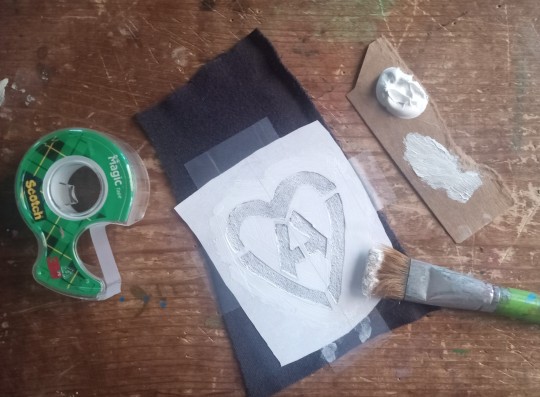
Step 2:
Cover both sides (front and back) of the design in packing tape
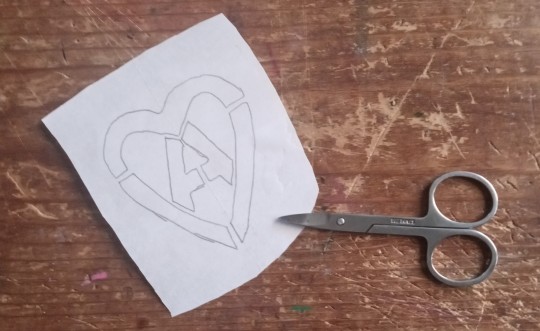
Step 3:
Cut it out
Step 4:
Use your exacto knife/scissors to cut out the design

Step 4:
Apply to whatever you want!
Happy DIYing!

#kahvi draws#patches#stencil#diy stencils#diy tutorial#punk diy tutorial#stencil tutorial#punk diy#folk punk#diy patches#pat the bunny
241 notes
·
View notes
Text
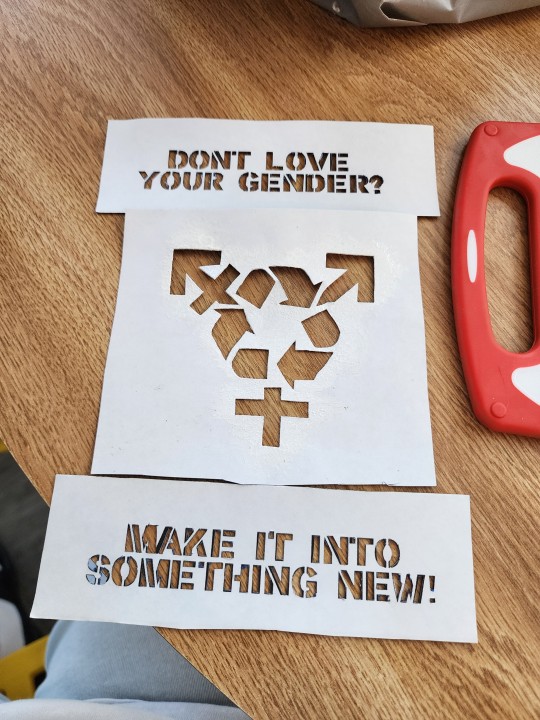
can't WAIT to slap this on some fabric and make a patch but unfortunately I have run out of tshirts to tear up and make patches with.
#leaf talking#leafs art tag#reduce reuse recycle#transgender#trans#its epic. i know.#stencil#diy stencil#diy#look at my tags boy
1K notes
·
View notes
Note
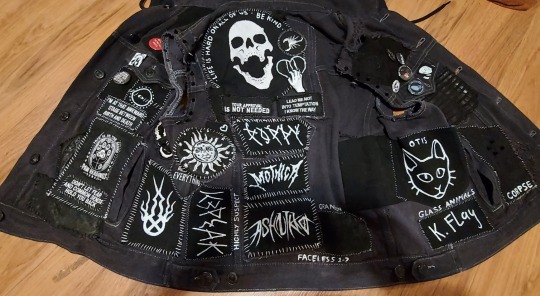
How do you make your patches for your vest? They look so cool!
Acrylic paint or matte fabric paint
Old black jeans
Cardboard or cardstock, ideally thin cardboard from packaging waste
Xacto knife
Pencil
Computer
Old sponge or makeup dabber
I pull up the logos from the bands I love and trace them onto printer paper or wax paper wirh pencil. Then I put that paper pencil-side-down on cardboard and rub the back hard until the pencil is transferred to the surface. Then I take an xacto razor and cut out the shape of the logo. Put the newly-made stencil right-side-up on the fabric and sponge paint on.
Let the paint dry, then go over it a few times if needed with a brush. Fix errors with black paint.
Sewing the patch on, I get double-sides fusing from the fabric store to make iron-on patches, or just pin them down and sew by hand.
Highly recommend double sided fusing for all kinds of patch jobs if you have issues sewing for any reason, just know that the glue melts into the fabric and will leave marks if you try to remove them later.
Glad you like 'em! ♡♡♡♡♡ V proud 😊
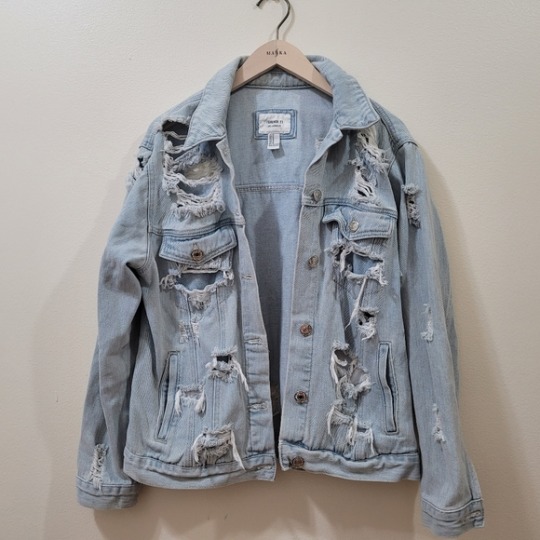
Current status: ⏬ ⏬ ⏬
Addition: here is what it looked like when I originally thrifted it- tag said it was a distressed denim forever 21 jacket, size large ⏬ ⏬ ⏬
for a lil how it is/how it started ♡
#Teaboot#Didn't make all of em but yeah more than half#I can't find my Jasmin Bean one and it was my favourite so I'm upset about it#But I still have the stencil somewhere!#Battle jacket#Vest#Patches#DIY
861 notes
·
View notes
Note
Question...how do you make your patches? They seem so fuckin cool. I'm working on a vest and a jacket atm, and I'd like for them to be done by the time a pride fest rolls around next month.
Main technique I use for making patches nowadays is linocut. Its best suited for mass production of patches.
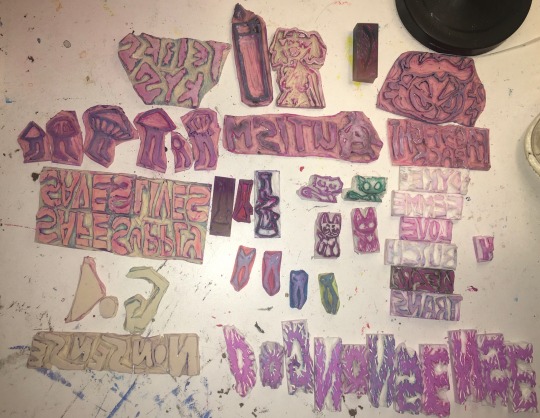
Make sure to remember your carving the mirror image so you have to flip all the text. Using tracing paper to flip the design is a good trick, as well as leaving graphite marks on side, then pressing that to the lino to leave the marks in the same spot. Another trick with pencil is to view what ur carving in negative space quickly, put a paper over your design and shade over it with pencil, darker marks will be where you haven't carved yet.
I use speedball fabric ink, it takes 1 week to set then will be fine to be washed. I have magenta, violet, turqouise, and white. They have a limited range of fabric colors at the store. I have seen gold and silver fabric paint for sale and I will investigate it one day.

I use a speedball roller, i find the smaller one to be better than the big one as I can be more precise and waste less ink.
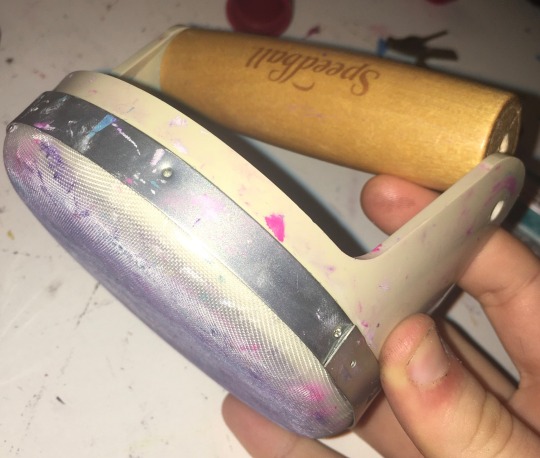
I got a fancy handle for $40 but the screws fallen out so its broken now so just get some heavy books. I used to use a mug. Whats important is pushing your whole body weight into it.
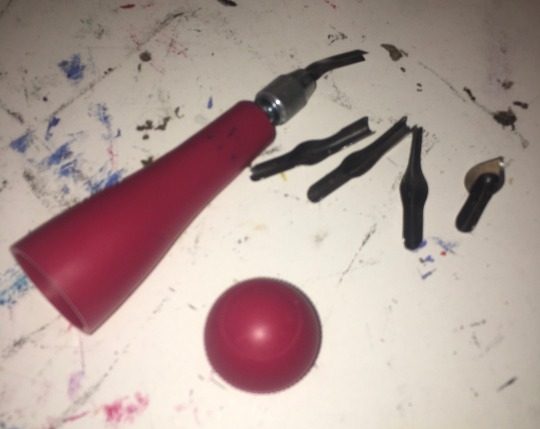
I got a speedball carving tool with different heads I can swap out so I can cut into the lino at different deepness and widths. The heads are stored inside the tool since its hollow and has a screwable removable bottom. I use linocut or dollar store erasers for my carvings. Make sure to wash the ink off your linocuts after your done using them.
A thing to increase the lifespan of you're linocuts is to use wood glue, some cork or wood pieces, and glued the lino stamps onto them. I dont do that yet so my stamps fall appart from overuse sometime and because I cut way too deep into the lino since I hate chatter.
Chatter is the term for in linocutting when theres little messy lines and stuff. It makes the art more recognisably to be linocut. My work is very clean with no chatter which is why people don't notice its linocut usually. This is a stylistic choice, with diy styles having a lot of chatter can look really cool so experiment with leaving bits of extra uncarvered lino sticking out in ur stamp. I need to experiment and buy some more lino.
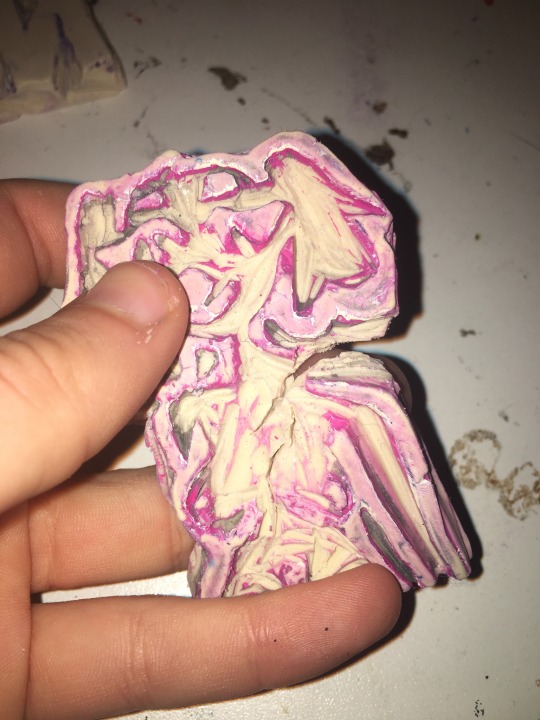
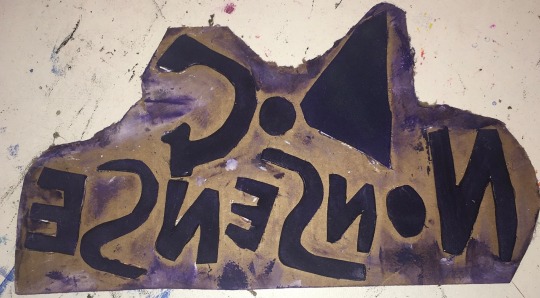
You can also use multiple linocut stamps together to make a patch. Some patches ive made have like 8 different stamps. Ive made a dog nonsense patch where each letter was their own eraser stamp. You can also use different colors between the different lino stamps on the same patch to add more color. An effect I like to do is first stamp it in color, then the next day I stamp it in white over the same spot but shifted to the right and down slightly. It makes the text have a cool border 3D effect I love doing.
If making a more detailed picture with colors, i reccomend hand painting patches. I use white fabric paint mixed with acrylics for color to get all the shades i need. Acrylic paint mixed with fabric softener works too.
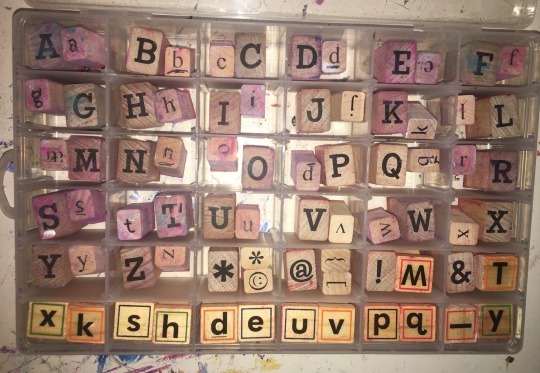
If doing words and you dont want a unique font reccomend using letter stamps. If you want a unique font for that i recommend hand paint for individual or linocut for mass produce.
The positive of letter stamps is the font is neat and can be done quickly. I know from lending them to my roommate that they are very helpful if you have dyslexia and have trouble getting letters right.
A visual effect of the letter stamps is that have a nice boxy edge effect, its an imperfection that adds a personally touch to it. I have both lower and upper case stamps that I got from michaels. You can use a hair band or elastic to hold a bunch of letter stamps together to make a word stamp.
You can use other stamps than letters that you find at craft stores for example my racoon print is a craftstore stamp.
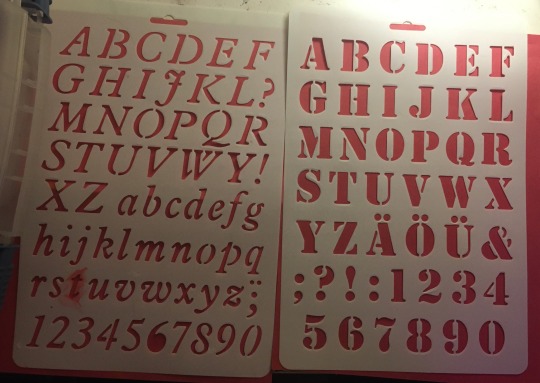
You can also find big plastic letter stencils at the dollar store that you can use to do lettering by filling in gaps with a sponge or or paintbrush. They make special paintbrushes just for using stencils.
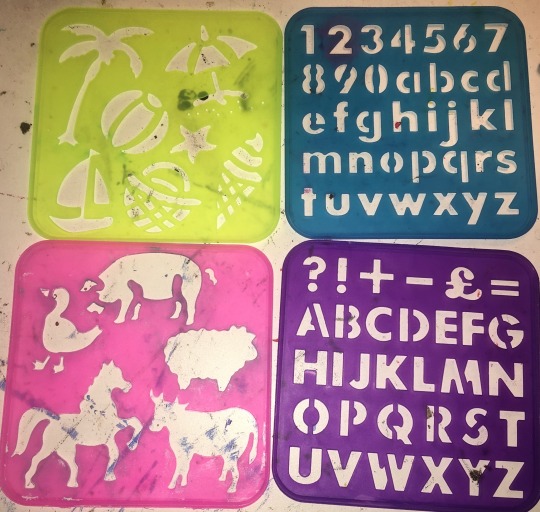
You can also get plastic stencils in the shapes of things, i got some for children and use a horse stencil for my horse smoking weed patch. Easier than drawing a horse myself.
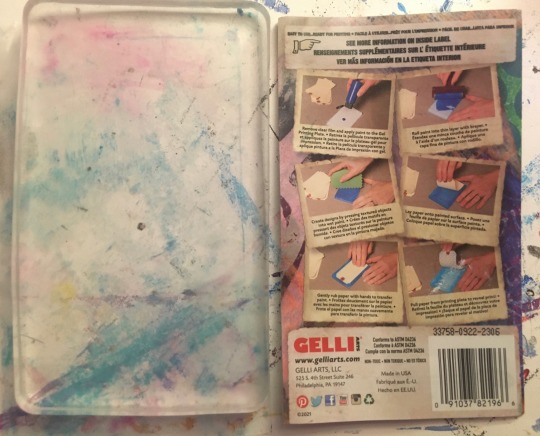
Another technique I use for more unique clean patches is gel plating. I haven't tried printing laserprint images with it as ive seen online a lot but I will try one day. What i personally do is use it to make imprints with chains and physical objects.
Another thing i use with gelplates are any stamps or linocuts that dont have words, or words ones that i fucked up with and forgot to mirror when carving. It flips mirror image twice with the gel plate so it goes back to being right again on the patch.
Another patch making technique is using foamboard cut into shapes glued onto cardboard. This is good for a quick test of a design and is very cheap to make. It will not hold under water so is more difficult to clean.
#punk#diy#patches#diy patches#patch pants#diy punk#crust punk#crust pants#battle vest#punk fashion#punk diy#punk patch#queer art#linocut patch#gel plate#linocut#stencil#my patches#patch tips#how to make patches#patch 101
341 notes
·
View notes
Text
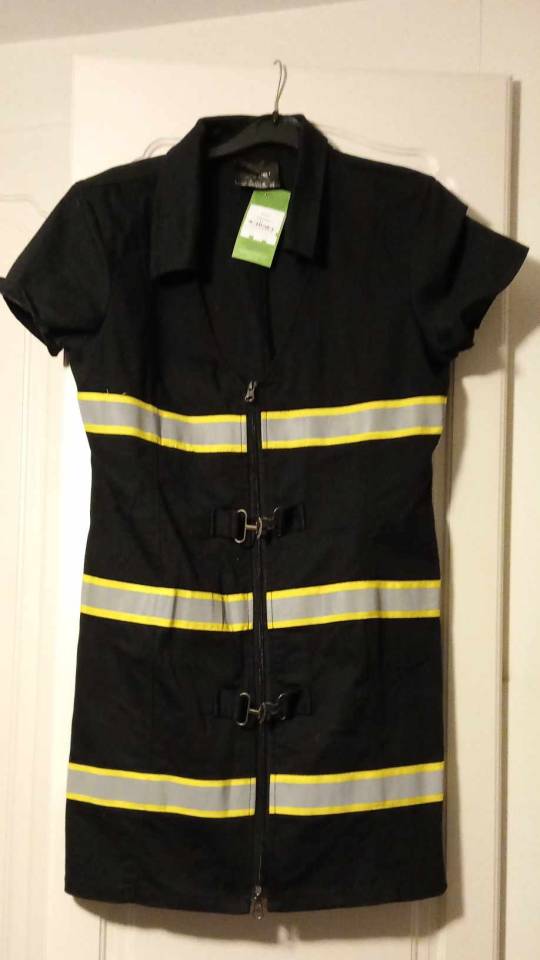
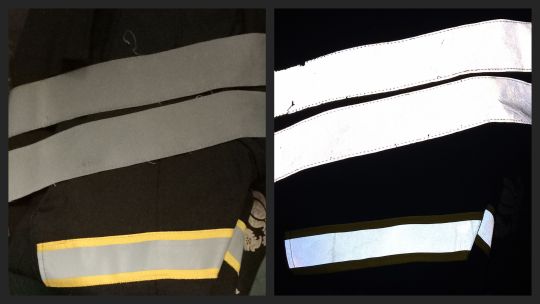
Cyber goth dress + my favourite way to make patches
I thrifted this dress a couple of weeks ago for £1. I believe it started life as some sort of costume, possibly a sexy firefighter, but the fabric is really good quality cotton, and I thought it had some cybergoth potential with the yellow and reflective bits. I also really like the metal fastenings.
I already had a high-viz coat in my wardrobe from when I used to go bicycling more often, so I was able to steal more reflective bits from that. Not yet sure what I'll do with them, probably cut interesting shapes and glue or sew them on. Photos with and without flash.
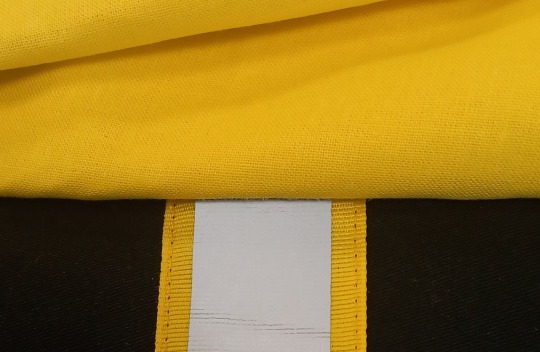
And then yesterday I got a half meter of cotton fabric for £1 which is an almost exact colour match, so I can make some stencilled patches.
I already had fabric paint at home, so this entire outfit has only cost me £2! Cybergoth clothing is usually super expensive.
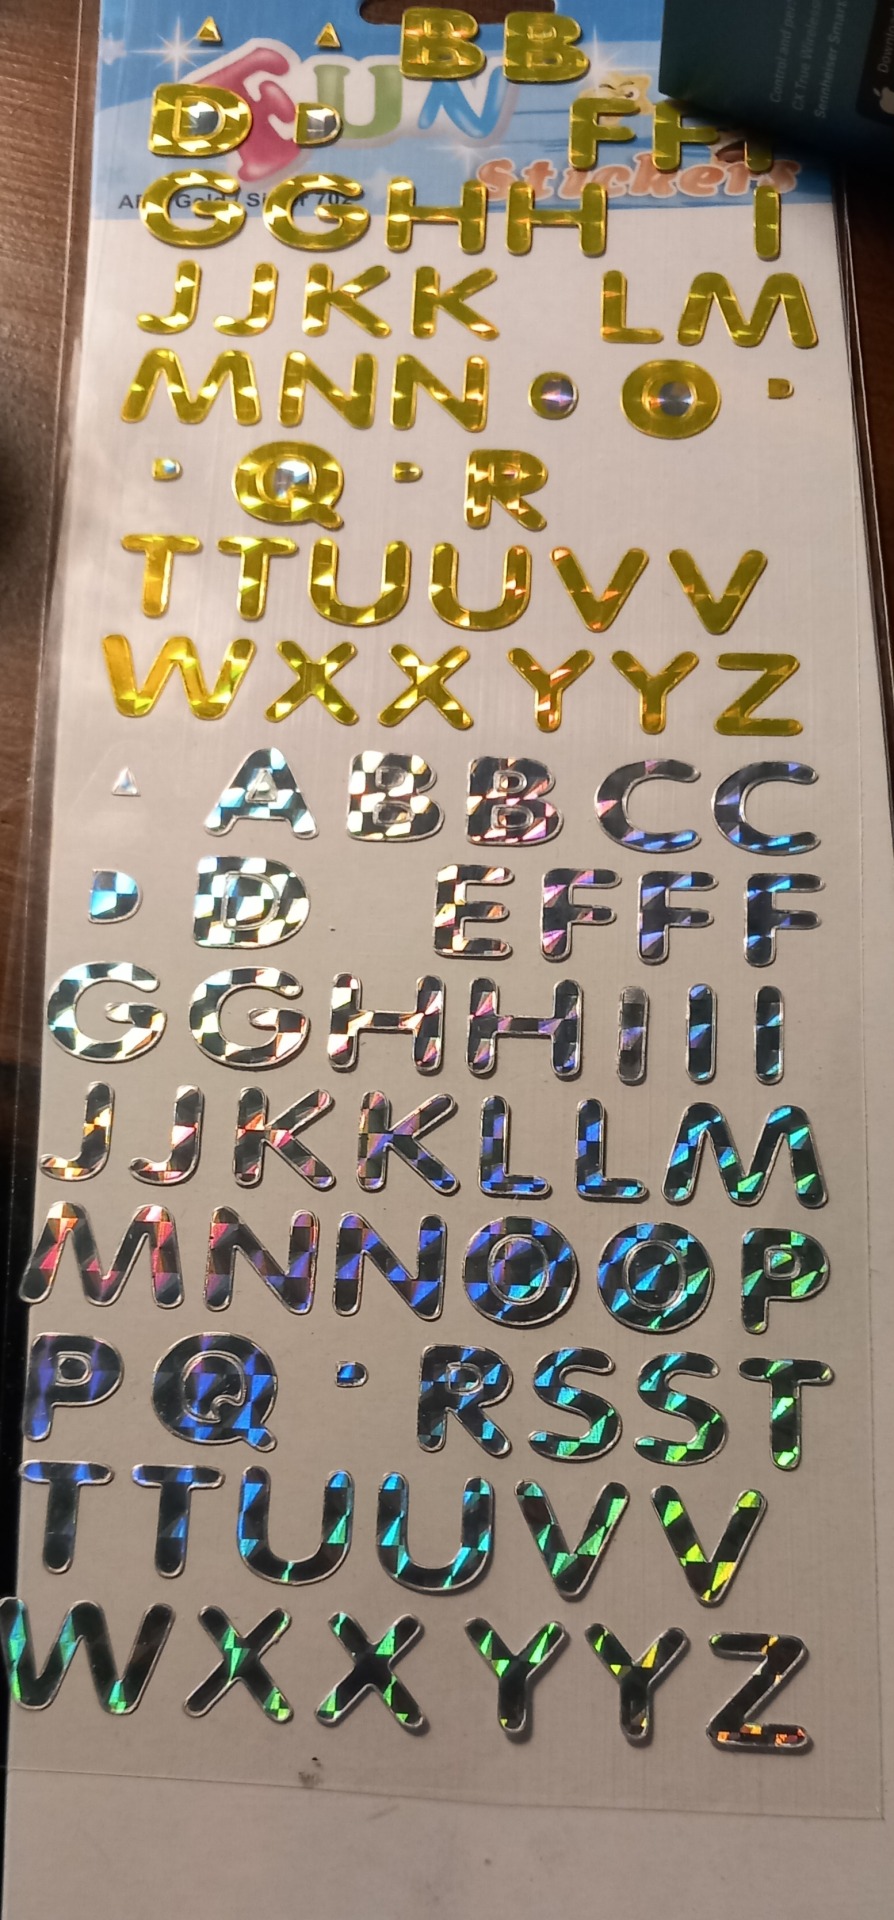
There are lots of tutorials for making stencilled patches on YouTube, (@rattusrattus3 has some excellent ones) but I lack patience and don't like cutting out intricate pieces, especially for lettering, so I had the idea to use alphabet stickers. You can pick these up really cheap from your local pound shop or dollar store depending on where you're from. I think mine were 40p a packet.
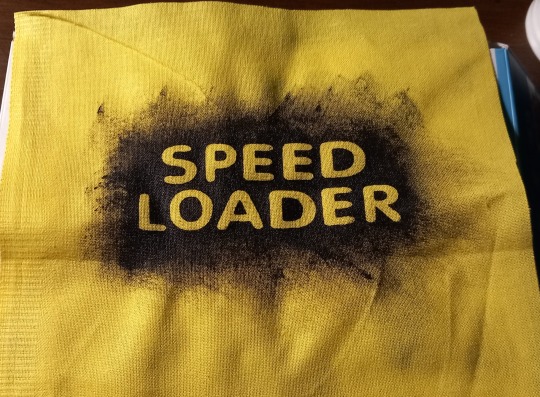
Stick them to your fabric, use fabric paint and a sponge, then when you peel the stickers off you'll have the words in relief. You can go thicker than I have here to make the surrounding area totally opaque, but I like the edges being messy and faded out. These are both song titles from cyber/industrial bands that I like.
Here are some other examples that I've done in the past. These were all done with pound shop spray paint which isn't ideal for fabric, but it's cheap! You'll also get more of the original fabric colour showing through with this kind of paint, which is nice.
If you're using black fabric, gold or silver paint will generally work better than white. These are all Devin Townsend song lyrics.
The only negative to this method for some people may be that the letters will be very uniform, but I like that. And if you want to you can space them irregularly to break things up a bit. Or you might be able to find more interestingly shaped alphabet stickers than I did!
#goth diy#cybergoth#goth sewing#goth upcycling#upcycle#upcycling#punk patches#stencil#goth#industrial#electronic music#alternative fashion#alternative#diy craft#diy sewing#diy projects#cyber goth#goth subculture#thrifting#thrifted#goth thrifting#goth charity shopping#charity shop finds
149 notes
·
View notes
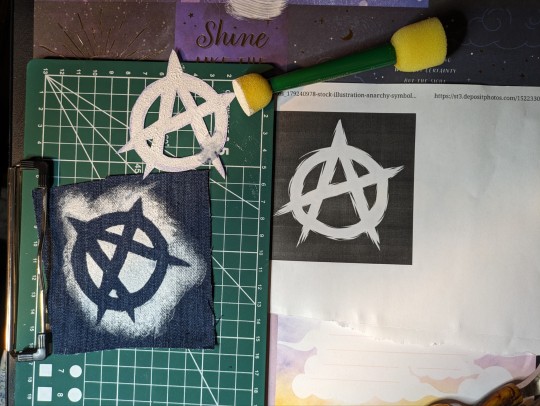
Text
two more stencils I whipped up tonight!!!

bat and a deathshead hawkmoth!
220 notes
·
View notes
Text

Well holy shit! My 2nd stencil, it's perfect! I can't believe how good this came out 😭
Shit. I just noticed I stenciled it sideways. Ahhh fuck it, I still love it
148 notes
·
View notes
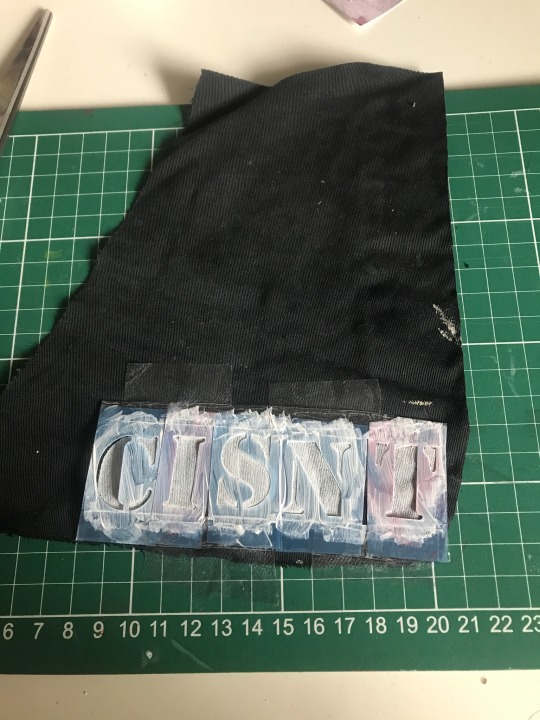
Text
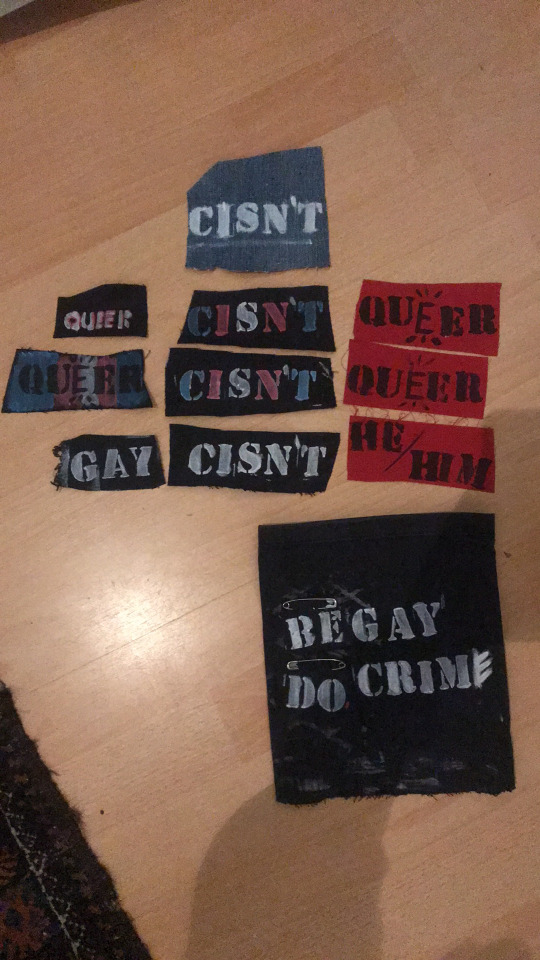
New load of patches!
Partially for a pouch I’m making for the wonderful @divinely-devious
WIP pics:


#things i made#patches#stencil#stencilling#punk diy#diy clothing#crafts#painting#pride#transgender#trans#be gay do crime#queer#gay
158 notes
·
View notes
Text

Eat the rich
65 notes
·
View notes
Text
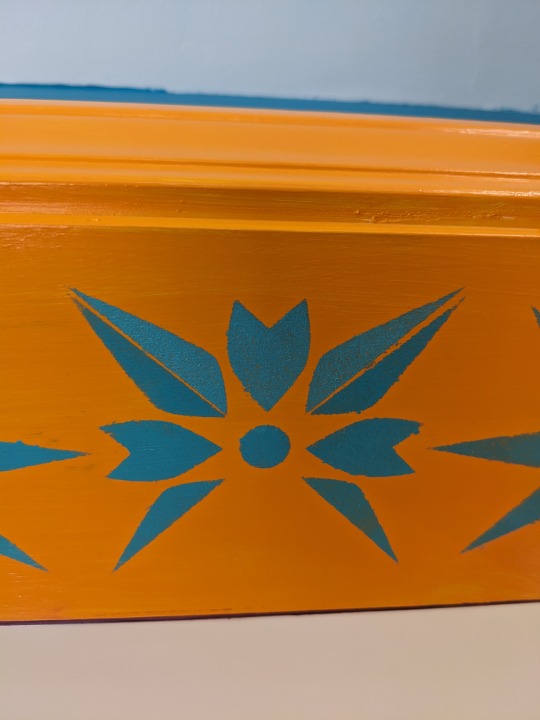
archway stencils
i keep forgetting to post about this. I did my archway stencils this past week!

[image description: looking through an orange archway, stenciled with turquoise stars in an alternating pattern, to see the deep teal wall stenciled with larger gold stars I did earlier]
progress shots and discussion under cut!

[image: the stencil, with a central eight-pointed star, and then the partial alternating star in the corners; the stencil is mounted diagonally so that the main star is centered on the archway trim, and there's a corner above and below]
I futzed around a little and this was the direction that worked. I'd thought about just doing that central element and repeating it freehand, but this was easier to line up..... but then to finish it, i would have to do TWO additional passes with the stencil, one on each side.

[image description: the archway in the background with the central element alternating with just the middle of the second element, as left behind by one pass of the stencil; I'm going to have to go back and fill in the sides of the second element. But in the foreground, I am holding my cat, because she insisted.]
I had Help. she wanted me to do this instead of paint. The whole time. She was incredibly persistent.

[image: the archway with one of my secondary passes complete, and the stencil stuck on diagonally showing how I have to separately fill in the left and right of each of the edge elements.]
I had experimented with just plopping the central element over this corner thing, and using that to fill in all the rest at once, but you see how the central element has long diamond-shaped "petals", but the other one has the shorter inward-pointing "petals" in the middle, and then longer petals on the sides? Yeah the longer petals are not shaped like the central element's, even though they look similar-- they are wider throughout. So to blend them with the half-petal deposited by the first pass of the stencil, it looks wonky as hell. And it does look better having a fully different element for every other star, instead of a blended sort-of-weird half-different one. So the long hard way it is; I went all the way down doing the left half then went to the other doorway and did the left half and then came back and did the right half, in totally separate passes, because you can see you have to tape the stencil down over the existing element, and if it were at all damp you're ripping paint off when you do that.
This stencil company does make specific border stencils for some of their designs, and I sort of thought this one was intended for that kind of use, but clearly it's not. I mean it worked fine so I'm not actually annoyed, but I did have to think about it a lot.
Some process notes: I did not use specialty stencil creme for this, I used my sample pot of a slightly lighter shade of the paint I used for the walls. it was semi-gloss because that's what they had for sample pots, and that worked out fine. I put it into the same plastic half-a-cannoli-box tray as before, and used the smaller stencil brush, and I did not really have to add drops of water, as the paint was less thick, but I had almost zero problem with bleeding-- all my problems were that I had to overlap the stencil while still damp and would sometimes get paint on the back of the stencil that then smudged onto bits I didn't want paint on. Paint also built up on the stencil really horribly because I was using it more intensively-- doing the whole wall it was kind of spread out over the huge stencil, but this was a single element. Being able to see through the stencil helped in positioning, so what I eventually wound up doing was that I would position the stencil, tape it down, wipe it clean with a rag, adjust the position, use it, move it to the next location, wipe it clean with a rag, repeat.
It was so hard to get the second element lined up-- you see how the "petal" is done in two pieces? well it never quite lined up and there was always a gap-- that eventually I pulled a plastic milk jug out of the recycling, traced the stencil on it, and cut out a stencil that was *just* a full copy of that half-petal mirrored so I could see if the stencil wasn't going to line up cleanly, I could just focus on lining up one of the petals, and leave the other blank and come back and add it with the standalone whole-petal homemade stencil. Good thing I'm a dab hand with an exacto.
[image description: a star stencil 3/4 complete, but the diagonal petals have gaps in the middle of them] Here's a problem example, and I was getting this on about half of them.

[image description: a piece of flat white plastic, an exacto knife, a cutting board, and a stencil element cut out of the white plastic.]
So instead I would rotate the stencil so one of the petals was good, and leave the other one off entirely to come back and do later.

[image description: looking from the living room through the stenciled archway to the kitchen, and this face of the archway is painted purple, and the wall is repainted to a consistent sunny yellow.]
I know that the most hinged thing to do would have been to just do all the trim orange, and then the wall yellow, and let it be, but I could not resist being fussy and doing the living-room-facing trim back in the living-room-trim purple color. I fortunately was able to find the original pots of paint from when we painted the living room, and it was still good!!!! (mixed in august of '07! amazing) so I repainted the living room wall where it was primer-white after the reconstruction. Looks pretty seamless now! But I have one more light switch faceplate to paint, it looks like. Hmmmmm what color.
The last thing I have left to do is the corner above the front door, where this newly-repainted yellow wall intersects with the wall above the front door that I decided should be kitchen-teal.
I could just do the corner as a flat normal transition. But I want to try to do something fancy, some kind of like pixel-dissolve or like, the stencil bits sticking into the other color, or something.
For now I've painted a cereal box and stuck it up there and I am going to put stenciled attempts on cardboard up there to see what they look like before I commit.

[image description: the corner above the front door of the house. the wall below is the kitchen wall and is teal. the wall above the archway is yellow because it's the living room. the wall above the door is not fully painted but is mostly kitchen teal. the corner is a cardboard cereal box painted yellow on one side and teal on the other, cut to fit.] it is an awkward junction! The most hinged thing would be to keep it simple-- would have been to just do all the trim orange and then the upper wall yellow and just make sure the corner was sharp and clean.
But I'm not that hinged, so I might as well do something that calls attention to it, LOL.
55 notes
·
View notes
Text

Oh, my. Somebody got a hold of some gold paint and either a stencil or a doily and went to work in this little 1912 house in Lansing, Michigan. It has 3bds, 1ba, and was reduced $3K to $81K (However, Zillow says it's only worth $75.5K.) Well, see what you think.

If you like themes, they've certainly got one going, here. There's something to be said about a blank slate for the buyer to decorate.
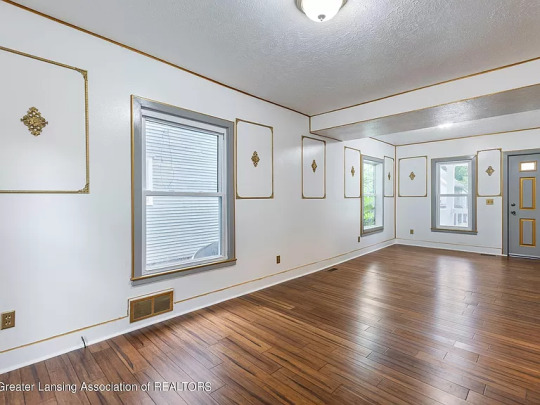
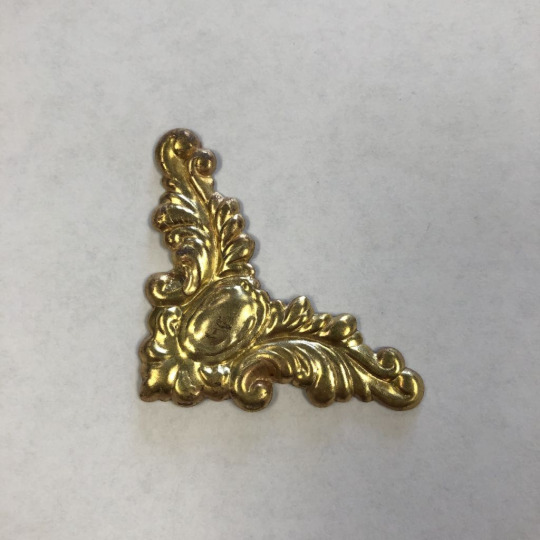
The faux molding looks like they used those little corner dust protectors for stairs.

I think I prefer plain gray cabinets.
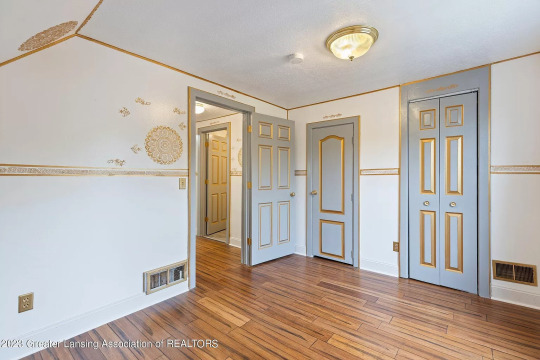
Primary bedroom.
Secondary bedroom.

And, bath.

Back yard.
https://www.zillow.com/homedetails/1103-Persons-Ct-Lansing-MI-48906/74002217_zpid/
116 notes
·
View notes
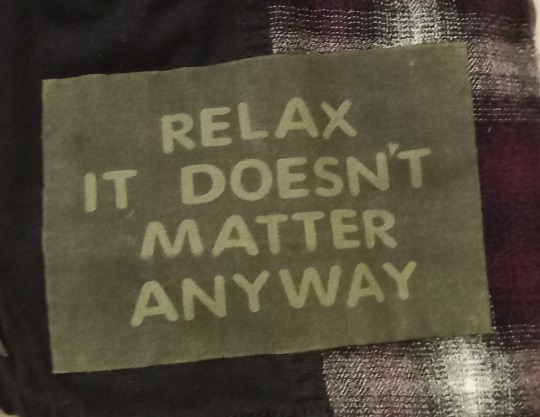
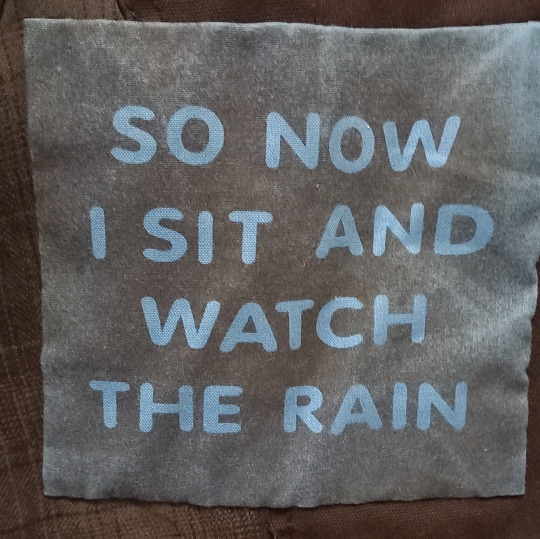
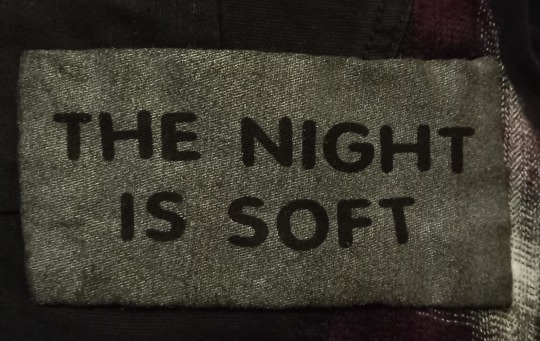
Text
How to make a stencil for your patches
⬇️ ⬇️ ⬇️ ⬇️ ⬇️ ⬇️ ⬇️ ⬇️

You will need:
Sponge
Watercolour paper / card
Art knife / boxcutter
Acrylic paint
Fabric
1. Find what you want to make into a patch. It's best if you can find a black and white image of what you want (or just draw it), whatevers in white should be able to support itself when you get rid of the negative space.
2. Print and use the edge of a pencil to shade the back of the image, it should look a bit tike this.
3. Flip around and use masking tape to stick it to card or watercolour paper, then use a blunt pencil to trace around your image. You should be left with a faded outline of what you want on the card underneath.
4. Use an art knife or box cutter to carve out all the negative space
5. Finally used a sponge and some acrylic paint and dab it over the stencil onto your fabric. I ironed the fabric I used beforehand so it was flatter and easier to print on

Anyway Ive struggled finding ways to print that work for me so I hope this works for other ppl
45 notes
·
View notes
Text


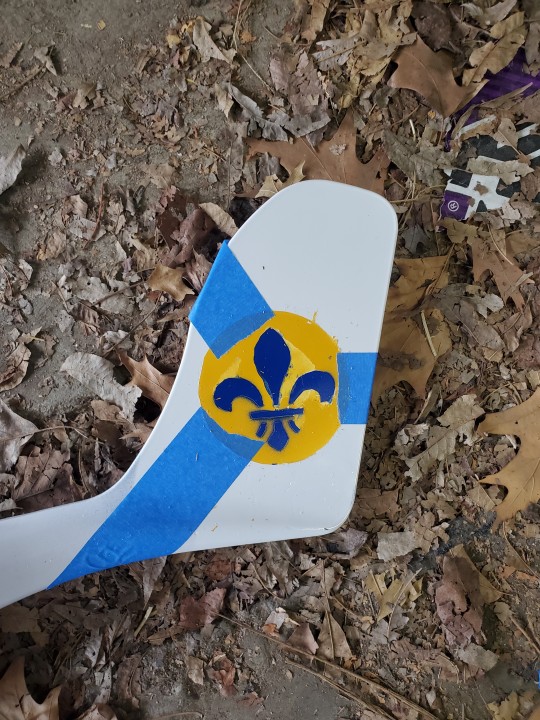
For my dad's birthday, he's been hinting he wants a windturbine. I went ahead and got him one, and reading that painting them will reduce bird colisions, stencil spray painted it to look like the st louis flag (city he's repairing). I have a feeling he'll like it.
45 notes
·
View notes
Note
I'm back. Could you share an example of what you mean by "a little bit of paint"? I'm still struggling to make it work here, and in my previous attempt I thought I used a little, but it still leaked right through.
hey ey!!
ehh ill just explain my process here for how i stencil my stuff
i start by pinning down my stencil and fabric on some cartboard, i added tape around the corners cause i didnt leave a big enough border around the stencil to prevent paint getting around it
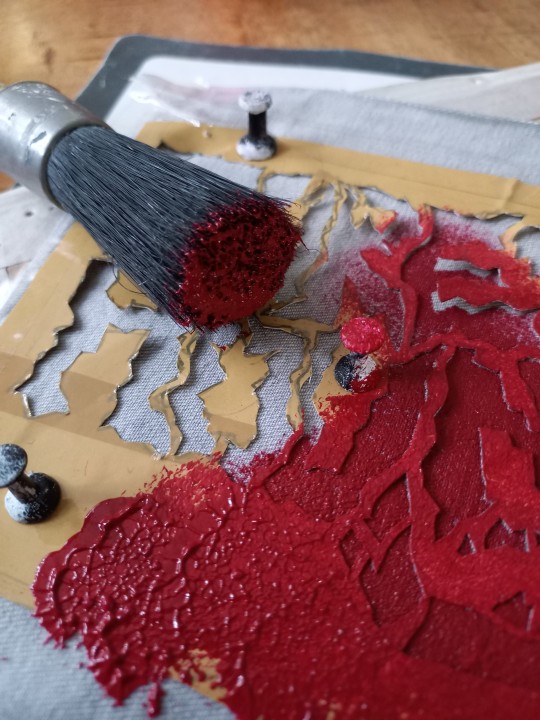
i dap my brush in some paint and then dap off some of the excess paint before using it on the stencil, in the pic you can see how much paint is on it when i removed the excess (so this is the amount of paint i use when stenciling)
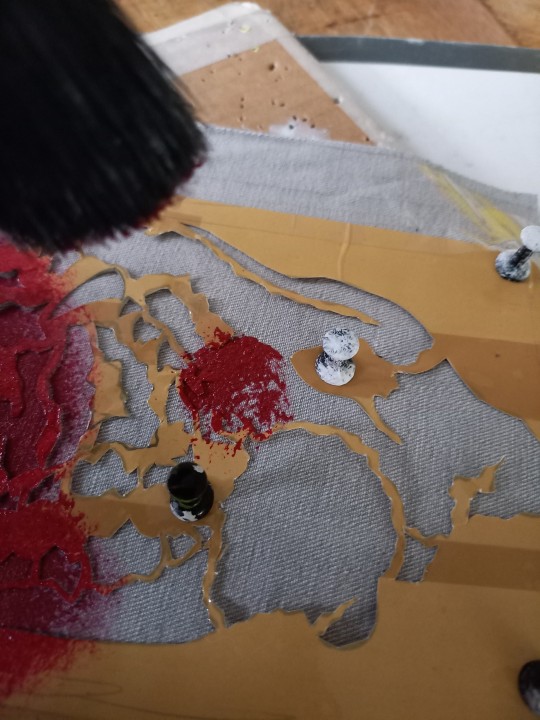
should leave about this much paint after the first dap. its important to spread this out first, dont immediatly get a new brush of paint.

should look about this when youre done, some other advice is to hold ur brush straight up while doing it, dont hold it diagnally.
i saw ur other ask about not letting the paint dry completely before adding the next layer maybe being the issue, i think that might indeed be the case. could be that ur pushing the older layer that hasnt dried yet under the stencil.
often the first layer of paint causes the stencil to stick to the paint at the edges and that creates a "seal" not allowing any paint to get between the edges and under the stencil.
hope this helps, let me know if you got any more questions
80 notes
·
View notes
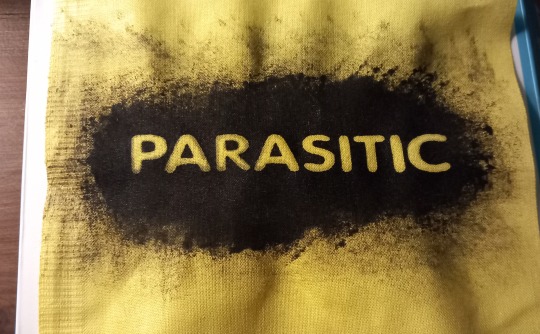
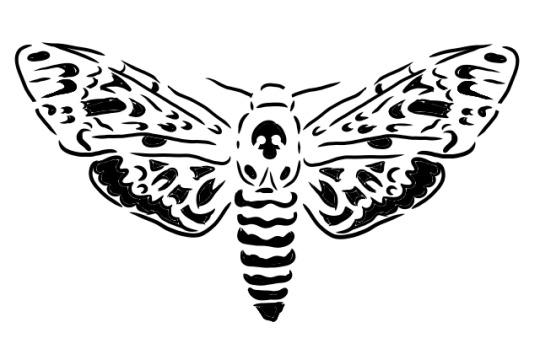
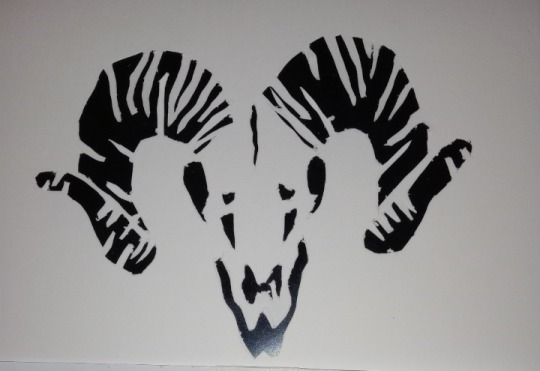
Text

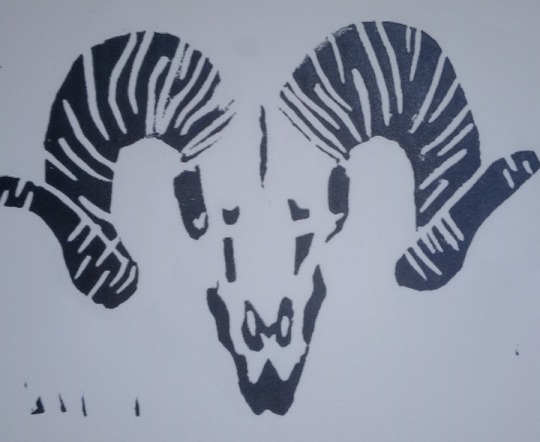
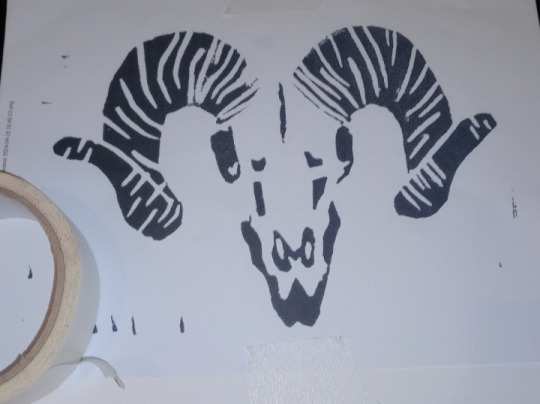
This one is epic and im so sorry to whoever tries to cut it out
#punk#stencil#folkpunk#grooviestencils#punk stencil#punk diy#diy#stencilism#anti folk#days n daze#days n daze band
65 notes
·
View notes
Text


my heart leaps when I can match my clothes with my hair, especially when it's shit I made myself 💚
46 notes
·
View notes
Last Seen Blogs

misssadashi
~SadashiSen~

grocientinfotech
Grocient Infotech Pvt. Ltd.

atomicdinosaurwerewolf
Untitled

jowiaduda
Untitled

roxanova
roxanova