#diy punk
Text


Portrait of my roommate @nixxsmokeweed I did today with some paint pens :3 they got their patch pants on in the pic :)
#punk#diy patches#patches#diy punk#patch pants#diy#traditional art#paint markers#wheelchair art#wheelchair#disability art#my art
101 notes
·
View notes
Text
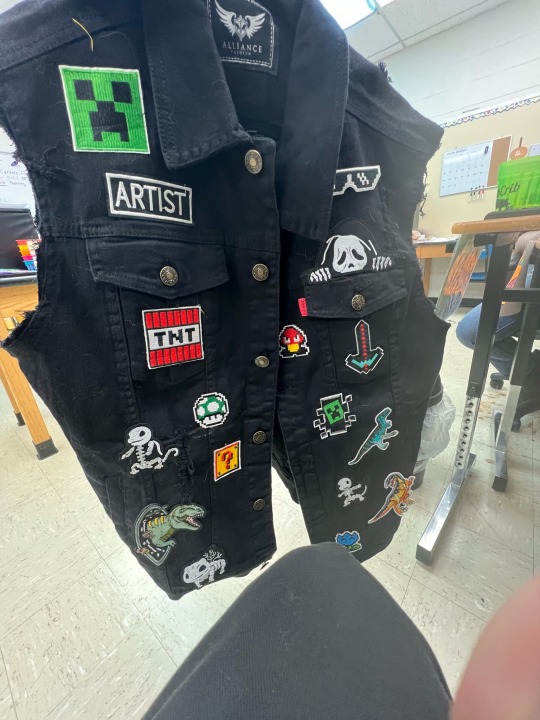
Y’all, my little nephew, who’s nickname is “Cabbage,” wanted a “punk jacket,” like Uncle Kade’s. (EMPHASIS ON LITTLE, be nice)
So, I asked him what kind of patches he wanted on it, and this is what we came up with. Just need to sew the patches down and line the vest. I can’t wait to finish it and send it to him.

49K notes
·
View notes
Text

[ID in alt text]
16/25+ of my LGBTQIA+ boots series! transgender flag themed
🏳️⚧️
stickers or prints of this series here
#jojoliverart#trans artist#queer artist#trans art#queer art#lgbt art#my art#trans rights#lgbt#lgbtq#trans#queer#trans pride#traditional art#eyestrain cw#artists on tumblr#transgender#queer punk#diy punk#punk
27K notes
·
View notes
Text
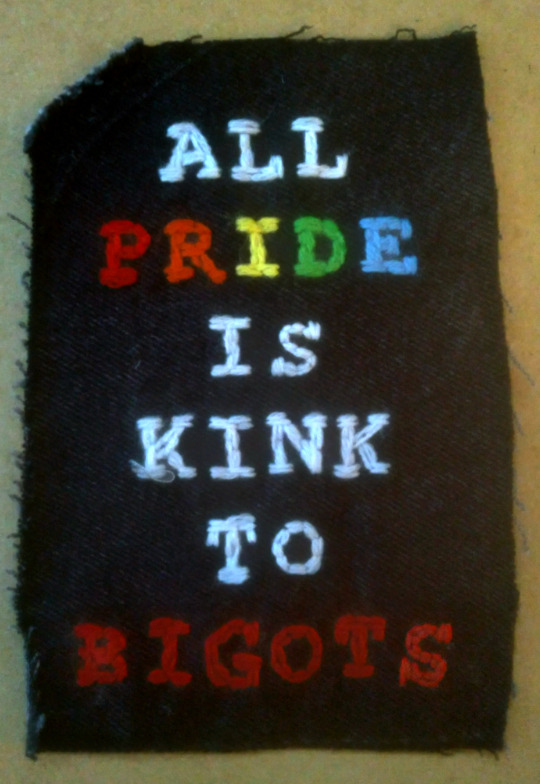
Pride month vest project, a patch a day #14: All Pride is Kink to Bigots
#all pride is kink to bigots#pride#gay#lgbtq#queer#pride patch vest#embroidery#battle jacket#diy punk
38K notes
·
View notes
Text
Had a few folks interested in how I made the patches I posted for Solarpunk Aesthetic Week, so I thought I'd give y'all my step-by-step process for making hand-embroidered patches!

First, choose your fabric and draw on your design. You can use basically any fabric for this - for this project I'm using some felt I've had lying around in my stash for ages.

Next, choose your embroidery floss. For my patches I split my embroidery floss into two threads with 3 strands each, as pictured. You can use as many strands in your thread as you prefer, but for the main body of my patches I prefer 3 strands.
Next you're going to start filling your design using a back stitch.

First, put in a single stitch where you want your row to start.

Poke your needle up through the fabric 1 stitch-length away from your first stitch.

Poke your needle back down the same hole your last stitch went into so they line up end-to-end.
Repeat until you have a row of your desired length (usually the length of that colour section from one end to the other). Once you have your first row, you're going to do your next row slightly offset from your first row so that your stitches lay together in a brick pattern like this:

Make sure your rows of stitches are tight together, or you'll get gaps where the fabric shows through.
Rinse and repeat with rows of back stitch to fill in your patch design.

When you're almost to the end of your thread, poke your needle through to the back of the fabric and pull the thread under the back part of the stitching to tuck in the end. Don't worry if it looks messy - no one's gonna see the back anyway.
This next step is fully optional, but I think it makes the patch design really pop. Once your patch is filled in, you can use black embroidery floss to outline your design (or whatever colour you want to outline with - it's your patch, do what you want). I use the full thread (6 strands, not split) of embroidery floss to make a thicker outline.

I use the same back stitch I used to fill the piece to make an outline that adds some separation and detail. You could use most any 'outlining' stitch for this, but I just use back stitch because it's just easier for me to do.
Once you're finished embroidering your patch, it's time to cut it out!

Make sure to leave a little border around the edge to use for sewing your patch on your jacket/bag/blanket/whatever, and be careful not to accidentally cut through the stitches on the back of the patch.
If you have a sturdy enough fabric that isn't going to fray, you can just leave it like this. If not, I recommend using a whip stitch/satin stitch to seal in the exposed edges (I find that splitting your embroidery floss into 3-strand threads works best for this).

And then you're done! At this point you can put on iron-on backing if you want, or just sew it on whatever you wanna put it on. Making patches this way does take a long time, but I feel that the results are worth it.
Thanks for reading this tutorial! I hope it was helpful. If anyone makes patches using this method, I'd love to see them! ��
#solarpunk aesthetic week#sewing#tutorial#sew on patch#punk diy#diy punk#punk aesthetic#handmade#solarpunk#handcrafted#embroidery#embroidered patch#how to#how to make a patch
17K notes
·
View notes
Text

found in a squat in an abandoned housing development, 2023
#urban decay#collage#squatting#crust punk#diy punk#diy#collage mural#wallpaper#squatters#abandoned buildings#urban reclamation#deer#antlers#this shit was cool#i would go back tbh but it was too much of a hot spot#pigs all over and lots of ppl claiming territory
8K notes
·
View notes
Text
i guess it's scary to me when white leftists say that the punk scene is the scene where you wanna go if you're trans or a person of color or a drug addict or someone else who's been kicked down in life. cuz like, if you've lived in this scene, is it really where you wanna send people?
i got involved in my local punk scene and the problem is that people aren't actually focused on looking out for each other. punk is heavily white. punk is heavily abled. punk is heavily cis. i know everyone says "real" punk is this and that, but the problem is: i live in a punk house venue. i live in a house where punks throw punk rock shows weekly and invite other punks into our home to throw music and art shows. the DIY scene is a mess. it's full of abusers. it's full of enablers. it's full of queerphobes and tranny chasers. it's full of people who collect vulnerable traumatized people. it's full of people who will hand beers to recovering alcoholics and pass lines to recovering addicts.
this scene is full of people who scribble "this machine kills fascists" on every object they own and turn around and cower and say "I'm scared, can you come pick me up, there's some scary guys outside." because some black dudes listening to some rap posted up outside of the punk show. this scene is full of virtue signaling assholes who put antisemitic symbols on their "battle vests". this scene is full of half-assed "communists" who just want to brag about the big scary words they learned like "praxis" and "proletariat" and "bourgeoisie".
this scene is full of fake socialists who won't lift a finger to help each other, but will drag each other into hell instead.
the problem with punk as we know it is that it's whitewashed to hell and back, and the spaces created by these individuals are not centered around safety, but violence. yeah, you kill fascists, but do you provide meals for the hungry, shelter for the homeless, and harm reduction for the addicted? do you pass out extra blankets and clothes? do you help people get to the hospital? do you pat someone on the back when they turn down that beer? do you remember to not offer a baggie to the person who just got out of recovery?
no? then you aren't a safe person to be around, and you ain't punk. you are the reason this scene is unsafe.
#diy punks#trans punks#trans punx#punk#genderpunk#punks#punx#queer punx#queer punks#diy punk#alternative#alt#about us
8K notes
·
View notes
Text

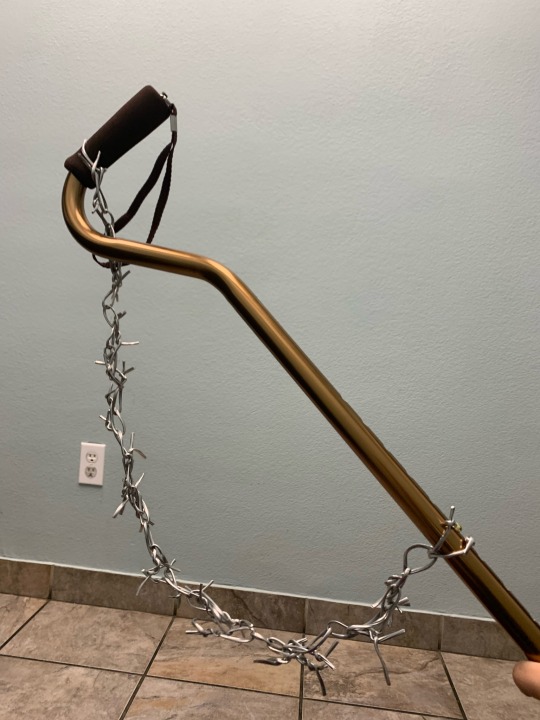

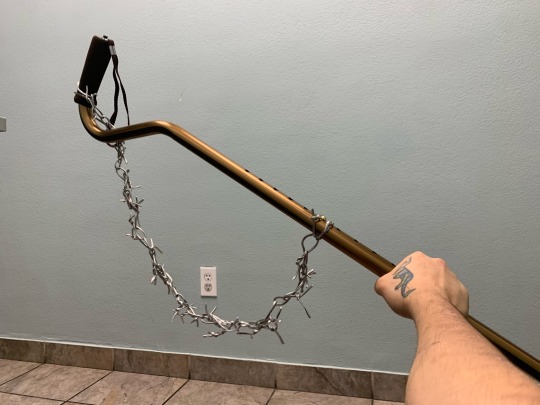
BARBED WIRE CANECHAINS ARE NOW AVAILABLE AT THE HELLFIRE FOUNDRY! 15.00 USD EACH :)
PREVENT UNWELCOME ABLED HANDS FROM TOUCHING YOU OR MOBILITY AID. CAN MODIFY CANES, ROLLATORS, FOREARM CRUTCHES & MORE. THE CHAINS ARE LIGHTWEIGHT ALUMINUM, HANDTWISTED TO CUSTOM LENGTH.
#GUNKJUNK#ETSY#upcycled fashion#CRIPPLEPUNK#DIY CRAFTS#HELLFIRE FOUNDRY#BRUTAL WORKS#RIVETHEAD#RIVETHEAD FASHION#GOTH#DIY PUNK
6K notes
·
View notes
Text
simple tutorial on how to make those bottlecap buttons you see everywhere
you'll need:
bottlecap•soda tab•safety pin•pliers•sandpaper/file•paint/paint markers/smth to decorate with•clear nail polish
remove the print on the buttons using a file or the sandpaper
(if you wanna keep the print skip this step, use a cloth to protect the print from scratches when folding down the sides of the cap)
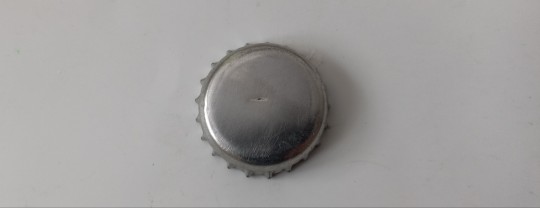
fold down opposing sides of the cap, to help add in the safety pin
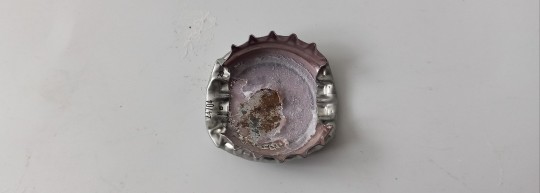
bend the tab at a slight angle, insert it into the cap. make sure the side of the safety pin that can not open is the one stuck under the tab
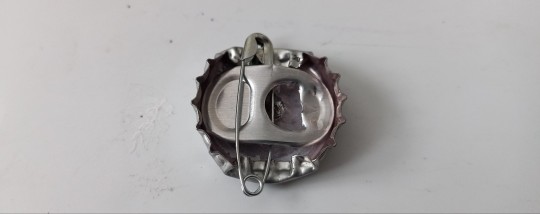
fold down one side of the cap to lock the tab in place, then try and press the tab as flat as you can, to lock the safety pin in place (prevents the buttons from moving on the safety pin, if you like rattling buttons, skip this step)
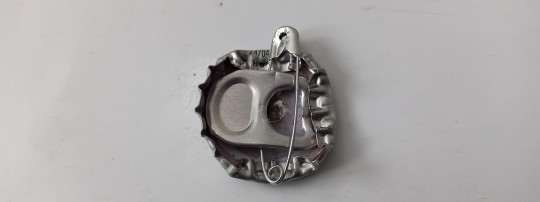
fold down all other sides of the cap
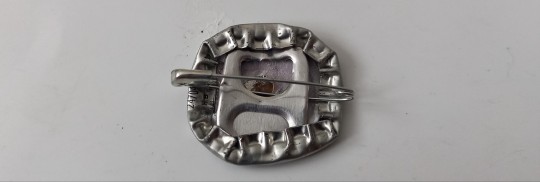
cover the button in one or more base layers of paint
add ur design (i use paint or paint markers for good coverage and vibrant colors)

cover that in one or two layers of nail polish, it will protect the button from rain and the paint from cracking

thats it, lemme know if you want tutorials on anything else, i like making em.
10K notes
·
View notes
Text
Idea: sew some cute little moths with scrap fabrics and sew them on holes you have on your clothes so you can keep wearing them :)

#diy#sewing#visible mending#textile art#DIY culture#diy punk#sewing ideas#craft ideas#eco fashion#reduce reuse recycle
22K notes
·
View notes
Text
Singing my song Woof Woods at the skatepark folkpunk show!
#dognonsense#dog nonsense#my band#my music#live music recording#vancouver punk scene#vancouver punk#vancouver bc#graffittiart#folkpunk#folk punk#punk#diy punk#doggirl#puppygirl#therian#furry
53 notes
·
View notes
Text
Punk is about love <3
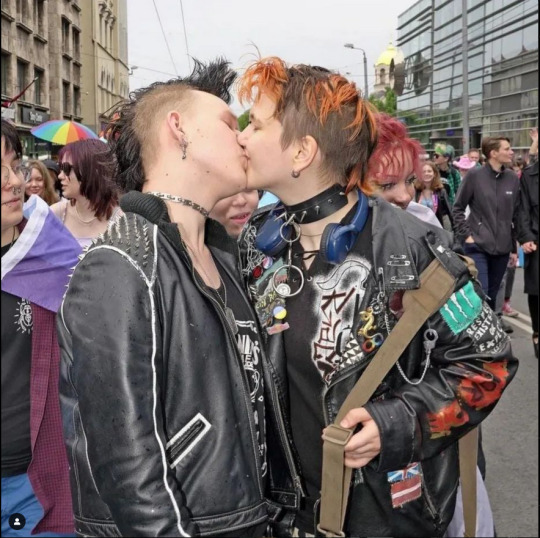
Photograph of me and my boyfriend at 2022 pride taken by photographer Arnis Balcus
#punk#alternative#hardcore punk#diy punk#punk aesthetic#punk rock#queer punk#queer community#pride#lgbtq community#punk queer#punk jacket
4K notes
·
View notes
Text
made some transsexuality patches for my jacket >:3
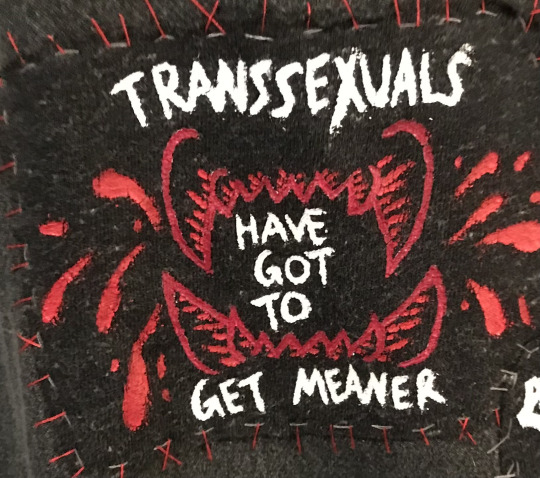
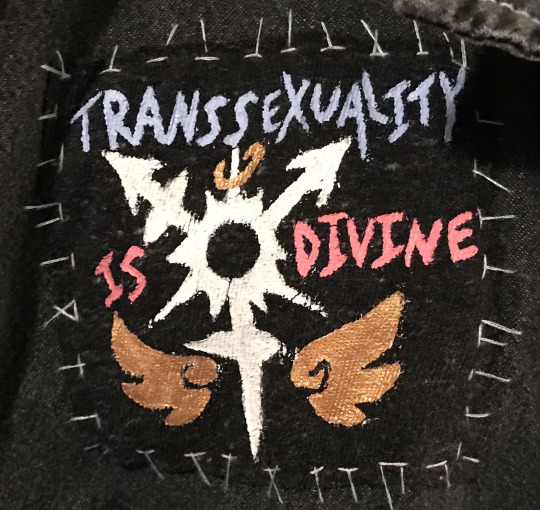
"transsexuals have got to get meaner" is a phrase I like from @sweatermuppet 's designs but I had an idea and wanted to make my own patch design based on it!!
and "transsexuality is divine" is a design/phrase I made myself inspired by sweatermuppet's transsexual designs as well!
#I might post my full jacket eventually but there's not many patches on it atm so I thought I'd just share my couple favourites :)#also lmk if the alt text is sufficient this is my first time trying to describe some images#my art#uh. I don't usually ever post irl art#what do I tag this as#sew on patch#transsexual#transgender#queer#queer art#punk#battle jacket#punk patches#diy punk
12K notes
·
View notes
Text
I'm seeing a lot of people say that punk fashion is expensive and inaccessible, which is very wrong. here is a list of some ways you can make punk fashion easier, cheaper and more accessible for you, since that's... kinda the whole point.
others are encouraged to add onto this!! (just don't recommend corporations like amazon. not cool.)
1. patches!! you don't need to buy them. DIY patches are not ugly or boring. in fact, they are encouraged here!! DIY, in my opinion, is always the best thing to do when it is an option and is safe to do so.
2. speaking of DIY, spikes!! you can make them!!
cut the top and bottom off of an empty can. cut down the middle of the cylinder and flatten it, so it's just a flat rectangle of metal.
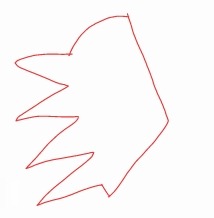
cut out a shape that is kind of a third of a circle, but around 3/4 of the curved edge is taken up by triangle shapes. (I'm not very good at describing, so here's a badly drawn picture)
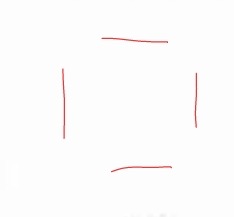
roll it into a cone, leaving the 4 triangles sticking out at the bottom. this bit is optional, but you can fill it with hot glue to make it more sturdy, just be careful touching the hot metal. I tend to hold the cone by one of the triangles with a bit of fabric wrapped around my fingers for this bit. cut 4 small holes in your fabric in this kind of shape:
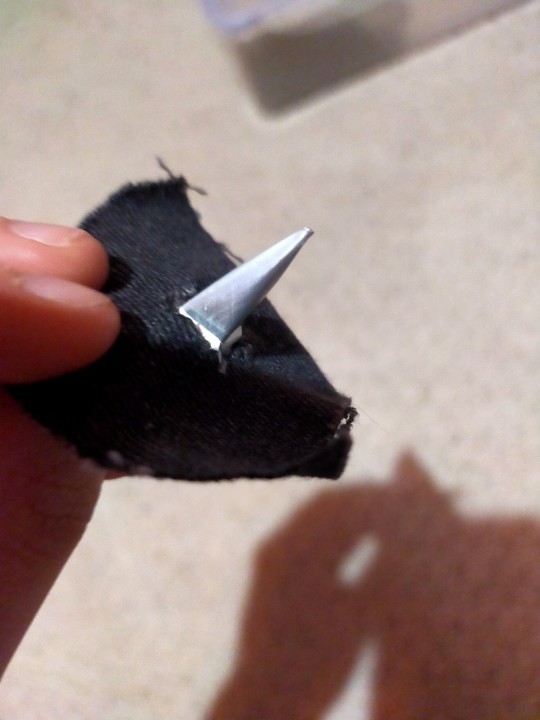
and put the spiky bits of triangle through the holes. fold the triangles in on themselves to secure the spike in place. boom. spike obtained. this is one I made and attached to a little piece of fabric to test this method out:
3. battle vests!! (like the base jackets). the best places to buy these are charity shops and second hand websites in my opinion, but if anyone else knows any better options, please reblog with those!!
a good trick I find works well on eBay is to filter search results to your country (or state? can you do that in the US? idk) so that a: fast delivery because local, and b: all the sellers of everything that shows up are in YOUR TIME ZONE.
why is this important? when people sell something for really cheap, it goes FAST. check eBay at like, 2am or something. all the scalpers in your area are asleep. grab the cheap stuff while they can't.
4. sewing!! want patches, but can't sew for whatever reason? I've heard of a lot of people with joint conditions like arthritis complain about the inaccessibility of patch stuff, and that does sound extremely annoying, however:
safety pins!! while they are still a little fiddly, they're much less work so you don't have to fiddle about for long. if you can, you could even ask a friend to help, since it doesn't take long at all I'm sure someone will be willing to help out!! (I know I would, but that's just me, and I love this kind of thing). safety pins on clothes are also widely considered to be a symbol of solidarity, so if anything, you're adding some extra love and meaning to your patch pants/battle jacket.
if that's still too fiddly, fabric glue is always an option. unfortunately this means you won't be able to remove/reposition patches, at least without leaving a massive patch of residue, but if you're ok with that then fabric glue is probably your best bet.
for people who prefer sewing: as for where to get the thread, I've heard a lot of people recommending dental floss, as it's apparently much cheaper and works just as well. I haven't tried this myself so can't confirm that, but I thought I'd share it regardless.
5. where to get fabric!! old clothes. rip em up. you don't need any kind of fancy fabric from the craft store. my patches are made of old jeans that I grew out of.
don't have any old clothes and you don't want to waste any good ones? I'm not sure about other countries, but in the UK, as long as you're not on private property (trespassing), dumpster diving is perfectly legal.
I definitely ;) do NOT encourage ;) trespassing rich people's land ;) to steal from their dumpsters ;)
or tbh it doesn't matter too much how rich the person is, since it's all going to landfill anyway. if it's in the bin, it's free game, but you didn't hear that from me. ;)
please add onto this where you can!! and if I missed something or got anything wrong, add that on too!!
#diy punk#patch jacket#battle vest#patch vest#punk vest#diy patches#punk battle jacket#battle jacket#punk patches#patch pants
7K notes
·
View notes
Text
diy!
#altfashion#punk fashion#diy punk#punk aesthetic#diy fashion#punk#crust punk#crust pants#patch pants#emo fashion#sewing#diy patches#patches
2K notes
·
View notes
Text
Here's that crochet cardigan I was talking about! Apologies for the quality of the video it's ripped straight from my Instagram story lmao
3K notes
·
View notes
Last Seen Blogs
fell-is-suffering
Aroace Fell!

mblek
les délires de m

star-going-supernova
Star's Corner of the Galaxy

dalojutawoci
Untitled

bangtan0070
starrybangtan007