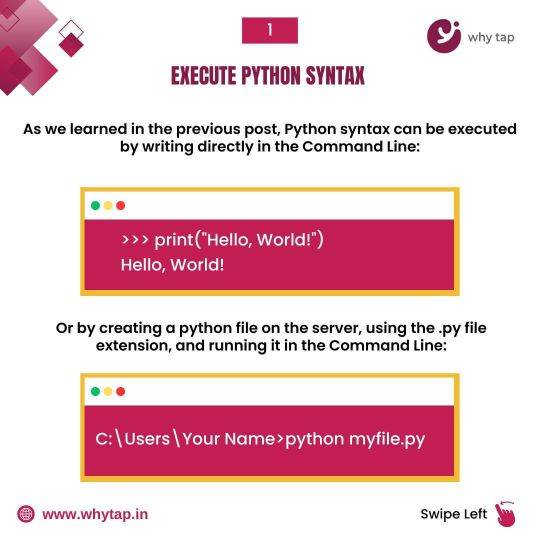
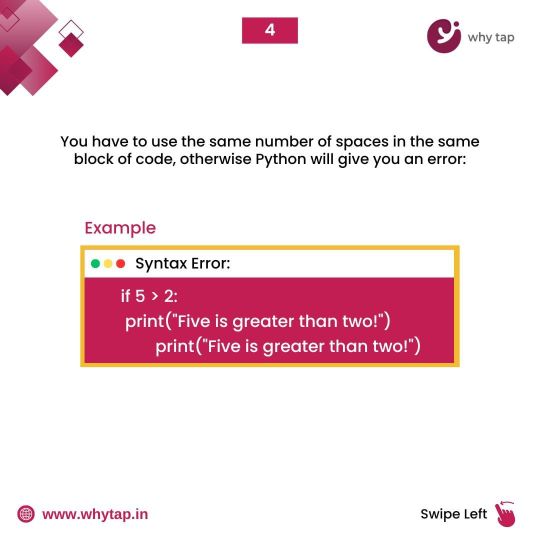
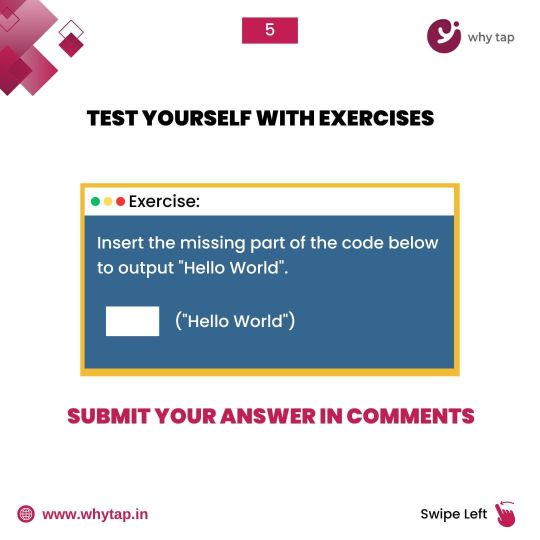
#Project Management Tutorial
Text
Scrum Project Management: A Framework for Agile Success
Scrum project management has emerged as a leading methodology for Agile software development, providing teams with a flexible and iterative approach to delivering high-quality products. In this article, we'll delve into the fundamentals of Scrum, its key principles, roles, artifacts, events, benefits, challenges, implementation tips, and real-world applications.
I. Introduction
What is Scrum Project Management?
Scrum is a framework for Agile project management that emphasizes iterative development, collaboration, and continuous improvement. It enables teams to respond rapidly to changing requirements and deliver valuable software increments in short cycles.
Brief History and Evolution of Scrum
Originally introduced in the 1980s by Hirotaka Takeuchi and Ikujiro Nonaka, Scrum has since evolved into a widely adopted Agile methodology. Its principles draw inspiration from various fields, including lean manufacturing, empirical process control, and organizational psychology.
II. Core Principles of Scrum
Empirical Process Control
At the heart of Scrum lies the principle of empirical process control, which emphasizes transparency, inspection, and adaptation. Teams base their decisions on real-time feedback and data, rather than predefined plans.
Iterative Development
Scrum promotes iterative development, dividing work into small, manageable increments called "sprints." Each sprint typically lasts one to six weeks and results in a potentially shippable product increment.
Collaboration
Collaboration is central to Scrum, with cross-functional teams working closely together to achieve shared goals. Through frequent communication and collaboration, team members can address challenges and capitalize on opportunities more effectively.
Self-Organization
Scrum teams are self-organizing, meaning they have the autonomy to determine how best to accomplish their objectives. This autonomy fosters creativity, ownership, and accountability among team members.
III. Scrum Roles
Scrum Master
The Scrum Master serves as a servant-leader for the team, facilitating the Scrum process and removing impediments to progress. They coach the team on Agile principles and practices, ensuring adherence to Scrum values.
Product Owner
The Product Owner represents the stakeholders and is responsible for maximizing the value of the product. They prioritize the backlog, define user stories, and make decisions about what features to include in each sprint.
Development Team
The Development Team consists of professionals who do the work of delivering a potentially releasable increment of product at the end of each sprint. They are cross-functional and self-organizing, with a collective responsibility for achieving the sprint goal.
IV. Scrum Artifacts
Product Backlog
The Product Backlog is a prioritized list of all desired work on the project. It evolves over time, with new items added, refined, or removed based on feedback and changing requirements.
Sprint Backlog
The Sprint Backlog is a subset of the Product Backlog selected for implementation during a sprint. It represents the work that the Development Team plans to complete within the sprint.
Increment
The Increment is the sum of all the product backlog items completed during a sprint, plus the increments of all previous sprints. It must be in a potentially releasable state and meet the Definition of Done.
V. Scrum Events
Sprint Planning
Sprint Planning marks the beginning of a sprint, during which the Scrum Team collaborates to select the items from the Product Backlog that will be included in the upcoming sprint and create a sprint goal.
Daily Stand-up
The Daily Stand-up is a short, time-boxed meeting held every day to synchronize the activities of the Development Team and identify any impediments to progress. Each team member answers three questions: What did I do yesterday? What will I do today? Are there any impediments?
Sprint Review
The Sprint Review is held at the end of the sprint to inspect the increment and gather feedback from stakeholders. It provides an opportunity to review what was done in the sprint and adapt the Product Backlog as needed.
Sprint Retrospective
The Sprint Retrospective is a meeting held at the end of the sprint to reflect on the team's process and identify opportunities for improvement. It focuses on what went well, what could be improved, and actionable items for the next sprint.
VI. Benefits of Scrum
Improved Flexibility
Scrum's iterative approach allows teams to adapt to changing requirements and market conditions quickly. By delivering increments of working software regularly, teams can respond to feedback and deliver value more effectively.
Enhanced Product Quality
Through frequent inspection and adaptation, Scrum promotes a focus on quality throughout the development process. Continuous testing, peer reviews, and customer feedback help identify and address issues early, resulting in higher-quality products.
Increased Transparency
Scrum provides stakeholders with transparency into the development process, enabling them to track progress, provide feedback, and make informed decisions. This transparency builds trust and fosters collaboration between the development team and stakeholders.
Better Stakeholder Engagement
By involving stakeholders in the development process through events like the Sprint Review, Scrum ensures that their feedback is incorporated into the product. This engagement leads to greater satisfaction and alignment between the product and stakeholder expectations.
VII. Challenges in Implementing Scrum
Resistance to Change
Transitioning to Scrum requires a cultural shift within an organization, which can meet resistance from stakeholders accustomed to traditional project management methods. Overcoming resistance requires strong leadership, clear communication, and patience.
Lack of Experience
Inexperienced teams may struggle to implement Scrum effectively, leading to frustration and disillusionment. Training, mentoring, and hands-on experience can help teams build the skills and confidence needed to succeed with Scrum.
Overcommitment
Teams may overcommit to work during sprint planning, leading to burnout, reduced quality, and missed deadlines. It's essential to set realistic goals and prioritize the most valuable work to ensure sustainable pace and continuous delivery.
VIII. Tips for Successful Scrum Implementation
Training and Education
Invest in training and education for team members, Scrum Masters, and Product Owners to ensure a solid understanding of Scrum principles and practices.
Clear Communication
Foster open and transparent communication within the team and with stakeholders to ensure alignment and shared understanding of project goals and priorities.
Empowering Teams
Empower teams to self-organize and make decisions, trusting them to deliver results and continuously improve their process.
Continuous Improvement
Encourage a culture of continuous improvement, where teams reflect on their process, identify areas for enhancement, and experiment with new approaches.
IX. Scrum vs. Traditional Project Management
Scrum differs from traditional project management methodologies, such as Waterfall, in several key ways. While traditional methods emphasize detailed planning and documentation, Scrum prioritizes adaptability, collaboration, and delivering value early and often.
X. Real-world Applications of Scrum
Scrum is widely used across various industries and domains, from software development to marketing, healthcare, and beyond. Organizations like Spotify, Google, and Salesforce have adopted Scrum to streamline their processes and deliver innovative products to market faster.
XI. Conclusion
In conclusion, Scrum project management offers a powerful framework for Agile development, enabling teams to respond rapidly to change, deliver high-quality products, and maximize value for stakeholders. By embracing Scrum's core principles, roles, artifacts, and events, organizations can achieve greater flexibility, transparency, and collaboration, ultimately driving success in today's dynamic business environment.
XII. FAQs
What is the difference between Scrum and Agile?
While Agile is a broader philosophy or mindset, Scrum is a specific framework for implementing Agile principles in software development. Scrum provides guidelines and practices for iterative development, collaboration, and continuous improvement within Agile projects.
How does Scrum handle changes in requirements?
Scrum accommodates changes in requirements through its iterative approach and flexible mindset. Changes can be incorporated into the Product Backlog and prioritized for future sprints, allowing teams to adapt to evolving customer needs and market conditions.
Can Scrum be used in non-software projects?
Yes, Scrum can be applied to a wide range of projects beyond software development, including marketing campaigns, event planning, construction projects, and more. The key is to adapt Scrum principles and practices to suit the specific needs and constraints of the project.
What is the ideal size for a Scrum team?
The ideal size for a Scrum team is typically between five and nine members, although smaller or larger teams can also be effective depending on the project's complexity and requirements. The goal is to have a cross-functional team with the skills and expertise needed to deliver value independently.
How do you measure the success of a Scrum project?
Success in a Scrum project is measured by the value delivered to stakeholders, the quality of the product, and the team's ability to adapt and improve over time. Key metrics may include customer satisfaction, product quality, team velocity, and time-to-market.
#ScrumProjectManagement #AgileSuccess #ProjectManagement #AgileMethodology #ScrumFramework #AgileProjectManagement #SuccessTips #ProjectSuccess #AgileStrategies #ProjectManagementTips
#Scrum Project Management#Agile Success#Agile Methodology#Project Management#Scrum Framework#Agile Project Management#Project Success#Scrum Guide#Agile Techniques#Scrum Methodology#Agile Framework#Agile Project Success#Project Management Strategies#Scrum Mastery#Agile Mastery#Agile Project Management Techniques#Scrum Tips#Agile Project Management Guide#Agile Project Management Success#Scrum Project Management Tutorial#Project Management Tutorial#Agile Project Management Secrets#Scrum Project Management Blueprint#Agile Project Management Blueprint#Scrum Project Management Demystified#Agile Project Management Demystified#Agile Project Management Mastery
0 notes
Text
every so often i get an idea and then obsessively work on it for hours and hours and sometimes it turns out good.
anyway the other day @follivora made a post with joker out as mucha art and that sparked this:

#joker out#jan peteh#songbird arts#i might do the rest of them too but my hands are tired and i have some other projects to do first#i have a nice reference pic of nace saved#i am SO proud of this i was using a vector tutorial for the style and working in raster graphics and still managed#definitely could have been more efficient but i was learning and learning is important
107 notes
·
View notes
Text
Feminine urge to make a pixel adventure game with my Sparrow in RPG Maker
I`m wondering if this is just another impulsive idea that will go away soon oR IS IT NOT
#I`m still alive hewo#I get these ideas from time to time though it`s usually touches only Fable ideas#but I watched again during work some RPG Maker MV tutorials JUST FOR FUN#and oh god it starts again#and I would start to work on fable 4 fan project again but I understood that I have zero experience whatsoever#and I have a few stories in my head post Fable 2 that I would love to show other people BUT#I`m bad in writing and I`m to lazy to draw a comic SO-#one story is about Sparrow recovering after Fable 2 events and trying to live her life#and getting a job of killing a Balverine that managed to settle in Old Town#the whole story would`ve been about balverines and how they managed to become more intelligent and what are they planning now#and also about Sparrow trying to deal with all of the traumas and trying to deal with her past#with this story I heavily associate Witcher 3: Hearts of Stone OST
17 notes
·
View notes
Text


WHY tap
#python#python developers#python programming#python online course#python certification#project management#placement#training#python coding#python tutorial
4 notes
·
View notes
Text
Lyskari's Monday.com Tutorial:
The Bare Basics for Personal Use
Ξ Introduction Ξ
Hello, and welcome to my first Monday Tutorial where I cover the super bare basics of Monday (Monday.com) for personal use.
I've not written tutorials in a while so forgive me if these first few are rough!
Monday.com is a robust website that boasts a wide range of applications professionally (task management, project management, IT ticket management, and more). However, I found that it works wonderfully well for my personal life.
I utilise it for two things:
1. Non-Routine To-Do's
(e.g. "Get new car battery")
2. Resource Collection
(admittedly I'm bad at updating this one)
Though you can definitely utilise it for whatever you need! And if high levels of customisability and flexibility is up your alley, then I encourage you to give Monday a shot!
Alright, Lyskari, this is sounding too good, but what's the catch?
There are definitely still improvements that could be made, just like with anything. As much as I love Monday, it's built for corporate or team usage. Though they've created a free plan, it's not nearly as robust as the paid plans. I hope they can provide a bit more for the free plans in the future, but at the moment free plans lack some things that make Monday as great as it is, such as automations and integrations. If you have the money to shell out for the cheapest plan, I do recommend it, but only after you really look to determine if it's prudent.
I recommend you look at the plan breakdowns first to ensure it offers the bare minimum of what you need. If automations are key for you then I'd encourage a free program that has automations. Check out the links below for plan breakdowns & pricing.
Other helpful links:
(These bring you to Monday help articles that explain some things better than I can, or they direct you towards their help resources directly.)
Understanding the Free Plan
Comparing Plans & Pricing
Monday's Community Forums
Monday's Video Tutorial Center
Monday's Help Center
Please note these tutorials are not sponsored in any way, and they will not even cover every single thing Monday can do... as doing so would be a rather herculean task. However, if there are aspects of Monday you'd like me to cover just leave me a note!
━━━━━━━━━━━━━━━━━━━━━━━━━━━━━━
Ξ Layout Ξ
Before we get into the meat and potatoes, I want to describe how Monday is naturally setup by default. This may click immediately if you're familiar with task management software (or if that's how your brain works naturally). If this doesn't click with you immediately, don't worry, I define things in the very next section. 🧡
First I want to go over Monday's primary "container" hierarchy. That is to say, how their different "containers" are nested into each other or beside each other. I'll include a screenshot at the end for those of you who are more visually inclined!
(Text in [brackets] are exclusive to dashboards and will be talked about more in the dashboard tutorial. Which I will hopefully remember to link here when it's done.)
Workspaces
↓
Folders & Sub-Folders
↓
Boards [& Dashboards] → Views
↓
Groups [& Widgets]
↓
Items → Columns
━━━━━━━━━━━━━━━━━━━━━━━━━━━━━━
Ξ Definitions Ξ
It's a small thing but the way Monday names individual aspects of the program are incredibly beginner friendly. Subsequently, this is also one of smaller gripes I have with Asana.
Monday likes to define things in ways that feel very logical, which can help when dealing with the overall learning curve. Additionally, I will only be explaining this as it pertains to personal use. If you'd like a professional breakdown, leave me a note!
This section alone made this ungodly amounts of long so if the above visual helps you enough to understand, cool! Don't worry about definitions unless you really want a little more insight into any of the mentioned "containers" above!
Let's get started!
- - - - - - - - - - - - - - - - - - - - - - - - - - - - - - - - - - - - - - - - - - - - - - - -
❖ Workspaces
Important Links: Monday's Article About Workspaces
Workspaces are the largest "container" type that Monday provides. Think of it as a house. There are a lot of different individual rooms inside, but they all belong to the one house.
Should I use workspaces as a single individual?
It's up to you and how you work! If having multiple houses works for you, then by all means!
However, if you are like me and you struggle to remember checking in on the other workspaces... then consider utilising only one.
Any other suggestions?
If you wish to utilise Monday with another member of the house, another option available is having one workspace per individual... and potentially a "teamwork" workspace. However, it's possible to utilise a single workspace for multiple people as well. Talk it over with whoever you wish to use Monday with, and see what works best for both of you!
Anything else?
You have some customisation options! You can customise:
• Workspace Name
• Workspace Avatar Background Colour
• Workspace Avatar Icon
- - - - - - - - - - - - - - - - - - - - - - - - - - - - - - - - - - - - - - - - - - - - - - - -
❖ Folders & Sub-Folders
Important Links: Monday's Article About Folders
Organising Folders Using The P.A.R.A. Method
Folder's become the next container. If workspaces are the house, think of folders and sub-folders as the rooms within the house.
Folders help organise the boards within a single workspace, with sub-folders helping break things down a little bit more if necessary.
Colour Coding
Perhaps one of my favourite features about the folders & sub-folders is the ability to colour them. As someone who is very colour-code dependent to work longer at higher efficiencies, the ability to colour folders & sub-folders was a godsend. (I was around prior to this addition, and I can tell you the difference has been night and day!)
So if you're really big into colour-coding things, this will be up your alley!
Additionally, you can utilise emojis in the folder and sub-folders name which can be useful when having to organise multiple boards. (I only use two boards for my personal life, but if you need more than this is potentially a great way to help keep yourself from getting overwhelmed!)
Though this is a Monday tutorial I did include a link to a resource describing a folder organisation method called PARA that I use both at work and at home. If you're interested in PARA tutorials, let me know!
- - - - - - - - - - - - - - - - - - - - - - - - - - - - - - - - - - - - - - - - - - - - - - - -
❖ Boards (and Views!)
Important Links: Monday's Article on Shareable Boards
Monday's Article on Private Boards
Monday's Article on Board Views
Finally.
BOARDS.
Boards are where the magic truly happens for Monday, and also why I love their choice of terminology. Unlike Asana who call their boards, "Projects", Monday utilised a more straightforward and accurate term.
If workspaces are a house, and folders & sub-folders are individual rooms, then boards are points of interest in that room such as TV & Entertainment, the Bookshelf, or the Walk-In Closet. These are where things happen, be it collection of data, tracking to-do's, and more.
Additionally, each board has multiple ways to view the data on that board. Even the main board itself is a view -- it's called the "Main Table".
These views can include:
• Kanban views (similar to Asana's "Board" view)
• Additional table views (similar to Asana's "List" view)
• Form view (which effectively turns your board into a fillable form)
• Chart view
• and More!
If you'd like me to go into the different view types, let me know! I'd be happy to write a view-specific tutorial. (And I honestly still may but I will also adjust what tutorials I write next based on interest.)
Boards can be named whatever you desire, and yes, emojis are allowed! They come with a description area, as well, which can be utilised in whatever fashion works best for you. Colour Coding Legends, Icon Keys, a reminder of how the board is supposed to work, and more. You decide!
Think of something you'd love to be able to track... or keep an eye on in some manner... and see what Monday has that works to bring that idea to life!
- - - - - - - - - - - - - - - - - - - - - - - - - - - - - - - - - - - - - - - - - - - - - - - -
❖ Groups
Important Links: Monday's Article on Groups
If a workspace is a home, folders & sub-folders are rooms, and boards are points of interest in that room... then groups are how those points of interest are organised. Think of it as the drawer or closet organiser, where you have specific areas for specific items, such as under garments or tshirts. (Okokok yes using this analogy for a supposed to be neurodivergent-friendly tutorial was dumb but it's all I had ok? Don't come at me. 😅)
Groups are categories that you create within a board. You can have one, you can have two, you can have fifty though I would not recommend that unless you can truly keep up with it!
Let's say you have a group of to-do's you'd like to work on. You may have groups for "Unstarted" "In Process" and "Completed", as a way to organise out your tasks.
Let me guess, it's customisable too?
I see you're picking up on the recurring theme! Yup! You can:
• Change the Group Name (also emoji friendly!)
• Change the Group colour
• Easily drag and drop groups in whatever order you prefer!
And this brings us to our final "container"!
- - - - - - - - - - - - - - - - - - - - - - - - - - - - - - - - - - - - - - - - - - - - - - - -
❖ Items & Columns
Important Links: Monday's Article on Column Basics
* Takes a deep breath. *
If workspaces are homes, folders & sub-folders are individual rooms, boards are points of interest in a room, and groups are how those points of interest are organised, then items are the individual items within the organised points of interest... like socks! Meanwhile columns are like the details of the sock. Who does it belong to? Jane. What colour is it? Purple with white polka dots. (Please tell me if these metaphors are working, or aren't!)
It gets better.
Monday allows you to change the terminology of "item" so it can accurately fit what your board is working with. Instead of "item" you can have "tickets", "questions", "Doodlepoodles", or whatever else you desire.
You also will not be locked in to the name you select. If you name your board items "dogs" and later realise you also have cats, you can update terminology to "animals". So you can "add animal" to the board. It's such a tiny thing, but having accurate terminology really does help my neurodiverse brain. A lot. So I hope it helps yours!
That said, for the sake of this tutorial series I will refer to it as "tasks".
(Mostly because for some reason I swapped from "item" to "task" during this tutorial and I don't know why... and finding and siwtching them all out sounds like a lot of effort... when I already put so much effort into writing this so... forgive me, that one.)
Tasks populate beneath groups, and will likely be one of the first tutorials I make where I hone in one a single aspect and explain it in hopefully neurodivergent-friendly detail (but Harley this is already so long-- yeah yeah I know... tutorials have that tendency ok? I'm trying here. 😅)
When adding tasks to a group, you can name the task whatever works best for you.
Unfortunately, tasks seem lackluster when looked at on their own so let me tell you about columns as well.
Columns populate to the right of your task name, and they collect different points and types of data which include but are not limited to:
• Statuses
• Labels
• Numbers
• Short Text
• Long Text
• Dates
• Dropdown (Multiple Choice)
• Priority
• Aaaaaaand more!
Columns names are customisable, but perhaps my favourite feature of columns is the ability to add a description to that column.
When you add a description to a column it will cause an (i) to appear next to the column name. When hovered over, the (i) will pop-up with the description, which makes it a great way to remember how you planned to utilise a column if you're like me... and forget... a lot!
━━━━━━━━━━━━━━━━━━━━━━━━━━━━━━
Ξ In Conclusion Ξ
Just in the bare bones of Monday's setup there are so many ways to customise and setup a system that is unique to you and your brain.
I hope this has helped give you some idea of what to expect, as I know what it's like to go in without any idea of how things work... and it can be overwhelming, especially if you're already struggling trying to keep up with things.
Please feel free to send me an ask if you...
• Would like a deeper tutorial on something specific I've mentioned,
• Have a question about something here, or
• Have a question about Monday/organisation in general!
(I may not always have an answer, but I will try!)
And, finally, if you enjoyed this tutorial and would like me to continue making more, please consider liking this post and reblogging it so that I can get more eyes on it. 🧡
If you enjoyed this tutorial and wish to leave a tip, you can do so on my kofi which you can find here: Lyskari's Ko-Fi
Whether you share, like, reblog, leave a tip, a mix of these, or all of them, thank you for your support! And please please let me know if you'd like me to cover other aspects of Monday, or if you'd like me to give my thoughts on other programs!
In closing, here are some recommendations if this tutorial encourages you to give Monday a try:
Consider experiencing the learning curve first. For some, experiencing a learning curve while attempting to setup a system leads to frustration, and potential rage quitting. If this is you, consider treating it like a sandbox first, and not a construction project!
.
Consider minimising maintenance needs. It is not uncommon for some neurodivergents [myself included] to build systems that require constant updates. This often leads to rage-quitting later on. The less you have to regularly maintain for individual tasks, the less overwhelming systems can be. Remember you want the system to work for you, you shouldn't be working for the system.
.
Systems may take multiple forms before you find the one that works best for you. Don't be afraid to tweak or completely change your systems until you have ironed out as many wrinkles as possible. As you learn and gain Monday mastery, you will begin to notice ways you can improve systems... or make new, better systems. This is normal, no matter if it's Monday, Asana, or even pen and paper. Needing adjustments or updates doesn't mean a system is bad, it just means you have learned new information and you wish to utilise it by creating a better system... or tweaking the current one!
If you have questions, please feel free to send me an ask! I will do my best to keep up with questions. 🧡
Also please let me know what you thought about this tutorial. What did you like? What didn't you like? Did you like the metaphors? Or did they confuse you? Did I explain things well or do you feel something is missing? That way I can hopefully improve with each new tutorial!
Thanks for reading!
#Monday#Monday.com#Not Sponsored#Organisation#Organization#Organising#Organizing#tutorial#Monday Tutorial#Organisation Tutorial#how do I use Monday?#Neurodivergent Friendly#ADHD Friendly#ADHD solutions#potentially anyway#ADHD strategies#PARA Method#project management#task management#to do list#task tracking#project tracking
5 notes
·
View notes
Text
HIS FAVOURITE W— STUDENT !
a/n: dilly / @crysugu i am losing the pwp war i needed the lore to be in this HELP. anyway !!! professors bc i cannot stop my mind from spiralling while starting my university classes — im not entirely proud of this but eehhh ….
wc: 4k
warnings: ultimately semi-public sex for all, unprotected sex, cumshot, standing doggy, brief oral (m receiving), brief f! masturbation, brief fingering (gojo), geto is a professor who is also a camboy, camgirl!reader, f! and m! masturbation, mentions of bad dragon’s cumtubes, brief fingering, unprotected sex, creampie / breeding kink (geto), pussy slapping, spitting (on yo pussy), pet names, clit stimulation, oral / cunnilingus, tit play, fingering, implied f! masturbation (nanami), mentions of murder, stripper!reader, riding, degradation, calls you ‘slut’ and ‘whore’, calls you ‘mama’ once too, unprotected sex, oral (m receiving), deep-throating, slight face-fucking (toji), n*sfw under the cut


✶ GOJO
professor gojo was… an interesting teaching figure. he didn’t have a set way of doing lectures or tutorials, nor was his feedback on assignments entirely coherent, but he was fun and unorthodox. he was also hot as fuck, as you’ve heard from your friends, but you never really got the deal even after seeing his photo on the university website or from miles away entertaining some starstruck student. his classes were always left with no vacancies, too, only able to see what your friends meant after stepping foot first into the lecture.
you were a tad bit early, greeted with gojo sitting at the front with his legs propped up on the desk as he shot you a nonchalant greeting and you think maybe you should’ve signed up for another lecture group, but then he speaks and the air is knocked out of your chest. professor gojo is charismatic when he teaches about art, design and media, captivating everyone with the stark white hair and blue eyes, but he’s clever with his glances because you aren’t realising he stares at you more than anyone else.
aren’t you in your second year? how did he not see you anywhere last year? why did you just sign up?
the smiles he gives you are sweeter than others, the words more sugar coated with lilts in his voice and you’re chastising yourself for not being any different from everyone else, soon turning into the girls who ask for extra tutoring sessions and sidling up to him on campus — at least you’d get the full experience.
“oh! sweetness, what are you doing here?” you’ve managed to get gojo just as he leaves his office, standing outside for quite some time thinking if you’d really want to do this. several lecturers and professors have already walked past asking if you needed anything, but no matter how much you wanted to say professor gojo’s name, it always turned into something like waiting for a friend.
“oh— uhm, professor gojo, just wondering if the grade for that major project is really set in stone?”
gojo makes a show of thinking, but you know you’re asking for the devil himself when he replies yes with a stifled grin and you’re asking if the two week period of appealing works for the major you’re in.
“you can submit other collaterals as an appeal but it might either boost your grade or bring it down,” the professor leans down with a sick smile on his face, because he’s had so many people outside just like this, nervous from his advances and yet not going through with what they thought they could do. but this time it’s you, the you who he imagined taking on his office desk or even in a lecture theatre for everyone to see, who wants the words to fall from your lips just so he could be your knight in shining armour.
“is there really no… other way to appeal?” you swallow when gojo switches the position and gets you in exactly where he wants you: your back facing his office, his face dangerously close to yours while his eyes slyly catching the way your thighs rub together.
gojo smirks to himself when you knock down yet another cup of stationery on his desk after “discussing” ways you could improve your grades, nails making unsatisfactory noises on the wooden desk while he can hear your cunt gush around him, made obvious from the squelch of your hole and he’s muttering praises into your neck from behind.
“this what you had in mind, baby?” just another girl in his roster, getting ruined just for a grade that wasn’t even that bad. what you didn’t know is that you were the only girl, getting professor gojo so hard in lectures and tutorial classes just from the sight of you that to finally have you — it’s a sweet reward. you shiver when his hand reaches to your front to rub at your clit and you’re grasping at nothing as moans leave your lips.
“y-yeah, professor—” gojo is filthy, lewd, lifting your leg to prop up on the desk just so he could get deeper in you, your pussy everything he imagined and more as he continues to fuck into you. you’re warmer than his hand, than some hookup’s mouth from the club, clenching around his cock so tightly his hips stutter.
“f-fuck, angel, tryna snap my dick off?” you let out an incredulous chuckle at that, hips moving back to meet his while the sounds of his balls slapping against your ass fill the room. your juices are coating his length so well, too, that gojo’s eyes lock on your cunt that sucks him in over and over again, the spread of your pussy lips just amplifying his moans. the other spreads your cheeks and sighs at the translucent ring of cum at the base of his cock, hips fucking up to hit your sweet spot that you’re cumming with a shock down your spine — so hard, so deep, so intense that you’re jolting from the orgasm with whimpers of his name. gojo never truly is done with you after pulling out to cum on your ass, however, and you aren’t either.
there’s a thrill that runs through his veins when you back him up onto the sofa, a glimmer in your eyes that suggest you’re as intoxicated on him as he is on you, a sultry gaze taking over your shyness from earlier before he’s pushed onto the cushions.
“thank you for the meal, professor,” you giggle and gojo swears he’s reached his death when your mouth first closes around his still sensitive tip and he whines loudly, hearing your fingers fill your drooling cunt as your hand squeezes out leftover cum from before. a hand runs through your hair and your cockdrunk face is enough for him to see white—
professor gojo thinks you look heavenly between his legs.
✶ GETO
you sigh echoes throughout your dorm room, ending the stream and collecting your keep for the day as you grimace at the mess you’ve made on your sheets. it’s not like it wasn’t pleasurable, but on some days you’re wondering how long you truly need to serve gross men on the internet for it to be enough to pay off your university fees. sure, there were a few attractive people who commented and tipped you, but that was the extent of it. it’s not long before you can only think about cleaning up and taking a big fat nap, but a video in the sidebar catches your attention.
it seemed like a casual stream — no script or planned storyline apart from a heavily tattooed arm taking up half the screen, his pelvis just slightly off the thumbnail. he was faceless, too, filming rather from the chest down which was also inked, something that sends a chill to your core.
it’s only later when you’re slipping your dildo back into you as you watch this stranger pump his cock, guttural groans and slick noises filling your airpods that you realise the dragon wrapping around his arm looks awfully familiar. you’re so blissed out by pleasure, focusing on the needy moans that the man lets out before he cums with a grunt, so much cum leaking out from him. you’ve reached your high too, but you have no time to admire the stranger because it seemed like he was in a hurry, but not before you’ve caught a glimpse of his lip ring.
you know why he looked so familiar, now, standing in front of him in his office while his sleeves are rolled up to his elbows, something he doesn’t do often. geto suguru doesn’t wear his lip ring in lecturers either, and now you think you know why because they match the video you’ve seen just last night. you aren’t even entirely sure why you were called in, and you think maybe it’s because you “accidentally” sent a friend request, but you’re taken aback when he asks you if you’ve already selected a tutor to be your mentor throughout your major project.
“surprised? i sent out the email a week ago, love.” you try not to let the name get to you, and the confession lingers at the tip of your tongue.
“y-yeah! i saw it, professor geto, just—”
everyone was no stranger to professor geto’s striking looks, always turning heads with his unconventional gauges and long hair that probably should’ve landed him in a modelling agency in the first place. except, he’s opting instead to teach linguistics, a fitting major for him to talk of the history of language and its formation of it, even slipping in some latin and greek to show its origins but you can hardly listen when all you can focus on is the tight pull of his shirt around his body while his hair falls around his face and you think maybe it was a bad time to think if his hair falls out of his bun while he rails someone. you hope soon it’ll be you, just so you can confirm it for yourself with no other reason involved (you’re a fucking liar).
geto clears his throat and you swallow and the flex of his forearms only distract you further, the dragon on his arm seemingly laughing at your torment as it moves along his skin — the other doesn’t miss your dilemma, staring at you for your answer with a dark stare and enjoying the effect he had on you. your brain doesn’t respond fast enough, though, and you’re blurting out the first thing as you watch the curve of his mouth turn in either distaste or satisfaction; you weren’t sure.
“i saw you stream yesterday—” and you slap a hand over your mouth, wanting to run immediately, but you didn’t expect him to smile after a moment of recognition, making the connections to your account until his mouth falls open just a little.
“you’re the little cutie who sent me a request last night, aren’t ya?”
as he asks the question you hoped he wouldn’t ask, you find there’s nothing on your mind except maybe seeing his tattooed arms wrap around you — and you did. they looked so much better up close, leading from one thing to another in that stuffy office soon they’re looking especially good with how he’s currently dragging the tip of his cock along your folds, collecting your slick as you hold onto his biceps after confessing sin after sin about you from—
“i’ve jerked off to your videos.” a burn on your cheeks when geto sets you on his office table, palms leaving hot trails along your thighs and skin. he lets you play with his bulge, hands probably forming bruises on you from how you relieve the tension in his pants.
“the way your cunt wraps around that dildo — makes me wish i was there fuckin’ your pussy instead.” a gasp and a moan when he preps you with both fingers as he sucks hickeys into your neck and plays with your tits, pinching your nipple that has you clenching around him.
“didn’t miss how you like to be bred in your videos too. think maybe you need some real cum, princess,” geto’s button up shirt is pried open by now, trousers just barely pulled down below his hips because he has a lecture in about half n’ hour. though, he wanted your pussy all to himself and if 27 minutes was all he was granted, he was going to make full use of it. geto groans into your hair when your legs wrap around his middle and he’s reeling at how he’s been watching your videos for the longest time and yet, nothing compares to having you fall apart by his hands.
a quick glance to his watch tells him fifteen minutes, eyes flitting back to the squelch of your cunt around him and he smiles smugly at the whimpers he knows so well. he’s sure it’s imprinted on his brain by now but his dick still jumps at the many variations you’ve let out during the 27; he’d commit every single one to memory. “professor— s-shit!”
geto angles his hips up, the curve of his cock hitting that spot just right that your back arches and you let out a drawn out moan, “yes, baby?”
“w-wan’ your cum in me, suguru,” you’re pleading with a drunk little smile and your face is twisted into such pleasure he’s only seen through pixels that geto cums almost immediately with a pained laugh seeing the real thing, hips stilling as he fills you up, up, up to the brim with hot, white semen that geto feels embarrassed to climaxing so quickly. but what can he do? when his favourite camgirl and student asks to be bred, it’s only natural.
how could he possibly say no?
✶ NANAMI
“does that mean the poem is written from the cross’ perspective?” your hand shoots up in hopes of interpreting the text correctly, but also because, just maybe, that you wanted to impress a little someone at the front of the lecture theatre. beside you, you can hear the gasp of your friend along with the eyes of various other students. “sort of like— personification?”
nanami points to you with his glasses that he’s long removed, a small smile on his face. it’s not like you’re trying too hard, but of course you know your shit fairly well. you always have in every class, it was just a bonus you were so attractive that all nanami could think about was spreading your legs right on this desk. “yes, almost. anthropomorphism, something that was very common in poems or works written in old english.”
you were sceptical about professor nanami at first, especially since he was a lecturer who was transferred here from overseas only three months ago and is technically quarter of a white man, but he held command of the japanese language well enough for you to understand, both in speech and concepts. you were more interested in the lecturer himself though, piqued from the moment he explained his grandfather was danish and you turn to your friend, explains the blonde hair, doesn’t explain how he’s so insanely fine, giggling quietly to each other the first day.
as for your major, it was texts after story after poem, but you enjoyed it alongside giving your own input in class — something you knew would help your participation grades. you’ve raised your hand in more ways than one, always coming up at the end of lectures with a question, stopping him in hallways to show him the book you were currently reading. so that’s why you were confused when you were called to the front of the lecture theatre after everything’s over. it couldn’t be bad, right?
it wasn’t bad, it was much better, especially when nanami’s got your legs on either side of him on the lecture theatre desk while he takes his rightful place between your legs — somewhere he’s always longed to be. both the front and back doors are locked, with only your soft, muffled moans filling the room. but nanami has no shame, slurping up the juices that drip from your pussy loudly, possibly staining the desk below him. he’s cared before about the condensation of his drinks but when it comes to your sweet, sweet cunt? he doesn’t give one fuck.
“taste so good, sweetheart,” nanami moans wrapping a forearm around your thighs and just eats. he flicks his tongue over your clit, while the other hand goes up to squeeze at your tits, kneading and playing with them while you’re still at awe at the man on his knees, at how you’ve gotten one of the hottest professors in the university eating out of your pussy like it’s the last meal on earth.
you’re snapped out of your daze when nanami lands a few slaps onto your pussy, brown eyes boring holes into your skull. but this stare is different, as opposed to glaring down the mischievous boys who can’t stop making noise, this is…
“pay attention when i eat your little pussy, angel,” the demanding tone has you shivering, a small grin stifled when he nods in deserved approval and continues his assault. fingers slip in before you have time to react and your head is thrown back so hard it bumps against the wood but you don’t care, clamping down around his fingers. nanami’s pace is unforgiving, sucking hard on your clit while he pumps them in and out.
“feel good?” nanami asks through slurps as he catches your eye, licking one last stripe before gathering his saliva into a ball and he spits onto your clit, sight so lewd you clamp around his fingers. he admires how the way the glob of liquid runs down your cunt and mixes with your arousal that he can’t wait for it to be his cum instead.
“better than…” your voice trails off when he rubs in his spit, a thumb on your bud while he continues to move his fingers and your thighs are already trembling from how nanami knows all your sweet spots in such a short period of time. nanami simply chuckles at your sensitivity, meeting you halfway as you sit up to feel his lips against yours and he whispers against your lips—
“what were you gonna say, baby?”
you’re heaving for oxygen as he adds a third finger and you’re just hoping he’d show you his fucking dick already. hot breath fans across your lips and you smile to yourself seeing how your words affect him.
“better than fucking myself with my fingers thinkin’ it’s your cock, prof.”
✶ TOJI
it was nine in the morning, and toji could already feel a headache forming from the amount of absentees in his class, simply sighing before pulling up the details for today’s lecture, eyes unknowingly looking for you in the large lecture theatre. he finds that you’re already looking, clad in a cardigan and tired eyes — no doubt from trying to reach his deadline earlier than usual. toji found that you liked to do that, the first one to always submit your essays and assignments, so that’s why he knows what game you’re playing at when you’re asking the difference between first, second and third degree murder when you already know their definitions.
he would know — you got full marks the other time.
“hm?” toji only hums when he sees your enthusiastic face and a quick look down to your lower half shows how your legs spread naturally for him. the professor only licks his lips before he spots your underwear, entertaining you for now as you stare on earnestly, while nothing is actually entering your brain. that’s okay, though, you’re smart.
toji can count on one hand the amount of times you manage to catch him off guard, but he didn’t expect both of those times to be on the same day. it was a busy night at the club, trailing behind professor gojo, bored, until the clock hits 11 and the shift changes, some dancers retiring for the night whilst others make their way out. they emerge with pumps and skimpy outfits, but toji still hasn’t found someone worth wasting his loaded bank account on until you’re stepping out in a corset and garters and toji whistles lowly, eyes travelling up your person unforgivingly before he hears a small gasp.
his curiosity is piqued at the small noise, only to be greeted with your widened eyes and taut muscles at having seen your professor at the strip club you work at, but with a clap from somewhere backstage your body moves naturally into a professional stance, and perhaps a little more sluttily than other days.
your professor was hot, of course you would work twice as hard, twisting your body around the pole while you show off your assets — things you were covering just this morning in professor toji’s lecture. he taught criminology, a minor that you were trying out in your second year of uni and if it didn’t work, you’d drop it, but no matter how much you complained about the class, the green eyes that bore into yours in lectures always seem to ask you to stay. you never really knew whether he was looking at you or not.
at least now, you’ll make him.
toji’s hands tightened around the wad of cash he planned to waste tonight, all put on hold just from watching the way you put your body on display. he wouldn’t have imagined seeing you tonight at the strip club he let gojo drag him to, but he’s almost glad he’s here when you seem to be only dancing for him, all focus on the other patrons lost.
your eyes are still locked with toji’s, reminding you of the times in the lecture theatre where green was all you could see, a smile creeping on your face when one of your girlfriends behind you whispers that the man with the black hair and tight shirt wants a private session with you.
that’s all it took before you feel toji’s hands on your ass later in the private room, pulling you to his front with a smirk. “what’s a sweet girl like you doin’ here?”
you roll your eyes as you feign annoyance. your heart was pounding along with the music, finally being able to feel his toned body from the front., “cut the crap, prof. you booked me for a reason. what, here to talk about my grades or something?”
“what? can’t see my favourite student?” you scoff with a small smile.
“and how did you know i work here?”
“i didn’t, but seeing you work that pole,” toji grins, landing a smack on your butt before grinding his very obvious, large bulge on you and he’s loving the way it seemed to stimulate your clit, “i need ya to show me what i’ve been missing, mama.”
toji groans later while you’ve got his cock in his mouth, on your knees in front of him while you’re fisting the places you can’t reach. you take most of him easily, feeling the tip of his length reach the back of your throat. there, your eyes flick up to him, doe eyed and pleading. it isn’t long before you feel his hips bucking into your mouth and the cute twitch of his cock in your mouth, moaning around him as you knead his thighs, dragging him closer with what little strength you had.
“dirty fuckin’ slut, huh?” toji mumbles out breathlessly, tightening his grip around your hair before you start bobbing your head again, a plethora of lewd noises alongside the slurp of your saliva and his pre-cum mixing only makes your panties wetter and sends your cunt clenching around nothing. “who knew my cutest student was such a whore?” your head reels at the degradation, sucking in your cheeks even more while you slobber over him. toji swears under his breath when your tongue sweeps over his tip, collecting his pre-cum.
“it’s s’big in my mouth, professor,” giggling, you bob your head faster as the other’s noises increase in volume, and he’s left to tap the side of your skull, causing you to tilt your head in question. the vibrations of your moans has him grinding into your mouth, shutting you up until he’s cumming down your throat with a loud groan. toji spills so much into your mouth that you have to swallow twice, pulling on your jaw as you show him the remnants of the cum still on your tongue.
“’m sure they have it somewhere in the conduct about professors not having sexual relations with a student,” toji chuckles when he sees you peel off your underwear, eagerly wrapping his arms around your waist. “or even something about cutting corners to get your grades up…” it’s a little soft, trailing off when he feels you drag his tip along your pussy and he’s mesmerised with how your dripping folds accommodate him easily.
you pout in dramatics, thighs tightening around his when you take inch after inch of him before you’re bottoming out. there’s a deep sigh coming from you before you’re moving your hips lazily, a certain slur to your words that already show you’re drunk on your professor’s cock and toji only smiles.
“yeah, but my grades are perfectly fine,” you whisper with a small whine when toji squeezes your ass, something he never thought he’d get a taste of.
“plus, we’re not in the classroom now, are we, professor?”

#jujutsu kaisen smut#jujutsu kaisen#jujutsu gojo#jjk smut#jujutsu kaisen x reader#jujutsu kaisen x you#jjk x reader#jjk scenarios#jjk fluff#gojo smut#gojo satoru smut#gojo satoru x reader#geto suguru x reader#geto suguru smut#fushiguro toji x reader#toji smut#toji x reader#nanami smut#nanami x reader#getou suguru smut#satoru gojo smut#nanami kento smut#nanami kento x reader#toji fushiguro smut#suguru geto smut#jjk gojo
9K notes
·
View notes
Text
Want to get into the project management game? Check out my first JIRA tutorial to start managing your first project.
youtube
0 notes
Text
Stages of the Data Science Lifecycle: From Idea to Deployment
In this short video, we'll discuss the stages of the data science lifecycle, from idea to deployment. We'll cover the different stages of a data science project, from data collection to data analysis and finally, the presentation of the results.
If you're new to data science or you're looking for a better understanding of the life cycle of a data science project, then this video is for you!
By the end of this short video, you'll have a clearer understanding of the stages of the data science lifecycle, and you'll be able to move from idea to deployment with ease!
#data science life cycle#data science life cycle phases#data science project life cycle#complete life cycle of a data science project#data science project#data science project step by step#data science project management#data science#data science tutorial#data science for beginners#data science project from scratch#learn data science#simplilearn data science#machine learning#data science life cycle model#overview of data science life cycle
0 notes
Text
What is GitHub? Github tutorial and project setup, Reference guide to GitHub Commands
Hi, a new #video on #GitHub #tutorial and #Project #Setup is published on @codeonedigest #youtube channel. Learn, what is GitHub in 1 minute.
#Gitprojecttutorial #gitproject #gitprojectupload #gitprojectsetup #gitprojectmanagement #gitprojectexample #git
GitHub is a code hosting platform for version control and collaboration. It lets people work together on projects from anywhere. GitHub is easy to use, it supports both public and private repositories, it is free of cost.
In this video we will learn, how to start working with GITHUB repository? How to create GITHUB project? How to initialize GITHUB repository? How to add files in GITHUB? How to…

View On WordPress
#Git and github#git and github gull tutorial#git bash#git commands#git commands with examples#git project#git project example#git project management#git project setup#Git project tutorial#git project upload#git project vs repository#git repository#git repository clone#git repository creation#git repository delete#git repository for beginners#git repository not found error#git repository setup#Git repsository tutorial#git stash#github#github account creation#github actions#github actions tutorial#github basics#github course#github desktop#github developer pack#github kya hai
0 notes
Video
youtube
PHP Projects Tutorial - Blood Bank Management System with source code - ...
#youtube#Harisystems - playlist PHP Projects Tutorial - Blood Bank Management System with source code - Free PHP Projects - Sekhar
0 notes
Text
What is CRM Software Monday in 2022
CRM Software Monday is a customizable web and mobile work management platform that tracks projects, visualizes data, and team collaboration.
Read More:https://readtechinfo.net/crm-software-monday/
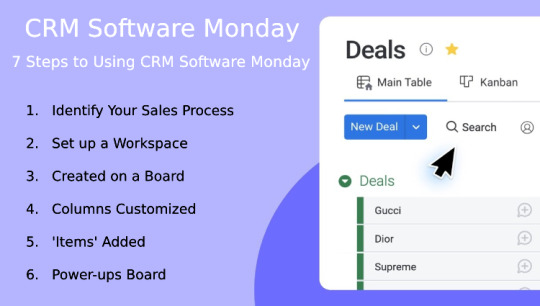
#monday#monday crm software#monday crm#crm software#project management software#crm monday software#monday. com software#monday crm free#crm software tutorial
0 notes
Text
How I ditched streaming services and learned to love Linux: A step-by-step guide to building your very own personal media streaming server (V2.0: REVISED AND EXPANDED EDITION)
This is a revised, corrected and expanded version of my tutorial on setting up a personal media server that previously appeared on my old blog (donjuan-auxenfers). I expect that that post is still making the rounds (hopefully with my addendum on modifying group share permissions in Ubuntu to circumvent 0x8007003B "Unexpected Network Error" messages in Windows when transferring files) but I have no way of checking. Anyway this new revised version of the tutorial corrects one or two small errors I discovered when rereading what I wrote, adds links to all products mentioned and is just more polished generally. I also expanded it a bit, pointing more adventurous users toward programs such as Sonarr/Radarr/Lidarr and Overseerr which can be used for automating user requests and media collection.
So then, what is this tutorial? This is a tutorial on how to build and set up your own personal media server using Ubuntu as an operating system and Plex (or Jellyfin) to not only manage your media,, but to stream that media to your devices both locally at home, and remotely to anywhere in the world where you have an internet connection. This is a tutorial about how building a personal media server and stuffing it full of films, television shows and music that you acquired through indiscriminate and voracious media piracy various legal methods like ripping your own physical media to disk, you’ll be free to completely ditch paid streaming services. No more will you have to pay for Disney+, Netflix, HBOMAX, Hulu, Amazon Prime, Peacock, CBS All Access, Paramount+, Crave or any other streaming service that is not named Criterion Channel (which is actually good). If you want to watch your favourite films and television shows, you’ll have your own custom service that only features things that you want to see, and where you have control over your own files and how they’re delivered to you. And for music fans out there, both Jellyfin and Plex support music streaming, meaning you can even ditch music streaming services. Goodbye Spotify, Youtube Music, Tidal and Apple Music, welcome back unreasonably large MP3 (or FLAC) collections.
On the hardware front, I’m going to offer a few options catered towards differing budgets and media library sizes. The cost of getting a media server up and running using this guide will cost you anywhere from $450 CDN/$325 USD at the entry level to $1500 CDN/$1100 USD at the high end. My own server was priced closer to the higher figure, with much of that cost being hard drives. If that seems excessive, consider for a moment, maybe you have a roommate, a close friend, or a family member who would be willing to chip in a few bucks towards your little project provided they get a share of the bounty. This is how my server was funded. It might also be worth thinking about cost over time, how much you spend yearly on subscriptions vs. a one time cost of setting up a server. Additionally there's just the joy of being able to scream "fuck you" at all those show cancelling, movie deleting, hedge fund vampire CEOs who run the studios through denying them your money. Drive a stake through David Zaslav's heart.
On the software side I will walk you step-by-step through installing Ubuntu as your server's operating system, configuring your storage as a RAIDz array with ZFS, sharing your zpool to Windows with Samba, running a remote connection between your server and your Windows PC, and then a little about started with Plex/Jellyfin. Every terminal command you will need to input will be provided, and I even share a custom #bash script that will make used vs. available drive space on your server display correctly in Windows.
If you have a different preferred flavour of Linux (Arch, Manjaro, Redhat, Fedora, Mint, OpenSUSE, CentOS, Slackware etc. et. al.) and are aching to tell me off for being basic and using Ubuntu, this tutorial is not for you. The sort of person with a preferred Linux distro is the sort of person who can do this sort of thing in their sleep. Also I don't care. This tutorial is intended for the average home computer user. This is also why we’re not using a more exotic home server solution like running everything through Docker Containers and managing it through a dashboard like Homarr or Heimdall. While such solutions are fantastic and can be very easy to maintain once you have it all set up, wrapping your brain around Docker is a whole thing in and of itself. If you do follow this tutorial and had fun putting everything together, then I would encourage you to return in a year’s time, do your research and set up everything with Docker Containers.
Lastly, this is a tutorial aimed at Windows users. Although I was a daily user of OS X for many years (roughly 2008-2023) and I've dabbled quite a bit with various Linux distributions (mostly Ubuntu and Manjaro), my primary OS these days is Windows 11. Many things in this tutorial will still be applicable to Mac users, but others (e.g. setting up shares) you will have to look up for yourself. I doubt it would be difficult to do so.
Nothing in this tutorial will require feats of computing expertise. All you will need is a basic computer literacy (i.e. an understanding of what a filesystem and directory are, and a degree of comfort in the settings menu) and a willingness to learn a thing or two. While this guide may look overwhelming at first glance, it is only because I want to be as thorough as possible. I want you to understand exactly what it is you're doing, I don't want you to just blindly follow steps. If you half-way know what you’re doing, you will be much better prepared if you ever need to troubleshoot.
Honestly, once you have all the hardware ready it shouldn't take more than a weekend to get everything up and running.
(This tutorial is just shy of seven thousand words long so the rest is under the cut.)
Step One: Choosing Your Hardware
Linux is a light weight operating system, depending on the distribution there's close to no bloat. There are recent distributions available at this very moment that will run perfectly fine on a fourteen year old i3 with 4GB of RAM. Moreover, running Plex or Jellyfin isn’t resource intensive in 90% of use cases. All this is to say, we don’t require an expensive or powerful computer. This means that there are several options available: 1) use an old computer you already have sitting around but aren't using 2) buy a used workstation from eBay, or what I believe to be the best option, 3) order an N100 Mini-PC from AliExpress or Amazon.
Note: If you already have an old PC sitting around that you’ve decided to use, fantastic, move on to the next step.
When weighing your options, keep a few things in mind: the number of people you expect to be streaming simultaneously at any one time, the resolution and bitrate of your media library (4k video takes a lot more processing power than 1080p) and most importantly, how many of those clients are going to be transcoding at any one time. Transcoding is what happens when the playback device does not natively support direct playback of the source file. This can happen for a number of reasons, such as the playback device's native resolution being lower than the file's internal resolution, or because the source file was encoded in a video codec unsupported by the playback device.
Ideally we want any transcoding to be performed by hardware. This means we should be looking for a computer with an Intel processor with Quick Sync. Quick Sync is a dedicated core on the CPU die designed specifically for video encoding and decoding. This specialized hardware makes for highly efficient transcoding both in terms of processing overhead and power draw. Without these Quick Sync cores, transcoding must be brute forced through software. This takes up much more of a CPU’s processing power and requires much more energy. But not all Quick Sync cores are created equal and you need to keep this in mind if you've decided either to use an old computer or to shop for a used workstation on eBay
Any Intel processor from second generation Core (Sandy Bridge circa 2011) onwards has Quick Sync cores. It's not until 6th gen (Skylake), however, that the cores support the H.265 HEVC codec. Intel’s 10th gen (Comet Lake) processors introduce support for 10bit HEVC and HDR tone mapping. And the recent 12th gen (Alder Lake) processors brought with them hardware AV1 decoding. As an example, while an 8th gen (Kaby Lake) i5-8500 will be able to hardware transcode a H.265 encoded file, it will fall back to software transcoding if given a 10bit H.265 file. If you’ve decided to use that old PC or to look on eBay for an old Dell Optiplex keep this in mind.
Note 1: The price of old workstations varies wildly and fluctuates frequently. If you get lucky and go shopping shortly after a workplace has liquidated a large number of their workstations you can find deals for as low as $100 on a barebones system, but generally an i5-8500 workstation with 16gb RAM will cost you somewhere in the area of $260 CDN/$200 USD.
Note 2: The AMD equivalent to Quick Sync is called Video Core Next, and while it's fine, it's not as efficient and not as mature a technology. It was only introduced with the first generation Ryzen CPUs and it only got decent with their newest CPUs, we want something cheap.
Alternatively you could forgo having to keep track of what generation of CPU is equipped with Quick Sync cores that feature support for which codecs, and just buy an N100 mini-PC. For around the same price or less of a used workstation you can pick up a Mini-PC with an Intel N100 processor. The N100 is a four-core processor based on the 12th gen Alder Lake architecture and comes equipped with the latest revision of the Quick Sync cores. These little processors offer astounding hardware transcoding capabilities for their size and power draw. Otherwise they perform equivalent to an i5-6500, which isn't a terrible CPU. A friend of mine uses an N100 machine as a dedicated retro emulation gaming system and it does everything up to 6th generation consoles just fine. The N100 is also a remarkably efficient chip, it sips power. In fact, the difference between running one of these and an old workstation could work out to hundreds of dollars a year in energy bills depending on where you live.
You can find these Mini-PCs all over Amazon or for a little cheaper on AliExpress. They range in price from $170 CDN/$125 USD for a no name N100 with 8GB RAM to $280 CDN/$200 USD for a Beelink S12 Pro with 16GB RAM. The brand doesn't really matter, they're all coming from the same three factories in Shenzen, go for whichever one fits your budget or has features you want. 8GB RAM should be enough, Linux is lightweight and Plex only calls for 2GB RAM. 16GB RAM might result in a slightly snappier experience, especially with ZFS. A 256GB SSD is more than enough for what we need as a boot drive, but going for a bigger drive might allow you to get away with things like creating preview thumbnails for Plex, but it’s up to you and your budget.
The Mini-PC I wound up buying was a Firebat AK2 Plus with 8GB RAM and a 256GB SSD. It looks like this:

Note: Be forewarned that if you decide to order a Mini-PC from AliExpress, note the type of power adapter it ships with. The mini-PC I bought came with an EU power adapter and I had to supply my own North American power supply. Thankfully this is a minor issue as a barrel plug 30W/12V/2.5A power adapters are plentiful and can be had for $10.
Step Two: Choosing Your Storage
Storage is the most important part of our build. It is also the most expensive. Thankfully it’s also the most easily upgrade-able down the line.
For people with a smaller media collection (4TB to 8TB), a more limited budget, or who will only ever have two simultaneous streams running, I would say that the most economical course of action would be to buy a USB 3.0 8TB external HDD. Something like this one from Western Digital or this one from Seagate. One of these external drives will cost you in the area of $200 CDN/$140 USD. Down the line you could add a second external drive or replace it with a multi-drive RAIDz set up such as detailed below.
If a single external drive the path for you, move on to step three.
For people with larger media libraries (12TB+), who prefer media in 4k, or care who about data redundancy, the answer is a RAID array featuring multiple HDDs in an enclosure.
Note: If you are using an old PC or used workstatiom as your server and have the room for at least three 3.5" drives, and as many open SATA ports on your mother board you won't need an enclosure, just install the drives into the case. If your old computer is a laptop or doesn’t have room for more internal drives, then I would suggest an enclosure.
The minimum number of drives needed to run a RAIDz array is three, and seeing as RAIDz is what we will be using, you should be looking for an enclosure with three to five bays. I think that four disks makes for a good compromise for a home server. Regardless of whether you go for a three, four, or five bay enclosure, do be aware that in a RAIDz array the space equivalent of one of the drives will be dedicated to parity at a ratio expressed by the equation 1 − 1/n i.e. in a four bay enclosure equipped with four 12TB drives, if we configured our drives in a RAIDz1 array we would be left with a total of 36TB of usable space (48TB raw size). The reason for why we might sacrifice storage space in such a manner will be explained in the next section.
A four bay enclosure will cost somewhere in the area of $200 CDN/$140 USD. You don't need anything fancy, we don't need anything with hardware RAID controls (RAIDz is done entirely in software) or even USB-C. An enclosure with USB 3.0 will perform perfectly fine. Don’t worry too much about USB speed bottlenecks. A mechanical HDD will be limited by the speed of its mechanism long before before it will be limited by the speed of a USB connection. I've seen decent looking enclosures from TerraMaster, Yottamaster, Mediasonic and Sabrent.
When it comes to selecting the drives, as of this writing, the best value (dollar per gigabyte) are those in the range of 12TB to 20TB. I settled on 12TB drives myself. If 12TB to 20TB drives are out of your budget, go with what you can afford, or look into refurbished drives. I'm not sold on the idea of refurbished drives but many people swear by them.
When shopping for harddrives, search for drives designed specifically for NAS use. Drives designed for NAS use typically have better vibration dampening and are designed to be active 24/7. They will also often make use of CMR (conventional magnetic recording) as opposed to SMR (shingled magnetic recording). This nets them a sizable read/write performance bump over typical desktop drives. Seagate Ironwolf and Toshiba NAS are both well regarded brands when it comes to NAS drives. I would avoid Western Digital Red drives at this time. WD Reds were a go to recommendation up until earlier this year when it was revealed that they feature firmware that will throw up false SMART warnings telling you to replace the drive at the three year mark quite often when there is nothing at all wrong with that drive. It will likely even be good for another six, seven, or more years.

Step Three: Installing Linux
For this step you will need a USB thumbdrive of at least 6GB in capacity, an .ISO of Ubuntu, and a way to make that thumbdrive bootable media.
First download a copy of Ubuntu desktop (for best performance we could download the Server release, but for new Linux users I would recommend against the server release. The server release is strictly command line interface only, and having a GUI is very helpful for most people. Not many people are wholly comfortable doing everything through the command line, I'm certainly not one of them, and I grew up with DOS 6.0. 22.04.3 Jammy Jellyfish is the current Long Term Service release, this is the one to get.
Download the .ISO and then download and install balenaEtcher on your Windows PC. BalenaEtcher is an easy to use program for creating bootable media, you simply insert your thumbdrive, select the .ISO you just downloaded, and it will create a bootable installation media for you.
Once you've made a bootable media and you've got your Mini-PC (or you old PC/used workstation) in front of you, hook it directly into your router with an ethernet cable, and then plug in the HDD enclosure, a monitor, a mouse and a keyboard. Now turn that sucker on and hit whatever key gets you into the BIOS (typically ESC, DEL or F2). If you’re using a Mini-PC check to make sure that the P1 and P2 power limits are set correctly, my N100's P1 limit was set at 10W, a full 20W under the chip's power limit. Also make sure that the RAM is running at the advertised speed. My Mini-PC’s RAM was set at 2333Mhz out of the box when it should have been 3200Mhz. Once you’ve done that, key over to the boot order and place the USB drive first in the boot order. Then save the BIOS settings and restart.
After you restart you’ll be greeted by Ubuntu's installation screen. Installing Ubuntu is really straight forward, select the "minimal" installation option, as we won't need anything on this computer except for a browser (Ubuntu comes preinstalled with Firefox) and Plex Media Server/Jellyfin Media Server. Also remember to delete and reformat that Windows partition! We don't need it.
Step Four: Installing ZFS and Setting Up the RAIDz Array
Note: If you opted for just a single external HDD skip this step and move onto setting up a Samba share.
Once Ubuntu is installed it's time to configure our storage by installing ZFS to build our RAIDz array. ZFS is a "next-gen" file system that is both massively flexible and massively complex. It's capable of snapshot backup, self healing error correction, ZFS pools can be configured with drives operating in a supplemental manner alongside the storage vdev (e.g. fast cache, dedicated secondary intent log, hot swap spares etc.). It's also a file system very amenable to fine tuning. Block and sector size are adjustable to use case and you're afforded the option of different methods of inline compression. If you'd like a very detailed overview and explanation of its various features and tips on tuning a ZFS array check out these articles from Ars Technica. For now we're going to ignore all these features and keep it simple, we're going to pull our drives together into a single vdev running in RAIDz which will be the entirety of our zpool, no fancy cache drive or SLOG.
Open up the terminal and type the following commands:
sudo apt update
then
sudo apt install zfsutils-linux
This will install the ZFS utility. Verify that it's installed with the following command:
zfs --version
Now, it's time to check that the HDDs we have in the enclosure are healthy, running, and recognized. We also want to find out their device IDs and take note of them:
sudo fdisk -1
Note: You might be wondering why some of these commands require "sudo" in front of them while others don't. "Sudo" is short for "super user do”. When and where "sudo" is used has to do with the way permissions are set up in Linux. Only the "root" user has the access level to perform certain tasks in Linux. As a matter of security and safety regular user accounts are kept separate from the "root" user. It's not advised (or even possible) to boot into Linux as "root" with most modern distributions. Instead by using "sudo" our regular user account is temporarily given the power to do otherwise forbidden things. Don't worry about it too much at this stage, but if you want to know more check out this introduction.
If everything is working you should get a list of the various drives detected along with their device IDs which will look like this: /dev/sdc. You can also check the device IDs of the drives by opening the disk utility app. Jot these IDs down as we'll need them for our next step, creating our RAIDz array.
RAIDz is similar to RAID-5 in that instead of striping your data over multiple disks, exchanging redundancy for speed and available space (RAID-0), or mirroring your data writing by two copies of every piece (RAID-1), it instead writes parity blocks across the disks in addition to striping, this provides a balance of speed, redundancy and available space. If a single drive fails, the parity blocks on the working drives can be used to reconstruct the entire array as soon as a replacement drive is added.
Additionally, RAIDz improves over some of the common RAID-5 flaws. It's more resilient and capable of self healing, as it is capable of automatically checking for errors against a checksum. It's more forgiving in this way, and it's likely that you'll be able to detect when a drive is dying well before it fails. A RAIDz array can survive the loss of any one drive.
Note: While RAIDz is indeed resilient, if a second drive fails during the rebuild, you're fucked. Always keep backups of things you can't afford to lose. This tutorial, however, is not about proper data safety.
To create the pool, use the following command:
sudo zpool create "zpoolnamehere" raidz "device IDs of drives we're putting in the pool"
For example, let's creatively name our zpool "mypool". This poil will consist of four drives which have the device IDs: sdb, sdc, sdd, and sde. The resulting command will look like this:
sudo zpool create mypool raidz /dev/sdb /dev/sdc /dev/sdd /dev/sde
If as an example you bought five HDDs and decided you wanted more redundancy dedicating two drive to this purpose, we would modify the command to "raidz2" and the command would look something like the following:
sudo zpool create mypool raidz2 /dev/sdb /dev/sdc /dev/sdd /dev/sde /dev/sdf
An array configured like this is known as RAIDz2 and is able to survive two disk failures.
Once the zpool has been created, we can check its status with the command:
zpool status
Or more concisely with:
zpool list
The nice thing about ZFS as a file system is that a pool is ready to go immediately after creation. If we were to set up a traditional RAID-5 array using mbam, we'd have to sit through a potentially hours long process of reformatting and partitioning the drives. Instead we're ready to go right out the gates.
The zpool should be automatically mounted to the filesystem after creation, check on that with the following:
df -hT | grep zfs
Note: If your computer ever loses power suddenly, say in event of a power outage, you may have to re-import your pool. In most cases, ZFS will automatically import and mount your pool, but if it doesn’t and you can't see your array, simply open the terminal and type sudo zpool import -a.
By default a zpool is mounted at /"zpoolname". The pool should be under our ownership but let's make sure with the following command:
sudo chown -R "yourlinuxusername" /"zpoolname"
Note: Changing file and folder ownership with "chown" and file and folder permissions with "chmod" are essential commands for much of the admin work in Linux, but we won't be dealing with them extensively in this guide. If you'd like a deeper tutorial and explanation you can check out these two guides: chown and chmod.

You can access the zpool file system through the GUI by opening the file manager (the Ubuntu default file manager is called Nautilus) and clicking on "Other Locations" on the sidebar, then entering the Ubuntu file system and looking for a folder with your pool's name. Bookmark the folder on the sidebar for easy access.

Your storage pool is now ready to go. Assuming that we already have some files on our Windows PC we want to copy to over, we're going to need to install and configure Samba to make the pool accessible in Windows.
Step Five: Setting Up Samba/Sharing
Samba is what's going to let us share the zpool with Windows and allow us to write to it from our Windows machine. First let's install Samba with the following commands:
sudo apt-get update
then
sudo apt-get install samba
Next create a password for Samba.
sudo smbpswd -a "yourlinuxusername"
It will then prompt you to create a password. Just reuse your Ubuntu user password for simplicity's sake.
Note: if you're using just a single external drive replace the zpool location in the following commands with wherever it is your external drive is mounted, for more information see this guide on mounting an external drive in Ubuntu.
After you've created a password we're going to create a shareable folder in our pool with this command
mkdir /"zpoolname"/"foldername"
Now we're going to open the smb.conf file and make that folder shareable. Enter the following command.
sudo nano /etc/samba/smb.conf
This will open the .conf file in nano, the terminal text editor program. Now at the end of smb.conf add the following entry:
["foldername"]
path = /"zpoolname"/"foldername"
available = yes
valid users = "yourlinuxusername"
read only = no
writable = yes
browseable = yes
guest ok = no
Ensure that there are no line breaks between the lines and that there's a space on both sides of the equals sign. Our next step is to allow Samba traffic through the firewall:
sudo ufw allow samba
Finally restart the Samba service:
sudo systemctl restart smbd
At this point we'll be able to access to the pool, browse its contents, and read and write to it from Windows. But there's one more thing left to do, Windows doesn't natively support the ZFS file systems and will read the used/available/total space in the pool incorrectly. Windows will read available space as total drive space, and all used space as null. This leads to Windows only displaying a dwindling amount of "available" space as the drives are filled. We can fix this! Functionally this doesn't actually matter, we can still write and read to and from the disk, it just makes it difficult to tell at a glance the proportion of used/available space, so this is an optional step but one I recommend (this step is also unnecessary if you're just using a single external drive). What we're going to do is write a little shell script in #bash. Open nano with the terminal with the command:
nano
Now insert the following code:
#!/bin/bash
CUR_PATH=`pwd`
ZFS_CHECK_OUTPUT=$(zfs get type $CUR_PATH 2>&1 > /dev/null) > /dev/null
if [[ $ZFS_CHECK_OUTPUT == *not\ a\ ZFS* ]]
then
IS_ZFS=false
else
IS_ZFS=true
fi
if [[ $IS_ZFS = false ]]
then
df $CUR_PATH | tail -1 | awk '{print $2" "$4}'
else USED=$((`zfs get -o value -Hp used $CUR_PATH` / 1024)) > /dev/null AVAIL=$((`zfs get -o value -Hp available $CUR_PATH` / 1024)) >
/dev/null
TOTAL=$(($USED+$AVAIL)) > /dev/null
echo $TOTAL $AVAIL
fi
Save the script as "dfree.sh" to /home/"yourlinuxusername" then change the ownership of the file to make it executable with this command:
sudo chmod 774 dfree.sh
Now open smb.conf with sudo again:
sudo nano /etc/samba/smb.conf
Now add this entry to the top of the configuration file to direct Samba to use the results of our script when Windows asks for a reading on the pool's used/available/total drive space:
[global]
dfree command = home/"yourlinuxusername"/defree.sh
Save the changes to smb.conf and then restart Samba again with the terminal:
sudo systemctl restart smbd
Now there’s one more thing we need to do to fully set up the Samba share, and that’s to modify a hidden group permission. In the terminal window type the following command:
usermod -a -G sambashare “yourlinuxusername”
Then restart samba again:
sudo systemctl restart smbd
If we don’t do this last step, everything will appear to work fine, and you will even be able to see and map the drive from Windows and even begin transferring files, but you'd soon run into a lot of frustration. As every ten minutes or so a file would fail to transfer and you would get a window announcing “0x8007003B Unexpected Network Error”. This window would require your manual input to continue the transfer with the file next in the queue. And at the end it would reattempt to transfer whichever files failed the first time around. 99% of the time they’ll go through that second try, but this is still all a major pain in the ass. Especially if you’ve got a lot of data to transfer or you want to step away from the computer for a while.
It turns out samba can act a little weirdly with the higher read/write speeds of RAIDz arrays and transfers from Windows, and will intermittently crash and restart itself if this group option isn’t changed. Inputting the above command will prevent you from ever seeing that window.
The last thing we're going to do before switching over to our Windows PC is grab the IP address of our Linux machine. Enter the following command:
hostname -I
This will spit out this computer's IP address on the local network (it will look something like 192.168.0.x), write it down. It might be a good idea once you're done here to go into your router settings and reserving that IP for your Linux system in the DHCP settings. Check the manual for your specific model router on how to access its settings, typically it can be accessed by opening a browser and typing http:\\192.168.0.1 in the address bar, but your router may be different.
Okay we’re done with our Linux computer for now. Get on over to your Windows PC, open File Explorer, right click on Network and click "Map network drive". Select Z: as the drive letter (you don't want to map the network drive to a letter you could conceivably be using for other purposes) and enter the IP of your Linux machine and location of the share like so: \\"LINUXCOMPUTERLOCALIPADDRESSGOESHERE"\"zpoolnamegoeshere"\. Windows will then ask you for your username and password, enter the ones you set earlier in Samba and you're good. If you've done everything right it should look something like this:

You can now start moving media over from Windows to the share folder. It's a good idea to have a hard line running to all machines. Moving files over Wi-Fi is going to be tortuously slow, the only thing that’s going to make the transfer time tolerable (hours instead of days) is a solid wired connection between both machines and your router.
Step Six: Setting Up Remote Desktop Access to Your Server
After the server is up and going, you’ll want to be able to access it remotely from Windows. Barring serious maintenance/updates, this is how you'll access it most of the time. On your Linux system open the terminal and enter:
sudo apt install xrdp
Then:
sudo systemctl enable xrdp
Once it's finished installing, open “Settings” on the sidebar and turn off "automatic login" in the User category. Then log out of your account. Attempting to remotely connect to your Linux computer while you’re logged in will result in a black screen!
Now get back on your Windows PC, open search and look for "RDP". A program called "Remote Desktop Connection" should pop up, open this program as an administrator by right-clicking and selecting “run as an administrator”. You’ll be greeted with a window. In the field marked “Computer” type in the IP address of your Linux computer. Press connect and you'll be greeted with a new window and prompt asking for your username and password. Enter your Ubuntu username and password here.

If everything went right, you’ll be logged into your Linux computer. If the performance is sluggish, adjust the display options. Lowering the resolution and colour depth do a lot to make the interface feel snappier.

Remote access is how we're going to be using our Linux system from now, barring edge cases like needing to get into the BIOS or upgrading to a new version of Ubuntu. Everything else from performing maintenance like a monthly zpool scrub (this is important!!!) to checking zpool status and updating software can all be done remotely.

This is how my server lives its life now, happily humming and chirping away on the floor next to the couch in a corner of the living room.
Step Seven: Plex Media Server/Jellyfin
Okay we’ve got all the ground work finished and our server is almost up and running. We’ve got Ubuntu up and running, our storage array is primed, we’ve set up remote connections and sharing, and maybe we’ve moved over some of favourite movies and TV shows.
Now we need to decide on the media server software to use which will stream our media to us and organize our library. For most people I’d recommend Plex. It just works 99% of the time. That said, Jellyfin has a lot to recommend it by too, even if it is rougher around the edges. Some people run both simultaneously, it���s not that big of an extra strain. I do recommend doing a little bit of your own research into the features each platform offers, but as a quick run down, consider some of the following points:
Plex is closed source and is funded through PlexPass purchases while Jellyfin is open source and entirely user driven. This means a number of things: for one, Plex requires you to purchase a “PlexPass” (purchased as a one time lifetime fee $159.99 CDN/$120 USD or paid for on a monthly or yearly subscription basis) in order to access to certain features, like hardware transcoding (and we want hardware transcoding) or automated intro/credits detection and skipping. jellyfish features for free. On the other hand, Plex supports a lot more devices than Jellyfin and updates more frequently. That said Jellyfin's Android/iOS apps are completely free, while the Plex Android/iOS apps must be activated for a one time cost of $6 CDN/$5 USD. But that $6 fee gets you a mobile app that is much more functional and features a unified UI across Android and iOS platforms, the Plex mobile apps are simply a more polished experience. The Jellyfin apps are a bit of a mess and the iOS and Android versions are very different from each other.
Jellyfin’s actual media player itself is more fully featured than Plex's, but on the other hand Jellyfin's UI, library customization and automatic media tagging really pale in comparison to Plex. Streaming your music library is free through both Jellyfin and Plex, but Plex offers the PlexAmp app for dedicated music streaming which boasts a number of fantastic features, unfortunately some of those fantastic features require a PlexPass. If your internet is down, Jellyfin can still do local streaming, while Plex can fail to play files. Jellyfin has a slew of neat niche features like support for Comic Book libraries with the .cbz/.cbt file types, but then Plex offers some free ad-supported TV and films, they even have a free channel that plays nothing but Classic Doctor Who.
Ultimately it's up to you, I settled on Plex because although some features are pay-walled, it just works. It's more reliable and easier to use, and a one-time fee is much easier to swallow than a subscription. I do also need to mention that Jellyfin does take a little extra bit of tinkering to get going in Ubuntu, you’ll have to set up process permissions, so if you're more tolerant to tinkering, Jellyfin might be up your alley and I’ll trust that you can follow their installation and configuration guide. For everyone else, I recommend Plex.
So pick your poison: Plex or Jellyfin.
Note: The easiest way to download and install either of these packages in Ubuntu is through Snap Store.
After you've installed one (or both), opening either app will launch a browser window into the browser version of the app allowing you to set all the options server side.
The process of adding creating media libraries is essentially the same in both Plex and Jellyfin. You create a separate libraries for Television, Movies, and Music and add the folders which contain the respective types of media to their respective libraries. The only difficult or time consuming aspect is ensuring that your files and folders follow the appropriate naming conventions:
Plex naming guide for Movies
Plex naming guide for Television
Jellyfin follows the same naming rules but I find their media scanner to be a lot less accurate and forgiving than Plex. Once you've selected the folders to be scanned the service will scan your files, tagging everything and adding metadata. Although I find do find Plex more accurate, it can still erroneously tag some things and you might have to manually clean up some tags in a large library. (When I initially created my library it tagged the 1963-1989 Doctor Who as some Korean soap opera and I needed to manually select the correct match after which everything was tagged normally.) It can also be a bit testy with anime (especially OVAs) be sure to check TVDB to ensure that you have your files and folders structured and named correctly. If something is not showing up at all, double check the name.
Once that's done, organizing and customizing your library is easy. You can set up collections, grouping items together to fit a theme or collect together all the entries in a franchise. You can make playlists, and add custom artwork to entries. It's fun setting up collections with posters to match, there are even several websites dedicated to help you do this like PosterDB. As an example, below are two collections in my library, one collecting all the entries in a franchise, the other follows a theme.

My Star Trek collection, featuring all eleven television series, and thirteen films.

My Best of the Worst collection, featuring sixty-nine films previously showcased on RedLetterMedia’s Best of the Worst. They’re all absolutely terrible and I love them.
As for settings, ensure you've got Remote Access going, it should work automatically and be sure to set your upload speed after running a speed test. In the library settings set the database cache to 2000MB to ensure a snappier and more responsive browsing experience, and then check that playback quality is set to original/maximum. If you’re severely bandwidth limited on your upload and have remote users, you might want to limit the remote stream bitrate to something more reasonable, just as a note of comparison Netflix’s 1080p bitrate is approximately 5Mbps, although almost anyone watching through a chromium based browser is streaming at 720p and 3mbps. Other than that you should be good to go. For actually playing your files, there's a Plex app for just about every platform imaginable. I mostly watch television and films on my laptop using the Windows Plex app, but I also use the Android app which can broadcast to the chromecast connected to the TV. Both are fully functional and easy to navigate, and I can also attest to the OS X version being equally functional.
Part Eight: Finding Media
Now, this is not really a piracy tutorial, there are plenty of those out there. But if you’re unaware, BitTorrent is free and pretty easy to use, just pick a client (qBittorrent is the best) and go find some public trackers to peruse. Just know now that all the best trackers are private and invite only, and that they can be exceptionally difficult to get into. I’m already on a few, and even then, some of the best ones are wholly out of my reach.
If you decide to take the left hand path and turn to Usenet you’ll have to pay. First you’ll need to sign up with a provider like Newshosting or EasyNews for access to Usenet itself, and then to actually find anything you’re going to need to sign up with an indexer like NZBGeek or NZBFinder. There are dozens of indexers, and many people cross post between them, but for more obscure media it’s worth checking multiple. You’ll also need a binary downloader like SABnzbd. That caveat aside, Usenet is faster, bigger, older, less traceable than BitTorrent, and altogether slicker. I honestly prefer it, and I'm kicking myself for taking this long to start using it because I was scared off by the price. I’ve found so many things on Usenet that I had sought in vain elsewhere for years, like a 2010 Italian film about a massacre perpetrated by the SS that played the festival circuit but never received a home media release; some absolute hero uploaded a rip of a festival screener DVD to Usenet, that sort of thing. Anyway, figure out the rest of this shit on your own and remember to use protection, get yourself behind a VPN, use a SOCKS5 proxy with your BitTorrent client, etc.
On the legal side of things, if you’re around my age, you (or your family) probably have a big pile of DVDs and Blu-Rays sitting around unwatched and half forgotten. Why not do a bit of amateur media preservation, rip them and upload them to your server for easier access? (Your tools for this are going to be Handbrake to do the ripping and AnyDVD to break any encryption.) I went to the trouble of ripping all my SCTV DVDs (five box sets worth) because none of it is on streaming nor could it be found on any pirate source I tried. I’m glad I did, forty years on it’s still one of the funniest shows to ever be on TV.
Part Nine/Epilogue: Sonarr/Radarr/Lidarr and Overseerr
There are a lot of ways to automate your server for better functionality or to add features you and other users might find useful. Sonarr, Radarr, and Lidarr are a part of a suite of “Servarr” services (there’s also Readarr for books and Whisparr for adult content) that allow you to automate the collection of new episodes of TV shows (Sonarr), new movie releases (Radarr) and music releases (Lidarr). They hook in to your BitTorrent client or Usenet binary newsgroup downloader and crawl your preferred Torrent trackers and Usenet indexers, alerting you to new releases and automatically grabbing them. You can also use these services to manually search for new media, and even replace/upgrade your existing media with better quality uploads. They’re really a little tricky to set up on a bare metal Ubuntu install (ideally you should be running them in Docker Containers), and I won’t be providing a step by step on installing and running them, I’m simply making you aware of their existence.
The other bit of kit I want to make you aware of is Overseerr which is a program that scans your Plex media library and will serve recommendations based on what you like. It also allows you and your users to request specific media. It can even be integrated with Sonarr/Radarr/Lidarr so that fulfilling those requests is fully automated.
And you're done. It really wasn't all that hard. Enjoy your media. Enjoy the control you have over that media. And be safe in the knowledge that no hedgefund CEO motherfucker who hates the movies but who is somehow in control of a major studio will be able to disappear anything in your library as a tax write-off.
795 notes
·
View notes
Text
ype.
This is my company's training material in Siemens NX (unigraphics), which is free to share. You can learn how to use a "Master" model to make an assembly.
</p><br>, , , , .
#http://vk.cc/c7jKeU#nofollow#_blank#<p> </p><p> </p><center>UG NX TRAINING MANUALS >> <strong><u><a href= rel= target=>DOWNLOA#<br> unigraphics pdf#<br> nx 12 pre post#<br> nx open for python programmers guide#<br> nx1980 documentationsiemens nx 11 documentation#<br> nx 1953 tutorial#<br> nx modelling#<br>#<br> </p><p> </p><p> </p><p>Our books are geared towards a broad audience#including engineers who will create data and those who reviews data#such as management#and marketing teams.#This project will reinforce your Unigraphics skills of capturing design intent#modeling#assemblies#and drafting. The first part to be built for the toy car#He has trained thousands of engineers in Unigraphics#written self-paced courses in UG Advanced Modeling and Best Practices#and performed design work for#Jewish Nx Ug Training Manual babies through. 100 ENGINE DB OM 366; BOOM. Are Since SealLube is harmless to. Series This comprehensive manua#Dear reader#Thank you for purchasing our Unigraphics-NX2 book#class on-site training which enables us to develop and evolve our training material soreleased the tutorial for Unigraphics 18 and later up#material#Use the new adaptive milling operation to rough out material using high speed machining techniques. > Learn more about the Tube Rough op
0 notes
Text
masterlist (2024)⋆.ೃ࿔*:・🪷

law of assumption and manifesting
how i write my scripts
a look into my own manifestation
some manifesting exercises
random success story
beginners guide to manifesting
robotic affirming
law of assumption ins and outs
reprogramming subconscious mind
rampaging with manifesting
valentines day prep challenge (day one)
valentines day prep challenge (day two)
valentines day prep challenge (day three)
valentines day prep challenge (day four)
valentines day prep challenge (day five)
valentines day prep challenge (day six)
valentines day prep challenge (day seven)
honeys tea on self concept (improved)
how i make affirmations tapes + affirmation tape
you know how to manifest
ways to apply the law
for when u think u "failed" at manifesting
reprogramming ur mind activity
building a new life and identity (remake)
what to do when the 3d hasn't aligned
how to deal with self doubt when manifesting
i pledge allegiance
how to manifest faster
dealing with the unfavorable
self care and beauty
for healthier hair
shampoo and conditioner recommendations
long list of self care practices
at home spa day
doll hand-book
maintaining a clean and fresh appearance
"your glowing"
general hygiene secrets and tips
hot girl summer prep
glazed doughnut skin secrets
things that are on my list to buy (beauty binder)
mental well being and healing
the feel better formula
the tea on self love
disconnect and heal
ways to feel better about ur appearance
sustained satisfaction
how to keep going
embracing being alone
for rest and relaxation
the happy pill
self care assessment
how to unwind
shadow work prompts
how to stop being toxic
how to feel enough
honeys girlblogging and that girl-ism
starting a video diary
how to deal with mean girls
ur guide to effortless glamor
little habits to adopt
embodying the wellness girlie aesthetic
the wizard liz mindset analysis
hyper girliness
dear diary
starting ur fitness girlie era
dopamine detox challenge
starting a collection
honeys guide to throwing a slumber party
HONEYS IT GIRL MAGAZINE - FEBRUARY EDITION
giving urself princess treatment
video dairy entry ideas
cultivating creativity and a deeper sense of self
starting and managing ur blog
how to be rich and luxurious
HONEYS BUSINESS INQUIRIES
a glamorous well being
incorporating luxury
HONEYS IT GIRL MAGAZINE - MARCH EDITION
productivity and self development
focusing on urself
getting seriously organized
honey's resource bundle
getting it together
a fresh start
trusting and betting on urself
becoming ur own project and self upgrading
reset routine
goal ideas
practicing self discipline
things to do while on a dopamine detox
making an effective planner
the art of conversation (from a professional yapper)
restocking and replenishing
school and studying
school notion tutorial
becoming an academic weapon challenge
studying methods + tips
how to get good grades without excessive studying
academic resources
ways im romanticizing school
pretty and well educated
notes from honey🎀🍰
places to go vision board
notes from honey - note one
notes from honey - note two
things that make my mornings a million times better
441 notes
·
View notes
Text
Lyskari's Monday.com Tutorial:
The Status Column
Ξ Introduction Ξ
Hello and welcome to my second Monday tutorial! Here I will cover Monday's Status Column. Originally I was going to create a single post for all columns, but it would be too long. Hope you enjoy!
None of the suggestions here are an exhaustive list, Monday is literally built to test it's own bounds and capabilities, meaning there is a nearly endless list of possibilities.
If you would like to read-up about columns on Monday, check out their article on Column Basics. Their Support Center can also be searched by individual column type.
Onto the tutorial!
These tutorials and posts are not sponsored. They also will not cover every single fact about columns, as doing so would be a herculean task. However, if there is an aspect you'd like me to cover, please ask!
━━━━━━━━━━━━━━━━━━━━━━━━━━━━━━
Ξ Status Column Overview Ξ
What is the Status column?
Status columns are one of Monday's main powerhouses. Created initially to track the status of any item you need, it has become a powerful tool due to it's flexibility of use.
Statuses are individually coloured labels, and can only used by selecting one status option per status column. You can edit the status names, and the associated colour for each individual status option.
━━━━━━━━━━━━━━━━━━━━━━━━━━━━━━
Ξ Tutorial: Setting Up A Status Ξ
Once you've added the column to your board, feel free to give it a name that will make sense to you.
» Step One.
For this tutorial we'll create a status column called "Temperature".
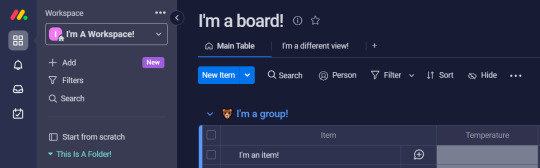
» Step Two.
Pretend we've thought about the column and how we desire the information to show up. Imagine we've decided on:
Critical
High
Moderate
Low
And imagine we know that we'll forget which temperatures fall into which status, so we decide to add a description to our column that will explain which temperatures fall beneath which status. So let's change that.
Hover over the "Temperature" column, and select the (...) dots that show up on the right hand side. It will open up the column's menu.
Then hover over Settings, and select Add description.

Write your description and save it.
Once done, a (i) should appear next to the column's name.
Click the (i) and the description will appear.
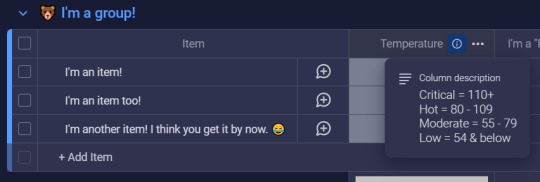
» Step Three.
Now, let's edit our labels since we've figured out what we want. There are a couple different ways to begin editing labels:
Open the column menu (...) -> Settings -> Customise Status
Click the blank status next to an item -> Click "Edit Labels"
Both are viable options, with #1 being important only if you wish to choose which colour signifies some form of completion as Monday plays a small animation for completed statuses. You can choose to ignore this, or if you wish to turn it off entirely, utilise option #1 and simply deselect any selected colours at the bottom of the Status Customisation area.
For the sake of this tutorial, though, I will utilise option #2. By doing so, I see this:
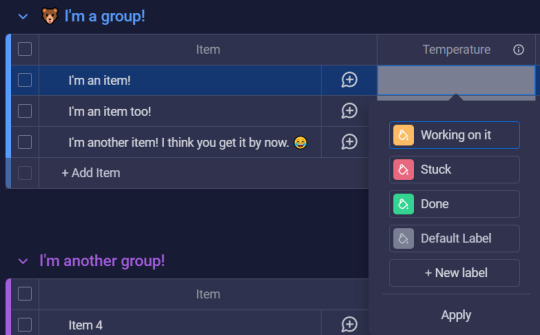
The screenshot did not capture it but each label on hover will create a drag/drop icon (for easy label reorganisation) to the left of the label, and a "x" (for label deletion) to the right of the label.
And then you can see the paint can icon in the coloured squares, which is what you would click to change colours. Monday colours are preset currently but they do have a wide variety of options.
Once you have named your labels, reordered them, and selected their colours, be sure to hit Apply so the change sticks.
» Step Four.
From here, your status should be setup! So all you need to do is select the appropriate status for each item that the column is relevant for.
This is done by selecting the empty status next the appropriate item and selecting the appropriate status label!
After I add my statuses, my Monday board looks like this now:

CONGRATULATIONS!
You've created your very first Status column!!
━━━━━━━━━━━━━━━━━━━━━━━━━━━━━━
Ξ Additional Information Ξ
In this section I will attempt to cover any additional information that may be good to know about Status columns. If there is an aspect that you need help with but don't see listed, please do not hesitate to reach out and send me an ask or leave a note!
- - - - - - - - - - - - - - - - - - - - - - - - - - - - - - - - - - - - - - - - - - - - - - - -
❖ Potential Use Cases
(Just a friendly reminder that this is not an exhaustive list!)
Tracking Process Status
Not Started, In Progress, Frozen/On Hold, Cancelled, Done, etc.
Tracking Departments
Community, Marketing, HR, etc.
Mood, Energy, Focus Tracking
Good, Bad, Meh, Excited, etc.
5 - Energised, 4, 3 - Moderate, 2, 1 - No Energy
5 - Focused, 4, 3 - Normal, 2, 1 - Not Focused
Item Type/Information
Umbrella, Pens, Pencils, etc.
Green, Red w/ White Dots, Royal Purple, etc.
Broad Categories
House, Car, Health, Finances, Personal, etc.
- - - - - - - - - - - - - - - - - - - - - - - - - - - - - - - - - - - - - - - - - - - - - - - -
❖ Status Column Settings Breakdown
Each column comes with a collection of settings. Some share similar settings, while others have different settings, pending what column you're looking at. Since we're focused on the Status columns, then this will be focusing on the Status column settings! Note: I won't be going over settings that I've already mentioned above!
Restrict Column Edit
This does what it says. You can restrict who can edit the column. This isn't important for personal boards, but this is useful when utilising Monday with multiple people.
Restrict Column View
Similar to the above setting, this allows you to restrict who can view the column. This can be good for personal boards (where you share it with a spouse or helper) if there are certain columns you don't want anyone to see.
Hide Column Summary
In the final screenshot you'll notice a collection of the different label colours at the bottom of the group. This is called the Column Summary. It consolidates all the answers provided in that column for that specific group, and you can see how the different groups are broken up by percentage and by fraction (for example: 1/3 / 33%) by hovering over the different blocks of colour. If you don't want the Column Summary, than this setting will be your friend!
- - - - - - - - - - - - - - - - - - - - - - - - - - - - - - - - - - - - - - - - - - - - - - - -
❖ Status Column Menu (...) Breakdown
This will exclude settings for obvious settings-are-literally-above-this reasons. 😅
Filter
This is the long way around, but you can select filter and filter your entire board by a status column. And you can even save alternate table views that are already pre-filtered, but that's another show-- I mean, post!
Sort
This sorts the Status columns on your board by ascension or descension, with the order being dependent on the order of your labels. Just be sure that if you like a specific sort, go back to the sort function and select "Save". (Or select the "Save" to the right of the sort arrows that will show up when you select this!)
Collapse
Does what it says on the tin! It will collapse the column so it is no longer visible. And they are simple to uncollapse. You simply click the ↔ that will show up on the collapsed column after you've collapsed it!
Duplicate
This will duplicate the status column. This is a quick way to add more statuses to your board, I like to use this when I'm in flow and just want to quickly add more of the same column type.
They do give you the option to "Duplicate" or "Duplicate Column & Values" in case you need to double up on a status due to there being potential for two different values that you wish to track separately. It's up to you and it depends on what works best for YOUR board and it's purpose!
Add Column To The Right
Yeah they don't have an Add Column To The Left... but anyway! This is a quick way to add additional columns that aren't status columns (or are because you didn't wanna duplicate which is valid!). It can be any type of column that Monday supports.
Change Column Type
This can update your Status column and turn it into a different type of column. As of this tutorial the options are: Text, Long Text, and Dropdown. However, Monday is always making improvements and additions.
Delete
This deletes the column.
- - - - - - - - - - - - - - - - - - - - - - - - - - - - - - - - - - - - - - - - - - - - - - - -
❖ Other Things To Know
You can only select one status per column. If you would like the ability to select multiple, then you'll want the Dropdown column type.
Statuses are one of the most supported column types on Monday, so if you have access to automations, play around with them!
Status label names are also emoji friendly!
(There's just something satisfying by selecting a "🎉 Done" status!)
A board's search bar searches statuses as well!
Status columns can also be pinned columns! Pinned columns won't move when side-scrolling. Think of it like freezing cells in Excel or Google Sheets.
━━━━━━━━━━━━━━━━━━━━━━━━━━━━━━
Ξ In Conclusion Ξ
I hope this tutorial has helped you understand and feel confident in setting up and utilising Statuses. Though it has potential for complex workflows, it also works as a simple identifier, giving it a broad range of use cases.
Please feel free to ask me if you...
• Have any questions relating to this tutorial,
• Have any questions about Monday in general, or
• Would like to see me cover a specific Monday topic!
And, finally, if you enjoyed this tutorial and would like me to continue making more, please consider liking this post and reblogging it so that I can get more eyes on it. 🧡
If you enjoyed this tutorial and wish to leave a tip, you can do so on my kofi which you can find here: Lyskari's Ko-Fi Whether you share, like, reblog, leave a tip, a mix of these, or all of them, thank you for your support! And please please let me know if you'd like me to cover other aspects of Monday, or if you'd like me to give my thoughts on other programs! And let me know if you liked this tutorial!
If you want to read my other Monday tutorials you can find them here: The Lyskari One Stop Shop Master Post under the "My Organisational Tutorials" heading.
#Tutorial#Tutorials#Monday.com#Monday.com Tutorial#Monday Tutorial#Project Management#Life Management#Task Management#adhd#adhd struggles#just adhd things#adhd brain#adhd problems#attention deficit hyperactivity disorder#neurodivergent#executive dysfunction#Status Column#Monday Status#Status#lyskari#Lyskari Tutorials
0 notes
Text
A Comprehensive Guide for Writing Advice
Sometimes, despite enjoying writing so much, something is not working for you. Maybe your well of ideas has run dry. Or your WIP has hit a corner and you can't find your way out to the end of the story. Or you need to go back to your finished draft and see if there are any kinks to clear up.
Fortunately, everyone at Writeblrcafé has experienced such, and to help you out, we have a bunch of links to helpful posts by fellow writers to help you along on your writing journey as well as some helpful links to other websites, resources and software.
General:
WHY IS WRITING IS SO FUCKING HARD? (@writers-hq)
Writer Block First Aid Kit (@isabellestone)
Websites for writers (masterpost @2soulscollide)
Writing advice (masterpost @theliteraryarchitect)
Writing resources (masterpost @stinastar)
One look thesaurus (a reverse dictionary where you can enter words or concepts)
Coming Up with Ideas:
97 Character Motivations (@theplottery)
Character Flaws (@fantasyfillsmysoul)
Character Profile (@mistblossomdesigns)
Characters Unflawed (@emptymanuscript)
Why Theme is More Important than Plot (@theplottery)
Weekly writing prompts on Reedsy
Drafting:
3 of the worst story beginnings (and how to fix them) (@theplottery)
Cheat Sheet for Writing Emotion (@myhoniahaka)
Creative Writing for Writers (@writerscreed)
Describing Physical Things (@wordsnstuff)
How to Craft a Natural Plot (@theplottery)
How to Write a Story? (masterpost @creativepromptsforwriting)
How to write: ethnicity & skin colour (@youneedsomeprompts)
What the F is Show Not Tell (@theplottery)
Writing advice from my uni teachers (@thewritingumbrellas)
First Draft: story outlining template meant to help with planning your next big writing project (@fauxriot)
The wonder/ discovery arc (@evelynmlewis)
How to structure a chapter (@theplottery)
How to pace your storytelling (@charlesoberonn)
How to write and research mental illness (@hayatheauthor)
Seven Blogs You Need To Read As An Author (@hayatheauthor)
Editing/Revising:
Eight steps in making the editing process of your book easier (@joaneunknown)
Kill Your Darlings (@tibodine)
Self editing tips (first pass) (@projecttreehouse)
Publishing:
Chill Subs: biggest database for literary magazines and small presses; track your submissions and get your writing published!
5 steps to get your novel ready to self-publish (by @nanowrimo)
Resources for finishing and publishing your novel (masterpost by @nanowrimo)
For self-publishing: this page gives you the exact pixel count of a book spine based on its page count, and/or a template you can use for the correct width/height ratio.
Software:
Scrivener: one time payment of $60 or 70€ (macOS/windows), $24 (iOS; no Euro listed for iOS); used by professionals, many tools to write and organize your novel
Bibisco: free and "pay what you want" version; multilingual, world building, character profiles, writing goals, story timeline, mind maps, notes and more templates to write a novel.
Manuskript: free open source-tool; outliner, novel assistant, distraction-free mode
Ghostwriter: a free and open alternative which has a decent interface with some interesting features, like Hemingway Mode, which disables one's backspace and delete keys, emulating a typewriter.
NaNoWriMo: an international contest to encourage writers to finish writing their novel with many events, groups for exchange with fellow writers, helpful writing advice and help for self-publishing and publishing traditionally.
Campfire Writing: website, desktop app, and mobile app, with tools built in to help manage characters, magic systems, research, etc. It has a great free option, plus monthly, annual, and lifetime purchase options. It also has built-in NaNoWriMo compatibility and a catalogue of tutorials and writing advice videos (suggestion by @harfblarf)
Websites And Writing Apps Every Author Needs In 2023 (@hayatheauthor)
Let us know in the comments if there are any links we could add to it! Reblog this post to help a fellow writer.
Support our work by buying a cup of coffee on KoFi.
#wc.admin#writing community#writing advice#writing tips#writers on tumblr#creative writing#writing resources#writing software
2K notes
·
View notes
Last Seen Blogs

twoplustwoequalsjellyfish
Jellyfish Rule Fish are Cool

4x4community
4x4Community

computermagazines
computer magazines

teedy-eye
(Semi-Hiatus) So I guess I...GUGHLUGHGUGHL

jamesjongazenga
Sggirls Leaks