#pattern tutorial
Text

I've been sitting on this pattern and tutorial for a while now! so time to finally share it with you!
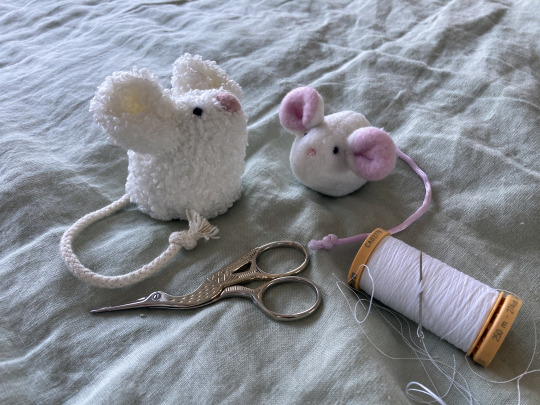
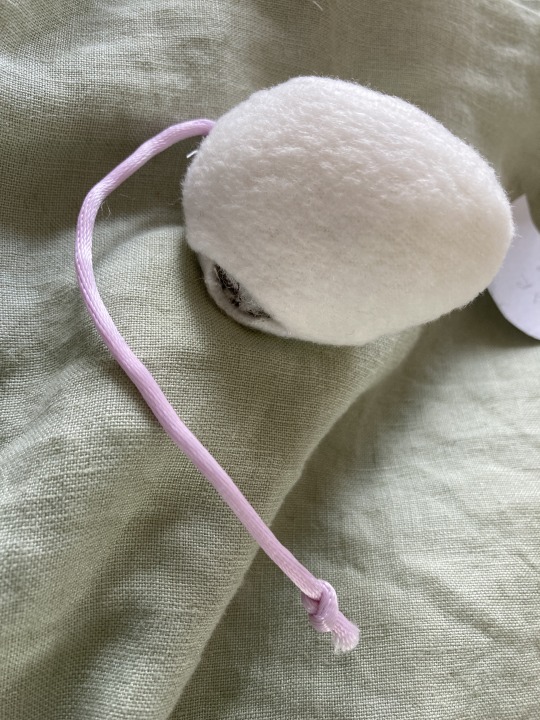
I was lamenting that the jellycat pip and sugar mice were long retired and difficult to get your hands on unless you are willing to pay much more than they retailed for each mouse, so i decided to try and eyeball a pattern and make some myself! they're not exact as i only used constructed visual references but they're close! please note that this pattern set is intended for personal use only. Rough tutorial under the cut!
This pattern is for printing onto A4 but you can check your scale with the measurements I've provided or just play around with how big or small you want to try and make them! i didn't really get any wip photos of pip mouse but it's method is largely the same with the nose being the major change, which i will detail in text in the instructions below.
for sugar mouse i would recommend using polar fleece as it will act the right way for the ears to do their squishy marshmallow looking thing. but minky should also work or other similar fabrics! for pip mouse if you can find a similar curly looking fabric with a thin backing that'll be ideal but fleece will also work well, you just wont get the furry texture, you want a fabric with a little bit of stretch to it. i however would not recommend fabrics like felt or non stretch cotton for these guys as it's likely to not take shape the same as there's no give to the fabric.
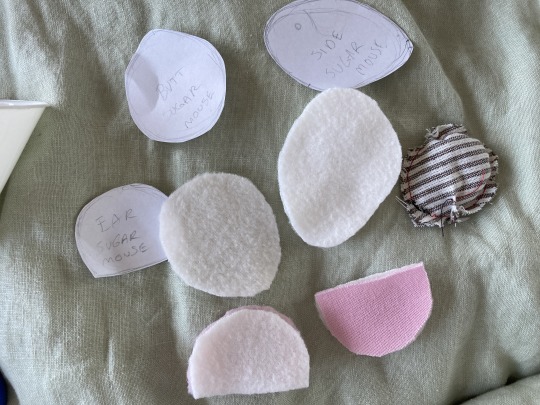
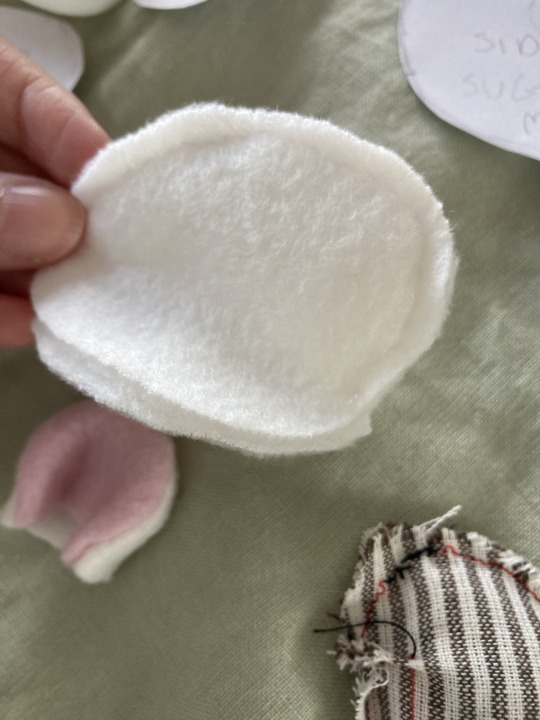
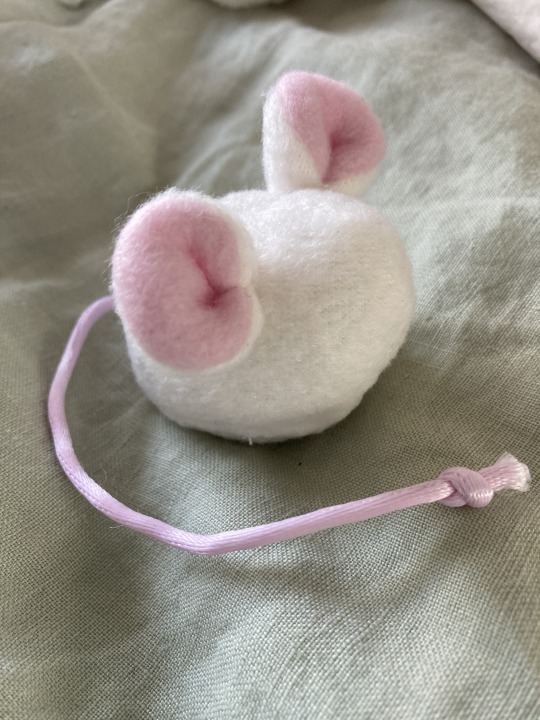
once you have printed out the pattern and cut the pieces in your fabric, you'll want to sew the ears up and turn them inside out, then put them aside for later. just leave them as is for now but here you can see i was playing around with pinching the turned through ear into shape.

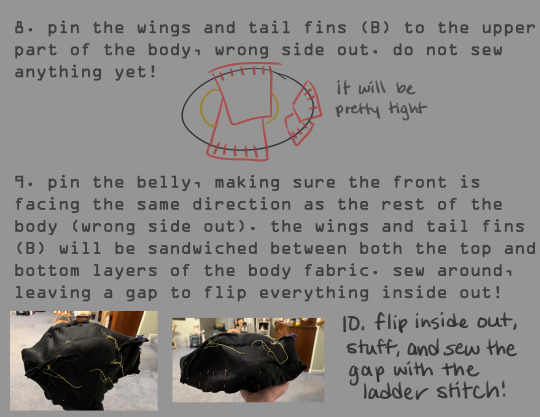
Then moving on, sew the back pieces together along the spine and front of face. you then want pull the bottom open ends apart gently and place the open sides flat up against the base piece so that they're aligned, it can be good to pin this in place so it doesn't shift.
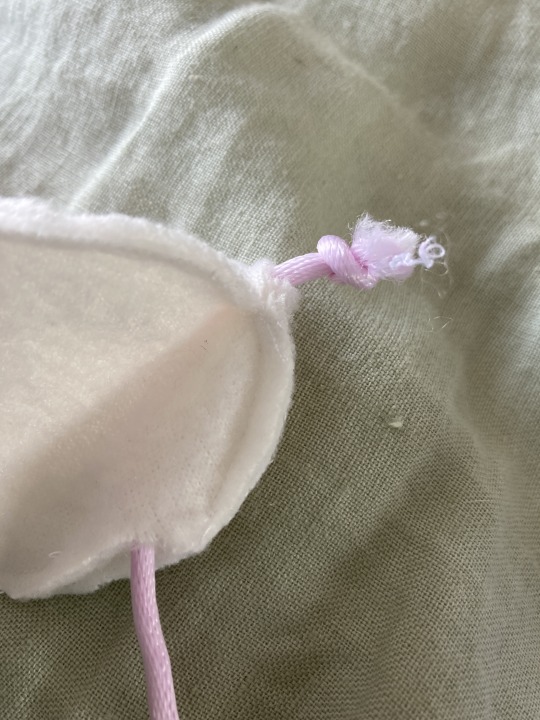
then, get your tail rope, and tie a knot at either end, placing the base of it inbetween the seam at the butt so that it'll sit in the right place, then sew the seam up directly with the tail in place, make sure you sew through the rope to secure it and make sure it doesnt shift. Sew around the bases seam leaving a hole in one side so that you can then turn your mouse through.
once turned through you will want to stuff your mouse with polyfill quite a bit so it takes shape! i like to put weighted beans in mine for extra effect, you can use dried rice or wheat too, just sew a little circle pouch a bit smaller that the mouses base with scrap fabric and fill and seal! then insert into the turning hole while you stuff. once stuffing is done you can sew the hole up with a ladder stitch. the weight from the beads will allow your mouse to sit up quite well.
next you will want to get those ears you put aside, take each corner and bring the ends together in the middle. then sew them gently together at the ends with one or two stitches in about the same spot. you want them to look 3d so dont sew the ends to the back of the ear, just end to end so they meet in the center.

Then pin the ears in place on the head
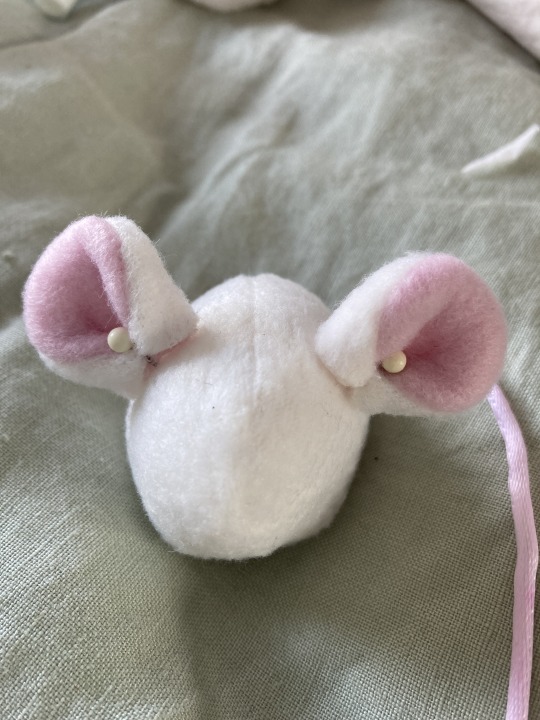
then you need to ladder stitch the ears in place while they're pinned so they dont shift around, go all the way around the outside edge of each.
now you're almost done! next they just need a face! sugar mouse only needs embroidery by way of a french knot for both the eyes and nose (you can find good video tutorials on how to sew a french knot online), pip mouse will also need a french knot for the eyes but has a separate process for it's nose.
(for the pip mouses nose you will need to leave the marked nose hole open and then stitch the nose fabric to the square nose backing in line with the dotted direction on the pattern, (it should look kind of baggy when it's unstuffed) sew it up completley with no hole, then cut a tiny slit in the backing and add polyfill there before closing with a basic stitch, then you ladder stitch the nose directly to the marked nose hole)
in order to hide the embroidery anchor knots i find the best way is to start by going down through the middle of the ears and then coming back up where you want the eye to be, and then going back down and up through the ear for the finishing knot, as it creates a very easy cover for them and looks nice and clean!
then you have yourself a little buddy!

haha they're great to squish!
if you use this pattern i'd love to see your results!
2K notes
·
View notes
Text

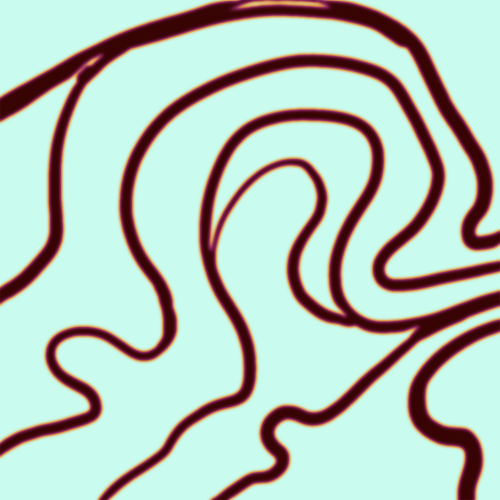
Barks Quick "Turing patterns in CSP" tutorial
you need some pixels to start with, either just grab the spray bottle tool or go to Filter>Render>Perlin Noise
Filter> Gausian Blur> value: 6
Filter> Sharpen> unsharp mask>
Radius: 22, Strenght: 255, Threshold: 0
----
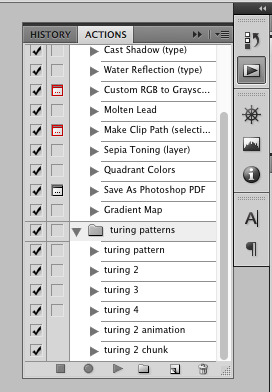
you need to repeat step 2+3 over and over. to make that easier you can go to:
Auto Action> create new auto action set
hit record in the bottom left of the auto action window
perform step 2+3
stop recording
right click the actions in the set and duplicate them
make sure they are sorted correctly and hit play a few times
-----
before you color your pattern or do anything with it go to
Edit> tonal correction> binarization
to get rid of any odd colored pixels
#this isn´t the cleanest tutorial and i just figured it out too but i couldn´t find any tutorials for csp so throwing this one out here#clip studio paint#turing pattern#or as the sailfin lizard paper would call it Vermiculation#get vermiculating my friends
1K notes
·
View notes
Text
Wednesday, November 29.
You reap what you sew.
Never have truer words been spoken. But they come as good news for Tumblr's sewing community, however, who have been sewing some absolute delights. Some real œuvres d'art. Some winner-winner chicken dinners.
As luck would have it, #sewing is trending. And it's trending right now, so we have reaped a selection of these very dinners for your eyes only. We have then asked ourselves just what did we do to deserve y'all, and your resplendent talents.
#today on tumblr#sewing#sew#sewblr#crafts#sewing machine#crafting#sewing project#textile arts#crochet#sewing patterns#sewing tutorial#sewing tag#craftblr#contemporary art#artists#artists on tumblr
1K notes
·
View notes
Text
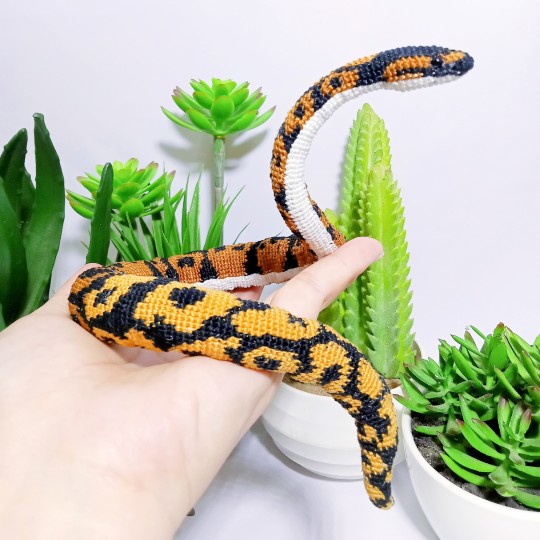
Hello, everyone! 👋
I wanted to share with you all a pattern, which is an amigurumi crochet ball python snake. You can find the free tutorial on my YouTube channel and the PDF pattern on my Etsy shop.
Thank you so much for stopping by and have a great day! 😊
420 notes
·
View notes
Text
Lolita Accessory tutorial pages from Japanese mook “Gothic & Lolita Patterns”, 2004
Included are: head dresses, hair clips/ties, camisole pattern, drawers pattern, sock stoppers, multiple bag patterns, detachable collars, and jewelry.
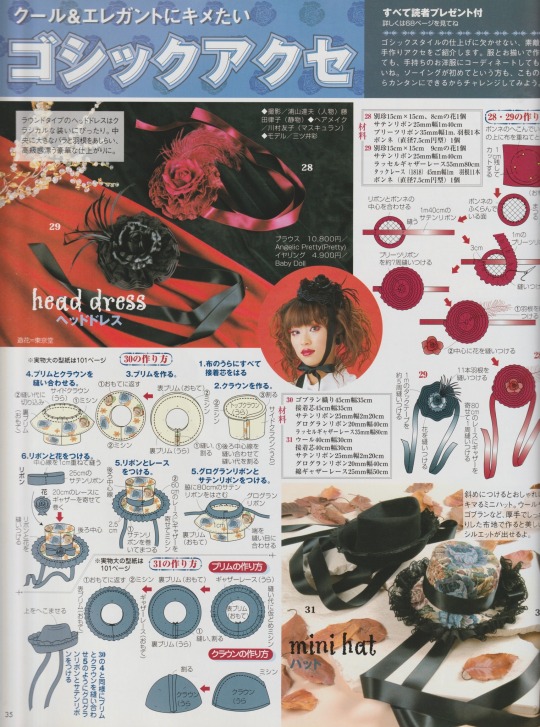
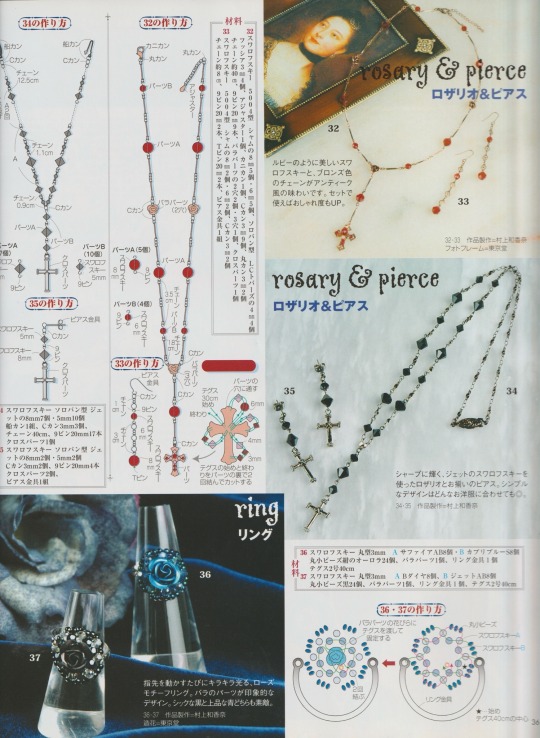
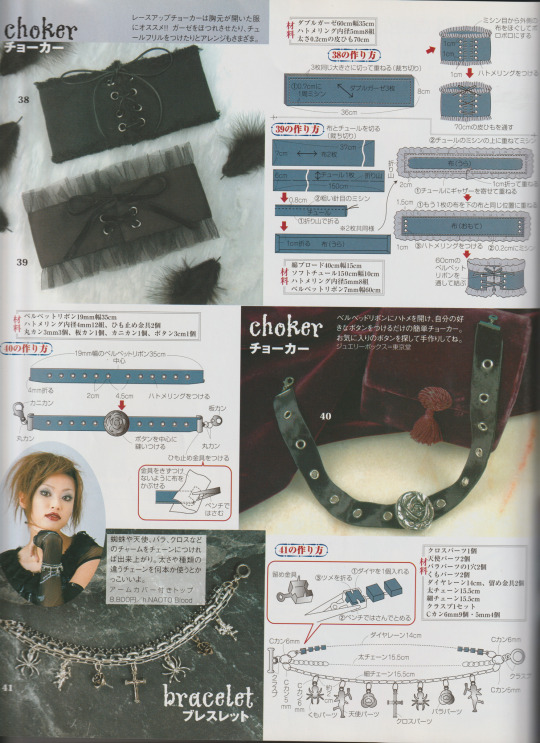
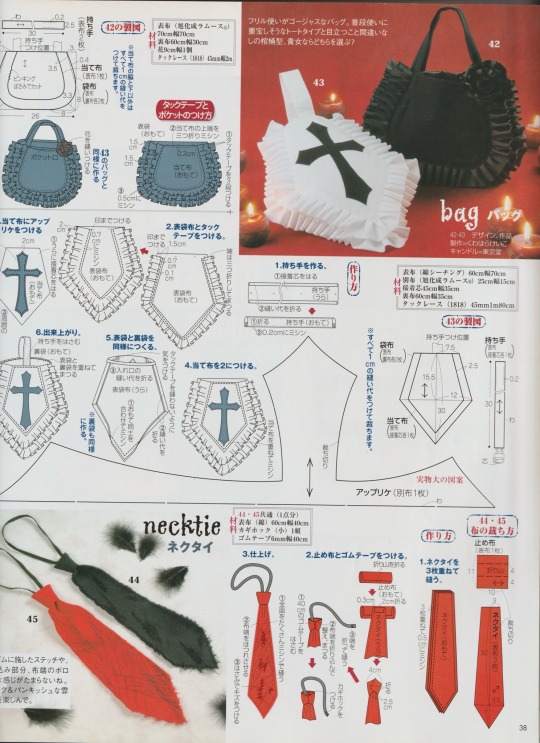
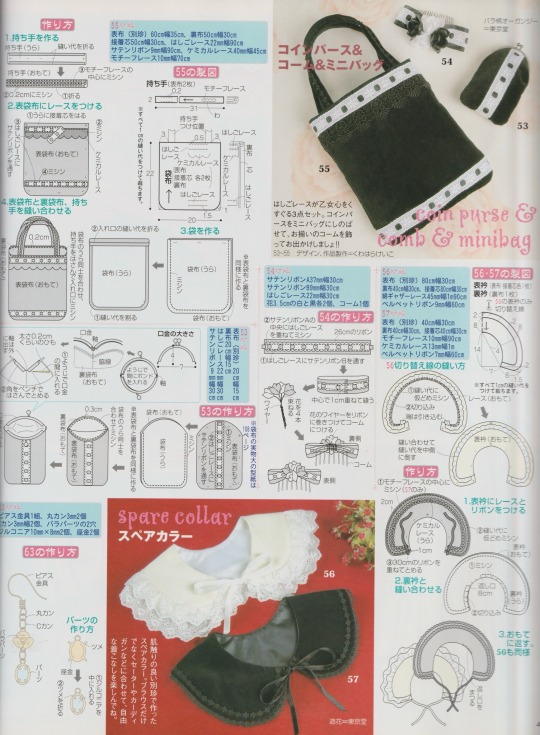
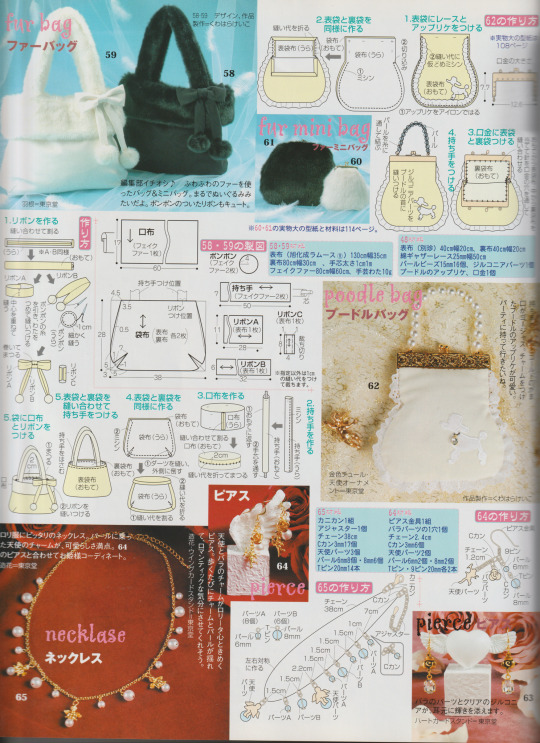
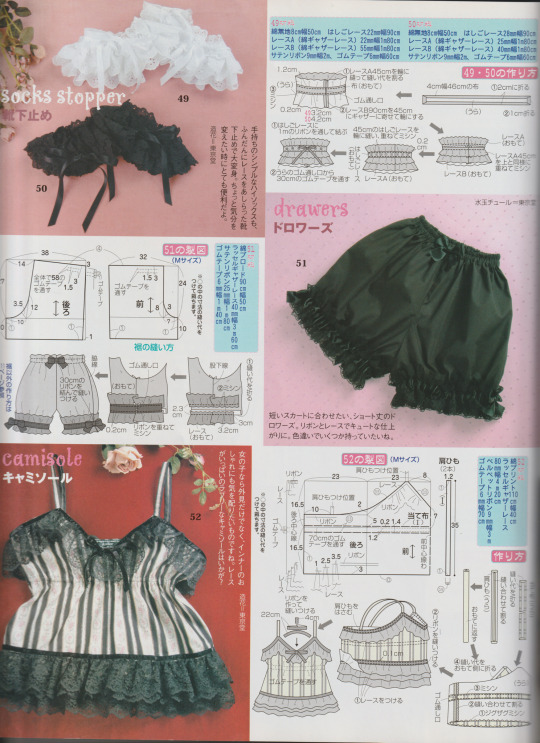
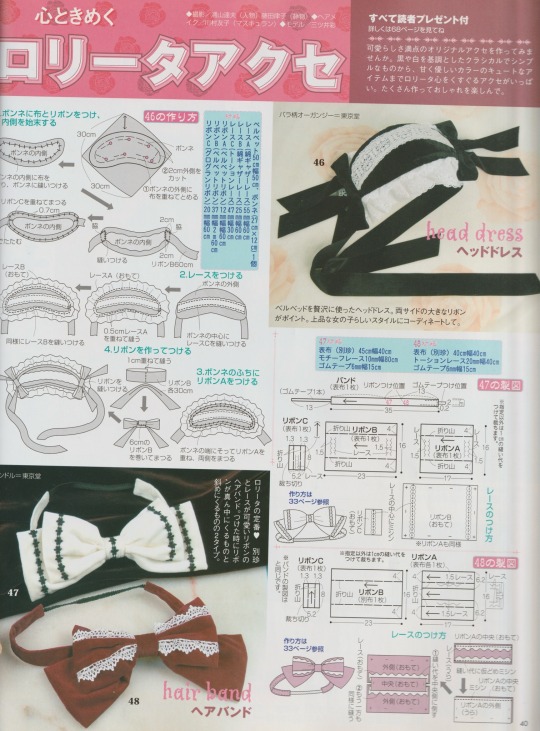
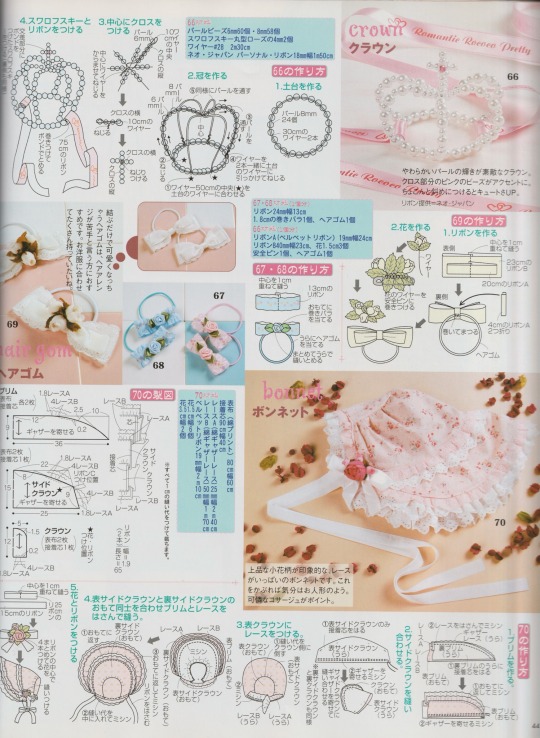
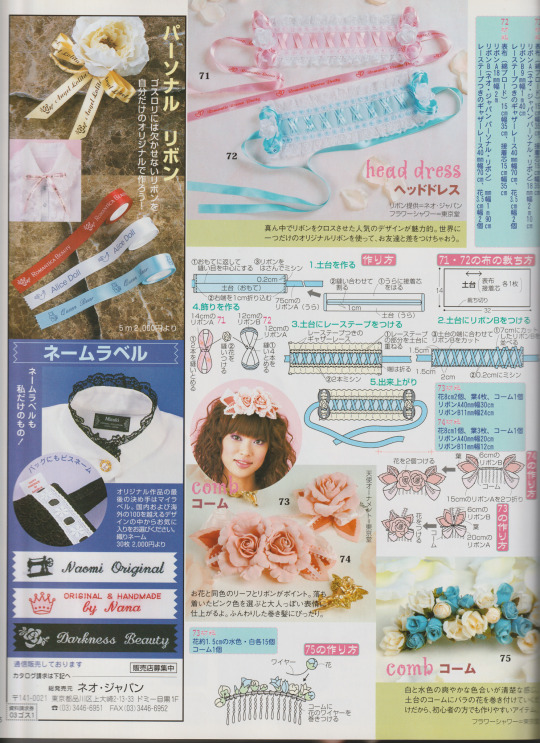
Consider this as my Valentine’s gift to you guys!! Thank you for being very kind about my post ^-^
*Also* If you would like the patterns to some of the tutorials (ie: the mini top hats, pattern 62) let me know so I can make a post later!
#gothic lolita#lolita fashion#j fashion#old school lolita#egl#egl fashion#coord#fashion#tutorial#magazine#sewing patterns#jewelry#goth#archive#my scans#happy valentine's day
781 notes
·
View notes
Text
how to make cool blobby turing patterns in photoshop
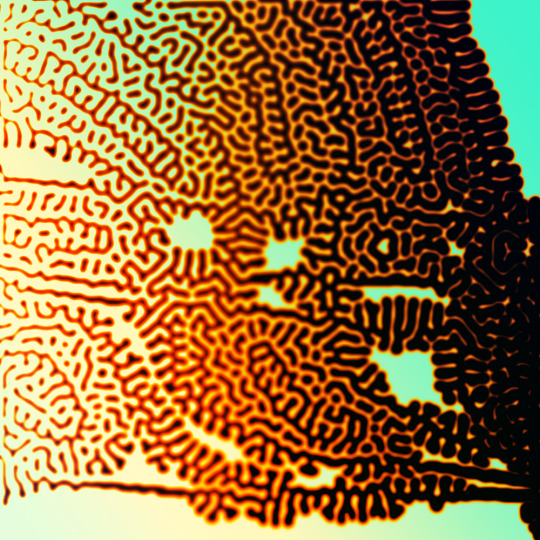
i'll preface with i learned the basic loop from skimming a tutorial on youtube, but as someone who prefers written tutorials i'm sure many would appreciate one! also, the second part of this is some of the visual effects i figured out on my own using blending modes and stuff.
i'm using photoshop CS4 on a mac so some buttons and stuff might be in different places on windows and newer photoshop versions but all the actions are the same. my canvas is 1000x1000 pixels.
UPDATES (i'm hoping these'll show up whenever you open the readmore?)
it's possible to do something similar in krita using this plugin, made by the love @arcaedex
it's also possible to do this in photopea, a free browser alternative to photoshop! the results are pretty much identical.
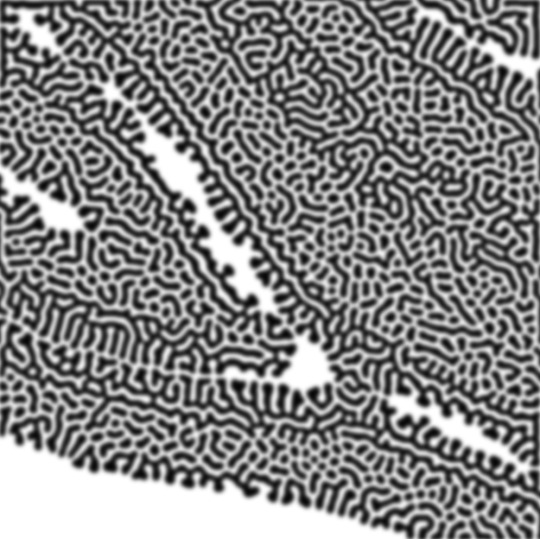
FIRST off you wanna get or make a black and white image of some kind. it has to be one layer. can be noise, a photo, a bunch of lines, whatever. here's mine, just some quick airbrush lines:

now find the actions tab. idk what it looks like in newer versions of photoshop but you probably won't need to dig!
hit the little page thingy to make a new pattern. once you hit 'record', it'll record everything you do. the little square 'stop' icon will end it.
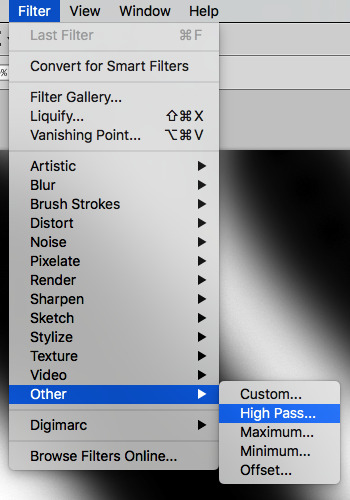
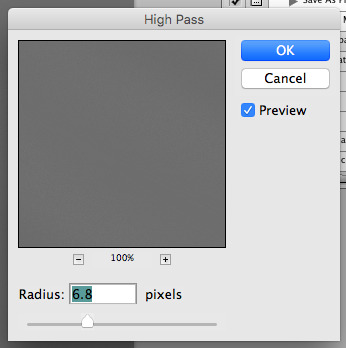
now you want to do a high pass filter. you can mess around with the radius to change the size of your squiggles, but the tutorial had it set to 6. experiment!
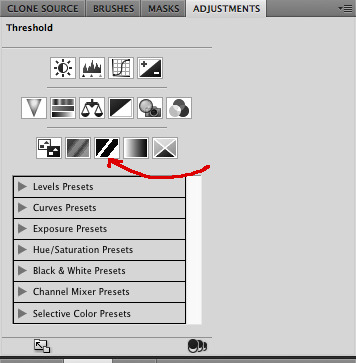
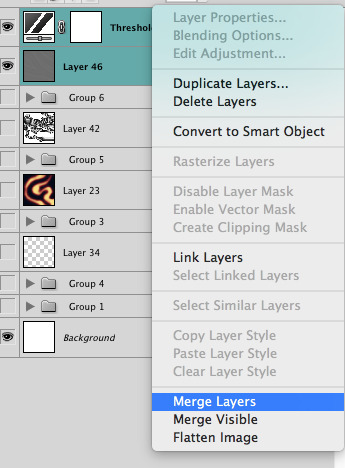
now add the 'threshold' adjustment layer. i use the adjustments tab but i think there's also a dropdown menu somewhere. keep it at the default, 128. merge it down. (control or command + E or you can right click it like some kind of weirdo)
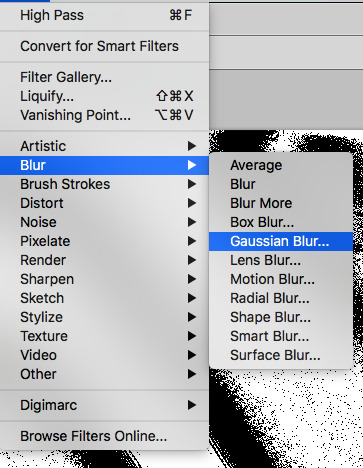
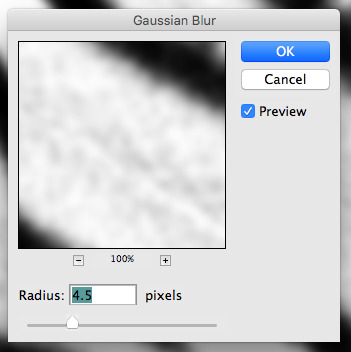
and finally, the gaussian blur! the radius of this affects the shape and size of your squiggles as well. i like to keep it around 4.5 but you can mess around with that too.
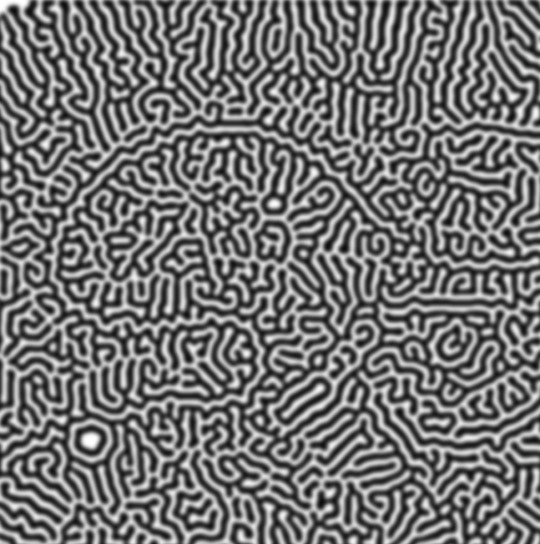
after that, hit 'stop' on the action you're recording, and then repeat it a bunch of times using the 'play' button, until you have something you like, like this:
WOW!! that was fun!! and only a little tedious thanks to the power of macros. anyway, here's some fun layer blending stuff i like to do. it's with a different pattern cause i made this bit first.
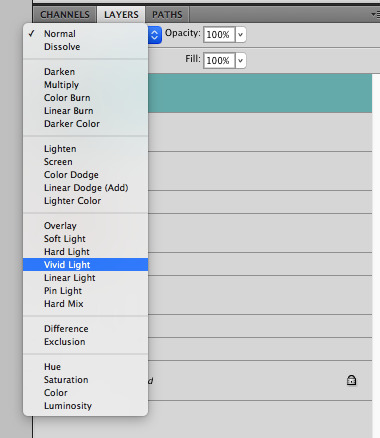
anyway, using a black and white gradient (or a grey base that you do black and white airbrush on), make a layer with the vivid light. this will make the blobs look thicker or thinner.


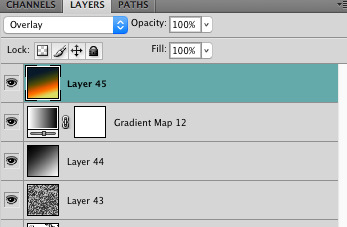
then, for cool colors, do a gradient map adjustment layer over that:

and finally, my best friend, the overlay layer. just using a gradient here bc i'm lazy, but feel free to experiment with brushes, colors, and blending modes!

NOW GO. MAKE COOL SHIT WITH THE POWER OF MATH. AND SEND IT TO ME
also these are not hard and fast rules PLEASE mess around with them to see what kind of weird shit you can make. here's a gif. as you can see i added some random airblush blobs in the middle of it, for fun.
924 notes
·
View notes
Text
god i hope this won't be too confusing-- here's the seeker pillow/plush pattern (just a loose guide, plus the actual pattern!)
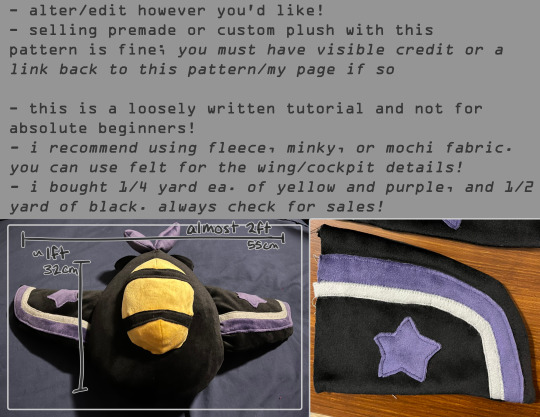
***attach the cockpit AFTER the body is stuffed instead!!! so, skip step 7 and do it last!***
- step 5 is optional!
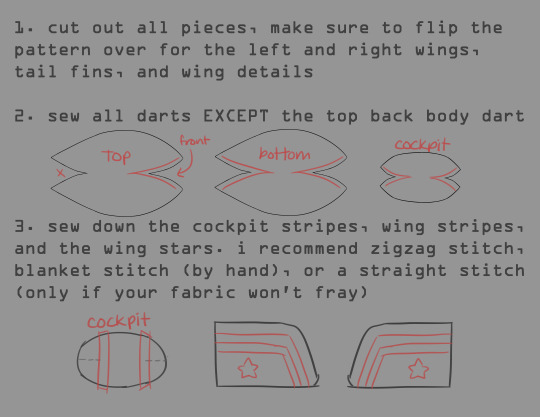
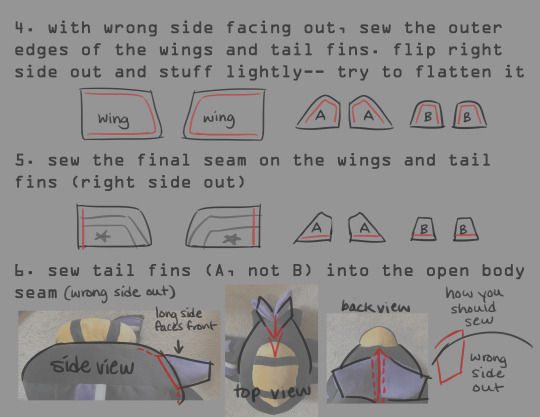


the pattern should be printer-ready on 8.5x11 paper, but if tumblr eats the quality, then twitter will hopefully work!
seam allowance is already included (whoops), and the dotted lines show where you should be sewing
the grey (non-dotted) lines on the wings and cockpit are there as a reference, please don't cut them!
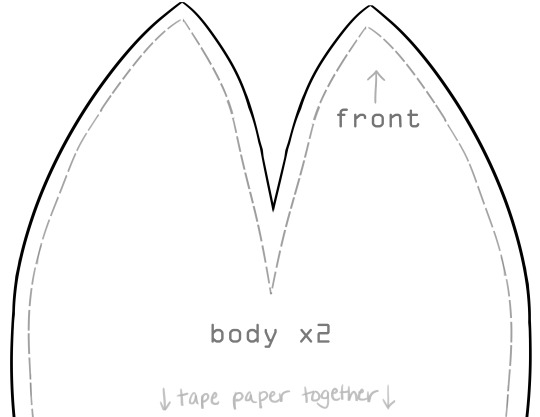
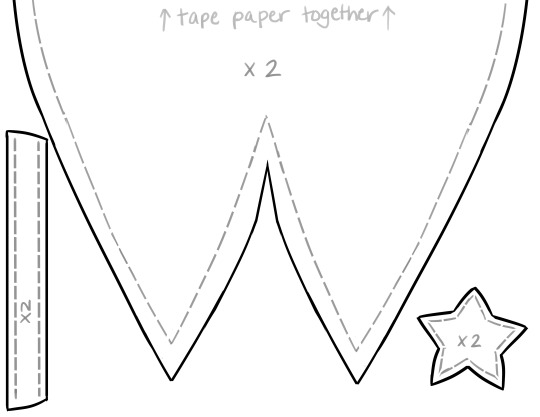

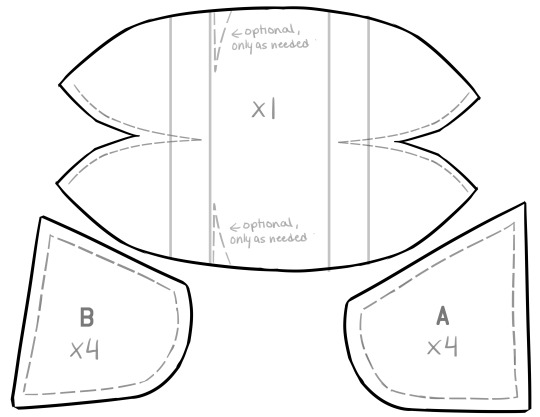
if your fabric has a right and wrong side, make sure to flip over the paper pattern when making the L vs R wings (and tail fins and wing details).
if the pile of your fabric faces one way, make sure that you pin the pattern accordingly!
if there's any errors, please let me know so i can correct them!
#pls show me if you make one!#my art#transformers#maccadam#transformers seeker#g1#plush pattern#skywarp#tutorial#am i allowed to tag this as#thundercracker#starscream
792 notes
·
View notes
Photo
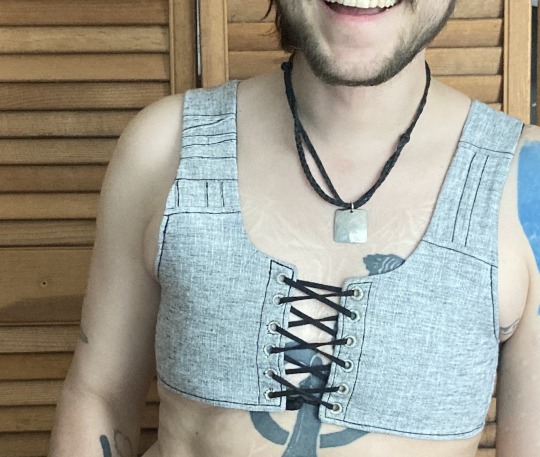
summer binder picture tutorial
this is the third binder ive made for myself recently and the first one i’m writing up. it’s designed to do a few things: 1) allow me to put it on by myself without dislocating my shoulders 2) allow me to breathe well enough to partake in normal activity 3) be cool enough to wear throughout a muggy 90-100F summer 4) not constrict my ribs in a way that aggravates my lack of connective tissue and causes intense pain.
this has become necessary even though i had top surgery many years ago, because when i had it i was extremely skinny and since then i’ve increased in size by about 50%. this has been really fucking good for my health in every single way* except that when my chest is squishy or moves at all it’s So Goddamn Triggering for me. but also since ive had top surgery ive developed and/or been made away of a plethora of chronic conditions that make every single commercially available binding option medically impossible. unbound, my chest is pretty much what you’d expect for a chubby cis guy but venturing out into the world in just a tshirt no longer works for me
*anyone who badmouths weight gain or fat bodies in the notes WILL be blocked
under the cut are a bunch of process pictures and explanations of what they all mean:
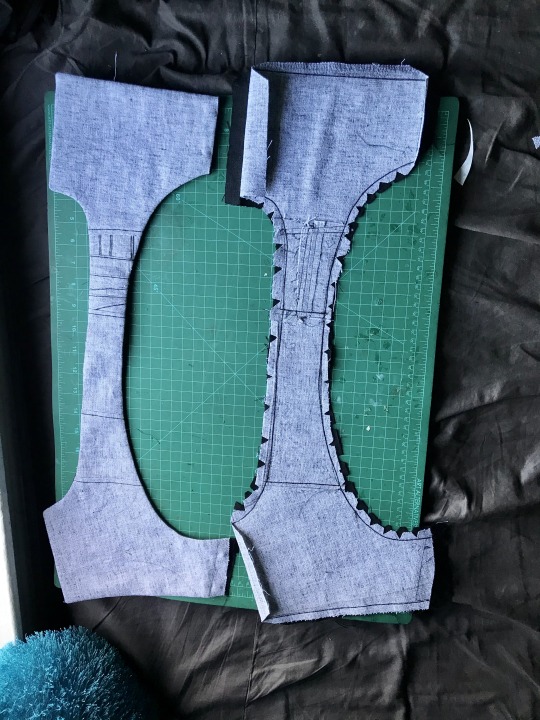
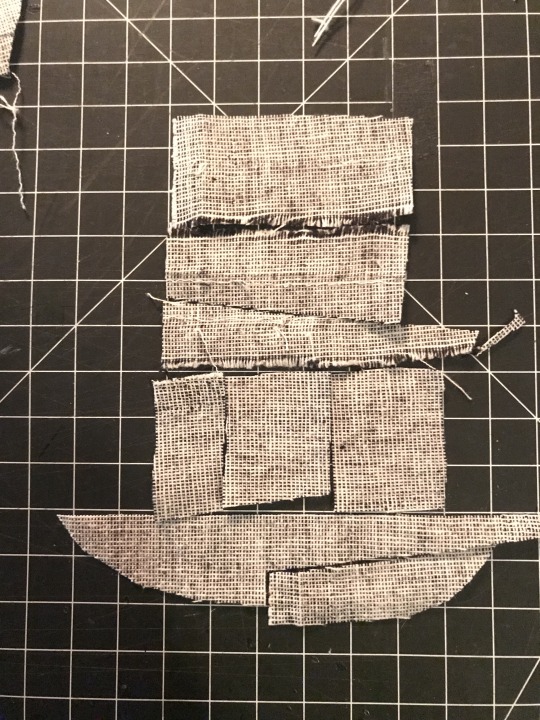
first i’ll give you a look at the pieces and measurements:
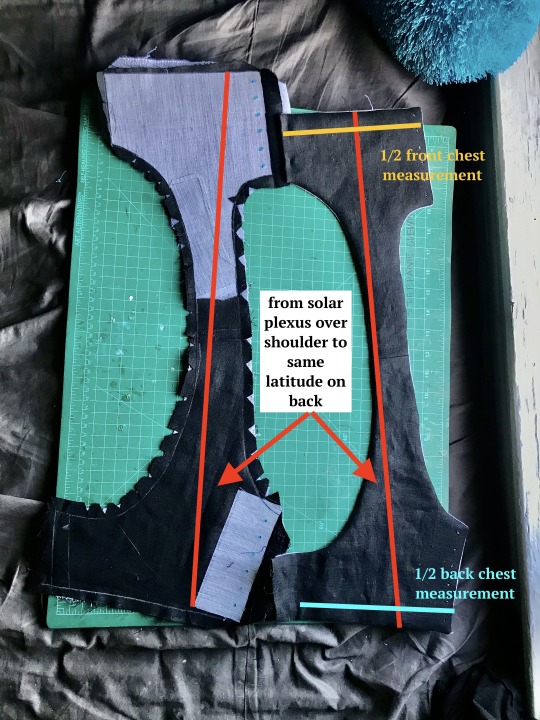
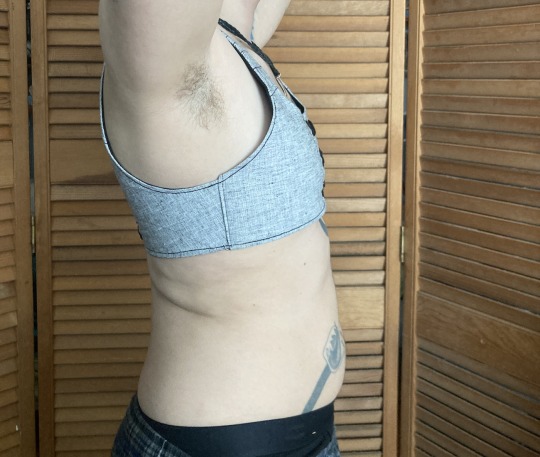
most of the seams are sewn in this picture and one half is turned inside out, allowing you to see both the finished dimensions (right) and the placement of the fusible horsehair canvas that gives this lil scrap of linen any structure at all (left)
to get your chest measurement, you’re gonna have to do some math:
first measure above and below what you want to bind. average these numbers. mine are something like 32 and 34, which average to 33. subtract a few inches--this is to allow the air movement between the laces at center front and back, critical in the summertime. i deleted 3 inches bc i like that number but you can go bigger if you want. the more inches you subtract here, the more youll be able to ratchet all your chest material down later, but at the same time you need to leave enough fabric for a sturdy garment. let’s say a range of 2-6 inches/5-15cm. by taking your measurements this way, you’re essentially measuring the chest you would like to have. that + the horsehair canvas work together to compress any squishy tissue/force anything that doesnt compress up and to the outside (basically into the armpit/lower shoulder--the chest might stick out but it will give a very puffed chest captain america pectoral silhouette)
you can also see how ive clipped my curves and pre-drilled my lacing holes. i used the marlin spike on my knife to open up the holes on the interfacing side, mainly as a way of marking them. this worked well bc the interfacing’s glue kept the linen from raveling
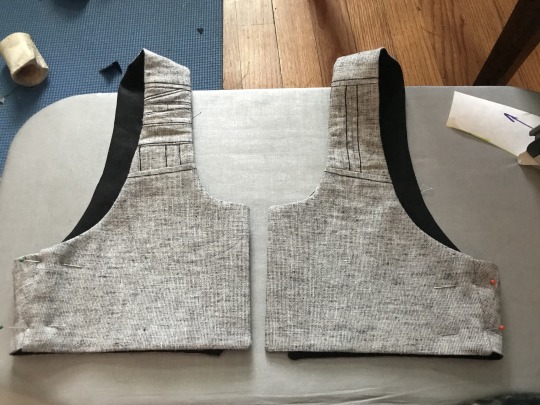
this is the same stage but looking at the non-interfaced grey linen/cotton blend (the black is some 100% linen from my cabbage stash). you can see ive broken the solar-plexus-to-back measurement up into a bunch of pieces to save on fabric but that’s not necessary. my original pattern was just two pieces (front and back) and chopping the straps into thirds on both sides was aesthetic
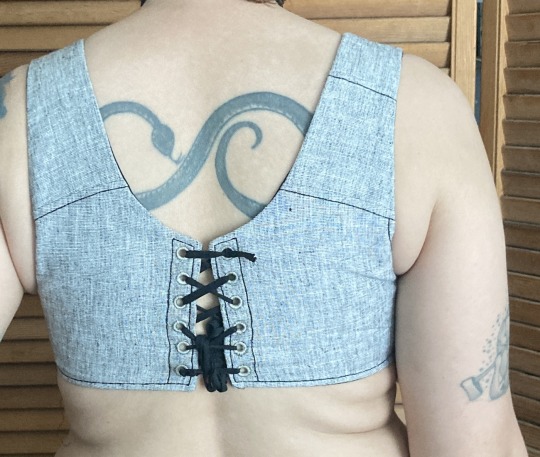
in the following picture you can really see how this is really just overgrown regency stays:
i thought about doing side lacing but didn’t think that would be comfortable for me. on the front, the side seam allowance was pressed inwards before turning to create a finished looking slot. on the back the side seam is left unfinished with an extra wide seam allowance, and is inserted into that slot.
here’s a closeup on it pinned in place (you can adjust the angle of the side seam and the fit during this pinning stage):
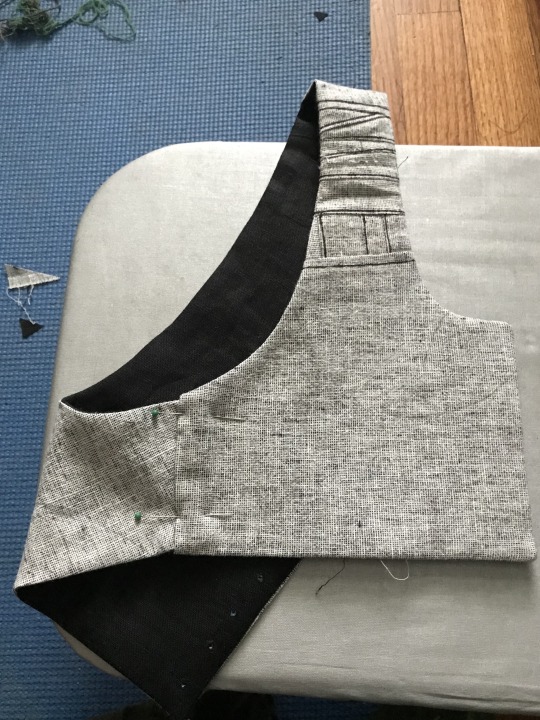
that side seam was just topstitched in place once i had the fit how i liked it, and the armhole was reinforced with more topstitching
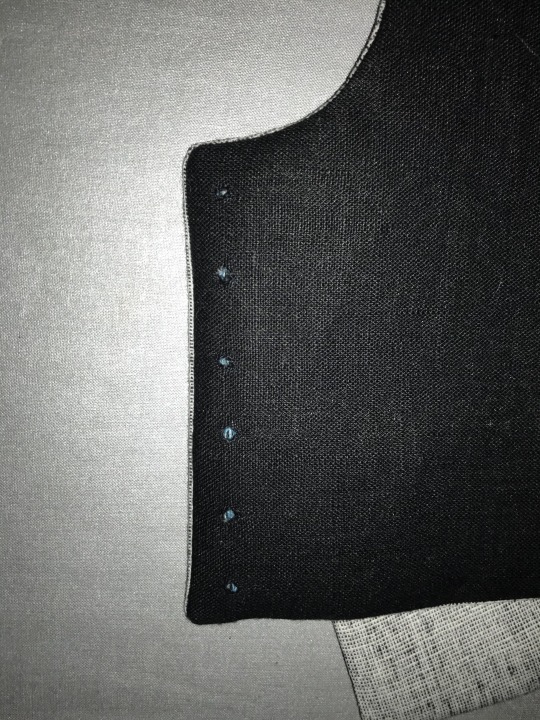
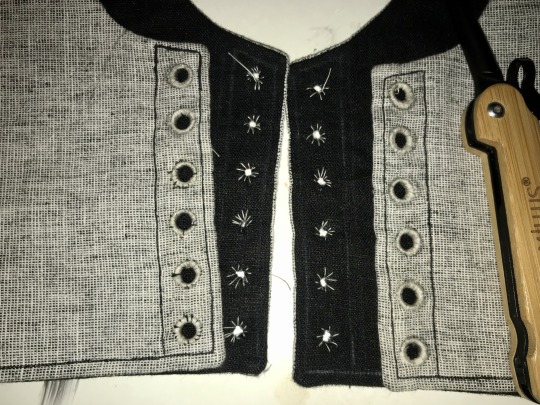
alright, time for eyelets: first, you can see how well the marking worked:
next, two rows of basted eyelets (left), one row of eyelets sewn with a doubled and waxed cotton thread (center right), and one row of eyelets opened and stainless steel rings placed (right).
next time i’m going to mark the eyelets same as i did above, but do this step differently--i’ll mark and baste the steel rings in place BEFORE widening the eyelets. this is bc i had a lot of problems keeping the eyelets on center
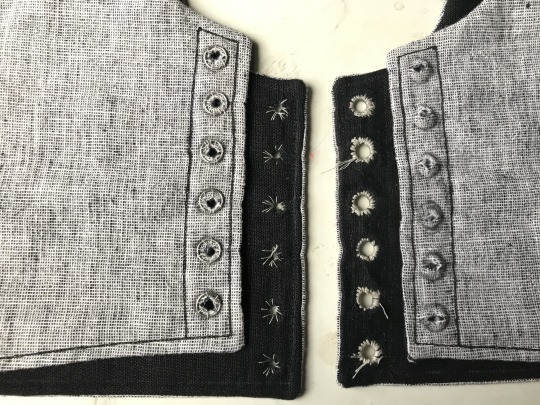
eyelets half done on this one! on the left are eyelets sewn with doubled and waxed cotton thread and on the right eyelets sewn with quadrupled and waxed thread. the center is basting again. i was able to force the holes back in line while sewing the eyelets but it was kinda annoying. adding a second picture that doesnt have great focus but hopefully shows how that process worked and shows the spike clearly

i ended up using this white cotton thread because it’s stronger than my black cotton thread (which the rest of it is sewn with). [eta: after this was first posted, i pressed the whole thing heavily, which effectively de-waxed the thread, and i dyed the whole thing a medium charcoal grey, the thread blends in perfectly on the lighter side and isn’t such a sore thumb on the darker side]
bonus: the piecing layout for that little piece of strap. the whole light gray half of the binder was made from 1/2 of one of the legs i cut off some linen suit pants to make slutty camping shorts last year and i really really didn’t want to break into any of the other three halves for this garment--i have Plans for it
overall the fit of this is incredible. it DOESNT hurt my ribs which every zip-up garment ive been able to find (and it is difficult) does due to really thick elastic at the base. it doesnt aggravate my sensory issues with the synthetic fibers that every commercial option is made of. i can walk up a hill or stairs, or go to pt, without getting too out of breath. i can eat with it tight, or loosen the front easily and without taking it off to make eating easier and less nausea-inducing. it is reversible!
best of all the lacing at the back gives the garment enough movement for me to get it on without dislocating, and the interfacing and steel rings give it structure once it’s on. the shaping comes only from fusible horsehair linen canvas and stainless steel rings like youd use for chainmail, there’s no boning at all, which makes it very quick to sew (except the eyelets, but metal grommets would be sturdy and quick provided theyre of good quality)
there’s a small amount of gaping on the outside of the shoulder strap, which i plan on fixing with a tiny tiny dart in the armpit, i want to add pockets to tuck the laces into, and i need a better lace for the back, but it’s completely wearable in time for the 90 weather next week which is all i wanted. i’ll do a reblog when it’s perfectly finished with an update on the fit but for now it is done enough
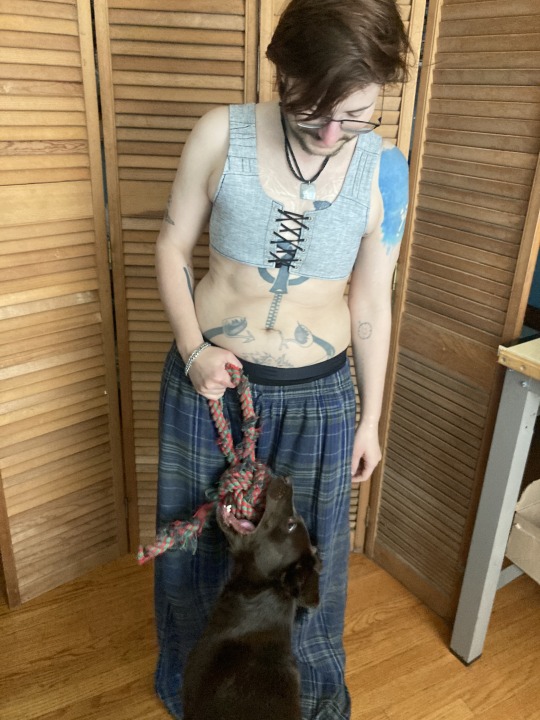
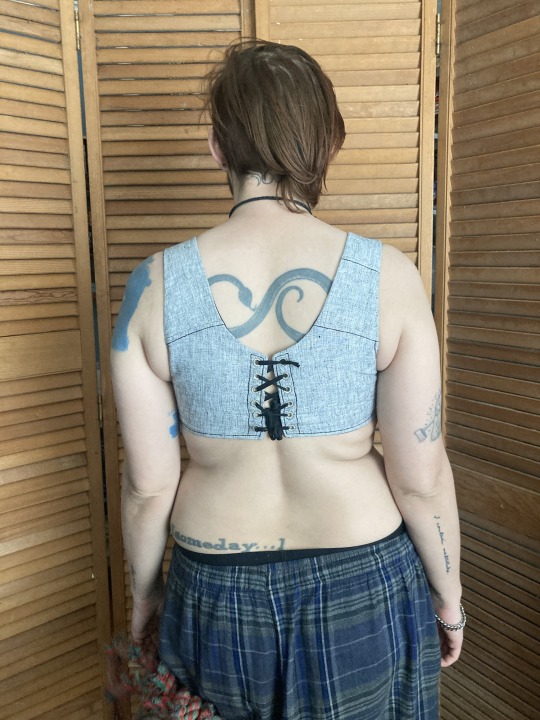
the little ridge where it doesnt lay flat against the shoulder is most visible with just a single t shirt over it. with a flannel or a sweater, it disappears, and by itself, it’s hidden in movement
eta: after dyeing this, i relaced it a bit looser in the back and that gape mainly disappeared. ive decided to leave it in instead of smoothing it with a dart because the loose fabric gives space for my chest to expand when breathing and shapes my silhouette in a way that emphasizes my shoulders
#sewing#trans#trans man#binding#body shaping#cotton#disability accommodations#physical#sensory#eyelets#fusible interfacing#historical fashion#regency#horsehair canvas#lacing#linen#lining#new build#drafted pattern#picture tutorial#piecing is contemporary too#stainless steel#stashbusting#stays#structured garment#treadle machine
1K notes
·
View notes
Text

HEY YOU! Do you wanna learn how to make something like this??
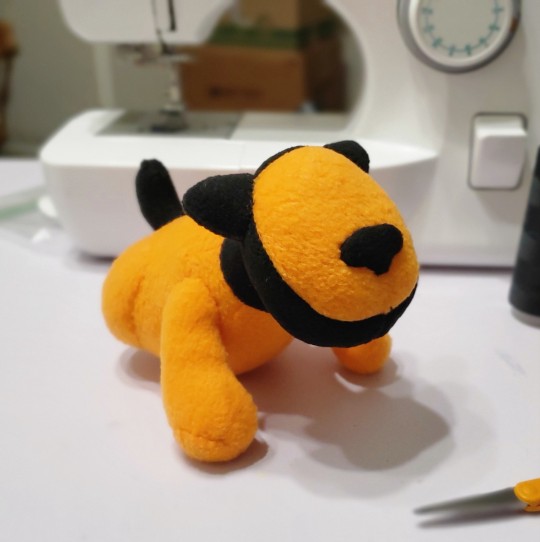
Or how about these babies?


Or even this thaang??
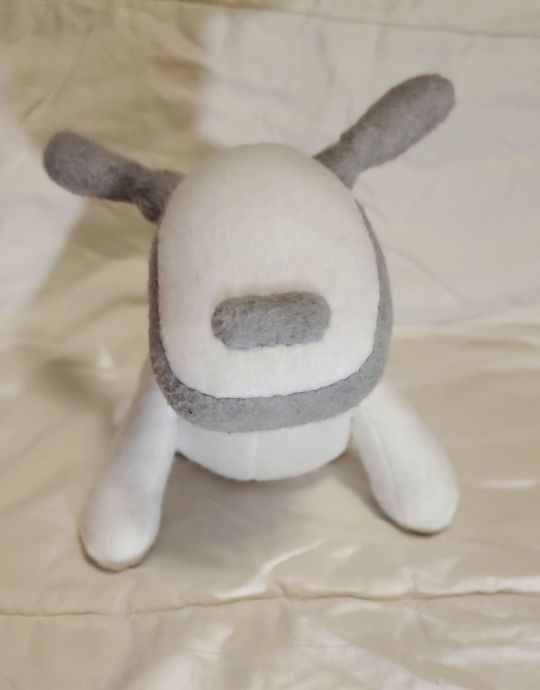


then CONSIDER checking out my sewing tutorial on how to make one of these puppies for yourself! its 1.6k words, and 21 pages of lovingly written, step-by-step instructions, featuring 38 images to help you follow along!
The download is available on my Etsy and (for a little cheaper!) on my Ko-fi shop!
#idog#idogs#icat#icats#2000s nostalgia#2000s#y2k#y2kcore#plushblr#plush#plushie#plush toy#cute#artists on tumblr#pattern#tutorial#sewing#craft#daylikescookies#kidcore#toywave#plush toys#sewing pattern#stuffed animals
2K notes
·
View notes
Text
The thing that gets me about history and humanity is that you never know what is immortalized, and the things that will be immortalized are things you would never think.
I saw a person sharing a new tattoo, and it was one of Onfim's drawings. A boy who lived so long ago he is barely a blip now, but his drawings meant so much to people that somebody is now permanently marked in their skin with one of those drawings. Do you ever look at the things you make and just sit there and wonder if this is the thing that future people look at? Do you ever look at your art, your writing, your schoolwork, or anything that is yours and just wonder who will find it, who will fall in love with a piece of your humanity and become overwhelmed with emotion over? It's not unlikely. It's not totally unlikely that somebody will find a piece of you in the distant future and devoid of any other context of who you were will still love you because you were here. You were here, and you are still here, even hundreds or thousands of years later. Treat yourself with the same love that so many have for dear Onfim.
#positivity#gentle reminders#if anybody has ancient children's drawings beside onfim let me know they melt my heart#i have always wanted a tattoo of that kind of thing too and i want ideas#see if archeologists dig me up or whomever else they won't find significant tattoos or other things. they will see i have loss.jpeg on me#and i think that's just as important. these people must know that people are silly and weird and don't make sense and that's IMPORTANT#i'm just. so obsessed with this because it's instantly humanizing#what little child hasn't drawn humans with twelve fingers per hand#or those kids drawings where it's only a torso/head conglomerate with stick legs and hands#i just really lived seeing how their tattoo turned out because i wasn't sure if it would look good in ink and skin#i feel the same way about archiving the internet. i was looking for the written crochet pattern for something#and the person who wrote and created it passed away and their blog has been scrubbed#their blog only exists on the archives. their pattern is only accessible on youtube because somebody made a video tutorial with the pattern#it's an eerie feeling. they've been gone for two years but their blog has been tethered by the wayback machine
406 notes
·
View notes
Text
I made some cute sunflower pillows out of scrap fabrics I had been saving from the dump. I couldn't find the right buttons so I made some out of polymer clay I had in my stash 🌻

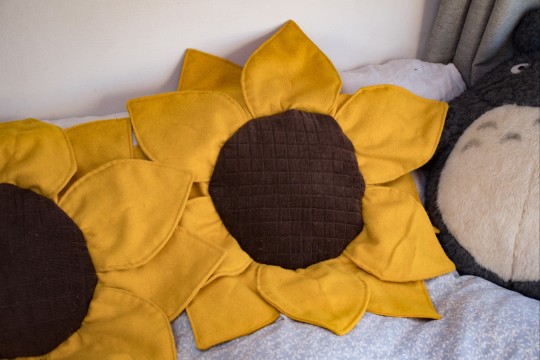
Here's some instructions if you also want to make some 😊
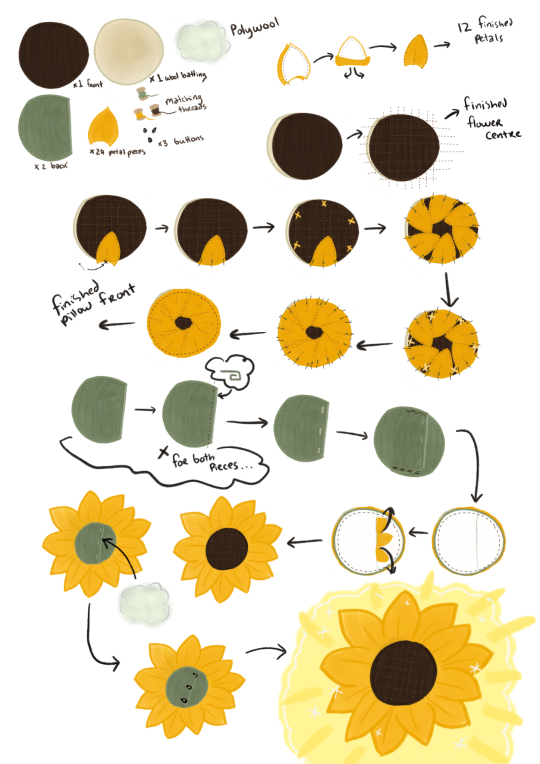
I still need to draw up a sized petal template but I've also made a youtube video (my first one, it's horrible 😂) if you are more of a visual learner.
youtube
1. Cut 1 brown corduroy circle 1 wool batting circle and 2 green 2/3 circles (for the back)
2. Cut 12 pairs of petals (24 pieces total)
3. Sew petal pieces right sides together 1cm away from edges. Turn right sides out and top stitch along the edge. Stitch centre petal seam. Repeat for all petals
4. Quilt your brown centre to the wool. I made lines about 1.5cm apart making a grid.
5 Pin 6 of your petals centre first evenly spaced around the edge. Pin the last 6 over the gaps. Sew 1 cm from the edge
6 Roll hem the straight edge of the 2/3 circle pieces (a rol hem to folding and then folding again)
7 make 3 button holes evenly spaced on one back piece
8 secure the pieces to eachother both having right sides up, creating a pocket
9 fold on your petals and pin your back piece right sides together to your flower front. Sew 1.5cm around the edge and turn out through the pocket.
10 stuff your pillow then add buttons to fit the holes you made earlier. I do the buttons last to make sure they fit nicely when fully puffed.
11 yayyyy pillow!
#cottagecore#slow living#cottagecore aesthetic#hobbitcore#sewityourself#diy#sewing tutorial#free sewing pattern#cottage life#Youtube
363 notes
·
View notes
Text

Crochet A Sturdy Shell Bag - Two Tutorials & Yarn Suggestions Too: 👉 https://buff.ly/2VLKxKJ
831 notes
·
View notes
Text
youtube
A meticulously deep dive into making a personalized pattern for a tunic or dress.
And her PDF
Much more info and time stamps are on the video description if you open it via youtube
The amount of detail she goes into is outstanding!
154 notes
·
View notes
Text

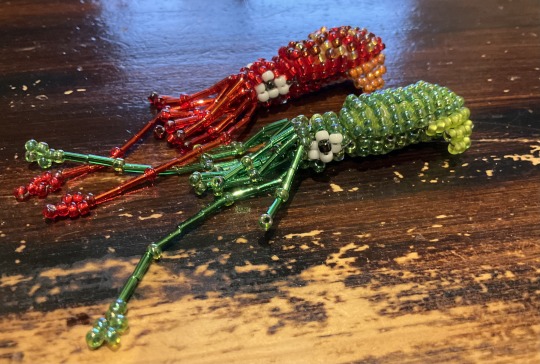
Made a pair of lil squid fellas to sit on my desk :)
I didn’t like any of the squid patterns I found on the internet so i ended up making my own, and after some trial and error I ended up with these little guys. They’ve both even got little beaks!
I’ve attached the pattern I made below if anyone wants it haha.
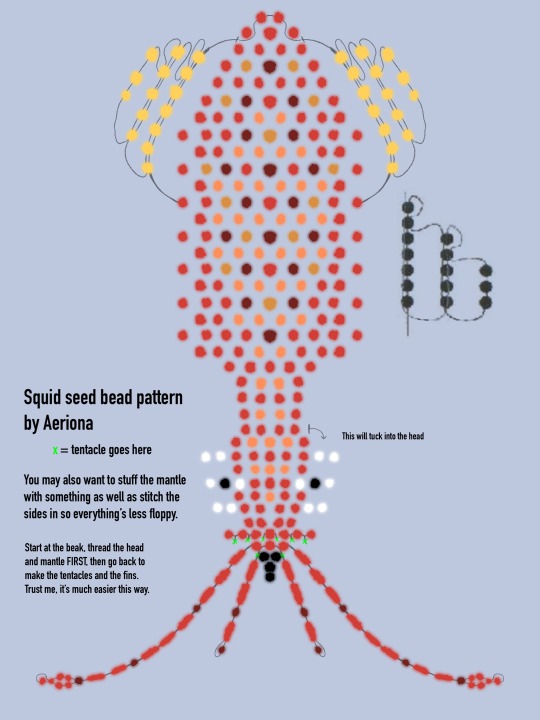
I used size 8 miyuki rocaille/round beads, some bugles and 0.28mm thread, but pretty much any size or shape should work. Hell, you could even use pony beads if you’re crazy enough.
If your thread’s long enough you can even do the whole thing in one go, I’d personally recommend that as it means you have less knots to tie up :).
#Surprise craft tutorial jumpscare#I love these little guys so much i had to share them with the world#My art#squid#beadwork#glass beads#seed beads#pattern#bead pattern#tutorial#crafts#craftblr
227 notes
·
View notes
Text
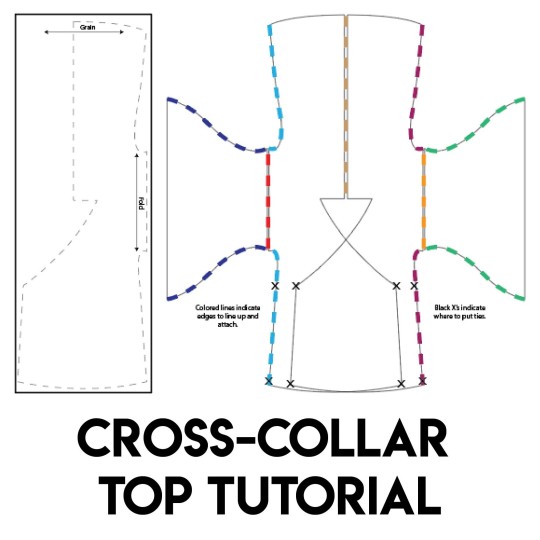
hello to the two people following me :) I haven't shared any patterns I've created before for sewing, but in making some period c-drama and danmei inspired cosplays and my resurging Hanfu fixation realized there aren't many good English resources for sewing cross-collar tops for zhongyi and other pieces so I made my own!
there are three pages but I tried to pack a bunch of information into it and you can download it via Gumroad for free :) I'm also entirely down to help out with patterning for anyone (if any lol) who might want to use this little pattern tutorial.
✨download link✨
220 notes
·
View notes
Photo


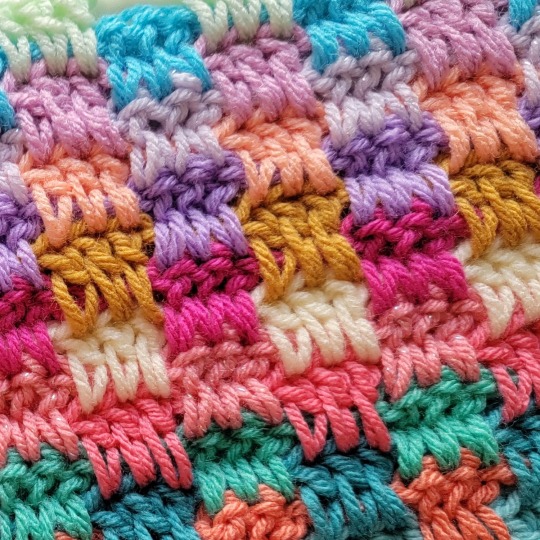
It's #wipwednesday! What are you working on this week? 👋🌟💝
Next free blanket on my hook! This is the Triple Interlocking Block Stitch, video on my YouTube channel! Tutorial here! 💖
Link to my blog/website: https://crochetml.com/
https://crochetml.com/free-crochet-patterns/
Check out the tiktok here!
#yarn#fiber#fiber art#fiber arts#fiber artists#fiber artist#crochet#crocheting#crocheted#crochet pattern#crochet patterns#free crochet pattern#free crochet tutorial#free crochet patterns#free crochet tutorials#crochet tutorial#crochet tutorials#video#videos#tiktok#tiktoks#diy#how to#crafts#crafting#crafty#craft#wip#wips#work in progress
877 notes
·
View notes
Last Seen Blogs

troyeblemaker-archives
〜 IN A DREAM 〜

smitecosplay
Smite Cosplay

studylais
Teen idle

allonasyreking
Kuro Arashi

mrcmh2000
Untitled