#eyelets
Photo
summer binder picture tutorial
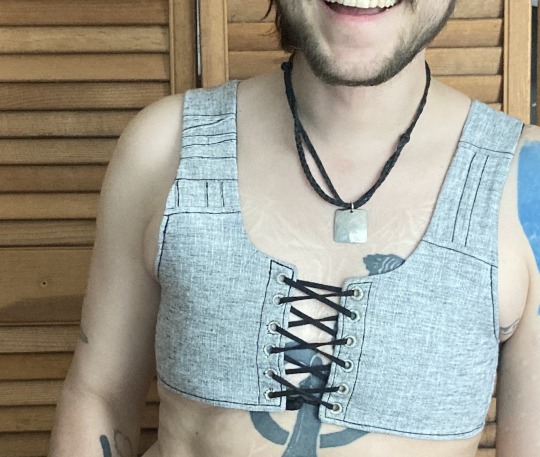
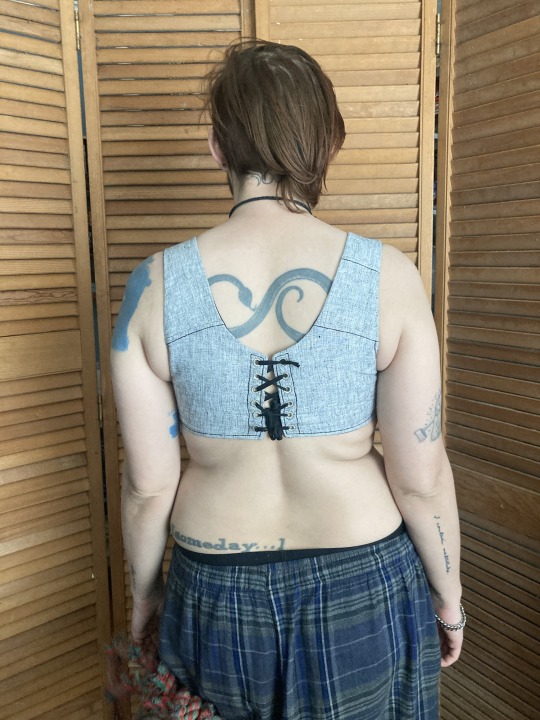
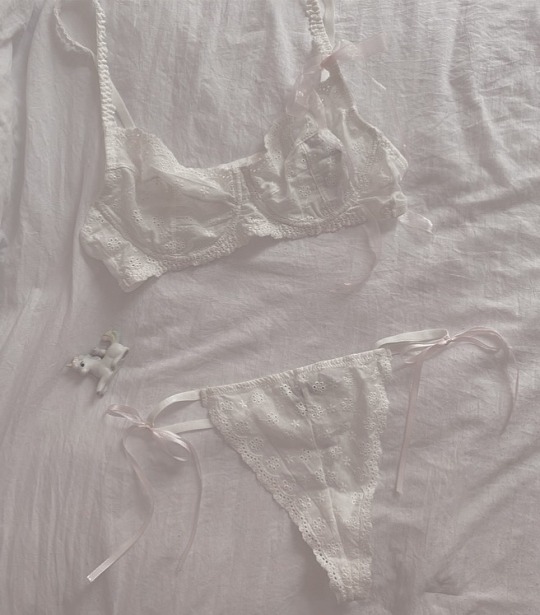
this is the third binder ive made for myself recently and the first one i’m writing up. it’s designed to do a few things: 1) allow me to put it on by myself without dislocating my shoulders 2) allow me to breathe well enough to partake in normal activity 3) be cool enough to wear throughout a muggy 90-100F summer 4) not constrict my ribs in a way that aggravates my lack of connective tissue and causes intense pain.
this has become necessary even though i had top surgery many years ago, because when i had it i was extremely skinny and since then i’ve increased in size by about 50%. this has been really fucking good for my health in every single way* except that when my chest is squishy or moves at all it’s So Goddamn Triggering for me. but also since ive had top surgery ive developed and/or been made away of a plethora of chronic conditions that make every single commercially available binding option medically impossible. unbound, my chest is pretty much what you’d expect for a chubby cis guy but venturing out into the world in just a tshirt no longer works for me
*anyone who badmouths weight gain or fat bodies in the notes WILL be blocked
under the cut are a bunch of process pictures and explanations of what they all mean:
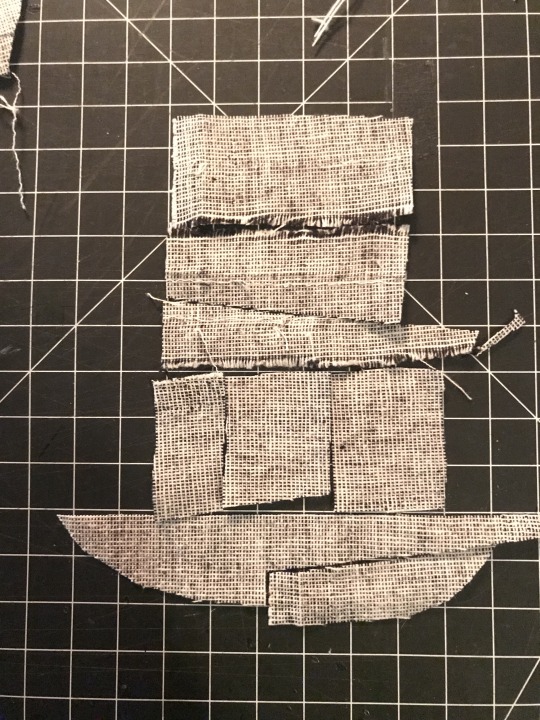
first i’ll give you a look at the pieces and measurements:
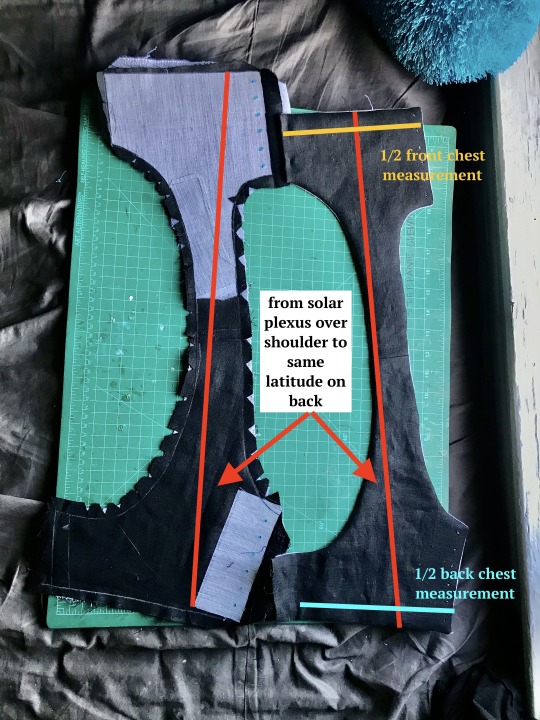
most of the seams are sewn in this picture and one half is turned inside out, allowing you to see both the finished dimensions (right) and the placement of the fusible horsehair canvas that gives this lil scrap of linen any structure at all (left)
to get your chest measurement, you’re gonna have to do some math:
first measure above and below what you want to bind. average these numbers. mine are something like 32 and 34, which average to 33. subtract a few inches--this is to allow the air movement between the laces at center front and back, critical in the summertime. i deleted 3 inches bc i like that number but you can go bigger if you want. the more inches you subtract here, the more youll be able to ratchet all your chest material down later, but at the same time you need to leave enough fabric for a sturdy garment. let’s say a range of 2-6 inches/5-15cm. by taking your measurements this way, you’re essentially measuring the chest you would like to have. that + the horsehair canvas work together to compress any squishy tissue/force anything that doesnt compress up and to the outside (basically into the armpit/lower shoulder--the chest might stick out but it will give a very puffed chest captain america pectoral silhouette)
you can also see how ive clipped my curves and pre-drilled my lacing holes. i used the marlin spike on my knife to open up the holes on the interfacing side, mainly as a way of marking them. this worked well bc the interfacing’s glue kept the linen from raveling
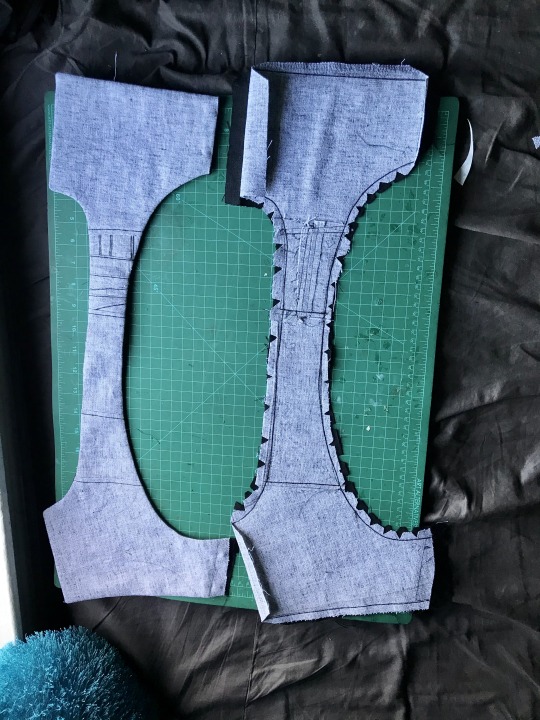
this is the same stage but looking at the non-interfaced grey linen/cotton blend (the black is some 100% linen from my cabbage stash). you can see ive broken the solar-plexus-to-back measurement up into a bunch of pieces to save on fabric but that’s not necessary. my original pattern was just two pieces (front and back) and chopping the straps into thirds on both sides was aesthetic
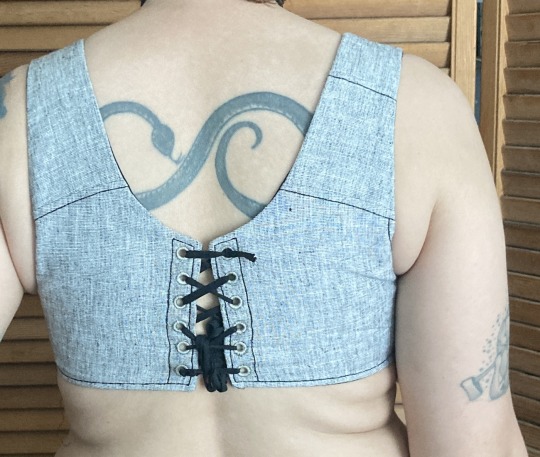
in the following picture you can really see how this is really just overgrown regency stays:
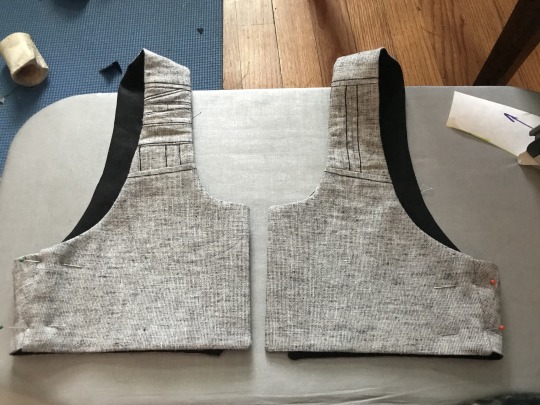
i thought about doing side lacing but didn’t think that would be comfortable for me. on the front, the side seam allowance was pressed inwards before turning to create a finished looking slot. on the back the side seam is left unfinished with an extra wide seam allowance, and is inserted into that slot.
here’s a closeup on it pinned in place (you can adjust the angle of the side seam and the fit during this pinning stage):
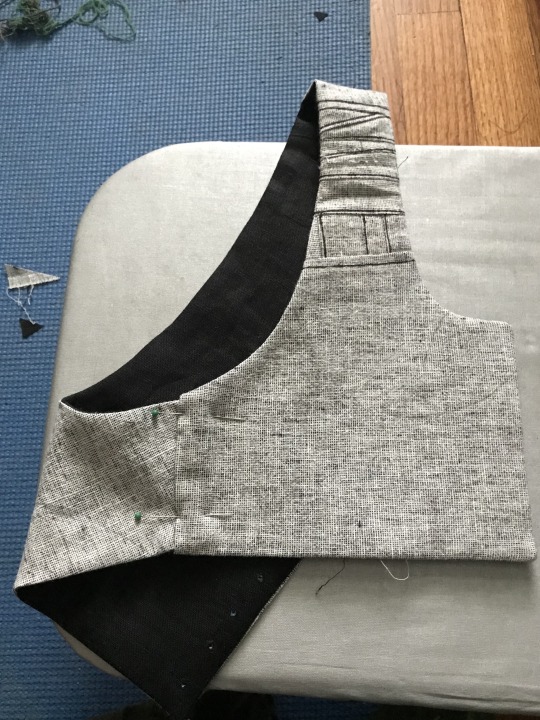
that side seam was just topstitched in place once i had the fit how i liked it, and the armhole was reinforced with more topstitching
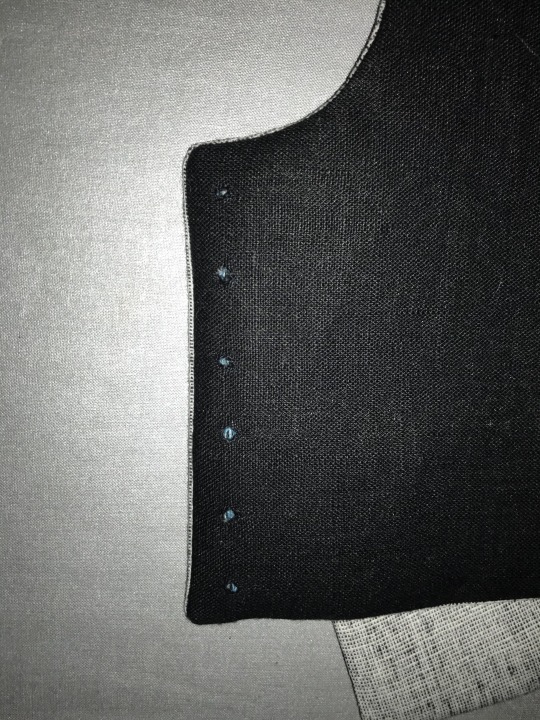
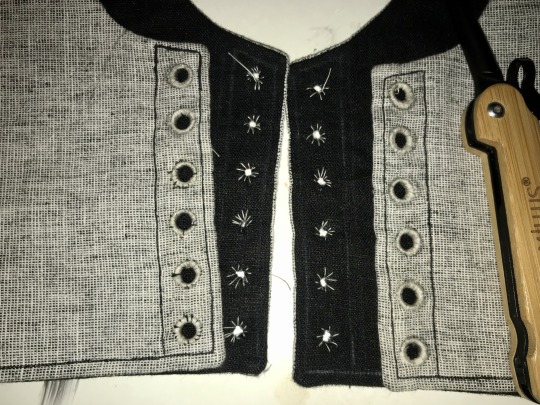
alright, time for eyelets: first, you can see how well the marking worked:
next, two rows of basted eyelets (left), one row of eyelets sewn with a doubled and waxed cotton thread (center right), and one row of eyelets opened and stainless steel rings placed (right).
next time i’m going to mark the eyelets same as i did above, but do this step differently--i’ll mark and baste the steel rings in place BEFORE widening the eyelets. this is bc i had a lot of problems keeping the eyelets on center
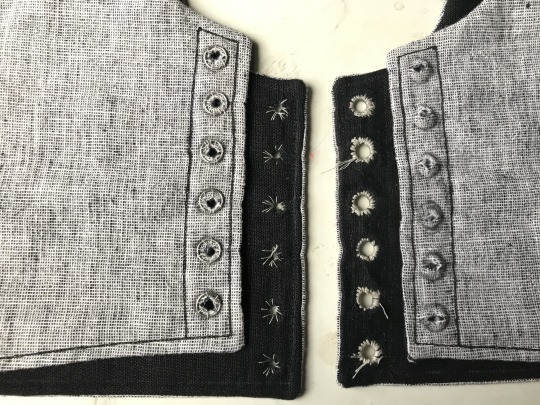
eyelets half done on this one! on the left are eyelets sewn with doubled and waxed cotton thread and on the right eyelets sewn with quadrupled and waxed thread. the center is basting again. i was able to force the holes back in line while sewing the eyelets but it was kinda annoying. adding a second picture that doesnt have great focus but hopefully shows how that process worked and shows the spike clearly

i ended up using this white cotton thread because it’s stronger than my black cotton thread (which the rest of it is sewn with). [eta: after this was first posted, i pressed the whole thing heavily, which effectively de-waxed the thread, and i dyed the whole thing a medium charcoal grey, the thread blends in perfectly on the lighter side and isn’t such a sore thumb on the darker side]
bonus: the piecing layout for that little piece of strap. the whole light gray half of the binder was made from 1/2 of one of the legs i cut off some linen suit pants to make slutty camping shorts last year and i really really didn’t want to break into any of the other three halves for this garment--i have Plans for it
overall the fit of this is incredible. it DOESNT hurt my ribs which every zip-up garment ive been able to find (and it is difficult) does due to really thick elastic at the base. it doesnt aggravate my sensory issues with the synthetic fibers that every commercial option is made of. i can walk up a hill or stairs, or go to pt, without getting too out of breath. i can eat with it tight, or loosen the front easily and without taking it off to make eating easier and less nausea-inducing. it is reversible!
best of all the lacing at the back gives the garment enough movement for me to get it on without dislocating, and the interfacing and steel rings give it structure once it’s on. the shaping comes only from fusible horsehair linen canvas and stainless steel rings like youd use for chainmail, there’s no boning at all, which makes it very quick to sew (except the eyelets, but metal grommets would be sturdy and quick provided theyre of good quality)
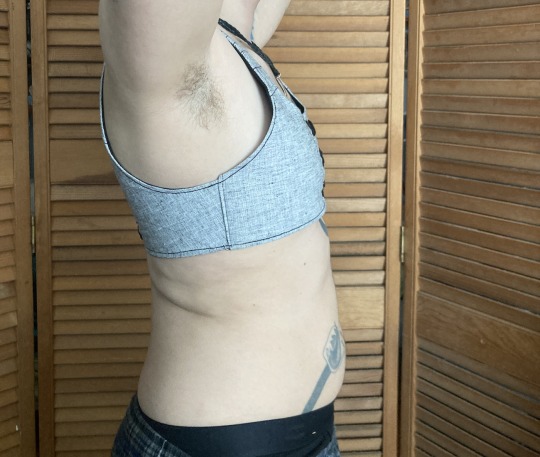
there’s a small amount of gaping on the outside of the shoulder strap, which i plan on fixing with a tiny tiny dart in the armpit, i want to add pockets to tuck the laces into, and i need a better lace for the back, but it’s completely wearable in time for the 90 weather next week which is all i wanted. i’ll do a reblog when it’s perfectly finished with an update on the fit but for now it is done enough
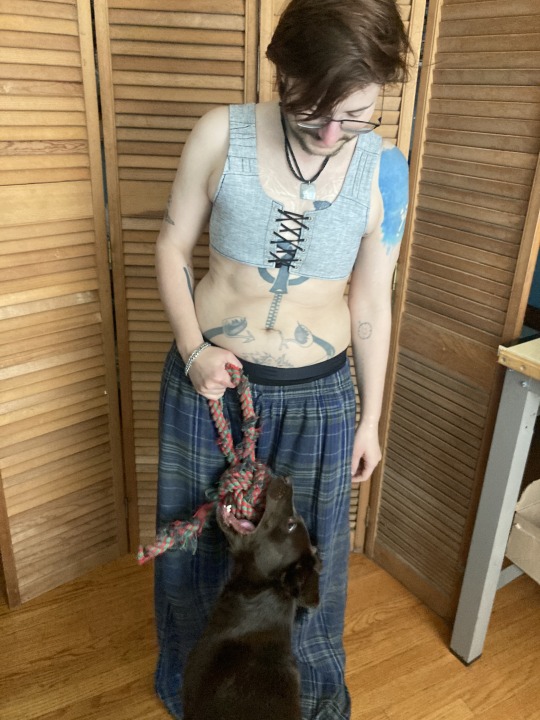
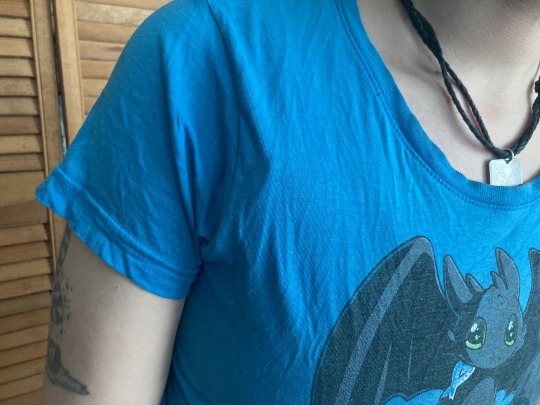
the little ridge where it doesnt lay flat against the shoulder is most visible with just a single t shirt over it. with a flannel or a sweater, it disappears, and by itself, it’s hidden in movement
eta: after dyeing this, i relaced it a bit looser in the back and that gape mainly disappeared. ive decided to leave it in instead of smoothing it with a dart because the loose fabric gives space for my chest to expand when breathing and shapes my silhouette in a way that emphasizes my shoulders
#sewing#trans#trans man#binding#body shaping#cotton#disability accommodations#physical#sensory#eyelets#fusible interfacing#historical fashion#regency#horsehair canvas#lacing#linen#lining#new build#drafted pattern#picture tutorial#piecing is contemporary too#stainless steel#stashbusting#stays#structured garment#treadle machine
1K notes
·
View notes
Text


🪞
#mirror palais#fashion#coquette#coquette fashion#cinnamon girl#danielle garza#eyelet#style#inspo#soft girl#mediterranean#mediterranean aesthetic#Latin fairy aesthetic#latin fairy#eyelets#interiors#interior design#im just a girl#just girly things#style inspiration#style inspo#fashion inspo#fashion inspiration#aesthetic#mystical coquette
157 notes
·
View notes
Text


3.14! The pattern is live! And it very much appears that naming something 3.14 is a terrible idea for Ravelry visibility.
3.14 is a hooded cape based on shawl shaping ideas, so it’s handy if you’d rather wear a hooded cape instead of a shawl I guess. Really ridiculously warm, all the yarns are discontinued (oh no) but I was not thrilled to pieces with how the acrylic blocked out, so maybe this is secretly good.
#knit#knitting#3.14 hoodie cape#Eyelets#ribbing#cape#hoodie#lilac colors#i feel like i could knit a half dozen of these with tiny variations
52 notes
·
View notes
Text
#my pics#dollcore#dollette#coquette#soft girl#nympette#lovecore#soft fashion#angelcore#pink blog#girlblogging#farmers daughter#eyelets
10 notes
·
View notes
Text

SCHIAPARELLI
#schiaparelli#hautefashion#haute couture#couture#white dress#eyelets#lace#white lace#white#neckline#evening dress#dress#january#winter#toya's tales#style#toyastales#toyas tales#fashion#clothing#fashion photography#fashion inspiration#fashion trends#fashion details#designer
13 notes
·
View notes
Text
SABO | sabo luxe
#sabo luxe#tatum dress#palmier dress#chiara dress#spring/summer#eyelets#white#linen#feminine#fashion#my style#us.saboskirt.com
6 notes
·
View notes
Text

Daniela Garza for Mirror Palais
4 notes
·
View notes
Text
youtube
Here are 5 MORE great stitches for creating lettering in hand embroidery, all contained in one handy video! New to embroidery? Have a look at my 'Top 5 Beginner Stitches' video: https://youtu.be/Tgc8CpuEHFo and my 'French Knots' video: https://youtu.be/f-IZqwwz_4s
If you liked these stitches I recommend taking a look at these 2 Playlists of mine -
A BUNCH OF FIVES
✅ https://www.youtube.com/playlist?list...
THE STITCH LIBRARY
✅ https://www.youtube.com/playlist?list...
0:00 Introduction
0:38 Eyelets
6:04 Fly stitch
11:26 Picot stitch
20:13 Coral stitch
23:24 Twisted chain stitch
28:12 A finishing touch!
Closing music - Avocado Street by Wes Hutchinson
#Sarah Homfray Embroidery#solarpunk#embroidery#how to#how to embroider#diy#do it yourself#embroidery for beginners#embroidery stitches#embroidering letters#letters#Eyelets#fly stitch#Picot stitch#Coral stitch#Twisted chain stitch#Youtube#Eyelet stitch
8 notes
·
View notes
Photo

https://www.apparelbutton.com/Eyelets.html @apparelbuttons #apparelbuttons #eyelets #fashionstyle #fashion #appareldesigner https://www.instagram.com/p/Ch5AZxeMVaR/?igshid=NGJjMDIxMWI=
3 notes
·
View notes
Text
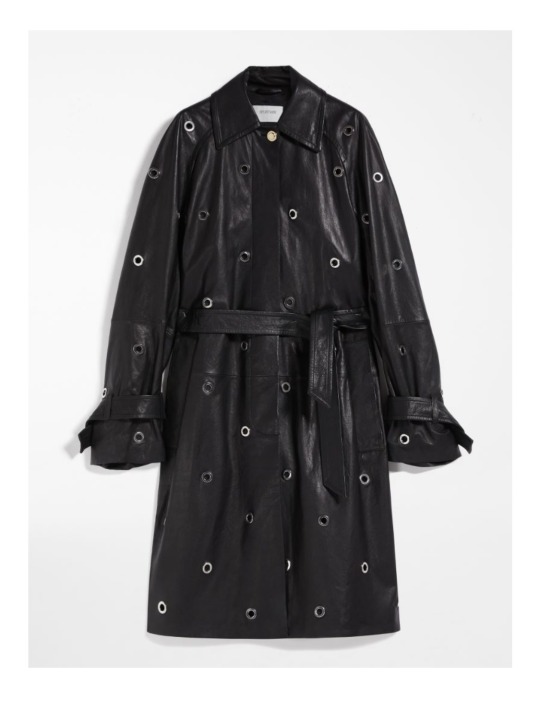


Sportmax “Nappa leather duster coat” 2022
4 notes
·
View notes
Text
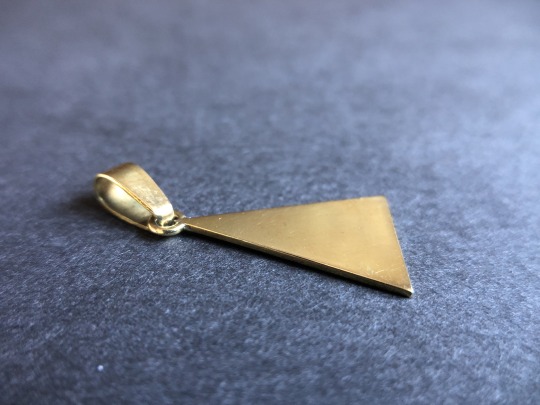
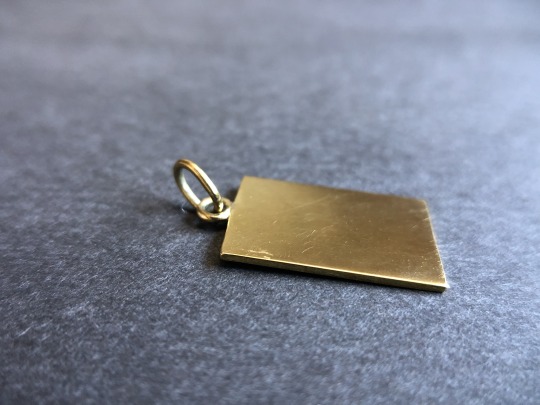

pendants with different types of eyelets, polished brass, 2023
1 note
·
View note
Text
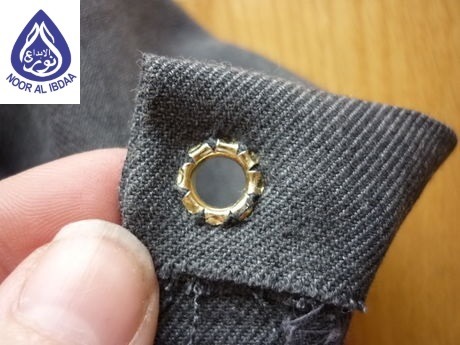
Eyelets are small metal, plastic, or rubber rings with flanges that are used to strengthen or reinforce holes punched in thin fabrics. They are also used as a fastening, with a cord or hook. Eyelets are a versatile fastener that can be used in a variety of applications, including clothing, shoes, bags, and other items.
Eyelets are typically made of metal, such as brass, steel, or nickel. They can also be made of plastic or rubber. Metal eyelets are the most durable and long-lasting, while plastic and rubber eyelets are more lightweight and less expensive.
Eyelets come in a variety of sizes, from small to large. The size of the eyelet is determined by the thickness of the fabric that it will be used on. Eyelets are also available in a variety of finishes, such as silver, gold, and bronze.
To install eyelets, you will need a special tool called an eyelet setter. The eyelet setter is used to punch a hole in the fabric and then to set the eyelet in place. Eyelets can also be sewn in place, but this is not as secure as using an eyelet setter.
Eyelets are a versatile and durable fastener that can be used in a variety of applications. They are a great way to strengthen and reinforce holes in thin fabrics, and they can also be used as a decorative accent.
#Eyelets#noor al ibdaa#Noor Al Ibdaa#Noor Al Ibdaa Building Materials Trading LLC#noor al Ibdaa building materials trading llc
0 notes
Text
#u lace#lace u#discountcode#20%discount#discount20%#deals#sale#buy now#remixd#fashion#20%off#sales#shoelace#customize sneakers#U-Lace elastic shoelaces#elastic shoelaces#customizing trainers#eyelets#united kingdom#Buy Now#Order Now
0 notes
Photo

Don’t worry… we’ll still always carry lots of #plugs & #eyelets for all of us with #stretchedlobes 👂 These ones look awesome alone or with your favorite earrings or shapes through. https://www.instagram.com/p/Cm1qsriLkWP/?igshid=NGJjMDIxMWI=
1 note
·
View note
Last Seen Blogs

librarybi
Untitled
zuszab
___.•*×{♡}×*•.___

yikes-its-cupcakes
nothing makes sense.

biketrace
@BikeTrace
theeyoungalabastor
TheeYoungAlabastor