#free binder sewing pattern
Text
Free binder patterns
Lately I've been needing a binder more and more, but I couldn't find somewhere that had my right size (large chest, small shoulders).
I'm trying these two patterns as soon as I get home, they're both free and I think this could help many crafty trans people.
As for materials, I want to try to make both in different ways to see the most comfortable ones:
the first one I'll make with powermesh and cotton/elastan jersey, probably in white or nude, as instructed (as I know that will work)
the second one I'll make with Lycra (doubled up in the back) and an additional cotton/mesh panel in front (something I've seen done by a few binder companies)
I'll update as soon as I make them, with results and annotated modifications for fit.
If anyone else has patterns to suggest or has experience sewing binders, please add!!
PS: I'm writing this because when you look up on google "chest binder sewing pattern" most of the results are bad diys with zippers and elastic tape, while there are limited resources for actual sewists who know what they're doing (I've been looking for a while and found only these two)
#binder#chest binder#trans#trans resources#binder sewing#sewing#trans man#non binary#nonbinary#trans masc#ftm binding#binding#free binder sewing pattern
247 notes
·
View notes
Text
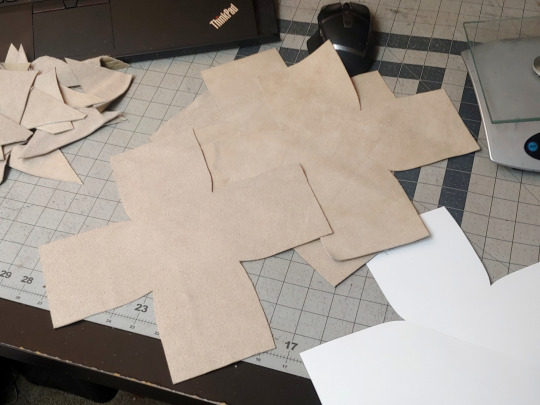
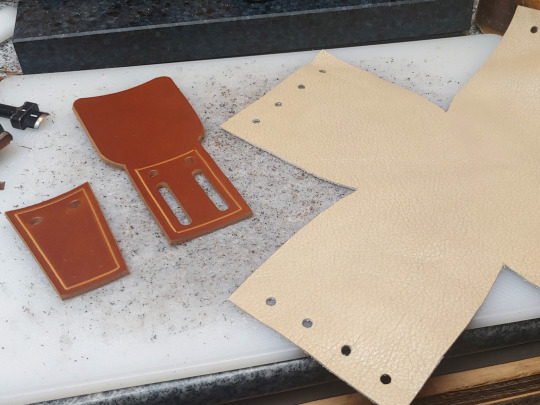
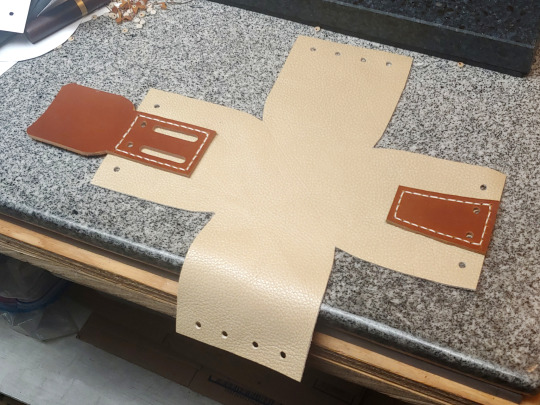
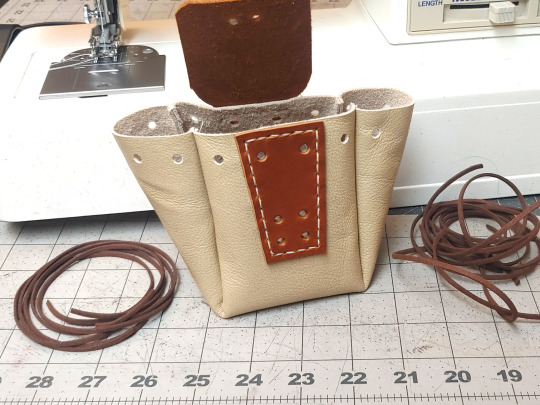
COUCH POUCH!! Free Pattern & Tutorial
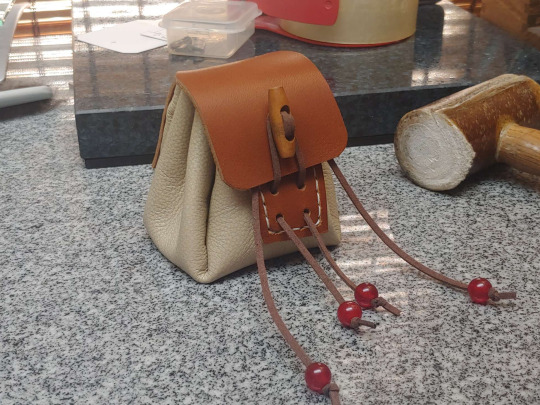
...called thus because they use upholstery-weight leather for the bag body, that in my case was in fact skinned off a couch. 🤣 Turns out they are relatively quick and easy to make, so I tidied up the pattern for printing and took pictures to document the process when I made another five of them.

First off, print your pattern, 100% scale:
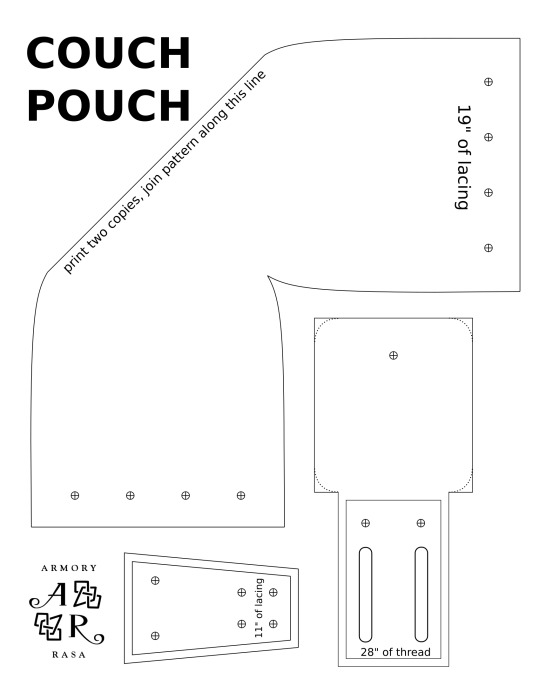
The bag shape was a modified version of the pattern I used for the Morpheus sandbag, but sized to fit in the roughly 11" squares that my couch skin came in. It makes a bag that sits very well on a tabletop, thanks to the flat base.
Though it turned out to not be the most efficient use of material, because that plus-shaped pattern tessellates well, if you're cutting them out of a full hide, but makes a lot of waste when you're cutting them out of squares of material. A more efficient design would have a half-rounded front and back, and a gusset between them, like so:
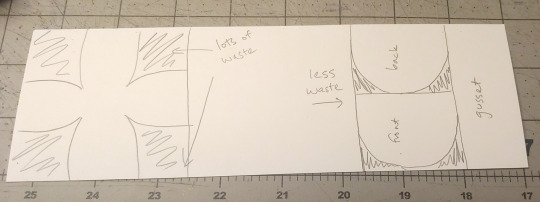
Ah well. It's not like I have any shortage of couch skin, though for the next round I'm going to experiment with a more efficient pattern.
First step, trace and cut out the bag body from your chrome-tan leather:
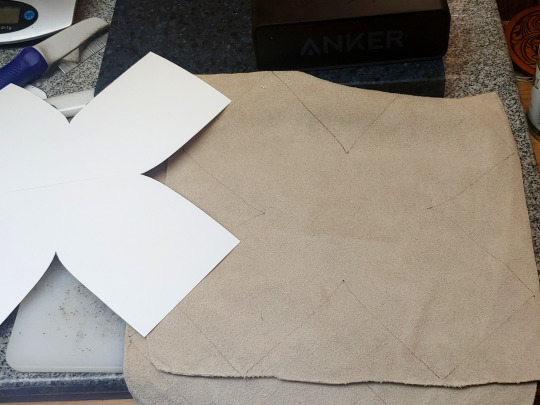
Like I said, this was upholstery leather, but anything that's flexible and ~1.5 mm thick will do.
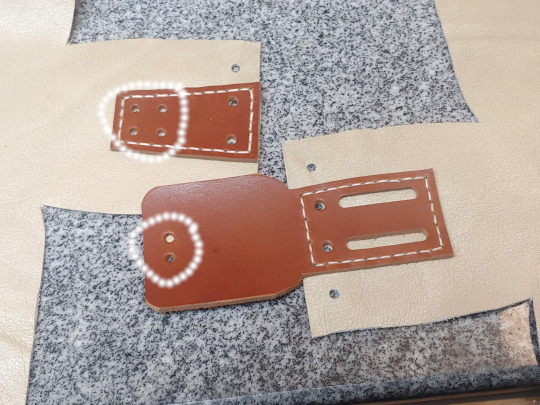
The flap and front need to be a stiffer leather though -- I used 7 oz latigo, but veg-tan would work equally well. (And then you could ✨tool it!✨)
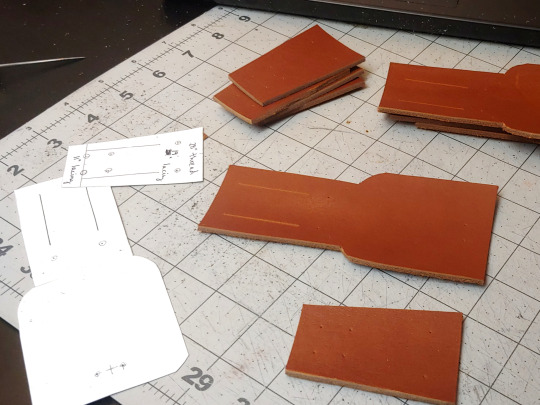
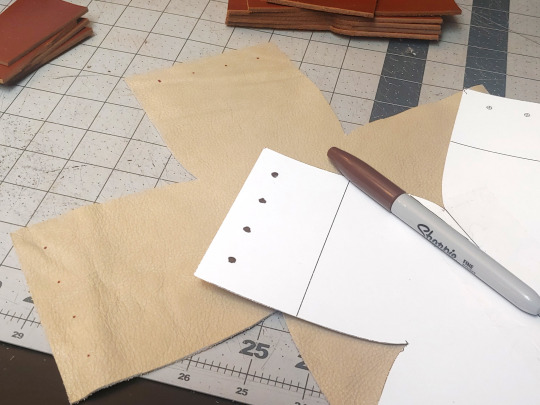
Cut them out, and then use the pattern to mark where your holes are going to be. Mark the holes on your bag body too:
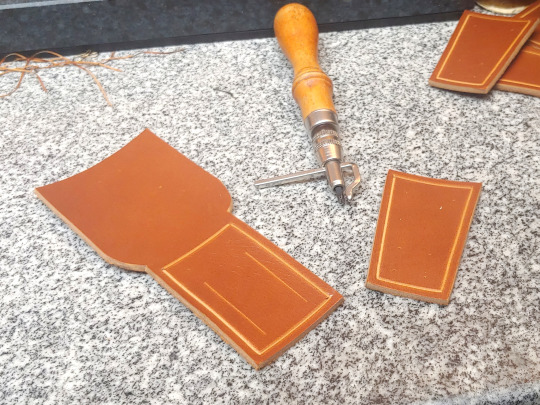
The latigo pieces get hand-stitched to the bag body, so I used a stitching groover to carve out little channels for the thread -- it's not strictly necessary, but it makes your stitches lay a lot more neatly:
Punch the holes shown below:
I used a ~5 mm hole punch for those, and a 1.5" slot punch for the belt loops. Some of the holes on the front piece you're not punching yet, because they need to go through both layers.
I put a dab of contact cement on the pieces (circled in white) to help hold them in place when I go to punch the stitching holes:
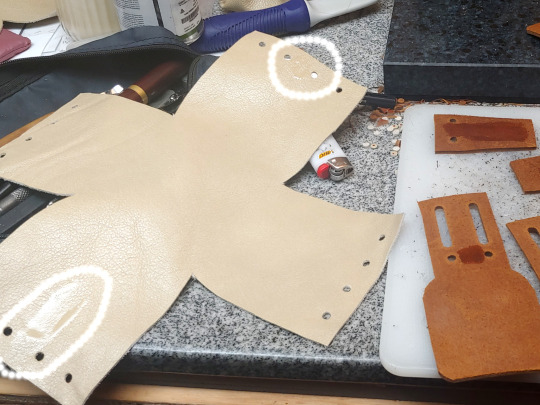
(Make sure you're not putting glue between the belt loops)
Wait fifteen minutes for the contact cement to dry until tacky, and then line up the holes and the edges and press the pieces together:
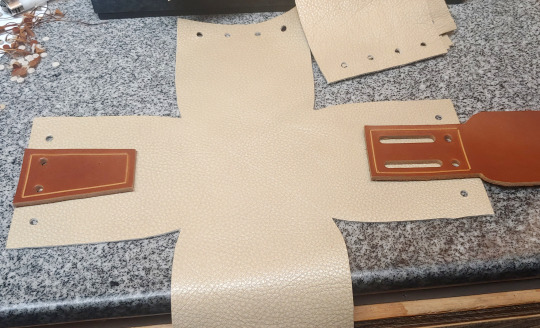
Punch stitching holes:
Saddle-stitch both pieces in place (takes 28" of thread per):
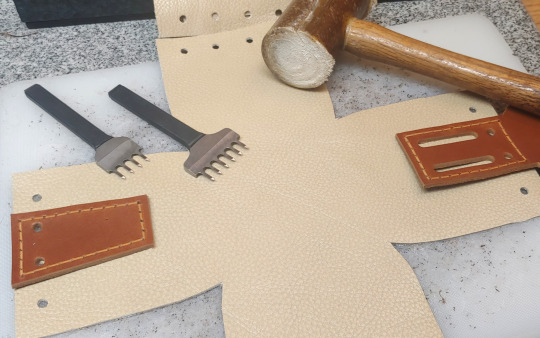
Now you can punch these holes:
(I used a slightly smaller hole punch than for the others, but it doesn't really matter.)
Now press the right sides of the leather together and sew up the seams from the inside:
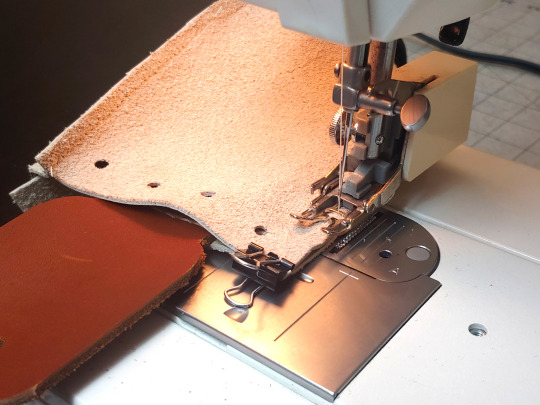
A regular sewing machine should be able to handle this, though you will need thicker thread, a heavy-duty leather-sewing needle, and a walking foot attachment. (If you don't have a walking foot attachment, it is SO WORTH getting one, even if you don't expect to sew much leather. Seriously, I use it for everything -- once you go walking foot, you don't go back. 💀) Because you can't pin leather without leaving permanent holes in it, tiny binder clips can be helpful for keeping your material lined up.
What they look like when you're finished sewing:
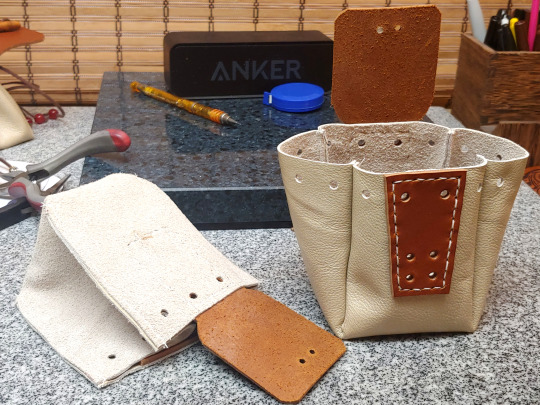
Cut 19" of lacing for the drawstring, and 11" of lacing for the toggle:
I use the 1/8" EcoSoft lace from Tandy, I think it's stronger than real leather would be at that thickness. The only important factor here is that you need something with a bit of texture and friction -- a silk cord isn't going to stay closed, it's going to slip open.
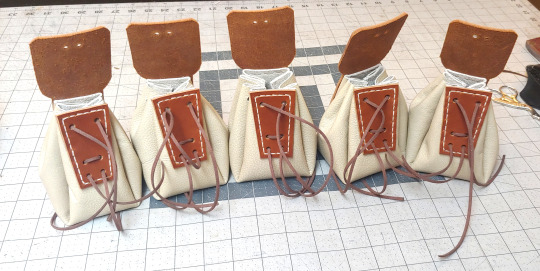
MANY BAGS.
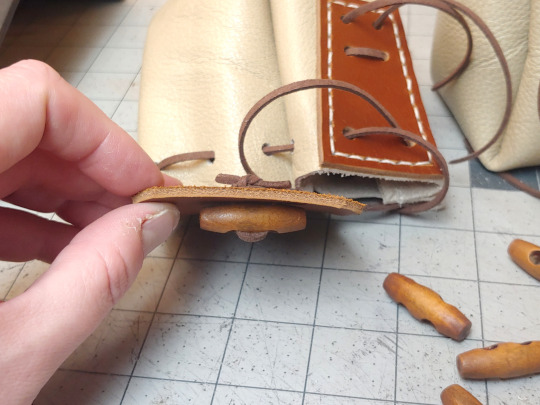
For these I used a wooden toggle -- cut another 8" of lacing, looped it through the toggle twice, and then made a tight square knot on the back:
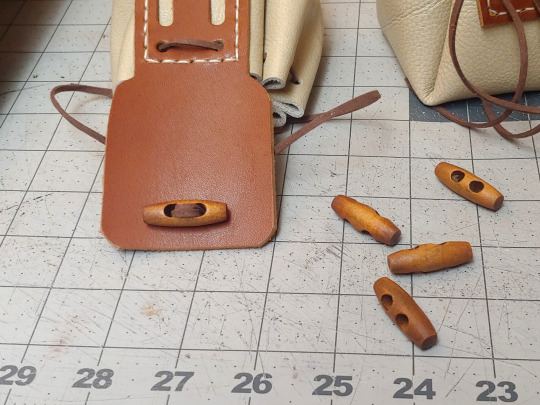
But another option is putting a concho or a large button on the flap. The bag I copied this design from, in fact, uses a concho toggle:

Thread some beads on the laces to keep the ends from getting lost, and you are DONE! 😁
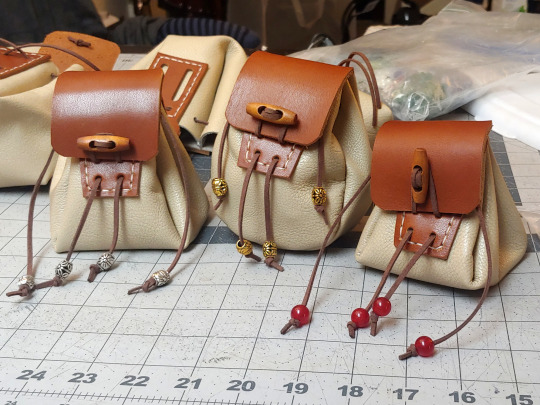
Happy Bagging!
571 notes
·
View notes
Text
FREE SEWING PATTERNS
https://blog.pattern-vault.com/free-designer-patterns/
https://www.moodfabrics.com/blog/category/free-sewing-patterns/
https://blog.megannielsen.com/2017/12/acacia-underwear/
https://ureshiidesign.ca/blog/binder-free-sewing-pattern-download/
25 notes
·
View notes
Note
i found a free sewing pattern for binders if you go to ureshiidesign.ca and then you search 'binder' in the search thingy there'll be a binder pattern and then if you click on that and go to the botton of the page theres a link to the blog and js click that and thats where the pattern is, the instructions are under another blog post but yeah free binder pattern :)
idk if this belongs on here but i thought id send it in anyway
Thank you! I’m sure this will definitely help someone out there!
13 notes
·
View notes
Note
Could you tell me how to bind fics? I would love to do that so much
I can do my best! So the tutorial i followed when i tried myself for the first time is this one (i believe it’s 3 parts and is super comprehensive!)
Also here’s like a step-by-step of what i do! (feel free to ask more about specifics, this is just to follow along)
- make your typeset (or get one from a fellow binder!)
- print it out (2 pages per sheet, double sided, flip on short edge)
- sort your signatures so the pages are in the correct groupings
- fold your signatures
- press in a book press for at least a few hours
- poke the holes in the center/fold of your signatures (I do 8, one on each side and 3 sets of two throughout the rest)
- sew your signatures! (the video tutorial is linked shows this very well)
- place your sewn textblock back in the press with the spine right at the edge
- glue (PVA binding glue) the spine, coat it and make sure the glue gets in all the ridges and holes
- let dry!
- cut your endpapers to size (8.5x11) and fold them in half w the color/pattern sides touching
- glue endpapers to the outsides of your text block with a thin line of glue along the spine
- guillotine the edges now if you want to!
- add a ribbon bookmark at this point if you want (i glue mine in at the bottom and make sure it’s enough to come out the bottom, up and through the book, and out and around the top so the charm can dangle!)
- glue in your headbands to the top and bottom of the spine
- glue your mull cloth to the spine, leaving little ‘wings’ of overhand on the sides
- glue in a cardstock spine stiffener
- set your completed textblock aside to dry
- cut our your front and back covers and spine from chip board (when measuring, make sure to leave room for your desired amount of overhang)
- glue the spine piece to cardstock of the same height
- flip that over and press your hinges
- create gaps of 7mm from each side of the spine (opposite side of the cardstock that the spine is glued to)
- glue the cardstock from the outside all the way up to that line and attach your front and back covers and press your hinges
- glue your book cloth to the case
- fold it over nice and tight to wrap around your case and glue
- once all your pieces are dry, glue your text block into your case by coating the outside of those endpapers and gluing them directly to the inside of the case (note: make sure you like where your text block is placed in your case before you glue. Also, do NOT glue down the spine, just the front and back)
- decorate your cover! personally i have a Cricut machine to do this but there are so many creative and amazing ways to make them look beautiful :))
Hopefully this was helpful!! Always feel free to slide in my asks w specific questions as well 🫶🏻🫶🏻
4 notes
·
View notes
Text
so i was looking for a pattern for my miku binder and i found this site that has a bunch of FREE binder sewing patterns. I'll be making one in June when my fabric arrives and I'll share how it goes
5 notes
·
View notes
Text
What are Water Soluble Stabilizers?

It's does not take loads of your time within the embroidery hobby till you encounter the term Water Soluble Embroidery Stabilizer, abbreviated as WSS. Water soluble stabilizers ar embroidery backings that dissolve 100% in water and disappear. Water soluble backings ar on the market in a very serious plastic like film kind, and a stabilizer that resembles cloth. They each do identical issue and that one you utilize is personal preference.
What's a remove / wash away stabilizer, is that identical thing? several new embroiderers get WSS confused with tear/wash away backings. A WSS is formed from water soluble fibers that dissolve in water. A tear-wash away embroidery stabilizer is formed from non-soluble fibers (that do not dissolve in water) command along by a water soluble binder. Upon laundry a tear/wash away, the binder dissolves permitting the backing to interrupt apart and also the fibers to clean away, nevertheless the stitches stay firmly secured because of the fibers that stay beneath the stitches.
Freestanding lace, or FSL, is what water soluble stabilizers ar most used for. FSL styles ar digitized to remain along while not the support of stabilizer. The styles ar freelance or "free standing" and holds itself along once the stabilizer is dissolved. With separate lace, you're ready to create elaborated items like ornaments, decorations, jewelry, and more.
You can use water soluble backings for free-motion or programmed computerised embroidery. For free-motion work, they’re nice once you’re operating with materials which will be troublesome to mark, you'll be able to draw your style right them to make your own sewing guide pattern.
When you ar able to dissolve the stabilizer, it has always best to chop away the maximum amount as you'll be able to initial to reduce any mess. Most WSS can dissolve if immersed and agitated in lukewarm water. make certain all the backing dissolves and also the residue is rinsed off your stitches before it dries once more.
Read the full article
0 notes
Text
INDEX: projects and patterns
Patterns and project ideas:
DIY cotton rounds
Easy knitted gloves
Free customisable sewing patterns
Easy rectangle skirt
DIY tote bag
DIY delicates laundry bag
DIY hot pads
Easy fleece hat
Fingerless fleece gloves
Apron pattern
Knitted weighted blanket (by Knitboyknit)
How to make a custom dress form
DIY scrunchies
DIY menstrual pads
Upcycled fabric baskets
DIY scrap fabric basket
DIY garter belt
DIY drawstring bag
Free 1920s sewing patterns
DIY dog bed
Pronouns cross-stitch patterns
Upcycling sweaters
DIY cutlery pouch
Little frog toy (by Boigameista)
Kawaii bat plushie pattern
Elastic waistband pants
DIY pumpkin plushies
DIY fabric flowers
Easy tunic tutorial
Easy knitted sweater
DIY ironing board cover
Recycled glove: chipmunk plushie
Repurposed denim wall organiser
DIY: jeans into denim jacket
DIY measuring tape bracelet
DIY pencil pouch
One hour dress and matching slip dress
DIY reusable dish scrubbers
DIY leggings from old sweaters
DIY fabric yo-yo's
DIY flannel sleep mask
Hooded cowl pattern
Cotton reusable snack bag
Binder pattern drafting tutorial (not free) (by Forestine)
T-shirt to shorts refashion
Oddknit.com
Hooded muffler knitting pattern
DIY scrap-pieced belt
Upcycled denim tic tac toe game
Easy knitted fingerless gloves
DIY grocery bag (pattern drafting instructions)
Homemade candles (by Of-shit-and-fans)
DIY bedside pockets organiser
Jeans to bell-bottom jeans (by Enterthetrees)
Easy vintage wrap top
Knitted dickeys
DIY cable organiser
DIY wrist pincushion
Circle skirts 101
Knitted cowl pattern
Removable winter pockets (by Aeolianblues)
DIY packing pouch and packers (by Fatmasc)
DIY knit/crochet buttons
Cute mouse plushie pattern (by My-darling-boy)
Easy vintage wrap dress
Envelope cushion cover
Heart-shaped zipper pouch
Star Wars craft projects
DIY ear warmers
Crochet vampire bat appliqué
DIY scrap fabric ball
Crochet mannequin head pattern
DIY fabric matching game
DIY cat zipper pouch
Crochet cat/bear basket
(If a link has a Tumblr username in brackets behind it, the link leads to a post I reblogged from someone else instead of a post I wrote myself.)
2K notes
·
View notes
Text
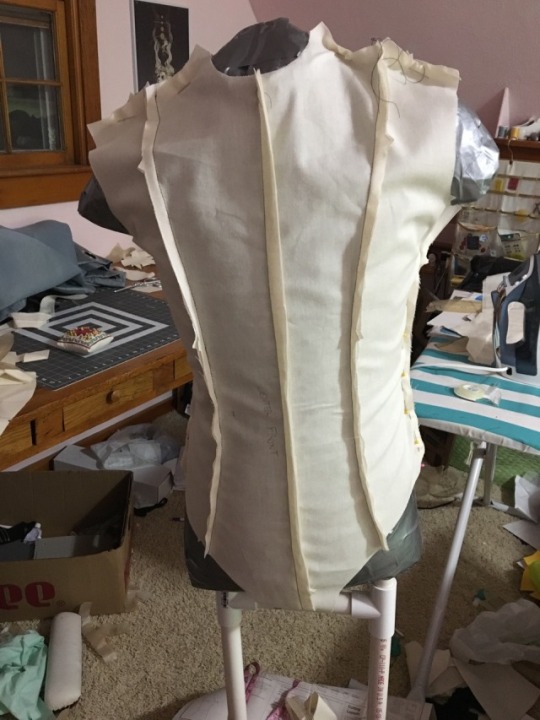
How I made my binding stays (Part 1: the pattern)
By popular demand, here’s a better writeup on the construction of my first attempt at gentleman’s binding stays:
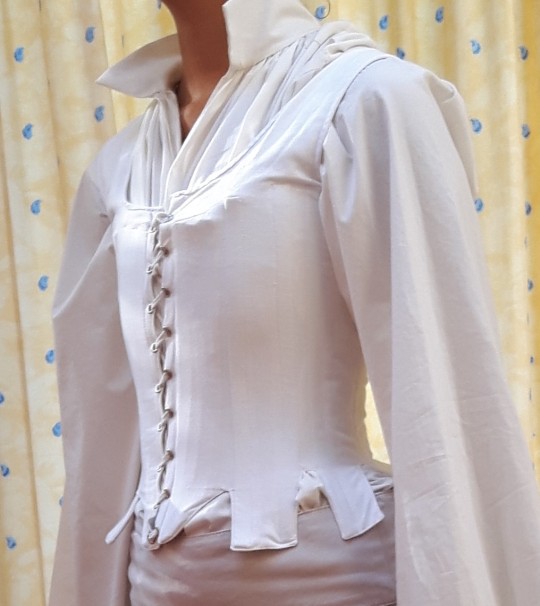

Just like all historical stays and corsets, this is meant to be worn over an underlayer, never on bare skin!
Please keep in mind I made this years ago, with recycled materials and no prior corsetry experience. Nonetheless, I’ve gotten a lot of questions about it, so I’m writing this down so people who want to make an improved version can profit from my mistakes ;)
The idea behind this corset was not to create a perfect binder for everyday use or attempt historical accuracy, it was just a fun experiment to see if I could get a masculine silhouette vaguely using the methods an 19th century gentleman would have access to. It was used to make my gentleman’s outfit fit as it was supposed to, with the added challenge that I needed to be able to dance for a full ball at least.
My research consisted of looking at 19th century political cartoons berating dandies for wearing figure improving garments, which showed a variety of stays, including stays with straps, front and back lacing and tabs along the bottom.
Here’s a link to a great post about men’s fashions in 1830, particularly the underlayers which include belts or corsets
I had just finished my very first pair of stays:
Which honestly shared a lot of similarities with some of the examples of political cartoons as well as being flattening, so to make my life easier I made the pattern for the binding stays from the basis of the elizabethan stays. That pattern was drafted with the free Elizabethan Corset Pattern Generator, which is a wonderful resource.
The alterations to this pattern were:
Add frontlacing, so i could more easily put it on and take it off
Shorten the centerfront point a little bit
Add about 5cm to the top of the front panels to prevent the bust shelf phenomena
Add broad straps to the pattern
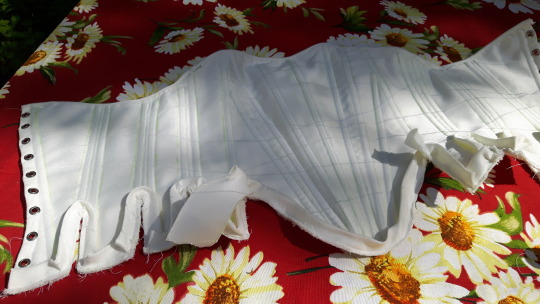
Now, the back is honestly the worst part of this project, but I’ll show you a picture anyway so you know what not to do:

The straps are placed wrong, there’s too much tension on the back lacing and the bottom pulls because of the lacing.
The first fix to this pattern would be not having a shoulder seam in the straps, but to have long straps at the front panel you sew to the back.
Good points of this pattern:
It is comfortable, patricularly the tabs which make sure nothing digs in your waist.
It takes away about 10cm of my chest measurement, only a few cm more than my ribcage.
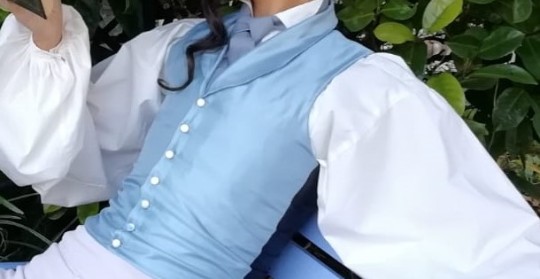
It gives the desired shape, shirts lie smoothly over it and in a waistcoat it gives a pleasing puffed out chest gentleman effect.
It is not difficult to make, this was my second pair of stays and the first corsetry pattern I improvised on and I still ended up with something half decent.
It gives back support which is quite nice.
It makes your entire torso more of a cone, so it does not only flatten your bust, but it also fills in a little of your waist and underbust so you need a little less flattening to look flat.
It makes these looks possible:
And that’s all I have energy for right now, in the next post I’ll explain how I did the boning and construction and what I’d do differently next time (Spoiler: at least use boning that isn’t irreparably curved at the ends and pokes out)
(EDIT: link to the follow-up post)
(EDIT 2: I made a different pair of stays years later that are more comfortable)
#gentleman's corset#binding stays#elizabethan binding stays#sewing#not a tutorial#just an explanation#a talia original#almost my face#for all of you who've been asking#if you've got specific questions you can ask me#i hope this satisfies the general interest#oh and if there's something you want me to include in the followup post do let me know#this does make me feel like making a new version that i can actually wear without boning poking me in the arm#but i've just started a victorian corset and i haven't been a princess in too long and a waistcoat wearer regularly lately#so corsets win
604 notes
·
View notes
Text
Making a 1906 Corset (Part 1/5)
It’s been a while since I’ve been on here and I apologize, uni has taken up so much more of my time than I had anticipated! As of right now I’m on my semester break so hopefully I’ll have some time to at least complete some of the projects on my to-do list. I have a much bigger project coming up but I still have to figure out the design so until then I decided to use some of my scrap coutil and make an Edwardian corset.
I’ve been wanting to make one forever but while I love Edwardian clothing I also feel like they are some of the most difficult ones to make so I always put it off. But now that I’ve found a free pattern from araneablack I’ve decided to give it a go!
This is the one that I’m going for:

(Apologies for the horrendous quality! I screenshotted that from a De Gracieuse magazine)
And this is my paper pattern.
I decided to go for size E which has a waist of 65 cm, I certainly do not have that waist size but I figured if it’s made for 5-10cm waist reduction maybe we can work with it. So I really hope the mockup fits, because let’s be honest, I have absolutely no clue what I’m doing.
First, I’m going to separate the panels again and cut them out of some old bedsheets. Up until now I’ve always sort of eyeballed the seam allowances on my mockups but for this one I wanted to be more precise. I know it’s gonna be less work in the long run!
I stitched everything together and quickly sewed some boning channels and inserted some cable binders. I didn’t cut them because i didn’t wanna waste them as I finally ordered some fake baleen and to my surprise found out that it is much cheaper than cable binders. I’m so sorry for ever recommending cable binders as a “cheap alternative”, I hope you were smarter than me.
Anyways, I tried it on to see if the length was alright and I think it is, then I pinned it onto my mannequin to see if the back fits and even with the padding inserted it seems to be fitting perfectly!
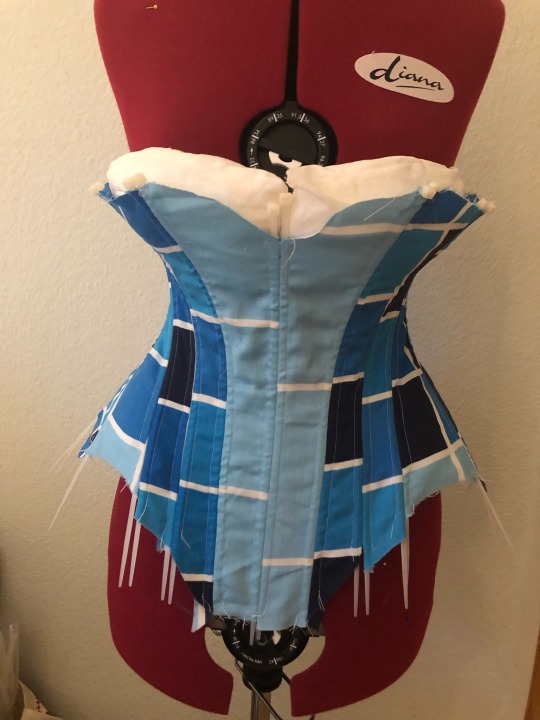


So I didn’t have the right padding and no bum pad (is that even what it’s called?), but I’m going to be making it. I inserted this makeshift padding just to see if it even works at all and it seems to be working out great! I’m obsessed with the shape and the silhouette and I can’t wait to see the final product!
I also didn’t have a front busk so I put in some cable binders as place holders but I’m gonna be ordering that soon!
Obviously, the mannequin is not a real body so I’m not sure how it’s gonna be when I actually pull it tight, I’m a little worried it might still be a little big. I might insert a couple of eyelets and test it out on the mockup but to be completely honest, I don’t want to waste sewing supplies so I might just go with it and hope it works out. I haven’t decided yet. I know the smart thing to do would be to insert the eyelets now and see if it fits. Oh well, I’ll decide tomorrow.
As for the final product, that’ll be one layer cream coutil with some coutil or canvas lining on the front and back pieces just for extra stability, the boning channels will be on the outside and I sort of want to do light blue coutil strips but I’m not sure yet. I have some blue lace I bought for a dress and never used and I really want to use it for this project. I don’t think I will be doing flossing just because it is so freaking tedious and I don’t think I saw it on the original, but maybe I’ll add some details if I feel like it. I’m also not entirely sure if I’ll add suspenders, it is the historically accurate way to do it but I don’t really have a costume to use this corset with so I think I could just add them whenever I need them.
That is it for now, I hope my supplies arrive soon so I can continue working on this!
Part 2 | Part 3 | Part 4 | Part 5
#fashion#historical fashion#fashion history#victorian#edwardian#corset#corset making#sewing#edwardian fashion#victorian fashion#mysewingadventures
82 notes
·
View notes
Note
You seem like someone who may know what they're doing (saw your post about chest binder patterns) so I was wondering if you could answer a question of mine - I'm a trans person who desperately needs a binder. I have one but it's unsafe for me to use as, due to limited mobility, the first time I put it on I got stuck and had to cut a shoulder strap to get out. I don't want to risk putting on a new binder without knowing I can get out of it. I've seen shapeshifters binders with a zipper on them and shapeshifters is from what I remember pretty reputable, so I'm assuming it's safe
Now I've written an essay of a backstory (apologies, but I felt it was necessary for context as I absolutely cannot wear another normal binder), my actual question. Could I sew a side zipper in myself (with a sewing machine)? And would it be safe? Because I'd assume it would serve the same purpose as a seam there, but I wouldn't know and this is something that is damn near impossible to find information on online
So, I've been looking around a bit and I feel like I can just summarize what I know for you to decide:
I've used a zipper in a corset (which is under much more tension than a binder), but the zipper must be metal (it's stronger) and you shoud wear something underneath as I've had my skin pinched by the zipper and it wasnt fun. But I've made it three years ago and it hasn't broken since.
I also have a sports bra with a zipper in the front, and it's really easy to put on as long as you use the hooks before zipping to pull the sides closer.
I don't know how comfortable an underarm zipper could be, the pulley is usually bulky (unless you use an invisible zipper but those are really weak). But it's also the most invisible place, as bot front and back zippers show up under t-shirts
as for adding a zipper to an existing garments, it's usually best practice to place it where there is a seam already as not to disrupt the structure of the binder
As for safety, as long as the zipper doesn't pinch you it should be fine, the only problem I see are the metal rubbing on your skin causing irritation and the stress on the seam. A few solutions could be to add a guard (a piece of fabric behind it, like in the fly of trousers and jeans) and some hooks and eyes in the most stressed places (at least the top to help keep the sides closer, I suggest also a few spots down the lenght: if you can place a hook behind the zipper you should be able to hook it before zipping and it makes everything easier, but the hook must be flat (my sport bra does it and it's a plastic hook like the one you use for taking on and off bra straps and an eye made of flat ribbon))
Another thing to consider is that a zipper isn't elastic, you should first check the lenght of the seam when worn and then match it to a zipper. If possible when installing it you should unpick the stitches in the seam instead of cutting straight down as it's important to keep the right size .
If you need any help feel free to send me a message!!
2 notes
·
View notes
Text
my best tips for transmasc sewing enthusiasts is to
a. avoid stretchy fabric
b. reference patterns from your clothes, not your measurements
c. if you plan on wearing a binder, only try your clothes on while wearing a binder! (this sounds obvious but have made this mistake before)
im very new to sewing so if anyone has any more tips feel free to comment 🙏
17 notes
·
View notes
Text
Here, have a little something.
If anyone remembers my age-old headcanon about Author and Host’s very... interesting “hobby”.
Hope you enjoy! Tell me what you think!
~~
Author hummed as he sat at his workstation, carefully sewing together the fabric he had cut into shape. Carefully sewing the shell of a doll, its body thin, with thin limbs, and mitten-like hands. The head just a little too big for the body, but with cute tiny ears, and a button nose. He kept the shell open at the head -the seam would be just like a jaw parting.
He filled this doll with cotton, making sure it wasn't too soft or too firm, before laying it down onto his opened case of utensils. The case was wooden square, with a part in the middle to be opened, revealing utensils on the inside of the lids -the opened up space empty, for the doll to lay on.
He hummed as he threaded his needle, before carefully sewing the head closed. The seam was tight, and the yarn showed slightly, giving it a slightly eerie look. Once he was done, he pulled open the large thin drawer of the table-top, revealing dozen of pairs of buttons. Humming in thought, his fingers hovered over them, until he picked a pair of large, shiny gold buttons.
He carefully sew them into place for eyes, smiling as he saw his puppet looking back at him. Laying it down again, he shifted to grab dark brown wool, cutting it how he needed it, before preparing his doll's head.
Using tweezers, he carefully attached the wool to the head, making the hair of his doll. Making sure it looked short and spiky, standing up on its own.
Next were the clothes. He laid the doll to the side, reaching for his laid out fabric he's already chosen. He carefully drew the patterns he needed onto them, before cutting out each piece carefully.
Using curved needles, he pinned them together how he needed them, before moving to his sewing machine. He laid the clothes beneath, fastening them, before spinning the wheel of his old machine, and using the foot-pedal to keep it going, humming a song as he worked.
Soon, he was carefully dressing the doll, buttoning its black shirt, pulling up the jeans, and putting on little shoes. Finally done, Author stood from his workstation, holding the doll near gently, making his way to his desk. Right above it was a shelf, on which there were already a handful of puppets.
Satisfied, Author set the doll down on the place he knew it belonged, head slightly tilted.
“There we are. Just like the real deal.”, he hummed, chuckling to himself, as he looked into the eyes of his own puppet.
~
Even now, his room was more of a study than a bedroom. Yes, he had his recording room for his radio and his podcast, and he could use the library however he pleased. But what he didn't want the others to see, stayed in his bedroom.
Where his bed was a mess pushed in a corner, where shelves were filled with his old personal items, his journals and papers, notebooks and binders. The floor was a mess of clothes and papers, boxes of different kinds and sizes.
It was there he had his workstation. His same desk, with the same materials around. His little case of utensils, all of his yarn and wool, his fabrics, his old sewing machine.
And above it the shelf, with the various puppets sitting in their spots.
Carefully, Host picked up his doll, his case of utensils laying open on the desk. Sitting down, he laid the doll down, taking a deep breath.
He turned the doll onto its back, taking his scissors and cutting through the clothes, to pull them away and let them fall into the trash. Laying it back onto its back, he grabbed his tweezers to pull out the hair of the doll, the short bits of wool adding to the trash. Lastly, he cut the threads of the button eyes, slowly pulling them off. With a deep calming breath, he let them slide out of his hands, landing softly on the rest of the trash.
He opened up the seam of the head, revealing the soft stuffing inside. He pulled it out, burying the golden buttons beneath the old fluff, and with a few narrations, the shell of the puppet was free of the remains of what had been Author.
He poured sawdust into the doll, careful to fill it right, before laying it back down on his workstation. He worked in silence, as he threaded the needle, and carefully sew the mouth closed once more.
He held the puppet gently in his hands, knowing the only remains of the eyes he hadn't let disappear looked back at him -torn golden threads, where previously he had had the eyes sewn on.
Shaking his head lightly, he laid it down, grabbing the same old dark brown wool, and now adding golden yellow wool, cutting it longer than the previous strings that he had used. With tweezers and the fitting threaded needle, he added the hair precautiously onto the head, making certain it was pushed back, and had one golden strand coming from the forehead.
Laying the doll down once more, he grabbed the fabric he needed, carefully cutting out the patterns he needed, before pinning them together with his curved needles. His sewing machine had gathered some dust and cobwebs, but that was alright. He wasn't bothered, turning it and starting to sew the clothes together.
He carefully dressed his little doll, buttoning its white shirt, putting on little boots, and finally, tying a trenchcoat fast. He bit his lip as he held the nearly finished puppet in his hands, gingerly grabbing the last piece it needed. Tying the strip of bandages around the puppet's head, tying it in the back.
He stood, holding the doll in both of his hands, looking down at it with such heavy feelings. “The Host hopes we won't have to be changed again.”, he murmured, before gingerly setting the little doll back into its place on the shelf.
#the other is speaking#admin writing#the host#the author#author hc#host hc#/ this is something ive had has headcanon ever since i have written host pretty much#/ never used it really but!#/ it's there#/ and now it has a little thing
7 notes
·
View notes
Note
Hello! I'm preparing to embark on making a Nanny Ashtorath costume and much like you I'm a sticker for authenticity. Yours is fantastic!-- one of the absolute best I've seen and I hope you don't mind if I ask you some questions about it. Did you use a pattern; if so which one? Regarding the skirt length-- I was unable to find a full length screenshot of Crowley/Nanny wearing the outfit; did you find one to determine that it was ankle length? Thank you, again, yours is so utterly fantastic.
@ajconstantine
Thank-you so much! And I don’t mind questions at all :)
I actually dabble in historical costuming and I noticed that this costume just screams “Edwardian!” haha. If you look up Women’s Edwardian walking suits it’s pretty spot on for what it looks like the costume department was aiming for. I stayed as accurate as I could to the time period including all of the underpinnings sans corset because I wear shoulder pads and a binder for David’s more masculine figure.
1)Petticoat: There’s no clear shot of the petticoat from the show that I can find, so I got a little creative here. The skirt just wouldn’t lay right without one so this is a must. I actually didn’t use a pattern here. It’s self drafted based upon a book of illustrated historical patterns I have and it’s basically two triangles with the back being fuller for gathering, darts in the front and a ton of hand gathered cotton lace and ruffles that I spent forever and back hand sewing in place. The waistband ties with grossgrain ribbon. White is period accurate, but I made it black because...Crowley, lol.
2)Skirt: I used Black Snail patterns (you can find them on etsy) here for an Edwardian Walking skirt. You can get a somewhat blurry shot of when David is walking and they focus on the carpet handbag and you can see that it’s ankle length, which is period accurate :) I DEFINITELY recommend investing in horsehair braid for the hem if you can. It gets you the most gorgeous drape. Just *chefs kiss* This skirt is just so much fun to swish around in, too!
3)Coat: I used Black Snail patterns again here and you’ll need to do lot of alterations to get both the collar and sleeve cuffs accurate to the show. This part is finicky (particularly the collar) so I’d definitely make a few mock-ups with muslin/scrap fabric. You’ll also need to the play with the shoulders as the pattern has a (period accurate) dropped shoulder seam and Crowley has a much more modern cut that is higher up.
4)Blouse: Again, Black Snail patterns, haha. You could easily use the 1900s Edwardian Blouse pattern here and be accurate. I was just extra and made mine a pleated shirtwaist even though you won’t see any of the pleating with the coat on, lol. I mainly just wanted this piece to wear for fancier occasions paired with a skirt ;)
Hope this helps! Feel free to ask if you have any further questions.
2 notes
·
View notes
Note
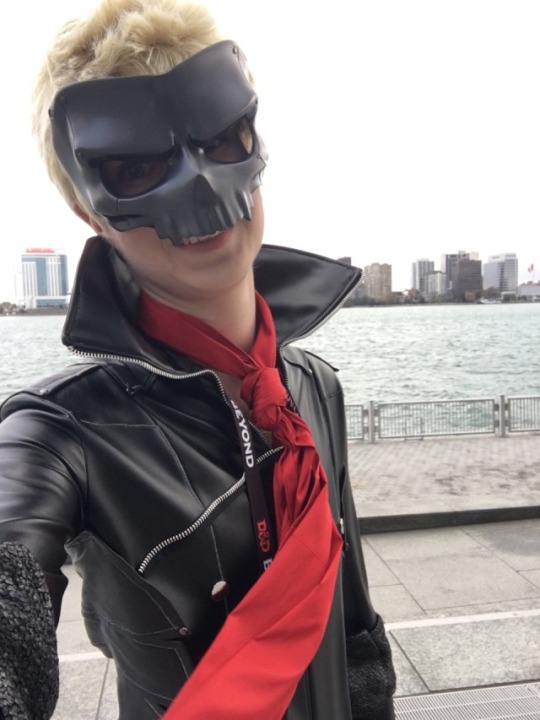
Ahh your so talented i loved your ryuji cosplay you are a perfect ryuhi i just wanted to ask how did you do it i always wanted to cosplay him in his phantom thief attire but never knew how if you have tips or trick or how you done it ?
Thanks! To be honest, most of it was based on combining techniques that had worked in previous costumes I made. But I can offer a combination of general advice and a couple of tricks! (This is gonna be a long post, sorry in advance.)
TIP ONE: choose your fabric really carefully! I ended up choosing a black, slightly textured, slightly stretchy pleather for my fabric. The biggest issue I saw with a lot of Ryuji cosplays for sale is bad fabric choice. Too shiny, too matte, or made from too-thin fabric. Ryuji’s bodysuit is the one that looks the most like it’s just made from sturdy ol’ biker-jacket leather.

Compare to Ann, whose bodysuit is almost as shiny as her mask - it looks like it’s made from high-gloss PVC, or Joker, whose outfit seems to be entirely made from suit fabric.
Another important thing in an outfit is texture contrast. That’s why the gray fabric I chose for the back panels is absolutely smooth - no texture whatsoever, just a smooth plasticy surface. On its own it was too thin and crumply to work for the stiff panels, but once I backed it with an interfacing and layered them together, we were set to go.

TIP 2: MOCK-UP AND FIT! Once your fabric is chosen, the next important step is getting the bodysuit to fit you as perfectly as you can. You don’t want it loose enough to crumple or sag anywhere. (I managed this by making a duct-tape bodyform while wearing a binder, but I’ve done this step many times before without one.) Then, I took my bodysuit pattern (the basic Simplicity one), cut it out of mock-up fabric (a huge bolt of cheap linen), and edited the fabric blocks to fit the bodyform. Those fabric blocks became my new pattern, and I knew it would fit BEFORE i ever touched my scissors to my real fabric.
This is also how I got the back panels to fit! This is a useful trick I learned from making the scales on my Transistor dress. I just took the edited pattern and cut it out of mock-up fabric again. I sewed it up just like the main pattern, then I drew on that linen version where I thought I’d like to have the panels. After a few rounds of edits in linen, doing them in the real fabric was basically painless!

TIP 3: SAND SAND SAND
All of the “metal” pieces (mask, spine, belt buckles, shotgun shells, knee and elbow guards) aren’t metal, I’m sorry to say. The guards are Worbla, and the shells are wood, and the rest are 3D printed. What do all of them have in common? I spent twice as much time sanding them than I spent on the rest of the costume put together. And yes, that was the most necessary step of the whole process.
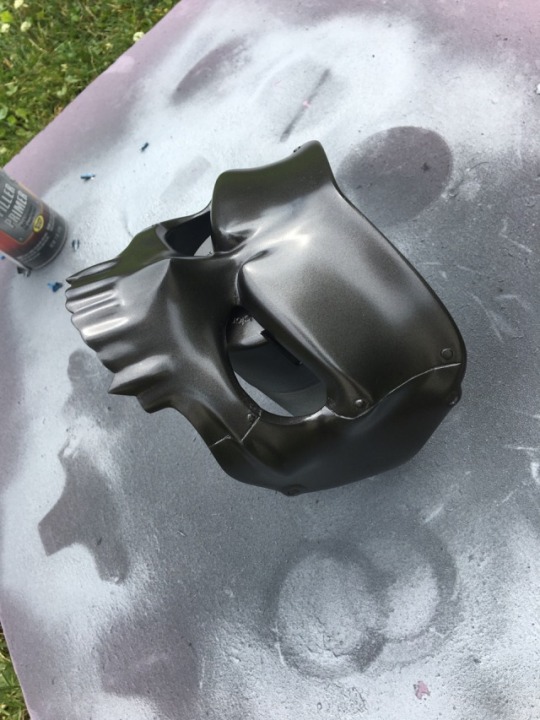
Here’s what the mask looked like straight out of the box (ordered from LevelOneProps on Etsy, great quality stuff there!). See how you can tell where the print lines are really easily?

What you want to do is sand those high ridges away, but it’s easier to also fill in the gaps while you’re doing that. That’s where Automotive Filler Primer Spray and Detail Bondo come in! Automotive Filler Primer is a sandable spray paint that builds layers of material and helps fill in imperfections, and Detail Bondo is a red paste that does the same thing. Regular bondo is a lot tougher, but a lot harder to control in fine detail. Then you take your sandpaper, start at about 100 grit, and sand to higher and higher grits while adding layers and layers of filler primer. Here’s that same mask, half-finished. See how the gray primer fills in the grooves and leaves those striations when you sand away the higher layers? The bondo is on the areas that the filler primer wasn’t covering fast enough, like the undersides of the cheekbones and around the eyes.

Keep going! Slowly! Wet sanding is your friend here - less dust, and the water helps the sandpaper to not get clogged as fast. I spent forever getting everything to as smooth as 220 grit would get me. Then I spent another forever getting everything to as smooth as 320 grit would get me. Then I spent an afternoon polishing everything to a slick 600 grit before giving it a final coat of paint.
TIP FOUR LAST ONE I PROMISE: RAISE UP THOSE DETAILS!
Costumes are full of weird lines, dots, and edges that really don’t mean much of anything. In most cases, they’re just drawings! Nobody’s thought out what you’d have to do to actually wear it. My advice is, whenever possible, take those little edges and dots and lines and make them into raised detailing. Use a zipper like piping! Use heavy-duty snaps like rivets! Use actual leather rivets! Instead of painting that design on, can you applique it? Embroider it? Bead it? Cut it out of craft foam? It all goes back to variations in texture. Texture makes costumes look more interesting, and in almost every case, vary it or make it Different and you’ll have something that’s just good to look at!
This was really fun to write up, and I hope I helped you out! I’m always happy to talk about how I made anything, so if you’re wondering how I made anything in particular, feel free to ask!
49 notes
·
View notes
Note
Do you have any binding advice? I have a relatively small chest, and since DIY/alternative binders usually only involve a little bit of compression, they never flatten my chest :/ I don’t know what to do and I can’t get a professional binder
Okay, so I know I've said this previously, but what worked best for me was to get two sports bras which I took the cups out of and layer them on top of one another to bind. I also wore (and still wear, in fact) shirts which are one size larger (large/extra-large) on top of that. I'm not sure how well this method works for those with chests any larger than mine, but this was one of the only things that did it for me.
I've seen posts about using one-piece bathing suits as a diy binder, as well as sewing patterns for binders, but I'm afraid I don't have them on-hand. I don't generally recommend sewing a binder, especially if you have to use non-stretch fabrics.
Regardless of the (safe) methods you use, follow the standard rules for binding (no more than six to eight hours, give yourself breaks, you know the drill).
If anybody has different (safe!) alternates, feel free to share!
6 notes
·
View notes
Last Seen Blogs

beans-and-shet
I need an intervention

r-o-s-e3
Ros3 ♡

scope-00
compact scopes

seviyoruzgibigibi
Nazlı
erros429
erros!