armory-rasa
the armorer is in
adventures of a kink & costume leatherworker.
Website - Facebook - dA - Instagram
672 posts
Don't wanna be here? Send us removal request.
Last Seen Blogs

shankarhalder
SEO Expert, Google Analytics, Google Ads & Facebook Ads Expert

kingsunboo
范丞丞的妾

justahalfwayhome
Just A Halfway Home

brothertedd
#brothertedd
Note
I can't speak on textiles broadly, but I know you can over-dye the wool from black sheep with blue dye (which, from woad, was a super common dye stuff in Europe all the way back to the Neolithic period) to get a richer black fabric. In viking-era Scandinavia this color was called "blar" -- a term that has caused academic fistfights among subsequent historians over whether it means blue or black -- and while it seems to have been a striking color for clothing (based on saga evidence), it doesn't seem to have been all that rare.
Leather is even easier to dye black (despite the common misconception that black leather in a historical/fantasy setting would be impossible, or impossibly expensive). All you have to do is soak iron shavings in vinegar to get vinegaroon, which is not quite as intense as modern black dyes, but will look black once it's been waxed/oiled.
In any case, there certainly are processes that can achieve a true black in leather and textiles even using pre-modern materials and technology, but whether people would have had local access to those materials (like the black merino sheep), or know how to do those processes (some of which are quite involved and counter-intuitive), is going to vary a lot by time/place.
So I've seen conflicting stories about the colour black in history.
Some say it's very expensive and hard to maintain, so that's why rich merchants wore black. Evidence in portraits.
Some say that for dyes it's on the cheaper side actually.
Some say the expensive black doesn't come from dye but rather the colour of the animal, so black fabric comes from black fibre which comes from black sheep. How exactly would black sheep be more expensive than regular white sheep?
Which one is right? I know this is probably influenced by which century it's set in, like maybe some eras have an easier time getting black dye
I found a well-sourced blog post about this, luckily, because I'm a 19th-century focused researcher and I've heard conflicting things about black in earlier periods. It seems to be that high-quality black-dyed fabric was difficult to obtain in the west from the Middle Ages potentially through the 18th century because it required massive amounts of dye to get the color very deep ("true black"). Lesser black shades were quite common, though, so black, period, doesn't seem to be more expensive than any other color. Possibly the intensively dyed, deep blacks might have been? But not black in general.
source
Rich merchants did wear black- but so did other people. They just usually didn't have portraits.
The black sheep thing I've never heard before. And anyway, that could only apply to wool- not cotton, linen, silk, leather, etc.
1K notes
·
View notes
Text
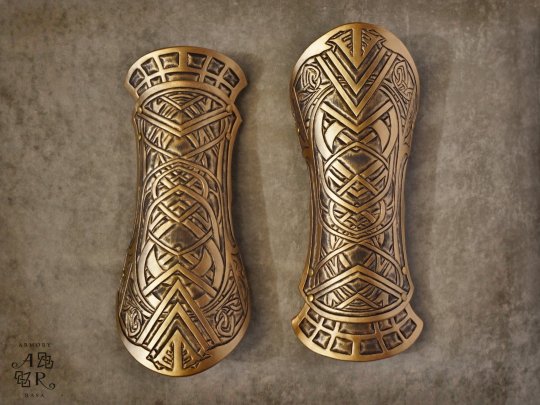
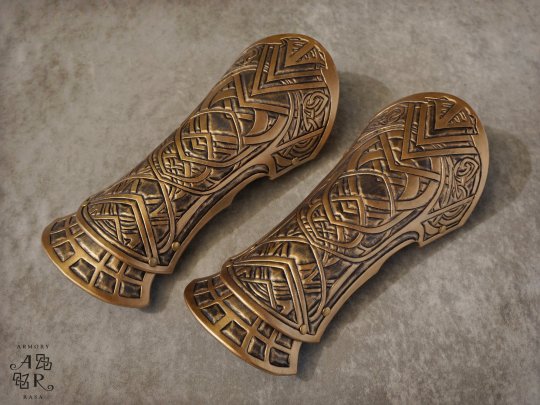


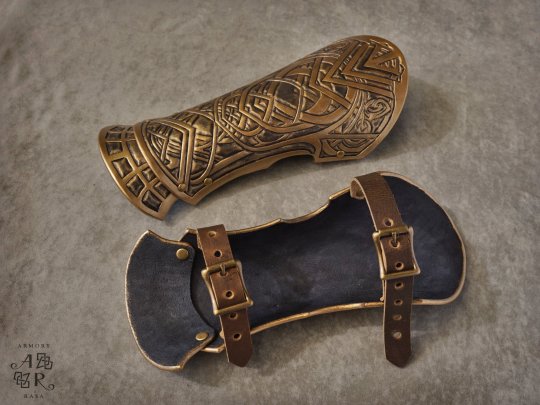
Raven bracers, Assassin's Creed: Valhalla, hand-tooled in 10 oz veg-tan leather.
(Available from Armory Rasa)
#assassin's creed valhalla#assassin's creed#bracers#cosplay#leatherworking#Eivor#looks more art nouveau than vikings to me#but I love them anyway
73 notes
·
View notes
Text
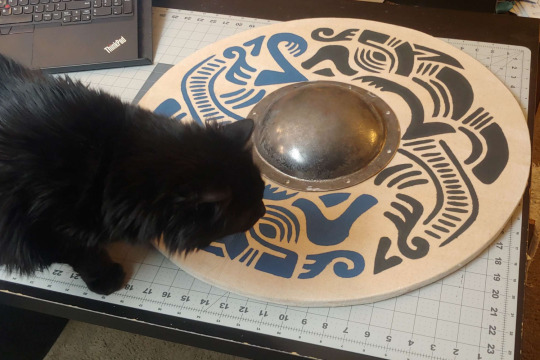
Progress is happening, on a functional round shield. :)
(1/2" plywood board, linen facing attached with wood glue, and a 14 gauge shield boss I hammered out myself. Design taken from a brooch found at Sutton Hoo.)
33 notes
·
View notes
Text
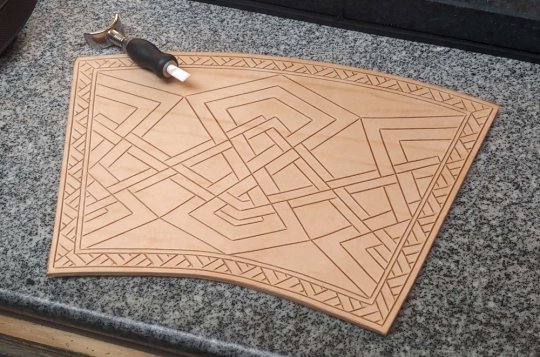
One (1) internet point to whoever can guess what I'm working on now! :D
24 notes
·
View notes
Text

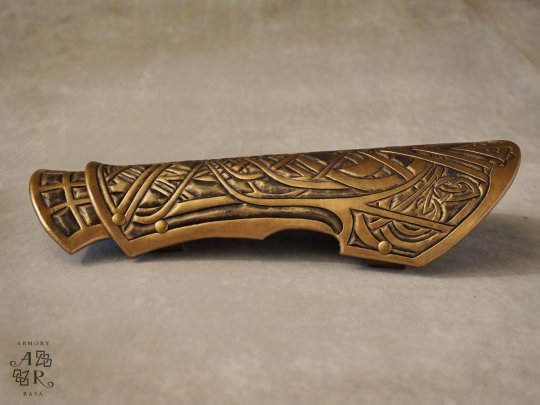
I've had like four different people inquire about it over the years, and each time it fell through, but at long last I HAVE BEEN COMMISSIONED TO MAKE ALTAIR'S BRACER.
There are many like it, but this one is mine. 😁
Bracer details were taken from the 1:6 scale figure and HOLY SMOKES, I don't know how they got it that fine -- I'm making it real-person sized, and some of the detail is still nearly too small to render in leather. It must be microscopic on the figurine:

61 notes
·
View notes
Text
Anyway, I'm going to be vending at the first annual Lincoln Forest Faire, in Ruidoso NM, this upcoming May, which is why I'm stocking up on small bags. And knives, because these adorable little puukko knives were back in stock, so I bought like fifteen of them:
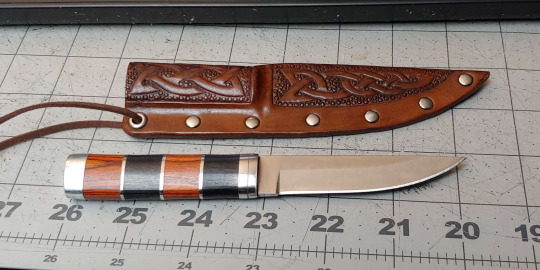
I'll be making a variety of sheaths for them (which I've talked about before), and selling them at the faire.
Neither the knives nor the couch pouches are likely to get listed in my shop (there's just... too much small variation to keep listings up-to-date) but if you are interested in either, absolutely hit me up, we can figure something out.
14 notes
·
View notes
Text
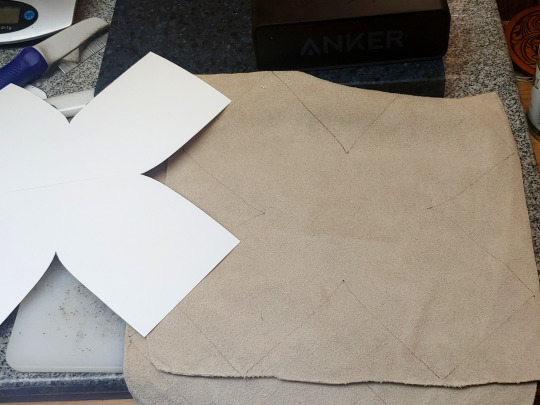
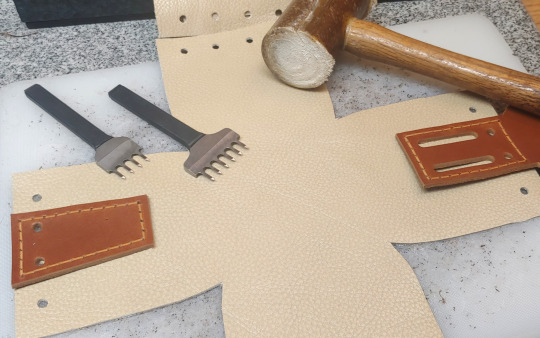
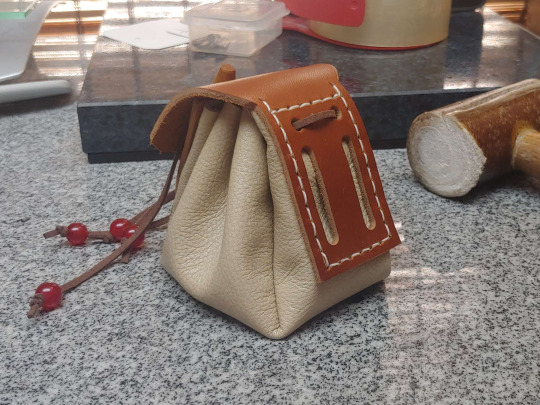
COUCH POUCH!! Free Pattern & Tutorial
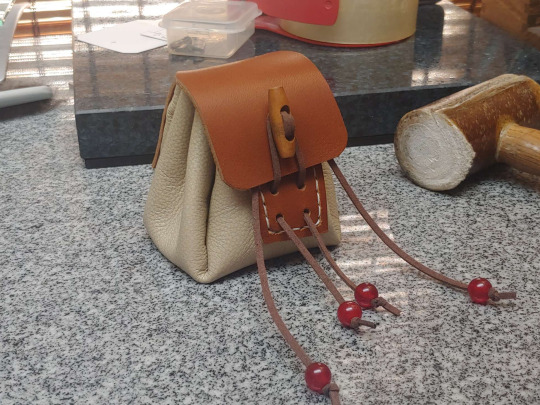
...called thus because they use upholstery-weight leather for the bag body, that in my case was in fact skinned off a couch. 🤣 Turns out they are relatively quick and easy to make, so I tidied up the pattern for printing and took pictures to document the process when I made another five of them.

First off, print your pattern, 100% scale:
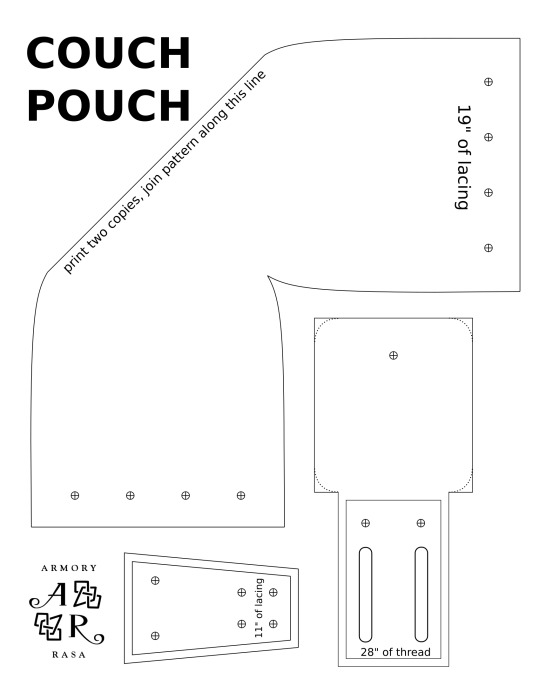
The bag shape was a modified version of the pattern I used for the Morpheus sandbag, but sized to fit in the roughly 11" squares that my couch skin came in. It makes a bag that sits very well on a tabletop, thanks to the flat base.
Though it turned out to not be the most efficient use of material, because that plus-shaped pattern tessellates well, if you're cutting them out of a full hide, but makes a lot of waste when you're cutting them out of squares of material. A more efficient design would have a half-rounded front and back, and a gusset between them, like so:
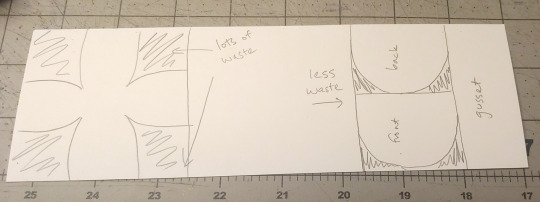
Ah well. It's not like I have any shortage of couch skin, though for the next round I'm going to experiment with a more efficient pattern.
First step, trace and cut out the bag body from your chrome-tan leather:
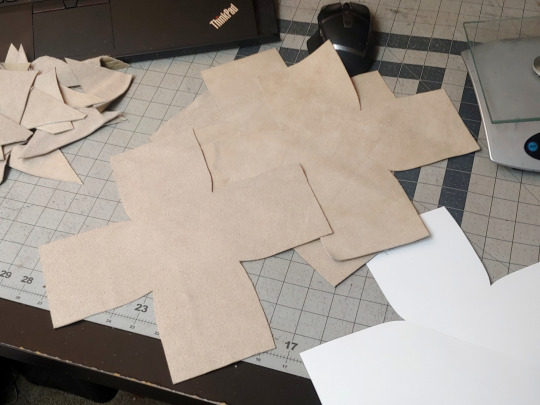
Like I said, this was upholstery leather, but anything that's flexible and ~1.5 mm thick will do.
The flap and front need to be a stiffer leather though -- I used 7 oz latigo, but veg-tan would work equally well. (And then you could ✨tool it!✨)
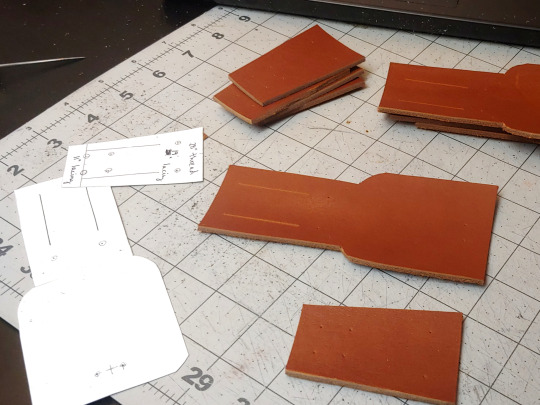
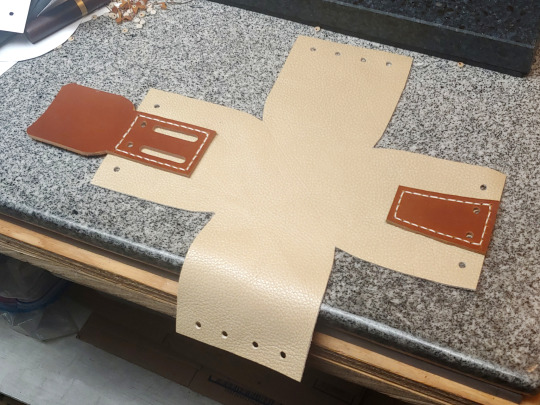
Cut them out, and then use the pattern to mark where your holes are going to be. Mark the holes on your bag body too:
The latigo pieces get hand-stitched to the bag body, so I used a stitching groover to carve out little channels for the thread -- it's not strictly necessary, but it makes your stitches lay a lot more neatly:
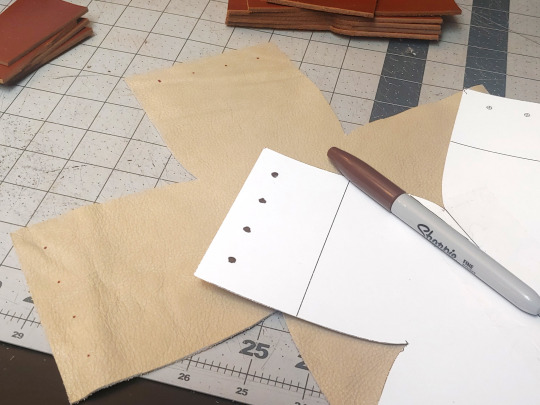
Punch the holes shown below:
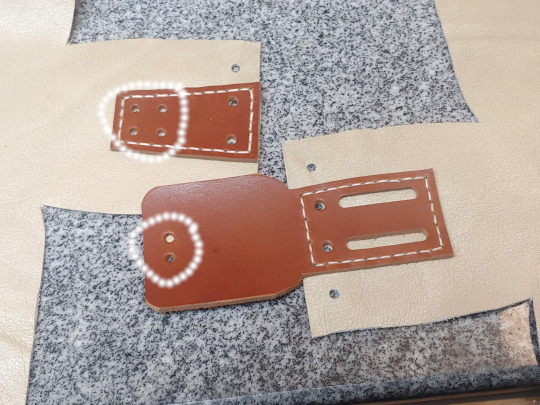
I used a ~5 mm hole punch for those, and a 1.5" slot punch for the belt loops. Some of the holes on the front piece you're not punching yet, because they need to go through both layers.
I put a dab of contact cement on the pieces (circled in white) to help hold them in place when I go to punch the stitching holes:
(Make sure you're not putting glue between the belt loops)
Wait fifteen minutes for the contact cement to dry until tacky, and then line up the holes and the edges and press the pieces together:
Punch stitching holes:
Saddle-stitch both pieces in place (takes 28" of thread per):
Now you can punch these holes:
(I used a slightly smaller hole punch than for the others, but it doesn't really matter.)
Now press the right sides of the leather together and sew up the seams from the inside:
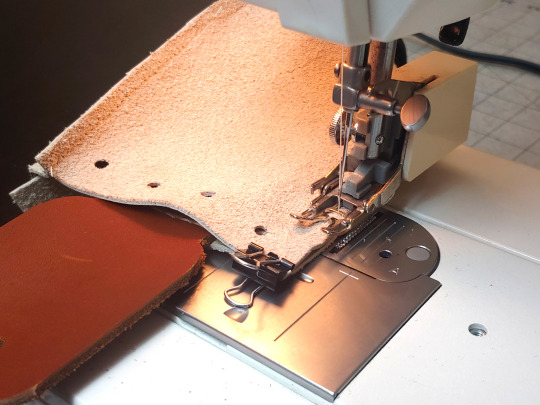
A regular sewing machine should be able to handle this, though you will need thicker thread, a heavy-duty leather-sewing needle, and a walking foot attachment. (If you don't have a walking foot attachment, it is SO WORTH getting one, even if you don't expect to sew much leather. Seriously, I use it for everything -- once you go walking foot, you don't go back. 💀) Because you can't pin leather without leaving permanent holes in it, tiny binder clips can be helpful for keeping your material lined up.
What they look like when you're finished sewing:
Cut 19" of lacing for the drawstring, and 11" of lacing for the toggle:
I use the 1/8" EcoSoft lace from Tandy, I think it's stronger than real leather would be at that thickness. The only important factor here is that you need something with a bit of texture and friction -- a silk cord isn't going to stay closed, it's going to slip open.
MANY BAGS.
For these I used a wooden toggle -- cut another 8" of lacing, looped it through the toggle twice, and then made a tight square knot on the back:
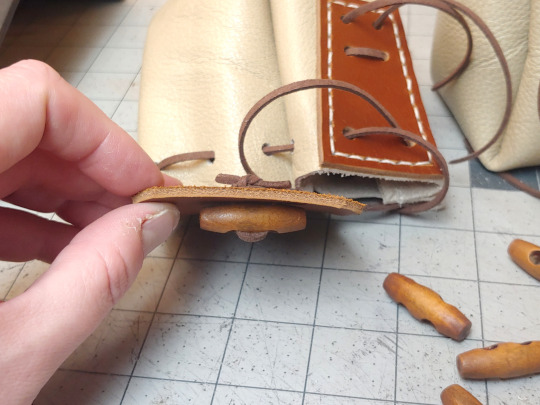
But another option is putting a concho or a large button on the flap. The bag I copied this design from, in fact, uses a concho toggle:

Thread some beads on the laces to keep the ends from getting lost, and you are DONE! 😁
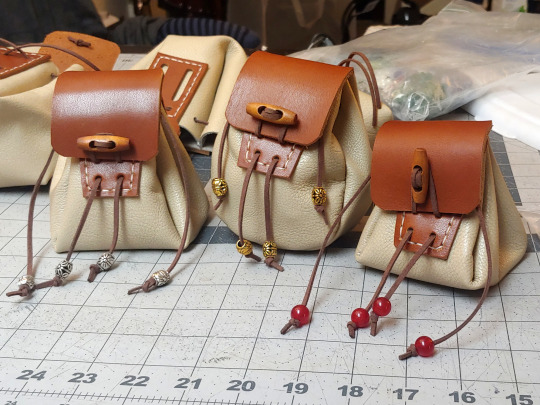
Happy Bagging!
572 notes
·
View notes
Text


First attempt at redesigning the round pouch from the Breath of the Wild set -- it needs to be a little bigger, but I'm pleased with how tidy it came out, especially since I almost never work with soft leather.
Part of my motivation for redesigning it to use soft leather was because I currently have tons of the stuff, from skinning my lawyer's parents' old couches before they got carted off to the dump. 🤣
39 notes
·
View notes
Text

Cold forged shield boss, COMPLETE!!
But oh my god that was so much work. If I ever decide I want another one of these, I'm just buying it. 🤣
18 notes
·
View notes
Note
Hello! Is there any chance you would have the pattern for the Khorasan pouch available, paid or otherwise? I love the design and would like to make something similar. No worries if not, but either wsy, thanks for sharing your art (and your processes) with all of us! Also, thanks for the link to the museum, I hadn't seen their collection before. I got some good ideas for my next woodworking project too! Have a good day! :)
Yep! It's all digitized, and I was planning to make it available (...since the pouch itself is going to be out of most people's price range >_<), but I'm easily distractible so there's no telling when I would have gotten around that.
In the mean time, you can hit me up at [email protected] and we'll figure something out.
5 notes
·
View notes
Text
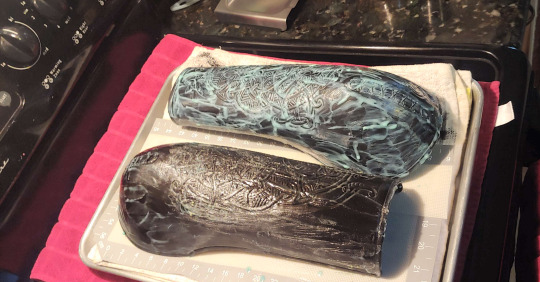
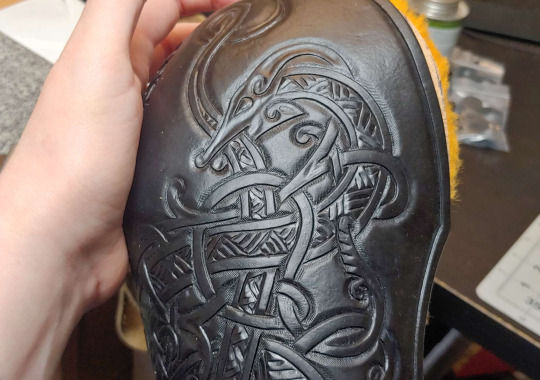
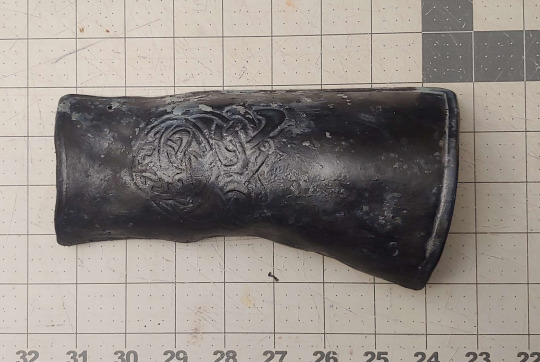
Bazubands part 1: A LESSON IN HUMILITY 🤣
So one of my projects for the winter break was to make a set of bazubands made for myself -- a middle eastern armor piece that provides all-in-one wrist/forearm/elbow protection, and the easiest way to get the coverage required for SCA fighting. (My garb is viking, but such are the exigencies of modern safety standards, that fighters usually wind up with a mix of armor types.)
Anyway, I packed up the necessary tools and materials and took them with me when I went to visit my parents, which is why the backdrop for these pictures isn't my usual workshop.
Found a pattern on google, cut it out of 10-12 oz veg tan, traced/carved/tooled it:
(You can see why this is the easiest way to get elbow protection, it's WAY less fiddly than trying to do articulated plates around the joint.)
Soaked the elbow cop again (because it was starting to dry out by the time I was done tooling), rounded it out and stitched it up:

Dyed it black, in my parents' backyard:

(And if you use Angelus dyes, that's how you keep from spilling it -- the box has little perforations so that it can hold the bottle safely upright.)
WAX THAT MOTHERFUCKER:
It doesn't show in that picture, but I have a metal bowl of wax (jeweler's casting wax) melting on the stovetop. I alternate between brushing it onto the leather, which looks like the picture above, and then putting the leather in the oven at ~200F, at 10-20 minute intervals, until the wax soaks in. Repeat until the leather is fully saturated and does not absorb more wax. (This often takes hours, so find something else to multitask with.)
But when you're done -- ta da!

Your project will be thoroughly waterproof, very strong and hard, with a low lustre. It's functionally ABS plastic at this point.
The next step was padding, so I got some sheepskin and and fitted it to the inside:
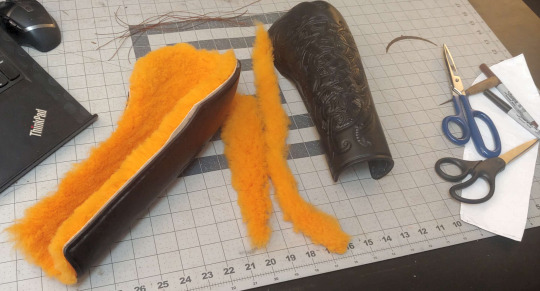
(idk why it's so fucking orange, but the alternative was kind of a mint-mucus green. I think the orange is growing on me though.)
Time to pattern the other, simpler piece of the bazuband, because they're hinged to enclose your full arm:

(I couldn't do this earlier, and therefore do both pieces concurrently, because I had no idea how much bulk the padding was going to add to my arm. I suppose you could wrap your arm in padding when you're measuring at the start.)
Slapped a quick design on it:

(And carved & tooled it too, though I neglected to get pictures of that.)
And then--
DISASTER, MY FRIENDS.
I put it in the oven, and it lost its gd mind.
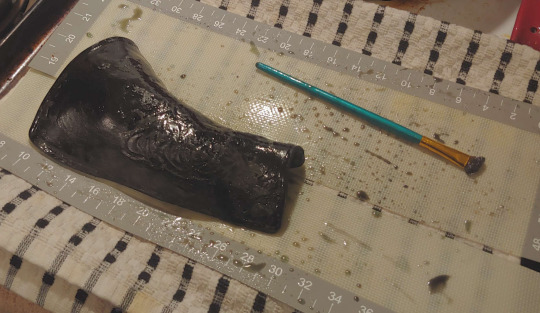
WHAT.
Seriously, just -- words do not do this abomination justice. o_O
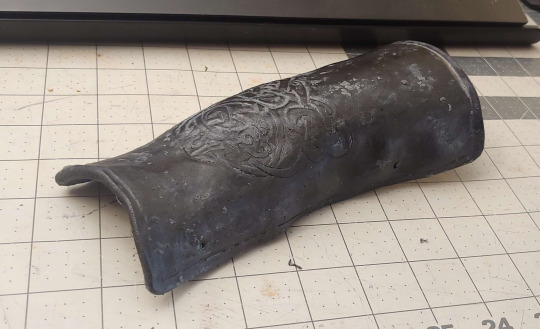
LOOK AT IT.
Coming so close on the heels of the Khorasan pouch, which had turned out absolutely perfect and has been more widely shared and lauded than anything else I've posted, this was a humbling experience. 🤣 Like, yes you're good, Gabriel, but you're not immune to fucking up.
So what happened here? Why did the same leather as the bazubands, undergoing the exact same steps and processes, turn out like THIS?
I'd have to repeat the experiment to 100% confirm my theory, but I'm pretty sure the critical difference is that I was speed-running this one, and I didn't wait for the dye to fully dry before I started waxing it. It wound up with, essentially, wet leather hermetically encased in wax, and since the water didn't have anywhere to go, it did weird things to the structure of the leather fibers when it started heating up. And because I don't often work with wax, I had somehow never run into this situation before, and thus already learned that lesson.
Ah well.
It wasn't a huge amount of leather, and it was only like two hours of work, so I'm not that fussed about it. (More embarrassed than anything else, at what feels like a very rookie mistake -- and conscious that it could have been SO MUCH WORSE if that had happened to the larger bazuband pieces, which had a lot more time and materials sunk into them.)
Anyway, I'm going to tweak the pattern a bit, make it narrower at the wrist and a bit longer, and change the design to something that matches the dragon better -- and let it fully dry this time. 😂
46 notes
·
View notes
Text
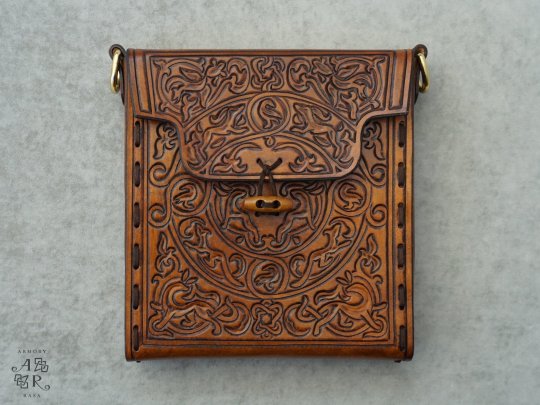
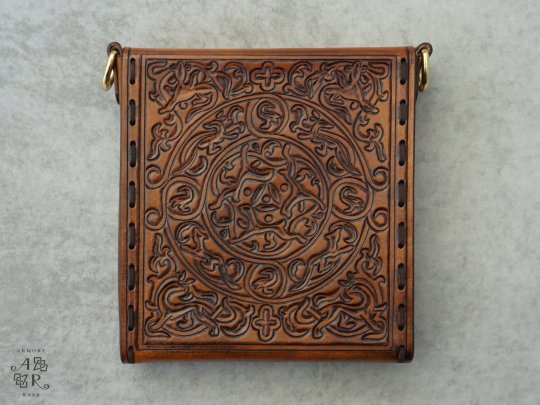
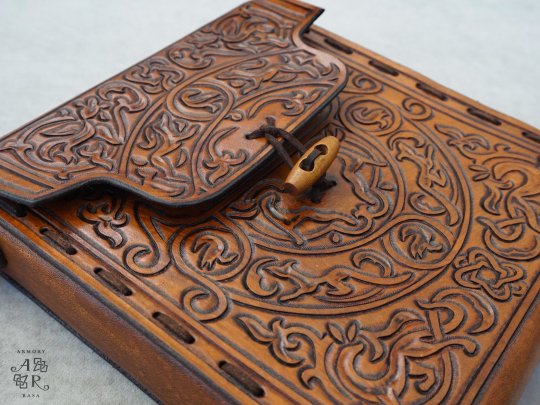
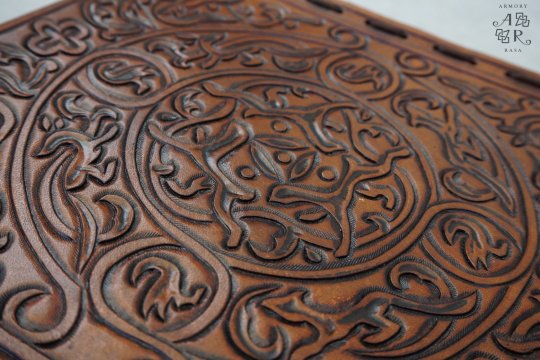
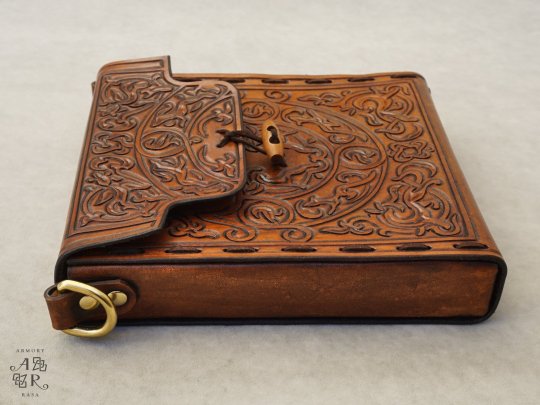

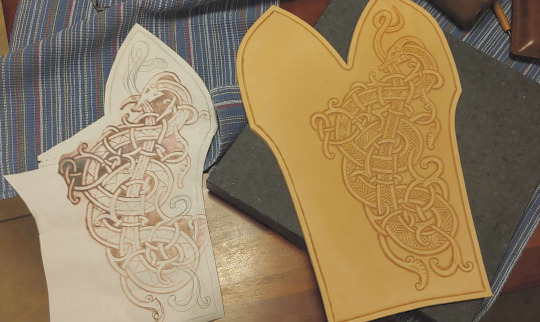
Replica of a 12th/13th century leather pouch made in Afghanistan or eastern Iran. The original is currently housed at the David Collection in Copenhagen:
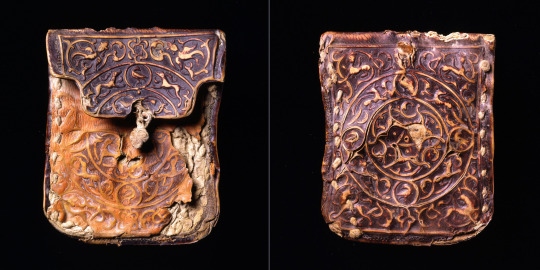
(Khorasan pouch, available from Armory Rasa)
#leatherworking#historical fashion#Iranian art#Persian art#this has been kicking around incomplete on my desk for ages#and finally I was like FINISH IT NERD BEFORE YOU SPILL COFFEE ON IT.
561 notes
·
View notes
Text
Gambeson project: cutting out & fitting
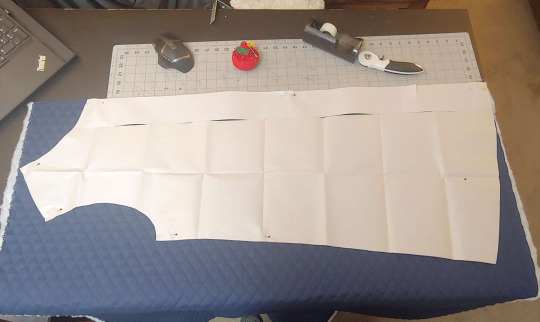
Lol, apparently past-Gabriel made this pattern EXACTLY to fit 42" wide fabric. Good job, team.
However, I realized this would put the diamonds oriented horizontally instead of vertically -- which, like vertical stripes, tends to be more aesthetically pleasing on clothes. I would have preferred them vertical, but there wasn't a way to arrange the pattern pieces going the other direction, and I decided it's subtle enough not to worry about it.
Be advised that this fabric is REALLY thin though, for something quilted. Like, so thin that I'm not sure it's going to be functional at all for actual combat. o_O
But that's okay -- the whole reason I picked this color was because I had a vague idea that it could double as the gambeson layer in Eivor's very stupid ""brigandine"" armor in AC:Valhalla, if I ever decided to make that:

(Seriously, just. What is going on there.)
Anyway, I got all the pieces cut out, and then pinned them together to get an idea of the size, with straight pins along the back to mimic a seam, and safety pins along the sides to mimic lacing:


....Put it on, and then promptly took it off and cut 3" out of the back, because I was swimming in it. But better too big than too small.
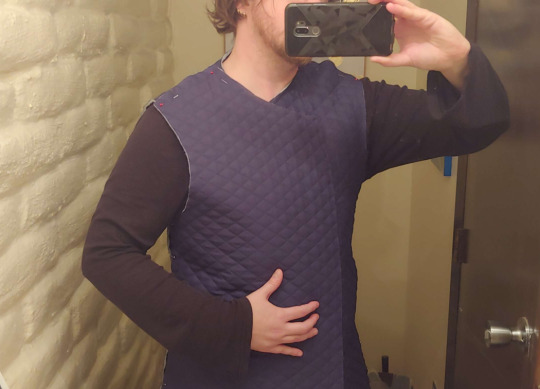
Still a lot of overlap in the front, but doing better. I proceeded to change the angle of how the pieces meet at the shoulder (to make it less sharply sloped, because apparently I have more muscle there than I used to), and cut the armscythe in another half inch, so it's not tugging when I bring my arms forward.

An arming jacket that fits me pretty alright!
I might use the leftover fabric to add a yoke piece over the shoulders too, if I can figure out how, because that's where most of the weight of the armor is going to be hanging, so it's the part that needs padding the most.
Another consideration, since this is aiming to be functional not just decorative, is where the strain is going to be put on the garment, and thus which parts need to be reinforced. Basically, the ties/buckles/whatever along the front, and the lacing on the sides, are going to need something stronger than just one layer of that quilted fabric to anchor them in, or they're liable to tear right out.
Since I'd been planning from the start to hem this with bias tape (....ugh) instead of folding the hems over, that gives me the option to tuck something stronger in there, like a panel of 3~4 oz veg tan, which I think will work nicely. (Bias tape also means I can keep fiddling with the exact dimensions right up until the last minute.)
TIME TO SEW! or something, idk, if you wanted to watch someone competent at sewing, you'd follow them instead of me. 🤣
......
.......fuck, I don't have blue thread.
TIME FOR THE STORE!
24 notes
·
View notes
Text
Project time: gambeson!
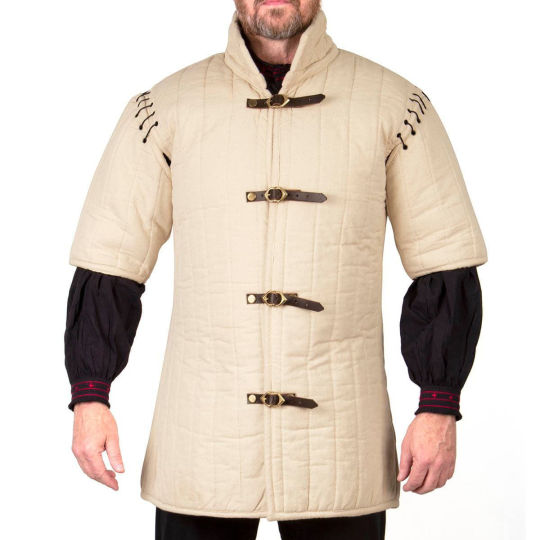
Been a while since I've liveblogged a new project, so I figured I'd take you with me on a voyage of discovery as I attempt to make a gambeson, aka arming jacket (among many other names), the quilted coat that goes underneath maille or plate armor to provide padding for comfort and protection. At its simplest, this:
I've always liked the look (when they're fitted better), but never had a use for one until the other day when I finally decided to bite the bullet and start doing SCA combat, as the local guys have been trying to get me to do for literally years. First fighter practice is next weekend, let's see what I can get done before then.
(Lolol, make no mistake though, I am not as good at sewing as I am at leather, because I only ever do it under duress. It's entirely possible that what I produce today by winging it will be underwhelming and/or unusable.)
So I looked at a BUNCH of pictures online to see all the various design choices available, and decided that I wanted:
Stylishly long, hitting right below the knee
Stylishly angled, with the hem coming to points rather than being cut square across
Detachable sleeves -- one, because sleeves are hard to make fit nicely, and two, because I'm undecided whether I want wide half-length sleeves (like the picture above) or fitted full-length sleeves. If they're detachable, I can have both.
Lacing on the sides -- because that's an easier way to get the fitted look than, y'know, actually tailoring it to fit. Also means it'll still fit even if I lose or gain inches.
Hat tip to this instructable for alerting me to the existence of pre-quilted fabric at Joanns, and also for doing it with two layers of that fabric, which was reassuring because I've never worked with it before and I was worried that just sewing single layers together would make it too bulky at the seams. I didn't need darts in the chest like hers did (lol thank god, because that looks Hard to do), and I wanted a less dramatic angle on the hem.
To that end, I used the pattern from my Anders brigandine as the jumping-off point:

Though I added some inches because I am no longer the skinny twink I used to be:

TIME TO CUT, BECAUSE I DON'T BELIEVE IN MUSLIN MOCKUPS AND I LIKE TO LIVE DANGEROUSLY.
(This, for the record, is why my sewing projects never turn out as well as they could, but I know myself and I know that if I do a mockup, I will be Fucking Done With Sewing by the time it's over, and then never get around to making the real thing. I expect this gambeson to be a learning experiment, and then wearing it for combat will further show me what I need to adjust for the next one.)
54 notes
·
View notes
Text


Adventures in stamps and stencils and fabric
(Currently going full-tilt getting my booth ready for vending next weekend)
20 notes
·
View notes
Text

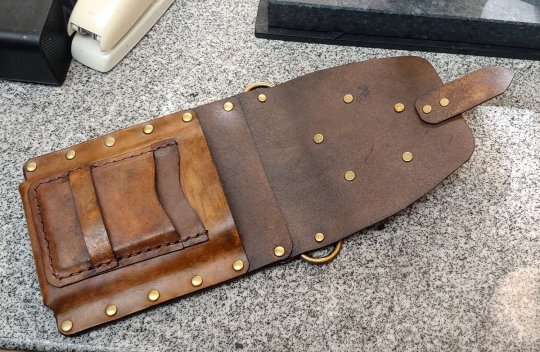
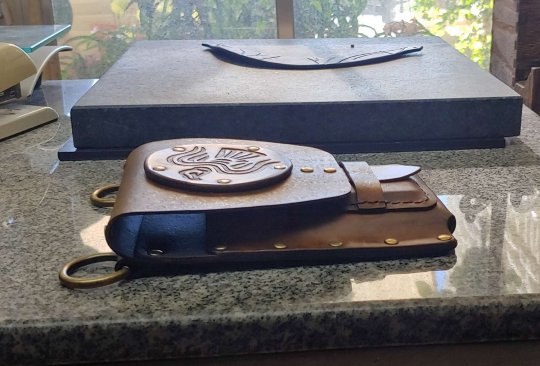

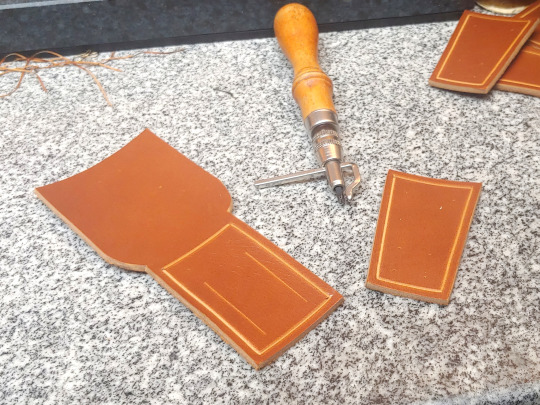
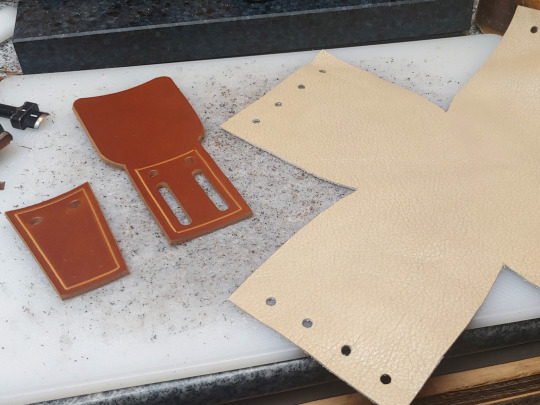
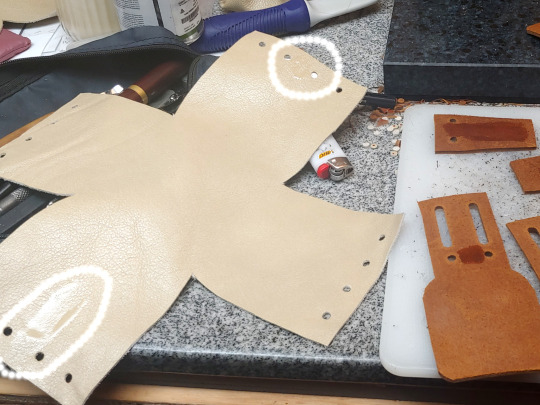
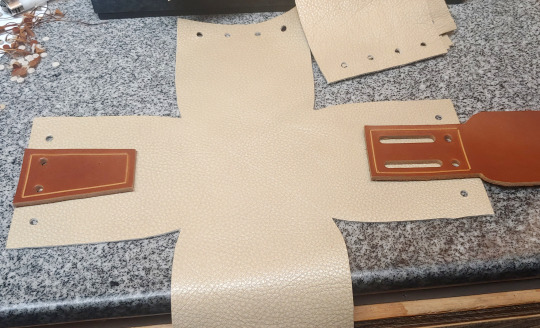
Prototype vendor bag, complete!
It features the following:
Two pockets for holding money, a large one in the front for keeping bills to make change, and a smaller one on the back of the bag for safely stowing large bills.
A molded pocket for holding a smartphone.
A slot for credit cards, and a slightly deeper molded one for business cards.
The O-rings will have detachable straps so you can easily take the bag off and pass it between the people manning the booth, in case someone has to leave for a bit.
Decoration of your choice! :D I was in a hurry so I just slapped the hrafnsmerki raven on it, but it could be anything, as long as it fits in a 3"x3" space.
I'll make some small changes before the final version, but on the whole I'm very pleased with it. It'll get a test run at the Las Cruces Renaissance Arts Faire on Nov. 4th/5th to see how well it works in practice.
Available eventually at Armory Rasa
28 notes
·
View notes
Text

This morning's project! A hanging belt pack designed for craft fair type vendors. Took the entire AM, but I'm about ready to disassemble and dye it, and then it'll actually look like something you'd want to wear. 🤣
If it works out, I'm hoping to make both the finished product and the pattern for it available in my shop. ✌️
6 notes
·
View notes