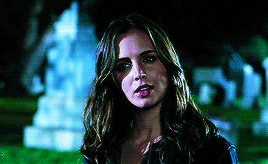
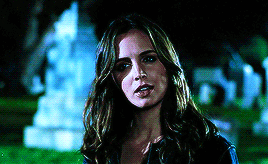
#and they all look so good in this psd it's wild
Text
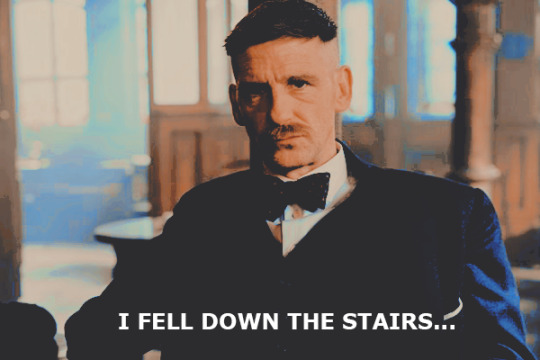
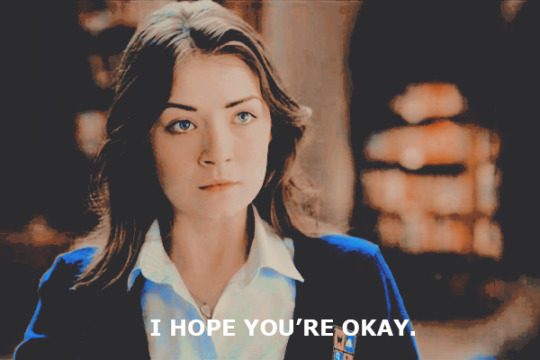
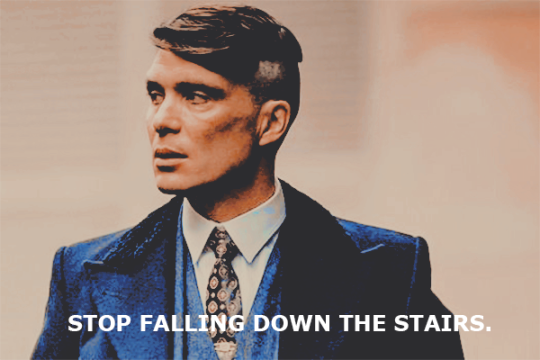
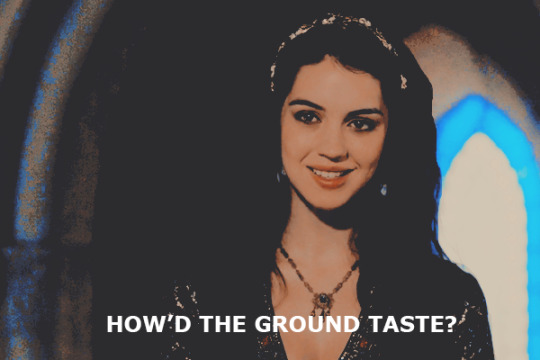
CONVERSATIONS WITH THE ELDEST SHELBY IN — LAWS — ft. @critica1success / @witchdoctrines / @critica1neutra1
ARTHUR : I fell down the stairs...
EM : I hope you're okay.
TOMMY : Stop falling down the stairs.
ROWENA : How'd the ground taste ?
PERSONALS DO NOT REBLOG
#ii. ( visage ) : to leave a hemorrhage of violets in your wake#vi. ( peaky blinders ) : i've made myself a bird of prey#iii. ( thomas / critica1neutra1 ) : i'll look for you wherever the burn marks form#iv. ( &. thomas / critica1neutra1 ) : maybe i'm too busy being yours to fall for somebody new#iv. ( &. arthur / critica1success ) : god forgives ; i don't#iii. ( arthur / critica1success ) : rage &. ruin ; sorrow etched into the space where bone meets muscle#i. ( crack ) : fey's guide to troubled bird#i. ( edit ) : what happens to anything beautiful#bringing back the greatest incorrect quote i ever made#and they all look so good in this psd it's wild#iv. ( &. emilie / witchdoctrines ) : if i told you that a flower bloomed in a dark room would you trust it#iii. ( emilie / witchdoctrines ) : maybe we're just blood ; whatever that's for
2 notes
·
View notes
Text

˚₊· ͟͟͞͞➳❥ miguel o'hara x spidey!fem!reader. CONTENT WARNINGS: oops, all berries (i.e. angst) no smut but minors/ageless blogs go away. depictions of traumatic events. insinuations of anxiety and ptsd. WORD COUNT: 1.4K PSD CREDIT!!!
˚₊· ͟͟͞͞➳❥ love note from the author: this is PART 2 to PURGATORY but you can read this by itself ig... i'm not your mom ¯\_(ツ)_/¯

Okay, let’s actually try to get through this, shall we?
My name is – Actually, not important.
I was bitten by a radioactive spider… But something tells me you already knew that. Wait, how many of these have you sat through? Holy shit– that many?!
But can any of those guys say they’ve been through space and time, universe after universe, only to get stranded in a total vacuum void?
You try to bang your head in exasperation but with nothing to cushion you, you end up pulling enough full-body revolutions to make an Olympic acrobat jealous.
Cut to a stretch of groaning that follows you around like a white flag.
Because it sure as hell feels like it’s high time to give up. He always did say you never knew when to quit. You didn’t see it as a bad thing then but now… With a little zero-gravity perspective…
No, no, no– the last thing you want is to give him the satisfaction of being right.
This phase comes and goes. You call it the I-can’t-not-hate-you-you-sent-me-here-in-the-first-place stage.
Grief is fluid, okay?
You despise it all the same. Because when you’re like this, all you can think about is him. Him and the last time you looked into those jaded crimson eyes.
There’s the silver lining you were looking for when it comes to your multiverse communicator finally giving out.
At least you never have to see how heartbroken he looked ever again, perfectly recreated pixel-by-fucking-pixel.
Now if only your actual memory would degrade the same way.
Because you still see it when you close your eyes, you see it all. The strike of terror flashing like lightning in the reflection of his dilated pupils, having come as a harbinger of a terrible, terrible, irreversible decision. The taut coiling of the fists he keeps at his sides, his claws coming in– not because he can’t help it but because he feels he deserves it.
“Miguel !!!! What the fuck?! How could you do this to me!?” You wail, lungs rotted with rage as you punch haplessly against the cocoon swiftly crystalizing around you. Panicked and like a caged animal, your eyes frantically scour the ceiling for an escape but you can only see your wild desperation repeated back to you in the many rubied eyes of the Going-Home-Machine.
I knew that was a stupid fucking name for you.
You never thought you would be on the other end of this wretched thing, be the little fly caught in its web and when you look at Miguel, eyes wrought with a pain too much for even Spider-Woman to bear, you look pitiful like prey too. Your chest spasms with a choked, “I…” Your fists, weak with emotion, unfurl and give way to open palms. Your breath ragged, when you pick your head back up at Miguel you let him have it.
“I loved you.” You say it with canines bared with poisoned malice, rage finally boiling over into heated rivets of tears down your cheeks.
And Miguel, he’s never looked more destroyed.
You swallow a sob, gulping so hard it rocks your chest. Your bottom lip warbles. You’re not good at this tough guy routine.
You never were.

“You can’t let it get to you.” Miguel’s voice, direct and to the point, precedes him in echoes as he makes his way to the high corner you’ve wedged yourself in.
Angling your body away from him, you avoid your superior’s gaze. Superior, because right now he’s not your boyfriend. He’s your commander.
“You’re terrible at comforting, has anyone ever told you that?” You call back, deadpan tone as good a deterrent as any. You sniffle, your throat clenching when you try to stuff the remainder of your cries down. When you finally wad up all your feelings for later, you turn back to face him with a mock look of happiness on your mask. “Who said I’m letting it get to me? I’m not letting it get to me. Sounds like you’re projecting.”
And because he’s your boss right now, not your lover, he sighs in frustration. “Mierda... I’m trying to help you.” He says with two fingers pinching the skin between his knitted brows after his headgear dematerializes. “You’re going to get burnt out at this rate. You know we can’t save them all. We’ve been through this.”
Your body coils into itself, trying to self soothe but it’s not working. Miguel’s voice starts to fade into the background, the cacophony of architecture collapsing and screaming, my god the screaming, overtaking your everything just then.
“You need to get past this–”
“Fucking hell, Miguel– Could you stop acting like my boss for one fucking minute and just be my boyfriend?!” There’s no denying how savagely ragged the last mission made you now that you’ve ripped your mask off. Your eyes are red and puffy, swollen from the tears you thought were safe to shed. Your lips are littered with little slivers of cuts from biting down too hard when you first tried to keep the devastation from bubbling up to the surface.
His body stills, as does yours.
You’d never seen Miguel cry. Not until that day.
It wasn’t bawling. It wasn’t even whimpering. It was a single drop that ran down one cheek, you saw it for a fleeting second before he rushed over to hug you, his hulking body cradling yours in what you thought was love.
But you’ve realized since then that it wasn’t out of love. It was out of grief. Grief because he had to let you go. You weren’t strong enough for this.
And he wasn’t strong enough to watch you go through it again.
Or so he thought. But no, true agony was watching you now, jailed in a prison of his making.
True agony would be spending a lifetime away from you.
“Stop the machine!” Miguel’s order rasps in his throat, a prominent vein down its column bulging and only worsening when Margo doesn’t move as fast as he would like. Frustrated and scared, Miguel rushes to the maze of computer mainframes, his hands a blur as he hopes just one, any one will abort a process already…
94% of the way in.
“Miguel!” Margo’s voice finally comes into focus, “Miguel, you have to stop– the machine–”
“You can either help me or get out of the way.”
Margo stops but that isn’t good enough either.
Big hands, far too roughly, grab at her shoulders and toss her aside in a frenzy. He can fix this. He can.
“Miguel!”
Even the whites in his eyes are splotched red when he turns back to you but finds you weren’t even looking at him.
Your face to face with a machine on the fritz, the massive technological arachnid drawing too many strands from too many places, mixing timelines to override another– corrupting the chrysalis it had nearly finished making.
“I can fix this, Miguel but you have to– Miguel, stop!” Margo’s screams are devastating, shrill and choked as she tries to remedy the situation but her fingers go limp. Limp because she knows.
There’s no fixing this.
The spider’s arms start jerking sporadically, its long limbs with metal claws ripping the timelines it just crossed. The connected strands start to glitch, the bot’s failsafe commands trying to pull through but it can’t fix what it can’t stop.
You watch in horror, too scared to move much less breathe, as the glowing lines stretch and tear, their dimensions ultimately being warped by…
A black hole.
“Miguel, wait–”
Your hand instinctively reaches out, memories of all the times he’s caught you just like this flashing in your mind like a flipbook animation. Only, he can’t save you this time.
No one can.
Thaaaaattt’s enough emo for one day, I think.
You tuck your knees in, slowly folding into yourself as your spin cycle finally comes to an end. Your chest is wound up tight, your heart drumming so loud you feel it in your eardrums. You just want this to end.
A sob creeps up the column of your throat, your eyes already seared red with the tears you refuse to cry. In a rush of emotions, far too many for you to isolate, you rip off the communicator band around your wrist and send it flying to nowhere.
At least, that’s what should have happened.
Instead, your accessory’s open-ended trajectory, well–
Meets an end.
A black hole appears from what looks like a ripped stitch, its growth unstable and its edges weathered. You have to investigate, it’s the first anomaly you’ve seen in this vapid world and possibly your only way back home.
Home.
You imagine Miguel.
So you dive, not knowing where this will take you but…
The bad thing’s already happened. How much worse can it get?
#miguel x reader#miguel o'hara x you#miguel o'hara x reader#miguel x you#miguel o'hara#astv x reader#astv miguel#astv fanfic#miguel angst#miguel o'hara angst#.˚₊ ੈ ʚ 🍰 ɞ ₊˚. ꒰ a little treat for miguel. ꒱
382 notes
·
View notes
Note
BLUE

blue: " do you have favorite editors? is there any specific reasoning for your choosing? "
this is a tricky one since i'm horrible at expressing my gratitude but I WILL TRY!
(also if you're not in this list please don't take it too harshly!! it's 4am and i don't think i could think up everyone)
@plecakism!!! liam has been one of my inspirations since i've started posting on tumblr, one of the first ever events i did was one of his! it was really cool to win his events and i still love staring the prizes i've gotten from that. liam's edits are always so nice to stare at and i hope he gets a billion kazillion followers
@llocket!! MY BOYFRIEND!! obviously he's my favouritest ever editor because i am his #1 FAN!!!! i love the way he edits things, it's so sophisticated and cool- i also love how he does text layouts for things like rentry and discord about me's (i love him a lot 😍)
@necroangelz! proud to say that i am an og-ish moonlight follower, the improvement i've seen is CRAAAZY WILD like oh my god idol just keeps getting better and better at editing?? how??
@kiochisato-pufferfish20240406 (wtf is that username kio)
i haven't interacted with kio but i do look up to her edits a lot, the colouring, the composition, the creativity is so awesome to stare at, i wish i wasn't so shy to actually send a few asks or something since bow seems really nice to talk to
@pwupsicle! I CANT BELIEVE I WASNT FOLLOWING THIS ACCOUNT BEFORE I SWEAR TO GOD I DID IT LMAFGHO.. but oh my god i've seen his psds a lot in the purrfect tale discord and they all deadass make me wanna learn photopea JUST to use them
@cactiflowering! fellow glass animals enjoyer so instantly one of my favourite editors. /hj
seriously though i've always found squid's edits so satisfying and lovely to stare at, also his colouring is sSOOOO GOOD? PJ <MY GOD?
@ideallyadored! although we haven't talked much i do look at what they say on purrfect tale and he's SOOO based, i look up to how they speak her mind because i'm pretty timid and keep to myself most of the time, anyway i do also love their edits- they're always so clean and neat and the colouring always slaps
phew that was a lot sorry LMAOFH

15 notes
·
View notes
Note
torturedpoets*tumblr*com/post/738611754795466752 hi! do you mind sharing what steps you use to color gifs like this? Some could assume that gifs with just one colour will be boring, but your colourings is always so nice 🥰
hi there!! i'd be happy to! i've never regretted saving a psd yet 😂 this is the post in question and honestly, for as... not great as the quality of my dl of the movie is, i'm still really happy with how it turned out! also i love women 😍

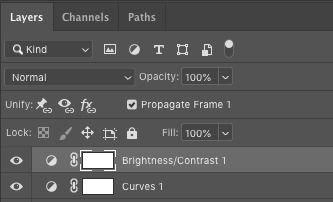
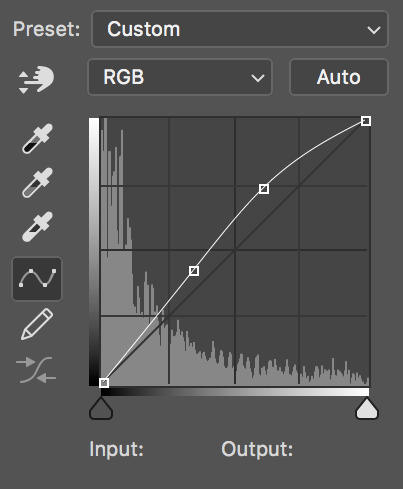
nothing too wild going on here, but even when i do "simple" coloring like this (gradient maps, my beloved), i still color the base gifs. once i have all the gifs made and plopped onto the canvas, this is what my coloring layers look like:
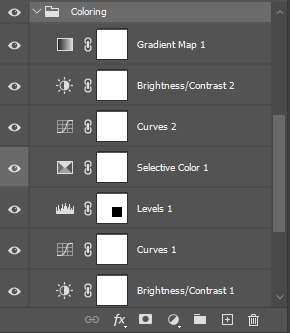
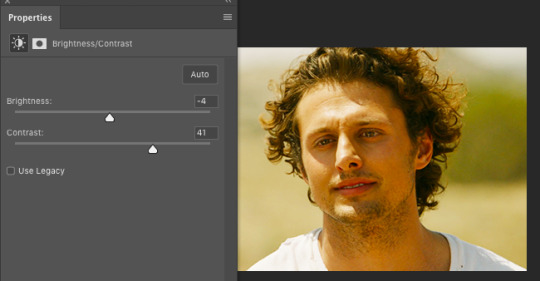
working from the bottom up, i almost always start with a brightness/contrast layer. i don't adjust either value, but instead set the layer's blending mode to screen. this movie is pretty dark, so i left the opacity at 100%, but sometimes, i'll drop the opacity as low as 20-30%.
i follow that up with a curves layer, where i utilize the black and white eyedroppers. click the black eyedropper and then click the blackest point on your gif. then do the same with the white eyedropper. it's a good idea to play around with different points, especially when you're working with super tinted scenes. curves layers can be a lifesaver!
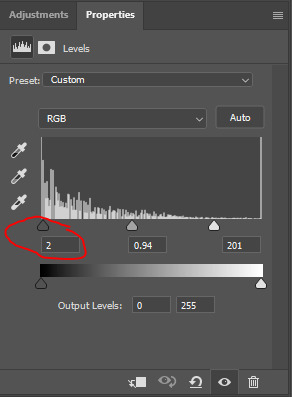
on the levels layer, i did the same exact thing with the eyedroppers, but oftentimes, i end up increasing the black value, like you see here:
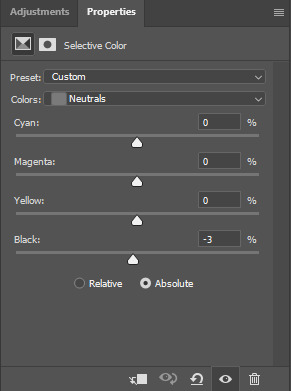
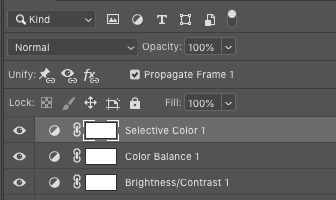
next, my FAVORITE adjustment layer: selective color! i like to color code my selective color layers, especially when i'm working on a super colorful set like my recent lisa frankenstein set. i always start with adjusting the blacks and usually the neutrals. you can right click on the eye/visibility icon to select a color. i use grey for these colors. here were my adjustments:
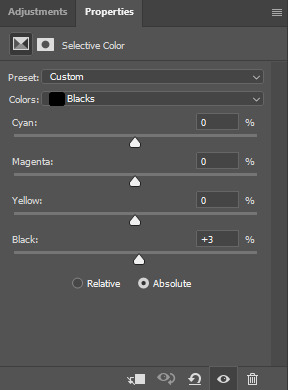
i'll occasionally adjust the white values when working with a really tinted scene, but these were fine, and it wouldn't make much difference anyway since we're putting a gradient map over top.
the next curves layer is just a slight adjustment for the top row of gifs to make the eventual gradient map layer more vibrant. i added this after the fact, but wanted it positioned here.
the subsequent brightness/contrast layer is the same thing. the top row just needed some more work. same as the original b/c layer, i didn't adjust the values and set the layer to screen. on this one, i dropped the opacity to 45%.
finally, the pièce de résistance, the gradient map layer! i just slapped on a gradient map adjustment layer. the color on the left should always be your darker color, and in this case, i want it true black. the color goes on the right, and bc this was a lesbian flag set, i just googled the specific hex codes for the lesbian pride flag and used those colors for each row! here's what that looks like for the orange portion of the set:
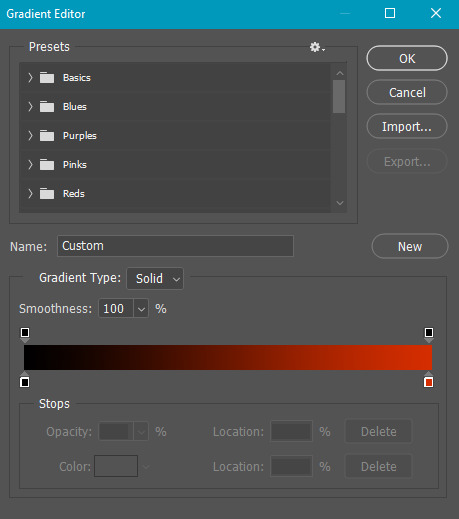
to change the colors, you just click on the lil square guys on the bottom of the gradient and you can choose a color from the color picker or just copy and paste a hex code.
and there you have it! i lovelovelove using gradient maps for big, vibrant pops of color, but also for gifs of scenes that are just. so hard to color lmao. call it a cop-out, but it makes my life a lot easier 😂
let me know if you have any more questions on this set or any others!!
#answered#Anonymous#my tutorials#gif tutorial#gifmakerresource#chaoticresources#dailyresources#completeresources
19 notes
·
View notes
Note
Helloooo, hope you've had a lovely day ❤ Love your blog and was wondering if you have any tips for what programs to use for creating and editing gifs? Searching on google has lead me nowhere 🥺
Hi! This is so nice, thank you 😭😘
The tools I use are KMPlayer, obtained legally because it's free, whatever online YouTube downloader happens to be functional at the time I'm ripping a video, dubiously legal but relatively available, and Photoshop Portable 2022, obtained totally legally and definitely not via poking around on the internet til something shook loose.
I've tried various image editing softwares for gifs, and honestly the only one that doesn't want to make me julienne my own eyeballs has been PS, but I've also been working with PS on and off for like 20 years, so it's probably familiarity more than anything that sets my preference.
My advice for giffing in general? Go nuts. Go nuts and let nobody stop you. There are a zillion gif tutorials out there, but nothing is as valuable as having a good old crack at it yourself - fail fast, fail forward, as the saying goes (is that a saying? It's certainly said a lot around me.)
When I was first getting started, I generally did static graphics and that kind of taught me everything I know about colouring and layering and texturing and all sorts of wild stuff - evidence of which is still in the depths of my blog if you're willing to go more than 15 pages deep in my edit tag. There's some stuff in there I have no idea how I made, and other stuff in there I wish I'd never posted, but it's all there.
I learned a lot by doing, and sometimes by downloading other peoples' .psds and reverse engineering/butchering their methods. So, in the interest of paying it forward, here's a google drive with a bunch of random .psds' and their corresponding gifs. Feel free to rip 'em to pieces. Drag the psd (usually grouped because I can't not) onto another image or gif of your own and see how it looks. Outright use the entire thing in your own stuff, I don't care - if it helps and you like it, go nuts. If I've ever made anything in particular you and you want to get a look at its insides, let me know and I'll probably be able to either share the .psd or recreate something similar and share that.
I did do the world's most slap-dash gif tutorial a while ago, but it didn't really focus on the basic giffing part. If anyone wants something more in depth/step-by-step, even if it's just one person, I'm more than happy to cobble something together.
As in life, in giffing, I tend to take the spaghetti approach: throw shit at the wall and see what sticks.
Dubiously helpful at best, but I hope something here was useful. Feel free to ask more questions/demand specifics from me, lmao.
6 notes
·
View notes
Text
Cuteftp pro vs coffeecup

#CUTEFTP PRO VS COFFEECUP MANUAL#
#CUTEFTP PRO VS COFFEECUP 64 BITS#
#CUTEFTP PRO VS COFFEECUP PRO#
#CUTEFTP PRO VS COFFEECUP SOFTWARE#
#CUTEFTP PRO VS COFFEECUP PASSWORD#
This Include, JPEG, GIF, PNG, TIFF, TGA, PCX, PSD, BMP, PCD, WMF and EMF. Most standard image formats are supported. Up to 50 levels in fact, memory permitting. Yes there are multiple levels of undo and redo.
#CUTEFTP PRO VS COFFEECUP PRO#
Professional CuteFTP 8 Home CuteFTP 8 Professional CuteFTP Lite CuteFTP Pro Cyberduck DataDirBak DeluxeFTP Directory Opus EasyFTP ExpanDrive Far Far2 FFFTP FileZilla. Over 50 filters can be used to quickly alter and adjust your image. CoffeeCup FTP Core FTP Cryer Web Site Publisher CuteFTP Digsby Directory Opus Eudora Excite Messenger ExpanDrive FAR Manager FTP FFFTP FileZilla FlashFXP Fling FTP Forte. Paper Textures: A wide variety of paper and canvas textures can be selected so that brush strokes respond with the texture as they are placed on the paper or canvas These range from very simple color dots to realistic representations of natural artist tools to very wild brushes TwistedBrush has hundreds of different brushes available. CuteFTP 8 Professional pro with crack 100 work. This allows for super smooth color mixing and alpha blending.
#CUTEFTP PRO VS COFFEECUP 64 BITS#
TwistedBrush represents all image data internally at a full 64 bits of color resolution. Most graphic program offer at most 32 bits of color resolution. In addition the responsiveness of the brush tools should be quick and show marks on the page instantly to allow the artist to enter the "zone". As an artist draws and paints the tools should disappear from thought and allow focus on the creative process rather than waiting for the tool to finish its job. Pixarra's attention to performance is a top priority. CuteFTP Pro 2.0 (client is quite ok, will do 168bit data and control EXCELLENT) WSFTP Pro 7.5 (client is good, will do 168bit data and control EXCELLENT) WSFTP Pro 7. Here are some key features of "TwistedBrush Pro Studio": Best of all, feature updates are frequent. TwistedBrush has more than 5,000 brushes, along with all the features that artists love to use: layers, realistic media, photo cloning, tracing, masks, particles, filters, script recording, scripts to AVI, drawing tablet support, brush shapes, atterns, textures, integrated scanner support, image brushes, drawing guides, reference image views, dirty brushes, scratch layer, dynamic palettes and a whole lot more. TwistedBrush Pro Studio has one of the most versatile and powerful brush engines in existence, yet it as designed from day one to be easy to use.
#CUTEFTP PRO VS COFFEECUP SOFTWARE#
Of course, CuteFTP v9 has all of the other key features that user loveĬomprehensive protocol options, including FTP/S (SSL), HTTP/S (SSL), SFTP(SSH2) Įasily monitor local folders for changes Ĭonsolidation of CuteFTP Lite, Home and Pro - CuteFTP has been consolidated into one, powerful FTP client.TwistedBrush Pro Studio is a digital paint software and photo editor with natural art tools. Securely work with multiple remote sites at one time. Painlessly edit remote documents with a built-in editor ĭrag and drop files for fast and easy movement - up to 100 concurrent transfers Schedule fast, fully-automated transfers Ĭreate labor and time-saving scripts and macros Ĭreate podcast RSS feeds and manage audio files Ĭonnect to new sites in a snap with step-by-step wizards
#CUTEFTP PRO VS COFFEECUP PASSWORD#
OpenPGP encryption, One Time Password authentication protocol, and Password Manager A great feature set, an easy to use interface and a properly documented application like this one is sure to become a popular choice among all users types.Ĭomprehensive protocol options, including FTP/S (SSL), HTTP/S (SSL), Secure Shell (SSH)
#CUTEFTP PRO VS COFFEECUP MANUAL#
In case some features of CuteFTP Pro are not easy to understand or if users are looking for a detailed explanation about the usage of any function, there is a truly comprehensive help manual to make things clear.ĬuteFTP Pro is one of the best tools of its kind available on the market. Furthermore, it remains quite light on computer resources all the time, which means it could be easily loaded on older machines too. Otherwise, CuteFTP Pro has all the things users would expect from a fully-fledged FTP client, so users would not be disappointed at all. Besides the backup and synchronization features of this utility, the more advanced users will surely appreciate the addition of macros and scripting tools for building fully automated actions. With the application, users can even modify remote documents thanks to the built-in editor. The application fully supports drag and drop so the user just has to drag files around to upload them to an FTP server, but in case the user wants to stick to the old-fashioned methods, the rich right-click menu will help him in this regard.ĬuteFTP Pro includes a couple of great goodies, such as an HTML editor and a podcast manager. CuteFTP Pro v9.3.0.3 | File Size: 20.9 MBĬuteFTP is a powerful and easy-to-use FTP client that enables users to backup and synchronize websites and monitor local folders for changes.
0 notes
Text
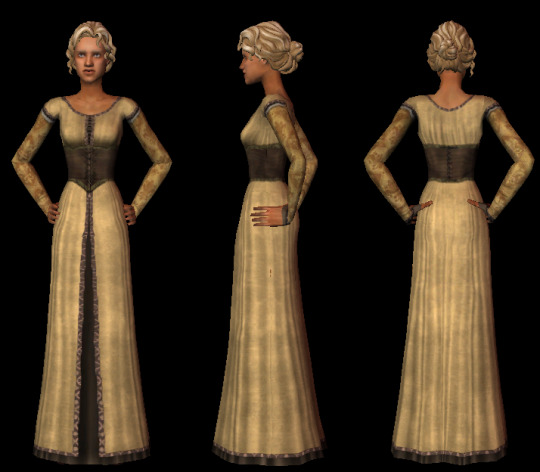
Filling the gaps - part 11 - afbodykasa
Edit 12/27/21: Added a download link with a psd-file for recolorists :)
Another default replacement for a nightlife outfit: afbodykasa. I spent way too much time on this. I edited the textures so often and I never got to a point, where I said: “Yeah. This looks fine.”
I’m still not satisfied with the result, but I am tired of it and for now it looks the way it looks. 😕
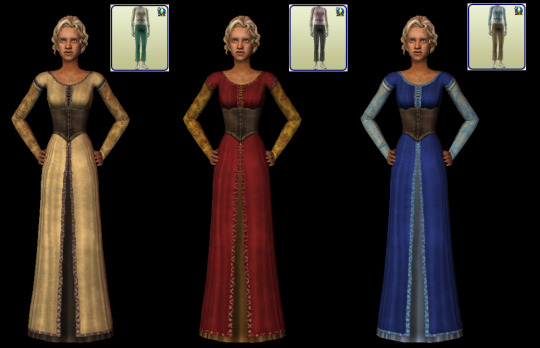
These are recolors of Bri_Anna’s WDS Gown mesh. And boy, what is going on with me? There is so much fiddle-faddle, very dark and/or washed out shadows, layers and patterns. The more I look at them, the more I’m like: “Do I like that? Do I really? ... Eh. I guess so...?”
They are categorised as everyday, formal and maternity clothes. They might spawn on townies. They use the normal shoe sound.
If you don’t want to use the default, a custom version is included as well.
The custom dresses share a normal map, so they come merged only. The merged file contains all 3 abominations dresses. They are tooltipped.
All files have been compressed. Preview pictures are included in the archive.
The mesh is not included! It is available at MTS. Even though it’s pretty old and I can’t seem to find a recent post by the creator, I don’t feel comfortable to include the mesh, when it is easily accessible still.
By the way, if you visit Bri_Anna’s page at MTS and are tempted to visit their linked site (The well dressed sim) don’t. My anti-virus software rang it’s alarm multiple times, so it is probably not a good idea to visit.
+Credits+
Mesh: Bri_Anna
Textures: Iamliz13, Kgcowbelle, Maya40, Morganna, Poe, Riekus13, Serena_Moonstone, Sherabim
+Download (SFS)+
Quick & Dirty Install instructions:
Default Replacement:
Delete any default for afbodykasa you might already have!
Put “DR_afbodykasa-Bri_Anna-WDSGown_12Raben“ and the mesh in your downloads folder.
Custom Dresses:
Put "AF-body-Bri_Anna-WDSGown-kasa-merged_12Raben” and the mesh in your downloads folder.
+PSD for more recolours - download+
Requested by @cindysimblr. (Thank you for your kind words. A custom version is included in the archive of the replacement. 😊) I use gimp to make my recolours, so I hope, this file can be opend with other programms. Be warned though: It’s a wild jumble of not only textures, but english and german language as well. I included the normal map in this archive.
Happy simming!
#sims#sims 2#ts2#sims 2 default#sims 2 medieval#fillingthegaps#dldrclothing#dldrbodyshop#dldrafbody#dlafbody#ts2 dl
54 notes
·
View notes
Text
Biodiversity - A journey in nature
Final images canvas, 500 word evaluation and saved as screenshots
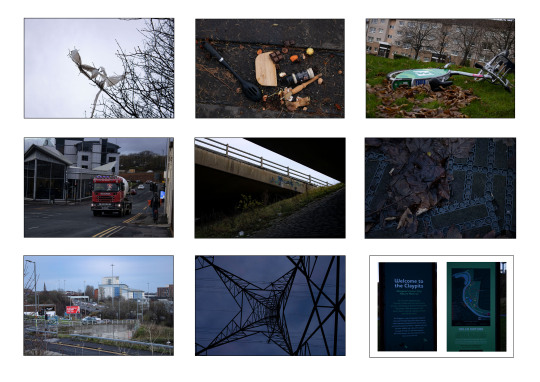
For this task I chose to split my choice of images into three separate categories, residential, industrial and canal. The residential area is approximately a 5 minute walk from the college, the industrial area is a wee bit further, about 10 – 15 minutes, and the canal is about 20 minutes, that is if you don’t keep stopping to take pictures like we did
When passing through the residential area there were bins scattered around but so much rubbish lying on the ground and stuck in trees, black bags lying next to bins, I don’t know if the bags have been dragged and opened by dogs / birds or other animals, or people just don’t care / need to be educated. The area has some nice green areas with trees and bushes, areas for the kids to play as well, but the area is spoiled by the scattered rubbish.
Moving on to the industrial estate area, this was in two parts, before the motorway and across the other side of the motorway. Again, plenty of green areas with bushes and trees, grassy areas, wild areas to encourage life but also much fly-tipping and general rubbish lying around. I have noticed that a lot of industrial estate areas seem to be favourite spots for fly-tipping. I think this is because people don’t want to pay the levy when taking big bits of rubbish or industrial rubbish to the tip.
Once we reached the canal area there was still a bit of rubbish lying around, and in the water, but greatly reduced. We didn’t get too far along the canal as we were only going as far as the nature reserve, so we were still in a built-up area surrounded by houses and businesses, but this area seemed to be more careful about how they looked after the environment in which the lived and worked.
Overall, Glasgow has a lot of green space, the local council / government encourage activities within green spaces for people’s health and wellbeing. These spaces are also great for helping the local wildlife and nature in general to thrive. I think a lot of people in the residential areas and industrial areas don’t think of these green spaces as places of nature, if they have lived in the city all their life and rarely leave that city environment they associate nature with the countryside only, and not as any green space whether countryside or city.
To close, I think more should be done to educate people in general about the environment, and for young children, so that their learning passes on to future generations, maybe more trips to farms, parks with rangers, to learn about how nature helps the environment in general, and them to live good healthy lives. It would be nice to see people being more respectful of their living and working areas in general. I imagine that it is the minority in these places that do not care, but it would be nice if we could find a way for them to care more.
Save as .psd file
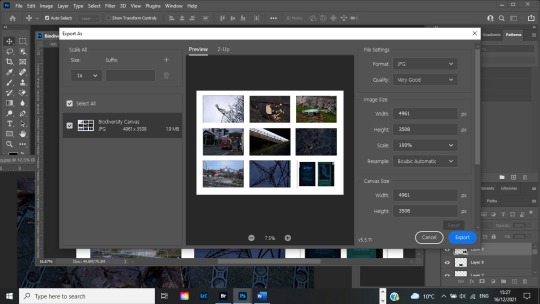
Exported as .jpeg file as I can’t save as jpeg for some reason.
#nqphotography2021#nqphotography#nqphotoblog#biodiversity#PhotoSafari#location#storytelling#environment#waste management#climate emergency#documentary#folio 2
5 notes
·
View notes
Photo
hello! i’ve been asked by a genuinely surprising number of people to walk through how i gif, so here i am with something that’s less a tutorial and more a collection of tips, tricks, and useful links. i hope it helps! ✨
08/23 UPDATE:
i see this post is making the rounds again, but i’ve actually got something better these days: here is the super in-depth gifmaking 101: a comprehensive guide tutorial i put together earlier this year! the new one is way more helpful ✨
GIFMAKING: BASIC TUTORIALS
i’ve been doing this for just over a year two years, guys! i know nothing some things, jon snow!
i learned to gif by following tay’s (@kylos) tutorials, so rather than look to me, go ahead and check out her incredibly thorough master list of tutorials for all your giffing needs
another great resource is rina’s (@hayaosmiyazaki) extremely detailed gifmaking for beginners guide, which is current as of july 2020
V. BASIC TIPS
always, always, always gif from 1080p or up. seriously.
sharpen your gifs! tay and rina both cover sharpening, and here’s another great tutorial by @justin-ripley
always make sure you brighten + color your gifs
@anyataylorjoy has a phenomenal action pack to help you streamline your giffing process
don’t be afraid to experiment! just, idk, fuck around and play with things and see what happens
BRIGHTENING & COLORING & PSDS (OH MY)
experiment. play with levels, selective color, curves, hue and saturation, etc. until you know how they work; that’s the easiest way to figure out what your own personal style + preferences are
or, if you’re looking for something to help you along as you color, go nuts with psds
@dailypsd is an awesome resource for psds
@chaoticresources, which also has tutorials, template, fonts, etc.
@itsphotoshop also has tutorials, templates, etc.
tutorials: tay and rina both cover brightening and coloring!
@bbbbbbbbbbbbbbb-8 also has an amazing guide on how to color correct the murderously blue exegol scenes from sw: tros that is super helpful if you’re struggling with an overabundance of a particular color
i can’t for the life of me remember where i first saw this, but a great trick for Instant Brightening™ is to create a brightness/contrast layer just above your video layer, do exactly nothing to the settings themselves, and just set the blending mode to screen. it preserves most of the colors while dramatically brightening the gif and giving you a great starting point for the rest of your coloring
and holy shit, here is a truly life-changing tutorial on channel mixer which can be super intimidating if you don’t know quite how to work it
practice really is your best friend here! just fiddle around with stuff and you’ll eventually get the hang of it, i promise
FONTS
fonts are the goddamn bane of my existence, but here are some resources to help you conquer them
@yourfonts is the holy grail of font blogs! go give them some love!
@ihaveresources also has one of my favorite font tags
you can always message a content creator to ask what font(s) they’ve used in a particular edit, but if you’re not comfortable doing that, both WhatFontIs and WhatTheFont are super helpful for tracking down fonts
pick a simple, legible font (arial, alte haas grotesk, myriad pro, calibri, etc. are all good options) for subtitles
speaking of subtitles: tay and rina talk about them!
drop shadow is your friend
gradient text can be super fun! if you’re working in photoshop just go to layer > layer style > gradient overlay, and go wild
gradient text in captions is a bit of a pain but also very cool
TAGGING & POSTING
rina has a very comprehensive guide to tagging!
general rules of thumb: tag what you’re editing, who you’re editing, source blogs, and then any user tracked tags
for example: i track #userbells
be mindful of content warnings: for example, i always try to tag anything that flashes as #flashing tw
post on an east coast-ish schedule if you can! 7-10 pm est seems to be the optimal time to post if you want to maximize engagement. here’s a whole union metrics thing about it
boost your own stuff by doing a timezone reblog or two to make sure people have a chance to see it. it’s damn impossible to get a reblog in this economy, so do what you gotta do!
FINALLY! MY PERSONAL NONSENSE: STEP BY STEP
✨ updated 12/2021 ✨
for files i can successfully acquire
acquire file(s)
open file(s) in mpv player + take screencaps
load files into stack in photoshop
crop + resize canvas
covert files into layers on video timeline
sharpen
color
add text and/or effects
convert back to frames + adjust timing
export
post to tumblr
for files i cannot acquire
screen record file(s) player using mac screen capture/quicktime player
import video frames to layers in photoshop
import every frame
crop + resize canvas
manually remove duplicate frames
convert to video timeline
select all layers + convert for smart filters
sharpen
color
add any text and/or effects
convert back to frames + adjust timing
export
post to tumblr
voilà! there you have it!
i’m working on a more comprehensive guide to how i do things, but in the meantime, please feel free to send an ask/shoot me a message if you have questions about something i didn’t address here!
306 notes
·
View notes
Note
im so curious: 1, 4, 8, 21, 26, 32, 42 i hope its not too much 🥺
never too many ;)
1. What are your top 3 favourite sets you’ve made?
did one of these earlier sooo let’s pick 3 more!
pedro + cursing - from yesterday but this was insanely fun to make. & honestly as soon as I saw the request I had instantly picked out all the swearing moments like what space would I have in my brain if I didn’t have all these pedro moments memorized.
yeehaw man - look at his NECK omg & just look how CRISPY this set it mmm yes good job me
the passenger - this is a colourful set that I got great responses from!??! (y’all so nice) I had fun making this one experimenting with gradient map tool. I really wasn’t super happy with how it turned out I wanted it more purple & more orange but people left super nice comments so yes ty friends🥺
4. A set that flopped but deserved better?
how long we got??? jk jk gifmakings a rough business. This one not because its good or anything like this was during my early return to gifmaking but I spent WAYYYYY tooo long trying to make the emojis like rotate lmaooo. I still don’t know if theres a better way but I individually selected each emoji then rotated it slightly to the left/right. asjdkfjsl I spent too much time when I could have done something more productive... ANYWAYS
8. What gif trend do you hate?
*cough cough* reblog to like ratio 😔✌️
21. PSDs or original colouring for each gif?
I tend to do original colouring for each gif but sometimes if I’m working on a set thats similar to a previous one I did (like a DARK gif) I’ll steal the filters I added. But then still I end up changing each layer anyways.
26. How many un posted sets are in your drafts right now
4! some are finished a few are partially done. The gif requests I’m doing for my milestone celly has got me super inspired🥰Plus I’m recently graduated & unemployed so I have alll this freee time! yay (shhh getting a job is a later problem)
32. What is your favourite tool/adjustment layer in Photoshop
Curves!!! oh my goodness once I started using those like light/dark eye droppers OH BOY have my gifs looked ✨spectacular ✨
42. How is your gif folder organized? Is it organized at all?
I recently “organized” it... I have a tumblr folder then some sub folders for different fandoms, right now I have 4: Murdoch Mysteries, Marvel, PEDRO PASCAL & Others. Inside those theres typically 2 ish folders to separate gifs & edits. But my Pedro Pascal gif folder is wildely unorganized theres 227 gifs in there (HOLY CRAP!??!?!?!?!?!) all terribly named. I should delete some....
Ask me questions about being a gif-maker!
5 notes
·
View notes
Photo


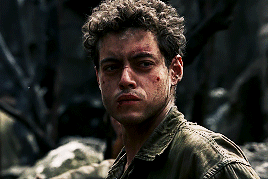
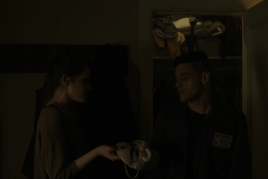
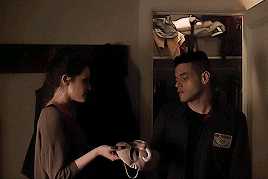
Tagged by @jimmytfallon for this gif meme. I’m not really sure how the meme started so I may be missing the point, but I think it’s to show overall skill with coloring and whatnot? Also this project presents a minor challenge for me, in that all my .psds and previous gifs are almost all full-width. So it was fun practicing with half-width!
Anyway, I have three different methods I use, depending on the source material, for getting videos to work with.
For YouTube/Instagram videos of 720p or lower, I screencap the video, load files into stack, and use the basic method outlined here. I think it’s the best way to handle smaller gifs.
For YouTube/Vimeo videos of 1080p or higher, I directly load the video file itself into Photoshop and work off of that.
For screen recordings (most of the Pacific, BoRhap, and Robot gifsets I do are like this), I simply don’t have the option of screencapping—my computer records at almost 3000px width and the screencaps fill up my hard drive in a matter of minutes. So I open the screen recording in Photoshop, and after I’ve slowed the clip (in all three cases, it’s usually around 81% speed for it to be somewhat normal speed), I resize to the desired width immediately. This has to be done or my computer will crash and this thing is not exactly bottom of the line.
From there, I do my adjustment layers and then I sharpen. It doesn’t matter what order you sharpen in if you’re doing this as a smart object. You can turn on and off these sharpening effects—and if you’re feeling fancy like I have lately, you can do the same with the artistic effects like oil paint or half-tone.
Adjustment layers in order of preference/use:
Curves. You can literally do everything in curves if you’re really willing to learn how they work. Initially, you might think they effect lighting. The bottom left corner turns up and down blacks. Left of center, you’re changing how light or dark the shadows are. Right of center, you’re changing the highlights, and to the top right, you’re changing the whites and how bright they are. But you can also change colors within the different toggles of Curves. I don’t always do this because to do an effective job, you still have to create multiple curves layers—and why do that when you can just do...
Color balance! This is the absolute most important coloring tool that I’ve found to deal with Mr. Robot’s pallor. It’s so green-yellow that I find myself turning things back to red and magenta and blue to try and give Elliot a little bit of life back. In the gif above, you can see that it was almost a pea green tone over the whole thing, so I gave it back some peachiness (and don’t get me started on how dark all of Mr. Robot is).
Brightness/Contrast. I try to use this sparingly, but sometimes it’s just the simplest tool to get things done.
Selective Color! I didn’t know about this for a long time and once I figured it out, it was a game changer. When you just want a yellow robe to be a warm yellow without green undertones and you want high contrast in the rest of the image but not in the yellow robe—Selective Color is where you need to go. Hue/Saturation can only do so much for you here.
Solid Color. Lately I’ve been trying to vignette some gifs using this. And it can be really helpful to do so because it cuts down on flashing pixels that will add to your overall gif megabyte-age. So I’ll load one up in a dark color (if not completely black) and then use a layer mask to get rid of a lot of the solid color. This is not shown anywhere above, but you can see it in action here. It’s more valuable in extra-big gifs.
And then Smart Object effects
Plain old Sharpen. I always do this before the other. And sometimes I turn it back off after I’ve gotten the next step down. In the yellow robe gif above, I wound up turning off this sharpen layer because it introduced too much edge noise.
Smart Sharpen. Learning how to hone this is absolutely vital. 500, .3, 20, Gaussian is always a good place to start—and if that doesn’t mean anything to you, just try opening the Smart Sharpen tool and putting those four things in. Of course, once you get a handle on Smart Sharpen, you can go wild trying to get things just right. Layering it with other Smart Sharpen layers can sometimes help create a balance, too.
Oil Paint. I’ve been screwing around with this a lot lately and haven’t quite got it nailed down, but I’m having fun with it!
Other Useful Layers
Overlays. I love to layer up two separate video files! So much so that I now have a drop-down menu for them on my full browser layout. The YSL/Rami modeling overlay above is the perfect example. Want to see how I do it? Ask for a tutorial. I don’t want to give everything away in one post!
Layer Masks. For mostly-still scenes, especially in cinematography where the camera doesn’t move a lot (like Mr. Robot, or in an interview), you can take a picture basically of your gif, super-impose it, and then make a layer mask to make it smooth. Works really well in many of my Mr. Robot Rewatch sets, like this one. Again, willing to give a tutorial if you ask.
Captions. All of mine come out looking fuzzy and I’m not good at them so I don’t do them much. If you’re a gif maker reading this and have a method you like, please share because I cannot figure out why I can’t make this look good.
So anyway, as you can see, it’s a lot to work with. So many options! There’s so much that can go into a single gifset, and though I have a system down to where I can make certain gifs really quickly, it’s still usually an hour or two on even the simplest gifs. I like to think it doesn’t take as much brain power as a fic writer, but it does take a certain intuition and know-how that takes years to hone.
I love my fellow gif makers and would love to see how they do. Tagging @gwil-lee, @ewan-mcgrxgor, @ilygwilym, and @warmommy because I want to learn your secrets see your process if you’re willing to share!
49 notes
·
View notes
Note
dude I've been stalking your twitter (sorry) and I just wanted to say that your gifs look so good!!!! do u have any tips and is there any chance youll post more on your blog? (-:
hi anon this is v sweet and it really warms my heart to receive asks like this one! akskskss well my tip is to really just keep on making gifs until u find what you like and what ur style is. and do it bc u love it! also always always find videos that are 720p or higher and rmb that resizing is important on tumblr, but on twitter go wild! i still don’t think my gifs r rly that good but u r ur own worst critic i guess!
tbh the only thing stopping me from posting on tumblr is its 3MB limit and resizing stuff is so time consuming so mad respect to all the gif makers on here y’all are the real ones! also feels kinda bad bc people use photoshop and their computers and gifing is an ~artform~ while i’m here still tryna figure out what psd and layers are oops
#i kind of get it#but at the same time#not rly#also whoever invented smart sharpen#i luv u 4 lyfe#ask
1 note
·
View note
Text
Gif Tutorial
I’ve had a *lot* of questions really about gif making. There are a MILLION gif tutorials on youtube and Tumblr but I figured I would show you guys how I personally do it, and maybe that will help! I’ll show you how to make this gif, and god help you because I'm bad at teaching.

HERE is where you find the dimensions for gifs on Tumblr for them to work properly.
Step 1: Import your video clip into Photoshop. I only use MP4 files--I find it the best and easiest way to make gifs *shrug* Import video frames to layers
and then you’ll isolate which portion of the clip you want for your gif. (if it’s a whole episode/movie/whatever that you’re giffing from, trim it in Quicktime first so you’re not just throwing the whole thing in there and then trying to isolate from there. That’s a *pain*
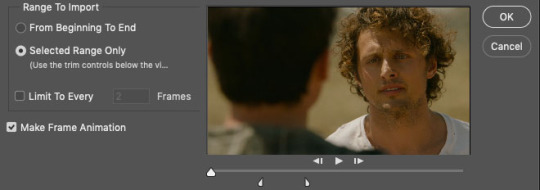
IF you’re using MP4 files, you do NOT need to limit to every 2 frames unless you just want it to be a super fast gif and hey, no judgment. You do you.
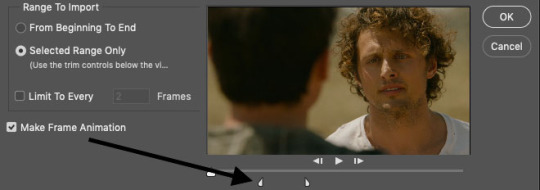
use the tabs at the bottom to further isolate the moment you want (advice: always import a few frames before and a few frames after the part you want. You can delete frames later. Also there is a limit to how many frames you can import--don’t worry, Photoshop will sure as fuck yell at you when you try.)
Now when everything is imported, you'll see your “timeline” at the bottom of your screen. These are the frames you’ll be working with. The little garbage can icon is, unsurprisingly, where you will delete frames you do not need. Frame count depends A LOT on how big the gif is, the way you color, how vibrant the colors, how you've sharpened it, etc. A good rule of thumb is 35-40ish frames for a 540 pixel wide gif, 70-100 for a 268 wide gif, and even more for a 177 pixel wide gif (I don’t often use that size...as you can tell)
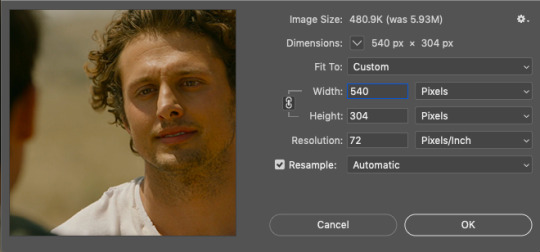
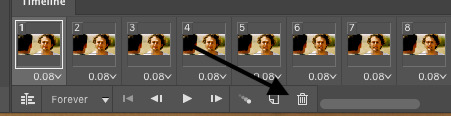
I’m making a large gif (540 pixels, a common size for me personally) so I set it the width here (the height will be adjusted later)

Once you’ve got the width you need, then you can start cropping to get the height you want. This particular gif is 269 pixels in height, based on...well, what I think looks good (A plus for teaching here)
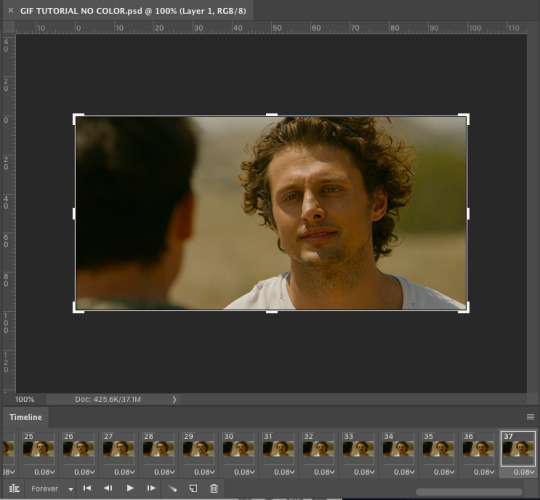
So now we’re here. We have 37 uncolored frames with the correct width and the desired height. Now, you could leave it here, and still have a gif.

But that’s no fun. There’s no color! We gotta see those curls in technicolor, darling.
SO NOW FOR THE FUN PART

The adjustment tab is where you’re going to add light, brightness, saturation, whatever your little heart desires. No limits (ok there’s limits, sorry)
Now, we’re lucky here because A) we have a good quality download and B) the scene is in natural light so we really don’t have to do *too* much. If it’s a dark scene....well, that’s when you’ll want to die.
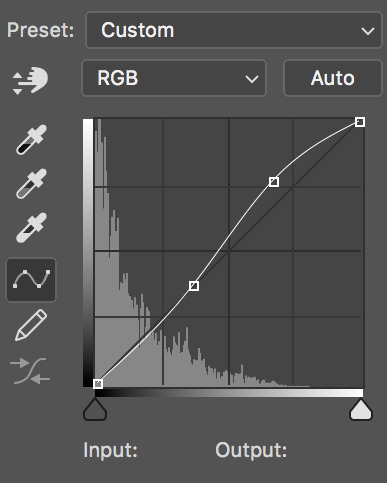
This is the part where EVERY gif maker is different. This is just what I do. You find what works for you. I start with curves.


a good place to start is just to hit “auto” and then adjust from there, which is what I did here. It’s better to have it a tad too light than too dark (at least for me!) (yes he looks orange, yes that will be fixed)
Next: brightness/contrast
Now we’re cookin’ with fire! It’s still too orange but now the gif is highlighting what I want it to. I want it to be deeply saturated (especially the curls and facial hair)
Next: color balance


Run buck wild. That dropdown will let you adjust the color in shadows, midtones, and highlights. You’ll find your style VERY quickly here. Spend lots of time here learning what each sliding color scale does (tip: I RARELY use the magenta/green colors. And when I say rarely, I mean basically never.)
Once you’ve done that, you can do vibrance, hue/saturatio, whatever you want (keep in mind that the more “vibrant” the gif, the fewer frames you can use)
Me personally? I use selective color A LOT

ESPECIALLY blacks. And because Roswell is addicted to YELLOW YELLOW YELLOW, I alter yellow a lot to try and balance it.

The ONLY thing that can help you here is practice. Slap a scene into photoshop and figure out what color/light works for YOU

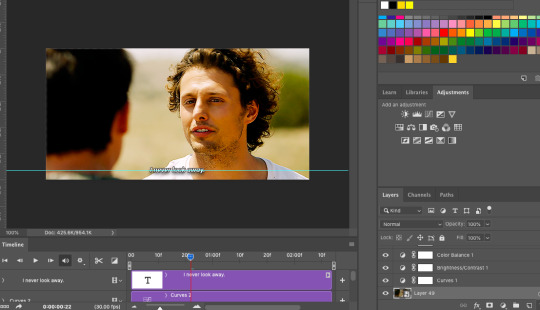
Once you've done all the coloring you want to do, now you can add dialogue. This is where I will direct you to these tutorials here and here because these are how I learned and they do it better than I ever could. (a tip though: USE THE RULER IN PHOTOSHOP. Make sure your dialogue lines up in the same spot in every gif. I do mine at 93% but whatever works for you. Don’t leave it up to your eye, I promise it won't work)
OK we now have the right color AND the right dialogue let’s sharpen this bitch! But first, let’s make sure our gif is the right size because sharpening and saving the gif will increase the size and you need to keep it under 3 MB for Tumblr. AT THIS POINT, SAVE THE PSD. Because sharpening and things may take some room for error and you really don’t want to lose it all. Trust.

Click your “File” folder, then “Export” and then “Save for Web” and you’ll see this:
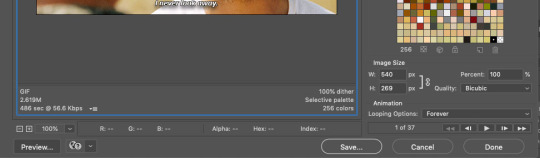
2.61 MB is a very good size to have before sharpening. Anything more than that and you’re playing with fire. Because once you've sharpened and it looks great you may very well discover it’s too large and then you have to undo what you just did to delete frames and that’s rage inducing.
Go down to your timeline and click “convert to video timeline”
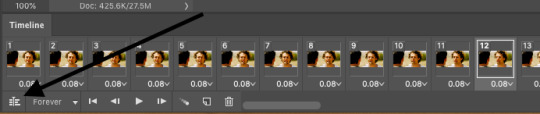
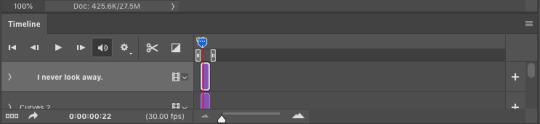
THEN go the right side of your screen and highlight all your layers

And then go to “Filter” and click “Convert for Smart Filters”
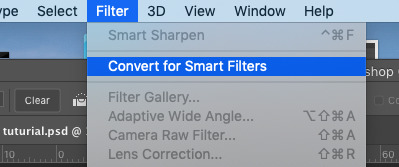
and it will look like this:

All your layers have been grouped together so now you can sharpen.
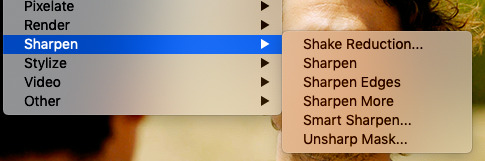
Under “Filter” you’ll find all the things you can do to your gif now that it’s been converted for smart filters. have a ball! Experiment!
For my gifs, I use “Smart Sharpen”

and then I have it set to what I think looks good. I typically tend to over sharpen.
So this is what we have! We’ll check the size one more time before we save
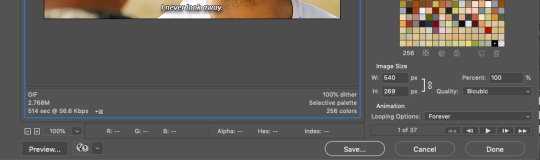
2.76 MB! Perfect! I’ve found that at this point anything about 2.85 MB will save to my computer as a file that is bigger than 3 MB and thus unusable on Tumblr.
And tada! A gif!
#long post#and I do mean long#gif resource#giffing resource#gifmaker resource#gifmaking#my gif tutorial
87 notes
·
View notes
Text
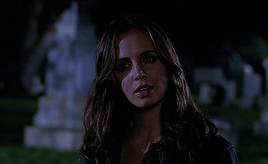
coloring dark gifs tutorial part 2
Karissa made an awesome tutorial which you should definitely check out here. But since we have somewhat different styles I didn’t want to seen lazy and non-participatory (wouldn’t want anyone thinking things that aren’t true...) so I’m going to (try to) explain how I color my gifs as well. This might be kind of long so bare with me.
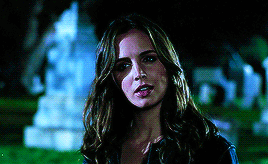
Here is my gif without any coloring:
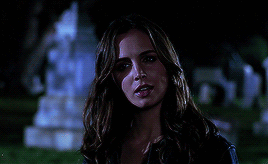
and here it is when I’ve finished coloring:

tutorial below
Okay so I typically color using psds. I make my own psds but tons of people post them too so you can find some really nice ones online as well. It’s good to use one that doesn’t manipulate the picture too much but gives you a nice base to start with (a little brightening, color correction, etc.)
Here is what my gif looks like when I apply the base psd:
Here is what my base psd looks like. I couldn’t really tell you why it looks like this because I make them on a scene based on instinct and then reuse the ones that work well on other scenes but I’m sure you can get the idea.
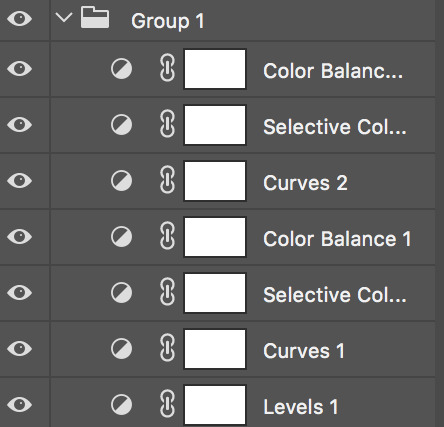
and then here are the settings I have on each layer:
levels 1:
curves 1:

selective color 1:

color balence 1:
curves 2:
selective color 2:

color balence 2:

Alright right now I’m sure that doesn’t mean a lot to you but I’ll try to explain the purpose of these when I add more to the gif.
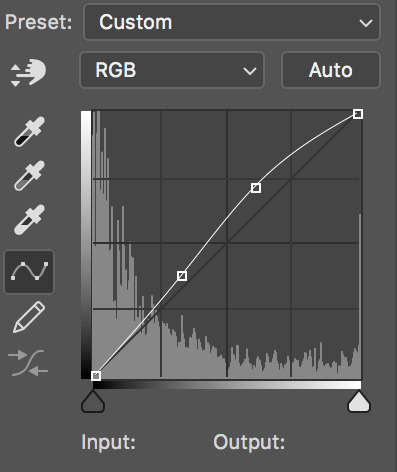
Next I start underneath the psd (so the layers are between the psd layers -which are in a folder - and the gif). Usually I start which either curves or color balance depending on what I think the gif needs more. In this case I started with curves because it’s super dark.
here are the curves settings I added:
Typically I’ll bring the left hand side of the curve down (which I’ll explain later) but in really dark scenes sometimes you need to bring it in a full curve through the lefthand side (I have no idea what I’m talking about so if this doesn’t make sense that’s why) to evenly brighten up the gif.
here is my gif after I add the curves layer:

So now we can actually kind of see what’s happening. If you like your coloring like this you might even just leave it here but I like to add more layers so here we go.
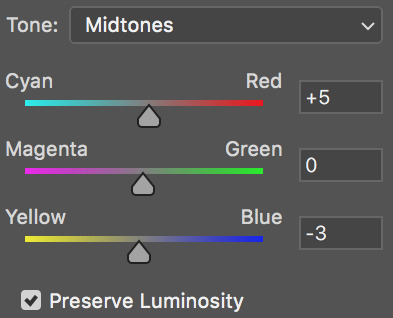
The next thing I focus on is skin tone. If there are no people, or no human skin, in the gif you can pretty much go hog wild and make it whatever color you want, but with people obviously you don’t want them looking super pink or blue or yellow or whatever so color balance does exactly what it sounds like, and balances the colors. You want to identify what color she’s leaning towards, for me it looks like magenta, so we’re going to slide it over to green.
Here is the color balance layer I added:


and here is what the gif looks like now:

So she looks kind of pale now but we’ll fix that. Mainly our focus is that her skin tone is more even, and if we add onto this it’ll get brighter as this skin tone and not the purply skin tone. I typically use midtones and highlights because I think it gives the gif a little more depth. I almost always eventually try to bring the midtones towards red and yellow and the highlights to cyan, but how much will vary by the scene and you may have to do some sliding to the other side first to counteract the lighting in the scene.
I’m going to say real quick that if you’re coloring non-white people (which uh... sadly not much of an issue with btvs, but doesn’t hurt to say), and you don’t want to white wash it can be helpful to put a selective color layer beneath the psd as well and bring up the reds and yellows (in both the red and yellow selections) and this should help counteract the curves or levels layers making them paler than they should be.
Alright next we’re moving to above the psd, so this will be on top of all the coloring we’ve already added. I’m going to add a vibrance layer. When you bring up the lighting it tends to wash out the colors so I like to make sure I’m adding them back as I go.
Here are my vibrance settings:
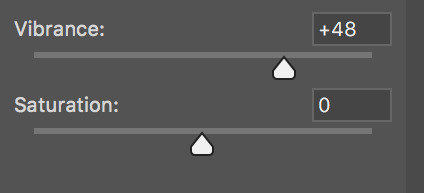
and here is the gif when I apply them:

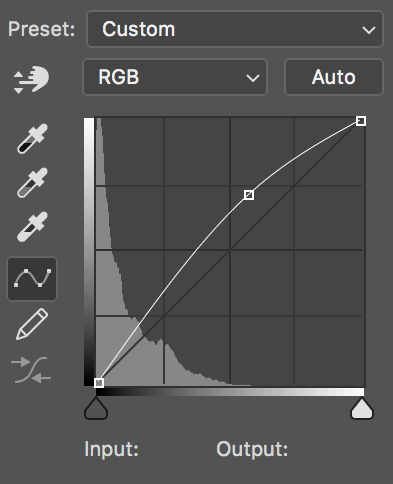
I like vibrance more than saturation because I think it’s subtler, but if your scene is really getting washed out it can help to add a little saturation too. So now we can kind of see the color of her face again (the reason I like to put color balance below is so that when you bring up vibrance it brings out the right colors), we’re going to continue to make it brighter. I’m going to use another curves layer.
Here are my curves settings:
and here is the gif:

Like I mentioned before I typically like to bring it up on the right and down a little bit on the left. This essentially just maintains the depth of your gif so that the darker parts stay dark and it doesn’t get super grainy (though unlike Karissa I like a little grain). How much you move the left part down is going to depend on the scene, some need more depth than others (though if you’re trying to counter act grain, less light is better than more depth).
I’m starting to see her skin tone move back towards magenta (coloring is kind of like wack-a-mole, you just have to keep everything in line as you make it brighter), so I’m going to add another color balance layer.
Here are my color balance settings:
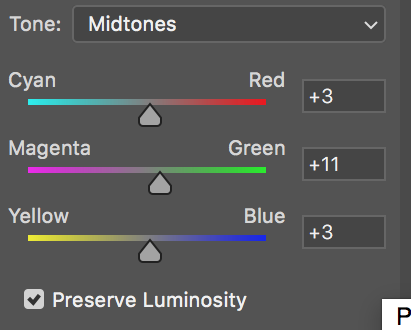

and here is what the gif looks like:

So now her skin tone is looking kind of balanced again, we can bring up the vibrance again. (for the sake of full disclosure I also added a selective color layer where I brought the yellows in yellow down to -50, but you can’t even really see the difference so I’m not including it)
here are my vibrance settings:

and here is the gif:
As you can see on this one I did up the saturation but I still try to use vibrance more. Now we’re going to brighten again. I’m using another curves layer.
here are my curves settings:
and here is the gif:
Now we’re really cooking with gas. You can see Faith and everything. I’m just going to make a couple more adjustments and then we’re done! I’m adding a levels layer on top of this curves layer to just make it a little brighter.
here are my levels settings:
and here is the gif:

Pretty minor adjustment. I just brought it up a little on the righthand side. If it was losing depth I could bring the left in too but it looks fine so I didn’t. I thought her face still had a little bit of a magenta hue, so I added another selective color layer.
here are my selective color settings:
and here is the gif:
This just got rid of the lingering magenta, and moving the yellow up will hopefully take the color more towards red, which looks more normal as skin tone. I just did this so I could bring up the vibrance one last time (which will bring back some magenta but c’est la vie).
here are my vibrance settings:
and here is the final gif:

We’ve got a nice tone, the lighting is good, there’s some grain but not enough to make it ugly. This is where I typically leave gifs. You could keep going if you wanted but you’d have to start being careful about grain and depth issues.
Hopefully this was helpful and not terribly confusing. If you have anymore questions you can ask me here or on my main blog @buffyslehane.
- lola
189 notes
·
View notes
Note
I love the visuals you make for your wips! (And the wips themselves lol) if you dont mind me asking, where/how do you create them?
thank you so much!!
ok so!! there are two ways i like to make visuals.
1. ONE SCENE.
as you can see, this is one picture. this was the visual for my novella dead men pay their debts (dmptd).
first off, pick your pictures. i like to splice together a few different background scenes. dmptd is a western, so i took a bunch scrubby californian desert scenes and put them together.
next, i took my faceclaim and put him on there. you can put one or you can put many. i also added a cowboy for good measure, cause this is a cowboy story after all. basically just put cool things relating to your story.
finally, i added a quote from it on the front!
also i used psds. the one in this is WILD WILD by @blossomov (check her out, she makes amazing psds) but you can use any. or you can experiment with your own!! psds add so much to a visual in my opinion.
2. COLLAGE.
this is the visual for my dark academia wip what they call god (wtcg). instead of being one picture, it’s four different pics.
same thing as before - pick your pics. i like to make mine either 2x2 like shown above, 2x3, or even 2x4. so you use 4-8 pictures. pick ones that relate to your wips. you can use google, or websites like pinterest/unsplash.
use some app or site to arrange them geometrically. i like using canva!
again, i like to use psds to add atmosphere and to make it all look more aesthetically pleasing.
optional just like the psds but gif overlays are always nice!!
this is all just my personal process but thank you for asking!!
4 notes
·
View notes
Photo
⌠ GREGG SULKIN, 23, CIS-MALE, HE/HIM ⌡ welcome back to gallagher academy, GRAYSON BERKSHIRE! according to their records, they’re a FOURTH year, specializing in KNIFE FIGHTING SKILLS, SWORD TRAINING, PRECISION SHOOTING, FIREARMS & SWAT TRAINING + COVERT OPERATIONS; and they DID go to a spy prep high school. when i see them walking around in the halls, i usually see a flash of (hands shaking slightly, a half-hearted smile & a well worn book under one arm). when it’s the (libra)’s birthday on 10/2/1995, they always request BRAISED FRENCH ONION CHICKEN WITH GRUYÉRE from the school’s chefs. looks like they’re well on their way to graduation.
this psd sure is a throwback but i couldn’t be bothered to find a new one. but like.....i did make a graphic so........................an attempt was made
anyways get ready for the shortest intro u have ever seen
grayson’s parents and grandparents work in espionage. so he grew up among spies and they always had his future mapped out for him. he was raised doing physical challenges and sharpening his mind and figuring out logic problems, all starting when he was like ??? three or s/t
ofc he went to various school his whole life for spies ... n he’s british so most of this happened in the uk, not just england bc his parents had to move around a lot so they were always relocating
for this reason he’s like .......... awkward he’s not rly the BEST at meeting new people or making friends. he can smooth talk and act like he fits in if it’s for a mission but forging like?? actual relationships???? yikes
anywho being a spy has never really been his passion but he’s good at it. largely bc he didn’t really have a CHOICE. he’s fairly clumsy and nervous in his everyday life but the second he has to go into spy mode, he snaps into shape and knows exactly what he’s doing. so even if being a spy isn’t something he loves, it is the one thing that makes him feel like he’s doing something right????? yike s
the thing he’s just always naturally been best at is weapons training, even tho he doesn’t seem like the type of guy who’d be skilled with a set of knives or a firearm. his reaction time is unreal and he has perfect aim from truly a lifetime of training and it’s wild to see him in action if you know the real him at all but .... sometimes it be like that
covert ops is more the thing he’s interested in doing, he’d prefer to be behind the scenes and he’d like to teach after graduating. and if he ever had to step in and save somebody’s ass in the field he could do that too esp when it comes to the fighting aspect. he doesn’t rly enjoy violence he kind of just has to detach himself from the situation when he throws a knife at someone from across the room u feel
idk this makes no sense but grayson is um nice and the least intimidating person on earth bye. but also he could kill someone by mistake eye--
9 notes
·
View notes
Last Seen Blogs
reykanulasy-blog
My Reyka-an

incorrect-whiterose
incorrect whiterose [RWBY]

shyoongift
shyoongift

itsagentzero
Call me agent Zero

illfuckthefuckoutofyou
I'll Fuck the Fuck out of You