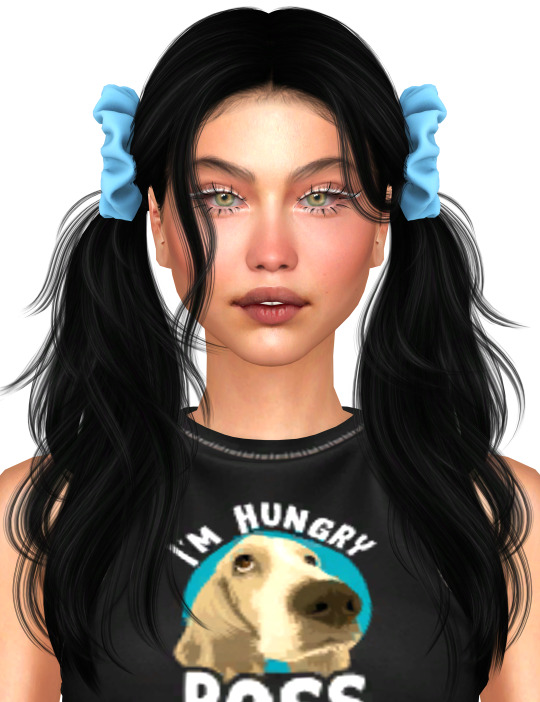
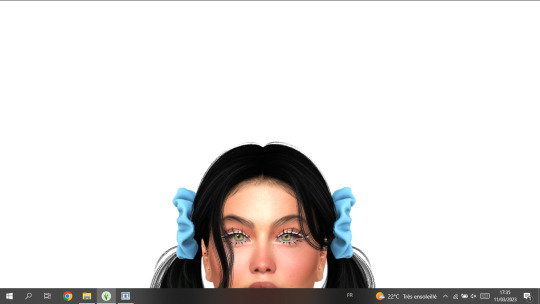
#please click for a higher resolution
Text
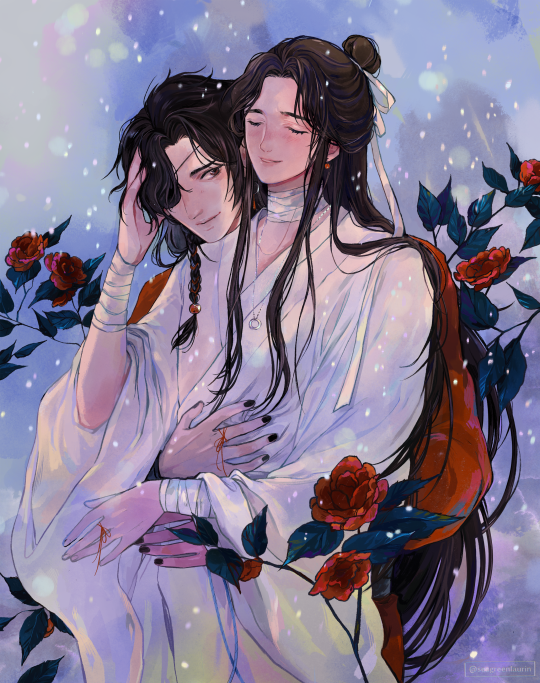
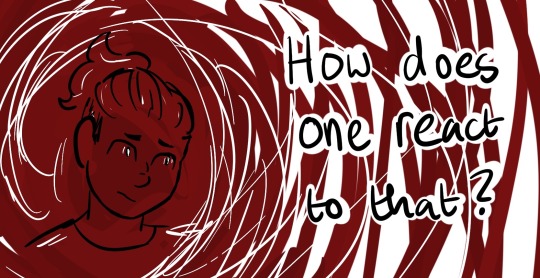
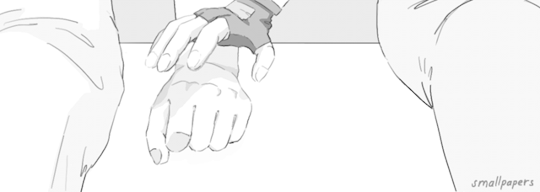
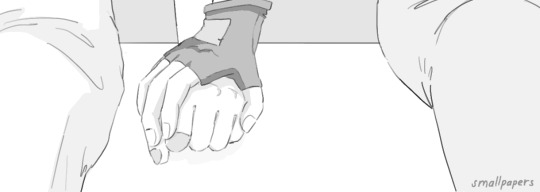
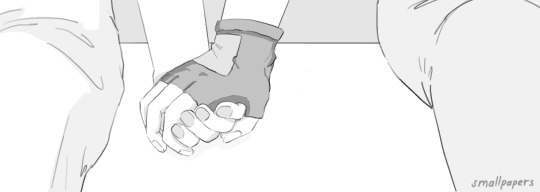
“Only after having met you did I rediscover that it’s such a simple thing to be happy.”
#heaven official's blessing#tian guan ci fu#tgcf#artists on tumblr#digital art#art#illustration#mxtx tgcf#tgcf fanart#xie lian#mxtx fanart#tgcf xie lian#tgcf hua cheng#hua cheng#hualian#i made it#please click for a higher resolution#Hualian brainrot#I love them sm#them#❤️#I finally made it 😭
2K notes
·
View notes
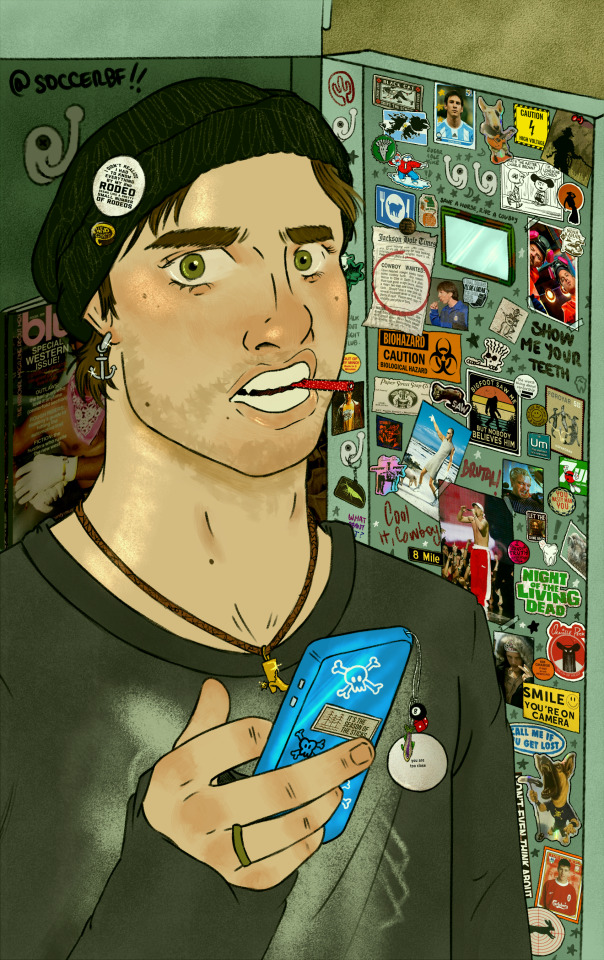
Text
I don't care that my first post about this AU was just a few hours ago, I already made the character designs for the choir members

Some design notes:
• I gave the Onceler a thneed around his neck
• I made Alastor a human since In canon, he only has deer features because he's in Vivziepop hell where everyone becomes a furry when they die, but since RTC's afterlife doesn't do that, I figured it wouldn't make sense to give him real deer ears and a tail, so I just gave him an amylered headband, as for why his left eye is gray, that's because he usually has a monocle there but I didn't feel like giving him a monocle so I just made him blind in that eye
• ALL OF WALLY'S LITTLE PAINT SPLATTERS!!!!! also, I think his crutches turned out pretty good considering this is my first time drawing someone with them
• It took my forever to get John Doe's snow leopard plushie to look good, both the head and the body
• this is also my first time drawing any of these characters, and I gotta say, I did pretty good
#Ride the cyclone au#Rtc crossover#tumblr sexymen#The onceler#alastor hazbin hotel#Mha Dabi#touya todoroki#Wally Darling#Jack Frost Rise Of The Gaurdians#Luigi Mario#Please for the love of God click this image if you want a resolution higher than 5 pixels!!!!!#Ride the cyclone#ibis paint x#My art#Ride The Tumbler
36 notes
·
View notes
Text
🎱🦐LILLEBROR, DET ER 21 OKTOBER, KLOKKEN ER 00:00, OG DET ER DIN FØDSELSDAG🦐🎱
#happy birthday to the coolest funniest handsomest shrimpiest and sweetest guy in the world!!! you're old!!! ilysm#as always click for higher resolution and zoom in#digital art#my art#paint tool sai#original work#artists on tumblr#please please rb this one it took me so long#if you think about it it's kind of a companion piece to the yellow telephone self portrait. we're sold as a package deal
19 notes
·
View notes
Text

Quick doodle of Lieutenant Seinosuke and Soul Reaper Academy Hanataro _(´ཀ`」∠)_ ...........
#bleach#fanart#yamada hanataro#hanataro yamada#seinosuke yamada#yamada seinosuke#seinosuke-nii-san might be shady but I think he cares about his little brother in his own way hehe...#yamada hanatarou#hanatarou yamada#please click for higher resolution!
66 notes
·
View notes
Text
What's new(ish) in the settler-colonial state of the US is that a series of bills have been passed in the House (the Baby Senate as I like to say) and are on their way to the Senate that make it harder to voice support for Palestinians while also making sure your direct taxes aid the genocide in Gaza.
These bills affirm the US's stance on the settler-colonial Zionist Entity and the implicit ties that the government has with Israel and really — just goes to show you how Israel is just one big base for American Imperialism.
Anyways, there's still time to call your senate and tell them that you don't want these bills that only further spiral the US into fascism so even if you think it might not do much — it's important that we document our dissent in official sources. And while you're at it — call your congressperson and tell them that if they voted for this you're not voting for them next election. If they voted against the bills, still call your congresspeople and tell them you support their decision to vote against these bills.
Here are the bills:
📍Resolution: HR 6126
Resolution Name: Israel Security Supplemental Appropriations Act
Description: Gives $14.3 Billion To Israel From The IRS (Taxes You Pay). Like straight up. Just takes it from an IRS project, which used our tax dollars to begin with, to give to Israel "defense."
Link to check summary: https://www.govtrack.us/congress/bills/118/hr6126
📍Resolution: HR 798
Resolution Name: "Condemning the support of Hamas, Hezbollah, and other terrorist organizations at institutions of higher education, which may lead to the creation of a hostile environment for Jewish students, faculty, and staff."
Description: Will Penalize Students On American College Campuses For Supporting Palestine. This includes "Free Palestine" Protests as according to Rep Owens who introduced the bill (Click).
Link to check who voted: https://www.govtrack.us/congress/votes/118-2023/h578
📍Resolution: HR 3266
Resolution Name: "Tolerance in Palestinian Education Act"
Description: They will be examining Palestinian education materials to see if it promotes "hate" or "violence" (aka are they teaching their children to become murderers??). Will inevitably require Revision Of Text Books In Palestinian Schools To Portray The Occupation In A Positive Light.
Link to summary: https://www.govtrack.us/congress/bills/118/hr3266
📍Resolution: HR 340
Resolution Name: "The Hamas International Financing Prevent Action"
Description: Claims to stop financial support for "terrorist" organizations but considering that Gaza's government is run by Hamas, then this would mean Gaza will receive absolutely no aid and donating to people in Gaza could get you in legal trouble.
Link to summary: https://www.govtrack.us/congress/bills/118/hr340
There's a button for most of these bills that allows you to contact your representative directly. Please do take the time to contact them — while many of this isn't especially new to Palestinians, the difference is now that we have a larger power in numbers than we did in the past. Please make sure to advocate for you Palestinian comrades in the US whenever possible! Help us Free Palestine one step at a time!
15K notes
·
View notes
Text

I’m currently reading a lovely fanfic from @christaspirit and I had to draw some fanart. I just found out about her account here on tumblr and saw that official art already existed. Which means I drew her superhero costume completely wrong. I’ll probably draw it correctly in the future but anyway thank you for the awesome fanfic christaspirit, I’m at chapter 8 now and it’s really great. I love how the characters are all way more likeable then in the show and I just adore Chloés and Maris friendship.
(:
#Click for higher resolution#please ignore the hands and the feet#i kinda hate the way I drew Chloé‘s skirt but I’m too lazy to correct it so…#miraculous fanfic#miraculous fanart#@christaspirit#drawing#fanart
0 notes
Text


Would You Still Love Me If I Were A Wyrm, written and illustrated by me.
This interaction has stuck with me for a while, so I figured I should write down my thoughts about it. So here we are.
Please click for higher resolution, reblogs are appreciated, do not repost.
#jg arts#comic#digital#complete art#queer art#queer#my art#queer comic#trans#nonbinary#genderqueer#Ace#gay#bi#pan
390 notes
·
View notes
Text
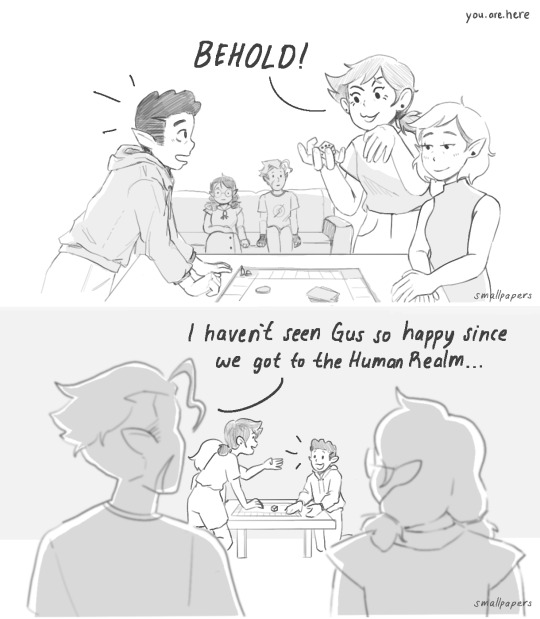
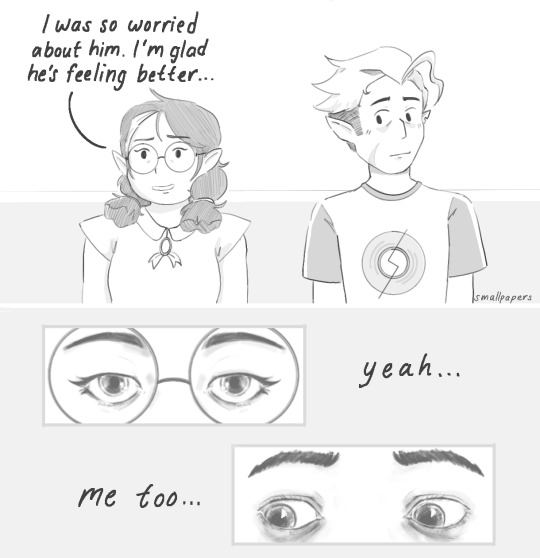
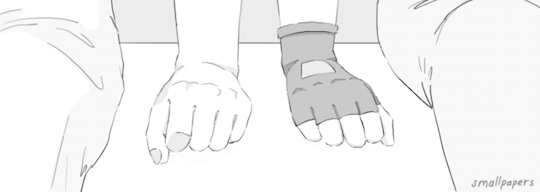
a moment with you
don't forget about yourself.
please click for higher resolution! (you.are.here series: tag/masterlist)
#the owl house#huntlow#hunter wittebane#willow park#luz noceda#amity blight#gus porter#augustus porter#toh kings tide#toh comic#myart#the golden guard#i semi-rotoscoped my own hand as an animation reference#i hope this formatting is readable!! also sorry if you cant read my handwriting but i refuse to deal with the procreate text tool#long post#yes theres at least 3 diff art styles in 1 post RIP#youarehere toh
7K notes
·
View notes
Text
A quick redraw I did of one of my favourite scenes from MDZS! Click for higher resolution ✨
Please do not repost without permission!
#mdzs#mo dao zu shi#wei wuxian#lan zhan#the untamed#grandmaster of demonic cultivation#wangxian#art#illustration#etsyshop#lesbian art#drawing#artist#digital art#my art#artists on tumblr#fanart#mdzs fanart#mdzs fandom#mxtx mdzs#mxtx fanart#mxtx#mxtx characters#queer
212 notes
·
View notes
Text

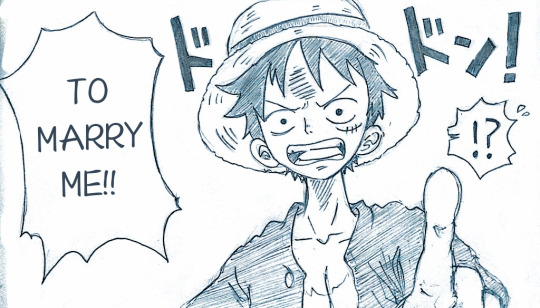
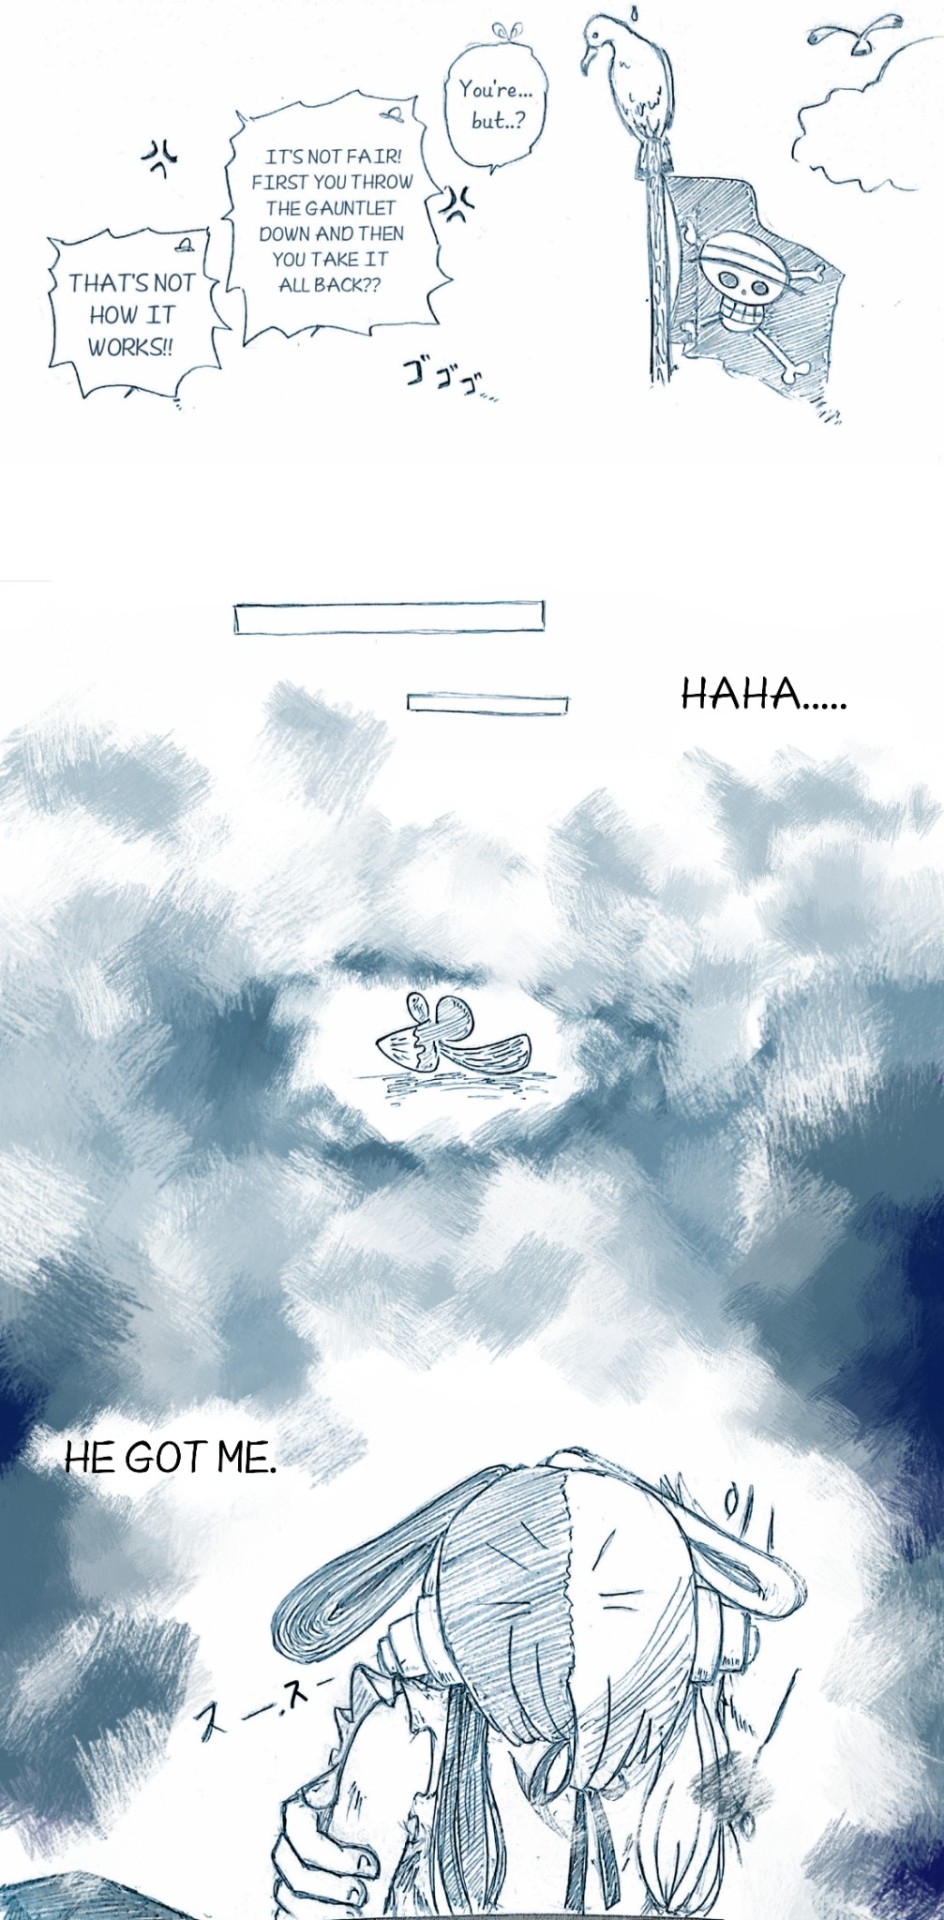


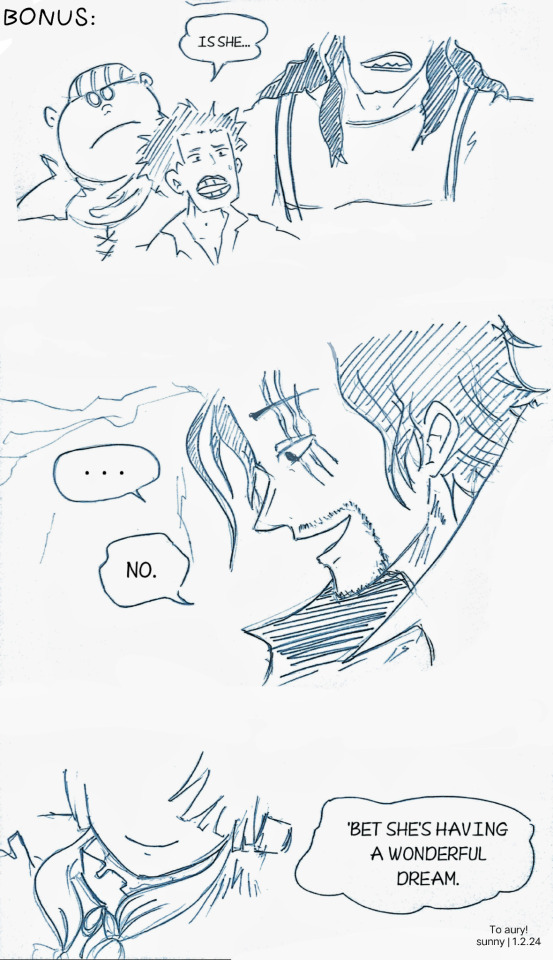
(click for higher resolution)
My gift to @standreamy for our server's annual gift exchange event. While making the gift, I noticed the amount of subtle hints at Luffy in Uta's hopeful songs. As for the beginning, I was inspired by Aury's own fic. Please check out the works of our multitalented bean!
Standreamy's twitter | ao3
#ily aury I'm glad I could make something for you#one piece#monkey d. luffy#one piece uta#uta one piece#one piece film red#luffy x uta#luuta#shanks#my doodles#i need a luffy tag#red haired shanks#red hair pirates#red haired pirates#lucky roo#mine
126 notes
·
View notes
Text
low quality video ➜ "HD" gifs tutorial! (2022 UPDATE!)
back by popular demand. warning, this is a work in progress! so far I have found this is the best way to restore low quality movie videos into somewhat clear and “hd” gifs. I will update if I discover anything different (:
this works on movies/videos in 720p and lower
you must have basic gif making knowledge
I'm using adobe photoshop cc 23.4.1 (2022) for windows
link to previous version of this tutorial
TUTORIAL UNDER THE CUT 🔽
so this tutorial is going to show you how to create the ILLUSION of high quality and film grain in your gifs just by using smart filters, coloring, and the filter gallery tab! this trick works on 720p, 480p, 360p, and 144p resolutions
1. MAKE YOUR GIF BASE
I’ll be using a scene from hello mary lou: prom night 2 in a *really* gross 480px lol
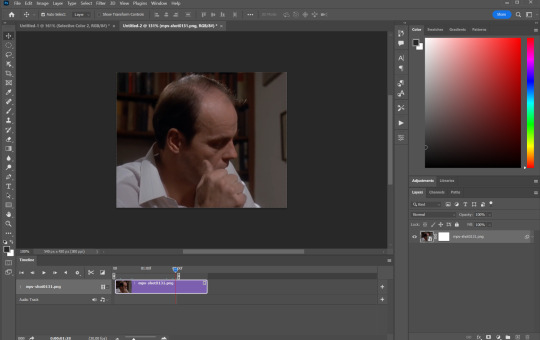
2. RESIZE YOUR GIF
ctrl + alt + “I”
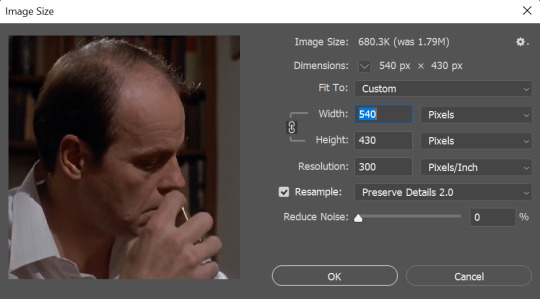
These are my resizing settings (copy these).
Resampling your gif under the ‘preserve details 2.0′ option allows you to resize your gif without losing those small details - essentially making your gif sharper.
⭐ please note that gifs will look better if resized to 268px instead of 540px as its easier to hide low quality trails that remain in the end.
3. ADD ‘SMART SHARPEN’ FILTER
filter ➤ sharpen ➤ smart sharpen...

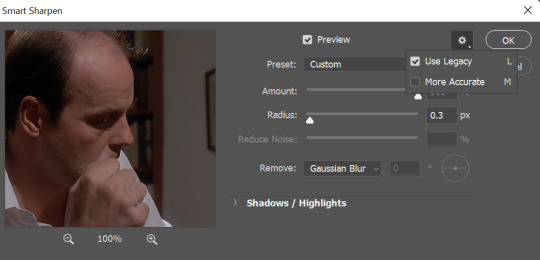
When adding your smart sharpening layer, be sure to unselect More Accurate from the drop down menu at the top. (You can access this menu by clicking the gear in the right hand corner)
Unselecting this option will add more sharpness to the highlights and shadows of your gif, which is essential for this trick to work
⭐ of course if you have preferred sharpening settings, feel free to use those instead!
3. ADD ANOTHER ‘SMART SHARPEN’ LAYER
filter ➤ sharpen ➤ smart sharpen...
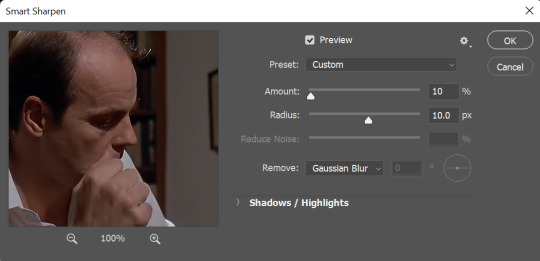
Copy these settings
Keep the More Accurate option SELECTED for this layer!!!
4. CREATING FILM GRAIN
filter ➤ filter gallery... ➤ texture ➤ grain

These settings will depend on what you think looks best! For this gif, these are the settings I ended up with
Be sure that the “Soft” option is selected from the drop down menu. Its the cleanest grain filter photoshop offers and its the closest you’ll get to grain used in films
The intensity will depend on you and what your gif needs. Don’t go too crazy here. Keep the number low (no higher than 10)
Contrast will generally stay in the 50′s but if you need more black areas in your gif feel free to push that number a bit
⭐ Don’t get too attached to these right now as they may change throughout your process!
4.2. ARRANGING SMART LAYERS
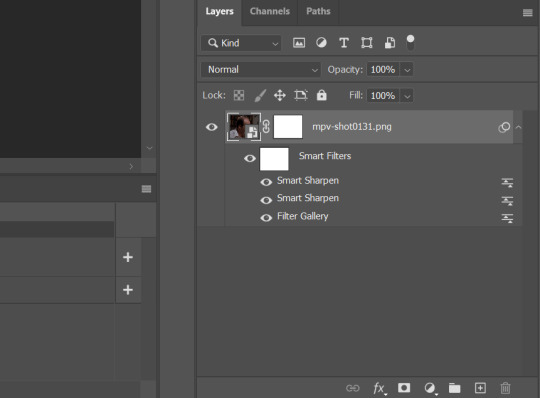
MUY IMPORTANTE!!!!
In order to get that sharp grain look, you’ll need to place the “Filter Gallery” layer beneath the 2 smart sharpen layers like in the pic above
Edit your grain settings as needed!
5. COLOR COLOR COLOR
After all of that is said and done, add your coloring! Try to push the shadows and add more black in your 'selective color' adjustment layer just to give your gif more contrast. This will clean up the pixel-y blacks and make your gif look a bit nicer to look at. Again this will all depend on what you’re looking for and what you think looks best!
6. SAVE!
Once you're satisfied with how your gif looks, alt + ctrl + shift + “S” and you're done! Here are my save for web settings
MY RESULTS!
480px video, before and after:
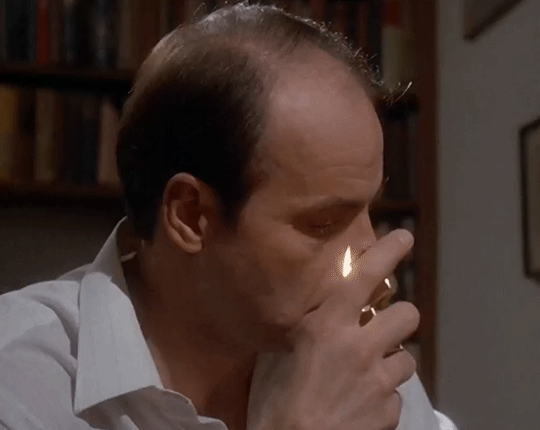
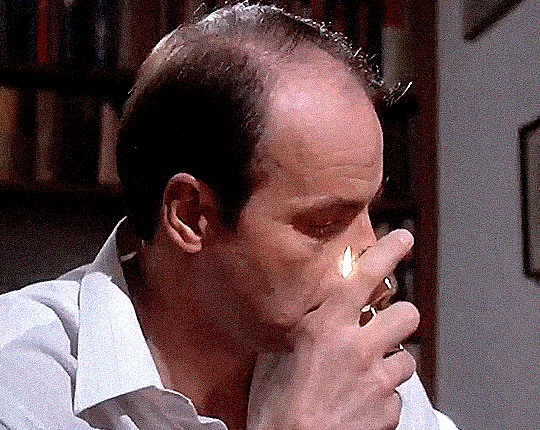
(Still looks pretty shitty but I guess its better than the original ???)
360px video, before and after:

(I ripped this movie straight from the DVD and the glitch you see came with it unfortunately 😒)
End notes/tips!
This trick will not work on every low quality movie
Please play around with the sharpening, grain, and color settings to find the best version for you!
The higher the quality of the video (720p, 1080p dvd) the less grain you will need to add
Again, gifs look even better if they are put into 2 column posts instead of a single column (268px instead of 540px)
The grain filter will unfortunately make your gif size very large which is something I havent been able to work around
And once more for the people in the back - this is FAKE HD, it won't turn your 480p video into a crisp blu-ray 1080p quality. it just gives an illusion of higher quality 🤠
Please feel free to send me a DM or an ask if you need further help or have any questions whatsoever! Thank you!✨🖤
#i fought for my life getting these to look somewhat decent#but ig im proud considering how bad the originals are#anyways i hope this helps someone#gif resources#resources#gif tutorial
1K notes
·
View notes
Text
sorry for disappearing suddenly,
take a revenant :]
click for higher resolution please!!!
27 notes
·
View notes
Text

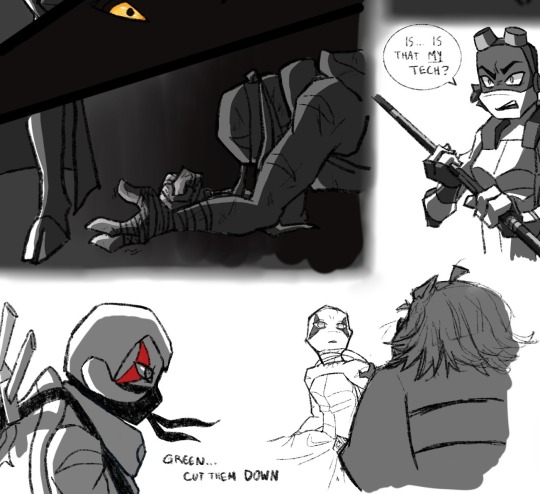


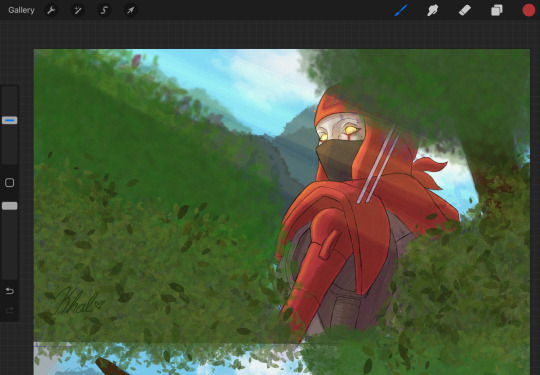
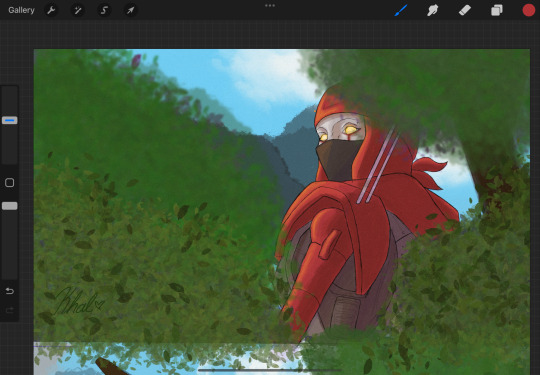
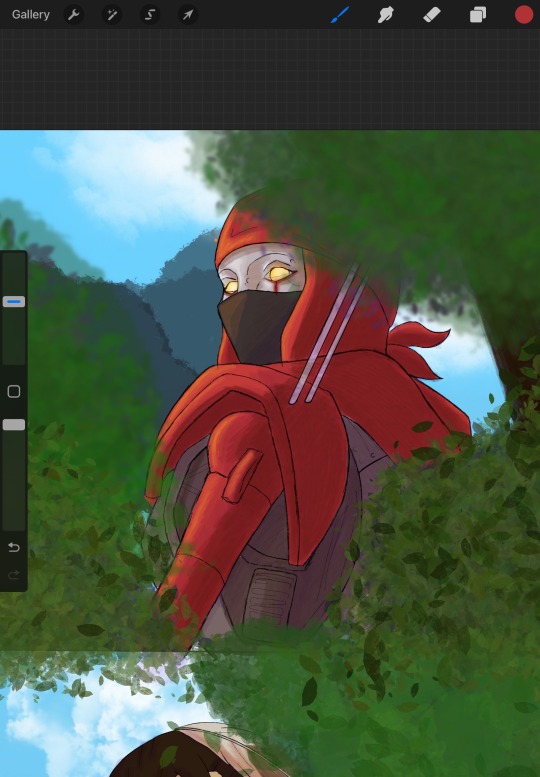
So if you dabble in tmnt fanfiction at all you know of Like Father Like Son by @eternalglitch
This is a mega sketch dump, the story made me feel things and my feelings always give me drawing motivation
(Also I really don’t know what the quality of these are going to be once it posts so please click for a higher resolution. If they’re too blurry I’ll repost with smaller dimensions)
#tmnt#rottmnt#lfls fanart#lfls#teenage mutant ninja turtles#like father like son#fanfic#rise of the tmnt#leonardo#green#sketch#sketch dump#art#fanart#digital art
966 notes
·
View notes
Note
Your photos are always so bright and HD! What graphics card do you use and what are your in game settings if you don’t mind me asking?? Could you also give some tips for somebody starting out to take photos in the sims 4 🪐😚
Thank you ♡
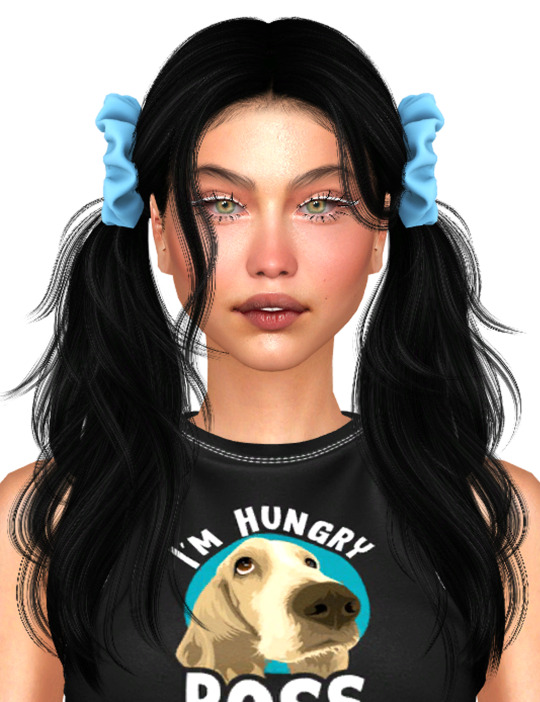
I have a low end laptop lol. But i use few tools and tips that help me take some good quality photos. I’ll share them in details so this is going to be a long read !! Sorry ahead and bear with me please 🥰
Let’s start with few things to enhance your in game quality first :
If you don't use HQ mod i recommend you check it out HERE !
Here are pictures without and with HQ mod ( click for better quality )

Do you notice the HUGE improvement in details like eyebrows, skin, eyes and clothes, pretty much everything lol!!
I use HQ Mod Switch to turn HQ mod on and off as i wish. Be aware that HQ mod slows your game !! you can simply turn it on just when you need to take screenshots.
I use This Gentle Cas Lighting ( IT’S A MUST!!)
Now, there are two ways to take good quality pictures that i know of and use :
OPTION 1 :
If you want something quick but does the job then this is your go to :
- SRWE :
Download the zip file and unzip it.
Run The Sims 4 game.
when you are ready to take screenshots whether in cas or in game ( i take mine in cas ) go to settings and change display type to windowed. Here are my in game settings.
Open the SRWE file you downloaded earlier and run the app. ( Make sure you unzipped it 1st )
Click on Select running Application and choose TS4 game then Click open.
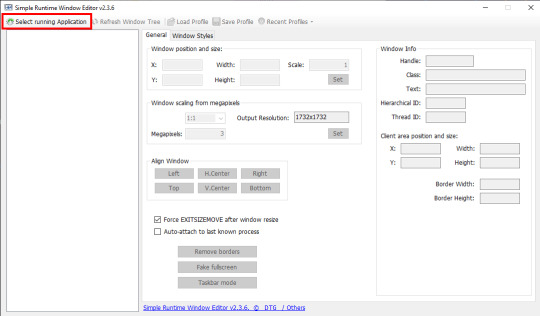
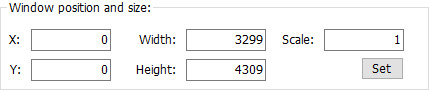
in the Window position and size you adjust the width and height to your liking. Be experimental with it till you are satisfied. These are my settings :
When you go to the game you will notice the change in resolution. Here it’s tricky a little because if you make the resolution too big, you might not be able to see everything on the screen, here is an example
You can move around by clicking on the options in Align Window.
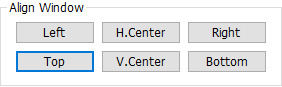
It helps you navigate around the screen. I always go for Left + Top which displays this as a result :

When it's set this way i get to see Traits properly to pose my sims before i take a screenshot .
Please bear in mind that my screen resolution is 1366x768. If your screen resolution is higher you dont have to use same settings as mine !!
FINALLY, you hit C on your keyboard to take screenshots. And you are done.
Tip : If you liked your SRWE settings and want to save them, click on Save Profile then name it so you can load it the next time you use SRWE, without having to type everything all over again. As you can save many profiles with different settings !! feel free
Ps : As you noticed from the previous last two pictures, using SRWE will display part of the screen and not all of it because the resolution is bigger now!! in this case i recommend you go to the screenshots folder of your game and check how the screenshots turned out while you are still running the game so you can decide if you like them enough or not before closing the game!
Here are pictures taken without and with SRWE ( using HQ mod in both )
OPTION 2 :
If you have the patience and time, you should try rendering in Blender.
There are so many tutorials on youtube that can help you learn how to render. I’ll link you the one i liked best HERE !
TIPS :
This is my resolution settings for pictures in blender ( you click on Output Properties to set it )
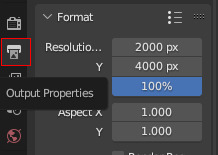
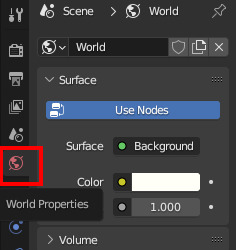
I dont use any lightning in blender, i use World Properties instead by clicking on color then setting the value to 1.000. If you want some cool effects you can have fun trying some lightning options ( watch the video to see how to do it ! )

You can add a background in blender and change its color to your liking. I use transparent background beacuse it's easier to edit the image that way. To get an image with transparent background in Blender go to Render Properties>Film>Transparent

I use Eevee to render my images. It is recommended to use Cycles for better/higher quality but it takes longer time and it can crash if your PC doesn’t support it ! So be aware please!!
HOW I EDIT MY PHOTOS TO LOOK BRIGHT!
I use Photoshop to edit my photos. I don't do much to be honest. i resize images when it's needed and adjust brightness/contrast, tone and color ( 70% of the time i just go for Auto Tone ) which you will find in Image.
Tips : you have some cool options in PS that can give you that bright effect, such as :
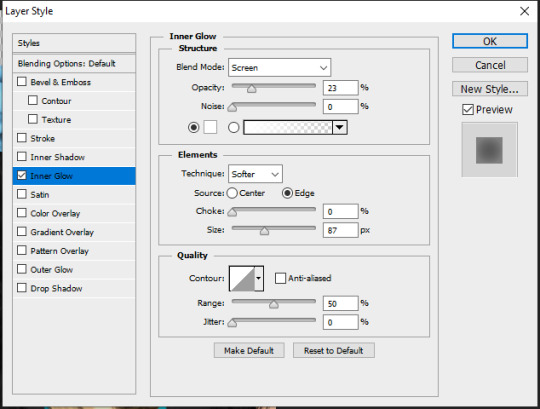
Inner Glow : You can find it in Layer>Layer Style. And here are the settings i use ( they are still adjustable depending on the clothes, hair and skin color of my sims ) :
Outer Glow : you can find it in Layer Style as well. I dont have specific settings for this one. It totally depends on the picture and type of edit i’m going for. I dont always use it unless i want some really bright effect around my sims like In my Fairy post HERE.
You can get creative with other options in Blending Options, which you can find in Layer Style.
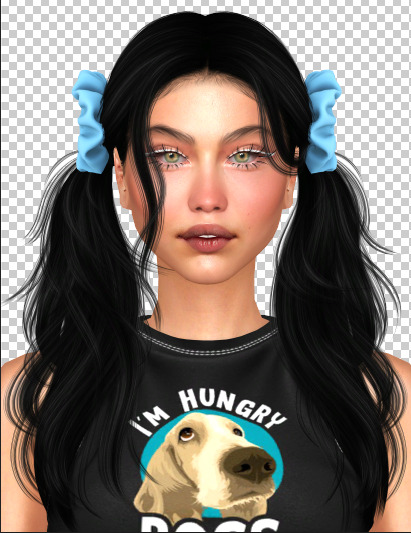
For the Glow effect to work properly you have to have a transparent background, or delete the background yourself ! it should look like this !
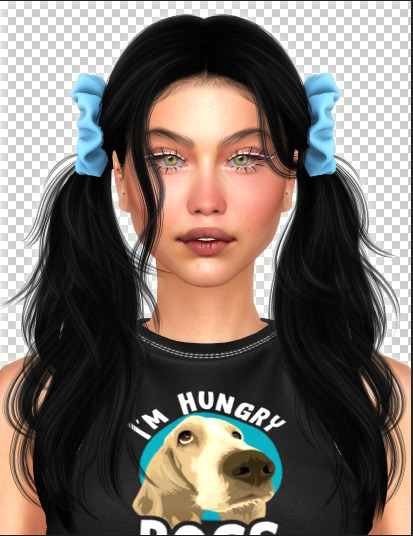
after adding the Inner Glow + Outer Glow effect it will give you this !
When i add a background (in a new layer) i dont make it 100% white! i go for this color to make the Glow effect pop a little !! and these are the color settings :

ET VOILÀ LE RÉSULTAT.
Lastly, if you made it till here thank you for taking the time to read all that ♡
I hope it was helpful a little. If my explanation was ambiguous or you have any more other questions, don’t hesitate to ask please!
#THIS WAS LONGER THAN IT NEEDEDTO BE!!!#but totally worth it if you are new to this!!#ts4 edit#ts4 cas#the sims 4#ts4 simblr#asks#editing tips#sims 4#simblr#ts4 render#ts4 screenshot
150 notes
·
View notes
Text
MTL Rarepair Month 2023
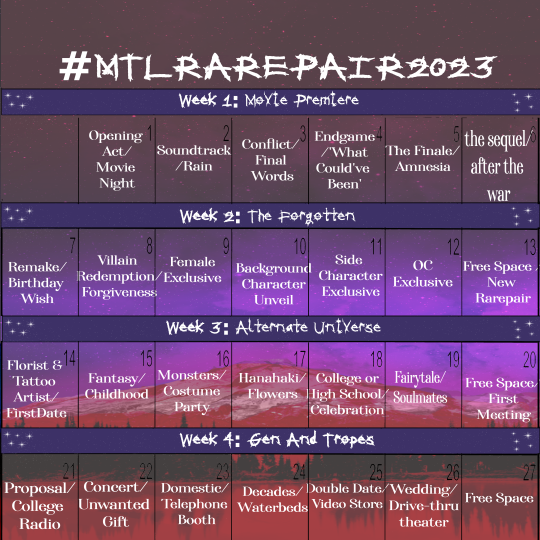
If image is blurry, click on the image to be taken to a higher resolution version!
After a long wait, the calendar for Rarepair Month is here for May 1-27! Thank you as well for those who participated in the survey! I tried to keep in mind of everyone's suggestions!
What is Rarepair Month?
From May 1-27, this event is dedicated not only to unpopular and rarer type of ships, but to any rare pair platonic/romantic!
As doing daily challenges may not possible for some, I am including weekly challenges!
Each week has a theme, and you can use that however you want to! You can replace a day’s theme with a weekly theme, write one fic per weekly theme each week, center a theme around the challenges, anything you want! How you complete this challenge is up to you!
Excluded Pairings
Note: While these pairings are excluded, you are allowed to write OT3s of these popular ships (Ex: Charles, Pickles, and Nathan). The decision to exclude these pairings was based on AO3’s relationship tags (the pairings with over 100 fics) and just general fandom knowledge.
Skwistok (Skwisgaar Skwigelf/Toki Wartooth)
Nickles (Nathan Explosion/Pickles the Drummer)
Narles (Nathan Explosion/Charles Foster Offdensen)
Chickles (Charles Foster Offdensen/Pickles the Drummer)
FAQ
Can I post content somewhere else other than Tumblr/AO3?
Yes, you can! I might only see the challenges on tumblr, AO3, and Instagram but you can always double post to get more traction!
What is the hashtag?
please use the tag #MTLRarePair2023! (Optional but encouraged!)
Do I have to do all 27 days/Do I have to complete the weekly challenges?
It’s all entirely up to you! If you want to do one over the other, both, and/or work on them separately it’s up to you! You are not obligated to do all 27 days or all 4 weekly challenges. The point of this challenge is to have fun so where’s the fun in being stressed out?
Can I write crossover pairings? (I.E Nathan Explosion x Eddie Briggs from Brutal Legend) Self-inserts/OC x character pairings?
Of course! It wouldn’t be a rare pair event without some crossover or OC pairings now wouldn’t it?
If you have any questions, please feel free to reach out to me, but remember there is no limit to this, just do what will make this fun and easier for you! Good luck!! (Any questions will be tagged as #MTLrarepair2023qanda so be sure to check that out if you wanna see if your question has been answered!
Social Media Links
You are free to post anywhere outside of tumblr and what i'm linking below but here is some sites where I'll be checking out the content!
AO3 Collection: https://archiveofourown.org/collections/MTL_RPM_2023
When you edit your works, make sure to add this to Collections: MTL_RPM_2023
Twitter: https://twitter.com/nightklok/status/1646857331991248896?s=46&t=dEbe-5kzzkXRk_nG60esmg
Instagram: @/mtlrarepairmonth
The Prompts:
Week 1 (1-6): Movie Premiere
As anticipation over the new movie comes near, what are your predictions? Or wish fulfillment? Alternatively, what are some movies, songs, etc you want to write a fic based around? Or some movie you can see your rarepair fitting well in?
Day 1: The Opening Act: How would the first scene or first act begin? Any establishing characters making an appearance? Alternatively, use this to post the first chapter, scene, etc to any series, fic, comic, etc!
Alternative Prompt: Movie night
Day 2: The Soundtrack: Using any song that reminds you of the film, write a fic based around the song!
Alternative Prompt: Dancing in the Rain
Day 3: The conflict: There can’t be any movie without some conflict so what is your prediction for the conflict? Is it a misunderstanding? Doomstar related?
Alternative Prompt: Final Words
Day 4: The Endgame Couple: What is the moment that makes it official your rarepair will be canon?
Alternative Prompt: What could’ve been
Day 5: The Finale:
Alternative Prompt: Confessions
Day 6: The sequel: You can use this day to write about any potential sequel ideas you might have or alternatively, something you wanted to write that fits this week’s theme!
Alternative Prompt: After the War
Week 2 (7-13) The Forgotten:
A week dedicated to the minor characters, background characters, anyone you feel should’ve gotten more screen time. While the main cast is allowed, try to make the other characters the main character/focus point of the story.
Day 7: Remake- recreate an episode, scene, season, or anything really into your rarepair- give them the love they deserve
Alternative Prompt: Birthday Wish
Day 8: Anti-hero/Villain Redemption: Maybe the villains were onto something-maybe they can be fixed
Alternative Prompt: Forgiveness
Day 9: Female Exclusive: I can’t exclude the main cast because there is no females, diversity win
Day 10: Background Character Unveil: Find a background character (someone with NO lines or importance) and basically treat them as an OC-free design template- alternatively, create your own background character
Alternative Prompt: Road trip
Day 11: Side Character Exclusive: While the focus is side characters (characters who appear occuringly or at least in more than one episode), you are free to use one-shot characters as well!
Day 12: OC Exclusive: It can be OC/ OC, OC/Character, whatever you want as long as an OC is the main character! For an extra challenge: Make someone's day by writing their OC!
Day 13: Free Space
Alternative Prompt: New Rarepair (make up a ship that has 0 tags on tumblr/AO3 or use one you’ve never written)
Week 3 (14-20) Alternate Universe:
Alternative Universes and Rarepairs go hand in hand so why not dedicate a week exploring that? Perhaps there's even an AU of an AU with your rarepair you want to explore or you've always wanted to write an AU that wouldn't have worked for your plot. Use this week's theme to go outside the box a little and explore the various possibilities you can do!
Day 14: Florist & Tattoo Artist AU / Coffee Shop AU
Alternative Prompt: First Date
Day 15: Fantasy/Magic
Alternative Prompt: Childhood
Day 16: Monsters
Alternative Prompt: Costume Party
Day 17: Hanahaki: A disease where flowers will grow in the heart of the infected from unrequited love. The cure can be to either surgically remove the roots but risk death or never feeling attraction towards the person again or confess/have the love turn requited.
Alternative Prompt: Flowers
Day 18: College/High School
Alternative Prompt: Graduation
Day 19: Fairytale
Alternative Prompt: Soulmates
Day 20: Free Space
Alternative Prompt: First Meeting
Week 4 (21-27) General Week:
With this month coming to close, try to write about more of the simpler things in life. The domestic stuff that you may have been avoiding to write. Use this week to try out new rarepairs by using any day/alternative prompts you didn't get to use.
But for those looking for something a little more fun to end the daily prompts on, I've used obscure/outdated tropes for the alternative prompts that you are more than free to use!
Day 1: Proposal
Alternative Prompt: College Radio
Day 2: Concert
Alternative Prompt: Unwanted Gift Trope
Day 3: Domestic Life
Alternative Prompt: Telephone Booth
Day 4: Eras (80s,90s,00s, etc)
Alternative Prompt: Waterbeds
Day 5: Double Date
Alternative Prompt: Video Store
Day 6: Wedding
Alternative Prompt: Miscommunication
Day 7: Free Space
54 notes
·
View notes
Text
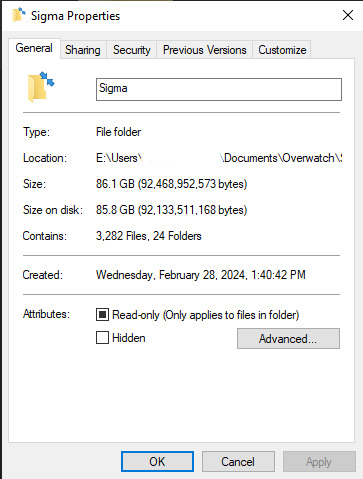
Welcome to your one-stop-shop for ultra high quality reference screenshots for Sigma aka Dr. Siebren de Kuiper from Overwatch.
== CLICK HERE FOR THE FULL TAG LIST FOR NAVIGATION ==
You will be able to search by:
skins + weapon customizations
victory poses + highlight intros + emotes
actions + featured body parts + visual effects
special screenshot types including starwatch, goofy shots, transparents, sprays, and the april fools googly eyes shots
You know, a normal level of detail--
== CLICK HERE FOR THE HIGH RESOLUTION DISCLAIMER ==
Because you should try zooming in on these screenshots, really. For most of these, you can see the pores on his nose. And you should know that for any with the high res disclaimer, I have even higher resolution available.
== HOW DO I FILTER YOU OUT FROM THE SIGMA TAG??? ==
Glad you asked!
Settings > Account Settings > Content You See > Filtered Tags > add #siebren de kuiper screenshots
This will cut down my posts to a little grey box you can un-filter at any time without blocking me!
More info about the blog in general below the cut, for the curious.
== WHY?? WHY IS THIS BLOG ==
because i have, ahem, a hobby.
Anyway, I figured that artists who want to draw Sigma should benefit from this uh. habit? of mine, of course.
== ...HOW?? ==
Settings > Video > Graphics Quality > Screenshot Quality > 5X Resolution
This applies a rendering multiplier on the in-game screenshot feature that activates when you hit your [print screen] button on your keyboard, temporarily straining your graphics card for a little more processing power to produce a screenshot at, in this case, 5x the resolution of the window you're playing in. These screenshots are rendered this way during recent highlights [including intros] [not including saved highlights], the hero gallery, and replays.
Almost all of my non-gallery and non-highlight screenshots are taken during replays using the 3rd person camera, replay speed at 0.1x to really control capturing the coolest moments, player outline at 0%, and covering about 5min of gameplay over the course of 3hrs on average, constantly pausing and flying around Sigma to capture his various skins + weapon customizations in various lightings, maps, settings, effects, poses, abilities, and angles.
For skins that I do not own, I am merely capturing opportune moments when I happen to play a game when a Sigma with a skin I do not own is playing, and pinning/importing that replay for screenshotting. It's mere happenstance to catch those moments, for the most part.
Skins I've screenshotted without actually owning them:
Maestro
Beholder
Carbon Fiber [and then they re-released him so i have him now!]
Draik [to be posted in the future!]
Now only really pending the opportunity to screenshot Drowned Warrior - I haven't seen anyone use him yet... BUT IF YOU HAVE A GAME REPLAY CODE WITH HIM [especially on nice, dark, tempered-colored maps like Circuit Royale!! which is his best map!! or Midtown which is also an amazing map for him!!] I WOULD WELCOME IT!!! PLEASE!!! ....even if it is one of my least favorite skins. LOL
#sigma overwatch#overwatch screenshots#siebren de kuiper#siebren de kuiper screenshots#overwatch sigma#siebrendeparadox nonsense
6 notes
·
View notes
Last Seen Blogs

valiantdiesel
Valiant_Diesel

heart2starr
Illy

akailou-blog
willie

houstonlawoffice4
Untitled
gianludo
Ludovica