#need to ask you for tutorial how to draw tails
Text
Fanart of merboys day 2:
@jack-o-phantom >:3

#need to ask you for tutorial how to draw tails#please help lmao#he offers you a hand#hmmmm#who's mersun is next#he had the end of tail#believe me
514 notes
·
View notes
Note
Hi!
I was just wondering if you have a tutorial on how you created this effect in your gifset, it's something I'd like to try but have no idea where to start. Your set is so pretty! Any helps appreciated x
https://www.tumblr.com/tawaifeddiediaz/712911415428743168/ill-take-you-with-me-then-well-both-die-you?source=share
Hey Nonnie, thank you! This is super late, but I don't actually have the psd for this set anymore (I delete them as soon as I post them), so we're just gonna wing it with a gif I made the other day. I think this ask is about the text, but if it's anything else, just drop me another line and I'll get to it when I can!
I'm pretty sure I got this tutorial from the wonderful @eddiediaaz but I then turned it into Lazy Girl Hours :)) anywho, here we go!
We’ll be making this gif:

This tutorial assumes basic knowledge of gif-making, Photoshop, and coloring. I’ve only described the typography tutorial in this, but you can reach out if you have any questions.
Tutorial under the cut:
Couple things to note beforehand:
There is a lot of trial and error involved when doing any sort of effect, and this is no exception! You might have to play around with the colors and the settings before you find something that looks good and readable and that fits your set!
This text effect works better on big gifs (540px width).
For this, I find that a simple font works better than a fully-cursive one, but play around with what you like. The boxes may need some adjusting if you use a font with too many tall or tail letters (i.e. text where all the letters aren't on one uniform line - that's why capital letters work so well.)
Movement works really well with effects like these, but again, it depends on your gif + readability. If you have a blended gif, it may take a little more trial and error.
I work in frame animation for all my text effects, but this works just as well in timeline as well.
We’re going to start with this gif:

First, I like to put my text on the gif. You can obviously move this around later so don't worry too much about how it looks right now.
The dialogue is "Just don't feel it." "Feel" is one of those Big Words for this quote, so I'm going to emphasize it with cursive text.
I am using Moon for the sans serif text, and Santa Fe Spring for the cursive text. Keep both of these in white for now:
Next, we're going to use the rectangular marquee tool to draw our rectangles around the capital letters (we're not touching the cursive text right now). I just eyeball this, and then try to center it as much as possible.
(The rectangular marquee tool has a keyboard shortcut of M, and it's the second tool in that little toolbar on the left of most people's Photoshop.)
This is what that'll look like:

Next, we're going to go down to the icons at the bottom right of the layers panel and select the half-black half-white circle > Color Fill.... You should get a color dialogue box. Choose your color - I'm using #8d0000. Then, we're going to move that layer below the corresponding text layer, and set its blending mode to Difference. This is what that looks like (click the image for better quality):
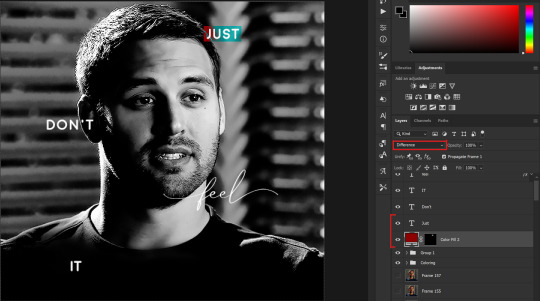
I'm going to repeat that with the other two boxes as well, using the same color. The boxes will look different with the Difference blending mode because of the shadows underneath.
For example, the box with "it" looks like a solid red square because it's against a completely black background, while the other two have some blue shading to them since there are some highlights behind them.
This is what my gif looks like now:
Next, I like to go The Lazy Girl™ route and put all three color-fill layers into one group underneath all the text layers. This just lets me edit the drop shadow of all three of them at the same time.
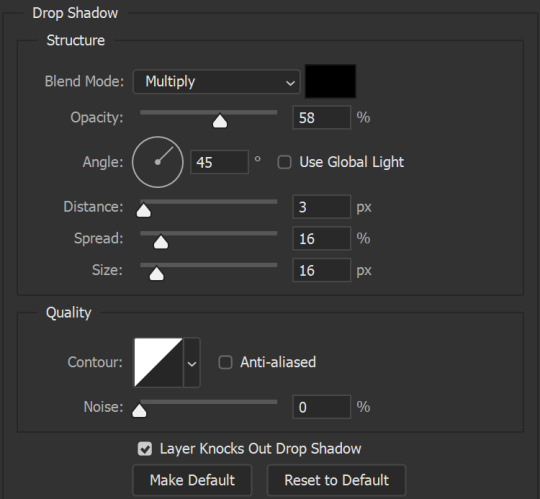
Right-click the group and open up the Blending Options. In Drop Shadow, these are the settings I'm using. The drop shadow color is #0c6477:

(Note: uncheck "Use Global Light" especially if you're working in frame animation to make sure all the drop shadow has the same angle on all frames.)
This is what my gif looks like now:
Now that we've finished that, time to move on to the cursive text.
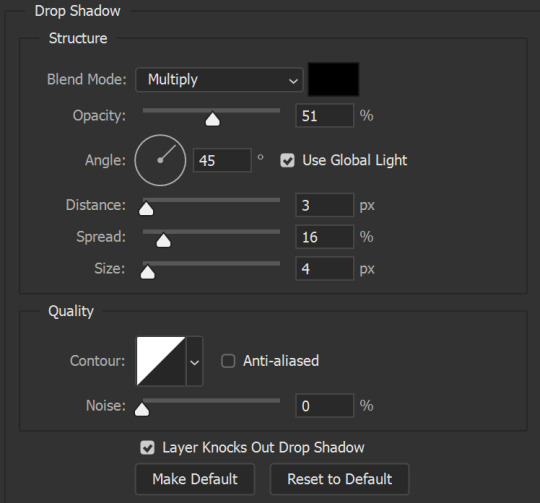
I usually match the cursive text to the palette of the rest of the text, and since the drop shadow is our "accent" color, so to speak, I'm going to use a lighter version of that color. I am also going to add a drop shadow for readability.
The color I used for the text is #acfffe and I actually ended up adding two drop shadows, just because I needed something subtle that doesn't overwhelm the text, especially since it's a delicate font. Here are the settings for both layers:
And here's what my gif looks like now:
Now, before we move on to the lines, just check the adjustment of all these text layers, see if there's anything you want to change. It's easier to change now than after the lines are added, since you'll most likely have to redraw them if you move the boxes after the fact.
To draw the lines, we're going to use the Line Tool. I just freehand all of this, and I try to go from center to center of the boxes when I can. It all depends on your angles.
My lines are 2px thick, but you can change these depending on your preference. Here's what mine look like right now:

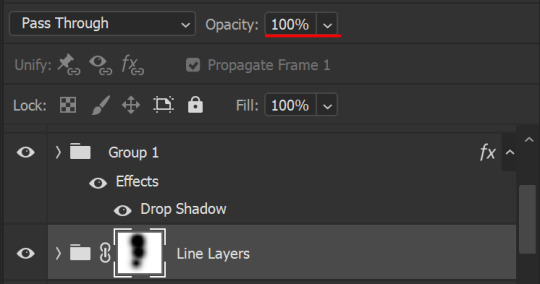
We're going to do the same lazy hack that we did for the color fill, and put all three line layers into a group. Move this group below the text layer and the color fill layers. The reason for this is so that the lines look like they're coming seamlessly from the box, rather than from on top of them or something.
Then, set the group to opacity 50%. I like more subtle, simple looks in my gifs, so I don't like super high opacities.
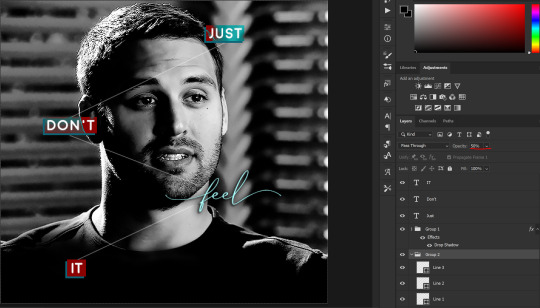
And that's it! This is our final gif:
Some final notes:
Absolutely play around with the blending modes of the color fill layers for this effect. These two gifs are the exact same color we've been using, just two different blending modes. You can see how drastically different they look. The first one is Linear Dodge (Add) and the second one is Vivid Light:
It can change how your gif looks in a BIG way, so play around with it, see what you like, especially if you don't really like the "two toned" thing going on.
Sometimes, I also like playing with the width and height of the text in the font settings, making it shorter and wider, or making it taller and more compact. You can play with the letter spacing as well. The world is your oyster, etc etc.
One other thing I've started doing is erasing the lines with a big brush, just to fade them from his face a little, like this:

To do that, use a layer mask on the line layer folder, and a brush that's 0% hardness, and at least 200px big. For this gif, I also changed the opacity of the lines back to 100% so the fading effect is a little more pronounced:
(this gif isn't the best example for this, but oh well. Anywho, hope this helps, Nonnie! Let me know if you have any questions.
Enjoy!
#zee's tutorials#tutorials#gif tutorial#photoshop tutorial#resources#dailyresources#completeresources#itsphotoshop#allresources#dailypsd#userisha#userdahlias#alielook#userabs#tuserheidi#userelio#userjaelyn#userisaiah#usermorgan#usergert#zee answers#im so pissed at myself for losing the tutorial the first time like you do not know how mad i am right now#i didn't even do anything tumblr just hates us all
187 notes
·
View notes
Text
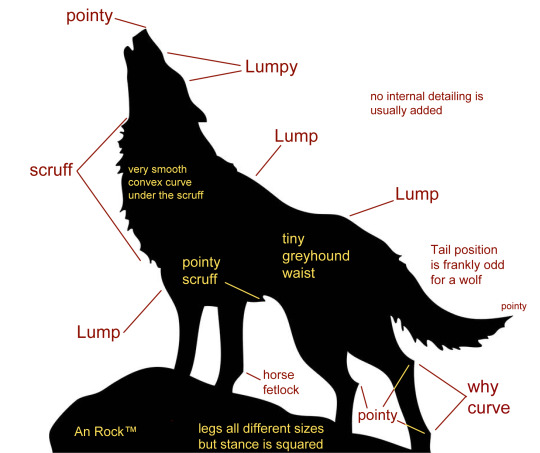
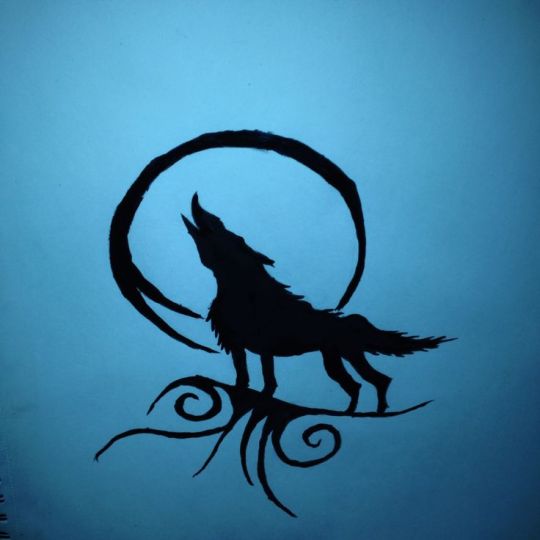
The Anatomy of Lumpy Kiba
(and how to identify him in the wild)
disclaimer: this is not a wolf anatomy tutorial. it’s a tutorial on how to recognize the features of one specific wolf silhouette so you can get pretentiously annoyed about it. don’t take my advice about things.
also, don’t harass artists over this shit if you happen to see it. I shouldn’t have to say that but the internet’s favorite pastime now is spontaneously deciding to make some random civilian’s life miserable for a minor misstep and it’s a fucked up thing to do. yes plagiarism is bad but frankly while the original clipart was obviously traced, that ship sailed over a decade ago and I don’t blame everyone for using this wolf silhouette because you have to go out of your way to avoid it at this point if you’re searching for free clipart. this is meant to be funny and lighthearted.
now, with that out of the way.
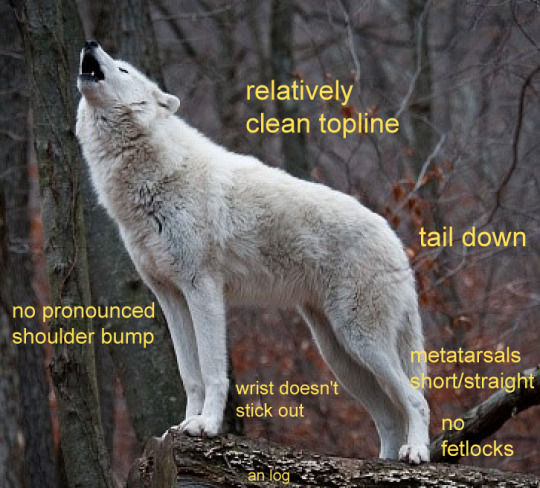
nobody asked for this but I need something to occupy my brain and the notes aren’t really slowing down on that post (this is what I’m referencing btw) and I’ve seen a few people questioning my claims that it’s all the same wolf silhouette and that the original is a still from the anime Wolf’s Rain. I also really enjoy when people find this bastard in weird places and want to make it easier. so I’m doing that. in a style flagrantly stolen from mcmansionhell, which I think is fitting given the subject matter of shameless plagiarism. to start, here’s one of the cleanest/most exemplary instances I could find, broken down. There’s some variation in rotation, nose shape, and scruff distribution, but it all basically averages out to this:
further analysis, examples, and deranged ranting under the cut!
not all of these details will be present in every instance of Lumpy Kiba (especially in smaller examples or jewelry where a lot of detail is lost), but more than 2-3 together with the same pose and you’ve got a set of weirdly specific anatomical issues that are unlikely to all occur naturally together unless someone is referencing an already badly-rendered wolf instead of a photo. The most consistent and noticeable feature of Lumpy Kiba is those hind legs, with their dangerously pointy hocks and very long and concave metatarsals, but the tail position, nose shape, and pronounced shoulder bump are also strong indicators.
for reference, here’s a photo of a real wolf in a similar pose. note the very rounded hocks and overall lack of lumps.
when you find a wolf silhouette clipart that ISN’T Lumpy Kiba, it won’t necessarily have perfect anatomy but it will have a lot more in common with the photo, like this dude

Wolves That Are Lumpy, But Not Kiba
stylizing is a thing though, and on rare occasions you WILL find a howling wolf silhouette that resembles neither a real wolf nor Lumpy Kiba. it was surprisingly hard to find ones that weren’t just “Lumpy Kiba but severely warped/altered” (I’ll get to those in a minute) but these were the two clearest examples I could find that are definitely not Lumpy Kiba or derived from him:
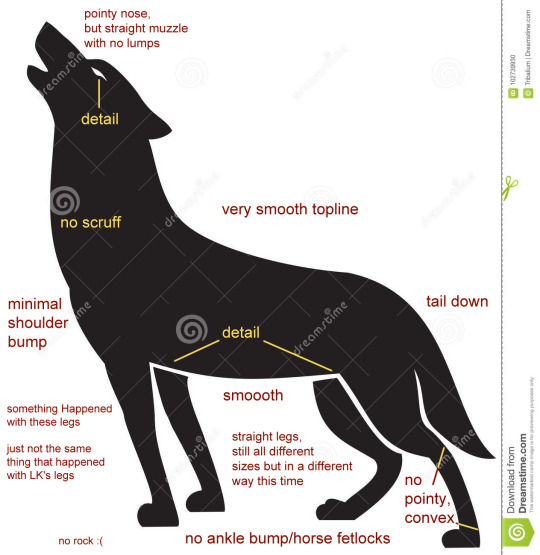
there are of course more differences than what I’ve pointed out, but those were the key points I used to pick them out from the ‘howling wolf silhouette’ image search.
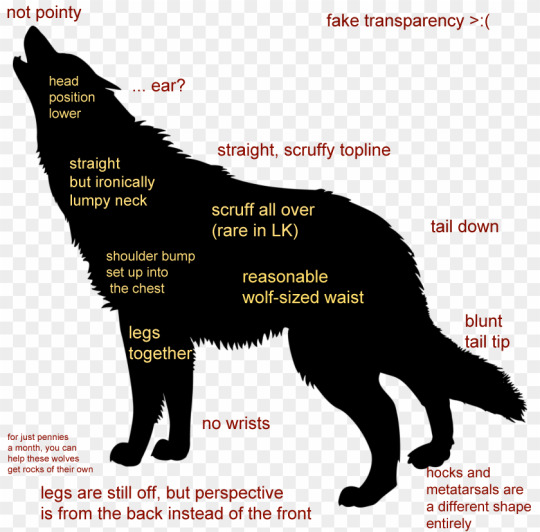
Weird/Hard To Identify Examples
in my digging around for example images for this post, I came across not only a staggering amount of Lumpy Kiba at every turn, but some that I initially thought were doing their own thing that, on further examination, were clearly referenced from Lumpy Kiba with some “you can copy my homework, but change it a little so the teacher doesn’t notice” slapped on. unfortunately the defining characteristics of Lumpy Kiba are so glaring and distinctive that if you use him as your only reference, it’s GOING to be noticeable. this, by the way, is why if you’re learning anatomy you NEED to reference photos (and real life if you can) instead of other peoples’ drawings. everyone stylizes, everyone has strengths and weaknesses, and weird things happen when you just copy another artist instead of actually learning what an animal looks like.
(this, incidentally, is the whole problem with Lumpy Kiba in the first place, but I’ll get to that)
here’s two that most likely weren’t traced, but the artist definitely referenced Lumpy Kiba exclusively


also two particularly weird examples that barely qualify as Lumpy Kiba, but which both were undeniably shaped by his influence. the first one being this unholy frankenwolf that uses components from Lumpy Kiba but also apparently a few other wolf silhouettes:
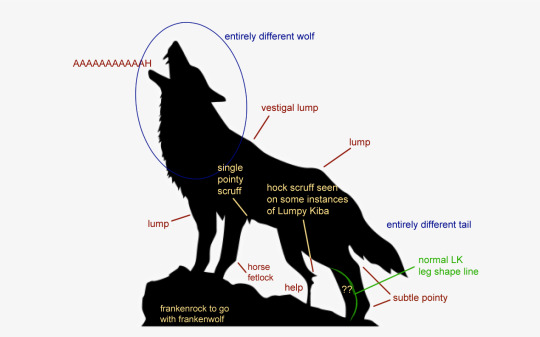
and if you thought we were done with that youtuber “tribal wolf tattoo” guy, I found someone who made a truly next-level copy of his slightly distorted trace of a moderately shitty vector of an anime screenshot. even after that game of visual telephone, the Lumpy Kiba telltale signs are still present. if anything, they’re in their purest form here, because not one single person in this chain ever looked at a photo of an actual wolf.
Click here for Part 2: Origins.
460 notes
·
View notes
Note
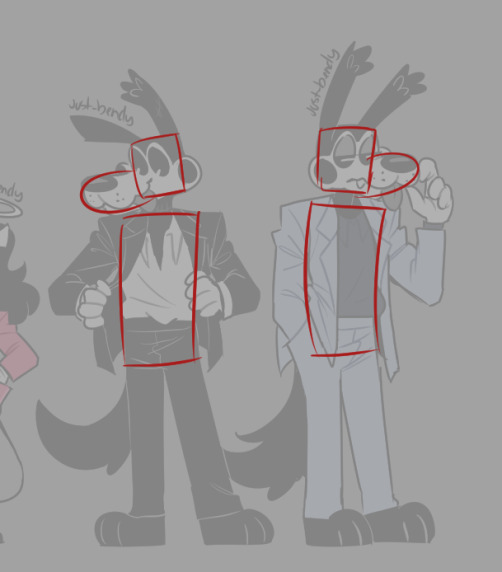
just saw asks were back open! question to the artist: this might sound weird, but could you please show how you go about drawing the cast? mainly bendy and alice i guess
(honestly i would prefer simple shapes or sketches-- but i want to know how you do the proportions and all because your artstyle is really nice looking haha)
(( sure! sorry this gets very long so i put the rest under read more, hope its helpful to you! i'm not really a teacher tho but i'll do my best
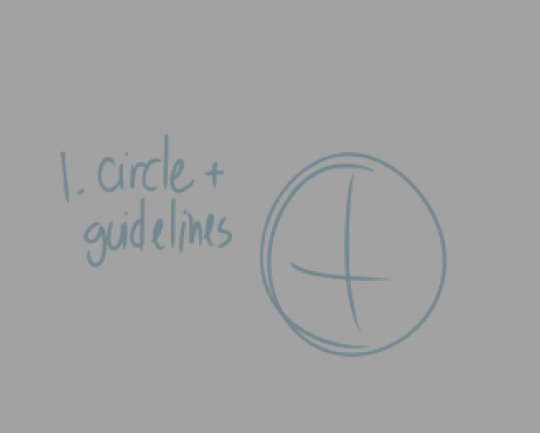
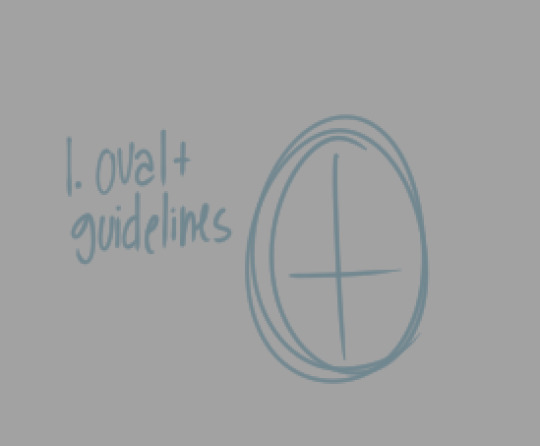
first i like to start with a simple circle and guidelines for where i'll put his eyes
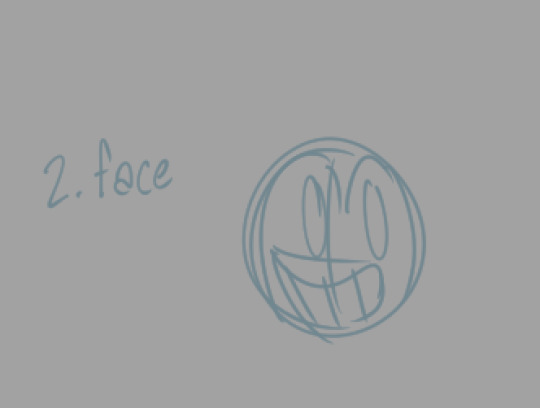
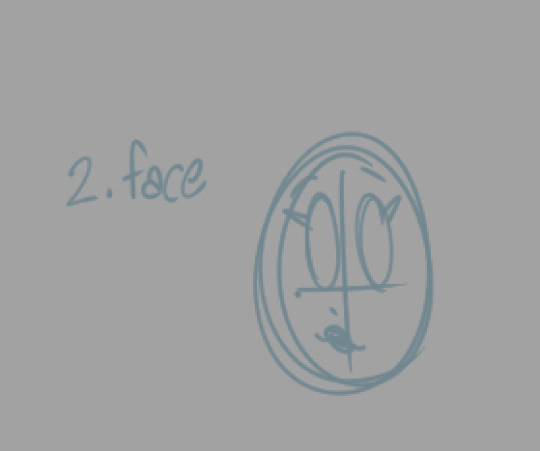
then i add his cute face

and his pointy horns! ( i struggle a lot with his horns tho 😓 )
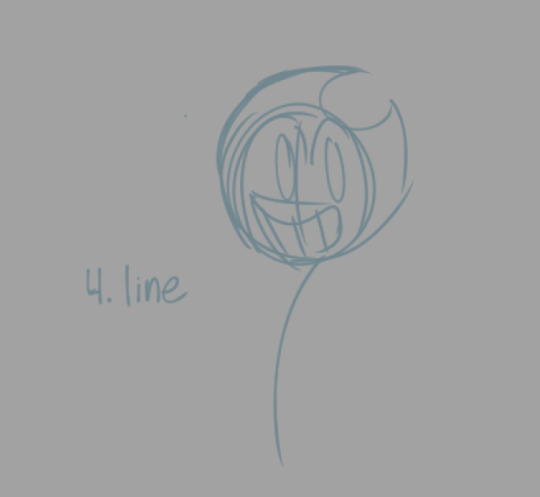
i add a line for his body to follow

and i place his lil bean body somewhere below. i like to make it the same length as his chin to eyebrow. i use this measurement for nearly everything else
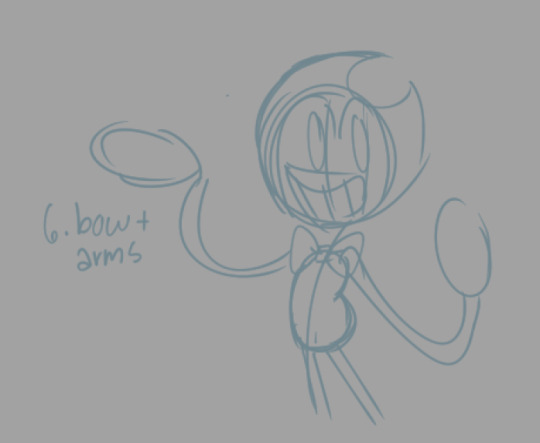
then comes his legs, his bow using a square and rounded triangle shapes, and his noodly arms and oval shape for his hands

then i add his fingers, gloves, and his tail
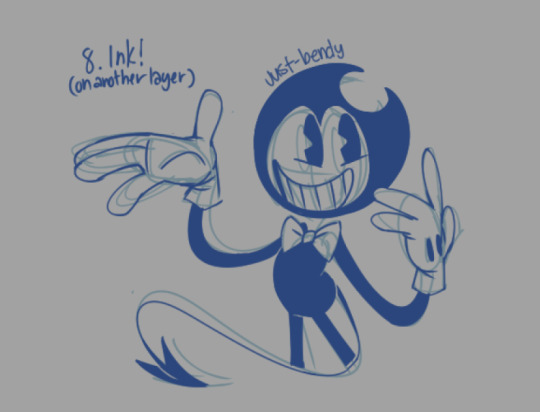
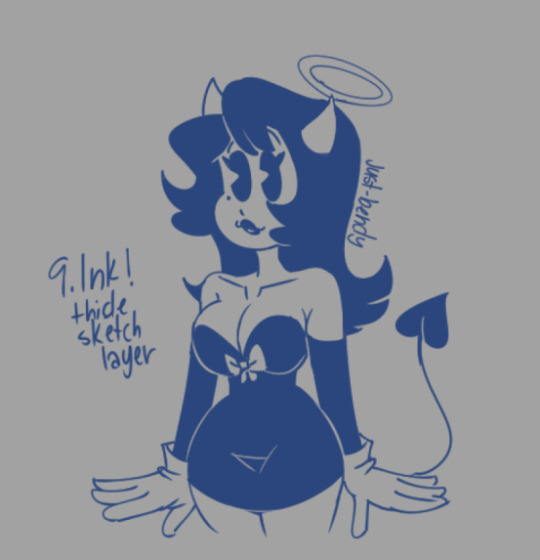
on a separate layer, i ink the bendy! making some corrections, details, and adjustments from the initial sketch
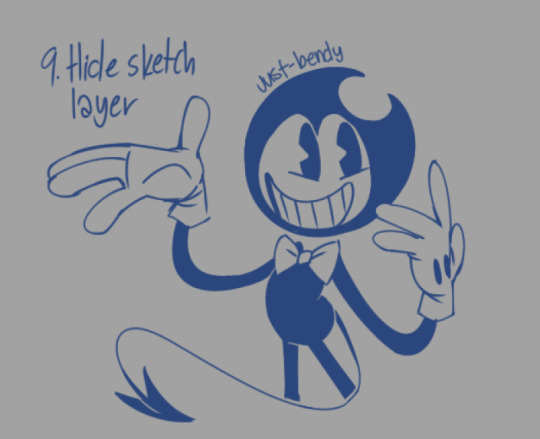
i hide the sketch layer
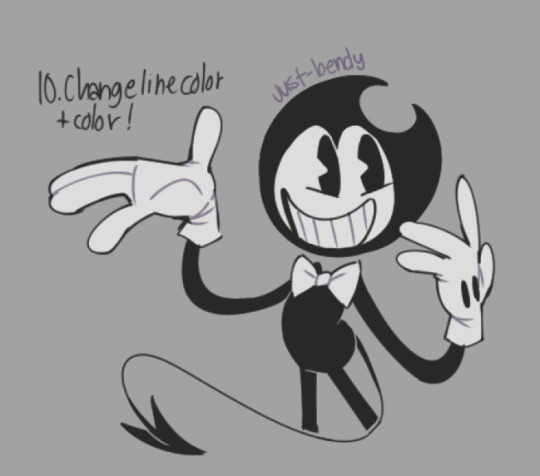
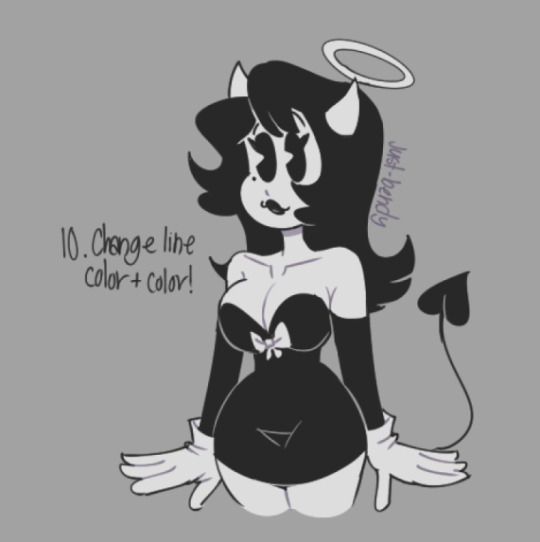
then i change the line color to black and start coloring him (on another layer)! i also like to color the lines to make it look a little more interesting
and bendy is done! i love how simple he is to draw, it makes it fun giving him expressions 🥰 i'm still perfecting the way i draw him, so he will always be changing.
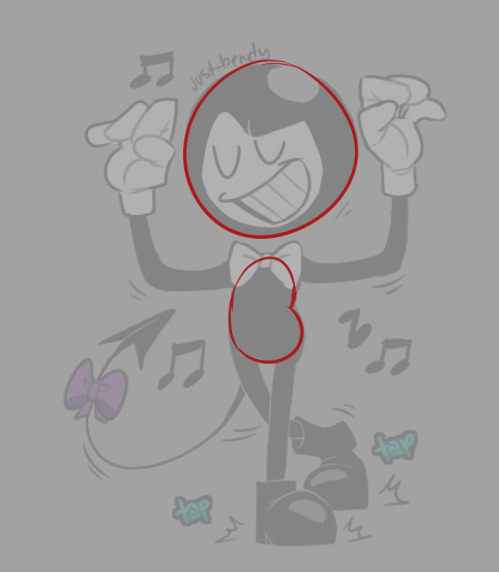
i'm not sure what kind of pose this is... the first step to drawing a bendy is to always visualize what pose you want him in 🤣
now it's alice's turn!
i start similar to how i draw bendy, but with an oval shape
add her lil face
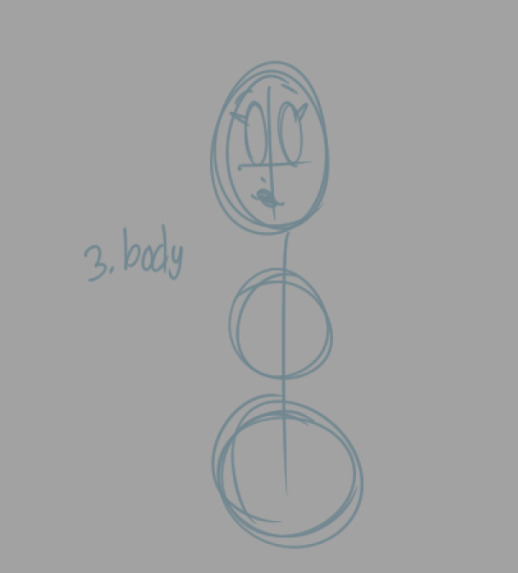
then i draw the lines again and two circles for her body, with the bottom one being larger
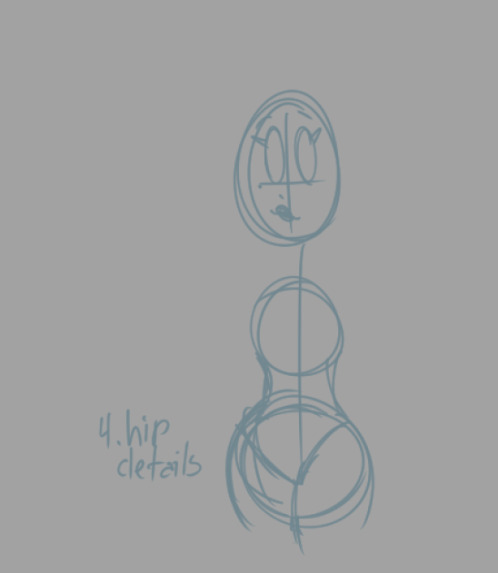
i draw her hips, similar to a bikini look, then her waist
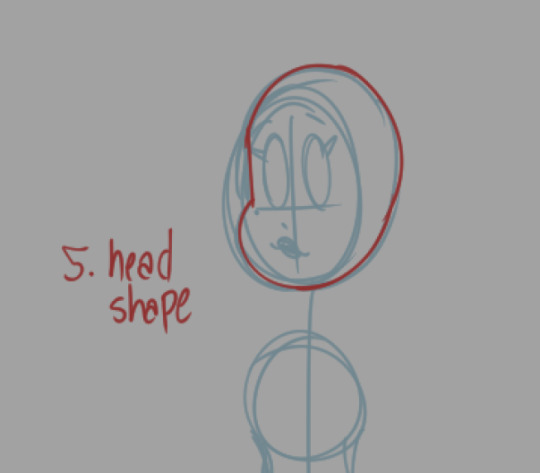
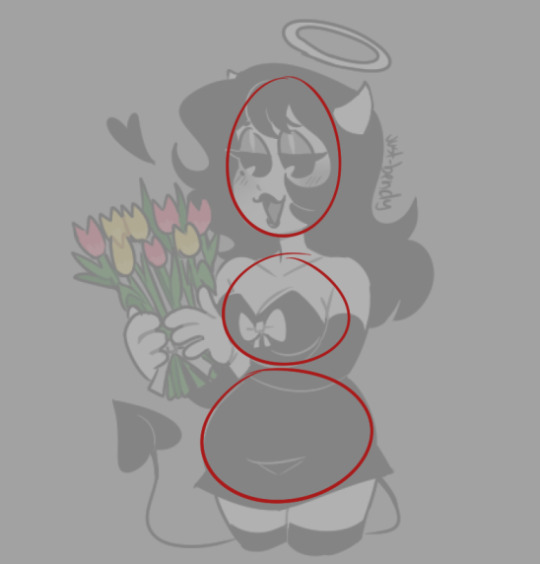
i draw her head shape, outlined in red to make it easier to see for this tutorial
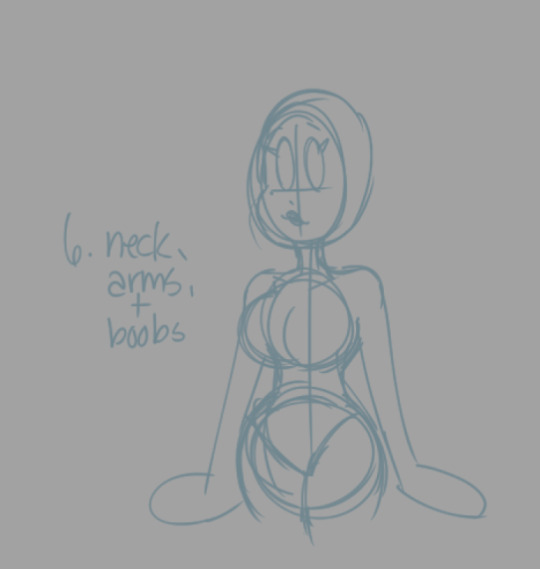
then i finish her body by drawing her boobas, her neck, arms and oval shape for hands
( i just eyeball her boob size so the sizes could be inconsistent from drawing to drawing 🤣🤣)
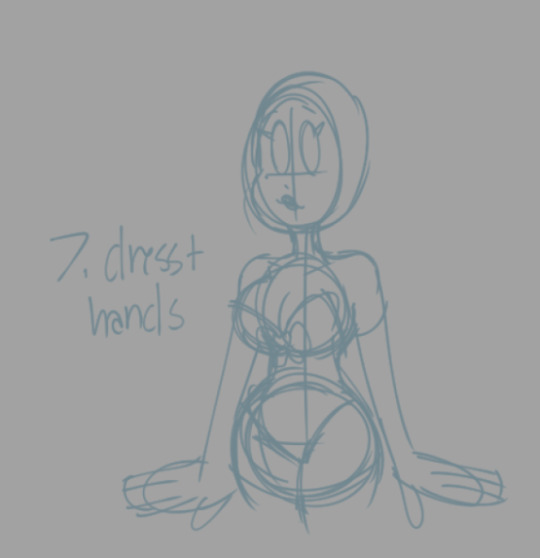
and then i draw her dress and finish her hands
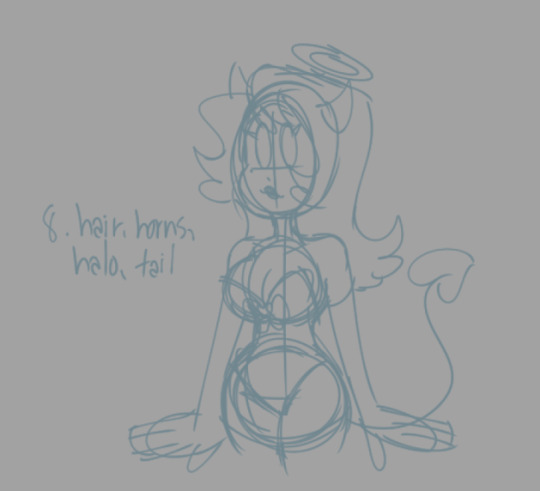
add her hair, horns, halo, and tail and we're done with the sketch
ink alice on another layer adding details and other adjustments
and finish the drawing by changing the color of the line and coloring her! alice is finished and she looks really cute
these are from an old tutorial but i thought it'd be helpful here! this is to help with the shapes i use for the characters
and another tutorial here which could also help if you still need it! its a bit old but its better at showing proportions? i think
thank you so much! 🥰💜💜✨i'm glad you think it looks nice! really appreciate it! 🥰 sorry this got so long but i hope you got something out of it!
if you wanna check out the older tutorials i made, you can go through the "art tut" tag on my blog ))
40 notes
·
View notes
Note
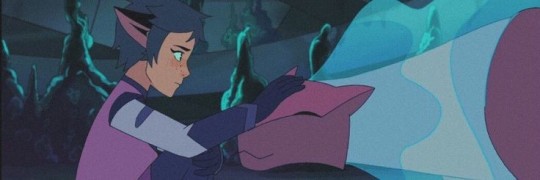
Hi I'm new here ! Could I ask for tips for a (highly kinsidering) Catra fictionkin?
I Took this ask as tips for connecting to catra, and if you meant something else please tell me. I'll happily fix it. It Is similar to tips for Dysphoria, I hope it helps.
Connecting to Catra as a Kinsidering Fictionkin
Having long nails, especially painted ones. It can help resemble claws.
Things like cat ears and tails could help, although may be hard to get.
Catras shown hiding in dark spaces, or wrapping herself in blankets. Things like that might feel comforting or familiar to try.
Clothes that resemble things you may remember can help! Even small accessories, for example the badges shown in the horde can be fairly easily replicated. If you make a pin with bottle caps you can decorate it in similar forms or glue cardboard on to form the right shape. It's pretty easy and requires easy enough materials. I recommend using pliars to bend and shape the bottle cap.
Catra has a lot of cat like tendencies so considering if you have those traits may be helpful in realising if you kin her. Plus it may be affirming to purr, or do other cat traits.
Not everyone has kin memories, and not having them doesn't invalidate you. However they can be helpful to kinfirm a kin. Just relaxing and doing things that might trigger memories can be helpful. For example watching, writing or drawing things related to Catra and any relationships or just engaging in activities you believe you/Catra might have enjoyed.
Music you associate with catra can be helpful! And the creator of she ra has created a playlist with songs that they associate with catra.
Catra is a complex character and recognising if her behaviours, reactions or events in her life reflect yours can be helpful. A large motivation for her character is needing to prove herself, feeling betrayed. A connection to these themes or the relationships shown in the show can also hint at it being a kin, although it is up to you to decide how you feel and if those relate to you kinning catra.
She's also shown heavily connecting with animals, and spending time with pets or other animals may feel affirming (plus is always fun).
Links to the playlist I mentioned and a tutorial for bottle cap pins are linked above, I hope they work. If People are interested I might make tutorials on creating things similar to what I remember from my past lives, or take requests on how to diy things. I wish you the best of luck working this out anon!
#ranboos cafe#orders up!#kin#kin help#otherkin#fiction kin#fictionkin#catra#she ra#spop#kin dysphoria
4 notes
·
View notes
Note
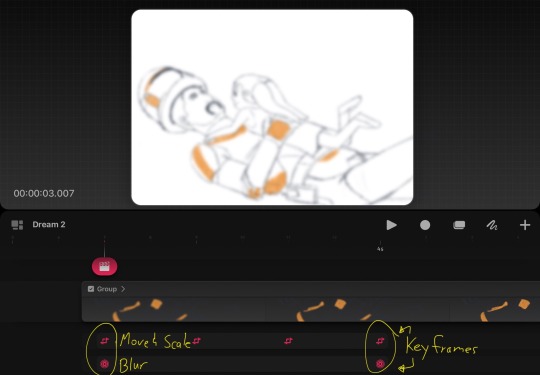
For the procreate dream animatic you did, how did you do the blurry quick pan over? I love it so much. What are the issues you are facing with the program, is it worth the money?
Gonna have the explanation down below~ Along with my thoughts on the app.
So for the pan over, I used these two frames. They’re basically the same image except I moved them to different ends of the screen. I added a kinda motion effect to the second image by drawing “tails” cuz the app only has guassian blur. The speed they move depends entirely on how many frames on the timeline you give them. I was working at 12fps (frames per second) and set these at one frame each.


As for the “focus” camera blur on Boil and Numa. There are key frames I used to achieve that effect. First the “camera movement” which was done with moving the animation track layer. Procreate Dreams has a feature called “performance mode” (it’s the circle next to the play button, I forgot to circle that oops) where you move a layer in real time. It took me a few tries to get the movement I was looking for. (The same movement feature was used for Numa falling.)
Second was the filter effects feature where I made the track blur then un-blur like when a camera is trying to focus.
And yeah, I hope this helps answer your question.
As for my thoughts on the app and whether is worth the money. I would say that is will eventually be worth it. Procreate the company is planning on implementing more updates to the app soon to fix bugs and streamline features. But there are a lot of basic UI stuff that I feel should have been included with the release.
This app is by no means beginner friendly. There is a learning curve to it just like any animation or art program, but the fact that I had to watch tutorials to figure out things like where to find the onion skin, which is an essential tool for animating, it kinda had me a bit frustrated.
There is no selection tool, so you can’t move individual parts of a layer instead of the whole thing (I had to redraw a few things cuz I accidentally made them too big or positioned them too far off). At the moment there is no pen stabilization, which is important for a lot of people. And, something I have found important for my own workflow, is that I can’t expand frames. I do initial storyboards one after the other then figure out the timing after. But with Procreate Dreams, you either need to know off the bat how long you want your frames to be, or move frames on the track one by one to make space.
Overall, the Procreate Dreams app is great, and it will improve with time just like Procreate. I do wish the company had already included basic functions from the get-go, like camera movement, but I’m sure that will be added in the near future along with a lot of other things people are asking for.
✨If you want my recommendation on a really good animation app that feels more polished and has more basic features, then look at ToonSquid. It’s half the price of Procreate Dreams, and though there still is a learning curve, you can figure it out just by clicking around. Though I will say that the creator’s youtube tutorial is an important watch to really get your flow going.
My only gripe with ToonSquid is that it doesn’t have a blur feature, and the vector brushes could be better. But that’s kinda superficial at best and the creator has it on the list for a future update.
So yeah, if you’re getting into animation, I’d say skip Procreate Dreams for now and use ToonSquid.
5 notes
·
View notes
Text
Paper Gator: sun x moon x monty
sun and moon make monty an origami alligator when he visits the daycare.
glittergolf week event
day 2: Arts and Crafts/ Gifts
story under the read more
Paper Gator (also on ao3)
“Hey! Hey! Friend Monty! Look what I made!“
Said gator glanced away from his incredibly important task of being held captive under a pile of daycare children to look up at his friend.
Sun crouched down, giddy as he placed a tiny origami alligator on the glamrock’s snout. The craft was dabbled with light touches of paint to resemble it’s original version.
“It’s you!“ the space themed animatronic cheered.
“Aaww, thanks, bud.“ Monty shook the children off and stood up, putting the origami in his chest plate. “Gonna keep it on the dresser in my greenroom.“
Sun beamed at him, bouncing back up to wrap the gator in a hug and twirling him around. The taller burst out laughing and returned the hug once the room stopped spinning.
“How’d you make it anyway?” Monty asked, readjusting his shades. “Thought you guys could only do the easy ones.“
“Moonie’s been watching tutorials during his breaks. He insisted on making it once he found a tutorial he liked.“ Sun puffed their chest out. “I added the finishing touches!“
‘Sunny!‘ Moon hissed, tugging his hat over his eyes in embarrassment. ‘You weren’t supposed to tell him, you blabbermouth!‘
“What’s so funny, Sunny?“ Monty raised a brow. The two sat at the craft table, Sun trying to teach him how to make more origami alligators. A few children had started drawing on the glamrock’s casing and he really hoped it wasn’t with permanent marker. Again.
“Noooothing~“ the DA sang. “Moonie’s just telling me how happy he is that you like our gift is all~“
“Really now?“ Monty grinned at his friend, one of the girls started drawing a stick figure Doduo on Sun’s back.
‘Sunny.‘
“Mmmmyep!“ Sun tapped his chin, pretending to have a conversation with Moon. “He also says-“
‘Sun,‘ Moon warned, tugging at the back of their mind. ‘Don’t you dare-‘
“-That he likes your tail and fancy mohawk.“
Moon whined, angrily rolling on the floor of their shared subconscious.
‘Rrrgghh! Just you wait, Sunny. Once it’s naptime I’m gonna tell Monty all about your sticker collection of him!‘
Sun gasped. ‘You wouldn’t!‘
‘Oh, I would!‘
‘Hmph, fine.‘
“Sun?“
Sun’s faceplate stopped rotating as he was pulled from his thoughts, Monty’s hand on his shoulder. “Hmm?“
“I gotta leave for the next concert but tell Moon I’ll be back for naptime, ‘k lil guy?“
Sun gave a mock salute. “You can count on me, Monty!“
The gator started jogging towards the daycare’s double doors, turning around to walk backwards halfway. “Hey, Sun!“ he called out “Y’might wanna get some baby wipes for your casing!“
Sun tilted his head rotating it 360 degrees . Why would he need-OH! Apparently one of the kids had made wobbly drawings of Sun, Moon, and Monty holding hands on the Daycare Attendant’s back
Monty snickered as Sun’s rays stuck straight out in surprise, giving him a double finger guns and a wink before picking up the pace to the main stage.
Steam puffed from Sun’s vents at the gestures. He hastily took a picture of the children’s art (purely to save the art before he had to get rid of it, of course).
Moon cackled in the background as Sun wiped the ink away.
#my words#my fanfic#shapeshiftinterest#theme event#games#five nights at freddy's#fnaf#LGBTQA#montgomery gator#monty#sun#sundrop#moon#moondrop#glittergolf#alligators#animals#robots#origami
25 notes
·
View notes
Text
My year in review!!!
I posted 3,455 times in 2022
That's 3,455 more posts than 2021!
1,165 posts created (34%)
2,290 posts reblogged (66%)
Blogs I reblogged the most:
@torchickentacos
@lmaoirrelevant
@ crtter
@lastoneout
@itstimetodrew
I tagged 1,617 of my posts in 2022
#taylor's tag - 352 posts
#pokemon - 188 posts
#pokeani - 138 posts
#anipoke - 133 posts
#contestshipping - 72 posts
#fave - 56 posts
#art - 55 posts
#pokemon drew - 53 posts
#pokemon may - 53 posts
#fav - 53 posts
Longest Tag: 139 characters
#ok for you i’m guessing like 350? you have so much talent but i also don’t see you advertising it often on here so i’m guessing a solid 350
My Top Posts in 2022:
#5
idk if I ever posted this. It isn’t pokemon but I know a couple of you like Zelda so here. Have Ms. Frizzalfos.
232 notes - Posted August 8, 2022
#4
So are we just not going to talk about that one time Caroline packed her bags and almost divorced Norman’s ass in front of the kids
304 notes - Posted July 5, 2022
#3
tumblr_video
James noises
318 notes - Posted August 3, 2022
#2
How I draw clouds since they’re my favorite thing to draw! Literally nobody asked for a tutorial but I’m making one anyways! Note, I am looking at a reference photo I took which is always recommended in my opinion, but once you get clouds down more you can pretty easily freestyle them. Want to go from a solid sheet of color on your canvas to having trees and shit? this is for you.
Step 1: put a solid sheet of color down. maybe an ombre, airbrush tool is probably the best here. Try to have a canvas size with at least 1k on either end, be it horizontal or vertical. We’re going to want it to look really smooth, not pilexated.

Step 2: I personally never start with white or the lightest color of the clouds. Clouds are pretty white usually, but there’s a lot of grey and blue generally-I like to start with the middle-leaning-darkest shade, like this. Use a waterfolor-y brush or something similar if you can! Just makes your life easier.
See the full post
487 notes - Posted October 19, 2022
My #1 post of 2022
I'm obsessed with pokemon doing just. weird animal things. A chatot trying to fight itself in the mirror. Flygon being a large weird lizard. Absol getting its scythe/horn stuck in things and needing to be rescued. Holding a torchic and moving it, seeing its head do the chicken thing. Furret being an absolute menace to society and stealing your socks to nest. Mr. Mime putting barriers around its food as a form of food guarding. Ninetales sleeping with its head tucked under its tails. Zigzagoon snuffling through the trash.
14,554 notes - Posted November 11, 2022
actually my top post is at 40k rn but I deleted it because it clogged my notes fjfjdjfjjdjsjsksk
Get your Tumblr 2022 Year in Review →
7 notes
·
View notes
Note
Hello! do you have any tips on how you do your character/creature designs? I love all your designs so much their all so cool especially your jackalope/rabbit oc! Love them^^ I would love to hear how you come up with the designs! (I’m planning to make a game and big spooky animal creatures are a big aspect n I wanna do it as best as I can so uh yeah like I said you got any tips?👀✨)
Creature design masterpost
I have been making a BUNCH of tutorials and tips about this and many other topics so check them out!
Yeah! My biggest tip is understanding Splice vs Blend techniques, <- I go into a LOT of detail on getting a cohesive creature here.

It's pretty clear visually here, but splicing is cutting and pasting animal parts together with no or minimum blending at the edges. Classic and real life genetic chimeras are splices of two organisms, and their boundary is very clear. It looks really unnatural. Hybrid animals and mixed breeds shuffle traits all over, so learn from nature to make things natural.

and then consider what traits you add and ask "how did this manage to evolve?" why do they have glowing eyes? Is it for communication? intimidation? warning of poison content?
What adaptions did they develop to best take advantage of their niche/biome? What was the process like? What did the intermediate stages look like and how did they function?
Make something cohesive, give thought to "how is it going to hold up its own weight?" how does it fight? Even rabbits have tools for fighting, and they're built for running and fleeing above all else.
How does it communicate? How would its body adapt to that?
These are all important aspects of Worldbuilding
Don't forget that animals will have instincts and behaviors, while sentient creatures will have Culture. A HUGE thing I see is people giving sentient creatures normal paws but somehow using and building tools? You gotta adapt that sort of stuff dude. They dont needs hands if you can come up with an alternate method of fine motor skills (prehensile trunk, tail, tentacles, weird teeth, an extra set of limbs just for manipulating things, etc) if your creature physically cannot hold and build a knife, they have no business wielding it.


If you cant draw them crafting something, don't draw them using it unless they got it from someone else.
But don't get too carried away with fancy digits you forget the primary purpose of limbs: locomotion and weight bearing.
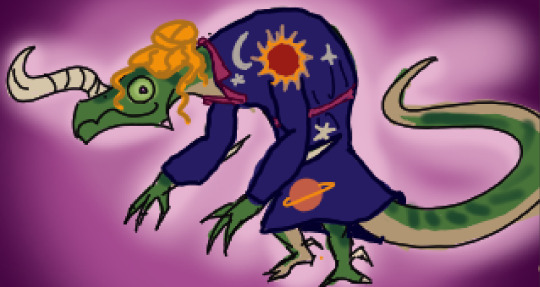
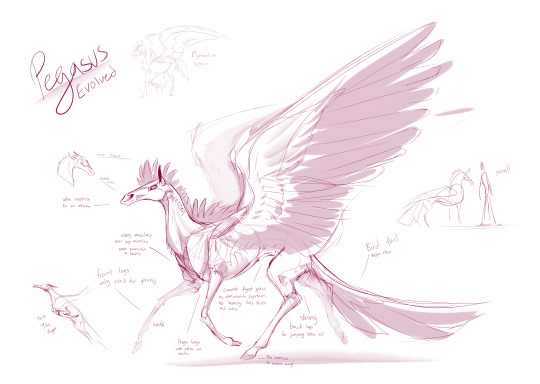
Here is an unfortunate dragon where I picked my favorite traits and put them together. I also added vestigial arms for some reason and now I have to explain why they're like that. The same goes for any other Just Cause trait you wanna slap on. His name is Dinkus

he's got some problems and you can kinda feel it just looking at him, but it will help you way more to name them. Every part of your creature should influence every other part. A horse has a strong neck and strong haunches because its a domino effect. Let's make this guy hefty
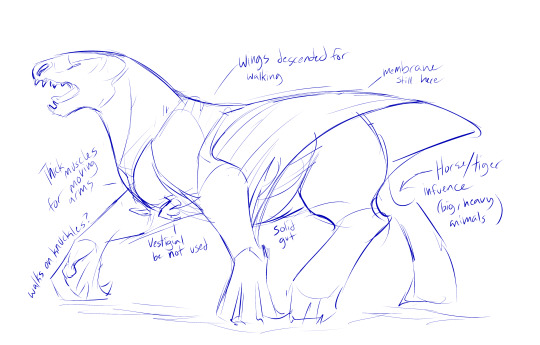
Though a biped would be Possible, it would just look like a t-rex, so I brought the wings down and reverted them to load-bearing legs. But because they used to be wings with long fingers, I'm having her walk on her knuckles because shortening the bat fingers takes a Long time and if evolution finds a shortcut, it will exploit it. But that's a flightless creature so is it really a dragon?
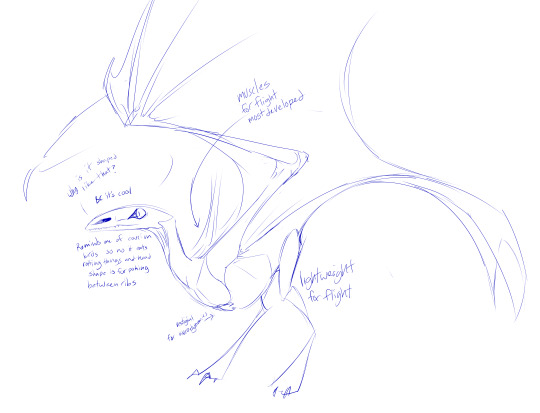
There's dinkus turned in the other direction. I wanted them to fly and so all their adaptions are for that. I also wanted that funky head and made up a reason for it to be that way. You might automatically have this small dragon hunting lizards and rats and such, but if you consider their physiology for a moment, their diet, you just expanded your world and filled out the vulture niche without even trying.
BE CAREFUL THOUGH!
While you cant worldbuild too much, you can infodump too much. So once you have everything built, you need to ask yourself what is appropriate for your project. If it's a dramatic story, you do not need to pause the battle to describe how the buzzard-dragons that are waiting to feast evolved. Just show them off, in writing or visually, and let the audience infer how they evolved and what their behavior is like form their anatomy.
Some people (me) want to engage in the worldbuilding details and get into the nitty gritty of biology/textiles/trade/politics/culture/etc but most audiences are here to be entertained. If you have dragons instead of vultures, a few people will go THAT'S SO COOL but most of them won't even notice... consciously.
Worldbuilding makes a world more believable and immersive. By having dragons eat the dead of war, you remind the reader that this is Not earth, but rather a place that is so whole and complete you know who is going to clean up the roadkilled jackalope stinking up the cobblestone.
Buuuuuuuuuuuuutt....
If you want to create a national geographic journal (which is what I'm doing) and your audience wants it too? (or if you dont care what your audience wants you do this for YOU) Go for it! roll around in details. daydream and doodle new ones. Go crazy go stupid go have fun
OH YEAH! And the biggest tip of all is study nature!
Try to guess what developed and why. How stuff is used, and then you can turn around and put both form and function into your own creatures.
Almost forgot: I clean, document, photograph, and assemble animal skeletons/skulls as a hobby. soooooo that helps me study Real Good.
Play games, make up challenges, and then make it harder
Studying what exists is the best way to create what doesn't. Study work you like, study my work and see what choices I made and ask yourself "why did he use THAT trait?"
Speaking of my work
I believe that in a perfect world, knowledge, especially art knowledge, should be free.
But it's not a perfect world and sadly I need money, so if you found this useful please consider pledging to my patreon or kofi!
#art tutorial#art tips#monster design#creature design#creature design tutorial#worldbuilding#how to design creatures#animal anatomy#ask#shire screams#shire draws#shire doodles#dragon#dragon design#tutorial#long post
2K notes
·
View notes
Text
Snapshots Of Love
Black!Reader x Midoriya Izuku
Ratings: T, sfw with brief mentions of sex.
Summary: Each year Midoriya turns your birthday and its following and preceding days into an event. While you two do things together in the meantime, like eating takeout, baths together, grocery shopping, a movie and making desserts together, these activities are not the specially planned ones he’s created for the two of you. Those are as follow: Wash day, Spa Trip, Picnic at Sunset.
Hii! So this was written as a birthday present to my wonderful friend Elle! Happy belated birthday girl and I hope you enjoy it <3 @voidsorceress
Word Count: 7,503

Activity #1: Wash Day
He knows how much you fuss over your hair, the long hours with music or a podcast or one of your favorite shows playing as you either take it down, do it up, wrap curls around your fingers or twist or braid. He’s assisted you with wash day before, careful as he helps separate the thick coils of your hair, his scarred fingers helping to use the end of the rat tail to gently part a waypath. He’s helped massage the shampoo into your scalp, help you put the plastic cap on your head in wait for deep conditioning. He’s always helpful, and when he can’t (he’s often fumbled with braiding extensions), he simply watches you in awe. Emerald eyes slightly hooded as he gazes at you with a soft smile curled upon his lips. His eyes watching the flex of your wrists and the semi-concentration on your face. He wants to do this for you, and he’s ready.
How He Prepares:
Midoriya is a lover, and as such, he pours as much of himself into everything that he can, especially learning, and especially learning about you.
He watches several youtube tutorials of Black women showing how to braid hair.
Talks to your friends, goes to the local African shop and begs for a lesson and they think he’s so cute, all freckled face and determined so they say yes.
So Midoriya stands his ass in a chair with one of the women “Grip it tighta! From the roots! Cross your hans’ like this, okay? Yeah yeah, he’s doing good!” She grins, nudging Midoriya’s shoulder. His cheeks are pink as he interweaves the braid on the kinky haired mannequin head. He’s going to get this right.
He asks for help from others too. He asks Mina who happily teaches him how to do crochet braids and their benefits, and finds himself more drawn to that style of braiding, something he feels he can do easier and so he focuses on practicing that.
He hides a mannequin in his office, having planned this months ahead, to which whenever he has a few minutes before a meeting he sits and practices. He wants this to be good for you, wants you to be able to proudly wear the braids.
He also goes shopping beforehand to get all the materials you’ll need. New shampoo, conditioner, deep conditioner, all the brands you leave stacked in his linen closet. He buys new ponytail holders and beauty supply rubber bands, oils and shea butter. He even buys you a new bath robe.
While he’s there he bulks up on luxury items for the bath he’ll draw you on your birthday: lavender, lemongrass, cherry almond, cocoa oatmeal. He’s going to make it special.
He has you take the three days off before your usual two (a week long vacay baby!) And while he as a pro-hero cannot take the entire time off, he strives to take at least the last three off, and the other two he is careful to make it home early.
What He Does:
The first day of your week off, he has set the living room up in front of the flatscreen with the prep for your hair: microfibre towel, two bottles of water, shea butter, a mixture of oil (jojoba, tea tree, rosemary oil, a tiny bit of black castor), your favorite gel, your favorite leave in conditioner, rose water in a spray bottle, a rattail comb, a detangling brush, a wide tooth comb, and 8 bags of pre-looped 14in passion twists in two colors. He’d gotten an extra few packs just in case.
He wakes you up that morning, fingertips brushing over the soft skin of your shoulder. He presses a gentle kiss upon your forehead as you stir, kneeling next to you on the bed in an old faded white T-shirt and a pair of comfortable shorts. His eyes are sparkling, having set the kitchen up after your breakfast nap.
“Hey.” He says softly, soft smile reaching the freckles that’ve spread across his face. A mini constellation. You grumble softly, shifting your feet beneath the comforter, eyelashes batting open as you slide an arm out, hand blindly reaching for him before he presses the warmth of his cheek into your palm. “Hey..” you grumble back quietly, voice slightly heavier in the sleep fog. He nuzzles your hand for a moment, cupping it before placing a kiss on the pulse point of your wrist. “Ready to shower? I’m washing your hair today.” He says, confidently but still quiet enough not to hurt your adjusting ears.
You blink at him, grin spreading across your plump lips as you make a soft humming noise.
“Oh?” You ask, reaching up to make sure your bonnet stayed on. He laughs softly, nodding his head. “Yep! I’ve got it all planned out. I even bought a shower cap so you wouldn’t have to use a grocery bag.”
You snort softly, pinching his cheek and he makes a soft pout in response. “Mm.. Okay. I pretty much detangled it anyway. I was gon’ style it for my birthday anyway.” You yawn, sitting up and letting the covers fall off of you. Zuku’s eyes follow the exposure of your curves before flicking back to your face at attention. “Can’t be out there lookin like a bum. Ma girls would clown me.” You sigh dramatically, shifting to sit cross legged. Zuku’s still kneeled in front of you, but a soft huff of a laugh comes through his nose.
“I would never though. You’re always beautiful to me, no matter what. The crinkle of your nose, the raise of your eyebrow, the crease of your smile--” He rambles, prattling off of the things he finds naturally beautiful about you. The shape of your eyes, nose, lips, the feel of your skin on his, you find yourself grinning in embarrassment, moving your hands away from him to press a foot on his chest.
“Alright alright! I love you too you goof but you know that ain’t what I meant. You might think I’m cute lookin’ like’a rats nest but sure as hell nobody else would. But its mo’ for me anyway.” You say, shrugging. “Plus, have you seen yoself? Our fineness needs to match baby, we not goin out there lookin like Raggedy Ann an’ ha man.”
Izuku laughs, eyebrows creased as he shrugs his shoulders. “Alright, alright. I concede.” He raises to full height, holding his hand to you which you accept and stand to your feet. “Lets get you cleaned.”
The shower is nice, warm water cascading down your bodies. Your shared home is spacious itself, and the bathroom more so. A separate shower and a tub. Zuku’s fingers work gentle wonders against your scalp, careful to avoid tugging any curls. You lean against his chest, head bobbing gently with his ministrations. Izuku’s not the most playful in the moment, considering it more intimate but he does laugh at the occasional stumble or bopping of suds on one's face. He lathers the shampoo in well, separating your hair into four sections, deep conditioning it and then placing the shower cap on to retain the heat and to let it “marinate” he had said with a beam, which caused you to cackle and playfully swat on his arm as he made his way out of the shower to instead draw a warm bath in the tub.
You rinsed out the shower, he got the water right and the two of you scrubbed each other down in the tub before hopping back into the shower to rinse your hair off. Once you were done and you opened the cabinet to take out your wide tooth comb, you paused in confusion. Your entire styling cabinet was empty aside from the edge control. Zuku had rinsed the rest of your curls down the drain, scrubbed the floor with comet and a sponge mop before he rinsed it, towel around his waist.
“Zuku, wheres my hair shit?” You asked, and the man paused for a second, shoulders tensing and you watched his freckled back. He set the mop aside after ringing it out and then smiled back at you nervously.
“Ah.. about that. I was gonna do your hair for you.”
You blinked at him. Staring. He stared back, and there was a moment of silence. Anxiety began creeping up his back and he began to wring his hands, a nervous habit from your younger days. He softly blew a few strands of his curly green moss from his eyes. “I-i mean, if that's okay..?” He stammered.
“Deadass?” You asked, eyeing him wearily. Zuku helped you but he didn’t do it himself, not often. He usually was able to do your hair naturally. His favorite was creating the twists for your twists out, and doing the bantu knots. He felt proud that his strong hands could also be delicate enough to help with those styles. “I wasn’t planning on doing my hair naturally--”
“I want to put crochet hair in.” Zuku cut in.
You stared at him again in silence. Before you could respond he stammered. You adjusted your towel. “I promise I’ve been practicing! I’ve studied this for months. I asked the shop you go to, I asked Mina, I even have a mannequin in my office I can do this.” He said, then said again more firmly. “I can do this and- you can watch the entire time and if I fuck up you can stop me but--” “Okay.”
Izuku goes quiet then. He stares at you, brain trying to catch up to your answer. He opens his mouth, closes it, a guppy in the water before in a quiet, confused voice he replies “Okay?”
“Okay.” You smile at him, step forward in your shower flip flops and softly pat his cheek. “I trust you in my hair, and if you’ve had as much practice as you say you have, I don’t mind. Plus it’ll be a nice treat. You doin’ my hair for my birthday is tooth rottin’.” You kiss him on his nose, which increasingly dusts with rose. You leave the bathroom and he washes his hands quickly and follows after you.
“I’ll do my best!” … And his best he does.
You’re both sitting in comfortable house clothes, you slotted between his legs on a pillow and eating snacks, Castlevania playing on tv as Zuku has your wide tooth comb between his teeth. He’s got a towel draped over your shoulders and a towel on his lap to catch the cute little shedded curls and hair products. He’s always amazed at how your hair shrinks, but finds it fascinating. He can’t help but stretch the sections as he moisturizes your scalp and hair using the L.C.O. method. Liquid, leave-in conditioner mixed with the rose water, the shea butter, then the oil to lock it in. He massages it all into your scalp and down the strands of your hair until it's nice and moisturized.
He isn’t able to cornrow yet but he told you not to worry and instead used a method he’d learned on youtube. It consisted of making regular front to back parts like usual and slicking their edges with gel to make clean sections. He parts a small square at the front of your hairline and creates a single braid, then parts another square right behind the first and places the previous single braid in the middle of the part, and braids using that. He continues until he runs out of hair at the nape of your neck and the part ends, creating an illusioned cornrow. Once your entire head was done he placed a wig cap with a grid over your hair, careful before he took the crochet hook and began sliding and tying the passion twists in, filling up the cap and the expanse of hair on your head.
The two of you talked about everything and nothing in between, and surprisingly
Izuku didn’t struggle. He looped, secured, and continued on as the two of you talked, occasionally holding up a mirror and having you hold one up to check the progress of the back, and occasionally you’d lift the other bottle of water to his lips to let him take a sip, or feed him one of the snacks on the table.
How it Ends:
Three to four hours later he’s done and you stand to stretch your arms above your head, popping your back and letting out a soft grunt as you do so. Your neck doesn’t ache as much as you’d thought it would but your head did feel a little heavier, as expected.
Izuku wiped his hands nervously and smiled at you. “Well! Look, take a look!” He exclaims, standing up as he folds both of your towels and nudges you towards the mirror in the entryway. You gasp, and Izuku’s emerald eyes are sparkling with glee.
Your hair looks incredible! Especially for a first timer. He’d cut the stocking cap to give you a side part, and cut around the edges to remove the thick band so it looked a lot more natural. You turned your head this way and that, admiring yourself and grinning ear to ear. Izuku was behind you, practically trembling with excitement. “Do you like it?” He asks, voice wavered slightly as he eyes you through the mirror and you toss some of the strands of hair over your shoulder.
“Yas! You did amazing baby! Thank you so much!” You turned to him and wrapped your arms around his neck, dragging him down to pepper kisses on his face. Of course his face turns rosy, warm large hands clasping your waist as he grins, eyes closing as he accepts the affection. “You’re welcome! I’m happy it came out good. I was worried.”
You shook your head. “No sweetness you did great. Thank you baby!” You grinned, squeezing him a little tighter.
Izuku was happy too. Your arms and hands didn’t have to be tired and wrinkled, he made you feel good, helped shape your hair into one of the beautiful styles you loved. His chest swelled with pride and happiness, nestling his nose into your shoulder.
Activity #2: Spa Day
Next is more pampering! You’re beautiful to him always, soft brown skin glowing in the sunlight, skin richening in the silver glow and indigo sky at night, but he wants you pampered and feeling like a queen upon your birthday, and so he takes it upon himself to book you an appointment at your favorite Day Spa, for all of your favorites: dip powder manicure, spa pedicure, etc.
How He Prepares:
He calls the day spa over a month ahead to make sure you’re scheduled in. He’s taking no chances. He also schedules it on one of your days off from work.
He schedules it for two, yes, he’s coming with! You’re always chastising him about not taking better care of himself so he decides what better way than a spa trip with his beautiful partner? He knows not only will you get to relax and enjoy yourself, but you’ll relax further knowing he’s doing the same.
He schedules it all, really. Body massage, facial, waxing, princess pedi, mani, facials, and chilllin’ in a steam room.
Knowing that this would be easiest served if all done at once, he makes this overnight stay. He borrows the keys to a suburban house that Momo’s family owns, out by the lake. He cleans up there early, adjusting dishes to the way you like them organized, leaving little love notes in the places he’s sure you’ll find. He lays out your favorite nightgown and body spray on your side of the bed.
Leaves your favorite body wash and body scrubs in the shower, along with his own.
What He Does:
That morning the two of you have a nice breakfast at a local owned cafe. The two of you chat together on the little patio under the sun, sharing food, reminiscing, talking about plans.
Once you’ve had your fill and wander around the neighborhood near the Day Spa for a bit, Zuku opens the door for you as the two of you enter. He tells your names for the appointment book, and the woman in the front in the cute floral scrubs and light pink clipboard, turns to you with the softest of smiles. “Happy birthday! While it's a couples booking for the two of you today,” she leads you two into a back room, and Izuku gently places a large warm palm on the small of your back as the door softly closes behind you all. “We’ve lowered the price and we offer complimentary wine for the two of you.” She exclaims before leading the both of you to the massage room. It's cream and brown and glowing gently with candles, which decorate the light aside from the decorative lamp attached to the ceiling, also admitting a soft warm, gentle golden hue.
The both of you are asked if you have a gender or identity preference for masseuse and if you have any injuries to report before you’re both told to strip to your comfort level, lay down and relax, and the masseuses come in to work their magic.
Almost earthy with hints of sweet smelling lotions, fingers gently grinding and kneading into your backs, shoulders, sliding down the dip of your waists, curving gently down your spine. They work the knots out, gently working into your thighs and legs and ankles and the both of you practically turn to jelly. The entire experience is quiet, warm, and just as relaxing as you’d liked. They’d even turned on light music for the two of you.
Once it’s done, the two of you are asked to dress in towels provided and led directly into the sauna attached to the room where you’re able to sit next to each other and relax.
Your breathing is slow, eyes closed back breathing gently before you feel the warm hand gently touch yours before sliding into your own. You open your eyes softly to glance at him. Izuku’s head pressed back against one of the boards. His eyes are shut and there’s gentle perspiration on his skin, not enough to bead water to drip but enough to appear softly flushed. His curly hair is currently all pulled up into a high ponytail, bobby pins trapping his bangs up and backwards. He’s also breathing quietly, skin flushed a gentle pink. You smile and slot your fingers together, gently squeezing back and massaging the scar on his hand.
Once the sauna time is over, you’re gently swept out, given a new towel to dry off with, and then lead back into the room to lay again on your backs and receive your facials!
Both of your heads are gently rested back on comfortable rolled back towels as they apply the gentle cleanser, massaging it into your skin. It smells vaguely like citrus mixed with cucumbers. They then use a soft facial sponge to remove the cleanser, warm water and ask quietly if it's the right temperature. You're practically purring a hum of confirmation as they continue.
Izuku opens his mouth to speak and quietly asks, “A- ah..a bit hotter, if it's not too much trouble?” and a soft smile appears on your lips as the individual working on him responds “Of course not! Ask for anything you like, this service is catered to you” before you hear the water running gently, and the bowl placed back onto the table again with a very quiet clink.
“You so cute.” You tell your boyfriend, and he tenses for only a moment before his face flushes again and he has to be told to “please stop wrenching your eyebrows or I can't clean the soap from them..” and he apologizes. A soft giggle jolts your body gently and your own Esthetician gently tuts at you to which you also apologize and try to soften your smile.
Next comes exfoliation, a gentle oceanic summer breeze smelling scrub is applied to your face, massaged in, and Izuku mumbles something about the two of you needing a beach trip. You agree quietly, a quiet murmur of “Matching swimsuits” as your esthetician massages your cheeks in circles.
The next processes go quickly, extractions if needed, gentle massaging, and finally cucumber face masks.
Once the entire process is over and the two of you are relaxed and warm and feeling good, they hand you slippers and gently usher you into a different room for the pedicure and manicure processes.
They allow you to pick your colors, and Izuku the same if he wishes and the two of you are set next to each other back in your regular clothes as they work on gently pushing back your cuticles, massaging your hands, etc. You’re given nail tips if you like, and the dip powder process starts while Izuku gets his hands massaged, and he opts for a deep forest green polish himself as the two of you talk. Izuku laughs.
“It tickles a little.” You tilt your head at him as the woman brushes off the particles and begins to massage your hands and apply a lotion to them. You’re tempted to ask if he prefers your hand massages, and the quirk of your lips makes Izuku fluster slightly. “I-it’s nice though!” he follows up, voice tapering off to a soft squeak and you shake your head at him. “It always feels and smells nice huh? And cute color Zuzu. I thought you’d go plain again.” Izuku’s cheeks pinken slightly and he gives you a dorky smile. “I uh- almost did but I was curious to what it’d look like. It matches the same color as my suit and I think it’ll look nice.”
You coo at him and careful to keep your hands still, lean your chin on him and glaze at his hands as the scars are carefully massaged over. Even though the largest was years ago, there were still new cuts and scrapes from his regular work, and the callouses. “It will boo. And the color just suits you anyway.” You say, and, and Izuku, shyly leans his head over on yours, before the two of you are released to go sit in the back and soak your feet.
The two of you allow your feet to sink into your respective tubs and both sigh in release at the same time. The water is hot, and the bubbles almost tickle as the water seeps heat back up within your bodies. Izuku visibly sinks back into his cushions, and you pick up the little remote controlling the different massage settings. “Use it.” You urge him, setting your own and he glances at the one on his side, lifting it to inspect before hitting a setting and letting out an “Oh!” in gasped surprise.
You’re laughing at him and he whines, back shifting. “I just wasn’t expecting it to be that intense!”
“Boy you should’a known from the get go. Here bae lemme see.” He hands you the controller and you lightly press to lower the intensity and Izuku relaxes again. “Thanks..” and you’re shaking your head and rolling your eyes. “Of course.”
After a bit, the Estheticians came back over to the two of you, lifting your feet gently out of the water and using a pumice stone, foot file, and Izuku jumped slightly. It wasn’t his first spa day, no, but his feet, while he may not have said it out loud, were slightly ticklish. You laughed at him and reached out your hand so he could grab onto yours to focus on that rather than the feeling on his foot. “You’re a baby.”
He made a soft whine “S’not true. Just tickles.” You shake your head and cock an eyebrow. “I feel like you would’a kicked me in my face if I was doin it.” Izuku huffs and leans over to push his face into your shoulder. “Wouldn’t--” he paused, voice muffled. “Would feel too bad.” and the huff of a laugh you give makes his head bounce on your shoulder.
What follows is the cuticle clipping, the nail filing, “Would you like them painted?”
“Yes. Same color as his nails.” You say, lifting your boyfriend's hand to show. Izuku blushes just a bit, pride swelling in his chest.
The man gets up to fetch your color, and Izuku opts for a clear coat. Both of your Estheticians get to work on massaging your feet. Their fingertips and thumbs rubbing circles into the soles and heels, working out the crinks after applying their lotion. Both of your feet are placed in the paraffin wax bags, the wax a hot orange color, like an orange icle that has yet to be frozen. You shudder gently at the heat, and Izuku practically becomes mush. You wiggle your toes once, the hot wax oddly soothing once you’d gotten used to the temperature. Once it was complete, your feet were removed from the bags, wiped with a gentle tissue, patted down with hot towels, and then moisturized one more time before they started painting your nails.
How it Ends:
By the end of it all, the two of you are slugs, warm and relaxed all over and honestly, the rest of the day goes by quickly. Izuku is always clingier when he’s tired, or relaxed, or sleepy, and as such he’s always touching you in some way as he pays the tips, fingers interlaced with yours, standing behind you with his head pressed against your braids, opening the door for you, the other hand on the small of your back. Even in the car ride home, mostly filled with silence, one of his hands stays magnetized to your thigh, thumb rubbing circles into it.
When the two of you step in the door, Izuku’s arms are immediately around your waist, pulling your body into his as he inhales your scent and sighs, his chest rising and falling against your back. “Shower? Movie? Takeout..” He mumbles, and you’re laughing, reaching behind you to stroke your manicured nails through his hair, gently scratching his scalp. His entire body vibrates with almost a purr as he sinks his bodyweight into you further. “Yeah bae, yeah. Pizza?” Izuku gives a weak nod and a soft “mmmhmm..” in response.
The shower is quick, and you’re dressed in one of his larger shirts and a pair of panties for comfort and him simply in sweatpants and a T and the two of you curl up together in the bed, throwing on a comedy movie as you grab your phone and order dinner.
The day is relaxing overall, and the night all the same.
“Want me to get your hero symbol on my thumb next time?” Izuku whines at that, face planting into your thighs.
Activity #3: Picnic & Presents
His last gift to you is more quality time, but with a little extra bonus on this little house he’s rented. Zuzu’s aware of your love for flowers and your enjoyment of heartfelt gestures and so the last gesture he plans outside of the home includes a Park Picnic for dinner outside by the lake during sunset. He decides a home made dinner but, eaten outside would be nice. He also admits he loves the way that golden hour glow illuminates your skin, your soft lips, the way your dark eyes brighten softly within the light. He’s a sucker for you, always, but in the sunset and sunrise? His heart beats out of his chest, and he sees the rest of his life with you.
How He Prepares:
He knows you love home cooking, putting his heart into the meal. So of course he cooks as much as he can for you.
Otherwise, with the nice breeze and the weather teetering on well, he knows this plan will work.
He gets a picnic blanket, extra large: thick oxford polyester top and a waterproof PVC bottom. It's durable, water resistant, and a gentle lavender plaid.
He uses a raised slab of wood he'd gotten with a blanket over it as a makeshift table for the food. He knows it could be placed on the ground but being the ever careful planner he is, uses the wood slab anyway, better for posture and all that.
Foods he preps:
Fruit sando made with strawberries
Ricotta and spinach filo parcels
Miso Beef onigiri
Picnic Fruit Punch
Water
A bottle of your favorite alcohol
He also tried to make a few dishes from your culture as well. He knows soul food can knock you out so he’s a little more careful with what he picks from it.
Deep fried okra
Mac & Cheese
Potato Salad
Chicken Katsu
Your gifts! He has three extra special ones this year.
What He Does:
You’re aware of this gesture too, and while he doesn’t let you help him cook or prepare, occasionally pouting at you when you’re tasting food, he doesn’t make you leave the kitchen. In fact the two of you make casual conversation as he puts everything together.
You two are currently matching. You’re in a nice yellow bodycon dress with white outlining the sleeve cuffs, collar, and the bottom hem that stopped above your knees. Izuku’s dressed in a yellow T-shirt with “White” written on the front in white Kanji lettering, and a pair of dark blue shorts.
“I’m honestly glad they even let you get this time off.”
Izuku’s currently rolling rice balls, nodding his head as he glances back at you. His dark curly hair is currently pulled up in a half ponytail. “Ah..it is hard. But I put in extra hours and Todoroki and Uraraka are keeping an eye over my part of patrol to help..And the new interns at the agency are doing well, and since I don’t often ask for time off they were really accommodating.” He spoke, and you hummed, sitting behind him on the kitchen island.
“I’m happy. I’ve missed you, wakin’ up to you and not some empty space, or goin to bed and you bein’ there and not slidin in late. Ain’t seen you as relaxed as the spa in so long. Zuku last time we had a spa day like that we was in highschool. You need’a be takin’ mo’ time for yoself even without it being for me. You know that right?”
Izuku had stiffened, his cheeks warming as he carefully curled the seaweed and placed the onigiri in the container with the others. “Y-you’re right. I know.. I just- it’s hard. I want to be the best hero that I can be and sometimes..I don’t- There’s so many people who need help. And I want to help everyone that I can.”
Your heart aches a bit as you hop off the island and wrap your arms around his waist from behind. You shift your body to plant a kiss on the back of his neck. He visibly shudders. “I know bae but you can’t take care of nobody if you ain’t takin’ care of yoself. If you half dead and wound up like’a overheatin’ spark plug you just gon’ explode. Take more care of this.” You said, reaching up to playfully squeeze at his pecks. He stiffens and places a hand over yours, and you’re laughing, pressing your face into his back. “Take care of yourself. If you end up broken somewhere who gon tell me I look cute with my bonnet on and dried drool.”
He laughs at that, lifting a hand to gently brush his lips against it. He’s quiet for a moment before he smirks against your skin. “I’ll leave a recording--” “Izuku!” You smack him on the back and he’s laughing full force before he turns, maneuvering to face you and dragging your body into his own. His body is radiating warmth, as usual, and he cups your cheeks. His eyebrows are drawn in, and he looks a little sad almost. “But really, I know. I will, for you, and for me..and because of my mom’s phone calls.” He says, pressing a kiss to your forehead and you’re the one with warm cheeks now. Nodding your head. “Good. So use yo damn days off and don’t be pickin’ up extra shifts.”
He stiffens. “..But-”
“No buts.”
“ … Two on, two off?”
“What did I just tell yo stubborn ass?” Izuku whined. “Can you at least think about it?”
“I did and I said no. Babe you workin at least 25 days a month and with yo damn overtime I’d be surprised if you ain’t clockin’ in at 400 hours or some shit. Take the time for yourself and if I gotta bribe you I will.”
Izuku huffs at that, leaving it alone before the oven beeps and he gently maneuvers out of your hold to take the filo parcels out.
…
He leads you to the backyard where he’s already set up the picnic blanket, the food sitting out with covers just in case. The breeze is cool and the sun is setting, orange and yellow and soft purple hues cascading over the sky, the wind causing the water of the pond nearby to gently wave, rocking the water lilies. The Creeping Jennys gently curved over the planted rocks, the Cardinal's red gently fluttering along the plants edge. The pond itself is beautiful, especially with the sun setting around it. Cameillia's bloom in proximity to Hydrangeas, Iris's near the Cardinals. There’s a mixture of color in the garden, along with a few bamboo stalks. It's a beautiful place, and it’s easy to often get caught up within the colors. The breeze and the slightly cooler temperature keeps it from being humid or overwhelming. There were also insect traps to keep from the bothering pests like flies, gnats, and mosquitos if they happened to venture by.
The occasional Japanese Wagtail and Tit would patter along the flowered lands. Flying overhead, giving soft chirps of appreciation for the greenery as they flapped their gentle wings, on their way home from their own long days.
You sit with Izuku on the picnic blanket. He’s got a cooler on one side with all of your drinks in them, capped, and two chilled glasses there for the two of you. He hands you a plate, the rest of the food laid out neatly and with their tops gently for protection if needed. A heat resistant mat laid out to hold the warmer pots and pans and trays.
Izuku pours you a glass of your choice of drink before handing it to you, watching as your eyes scan the sunset.
“It’s so pretty out here.. The city blocks all the natural light. And these flowers..Who even does the upkeep for this pond, it's beautiful..” You mutter, eyes gazing over the Autumn-like petals of one of the Cardinal flowers and Izuku is smiling at you.
“Yeah, I’ll keep this view forever.” He says, voice softer than usual, almost breathless. You turn to see him staring at you with those beautiful green eyes and you smack his chest playfully and smile. “Alright lover-boy. I’d rather keep you than the view though.” Izuku’s cheeks dust rose for just a moment as he gave a gentle rub to his nose. “You can and will.” He says quietly, and the two of you make soft talk while eating, watching the sunset and the changing of the reflection color in the pond.
By the time the two of you are done, your plates clean, he gently packs them away back in the basket he’d brought outside. Anything that could be leftovers was already put away and the heavier pots brought back in earlier. Izuku comes back out with a vibrant purple gift bag in his hands and sits down with a smile. He takes your hands in his. “Ready for your physical gifts?”
And you’re grinning at him, turning to face him and cupping his cheek. “You’ve done so much shit for me already Zuzu but show it to me babe.” You say, and Izuku plants a soft kiss to the inside of your palm before letting your hands go and placing the bag into your lap. You’re shaking your head, he’s already done so much for you that you’re grateful. Even the amount of time exceeding what the two of you have had since highschool.
You open the bag and blink at the contents inside:
The first thing you pull out from the tissue paper is a notebook. Not just any notebook either. On the front cover is a gouache painting of you and Izuku on your third date. Where the two of you are holding hands and smiling, while Izuku holds an umbrella between the two of you. It’s a painting of a picture Sero had taken of the two of you in highschool, and it's gorgeous with the vibrancy of the reflections of the water, the reds and yellows and oranges, the blues and greens and gentle lavenders all to create a scenic piece. While your faces weren’t completely clear, your silhouettes were both ingrained with colors representing your energies. Your hairstyles are clear, it's easy to tell it's the two of you. You're speechless.
"... wow."
Izuku's watching you expectantly. A smile spreads over his lips and he nods. "Open it, please?" And you look up at him for a moment before back down at the notebook. You figured it was just an empty engraved book but when you opened it, the page right after the first, was Izuku's handwriting:
"Love Letters for My Love."
It's cheesy but cute, and Izuku has doodled on the front page, like in the early 2000s American movies. There's a tree with a heart and your names in the middle and little hearts gently filling in some of the space on the page.
As you turn the page and start looking through the book you realize the book is a compilation of journal entries and poems about you, written about you and for you. Some dedicated directly to you, like when you were busy one week completing a project for work and the letter detailed everything from.the way you bit your pen to the furrow of your eyebrows as you typed up your report. He talked about how proud he was of you, and how he admired you.
Others were love poems to parts of you that you were occasionally more conscious of: stretch marks, birthmarks, etc.
Some were ranging back to things he'd written about you in highschool, dated correctly. Some were things he'd taken notes of about you, like favorite smells, hair products, jewelry styles etc.
You started to tear up a bit at how heartfelt this book was, and the entire hardcover journal was full. Not one page was empty, and some pages even included pressed flowers that you loved, the occasional scribble of a drawing he'd tried to do. Your heart swelled with just how thoughtful Izuku was and how loved you were to have someone care about you enough to memorize and notice the little things.
You fanned your face for a moment and wiped your eyes from the hot tears as you reached for Izuku's hand and he gladly took it, rubbing his thumb over your skin.
"Izuku I love this.. it's so beautiful. Boy, who taught you how to woo a girl this good?" You laughed softly through the tears and Izuku smiled. He had been worried you were upset when he saw the tears and he scooted closer to gently wipe away your tears.
"Ah.. just. I thought.. you know." He shyly kept his eyes on the now closed notebook. "It'd be nice for you to know how much I love and think about you. I know I'm not around much and it can get lonely sometimes. I miss you when I'm on patrol and I'm always thinking of you and I just wanted you to know how much I love and think about you.. you mean so much to me and I just can't see my life without you so.." his cheeks flushed softly.
Your heart melted at his words. He was darting his eyes down and his free hand occasionally squeezed his knee in increments, another nervous habit. You cupped his cheeks and lifted his head to yours and smiled at him, giving a soft sniffle. "I love you so much Izuku. I've never doubted how much you love me but this is just.. I'll cherish it forever. And when I tell my girls they gon be so jealous." You laughed and Izuku couldn't help but laugh at that too and he softly removed your hands from his cheeks, giving them a kiss. "Look, there's more." He gently nudged his head towards the bag and you rolled your eyes and smiled.
You dug through the bag again and in it was a new ankle bracelet and waist beads. The last item in the bag was a photo album, and upon opening it were Snapshots of the two of you. Some selfie, some with face masks or you getting ready for a gala. Some were taken by others like Izuku removing your shoes the time your heel broke, or you testing a new makeup palette on Izuku at Minas house. It was an album of your friendship with each other, from highschool studying to QR codes leading to videos of you running the track with Izuku and telling him to slow down. One of the QR videos lead to Izuku's first time getting drunk and him crying about how much he loved you, and telling a non-flirting Iida that he was "happily in the best love with the most beautifulest partner in the world!" And upon hearing that one, Izuku's ears had turned red. You shook your head and hugged him tightly.
"You dork! I love this all so so so much!" You squeezed him tight and kissed his cheeks. He laughed, squeezing you to his chest as he buried his face into your shoulder.
"I'm glad! Happy birthday Sweetheart.." and you squeeze him tighter. "Thank you Broccoli bae." Izuku laughs and then nudges his head against yours.
"... can I help you put on the waist beads?" You snort softly, knowing he'll just use it as an excuse to worship you, as he always does. You softly bump his forehead with yours. "Yes, cute stuff.. thank you.. come on. Let's put this stuff up and go in."
How It Ends:
With you and Izuku dancing in the living room to Cassie.
Okay, maybe that's not how it Ends but yall definitely do.
Your arms around his neck and his hands on your hips, the both of you swaying to the beat. He twirls you once and pulls you back in by your waist, hips moving against his, your back to his chest as the both of your hips move to the beat.
At some point you end up laughing as you try to get Izuku to twerk. "You got too much ass to not throw it back!" You laugh, even grabbing his hips to catch what he throws and it ends up with the both of you laughing and softly tipsy.
After the two of you have danced, warm from the buzz and the warmth of your bodies and the food, the two of you shower and get ready for bed, which, with his calloused warm hands running up your hips and your stomach, takes several hours of moans, trembling thighs and heavy breaths.
…
by the time Izuku is asleep, arms wrapped around you with his cheek pressed against your chest and your hand stroking through his hair, you're thumbing through the notebook again, reading one of the poems he'd written you:
You always say my freckles resemble constellations,
Your fingers a walking spaceship connecting the stars along my back.
You say my scars are shooting meteors and I think of how empty
This galaxy you've made of me would be
Without your dancing fingers to map them, to give them names and point to their shapes.
You've poured love into parts of me I didn't know yearned
To be wanted, needed, held.
Your pretty brown eyes
Have the same effect as the first sip
Of coffee in the morning.
The tight curls of your hair are like springs holding
the clouds together, they could swallow me whole
and I would thank you. Whether it be box braids, faux locs,
feed in, or cornrows, your hair reminds me of what it means
to see a fracture of the beauty the earth has to offer
You call me the galaxy and I will claim you the ocean,
your laugh lapping waves that change the rotation of my planets.
You've given me a submarine and I'll use my stars to light my way to your depths
And while Oceanographers and Astronomers say
we are too vast to know, too different
I can only see us together, Can only see
the way our depths merge and match and join as one
As always, and as forever, exploring
what it means to be complex and surface at once.
I want to spend my years exploring yours,
and I hope you will spend yours exploring mine.
As you turn the page to the next one, your eyes widen and your breath hitches.. your ears ring, heart thumping against your chest like thunder. Your hand leaves Izuku's head to cover your mouth as the tears begin to slide down your cheeks. Light, not even warm. You were crying without even meaning to but..!
Sitting within a groove in the book is a soft rose colored flower engagement ring, and above the groove, in soft curved font, Izuku's own messy cursive is written as neatly as possible, "Will you marry me?"
---------------------------------------------------------------------------------------------------
Authors note:
The ending is left as it cause I think it's cute cx but also Izuku is such a gentleman. He doesn't push the ring and instead let's you find it on your own. And I think that's sweet. It could've been that day. Months from then. All depends on how you read the book and when and I just think it's a sweet gesture.
#bnha fluff#bnha x reader#x reader#x black reader#x Black!reader#black!reader#izuku midoriya x reader#izuku x reader#izuku x you#midoriya x reader#midoriya x poc!reader#midoriya x y/n#deku x reader#x reader fluff#mha x reader
249 notes
·
View notes
Text
The Last Phoenotopia Blog Update
(Date 2021 MAR 01)
I debated how to open this blog post, but perhaps the main crux of this blog post is the best place to start. The blog is being retired.
The purpose of this blog was to be a "development" blog for Phoenotopia, and well, Phoenotopia's development is done. I'll still be doing bug fixes and maintenance on the PC and Switch versions, and playstation and xbox ports are underway (by a publisher). But I'm not going to be making any more major changes to the game. At some point, you put the paintbrush down and say it's done. Blemishes and all.
Recent Events
The game launched on Steam last month, and like any launch, it was hectic. Bugs Galore. This is our first commercial PC launch, so it was a real baptism by fire. Unlike Switch's one configuration, the PC has multiple configurations and factors to account for. The game needed to be able to handle multiple control schemes, screen resolutions, refresh rates, and more! I had a 60Hz monitor going into launch and didn't know anything about Hz (I do now). There was a troublesome stutter that some players were sensitive to that my whole team didn't notice since our eyes compensated it away. There were a few times where in fixing something at one party's behest, it introduced problems for another party. A few times, due to disorganization, I unwittingly rolled back a fix that was meant to be applied. For some, the game couldn't play at all (really glad Steam allows refunds).
It was messy. It was tiring. I.AM.BEAT.
I think the worst of it is over... I'll still be around to do the last updates and bug fixes, but I'm ultimately ready for what's next.
SO what is next?
What isn't next... is Phoenotopia 2. As you may have heard down the grapevine, the game couldn't be what you call successful. No one's earned even minimum wage on it.
Maybe there's hope in the game's long tail. A year or two down the line... maybe. I won't hold my breath though. At some point in the past few months, I finished processing (or grieving) and it's time to move on.
The game has at least earned enough for us to continue our modest operations. As long as we don't expand the team, and we don't take another monster six-year dev cycle like what Phoenotopia took, we can continue. We'll have to be smarter and faster. Perhaps the most valuable thing we gained from all this is experience.
The Experience
It is a dev blog. Here are some of the lessons I've accumulated from this game's development.
- Have a good menu design. Menus aren't just that in-between fluff before you get to the good stuff. Menus are KEY. Your menus need to be robust, expandable, and *understandable* (to you, the developer). Because once the game's out, you will invariably be asked to add more options. And if your menu design is bad, every time you have to add a new menu option, it becomes a whole new pain all over again. Support mouse from the get-go, etc.
- Focus on features that people will actually care about. For instance, I've never seen anyone praise the camera's zoom feature. In practice, people try that feature a few times and then never use it again. But that feature was a constant consideration factor for every level. Run through it multiple times to make sure the level didn't break, think about which zoom levels made sense, resize rooms because they worked at one zoom level but not the other, and so on.
- Don't do boxes that you can move around. Other 2D platformers avoid movable boxes because they're a huge headache to program and they really complicate the game space. Enemies need to respond to boxes you throw in their path and either navigate around or attack it. When you're moving the box, you have to worry about constantly changing your collision size and reconciling when the box gets snagged on the environment. The boxes were also a constant source of bugs because people can manipulate them to soft-lock themselves and more.
- More focused script. Phoenotopia's 100,000+ word script was panned more for being bloated than it was praised for being lengthy. Long scripts take a long time to write and make the game more unwieldy, increasing the costs of translation and upkeep. Every update we're addressing some textual error or mistranslation. There are some highly renowned games (e.g. Hyper Light Drifter) that do without a script at all!
- Be flashy! A bat and a lightsaber take the same amount of work to program, but the lightsaber will draw a lot more attention and interest.
- Slopes, surprisingly! Six years ago when I started, Unity was ill-equipped for 2D games. If you used the physics that Unity provided you'd have a really floaty character that wouldn't adhere to the slope when going downhill. There were a hundred different tutorials saying different things (use forces, use move position, use translation, etc). You can get rectangular collisions done in a day, but to do slopes took weeks. Meanwhile, games can actually get by fine without slopes. Most people won't even notice. Did you know the Phoenotopia flash game didn't have slopes? Neither does Hollow Knight or Rogue Legacy. You can save yourself a lot of work by avoiding slopes.
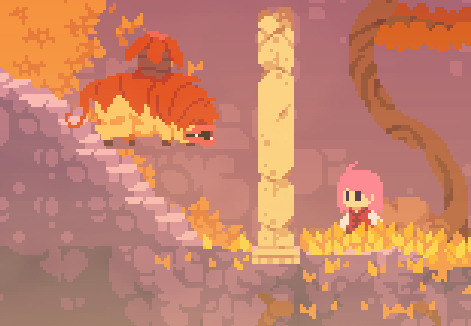
(big entities look weird on slopes. Bad slope!)
I could write enough little knowledge nuggets like this to fill a book! But I'd rather just make the next game.
So… what IS next?
As mentioned previously, it's not Phoenotopia 2. Pirate and I are mostly just tossing some ideas back and forth right now. We'll go silent for a year (or two). Our next game's scope will be more modest in some ways, more ambitious in others. It will definitely be more smartly designed. (There will be a map!)
We'll announce it when it's ready for the public. It might be necessary for us to do a kickstarter. I've tried to avoid kickstarters having been burnt on quite a few myself and also because I worry that mismanaging a kickstarter would earn the ire of backers.
But I did keep this blog regularly updated for six years. So I've gained some confidence in my abilities to at least manage a kickstarter well.
Is it really the last Phoenotopia Blog update though?
Okay, not really. There is some news that I'll need to announce, and this blog is one of the game's main outreach channels. Here are the events that will cause me to update the blog:
Announcing the launch of the xbox/playstation ports when they're ready
If a physical edition of the game happens
If a new language is getting introduced into the game (Korean is a high possibility)
When we're ready to talk about our next game
If (BIG IF) we begin development on a Phoenotopia sequel. I do want to do a sequel one day if we have the means and the demand is there.
Those updates will be more on a "when they happen" basis, rather than me reporting in every couple months.
Fan Art
As always, I'm very happy to see fanart of Phoenotopia. Major thanks again to Pimez for collecting all the artwork from the corners of the internet! Since this is the "last" blogpost, Sir Pimez can finally take a rest from collecting the fanart :P

ÆV made a series of pictures that tell a story. A Pooki is humanely sheared of its wool to create a hat. The Pooki is unharmed. Nice! Gotta love Gail’s expressions.
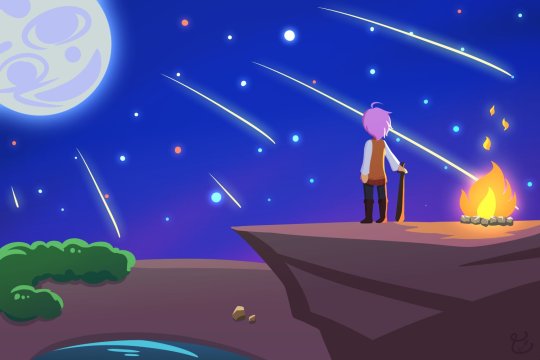
Amagoo Mazeru makes a stunning landscape shot of a full moon and shooting stars. It’s a sharp and clear vector art. I like the faint glow of the moon and the fire and the subtle gradient in the night sky. Very skillfully done!
Hah hah. I got a chuckle out of this one. I imagine this is how Gail's enemies see her by the end of the game. CaESar made this image based on TerminalMontage's famous youtube videos. Nailed it!
CrownStar drew two pictures of Gail. I'm a big player of JRPGs, so the first shot instantly reminded me of Persona 4's art style. (Hmmm... Phoeonotopia as a JRPG... there’s potential there...) Next, Birdy is shown carried off after her defeat. I really like Birdy's expression here - she just seems mildly uncomfortable.
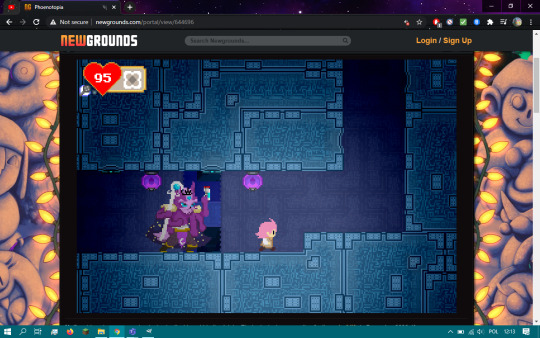
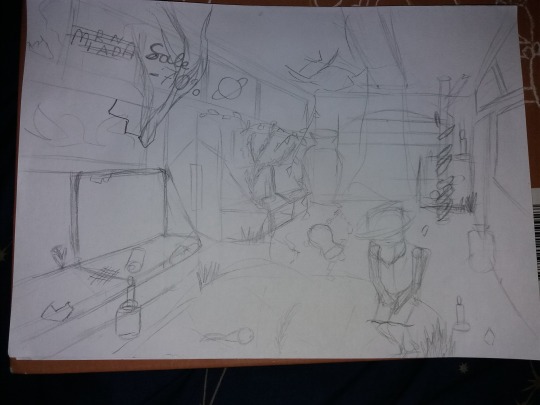
There's a bit of a story behind the first image. As Firanka shares it, she wasn't able to defeat the Big Eye monster at the end of the flash game, so she believed a tall tale that what awaited after was a 6 armed Kobold boss. Hilarious! The second is a rendition of the lonely Anuri elder. A rare subject. The loneliness is portrayed well here. I feel lonely just looking at it!
Koo_chop draws the clash between Gail and Katash at the top of the towers. I really like this interpretation of the game's art style. It’s faithful to the in-game graphics. And the lighting, from the glow of Gail's bat, to Katash's sword, and the lightning in the background... Amazing!
Lime Hazard shows Gail with a salute pose. Very appropriate for this occasion. I also like how there's a slight tilt in the angle that Gail is portrayed. Those dynamic angles are always hard to get right, and Lime Hazard pulled it off very skillfully. See you next mission!
Lyoung0J with a digital painting of Gail posed sitting on a rock. I like how it almost seems like she was caught in a candid moment - she’s smiling, but also feeling self-conscious. Cute! The art style really pops, and I like how Gail is sporting what I call the old anime style nose.

MyUesrNameIsSh*t with a sketch of Gail performing a skillful slingshot. I like how Gail is depicted with her tongue out in a mischievous manner, the way all mischievous people with slingshots do.
Niitsu Kentaro returns with a 2021 Happy New Year picture. That happened didn't it? A New Year... Gail's pose gave me a chuckle with how she seems to be waving the bat around as casually as one would wave hello. And "Phoenotopiyear"... Well said! One day we'll have our Phoenotopiyear...


Ochan Nu breaks all records with a stunning NINE pictures in one session :O
There's so many goodies here. My favorite would be the one with Gail staring intently at the screen - it's like she's looking directly at you. You almost feel uncomfortable.
Next, there's an Animal Crossing villager dressed as Gail and sporting her pink hair. It even looks like a house Gail would live in. Gail is a connoisseur of the arts and likes Mona Lisa. Yes :)
There are various comics of Gail pointing out Gail's weird food habits. A picture of Fran looking really cool, and even Gail rocking a bathing suit. (bathing suit image linked here in case NSFW). Wow!
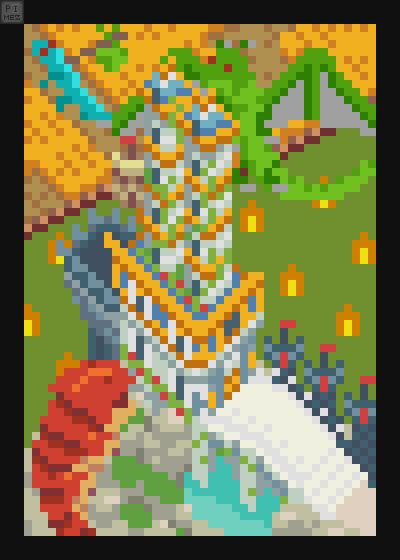
Pimez didn't just collect the arts, he creates them as well! This one, which he aptly named 'The Year 175' is a depiction of when the dragons invaded the towers as told by an elderly Daean woman. Great pixeling skills! I got a good chuckle from the ice dragon leaving with its stuff slung over its shoulder.
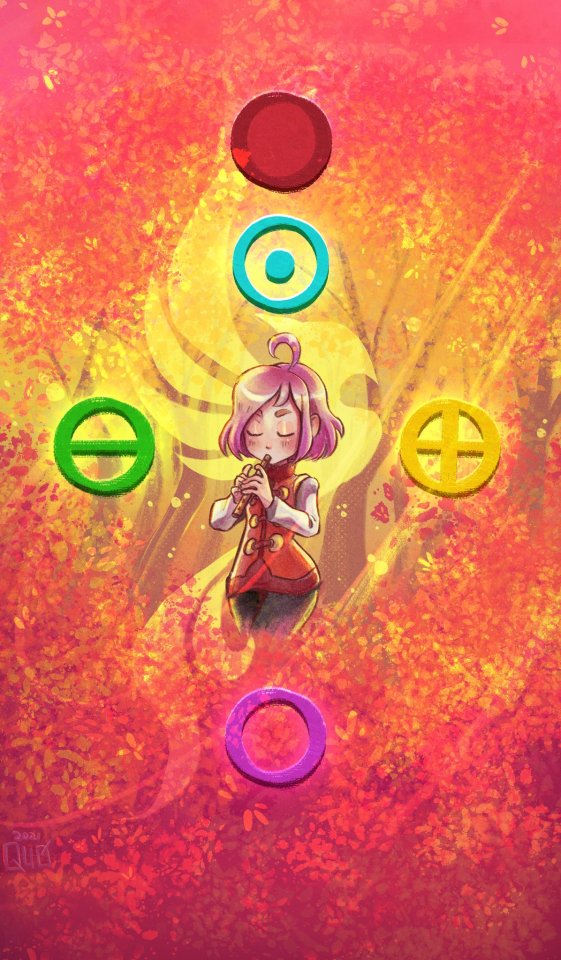
Quo made a stunning picture of Gail playing the flute surrounded by the 5 musical notes and the Phoenix logo behind her. The theme seems to be "fire" and it works really well. Gail herself looks awesome depicted in her red suit - it's like she's leading a marching band!
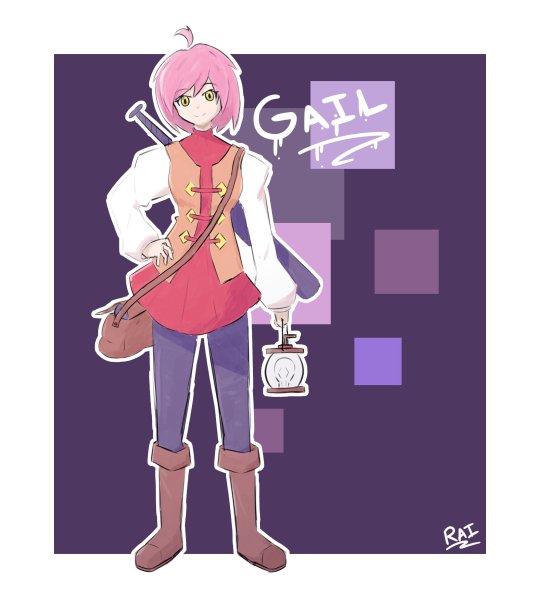
Rai Asuha depicts Gail in the late game with her red suit, and night star bat, and holding a lamp. She looks ready for adventure! I really like the white outline here and Gail's poofy shoulders here - the art style feels reminiscent of Final Fantasy Tactics.
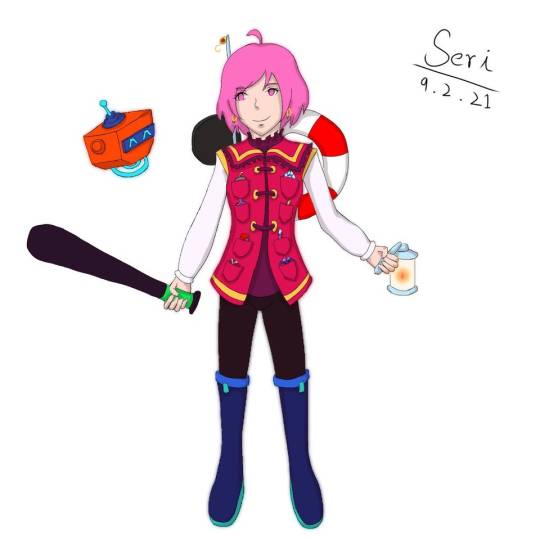
Seri also draws Gail bearing her late game equipment. Unique to Seri's drawing is how all of Gail's equipment is accessible from a pocket on her shirt. I also like how Gail is depicted with her lucky earrings - that accessory is often forgotten.
Treedude depicts Gail with a bat and wearing a funny smirk. She looks like she's ready to hurt someone!
Warotar returns with everyone's favorite Great Drake, Bubbles! It seems so happy to be featured!
I'm really grateful for all the fanart this game has received. From the bottom of my heart, thank you!
Closing Notes

Pirate drew a picture to mark the occasion. It shows Gail enjoying a hot chocolate with marshmallows and a pumpkin muffin. A rest well-earned...
Goodbye! Until next time!
95 notes
·
View notes
Text
furby dungarees tutorial!
this is a tutorial for furby dungarees! these are suitable for any furby that has doesn’t have it’s ears entirely attached to the body (the straps go trough the ears!), that’s also why i don’t have any exact measurements in this tutorial.
i tried my best to make this tutorial as clear as possible, but if you have any questions, feel free to comment them of message me!
also a disclaimer: i am very new to sewing, and all the techniques. feel free to use other techniques if you think they’ll work better!
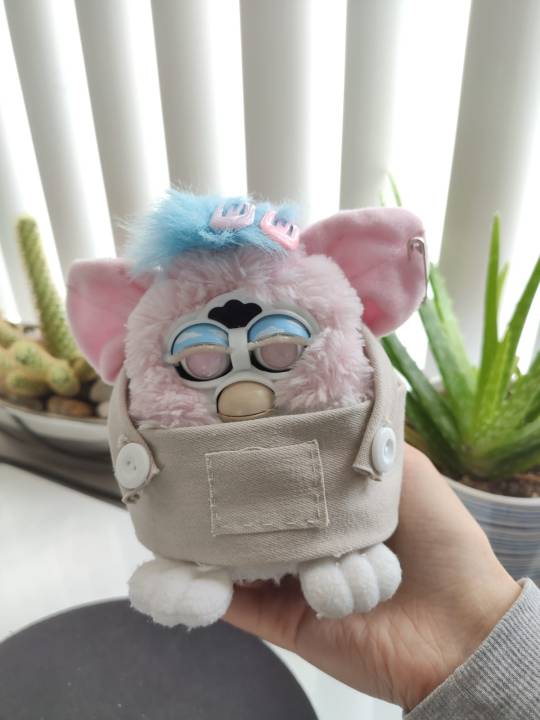
for this tutorial you will need:
- any fabric
- scissors
- needle and thread or sewing machine
- two buttons
- 2 sets of snaps (or buttons if you don’t have snaps)
- your furby
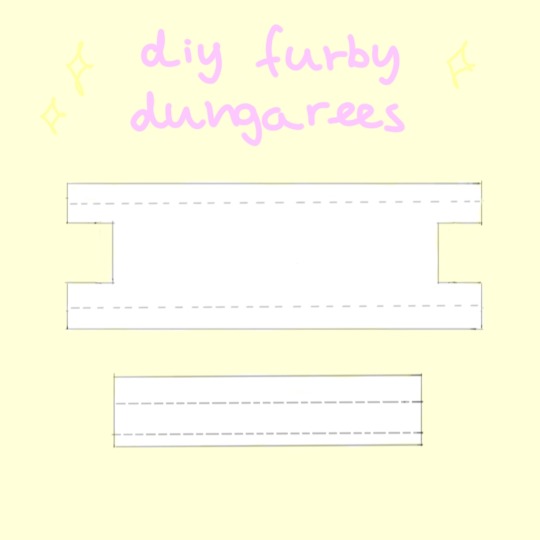
let’s start with the body of the dungarees:
the width of the body is the width of your furby + roughly 2 centimetres,
the fabric should overlap and you need this extra bit of fabric to attach snaps to later on, this is how we will close our dungarees in the back.
you can decide the length of your body, mine cover the entire belly of my furby (from the peets to just below the beak), but you could make it shorter (or longer) to your lliking. make sure to add around 1 cm of extra fabric to each side, we will fold this inside later, for a nice seam.
the body piece will have a gap on both sides, this is where the tail of your furby will poke out. try cutting a small part out of the fabric on both sides first and see how it fits. if the gap needs to be bigger, keep cutting small pieces off until it fits perfectly around the tail. if your furby has manes instead, you can skip this part.
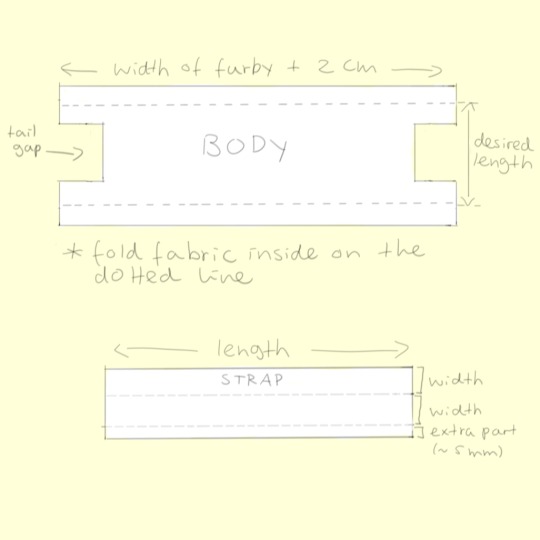
*** i would recommend finishing the body first, before starting the straps***
for the straps, let’s start with the width. i chose a width of 1 cm. but because we will fold the fabric in half, to create a sturdy and smooth strap, the total width of our fabric will be twice your desired width + around 5mm of extra fabric.
so that means mine are 2,5 cm total.
the length of the strap will be a little tricky to measure. with a measuring tape, roughly measure from the spot where you want the straps to start and end. (this might be easier if you make the body first and put it on while measuring). for reference, i included a picture of how the straps should look in the back.
make sure you make the straps longer than needed.
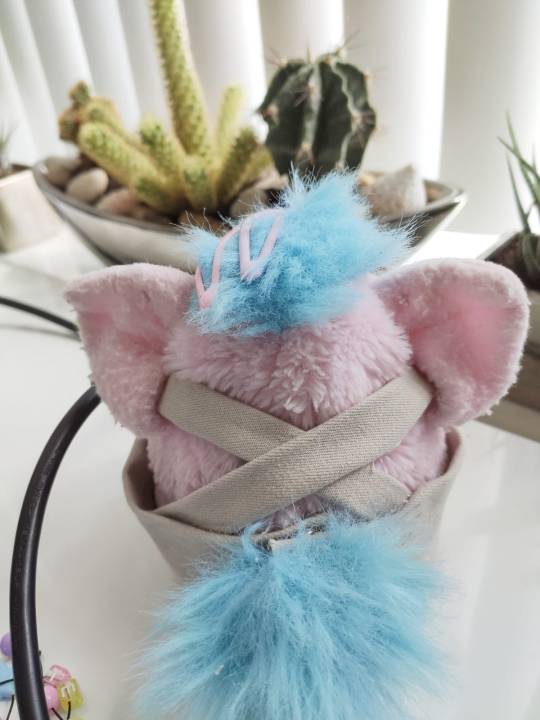
the next step will depend on your fabric: if you have a soft and thin fabric, fold the cut out piece with the wrong side outwards. after stitching along the length with a running stitch you will be able to turn it inside out, this way you won’t be able to see the stitching.
if you have a sturdy fabric like i do, sadly you won’t be able to turn it inside out. you’ll have to fold your piece with the right side outwards, and stitch along the length.
fold the fabric so you can’t see the seam / stitching.
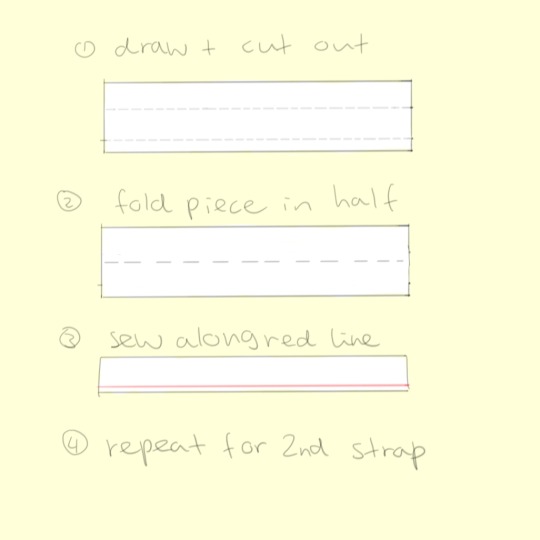
after you’ve cut out the body, fold on the dotted lines and make a crease.
now it’s time to add snaps (or buttons) to the back. (on the image i accidentally wrote studs instead of snaps oops)
this part might be very confusing, so i’ll try my best to explain. lay your fabric down, with the front facing up and unfold it. on the left side, attach one side of the snaps in the same position as in the drawing.
the other side of the snaps have to be attached to the back of the fabric (aka the wrong side). these will go on the part that will be folded over, like shown in the drawing.
after the snaps are attached, fold the fabric again on the crease, and when you close the dungarees with the snaps, it should look like the picture attached further below.
now, it’s time to attach buttons to the front of the dungarees. this is how you’ll be able to put the straps on and take them off.
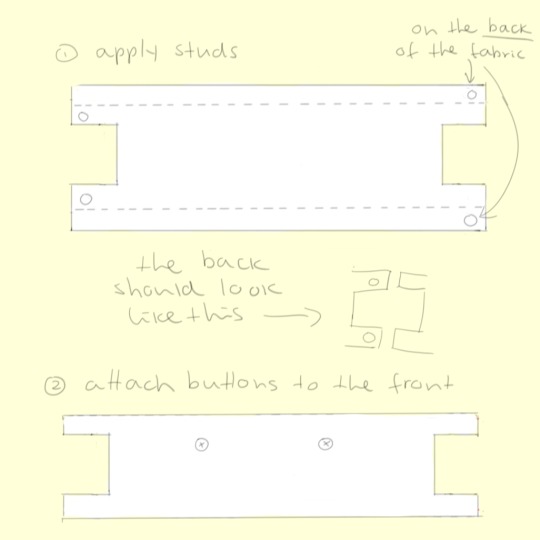
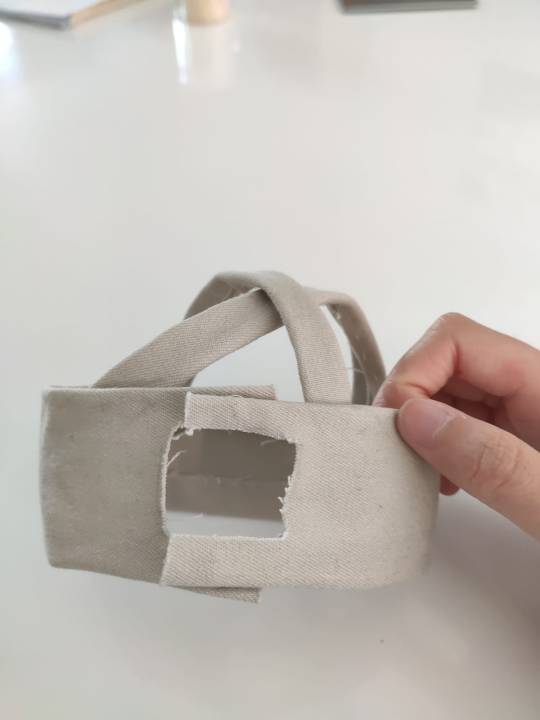
make a hole in at the end of the straps, and put the buttons trough the holes.
it should look like the picture below.
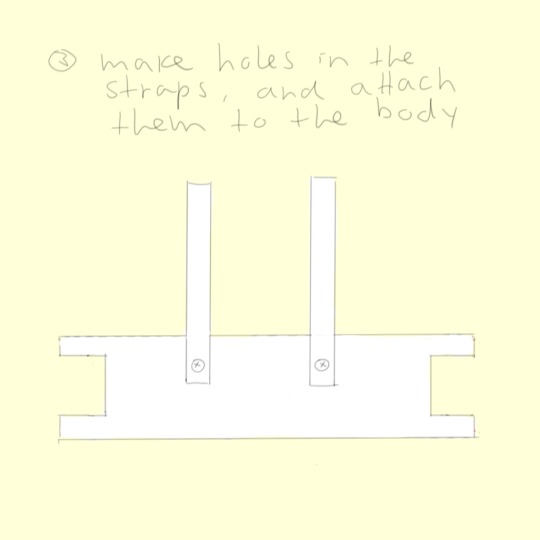
now put the dungarees on your furby and put the straps trough your furby’s ears. tuck the end of the straps under the body piece, in the place you want and pin them down.
now you can either sew along the red line as shown in the picture below or, attach them to the folded over part. (i chose not to sew along the line as i don’t know how to use a sewing machine and my hand stitching isn’t the neatest.)
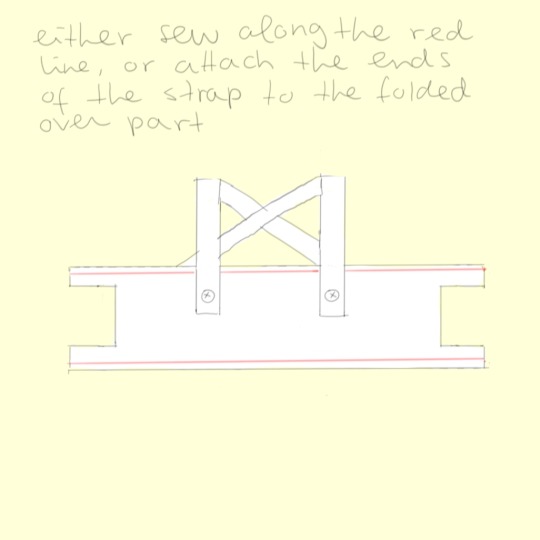
add a lil pocket to your dungarees if you want to, and they should be done!
i am not the best at explaining so i’m sorry if this tutorial was messy / hard to follow. feel free to ask any questions you have or leave feedback! if you give this tutorial a try, let me know how yours turned out!
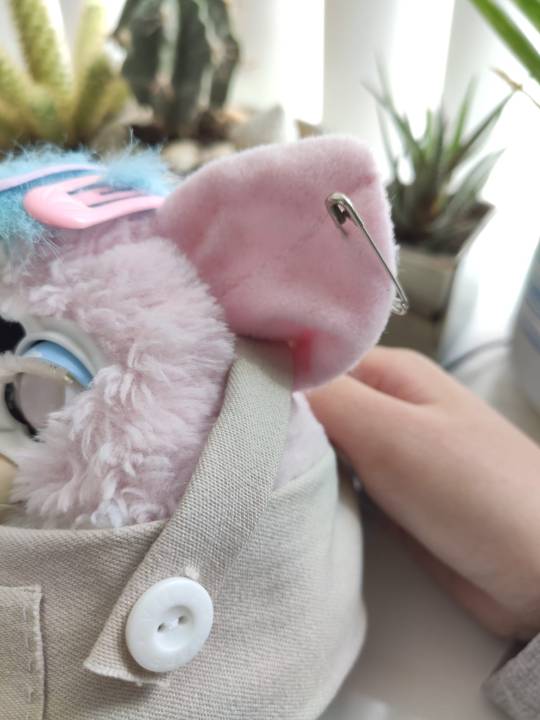
love, jessy, monstertruck and bong water <3
#furby#all furby#allfurby#safefurby#safe furby#furby tutorial#furbytutorial#custom furby#furby baby#furby accessories#furby diy#diy furby#furby 1999#furby 1998
784 notes
·
View notes
Note
Did any of you guys had any difficulties when designing the characters? Sometimes I love a character I designed but something was missing, yet, I sometimes never was able to figure out what was wrong.
The most difficulty I had was figuring out how I wanted lions to look in general. Because I definitely wanted to make sure there was a distinction between my lions, and lions in the TLK universe and the MP universe (and maybe the Kimba universe, but they're pretty toony so that's less of a problem)
Like "how can I do the tails differently" or "Do I want to give them ear fluff" or "How accurate do I want to make the noses and how much time do I want to waste on precise anatomy" LOL
I don't personally have a hard time designing characters so much as "What does this character want to look like"? Sometimes characters will tell you themselves, in the form of how difficult it is for you to draw them haha
What can be said about their story just by looking at them? That's the big question that I keep in mind when I design a character.
For example, I know what I wanted out of Hope's design. I wanted her to look the part of a protagonist, by not having her design be too "out there" but also without making her look bland (and without making her look too much like Kiara cuz that was a struggle LOL But it turned out giving her brown colors over gold colors and different eye shape really helped) I knew I wanted her personality to be sweet, and I wanted people to know that by looking at her, so I gave her round features and cute little freckles. I also wanted to make her interesting without the need of giving her a tuft of hair. I LOVE hair tufts on lionesses, but I also like the idea of making her interesting to look at without one (she does later get cheek fluff when she gets older tho) I also kept in mind that since she's a sapphic protagonist with a comparably more masculine romantic interest, I wanted to subvert some tropes and have Hope actually be bigger than Storm, rather than the other way around (not that there's anything wrong with a bigger stronger buffer sexier butch, it's just not what I wanted to do here. Butches can be short.) And then the thought process of what kind of physical disability I wanted her to have, since that was part of the initial premise. We wanted it to be something she was born with, but something she could realistically still trek for miles with. And what sorts of injuries would she receive and how would those injuries affect her appearance, if they affect her appearance at all?
That's also not getting into a character's culture and what their appearance means to them.
Its a LOT to consider, but it's ultimately questions you can ask yourself when designing a character that should make life a lot easier! It also doesn't hurt looking up tutorials on character design, specifically ones where the artist discusses their process. It can be very helpful because while everyone's style is different, there's some things that are universal.
16 notes
·
View notes
Text
NPR: rendering manga panels in MMD
Welcome to the manga stylization tutorial! Here, I’ll cover the core of this style for MMD as well as its usage.
Content index:
Introduction
Effects
Manga Resources
Rendering panels
Building Your Manga Panel
Credits
1. INTRODUCTION
It isn’t any news that many people underestimate MMD’s capabilities and power, not to mention how unexplored the stylization areas are. 3D rendering isn’t only about realistic and semi-realistic rendering! MMD excels in stylization because we have many cel shaders, coloring and screen texture effects in our arsenal.
With manga it isn’t any different! We all know all mangakas have their own styles and this applies to us, MMDers. I’ve been experimenting with manga stylization on and off, trying to find good effect combos.
“But ryuu, why would I want to make manga in MMD??”, you may be asking yourself. And I’ll present you some advantages of doing so:
A viable option for anyone who doesn’t know how to draw, like me.
Unique visuals! A 3D manga looks beautiful, creative and unique when done right.
Think out of the box and add fan panels of your favorite characters to your portfolio!
Since MMD models are very anime-ish, it’s so much easier to make “legit” manga looking panels! Comic theory and post editing are required, but worry not! I’ve got you covered.
2. EFFECTS
If I was to compile some of my manga renders, I’d have an extensive list of effects that produced pleasing results. I’m going to write down every one I can remember, render by render.

Effects: a-toon, excellent shadow, ik hatching, o color halftone 3p, o monochrome, croquis 改, draw style, o selfoverlay, o dlaa, o disalphablend.
Effects: a-toon, drawstyle, o monochrome, o dlaa, o disalphablend, o selfoverlay, croquis 改.
Effects: ray toon, lightbloom, ik hatching, croquis 改, powerdof, o selfoverlay, o color halftone 3p, postrimlighting, o monochrome, snapshot, fxaa.

Effects: ray toon, o monochrome, croquis 改, ik hatching, powerdof, o color halftone 3p, ik watercolor, o selfoverlay, snapshot, o tonemap の改変, fxaa.
Effects: ray toon, croquis 改, o selfoverlay, ik hatching, fxaa, snapshot.

Effects: adult shader, croquis 改 v2, o monochrome, ik hatching, hg sao, o bleach-bypass, o full alphatest, air, clarity.
Did you see how diverse the manga style can be? It’s all up to you how you want to stylize them! The key is making it black and white and adding a toon shader or a very basic one like adult. Don’t forget the contrast work!
If going for Raycast, make sure to use no more than two additional lights. I always add a directional light and go for it. NPR isn’t heavily shaded. If you stack lights, you’ll have double toon shading, which can look weird. I only advise using Raycast if you know what you’re doing.
I know there’s a manga shader, but I personally dislike it, since it doesn’t work well with the models I use.
Also, if you decide to use any bloom effect, make it subtle! We don’t want to give away every 3D aspect of your render, do we?
3. MANGA RESOURCES
So let’s say you want to make a manga panel in MMD. First of all, we need to look for the right resources, so you can post edit the renders for a reliable look. If you aren’t familiar with post editing, I recommend training it and looking at 2D manga scans for reference. The software I use is GIMP, a free and open source one that does as much as Photoshop. It opens Photoshop brushes, so no need to worry about that.
I’ll link a handful of manga resources for post editing!
Speech Bubbles
Manga speech bubbles 3 (image pack)
Manga speech bubbles 3 (GIMP brush)
Tails for speech bubbles
Shaky speech bubbles (GIMP brush)
Shaky speech bubbles (image pack)
Action bubbles (GIMP brush)
Screentones
Digital screentones
Action lines
Action lines 2
Various resources
Shoujo effects (brush)
Tone stars and shapes redux
Manga onomatopee for MMD
Regular fonts
Fonts for editing manga
Manga Temple
Augie
Felt
Wild Words
SFX fonts
Another
Big Fish Ensemble
TrashHand
Vnhltfap
4. RENDERING PANELS
First, we need to find our resolution! A panel can be 1700 x 2400, then you can copy the premade layouts for positioning. In my “oh, you handsome devil!” panel, I rendered each image as the default 1920 x 1080 and resized them later to 1570 x 883 for good margins. Thin or thick margins, that’s up to you.
Important note: when composing your scene, think of the final layout as well! Use the rule of thirds and try picturing where the speech bubbles and other effects will go. Planning is vital when making comics and it’s ok to render many tries before the final image.
Pick a nice set of effects that match your manga style and render! Dynamic shots look awesome with higher perspective. Textures like color halftone greatly improve your manga aesthetic and contrast, but careful not to exaggerate.
For “oh, you handsome devil!” I rendered two panels: one with Soma, one with Yagami and Kaito. The hatching there gives some shading to the models, since I loaded Adult Shader and Hg SAO to emphasize Yagami’s face.


5. BUILDING YOUR MANGA PANEL
Now in GIMP, I loaded the finished image to show you the rule of thirds guides. Notice how Yagami’s face is the focus, while Kaito isn’t left behind, as he’s close to the intersections. Also, there’s enough empty space to place a speech bubble between them.

Now let’s talk about basic comic theory! When placing text and speech bubbles, the general rule is to avoid doing so near the edges. This makes reading much easier and focused, unless a difficult reading is intentional. Always imagine an area that limits the edges of your focus so you know where to write your text.

Since you use MMD, I believe you’ve already read at least a manga panel in your entire life. A manga is read from right to left, not from left to right like in western comics.


This panel was built using the basic theory. In order to make the text readable, I made it white, added black edges and a slight blur under it. Contrast between text and image is very important in manga for straight forward reading, especially if your render is complex and has many distracting elements.
Back to Yagami and Kaito, the blue marks show where I placed the speech in the finished panel. Can you see how they fit within the red area? The reader can easily pay attention to both models and text. Kaito’s “sure” was placed near the red edges for it was a minor commentary rather than speech.

All you have to do now is to place the speech bubble and write within it! Make sure your text is big enough for the readers. This guide about manga editing has useful tips and free resources for everyone. Feel free to add any other manga effect you’d like, go wild!
Now with Soma, these are the guidelines. It was rendered with enough empty space for background customization. I later added shoujo effects and faded edges with vignette to show he’s in Yagami’s imagination. A daydream if you will! Everything is subtle as not to stray from our objective.

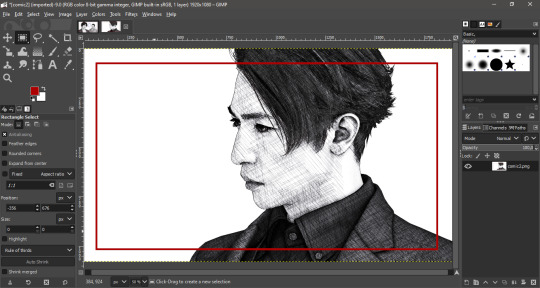
Now when putting everything together in a panel, fit the image within the margins and add a somewhat thick black edge on each. You can position them first, press CTRL + A to select the entire layer and stroke the selection. The line width I used was 15 px.
6. CREDITS
Valentine’s Day Kiryu
Yakuza 0 Kiryu and Majima
Masked Sugiura
Urban Yagami
Half-dragon Kiryu
Oh, you handsome devil!
2 notes
·
View notes
Text
crow tutorial
Ever wonder how to make a fake crow? Sure you have! We all need more fake crows in our lives, so here’s how you can make your own.
Photos by Alex Em
Step 1: Get foam and a knife!
If you’re like me, you can ask your boss at Target for Styrofoam packaging and then nervously laugh when they ask you why. If you’re not like me, you can purchase foam blocks at craft stores.
Cut out a block from the foam larger than the size you want your fake crow to be. Never measure anything if you live fast and furiously like me, but remember you can always cut away more if it’s too big. Using a marker, draw a simple bird body shape from the side and front, like so. Prepare yourself because it’s about to get messy.

Step 2: Carve the body
Go grab that paring knife from your kitchen that your mom keeps telling you not to use for your craft projects and saw away parts of foam to create a crow body using your lines as a guide. Pieces of foam will fly away and fall everywhere and be impossible to pick up. Line your work surface to catch shavings while carving if you want less...fun.

Step 3: Smoothing
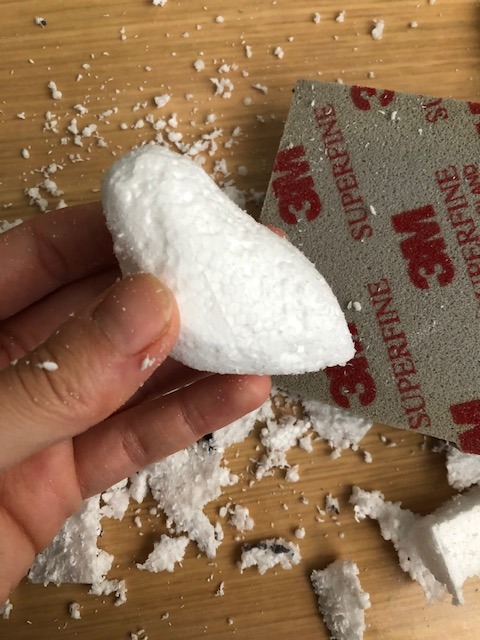
You can skip this step if you like but I prefer to sand the foam body of my birds with a superfine piece of sandpaper. It helps the feathers to lay flat later. Plus it looks nice. Look at it! It’s so fine it blows my mind!
Step 4: Sculpt beak
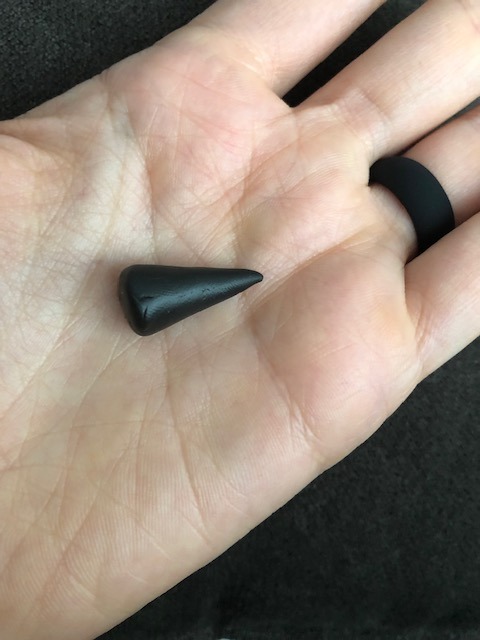
Polymer clay is great for making beaks. (Trust me, I know, I had to make 9 of these for various reasons!) Roll out a cone of it for your crow. You can add nostrils and a line for the mouth or just leave it like this. Stick a wire in it and bake according to package instructions. It also helps if you put a band on your ring finger to discourage people asking you to date them. Life tip.
Step 5: Glue beak
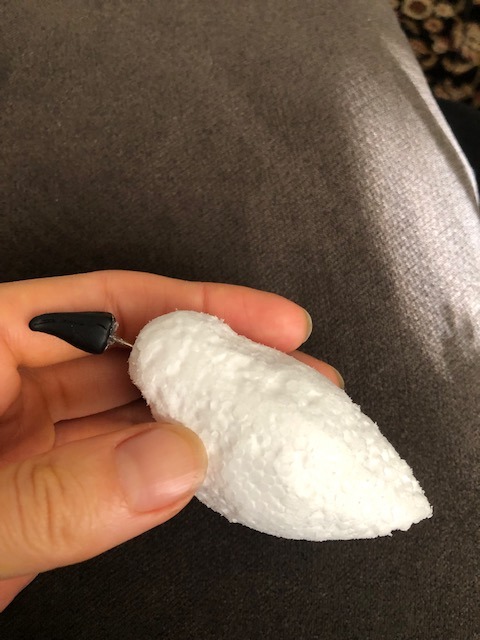
Hot glue or super glue your pinned beak in place. That’s it for this step.
Step 6: Feathers
After acquiring fake black feathers and Scotch glue spray from Michael’s you can feather these babies outside. Again, prepare for a mess! You can use scissors to cut tiny pieces of the feather fluff and adhere them to the crow bodies with tweezers. Cover the entire body with fluff and use larger feathers for the wings and tail.
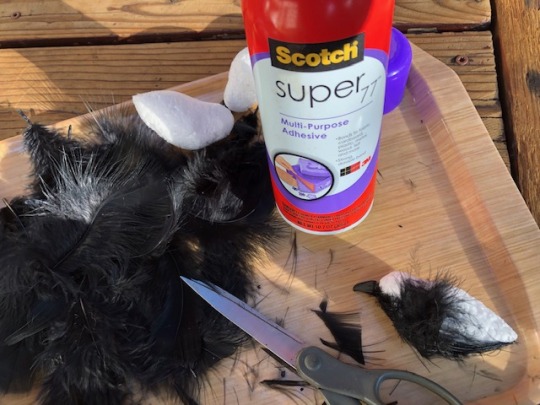
Step 7: Crow feet
The challenge-iest bit is the feet. Soldering a L shape of wire to a separate V shape of wire to make a simple crows foot takes practice. However, once you’re done you’ll be so much better at soldering! Also throw away that black wire you bought before realizing you can’t solder painted metal.
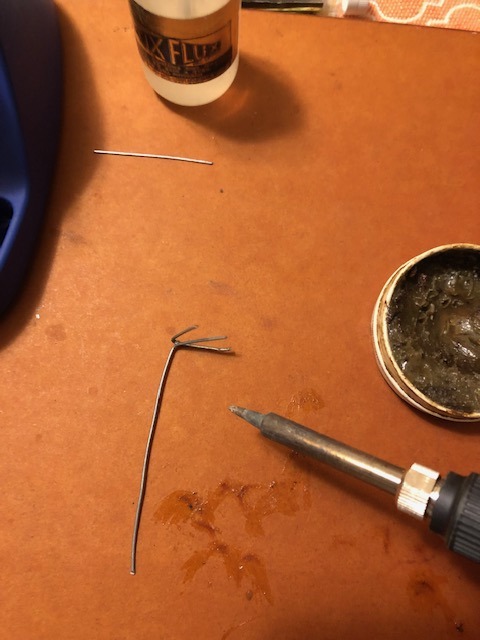
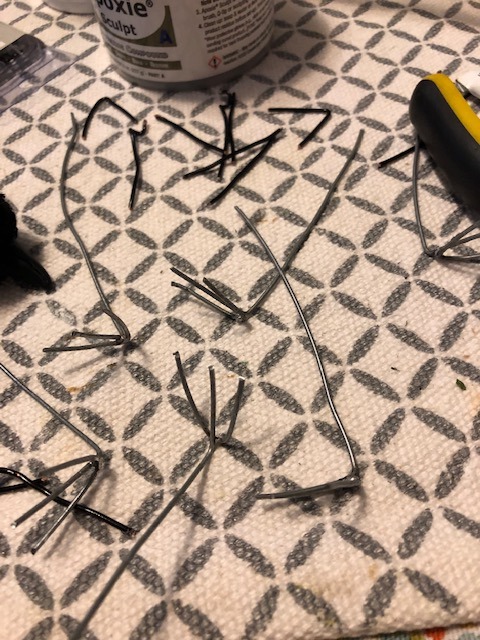
Step 8: Paint the feet
...and forget to take a picture of it for that fake crow tutorial you were making. It’s easy, though, just brush the feet with watered down black acrylic paint and let it dry. Repeat for extra coverage and spray with a sealant for protection.
Step 9: Glue it together and admire your work~
Once the feet are dry, you can use the smallest black brads Michael’s has to offer to use as crow eyes, and E6000 glue to keep everything in place. Once assembled let the glue dry, then your mini murder is ready to take over the world! All that’s left is to give them to a friend and go take a nap. Happy crow making!
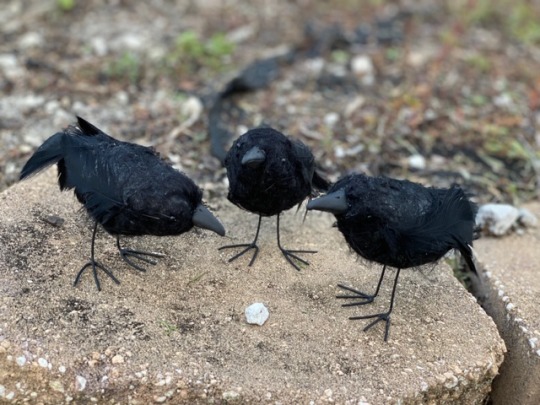
373 notes
·
View notes
Note
Oh my god i lov ur art so much!! Ur so good at drawing ppl!!!i lov how u draw DT so much i could cry!! Would it be possible to show ur art process?
Oh my gosh thank you!! No one has ever asked for my process before. It got pretty long due to all the photos, so check out my art-process-slash-tutorial under the cut!
1. So the first step is, of course, figuring out what I want to draw. This is often the hardest step… but not for the last few months cause I always wanna draw DT lol.
2. Sketch the shapes and the “skeleton.”
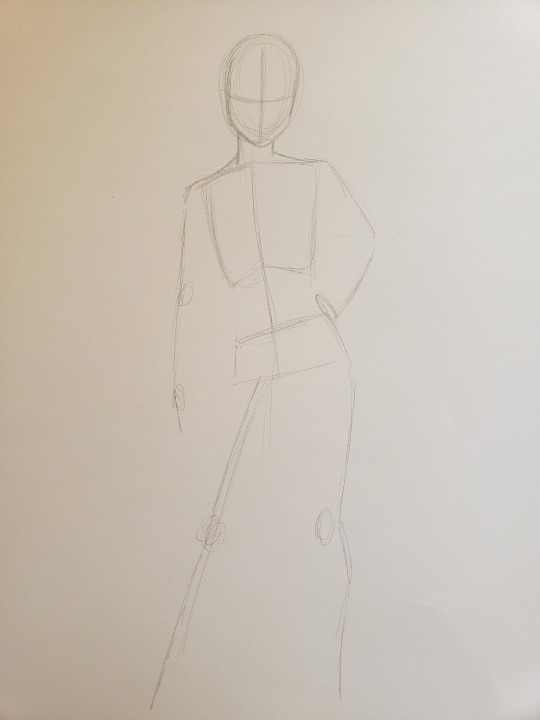
I pull out my trusty mechanical pencil and make a loose outline of the figure.You’re not really supposed to use mechanical because they makes dark lines and the pressure is hard to control. Teachers will tell you to use a hard graphite pencil for light, easily erasable lines. If you’re using this process as an example for some reason, do as I say not as I do lol.
I like to start with an oval for the head and work my way down. You’re not supposed to do that either. Teachers tell you to start with the “line of action” cause it helps make the pose cohesive and improves composition. I’ll do that when I’m going for a non-static pose, Teach, get off my back.
2. Flesh out the figure.
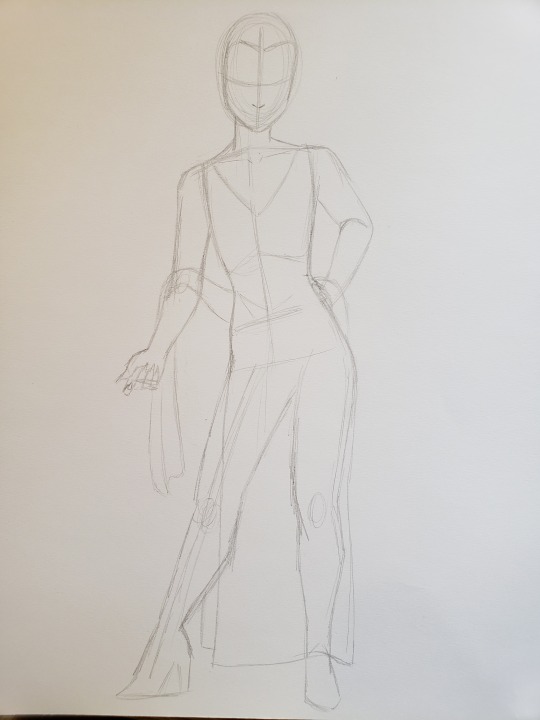
Here’s where I make the lines. They’re called contours but they’re the lines of the drawing. That’s all. DT might be tricky for some artists because they’re very androgynous. I give ‘em some hip, shapely leggy, no boobs, wide shoulders and a snatched waist waiT I FORGOT THE FUCKING TAIL HOLD ON I GOTTAJ UST HOLDO N A MINUTE WAI
3. Add detail.

This is where I work on the facial features and things like jewelry and clothing design. I count it as a separate step because I have to lean in reeeeeal close to get the little details right, and it usually takes a lot of erasing before I’m satisfied.
4. Ink it.
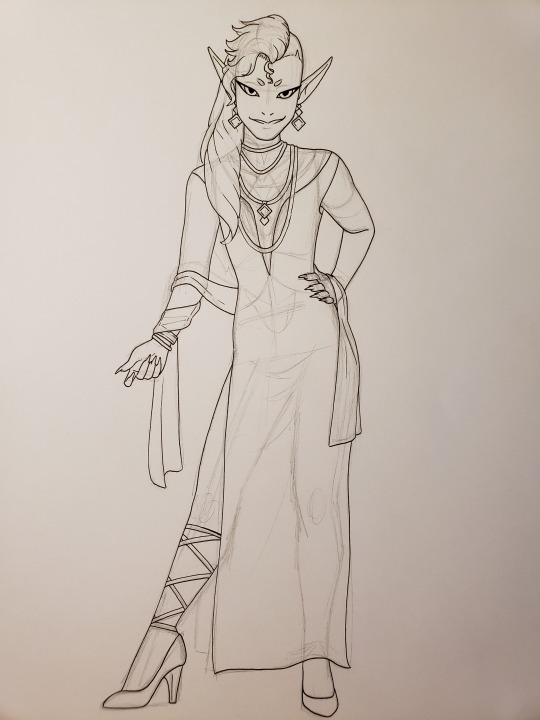
Once my pencil drawing is sufficiently finished (and sometimes earlier shh), I start inking it with a felt tip pen. Some people use this thing called VaRyInG LiNe WiDtH or whatEVER but it’s easier to I like a nice thin line all throughout the drawing so the details don’t get lost. I use a .1 or .05 tip pen. For tiny details, I like to use a .005 if I have one! But I don’t have one :’(
If you’re the artist’s girlfriend, you have a step at this stage!
4.b. Watch your future wife slave over the drawing for three days without adding the tail and SAY NOTHING.
5. Erase the pencil.
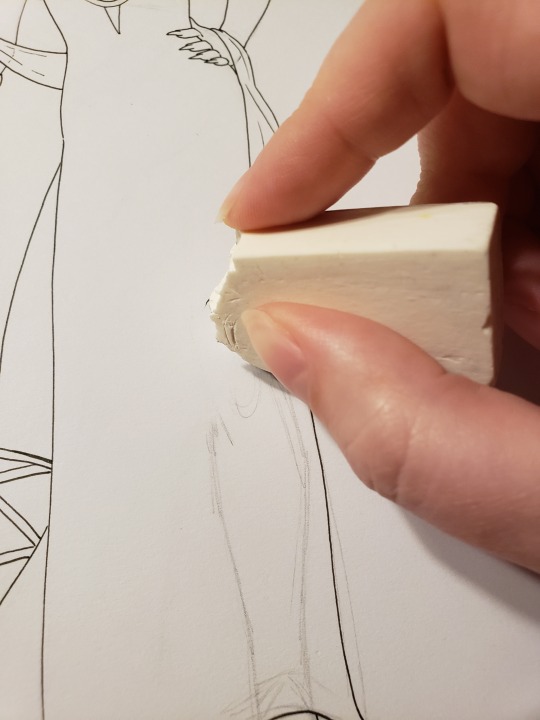
KEY: the pen must be dry. Felt tips are supposed to dry fast, but don’t be fooled. Give it at least a full minute. Trust me. Then CAREFULLY run a big eraser over the whole drawing to get rid of the pencil sketch underneath. Hold the edge of your paper in place and go slow, because the eraser WILL catch on the paper and it WILL fold your beautiful line drawing in half.
6. Clean up the lines.
An optional step. If I make some lines I’m not satisfied with, all is not lost. I use my handy white gel pen to clean them up. I simply draw the new line, and go over the old one with the gel pen.

Note that this doesn’t really work if you want the new line to be on the inside of the shape. Markers don’t like to go over gel pen so good. I’ve tried. Also doesn’t work if you’re planning to add a background for the same reason.

Et voila! You can hardly even see where the old line was.
7. Whip out the Bucket of Assorted Alcohol Markers™ and do the flat colors.
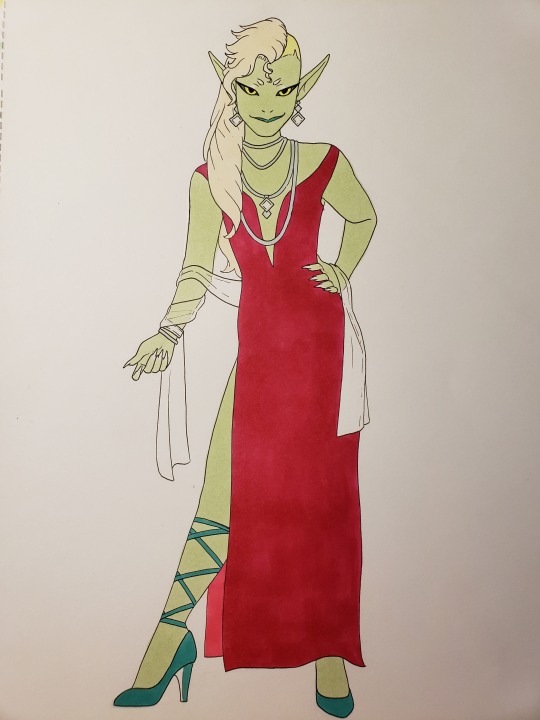
Everything I’ve put on this blog so far has been colored with alcohol markers. They’re long-lasting, they’re smooth, they’re printer-perfect, they’re outrageously expensive, they’re sometimes available at wish.com for a fraction of the store price, they’re great. When you do the flat colors, you want to put down the lightest colors in the drawing first. You can’t layer light colors on top of dark. They won’t show up and the light marker will absorb the dark color. Basically, do the highlight colors first. They might look bad together. That’s OK. These aren’t the final colors of the drawing.
If you don’t have your own BoAAM™, no problem. Simply borrow your sister’s in exchange for a stint with your Nintendo Switch.
The next step is to add the shadows. If you’re like me, and you’re just getting back into art after neglecting it for a few years, don’t try to do something complicated like back-lighting or a sheer scarf on top of a dark material. That’s really the worst decision you can make.
8. Add shadows that indicate back-lighting, and keep in mind the sheer scarf on top of the dark dress will need all new colors for every layer of shadow you choose to add.

A whole book could be written on how to color shadows, so I’ll try to keep it brief. If the light source is warm colored (like sunlight or your average lightbulb), the shadows should be cooler. If the light source is cool (like, I don’t know, the neon sign at your favorite club), the shadows should be warmer. Here I have light green and hot pink for the highlights; I used blue-green and purple for the shadows, respectively.
You might wonder why I color the entire shape with the lighter color if only a little bit of it shows through. There is some layering effect with markers. The purple I used on the dress was really QUITE purple - but when put on top of the hot pink, it looks more like a dark pink! Essentially, layering colors makes the end result more cohesive.
And hey don’t forget the tai– fuck.
9. Add some more shadows, and
10. Add the finishing details, because I forgot to take a picture in between these two steps oops.

If you’re going for intense lighting, you’ll want high contrast. That means using a very light highlight and/or a very dark shadow. So, I added two (2) more layers of shadow. It’s most noticeable on the dress - you can see the hot pink at the edges, then the pinkish-purple, then the dark purple, then the DARKER purple that accentuates the waves in the fabric of the dress.
Now to finish off my drawings I whip out the white gel pen again. This is SO useful. It can go on top of (dry) marker or pen or whatever and it’s small and precise. Here I used it to add shinies on the eyes, shinies on the jewelry, highlights on the hair, and sparkles on the dress. It makes things POP. I seriously cannot recommend a white gel pen enough if you do traditional art.
11. Ah fuck I forgot the tail.
DRAW the fucking tail and TRY to remember which of your 24,124 colors you used on the rest of the skin damn it was it hydrangea blue or phthalo blue
12. Scan it. Or, if you’re like me and are stuck in a hotel while your home repairs are taking pace, take a picture with your phone. Mind the angle - make sure your camera/phone is parallel to the paper or it’ll get distorted.
13. Digital editing. Play with the exposure and contrast and whatnot in your phone’s photo editing software until you’re satisfied with the result.
15. UPLOAD. DONE. CELEBRATE.
72 notes
·
View notes
Last Seen Blogs

xhalgr
y r u here
1closetedsapphic1
꧁☬ 𝒾𝓁𝓁𝒾𝓃𝑒 ☬꧂

gnarlycism
Welcome Back.

2blissofbaking
Pooja Khanna