#beta text editor
Text
Beta Editor Overview
This post was originally made on January 7, 2023, and was last updated on January 14, 2023.
After seeing quite a few posts expressing confusion/frustration over the beta editor, trying to understand new features and find where old options have moved to, I thought I'd write up an overview of the new editor, showing the various changes it has from legacy.
My main goal is to show people that the new editor not nearly as bad as they may have heard. You'll have a few days of weirdness and confusion, and then you'll be used to it. The beta editor does have some bugs... but so does the legacy editor. We've all just gotten used to legacy and know how to work around its quirks. After a couple weeks with beta, you'll be familiar with it and know how to do the same.
FAQ
I'm putting this part above the read more to quickly answer the questions I see asked most often.
How do I cut posts with the new editor? — You need to get an extension called XKit Rewritten and use Trim Reblogs. Once you have that installed, save the post to your drafts and click the scissors icon along the bottom of the post. This will open a window that allows you to remove earlier reblogs. If you run into funky issues, see my ginormous post here.
Where is blockquote? — Blockquote is now called indented. There are two ways to reach it. Option 1: select your text, open the dropdown menu, and choose indented. Option 2: type / on an empty line, select indented, and type your text.
Where is small text? — Select your text and click the small S in brackets. I recommend doing this at the end of writing your post, as it can be finicky otherwise. The old keyboard shortcut for small text does not work anymore; the new shortcut is CTRL/CMD + COMMA.
Where are bullets? — Select your text, open the dropdown menu, and choose bulleted list. You can also type / on an empty line and select/type bulleted list. Additionally, you can type * and a space on an empty line to autoformat to bullets, or use the keyboard shortcut CTRL/CMD + SHIFT + 8.
How do I disable reblogs on a post? — Click the settings icon in the top right, click the dropdown next to "Who can reblog?" and select "no one." (Please note that while it says those mentioned in a post can always reblog, I've found this to be broken. At the moment you should only disable reblogs if you don't want anyone reblogging it.)
Why does adding a gif to a post include the URL? — Inserting an image via link will automatically include that URL underneath the image in the final post (though it won't display in the editor). You can remove this by hovering over the image and clicking the chain link icon in the bottom left. Select the URL in the field there, delete it, and click Done.
How do I add alt text to an image? — Add your image, hover over it, click the three dots in the bottom right corner, and click "update image description."
Adding Elements
When you click on an empty line, options for things to add to your post will appear on the right, similar to legacy.

In order, these are:
Image
Gif search
Link
Audio
Video
Read more
All of these work almost exactly as they have previously, except for adding an image. Clicking that will give you this, which resembles a standalone photo post of the old format.

You can then upload directly from your computer, or paste a URL, as before. If you insert an image via URL, that link will be visible just below the image in your final post, though it won't show up like that in the editor. It'll look like this.

If you don't want this, make sure to click the link icon at the bottom left of the image and delete the URL there.
Back to the image you added in the text editor! Hovering over the image will give these options.

The squares icon in the top left lets you click and drag the image, and you can drag images next to each other to stack them horizontally. The X in the top right will remove the image from your post. The link icon in the bottom left shows the image URL, and will only appear if you inserted the image via link. And the dots in the bottom right allow you to add alt text to your image -- click the dots, then click Update image description.

Formatting Text
Now! If you type up some text and then select it, formatting options will pop up. This is similar to legacy, but now there's a dropdown menu.
Here's what's in the dropdown.

Here's what they all look like in a post.

Regular is plain text. Bigger is the equivalent of the headline option on the legacy editor. Biggest is the equivalent of the main title, but you can have more than one in a single post now.
Quote turns text into a serif font and increases the font size. If you type up a long quote, the font size will shrink.
Chat switches to a more computer-looking font.
Lucille increases the font size and is a cursive font.
Indented is blockquote. It looks a tiny bit different on the dash now, with some more spacing on the top and bottom, but it's functionally the same.
Bulleted and numbered lists are self-explanatory. You can also start a bulleted list by starting an empty line of regular text with * and a space, and a numbered line by starting an empty line with 1 and a space. Additionally, the keyboard shortcuts CTRL/CMD + SHIFT + 7 for numbered list and CTRL/CMD + SHIFT + 8 for bulleted list still work.
You can also access these same options (and some others) by typing a slash onto the start of an empty line. A menu will pop up, allowing you to either click the one you want or simply type the one you want and hit enter.
If you want to quickly add a title, an indented blockquote, or anything like that, this is the fastest way to do it.
Hopping back to the rest of these options now!
To the right of the drop down, these options are:
Strikethrough
Bold
Italics
Small
Link
Color
Most of these are self-explanatory. Keyboard shortcuts for bold and italics work as before. The old keyboard shortcut for small text no longer works, but CTRL/CMD + COMMA does.
Link works the same as it always has, and the keyboard shortcut of CTRL/CMD + K works as well. Additionally, if you have text selected and just paste in a URL, it will insert as a hyperlink from that selected text.
Color lets you change the color of your text to a few presets. Just click the paint bucket, and pick the color you want.

Post Settings
Back out to the main editor now, here's what under the settings icon in the top right.
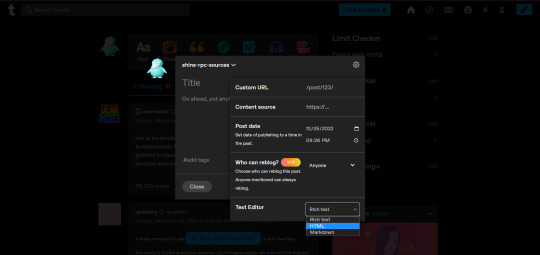
Custom URL lets you set a custom URL for your post, if you want it to be something other than a string of numbers.
Content source is the source link and works similarly to how it did in legacy.
Post date is not the scheduler! That's under the post button dropdown and is fairly straightforward. But this option lets you backdate a post, setting the date to sometime earlier than you actually made. Gonna be completely honest, I haven't used this at all and don't entirely see the point, but if you want to play around with it, there it is.
Who can reblog? Is one of my favorite features. Opening that dropdown lets you disable reblogs on your post. The reblog button will be grayed out on the dash. (After you've made the post, you can edit to turn reblogs back on if you need to.)
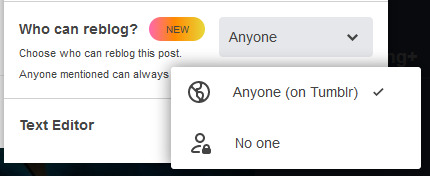
While this does say that anyone mentioned can always reblog, I've found this to be broken in my testing -- I have submitted a ticket to staff, so hopefully they're working on it. It would be a godsend for roleplayers, since it would restrict reblogs to only the partner that you @-mentioned in your starter and keep randos from reblogging your threads.
Lastly, the text editor lets you switch to HTML or Markdown for your post, if you prefer one of those. They are similar to how they worked in legacy.
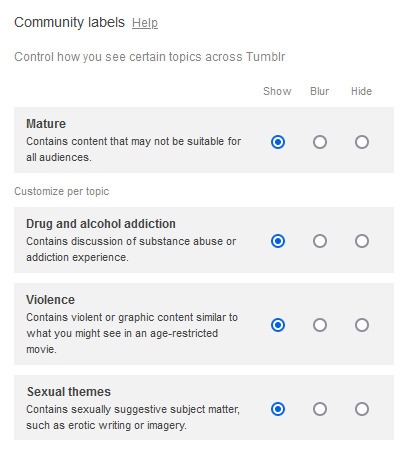
Community Labels
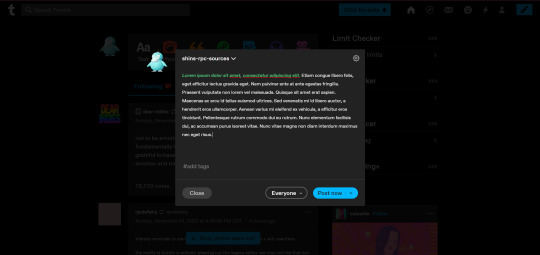
Along the bottom of the editor, you'll see the close button, the post button with the same dropdown as in legacy, and another dropdown that reads Everyone by default. Here's what that one looks like.

This is where you can manage your community labels, which is a fairly new feature from Tumblr. By default, your post will be marked as being for everyone. However, if your post contains any of the content listed, you should click to toggle that one on. This will hide your post from anyone who has that label switched off in their settings.
To check what you have on or off in your settings, look for this underneath your filtered tags:
Tags
Tags work the same as before. The only notable difference is that you can now edit inside tags without having to completely delete them. Just click on the text where you want your cursor to be.


You can rearrange tags with click and drag as before. Just be sure to click on the blue space around the text, rather than on the text itself.
Autosaving
The beta editor will automatically save your posts! It's autosaving whenever you see this pop up at the bottom of your screen, every minute or so.

If the editor gets closed unexpectedly, the last autosave of your post will go into your drafts. As someone who's lost many replies to unexpected tab closures, this is a godsend.
Just know that this only works if something external closes the editor. If you click the close button yourself, the post will disappear.
Miscellaneous Differences
You can now have more than one main title (Biggest) in your post.
You can no longer have multiple levels of bullet points.
You can no longer have paragraph breaks within your blockquote/indented text (though it's been that way for a while). To get a similar look in your blockquote, hold down shift and press enter twice (or use <br><br> in your HTML).
Previewing a post on your blog is still possible, but in a different location. Go to a post in your drafts, click the three dots in the top right, and click preview.
The editor will still remember your tags, but capitalization will be removed, which might be an aesthetic annoyance.
The editor will only suggest tags that start with your search. For example, if your ask memes tag is send me stuff ( ask memes ) — typing "send me stuff" in the tags box will suggest this tag for you, while typing "ask memes" will not.
When making or reblogging a post, your most recently used sideblog will be up by default; this is different from the legacy editor, which would always open your primary blog. Be mindful of things going onto the correct blogs!
More items may be added here as I spot them. Feel free to send any observations of your own if you have them.
Known Glitches
Because the beta editor is still known to be buggy, I thought I'd document the glitches I am aware of. I have reported these to staff using their feedback option and highly recommend that you politely do the same if these annoy you.
I've heard from several people that using CTRL/CMD + Z to undo caused their entire post to be erased. This has not personally happened to me, but I've heard it enough times that I feel I should share it here.
Using CTRL/CMD + A to select your entire post can be finicky. Clicking and dragging across the entire post is more reliable.
Typing with small text can be finicky and won't always apply correctly. I highly recommend applying the small text after everything is written, just to save some headache.
Generally, text formatting and paragraph blocks can behave oddly, especially when trying to select more than one. This is also a problem I've had with the legacy editor, but my experiences are not universal, so it may be a hindrance to you.
Customizing Beta/NPF Elements on your Theme
This is only for those of you who want to know how to change the way certain new beta elements look on their blog theme. If that's not you, you can stop reading here!
These are the elements and classes you want to customize in your CSS:
BIGGER - h2
BIGGEST - h1
QUOTE - .npf_quote
CHAT - .npf_chat
LUCILLE - .npf_quirky
RED TEXT - .npf_color_joey
ORANGE TEXT - .npf_color_monica
PURPLE TEXT - .npf_color_chandler
YELLOW TEXT - .npf_color_phoebe
BLUE TEXT - .npf_color_ross
PINK TEXT - .npf_color_niles
Colored text that isn't one of the default colors from Tumblr will just use <span> to assign a custom hex code, and can usually be targeted that way. You may need to use the !important property to override some of these default styles.
#beta editor#beta text editor#rpc#rpt#rph#*my stuff#*my tutorials#i seem to have branded myself the Beta Editor Gal at the moment so. leaning into it. here ya go
453 notes
·
View notes
Text
A USEFUL TIP WHEN USING BETA TEXT EDITOR
many of us seem to be struggling with a minor bug when it comes to typing out our responses on tumblr using the BTE. the biggest one i've come to notice is when we make our replies small. it's super common for the BTE to hardcore glitch and have the last couple of letters regular sized while the rest of the response is small. here is an example:
Lorem ipsum dolor sit amet, consectetur adipiscing elit. Aliquam eros leo, feugiat sit amet massa at, dapibus consectetur massa. Aliquam eget metus nec dolor efficitur sodales faucibus interdum dolor. Maecenas mollis justo euismod varius dictum. Etiam scelerisque erat vitae est hendrerit, a maximus justo tempor.
idk about you but i find that to be pretty annoying but that's just me.
another problem is that, for some odd reason, we're not able to do a form of "indentation" when typing out our responses on here via the BTE. why? idk. i really don't. now when i say "indentation" i mean like how one does when writing a research paper for school or writing out a fanfic. you know ... something like this:
Lorem ipsum dolor sit amet, consectetur adipiscing elit. Aliquam eros leo, feugiat sit amet massa at, dapibus consectetur massa. Aliquam eget metus nec dolor efficitur sodales faucibus interdum dolor. Maecenas mollis justo euismod varius dictum. Etiam scelerisque erat vitae est hendrerit, a maximus justo tempor.
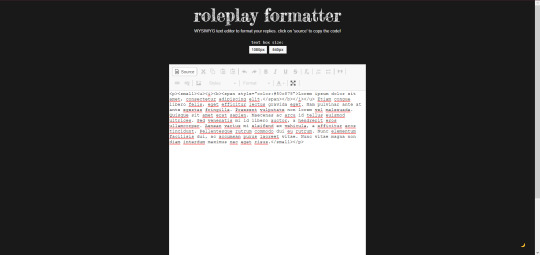
so what i honestly recommend doing is to just type all of your responses on Roleplay Formatter. the reason for this is because Roleplay Formatter is what many coders and graphic designers call WYSIWYG. for those of you wondering, WYSIWYG stands for What You See Is What You Get. this is very beneficial for those of us who code, do gfx, and whatnot because it helps us get a better idea on what to expect for the end result.
it's super easy to use and i honestly can't recommend it enough. really. and not only that but you can use hell of a lot more colors for your text through there than on here where you only get eight options to choose from. all you need is a website that gives you the color hex and you're golden. here's a couple of sites i recommend you using for getting color hexes:
encycolorpedia
color-hex
wikipedia ( a - f ) / ( g - m ) / ( n - z )
#rp tutorial#rpc tutorial#rp tutorials#rpc tutorials#rp#rpc#tutorial#tutorials#roleplay#roleplay community#community#roleplay tutorial#roleplay tutorials#how to#how#to#beta text editor#bte#beta#text#editor#wysiwyg#what you see is what you get#what#you#see#is#get
231 notes
·
View notes
Text

#tears of the kingdom#totk#legend of zelda#loz#the legend of zelda#screenshots are from kami nomi zo shiru sekai#begrudgingly used the ~beta editor~ to post this so that i could add alt text. sorry </3#stophope2k23
746 notes
·
View notes
Photo
autumn flowers in the warm light of the setting sun
#flowers#nature#floral#aesthetics#autumn#fall#original photography#photographers on tumblr#nature photography#naturecore#reupload because beta editor didn't let me upload as a picture but a text with a picture in it#1k#fav
2K notes
·
View notes
Text


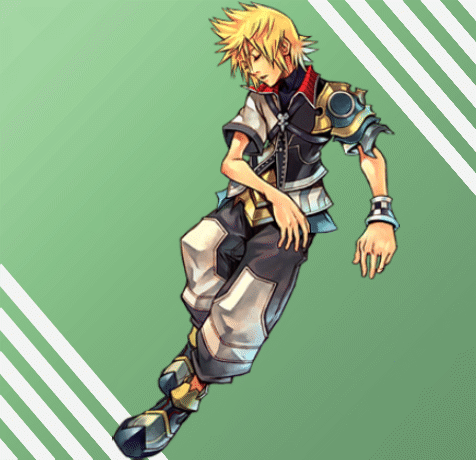
#kingdom hearts#kh#aqua#terra#ventus#kh bbs#first graphic!! im really glad i finally learned how to do this#i actually had to upload these twice because the formatting wouldnt work in the beta editor#but i had to make it work if i wanted to add alt text which i do with all my gifs so the formatting took so long fkhfdkjh
407 notes
·
View notes
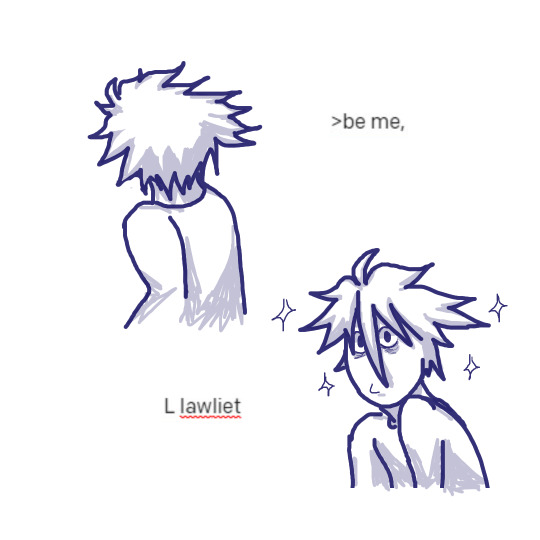
Photo


Link to the original post in the reblog!! Where’s that other post, though, the one about how Light should have used a gay porn magazine when he knew his dad and L had a camera on him because that actually would have been believable. because yeah.
#death note#l lawliet#light yagami#ai text#i'll do the alt text in a second too i had to switch off the beta editor so i could reorder the images the way i wanted them
444 notes
·
View notes
Text
@scriptrix-eclectica oh fun question in that in answering it we can find a) he's not and b) the mention of him being left-handed is an inference of gracie's that in turn, in retrospect, implies mordecai was anticipating being disarmed
b/c yeah he is always out here using his right hand for shooting or writing
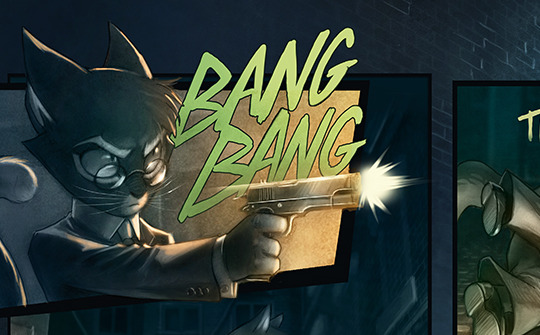

and the mention of left-handedness is this:

which, since he's not....a page or two later, gracie learns the gun he took off mordecai here is inoperable, and mordecai calls it auxiliary (backup / not the main one) and gets his gun from nico, which he then indeed shoots with his right hand. so what seems to have happened is: mordecai left his main gun with nico, left his sabotaged backup on him, and gracie found that gun somewhere on mordecai's right side, thus easier to draw from within a jacket with your left hand, which gracie notices b/c he's actually left-handed, implying in the absence of another gun that mordecai favors his left. gracie could've noted it as contradictory that mordecai just used his right hand to take off his glasses, but a) not like that proves he's Not left-handed, or ambidextrous, b) gracie's already generally suspicious, c) he's now more confident for having seemingly disarmed mordecai and d) it would also be a lot to Deduce like "ah so he must have taken another gun off his person, in anticipation of being patted down, and also disarmed, which means he plans to retrieve it, which means he also plans to attack us unawares" and e) it's pretty much too late even if he Was more suspicious about handedness; they're planning to kill him and if he made any earlier moves that still would've happened....but it's a fun teeny giveaway that Something's Even More Up than he thought
#without murder mystery monday updates it's just a friday evening's mordeposting lol#lackadaisy#the torment of having been hit with some connection latency Just as i see a Quastion that i'm like ooh i can readily research & answer that#trivia (handedness) And interpretation (of media)#then some latency in that typing up the text for this was laggy just to continue the pranks at my expense....#addendum: the pranks compound as i go ''uh oh a typo to fix'' and then More Latency such that it takes like 6 refreshes to do so#and even as i go to type it in the beta editor and its discrete blocks loading lag makes everything reshuffle like please
72 notes
·
View notes
Text
location: surprise me
for: @aurorabaystarter

"On a scale of same old, same old to being called out for someone's sexcapade gone wrong and having to cut a crying forty-six year old man out of a pair of handcuffs, how's your day been? Because mine's been a real fucking doozy."
#open starter.#thread.#aurorabay.starter#.nsfw text#feel free to assume connections if we haven't plotted yet my dudes#take the location anywhere u want#pls only reblog with beta editor. i don't have access to legacy <3
37 notes
·
View notes
Text
@realmyths (hoa) // continued from here because tumblr

Flori nods as a smile blooms on her lips. "---I'm always the one giving out the compliments. So I'm not the best with receiving them."
#realmyths#floribeth dalisay / undetermined verse.#//had to make it another text post bc i'm using the beta editor and not the other one#//hope that's okay; idr which one you are using atm#queue.
8 notes
·
View notes
Note
hey so staff announced recently that the legacy editor is getting deprecated this year (https://www.tumblr.com/staff/713772856384929792/hello-tumblr-if-you-joined-us-before-november) and i know you said in the post about frank making asks from the ether that she uses the legacy editor. i'm just wondering if the switchover will cause any downtime for frank when it does eventually happen or if you're working to get her to use the new editor?
I don't know when legacy post creation through the API will go away. It won't necessarily happen at the same time that we lose the legacy post editor in the UI.
But yeah, given that announcement I figure its days are numbered.
Thanks for reminding me about this. It will cause downtime when it happens, unless I've already added NPF creation code by that time. I've been avoiding that because it'll be a complicated chore, and right now it wouldn't add any value. But I should get around to it sometime.
#nostalgebraist autoresponder meta#on another note -- i'm still frustrated about the legacy editor going away#it's so much better#the beta editor is less responsive in a way that's hard to describe but very real#also adding styles to text with it is painful#(try putting some text at the start of a post in a blockquote and then inserting non-quoted text above it -- just one example)#worst of all its undo/redo feature is broken and often eats my text permanently!!
24 notes
·
View notes
Note
Somebody that I Used to Know

certainly!
#asks#requests#kittyluvr42#lmao-anyways#no id in alt text#because this ask is from 3 years ago! and so can't be edited with the beta editor#still#fun times
51 notes
·
View notes
Text
making a new post bc the first one died immediately. hi we’re a mentally ill queer transmasc system who’s been trying to save up to start hrt and get out of a household that’s becoming increasingly unsafe. after crawling out of the worst mental breakdown we've had in 5 years, we're trying to recoup our losses after a combination of having to take a handful of days off to stay (somewhat) sane, hours already being tight at work so its tough to make up for them, & being lied to about being helped with car payments that *will* drain us dry in the next few months. at this point anything helps.
here is our commission info/TOS/examples (new link bc the old one is defunct)
here is our ko-fi
here is a halloween ych we've sold one of
here are some adoptables we haven't sold yet
best way to contact us at the moment is [email protected] since we’re trying to not use social media as often for the sake of our mental health
#talking#commissions#gonna queue this for a few times today/tomorrow bc god damn am i getting desperate lol#also god i hope this isnt annoying to schedule bc i had to turn off beta editor. its deleting text when you add links again
60 notes
·
View notes
Text
COLOR TEXT TUTORIAL
so i made a tutorial in the past explaining how to do add color to your text on my previous blog @shinsources but unfortunately it's no longer active. and not only that but i found it a bit complicated so i'm gonna go ahead and remake it. the things you will need will be Beta Text Editor, Roleplay Formatter, and a website that provides you with color hexes. here are a couple that i recommend using:
encycolorpedia
color-hex
wikipedia ( a - f ) ( g - m ) ( n - z )
so the reason you have to use BTE is because colored text is only available in BTE and not LTE. and the reason i recommend you using Roleplay Formatter is because the number of options BTE supplies us with is ... uh ... limited, to put it bluntly. we literally only get eight colors which sucks. but whatever. eight is better than nothing i guess. idk.
anyways! let's get to the actual tutorial, yes? because it's relatively long i'mma throw everything under a READ MORE for simplicity's sake.
now all you have to do is type out your response on Roleplay Formatter, highlight the text you want to color, and then select color text font as shown down below.
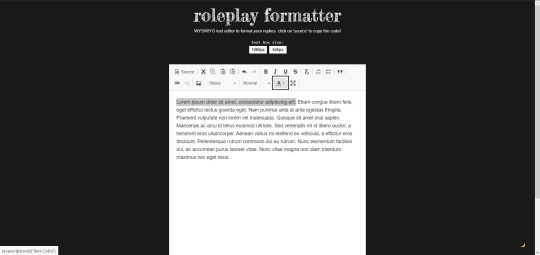
once you click on that the image on the top will pop up. i need you to do me a favor and click on more options which will trigger the image on the bottom to pop up.

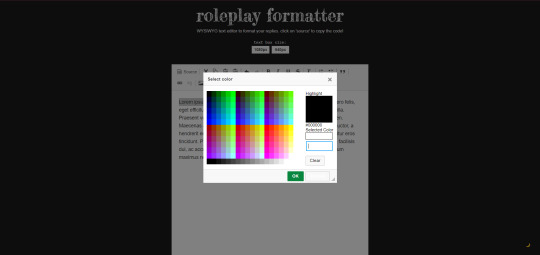
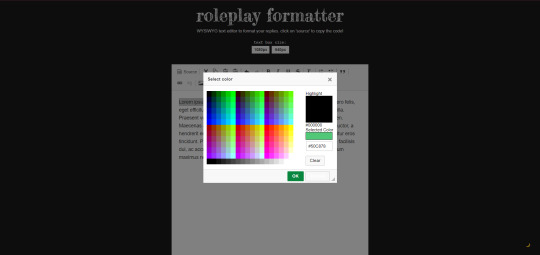
now obviously you're gonna want to pick out your color in advance because that'll make things 1,000,000 times easier in the long run. i'mma choose emerald green because that's what i use for my ulquiorra blog over @segnuda ( shameless self promo ). the color hex for emerald green is #50C878 for any of you wondering, fyi. you will do like i did in the image on the top and paste it in the second or bottom box. once you do that you click on okay and it will turn out like it does in the image on the bottom.

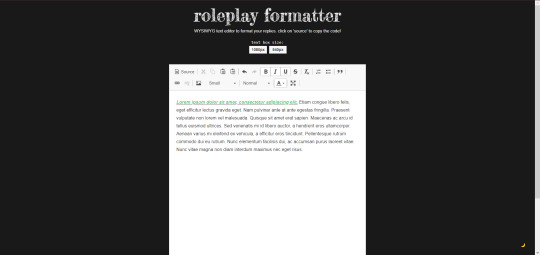
now i recommend you going ham and doing anything fancy shmancy with your text — bold, italics, strikethrough, small font, etc. — because who doesn't like fancying up their writing, right? i decided to make my text small ( in which you click on Styles until you see Small and click on that ) and bold / italicize / underline the first line as seen in the image on the top. once you get everything to your likings click on Source as highlighted in the image on the bottom.
NOTE: don't pull a me and actually underline your stuff because i forgot that BTE doesn't support underline. it won't register it at all.
once you've done that, you'll see something similar to the image similar to the one on the top. i need you to copy the whole entire source code via CTRL + C and then get onto tumblr followed by getting a text box open. i need you to do like i did in this tutorial here and completely backspace to where it goes from the middle image to the bottom image.

once done, click on the settings widget in the top right corner and go from Rich text to HTML as seen in the top image. it'll now look something like the image in the middle. after you've done that, paste the code you just copied and it'll look a little something like the one on the bottom.

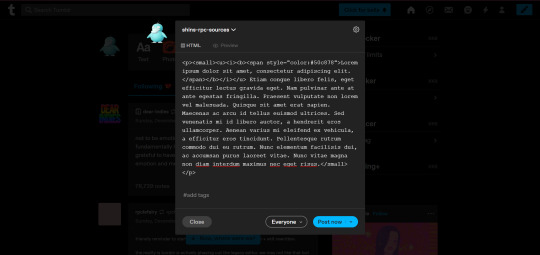
when done you'll click on the settings widget again and go from HTML to Rich text. once done it'll look a little something like this!
literally all you have to do now is add any icons you want and the whole nine yards then you're good to go! simple as that!
#rp tutorial#rpc tutorial#rp tutorials#rpc tutorials#rp#rpc#tutorial#tutorials#roleplay#roleplay community#community#roleplay tutorial#roleplay tutorials#how to#how#to#beta text editor#bte#beta#text#editor#wysiwyg#what you see is what you get#what#you#see#is#get#color#colored
59 notes
·
View notes
Text
a heads-up: i don’t have access to the legacy editor for new posts anymore, so every starter / continuation post will be written in the new editor going forward. please use the new editor for new threads with me from now on, so we don't run into any compatibility problems formatting-wise. however, old posts / threads still have access to legacy and i will keep using legacy for those for as long as i’m able to. ♡
#【♞】 ooc.#you can pry legacy from my cold dead hands!!!!!!#tired of this site's BS#i HATE the beta editor : /#it has so many problems for me and kills my writing flow#if you see any new posts from me? rest assured i pulled up an old draft to use the legacy editor and then copy pasted my shit into beta#can you tell i'm desperate#it's annoying but the alternative is#to deal with beta which at times lags; doesn't wanna let me delete words / sentences / paragraphs; fucks up my formatting......Sometimes;#keeps switching to the bigger font; will wrap my text into some ugly grey as if i marked it; etc. etc.#i love how they never fully ironed out the kinks of their new editor before forcing it on ppl truly amazing
7 notes
·
View notes
Text
GUESS MY TYPE (sweats nervously)


Maul (sw) || Edward Nigma (dc) || Loki (mc/u)
Marcus (arcane) || Garrus Vakarian (mass effect) || Bruce Wayne (dc)
John Hancock (fo4) || Adrian Chase (dc/peacemaker) || Sam Drake (uncharted)
@statichvm @risingsh0tand @jackiesarch tagged me to expose myself and post 9 of my favourite characters and see if people can guess my type in the replies
so uhh, do you have any idea? I can't really see a pattern...
tagging @sstewyhosseini @adelaidedrubman @aceghosts @natesofrellis @indorilnerevarine @hoesephseed @thomrainer @shellibisshe @henbased @vasiktomis @roofgeese @poeti-kat @ptrixiarbrt @confidentandgood @lethal-justice @ghastlyrider @josephslittledeputy suffer like I had to!!!
#I had to use the beta text editor for this#bark snarl hiss#I gotta admit sam was a last minute addition#he kept me from putting redacted on this list 🤡#🙈 iykyk#I dread the day when I finally reveal who he is...#tag game#personal#I am literally screaming at this editor
49 notes
·
View notes
Text
Lewis Fic Recs: A Change of Season
Winter fades into spring, bringing with it rainstorms, bed- and hotel room-sharing, poetry quotations, and coming out. As usual, please feel free to add to the list!
The Last Refuge of the Unimaginative by wendymr
472 Words, Gen, Rated G, No Archive Warnings Apply
A windy day leaves a grumpy Hathaway smoking in a deserted beer garden, until Lewis orders him inside, to a table near the blazing hearth and a glass of whisky. March isn't the only thing that comes in like a lion.
Blame it on Derek by Evenlodes_Friend
4,011 Words, James/Robbie, Rated M, No Archive Warnings Apply
A raging winter storm forces James and Robbie to share the last room at the inn, blowing down the barriers between them as they sleep. The snarky banter between them is spot on, and the moments where they quietly begin to open up about their childhoods and past are just heartwarming.
Close Quarters by wendymr
3,211 Words, James/Robbie, Rated T, No Archive Warnings Apply
James and Robbie have to share a room at the police training center—and then the heat goes out. During the night, James' embrace seems to be the only thing to calm Robbie's restless sleep, but worries he's overstepped when they awake curled together.
Truth Time by Sarren
4,049 Words, James/Robbie, Rated E, No Archive Warnings Apply
Flooding rivers and fallen trees leave James and Robbie stranded at a remote hotel, forcing them to Talk About Things. Robbie begins the conversation with a story about a boy he knew during his earliest days on the force. Things develop quickly from there.
as someone long prepared for the occasion by blindbatalex
6,064 Words, James/Robbie, Rated T, No Archive Warnings Apply
When their car breaks down in the rain, Robbie and James finally have that long overdue conversation. This does a great job capturing James' prickly defensiveness when talking about personal topics, and the image of Robbie marking up and memorizing his guidebook on supporting your LGBT child sergeant is just delightful.
Singing in the Rain by Small_Hobbit
687 Words, Gen, Rated G, No Archive Warnings Apply
Driving home from a concert, Robbie finds his sergeant standing under a lamppost in the rain—drunk and singing out his angst over their latest murder victim—and invites him home for some cheese on toast.
Rain by paperscribe
510 Words, Pre-James/Robbie, Rated G, No Archive Warnings Apply
As they walk through the rain, James and Robbie talk about planets where the sun only shines one hour every seven years, whether they wanted to be an astronaut or knight as a child, and how Laura says they really ought to talk about their feelings more.
Out of the Rain by serenbach
895 Words, Pre-James/Robbie, Rated G, No Archive Warnings Apply
Caught in the rain out at a crime scene in the woods, Robbie and James find themselves lost as they return to the car. As they huddle together under the trees, waiting for the storm to pass, Robbie realizes a few things about the proximity of his sergeant.
Daisies and Dreaming Spires by lesyeuxverts
200 Words, Pre-James/Robbie, Rated G, No Archive Warnings Apply
An atmospheric, poetic double-drabble. James' hope blooms along with the springtime flowers, but he's had enough of metaphors. He will wait for something real.
The End of Winter LyricaXXX
2,366 Words, James/Robbie, Rated T, No Archive Warnings Apply
A gentle, pattering falls outside their hotel room door, when James asks Robbie if he remembers his first kiss. He does—his name was Davie—but Robbie's not sure if he's ready to tell James that just yet. And then his sergeant is pulling to comforter off his bed so he can go lay out on the balcony during the rain.
Long Overdue by Sarren
3,864 Words, James/Robbie, Rated T, No Archive Warnings Apply
A quote on the barroom sign prompts a discussion of holding hands and first kisses, bringing back memories of the boy Robbie loved in his school years, and prompting some realizations. Then Robbie begins to notice all the flirting.
Spring Fancy by Lindenharp
1,944 Words, James/Robbie, Rated M, No Archive Warnings Apply
"In the Spring a young man's fancy lightly turns to thoughts of love." Robbie invites James back to his for some whiskey after a difficult case, and they have a serious drunken discussion about Tennyson's poetry, inappropriate feelings, and... pow!
We Walk Blind And We Try To See by Cohens_Girl
1,162 Words, James/Robbie, Rated G, No Archive Warnings Apply
Established Relationship. Early on in their relationship, Robbie wakes on a rainy, lazy Sunday morning, to find James gone from their bed. A quiet, gentle fic, full of understated domesticity and affection.
#this is super late in so many ways#ah well#James Hathaway#Robbie Lewis#Inspector Lewis#itv Lewis#Lewis/Hathaway#LewisFicRecs#also ughh they finally made the beta post editor mandatory#I don't like it#even trying to delete lines of text is a pain in the ass
19 notes
·
View notes
Last Seen Blogs

sad-ena-kinnie
Hello? Hand in marriage please-

wadhgdhhfhmnb
just for venting

alunasky-blog
Alunasky


hashibrew
はしからぶるーいんぐ