#rp tutorials
Text
A USEFUL TIP WHEN USING BETA TEXT EDITOR
many of us seem to be struggling with a minor bug when it comes to typing out our responses on tumblr using the BTE. the biggest one i've come to notice is when we make our replies small. it's super common for the BTE to hardcore glitch and have the last couple of letters regular sized while the rest of the response is small. here is an example:
Lorem ipsum dolor sit amet, consectetur adipiscing elit. Aliquam eros leo, feugiat sit amet massa at, dapibus consectetur massa. Aliquam eget metus nec dolor efficitur sodales faucibus interdum dolor. Maecenas mollis justo euismod varius dictum. Etiam scelerisque erat vitae est hendrerit, a maximus justo tempor.
idk about you but i find that to be pretty annoying but that's just me.
another problem is that, for some odd reason, we're not able to do a form of "indentation" when typing out our responses on here via the BTE. why? idk. i really don't. now when i say "indentation" i mean like how one does when writing a research paper for school or writing out a fanfic. you know ... something like this:
Lorem ipsum dolor sit amet, consectetur adipiscing elit. Aliquam eros leo, feugiat sit amet massa at, dapibus consectetur massa. Aliquam eget metus nec dolor efficitur sodales faucibus interdum dolor. Maecenas mollis justo euismod varius dictum. Etiam scelerisque erat vitae est hendrerit, a maximus justo tempor.
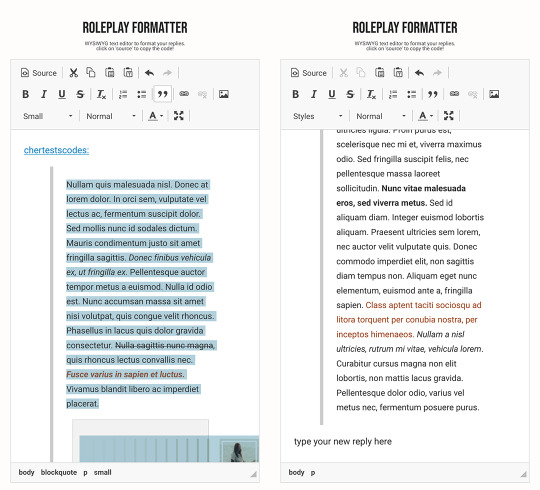
so what i honestly recommend doing is to just type all of your responses on Roleplay Formatter. the reason for this is because Roleplay Formatter is what many coders and graphic designers call WYSIWYG. for those of you wondering, WYSIWYG stands for What You See Is What You Get. this is very beneficial for those of us who code, do gfx, and whatnot because it helps us get a better idea on what to expect for the end result.
it's super easy to use and i honestly can't recommend it enough. really. and not only that but you can use hell of a lot more colors for your text through there than on here where you only get eight options to choose from. all you need is a website that gives you the color hex and you're golden. here's a couple of sites i recommend you using for getting color hexes:
encycolorpedia
color-hex
wikipedia ( a - f ) / ( g - m ) / ( n - z )
#rp tutorial#rpc tutorial#rp tutorials#rpc tutorials#rp#rpc#tutorial#tutorials#roleplay#roleplay community#community#roleplay tutorial#roleplay tutorials#how to#how#to#beta text editor#bte#beta#text#editor#wysiwyg#what you see is what you get#what#you#see#is#get
231 notes
·
View notes
Text
how to use xkit rewritten / trim reblogs on mobile:
updated for december 2022
this method is beta editor / npf compatible
my previous tutorial to trim posts technically still works, but as tumblr is discontinuing legacy posts that method is already outdated and unhelpful for people who have no other option than to use the beta editor.
but fear not! i've figured out how to use xkit rewritten on mobile and it's VERY easy.
install "firefox nightly for developers" OR "firefox beta for testers". must be one of these two, not regular firefox.


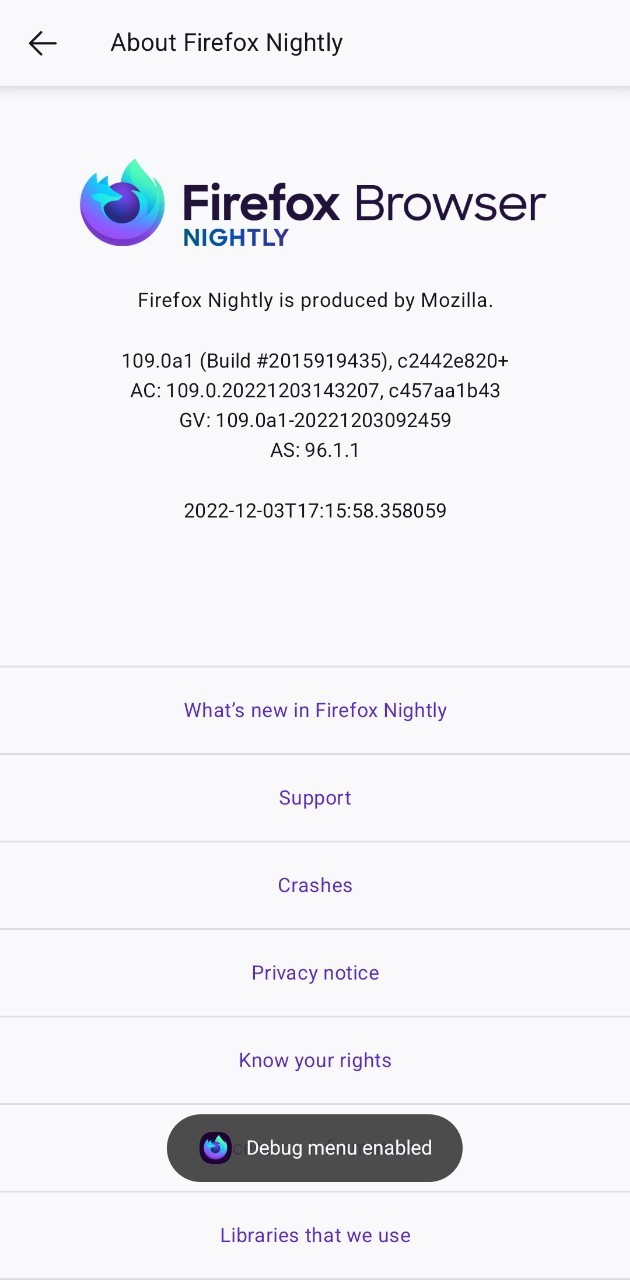
go to settings, scroll down to the "about firefox" page at the end and then click on the logo 5 times until debug mode is enabled.

back to settings and below add-ons you'll see the 'custom add-ons collections' option.
add 17683742 as the ID and name it 'tumblr' like so:

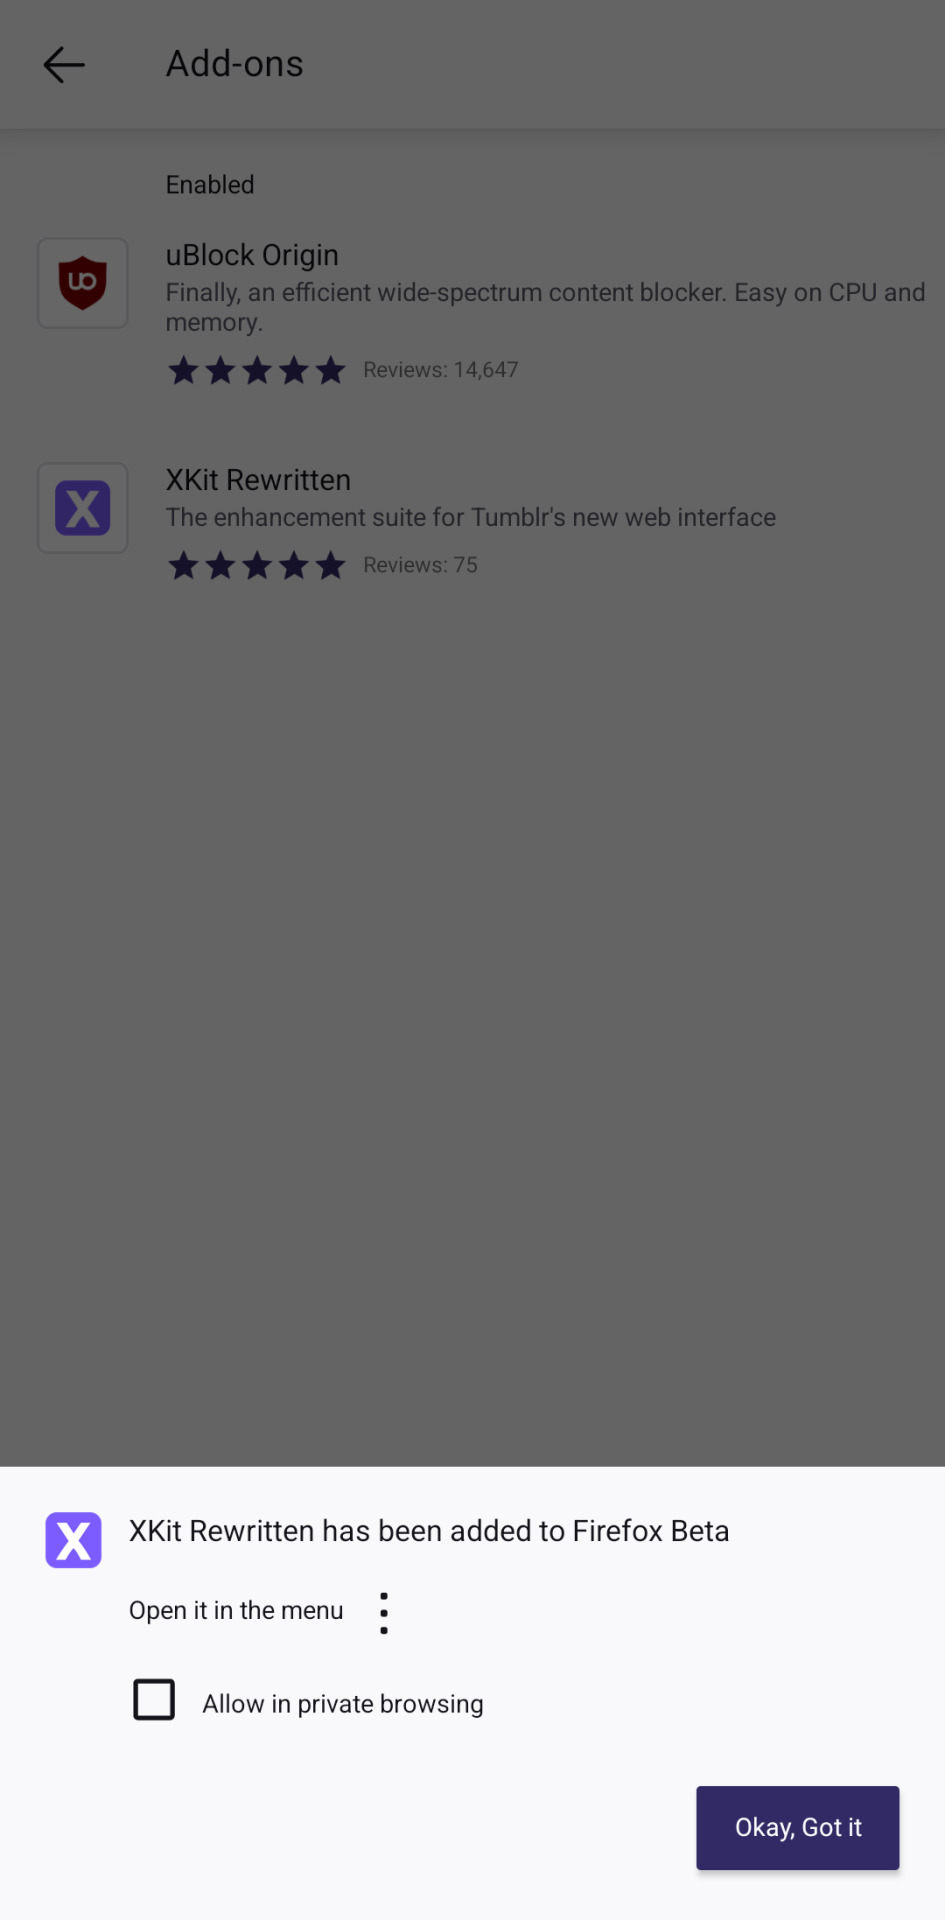
the browser will give you a little pop up that the extension is being added and the app is being restarted.
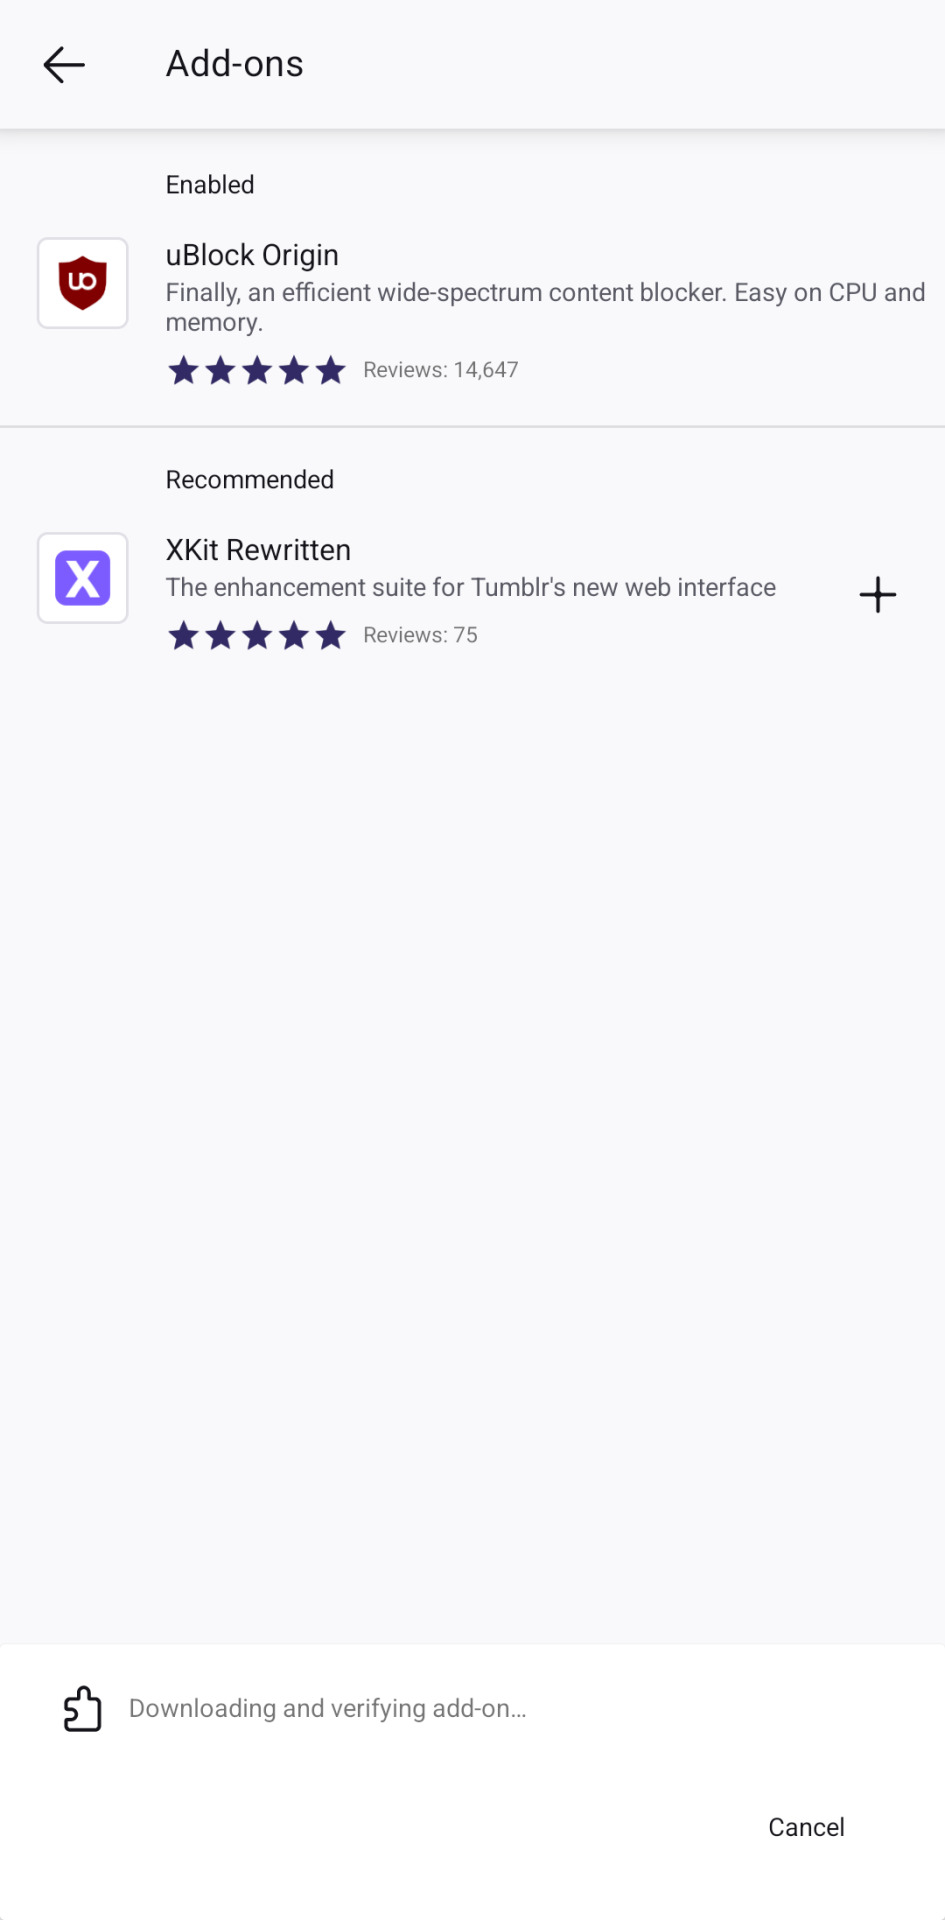
now enter the app again, go to the add-ons section and xkit rewritten should be loaded there. i've included ublock in the collection so you can use both because you absolutely should.
on firefox beta you'll see the extension with a +, click on it to add it.
now cut your replies the same way you do it on desktop with xkit rewritten!
save the post as a draft
click on the scissor button
it's done!


please consider that this is experimental so not all of xkit rewritten's features will work on mobile. trim reblogs does work though!
i still recommend using my roleplay formatter for formatting your replies and then copy pasting the html on your reblog.
other useful links :
this post explains the differences between the two editors and why we're switching.
this post is a tutorial on how xkit rewritten's 'trim reblogs' feature works.
1K notes
·
View notes
Text
PHOTOPEA TUTORIAL / PHOTO FILTER FOR SKIN TONES:
a tutorial on HOW TO BRING OUT SKIN TONES if an image is 'too gray' (faded) or has too much of one (likely over saturated) color!
this technique can easily be applied to icons that already have a border ! just put your focus on the base image / icon ! this works on relatively anything, including poc and non-poc.
WHAT YOU WILL NEED: photopea...and your desired your base image(for example, i'll be showcasing inconsistent or otherwise dark/faded scene lighting, like twilight and saw).
DISCLAIMER: not all lighting/images are the same, nor are psd colorings. while some colorings may be designed to bring out reds/yellows(which is the filters we'll be using in this specific example), others may mute them and you may have to improvise with whatever color the psd you're using is designed to focus on. this is just a general idea, you will have to explore as you see fit. it's all going to depend on your personal taste !
by the end of this, you should be able to manage results like this !
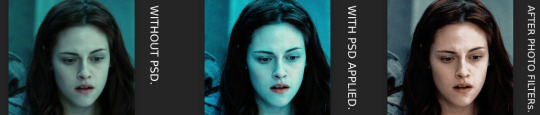
cool, huh?....anyway, on with the mechanics !
EXAMPLES:

[ BEFORE PSD ] [ SYNOPSIS ]
#01 / LEFT IMAGE ABOVE: too much green, becomes muted with psd and doesn't show variety.
#02 / RIGHT IMAGE ABOVE: the colors are very faded in this scene, and the pink focused psd in question made the image seem gray. we will start with EXAMPLE #01.
i will be using the same PSD on both, a custom psd i made and focuses on reds/pinks.

as you'll see above the PSD has now been applied...but now it's kinda boring :// (there's nothing wrong if you don't mind how it is above, everyone's got their aesthetic choice—HOWEVER, we're aiming to add skin tone...)
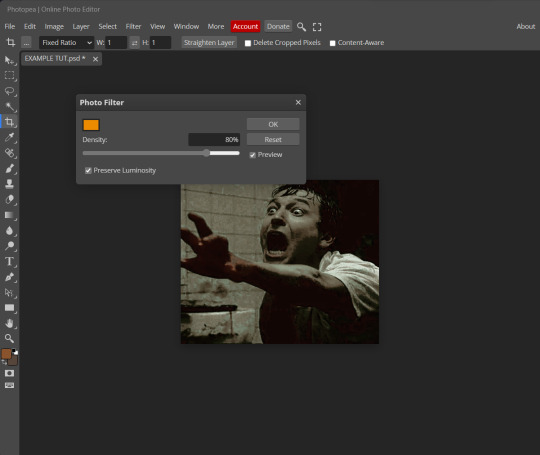
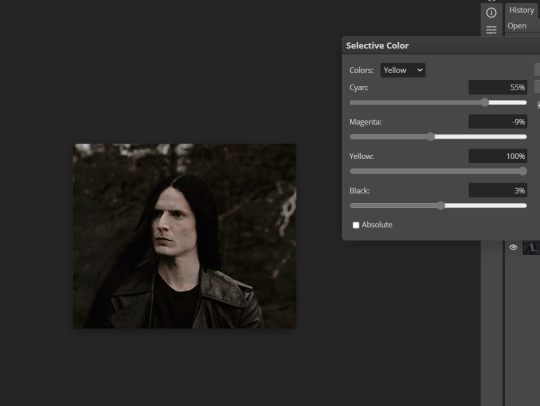
once you have your image open, you'll want to go to image>adjustments>photo filter; i went ahead highlighted it in yellow for easy finding !

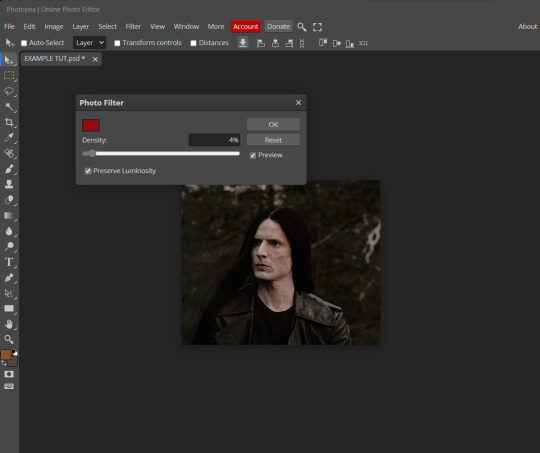
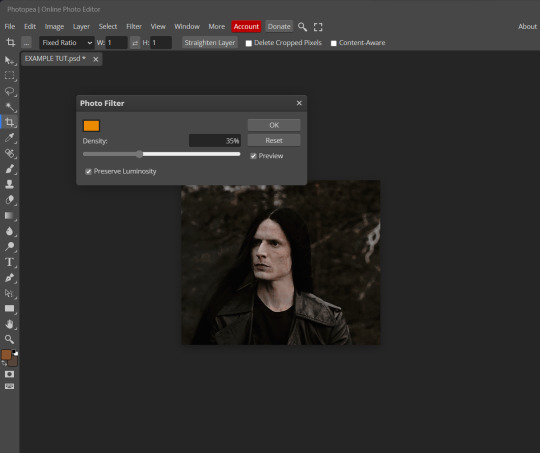
since this psd DOESN'T mute reds/yellows, (and those are usually the base of most/general skin tone combinations) i applied both a yellow and red filter. now, these colors i'll be using in this example, because they're in my default colors on the photo filter option—you can totally choose lighter or darker variants of these colors, or like i said, a different color altogether based on how the PSD you're using works. the toggle setting doesn't have to be exact to this example either—this is just what worked best on this image combined with the chosen PSD ! // RIGHT IMAGE IS THE FINAL RESULT AFTER APPLYING THE RED FILTER AFTER THE YELLOW.

repetition

this scene in particular is very faded, and the red feels a little blotchy/over saturated here...so i'll show you an EXTRA STEP you can use ! in saying this, you don't have to do exactly this; you can even choose to go ahead with selective color to fix your image, without doing the filters, if you find that suitable. but i'll be showing you the magic of selective color to balance out the red toned overlay.
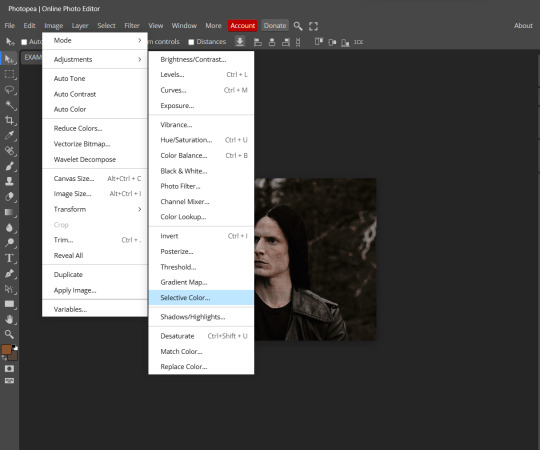
same concept as before, just a different selection: image>adjustments>selective color. think of selective colors as "balancing" the colors.
it does have a toggle selection for each color, which is super helpful, including diminishing or adding white highlights.
given the PSD colors, naturally, i'll be focusing on yellow and red.

it's now got a general skin tone and red is not as blotchy !
[ FINAL RESULTS / CONSISTENCY WITH PSD APPLIED ]

this is a great hack i use quite a bit, it's great for maintaining consistency in your icons when the lighting is working against you...hope this was comprehensible and helpful, happy editing !
#FREE TO REBLOG !#leech's tutorials: photopea.#rp community#icon tutorial#rp icon tutorial#psd tutorial#roleplay coloring#roleplay help#roleplay resources#roleplay community#roleplay graphics#coloring psd#psds#icon psd#psd#roleplay psd#rp graphics#rp psd#rp resources#tutorial#editing tutorial#rpc tutorial#long post /#editing resources
173 notes
·
View notes
Text
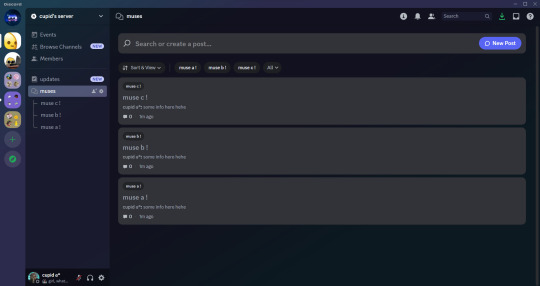
˚꒰ 🏹 DISCORD FORUMS TUTORIAL♡
i'm not sure if people have seen or tested out the forums on discord but i thought i'd make a tutorial on how i use it for roleplaying since i found it super fun and helpful for organization purposes!
so what are forums? discord describes it as "a space for organized discussions". much like threads, the discussions can be contained in one post which makes it easy to keep your topics in order. the part that i find most useful is that you can organize your post by tags and filter through them! now in order to get forums in your server, you will have to enable 'Community' on your server. so let's start!

♡ . ) first thing you'll do is open your server setting. there will be an 'Enable Community' that you can click on and it will take you to a page like this
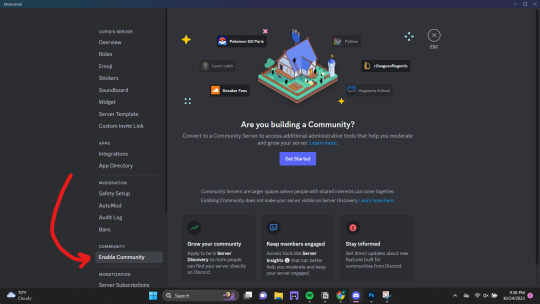
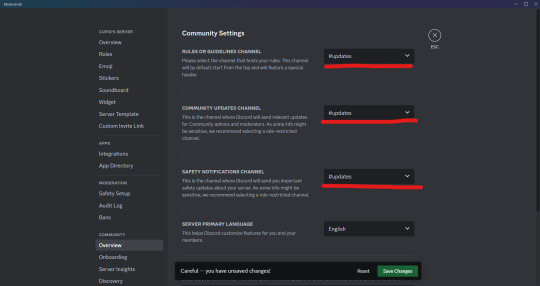
♡ . ) once you click 'Get Started' it will take you through a series of questions and system settings. you will need at least one "default channel" where discord will send automated updates. this channel is necessary if you want to use forums.

if you continue with the default settings, discord will automatically create two channels for you: one titled 'rules' and another titled 'moderators-only'. the announcements made whenever there's an update as mentioned above will be sent to the latter.
NOTE FROM CUPID ! i personally like to make a single channel titled something like 'updates' and keep it locked. this can be done before or after enabling community, you will just need to change the settings to go to the new channel first.
♡ . ) once you have community enable, you're free to make all the forums you want! when you go to create a new channel, 'forums' will show up as an option like this

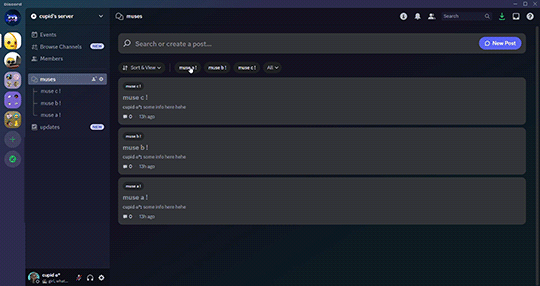
for this example, i'm going to show how i set up my muses' profiles for 1x1 writing server like a roster, but you can also do this for single muse / threads / sms / etc.
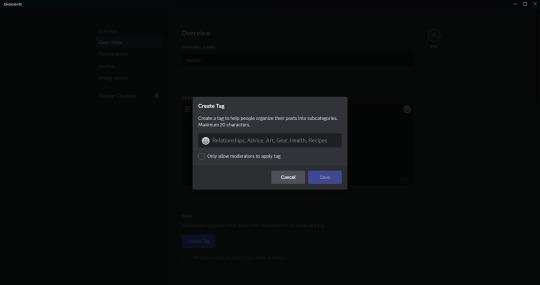
♡ . ) when you click into the forums channel you created, you will see a landing page like this. there are instructions on how to navigate the channel as well so feel free to read those as well! the first thing i like to do is create tags. you can open that setting by clicking either of these buttons.
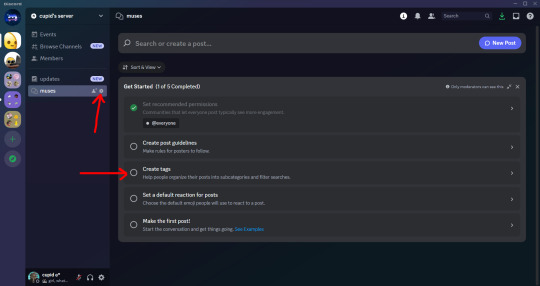
(navigate to the 'Tags' section and click 'Create Tag' if you need to) it will open a popup box like this. i like to create a tag for every muse that i want to add to my roster and you're able to add 20 tags!
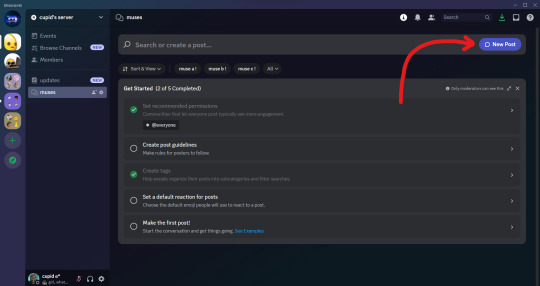
when you're finished, they will be listed as you see below. there are other options in forums settings that you can play around with including a 'default reaction' emoji, 'slowmode', layout and sorting option, age restriction and 'hide after inactivity'. all these are based on preference!

♡ . ) once you've saved your setting changes, you can leave this page and are now able to make your posts by clicking 'New Post' on the upper right hand corner.
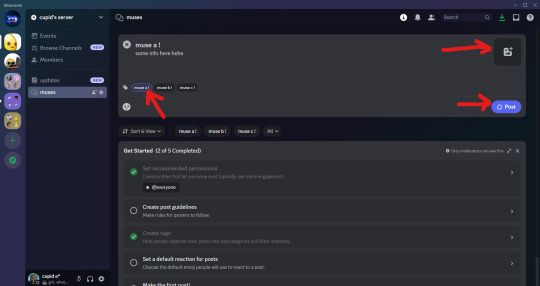
this is where you're pretty much able to do whatever suits your style including formatting how you like and adding photos, all you need to make sure to do is add the corresponding tag to the post! once you're finished making it look how you want, you can click 'Post'
they will appear in the channel like this!
♡ . ) and by clicking on a post, you will be able to open it in a side view like this. if you want to see the post in full view, you will click the three dots in the upper right hand corner of the side view and then choose 'Open in Full View'.
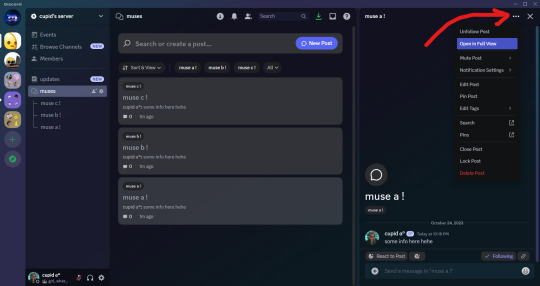
you're now able to add more messages within the post! for me, i like to add stats of my muses and headcanons that may be useful when i thread.
NOTE FROM CUPID ! one set back i found is that you are not able to use threads within a forum post so it may get a bit cluttered depending on what you send in a forum post. so if you are wanting multiple different sections for one topic, i suggest creating a forum instead. for example, if you are wanting to add musings, faceclaim pics, headcanons and stats all for one muse, i would create a single forum post just for that muse instead to avoid having important info getting lost!
and that pretty much covers how i use forums for discord rp! i encourage you to play around with it to find a style and format that best works for you. and if you have any questions, you're more than welcome to send it to my inbox. happy writing everyone♡♡♡
157 notes
·
View notes
Text

✦ Okay, I give in. Let's upload our gifs on the beta editor to prepare for a gif pack page. Resources are available at the bottom, so lets get started !!
So first things first, you can only upload 30 gifs at a time. Now for me, I will always upload as I gif, around every 20 gifs, then upload to the page (this also ensures I don't skip any or have doubles) and keep gifing. That used to mean that I don't have to wait for tumblr to load 300 gifs and die from impatience. For the rest of y'all that means you're going to have to batch upload. I know, I'm sorry.
Note: With the help of @nataliealynlind we discovered that the daily limit is 250 gifs! So if you have more than that, prepare to upload your gifs over the course of a couple days or use a second blog. (imo this is another great reason to upload as you gif! that way you don't have to get stuck at 250!)
So after you upload your gifs (in this case I only did 10)*, you're going to go to the gear at the top of your post and click it. Then scroll all the way to the bottom where it says Text Editor. This looks familiar, right?

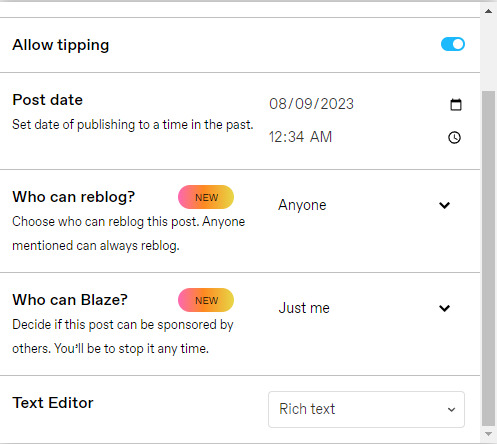
*Note: If you don't save it as a draft first, your gifs will be in .gif format, not .gifv. This means you can skip removing this tag later on, but I'm not sure if gifs that are uploaded but never saved/drafted will later disappear at some point. To be safe, I would save it as a draft. I just forgot at this part tbh
Well the good news is, you only have to change this once! The bad news is, we don't do Markdown then HTML anymore bc Markdown doesn't strip any of the code anymore 🙃 So just change it to HTML
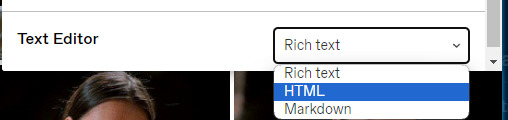
Now it should look like this! Fun!
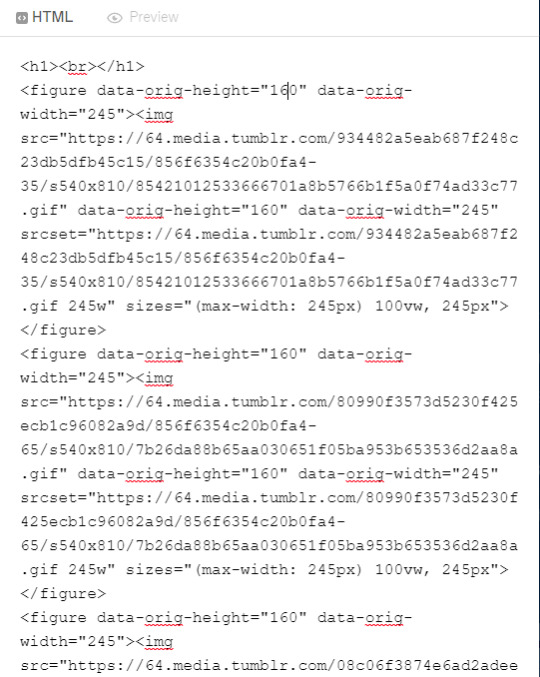
Okay, now we're going to copy that text and take it on over to our new best friend, the HTML Cleaner! So you're going to want to paste it on the right side of the screen. Your gifs should appear on the left side. If both sides have text, that's how you know you pasted it on the left.
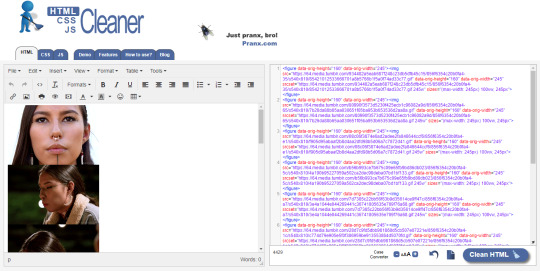
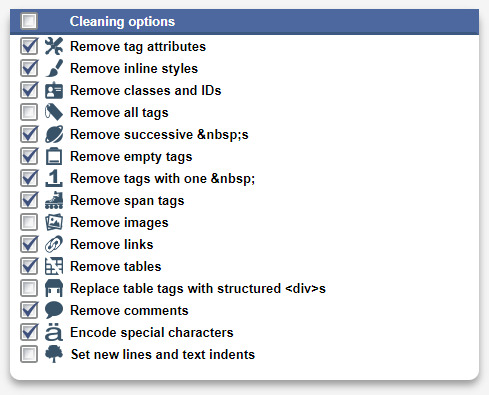
So in order to get ride of all this extra code, it's going to take a couple extra steps. First, you're going to check these boxes on the left hand side.
Now, on the right hand side, you're going to enter these under Find and Replace (copy/paste section below!!). I know you're like, uh what? Where the hell did you get those numbers? Well, I got them from our gif post code!
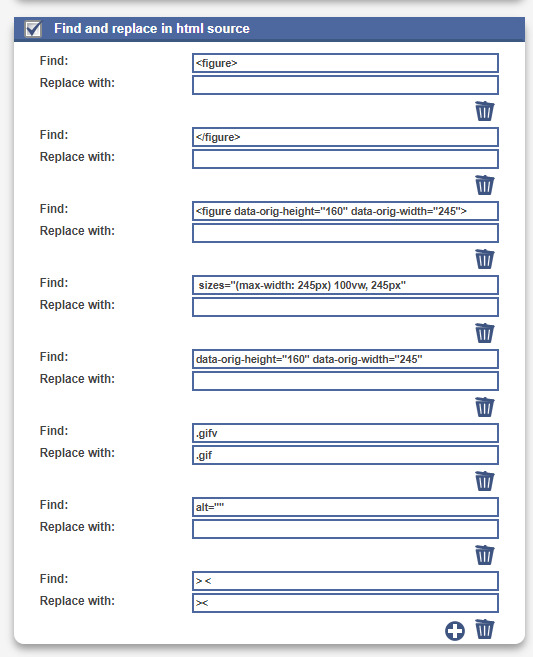


For easy copy pasting:
Find: <figure>
Replace: (leave blank)
Find: </figure>
Replace: (leave blank)
So after you add the specific widths for your gifs, you're also going to want to add the following:
Find: .gifv
Replace: .gif
Find: alt=""
Replace: (leave blank)
Find: /> <
Replace: /><
NOTE: If your gifs are usually the same size, I would recommend saving these snippits above on your computer's sticky notes or a draft to copy/paste for future uploads! While I do appreciate the viewer traffic, I'm sure coming to this tutorial every time is gonna get old real fast.
After all that, click Clean HTML

And now, your code should look like this! If there's still a space between your image links, just click Clean HTML again and it should get rid of it!

Now your code is nice and clean to put into your gif pages! Not quite sure how to do that? Read the Setting Up Your Sidepage section in this older tutorial!!
Resources
HTML Cleaner
My Gif Pack Page Codes
Recommended Gif Pack Page Codes (tag)
Previous Tutorial (How to upload to a Standard Sidepage)
Barebones Code (for previous tutorial)
#rpc#rph#gif pack tutorial#uploading gifs on beta#rp tutorial#beta editor tutorial#mytutorial#rp guide#me: i'm tired of this (remaking this tutorial every other year) grandpa#tumblr changing posts every five minutes: that's too damn bad!
157 notes
·
View notes
Text
🐝 * ― 𝗖𝗔𝗥𝗥𝗗 𝗧𝗨𝗧𝗢𝗥𝗜𝗔𝗟: 𝗠𝗨𝗦𝗜𝗖 𝗣𝗟𝗔𝗬𝗘𝗥𝗦
important note: only works if you have a pro or a pro plus account, and can use the 'embed' element.
― STEP ONE: PREPARING YOUR MUSIC
if you want to have music play on your carrd, the most important thing is, of course, the music. just make sure you have whatever song you want to have played in your files, and if you don't already have it, make sure to download it. now, the next step is to share your file so you'll get a direct file link you can later use in your music player code. personally i'm gonna be using and explaining the dropbox method for this, but there are other ways to do it as well. upload the music file to your dropbox ( either directly or to a special folder, whatever you prefer ) and then click the share button. then create link and copy link and you'll end up with a link that should look something like this: https://www.dropbox.com/scl/fi/j904wa1i2e229tdfa4rkb/ok-3.gif?rlkey=jy7822s2rrgaszj3jduggxn9k&dl=0 to create a direct download link out of this one, take out the 'www' and instead replace it with 'dl' so you'll have something like this: https://dl.dropbox.com/scl/fi/j904wa1i2e229tdfa4rkb/ok-3.gif?rlkey=jy7822s2rrgaszj3jduggxn9k&dl=0 save this link somewhere or keep it handy because we're gonna need it again a little later once we actually start working on the carrd.
― STEP TWO: GET THE MUSIC PLAYER ON YOUR CARRD
for the next step, we're gonna be looking at different music player codes. there are a wide variety of ready-to-use ones already available ( for example here ) or if you are good at coding, you can always create your own as well. whatever you prefer and feel more comfortable with. once you've found something you like, copy the code because it's finally time to actually put it all on your carrd. if you have multiple sections and want your music to be played in all of them, either use a header or a footer and if you only want it in one, put it in the one you want to use for this. click on the little '+' to add an embed element to your carrd ( it's the one with this symbol: '</>' ). scroll down to the 'code' section and paste the code of the music player you've previously copied there. next thing you need to do to make sure it plays the song you want is to locate the '<audio id="audio" src="link here"audio"></audio>' and replace the link with the direct file link of your music. to see if you've been successful, you either need to publish your site or save it as a template ( in case you aren't ready to publish it yet but still wanna check if everything worked as planned ) and it should display the music player and play your music once clicked.
― STEP THREE: CUSTOMIZE IT ( optional )
the last, and optional, thing you can do is customize it to your preferences. this is best done if you have a little knowledge and understanding of html coding, but minor things like changing colors can totally be done without it. for example, if you want to change colors just locate those within the code ( titled 'color' or 'background-color' and they should have a hexcode number right beside it ) and change the hexcode to whatever you want to use. or if it includes text, you can change the font size ( aptly titled 'font-size' ). you can just play around with different settings to see if you'll get something you like ― most of it within the '<style></style>' section of the code is pretty self-explanatory.
#guide.#carrd help#carrd tutorial#tutorial#carrd#rp help#rph#type: guide#( just did this for one of my own carrds so i thought why not make a tutorial if anyone else is interested in this )
175 notes
·
View notes
Text
Roleplay 101 - An Indie RP Guide
I've been meaning to put together one of these for a while, but seeing roleplayers begin to migrate over from Twitter gave me the little push to finish. Roleplay 101 is my guide to getting started with indie roleplaying here on Tumblr, and covers pretty much everything -- Tumblr interface basics, blog setup and customization, finding partners, writing threads, cutting posts, standard etiquette, and more. It's split into multiple parts for ease of reading, and for easy updating as things on this site inevitably change.
If something in the guide isn't clear, or you think something should be added, feel free to send me an ask.
The guide can be found here!
154 notes
·
View notes
Text
Hace unos días, cuando estaba compilando las fuentes para el pack que les subimos, me llegó una duda. Verán, algunas fuentes tienen versiones alternativas o caracteres alternativos. En Photoshop es fácil elegir la opción para usar esas variantes, pero me surgió la duda de cómo se lograría en CSS.
Bueno, al parecer la opción sí existe y se llama font-feature-settings. ¿Es infalible? Nope. ¿Podré usar todos los caracteres que tenga la fuente? No lo sé al cien por ciento. De todas maneras, quise hacerles este post para compartirles mi nuevo descubrimiento.
Tomemos de ejemplo la primera fuente de este pack, Balgon. Lo primero que vemos es el nombre de la fuente con caracteres que no están en los glifos principales, ¿cierto?
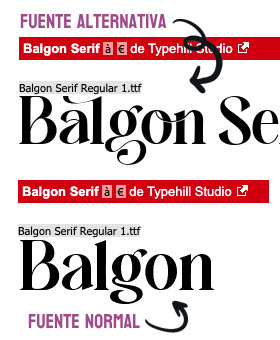
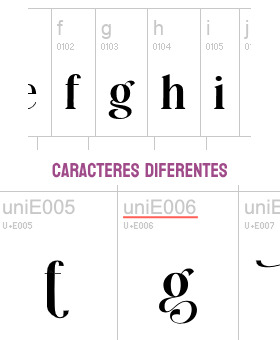
Pero si clickamos en "Ver todos los glifos", podremos darnos cuenta que sí están incluidos en la fuente, sólo que bajo un nombre diferente. En el caso de la fuente Balgon, tienen el nombre uniE000, de acuerdo al caracter. A veces, en otras fuentes, estos caracteres alternativos se llaman alt, aalt, salt, etcétera.*
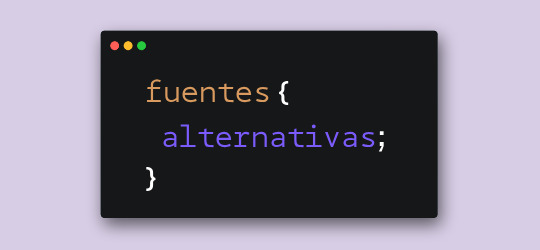
Entonces, si queremos usar estas versiones, basta con agregar lo siguiente:
.tu-clase {
font-feature-settings: "salt" 1;
-webkit-font-feature-settings: "salt" 1;
}
*Si no funciona con "salt", intenta alguno de los otros nombres como alt, aalt, etcétera.
¡Y voilà! Puedes ver el resultado dando click acá. ✨
¡Pero espera, hay más! Si hay más de un estilo alternativo, puedes sustituir el 1 por 2, o 3. Inténtalo y nos cuentas.
41 notes
·
View notes
Text
𝘁𝘂𝘁𝗼𝗿𝗶𝗮𝗹 𝗱𝗲 𝗶𝗺𝗮𝗴𝗲𝗺 𝗰𝗼𝗺 𝗴𝗶𝗳! (rebloguem)
♡🔒 - 𝖿𝖺𝖼̧𝖺 𝗈 𝖽𝗈𝗐𝗇𝗅𝗈𝖺𝖽 𝖽𝗈 𝖼𝖺𝗉𝖼𝗎𝗍 𝖺𝗊𝗎𝗂 .
#messy moodboard#moodboard amino#wugem moodboard#rp moodboard#rp edit#rpg moodboard#tutoriais#jungkook moodboard#lisa moodboard#bts moodboard#blackpink moodboard#tutorial#taehyung icons
227 notes
·
View notes
Text
Tutorial: Cutting Posts in the Beta Editor
hello everyone !! i am certainly not the only person to write a tutorial like this, but i'd thought i'd try my hand at writing one.
this tutorial covers how to cut your replies in the beta editor using xkit rewritten, as well as how to remove those pesky gif source links.
read on for the tutorial !!
keywords: beta editor, xkit rewritten, cutting posts, trim reblogs
written 12.09.2023.

Step 1: xkit rewritten
the beta editor requires a new browser extension completely different from the previous xkit ( the one that showed in your tumblr settings ) called xkit rewritten. if you have not done so already, go ahead and install xkit rewritten for chrome or firefox.

xkit rewritten shows in your browser task bar along with your other extensions. i like to pin mine to always show. it is through here that you control all the settings.

Step 2: enable "trim reblogs"
the setting in xkit rewritten that will enable you to cut posts is called "trim reblogs".
to turn it on, click the extension icon. a menu will pop up where you can toggle on and off various settings. scroll until you see "trim reblogs" and toggle it on.
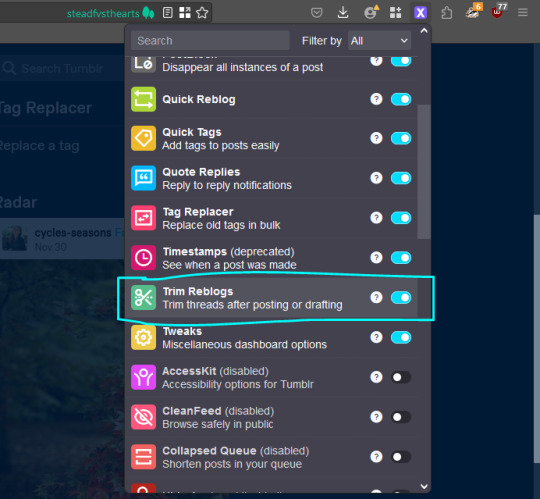
you can check this is properly enabled by going to your blog page and looking at any post you've made. at the bottom of the post with the editing, reblog, and like options, there should now be a scissors icon which is the trim reblogs option !!
Step 3: cutting/trimming replies
we are now ready to write and trim a reply !!
Step 3a: write and draft or queue/schedule your reply
write your reply below the other two previous replies.
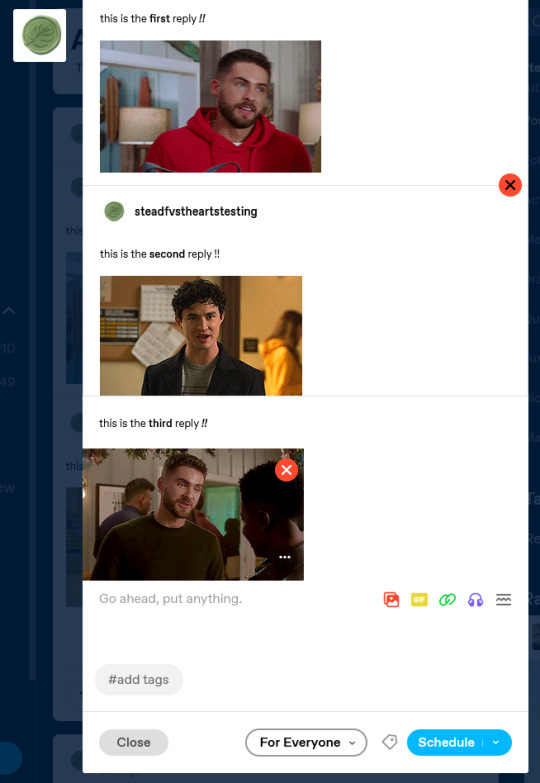
you do not need to copy or paste anything from the previous replies. simply write your reply in the editing space and put in your gif or icon if desired.
when you are done, draft or queue/schedule your post.
**note: as someone who doesn't draft replies first, i'm partial to scheduling the post for a few minutes in the future as a popup like the one below shows at the bottom of the screen when you do this. you can click this pop up to take you directly to the post in your queue which just cuts out having to manually navigate to your drafts or queue.

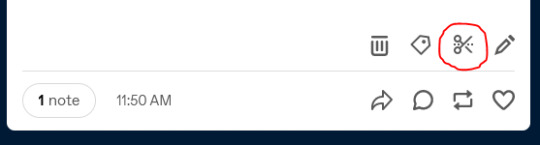
Step 3b: trim your post !!
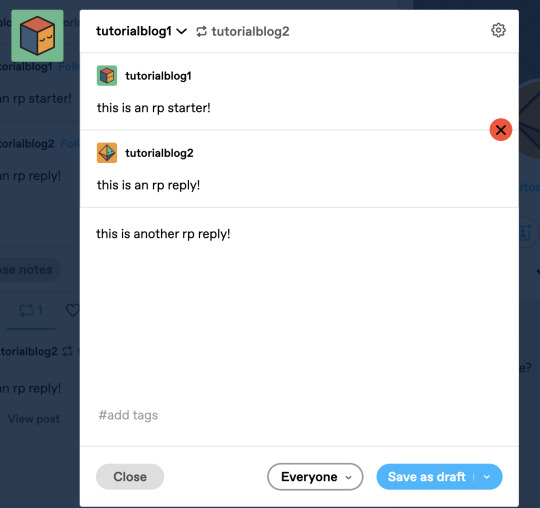
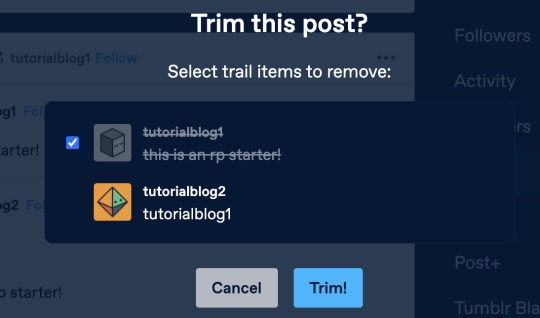
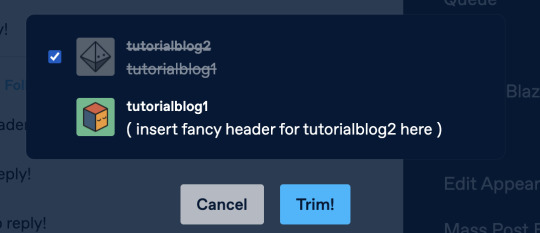
navigate to your drafts or queue and find your post. scroll to the bottom of the post and click the scissors icon. this is the trim reblogs icon.

you will see the following pop up. the checked box is the reply that will be removed. classically, the first box is the one you want checked as you are removing your old reply.
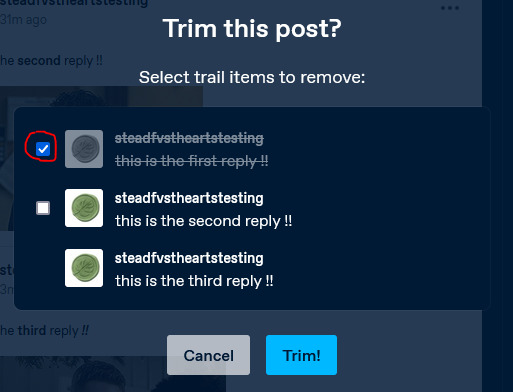
make sure the correct reply is checked, then click trim !!
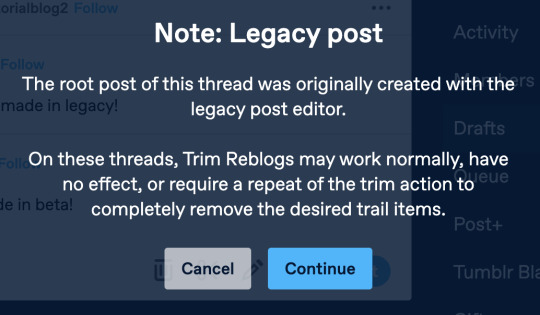
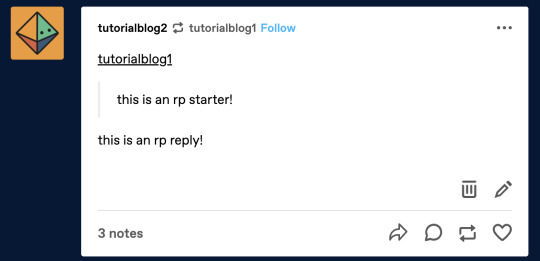
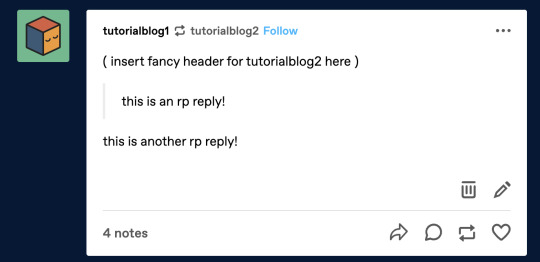
you will now see the post has been trimmed to just the proper two replies.

that's all !! you are now ready to post.
**note: if you forget to draft or schedule your post, you can trim reblogs directly on the dash too !!
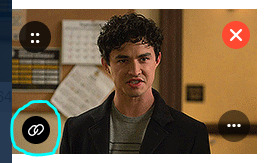
Bonus: getting rid of the gif source link

if you are seeing the source link show beneath your gif like above, there is an easy way to get rid of it!
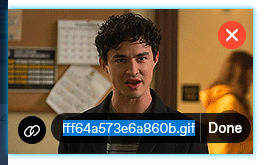
in the post editor, hover over the gif and click the link icon:
delete the text in this field and click done !! that's all !!
this concludes this tutorial !! one last note : if you are an android user, you are also able to use xkit rewritten to cut posts while mobile. for a more detailed tutorial on how to set that up, see here.
please consider giving this a like and/reblog if you found it helpful !! happy rping !!
35 notes
·
View notes
Text
how to use beta + trim reblogs
so! we all know about beta editor by now. for better or for worse, a lot of us are using tumblr's new beta editor, and it's likely that everyone will have no choice but to use it soon. this unfortunately means a lot of us can't use the new xkit to trim our roleplay posts. there have been a lot of posts explaining this and the benefits of xkit rewritten; this one, this one, and this one especially helped me understand what's going on. however, a lot of people still seem to be floundering around in the dark so i wanted to make a tutorial that sums up everything i've learned from other tutorials as well as my own trial and error.
if you want a step by step guide to trimming reblogs (with screenshots) as well as a brief overview of beta editor's pros and cons, keep reading.
the first step, obviously, is to switch to beta editor and install xkit rewritten. the posts linked above explain how and why so i won't go into detail here. trim reblogs is the new version of edit reblogs, and it looks like this. one of the best features is that you can use it even after posting your reply, so if something glitches or you forget to trim, you still have a chance to fix it.

once you have them, there are two different ways i've seen people use xkit rewritten to trim their posts.
1. seperate reblogs
this is, in my opinion, the best and easiest way to go about this. mun 1 makes a post, mun 2 reblogs it, and then mun 1 uses xkit rewritten to trim their original post from the thread.
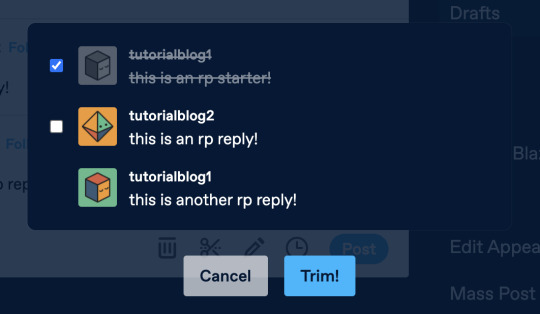

however, this only works if the original post was made in beta. if you try to trim a post that was made in legacy, you get get a warning, and if you go ahead with it, it's going to glitch somehow. in my testing, my reply duplicated! which is very annoying. and despite what the warning says, repeating the trim usually does not last—even if it seems like it does at first.


2. (probably) copy and paste
this is more visually reminsicent of editable reblogs from new xkit. there might be an easier way to do this that i don't know about—if so, please let me know. the name kind of explains it all; a mun will copy and paste their partner's reply, indent it, and write their own below. then, obviously, they'll have to trim all the past reblogs of the post. this is especially good for people who like doing pretty headers or editing their partner's url to look pretty, you know what i'm talking about.
there is a glitch i have run into on my own blog a few times that i was unable to duplicate, so i've just taken a screenshot of my own blog with most of the information blanked out. if only one person if using beta, trim reblogs will still sometimes glitch and duplicate. i trimmed my reblog multiple times but every time i reloaded, my duplicated reply was back. please, please communicate with your partners. i know it's annoying and awkward but it will save everyone so much frustration. especially if you're clinging to legacy, please let your partners know so they can adjust accordingly—or consider switching to beta, even if just for that thread.

but beta is not all bad i promise
i know how frustrating this all is (i fully refused to do drafts for a few days once beta really started kicking in and new xkit stopped working for me), but i am slowly coming around to it.
tags are editable now! i cannot explain the joy i experienced when i first realized this. no more typing up a long, rambling tag only to notice a typo as soon as you've hit return. you can edit tags at any point—even when going back and editing an old post! does this mean that i have accidentally started editing a tag when i meant to move it? yes but it's worth it.
making the text small is so much easier now. no more going into html or command+option+shift! instead, it's available as an option right in between the italic and link buttons when you highlight text.
you can now edit the size and type of text very easily! this did confuse me at first when i couldn't find the indent button, but it's now in a toggle list; if you click on the regular tab when text is highlighted, there are a ton of options including indent, chat, lucille (whatever that means), bigger/biggest, and more.
however, it's not all great. but it's tumblr, what did we expect.
the most frustrating thing for me personally is that you can no longer copy and past an image link into your reply, or else the image url will be tagged on underneath it. it looks funky and isn't great if you don't want to download a million gifs. while i've just been downloading/dragging the gifs i want to use to desktop and uploading them to my reply, it's annoying to have to clean up my desktop and empty my computer's trash so i'm not wasting storage space. additionally, this does not work if the gifset is in a post rather than a page; the only option there is to copy and paste and simply put up with the image url. clicking "add image" and then pasting the image or dragging the gif from the page/post's tab into the tumblr tab and onto your reply still results in a url. if anyone has figured out a workaround for any of this please let me know; otherwise, i think we should all just agree to ignore the url if it shows up. update: thank you sm to anon for informing me of @rpclefairy's roleplay formatter! if you put the gif in their formatter, copy the source, and paste that into the post when it's in html mode, not rich text mode, the link is gone! and thanks to tumblr realizing this was annoying, if you click the little link icon that appears when you hover over an image, delete the url, and hit done so it saves, the url will be gone!
formatting is......weird now. if you make your paragraph text small and then decide to add another sentence, the new text won't be small. you'll have to edit it again. text that has been formatted (small, italic, bold, etc) will be highlighted in a very strange way when the cursor is in the formatted section. as far as i've been able to figure out, even after poking around a bit in the html, there's no way to change any of this. not to sound like a broken record here, but if you've found a way to change any of this, please let me know. otherwise i think we just have to put up with this bullshit.


there's always a chance that these things will be fixed; it is still just a beta system after all. for now, i think the best thing the community can do is communicate with partners, ask questions, and just accept that there's gonna be some weird shit going on and we're all doing our best.
if any of this changes i will update this post, but in the meantime, pls share if this helped or you want to share the word. and for the last time, if i've gotten anything wrong, just let me know and i'll update.
#rpc#rp community#rp help#rph#tumblr beta#tumblr beta tutorial#xkit rewritten#tumblr rp help#rpt#idk how to tag this lmao#also i truly have no idea if this will be helpful to anyone#or if i'm just outing myself as a dumbass#if so pls just ignore lmao#also!! this is in no way an attack on people still using legacy#i'm autistic i get it#m*
377 notes
·
View notes
Text
HOW TO GET YOUR OWN SCREENCAPS FOR MAKING ICONS / GFXs / ETC.
being able to find pre-made icons of whomever you want to roleplay as can be nothing short of tedious, right? well, that's why i've put it upon myself to make this tutorial! because idk about you guys but i prefer making my own icons because mine are all 150 x 65 because i simply like and prefer rectangular icons to square icons. so let's get down to business, yeah? and like pretty much all of my lengthy tutorials, this will be under a READ MORE.
STEP 1: PROGRAMS
the main program you'll need for this is VLC Media Player. the reason for this is because it has a built-in feature that allows you to screencap any video you play. now if you're roleplaying as a video game character and you need the cutscenes from said game ( or video game movies as i call them if they're all together in one video ) then i definitely recommend you getting 4K Video Downloader. the free version allows you to download up to 30 videos / day for free whereas the license grants you an unlimited # of downloads / day off of youtube.
STEP 2: THE SETUP
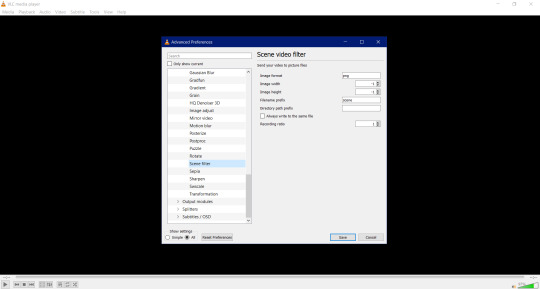
after you've install VLC Media Player, get it going and go to Tools > Preferences. once you've done that something like this should pop up.
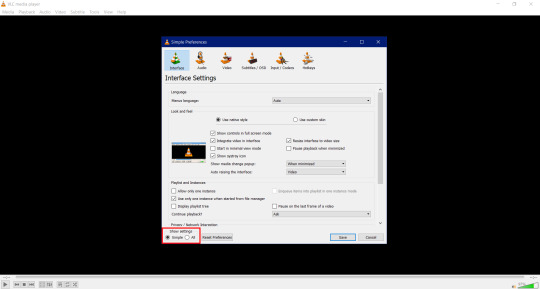

now do me a solid and click All in the box that's highlighted in the red box. by doing so will result in this popping
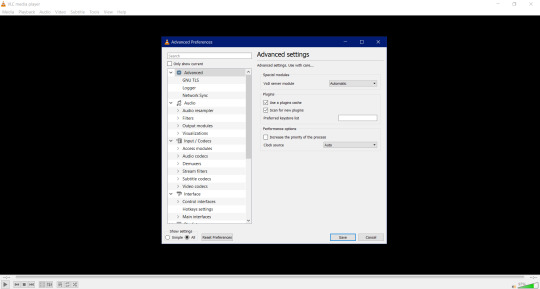

now scroll all the way down to where you see Video and then click on Filter. once done you'll have this pop up.

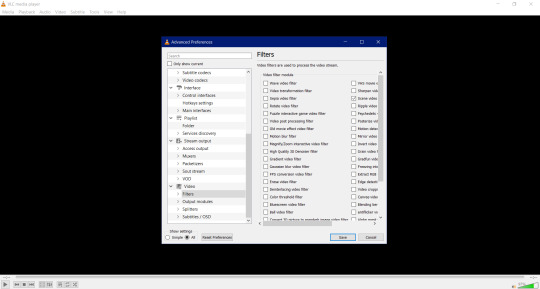
once you have this window up scroll the sidescroll all the way to the right until you see Scene filter video. it'll be third from the top as highlighted down below. check it and then click Save.


STEP 3: WE'RE ALMOST THERE
so once you hit Save, the box closes. there's nothing to freak out or worry about because that's perfectly normal. what we're gonna do now is have you go to ... like ... your Pictures folder and make a folder named after whatever you're getting screencaps for. if you're needing screencaps for, say, crisis core reunion then you'll create a new folder and name it something like ... say ... Crisis Core Reunion Screencaps. now do me a favor and double click on the folder so that you're now actually in it. you'll see why in a minute.
i need you to go back to Tools > Preferences > All > Videos in VLC Media Player. once you do that i need you to click on the little > right next to Filter so that a little drop down menu will pop up. it'll look a little something like this.

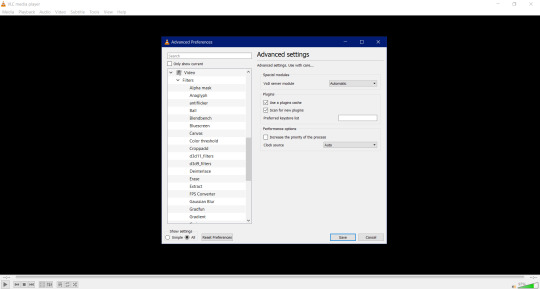
now scroll all the way down until you see Scene filter and click on that. once you've clicked on it this window will pop up.

remember when i told you to keep that folder up and running for Crisis Core Reunion Screencaps? well, this is where it comes into play! click on where it says This PC > Pictures > Crisis Core Reunion Screencaps , highlight everything , and the press CTRL + C to copy it. and for those of you wondering ... ... ... ... ... it'll look a little something like this: C:\Users\PROFILE\Pictures\RP Stuff\References. that's perfectly normal!
now i want you go pay close attention to the box i have highlighted down below. why? because the original number they had for the Recording ratio is ridiculous. switching the number to 1 means that it'll take one ( 1 ) screencap every second! and the number of screencaps you'll have will determine how long your video game movie is.

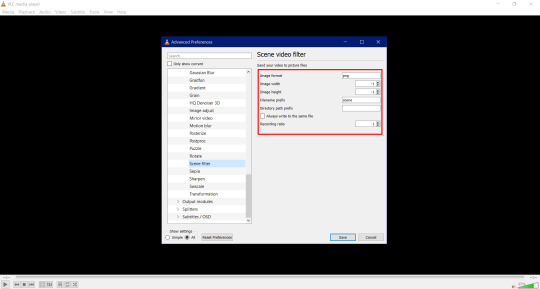
now you're probably wondering why the Directory path prefix is empty. of course you are. why wouldn't you be wondering it? well, that's where you're putting the directory for the directory path you just copied earlier! click on the empty box and press CTRL + V to paste it. once finished, click save and you're good to go.
STEP 4: GETTING THE ACTUAL SCREENCAPS
now that you've gotten all of the hard stuff done and out of the way, this is when you click on Media > Open file and then click on that Crisis Core Reunion movie you downloaded using 4K Video Downloader. once you have that going, the screencapping will commence and all you have to do is just minimize VLC Media Player and go on your merry way until the "movie" is done!
this is all you have to do to get screencaps. and all you have to do every time you want to get screencaps for something super specific is to make a folder for said thing, copy the directory path, and paste it into the Directory path prefix.
i'm hoping this tutorial was simple enough and easy to understand for y'all!
#how to#tutorial#tutorials#rp#rpc#roleplay#roleplay community#rpc tutorial#rpc tutorials#rp tutorial#rp tutorials#screencaps#screencap#icon#icons#iconing#gfx#graphics#photoshop#making icons#making
207 notes
·
View notes
Text

alright roleplayers, im not even going to lie — not being able to format posts in the true Vintage Tumblr Style™ has actually pissed me off so bad... anyways, if you want to bring back the old <sup><small> text, this is how you do it.
just for transparency’s sake, this will not force tiny text on people who do not follow the tutorial, so its a win win for us who like that ye olde ant sized tumblr text and those that don’t. it also works with the post editor!
—— i am not a pro coder or teacher, therefore my terminology may be off. i tried my best to illustrate & visualize everything, though !!
1. what you’re going to want to do is download the stylus extension from the extension store ( mozilla & chrome ), not stylish. ( stylish steals browser history and shit. stylish bad. )
2. when the extension is installed, select “find styles” from the extension menu, and look up “no more small text”. the correct style should have a pic of jenna marbles on the dash as the thumbnail lol.

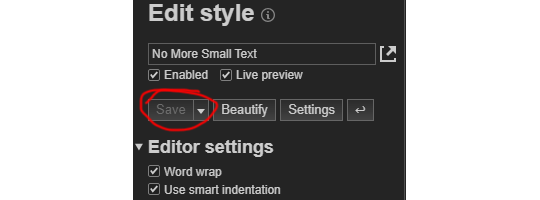
3. alright ! we got the ‘no more small text’ extension. it sounds counter productive, but it’s not ! it edits the <small> text function, so now all we have to do is edit the font size it changes the <small> tag to. to do this, click the little pen next to the name of the extension.

4. this should open a new page with a text editor containing the code for the script. pay no attention to any code except the chunk shown below. see that circled green text ? that's what we're changing.

i haven't messed with em as unit for font size (i'm used to px), but i've found that 0.82em is a pretty good size to use for smaller text, however, you can mess around with the font size to make it as big or little as you want. after adjusting, your code should look like this:

5. after this, you're pretty much done! this will basically change the font size of anything under the <small> functions on your dashboard to your desired size. all you have to do is hit the save button to the left of the style editor page. maybe even rename it to small text or something so it's not confusing in the future.
but.... if you want to be greedy and bring back that sweet <sup> text from before, like, 2020, you're gonna add a little vertical-align attribute.
6. DIRECTLY after the font size styling, and BEFORE the closing } we're gonna add this: vertical-align: 3px!important; if pasted correctly, your code should now look like this:

the vertical-align tag will add an offset to the text under the <small> function, simulating the look of the old <sup><small> tag combination. we can't actually bring back real <sup><small> text because, as far as i'm aware, tumblr blocks it. just like with the prior step, mess around with the amount of vertical align to your hearts content ! after this you're finished, like actually finished.
#okay to rb#resources.#tutorials.#idk what else to tag.... just felt the need to spread the word#indie rp#rp help#rp formatting
88 notes
·
View notes
Text
I think there's always fun discourse to be had whenever it comes to the definition of a genre. And by that I mean I have to fight anyone who disagrees with me
#but not as much as the guy out there who said crpgs didn't have to have rp and shouldn't have quests#but needed to be isometric and should be turn based and 2D or you were on thin ice and seemed willing to kill over it#thinking about that guy#definition also included that it should be so hard that most people who played it died in tutorial and quit#as much as that guy is a bit out there I don't consider any very action focused 3D game without RP even potentially a CRPG#so really who am I to judge. skyrim isn't a CRPG or any kind of RPG even. and yet some people hold... a mysterious other belief.#rambling
14 notes
·
View notes
Text
updated tutorial on trimming posts on mobile
reply formatter mobile edition:
i’ve been trying to figure out a way to adjust the roleplay formatter to be used on mobile but unfortunately tumblr just does not render blog themes well on mobile browsers (my guess is to force people to use the app but i digress)
so i made a mobile friendly version with carrd. the only differences are the box size option and the night mode toggle, which the carrd version doesn’t have.
if you don’t use either of these you can use the carrd version on desktop as well, everything else is the same. for the purpose of this tutorial i’ll be using the carrd version as it is optimized for mobile screens.
if you can consider tipping my ko-fi or using my carrd referral code ( DPY34V1H ) to help me keep hosting the formatter ♡
this is a very easy level tutorial
even if you’re not comfortable with html!
this post may be long because of the screencaps, but the method itself is only a handful of clicks and it shouldn’t take you more than a minute.
this method technically works on any browser, but it works best on firefox as it is the only browser i’ve tested that keeps all formatting (bold, italics, color text, etc).
i encourage you to install firefox on your phone to at least cut replies, you could technically use the tumblr app to write and format your reply once you get the code of the trimmed reblog.
what you will need:
a mobile browser (can’t stress this enough i strongly suggest firefox, specially if you don’t want to have to manually add your partner’s formatting. it will make your life easier)
the mobile friendly reply formatter.
that’s it.

tutorial:
step one:
first thing you’re going to do is copy this line of text:
?redirect_to=%2Fdashboard%3Frestore%3D1&avoid_redirect=1
time saving tip! depending on your device you may have a “pin” or “lock” option in your clipboard, use it so you can keep using it without looking for this post and copying it all over again.
if your device does not have a pin / lock option, you can create shortcuts assigning a short word or symbol and when you type it the saved line of text will be suggested.
here is a tutorial for android and ios.
step two:
save the post you want to trim as a draft.
you can do this on the app.
step three:
open your draft on your mobile browser. click to edit the address bar.
the url of this post will look like this : https://www.tumblr.com/edit/USERNAME/POSTNUMBER
now delete the part with your username and one of the brackets (either the first one or the last one, it doesn’t matter which one, just don’t leave 2 brackets.
then add “?redirect_to=%2Fdashboard%3Frestore%3D1&avoid_redirect=1" (without the quotes) at the end of the link, then click on the link and load the page

thanks to this anon who figured the link trick out💗
step four:
select everything and copy

then click on the x to remove the previous reblogs.
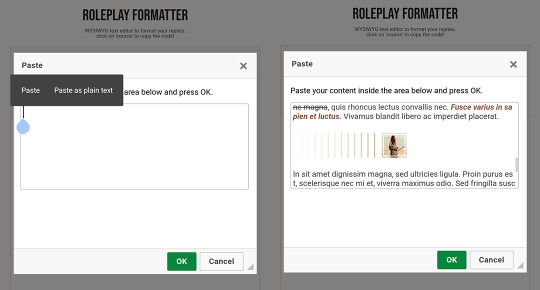
step five:
now go to the reply formatter here, click on the paste button and you’ll get a pop window.
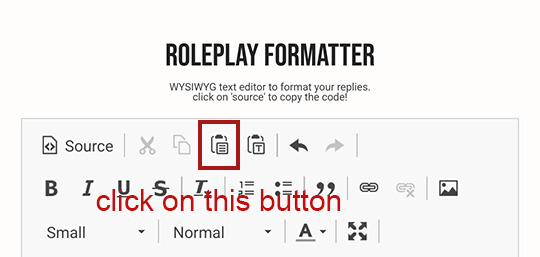
there tap your screen until you get the options “paste” and “paste as plain text”. use the regular “paste” option.
step six:
select the blockquote text you want to delete trimming the reply like you would on desktop with editable reblogs.
and that’s it ! you’re done.
from here you can either write and format everything on the formatter
or you can copy the html code from trimming the post and paste it on your trimmed draft on the app
ir order to do that, on step 4 add anything to the body of the post so you can save the post (it can be just a comma or a keymash)
then write + format everything on the app. just remember to switch the editor to html on the app!
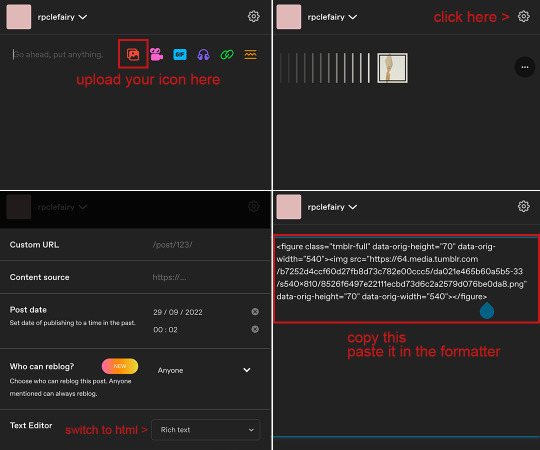
bonus tip + tutorial: uploading icons
save your icons folder to your phone / google drive (and then save to your phone the icon you want to use)
on your browser (NOT THE APP) create a new post
upload your icon
switch the editor from rich text to html
copy everything, paste it in the source code of the formatter.
you’re done!
383 notes
·
View notes
Text
youtube
been a while since I made one of these hehe!
Weasel belongs to @sasster
finished under the cut

#my art#speedpaints#fantroll#fantroll rp#fanart#tutorials#homestuck#homestuck oc#homestuck rp#hiveswap#friendsim#pesterquest#Youtube
13 notes
·
View notes
Last Seen Blogs
dejcis00
Astolfo

boethius
Untitled

kantongsampahmedis
Untitled

bibluemoon
battleaxe bisexuals unite!

mr-privatelife
Mr.Privatelife