#rpc tutorials
Text
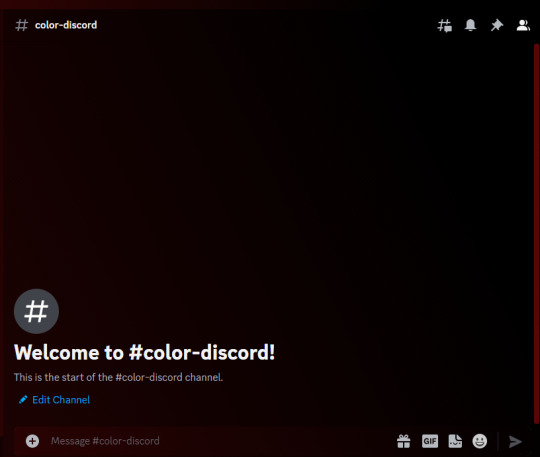
A USEFUL TIP WHEN USING BETA TEXT EDITOR
many of us seem to be struggling with a minor bug when it comes to typing out our responses on tumblr using the BTE. the biggest one i've come to notice is when we make our replies small. it's super common for the BTE to hardcore glitch and have the last couple of letters regular sized while the rest of the response is small. here is an example:
Lorem ipsum dolor sit amet, consectetur adipiscing elit. Aliquam eros leo, feugiat sit amet massa at, dapibus consectetur massa. Aliquam eget metus nec dolor efficitur sodales faucibus interdum dolor. Maecenas mollis justo euismod varius dictum. Etiam scelerisque erat vitae est hendrerit, a maximus justo tempor.
idk about you but i find that to be pretty annoying but that's just me.
another problem is that, for some odd reason, we're not able to do a form of "indentation" when typing out our responses on here via the BTE. why? idk. i really don't. now when i say "indentation" i mean like how one does when writing a research paper for school or writing out a fanfic. you know ... something like this:
Lorem ipsum dolor sit amet, consectetur adipiscing elit. Aliquam eros leo, feugiat sit amet massa at, dapibus consectetur massa. Aliquam eget metus nec dolor efficitur sodales faucibus interdum dolor. Maecenas mollis justo euismod varius dictum. Etiam scelerisque erat vitae est hendrerit, a maximus justo tempor.
so what i honestly recommend doing is to just type all of your responses on Roleplay Formatter. the reason for this is because Roleplay Formatter is what many coders and graphic designers call WYSIWYG. for those of you wondering, WYSIWYG stands for What You See Is What You Get. this is very beneficial for those of us who code, do gfx, and whatnot because it helps us get a better idea on what to expect for the end result.
it's super easy to use and i honestly can't recommend it enough. really. and not only that but you can use hell of a lot more colors for your text through there than on here where you only get eight options to choose from. all you need is a website that gives you the color hex and you're golden. here's a couple of sites i recommend you using for getting color hexes:
encycolorpedia
color-hex
wikipedia ( a - f ) / ( g - m ) / ( n - z )
#rp tutorial#rpc tutorial#rp tutorials#rpc tutorials#rp#rpc#tutorial#tutorials#roleplay#roleplay community#community#roleplay tutorial#roleplay tutorials#how to#how#to#beta text editor#bte#beta#text#editor#wysiwyg#what you see is what you get#what#you#see#is#get
231 notes
·
View notes
Text
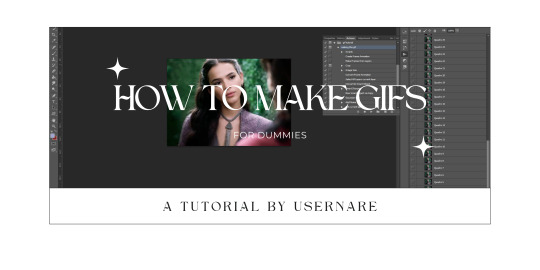
we all know that giffing can be a pain in the ass sometimes. it is time-consuming, tiring, and annoying. but highly addictive, too. there's no cake recipe for making gifs, but everyone has some tips and shortcuts developed through time and hard work, the same way as our nanas have their special chocolate cake recipe.
that being said, welcome to my crazy attempt to make a comprehensive tutorial. this is how to make gifs for dummies, my name is nare and i'll be your host during this extensive ramble dressed as a tutorial.
my giffing process (and this tutorial) is divided into 5 phases:
downloading the footage;
cropping the scenes;
extracting the frames from said videos;
organizing the frames into the folders;
and making the actual gifs.
at google docs i'll provide every link you might need, and will try to explain everything you need to start making your own gifs. thank you!
#tutorial#gif pack tutorial#gif tutorial#rpc#rph#rpt#dearindies#supportcontentcreators#usermina#userdevon#idk who to tag#but i hope it helps anon#nare: tutorial#res: useful
468 notes
·
View notes
Text
What is going on with cutting posts?
You may have seen some posts floating around lately about the beta editor and trimming reblogs, and possibly found yourself extremely confused trying to figure out what this tangled web of editors, extensions, and add-ons even means. I’ve been on this site for years, and I still find the whole thing terribly confusing.
So this post is my effort to explain everything -- legacy vs beta, New XKit vs XKit Rewritten, editable reblogs vs trim reblogs -- everything. This also doubles as a tutorial for the various methods of cutting posts.
TL;DR
Tumblr is in the process of switching to a new post editor that some old users have opted into, while new users have been forced into it.
The old Editable Reblogs extension does not work with this new editor, requiring people to use a new extension called Trim Reblogs.
Trim Reblogs and Editable Reblogs are not compatible. If your partner uses Editable Reblogs, you cannot cut their posts properly using Trim Reblogs (unless you’re willing to do some tedious and frankly unreasonable workarounds).
The only way for everyone in the RPC to cut their posts properly and efficiently is if everyone moves to the new system and uses Trim Reblogs. Clinging to the old system with Editable Reblogs is actively creating issues for the people using the new system -- some of whom do not have a choice.
Cutting Posts
Cutting posts is the act of removing older replies on a thread when reblogging it. This goes by several other terms, including trimming replies/reblogs or any variation of that wording, but I will be referring to it as cutting posts to avoid confusion with the Trim Reblogs extension, which will be coming up a lot.
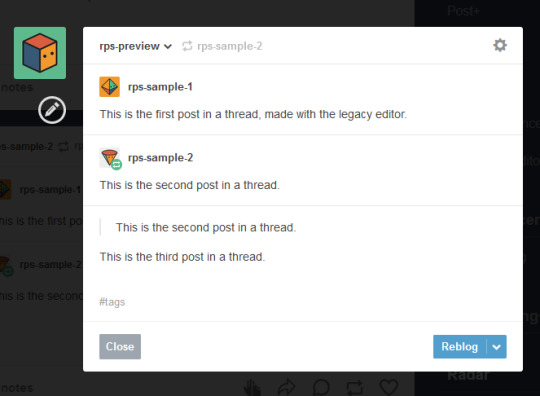
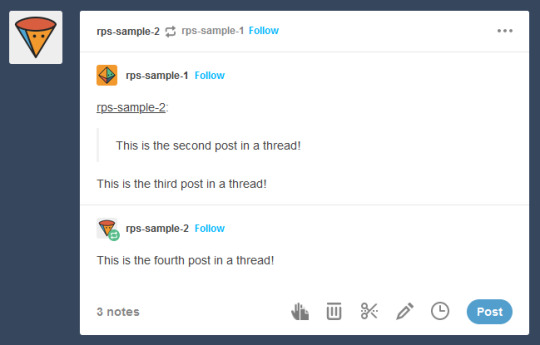
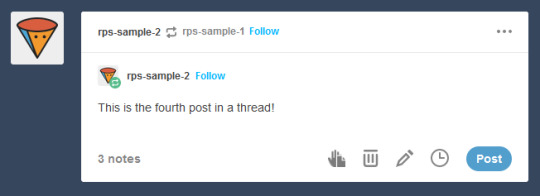
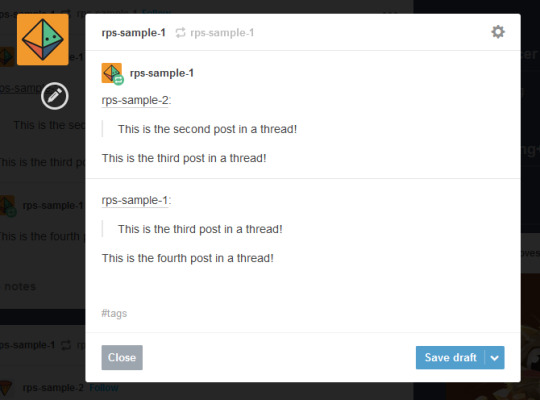
Typically, when cutting a post, you only keep your latest reply and the reply from your partner that immediately precedes it. This means that instead of a thread looking like this...

It would like this:
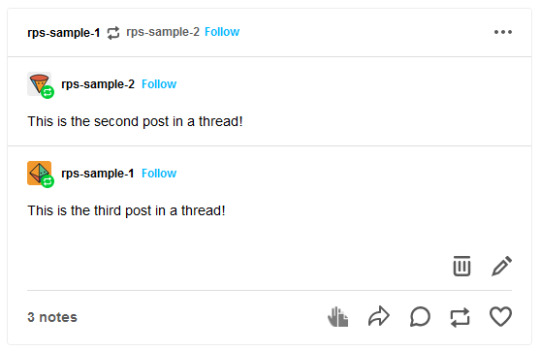
Or like this, depending on the method used:
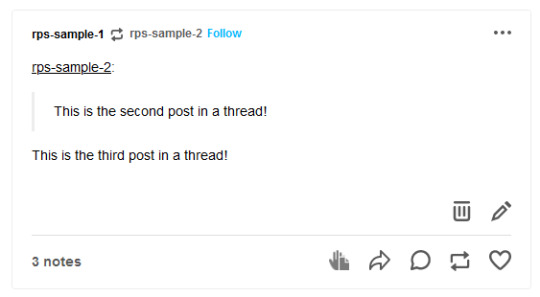
In either case, the first post is gone while the second and third post remain.
Cutting posts is done so that threads aren’t all extremely long on the dashboard. When there’s three short replies like this sample, it’s not that bad. But imagine a thread with twenty replies where each is several paragraphs long. That would require people to scroll and scroll and scroll to get past it. And since the same thread would be reblogged multiple times, your dash might become the same posts, over and over and over again, with only one new addition at the end each time.
Cutting posts is extremely common Tumblr RP etiquette. Many people won’t follow you if you don’t regularly cut replies, due to how irritating the alternative is.
Copy and Paste (Outdated)
Once upon a time, you used to be able to cut replies without any kind of extensions. Unfortunately, those days are gone.
That method worked as follows. You would go to reblog as usual...
Copy and paste the last reply, putting it in a blockquote (or using any other formatting you like, really), then add your own reply underneath.
Then you can simply hover over the older replies and click the red X in order to remove them.

And this used to work. But now, the very first post in a thread cannot be deleted -- only later reblogs can. This means that the first post will always stay above the others, no matter how far along in the thread you are.

So since cutting posts can’t be done normally, we have to rely on browser extensions. This is where things get complicated. And also where I need to explain the different editors.
Legacy vs Beta Editor
Every time you make or reblog a post, you are using Tumblr’s post editor to do so. This is the area where you type up your post, add images, etc. Tumblr has been using the same editor for several years now, and it’s called the legacy editor.
However, Tumblr has been slowly rolling out a new text editor, called the beta editor. You may remember the beta editor when it was first rolled out a couple years ago as a buggy, unstable mess -- that’s not the case anymore, and it’s no more buggy than the current editor. For text posts, it’s functionally pretty similar, and even has a few features that some of you might want, such as easy colored text and the ability to make posts non-rebloggable. (Photo and other posts are fairly different, and I know gif makers have some pretty understandable reservations and complaints about it, but I won’t be covering that here.)
Older users have the option to toggle between the legacy and beta editors at will, while new users (starting around November/December 2022) are locked into the beta editor and cannot switch back to legacy.
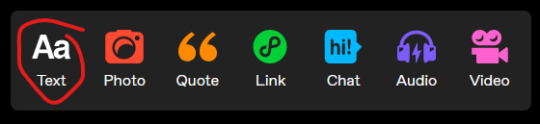
To check which editor you have, go to make a new text post and look in the top right corner.
If you see either of these:


You are using the legacy editor, with the option to switch between the two.
If you see this:

You are using the beta editor, with the option to switch between the two.
If you don’t see anything at all, you are using the beta editor, and cannot switch.
While the text interface of the two editors isn’t terribly different for roleplay purposes, the methods by which you need to trim reblogs are entirely different. Each requires a different extension -- specifically, a different version of XKit.
XKit
XKit is a browser extension designed to add features and functionality to Tumblr. It includes many quality of life features such as a mutual checker, better tag tracking, queue improvements, ad blocking, more detailed timestamps, and so much more. (It was preceded by a similar extension called Missing E, if you’ve been here long enough to remember that.) And among all of these many features is the ability to cut replies.
The original XKit is no longer in use, having stopped updates in 2015 and being entirely unusable now. However, a few new versions of XKit have popped up throughout the years.
New XKit & Editable Reblogs
A different team created New XKit as a successor to the original, a similar extension designed to restore many of the same features.
New XKit’s feature to cut posts is called Editable Reblogs. It works by adding a pencil button to the left of the post when you reblog.

Clicking that button will break the post’s formatting -- actually changing it to how Tumblr posts used to be formatted -- but allow it to be edited however you wish.

So in this instance, I could simply select the first reply and delete it before adding my new reply underneath.
Editable Reblogs is only available if you use the legacy editor. It does not work with the beta editor and does not even appear as an option.
XKit Rewritten & Trim Reblogs
In 2020, Tumblr began to roll out its updated dashboard, which is now permanently in effect for all users. While the new interface looks very similar, the code was actually entirely redone, and behind the scenes functions very differently from the older dashboard. As a result, some of New XKit’s features no longer work as intended -- though a few still do, such as Editable Reblogs.
In response, the New XKit team decided to similarly start from scratch and created XKit Rewritten, another iteration of the add-on with similar features once more. However, not all New XKit features are available on XKit Rewritten, and vice versa. Many people are running both extensions simultaneously to take advantage of features on both.
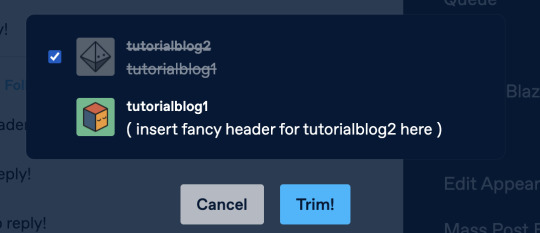
XKit Rewritten’s feature to cut posts is called Trim Reblogs, and it works completely differently than Editable Reblogs. With this, you first need to save the thread to your drafts with your reply already written.

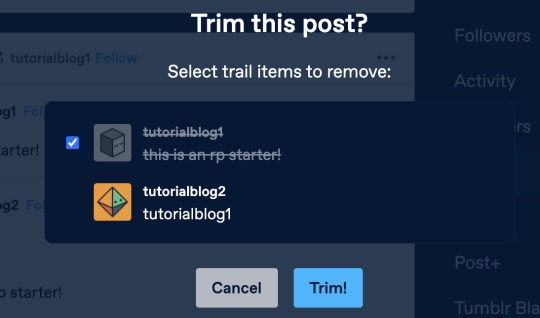
You’ll see a scissors icon appear along the bottom of the post. Clicking that will open the trimming options, letting you select which previous reblogs to delete.
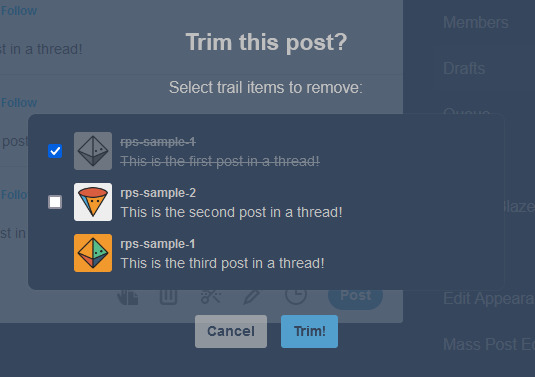
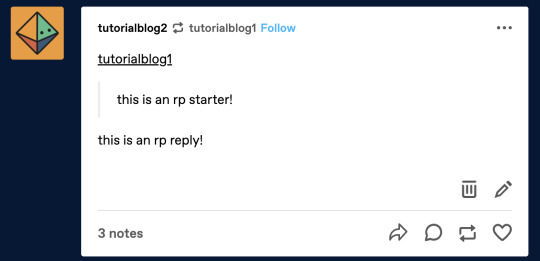
Clicking Trim will remove the selected reblogs.

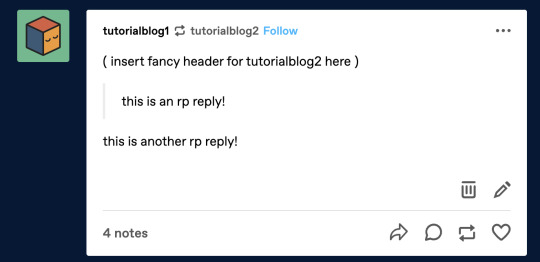
You can then click post. You’ll note that this method preserves Tumblr’s formatting, as opposed to Editable Reblogs, which breaks it.
EDITED TO ADD: Apparently you don’t need to already have your reply written in your drafts anymore. You can save the post to your drafts without adding anything, use trim reblogs, then edit the post to add your reply. Either works fine.
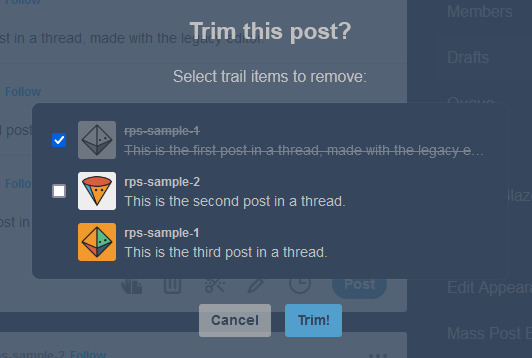
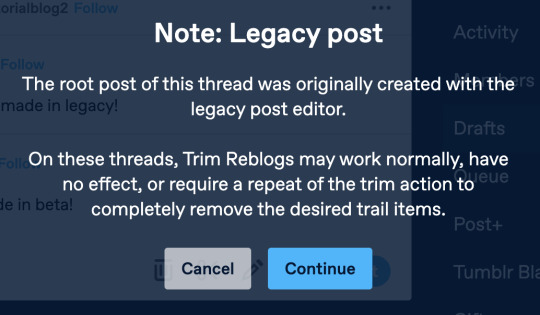
This method does have two major issues, though. First, if the first post of a thread was created in the legacy editor, then the system gets really buggy and just doesn’t work.
This is what happened when I tried it out. Initially, it seemed to work as expected.

However, when I posted the reply, or simply refreshed my drafts, this happened.

Attempting to trim again simply caused this to repeat. There is no fix for this. This means that for this method to work, both you and your partners need to be using the beta editor.
EDITED TO ADD: You can fix this double posting by either using trim reblogs before adding your reply, or by adding your reply, using trim reblogs as intended, refreshing your drafts, editing the post, and clicking the red X to remove the first of the double postings. I have a better guide here.
The only other alternative is to move the thread to a fresh post when you reply, so that the new first post was made with the beta editor. Then you can cut future reblogs of the post using Trim Reblogs as normal.
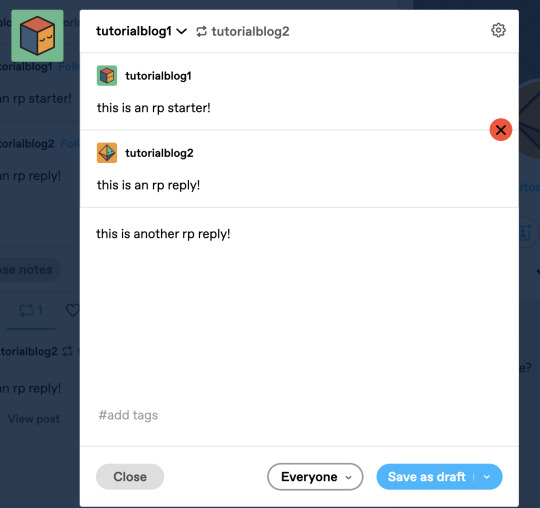
However, the other major issue is that if your partner uses Editable Reblogs, you cannot use Trim Reblogs as intended. Let me show you why.
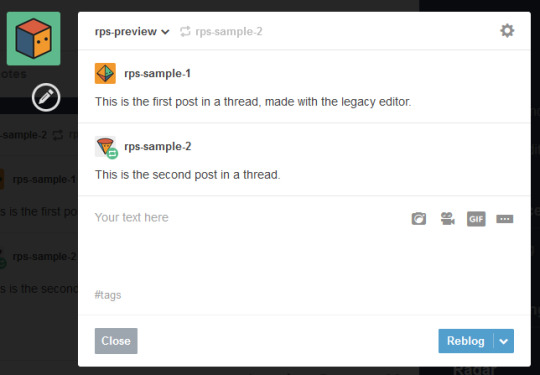
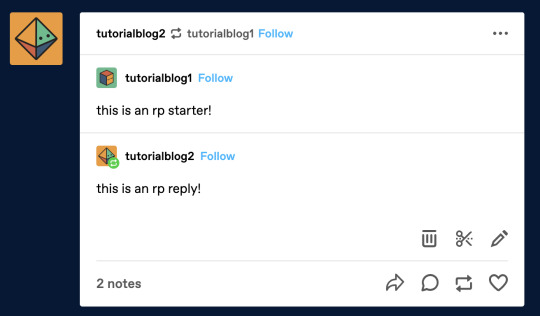
Say I want to reply to this post.
I’ll add my reply and save it to my drafts, as before.
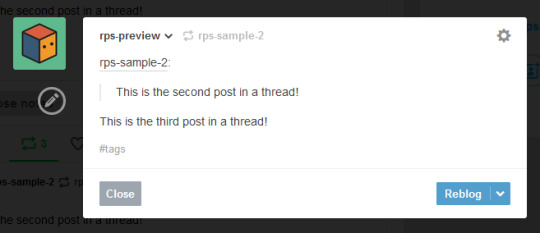
You may have spotted the issue already. The first and second replies are now “combined” so that Tumblr sees them as a single post. We want the post to be interpreted like this, so that I can remove the oldest reply while still keeping the one immediately prior to mine.

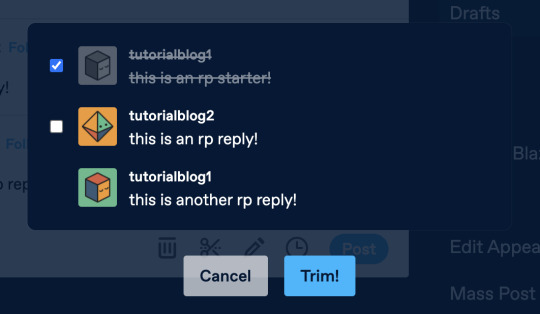
But Trim Reblogs can only see it like this.

When I go to trim reblogs, I can only remove the previous replies as an entire unit. I can’t remove just the oldest reply and keep the one immediately prior -- either it all stays or it all goes.

This is admittedly better than nothing. However, most people do want to keep their partner’s previous reply for reference, and just to have on their blog. This means a lot of people using Trim Reblogs simply don’t cut their partner’s posts at all.
You might be able to get around this issue by combining it with the outdated cut and paste method I described above. When saving to your drafts, paste your partner’s last reply above your own, using a blockquote or whatever formatting you like to separate the two.
You can then use Trim Reblogs to remove the first post, leaving only your copy pasted reply. The formatting is broken, but it’s at least workable.

However, this will only work if the very first post of the thread was made with the beta editor -- since people using Editable Reblogs have to be using the legacy editor, you’re likely to still run into issues on a lot of posts. Which can again be solved by moving the thread to a fresh post made with the beta editor, but at this point we’re stacking so many issues on top of each other that I really can’t blame you if you just don’t want to bother with any of them.
All of this brings me to...
It’s time for the RPC to collectively switch to the new system
I’ve stuck to the legacy editor myself due to the issues described above -- using Trim Reblogs when everyone else still uses Editable Reblogs is an enormous pain that I don’t want to deal with. Even as I make this post advocating for people to switch, I’m dreading actually doing it, because I know that most of my partners still use the old system and I will have nothing but headaches.
But the thing is, everyone refusing to switch is what’s creating the headaches in the first place. If we all moved to the new system together, these issues would simply disappear, and we would all be able to effortlessly cut our posts using Trim Reblogs without ever having to worry about it again.
The RPC needs to collectively make the switch, for two reasons.
First, Tumblr is going to switch everyone to beta eventually. Refusing to switch now is really just delaying the inevitable -- it’s not a question of if you’re going to be forced into the new system, but when. By switching now, you can go ahead and get used to it and start giving feedback to both Tumblr and the XKit Rewritten team if you find anything buggy or broken.
Second, as I said above, new users are locked into beta, with no option to switch back to legacy. Trim Reblogs is their only option for cutting posts -- and as long as most of their partners are using Editable Reblogs instead, they cannot cut their posts properly. Their only option is to use a series of increasingly ridiculous workarounds that most people won’t understand. The fact that it took me 1500 words just to explain everything should tell you how confusing the whole thing is -- you can’t be that surprised when a lot of people, upon realizing that they can’t cut posts without a whole lot of tedium, decide to just not bother cutting them at all. The best way for everyone to be able to cut their posts properly and efficiently is for everyone to be on the same system.
Yes, the beta editor is different. It has some weird quirks. It will be a bit of a learning curve to get used to a new system of replying to threads. But this is a change that’s going to happen eventually, and is a change that needs to happen for a lot of people to able to cut their posts properly.
(It’s also worth noting that -- assuming you still have the option to switch -- you may be able to toggle between the two systems during the adjustment period. I haven’t been able to test this yet, but I see no reason it wouldn’t work. Use Trim Reblogs whenever possible, and especially for the partners that have already made the switch. But when you get to a reply that it just won’t work for, toggle back to the legacy editor and use Editable Reblogs just for that thread. It’s a bit annoying, but it could be the middle ground needed to help people start making the switch. And once the majority of the RPC is on the new system, then this won’t be an issue anymore.)
#rph#rpt#rpc#editable reblogs#trim reblogs#*my stuff#*my tutorials#this started as a tutorial for cutting posts and led into something else lmao#beta editor
2K notes
·
View notes
Text
how to use xkit rewritten / trim reblogs on mobile:
updated for december 2022
this method is beta editor / npf compatible
my previous tutorial to trim posts technically still works, but as tumblr is discontinuing legacy posts that method is already outdated and unhelpful for people who have no other option than to use the beta editor.
but fear not! i've figured out how to use xkit rewritten on mobile and it's VERY easy.
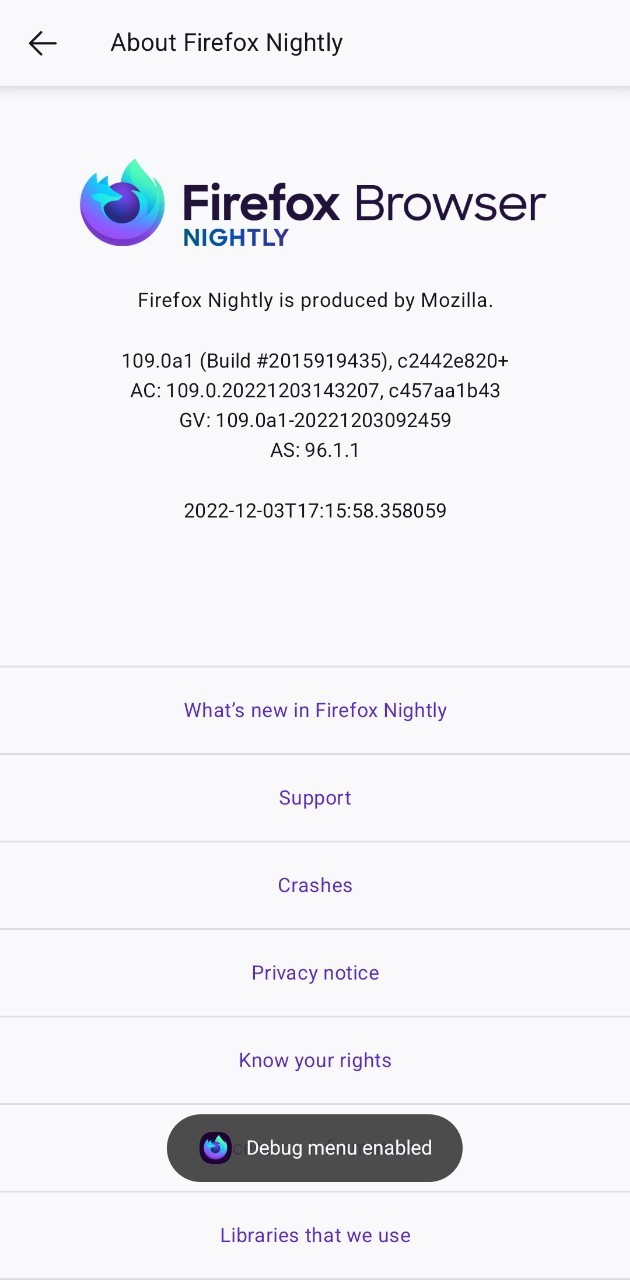
install "firefox nightly for developers" OR "firefox beta for testers". must be one of these two, not regular firefox.


go to settings, scroll down to the "about firefox" page at the end and then click on the logo 5 times until debug mode is enabled.

back to settings and below add-ons you'll see the 'custom add-ons collections' option.
add 17683742 as the ID and name it 'tumblr' like so:

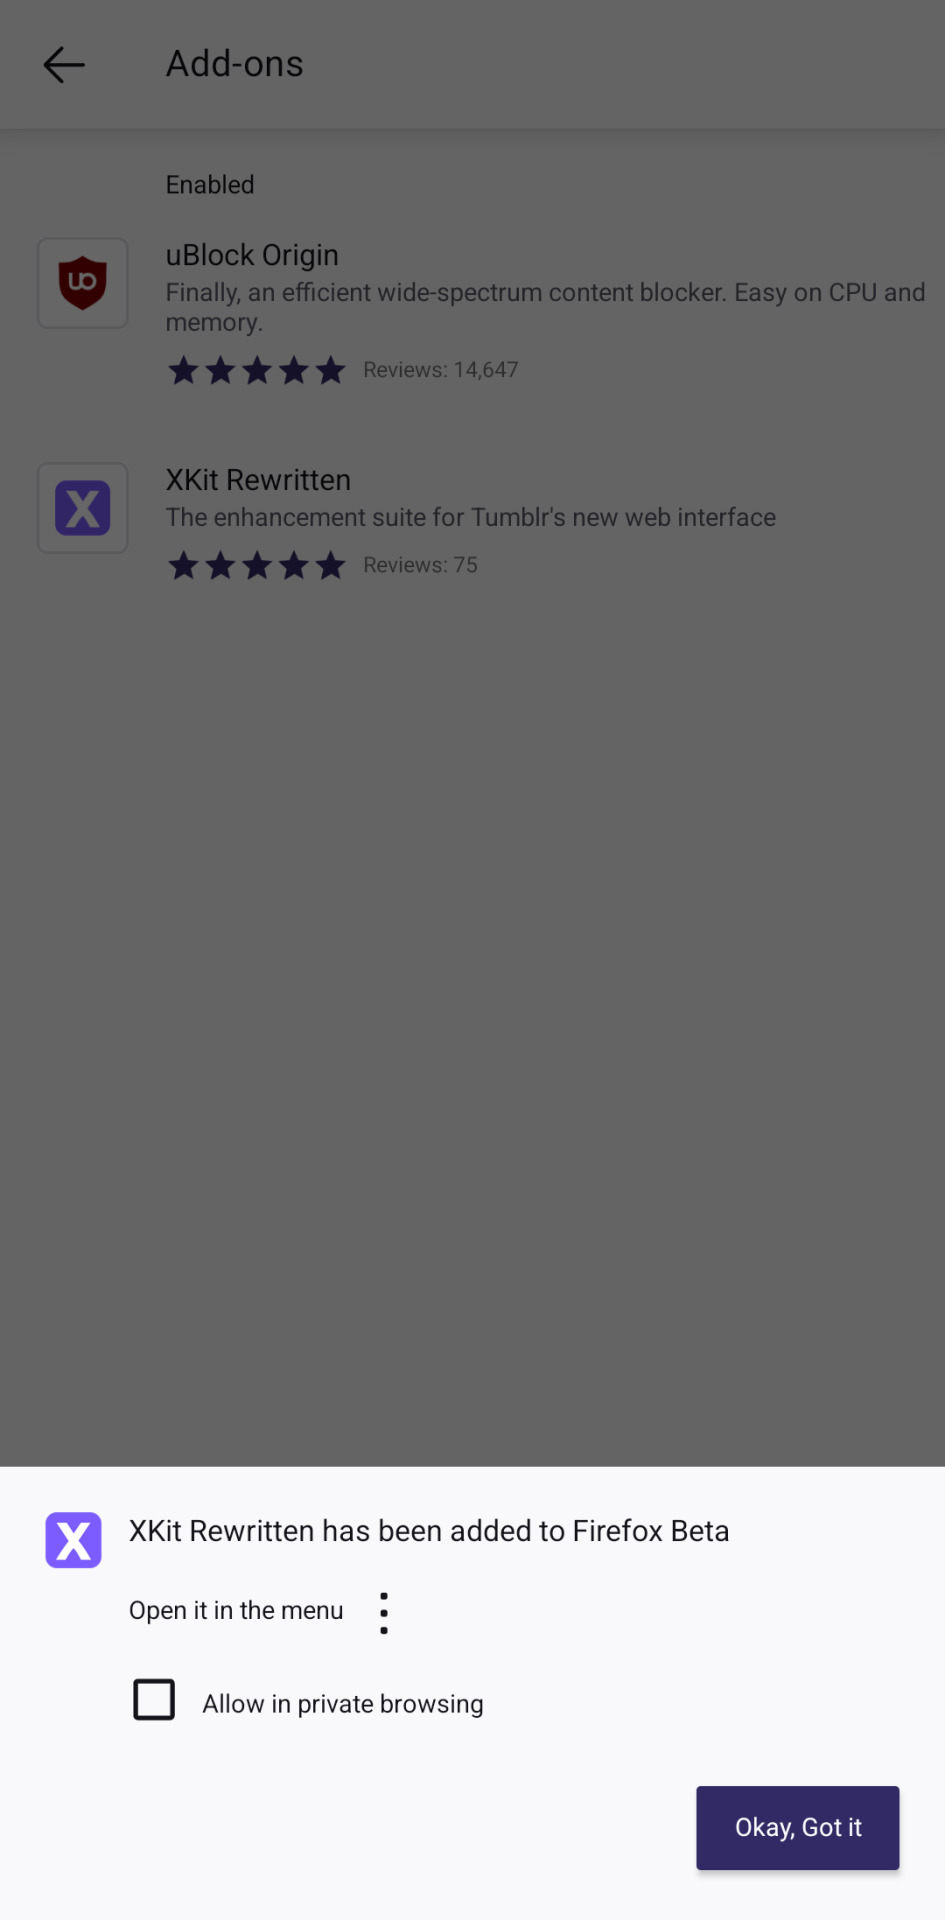
the browser will give you a little pop up that the extension is being added and the app is being restarted.
now enter the app again, go to the add-ons section and xkit rewritten should be loaded there. i've included ublock in the collection so you can use both because you absolutely should.
on firefox beta you'll see the extension with a +, click on it to add it.
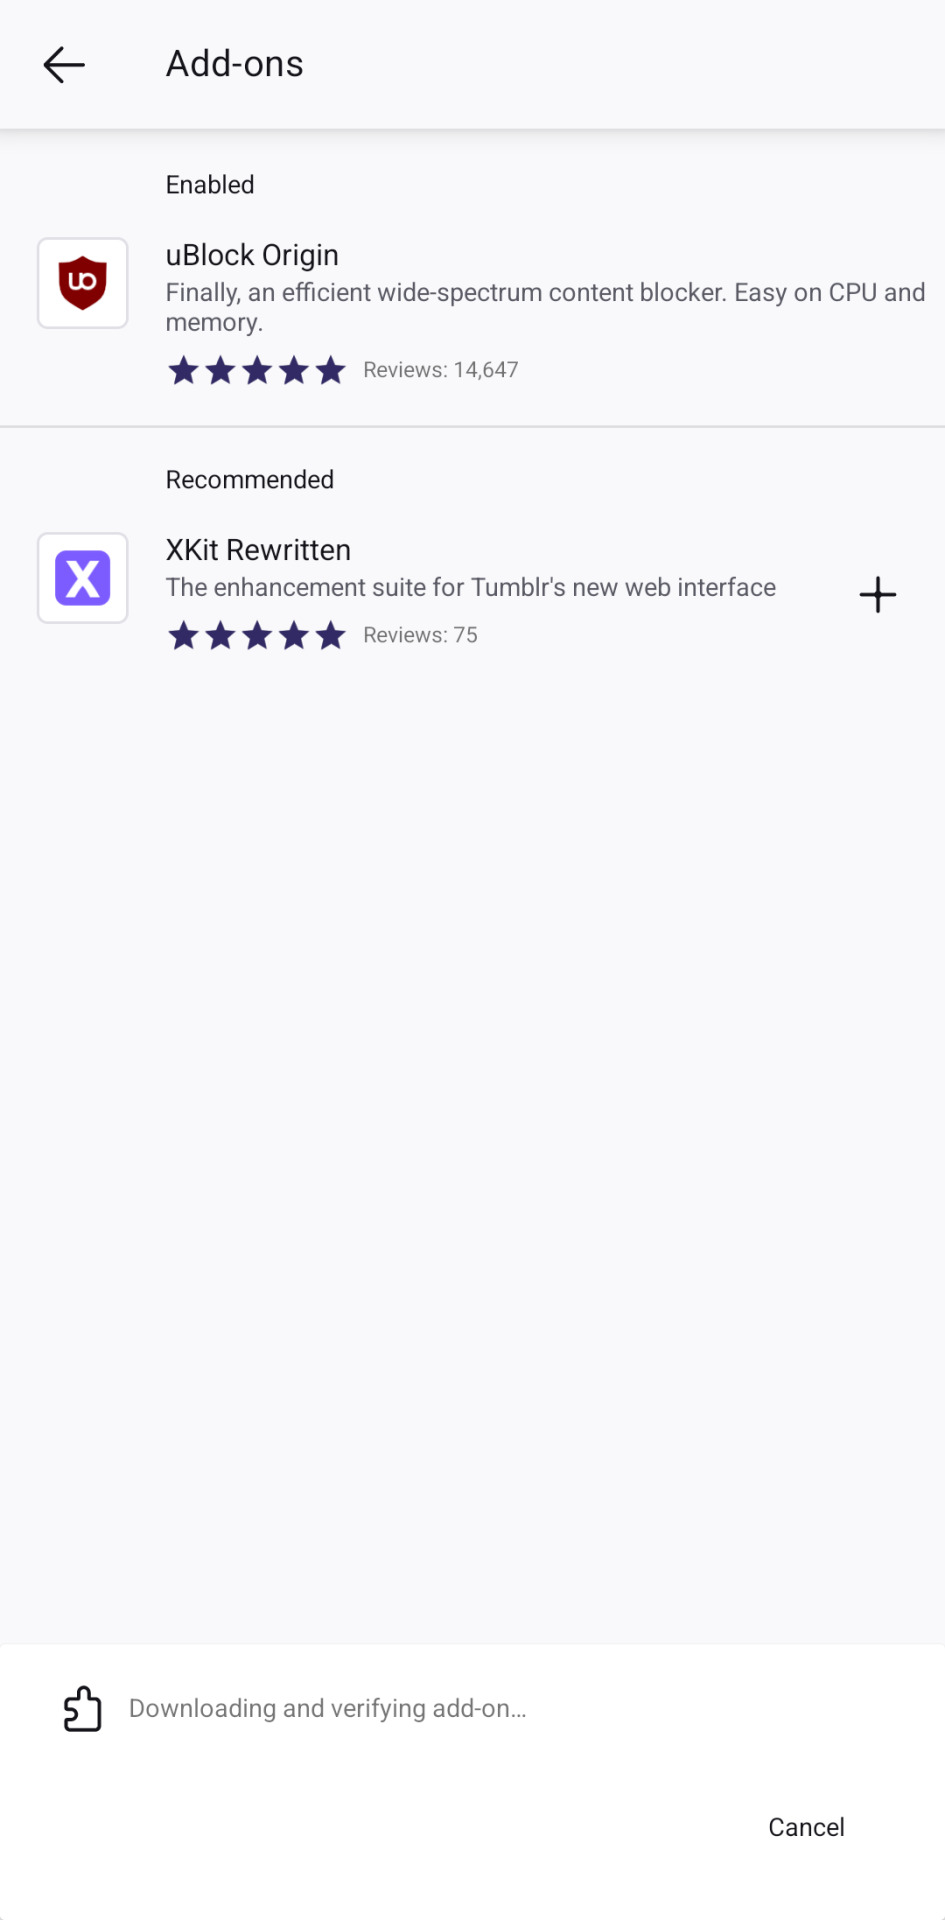
now cut your replies the same way you do it on desktop with xkit rewritten!
save the post as a draft
click on the scissor button
it's done!


please consider that this is experimental so not all of xkit rewritten's features will work on mobile. trim reblogs does work though!
i still recommend using my roleplay formatter for formatting your replies and then copy pasting the html on your reblog.
other useful links :
this post explains the differences between the two editors and why we're switching.
this post is a tutorial on how xkit rewritten's 'trim reblogs' feature works.
1K notes
·
View notes
Text

✦ Okay, I give in. Let's upload our gifs on the beta editor to prepare for a gif pack page. Resources are available at the bottom, so lets get started !!
So first things first, you can only upload 30 gifs at a time. Now for me, I will always upload as I gif, around every 20 gifs, then upload to the page (this also ensures I don't skip any or have doubles) and keep gifing. That used to mean that I don't have to wait for tumblr to load 300 gifs and die from impatience. For the rest of y'all that means you're going to have to batch upload. I know, I'm sorry.
Note: With the help of @nataliealynlind we discovered that the daily limit is 250 gifs! So if you have more than that, prepare to upload your gifs over the course of a couple days or use a second blog. (imo this is another great reason to upload as you gif! that way you don't have to get stuck at 250!)
So after you upload your gifs (in this case I only did 10)*, you're going to go to the gear at the top of your post and click it. Then scroll all the way to the bottom where it says Text Editor. This looks familiar, right?

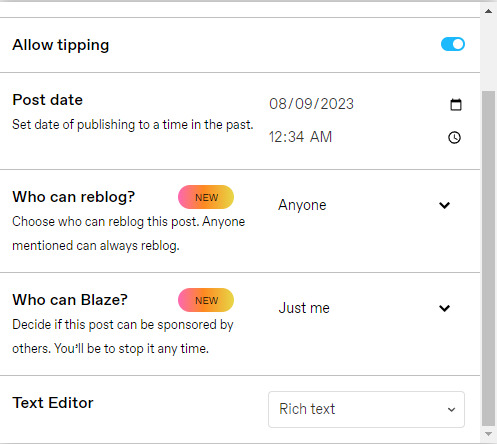
*Note: If you don't save it as a draft first, your gifs will be in .gif format, not .gifv. This means you can skip removing this tag later on, but I'm not sure if gifs that are uploaded but never saved/drafted will later disappear at some point. To be safe, I would save it as a draft. I just forgot at this part tbh
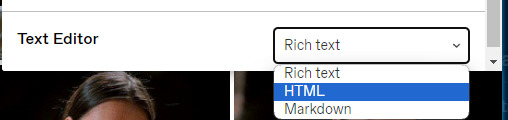
Well the good news is, you only have to change this once! The bad news is, we don't do Markdown then HTML anymore bc Markdown doesn't strip any of the code anymore 🙃 So just change it to HTML
Now it should look like this! Fun!
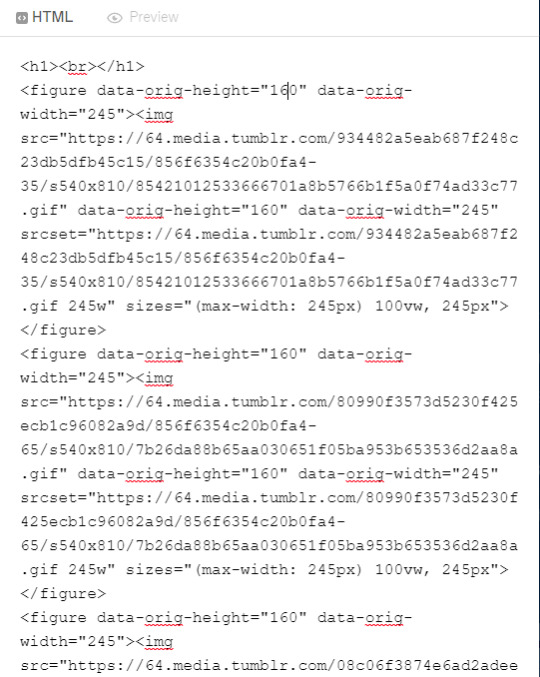
Okay, now we're going to copy that text and take it on over to our new best friend, the HTML Cleaner! So you're going to want to paste it on the right side of the screen. Your gifs should appear on the left side. If both sides have text, that's how you know you pasted it on the left.
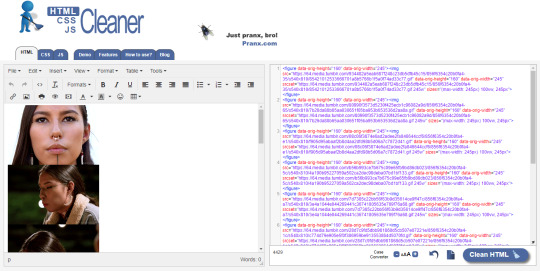
So in order to get ride of all this extra code, it's going to take a couple extra steps. First, you're going to check these boxes on the left hand side.
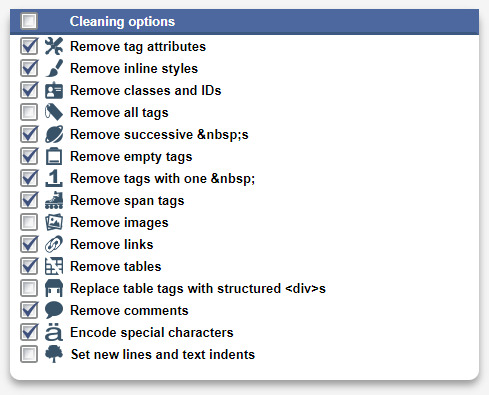
Now, on the right hand side, you're going to enter these under Find and Replace (copy/paste section below!!). I know you're like, uh what? Where the hell did you get those numbers? Well, I got them from our gif post code!
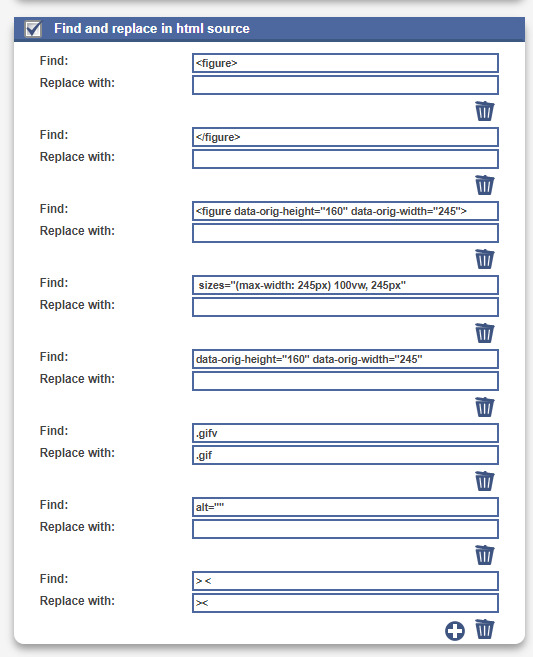


For easy copy pasting:
Find: <figure>
Replace: (leave blank)
Find: </figure>
Replace: (leave blank)
So after you add the specific widths for your gifs, you're also going to want to add the following:
Find: .gifv
Replace: .gif
Find: alt=""
Replace: (leave blank)
Find: /> <
Replace: /><
NOTE: If your gifs are usually the same size, I would recommend saving these snippits above on your computer's sticky notes or a draft to copy/paste for future uploads! While I do appreciate the viewer traffic, I'm sure coming to this tutorial every time is gonna get old real fast.
After all that, click Clean HTML

And now, your code should look like this! If there's still a space between your image links, just click Clean HTML again and it should get rid of it!

Now your code is nice and clean to put into your gif pages! Not quite sure how to do that? Read the Setting Up Your Sidepage section in this older tutorial!!
Resources
HTML Cleaner
My Gif Pack Page Codes
Recommended Gif Pack Page Codes (tag)
Previous Tutorial (How to upload to a Standard Sidepage)
Barebones Code (for previous tutorial)
#rpc#rph#gif pack tutorial#uploading gifs on beta#rp tutorial#beta editor tutorial#mytutorial#rp guide#me: i'm tired of this (remaking this tutorial every other year) grandpa#tumblr changing posts every five minutes: that's too damn bad!
157 notes
·
View notes
Text
fast .mkv (to .mp4 / .mov / etc) conversion
are you sick and tired of wrangling with .mkv files when you want to make gifs? are you mad at all the online converters having a 1gb limit?
download amvpack from amv101.
little tutorial under the cut because some friends have reported a little confusion on what to download! (**note, as far as i can tell, this download will expire by the end of the year, 12/31/2023)
download the appropriate software for your operating system. the website offers windows & mac.
install the package as you usually will, continue through the screens. install which programs you want from the package. you will need AMVtool.
now you should have this application. open it.

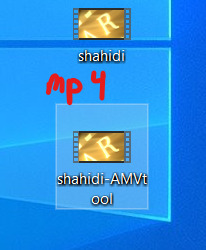
4. rename your .mkv file to something short & simple so that it converts easily. i usually choose to do the name of the person i'm giffing. open that file in amvtool by clicking add or dragging the file into the window.
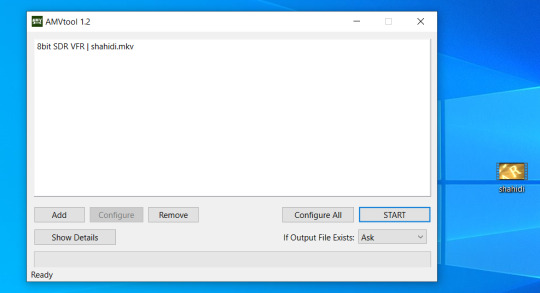
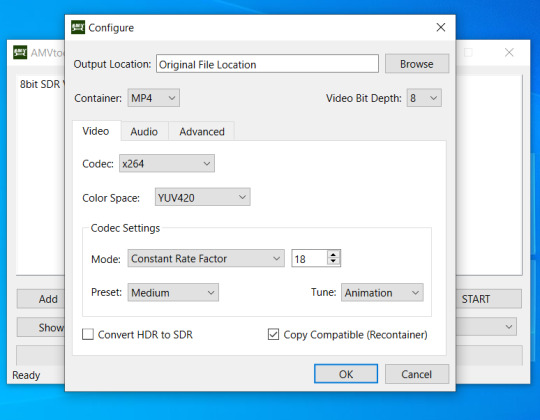
5. you'll want it to say 8bit sdr. for me, 10bit videos have never worked. idk i'm not a computer scientist. we're going to click on configure all now. (*note, you can do multiple .mkv files at once)

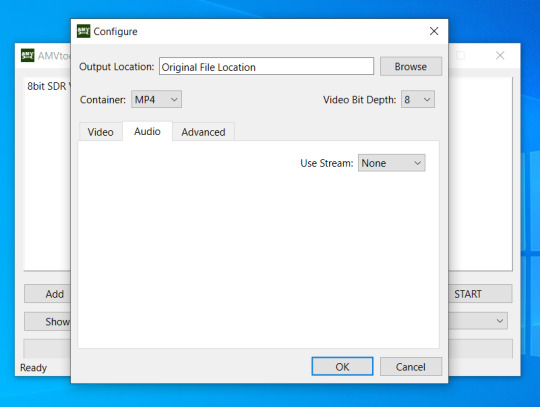
6. awesome, now you have this window. choose whatever output location you like. make sure you check copy compatible (recontainer). feel free to mess around with the other settings if you have the time. you can also convert video to .mov if you want. on the audio tab, i change use stream to none, as i don't actually watch what i'm giffing and find audio to take up needless space. click ok to save the settings and the window will close.
7. click start ! this usually takes a minute max for me, depending on how big my file is.
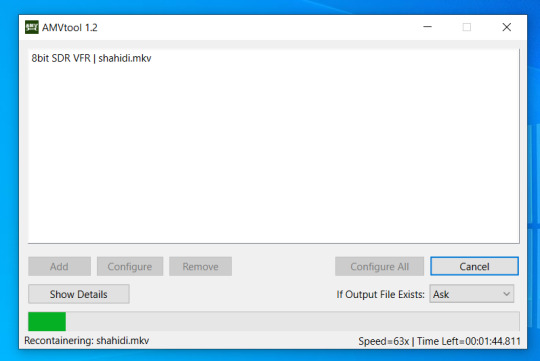
8. celebrate, because now it won't take ages to gif !

79 notes
·
View notes
Text
✧・゚ A short and easy workaround for Reblogs with Beta & XKit Rewritten

Disclaimer: This also seems to work with old Legacy-Threads when reblogging with the new Beta-Editor bc XKit Rewritten doesn’t work with Legacy. The whole trimming order and process of both combined can be confusing, but it’s important so the post doesn’t get fucked up. So technically, it's also helpful for Beta-Reblogging in general. (video below)
SO, IF YOU WANT TO AVOID DOUBLE-POSTING of your own reblog, do the following:
Hit reblog (make sure you’re using Beta).
Enter reply, whatever.
Safe to drafts.
Remove the first post with Trim Reblogs.
Safe.
Refresh drafts.
Remove your own reply that now shows twice with the Beta-Editor. You will only have one option to remove here, so that makes it easy.
Refresh.
Tadaaa.
In this way you can preserve your partner's reply if you want to, since the blockquote-format won't work like that anymore. So hopefully, reblogs with the Beta-Editor & XKit Rewritten should be easier now for you and your partners without having to move your whole Legacy-Thread to a new post after this measure. I am very nostalgic over my old stuff, so that's a reason why I don't want to do it. If you have additions or experience possible errors, feel free to add them.
PLEASE NOTE THAT THIS WILL ONLY WORK if your partner reblogged their response without any XKit-Extension. Just a plain reblog.
#rph#rpc#beta#editable reblogs#trim reblogs#xkit rewritten#new xkit#legacy editor#tutorial#*mine: edits#[ I just needed a short guide for my horrible brain ]#[ just short; no additional info ]#[ just wanted the essentials to get rid of the double reply issue ]#[ maybe it helps you too ]
455 notes
·
View notes
Text

My friend showed me this website on how to make a cool format for discord and decided to make a tutorial for everyone. If you find this cool or it helps then please LIKE/REBLOG.
Go to the channel/message area where you want to send a message. Open up THIS link in your browser.

Write whatever message you want in the section that says "Welcome to Rebane's Discord Colored Text Generator!"

The FG is going to look like the green text. The BG is going to be looking like the BLUE text in the example. You are going to then want to click "copy text as discord formatted"
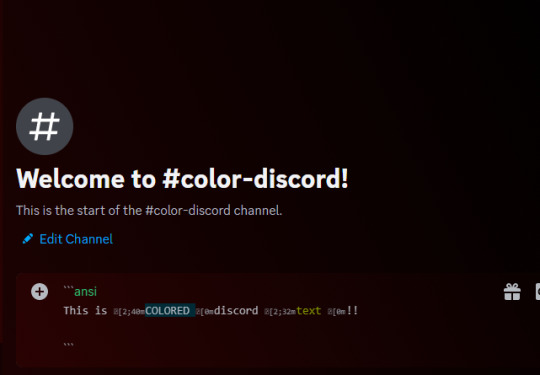
Paste it where you would normally put a message and hit send!
This is what it looks like on DESKTOP ONLY. At this time, it will not show up with this format on mobile. There are a few colors that can be done.
149 notes
·
View notes
Text
how to use beta + trim reblogs
so! we all know about beta editor by now. for better or for worse, a lot of us are using tumblr's new beta editor, and it's likely that everyone will have no choice but to use it soon. this unfortunately means a lot of us can't use the new xkit to trim our roleplay posts. there have been a lot of posts explaining this and the benefits of xkit rewritten; this one, this one, and this one especially helped me understand what's going on. however, a lot of people still seem to be floundering around in the dark so i wanted to make a tutorial that sums up everything i've learned from other tutorials as well as my own trial and error.
if you want a step by step guide to trimming reblogs (with screenshots) as well as a brief overview of beta editor's pros and cons, keep reading.
the first step, obviously, is to switch to beta editor and install xkit rewritten. the posts linked above explain how and why so i won't go into detail here. trim reblogs is the new version of edit reblogs, and it looks like this. one of the best features is that you can use it even after posting your reply, so if something glitches or you forget to trim, you still have a chance to fix it.

once you have them, there are two different ways i've seen people use xkit rewritten to trim their posts.
1. seperate reblogs
this is, in my opinion, the best and easiest way to go about this. mun 1 makes a post, mun 2 reblogs it, and then mun 1 uses xkit rewritten to trim their original post from the thread.

however, this only works if the original post was made in beta. if you try to trim a post that was made in legacy, you get get a warning, and if you go ahead with it, it's going to glitch somehow. in my testing, my reply duplicated! which is very annoying. and despite what the warning says, repeating the trim usually does not last—even if it seems like it does at first.


2. (probably) copy and paste
this is more visually reminsicent of editable reblogs from new xkit. there might be an easier way to do this that i don't know about—if so, please let me know. the name kind of explains it all; a mun will copy and paste their partner's reply, indent it, and write their own below. then, obviously, they'll have to trim all the past reblogs of the post. this is especially good for people who like doing pretty headers or editing their partner's url to look pretty, you know what i'm talking about.
there is a glitch i have run into on my own blog a few times that i was unable to duplicate, so i've just taken a screenshot of my own blog with most of the information blanked out. if only one person if using beta, trim reblogs will still sometimes glitch and duplicate. i trimmed my reblog multiple times but every time i reloaded, my duplicated reply was back. please, please communicate with your partners. i know it's annoying and awkward but it will save everyone so much frustration. especially if you're clinging to legacy, please let your partners know so they can adjust accordingly—or consider switching to beta, even if just for that thread.

but beta is not all bad i promise
i know how frustrating this all is (i fully refused to do drafts for a few days once beta really started kicking in and new xkit stopped working for me), but i am slowly coming around to it.
tags are editable now! i cannot explain the joy i experienced when i first realized this. no more typing up a long, rambling tag only to notice a typo as soon as you've hit return. you can edit tags at any point—even when going back and editing an old post! does this mean that i have accidentally started editing a tag when i meant to move it? yes but it's worth it.
making the text small is so much easier now. no more going into html or command+option+shift! instead, it's available as an option right in between the italic and link buttons when you highlight text.
you can now edit the size and type of text very easily! this did confuse me at first when i couldn't find the indent button, but it's now in a toggle list; if you click on the regular tab when text is highlighted, there are a ton of options including indent, chat, lucille (whatever that means), bigger/biggest, and more.
however, it's not all great. but it's tumblr, what did we expect.
the most frustrating thing for me personally is that you can no longer copy and past an image link into your reply, or else the image url will be tagged on underneath it. it looks funky and isn't great if you don't want to download a million gifs. while i've just been downloading/dragging the gifs i want to use to desktop and uploading them to my reply, it's annoying to have to clean up my desktop and empty my computer's trash so i'm not wasting storage space. additionally, this does not work if the gifset is in a post rather than a page; the only option there is to copy and paste and simply put up with the image url. clicking "add image" and then pasting the image or dragging the gif from the page/post's tab into the tumblr tab and onto your reply still results in a url. if anyone has figured out a workaround for any of this please let me know; otherwise, i think we should all just agree to ignore the url if it shows up. update: thank you sm to anon for informing me of @rpclefairy's roleplay formatter! if you put the gif in their formatter, copy the source, and paste that into the post when it's in html mode, not rich text mode, the link is gone! and thanks to tumblr realizing this was annoying, if you click the little link icon that appears when you hover over an image, delete the url, and hit done so it saves, the url will be gone!
formatting is......weird now. if you make your paragraph text small and then decide to add another sentence, the new text won't be small. you'll have to edit it again. text that has been formatted (small, italic, bold, etc) will be highlighted in a very strange way when the cursor is in the formatted section. as far as i've been able to figure out, even after poking around a bit in the html, there's no way to change any of this. not to sound like a broken record here, but if you've found a way to change any of this, please let me know. otherwise i think we just have to put up with this bullshit.


there's always a chance that these things will be fixed; it is still just a beta system after all. for now, i think the best thing the community can do is communicate with partners, ask questions, and just accept that there's gonna be some weird shit going on and we're all doing our best.
if any of this changes i will update this post, but in the meantime, pls share if this helped or you want to share the word. and for the last time, if i've gotten anything wrong, just let me know and i'll update.
#rpc#rp community#rp help#rph#tumblr beta#tumblr beta tutorial#xkit rewritten#tumblr rp help#rpt#idk how to tag this lmao#also i truly have no idea if this will be helpful to anyone#or if i'm just outing myself as a dumbass#if so pls just ignore lmao#also!! this is in no way an attack on people still using legacy#i'm autistic i get it#m*
377 notes
·
View notes
Note
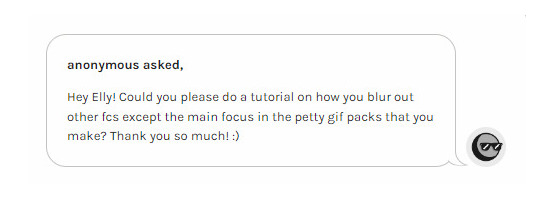
Hello. I have a quick question and I hope that you can help me. I’m about to start making gif packs and I wanted to ask how do you put the source link in the post to link to the gif page? I’ve never done anything like gif packs before and would love all the help that I can get with them.
Please and thank you in advance!
Hi! The world of gif packs on Tumblr is not easy, so I totally understand! Welcome to the chaos! I've included a picture-heavy tutorial for this. It's under a cut because of that.
Get your text post set up as you normally would for to advertise you completed a gif pack. Everyone has a different format, but for the purpose of this tutorial, I'm not focusing on that. I'll just use a throwaway private post for this.

Once you get your post set-up, click the gear icon in the corner. That'll show you some advanced set-up.
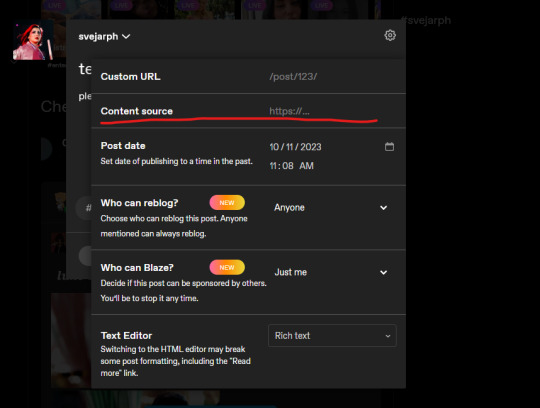
You're going to want to put the gif pack page link (or whatever you want to link - like I do my commissions info page sometimes or a redirect to a requesting resources or discord link) by putting it in the content source page. I usually add the "https://" before it just in case Tumblr wants to be wonky.
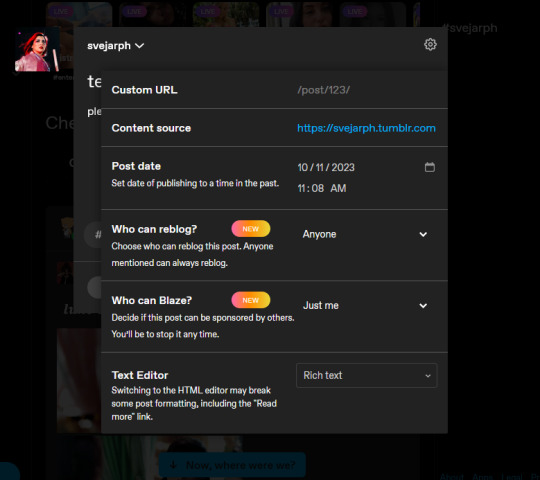
This is what it'll look like after you input something! Red means it isn't valid, and blue means it'll lead you somewhere when you click on the source link. I inputted a simple link, but you're going to need the entire URL in the space.
After this, you can click out of the advanced controls by clicking the gear icon again.
Like you would for any other post, post it!

This should be your final product - a clickable link to the page you wanted people to go to!
Hopefully this helps. If you have any other questions, feel free to let me know! (:
21 notes
·
View notes
Note
hi dev! do you know of any good gif making tutorials for beginners?
Hi lovely sorry I'm so late getting to this. The one I learned from no longer exists but I would suggest taking a look at any of these. (I've linked the few I've reblogged and also @dear-indies tutorial tag where you can find tons of tutorials and hopefully find one you can follow!
https://olivaraofrph.tumblr.com/post/673206801840390144/how-i-make-gifs-using-giphy-ezgif-tutorial
https://nicolemaiines.tumblr.com/post/658075683609804800/how-to-make-gifs-via-ezgif-a-guide-by
https://osvaldrps-archived.tumblr.com/post/651703649597308928/gif-making-for-lazy-ones-a-tutorial-by-osvaldrps
https://dear-indies.tumblr.com/tagged/gif-tutorial
Not what you asked for but hopefully also helpful! Please look around for sharpening/settings/etc you love. of course but here's some fave suggestions for you
27 notes
·
View notes
Text
HOW TO GET YOUR OWN SCREENCAPS FOR MAKING ICONS / GFXs / ETC.
being able to find pre-made icons of whomever you want to roleplay as can be nothing short of tedious, right? well, that's why i've put it upon myself to make this tutorial! because idk about you guys but i prefer making my own icons because mine are all 150 x 65 because i simply like and prefer rectangular icons to square icons. so let's get down to business, yeah? and like pretty much all of my lengthy tutorials, this will be under a READ MORE.
STEP 1: PROGRAMS
the main program you'll need for this is VLC Media Player. the reason for this is because it has a built-in feature that allows you to screencap any video you play. now if you're roleplaying as a video game character and you need the cutscenes from said game ( or video game movies as i call them if they're all together in one video ) then i definitely recommend you getting 4K Video Downloader. the free version allows you to download up to 30 videos / day for free whereas the license grants you an unlimited # of downloads / day off of youtube.
STEP 2: THE SETUP
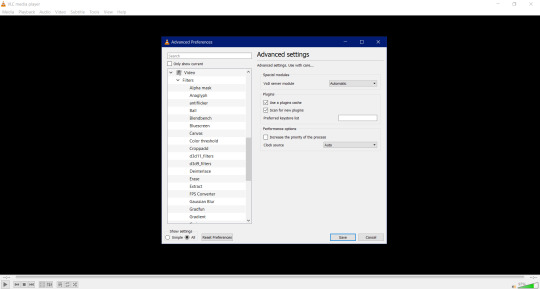
after you've install VLC Media Player, get it going and go to Tools > Preferences. once you've done that something like this should pop up.
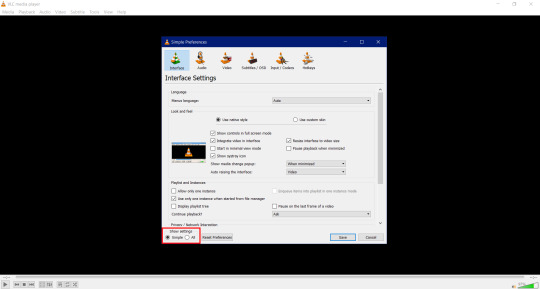

now do me a solid and click All in the box that's highlighted in the red box. by doing so will result in this popping
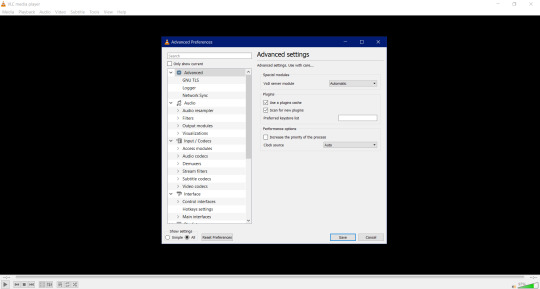

now scroll all the way down to where you see Video and then click on Filter. once done you'll have this pop up.

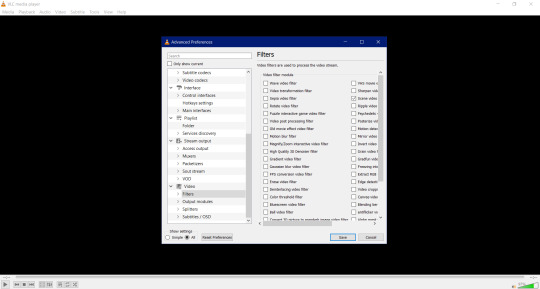
once you have this window up scroll the sidescroll all the way to the right until you see Scene filter video. it'll be third from the top as highlighted down below. check it and then click Save.


STEP 3: WE'RE ALMOST THERE
so once you hit Save, the box closes. there's nothing to freak out or worry about because that's perfectly normal. what we're gonna do now is have you go to ... like ... your Pictures folder and make a folder named after whatever you're getting screencaps for. if you're needing screencaps for, say, crisis core reunion then you'll create a new folder and name it something like ... say ... Crisis Core Reunion Screencaps. now do me a favor and double click on the folder so that you're now actually in it. you'll see why in a minute.
i need you to go back to Tools > Preferences > All > Videos in VLC Media Player. once you do that i need you to click on the little > right next to Filter so that a little drop down menu will pop up. it'll look a little something like this.

now scroll all the way down until you see Scene filter and click on that. once you've clicked on it this window will pop up.

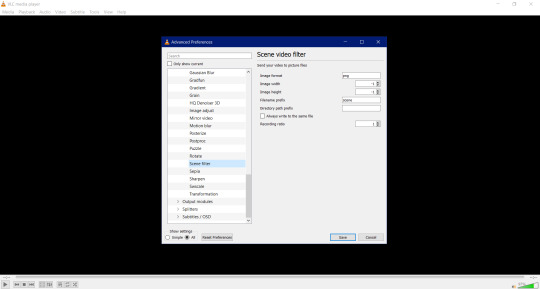
remember when i told you to keep that folder up and running for Crisis Core Reunion Screencaps? well, this is where it comes into play! click on where it says This PC > Pictures > Crisis Core Reunion Screencaps , highlight everything , and the press CTRL + C to copy it. and for those of you wondering ... ... ... ... ... it'll look a little something like this: C:\Users\PROFILE\Pictures\RP Stuff\References. that's perfectly normal!
now i want you go pay close attention to the box i have highlighted down below. why? because the original number they had for the Recording ratio is ridiculous. switching the number to 1 means that it'll take one ( 1 ) screencap every second! and the number of screencaps you'll have will determine how long your video game movie is.

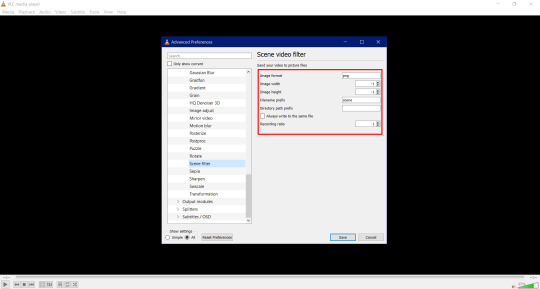
now you're probably wondering why the Directory path prefix is empty. of course you are. why wouldn't you be wondering it? well, that's where you're putting the directory for the directory path you just copied earlier! click on the empty box and press CTRL + V to paste it. once finished, click save and you're good to go.
STEP 4: GETTING THE ACTUAL SCREENCAPS
now that you've gotten all of the hard stuff done and out of the way, this is when you click on Media > Open file and then click on that Crisis Core Reunion movie you downloaded using 4K Video Downloader. once you have that going, the screencapping will commence and all you have to do is just minimize VLC Media Player and go on your merry way until the "movie" is done!
this is all you have to do to get screencaps. and all you have to do every time you want to get screencaps for something super specific is to make a folder for said thing, copy the directory path, and paste it into the Directory path prefix.
i'm hoping this tutorial was simple enough and easy to understand for y'all!
#how to#tutorial#tutorials#rp#rpc#roleplay#roleplay community#rpc tutorial#rpc tutorials#rp tutorial#rp tutorials#screencaps#screencap#icon#icons#iconing#gfx#graphics#photoshop#making icons#making
207 notes
·
View notes
Photo

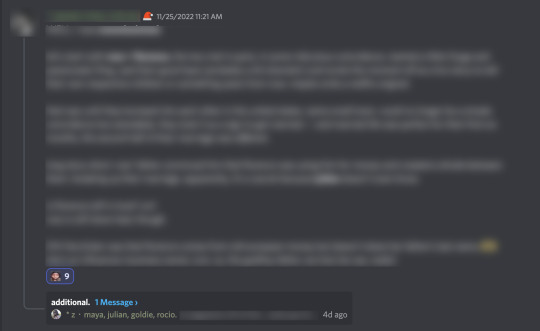
making use of a tl;dr channel to keep everybody in the loop !
given the size of our group, it’s impossible for everyone to know what’s going on at every given time. that would mean having to read through nearly hundreds of threads every single day, and that’s just... unreasonable to expect of anyone.
given this, we created a tl;dr channel at the request of our members ( so we don’t take credit for the idea at all ! ) , where people can submit updates on their muses and what’s been going on with them. here’s a goofy lil example of two updates i sent about my characters:
additionally, your writing partner/s can create threads in response to your update to build on it and add more details as you can see below:
groups that are plot-heavy and very involved might find this useful in keeping everyone in the loop, but i’d say it’s also been incredibly useful for a more plotless rp like ours !
we recommend that our members send in any and all updates that they want people to know, such as when their muses develop a crush or are feeling a certain way about something that’s happened, etc.
you will have to remind people not to meta-game based on what they read in this channel, but that’s kind of a given !
all-in-all, i’ve found that it’s a useful tool in making sure nobody feels left out or in the dark, and it’s always exciting to see what everyone’s muses are up to !
113 notes
·
View notes
Text
Beta Editor / Trim Reblogs Masterpost
This is just a spot to gather all my posts about the beta / legacy editors and cutting posts into one place, mostly so it's in one easily shareable link for people who ask. (Last updated February 21, 2023.)
WHAT'S EVEN GOING ON — This long post explains pretty much everything in great detail. It covers the different editors, the different extensions required for cutting posts and how they work, some glitches you may encounter, and reasons the two systems aren't compatible. I highly recommend reading this one before any of the others, as it provides the most context.
TRIM REBLOGS GUIDE — An overview to just Trim Reblogs.
USING TRIM REBLOGS WITH THE LEGACY EDITOR — If you aren't willing to commit to the beta editor yet, at least learning how to use trim reblogs will make a world of difference to your partners using it.
BETA EDITOR OVERVIEW — An overview to the beta editor, the differences it has from legacy as well as its new features.
TRANSFERRING THREADS TO BETA / TRIM REBLOGS — An overview of how to actually go about transferring threads cut with the old system (editable reblogs) to the new system (trim reblogs).
DOUBLE POSTING GLITCH 1 + HOW TO FIX — Goes over a glitch you may encounter when using trim reblogs on a post that was originally made with the legacy editor, causing your reply to duplicate upon posting.
DOUBLE POSTING GLITCH 2 + HOW TO FIX — Goes over a glitch you may encounter when using editable reblogs on a post that was originally made with the beta editor, causing your partner's reply to duplicate upon posting.
#rph#rpt#rpc#beta editor#trim reblogs#legacy editor#editable reblogs#xkit#new xkit#xkit rewritten#*my stuff#*my tutorials#*beta editor masterpost
972 notes
·
View notes
Text
updated tutorial on trimming posts on mobile
reply formatter mobile edition:
i’ve been trying to figure out a way to adjust the roleplay formatter to be used on mobile but unfortunately tumblr just does not render blog themes well on mobile browsers (my guess is to force people to use the app but i digress)
so i made a mobile friendly version with carrd. the only differences are the box size option and the night mode toggle, which the carrd version doesn’t have.
if you don’t use either of these you can use the carrd version on desktop as well, everything else is the same. for the purpose of this tutorial i’ll be using the carrd version as it is optimized for mobile screens.
if you can consider tipping my ko-fi or using my carrd referral code ( DPY34V1H ) to help me keep hosting the formatter ♡
this is a very easy level tutorial
even if you’re not comfortable with html!
this post may be long because of the screencaps, but the method itself is only a handful of clicks and it shouldn’t take you more than a minute.
this method technically works on any browser, but it works best on firefox as it is the only browser i’ve tested that keeps all formatting (bold, italics, color text, etc).
i encourage you to install firefox on your phone to at least cut replies, you could technically use the tumblr app to write and format your reply once you get the code of the trimmed reblog.
what you will need:
a mobile browser (can’t stress this enough i strongly suggest firefox, specially if you don’t want to have to manually add your partner’s formatting. it will make your life easier)
the mobile friendly reply formatter.
that’s it.

tutorial:
step one:
first thing you’re going to do is copy this line of text:
?redirect_to=%2Fdashboard%3Frestore%3D1&avoid_redirect=1
time saving tip! depending on your device you may have a “pin” or “lock” option in your clipboard, use it so you can keep using it without looking for this post and copying it all over again.
if your device does not have a pin / lock option, you can create shortcuts assigning a short word or symbol and when you type it the saved line of text will be suggested.
here is a tutorial for android and ios.
step two:
save the post you want to trim as a draft.
you can do this on the app.
step three:
open your draft on your mobile browser. click to edit the address bar.
the url of this post will look like this : https://www.tumblr.com/edit/USERNAME/POSTNUMBER
now delete the part with your username and one of the brackets (either the first one or the last one, it doesn’t matter which one, just don’t leave 2 brackets.
then add “?redirect_to=%2Fdashboard%3Frestore%3D1&avoid_redirect=1" (without the quotes) at the end of the link, then click on the link and load the page

thanks to this anon who figured the link trick out💗
step four:
select everything and copy

then click on the x to remove the previous reblogs.
step five:
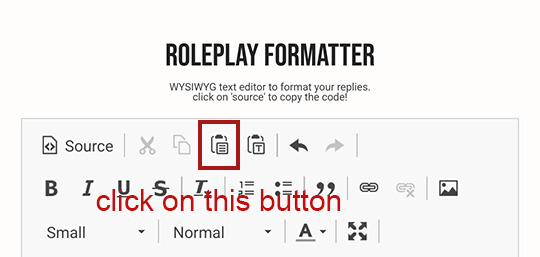
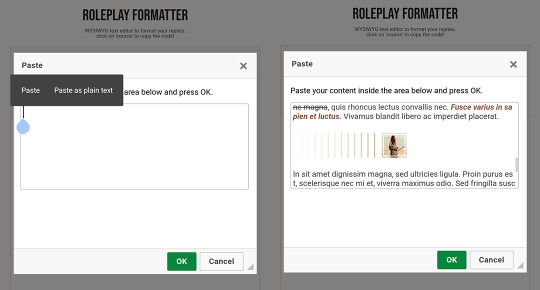
now go to the reply formatter here, click on the paste button and you’ll get a pop window.
there tap your screen until you get the options “paste” and “paste as plain text”. use the regular “paste” option.
step six:
select the blockquote text you want to delete trimming the reply like you would on desktop with editable reblogs.
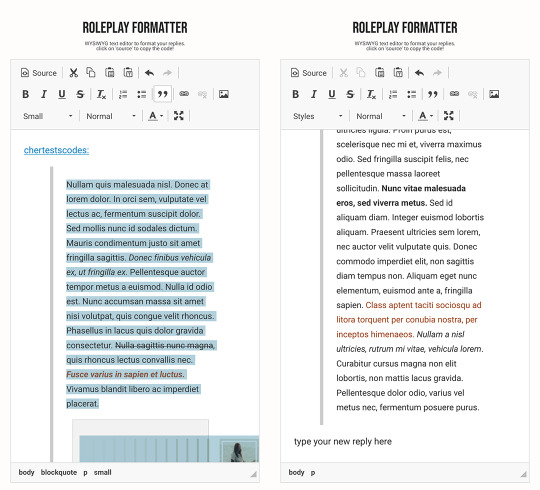
and that’s it ! you’re done.
from here you can either write and format everything on the formatter
or you can copy the html code from trimming the post and paste it on your trimmed draft on the app
ir order to do that, on step 4 add anything to the body of the post so you can save the post (it can be just a comma or a keymash)
then write + format everything on the app. just remember to switch the editor to html on the app!
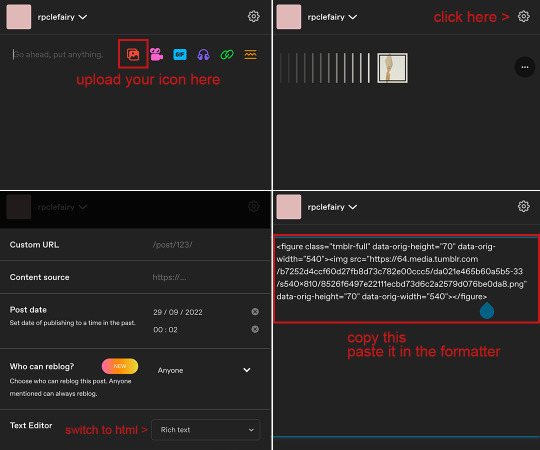
bonus tip + tutorial: uploading icons
save your icons folder to your phone / google drive (and then save to your phone the icon you want to use)
on your browser (NOT THE APP) create a new post
upload your icon
switch the editor from rich text to html
copy everything, paste it in the source code of the formatter.
you’re done!
384 notes
·
View notes
Photo
Why yes, yes I can.
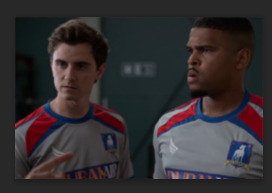
Okay for this tutorial I’m going to be using @oliviaholt ‘s action that you can find here. It is truly a godsend.
Since the anon asked on how to blur, I’m going to assume you already know the basics of making a gif, right? Great! So I’ve already turned my frames into layers and I’m ready to sharpen using the action.
For this, I use the DICOM imports option, just select it and hit play.

This will sharpen your gif as god (and oliviaholt) intended. Now here’s the petty part. You’re going to go into your history window (if it’s not already open, go to Window > History) and go back to the step that says Master Opacity Change.
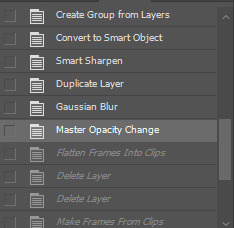
This is the part of the sharpening action that duplicates the smart object that has been sharpened, then adds a gaussian blur and lowers the opacity to make it softer. If you don’t use an action (or use a different action) this is the step where we make our gif blurry on the person we don’t want to appear. So, duplicate the top layer (Group 1 Copy) and place it above.
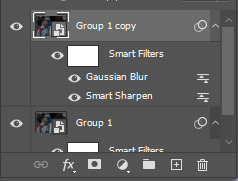

Set the layer at 100%

Now add a layer mask to the smart object (NOT the existing layer mask on the smart filters!!)
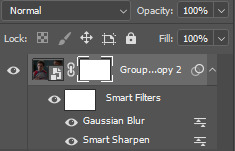
Erase the person that you want to be more visible (rip Kola I’m sorry) using the eraser tool on the layer mask using a soft brush.


Use the video timeline to make sure that you erase more if the person moves around in the frame


Now if you REALLY want that person blurred out, double click on the Gaussian Blur applied to this layer

And make the radius of the blur higher. You can make it as blurry as you want, but try to stick under 3.5


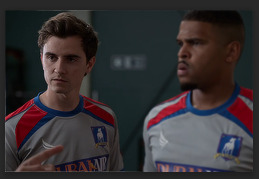
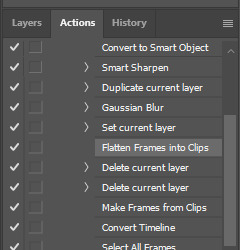
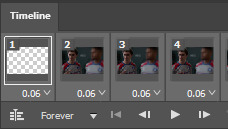
And now you have a blurred out gif! Almost. Now we need to finish the rest of the action. Open up your action panel and see where we left off. You’re going to want to click Flatten Frames into Clips and then hit play on the action.
If your timeline has a blank frame at the beginning or end, just delete it and save your gif as normal!
And there you go! A fully blurred out petty ass gif. (Again, I’m sorry Kola)

#gif tutorial#gif pack tutorial#blur tutorial#rpc#rph#mytutorial#fakecontent#special thank you to oliviaholt for the original action and for giving me the go ahead to post this!
47 notes
·
View notes
Last Seen Blogs

djxksks
제목 없음

gideonsgirl
I'll take monsters over heroes any day

dundeelad32
Untitled

dudhatchemequip
Dudhat Chemequip Pvt. Ltd.

scvnthorpe
SCVNTHORPE