#baking tutorial
Text
How to make chocolate ganache. Super simple!!
Ingredients:
8oz (two 4oz bars) of baking chocolate*
1 cup (240ml) heavy cream
(That's it!!)
Instructions:
Pour the cream into a small sauce pan. Bring to a simmer on medium high heat. Remove from heat before the cream can boil.
While the cream is heating, chop up the chocolate bars. The smaller the pieces, the quicker they will soften and your ganache will be easier to mix together.
Pour chopped chocolate into a heat proof bowl, then pour the heated cream over the pieces. Allow to sit 3-5 minutes so the chocolate can soften.
With a spoon or rubber spatula, gently stir the chocolate and cream together. Be patient! This will take a few minutes, but you'll see it slowly come together!
That's it! You've made ganache!
This ganache is a 1:1 ratio, 8oz of chocolate to 8oz of cream, and creates a excellent spreadable consistency. But it's easy to make pipeable ganache with the same process!
For pipeable ganache, cut the cream amount in half! Use just four ounces, or half a cup, of cream, and follow the same instructions. Enjoy!
*What kind of baking chocolate is completely up to you! Milk chocolate? Semi-sweet? White? Choose whichever of these will best compliment your dessert!
#chocolate#chocolate lovers#dessert#ganache#chocolate ganache#recipe#baking#how to#kitchen diy#kitchendiy#baking tutorial#chocolate overload#baking babble#eg
201 notes
·
View notes
Text
It’s here! The full YouTube howto cake recipe tutorial to make the scrumtiously soft and velvety lemon loaf /lemon cake you have ever had! https://youtu.be/ac1e0B3-pAo
youtube
#cakes#cake design#cupcakes#cakemeistro#cake#cake decorating#london cakes#lemon cake#lemon loaf#lemon loaf cake#how to video#youtube tutorial#recipe video#recipe#cake recipe#baking recipes#cake recipes#baking tutorial#Youtube
9 notes
·
View notes
Text
youtube
btw i made a cake and had a fun time while doing it
#remembering to post the things i do here#or working on it lol#Youtube#my video#my.video#youtube video#cooking video#baking video#baking tutorial#cooking tutorial
0 notes
Text
A holiday twist on a sweet & simple favorite ✨
Head over to my IG for the full recipe 🎅🏻 @shelikesmilk
#christmas#christmas recipes#recipes#recipeoftheday#holiday recipes#pound cake#eggnogg#eggnogseason#baking#baking tutorial
0 notes
Video
youtube
NEW Laura Mercier Setting Powder VS Original Laura Mercier Powder
This is a NEW Laura Mercier Setting Powder VS Original Laura Mercier Translucent Loose Setting Powder review video. We will be comparing the new laura Mercier setting powder to the original Laura Mercier loose setting powder. The new Laura Mercier powder is called the TONE UP setting powder in Rose. This new Mercier setting powder is meant to brighten up the complexion. We'll also be doing a HUDA BEAUTY baking makeup tutorial. I honestly feel like the Laura Mercier blurring powder can be the BEST baking makeup EVER!
#youtube#makeup#beauty#new makeup 2022#new makeup#sephora#laura mercier#influencer#beauty blog#blogger#best makeup#setting powder#baking#baking makeup#baking tutorial
0 notes
Text
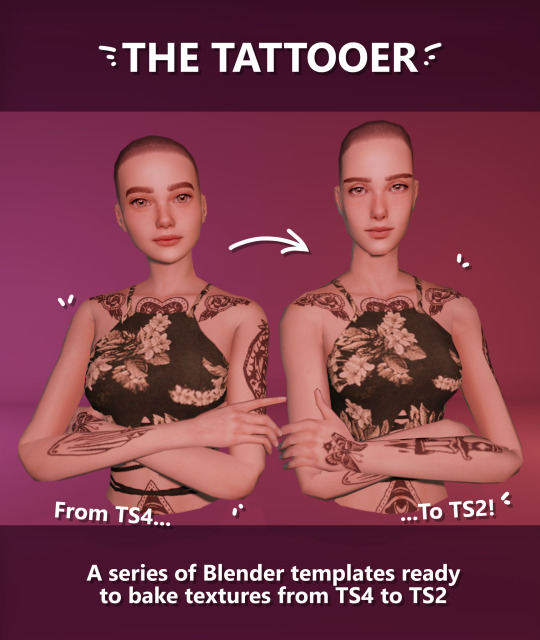
Updating... The Tattooer (ver. 3.4)!

Finally! Took me a while, huh. This is the updated version of the Tattooer project. It skips some steps, making the workflow much, much faster! Huge thanks to @applewatersugar for his
suggestion on how to bake textures while preserving the transparency. This is kind of a repost of the original Tattooer post, but it actually has some new stuff and a few changes here and there, so please take a look if you want to learn how to use this new version.
This is a series of Blender template files already set up to quickly bake textures from The Sims 4 to The Sims 2. The different Blender files will allow you to:
-Bake body textures from TS4 to TS2 (Female)
-Bake body textures from TS4 to TS2 (Male)
-Bake body textures from TS4 (Female) to TS2 (Male)
-Bake body textures from TS2 (Female) to TS2 (Male) [Bonus!]
-New! Bake face textures from TS4 to TS2 (Unisex) [Bonus!]
-Bake head textures from TS4 to TS2 (Face + Scalp) (Unisex) [Still experimental]
Check the file names to see which one is which, and the resolution of the baked texture it will give.
Everything you see in the render above was 100% converted using those Blender files.
Download here! SFS / GD
Update: Version 3.4.1 (27/08/2023) Fixed some issues on the shoulders for the AF-body-4t2-1024 and AF-body-4t2-2048 templates. Now the top straps on most converted underwear/swimwear should look right.
Update: Same version (13/12/2023) As requested, added a new spanish version of the included pdf guide!
These templates were made mainly to bake and convert tattoos, but there’s more you can do with them if you get creative. I have to say, these are NOT perfect. Results may vary depending on what you are trying to convert, so! With that in mind, this is all the stuff you will be able to convert almost seamlessly from TS4 to TS2:
-Tattoos.
-Other body details such as body hair, scars, freckles, supernatural/occult details…
-Body painted underwear and swimwear, as well as some other clothing that’s mostly painted on the body.
-Socks, stockings and maybe leggings.
-Even skintones! In some areas they will look weird, so I recommend editing and blending them with other existing TS2 skins.
-Makeup, eyebrows and beards. In the old version this was just a proof of concept, but now I’ve added a new Face file template which gives some pretty decent results!
-Hair scalps. Very useful when converting some hairs! Although keep in mind part of that texture might also need to be baked on the face mesh, you know, that hairline makeup stuff.
Got your attention? Nice! Editing some of the textures from TS4 to match the UV mapping in TS2 using a 2D editing program can be incredibly hard. That’s where texture baking in Blender comes to the rescue!
You will need to download Blender, at least version 3.4, but you could always use a newer version. It is only incompatible with versions older than 3.4.
-You can download Blender for free here.
-You will also need Sims 4 Studio to extract the original Sims 4 CC textures you want.
In the first version of these Blender files, there was a necessary step using Photoshop, but that’s no longer needed. However, there’s still a tiny extra step which requires resizing the newly baked texture on some of the high resolution templates, so you might need a 2D editing program like Photoshop. More on that later.
So, before we begin, let’s clear out some questions you might have. What the heck is this texture baking thing and what does it do? Well, let’s imagine you have a video projector and point an image into a blank wall. Then you pick up some brushes and start painting and copying that projected image in that wall. Texture baking is kinda like that when it comes to 3D models. You align two models and match them as closely as you can in shape and form, and once you adjust some parameters and values, Blender does the rest for you: it will give you a new texture for a new model with a different UV map. These files I’m sharing have everything already set up, so it’s a matter of plopping in that Sims 4 texture and you will get that new texture for TS2 in just a few clicks.
This tutorial assumes you know literally nothing about how to use Blender, so if you feel uncomfortable with it, worry no more! This will guide you with pictures showing where you need to click and explaining what is happening. For Sims 4 Studio and Photoshop the process might be a bit less detailed, but still this should be pretty beginner friendly. For this tutorial, I will use some tattoos as an example (properly credited at the end of the post). Alright, enough with the rambling. Let’s get started!
·EXTRACTING TEXTURES IN SIMS 4 STUDIO:
First things first, you will need to extract as pngs all the textures you want to convert from TS4 using Sims 4 Studio. It should be pretty straightforward. Just open the packages and export the Diffuse textures. Keep them organized in a folder for easy access.
·BAKING THE TEXTURES IN BLENDER:
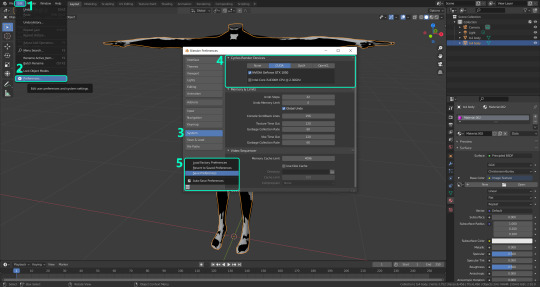
PRELIMINARY STEP 1: CONFIGURING BLENDER’S GRAPHICS SETTINGS:
Open your preferred Blender file depending on what you’re going to bake and the desired resolution (in this example I’m going to use the AF-body-4t2-1024 file). Before we start messing around in Blender, there’s one thing you should set up. It is a onetime step, and once it’s done, you won’t need to do it again. So, does your computer have a dedicated graphics card? If you don’t know or you’re not sure, just skip to the next step. Configuring Blender so it uses your graphics card instead of your CPU will make the baking render much faster, so it is recommended you set it up correctly.
If your computer has a dedicated graphics card, click File (1) > Preferences (2) > and on the window that pops up click System (3) > and select CUDA and make sure your graphics card is there and tick it (4). I have an Nvidia Graphics card but your case may vary. Once you’re done, click on the tiny button on the bottom left corner and Save Preferences (5).

PRELIMINARY STEP 2: CHOOSING THE RENDERING DEVICE:
Click on the tiny camera button on the right, called Render Properties (1), and on Device (2) select GPU Compute if it’s not already selected. If you’re not sure if you have a graphics card or not, just select CPU. Then select the Material Properties tab (3) and Save your changes, either by pressing Ctrl + S, or clicking File (4) > Save (5). You might need to do this second step with the other Blender files, but once you have it done and saved, you won’t need to do this again. Okay, time to get into the good stuff!

·STEP 1: LOADING YOUR TS4 BASE TEXTURE:
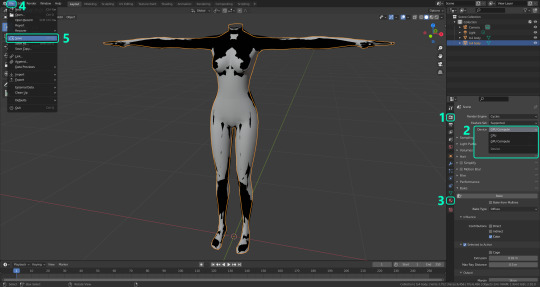
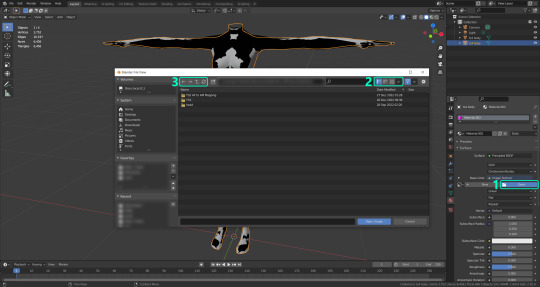
In the Material Properties tab, click the folder icon that says Open (1) and on the window that pops up, navigate through your folders and select your first texture. To navigate easily, the 3 buttons on the top right (2) are for the display mode. They will show your files in list mode, vertical and horizontal, and the one on the right will display the file thumbnails, pretty useful if you want to easily preview your textures here. The icons on the left side (3) will let you go one folder back and forward, go to the parent directory, and refresh the folder in case you just dropped something new in there. Double click on the image you need and that will load the texture into the Sims 4 body model, named “ts4 body”.

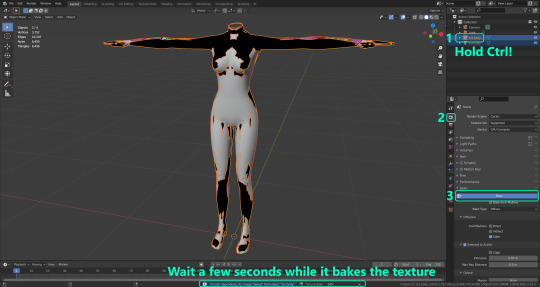
·STEP 2: SETTING UP YOUR SELECTION AND BAKING THE TEXTURE:
On the top right of the screen, you will see the names of the 2 models in the scene. Hold the Ctrl key in your keyboard and left click on the “ts2 body” model (1). If you did it correctly, you should see “ts2 body” in a yellowish orange color, and right down below, “ts4 body” should look more like a red orange. If not, try again by clicking first on ts4 body, and then while holding Ctrl click again on ts2 body. Then switch to the Render Properties tab by clicking the tiny camera icon (2) and click Bake (3). Depending on your screen resolution, you might need to scroll down a bit with your mouse to see the Bake button. Wait a few seconds for it to finish. You will see the progress percentage down on the bottom of your screen. Don’t panic if you notice your computer fans start ramping up, that’s completely normal! As I said in the beginning, using your GPU will bake the textures much faster than the CPU.

·STEP 3: SAVING YOUR NEW TS2 TEXTURE:
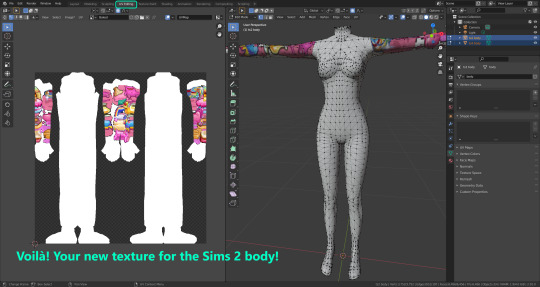
Once it’s finished, switch to the UV Editing Mode by clicking “UV Editing” on the top of your screen. And there it is: your new texture! You might have to scroll up your mouse wheel a bit to zoom in and see it in all its glory on the left side of the screen. We’re still not done yet though. You need to save it to yet another new folder (always try to keep your stuff organized!).

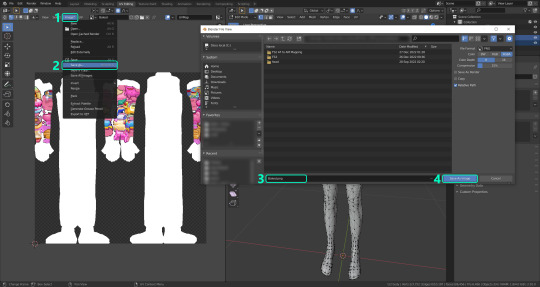
You can save it by pressing Shift + Alt + S, or clicking on Image* (1) and then Save As… (2). That will pop a window where you’ll need to navigate again and save it somewhere. Give it a proper name (3) and hit Enter to save it… well, Enter doesn’t always work for me for some reason, so if that happens just click Save As Image (4). And that’s it! You’ve successfully converted your baked texture. Congrats!

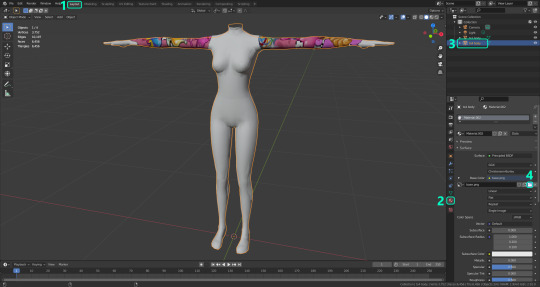
·STEP 4: GOING BACK TO STEP 1:
Alright! If you’re done with your textures, you can close Blender without saving and call it a day. But let’s say you want to keep baking other swatches. In order to go back to step 1 and start the process once again, click Layout (1), go back to the Material Properties tab (2), select “ts4 body” (3) and click on the folder icon (4) to open and load your next swatch.

Then it’s just a matter of repeating the process from step 2. When you’re ready to move on, close Blender without saving. If you see a small check telling you it will save some images, make sure you uncheck it, so you will be able to use it again in the future from the starting point with no issues. I don’t think it really matters if you accidentally save your progress in these files, but I like to keep it clean and fresh so I can do the process where I left it from the beginning next time I open it. And in case you mess up and save somewhere, you can always just delete the .blend file and download the template files again.
In case you’d like a video tutorial on how to use these files, the amazing @platinumaspiration recorded this fantastic video showcasing the process! You can watch it here.
One final note: some of the baking .blend files save the textures with a resolution of 2048x2048 pixels, as clearly stated at the end of their file name. That’s way too overkill, because TS2 only properly supports up to 1024x1024 for most of its textures and you should always resize your final product to that max resolution (or lower if needed). I just made those 2048 versions because there might be some really tiny and slim details on some tattoos that might look a little too blurry when baked into a 1024 resolution texture, so for those cases use that if you want and then resize them using your 2D editing software of choice.
In Photoshop, in the Resample mode of the Image Size menu, there are a few options to choose. For the fine details, I like the Nearest Neighbor (hard edges) option, which, even if it looks a bit pixelated, it still preserves most of the texture and quality.

For anything else, I would just directly bake them using the 1024 versions in Blender (512 for the face and scalp).
And for the folks who feel comfortable playing around in Blender, this is just the beginning! Texture baking opens a LOT of possibilities, so feel free to move stuff around and edit the models to your liking! If you notice the baked textures look warped or stretched somewhere, or don’t like where some textures are placed in the S2 body, poke around that area moving stuff and then give it another try. The main objective of the baking process is keeping both overlapping models as close in shape as possible. You may also edit and save new copies of the templates, or make new ones from scratch using mine as a reference (keep a close look on those Baking settings and values, I think they work pretty well) and share them if you want to. Go ham, do whatever you want with them! I still have plans on making templates to convert body textures from Sims 3 to Sims 2, but for now it’s not on my priorities, so we’ll see when that happens.
Whew! Hope none of this was too confusing. Need help or have any issues with these? Please ask/message me here and I’ll be glad to help when I’m able to!
Credits for the CC used in the render demonstration:
-Skin by Sims3Melancholic.
-Eyes by Northern Siberia Winds.
-Eyebrows by PeachyFaerie.
-Tattoos by xtc.
-Top by SerenityCC.
And the Tattoo I used for the tutorial can be found here, by ValhallanSim.
Last but not least, a huge thanks to all the people who somehow contributed to make this project and update possible, either by doing initial testing, finding issues to fix, or teaching me new Blender tricks to make the workflow way faster and easier. So thanks again to @elvisgrace @moyokeansimblr and @applewatersugar on Tumblr! <3
And thank you for reading! Hope you have fun playing with this (not so) new toy hehe.
#tattooer project#tattooer update#ts2 tutorial#ts2 resources#ts2 blender#ts2 overlays#ts2 texture baking#4t2 conversion tutorial#this took me so LONG to update#im really sorry for the delay :(
286 notes
·
View notes
Photo
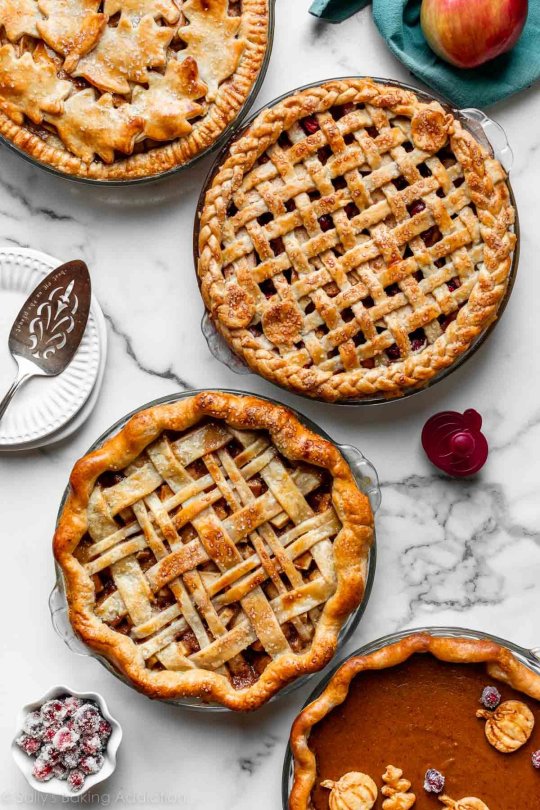
Pie Crust Designs Tutorial
434 notes
·
View notes
Text
must say again that mgs3 ocelot is so so compelling to me. in my head he's the perfect little prodigy boy who has his position as a major at just 20 yrs old thru a combination of nepotism and real skill, real gifted kid who's excelled at everything he's ever tried, triple agent fooling absolutely everyone, trying out combat techniques he's only read or heard about in the field bc he knows he'll just Get it right away, and it's like partially true that he's very good but he's not That good, there's people pulling strings behind the scenes to get him there, but he doesn't see them and thinks he got this all by himself. and i need to put this smarmy little man in my mouth and shake him like a dog with a toy.
#ignore me#i like him sooooooo bad i like him so much#kitten ocelot inspires this cuteness aggression in me to such an intense degree#literally said i need to bake him into a pie the other day. And i do.#my fucking googyyyyy....#like and then he runs into big boss and that's his first ever real challenge and he Loses. and i foam at the mouth#the way he repeats 'pretty good' and then like genuinely swoons. fuck offfffff#ooo did you get a compliment you little teacher's pet are you hooked on the serotonin of getting a pat on the heas#*head#do you respect this man bc he defeated you but you're also blindingly furious at him for it and also a lil bit got a little puppydog crush#i'm gonna explode. i haven't even finished the tutorial on mgs2 yet and i can't wait to start 3.#for Him.
78 notes
·
View notes
Photo

Beginner's guide to french macarons
#macarons#french macarons#cookies#sweet food#food#baking#dessert#french food#french cuisine#sweet treats#sweet tooth#macaron#cooking tutorial#tasty#foodporn#delicious#cooking#food photography#foodgasm#recipe
524 notes
·
View notes
Photo

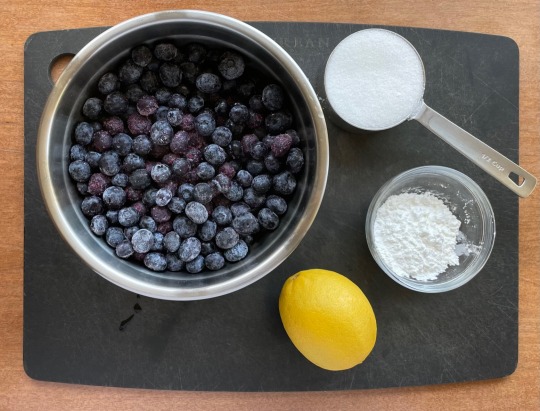


DIY Mini Blueberry Pies
These mini blueberry pies combine an easy blueberry pie filling with homemade or store-bought mini pie crusts. They're perfect for dinner parties or holiday celebrations.
✖✖✖✖✖✖✖✖
sew-much-to-do: a visual collection of sewing tutorials/patterns, knitting, diy, crafts, recipes, etc.
#DIY#mini#blueberry#pie#bake#baking#homemade#tutorial#recipe#sweet#treat#party#cute#holiday#celebration#berry
148 notes
·
View notes
Text
youtube
Finally uploaded a new video!
#cooking#baking#peaches#syrup#in the kitchen#kitchen diy#kitchen life#kitchen confab#baking tutorial#bottling#canning#preserving#Youtube
10 notes
·
View notes
Text
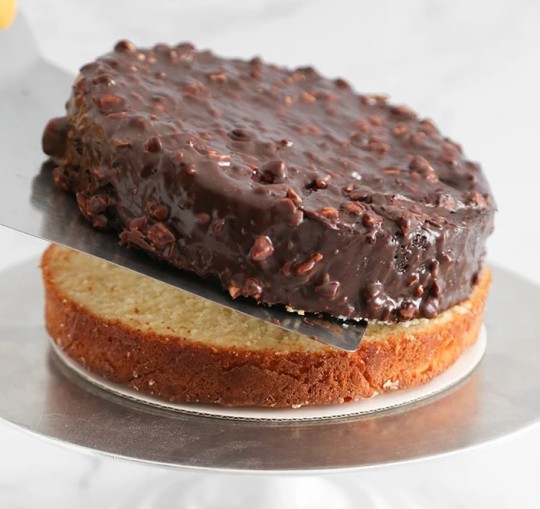
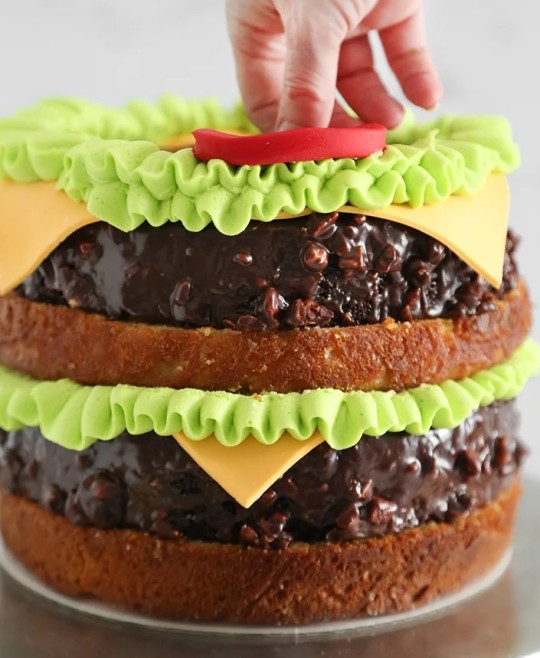

Hamburger Cake
#diy#cake#decorate#hamburg#frosting#bake#sugar#flour#icing#edible#faux food#food#homemade#celebration#bbq#fondant#tutorial#how to#chocolate#nuts
223 notes
·
View notes
Text
youtube
►Subscribe for more videos: https://www.youtube.com/cookinginnancishomekitchen?sub_confirmation=1
#cooking in nanci's home kitchen#food#delicious#yumyum#delish#baking#bakinglove#bakinglife#sweet#cookies#sugarcookies#sugar cookies#pumpkinspicecookies#pumpkin spice#baking show#home baking#baking tutorial#homemade#howto#Youtube
1 note
·
View note
Text
Blender 3.6
After taking such a long time away - 2.7 is a bit iffy for me to remember all the steps to bake, but ... 3.6. Wow. Lost is inadequate a word to describe the depths of where I found myself.
18 notes
·
View notes
Text
Make your very own Pemberley gingerbread house this holiday season with this simple tutorial and free pdf template.
youtube
#jane austen#books & libraries#fiction#writers#pride and prejudice#mr darcy#elizabeth bennet#gingerbread house#gingerbread#holiday baking#holiday#christmas baking#christmas#baking#gingerbread tutorial#Youtube
12 notes
·
View notes
Text
Introducing... The Tattooer!
[This version is OUTDATED! Please, check the new version here. I updated the workflow, skipping a lot of unnecessary Photoshop editing. It's way faster! I'll leave this old version and files up though, for archiving purposes. But yeah I still totally recommend you use the new version!]
Finally! I’ve been working on this for so long and I couldn’t wait to share it. This is a series of Blender template files already set up to quickly bake textures from The Sims 4 to The Sims 2. Really neat for cc creators! The different Blender files will allow you to:
-Bake body textures from TS4 to TS2 (Female)
-Bake body textures from TS4 to TS2 (Male)
-Bake body textures from TS4 (Female) to TS2 (Male)
-Bake body textures from TS2 (Female) to TS2 (Male) [Bonus!]
-Bake head textures from TS4 to TS2 (Face + Scalp) [Experimental]
Check the file names to see which one is which, and the resolution of the baked texture it will give.
Download! SFS / GD
Everything you see in the render above was converted using those Blender files. I only did a couple tiny edits to the eyes and lips to fix them.
These templates were made mainly to bake and convert tattoos, but there’s more you can do with them if you get creative. I have to say, these are NOT perfect. Check out the eyebrows on the render above. They look a bit wonky compared to the original, don’t they? I left them as is to keep your expectations with these as realistic as possible. Results may vary depending on what you are trying to convert, so! With that in mind, this is all the stuff you will be able to convert almost seamlessly from TS4 to TS2:
-Tattoos.
-Other body details such as body hair, scars, freckles, supernatural/occult details…
-Body painted underwear and swimwear, as well as some other clothing that’s mostly painted on the body.
-Socks, stockings and maybe leggings.
-Even skintones! In some areas they will look weird, so I recommend editing and blending them with other existing TS2 skins.
-Makeup. Kinda bad but hey it works! Eyeliner and anything that is around the eyes looks terrible for now, but other stuff like blush may look just okay.
-Eyebrows and maybe beards. A bit of hit or miss with those.
-Hair scalps. Very useful when converting some hairs! Although keep in mind part of that texture might also need to be baked on the face mesh, you know, that hairline makeup stuff.
Got your attention? Nice! Editing some of the textures from TS4 to match the UV mapping in TS2 using a 2D editing program can be incredibly hard. That’s where texture baking in Blender comes to the rescue!
It is recommended you download Blender version 2.91.0, which is the one I use. Don’t worry, it’s free! There’s also 3 Photoshop actions you will need to set up the textures for baking and then putting them back together, because unfortunately Blender doesn’t support transparencies in that baking process, so that takes a couple extra steps to make it work, but I think it’s still pretty fast and easy. And just in case Tumblr manages to blow up or something, I decided to include a pdf with the upcoming tutorial that will guide you step by step with all this process, so if this post gets deleted somehow (I really hope not!), you will still have that pdf as a backup archived.
You can download Blender here. Personally I recommend picking the fourth option, “blender-2.91.0-windows64.zip”, which is a portable version and doesn’t need to be installed.
You will also need Sims 4 Studio to extract the original Sims 4 CC textures you want.
As for Photoshop… I’m not going to tell you to buy that subscription service and give Adobe some undeserved money, so… yeah, there might be some other options out there to get it (very legit, yes yes).
So, before we begin, let’s clear out some questions you might have. What the heck is this texture baking thing and what does it do? Well, let’s imagine you have a projector and point an image into a blank wall. Then you pick up some brushes and start painting and copying that projected image in that wall. Texture baking is kinda like that when it comes to 3D models. You align two models and match them as closely as you can in shape and form, and once you adjust some parameters and values, Blender does the rest for you: it will give you a new texture for a new model with a different UV map. These files I’m sharing have everything already set up, so it’s a matter of plopping in that Sims 4 texture and you will get that new texture for TS2 in just a few clicks.
This tutorial assumes you know literally nothing about how to use Blender, so if you feel uncomfortable with it, worry no more! This will guide you with pictures showing where you need to click and explaining what is happening. For Sims 4 Studio and Photoshop the process might be a bit less detailed, but still this should be pretty beginner friendly. For this tutorial, I will use some tattoos as an example. Alright, enough with the rambling. Let’s get started!
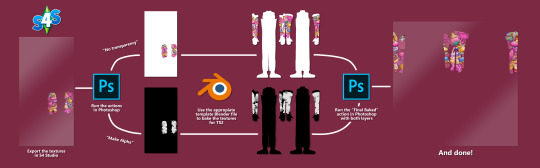
·EXTRACTING TEXTURES AND EDITING THEM WITH PHOTOSHOP:
First things first, you will need to extract as pngs all the textures you want to convert from TS4 using Sims 4 Studio. Once you’ve done that, open them up one by one in Photoshop and run the “No transparency” action. This will remove the alpha channel from the image, getting rid of all the transparency. Go ahead and save a png copy of it. Then run the “Make Alpha” action on those same swatches (from the beginning, make sure you’re not running the action on an already edited swatch!), which will only show the alpha channel of the image in black and white, and save another copy of that. You should have 2 textures for each tattoo swatch. For the “No transparency” action I like to name it BASE (And your swatch number or name), and for the “Make Alpha” action I usually name it ALPHA (And that same swatch number/name). I recommend saving them in different folders named BASE TS4 and ALPHA TS4 respectively to keep it organized. If you want to make this much faster in Photoshop, there’s an automation option in it that allows you to run an action through a batch of files in a folder and then saves it all. I won’t cover how to do it in this tutorial, but you should be able to find it easily on Google by searching something like “Photoshop automate batch”. It’s really powerful and will make your workflow with actions much faster. Definitely recommend learning about that!
·BAKING THE TEXTURES IN BLENDER:
PRELIMINARY STEP 1: CONFIGURING BLENDER’S GRAPHICS SETTINGS:
Open your preferred Blender file depending on what you’re going to bake and the desired resolution (in this example I’m going to use the AF-body-4t2-1024 file). Before we start messing around in Blender, there’s one thing you should set up. It is a onetime step, and once it’s done, you won’t need to do it again. So, does your computer have a dedicated graphics card? If you don’t know or you’re not sure, just skip to the next step. Configuring Blender so it uses your graphics card instead of your CPU will make the baking render much faster, so it is recommended you set it correctly.
If your computer has a dedicated graphics card, click File (1) > Preferences (2) > and on the window that pops up click System (3) > and select CUDA and make sure your graphics card is there and tick it (4). I have an Nvidia Graphics card but your case may vary. Once you’re done, click on the tiny button on the bottom left corner and Save Preferences (5).
PRELIMINARY STEP 2: CHOOSING THE RENDERING DEVICE:
Click on the tiny camera button on the right, called Render Properties (1), and on Device (2) select GPU Compute if it’s not already selected. If you’re not sure if you have a graphics card or not, just select CPU. Then select the Material Properties tab (2) and Save your changes, either by pressing Ctrl + S, or clicking File (4) > Save (5). Okay, time to get into the good stuff!
·STEP 1: LOADING YOUR TS4 BASE TEXTURE:
In the Material Properties tab, click the folder icon that says Open (1) and on the window that pops up, navigate through your folders and select your first texture. For now we’re going to bake the BASE texture, so go to that folder where you saved the edited “No transparency” image. To navigate easily, the 3 buttons on the top right (2) are for the display mode. They will show your files in list mode, vertical and horizontal, and the one on the right will display the file thumbnails, pretty useful if you want to easily see your images. And the icons on the left side (3) will let you go one folder back and forward, go to the parent directory, and refresh the folder in case you just dropped something new in there. Double click on the image you need and that will load it into the Sims 4 body model, named “ts4 body”.
·STEP 2: SETTING UP YOUR SELECTION AND BAKING THE TEXTURE:
On the top right of the screen, you will see the names of the 2 models in the scene. Hold the Ctrl key in your keyboard and left click on the “ts2 body” model (1). If you did it correctly, you should see “ts2 body” in a yellowish orange color, and right down below, “ts4 body” should look more like a red orange. If not, try again by clicking first on ts4 body, and then while holding Ctrl click again on ts2 body. Then switch to the Render Properties tab by clicking the tiny camera icon (2) and click Bake (3). Depending on your screen resolution, you might need to scroll down a bit with your mouse to see the Bake button. Wait a few seconds for it to finish. You will see the progress percentage down on the bottom of your screen. Don’t panic if you notice your computer fans start ramping up, that’s completely normal! As I said in the beginning, using your GPU will bake the textures much faster than the CPU.
·STEP 3: SAVING YOUR NEW TS2 TEXTURE:
Once it’s finished, switch to the UV Editing Mode by clicking “UV Editing” on the top of your screen. And there it is: your new texture! You might have to scroll up your mouse wheel a bit to zoom in and see it in all its glory on the left side of the screen. We’re still not done yet though. You need to save it to yet another new folder (always try to keep your stuff organized!).
You can save it by pressing Shift + Alt + S, or clicking on Image* (1) and then Save As… (2). That will pop a window where you’ll need to navigate again and save it somewhere. Give it a proper name (3) and hit Enter to save it… well, Enter doesn’t always work for me for some reason, so if that happens just click Save As Image (4). In this case, I personally like to call it something like “BASE TS2”.
·STEP 4: GOING BACK TO STEP 1:
Alright! So you have your new baked base texture, but we still need to bake the alpha channel to give it its transparency. In order to go back to step 1 and start the process once again, click Layout (1), go back to the Material Properties tab (2), select “ts4 body” (3) and click on the folder icon (4) to open and load the alpha texture you did in the beginning in Photoshop.
Then it’s just a matter of repeating the process from step 2: bake the alpha channel and save it again as a new image (watch out, don’t overwrite your previous image!). This one I like to name “ALPHA TS2”. When you’re ready to move on, close Blender without saving. If you see a small check telling you it will save some images, make sure you uncheck it, so you will be able to use it again in the future from the starting point with no issues. I don’t think it really matters if you accidentally save your progress in these files, but I like to keep it clean and fresh so I can do the process where I left it from the beginning the next time I open it. And in case you mess up and save somewhere, you can always just delete the .blend file and download the template files again.
·FINAL STEP: PUTTING EVERYTHING BACK TOGETHER IN PHOTOSHOP:
We’re almost done! Open Photoshop and drop in both your 2 new baked textures, “BASE TS2” and “ALPHA TS2”. Keep both layers on top of each other and aligned. For that you can enable the snapping in View > Snap to… > All. Rename these layers so the Alpha layer is “ALPHA” and the Base is “BASE”, and make sure ALPHA is on top.
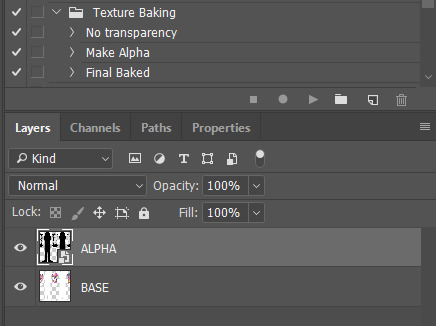
Then run the “Final Baked” action and now for real, it’s finally over! You just fully baked and converted these new textures. Congratulations!
So, to summarize, here’s a small guide with all the steps of the workflow I developed. Once you get the hang of it, baking and converting one swatch of a texture just takes a couple minutes. It really is that easy!
One small note though, some of the baking blend files save the textures with a resolution of 2048x2048 pixels, as clearly stated at the end of their file name. That’s way too overkill, because TS2 only properly supports up to 1024x1024 for most of its textures and you should always resize your final product to that max resolution. I just made those 2048 versions because there might be some really tiny and slim details on some tattoos that may look a little too blurry when baked into a 1024 resolution, so for those cases use that if you want and then resize them in Photoshop. In the Resample mode of the Image Size menu, there are a few options to choose. For the fine details, I like the Nearest Neighbor (hard edges) option, which, even if it looks a bit pixelated, it still preserves most of the texture and quality.

For anything else, I would just directly bake them using the 1024 versions in Blender.
And for the folks who feel comfortable playing around in Blender, this is just the beginning! Texture baking opens a LOT of possibilities, so feel free to move stuff around and edit the models to your liking! If you notice the baked textures look warped or stretched somewhere, or don’t like where some textures are placed in the S2 body, poke around that area moving stuff and then give it another try. The main objective of the baking process is keeping both overlapping models as close in shape as possible. You may also edit and save new copies of the templates, or make new ones from scratch using mine as a reference (keep a close look on those Baking settings and values, I think they work pretty well) and share them if you want to. Go ham, do whatever you want with them! I have plans on making templates to convert body textures from Sims 3 to Sims 2, but for now it’s not on my priorities, so we’ll see when that happens.
Whew! Hope none of this was too confusing. Need help or have any issues with these? Please ask/message me and I’ll be glad to help when I’m able to!
Credits for the CC used in the render demonstration:
-Skin by Sims3Melancholic
-Eyes by Northern Siberia Winds
-Eyebrows by PeachyFaerie
-Tattoos by xtc
-Top by SerenityCC
And the Tattoo I used for the tutorial can be found here, by ValhallanSim
Last but not least, a huge, special thanks to @elvisgrace for all her help testing this for me. I’ve never shared Blender files, so hopefully everything works as intended and everyone can use them with no weird issues. Fingers crossed! And thank you for reading! Hope you have fun playing with this new toy hehe.
#ts2 tutorial#ts2 resources#ts2 blender#ts2 overlays#ts2 texture baking#4t2 conversion tutorial#i swear blender is the coolest thing ever#yes you can consider this post as blender propaganda
302 notes
·
View notes
Last Seen Blogs

mysinsforbts
I_sin_for_BTS~

pikkssss-blog
Untitled

hungryartbean
Bean

westeros-universe-blog
westeros-universe

transformers-2023-1080p
变形金刚:超能勇士崛起- 完整版電影~中文字幕[