
prettyediblestylist
Pretty Edible Stylist
Natalie Seldon | Cookbook Author | Writer | Food Stylist | Prop Stylist
55 posts
Don't wanna be here? Send us removal request.
Last Seen Blogs


Text
Gluten-Free Salted Double Chocolate & Pecan Cookies

Is it just me or did Christmas creep in a hell of a lot quicker this year? Personally I blame our nations great (aka desperate) need for distraction from you know what! (Plus a few other somewhat disturbing shockers currently in the headlines.) The thing is, if you’re anything like me, the thought of Christmas always feels too soon (*sorry to all you tinsel devotees) Just at the very thought of Black Friday this week, beads of sweat threaten and I can already feel my diary is beginning to swell with plans for festive gatherings. You are guaranteed to find random gift lists, shopping lists...- (new year resolution lists? god no!) - sporadically left around the kitchen. And for many of you too perhaps, the start of Christmas menu planning and preparation - and the harsh truth is that it's not all going to happen. But before the idea of festive love and joy begins to seep away, promise me you'll consider baking these super-easy, speedy Salted Double Chocolate and Pecan Cookies. They are perfect for freezing, so if the desire takes hold in the next few weeks, you are safe in the knowledge they will keep well until Christmas week officially lands. I promise you they are worth it, and you'll only wish you made more. (Fyi, this recipe is easily doubled or tripled.)
First though, I feel it only appropriate to swing by some history (cue some cheeky cookie facts!) One of which in particular recently caught my attention; we Brits are one of the world's biggest spenders when it comes to biscuits! Quite frankly, it made me feel somewhat proud of our nation. But while we've created some fine examples in our time (the wholesome fig roll, the posh viscount, even the garish pink wafer), it's America which takes the gold medal in this arena, for inventing the chocolate chip cookie. It was Ruth Wakefield of the Toll House Inn in Whitman, Massachusetts, who came up with the brilliant idea of adding chocolate to her butter cookies some time in the 1930s. Since then, the cookie has taken on many different guises to tickle the taste buds of even the hottest aficionado...strictly 'purist' or not. I for one love playing around with new ideas and am thrilled with this latest gluten-free number which is loaded with double chocolate chunks, toasted pecans and hazelnuts (but please feel free to use whatever your favourites are in the cupboard), plus a cheeky sprinkling of sea salt (I think by know we are all aware salt and sweet marry so well). This just leaves me with one more thing...spoiler alert: they taste amazing!
Salted Double Chocolate & Pecan Cookies
Makes about 15
120g pecans (or use 60g pecans and 60g hazelnuts if you like)
100g butter (or you can use vegan-friendly margarine)
1/2 tsp vanilla bean paste or extract
125g soft brown sugar
1 egg, lightly whisked (or to make this wholly vegan you can substitute with 1 tbsp milled flaxseed & 21/2 tbsp water mixed together/allow to sit for 5 minutes)
100g buckwheat flour (I use Clearspring*)
75g almond flour (I use Sukrin**)
1/2 tsp bicarbonate of soda
1 tsp sea salt (plus extra to sprinkle on top)
50g dark chocolate, cut into small chunks (gluten-free & vegan available)
50g milk chocolate, cut into small chunks (gluten-free & vegan available)
1. Preheat the oven to 200C, 180C fan and line two baking trays with greaseproof paper for the cookies.
2. On a separate baking tray, toast the nuts in the oven for 8-10 minutes, or until fragrant and slightly browned. Remove and allow to cool. Roughly chop.
3. Melt the butter and vanilla in a saucepan over a medium heat. Continue to cook, swirling occasionally for 3-5 minutes, or until the butter turns golden and smells nutty. Place the sugars in a large bowl and stir in the butter. Allow to cool.
4. Add the egg, flours, bi-carb, salt and chopped nuts. Stir until combined. Finally add the chocolate chunks and carefully combine until evenly distributed. If the dough needs to firm up before rolling, you can place it in the fridge for 30 minutes (or alternatively place in the fridge for up to a week at this stage)
5. Scoop the dough into roughly 4-5 cm (1 1/2 inch) equal-sized balls (an ice-cream scoop can be useful here!), then place slightly apart on the prepared baking trays and flatten into discs - so they are about 6cm diameter - with the palm of your hand. Top each with a little sprinkling of sea salt.
6. Bake the cookies for 12-15 minutes, or until the edges are golden, set and the tops are pale golden but still soft and slightly under-baked (so keep a close eye on them!)
7. Remove the cookies from the oven and allow to cool slightly on the tray before removing onto wire cooling racks. They are best eaten cool to warm in temperature, but will keep in an airtight container for up to three days. (see note on freezing in intro)
*Clearspring buckwheat flour
**Sukrin almond flour
Recipe, styling & photography: Natalie Seldon
Instagram @prettyediblestylist
#cookie#cookies#glutenfree#glutenfreerecipe#glutenfreecookies#instafood#foodie#delicious#biscuits#picoftheday#foodphotography#prettyediblestylist#photography#photo#foodpic#foodpics#instadaily#instamood#instagood#festive recipes#christmas#christmas recipes#festivefood#nomnom#eeeeeats#eating#eat#healthyeating#eathealthy#cleaneating
0 notes
Text
White Chocolate, Strawberry & Coconut Yoghurt Popsicles

Dreamy Strawberry, White Chocolate & Coconut Popsicles anyone? These guys are bursting with fresh homegrown strawberries which are gently marbled into a luscious and creamy mix of melted white chocolate and fresh coconut yoghurt. The added bit of greatness here though is the crunchy coconut cookie crumb alongside delicious surprise nuggets of white chocolate i.e joy in every single bite. All we need now is more bright and balmy sunshine this weekend....& plenty of it please!
So I’ve come to the end of a busy week of recipe creating, photoshoots and new restaurant launches - and now it’s officially Friday (hooray), I strangely have a burning desire to reorganise my spice, dried herbs and condiment cupboard. (anyone else get those urges?) That aside, I thought it was only right ahead of the third weekend of August to quickly share the recipe for these fruity delights on sticks. The white chocolate is for therapy, the strawberry is to fuel your inner power and the coconut will hopefully make you feel like you are in fact on a deserted tropical island in the middle of the Indian ocean.
Ahead of that though, some pretty pictures of delicious popsicles in the making!


I should also probably mention these pops are utterly simple and straight up delicious. They’re also speckled with vanilla bean and then finished with a drizzle of strawberry & white chocolate, plus even more coconut cookie crumbs for extra crunch. TICK! Oh and hands down these are enjoyable for the kids to get involved with too (we all know school holidays can be a time where imaginations have to be stretched somewhat to keep them occupied - my pleasure :)


White Chocolate, Strawberry and Coconut Yoghurt Popsicles
I can recommend using a 10-hole popsicle mould for this recipe, but if you’d rather use some disposable cups and wooden sticks instead, this will work just as well.
Makes 10 lollies
Prep 30 minutes, plus freezing time
Cook 5 minutes
150g Free'ist White Chocolate and Strawberry Chocolate, broken into small pieces
250g strawberries, roughly chopped into medium chunks
1 x 350g tub coconut yoghurt
1 tbsp sugar
1 tsp vanilla bean paste
pinch of salt
To decorate
50g Free'ist White Chocolate and Strawberry Chocolate, broken into small pieces
1 tsp coconut oil
3 Free'ist Coconut Cookies
1. Place strawberries, sugar & vanilla into a blender and whizz for just a few seconds so there are preferably still small chunks of strawberry visible. (Don't panic if you go too far...the end result will still be delicious!) Pour into a large jug and very briefly stir in most of the yoghurt so that you are still left with a slight ripple-effect.
2. Melt the white chocolate over a bain marie (or in a glass bowl in the microwave in short intervals. I put mine in for 30 seconds, then stirred, then three lots of 10 seconds with stirring in between – be careful not to go over as the chocolate will seize otherwise from over-heating too quickly) Allow to cool a little, then stir into the strawberry yoghurt mixture. If some nuggets of hard chocolate form, this is even better resulting in a chocolate chunk surprise in every bite. Set aside until needed.
3. Place the coconut cookies in a food processor and whizz until small-medium crumbs are formed. (It can be a bit rough.) Fill each popsicle mould with the strawberry and white chocolate yoghurt mix about 1-2cm from the top. Tap the mould firmly on a work surface to even the top and prevent air bubbles, then carefully place some of the cookie crumbs to fill to the top of each mould, pressing down with your fingers to push them into the yoghurt, keeping it compact. Insert wooden popsicle sticks into the centre of each lolly and freeze for 5-6 hours, or preferably overnight.
4. For the white chocolate drizzle, combine white chocolate with coconut oil and melt over a bain marie (or in a glass bowl in the microwave in short intervals. Again, begin with 30 seconds, then continue microwaving and stirring in 10 second intervals until melted and smooth. Allow to cool for a few minutes, or until it reaches room temperature. Remove the lollies from the mould by briefly running under warm water. Transfer on to a large baking tray (preferably one you have previously placed in the freezer for 1/2 an hour) otherwise a board, or a wipeable, clean surface. Drizzle over the chocolate with a spoon, then sprinkle over the remaining coconut cookie crumbs. Enjoy immediately, or return to the freezer until you are ready to serve.
Recipe, Styling and Photography: Natalie Seldon (created for Sainsbury’s Recipe Hub)
For more recipe ideas, follow me on instagram @prettyediblestylist
0 notes
Text
Black Garlic + Crispy Sage with Spinach & Butter Beans

This is the holy grail of weeknight supper action if you ask me. A quick cupboard & fridge raid tonight resulted in this light dinner dish of undeniable comfort (due to our temporary blip with summer today)... Black Garlic and Crispy Sage with Spinach & Butter Beans. Plus some really good olive oil & shaved parmesan. I’d have added ‘nduja or chorizo if I’d had some knocking about (must have eaten it all! 😬)...so instead I added some pimentón from the kitchen spice store (aka smoked paprika) For those who aren’t in the know, black garlic is warm, sweet & almost nutty. A nice change from OG garlic - & one of my favourite aromatics so I urge you to give it a go. In summary, this is fuss-free, quick & delicious goodness. I hope you try it for yourself...find this great recipe below.
Black Garlic and Crispy Sage with Spinach & Butter Beans
As already mentioned, this dish is also wonderful with chorizo or ‘nduja added (in which case you can omit the paprika) Wonderful on its own as a meat-free dish or serve with roasted lamb, pork or chicken.
Serves 2
Prep 10 minutes
Cook 10 minutes
1 tbsp olive oil
1 large black garlic clove, crushed (or you can use standard garlic)
a few sage leaves, (larger leaves roughly chopped)
1 x 400g can of butterbeans, rinsed and drained
a splash of white wine (optional)
1/2 tsp Pimentón (smoked paprika)
75g young leaf spinach
20g parmesan, shaved
good olive oil or ex-virgin olive oil, for drizzling
1. In a medium saute pan, heat oil over a medium heat. Cook the garlic and sage for a few minutes, or until the sage begins to crisp up. Add the butter beans, stir, then add a splash of white wine (if using) and paprika with some salt and pepper to taste. Allow the wine to reduce a little, then add the spinach whilst occasionally stirring to allow the leaves to wilt and let the flavours blend.
2. Serve with shaved parmesan and a good glug of your favourite olive oil. Bon Appetito!
For more recipe ideas, follow me on instagram @prettyediblestylist
Recipe, Food Photography and Styling: Natalie Seldon
#prettyediblestylist#weeknightmeal#quickdinner#quickrecipe#vegetarian#glutenfree#onmytable#foodphotography#styling#natalieseldon#recipeoftheday#recipe#food blogs#foodblogger#foodblog#recipeideas
3 notes
·
View notes
Text
Hot Smoked Salmon, Watercress, Green bean & Avocado salad bowl with Chermoula

One of my favourite ways to brunch this time of year?... with a gorgeous summery bowl of fresh, delicious ingredients - that requires zero faff to assemble, meaning more time to sit back, relax and enjoy. This brings together all-important texture, colour and full-on-flavour in one winner salad, which probably explains why it’s been one of the most popular of all the dishes I recently created for The Hoxton Hotel’s menu in London, Amsterdam and Paris. Here I show just how easy Chermoula is to create; as one of north Africa's most popular condiments and sauces, it is mainly used as a dip or marinade for meats, fish and vegetables. It contains just a few ingredients such as fresh parsley, coriander and dry spiced cumin and paprika, which are quickly whizzed together in a blender - and has a fresh, rich flavour with a zingy, salty finish thanks to the addition of zesty preserved lemons and peppery Green Tabasco. I always recommend making a large batch as it keeps well in the fridge stored in a jar or container for up to two weeks. Other gorgeous dish ideas to serve with Chermoula are Shakshuka or soft-poached eggs on toast for brunch, brushed all over roasted-chicken, lamb, or even chargrilled halloumi either cooked on a griddle pan or on the barbecue. The only thing to order now is sunshine! :)
Hot Smoked Salmon, Watercress, Green bean & Avocado salad bowl with Chermoula (Vegetarian/GF/DF)
Serves 2
200g hot smoked salmon
½ an avocado, chopped
50g watercress
150g fine green beans
1 tbsp pumpkin seeds, to serve
a few mint leaves, to serve
For the chermoula sauce
60ml ex-virgin olive oil
1 handful coriander, roughly chopped
1 handful parsley, roughly chopped
1 garlic clove, crushed
1/2 preserved lemon, skin only and finely chopped
½ tsp ground cumin
½ tsp smoked paprika
3-4 dashes of TABASCO Green sauce
1. Blitz all the ingredients for the chermoula sauce in a food processor (or finely chop) with a generous pinch of seasoning, then set aside. ((This will keep in an airtight container in the fridge for up to three days)
2. Cook the beans in boiling salted water for 5-6 minutes, until just tender, then drain and refresh under cold running water. Shake well to remove excess water, then pat dry with kitchen paper. You can do this the day before and keep the cooked beans in the fridge (in a bowl covered with cling film).
3. When you're ready to serve, divide the watercress, green beans and salmon into two separate bowls. Spoon over the the chermoula sauce, then add a few more dashes of Green Tabasco. Finish with pumpkin seeds and mint leaves.
For more recipe ideas, follow me on instagram @prettyediblestylist
0 notes
Text
Tandoor Flatbread
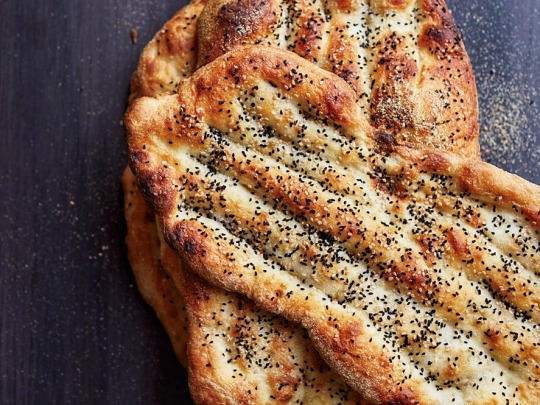
Very excited to be cooking up a wonderful Tandoor extravaganza for all the lovely (and hungry) crowd at Latitude festival this year. Both myself and master of EVERYTHING BARBECUE and live-fire cooking, plus official ‘wood whisperer’ Mark Parr aka Lord Logs (London Log Company) will be creating a gorgeous feast whilst providing lots of top tips & fuss-free techniques to arm you with recreating delicious, fuss-free BBQ food at home. Without wanting to give too much of the action away, some of the delights will include spicy, more-ish chargrilled buttermilk Tandoor-spiced chicken kebabs and Pepper, Red onion and Baby Courgette Shashlik, along with barbecued avocado, Tandoor-spiced squash and cauliflower steaks...all of which will be served in our winning Tandoor flatbread along with freshly-grated coconut chutney and a salad show-stopper dressed with apple blossom flowers and our all-time favourite YUMMY buttermilk & peppery mustard sauce 👌🏼 The festival runs for the whole weekend from the 18th - 21st July & every year proves to be a fun-filled, family-friendly occasion that’s always packed full of joy. It would be wonderful to see (and feed!) as many of you food lovers out there that can make it…the beautiful surroundings of Henham park in the Suffolk countryside are worth the visit for alone. I’ve been so busy getting everything ready for the weekend that not all of the recipes are posted here yet, but this will be on the blog as soon as possible I promise.
Looking forward to seeing many old and new faces along the way. Our demo will be kicking off on Saturday at 5p.m outside the food theatre! :)
Tandoor Flatbread
You can buy some great ready-made versions now, but nothing quite beats the pleasure of making it yourself at home. Here’s the recipe for all you budding bakers (which makes it sound quite tricky, but it really isn’t!) I love to add chopped fresh coriander to the dough when kneading, plus a sprinkling of cumin powder for extra pep. Olive oil is essential for keeping the bread lovely and soft once cool, but if you like things a little more indulgent add 25g diced cold butter to the flour and water in the electric mixer (and remove 25ml vegetable oil). For a garlic butter version, take 50g cubed butter and place in a microwave safe bowl along with 2 cloves of freshly crushed garlic. Microwave together just until the butter is completely melted in 20 second bursts. Use to brush onto the hot, fresh flatbread before serving.
For the starter: x4
500g strong flour
500ml water
1. This needs to be done in batches. In an electric mixer with the whisk attachment, mix together the flour and water on medium speed till the mix is stringy and leaves a trail. Empty into a large container that can hold 10kg. Repeat this process three more times.
2. Place the lid on this mix (or cover with a damp tea towel) and leave in a warm place for 12-16 hours.
3. By this point it should have risen and the dough should be bubbly. Place in the fridge - or put outside in the winter months (if you only need for occasional use)
For the dough
1kg starter
500g atta (or any wholemeal wheat flour)
50g sugar
25g salt
200ml water
1. Mix all ingredients with the hook attachment until you have a smooth dough that comes away from the sides of the bowl.
2. Store in a large container or bowl as the dough will rise and you want to avoid it spilling over. Cover with a damp cloth and leave somewhere warm for 3/4 hours (or as long as it needs till it rises)
3. Once risen, knock the dough back and return to the container, then refrigerate if you are using the next day or start to portion out 100g balls into a large tray, dipping the dough balls in sesame (and I also like to dip into nigella seeds) before arranging spaced apart on the tray.
4. Prove for a couple hours and either use straight away or refrigerate for the next day.
-2.5 teaspoons -
240ml warm milk
60g plain yoghurt beaten with one egg
60ml veg oil
360-420g all purpose flour (start with 360 and add of need to get to desired consistency)
2 tsp sea salt
1 tsp baking powder
1. Dissolve the yeast In warm water with a tablespoon or two of the flour. Mix into a paste and leave for 15 minutes in a warm place.
2. Add your yoghurt mixture. Mix flour, salt and baking powder for a minute or two until mixed well, then add the liquid mix in parts and knead for 5 minutes.
3. Leave to rest for 2 minutes, then knead again for another 2-4 minutes whilst mixing in the oil. I would like it wetter so I wouldn’t add any more flour as it firms up after the first prove.
4. When you have your desired consistency, form a ball and keep in a well oiled bowl with a damp cloth over the top. Leave in a warm place for 2 hours.
5. Knock it back and reform the ball. Return to your oiled bowl or container and keep in the fridge for the next day. Oil the top and cover loosely with cling film or damp cloth.
6. Form into desired size into a tray, oil the top and line the tray with clingfilm or a clean bin bag.
7. Preheat oven to 240C/fan 220C/gas 9 with a pizza stone (baking stone) until stone is hot. (Using a baking/pizza stone will help to give the flatbread a similar intense heat as a clay tandoor. You can also use the base of a large ceramic dish inverted)
8. Scrape out your balls individually and apply sesame/nigella seeds if you like. Roll using a little flour if needed and stud with a fork to prevent it from rising too much (try not to use too much flour so it doesn’t burn when you are cooking them) Lay on top of preheated baking stones. Bake until puffed and golden on top which should be about 2–3 minutes. Brush with garlic butter and top with fresh coriander, if desired. Repeat as desired with more flatbread.
Recipe: Kian Samyani (Head chef at Berenjaks and Brigadiers, London)

Chicken Kebabs with Tandoor Spice
I love what I like to call the ‘double skewer method’ which makes the skewers much easier to thread and handle when cooking on the barbecue. You can alternatively use the standard method if you prefer by cutting the chicken into cubes, then threading the meat onto single skewers the traditionally way.
Serves 4-6
Cook 25 mins (plus marinating)
You will need: about 12 wooden (soaked) or metal skewers
3cm piece of ginger
2 cloves of garlic
150g natural yoghurt (or you can use 150ml buttermilk)
2 tbsp olive oil
60 ml tomato passata
½ tsp garam masala
½ tsp chilli powder
½ teaspoon smoked paprika
½ teaspoon turmeric
10-12 skinless, boneless free-range chicken thighs (or mix with chicken breast)
1. Peel and finely grate the ginger, peel and finely chop the garlic, then place in a large bowl with the yoghurt (or buttermilk), oil, passata and spices. Stir well.
2. Slice the chicken thighs (and breast if using) in half , coat well in the marinade, then season with sea salt and black pepper. Cover with clingfilm and refrigerate for 2 to 3 hours.
3. If using the double skewer method, thread each thigh or breast onto two skewers horizontally about 6cm apart, then barbecue or grill for 25-30 minutes, or until golden and evenly cooked, turning occasionally. Serve with lots of fresh coriander and mint and my Spinach and Peashoot salad with edible flowers and buttermilk/mustard dressing plus a good drizzle of natural yoghurt. Or the gorgeous fresh coconut chutney we showed you at Latitude. (Recipe coming soon!)
Follow me on instagram @prettyediblestylist
#latitude#latitudefestival#prettyediblestylist#natalieseldon#barbecue#tandoor#latitude2019#foodtheatre#fooddemo#bbq
0 notes
Text
Grilled Halloumi & Tenderstem Broccoli salad with Pomegranate, Mint & Harissa-spiced Quinoa & Puy Lentils

There are moments during summer time that I love. The kitchen is quiet, calm and mercifully cool - and my appetite cries out for light and satisfying plates of fresh, vibrant food. Salads seem like the easiest dish to make. There is no browning or slow cooking. You take the elements – usually raw, sometimes cooked – and dress them. There are always greens in my fridge, copious and chilled and there may be a handful of cooked whole grains such as quinoa, barley wheat or freekeh - which is roasted green wheat, fast becoming more and more popular - to lend substance, (otherwise a handy packet in the cupboard on standby!) I particularly love whole grains for salads as they keep their shape and don’t become sticky like refined ones, they make terrific salads – they keep their shape, benefit from being soaked in dressing, and can sit in the fridge not just for an hour but for a couple of days, without spoiling. I use bowls of iced water to perk up pea shoots, watercress and salad leaves. The dressings are generally made first because I like taking time to balance the acidity of vinegar, a favourite mustard or something sweet like honey/agave nectar (like in this recipe) together with citrus juices, oils and seasonings.

When entertaining, summer always seems so much easier compared to winter. You can cook outside, (halloumi and tenderstem broccoli are wonderful when grilled on the barbecue lightly coated in olive oil) which always feels more liberating than being glued to the stove, plus you can eat outside, where things always taste sweeter. Today’s recipe was born from a last-minute gathering with friends, when the sun suddenly started shining and we piled outdoors to eat, happy faces and all.
Grilled Halloumi & Tenderstem Broccoli salad with Pomegranate, Mint & Harissa-spiced Quinoa & Puy Lentils
The salty halloumi here partners so well with the sweet, zesty dressing, but if you prefer the taste of goat’s cheese, this would also make a worthy addition.
Serves 2 (can be easily doubled or more)
2 tbsp olive oil
1 tbsp harissa
150g quinoa and lentil ready-cooked mix (you can find these packs with the ready-cooked rice in most supermarkets, such as Waitrose ‘Love Life’ range. If you buy raw quinoa and lentils, follow the packet instructions, then continue as per method 2 below)
200g halloumi, sliced
150g tenderstem broccoli, halved horizontally
50g ruby chard leaves (or other salad leaves of your choice)
a handful of fresh mint leaves
2 tbsp pomegranate seeds
1/2 tbsp sesame seeds
For the dressing:
1 tbsp freshly squeezed lemon juice
2 tbsp ex-virgin olive oil
1 tbsp agave nectar (or for non-vegans, you can use honey)
1. To make the dressing, place the lemon juice, oil and agave nectar with some salt and pepper in a small bowl and mix to combine. Set aside.
2. Heat 1 tablespoon oil in a medium saucepan over high heat. Add the harissa and allow to heat for a few seconds, then reduce the heat and add the lentils/quinoa mix. Cook, stirring for a few minutes. Then remove from the heat to cool.
3. Heat the remaining 1 tablespoon of oil in a non-stick frying pan over a medium to high heat. Add the halloumi and cook for 3 minutes each side, or until golden. Set aside. Add the broccoli to the pan with a little more oil if needed and cook for 5-7 minutes, or until al dente and chargrilled, Divide the halloumi and broccoli between two plates. Arrange the ruby chard (or other salad leaves), quinoa/lentil mix and mint leaves on top. Toss together lightly with the dressing. Finish with a scattering of pomegranate, sesame seeds and a little more seasoning.
Recipe, styling & photography: Natalie Seldon
For more recipes, follow me on instagram @prettyediblestylist and twitter @pretty_edible
#recipe#healthy#salad#recipeoftheday#meatfreemonday#meatfree#glutenfree#delicious#foodie#photography#foodpic#foodpics#styling#style#foodwriter#cookbook#prettyediblestylist#stylist#healthyeating#feedfeedglutenfree#feedfeed#thefeedfeed#thefeedfeedglutenfree#goopmake#yummy#lunch#dinner#instamood#instagood#eatwell
14 notes
·
View notes
Text
Chocolate Oreo Mousse Tart (vegan)

Richly flavoured, yet light as air, there are few more perfect ways to end a meal. This is one of those ‘love at first bite’ recipes where you’re left wondering how and why you’ve coped so long without this yumminess in your midst.
This magic is creamy, rich and smooth, like the best chocolate pudding-meets-mousse-meets-chocolate-pots-de-creme of your life. There’s no milk, cream, eggs…or in fact anything dairy-like. But there’s also no scary vegan ingredients – it’s just all things you could buy at your regular supermarket. My favourite kind of recipe.
Why this vegan chocolate tart is quite so mind-blowing!…
-The mousse contains only 5 ingredients. The base only two!
-No Bake.
-TASTES LIKE HEAVEN.
-But is also healthy and sin-free.
-It contains Oreo cookies.
I could stop there. But we could also keep going:
-Tofu. Everything else in this short ingredient line-up is going to be fine with you and then you’re going to see tofu and you’re going to doubt me. Admittedly, I was a doubter myself and I promise that you will eat this and think zero thoughts about this addition. In fact I have a new found respect for tofu because here it helps create just the right level of thick and creamy, that blends together easily, but the flavour is almost completely neutral. Smooth, silky perfection.
-Obviously, chocolate and more chocolate. Your favourite kind is a major player here. I used Doisy & Dam’s Organic Maca, Vanilla & Cacao chocolate here, partly because this is a lovely new brand of wonderful flavour combinations I was particularly keen to shout about (such as Goji & Orange and Date & Himalayan Pink Salt)
-And to wrap up, the mind-blowing element is a little bit of almond love. Just scoop some almond butter in that blender (I’m a big fan of Vitamix!) to get a buttery texture, and leave the smoothing-out part to the chocolate almond milk.
Now for some base talk. I personally love an Oreo cookie and I knew this would create a beautifully dark chocolate, crunchy base layer to compliment the so-mousse-ey soft filling. I urge you to use your favourite kind of biscuit though as I’m all too aware that personal biscuit brand choice is a serious matter. Chocolate hob nobs, chocolate chip cookies, almond biscuits…the list of possibilities is endless. Most supermarkets have quite an extensive range of vegan biscuits on offer now too, so if you are vegan but also love an Oreo, you can buy their vegan substitute here. Alternatively, why not go for a nut base using all your favourites blended together with chocolate almond butter, and to help bind the mixture together, a few Medjool dates or melted coconut oil.
A tasty tart topping? Here I used some simple edible flowers and frozen blueberries - both of which make this tart into a real show stopper if you are serving guests at home. But you can also use any favourite berries tumbled into the centre (fresh or frozen), banana slices, toasted coconut shavings or a mixture of your favourite chopped nuts. On that note, a granola mix such as my Maple-Roasted Nut & Seed recipe from my book which has become a firm stand-by favourite, would add a delicious variation of textures (but even a good store-bought granola would work perfectly well) And if you prefer the simpler things in life, stick to a delicate sprinkling of sea salt which is your guaranteed fast-track to sweet/salty greatness.
The beauty of this recipe is that you can also easily play around with flavourings to suit your own taste – pop in a teaspoon of coffee, a zest of an orange, or booze (whisky, rum, Grand Marnier – whatever you fancy), a sprinkle of chilli flakes or a few cardamom seeds. Either way, you’ll have one of the easiest, most delicious and satisfying puddings around.
So, to conclude…whether it’s for a special occasion, an impromptu gathering with friends, a restorative chocolate and red wine night in pyjamas alone (I’m behind that decision all the way)…go forth and enjoy your fill - because simpler things in life taste even sweeter!
Vegan Chocolate & Oreo Mousse Tart
I love to add a sprinkling of sea salt over the mousse topping before serving and as suggested here, berries (frozen or fresh) and edible flowers make a beautiful end result when serving to friends.
You will need: a 21cm loose-bottomed tart tin, lined and lightly greased
Serves 10-12
100ml almond chocolate milk (I used Alpro soya; find this in the long-life milk aisle - or you can use any chocolate milk you wish)
275g silken tofu
75g Pip & Nut chocolate almond butter (or you can use regular almond butter)
250g dark chocolate broken into pieces (vegan optional or I used Doisy & Dam’s Organic Maca, Vanilla & Cacao chocolate: see note in list above)
1 tsp vanilla bean paste or extract
For the crust:
300g Oreo cookies, broken into smaller pieces (vegan & gluten free available here)
175g coconut oil, melted
1. Begin by making the crust. Tip the biscuits into a food processor, blitz to crumbs and pour in the melted coconut oil. (You could also bash the biscuits into crumbs with a rolling pin in a plastic food bag, then stir in the oil.) Press the biscuit mixture into the base and sides of the tin – the easiest way to do this is by flattening it with your hand under a sheet of cling film, then smooth the surface with the back of a large spoon. Place in the fridge to set.
2. Blend the tofu, chocolate almond milk, almond butter and vanilla until smooth. Melt the chocolate in a bain-marie (a bowl placed over a pan of simmering hot water) or microwave in 30 second bursts, stirring in between. Add to the processor and blend until smooth and combined – occasionally scraping down the sides with a spatula if needed.
2. Pour the filling into the oreo crust and chill for at least 4 hours, or preferably over night. Before serving, add a sprinkling of sea salt and decorate how you wish (see notes above). Devour!
Recipe, styling & photography: Natalie Seldon
Follow me on instagram: @prettyediblestylist
*www.doisyanddam.com/ Instagram @doisyanddam
0 notes
Text
Spring salad of Roasted Radishes, Jersey Royals and Asparagus with Parmesan & Lemon dressing

Spring time bowl. Roasted Radishes, Jersey Royals and Asparagus with Lemon, Parmesan & Mint dressing. Here’s me paying homage to my favourite season by representing all that is great and fresh about English gardens right now. There’s nothing I love more than piling a few star ingredients simply-cooked into a large bowl, adding a generous drizzle of quick, fuss-free dressing...then happily knowing all that’s left to do is quick mix - and devour! Minimum effort, yet full-on flavour.
The first radishes of the season, roasted with honey and balanced with lemon to encourage their sweetness, the all-mighty Jersey Royal cooked until golden and crisp, plus a gorgeous mix of white and green asparagus stems simply blanched until al dente to add a little crunch to this dish. What other flavours speak the language of spring to you? I also included some pearls of garden peas and fresh mint leaves plucked from the pot. (Oh, and as I had some white courgette left over from our Easter lunch, I peeled some long raw ribbon strips too (as this took approximately 30 seconds). Dressing wise, a fuss-free favourite of good ex-virgin olive oil, lemon (I love to use both zest and juice - no waste here) and finely grated salty parmesan which also adds great texture. This salad goes particularly well with a glass of ice-cold rosé outside on a warm day. I used both the purple and dip-dyed pink/white breakfast radishes, but the regular round ones would work perfectly well too. We eat this for an alfresco lunch or late evening dinner but I’d proudly serve this as a quick starter too. They are also great at a picnic or a party; just double or triple the recipe for a crowd. It’s full of colour, life and zest (literally!)

Roasted Radishes, Jersey Royals and Asparagus with Lemon, Parmesan & Mint dressing
I like to serve this when the potatoes and radishes are still a little warm as I’m a great lover of hot and cold together. If you wish, you can make ahead and place in the fridge, making sure you bring them up to room temperature a little before serving.
Serves 4
300g breakfast radishes, larger halved (I also used purple but you can use any radish you wish)
500g Jersey Royal potatoes, larger ones halved or quartered
2 tbsp olive oil
1 small lemon, zest and juice
2 tbsp runny honey
200g asparagus, trimmed and halved (I used both green and white asparagus, but use whatever you have to hand - and sliced in half horizontally as my stems were quite thick but you can also leave whole)
100g fresh garden peas (or frozen is fine)
1 courgette, sliced horizontally to make ribbons (I like to use a peeler for this)
For the dressing
75ml ex-virgin olive oil
1 small lemon, zest and juice
25g parmesan, plus extra to serve
a few mint leaves, torn, plus extra to serve
1. Preheat oven to 220C, fan 200C. Place the potatoes into a large, deep roasting tin and drizzle over the oil, honey & lemon juice with some zest, then give it a good shake to evenly coat. Season with a little sea salt and black pepper. Roast for 30 minutes, or until the potatoes are starting to crisp with a lovely golden brown colour. After about 10 minutes add the radishes and give the tray another shake. If you feel the radishes need a bit of help with the oil and honey, feel free to add a little more at this stage. They should be ready when the radishes are crisp and have bled their colour a bit.
2. Meanwhile, bring a pan of salted water to the boil and add the asparagus. Blanch for 1 minute then drop into iced water to stop cooking. Set aside until needed. Place the pan with the cooking water (or just refill if needed) back on the heat and add the peas. Cook for 2 minutes, then drain and add to the iced water.
3. Make the dressing by mixing all the ingredients together in a small bowl or jug. When you are ready to serve, place the potatoes, radishes, asparagus, peas and courgette in a large bowl. Drizzle over some of the dressing (any leftover can be stored in the fridge for up to a week) and add a little seasoning. Finish with another grating of parmesan and a few mint leaves if you wish.
Ceramics handmade by me
Follow me on instagram @prettyediblestylist

#ceramics#pottery#salad#spring#delicious#foodheaven#natalieseldon#prettyediblestylist#recipeideas#recipeoftheday#healthyeating#eathealthy#healthy#vegan#glutenfree#foodie#lovefood#foodblog#foodblogger#lunch#dinner#lunchideas#stylist#style
0 notes
Text
Roasted Jersey Royals & Radishes with Honey & Lemon

Spring feast! My Roasted Jersey Royals & Radishes with honey & lemon which was recently voted a one-pan hit! Rich in colour, these first of the season radishes are heavenly when eaten raw, sliced, julienned, pickled (see last post for my quick and easy recipe) or as I have shown here, roasted to utterly crisp perfection. I love how they still maintain their characteristic crunch, working hand in hand with the soft, golden body of the Jersey Royals. Admittedly, this is an element of another spring dish creation I will be telling you all about soon, but as it’s so darn delicious in its own right, I thought I would share this recipe with you asap. No fussy or complicated ingredients here (a mere five in total)...just really simple, delicious flavours that work jolly well together. I also appreciate something tasty that I can knock up on the go with only a pan to wash up.
Having recently opened up the panel to you, my important readers, in regards to what elements of a recipe speak to you, make you think ‘I know I can realistically cook that’ - and possibly more importantly - ‘want to cook’, I have become increasingly aware of just how much the subject of convenience in the kitchen plays a key role with your home cooking needs. It was at the top of 90 per cent of your lists so needless to say, it reaffirmed what I already knew (as in all honesty, I am no different to the rest of you). With this in mind, you can expect many more recipe ideas like the one below making an appearance both here and on instagram in the next few months. As late spring/early summer beckons, now seems even more relevant with the sunshine-filled days and balmy alfresco evenings all in sight....equating to much less time on your feet in the kitchen. WIN. With the array of gorgeous, fresh seasonal ingredients available between now and September, I could easily pretend this will be much more of a challenge than I know to be true. I look forward to sharing more light yet satisfying - and above all ‘convenient’ ideas with you soon. In the meantime, you’ve got this dish in a ‘wham bam, thank you mam’ 30 (And as a bonus, for those of you who haven’t tried crispy roasted radishes before, you’re definitely in for a treat)
Roasted Jersey Royals & Radishes with Honey & Lemon
Serves 4
300g breakfast radishes, larger ones halved (I also used purple but you can use any radish you wish)
500g Jersey Royal potatoes, larger ones halved or quartered (I used baby Jersey Royals here which will save you doing this)
2 tbsp olive oil
1 small lemon, zest and juice
2 tbsp runny honey
1. Preheat oven to 220C, fan 200C. Place the potatoes into a large, deep roasting tin and drizzle over the oil, honey & lemon juice with some zest, then give it a good shake to evenly coat. Season with a little sea salt and black pepper. Roast for 30 minutes, or until the potatoes are starting to crisp with a lovely golden brown colour. After about 10 minutes add the radishes and give the tray another shake. If you feel the radishes need a bit of help with the oil and honey, feel free to add a little more at this stage. They should be ready when the radishes are crisp and have bled their colour a bit. Perfect as a side or added to a spring salad (for which the recipe is on the following post!)
To make this vegan friendly, simply substitute honey with agave nectar, or a little maple syrup if you prefer.
#spring#springrecipes#food#prettyediblestylist#natalieseldon#radish#seasonal#seasonalingredients#inseason#recipeideas#quickrecipe#lunchideas#dinnerideas#healthy#healthyeating#eathealthy#glutenfree#vegan#veganfood#veganfoodshare#delicious#fastrecipe#foodie#lovefood#onmytable#springfeast#yum
1 note
·
View note
Text
Mushroom Ragu, Soft Polenta & Thyme

For those of you who know your London food lore, news of the exciting menu offering at Ottolenghi’s latest light, airy eatery, Rovi will come as no surprise. I’ve been lusting after both Rovi’s and head chef Neil Campbell’s instagram for months now so recently I finally got round to paying them visit. We weren’t reserved when ordering (very unlike me, I’m well aware ;) such as Squid and Lardo skewers, fermented red pepper and aioli, Burrata served with rhubarb, monk’s beard and lemon and their newest dish we were lucky to be the guinea pigs for, namely Beef rump cap, ssamjang sauce and coal roasted vegetables. The absolute stand-out dish for me was their Confit of Mushrooms with fermented black vinegar and chilli...which is where the inspiration for this creation came about. This riff is refreshingly simple, quick & so delicious. A fast-track way to a very big hug on a plate *all ceramics made by me
Mushroom Ragu with Soft Polenta & Thyme
I used a mixture of shiitake, maitake & eryngii varieties but chestnut, oyster & standard white mushrooms also work well. Sometimes all I want is layer upon layer of soft texture but if you fancy a little crunch with every bite too, I love the addition of golden toasted almonds.
Serves 2
250g mixed mushrooms
2 tbsp olive oil
a knob of butter
1 garlic clove, crushed
a handful of thyme leaves, plus extra to serve
50ml veg stock
2 tbsp grated parmesan
25g blanched almonds, toasted & roughly chopped (optional)
For the soft polenta
250ml milk
250ml veg stock
100g instant polenta
25g butter
25g finely grated parmesan
1. Halve or thickly slice any large mushrooms. Heat the oil & butter in a large pan over medium heat, add the garlic, mushrooms & thyme leaves, stirring occasionally. Add stock & bring to the boil, cook for 2 mins, or until liquid has reduced by half. Season to taste & cover to keep warm.
2. Bring the milk & stock to the boil in a saucepan. Gradually add polenta, stirring constantly. Reduce heat, & continue cooking stirring frequently for 10 mins or until polenta thickens, Stir in butter & parmesan, then season to taste.
3. Spoon the polenta into bowls or a platter. Add the mushrooms on top & drizzle with some of the pan juices. Top with more grated parmesan, sprinkle over some extra thyme & toasted almonds, if using.

Recipe, styling, ceramics & photography: Natalie Seldon
For more recipe ideas, follow me on instagram @prettyediblestylist
#recipeoftheday#prettyediblestylist#natalieseldon#vegetarian#healthyfood#healthyrecipe#rovi#ottolenghi#delicious#mushrooms#lunch#dinner#recipeideas#quicksupper#foodie#london#londonrestaurants#neilcampbell#ceramics#pottery#stylist#style#atmytable#recipe#food
0 notes
Text
Roasted Rhubarb with Stem Ginger & Orange (aka Rhubarb & Custard for grown-ups)

I’ve returned to spring in full-flow here - & found myself knee deep in these brightly coloured forced rhubarb before the season comes to an end (the outdoor crop variety with dark-green stems flecked pink or deep red arrives in late spring/early summer!) Naturally, they are wonderful used in your favourite dessert - from pies to fools to crumbles, rhubarb also makes excellent jam, jelly and cordial syrup. For me, however, rhubarb really shines when served as a condiment for savoury foods. Made into a chutney or piquant relish, or roasted & served alongside some oily pan-fried fish such as mackerel - or even roasted pork, its fruity sour note makes an intriguing match for so many flavours. Make sure to select firm, rich in colour stems with no blemishes and be sure to remove the leaves as these are poisonous and contain toxic oxalic acid, which can be harmful if eaten.
One of my all-time recommended ways with rhubarb sparks happy childhood memories when roasted with sweet, gently spiced stem ginger and orange, then served with a creamy thick vanilla custard spiked with orange zest (also delicious with ice-cream or yoghurt, and sprinkled with toasted nuts, oats or granola - which makes for a satisfyingly tasty breakfast) You can find this delicious & super quick recipe below for all your tickled pink needs….
Roasted Rhubarb with Stem Ginger & Orange
Serves 4
400g rhubarb, cut into 5cm lengths
Zest and juice of 1 small orange
1 small stem ginger, finely diced
2 tbsp stem ginger syrup, to taste
To serve, custard with 1/2 orange zest (substitute with ice-cream/natural, coconut or Greek yogurt if you wish)
Toasted nuts, oats or granola
1. Preheat oven to 200°C, fan 180C. Place the rhubarb, orange juice and zest, stem ginger and ginger syrup in a roasting tray, then toss together. Cover with foil and bake for 10 minutes.
2. Uncover, give the tray a bit of a shake, and roast for another 15 minutes, until the rhubarb is tender but still holds its shape. Allow to cool, and serve straight away with custard (or above options) Or you can store in an airtight container in the fridge for up to a week.
0 notes
Text
Satay Chicken bowls with greens & brown rice

Who doesn’t love SATAY? For me, it clearly conjures up childhood memories where a few times a year as a special treat, we would go to our local Chinese restaurant, the Sun-Do (which I’m pleased to say is still thriving today. Okay, so I’m not ‘that’ ancient ta ;) and amongst crowded plates of prawn toast, duck pancakes and crispy seaweed, we would enjoy the traditional method of chicken grilled on sticks, smothered in this satisfyingly moreish golden, sweet and nutty sauce. The seating positioning was key as the spinning Lazy Susan (basically, a rotating tray that sits in the centre of a table) was like a wheel of fortune depending on how close you were seated to your favourite dish. Needless to say, within arm’s reach was the aim! ;)
I loved it then, and I still love it now. Satay also works well with beef, fish, vegetables, noodles, beans (such as black-eyed) - and any grain such as quinoa and buckwheat. The list is endless. Coincidently, one of the most popular recipes in my cookbook, The Goodness of Nuts and Seeds (see here) is the deliciously simple and delicious Satay Griddled Beef with cucumber ribbons. I urge you to give it a try.
For now though, here’s my riff on the Satay chicken favourite. I loved the idea of creating a satay bowl which only adds to the deeply comforting and soulful qualities of this dish...plus of course, it has the means to hold a lot more sauce! A double win in my eyes.
Satay Chicken Bowls with Greens and Brown Rice
The real deal red Thai paste is definitely preferable for this recipe rather than the loose consistency jars of the stuff they strangely still call ‘paste’. You can get hold of Thai Taste in most local supermarkets to save you hunting down a traditional Thai/Chinese specialist version. I love to serve this dish with thinly cut strips of cucumber and spring onion too which offsets the spicy rich sauce perfectly.
Serves 2
Prep 20 minutes
Total 25 minutes
1 tbsp olive or sunflower oil
2-4 boneless chicken thighs with skin, depending on size
1 tsp curry powder
250g green vegetables, such as sugar snap peas or tenderstem broccoli (go for your favourite, or mix it up)
a couple of handfuls of beansprouts
1½ tbsp Thai red curry paste
½ x 400ml tin coconut milk (make sure you scoop in some of the creamier coconut as this sometimes sits at the very top of the tin)
200ml chicken stock
2 heaped tbsp crunchy peanut butter
1 small red chilli, deseeded and finely chopped
1 tbsp soft light brown or coconut sugar
1 tbsp fish sauce (optional)
juice of ½ lime, plus extra to serve
1 x 250g pouch wholegrain brown basmati rice (or any cooked rice, quinoa or favourite grain)
2 tbsp toasted or salted peanuts, chopped (cashews make a lovely substitute)
fresh herbs, such as coriander, mint and Thai basil, to serve
spring onion and cucumber, thinly sliced, to serve
1. Lay the chicken thighs out on your chopping board and sprinkle with the curry powder and some salt. Rub the thighs until evenly distributed. Drizzle on some olive oil and using your hands, lightly rub it on the thighs so they are lightly covered. Heat a little more olive oil over a high heat in a large frying pan and cook the chicken for 5-7 minutes on each side, or until cooked and the skin is golden and crispy. Remove from the pan and rest on a board or plate, loosely covered with foil.
2. Turn down the heat and add a little more oil if needed, then the vegetables and beansprouts - then stir-fry for a few minutes, or until the vegetables are just cooked al dente with a bit of bite. Transfer the vegetables into a bowl (preferably warmed up in the microwave), then cover the vegetables with foil. To the same pan, add the curry paste. Cook for a couple of minutes, stirring, before adding the coconut milk, chicken stock, chilli, peanut butter, sugar and lime juice. Bring to the boil, then reduce the heat to a simmer for a few minutes, stirring, until the consistency is creamy. Season to taste.
3. Cook the rice in the microwave for 2 minutes, then divide between 2 bowls. Slice the chicken and add to each bowl along with any cooking juices. Lay the vegetables next to the chicken, then add lots of satay sauce. Add the spring onion and cucumber strips if using, then sprinkle on the fresh herbs. Serve each bowl with a wedge of lime.
Recipe, Photography & Styling: Natalie Seldon
Follow me on instagram @prettyediblestylist
#thai#Thairecipe#Delicious#glutenfree#healthy#sataychicken#weekend#recipeoftheday#recipe#prettyediblestylist#natalieseldon#foodblog#foodblogger#chinese#chineserecipe#plantbased#satay#foodphotography#foodphotographer#foodpic#foodheaven
0 notes
Text
Salted Caramel, Pecan & Apple Muffins

Whether you chose to embrace or shun it, I’m sure most of you are aware the official day of love is soon upon us. I myself prefer to eschew the elaborate cliches and keep Valentine’s Day a straightforward - but also plentiful and joyous - affair. I certainly don’t see any harm in celebrating what love represents (and I mean in the real, non-commercial/pink-fluffy-heart sense) It doesn’t have to equal romance or a dozen red roses (although lads, I’m fairly confident this wouldn’t do any harm) - but instead can be a worthy excuse to bring people and conversation together in one place, whether it’s with friends, family or loved ones.
This year, I decided to share the love by baking a new muffin recipe because...well, there’s always time for muffins right! One should also note, the only good muffin - with perfectly light fluffiness and heaps of that other ‘m’ word - is a freshly baked muffin made at home. Luckily for you, these are super easy and no-fuss, involve little ceremony yet bags of more-ish yumminess. They use one of my all-time favourite flavour combos - SALTED CARAMEL, PECAN and APPLE. Erm, yum. If you haven’t tried this combo, I can promise you’re in for a treat. When combined, they ooze decadence and sweet/salty/nutty pleasure and yet, believe it or not, these guys are also rather good for you. Partly due to my new discovery which naturally sweetens the muffin without having to use unrefined sugars. Big plus! I also created a simple way to make salted caramel using just four ingredients which are packed full of heart-healthy benefits, fibre, calcium, vitamins and minerals: dates, milk (dairy or nut/soya variety), vanilla and sea salt. Yup, that’s it. Other than to say, they taste even better with a smothering of the aforementioned on top.
Go forth and share the muffin luurve!


Salted Caramel, Pecan & Apple Muffins
Being gluten, dairy and sugar-free (not that you would know!) these are made for everyone but feel free to use whichever plain flour or milk you have to hand/suits your preference. They can easily be made vegan by replacing the egg with my substitute option below.
Makes 12 muffins
200g Medjool dates, stoned
1 tsp vanilla bean paste or extract
75-100ml soya or nut milk of choice (you can use dairy milk)
1 tsp sea salt
150g ground pecans, plus 75g roughly chopped
100g buckwheat flour
zest of 1 small lemon
4 large eggs, lightly whisked *substitute with the below to make this vegan-friendly
1 tsp baking powder
50ml olive or rapeseed oil
150g apple (about 1 x small), chopped roughly into small cube, plus one apple thinly sliced
Extra salted caramel sauce to serve, if you wish
200g Medjool dates, stoned
1 tsp vanilla bean paste or extract
1 tsp sea salt
75-100ml soya or nut milk of choice (you can use dairy milk)
1. Preheat the oven to 180C/fan 160C. Begin by making the salted caramel (you can make a double quantity together if you are eating the muffins the same day and wish to serve the muffins with spoonfuls of extra sauce as shown in the image above and below. I can recommend this!) In a high speed blender, blitz together the dates, milk, vanilla and salt for a few seconds, or until smooth and creamy.
2. In a large bowl, add the salted caramel, ground pecans, flour, lemon zest, eggs, baking powder and oil. Mix until a smooth batter is formed, then carefully fold in the chopped pecan and apple.
3. Line a 12-hole muffin tray, then carefully use two large spoons to fill each case until all the mixture is used up. Smooth the surface of each muffin with the back of a spoon, then top with a slice of apple.
4. Bake in the oven for 25 minutes, or until the surface of the muffin is firm and springy. Remove from the oven and allow to cool in the tin for a few minutes on a wire rack. You can devour these warm or at room temperature with spoonfuls of salted caramel. They will keep for a few days - or just as I like to do, they are perfect for freezing individually, then enjoyed as and when you need one or five!
*To make these vegan you can substitute the eggs with 3 tablespoons milled flaxseed & 110ml water mixed together. Allow to sit for 5 minutes before adding to the batter mix.

Recipe, Photography & Styling: Natalie Seldon
Follow me on instagram @prettyediblestylist
#muffin#salted caramel#recipe#baking#bakingrecipe#glutenfreebaking#glutenfreerecipe#healthyrecipe#healthy#healthyeating#love#winner#muffinrecipe#delicious#prettyediblestylist#natalieseldon#foodphotography#foodpic#photographer#foodphotographer#foodblog#foodblogger#foodblogging#glutenfreemuffin#vegan#veganrecipe#veganmuffin#veganfoodshare#stylist#style
2 notes
·
View notes
Text
My ‘Fresh & Healthy’ menu at The Hoxton with Green Tabasco

Whilst most of you had other things on your mind (and appetite) over Christmas, I was busy in the kitchen creating ideas for an exciting new menu to be showcased for the month of January at the Hoxton in London, Paris and Amsterdam. I revelled in this task as this completely tapped into the way I love to cook and eat at home. And even better, apparently you all loved it too, with sell-out dishes on numerous days and multiple requests for them to become a permanent feature. Who knows?...that might well happen. (so feel free to watch this space or upcoming news on my instagram feed)
For those of you who didn’t get the opportunity to give these a try, the menu consisted of satisfying and full-on-flavour dishes such as Salt and Pepper Tofu with Thai-Braised Green Lentils, Bok Choi and Seaweed, Chargrilled Broccoli steaks with Cumin, Feta and Toasted Hazelnuts (served with a moreish green tahini sauce), Hot Smoked Salmon, Watercress, Avocado and Chermoula with Toasted Seeds and Turkish Scrambled Eggs with Seeded Pita and Salsa Verde. Every recipe was given some added pep with my absolute favourite Tabasco green sauce (honestly, this has become a new cupboard staple as it goes with just about anything savoury - and sweet to be fair i.e great with a few dashes on griddled pineapple along with maple syrup or honey, then served with chopped toasted nuts and a decent-sized dollop of coconut yoghurt or ice-cream) Seedlip drinks joined in on the fun too, designing a tempting new alcohol-free cocktail menu to run alongside the food offering. Tick.

It was quite a close call between the Chargrilled Broccoli steaks and the Salt and Pepper Tofu, but in the end the above just pipped the other to the post. And by way of celebration, I have the recipe for you below. It’s quick, easy - and perfect for a mid-week supper. In the coming weeks, I’ll be sharing the recipes for the whole menu but in the meantime, I’ve included some images below at the end of the post. What would be your favourite choice?
Salt and Pepper Tofu with Thai-Braised Green Lentils, Bok Choi and Seaweed (Vegan/GF/DF) Serves 2
For the crispy salt & pepper tofu
250g firm tofu, sliced lengthways down the middle
2 tbsp vodka (or use water if you'd prefer this alcohol-free, the secret to the crispiness though!)
1/4 tsp TABASCO green sauce
3 tbsp cornflour
2 tsp Maldon salt
2 tsp ground white pepper
2 tbsp sunflower oil (or you can use other oil with high smoke point such as groundnut, peanut, grapeseed or avocado oil)
2 pak choi, halved or quartered
100g sugarsnap peas
200g green lentils (I used these from the tin but you can also cook from dried and cook as per packet instructions)
1 tbsp sesame seed oil
1 tbsp thai green curry paste
1 tsp grated fresh ginger
2 tsp kecap manis (or you can substitute with gluten-free soy sauce)
2 tsp Tamari sauce
1 spring onion, sliced on the angle
a big squeeze of lime, plus extra lime wedges to serve
a handful of coriander, roughly chopped, plus extra to serve
a handful of Thai basil, torn (optional)
3 shards of seaweed, roughly torn
2 tbsp salted peanuts, roughly chopped or ½ tbsp sesame seeds
1. Use kitchen towel to remove as much moisture as possible from the tofu. I normally use a folded couple of layers on the bottom and then on the top. Repeat until the tofu is dry – as this will help them crisp up and turn golden.
2. Mix together the cornflour, sea salt and pepper in a large bowl. Mix and add the tofu chunks, tossing them evenly to coat. Gently shake off the excess and transfer them to a plate. Mix the vodka, ¼ green Tabasco sauce and water into the leftover flour mixture and stir thoroughly to combine (sometimes a whisk helps with cornflour).
3. Heat the oil in a large shallow pan over a high heat. Add the tofu pieces back into the wet flour mixture, then lightly coat each piece in the batter. Transfer each piece gently into the hot oil. (Make sure not to overcrowd the pan – batch cooking will achieve the crispiest results).
4. Adjusting the heat as you go, turn the tofu as the pieces start to turn caramelise and turn a golden colour (This won’t take too long). I like to create a system where I turn them all the same way so I don’t miss a side. It makes me feel very organised and very enamoured with tofu. Make sure all 4 sides of the tofu are cooked, before transferring them to a paper towel to blot dry.
5. Meanwhile, heat the sesame oil on a medium heat in a separate pan. Add the thai paste, ginger and spring onion then cook for a couple of minutes before adding the kecap manis and Tamar. Stir for one minute, then add the lentils with a two tablespoons of water from the tin. Reduce the heat and simmer on low for 2 minutes. Add a good squeeze of lime and coriander.
6. Steam the green vegetables until tender but still a little bite. Divide the lentils onto two plates, then top with the vegetables and tofu. Finish with the extra herbs, a sprinkling of peanuts (or sesame seeds) and a wedge of lime. I like to drizzle a little extra sesame seed oil and few more dashes of Tabasco before serving.


#tabasco#tabascogreen#prettyediblestylist#natalieseldon#thehoxton#thehoxtonhotel#healthy#healthyeating#healthymenu#vegan#veganfood#vegetarian#veganfoodshare#foodphotography#photographer#photography#food#eating#foodheaven#delicious
1 note
·
View note
Text
Middle-Eastern Spiced Roasted Cauliflower and Chickpea Wraps with Tahini & Pomegranate

Without question over the last couple of years cauliflower has made vegetable hero status. Personally, I can’t get enough. Roasted cauliflower. Pureed creamy cauliflower. Cheesy cauliflower gratin. Cauliflower pizzas. Cauliflower soup. The list is endless. But the absolute favourite? My Middle-Eastern roasted cauliflower and crispy chickpea wrap with pomegranate and lashings of tahini/lemon sauce. Not to mention that it’s amazingly good for you too. Also works brilliantly wrap-free - after all, sometimes all you need is a bowl and spoon!
Creamy, smoky and spicy with a little zing from some lemon - and of course we can’t forget the all important garlic hit. The tahini sauce is made to be smothered all over the roasted cauliflower and crispy chickpea combo, but is so good that I always make extra to keep in the fridge for dipping raw veggies, drizzling on all sorts of roasted veggies or even just to have the occasional spoonful when I get a craving (please don’t judge ;)
So quick, easy and delicious. Perfect alongside any grilled meat or seafood - or even better, next to some salty halloumi for a meat-free meal. Plus quite frankly, any excuse for cumin in my cooking!
Middle-Eastern Spiced Roasted Cauliflower and Chickpea Wraps with Lemon Tahini & Pomegranate
I also love to roast off the cauliflower leaves (outer larger leaves I slice in half) They crisp up to perfection! They usually take less time in the oven so I’d keep an eye on them after about 15 minutes.
Serves 4-6
1 large cauliflower, cut into small florets (see above suggestion re cauliflower leaves)
1 x 400g cans chickpeas, rinsed & drained
2 tsp ground cumin
2 tsp ground coriander
1 tsp ground turmeric
1 tsp crushed chillies, plus extra for serving
60ml olive oil
4-6 seeded wraps (or wraps of your choice)
For the lemon tahini sauce
3 tbsp tahini
60ml water
juice 1 lemon
1 clove garlic, crushed
To serve
4 tbsp pomegranate seeds,
1/2 lemon, zest only (you can also serve with extra lemon wedges) ,
a large handful of coriander leaves, roughly chopped
4-6 tsp pomegranate molasses, optional (i.e don’t fret if you don’t have any in the cupboard. I’d rather you didn’t dash to the shops just for this)
3 tsp nigella seeds (or black sesame seeds), optional (as above)
1. Preheat the oven to gas 6, 200°C, fan 180°C. In a bowl, mix the spices, oil and 1⁄2 tsp salt. Add the cauliflower and chickpeas (if they are quite wet, you may need to dry these off a little with kitchen roll), stirring to coat. Place on two baking tray and roast for 25 minutes, or until the cauliflower is tender and the edges start to caramelise/the chickpeas are golden and crispy. (I recommend you turn the cauliflower half way through)
2. Meanwhile mix together all the ingredients for the tahini sauce. You want quite a loose consistency so feel free to add a little more lemon juice or water if it’s still too thick. Set aside until needed.
3. When you’re ready to serve, pop the wraps in the oven if still fairly warm from roasting (or place in the microwave for 10 seconds/as per packet instructions). Divide the cauliflower and chickpeas onto each wrap, then sprinkle over the pomegranate seeds, lemon zest, coriander and nigella seeds, if using. Drizzle over the lemon tahini sauce and pomegranate molasses. Enjoy!
#cauliflower#prettyedblestylist#veganrecipe#veganrecipes#vegan#glutenfree#healthyfood#healthyrecipe#christmas#christmasrecipe#natalieseldon#eathealthy#cauliflowerrecipe#roastedcauliflower#roasted chickpeas#delicious#food#recipe#recipeoftheday#nutritional#tahini#styling#foodstyling#food52#thefeedfeed#dinner#lunch
1 note
·
View note
Text
Roasted Jerusalem Artichokes & Brussels Sprouts with Warm Honey Mustard Glaze

Much like slow-roasted garlic, Jerusalem artichokes take on a whole new ‘caramelised’ dimension when given the right amount of time & heat in the oven. Don’t fear them when you spot these guys on the shelves. They might look a bit knobbly around the edges, but they have so much to offer this time of year. Sweet, sticky & totally more-ish once roasted. I decided to pair them with the Brussel (plus any excuse. I’m all for the brassica in any form) - but I also figured that now we’re probably officially on Christmas countdown (how are we nearly December awready?), it’s definitely their time to shine. The honey & mustard warm glaze spiked with chilli & lemon zest - plus a knob of butter for that gorgeous glossy end result - seals the deal for this veggie dish. And as a Brucey bonus, it works perfectly well with pretty much any favourite roasted veg or meat. Seasons greetings ya’ll x
Roasted Jerusalem Artichokes & Brussels Sprouts with Warm Honey Mustard Glaze
Serves 4
600g Brussels Sprouts, trimmed and halved
350g Jerusalem artichokes, halved or quartered (scrubbed or soaked in water for a few minutes to remove any excess dirt)
olive oil
75g runny honey
25ml sherry or red wine vinegar
large pinch of dried chilli flakes
1 tbsp wholegrain mustard
1 tbsp butter (about 15g)
2 spring onions, thinly sliced to serve
1/2 lemon, grated zest to serve
a handful of parsley leaves, roughly chopped to serve
1. Preheat oven to 200C, fan 180C. Place Brussels sprouts and artichokes cut side down on two separate baking trays (evenly spaced apart so they are able to brown) and drizzle with olive oil. Add a little seasoning, then place in the oven for 35 minutes, or until the artichokes are tender and the vegetables are golden. If you have the kind of temperamental oven like I do, I recommend you swap the trays half way through.
2. Meanwhile, bring the honey to a simmer in a small pan over a medium heat. Reduce heat to medium-low and cook, stirring often for a few minutes, until honey is a deep amber colour but not burnt (it will start to foam so don’t worry)
3. Remove from the heat, then add vinegar and chilli flakes and whisk until the sauce is smooth. (beware that the honey might bubble up a bit when you add the vinegar). Return the pan to a medium heat, add butter, wholegrain mustard with a pinch of salt and cook for 3-4 minutes, stirring until the glaze is glossy and slightly thickened.
4. Transfer the cooked vegetables to a large bowl or dish. Pour in the honey sauce, sprinkle over the spring onion and carefully toss to combine. (the Brussels and artichokes will be quite delicate - if you’re worried, you can always drizzle once they are in their serving dish) Before serving, top with lemon zest and parsley.

#christmas recipe#christmas#prettyediblestylist#natalieseldon#recipeoftheday#brusselsprouts#vegan#veganrecipe#glutenfree#glutenfreerecipes#glutenfreerecipe#vegetable#vegetarian#vegetarianrecipe
0 notes
Text
Roasted Chestnut, Pancetta & Mushroom Linguine with Chestnut Herb Pesto

Easy and delicious weeknight dinner alert. Roasted Chestnut, Pancetta & Mushroom Linguine with Chestnut Herb Pesto. Which is, when simply put, your fast-track to Autumn comfort & goodness in one pan! Rich, classic flavours and buckets of umami from the mushroom and parmesan equals my favourite kind of soul food. The inspiration behind this recipe was mainly due to a surprise find of gorgeous local chestnuts, which are ideal for roasting at home. (I’ve added notes on just how quick and simple it is below.) If you can’t find your own or simply aren’t seasonally available, it’s easy enough to find cooked chestnuts in supermarkets or even better, your local farmer’s market. (The toasted aroma they fill your kitchen with though...) They’re ideal used in pesto like the one here, which I’ve also done a similar riff on using hazelnuts & cobnuts, but almonds - or indeed most variety of nut or seed like pumpkin for example - would work perfectly well too.
Either way, I figured I had to make this is a goody being the last home-cooked meal for a while before I head to NYC this week (the forecast of minus temperatures AND SNOW led me to convince myself that a second helping of carbs was wise) I know many of you are fans/regular visitors to the city so recommendations are always welcome. I’ll be sharing news of my visit to Stone Barns via my insta stories which is located not too far up in the New York Hills. So much incredible work goes on behind this reputable food organisation which is transforming the way America eats and farms by creating a healthy, sustainable food system.
But back to the subject of bowl food heaven...the recipe is attached below. Pasta la vista bebe (no doubt I’ll regret that use of phrase in the morning) x

Roasted Chestnut, Pancetta & Shiitake Linguine with Chestnut Herb Pesto
Serves 4
100g cooked chestnut (I roasted mine first, but you can find cooked chestnuts in most supermarkets if you prefer) plus 3 chestnuts quartered
a handful each basil, parsley and mint, leaves only, plus extra to serve)
50g parmesan, grated, plus extra to serve (I like to use Parmigiano Reggiano)
2 garlic cloves
150ml olive oil or your favourite kind
a squeeze of lemon juice
350g fresh or dried linguine
1 tbsp olive oil
150g pack mixed mushrooms, halved or quartered depending on size (here I used a mix of shiitake & oyster but feel free to use standard white or chestnut mushrooms if you wish)
2 spring onions, sliced on the diagonal, plus extra to serve
100g cubed pancetta
100g young leaf spinach
1. Put the chestnuts in a food processor and pulse until roughly chopped. Throw in the herbs, Parmesan and garlic, then pulse again until chopped (not too finely). Pour in 100ml oil, mix together and add more oil if needed as you want the pesto to be smooth and creamy, but loose enough to mix into the pasta. Add a good squeeze of lemon and season to taste.
2. Cook the pasta in plenty of boiling salted water, according to pack instructions. Meanwhile, heat the olive oil in a large frying pan and fry the pancetta and spring onion for 1 minute, followed by the mushrooms for 6-8 mins until tender and starting to brown. For the last couple of minutes of cooking, add the remaining cooked chestnuts halved or quartered and the spinach leaves. When the pasta is cooked, drain it, return to the pan, then stir through the mushroom mixture and pesto (you may not need it all so add as much as you see fit. Any remaining can be stored in the fridge and eaten at your leisure!) Serve with some extra Parmesan, spring onion and herbs on top if you wish.

Your ultimate guide to roasting chestnuts: Preheat oven to 200C, then score a cross on the flat side of each chestnut using a serrated knife (these two methods make it much easier. See image below) Soak in boiling water for 1 minute which loosens the shell & helps the peeling process later, then place on a baking tray and roast in the oven for 25 minutes, or until the skins have peeled back & the inside is tender. Remove from the oven, wrap them up in a tea towel & let them sit for a few minutes before peeling (& enjoying warm!) Note: keep in mind that roasted chestnuts are best eaten/used in a recipe the same day, as these delicate guys have a short shelf life.

#pasta#pastarecipe#pasta recipes#autumn#foodheaven#recipeoftheday#prettyedblestylist#healthyeating#plantbased#vegan#veganrecipes#glutenfree#glutenfreerecipes#natalieseldon#foodwriter#delicious#weeknightdinner#weeknight meals#foodphotography#foodphotographer#stylist#foodstylist
0 notes