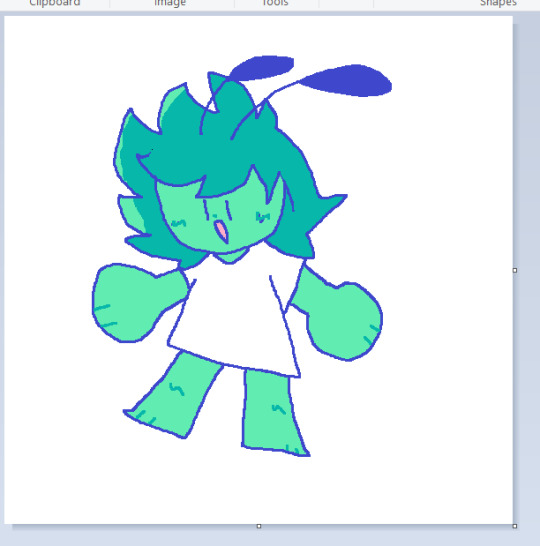
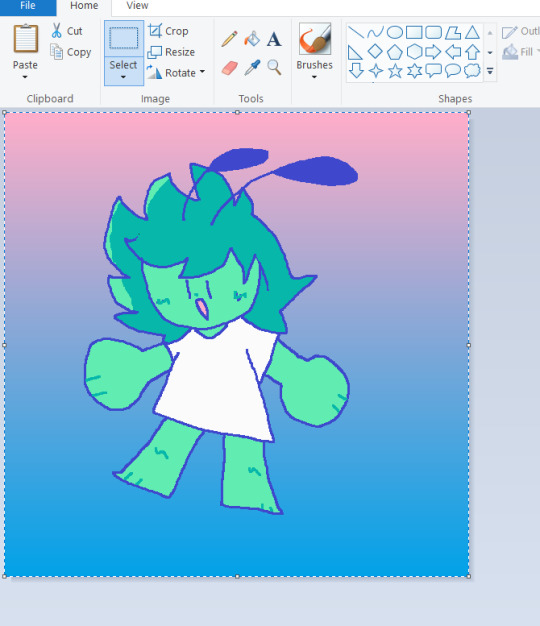
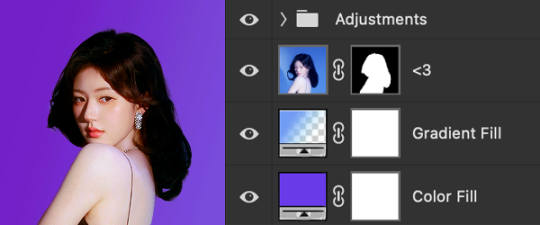
#for the background I was originally going to do a gradient and be done with it
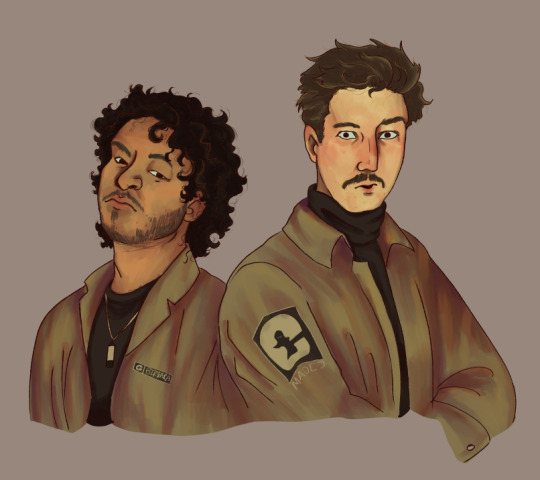
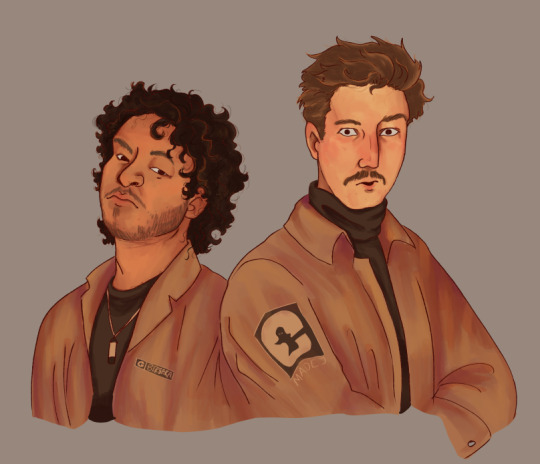
Photo

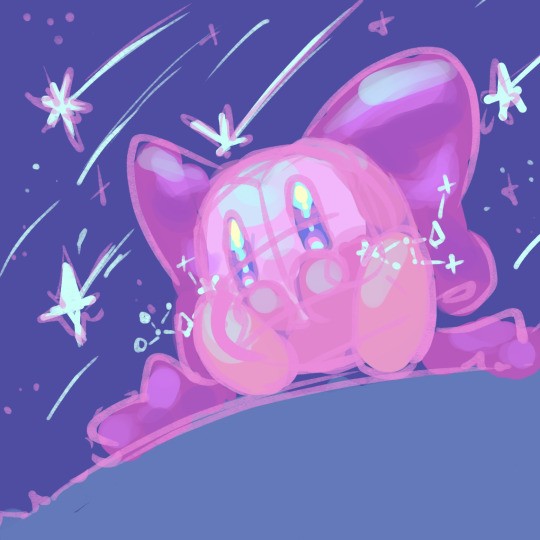
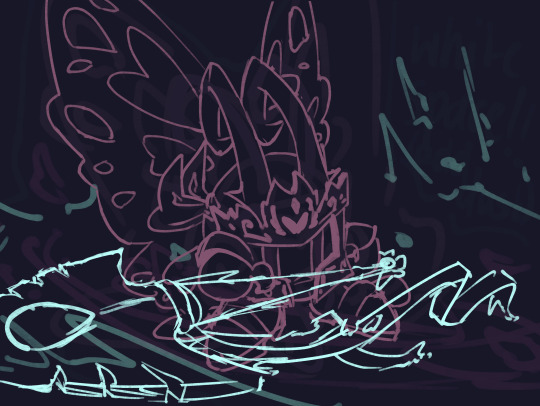
Will he stay in the dark or come into the light?
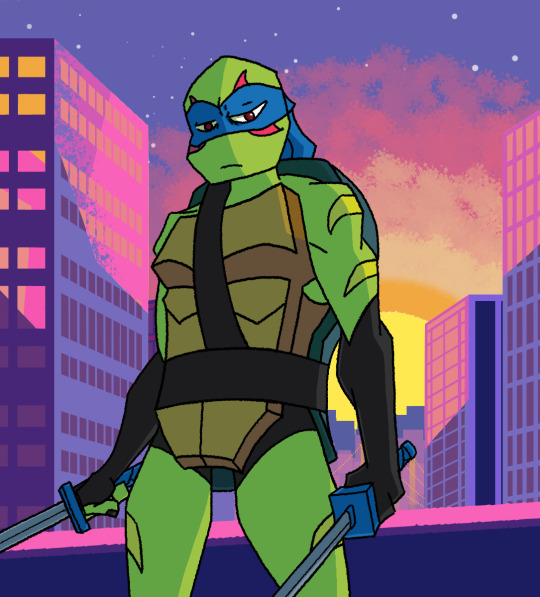
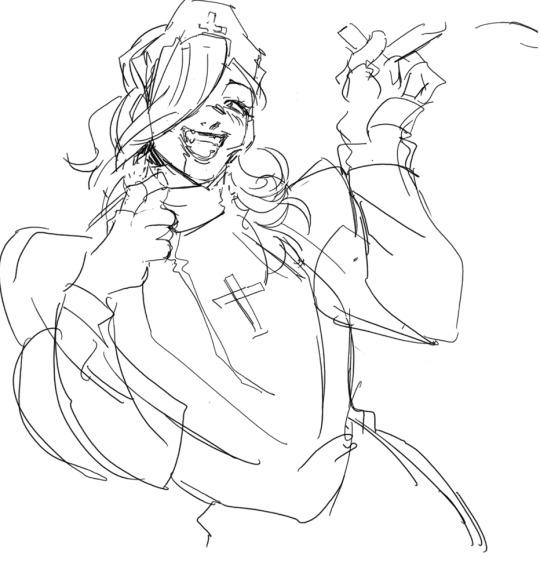
Here’s my go at @trubblegumm DTIYS!
#my art#rottmnt#tmnt#rise leo#trubblegumm3k#trubblegumm#it took me about 7 or 8 iterations for me to be happy with Leo’s pose#and then when I started try to figure out the shadows I redid him 2 more times#for the background I was originally going to do a gradient and be done with it#but then I was the update with the youngest trio looking at the sunrise and thought I’d make a sunrise background#so I spent a few days working on one and looked at it and thought that maybe with the shadows it would look best at night#that’s when I found nowayjermaine on twitter and saw his background cheat sheet for the show#so then I spent almost 48 hours remaking my night background and then making the dawn one#anyway if I'm asked enough I'll post just the backgrounds
800 notes
·
View notes
Text
My Favorite Cheap Art Trick: Gradient Maps and Blending Modes
i get questions on occasion regarding my coloring process, so i thought i would do a bit of a write up on my "secret technique." i don't think it really is that much of a secret, but i hope it can be helpful to someone. to that end:

this is one of my favorite tags ive ever gotten on my art. i think of it often. the pieces in question are all monochrome - sort of.

the left version is the final version, the right version is technically the original. in the final version, to me, the blues are pretty stark, while the greens and magentas are less so. there is some color theory thing going on here that i dont have a good cerebral understanding of and i wont pretend otherwise. i think i watched a youtube video on it once but it went in one ear and out the other. i just pick whatever colors look nicest based on whatever vibe im going for.

this one is more subtle, i think. can you tell the difference? there's nothing wrong with 100% greyscale art, but i like the depth that adding just a hint of color can bring.
i'll note that the examples i'll be using in this post all began as purely greyscale, but this is a process i use for just about every piece of art i make, including the full color ones. i'll use the recent mithrun art i made to demonstrate. additionally, i use clip studio paint, but the general concept should be transferable to other art programs.


for fun let's just start with Making The Picture. i've been thinking of making this writeup for a while and had it in mind while drawing this piece. beyond that, i didn't really have much of a plan for this outside of "mithrun looks down and hair goes woosh." i also really like all of the vertical lines in the canary uniform so i wanted to include those too but like. gone a little hog wild. that is the extent of my "concept." i do not remember why i had the thought of integrating a shattered mirror type of theme. i think i wanted to distract a bit from the awkward pose and cover it up some LOL but anyway. this lack of planning or thought will come into play later.
note 1: the textured marker brush i specifically use is the "bordered light marker" from daub. it is one of my favorite brushes in the history of forever and the daub mega brush pack is one of the best purchases ive ever made. highly recommend!!!
note 2: "what do you mean by exclusion and difference?" they are layer blending modes and not important to the overall lesson of this post but for transparency i wanted to say how i got these "effects." anyway!
with the background figured out, this is the point at which i generally merge all of my layers, duplicate said merged layer, and Then i begin experimenting with gradient maps. what are gradient maps?
the basic gist is that gradient maps replace the colors of an image based on their value.

so, with this particular gradient map, black will be replaced with that orangey red tone, white will be replaced with the seafoamy green tone, etc. this particular gradient map i'm using as an example is very bright and saturated, but the colors can be literally anything.

these two sets are the ones i use most. they can be downloaded for free here and here if you have csp. there are many gradient map sets out there. and you can make your own!
you can apply a gradient map directly onto a specific layer in csp by going to edit>tonal correction>gradient map. to apply one indirectly, you can use a correction layer through layer>new correction layer>gradient map. honestly, correction layers are probably the better way to go, because you can adjust your gradient map whenever you want after creating the layer, whereas if you directly apply a gradient map to a layer thats like. it. it's done. if you want to make changes to the applied gradient map, you have to undo it and then reapply it. i don't use correction layers because i am old and stuck in my ways, but it's good to know what your options are.

this is what a correction layer looks like. it sits on top and applies the gradient map to the layers underneath it, so you can also change the layers beneath however and whenever you want. you can adjust the gradient map by double clicking the layer. there are also correction layers for tone curves, brightness/contrast, etc. many such useful things in this program.
let's see how mithrun looks when we apply that first gradient map we looked at.

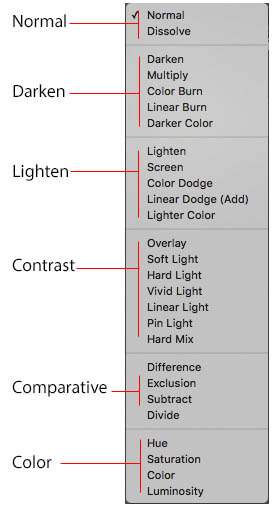
gadzooks. apologies for eyestrain. we have turned mithrun into a neon hellscape, which might work for some pieces, but not this one. we can fix that by changing the layer blending mode, aka this laundry list of words:

some of them are self explanatory, like darken and lighten, while some of them i genuinely don't understand how they are meant to work and couldn't explain them to you, even if i do use them. i'm sure someone out there has written out an explanation for each and every one of them, but i've learned primarily by clicking on them to see what they do.
for the topic of this post, the blending mode of interest is soft light. so let's take hotline miamithrun and change the layer blending mode to soft light.

here it is at 100% opacity. this is the point at which i'd like to explain why i like using textured brushes so much - it makes it very easy to get subtle color variation when i use this Secret Technique. look at the striation in the upper right background! so tasty. however, to me, these colors are still a bit "much." so let's lower the opacity.

i think thats a lot nicer to look at, personally, but i dont really like these colors together. how about we try some other ones?

i like both of these a lot more. the palettes give the piece different vibes, at which point i have to ask myself: What Are The Vibes, Actually? well, to be honest i didn't really have a great answer because again, i didn't plan this out very much at all. however. i knew in my heart that there was too much color contrast going on and it was detracting from the two other contrasts in here: the light and dark values and the sharp and soft shapes. i wanted mithrun's head to be the main focal point. for a different illustration, colors like this might work great, but this is not that hypothetical illustration, so let's bring the opacity down again.

yippee!! that's getting closer to what my heart wants. for fun, let's see what this looks like if we change the blending mode to color.

i do like how these look but in the end they do not align with my heart. oh well. fun to experiment with though! good to keep in mind for a different piece, maybe! i often change blending modes just to see what happens, and sometimes it works, sometimes it doesn't. i very much cannot stress enough that much of my artistic process is clicking buttons i only sort of understand. for fun.
i ended up choosing the gradient map on the right because i liked that it was close to the actual canary uniform colors (sorta). it's at an even lower opacity though because there was Still too much color for my dear heart.

the actual process for this looks like me setting my merged layer to soft light at around 20% opacity and then clicking every single gradient map in my collection and seeing which one Works. sometimes i will do this multiple times and have multiple soft light and/or color layers combined.
typically at this point i merge everything again and do minor contrast adjustments using tone curves, which is another tool i find very fun to play around with. then for this piece in particular i did some finishing touches and decided that the white border was distracting so i cropped it. and then it's done!!! yay!!!!!
this process is a very simple and "fast" way to add more depth and visual interest to a piece without being overbearing. well, it's fast if you aren't indecisive like me, or if you are better at planning.

let's do another comparison. personally i feel that the hint of color on the left version makes mithrun look just a bit more unwell (this is a positive thing) and it makes the contrast on his arm a lot more pleasing to look at. someone who understands color theory better than i do might have more to say on the specifics, but that's honestly all i got.

just dont look at my layers too hard. ok?
1K notes
·
View notes
Text
Zagreus almost finished... OR NOT?

OK, now that I'm done with the original art, it's time to do the finishing touches. Initially I wasn't going to add any background, the fabric is beautiful sky blue color and looks pretty decent. But I am having second thoughts. So let's have a poll. Please help me decide.
252 notes
·
View notes
Note
HOW DO YOU DO GRADIENTS IN PAINT LIKE THAT???
okay first off thank you for reminding me i was going to make a tutorial
So what you do is take your canvas (any size) and draw a diagonal line across it like so (can be any colors)
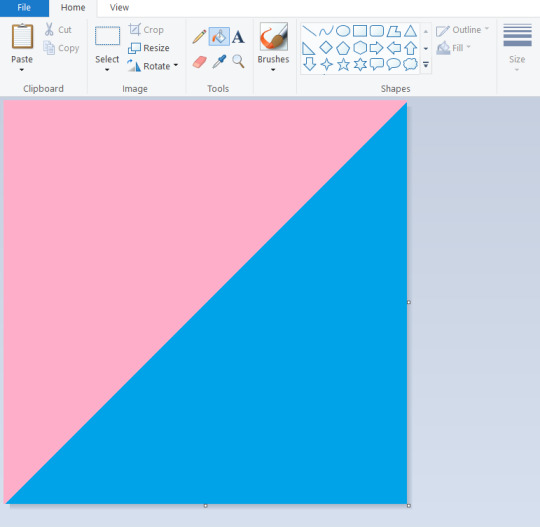
(Protip- hold shift while dragging the line tool to get a perfect diagonal)
Then go to the resize panel, resize by pixels, and change the horizontal size to 1 (TURN OFF ASPECT RATIO or it will make your entire canvas super small)
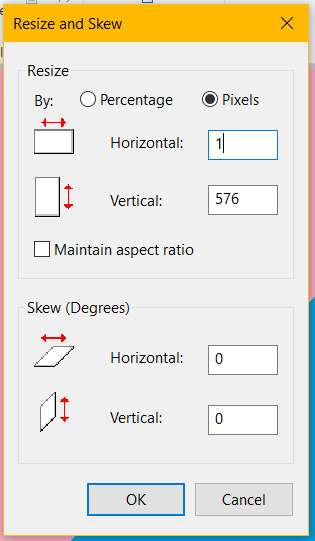

it will make your canvas the skinniest thing on planet earth but now what you do is go back to the resize panel and change the horizontal size back to what it was originally (in my case 576 but it works with everything)

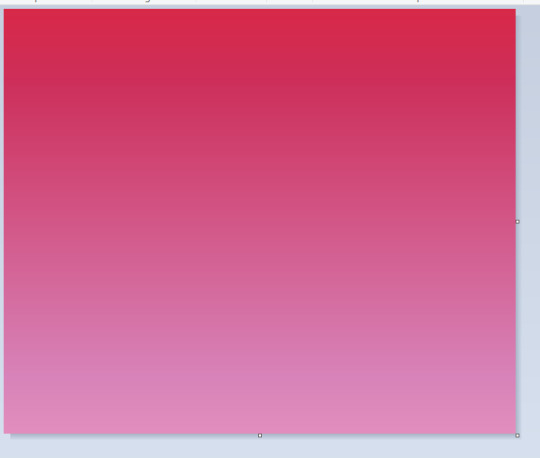
and now you have a gradient made entirely in paint! super clean too
on the right is an example of one made with 3 lines (red, purple, pink) as an example of one with more than 2 colors if you want a smoother gradient. experiment! get wacky with it!
Now obviously with the gradient it gets hard to draw on (especially if you're going to be fillbucketing stuff) so under the cut is a bonus tutorial on how to transfer a drawing to a background (yippie!)
Start by drawing up your whatever on a seperate canvas but one that's the same size as your background
Do note that the way this works you have to make your color 2 on both canvases the same color and one that's NOT used in your drawing, else it becomes transparent- if you want to keep the color 2 white on both, make sure to color all white parts on your drawing with a very very slightly off-white to prevent this
Ctrl + A to select everything on your drawing canvas, then go back to your gradient and (making sure transparent selection is on) paste it in

Move the drawing however you want if it's not perfectly centered, add whatever else you want, and bam you're done

paint has a lot of cool tricks like this and when used it becomes as easy as any other program (save for, well, multiple layers)
#ask#tutorial#art tutorial#ms paint#should note that i did not find this myself i just watched copious amounts of ms paint trick videos at the age of 11#but i enjoy sharing my knowledge regardless :)
2K notes
·
View notes
Text
Middle Kingdoms "Tale of the Five" series recover for A/B testing: Minimalist (1) group
(Though first an explanatory note about this for those who're coming in late.)
So here's what the original sketch for this group looked like...
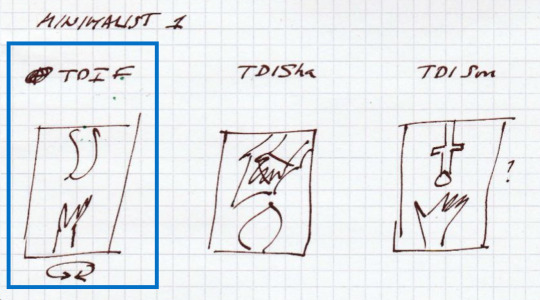
...and here's what we've got now.

Notes and full-sized images under the cut.
Numerous small tweaks are still to be made on these, and some other changes if possible. For example: on the Fire cover, there's no gradient or other imagery behind the hand—primarily because that blue fire hanging down is not an image with a transparent background, and masking it is going to be a nuisance. It may take a little while to sort out a solution for that.
Meanwhile I'm now in a position to do full wraparound covers for paperbacks, so I can probably get those done over the weekend, and drop the new covers (and books) to Amazon next week. (Pity I can't get Luis to help me with the back cover copy again, but we can't have everything...) Then those can start their two-week test run while I start work on the next set.
...So, the full images: and then I'm going to bed. :)

.
.
83 notes
·
View notes
Note
i adore your paintings so muchhh
would you happen to have any other tips or tutorials for your process? anything from thumbnailing all the way to final render
Thank you 😭♥ I appreciate that a lot!!
To start with I've got my advice tag (both new and veeery old stuff lol), & my youtube has a couple of speedpaints on it, one with commentary including process, brushes etc
In terms of general stuff about how I approach painting, I tend to tailor the method to the desired outcome. I talk about it more in depth on this post here, I also link to some references & tutorials that I really enjoy/recommend!
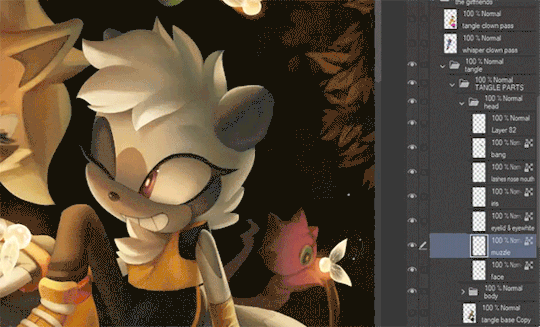
Besides that though, I guess I can do a little walkthrough of the Whisper & Tangle painting I uploaded a few months ago, since I tried something new with it that I pseudo integrated into my workflow & could be fun to talk about? 🤔

SO yes, I do always thumbnail when I'm doing a bigger painting, and they're definitely not pretty LOL. I usually use the colour fill lasso just to block in basic shapes and values with a gradient map slapped on the top -- I ended up swapping the values around in the end because it let me use the fireflies as the sole light source, making it more character focused! Then it's the usual process of resketching it all & flatting in the base colours (I also added Whisper's wisps hehe), then adding shading:
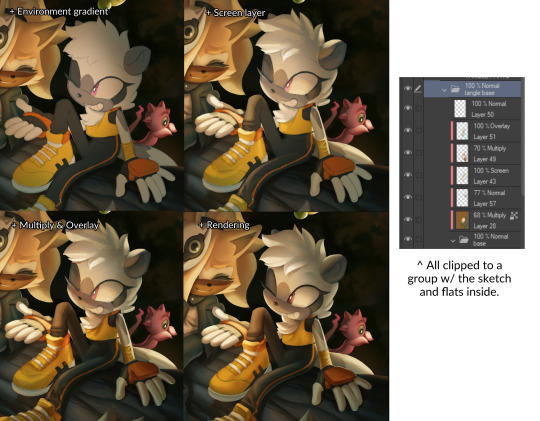
This is how I usually approach it, w/ all the shading layers clipped to the original flats to preserve editing. Multiply, screen & overlay are the most common layer modes I use while doing this, and if I'm ever struggling I'll sometimes add a gradient map too in order to unify awkward colours etc. The new thing I tried for this painting was doing what's often nicknamed as a 'clown pass' -- which is using hard edged shapes to create an easily-accessible selection mask for each part:
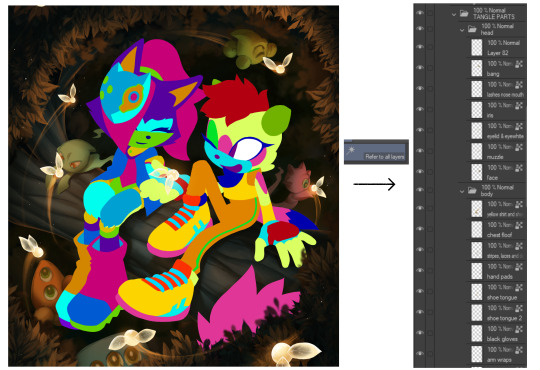
It looks Super funny but I actually found it very helpful, and I ended up using it to select & cut out all of their body parts onto seperate layers, which were then alpha locked. It meant I could go ham w/ large or textured brushes, smudges etc without worrying about losing those edges, or accidentally over-rendering and screwing up the anatomy in the process!!
I've kept doing something similar since, though it's a bit more dialed back; mainly using the lasso select to chop it up directly and preserve specific/necessary edges, grouping up similar body parts on a single layer etc.
After doing all that, I sat down and started rendering. The background was all blocked in & detailed with a hard round brush and these amazing brushes from Devin Elle Kurtz. There isn't anything super insightful that I think I could type on how I render, but I do have that speedpaint I mentioned earlier that'll probably shed more light. It's just a lot of eyedropping & painting, rinse and repeat
When rendering is done I usually add a concoction of adjustment layers, as well as an overlay w/ a noise texture on it. I also sharpen it all after doing so! These are the ones that I ended up adding for this painting:

The dupe & blur is a fun thing that doesn't always work, but it looks super neat when the painting itself calls for it, especially when paired w/ that noise texture. It can make stuff look like an old/low quality photograph or recording -- here's another example w/ a shadow and amy doodle I posted a few months ago:

That's about it for this painting, the majority of the time spent on it was honestly me rendering those damn leaves 🥲 Very tedious but worth it & it was a really good learning experience. I'm not sure if any of this will prove useful but thank you so much for sending in the ask, & if you (or anyone else reading this) wants a similar breakdown for a different painting of mine, please do let me know and I'll try my best to do one!! 🥺💞
#tutorial#kinda. i'm counting this as one... i should really start a new tag for these sorts of posts because theyre super fun#art breakdown#maybe??#either way thank you so much ♥
125 notes
·
View notes
Note
your icons are soooooo so cute honestly!!! i wanted to ask if there's any way you can make a tutorial on how to make them? of course if you want, if you don't want to, that's okay :)
Hi! I really appreciate that you like my icons, thank you so much! 💖💖💖🥹
It's been a long time since I've done a tutorial so I hope I can explain it well haha
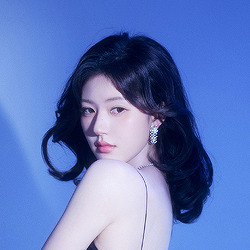
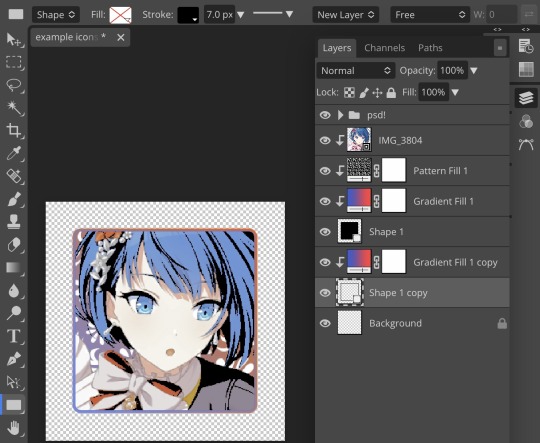
So I will explain how i go from the original picture and the final icon below:
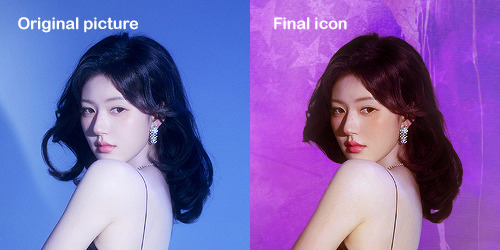
I'm using Adobe Photoshop 2024 but you can use other versions too!
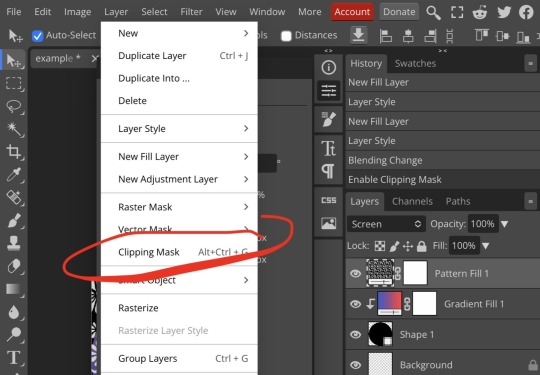
First, I create a 250x250px document and apply a random color fill layer to be the background color of the icon, you can do it by going on Layer > New Layer Fill > Solid color (the color in this moment doesn't matter because I change them later according to the picture I choose to edit).
Then I place the picture I want, adjust the size to make the subject on the center and apply some smart sharpen:
I apply some adjustments to try to color correct if the original picture using Levels, Selective Color and Color Balance to get something like this:
If you want to know the exact adjustments settings I used on this picture you can download the psd here.
To remove the background, I do the hack where I go to the Properties panel (Window > Properties) and click on the "Remove background" option. It's not always that I will get a perfect result but I think it makes easier for me to adjust the little details such as hair and accessories, etc. And I do that using the Lasso tool (shortcut L).
Now, with the background removed I pick a color that I think will match the icon in the Color Fill layer that I created before. To make the background more "fun" I like to add a Gradient Fill layer (Layer > New Layer Fill > Gradient) with a color that might go well with the one I picked earlier to make a smooth and light gradient.
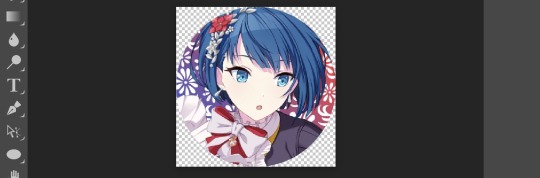
My result until now:
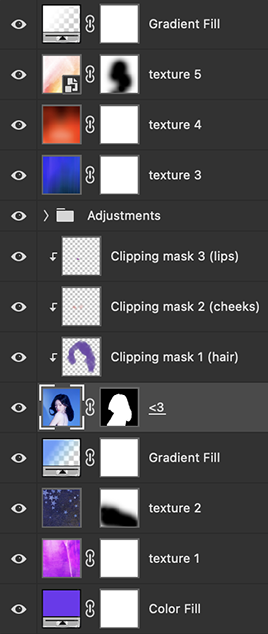
Now it comes the fun: adding textures! I like to add some textures to make the icon more lively and I usually download them on deviantart or on resources websites. You can download some cool textures here, here and here. On this part I really test a lot of textures with different Layer blending. There are a lot of different blending options so you can try as much as you want.
Other thing I like to do is add a clipping mask above the subject layer when I want to color something specific in my picture such as the hair, the clothes or even applying some "fake" blush on the cheeks. I do this adding a new layer, then using the shortcut option (or alt) + command (or ctrl) + g to make it a clipping mask and then using the Brush layer to color what I want. For the blending mode I usually use Soft Light and sometimes Color if I want the color to really stand out.
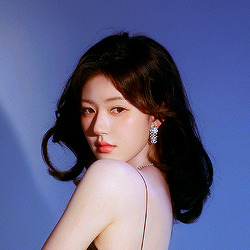
And in the end I will have something like this:
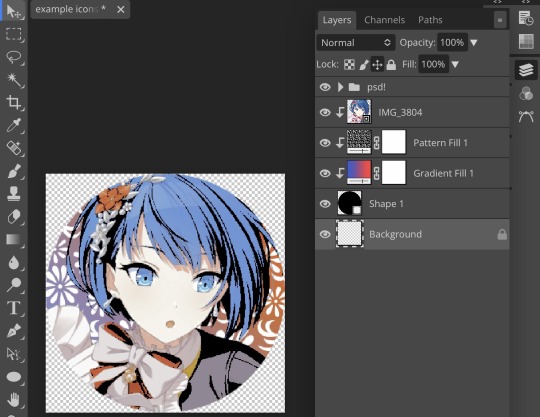
And my layer tab will be like this:
For using on the dashboard I usually resize it to 100x100 to make it look more sharper and defined but it's really a choice, you can already start making your icon using the size you want, I just prefer doing on 250x250px because i'm used to.
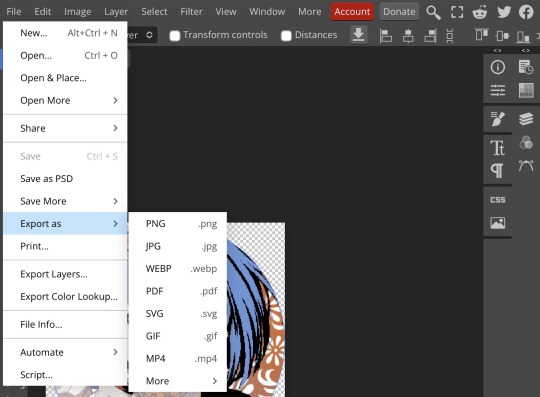
To save it I use the shortcut shift + option (alt) + command (ctrl) + s to save it for web with these settings:
And that's it! Sorry for not going to deep in each step but I guess you can get the feeling when you try making your own icons! Is really about trying different methods and things until you became satisfied with your result.
53 notes
·
View notes
Note
what's your process for coloring like? the look of that elendira is so textured and interesting, i can't figure out how you do it
AA THANK YOUU ^__^ !! textures & brushwork are my favorite things abt my art, so im happy you find it interesting hehe . its SOO cool to look at & so much fun to draw imo
i prefer to color by building in layers , if that makes sense 🤔!! hundreds of them !! such that i'm always drawing on Top of previous layers, working from big & messy blocks of color to, eventually, small and refined blocks of color until it feels processed enough. as a result, i rarely ever erase (!!) and i rarely ever draw lineart aside from the initial sketch
a rough, patchy textured brush is key here, as it'll give you dimension and variability w/ your colors. i recommend "Brush and various sets of fountain pen style (万年筆風ブラシと色々セット)" on Clip Studio (ID: 1679706) !! :3

im terrible with explanations though, so i'm going to show a step by step of that elendira drawing if you dont mind :3
sketch layer !! because i mostly render through color alone, i try to make this as close to the finished thing as possible . ^__^ i hateee drawing the same thing over and over and like the expressivity and movement of my sketches anyways , so the more i can preserve at this step, the better. if u were to look at a side by side of my sketches and finished pieces, youd notice a lot of those og lines are present in the final drawing :3

2. flats !! pretty self explanatory, but the solid background gives me an idea of where the figure begins & ends while the colors themselves help distinguish whats what . i stick to ambient lighting @ this point because im usually not sure what i want to do with the overall palette or lighting yet . having two tones (ex, dark and light in her hair or dark and light on her skin) can also help in identifying key features early on that u wanna preserve. as you build layer by layer, sometimes these areas will remain untouched and i think it makes for a rly lovely feel at the end

3. start blocking !!! to be totally honest with you, i dont really know what i do here HAHAHA. like i just scribble the shit out of it, usually focusing on what i might want to do with lighting (ex: grey areas to accentuate folds in her costume). i think i like to start "erasing" the sketch where possible by coloring on top of it .. like if you look at her hat or her arm , you can tell i'm starting to get a sense of the shapes i like vs the ones i dont. it's at this point that the final image starts to emerge in my mind , like im gradually pulling her from a tarpit of scribbles until shes recognizable lol. chipping away at the marble until i can free her. tbh.

4. keep blockingg...when u think u are done , block some more . as you can probably see, the brushwork becomes more intentional as i add more shape, with specific focus on line weight. this is also where the patchiness of that textured brush comes in - notice how none of the colors seem totally uniform (ex: the red cross or the original sketchlines for her waist). you can see bits and pieces of the layers underneath pushing through and i really like that !! ^__^ its very fun and sketchy to me, so i try to keep them around. those areas are also great to colorpick from, because it'll give you "new" colors to work w/ that are already part of your palette.

5. GRADIENTS & GRADIENT MAPS !! TONE CURVE !! COLOR PICKER !! this is the best stage tbh. flatten your image so its all on one layer and just go crazy with all the color settings in ur program. add gradient layers and set them to darken, or overlay, or subtract, orrr. lighten or dodge glow or divide or soft/hard light.! OR!! edit the hue, saturation, luminosity and contrast.and then color pick from these edits, block even more on top of ur image, flatten, color edit again, etc. etc. until u feel satisfied.
ANYWAYSS . i hope that makes sense @__@ sry i wrote this out and deleted it like 23 times trying to make it make More sense but thats what ive got HAHA i hope its useful though :3 !
#SRY I STRUGGLED 2 EXPLAIN THIS#dude its like my brain bcomes stuffed w/ cotton anytime i try 2 write#i hope it makes sense tho..#it also probably sounds so redundant to make new layer one after the other for just a few brushstrokes#but those brushes i linked have a multiply property so if you draw on top of prev lines they'll create dark patches#and so if im working over a large area ill generally need like . 5 layers each with one brushstroke :sob: if that makes sense#this one had . 84 i think. total. layers i mean. the merylvash one had 300+ HAHAH so it rly depends#like YEAAH i could just use a normal brush but i really like the way this looks#andd sometimes the multiply function works really well or will give me the proper shadow tone im looking for#anywas.wanywaysn anyways#asktag#anonymous#long post
58 notes
·
View notes
Text
Meet Baxter🐟🧪

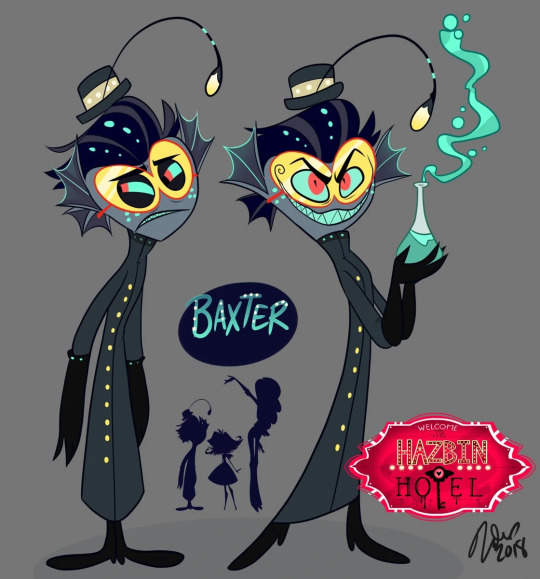
Meet my take on Baxter, an old Vivziepop character shown in the past, at the moment a background character in the show, many believe he could join due to concept art and suppose scrapped episode concepts online. In my take, I’m making him part of the group! Ngl his designs been one of my favs because of the fish motif and color scheme.
Here’s a link for his Wiki page Info. Baxter
Character:
I can see my Baxter act as the Hotel’s medical expert. Perhaps the closest so far they have to a medical professional. He dabbles a lot in Biomedical/Chemsitry science in contrast to Pentious who’s more of an inventor. Fun fact, Baxter also died in the 1900’s and his names of English origins so he and Pen could’ve known eachother! Supposedly Bax died via boating incident, drowning.
I can imagine Charlie got him to join, speaking to his scientific interests, making him invested in the hotel as one of his newest and greatest experiments yet. Can a Sinner be redeemed and go to Heaven?
I def want him and Sir P to become science buddies and do all kinds of crazy experiments. I can see him be a mix of Kreiger from Archer , Abed from Community along with some bits of what he’s supposedly like from the wiki. I can see him have a voice like Richard Steven Horvitz(Invader Zim, also does Moxxie in Helluva Boss), Paul Rugg(Freakazoid) or perhaps David Tennants Voice(Dr. Who!)
“ Baxter's personality is considered still in development, but Vivziepop likens him to the character Myron Reducto from the show Harvey Birdman in his mannerisms. He is a screechy, neurotic, fidgety, anti-social "gremlin" and an all-round mess. He is introverted and wants nothing to do with anyone, preferring to do science alone in peace”.
youtube
Abed clips.
youtube
Design:
His design has always been one of my favourites, especially because of the color scheme, the fish theme and blues are amazing!
Made his eyes dark for a flowy effect and to make them more fish like.
Removed the red ❤️
Added wet marks on his coat aswell as some tatter.
Added webbing for her gloves and feet protection.
Made his hat more like a bowler/derby hat. Was popular 1900’s style.
Added more bioluminescence. Added a gradient affect with the fins.
For my Gang I’m going for a rainbow motif, he represents Blue as he’s a sea creature and the color blue can often symbolize intelligence but also things such as stubbornness and timidity.💙🌈

Gave him more an underbite. I can imagine in his full demon form it becomes bigger with more teeth sticking out and more eery glow!
Added lil nostrils.
Made his hair more fin like!!!!
Fun fact, Only female Anglerfish have the lights. TRANS BAXTER 🏳️⚧️ ⚧️ . I can also see him be Intersex and mainly goes by He/him pronouns.
here’s Baxter concept art. He’s the guy in blue.


I’ve also done some of the rest of the gang such as Alastor(links for the others in his page) and even other characters such as Mimzy who was also once suppose to be a main character.
What do u think? Do u think he’d be a great part of the cast? I’d love to know💖
#Hazbin hotel#Baxter#hazbin hotel redesigns#hazbin hotel redesign#hazbin hotel baxter#my art#my redesign#Character rewrite#hazbin hotel rewrite#hazbin hotel rewritten#hellaverse#Dnp talks#hazbin hotel fanart#hh#hazbinhotel
19 notes
·
View notes
Text


okay so. two things!! first of all, over the course of january (and the beginning of february) i participated in the kirby oc secret santa, which was wonderfully hosted by @/moonverc3x. i was lucky enough to be the santa for @/starflungwaddledee, and ended up with two of my best pieces so far!!
these were CHALLENGING, though. which is where the second thing comes in!! under the cut, i'll be going over some of the sketches, drafts and phases of either piece! there's also a speedpaint. exciting!!
i'll be starting with my starstruck piece! the theme here was wanderlust - literally one of the most whimsical words i know - and generally anything to do with the stars. i had a few things in mind, but considering how long it sometimes takes to make artwork, i decided to roll with what inspired me the most.
this is the final sketch compared to the final artwork. certainly one of the crazier transformations i've done. i had a mental image of most parts of the artwork, from the material of starstruck's bow to the lighting cast by the stars. everything except for the grass (i hate grass!!) i ended up rendering the grass and background first, anyway.
doing the background before the rest of the artwork helps define the lighting and shadows! if i decided to draw starstruck before the background, i'd have to draw it according to the lighting.
weird explanation, but in summary: background before character helps the character look like a part of the environment! character before background means extra steps need to be taken before the character fits in the environment!
starstruck's bow was also a decent challenge! i'm a fan of bows and satin, so a satin bow sounded like a good idea. it was, but i've never drawn satin before. the workaround was an active satin study! i stared at a satin bow i found on pinterest and tried to understand how light spread over the material. it's quite interesting!!
you might notice that i flipped the direction of the shooting stars. this is for composition reasons!! i wanted to make starstruck the obvious focus, and while the contrast between her warmer palette and the background's cooler palette easily achieve that, i wanted to cement it. i also added little hand drawn sparklies everywhere. because i like it.

of course, i have to talk about the eyes!! if anything, i noticed that in all of starflung's drawings of starstruck, she had really glittery eyes. literally adorable. so i made it my mission to capture her feelings in her eyes!! i had a lot of fun making them super shiny and adding little stars in there. i also needed to pay attention to the subtle gradient, though - they fade from blue to pink if you zoom into starflung's artworks - and decided to keep it vibrant.

okay. thats all for this one!! i'd like to mention that in the original sketch for this specific pose, bandee was in the background. i really regret scrapping that now. oh, well!
time for morpho dee! i'll be starting for with the speedpaint for this one, mainly because it sort of explains some of the process by itself.
i restarted the shading... three or four times at least? so yeah. i was losing it on this piece. i'll be completely honest, i contemplated dropping it for the sake of meeting the deadline. it wasn't stressing me out, but i had studies to worry about too, and i was worried that it wouldn't be of great quality? but after some advice from my beloved older sister, i managed to turn the tide!!
this is a first for me, but everything here was a challenge. if you scroll through my account and the few artworks i've posted, you'll notice that i draw gijinkas far more than orbs. now, you may be wondering why this didn't pose so much of an issue for my starstruck piece! it's mainly because i chose a far simpler pose for her than i did for morpho over here.
for morpho, the artwork needed to be dramatic. i draw cutesy things - while i've always wanted to draw something dramatic, i've never pushed myself to do it. until this artwork! i went for a dynamic pose which would (hopefully) pull the viewer's eye towards morpho dee. that's what's up with the foreshortned spear! i also realised that the plcement of his feet would be quite significant to the artwork. you might not know this, but feet are my greatest enemy. i'm still trying to figure out how best to draw them for people or orbs, but i'm getting there.
after 'lineart' (which really ended up being a cleaned sketch - this was supposed to be linelessly rendered, but i gave up on that) the pose was no longer a problem. because the shading was! hooray!!
nothing has quite bewildered me like metal shading has. i've shaded gold. satin. cotton, fluffy scarves, shiny things, grass. yet metal shading continues to elude me! this was, hands down, the most difficult part of this artwork. i struggled to make sense of how the lighting was supposed to work, even with references. and every time i thought it made sense, i ended up with something i didn't like the look of. the solution? long breaks, more references and pinterest tutorials. i have no clue how i managed this, but we got here anyways. i finished it off by colouring the lineart according to the shading.
i have experience with drawing fire, at least! it was three or four years ago in an old artwork, but i have experience! i simply had to figure out how to work it into the atmosphere. for the glow, i duplicated the layer, gaussian blurred it and used a slight glow layer! i did something similar for the durst particles, but i used motion blur instead.

i also want to talk about the spear a little bit. you might notice that i added a bit of ambient glow around the blue gem. that was with the light intensity in mind, but also for a sense of realism! i also had to keep the pink light in mind, though. so i ended up using an airbrush to create a base for the lighting and i continued from there. i added a few scratches on the handle just to give it a bit more life, too.
and, finally, a one-to-one comparison between the sketch and the final! i have literally no idea how i pulled either of these pieces off, but i'm quite proud of them.
i recommend you drop by @/kirbyoc-secretsanta for other artworks! a total of 75 artists participated, so there are plenty of super cool ocs to adore over there and new artists to find!! this was my first secret santa experience, and @/moonverc3x made an amazing host (thank you for hosting, by the way!!) bye bye!!
#kirby#digital art#starstruck dee#morpho dee#sorry to everyone who thought this was short. and sorry to everyone who reblogs this#it really wasn't supposed to be so long but i had a lot to talk about#i'm pretty sure i've covered everything though#but these were a thrill to make!!#i've always wanted to make fanart for starflung because her characters are so cool and unique#so i was hoping to get her in the santa and. somehow i did#yeah i screamed when that happened. heehee#but!! i'll probably try to participate in more events like this!! this was super fun!!#i literally cannot thank moon enough for being such a great host#i'm generally a nervous person when it comes to talking online but moon was quite warm and sociable!!#this was an exciting first time for me!!#glitter in my ink
22 notes
·
View notes
Note
hiii so sorry if this is a stupid question but how do you make icons that aren’t squares? the only canvas i can make Is square 🥲

how to make shaped icons!
no worries anon! things like this can be a little confusing at first, so i get you. let’s get into it!
first thing’s first is creating a new project in photopea. i tend to make my icons 300x300, but it doesn’t really matter the dimensions as long as they match (so you shouldn’t do 750x700, for example.) make sure your background is set to transparent (no worries if you forgot this step—just delete the colored background layer!)
next thing is getting the shape! i tend to use photopea’s shape tool for this, since it’s easiest for me, but you can also just google “circle png” or something. (make sure your image is actually transparent, though. click and drag or click and hold and see if the dotted background lingers or goes away!)
for the first icon, i’m going to use the ellipse tool. feel free to change the color of your shape—i usually set backgrounds later, but that’s up to you. the exact dimensions of this shape don’t matter, but like your canvas, they have to match so the circle is even. click and drag to make your shape
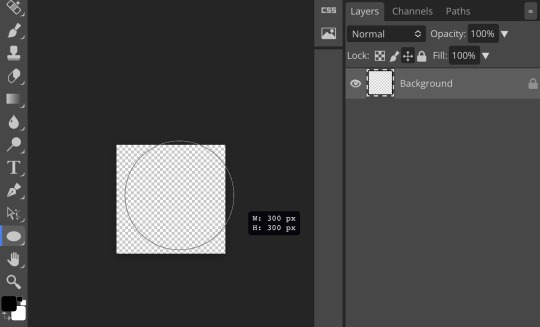
as you can see, my shape isn’t centered just yet—but i corrected that by using the click and drag tool: the one at very top of your sidebar. photopea will center and align your shape for you if you move it towards the middle
now you have your base! time to start adding backgrounds and such things. i used my usual method for the background, but you can do whatever. one thing to make sure for this step is to set all your layers to clipping mask (putting the shape below all your other layers)
to find clipping mask click the button that says layer at the top
as you can see, my gradient fill is already clipped mask’ed. if for whatever reason you want your layers un-clipping mask’ed later, just go back and click the clipping mask button again. (i’ve said clipping mask too many times. it feels like a fake word.)
(hello, haruka!) this is how my icon looks so far! everything is clipped mask’ed to my circle. if you’d like, you can stop here, and download your image. i went ahead and added a psd. unless you’re using a color fill later or something similar in your psd, that doesn’t really need to be clipping mask’ed.
(the psd i used here is really simple and i didn’t save it, but always put your psds in folders, just to make your life easier.)
now that we’ve got that done, time to export! make sure that you export as a png. otherwise, your icon will still be square.
the finished product! pretty simple, right? you can use this method for all sorts of shapes. i went ahead and did two other kinds—bordered and faded.
for the border, i copied my original shape (a square in this instance) and switched the fill mode to the icon with an x through it, and switched the stroke mode to a solid color, and set the stroke to seven pixels. i think for bordered icons you can also shift the border so that there’s a space between it and your icon, but i left it where it was this time
as you can see, i didn’t change any other layers, except that i duplicated my gradient fill! this is the same project i was working on before, just with a different base.

now for the faded icon! i used a heart shape for this, as that’s pretty standard, “but wait! photopea’s shape tool doesn’t have a heart option!” it does, actually! it’s just hidden. click your shape tool and go down to custom shapes. then scroll at the top until you see the little arrow with the star beneath it (which should be as far right as you can scroll.)

wow! so many shapes!! i scrolled down until i found the heart, and added it. the heart i didn’t worry too much about the numbers—i just adjusted it until it looked nice.
now to make our heart faded! first thing to do is to rasterize your shape layer. make sure you have your dimensions and everything set before you do this, as you won’t be able to correct them after your shape is rasterized.

rasterize can be found in the layer drop-down menu, where you found clipping mask. click that, and now you can blur your shape! the blur tool can be found in filter > blur > gaussian blur. you can also use motion blur or radial blur, but i like gaussian blur
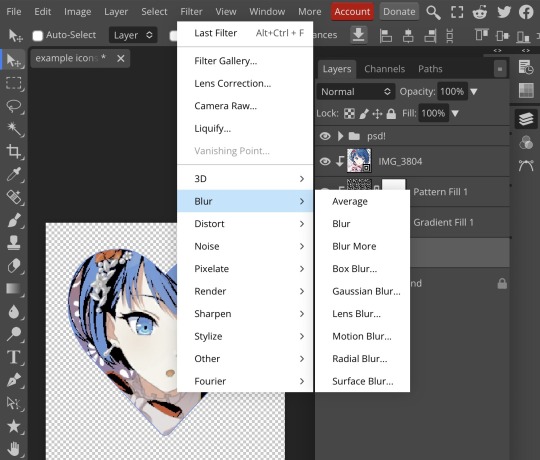
clicking gaussian blur will give you one of our old friends the sliders. just mess with that until it looks about right. click “ok” once you’ve got it set how you want it
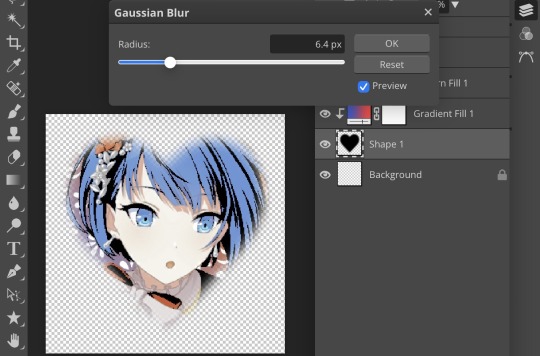
i also adjusted my heart’s sizing a bit by going to edit > free transform and making it bigger. just do what looks good to you!
and there’s your faded icon!
i hope this is helpful!! feel free to ask if you have any questions :3
sincerely, eos
41 notes
·
View notes
Note
Do you have any coloring tips? I'm trying to get better at coloring but it's hard :/ everything looks so out of place and I lose motivation fast
Of course!
By no means am I an expert on this (I still forget to choose a light source 90% of the time) but here's a few things that I do when I'm colouring something digitally. Remember these are all individual to the way I make art so they may not all be applicable to yours and are simply me explaining how I do colours, not a tutorial for all colouring styles.
Buckle up folks, this one's a long one (sorry in advance!!)
Here goes nothing.
Losing motivation is totally normal and okay, take a break if you need it, maybe send it to some friends for some hyping up (art servers full of other artists are great for this!). Colours ain't gonna look perfect first time you try to do them, I never put down a colour that I like first time, it takes some messing around and asking friends for me to get them down.
So don't feel pressured to get them perfect in the beginning, that rarely happens!
Here's a mini explanation of how I do my colours, hope it will help a little :)
1) GET THOSE BASE COLOURS IN!!
It doesn't matter if they're not exactly what you're going for rn, go with roughly the colour you want and start there! Personally, I do big blotches of colour just to get something down on the page as this helps me want to actually finish it. Then you clean up those edges so they're all in their correct spaces.
I've found that working on a neutral mid-tine grey background helps you see the colours best at the start so all of my 'paper' starts off grey when working digitally.
Here's the example I'm going to be using (this is from the ghost files fanart I'm working on)

2) ADJUST THOSE COLOURS!!
So, now you've got those colours down, you can adjust them to be roughly how you want them to look. If you're unsure on what colours look best together, you can either take some time out, find some YouTube channels and learn a little about colour theory... OR you could grab some colour pallettes from online and have a play around with gradient maps or simply placing the colours in yourself. There's no shame in using resources like those, that's literally what they're there for.
I didn't need to do this on this drawing as I was happy with the colour selection. This is because I chose the background colour and simply adjusted the hue and saturation slightly until I got the colours I wanted. This is my general technique for choosing colours as my work tends to be fairly similarly coloured (browns, oranges, reds, yellows with hints of purple)
3) ✨SHADING✨
Right, well done! You've got your base colours in.
...but oh god, what now?? They look so flat and lifeless, what shall you do?!
This, my friend, is where shading comes in. It's both a way of telling the viewers where the light and shadows are, can change the mood of the drawing, can change what we feel about a character or it can just look real pretty but shading and lighting does all sorts of fun things to a drawing.
If your style is more simple and doesn't require shading/has minimal shading: apply this tip to any shading you do have and don't forget the importance of rim lighting in simpler styles.

For shading both skin and clothes, I use the original colour, shift it down into a darker shade and on the colour wheel I shift it down too (eg. shading green with blue, red with purple) sometimes you can shift that even further to create similar shading to the one above, where I shaded orange/brown with pinks/purple's.
The principle is the same with highlights but like,,, opposite. Shift everything up, shade browns with yellows, blues with greens, etc.
SIDENOTE ON HOW I COLOUR SKIN:
Okay so, these next two paragraphs are based entirely from what I've learnt during studies and aren't rules, just simply how I do it.
For lighter skin tones, I tend to start from one of the lightest colours and shade darker, like you would if you were working with something like watercolours. This allows you to build up shadows in areas of darkness. Once you've done the shadows, you can then go in and add highlights and lighter sections where necessary.
For darker skin tones, I tend to start at one of the darkest values, as dark skin tends to reflect light differently to light skin. Then I add lighter shades in sections that the light would reflect. You can add shadows too, I tend to add them if the drawing still feels flat after doing the highlights.
3) OVERLAY + MULTIPLY LAYERS ARE YOUR BEST FRIEND
These things are literally lifesavers for me, I love an overlay layer.
I can't really explain what they actually do so I'm not even gonna try, just play around with them. But using a purple/blue multiply layer and erasing where the light hits, that makes the illusion of full shading without the same effort of painting in the shades.
Overlay layers are 100% a 'fuck around and find out' resource, I tend to use red and pink overlay layers as my colours tend to be more desaturated and this helps with brightening them up. However they can also be used to change the genre/mood of the drawing, like this:
These two drawings are the exact same. There's no difference between them other than an overlay gradient map layer in green or sepia. (These gradient maps are built into clip studio paint, I'm not sure about other programs)
But the whole vibe is completely different. So yeah, fuck around with different colour schemes and overlay layers (the bi flag colours are a great choice for experimenting with overlays as the colours are naturally very harmonious so maybe start there.)
You can also try a noise later for a bit of texture, it's my go-to fix it for any drawing ngl
Uhhhhh, yeah. That was lengthier than I expected, hope it helps even in the slightest. As I said at the top, I am by no means an expert and am still figuring things out myself, so just fuck around and find out.
Bye now!
#artists on tumblr#art#artwork#digital artist#fanart#ghost files#art tutorial#colouring#art tips#deathian answers#digital painting#digital art#colour tutorial
21 notes
·
View notes
Note
Hi! You're one of my favorite artists ever, and I would love to do some studies of your art! What are some of your favorite pieces that you've done, and how do you pick your colors? There's a lot more questions that I could ask, but figured you wouldn't appreciate an entire list of questions XD
Hello and thank you, I am honored! Feel free to send me all and any questions! I'll answer these two, starting by:
How do you pick your colors?
As I change art style with pretty much every illustration project of significance, this varies a lot. Here are, from most to least common, ways I pick my colors.
Eyeballing it. Unfortunately my most common... What I will do a lot digitally is lay down a color background, and flats of a few colors, then manually adjust each until they look good together by selecting by color and using adjustements. I then paint over it all.
Using a limited palette, eyeballed. Same as before, but this time I force myself to only use a few colors. It helps me, as constraints do.
Using a reference, eyeballed. This happens a lot when I mimick an art style. My medieval drawings for example, are often done by looking at images of actual medieval art to get an idea of what colors to use to look medieval.
Using an existing image, pipetted. Rarely, often as a challenge or if I'm super stuck, I'll just take a pic with colors I like and pipet from it. This website automates this if you want a good easy starting point!
These can be combined around. I'll post examples now, explaining how they use each.
This is a sketch for a drawing I ended up doing way different. This is the first method - I used a flat layer for the characteres and three colors for the sky to test out atmosphere. This is how I plan out most full paintings, just trying to nail down a mood I have in my head. I fiddle around until I like it or, like in this case, fully give up and iterate further. Here, the composition was to be redone too as I did not like the body language. I was going for "bright hot sunny day under a weather that feels wrong".
For this comic, I combined a very limited palette and a photo ref to pipet from. I was looking for the stark cold/warm contrast of a mid-season bright night by a fireside. I took a google image photo of a campfire at night that was already edited. The photo itself looks unnatural but conveyed what I wanted. It's still on the file itself! From it, I pipetted a few colors I found "summed up" the palette and did all with them.

While my own habits make me prefer painting as you would in traditional methods, with directly picking the right colors, I will often digitally alter with overlays and layer blending modes some colors and gradients, etc, to alter a drawing to fix it's color palette. The following is a quite egregious example, because I first drew the character in flats before putting him in a full scene. Here is a before/after summed up.

The shadow is a layer, the bright yellow light zones also, and the orange "transitions" of light zones on the skin a third. There's also an overlay over the full character to blend him in. I do this by...making a full flat color of a layer, fucking around until a blending mode does what I want, and adjusting hue/brightness/saturation and opacity until it looks good.
Another WIP where I was struggling with the overall palette. I was going for late 60s psychedelic. You can see in the top right the original color. I thought it looked too...new, so I added a yellow layer on top, and fiddled with it. Final choice was the following setting. I then put it with my sketch and color blockout in a folder and painted over it.
For this sort of adjustement, the "Color Balance" modifier in CSP, Photoshop, and others is also a godsend - but one I often use for fine tuning a finished piece.


This being said, there's some rough rules to coloring which are...born from studying color theory and doing studies. I am guilty of doing very little studies...so I'll just sum up the basics of the color theory rules I use.

For "default" shading, I use a color that is darker, more saturated and with a slight hue diff. This is my "don't shade with black".
Using a shadow that's cooler will make the light look warm.
Vice versa.
There's a bunch of stuff to remember in how colors relate to each other and pipetting images who's atmosphere you think is interesting really is the best way to learn... It's learning how to black-blue/gold-yellow dress in your own art for the lack of a better word...But the basics will be:

Don't trust numerical values, but look at your colors in context. A same hue, brightness, saturation can look so much different. This is how Rakkan's beard looks whiteish here despite being a light very grey brown.

All this but...colour is such a wide topic, I can't really say a lot but can also type for hours... if you have precise questions about a piece in particular I can explain :') I hope this wasn't too vague and was instructive!
Speaking of particular pieces, answering your question last under the cut:
What are some of your favorite pieces that you've done?
In no particular order, illustration only.
Including this in another poast bc staff's new post editor limits the amounts of pics I can put in response to asks. Insert colorful language here...
Frankly twas hard to pick I am rarely fond of what I draw
41 notes
·
View notes
Note
Can you maybe do Toji x f!reader riding him? It's fine if not btw :D (I'M 19 BTW)
|Ride me - Toji x afab!reader|

**WARNINGS: contains smut, explicit language, and sexual themes. MINORS DNI although I know yall horny out there reading it**
The picture above is NOT MINE and goes to the rightful credited owner.
All characters mentioned below are NOT MINE and belong to the Original Creator/Author/Illustrator.
This piece is a work of fiction and is pure imagination and is not real and does not involve in the original story/timeline.
Genre: smut, romance
cw: switchTOJI!?, switch afab!READER?!, fem!reader, exhibitionist, voyeurism, PDA, not proofread sorry folks
A/N: first ever req im getting (and i'm thrilled af pls) – thanks anon <3, i'm assuming yall loves dilfs huhhuh. and YES absolutely! AND WHYD THIS TAKE ME 4HRS LMAO IM SO BAD WITH THIS buttt here ya goo and enjoyy ~
wc: 3.3k sheesh -----------------------------------------------------------
‘And I’m done!’ I thought happily, appreciating the way I looked, shown by the reflection. Twirling a bit as I spritz some of the DIOR J'adore Eau De Parfum on myself and sigh happily at myself. Today was a special day. Today was the day when I finally got hold of my boyfriend, Toji who seemed way too busy with the odd job that he never told in detail. We planned a date after struggling to match with our hectic schedule giving no chance and decided that today was the day. Smoothing little unnoticeable wrinkles from my satin, black skater dress I slipped inside my cheetah print full sleeve jacket. A beautiful, plain diamond jewelry settled nicely on the base of my neck which was paired with a pair of simple dangling earrings.
Combing through my hair that I styled with my utmost effort, I reached out the lip gloss in the shade of power red and swiped another coat on my lip and correcting the smudges and maintaining a gradient look. My eye makeup was rather done simply allowing my bright eyes to be the star of the show. Grabbing the purse that was sitting idly on my bed, I slipped my phone in but not before I checked the time. 6:55 PM – it read. I had a couple of minutes before I head out. Going to the small walk-in closet I turned over to choose what footwear will it be today. ‘I’ll just match with my jacket’ I thought mindlessly and bent over to take the high-block heel. Switching off the lights that were open, I took a glance once more at my well-maintained apartment and decided it was time. Today’s venue happened to be the cinema and it was perfect because I was able to get hold of the tickets for the most anticipated movie in my opinion – Top Gun – Maverick. Locking my apartment, I trotted over to the elevator and entered it while humming away at a random tune. A familiar ding was heard, and the doors slid, either way, revealing the exit/entrance of the building. Greeting a ‘have a good evening’ to the nearby staff I walked over to my car and revved up the engine.
Today Toji had some personal things to deal with so he said he wouldn’t be able to join me on the ride on the way to the cinema and said he would reach there on his way. Shrugging the sadness away as nothing when I heard that since he never broke any promises and always showed up one way or another was reassuring. A podcast played in the background from my open radio as I drove to the cinema. Today the city looked incredible. It could just be my happy mood, or it was always this extraordinary. The city lights blared from all directions, blinding your eyes in a good way. The level of serotonin I got from the view of the bustling people carrying out different activities was really thrilling. A group of musicians cheerfully played their best tunes while the crowd formed praised away. Smiling slightly, I focused on my driving.
Today’s gonna be good.
Parking my car at an empty spot I found I climbed out of my car, making sure I collected my belongings and switched off the engine, and locked the car. Checking the time once again it read 7:22 PM. ‘Oh great, I’m not late.’ I thought and strolled into the cinema and was introduced to a large hall filled with full of movie posters and stations packed with various flavoured popcorns and different soda machines all lined up. This time, the cinema was quite packed compared to other days. Families, couples, friends, and numerous groups of people were scattered around the place. Drifting my eyes from the crowd I performed a slow 360o spin and admired the neon lights that were running across the walls giving it a bit of a club vibe. Whilst spinning I accidentally bumped into someone but not too harshly but rather a soft one. Without looking I apologized several times and was ready to walk away until that person spoke with a hot breath next to the shell of my ear. “God was definitely showing off when He created you huh.” That voice. It was a perfect balance of clear but rough pure masculinity tone. I whipped my head immediately to that person and engulfed him in a big hug. “TOJI!” I squealed in happiness as I looked up, peeking through my lashes while his towering figure looked down on me. “Hey, babe.” There was a soft smirk drawn on his lips while that scar was stretched ever so slightly due to that motion. His black hair was shaggy as usual covering his eyes a bit. I stepped back and looked up and down at his attire. And boy did he look SEXY.
A black full-sleeved dress shirt was worn paired with black slacks. The first couple of buttons were undone from his shirt and his sleeves were rolled up to his elbows. A hand was tucked inside his dress pant pocket while the other was brushing on his hair. There was a black band ring that sat comfortably on the index finger of his right hand. Flustered slightly at the way his strong muscles were hugged by the black shirt. It was evident he was a built man. Every move he did there was a slight ripple and strain in those carved muscles I’ve witnessed under that shirt. It almost felt like the clothes he wore was just a second layer of skin. Going closer to him I whispered enough for him to hear. “You look really good tonight, a little too good.” I stated humorously giggling in the process and to hold of his free hand and dragged him into the cinema hall #4 where the promotions and advertisements were playing already.
The room was completely dimmed down while there was in built small circular lights on the stairs giving a nice relaxing illuminating glow. I choose the furthest row at the back so we can comfortably have a view of the full screen. There were very few people at that row, only two people were sat at the very far end from our seat. The below row was also empty to an extent as well. sitting in our respectable places I told Toji I was to collect the snacks, but he urged that he would do so. After exchanging few words of who should go, he won and left the room before I could argue anymore. Huffing slightly at his sweet acts, I sat rather graciously and settled my items, so I was relaxed. Few minutes passed and Toji appeared cradling a large popcorn bucket alongside with two cups of cold drinks, one being my favourite and a bag of other snacks hanging off his elbow. Helping to keep the items safely and not creating a mess, he soon joined me, and the movie finally started.
Around sometime in the movie I felt Toji excuse himself to the restroom which I nodded unconsciously since I was so focused on the movie. Few minutes passed and soon I realized he still hadn’t appeared. I decided not to give too much thought too it and opted to hang around for some time before I gave him a call. Few moments passed he came back looking rather disoriented. The light from the large, displayed screen showed how his shirt was more undone. There was a layer of sheen sweat on his Godly built chest. He plopped down on the seat and manspread-ed, occupying the entirety of his seat. He was slightly more slumped against the chair and his right hand was placed lightly on his finger; his expression tells me he’s in some deep thought.
“Babe? You alright? You don’t look too good.” I spoke out with great concern. Lifting my hand, I pressed against his forehead was felt extremely hot. Snatching my hand away I glanced at him with worry. “You are developing a fever!” I quickly got up only to be pulled down immediately with his arm wrapped on my arm. I fell atop him, my chest near his vision. Blushing at the odd position I was in, I wriggled from his grip. “Toji, what’re you doing!?” I exclaimed quietly. “I got this fever because of you.” He spoke lowly. What? I caused his upcoming fever? Impossible. “You’re gonna have to elaborate more on that but do that later when we bring that fever down.” I said sternly, trying my best to break free from his grasp but no luck. Couple of seconds passed and he gave no response but just staggering breathes were heard. “Toji, darling what’s wrong?” I muttered out softly. I brought my hand after gently convincing him that I’m not getting up and caressed his face. “Ever since I laid my eyes on you, I got so fucking hard it was unbearable.” I gasped at his confession and locked eyes with him. “Darling, you were so focused in your movie I couldn’t disturb you. So, I thought I could take care of it myself.” Poor him. He was dealing with all this all alone without me knowing.
“Babe, you should’ve told me. I could’ve helped you; you know.” I spoke sweetly whilst my hands slid down his chest ever so slowly until it reached the problem. I softly caressed his hard on and kept a fixed stare on his face. “Babe– fuck, please help me…” He gently pleaded. How could I not help him when he laid there in front of me, looking so helpless. How sweet it was of him to not disturb me when watching the movie not knowing I’d drop anything to help him. Grabbing his large rough hands, I led them to run my hair over and hold a makeshift ponytail. I settled on the carpeted ground and unzipped his pants and stared at it. There was a wet patch on the dark, tight boxers he wore that hugged onto his pure thick muscular thighs. Freeing the hard dick from the strains, there it stood proudly. The tip had an angry shade of red – thanks to the light coming from the screen I was able to appreciate his dick properly.
The cockhead was leaking generous amount of pre-cum which dribbled down uncaringly. A thick vein ran underneath the shaft and made its way to the thick, large fat balls. Licking my lips at the delicious sight, I looked up at him once more only to find him looking back at me with such intensity in his green eyes. He bit his lip as he let out a low groan. “Fuck, you look so good down there.” The grip he had on my ponytail was tightened and pushing my face to his hard cock. Preparing my mouth for the abuse I kitty licked the tip and kissed the sides. Sucking the tip like a candy I stuck my tongue out and allowed myself to wrap the tip carelessly. I slipped the cock to entire my hot cavern and the part that didn’t fit I wrapped it with my hands. Pumping with my hands and I bobbed my head up and down I fought back the gag-reflex. I looked at him through my lashes as I kept my cheek hallowed and kissed the tip several times. Spitting the built of drool on the head, I kept pumping his cock and once again swallowed his dick.
“You look so fucking hot right now.” He spoke with a low pitch and letting occasional groans. Thank goodness to the blaring speakers of the movie hall, it masked the erotic sounds we were producing. Suddenly my head was yanked back harshly as he came closer to my face. A finger was stuck in my wet mouth, and I sucked it, swirling my tongue. Toji tightened his jaw when he saw how obedient I was being. A smirk broke out as my eyes land on those pink lips of his that was adorned with that scar. “As much as I’d like to fill your mouth with my cum and have you kept it till the movie’s finished, I think I’ll use that pussy of yours instead.” His voice was rough and hoarse but had a hint of degradation.
His hand motioned towards his thick thighs, and I gulped at the sight. “Get on my lap, now.” He ordered with a gravely tone. Nodding I sat immediately on hard thighs. His right hand that was in my mouth was now removing my panty and was completely removed. Feeling the cool air hit my bare cunt I gripped onto the arm rest wondering what he’ll do. “Don’t make a fucking noise, got it?” He spoke right next to my ear as I nodded. His free hand wrapped around my neck and had a slight tight grip, enough to cut out a bit of oxygen. “Where’s your manners? Hm?” He questioned threateningly. Nervously I answered “Y-yes sir.” A satisfied hum was heard, and my underwear was now a small ball and was near my mouth. Getting the idea, I opened my mouth, and the panty was shoved inside. “Very good.” His voice so husky, his tongue licked my jawline as he brought my back against his hard, chiseled chest.
The finger with the ring was wet presumably from his spit and now made his way to my cunt. His thighs nudged my thighs to open up more. His hands were carrassing my inner thigh as he teased my pussy but not quite relieving any pressure. All of a sudden, he stopped his actions and moved around a bit, most likely removing something from his pocket. “Open it.” He whispered hotly and gave it to me, which I obeyed and opened the black case. There it was a purple clit vibrator. I gasped at what I opened but that went unnoticed as I had a makeshift gag ball in my mouth. He then took it from me and then placed it on my clit., nestling it and making it fit right. Squirming on his thighs at this foreign object contacting my pussy was kind of exciting.
“Relax darling, it’s just a vibrator.” He reassured and kept it there for some time while he held it. Few minutes later he proceeded to whip out the remote and there he played with the controls going from low to high intensity. Immediately I thrashed a bit at the random, sudden sensation I was dealing with, but Toji was quick to stop my movements and had me attached to his back. His free hand roamed around my torso until he it massaged my covered breasts. He slipped his hands under the dress and then tugged the bra under and kept teasing my tits. He flicked, pinched, rubbed circles and pressed on the hard nubs of mine. He did the same with my other boob switching hands and felt the cold ring tease my hard ass nipples. Moans were escaping my mouth but were muffled by the gag. My hand went to his cock that was right under my pussy, which was rubbing it, making it hard as fuck.
“Shit, if you keep that up, I’ll fuck you right here, right now.” He stated with few light groans releasing into the warm air. I moaned at his words and pushed my hands to have a faster pace. I want him to fuck me right here. Having a hundred or two sitting in the same room, shrouded with darkness with nothing but just the projector as our light. Anyone could catch us. We could get caught. We could deal with the securities but that’s what made my pussy clenching on nothing. I let out some words but were intelligible. “What d’ya say sweetheart? You wanna get fucked right here? Like a dirty slut? Hmm?” He questioned one after another, his tone had a patrionising tone. I nodded as fast as I could and urged his hand from my breast to go to my gushing cunt. A deep chuckled reverberated from his chest. “Well, do it yourself then. Use me while fucking me. C’mon darling ride me.” He spoke lazily as he flipped through the intensities making me groan and break out into tears. The thought just past my head. Riding him in a public place, sitting innocently on my boyfriend’s lap while no one knows what was actually going on. That he was practically rearranging my guts.
I lifted my hip and used my hand to align his hard leaking cock into my fluttering hole. Going down I felt him practically rip me open. He was so fucking big it hurt deliciously. Once he was fully inside me, barely sat comfortably as I felt his cockhead kiss the opening of my cervix. Looking down there was a bulge formed on my tummy where my uterus would be. “I filled you up so good, didn’t I?” He spoke to himself and tapped on my thighs to start moving. I slid up and down much with all the energy I had. This kept going on for maybe around ten minutes and Toji just sat there, doing nothing, his eyes were on the movie while he mindlessly switched intensities. Letting out a whine and tears of frustration came out as I couldn’t reach the high that was seconds of breaking open but not quite there yet. “What’s wrong baby? Can’t cum? Need my help?” I nodded but he still sat there looking at me deeply. Soon he removed the gag from my mouth. “Use your words.” He spoke with a bored expression while his face rest on his palm whilst his elbow rested on the armrest.
“Y-yes sir, p-please mmmhm I wanna cum so badly.” I pouted as I squirmed once again. His hands than held onto my hip and helped me to move up and down while simultaneously he pistoned his hips inside me deeply and accurately managing to hit that favourite spot of mines. My gummy wet walls wrapped around my cock as I felt my high coming closer. He set the vibrator at a high setting and alongside with him brutally hammering inside me was really pushing it. Groans and moans escaped quietly from both of us and mingled together. The slapping noise was there but thanks to the climatic scene that was playing, the speakers were blaring with all sorts of loud noises. Few more thrusts what caused the tight knot to snap and caused me to squeal out loud. The dress had already fallen back, concealing everything while couple of people below us had turned around, trying to find where the noise had come from. His warm cum painting my walls white as the remote was switched off to stop me from overstimulating. I rolled my hips, grinding and milking the remaining cum of from his shaft and squeezed Toji’s balls. “Fuck, you better keep quiet if you don’t want to get caught.” He snapped while tugging my hair making me fall backwards.
After two or three minutes of cockwarming and him softening up, still semi-hard he removed himself and helped me sit by the near seat. The soaked panty that was held in front of me and Toji, he smirked and assisted me in slipping it back on. “Don’t want that precious cum leaking out now, do we?” He spoke smugly, his vibrant green eyes were clouded with various emotions and one being is lust mixed with affection. It was slightly shroud with his jagged hair that stuck to his forehead due to the sweat. He tucked himself in and got up disposing the waste in the spare bag he brought. He enclosed the vibrator and slipped it back on his pocket. The movie ended alongside, and the lights returned, brightening up the place. As he stood up, totally towering me he leaned down and stole a wet kiss from me, his gorgeous veiny hard hands swiped away presumably the smudged lipstick from my cheeks and chin.
“Get your ass up, I’m not done with you yet.”
------------------------------------------------------------------------------
#daddy toji#fushiguro toji#toji scenarios#toji x reader#toji x you#jujutsu kaisen toji#toji fushiguro#smut#jjk smut#jjk x y/n#x reader#fem reader#reader insert#dilf toji#oneshot
215 notes
·
View notes
Text
50 Follower Special Surprise
Hihi besties, so I've officially hit 50 followers which may not seem like much but the fact that there's 50 of you that listen to my insanity is wild so first off, thank you all!!
Second, I promised a surprise, and I am following through. So for those of you who don't know, hi I am currently studying fashion. I have been for the past four years, and in my studies, one thing we've learned is how to do flat sketches. I found that I loved doing these, so sometimes I do them on my own for various ideas I have. One of these ideas that had come to me was to make gown concepts based on all of the BVB albums and eventually the EPs, so, that's what this is. You can view the full collection below, and under the cut are close ups of each gown and some insight into my thought process for each, enjoy!


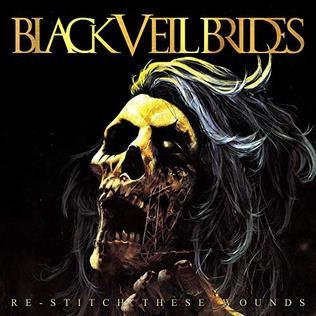
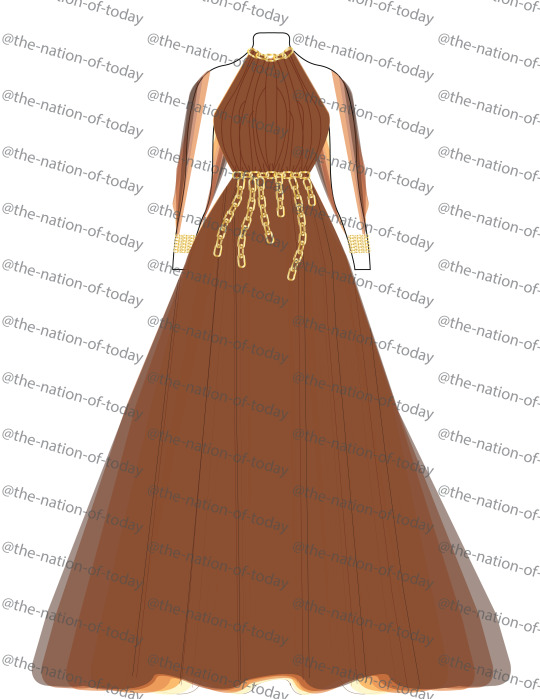
First up is We Stitch/Re-Stitch These Wounds. Since these albums are companions to each other, I wanted to make one gown that combined aspects of both. Fun fact this was actually one of the last gowns I conceived because oh boy did I struggle with the silhouette on it. Anyway, to the gown itself, the most obvious motif is the lacing calling back to the idea of stitches, featured on the side panels, the neck, and on the corset belt. Then, on the detachable cape and matching choker are embellishments made to look like eyes, which relates to the eye motif found on the original We Stitch cover. The colors are then picked from the Re-Stitch cover, since by the point I did this gown I had already done quite a bit of black and wanted to go in a different direction.

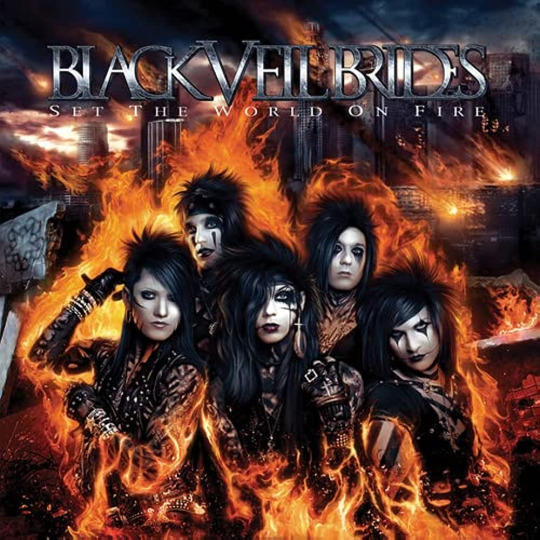
Next is Set The World On Fire, or as I have lovingly dubbed this gown, Set My Computer On Fire because Adobe Illustrator crashed a grand total of three times while figuring out this gradient. Now my ORIGINAL plan for this one was to have the entire gown be one gradient from black at the top to fire colors at the bottom (think Katniss' Mockingjay dress but like mid-transformation). Illustrator uh... did not like that because each of those wing shapes is separate and complicated, hence the crashing. Instead, each wing shape has the fire-colored gradient which I ended up liking better. Obviously the wings are a reference to both Fallen Angels (obviously) and The Legacy ("on leather wings"). Then, the sort of tattered belt and choker are there to be callbacks to the acrylic paint the band wore on their bodies during this era.


Next is my beloved Wretched And Divine. For this one, I didn't take inspiration from the album cover so much as I did the Wild Ones' outfits, particularly the Prophet (to the surprise of no one). In those outfits you obviously see use of mainly black with a lot of asymmetrical elements. The collar of the gown, for example, references the collar of the Prophet vest in the In The End MV. The armpiece, on the other hand, is a twofold reference. It references both the strips hanging off of his belt in the In The End MV but it also references the feather armband Andy wore during I believe it was Download 2012 if I'm not mistaken. This one was very fun to play with the various elements and just kinda go nuts.


Next is Black Veil Brides from 2014. I will be the first to admit I struggled heavily with this one. I feel like this album is one of their most stripped back, so I was struggling on how to represent the different aspects. I eventually turned to the album cover again for inspiration. The tired skirt is a reference to the rubble pile that the gargoyle stands on, while the mesh sleeves and chest are reminiscent of the skyscraper ruins in the background, using a large, square mesh to evoke that building skeleton look. Finally, the silver belt with the circle clasp is a reference to the eclipse happening on the cover, and the color scheme is evoking the album's grayscale.

Next we have bestie beloved Vale. Now stick with me, this is the most conceptual of all the gowns. So with Vale, whenever I listen to it, I always get two kinda ideas from it: the idea of feeling like a ghost and the imagery of being chained down to something. It’s hard to translate into 2D but if it were real, it would be made of some really light and flowy fabric (something like a semi-sheer chiffon for anyone else who knows fabric) and each layer of fabric is a different color from the album cover (you can see it at the bottom there as well as on the open sleeves). This is where that "ghost" idea comes in, that weightlessness. Then, being weighed down is represented by the chain belt, with the sleeves are connected in the back to that top chain detail on the collar and I imagine there would be chains back there too. Essentially, I wanted to play with those dualities of feeling like you're floating away while still being chained down by something.

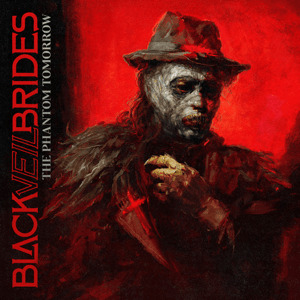
Finally for the full albums is The Phantom Tomorrow. This was actually the first gown that I made in this mini collection because I had such a clear idea of what I wanted since TPT has some of the most obvious visual motifs in the form of the scarlet cross. This gown is actually two parts, the gown itself and the cape/collar. The silhouette is based off of both the girl's dress in the TPT music videos and of Andy's jacket in the Scarlet Cross MV. You then obviously have the motif of the cross cutting through the center of the gown. The cape is then a result of me wanting to allude to the idea of wings (because of the Blackbird) without wanting to do something obvious like feathers. Then, of course, I needed to incorporate Andy's slutty priest collar as a crucial element. Finally, the rosary belt was added to both break up the red and to add a little extra blasphemy because we can always do with more (sweet) blasphemy (Get it??? Wrong album I know but I had to)
Now, onto the EPs. So I actually did not do these at the same time as the albums. I did the albums in October 2022, before The Mourning came out. Once I finished those, I didn't really have any ideas for the EPs so I just let them be. Then in March of this year, I had basically an epiphany about them, like I got out of bed specifically to do a janky sketch so I wouldn't forget my ideas. So, here they are.


First off is, of course, Rebels. Since this is Rebels, I wanted it to look different from every other gown so far, hence the silhouette. The asymmetrical skirt and sleeve allude to going against the grain and not being perfect (y’know, rebelling). The damask pattern on the top of the skirt and sleeve comes from the Coffin video, the women with the candles wear veils that look like they have a sort of damask (tbh, couldn’t tell exactly but they’re Ornate). The center panel of the bodice also has a distinct coffin shape, while the slashed stripes across the bodice reference the chest paint they all wear in that video, it’s sorta striped and almost looks like a ribcage. Hard to tell on here, but it would be almost sliced open with like a peekaboo black fabric beneath it. The colors of the rest of the bodice are then color picked from the jacket on the EP cover. Finally, the chain details come from the chains on the EP cover, and the upside down cross allude to both the crosses in the Coffin video and the fact that Unholy is a song on there, y’know the upside down cross being the opposite of a right side up one.


Next up is The Night, aka the first one I had an epiphany on in regards to this set. The purple comes from the EP cover and the videos, obviously. The chains are a part of Andy’s outfits in both MVs, which is also where the crosses on the hem come from, both are on his jacket in both videos. The neck piece is a callback to the streaky paint/makeup Andy has on, and then the X on the bodice is a reference to Lonny’s makeup since it was his first record with the band, I wanted to ensure there was a reference to him. I wanted the X to be a little sharp and almost look painted on. This whole EP has always sounded very sharp to me, so I wanted to channel that in this gown. Kinda just went with the vibes on this one, ended up with this gothic armor sort of look for the neck piece, but it slaps so we're sticking with it.


And last but certainly not least, The Mourning. I wanted this to be a very big and ornate gown, almost looking heavy. The color scheme, obviously, adheres to the grayscale of both the cover and music videos. The skirt is made to look like panels or pieces of a stained glass window, referencing the rose window in the Saviour II video. The neckline is a modified sweetheart, with the two extrusions made to look like devil horns (cause, Devil, get it). Then the sleeves are twofold- they are reminiscent of angel wings (both Better Angels and the angel on the EP cover) and they represent Saviour II because they’re meant to be big and sweeping, like the song is. Finally, the studs are taken directly from Andy’s jacket in the Saviour II video
And that's it! I hope you guys enjoyed these. I am very proud of how these all came out, definitely one of my biggest projects to date but one that I'll always love!
#black veil brides#bvb#black veil army#bvb army#we stitch these wounds#re stitch these wounds#set the world on fire#wretched and divine#black veil brides 2014#vale#the phantom tomorrow#rebels#the night#the mourning#maeve.png#this is my first time sharing my designs to a wider audience so be kind to them#i put a lot of effort into these so
47 notes
·
View notes
Note
how many wips do you have going at any given time? i work full time, and i only get weekends to do fan art.. so i told myself that no matter how many idea sketches i had, i would only work on one piece of art at a time and not start another until its done! this means i don't put out work too regularly lol.. so just curious as to how other artists that do art full time work! :D
Hi Anon!
Thank you so much for your question, I’m more than happy to share my experiences with WIPs!
First I organize my sketches and WIPs into folders based on what they’re for: zines, personal work, commissions, etc
Some of these canvases are just sketches that *may* turn into full illustrations but most of them are WIPs. I didn’t include my commission or other zine folders, which brings the number up a lil’ more!
I tend to bounce around WIPs based on when they’re due. First I’d warm up with a limited palette challenge, then I’d work on some line art, followed by adding flats to another piece. Then I’d sketch out some more ideas and add on to the ever-growing WIP pile.
During Linktober, or when it’s close to a certain deadline, that’s when I’ll focus on one piece until it’s finished. Like I said before, usually I’d bounce around and take breaks in between stages. That helps me take a step back and see the piece with fresh eyes at a later time.
One piece took me a whole year to complete! Thankfully it was a personal, original illustration so I was my own client 🫣 During that long break I learned a lot more about color, painting techniques, etc, so I was pretty happy with how it turned out even though it took a while!
That being said, this is how I approach full illustrations with background, lighting, rendering, the whole pie. If you notice painting is taking a while, then try including some shortcuts in your process! For example, using the lasso tool to color wider spaces, coloring in grayscale, and then using Gradient map on top help loads with digital art. With traditional art, blocking in colors and focusing on values help bring a piece to life quickly!
Also if you’re interested in posting more frequently, feel free to share your sketches and WIPs along the way! Please don’t feel pressured to meet a certain metric, your art making process should reflect what you want to get out of it - are you studying certain techniques? Or vibing and going with the flow?
However you go about it, don’t sweat over the number of WIPs you have. When you feel like going back to a certain WIP then that’s the perfect time to work on it!
I hope this helps and happy art making!
#long response#long reads#ask and i shall answer#anon reply#anon answered#anonymous#wips#I have more on my laptop#I’m ashamed#but also it’s chill#my art#artists on tumblr#mochiwei#whit be quiet#I really hope this helps!!
27 notes
·
View notes
Last Seen Blogs

the-owl-house-tarot-cards
The Owl House - Tarot Cards
made-bykitty
madebykitty
daryl-fucking-dixon
normans girl

mochiipudding
ChocoMilk
dawahman-blog
The Final Da'wah