#but also i just wanted to try a psd on it so
Photo
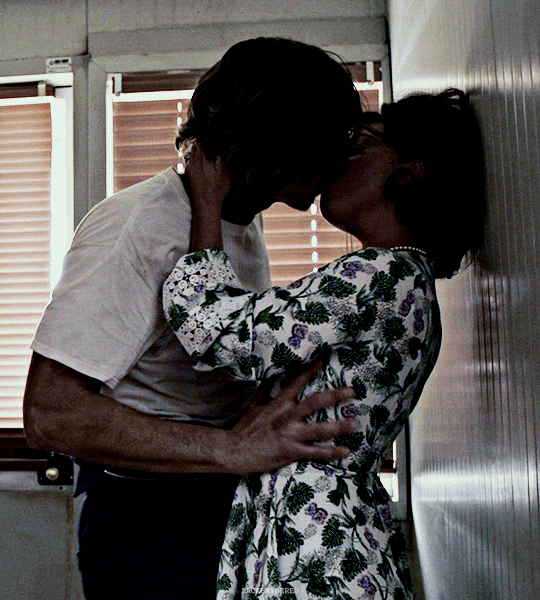
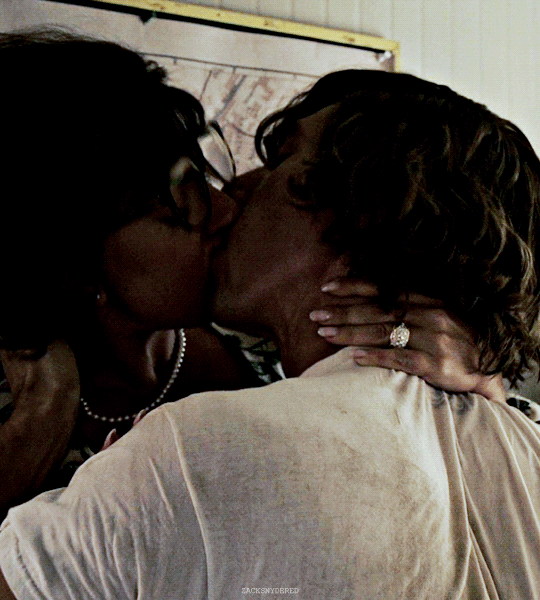
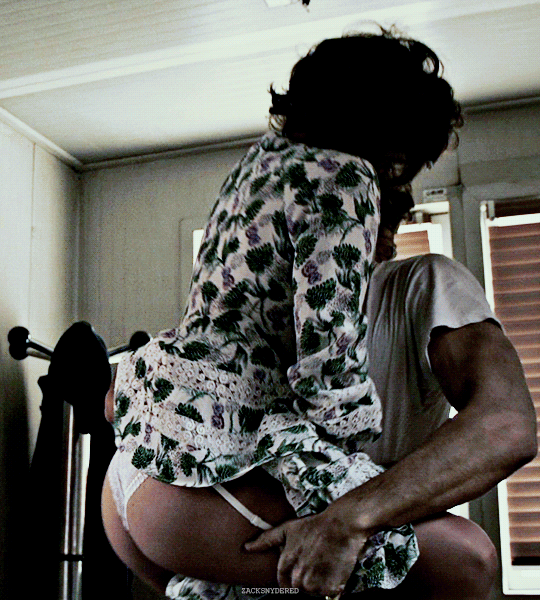
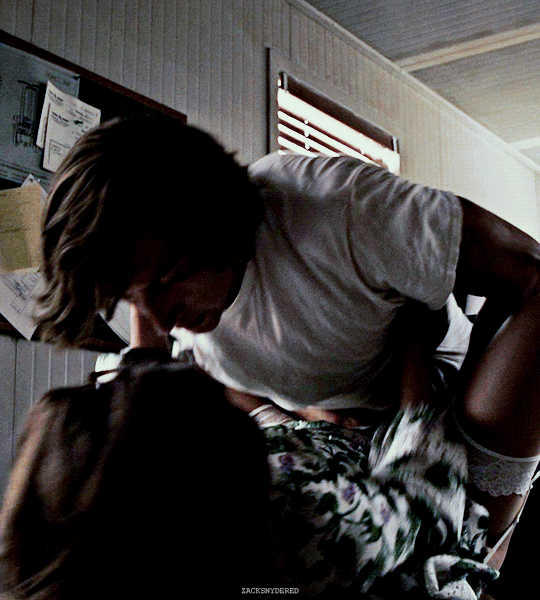
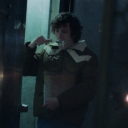
ADAM DRIVER and LADY GAGA
House of Gucci (2021) | Dir. Ridley Scott
#adam driver#adamdriveredit#adriveredit#driveredit#lady gaga#ladygagaedit#gagaedit#house of gucci#maurizio gucci#patrizia gucci#mine.#edit: gifs.#film: house of gucci.#i think someone requested this awhile back#I THINK#but also i just wanted to try a psd on it so
273 notes
·
View notes
Text
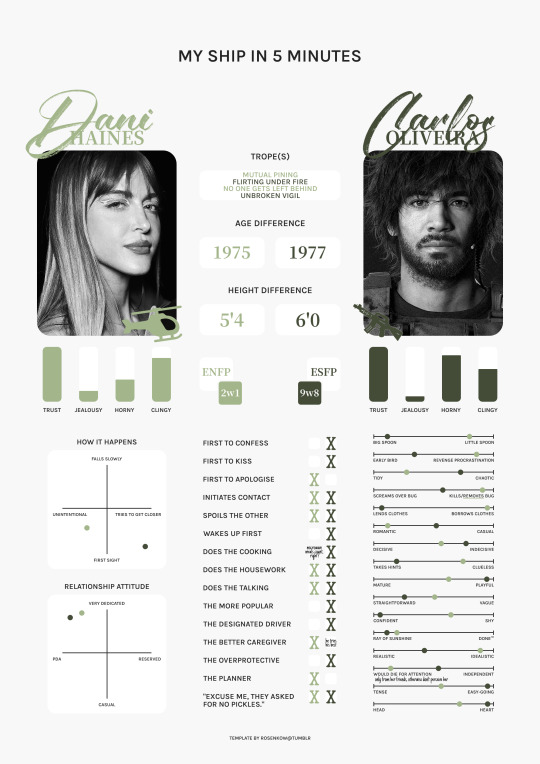
DANI HAINES x CARLOS OLIVEIRA / template.
#mine.#pair: dani x carlos#oc: dani#click for better quality as always ♡#so um i meant to post this the same time as the claire on last year but just completely forgot then found out i lost my psd so oops#i wanted to do like a stencil or army font for their names but also wanted that handwriting look so the letters overlapped...aughgh#gave up on looking for pics of carlos' face model as well i'm so sorry like there were none with his long hair and the ones from cosplay#they weren't hd or big enough so i was like whateva i'll use this pic that kinda looks real anyways 🤷#anyways yes dani has falling in love with her friends disease. she's so real for that actually#and there's something going on in my brain chemistry seeing dani be the one with two partners yet she's the jealous one...inchresting#again i'm fighting for my life with the new html text editor so hopefully this posts properly...i think the ewskers family tree#posted fine but also that one was a bit more complicated with the read more and line break pics...but omg trying to use gradient text#now...so yes anyways here are my other beloveds !! if i notice an error after posting this i'll blow up cause the new editor makes it harde#to do literally everything lmaoo i hate it sm
15 notes
·
View notes
Text
ok i have to go out for a bit but. I wanna do things when i get home
#i wanna change psd again 😔#i also wanna write tho#esp bc im going away in just under 2 weeks so like. i want to try to get threads out before then where i can#bc i can probably answer asks whenever i want on the trip but threads. will be difficult#bc once i leave home i have no computer no xkit so no trimming posts
1 note
·
View note
Text

FALLING LETTERS ANIMATION tutorial
hello! @kimmomi asked for a tutorial on how i made the letters "fall" in this gifset and so i figured i would make it and post here! this effect isn't hard to achieve but it might get a little tedious if you have a lot of letters.
note: you will need photoshop with a timeline!
STEP ONE: create your base gif! be mindful of number of frames in your gif. the number of frames doesn't really matter here, altho the longer the gif the better the effect. i'd say try to limit it to 60-70 frames, depending on how big your final gif will be.
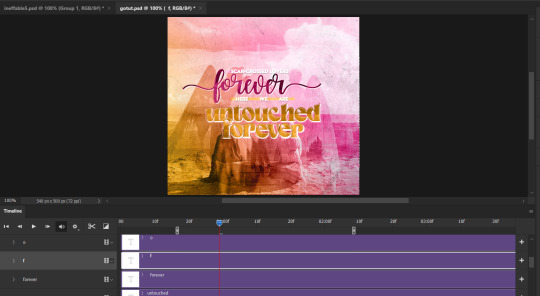
STEP TWO: make your text the way you want it to look. this effect is basically the last step of your gif making process. (i will be using the typography from my set as an example as i already have that psd saved)
this is what my typography looks like now.

STEP THREE: i would recommend that the word at the bottom be the word that "falls". for me that is forever.
now, you will have to duplicate the "forever" layer and make your non-copy forever invisible.
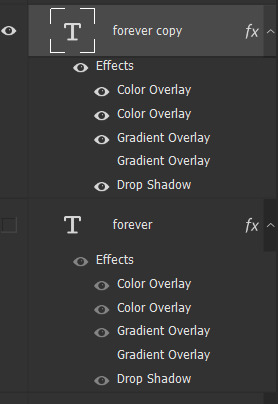
what you will want to do now is delete all the letters but the first one in the duplicated layer. for me that is f. then you just duplicate the f layer and write your second letter instead of it, in my case o. you will have to do this for all letters. also as you do that make sure to move them a bit away from each other.

now, what helps to align those letters where they start off, is making your non-copy layer to be visible again.

after you've aligned your letters, make the non-copy layer invisible again.
STEP FOUR: so now we come to a bit of a tedious part.
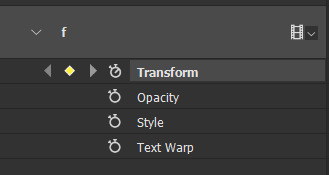
what you will do now is move the playhead (blue timeline arrow) a bit further from the beginning of the gif (this allows for the text to stay still a bit before it starts "falling") and click on the first letter.
next step is to click on the little arrow next to your letter and clicking on the stopwatch next to Transform.

then, you will take the playhead and drag it to the end of the gif where you will start with transforming your letter with Free Transform tool (shortcut ctrl+T on windows). and what you will do is, while in Free Transform mode, drag your letter to the bottom of your gif while also rotating it a bit. when you're happy with your placement of the letter, hit enter. see below gif for how i did it.

you will have to do this for every letter, but make sure to rotate some in the other direction. also make sure that the beginning of the stopwatch mark is the same for every letter.
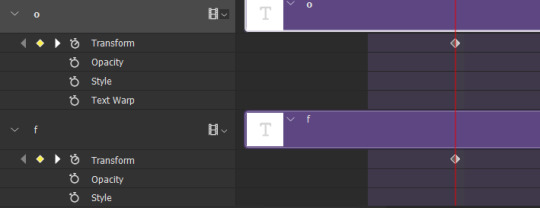
and that is basically it! after you transform every letter, you can go and save your gif.
this is my final result:

for some extra dramatic look, you can duplicate your initial layer with the whole word on it, drag it above all layers, clear layer style and add a stroke and make sure its FIll is at 0% where you will get the outline text that stays behind.

i hope this was helpful and understandable. if you have any questions, feel free to send me an ask or dm me <33
#usergif#completeresources#allresources#gif tutorial#ps help#userkimchi#uservivaldi#userraffa#tusermona#userelio#usercats#tuserheidi#usershreyu#userhallie#userroza#userdean#userisaiah#thingschanged#tusercasey#usertj#userwwz
519 notes
·
View notes
Note
hiya! any tips on creating an immersive save that will attract not only you as the player but others as the viewers? your aesthetic is stunning and im so obsessed with everything you do!! <3
oh wow, this is a super sweet ask, @plumday.
let's see. I interpreted this as an ask about how I setup my sim save in a way that engages me. Hopefully this is helpful!
Setting Up TS4 Gameplay

Revamp Sim Worlds
BRAVE THOSE LOADING SCREENS and leave your residential lot! (I promise it's worth it)
NEW LOTS - Each of my worlds have been renovated with lots I handpicked from the gallery - too much work? I recommend using a savefile! Here are some of my personal faves @ratboysims 1, @down-in-simsland 2, @folkling 3 & @sweetbeagaming 4.
RESIDENTIAL RENTAL - these lots help make the world feel more dense and lived in, plus condensing the local households to 1-2 lots leaves room for more non-residential lots to explore with your sims.
WORK AND SCHOOL - I recommend placing offices, schools, and daycare lots. These combined with a few mods (semi-active custom careers and Zerbu's go to school mod 2) and clubs are something I really enjoy.
Set Up Clubs
I really like @sojutrait's tutorial on how to use clubs to enhance your gameplay and is a MUST HAVE in my humble opinion. I usually have a family chore club, work clubs, neighborhood clubs, extended family clubs, etc... and it's so nice to click a button suddenly there are sims there making my game more lively.
To have more than 3 clubs per sim, I use this mod maintained by @kingzaceofsims.
I also use custom club activities so sims (MOSTLY) behave how I want them to. @srslysims has tutorial on how to make your own.
To be able to have club gatherings in vacation worlds I use this mod. It was helpful with sending my pixel kids to camp.
Set Up the Calendar
@aliennooboo made this AMAZING tutorial on setting up your sims calendar that I just adore. I find this helps me remember to do things with my sims and helps change up their day to day life.
Playing
ROTATIONAL GAMEPLAY - I find this keeps me engaged and prevents boredom. It keeps things fresh and allows me to explore different stories. Here is a great resource to get started!
GAMEPLAY MODS - I find adding various mods keeps my gameplay fresh and interesting. I recommend these creators (1, 2, 3, 4 & 5) in particular.
Screenies
POSES - As a gameplay person, I try to use poses sparingly. It disrupts the game for me but I find sometimes I can't convey what I want to without them, so I try to only use a few. This is what works for me, please do what works for you. Shout out to all the storytellers blogs, though, that keep me fed.
RESHADE or PSD files can add some fun color and effects to screenies. ONLY edit as much as you want to. I felt a lot of pressure to get better at this and I am finally finding the balance of how much and what kind of editing I actually like to do. I have collected reshades/gshades and resources here.
House Keeping
Keep back ups of your trayfiles, screenshots, households, lots, etc 'cause it's sims, things break and go wrong.
Keep your CC and mods organized otherwise fixing your game is a hug pain.
Reblogs and additional tips and recommendations welcomed!
HAPPY SIMMING!
348 notes
·
View notes
Text

Riliane Lucifen d'Autriche
ive been wanting to make fanart for mothy's seven deadly sins series for a while and now i'm finally taking the dive. so the next few posts will be completing these series of illustrations of the characters :) started off with rin's character cuz i feel like the daughter/servant of evil is where a lot of us got introduced to evillious chronicles hehe
excited to see the little collection all come together and i hope you are too
~~
by the way!!!!
5 people have indicated on a poll that they would be interested in coloring pages of my art, and i thought i'd do just that! at least as a little test. so here are some lineart files of the piece~
psd file - should be compatible with photoshop and ibispaintx definitely. probably compatible with other programs like csp but i haven't checked 😅
procreate file - procreate throws a fit when you try to import psds so i had to make it separate just in case 🫠
this is the first time officially releasing these so im not sure how to go about it?? again it's sort of a test, i'll figure things out.
just be aware that the lineart is more gritty/textured so filling colors with a bucket tool might be a little wonky.. but i'm sure that's fine
some terms when using these coloring pages :)
don't remove or obscure the watermark. you can move it, but make sure it's visible in some way
when posting, make sure to credit me (mayordoi) for the lineart
if you post on tumblr or instagram, tag me or let me know somehow cuz i wanna see em!!
again not fully sure if there's a big audience for these but i like the idea of coloring pages so why not release my own!
and yes the rest of the sin characters will also have coloring pages released in a similar style :]
#mayor doidles#fanart#vocaloid#evillious chronicles#evillious fanart#akuno p#aku no musume#daughter of evil#kagamine rin#riliane lucifen d'autriche#digital art#regular style#<- again my tagging system for my 'styles' is kind of a mess i'll have to fix that soon#art#artists on tumblr#vocaloid fanart
382 notes
·
View notes
Text
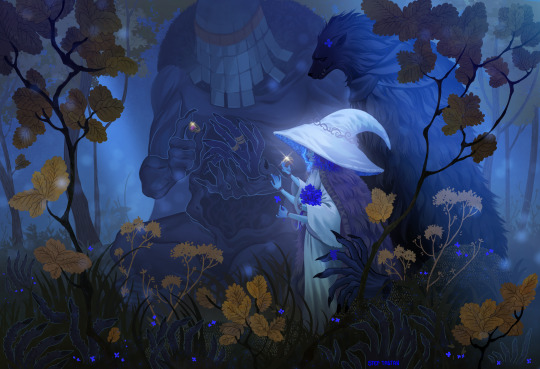
Carian Stroll
“Tell Blaidd, and Iji…I love them.”
Before this piece, I had been wanting for a long time to create my own piece of Elden Ring fanart featuring Ranni. I had tried several sketches unsuccessfully, just wasn’t particularly feeling the ideas I had sketched up until that point.
One day of usual internet scrolling, I stumbled upon this gorgeous piece of art by Shimomura Kanzan.
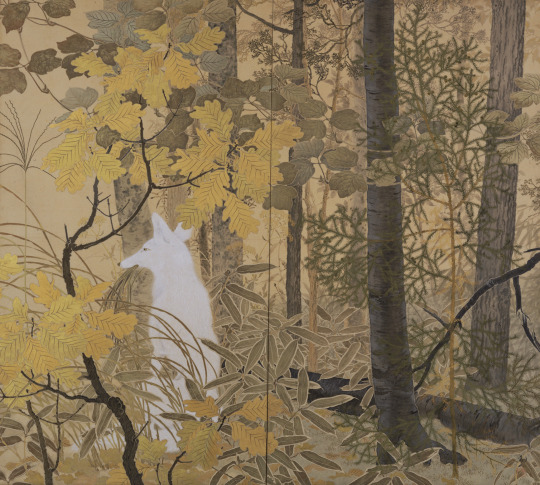
I knew immediately I wanted to do something like this for my Elden Ring fanart. In fact, if you look at this piece, there is tons of inspiration that I drew from the original artwork, such as the style of the yellow leaves and the main subject matter being a prominent silhouette of the brightest value, placed at approximately the bottom third of the image.
The main character is cleverly shrouded amidst various layers of trees and foliage, giving us the impression that we're peeking into candid moment of their life. In the case of the fox, we caught it during a mid-day snack. In the case of Ranni and her party, we caught them in a leisurely stroll, while Iji outfits the dreaded Fingercreepers with their iconic rings.
I wasn't sure if I wanted to capture a happy moment, but Ranni goes as far as to ask us to deliver to Iji and Blaidd the message that she loves them dearly as her quest draws near its end. I would imagine they all must have had fun moments together as a family. Hey, maybe even the hands liked to be around them?
The process
youtube
I started this on my iPad using the procreate app. Sadly the full process is not captured on video, as I switched to Photoshop for the rendering phase of the illustration. This video is a fun window into my chaotic process and how I iterate on the fly on the same canvas. I probably wouldn't do that in a professional setting where you often need to have color keys and iterations to be reviewed and analyzed. I like to I cut myself some slack when doing personal art to keep things fun.
Trying and failing some more
This illustration was not a straightforward path. I haven’t been very diligent about personal art, and at some point I started deviating too much from my reference by adding too many levels of depth to the background and suffocating the piece. I got into a weird loop where I would randomly open the PSD, play around with the values, pushing Iji to the back, then bringing him back, cranking all the levers on Ranni, etc., decide it would look horrible, then begrudgingly determine I’d never complete this image and go on with my life.
As artists we likely have unfinished work sitting everywhere, be it in our sketchbooks, canvases, or hard drives. But it’s a different kind of sting when you feel like you can’t even nail the fundamentals.
Anyway, so a couple weeks ago, I decided to give it another go, but this time I would get rid of all the unnecessary stuff, even stuff that I had been trying to render for ages. I would not hold on to anything, I would try and recapture what drew me to Kanzan's beautiful painting to begin with.

After it became a matter of pushing and pulling pixels until the image was finished!
That’s about it. I didn’t go crazy in depth but lately I’ve been enjoying reading into artists’ processes and I’d be remiss to not share my own thought process also.
Thank you for viewing!
#elden ring#lunar princess ranni#blaidd the half wolf#war counselor iji#illustration#artists on tumblr#fromsoftware#digital art#video game#fanart#Youtube
573 notes
·
View notes
Text

The silent art of gif making
The gif above has 32 layers plus 6 that aren't shown because this is part of a larger edit. I wanted to share it to give everyone a glimpse of the art of gif making and how long it usually takes for me to make something like this. This one took me about an hour and a half but only because I couldn't get the shade of blue right.
I use Adobe Photoshop 2021 and my computer doesn't have a large memory space (I don't know what to call it) so usually most of psds get deleted because I'm too lazy to get a hard drive. It doesn't really bother me that much because I like the art so when it's done, it's done. Off to somewhere else it goes.
Here are the layers:

Everything is neat and organized in folders because I like it that way. I prefer to edit it in timeline but others edit each frame. There's a layer not shown (Layer 4 is not visible) and it's the vector art. Here it is:

Now it is visible. I don't plan to make this a tutorial, but if you're interested I'd love to share a few tricks about it. I'm pretty new to the colors in gifmaking but the rest is simple to understand. Here, I just want to show how much work it takes to make it.

I opened Group 2 and here's the base gif. I already sharpened and sized it correctly but that's about it. Let's open the base coloring next.

Yay! Now it looks pretty! The edits are in Portuguese but it doesn't matter. There's a silent art of adding layers depending on how you want the gif to look but you get used to it. The order matters and you can add multiple layers of the same thing (for eg. multiple layers of levels or curves or exposure).

This was pretty much my first experiment with coloring so I don't know what I'm doing (this happens a lot with any art form but gifmaking exceeds in DIYing your way to the finished product) but I didn't want to mess up his hair, that's why the blue color is like that. Blue is easy to work with because there's little on the skin (different from red and yellow but that's color theory). I painted the layers like that and put it on screen, now let's correct how the rest looks.

I was stuck trying to get the right teal shade of blue so yes, those are 10 layers of selective color mostly on cyan blue. We fixed his hair (yay!) we could've probably fixed the blue on his neck too but I was lazy. This is close to what I wanted so let's roll with that.

BUT I wanted his freckles to show, so let's edit a little bit more. Now his hair is more vibrant and his skin has red tones, which accentuates the blues and his eyes (exactly what I wanted!). That lost Layer 2 was me trying to fix some shadows in the background but in the end, it didn't make such a difference.

This was part of an edit, so let's add the graphics and also edit them so they're the right shade of blue and the correct size. A few gradient maps and a dozen font tests later, it appears to be done! Here it is:

Please reblog gifsets on tumblr. We gifmakers really enjoy doing what we do (otherwise we wouldn't be here) but it takes so long, you wouldn't imagine. Tumblr is the main website used for gif making and honestly, we have nowhere to go but share our art here. This was only to show how long it takes but if you're new and want to get into the art of gif making, there are a lot of really cool resource blogs in here. And my ask box is always open! Sending gifmakers all my love.
#gif making#gif tutorial#resources#completeresources#y'know what that post yesterday got me into this#i love creativity so i send all my love to gifmakers#this is HARD#my tutorials#tutorials
252 notes
·
View notes
Text
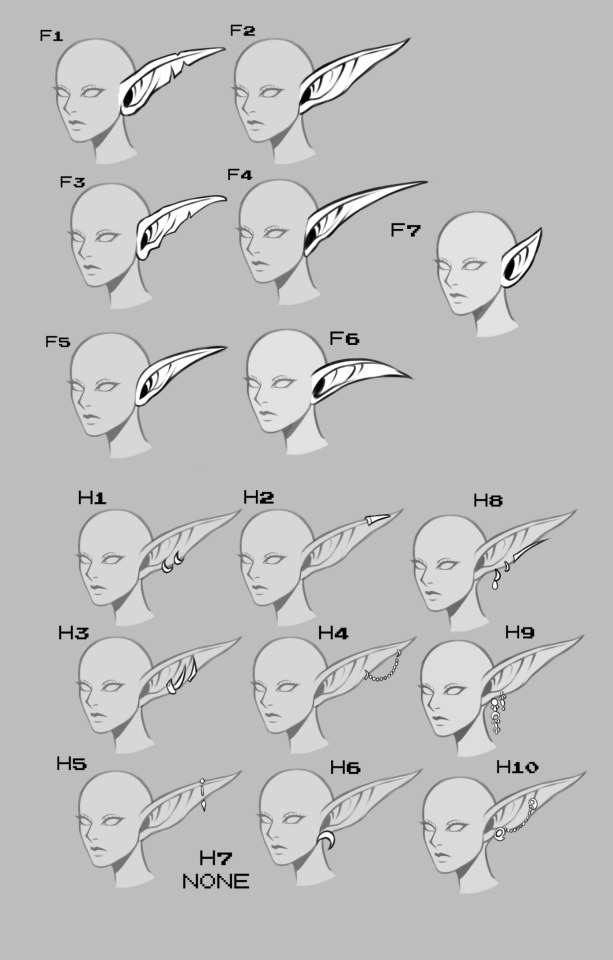


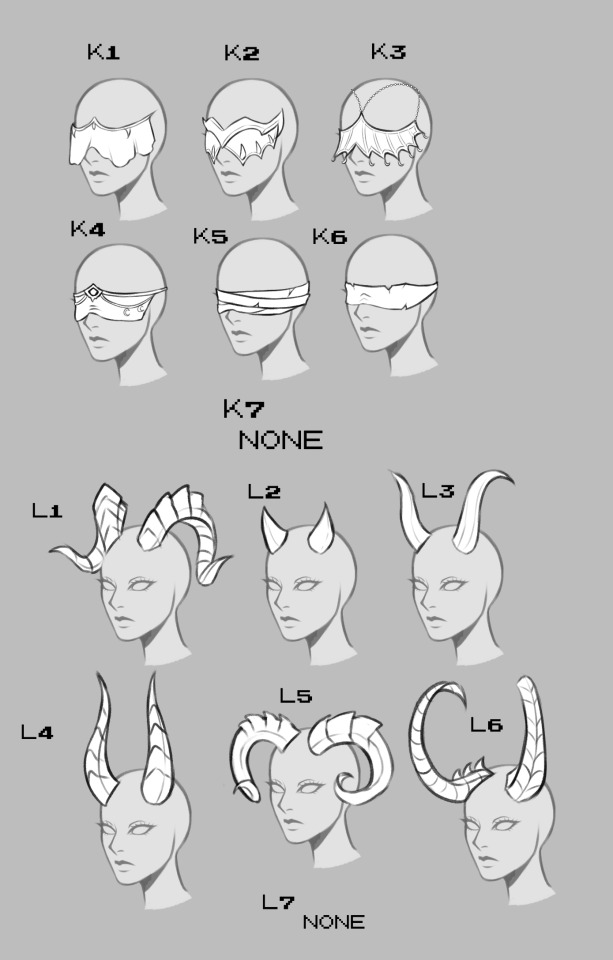

Beta Set-Up 12/17/2023
ADDED:
Demon Hunter horns + blindfolds
More tattoos
More face decorations
More ear styles
More eyebrow styles
More earrings
More hairstyles
To Be Added:
Antlers
Scale textures
Undead features
More Scars
Tattoo colour generator?
Necklaces
Circlets
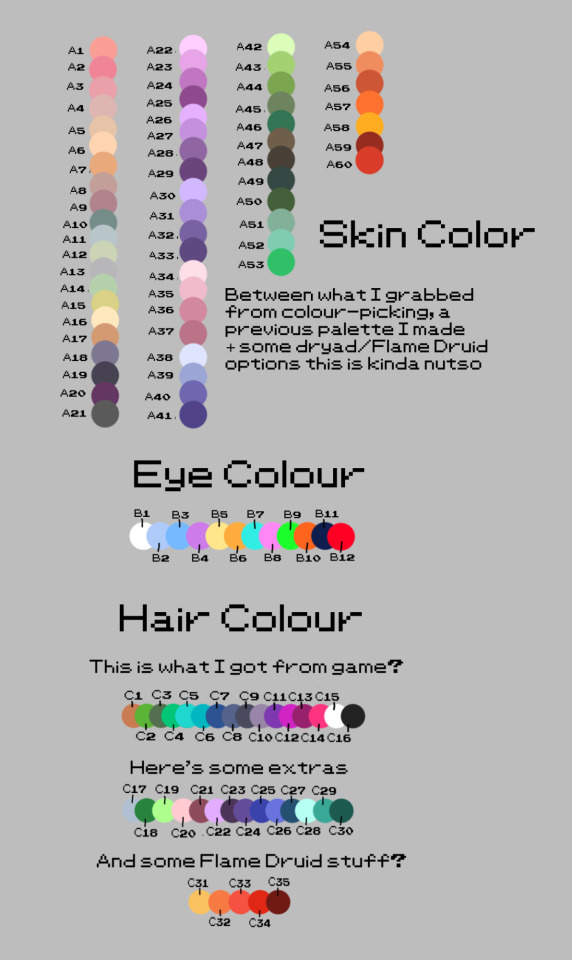
Nine years ago I made a Night Elf lady generator for design ideas because hitting 'random' in-game or on WoWhead wasn't good enough. As a pet project for ??? I decided to pick away at a new one so if I generate anything nice maybe I'll draw it in full just 'cause.
You use Google's number generator and just feed the numbers in and you get what you get - however some Druid of the Flame colours clash really hard etc, so I have some separated palettes if you want to omit specific ones. You can also omit any scars/tattoos/accessories as well.
I have just about everything from the game customizations (no necklaces, circlets and DH stuff yet though)

Since I have the PSD layers I rolled some numbers and put together what I got, so I get a visual (will probably draw ones I like later). If you Inbox me some some rolls you get I'll try and put 'em together to see how they look!
207 notes
·
View notes
Text
Happy Chrysler! The brushes and fonts are here!

After months of promising I've finally put together the ULTIMATE LO DEBAUCHERY brush and font pack! This was something I've been wanting to put together and release for a while but between technical difficulties, moving PC's, and wanting to ensure the brush pack was as refined as possible, it led to some delays. That said, it's finally finished!
VERSION 3 HERE! Helpful anon struck back not once, but twice! This will be the FINAL RELEASE of this brush pack (unless anything else is discovered but at this point it's feeling pretty complete! Any new additions will be collected and released in a new version at a later date <3)
WHAT'S INCLUDED:
All the brushes I consistently use in my panel edits of LO and Rekindled panels, among a metric FUCKTON of others provided by the community since releasing the first build! All the brush files are .abr meaning they can be used cross-platform between Clip Studio, Photoshop, Procreate, and other compatible drawing software!
A small selection of fonts from the Jason Brubaker 26 Fonts set.
A raw .clip and .psd file of Persephone from Episode 38 containing all the layer information for you to pull apart and play with! Also comes with an instruction layer to explain what brushes were used and where. Please use responsibly ( ´ ∀ `)ノ~ ♡
An .mp4 time lapse of an Eros panel recreation from S1 using the newest set of brushes!
WHAT'S NOT INCLUDED:
Clip Studio brushes that I also use due to exporting limitations. This includes the standard Gouache brush (which I've replaced with some Photoshop-compatible brushes that are close enough) and the Design Pencil brush, both of which come pre-packaged as default brushes with Clip Studio Paint. So if you use CSP, you should be able to find these missing brushes in your default brush kits!
The remaining 23 fonts from the Jason Brubaker set as they're not typically used in LO and I don't want to go releasing an entire font pack. Note that you should NOT use the provided fonts commercially unless you've legally paid for them. If you want all of his comic fonts to use royalty-free then you can buy them on Gumroad!
The canvas texture overlay that I apply to all my pages, the one I use can be found in Clip Studio's default texture overlays but you can undoubtedly also find overlays for free online or simply use the "Add Canvas" brush that's included in the brush pack! (the overlay is just faster and more uniform haha)
Commercial ownership - these brushes are all being provided to use for free, but you are NOT allowed to use these commercially, says the law. If you try to use these in a professional commercial product and get caught, it's your own funeral! Use at your own risk!
A lot of research and trial and error went into putting this together, so I'm thrilled to finally bring it to y'all for your panel editing, text editing, and style-studying needs ~ Consider this my grand gesture of appreciation and gratitude for accepting me into this community with open arms and showing so much support for what I've added to the table <3 Enjoy! ( ´ ∀ `)ノ~ ♡
And if anyone asks you where or how you got these, no you didn't-

#merry crismus#happy chrysler#many of these brushes are adapted from other brush kits that have been made inaccessible by corporations like adobe#so be cool about it mkay#resource sharing is caring#that said i'm turning off reblogs so pls stick to message / link sharing okie poke#lore olympus critical#anti lore olympus#lo critical
153 notes
·
View notes
Text
tutorial contents:
1 ‣ gshade & photoshop actions
2 ‣ template or cropping & colouring
3 ‣ notifs & pop-ups
okay hi! i have a really old editing tutorial from back in january that i've been linking people to, but it's pretty outdated by now. i also keep getting anons asking about the same things, which is fine, but i always have to go searching for the post explaining it, so having it all in one place will be a lot more convenient lol
i use a ☠ copy of photoshop cc 2017 to edit my screenshots, however the majority of everything i'm doing also works on photopea
photopea is an online version of photoshop that's 100% free and works very well! i can't recommend it enough, it's fantastic
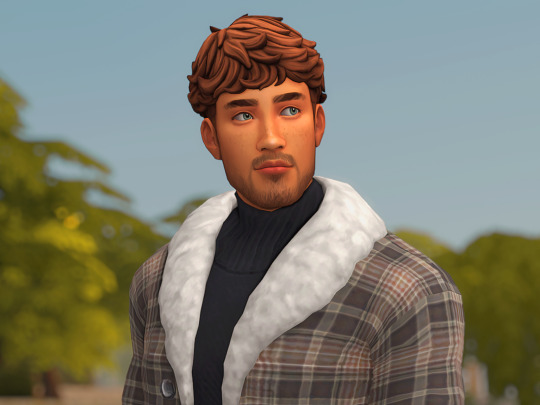
first things first, you're going to need some screenshots to edit. for the sake of this tutorial i'll be working with this one of raffy:
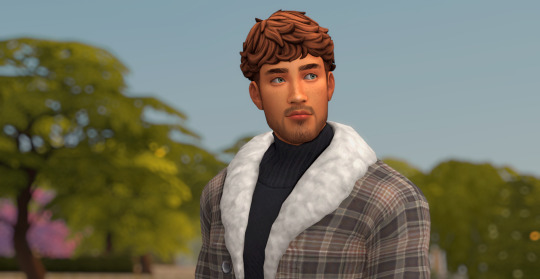
in all honesty, gshade will do most of the work for you. of course it's not needed, but i definitely don't think i could live without it! in this screenshot i used sunset n' vinyl by nesurii
when opening the screenshot, the first thing i do is run it through 2 photoshop actions:
butter action by early-grape
smooth sharp (no topaz) by poolbrop
to add actions in photoshop go:
windows > actions > the 4 lines at the upper right corner of the newly opened window > load actions > your downloads folder > open up the .atn files!
if you're using photopea, as far as i'm aware you can't use photoshop actions, but i've found that 'filter > stylize > oil paint' and 'filter > sharpen > smart sharpen' have a very similar effect when using the right settings. try these:
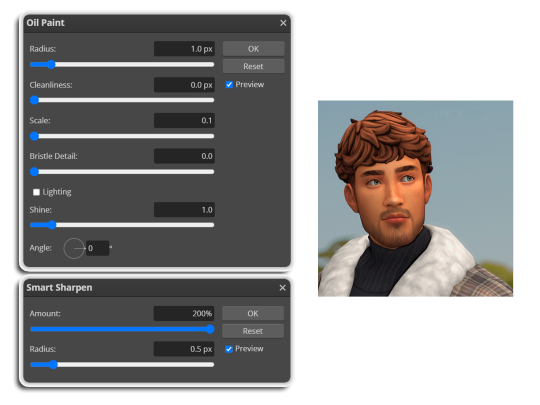
i like these two actions because they smooth everything out nicely, but keep it sharp at the same time! i always run butter before i run smooth sharp, however butter may leave you with 2 layers. make sure to merge these layers before running smooth sharp to achieve the full effect.
here's a before and after (of the photoshop action):

from here you can move on to step 2
before anything else i want to share the template that i use to make editing a lot faster. you don't need to use it but it's definitely made things a lot easier for me! it's a .psd file and will work perfectly in photopea
download (simfileshare)
if you're using the template you can skip right on to the next section, as it's already cropped to the right size and has the colouring folder included. just drag your screenshot into it and resize to fit the height.
if you're not using it, crop your edited screenshot to:
1707 width x 1280 height
then adjust the colours to your liking. it always varies slightly depending on the picture but my regular process for each screenshot would be:
up the saturation by 8%
up the lightness by 3%
up the contrast by 12%
all of this can be done by looking in the 'images > adjustments' tab
you should end up with something similar to this!
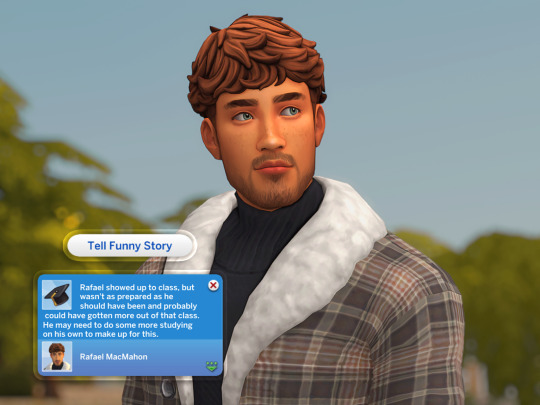
if you want to add a moodlet or social interaction or anything similar, it's all the same process. what you'll need is a screenshot of it straight from the game. i just press the 'c' key to capture them! i'll be working with these two:
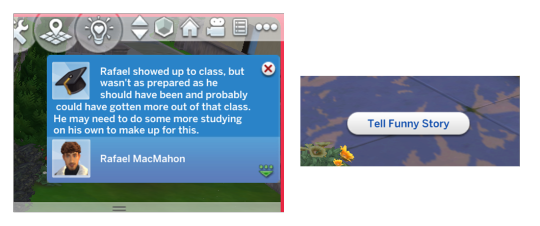
for the blue notification i'm going to select it using the box select tool. try to get it as exact as possible. one you have it selected
for photoshop users:
click on the 'select and mask...' option located at the top
adjust the global refinements at the side as follows:
smooth: 70
feather: 0.0px
contrast: 50%
shift edge: 0%
for photopea users:
go to select > modify > smooth
set it to 15
select 'ok' and press 'ctrl + c' to copy it, then 'ctrl + v' to paste it into your screenshot. adjust the size and position and you should end up with something like this:
next you want to add the transparent border around the notification. if you're using my editing template, right click on the reference notif in the layers tab and select 'copy layer style' (photopea > 'layer style > copy'). from there you can paste that layer style onto your own notif through the layers tab.
if you're not using the template, here's how to set it up on photoshop:
right click your notification layer and select 'blending options'
under styles, tick the checkboxes for stroke and drop shadow
input these settings:
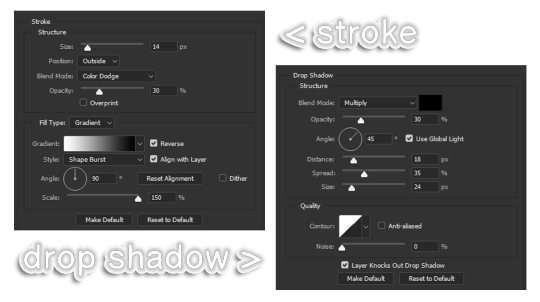
on photopea, it should be more or less the same. repeat the exact same process with the social menu option, but instead of selecting it with the box select tool, use the magic select tool. in the end you should end out with this!
from here you're finished! thanks for reading! go to file and export as png
if you've got questions never hesitate to ask, just make sure to read the faq in my pinned. i might edit this post soon to include the gen intro traits and aspirations bit, but this is all for now. hope it helps, my editing process post has been in need of a revamp for a very long time. i haven't proof-read this so apologies for any mistakes!
#ts4#sims 4#ts4 tutorial#5 anons in my inbox asking the same question after not reading my faq#this ones for you#3 anons in my inbox asking about cas pics#ones coming for you soon#okay maybe not soon but sometime#all my free time has been eaten up#i signed up for extra saturday morning classes and not having a lie in is sucking the life out of me lmao#when i'm busy i just wanna play video games and when i get the chance#to play games i just wanna sleep#its a vicious cycle#i'm currently playing resident evil biohazard tho#enjoying it very very much#i've only got 2 and 3 left to play and i've played every mainstream re game 💪💪#it was a very fun journey! i played them all within this year#long post
1K notes
·
View notes
Text
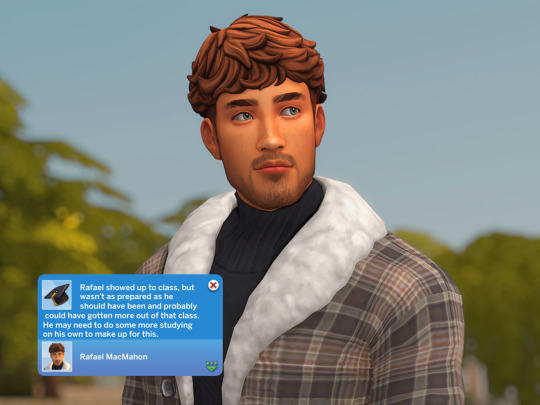
CALLING ALL YTTD FANS: i challenge you to color this in your style!

its only april, but the heat made me feel like its july 🔥🔆
since the 20th is my birthday, i wanted to do something special!
i LOVE art collabs so, try coloring my lineart in your own style!
i dont want to make a whole contest, so there are no rules or deadline or anything. you are free to recolor and lightly edit (transparency, layer modes etc) the lineart as well. if you want you can even print it out and color it traditionally!
i feel like the yttd fanbase on tumblr has a lot of talent, and of course we love to see it, so when youre done with your piece just tag me in your post ^_^ and id like it if you reblog this post too, so more people can see it!
you can also tag it as #BobsYTTSColoringBook (i couldnt come up with a better name)
⚠ as always, as tumblr kills the quality, please download the lineart from this imgur link !!! there are multiple versions to choose from (including versions without a background if its too complex) ⚠
alternatively, you can download the .sai or .psd file ^_^
HAVE FUN
#yttd#your turn to die#ytts#your time to shine#sara chidouin#nao egokoro#kazumi mishima#kai satou#touko rikuno#jin mutou#fart tag#<- kinda...?#art challenge#BobsYTTSColoringBook
62 notes
·
View notes
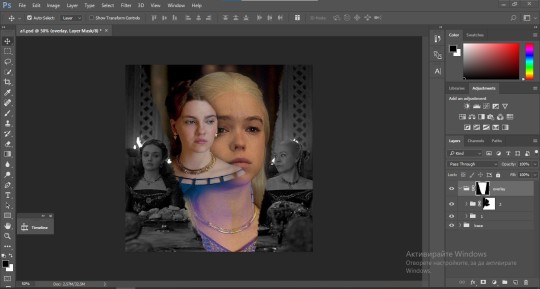
Note
could you please do a tutorial of your game of thrones 'so much for stardust' gifs where it has the ripped paper textures? it's so pretty, and i'd like to learn how to do one with just the texture in the middle and two gifs on either side, like half and half and just having a rip in the middle. it's so cool how you did a gif in the middle though so i wanted to ask as well! all of them are so cool looking. you are extremely talented. if you don't want to though i understand :) thank you
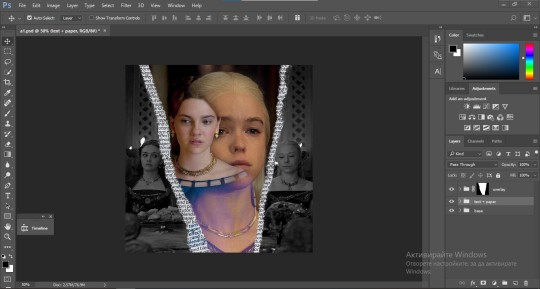
TORN PAPER EFFECT + BLENDING TUTORIAL
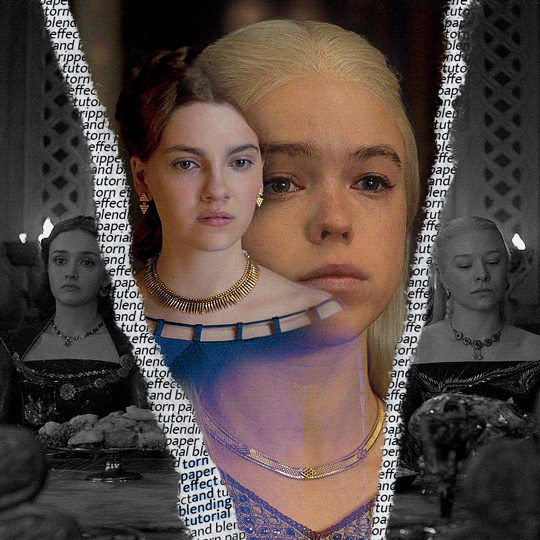
thank you so much for your sweet words, dearest anon and i'm sorry it took so long to answer but it's here now so i'll try my best to explain <3
disclamer: this is the first tutorial i ever made, it's very screenshot heavy and it assumes the basic knowledge of ps and gifmaking. if there's something you don't understand, don't hesitate to ask <3 so, let's get to it!
1. PREPARING THE BASE
As you can see in this shot there's a lot of space between Rhaenyra and Alicent and that makes it perfect for the ripped paper overlay without hiding much of the base gif. So the first thing i did was to crop it like this:
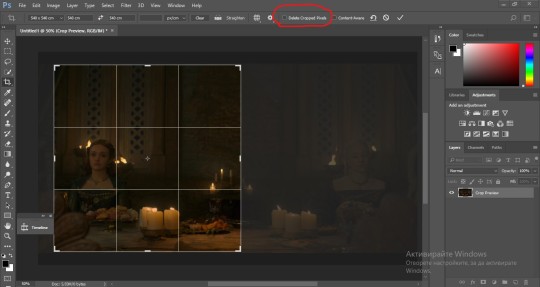
Also you want to make sure that the highlighted box (delete cropped pixels) is unchecked! After taking the usual steps for the animation (creating frames from layers, reversing the frames, setting frame delay) you continue with the video timeline and convert your frames into a smart object.
psa: if you don't have the motivation or the time to play around with coloring here are some psds i recommend: 1, 2; as for the sharpening i think this one is the best.
now that you have your smart object sharpened and colored what you want to do next is drag it to the end of the canvas and duplicate it. after that you move the copy on the other end like the original and make sure it's under the coloring layers, like this:
After that you have to create layer masks (the highlighted icon above) for both smart object and the copy and change the blending option of the copy to screen or lighten (whatever looks best!). So this is how it looks now:
pls ignore that there are no layer masks on the smart objects i just added them after changing the blending rip </3
Now, as you see both gifs are like fighting eachother for their rightful place on the canvas. (fgfgfdf) To fix that you have to use a soft round brush to delete the parts you don't want. (feel free to play around with the brush however you want to get the result you want!) Here's my result:
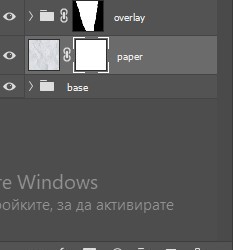
2. THE OVERLAY
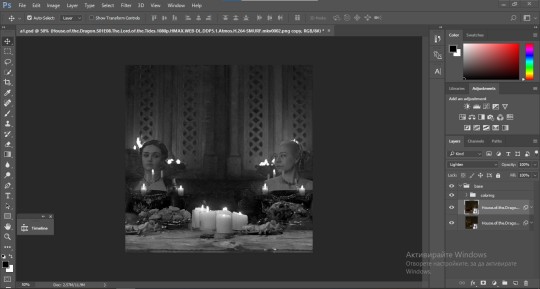
Now for the both gifs you want to use for the ripped paper effect you pretty much apply the same steps as the ones you did with the gifs for the base. Here are the two gifs i chose:

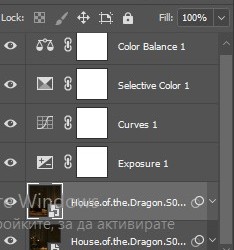
Before blending both gifs however you want to create a clipping mask for each of the smart objects coloring layers, like this:
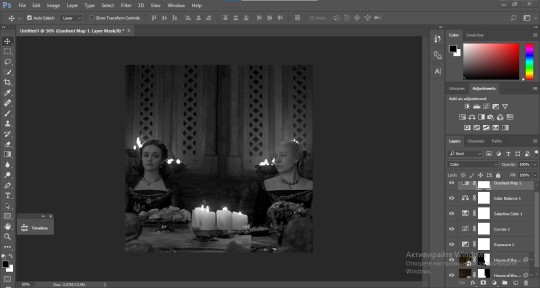
And now you're ready to blend both gifs together! You choose the group with one of the gifs and change the blending again to screen or lighten and place the said group on top of the other. So this is how it looks now:
optional: if you feel like the base gif doesn't pop out enough you can always add a gradient map on one of both gifs and play around with the opacity and the color you think fits best.
Then you add a layer mask on the overlay gif group and again play around with the brush to delete what you don't want. So this is the final result:
ps - don't repeat my mistake by placing the group with the layer mask under the other group. it should be on top and the blending option should be lighten or screen.
After blending both gifs together, you're ready to place them on the base. So first thing you want to do first is place both groups of each gif in one single group together. Then you duplicate the said group in the psd of the base gif and create a layer mask. This is how it should looks:

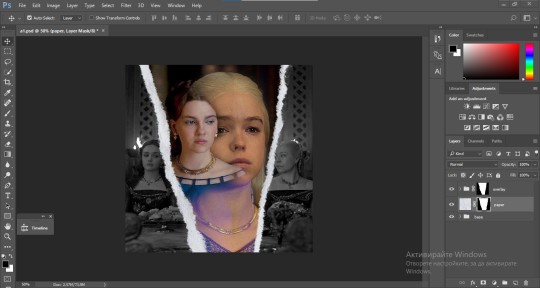
Now, in order to create the ripped paper effect, you'll have to download a ripped paper brush pack. This is the one i use. After loading the brushes in ps (if you don't know how here is explained) you're ready to begin! Change the size and angle however you'd like to make it look how you want. And if you want you can move the overlay gif by choosing both groups in case you aren't happy with the adjustment. This is how it looks like so far:
We're almost done! Now you have to find a paper texture, (i got mine from google) place it between both groups of your gifs and create a layer mask, like so:
What you have to do here is pretty much the same thing you did with the overlay gifs. Still, make sure there's enough space for the text you want to write in. However, if you think that the space isn't enough you can just delete a bit more of the overlay gifs. Here's mine:
3. THE TEXT
You're finally ready to type out the text you want! If you're having troubles with choosing the right font and size, here are my text settings:
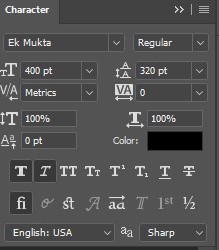
You can always play around with the angle and if your text is too small, zoom in so you can place it just how you like it. And since i'm a bit lazy to deal with it later, i choose to add the highlight color while it's still zoomed. You just have to add an layer above the text and use a soft round brush with opacity from 70-75% and flow from 15-18%.
For the repeated text you want to make sure you create a big space for writing so it can contain the whole space of the torn paper. Also, write where the text will be seen only and use the tab button to skip the space where the gif is. This is how it looks:
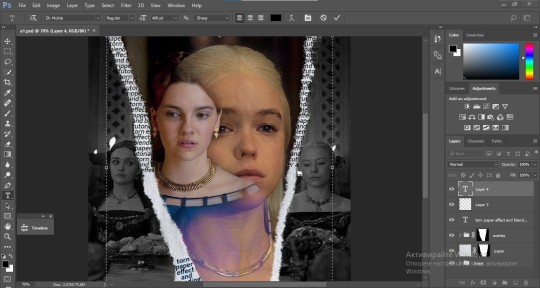
Once you're done with writing the repeated text, you want to select all the character layers and the highlight layer and move them under the overlay gif and on top of the paper, like this:
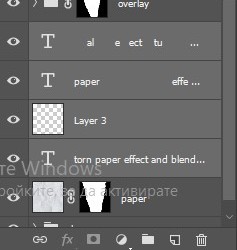
With the layers still selected and in order to contain the text within the paper the last thing you want to do is create a clipping mask. And that's It. You're done! This is the final result:
#allresources#dailyresources#usergif#chaoticresources#gifmakerresource#hisources#onlyresources#alielook#usermaguire#userrobin#usernik#userpat#userbells#gif tutorial#ps help
62 notes
·
View notes
Text

A while ago I'd been trying to find gif overlays to use, then I thought "Why don't I just make some..?" So, here they are.
Included are 11 textures. I've included the PSDs as well as the textures in gif form and alternate black&white gifs.
Please like/reblog if using. You can make any changes you want and use however/wherever you would like, but Do Not repost or claim as your own!
Download: {Dropbox}
Also check out my PSDs!
Textures used on preview gif: Gentle Water & Clouds
153 notes
·
View notes
Text
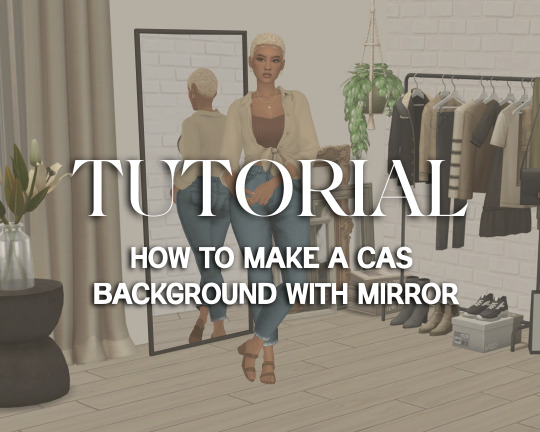
Tutorial: How to Make a CAS Background With Functional Mirror
Overview
This is something that has been highly requested so I hope this tutorial will be helpful for the sims 4 cc community!
This tutorial will have 2 parts for creating 2 different types of CAS "room" backgrounds. Part 1 (The Easy Way) uses a template I created for you to use your own 2D images/screenshots with a simple rectangular mirror. Part 2 (The 3D Room) will result in a better quality background, but it’s not a beginner friendly project so I don’t recommend trying it if you’ve never made any cc before. I will not cover the basics of cc making here, only what’s relevant to making a CAS bg using my template specifically. The Sims 4 Studio forum has a ton of great tutorials for everything else.
In my own research & experimentation, I noticed that (as far as I can tell) EVERY other CAS room with a functional mirror seems to be derived originally from LittleDica's CAS room [link] I want to acknowledge credit to LittleDica for their CAS background which I studied as a reference. But to be clear this tutorial and my templates are NOT derived from another creators' work; I created mine from scratch and it took a lot of time and effort. My version is much more simple and more compatible with Sims 4 Studio because there are no extra mesh groups or diffuse maps. I also made a great effort to make the reflection in the mirror more realistic for the size of the room. I hope you will be able to use this resource to create your own beautiful CAS backgrounds! ♥
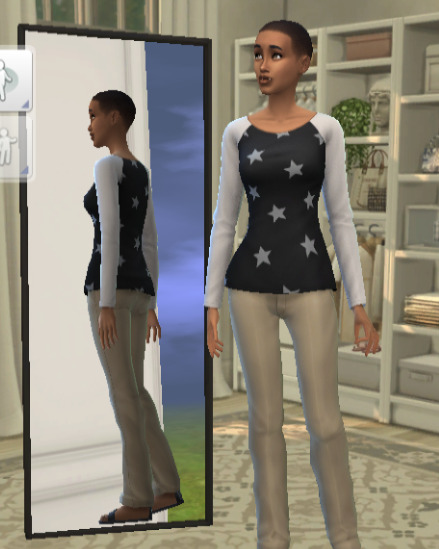
Also in case you missed it, you can download my CAS background used in the preview [here] (it is slightly different from the template package.)
Requirements:
Sims 4 studio
Image editor (Ideally photoshop)
my templates (attached below)
—————
Part 01: The Easy Way
The easiest way to create a CAS background with mirror is to use my attached templates.
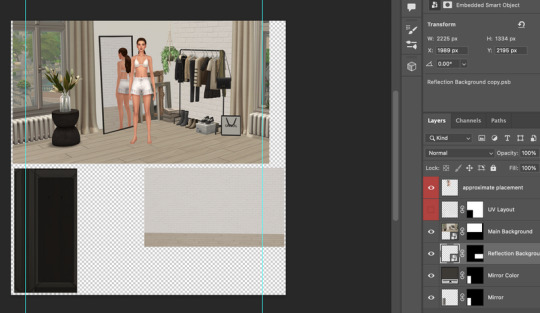
The PSD template is the best option, but for those of you that don’t have Photoshop, there is a PNG version as well.
You will need 2 images; one for the main background, and one that will be reflected in the mirror. The large top area is the main background, and the smaller rectangle at the bottom is what will be reflected in the mirror behind your sim.
In the image editor, paste your images and resize them to fit into the outlined areas.
For framing your screenshots, it’s important to understand that the mirror is actually just floating in space in front of a flat background. That means you’ll have to fake the perspective a bit and that may require some trial and error to get right. I recommend taking multiple screenshots at a variety of angles so you have options to work with. Use the model sim as a guide to help you with placing your background image. (Don’t forget to hide the model sim and UV layout when you’re done!)
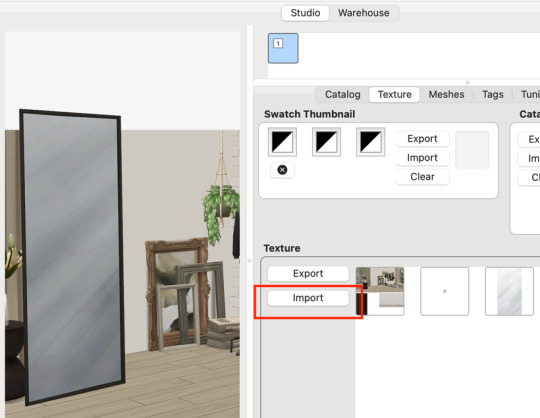
Save as .PNG or .DDS and import it into the template package in Sims 4 Studio.
That’s it! My goal was to make it super easy for you. Remember to only use one CAS background in your mods folder at a time since it's an override. Also note that it is not compatible with 'cas blob remover' since the instance for the dropshadow is now used as the mirror.
TOU — PLEASE READ:
I give permission to the Sims community to use my template files and modify them as needed to create your own CAS backgrounds. This took months of work, researching and experimenting, so please respect the effort I put into creating this resource by agreeing to these simple terms:
Don’t re-upload my files.
Don’t claim my work as your own.
If you use my templates for your cc, please share credit with my username (Lijoue) and link to my Patreon page.
If you make any money from cc created with my templates, please consider making a donation via my Patreon. It is greatly appreciated.
download template files here
Part 02: The 3D Room
to be continued…
This part will take more time to finish because there’s a lot more steps involved in creating a 3D CAS room. In the meantime, the template should be enough of a starting point for those of you that already know how to make cc objects, since I already handled the hardest parts. Just understand that the mirror reflection is not automatically calculated, meaning that if you move the mirror in the mesh, you will need to change the Mirror Plane Normal and Mirror Plane Offset in S4Studio Warehouse to match the new angle or position. Otherwise it may look unrealistic or worse, it could reflect the eerie wasteland world that the CAS room is set in. (pictured below)
#sims 4 creator#sims 4 tutorial#the sims cc#ts4 maxis cc#maxis match cc#sims 4 maxis match#ts4 tutorial#sims 4 studio#ts4 custom content#ts4 cc#cas backgrounds#sims 4 cas
102 notes
·
View notes
Text
Roman’s Cousin.
gif creds: @bloodycowboyclub

summary:You’re Roman Reign’s right hand woman,helping him with everything in his life. But his cousin,Jey,caught your attention a little too much..
jey uso x black reader
wordcount:1,416
“Well well well..look who’s all alone here” you heard a familiar voice behind you,turning around to see Jey. You two had a few on screen moments were you almost got caught up but masked it. You were Roman’s right hand woman and with the bloodline falling apart,you couldn’t betray him. You were also a wrestler and have won so many matches,even beating Rhea Ripley. “Hi Jey..nice to see you I guess” you spoke with a smug smile on your face,knowing you just wanted him to knock the Mario coins out of you right then and there. “Mm guess I can say the same ma,where’s your ‘tribal chief’” he responded using quotations around the words tribal chief. “He’s busy handling your brother with Paul right now. Though it’s none of your business on what” “mm so we can take things back to my dressing room then?” he said as he kept looking at your glossy lips,wanting to kiss you right there.
“fuck Jey..” you whimpered out as he continued to kiss your sensitive spots,with his hand up your skirt rubbing your clit. “right here baby?” “yes please fuck” you said as your eyes rolled back,orgasm approaching very quickly. There was a knock on the door causing you both to freeze up instantly. “Yo uce! Cmon man we gotta go in 10 minutes” Jimmy spoke through the door,walking away as you both looked at each other hearing his foot steps get farther away. Jey continued his movements,pulling you into a deep sloppy kiss to prevent you from being loud. “oh my god-“ you words were cut short from your orgasm hitting you hard. It took everything in you not to let out a loud ass moan,panting trying to catch your breath. “Better get going before Roman looks for you” he said with a wink,fixing your clothes and opening his dressing room door walking out. You quickly followed behind him trying not to get caught and immediately went to Roman’s dressing room.
“(your name)! Where the hell have you been?” “I apologize my tribal chief,I was in the bathroom” you said in a calm tone,somehow convincing him. “Well how’d things go with Jimmy?” “Just fine I hope. Now come help me get my stuff to the car” you nodded at his words and began grabbing his belongings,taking them to the black car in the garage waiting for him. Once all his stuff was in the car and he left,you checked your phone seeing a text from Jey.
Jey<3 - “hey mama,you still coming by tonight”
You - “Yea give me an hour”
Once you responded you put your phone away and got in your car,driving to the hotel. You two got lucky enough to be put on the same floor so you just went straight to your room to shower and change. Once out of the shower you put on shea butter and some baby oil,along with the strawberry scented perfume he got you a while back since it’s his favorite. You slipped on a matching red lace bra and panty set,throwing on a crop top and shorts. You texted him letting him know you’ll be by soon,fixing your bun and edges before heading out the door. You walked three doors down and knocked,waiting for him to open it.
When he opened the door,he was standing there with nothing but a pair of psds on. You looked him up and down mentally cursing when you noticed his print. You two had sex before but it seemed like every time it got bigger. “You just gon stare at me?” he asked making you snap out of your thoughts,”No just let me in” you brushed past him letting yourself in. You sat on the end of the bed,looking up at him as he hovered over you. “Clothes off ma you know how this go” he said as leaned down to kiss your neck while playing with the hem of your shorts. You whined and was able to get him to move away from your neck,allowing you to remove your shirt and soon yours shorts. He stared at you in awe at the lace garments you chose to wear,since you never wore them around him. He smiled and unclipped your bra,taking your right breast in his mouth. You threw your head back,letting out soft moans at you played with his hair gently. He stood up and turned your body around putting you on all fours. You felt him rip your underwear off and before you could speak you felt his tongue going to work on your clit. “O-oh my god..” you moaned out gripping his hair as he continued to eat you out,this time using his fingers. “You always taste so good for me mama” his words making you shy and more wet than you already were.
You whined when he pulled himself away,but your whines were cut short when he pulled his boxers down and slid inside of you with ease. Your back automatically arched and you shoved your face into a pillow,moaning. "Aht aht pretty girl lift your head up." he said as he pulled your hair making you lift your head. "Fuck right there!" you yelped out,not being able to control yourself or your moans at this point. He laughed at this,running his hand down your back as he continued his movements getting deeper knowing you couldn't handle all 10. You were a stuttering mess,with each thrust you felt him in your stomach not being able to handle it all. "Cmon princess whose pussy is this hm" "Y-yours! SHIT-" you felt his finger massaging your clit. You were on cloud nine right now,eyes rolling deep into your skull letting out nothing but moans and whimpers. He loved seeing you all fucked out,it made him pleased with himself. You felt a swift smack at your ass,making your shoot your eyes open,"Eyes open for me baby." he demanded and you obeyed. He held your head up by wrapping his hand around your throat,keeping eye contact with you. "Please Please daddy I can't-" "Yes you can baby,I know you can. So just hold it for me I'm almost there" he said with a slight moan towards the end. You've never heard him moan before but god did you love it.
You were fighting back tears at this point from overstimulation,but you loved it and he knew it. “Fuck- cmon baby cum on this dick for daddy” he whispered breathily in your ear. Hearing his voice in your ear like that in the state you were in was just enough for you. You let out a scream which was half way cut off with a sloppy kiss,soon he pulled away making you whine and lay on the bed. “shit..yo you on birth control?” he asked realizing he didn’t pull out this time,which made you wanna slap the shit out of him but you were too tired to do so. “Yea I’m on it don’t worry..” you told him making him sigh in relief,as he went in the bathroom and came back with a warm towel wiping your body down which made you whine and jolt your body a bit. You turned over on your back and smiled when you saw him hovering over you leaving kisses down your body and tickling you which made you laugh. “Ok okkk I have to get back to my room Jey” “Fine ma,but call me in the morning ight?” “Ok I promise” you spoke getting up slipping your clothes back on. “Oh and wear lace more often baby,looks good on you” he said smacking your ass as he put his underwear back on along with some shorts,walking you to the door. You smiled and gave him a quick kiss before walking out the door and back to your hotel room. You decided to shower in the morning due to your tiredness.
_the next day_
You walked into Roman’s dressing room seeing The Usos,Solo,and Paul there which confused you but you could tell Roman was upset about something. You then took notice to Jey’s face of nervousness and realized. ‘Shit he found out-‘ your thoughts were cut short with Roman’s words. “My cousin huh?”
331 notes
·
View notes
Last Seen Blogs

aircooleruae
Aircooler uae
tayday-countdown-blog
#TAYDAYCOUNTDOWN
c0ffinshit
paige r.

manabu55
manabu55's tumblr.
electrivolt
Shocking