#sims 4 tutorial
Text
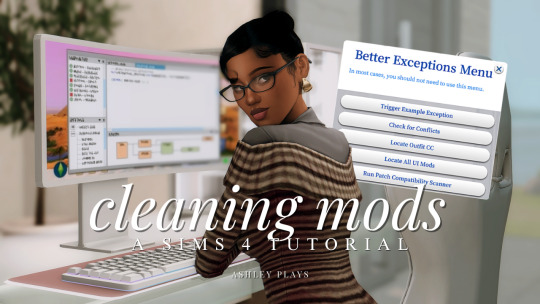
how to clean & organize your mods folder + update broken/outdated mods
by ashley plays
this video goes over the following:
how to organize your mods folder
how to update your mods folder after a patch update
how to find broken/outdated mods
how to clean out custom content & find duplicate files
↓ mods, programs & helpful websites mentioned below
mods:
better exceptions
mc command center
programs:
sims 4 tray importer
sims 4 mod manager
helpful websites:
sims 4 news & updates
scarlet's realm: the mod list
bienchen's mods
littlemssam's mods
kiarasims4mods's spreadsheet
mizoreyukii's spreadsheet
699 notes
·
View notes
Text
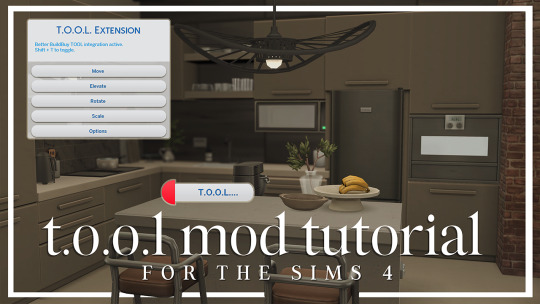
T.O.O.L Mod + Better Build/Buy Tutorial
by LargeTayterTots
download links
better build/buy mod by twistedmexi
t.o.ol. mod by twistedmexi
7zip file extractor
andrew's pose player
teleport any sim mod

youtube / tiktok / twitch / patreon / gallery id: largetaytertots
226 notes
·
View notes
Text
How To: Auto Height for Shoes
Haiii! As promised, here is the tutorial to make it so your custom shoes no longer require a shoe slider!
Thank you to the bestie who took the time to pick through Madlen's package file to figure out how it worked. And of course, thank you to Madlen who did the majority of the work figuring out how to make this possible in the first place!
♥ Tut below cut ♥
~~~
Set Up Your Blend File:
We're going to add a plane that will act as the mesh for the SlotRay which will allow for you to adjust the height of your shoes!
Open your blend file that contains the shoes your wish to adjust.
In the 3D View, press Shift + S and in the menu, select “Cursor to Center” In the 3D View, press Shift + A and in the menu, hover over “Mesh” then add a plane.
Now size this plane down as small as you can get it. You don’t want this plane visible in game.
Double check to make sure the plane has not moved from the center!! Your sim won't be centered in game if it has! If you see that it's moved:
Press "Shift + S" and click "Cursor to Center".
Then Select your plane and press "Ctrl + Shift + Alt + C", click "Origin to 3D Cursor".
Press "Ctrl + Shift + Alt + C" again and click "Geometry to Origin".
Navigate to the “Object data” tab and under “UV Maps” add a new one then name it “uv_0”.
Next, navigate to the “Scene” tab and under “S4Studio CAS Tools” set the cut number.
Depending on how many cuts your shoes have, you’ll want to adjust this number. For example, if your shoe has 3 cuts (0000, 0001, 0002) then this plane would have a cut number of 0003.
Since my boots only have one cut, I will put the number as 0001.
Now select your shoes and enter Edit mode. Select a face/vertice/edge on the very bottom of your shoes. Look to the panel on the left side of the screen (if it’s not open, press “N”). Under “Transform”, note down the number next to “Z”
After that, save your blend file under another name so you can distinguish which is which. I’ll name mine “Boots_3_Height Cut”
youtube
~~~
Add a New Cut to your Package File:
We're going to add an additional cut in your package file for the new plane!
Open Sims 4 Studio, make a new package file for your shoes and import them.
Go to the Warehouse tab and select your LOD 0, it will be the geometry with the largest file size. Sometimes you have to close then reopen the package to see the geometry.
Duplicate this geometry and in the box that pops up, change the last character of the “Group”. It can be any number or letter as long as it’s not the same as the duplicated geometry. On the duplicated geometry, note down the Group, Instance & Type values.
Find the “Region Map” and next to “Entries” click “Edit Items”. Add a new entry and in the “Layer” box, type the number you used for your cut. Since I used the cut number 0001, I will type 1.
Keep the “Region Type” as “Base” and move to “Models” then click “Edit Items”. Add a new Model entry and paste the Group, Instance & Type values you noted down before. Save and close each box.
Find your “CAS Part”, this is your swatch.
If you have additional swatches, it is a good idea to remove them and add them back once you are finished with this process.
Scroll down until you find the “Lods”.
Click “Level: 0” and next to "LOD Models", click “Edit Items”. Add a new entry and paste the Group, Instance & Type values again.
Save & close each window and return to the Warehouse.
youtube
~~~
Adjusting SlotRays:
We are now going to edit the SlotRays for the new cut which will adjust the height of the sim for your shoes!
Return to the new duplicated Geometry and in the “Data” tab, find the “SlotRay Intersections” and click “Edit Items”. Add a new entry and find the “OffsetFromIntersectionsOs” box.
You'll want to change ONLY the middle coordinate number. That will be the height of the sim.
You want to take the “Z” coordinate that you noted down from blender and replace middle coordinate number. If the number you wrote down is negative (i.e -0.01234) make it positive (i.e 0.01234).
In the “SlotHash” box, change the value from “00000000” to “FEAE6981”. This is the hash for the b__ROOT__ bone in the Sim's Rig.
Save and close the dialogs then return to the warehouse. Next, reimport your mesh and save your package file. You can now test your shoes in game!
youtube
Please keep in mind:
You have to do this for every LOD of your mesh
You can freely replace the mesh of your shoes and adjust the height since the cut with the plane has the SlotRay data
Animations may be off since EA hasn't made the game to support taller sims
CAS windows may move slightly if your sim is using poses/animations where they are leaning to the side. This won't affect gameplay
I recommend using Helgatisha's Stand Still in CAS mod to make sure your sim is absolutely centered
Hope this helped :)
1K notes
·
View notes
Text
mutt's guide to using dsr on ts4, with pictures!!!
ok so, dsr is a thing available for nvidia gpus that allows you to take veeery high resolution screenshots of games without much trouble, like this
it's an alternative to srwe, as it plays nicer with a lot of reshade shaders and is just, generally more nice to use! let me teach you how to use it - full tutorial with pictures for every step under the cut (im sorry its too long without the cut)
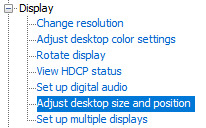
step 1: right click your desktop and open the nvidia control panel
step 2: go here (adjust desktop size and position)
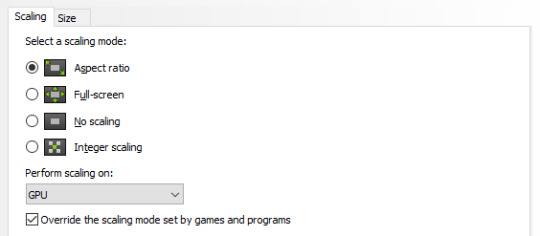
step 3: make sure your settings are set as follows! this is important
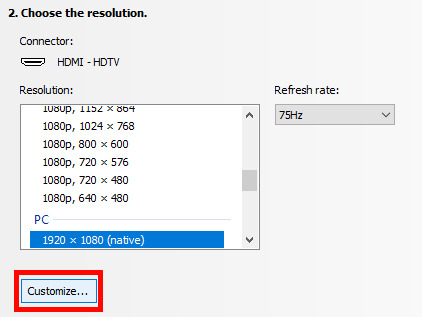
step 4: now, go here (change resolution)

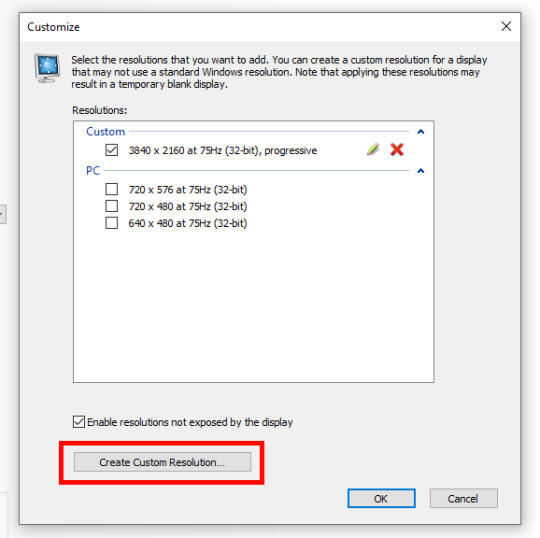
step 5: under change resolution, click on this button (highlighted with a red square)
step 6: in the windows that appears, make sure that "enable resolutions not exposed by display" is ticked! this is very important! (again, highlighted in red - it should look like this)
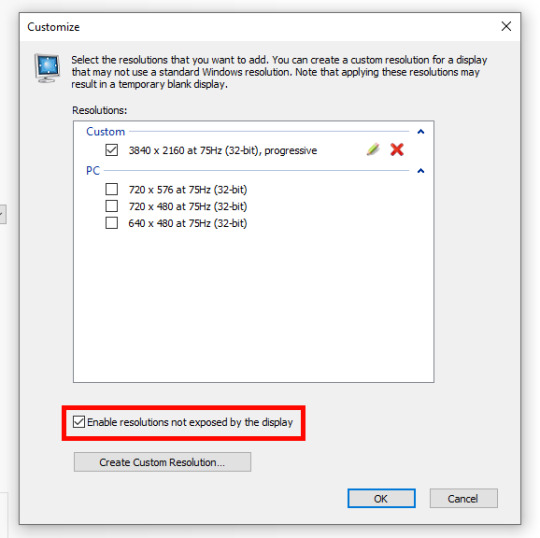
step 7: now, click on "create custom resolution"
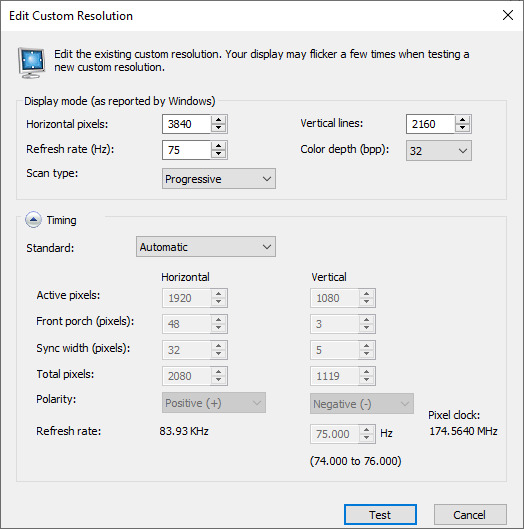
step 8: this is where you set your desired resolution, and where i get a bit rambly; so, in my opinion, there is ZERO reason to go above normal 4K for TS4, as it's generally not a really high-poly game and it has rather simple graphics. you can fuck around a lot here, but if you don't feel like it, here are my settings - this will give you 4K screenshots. NOTE: THE REFRESH RATE DOESN'T NEED TO BE 75! SET IT TO WHATEVER THE REFRESH RATE OF YOUR MONITOR IS!
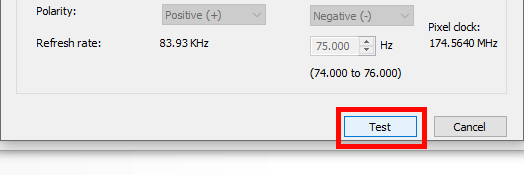
step 9: now, click on test
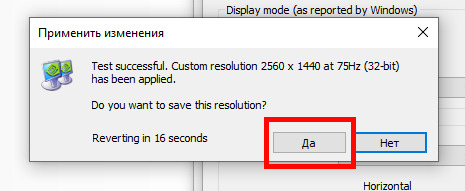
step 10: let the thing load, and after it's done, a window like this should pop up.. but yknow, in your language. click on "yes" (or accept or ok!! idk mine's in russian; basically, the button highlighted here!)
step 11: click "ok" in the window that pops up! like this! afterwards, close the nvidia panel

step 12: open the sims 4 and go into game options, then into graphics
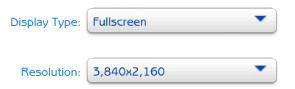
step 13: set your "display type" as "fullscreen", like this

step 14: under "resolution", select whatever resolution you setup earlier; in my case it's 4K, so if you used the same resolution, your settings should look like this
step 15: click on apply changes!
AND UR DONEE!! WAHOOIEE!! now, take your screenshot using reshade, and then go back into sims settings and set it back to what you usually play at, then apply changes!
every time you need to take an HD screenshot, simply open game settings and use your custom resolution! that's it, have fun :3
#sims 4 tutorial#ts4 tutorial#sims 4 screenshots#ts4 screenshots#sims 4 screenshot tutorial#ts4 screenshot tutorial#sims 4 hotsampling#ts4 hotsampling#srwe#nvidia#dsr#tutorials
604 notes
·
View notes
Text
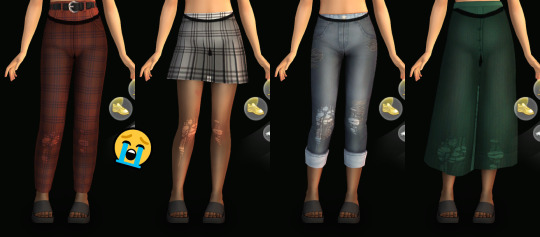
mini-tutorial: fixing pants/stockings texture overlapping
maybe you've had this happening as well. it's rare, but can be very annoying if it happens with pants that you really love but can't use with socks and stockings.
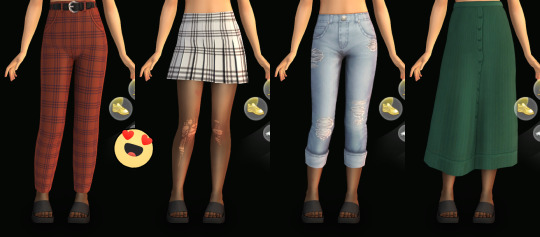
it's a very quick and easy fix. here's a simple explanation how to do it.
open pants in question in sims 4 studio
repeat exactly the same process as when you fixed pants/shirt overlapping
the only difference is sort layer numbers you'll be typing in this time. if it's anything other than 14000 (bugged bottoms most often will have 10400), make it 14000 for each CAS part.
that's it. we've fixed it :)
quick infodump in case someone's curious as to why that happens: creators often use panties as a base, because panties base is comfortable to work with. but panties have texture layer priority lower than stockings, so they go under stockings. and if a creator makes pants or skirt on that base and forgets to change the sort layer to match actual pants, they still go under stockings :)
169 notes
·
View notes
Text
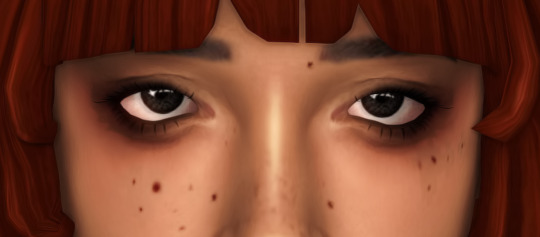
Broken Aliens Fix
Hi! This is fun, isn't it?

EA apparently decided that aliens need a new occult tag
Why? Who knows. But it broke some cc for aliens, including both versions of the ea eyelash remover, skintones, and presets.
If you want to fix those, for personal use, here's how. You'll need Sims 4 Studio https://sims4studio.com/board/6/download-sims-studio-open-version
The first thing you'll need to do is make sure the thing you want to fix is actually broken. Most cc seems to still work fine. And if you don't have Get to Work, you don't really need to care about it, unless you're making the cc yourself.
Then you'll want to make a backup of the file, in case something goes catastrophically wrong. It shouldn't, but be safe.
Then you'll need to open the package, by right-clicking it and opening it with Sims 4 Studio. Go to the warehouse tab at the top, if there's more than one.

Find CAS Part or CAS Preset on the left, and scroll down on the right to Tags, and click Edit Items... EDIT: It's under Skintone on skintones.

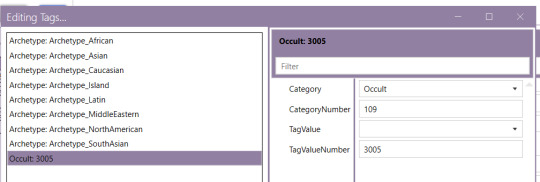
A box will open that looks something like this

Click Add, then for Category pick Occult (you can start typing until it turns to Occult), for CategoryNumber type in 109, and for TagValue Number, type in 3005. Leave TagValue at None. Then click save. The box will close. Do this for every CAS Part/CAS Preset.
Once you do them all, click save on the bottom right corner of the main window and close Sims 4 Studio.

Then put the file in your game and see if it worked. This is with Cienz Roza's version of no ea eyelashes and an EVOXYR ear preset fixed. I chose them because they don't seem to be around to fix their own cc.

Hopefully soon there will be a batch fix from Sims 4 Studio, but for now, if you have something you desperately need to use, hopefully you can.
Update: Batch fix is out. Update or download sims 4 studio to get it
273 notes
·
View notes
Text
youtube
▶ POSE CREATION WORKSHOP VOD
Everything I know about creating poses starting with the default rig from S4S and ending on a detailed overview of @vyxated's most excellent Rig Helper.
originally streamed on 11/09/23 on twitch
202 notes
·
View notes
Text
Some tricks to paint your animals in CAS
I won't make a tutorial because I wouldn't know where to start and honestly, it's mostly through practice that you'll improve yourself at painting. But here are a few tricks that might help you.
1. Enter the cheat code "cas. clockspeed 2" to almost pause the time in CAS. When the animal is breathing too fast it really makes it more difficult to paint details.
2. When you want to paint small details on your pet's face, click on "edit details", then double click anywhere else to exit the details painting mode without zooming out. You'll have a closer look of what you're doing.
3. Be aware that you can have a much darker black paint by pulling down the slider lower than it is set.

4. Use pictures as references. Can sound silly, but it isn't just for inspiration, it will really help you to see better where you are supposed to paint the lights. Aaand they are really important since they will give much more landforms, and therefore, realism to your animals.
5. Paint the eyelids and the nose of your pets. Trust me, they will look much more expressive and realistic.
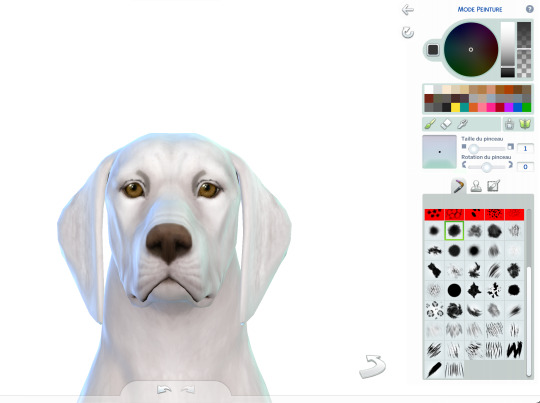
6. You can paint thinner traits with a simple technique.
First, you make the trait you want using the colour you want, usually darker than your pet's colour.
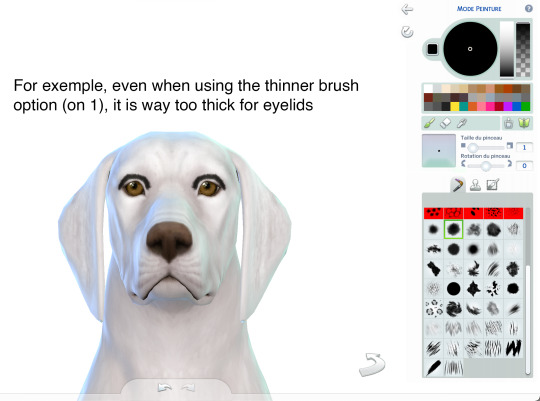
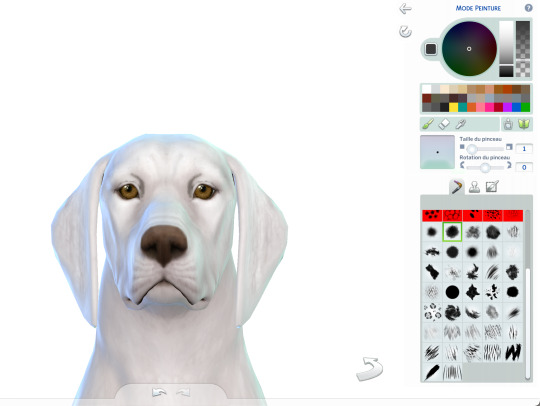
Once you've done your trait the way you want it, select the pet's base colour (white in this exemple) and draw an other trait just next to the first one. It has to be very close to erase some of it but not all.

Same here:
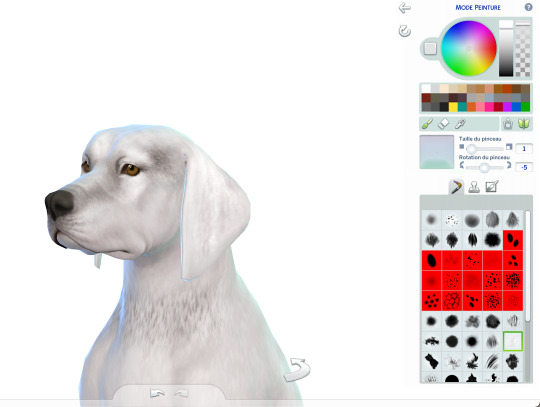
7. Make a hairy effect using the fur brushes. Use different ones, set them to to smallest option on the face and more or less bigger on the body, depending on the hair length.
Also, you can start with a dark colour and draw lighter above.
Pay attention of the orientation of your brushes; respect the hair's direction.
8. Don't hesitate to mess around with different colours and opacity.
9. Use fur brushes with a darker colour to give some shadows and landforms to your animals.
That's it, I'll update this post if I can think of anything else.
I hope some of you will find it useful.
Have fun ! ᵔᴥᵔ
#sims 4#ts4#s4#sims 4 pets#sims 4 cc finds#sims 4 cats and dogs#sims 4 dog#sims 4 tutorial#sims 4 tricks#sims 4 painting tricks#sims 4 help#sims 4 realistic pets
286 notes
·
View notes
Text
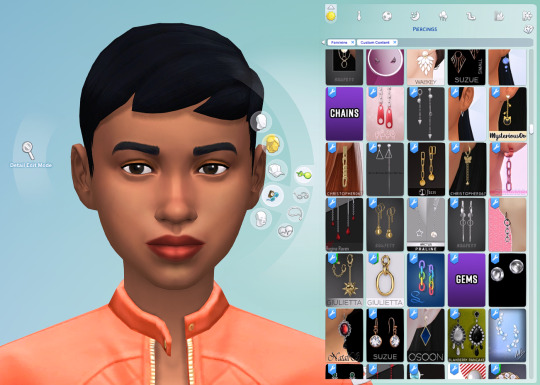
How to create visual "custom categories" with the new Sims 4 Studio Batch-Edit
As discovered by @vyxated Sims 4 Studio now supports batch-changing the Display Index number which allows you to easily sort your CC (see post here)
Using that, you can create visual "custom categories" for any existing category to sort your CC into smaller groups that share a thematic.
━━━━━━ ・❪ ☾ ❫ ・ ━━━━━━
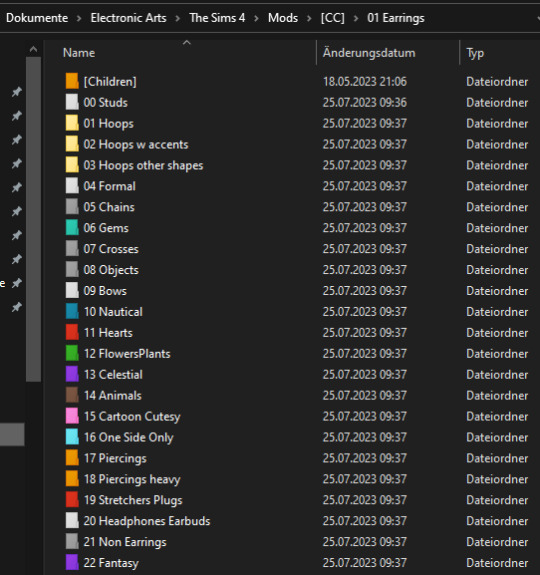
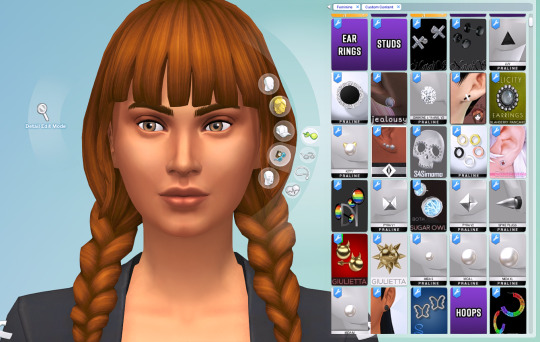
Step 1: Creating folders
First you need to sort your CC into whatever categories you want.
I am sorting my earrings.
( I use Folder Painter to get colored folders)
━━━━━━ ・❪ ☾ ❫ ・ ━━━━━━
Step 2 (Optional): Creating dividers
I highly recommend you to make some sort of divider for your categories (basically like my TidyCAS).
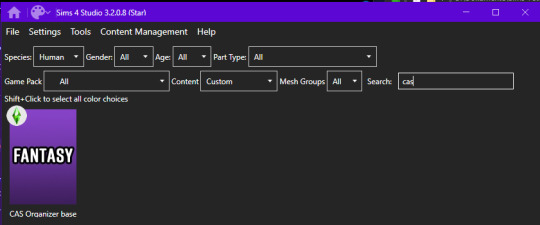
For that, in S4Studio start out by cloning any basegame CAS item.
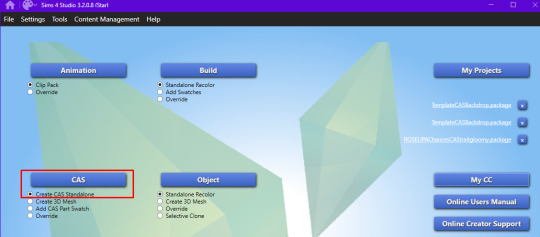
I usually always use the sunscreen facepaint, but it doesn't really matter, you shouldnt use smth with a mesh.
Or you can download this file and place it in Documents\Sims 4 Studio\Mods.
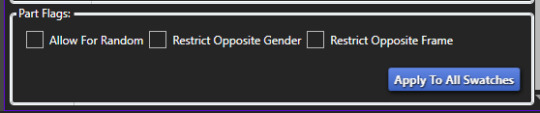
It has no texture, is enabled for a lot of things and disabled for random.
IMPORTANT: For every new divider you want to create, you have to clone the CAS item from S4Studio again. You cannot simply duplicate your divider CC and simply change it.
Save it as the number and name of your category. For me it would start with "00 Studs".
In that file, first import any type of custom thumbnail you want to use to display the category name.
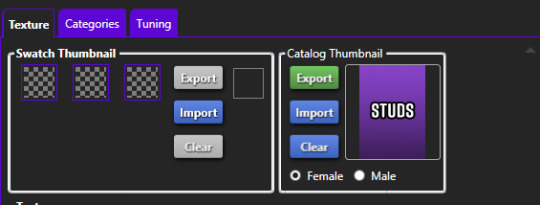
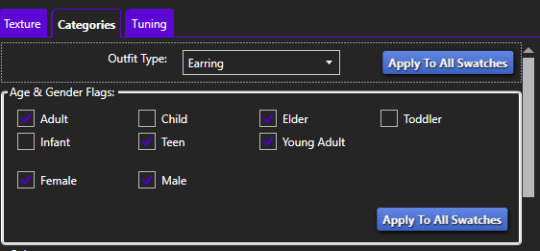
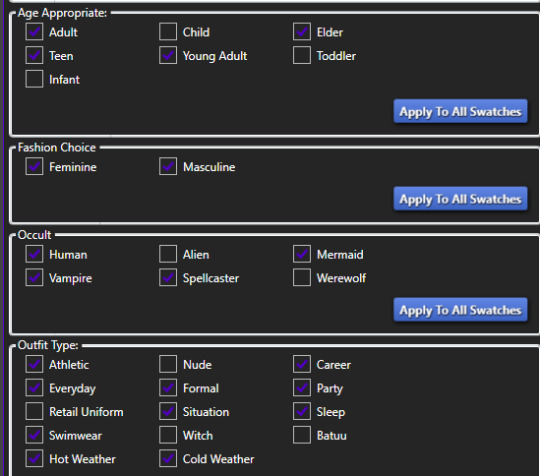
Then, change the category to whatever category you are working on and enable it for all ages, genders, fashion choices & outfit types you want and disable it for random.
Now if you want, import an empty texture to get rid off the sunscreen, but since you won't apply that CC, it won't matter.
Download the empty texture here
Make sure to place the dividers OUTSIDE your sorted folders.
━━━━━━ ・❪ ☾ ❫ ・ ━━━━━━
Step 3: Batch processing in S4Studio
Now you want to batch process your folders in S4Studio.
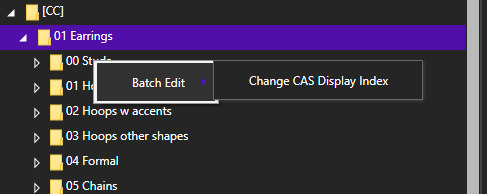
First click on "My CC" and let it load.

Now right click your first folder and select "Batch Edit - Change CAS Display Index"
In the next window, press "Run".
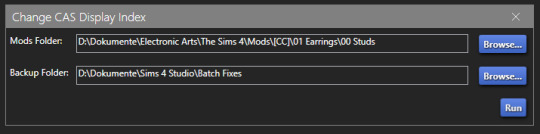
Then, enter whatever number you want to start with.
The smaller the number, the higher up the content is. You can go into negatives and the limit is a veeeeeeeeeery high number.
If you just want to sort some normal CC, I recommend starting with 0 simply.
For the next folder I then always go up by 10, so 0-10-20-30-etc.

Then press "OK".
You will then get a popup with all your changed files (I sorted mine before so it's non lol)
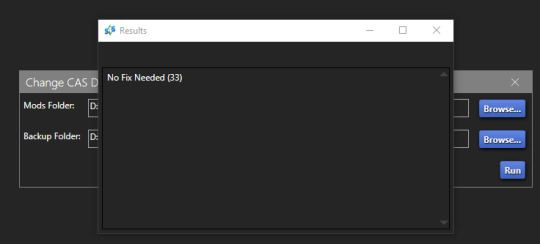
Note: Keep in mind that it does not sort your CC alphabetically.
Apparently it's by last modified date.
━━━━━━ ・❪ ☾ ❫ ・ ━━━━━━
If you have done step 2:
Step 4: Sorting your dividers
Lastly you want to make sure that your dividers show up at the beginning of the custom categories.
Open up your divider in S4Studio again if you closed it.
Click on "Warehouse", select the "CAS Part" and on the right in the "Filter" field search for "display".
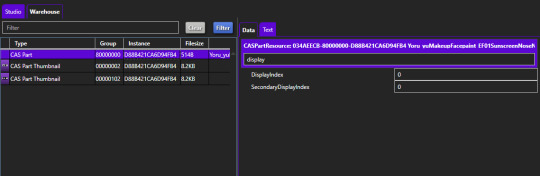
Under "DisplayIndex" you now want to input a number that's before your category.
My category starts at 0, so I will change it to -1.
If the category starts with 10, I input 9 and so on.
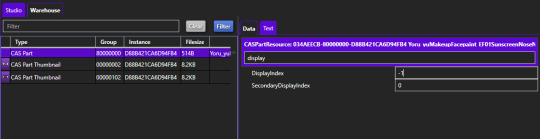
"SecondaryDisplayIndex" is swatch order, so it doesn't matter here.
Then just save it.
━━━━━━ ・❪ ☾ ❫ ・ ━━━━━━
And that's it!
@thefoxburyinstitute
#ts4 tutorial#ts4 resources#tutorial#sims 4 studio#sims 4 tutorial#s4 guide#ts4 guide#sims 4 cas#sims 4 organazation#ts4 cas#yorututorials
323 notes
·
View notes
Text
youtube
How To Create A Realistic Sims 4 Save File (Step-by-Step Tutorial + Tips) | The Sims 4
In this video, I demonstrate how I create my realistic and detailed save files, starting with the charming town of Henford on Bagley.
#bougiechloe#bougie chloe#bougiechloe cc#bougie chloe builds#sims 4 gameplay#the sims community#sims 4 save file#sims 4 saves#the sims 4#ts4#ts4 simblr#my sims#Youtube#sims 4 screenshots#sims 4 cc#sims 4 custom content#simblr#the sims 4 tutorial#ts4 tutorial#sims 4 tutorial#sims 4#the sims#the sims 4 cc#henford on bagley#cottagecore#cottage aesthetic#simblog#ts4 simbrl#show your sims#ts4 save file
62 notes
·
View notes
Text
Tutorial: How to Make a CAS Background With Functional Mirror
Overview
This is something that has been highly requested so I hope this tutorial will be helpful for the sims 4 cc community!
This tutorial will have 2 parts for creating 2 different types of CAS "room" backgrounds. Part 1 (The Easy Way) uses a template I created for you to use your own 2D images/screenshots with a simple rectangular mirror. Part 2 (The 3D Room) will result in a better quality background, but it’s not a beginner friendly project so I don’t recommend trying it if you’ve never made any cc before. I will not cover the basics of cc making here, only what’s relevant to making a CAS bg using my template specifically. The Sims 4 Studio forum has a ton of great tutorials for everything else.
In my own research & experimentation, I noticed that (as far as I can tell) EVERY other CAS room with a functional mirror seems to be derived originally from LittleDica's CAS room [link] I want to acknowledge credit to LittleDica for their CAS background which I studied as a reference. But to be clear this tutorial and my templates are NOT derived from another creators' work; I created mine from scratch and it took a lot of time and effort. My version is much more simple and more compatible with Sims 4 Studio because there are no extra mesh groups or diffuse maps. I also made a great effort to make the reflection in the mirror more realistic for the size of the room. I hope you will be able to use this resource to create your own beautiful CAS backgrounds! ♥
Also in case you missed it, you can download my CAS background used in the preview [here] (it is slightly different from the template package.)
Requirements:
Sims 4 studio
Image editor (Ideally photoshop)
my templates (attached below)
—————
Part 01: The Easy Way
The easiest way to create a CAS background with mirror is to use my attached templates.
The PSD template is the best option, but for those of you that don’t have Photoshop, there is a PNG version as well.
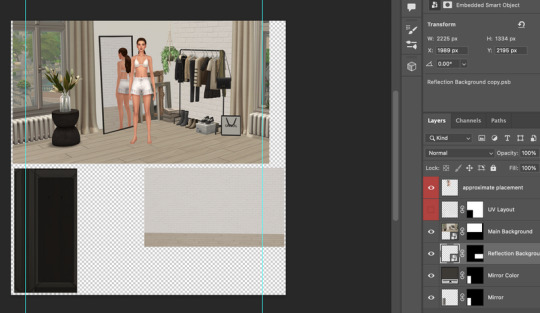
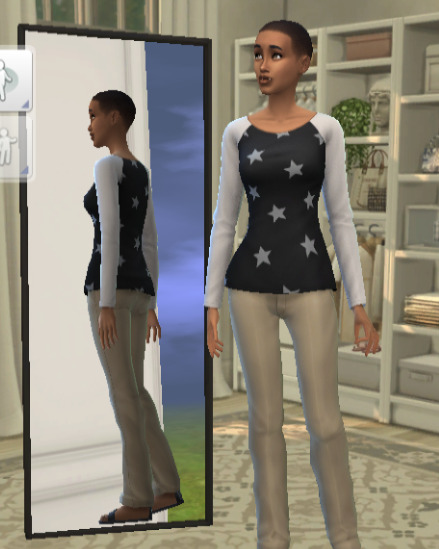
You will need 2 images; one for the main background, and one that will be reflected in the mirror. The large top area is the main background, and the smaller rectangle at the bottom is what will be reflected in the mirror behind your sim.
In the image editor, paste your images and resize them to fit into the outlined areas.
For framing your screenshots, it’s important to understand that the mirror is actually just floating in space in front of a flat background. That means you’ll have to fake the perspective a bit and that may require some trial and error to get right. I recommend taking multiple screenshots at a variety of angles so you have options to work with. Use the model sim as a guide to help you with placing your background image. (Don’t forget to hide the model sim and UV layout when you’re done!)
Save as .PNG or .DDS and import it into the template package in Sims 4 Studio.
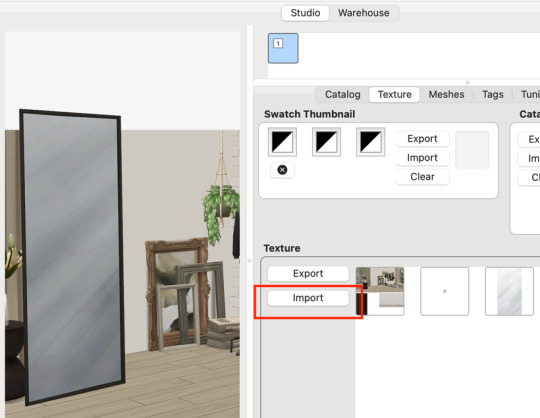
That’s it! My goal was to make it super easy for you. Remember to only use one CAS background in your mods folder at a time since it's an override. Also note that it is not compatible with 'cas blob remover' since the instance for the dropshadow is now used as the mirror.
TOU — PLEASE READ:
I give permission to the Sims community to use my template files and modify them as needed to create your own CAS backgrounds. This took months of work, researching and experimenting, so please respect the effort I put into creating this resource by agreeing to these simple terms:
Don’t re-upload my files.
Don’t claim my work as your own.
If you use my templates for your cc, please share credit with my username (Lijoue) and link to my Patreon page.
If you make any money from cc created with my templates, please consider making a donation via my Patreon. It is greatly appreciated.
download template files here
Part 02: The 3D Room
to be continued…
This part will take more time to finish because there’s a lot more steps involved in creating a 3D CAS room. In the meantime, the template should be enough of a starting point for those of you that already know how to make cc objects, since I already handled the hardest parts. Just understand that the mirror reflection is not automatically calculated, meaning that if you move the mirror in the mesh, you will need to change the Mirror Plane Normal and Mirror Plane Offset in S4Studio Warehouse to match the new angle or position. Otherwise it may look unrealistic or worse, it could reflect the eerie wasteland world that the CAS room is set in. (pictured below)
#sims 4 creator#sims 4 tutorial#the sims cc#ts4 maxis cc#maxis match cc#sims 4 maxis match#ts4 tutorial#sims 4 studio#ts4 custom content#ts4 cc#cas backgrounds#sims 4 cas
103 notes
·
View notes
Text
mods aesthetic para mejorar los sims 4 | aesthetic mods for the sims 4
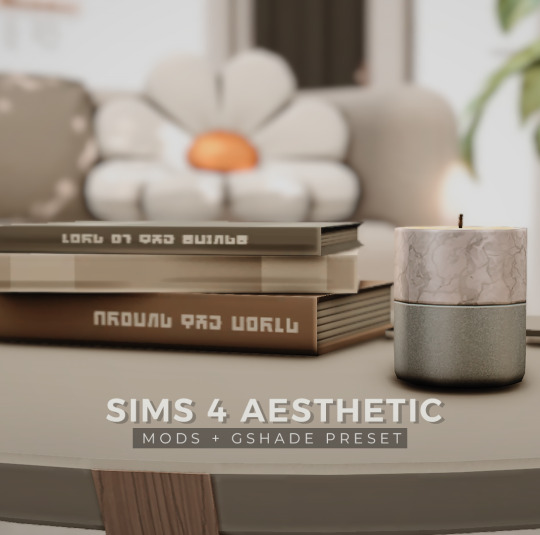
mostraré una guía de como hacer los sims 4 aesthetic, además les compartiré mi gshade preset + cas background.
· ver tutorial + preset download
#the sims 4#los sims 4#sims 4#the sims#sims#ts4#ts4 cc#simmer#simblr#ts4cc#tianaberrie#sims 4 aesthetic#sims 4 mods#sims 4 tutorial#sims 4 guide#mods sims 4#the sims 4 aesthetic#ts4 aesthetic#aesthetic sims#aesthetic#cottagecore#cottage aesthetic#aesthetic mods#gshade preset#reshade preset#sims 4 preset#top mods sims 4#ts4 mods
68 notes
·
View notes
Text

The making of of the loading screen for the therapy game 🎮
Pics above and below edited by imagechef

Draft from photo studio
And the screenshot edited with incollage

#incollage#photo studio#imagechef#therapy game#underwater love#sims 4#simblr#ts4#sims 4 edits#windenburg#windslar#sims 4 tutorial
46 notes
·
View notes
Text
Tutorial: fixing pants/shirts texture overlapping
friend requested this but i figured someone else might find it useful :)
so you know how sometimes you put pants and shirts together and they do this godawful thing?

that's a shirt problem. it happens when the creator uses a tucked in top as a package base but makes an untucked top mesh and doesn't change this setting. when a skirt/pants and top textures overlap on a texture map, the game considers the shirt tucked in and puts the texture of the pants over it.
luckily, it's a super easy fix!
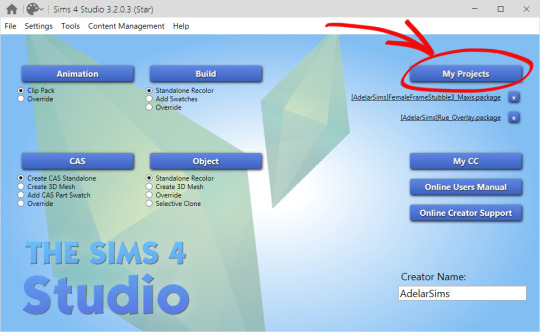
you'll need a Sims 4 Studio and a mean to locate your shirt file. open the file with Studio by clicking on "my projects".
after you open the file, switch to the warehouse tab and sort by type for your convenience, because you only need "CAS part" here. click on a CAS part and scroll the right part almost all the way down until you see sort layer.
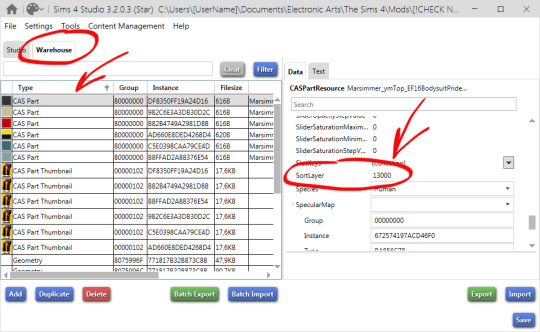
sort layer is, to put it simply, a priority of a texture. bigger number, bigger priority, texture goes above textures with lower numbers.
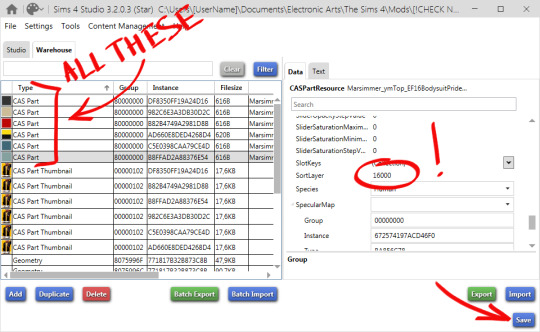
sort layer for tucked in tops is 13000. sort layer for untucked tops must be 16000. change it to 16000. do the same with each CAS part. it might be tedious if your top has a lot of swatches.
after you finish, click save.
now checking the result in the game... success!

---
UPD: You can also do the opposite, if you have a top in a form of a bodysuit and it goes over your pants, just change 16000 for 13000 to tuck it in.
609 notes
·
View notes
Text
youtube
Adjusting Rings for Kijiko Skin Detail Eyelashes
If you use a lot of skin detail eyelashes like I do, you've probably run into issues when putting rings on your sims. In this video I go through how to move the UVs so they don't conflict! You can do this with EA or CC rings, just make sure it's either for personal use or you're respecting the creator's TOU.
Have fun!
106 notes
·
View notes
Text
youtube
I made a lace tutorial for you allllll!!!!
@sifix hope this is good <3
158 notes
·
View notes
Last Seen Blogs
forgottenvalentina
Valentina Malconaire

fefairys
professional chimney rat
learnstufff
learnstuff

idek00001
Tw, Sad And Gay Shit

exclusivezoneofficial-blog
EXCLUSIVE ZONE OFFICIAL