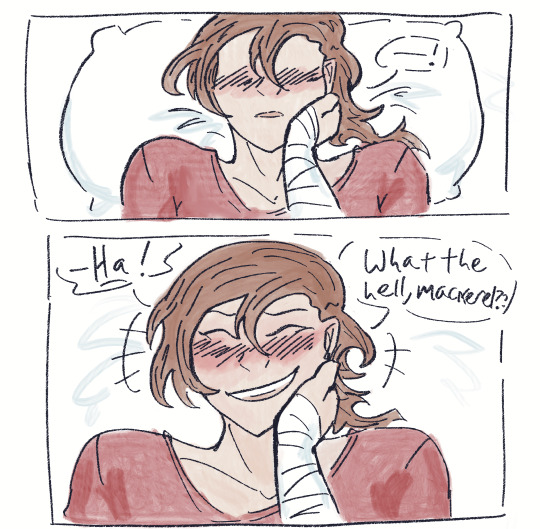
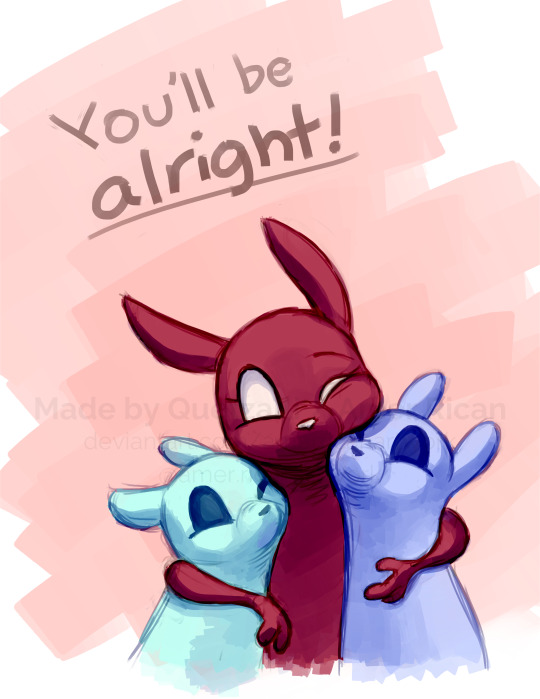
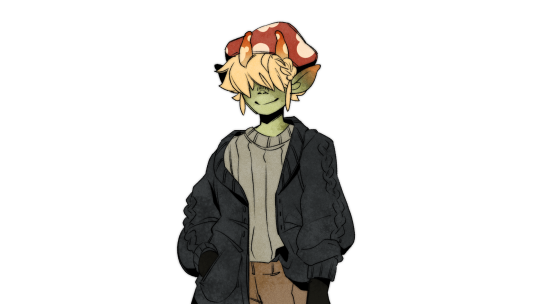
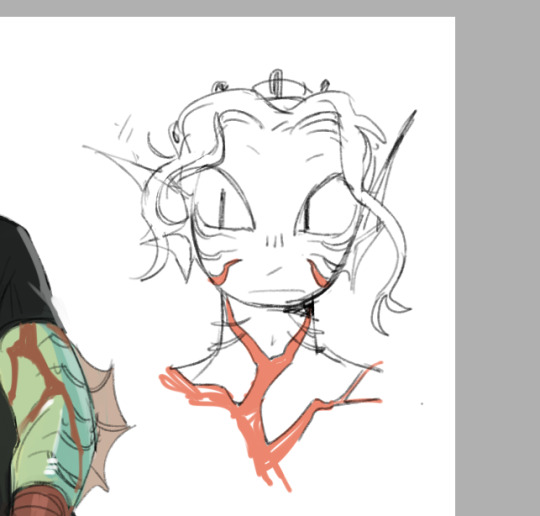
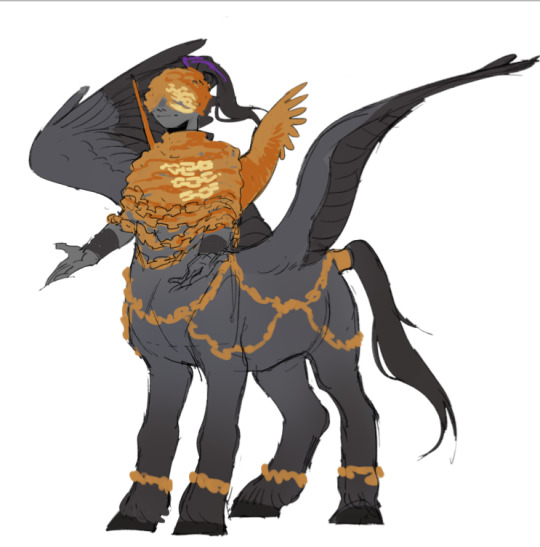
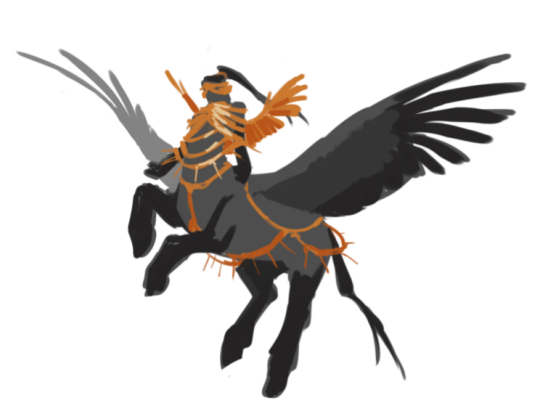
#I wanted to add color to a recent sketch;;
Note
🖍 :)
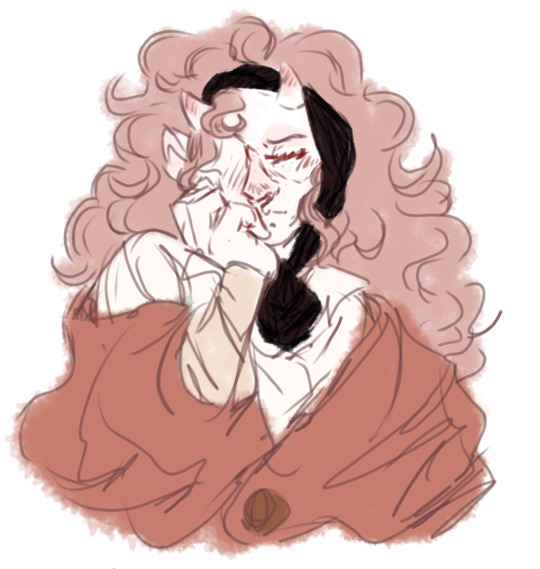

I offer a Stevie!
18 notes
·
View notes
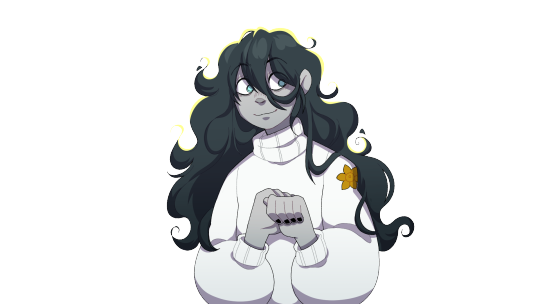
Note
Hello 👋
Swallowing my nerves at last to send you an ask! I was just wondering, what inspires your designs? Are their inspirations in stuff like movies or games? Or just things you come up with yourself?
i .. honestly its kinda hard to tell, sometimes i just randomly think of something, like some detail, or color combination and try to incorporate that into a design somehow; it can come from anywhere, like the color scheme of a pithaya/dragonfruit is something i have been wanting to make a design with for ages but havent come up with anything good in all those years ;O;
im a very easily fascinated by color, espeically in nature, like sometimes i just stop and stare at something like i froze in time bc i just woooooooooooooah color! i probably look like a weirdo doing that though
its really hard to pinpoint anything specifically, the most is probably .. other artists? i guess? which always makes me nervous bc my memory is shit in most areas of life and i worry myself to pieces whether i unintentionally "stole" an idea and just dont remember and think it was my own, it goes further that sometimes i see something that makes me want to draw a similar concept but dont bc i dont want to 'steal' even if that couldnt be further from my intention (have been accused of that before ..)
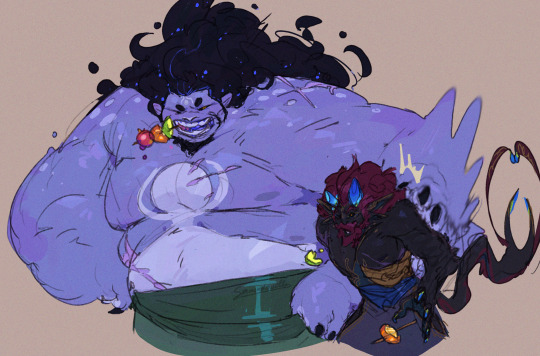
that said for my ocs specifically .. most are rather old and have just kinda evolved out of their awkward first iterations (shargons first iteration was a hauro-howl- copy that was really just some human covered in feathers .. another oc was once a hellboy copy but in green- havent drawn nor redeisgn them in ages lol), the biggest inspirations for them is a mix of animals, bonus if you dont see them often- im a big shark, whale and sea creatures in general nerd so i tend to take from them as a priority but always trying to be less directly animal and mostly just .. features that work together
Eadrya is one of the newer OCs- i started to write but then looked at my folders and oh they are from 2017 .., i even made a design timeline for them how much they, and my art, have changed back in 2020, so thats also way outdated now lol (they apparently started as a whale .. thing? its like a pokemon evolution lol)
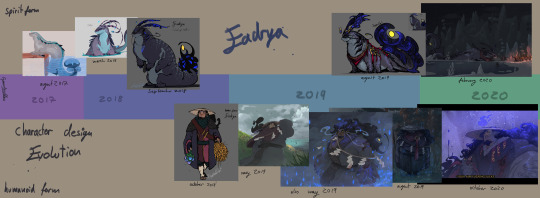
this is them now (i like this sketch still, though shargons design is now also outdated lmao)
this ones from early 2023 so also outdated now but you get the point
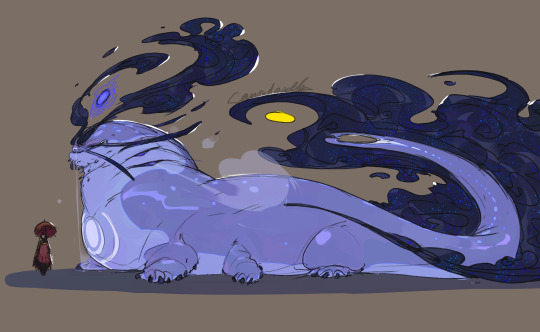
for demons i try to be a bit more wild on shapes and colors while still adhering to the rules of how they work (humanoid form, demon form, animalistic, one element each and more or less made to fit that, 4 arms is very common, look to be bost scary and wild but also something that would make you stop in tracks and stare in awe and fear if you crossed paths)
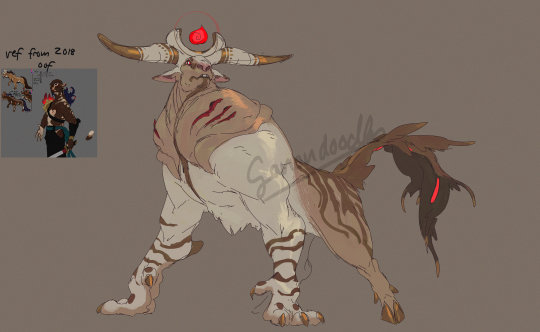
often times designs just kinda .. happen, i have maybe the idea ok i wanna make something with a white and red pattern also moose or those big horned cows are cool and kinda scary so maybe sth akin to that (though this one is technically a redesign too- its also pretty much entirely different)
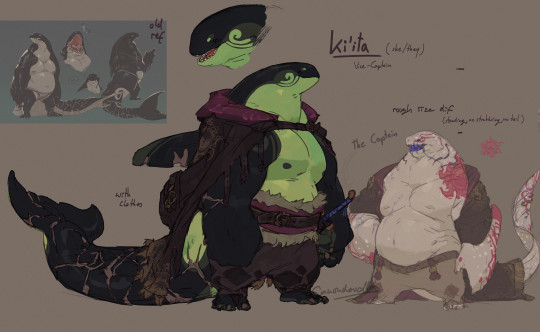
for non demons but still non human i go for a much more restrained design, mainly inspired directly by an animal and giving the color scheme a good spin, plus adding unconventional body shapes, like ki'ita is also a good example, her old idea was just orca anthro pirate and just by making the white green instead in her most recent redesign already adds that little spin to it
that can have its pitfalls though, as i often fall into the big arm small head small legs scheme over and over xD
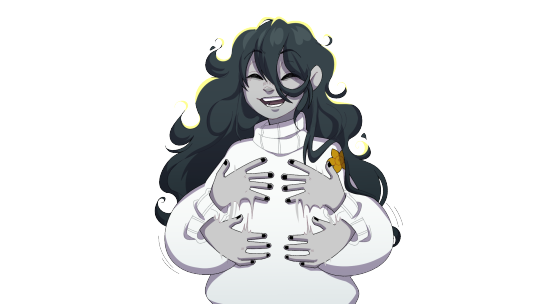
alot of it is trial and error, deciding on the colors can take me hours bc im always searching for my little rule of having one contrast color that shows up in very few places to draw attention to it (like with Eadrya its those bright yellow eyes and thingy at their tail)
and that is all about myy own ocs, when its fandom stuff it works kinda similar though, either in the connections i wanna draw or just thinking it further- like how deities in destiny work also just kinda .. happened like an ever derailing train
like for demise i was at first really just im gonna give him horns bc horns are cool and he got those on the starting mural in the game- so how his hair work? well maybe it isnt hair actually and just unbound energy, im making him a deity too and fit hylias design to his so, yeah, then so how does it work, ok he gotta have a skeleton still, but what if his entire actual body is made up of pure magical energy with its core in the ribcage? with the core in the ribcage >:3c
and the scales you see are just like cooled down lava as an armor bc his thing is fire and earth !! the normal blood? is a thin layer of skin imiated from mortals to keep the scales together and flexible so if he ACTUALLY gets hurt hed bleed magic that looks more like lava and any normal blood you see is just the armor- so why does he have a skeleton still instead of being just energy? maybe its gotta be bound to something OH and what if all of the deities started as mortals like a mirror to the trio later on and the gods cannot have direct influence to the worlds so they needed a right hand that is neither god nor mortal but both by killing a mortal by whatever their element will be (demise burned, hylia drowned etc) and their skeleton and spirit is kept but put into a body of magic- OH what if their spirit core is like almost piloting their bodies like a mech in a way bc if youd look close youd see that every strand of magic is actual a hand of their spirit so it makes it more weird and other bc hed be able to reach out with thousands of burning claws of all shapes and sizes like the beheaded forest god at the end of mononoke- SO if hed lose and arm or something all those strands would untangle and rearrange his bones back together-OH MY GOD the whole armor idea works so well for ghirahims dark armor so what if demise had two swords once and lost one and since has forged an armor similar to his own for ghirahim out fo fear of losing him t---
and that all is a process that happens over several weeks and months not rarely while i am drawing something mindlessly and suddendly *have a thought* and omg that makes so much sense-
so "what" inspires my designs? an ever derailing train of thought about making cool thick monsters that arent the evil thing to get rid of for once? cool color schemes? idk it just kinda happens??
#ganondoodles answers#dont think this was the point of the ask#maybe i shouldnt actually try to answer any questions bc im inherently bad at ... having an answer#i havent even gotten into the anatomy of demons in my oc stuff#yes they ... they got organs#i dont know why id need to think about how and what and their arrangmeent#but i ssure did#I DIDNT EVEN GET INTO HOW DEMONS WORK-#wasnt the ask#my brain is an unstoppable train that never lets me rest#writing soem stuff out like that really makes me realize just how MUCH THERE IS#no wonder i got not space left for any actually important information#like i couldnt tell you my phone number i have had for years but i sure could draw an anatomical study of a demon oc lol#this took me an hour to write.#why am i like this
61 notes
·
View notes
Note
hihihi! recently found your art and im OBSESSED w the style!! the texture is so cool!! if you dont mind, how do you do it? like brushes, layer effects etc. anyway i hope u have a good day!! (:
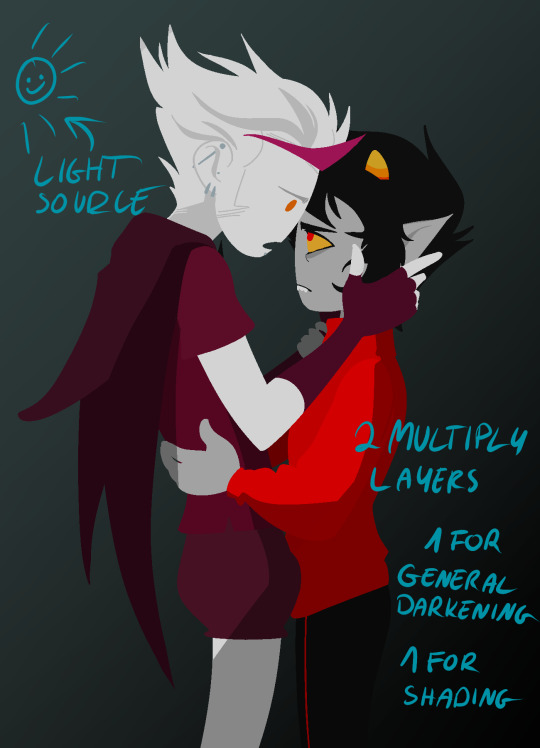
aaa this might be a long answer!! also hi! and thank you!! 😭🫶 i'll try to detail my entire process!
with sketching and lines, i use the nikko rull brush just sized down and with like 70ish brush opacity! and then i use default oil brush to shade! as well as the nikko rull also to color and such, theyre the only 2 brushes i practically use (except maybe for the airbrush but i use it more for the effects (will circle back to that))
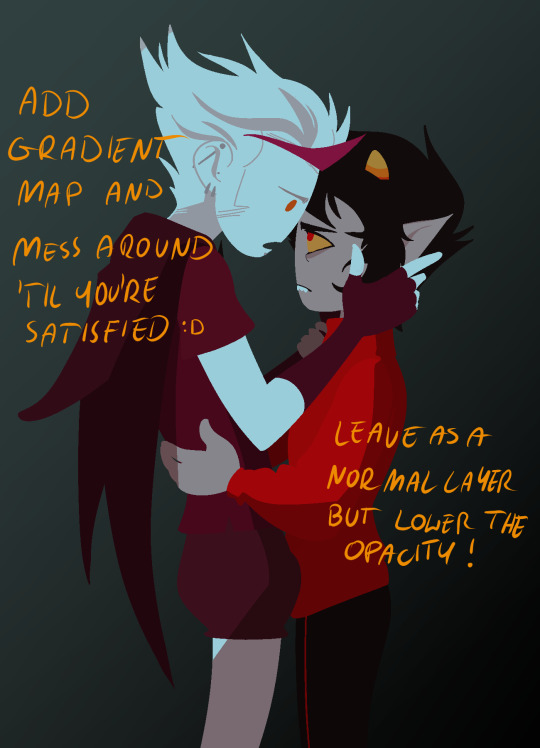
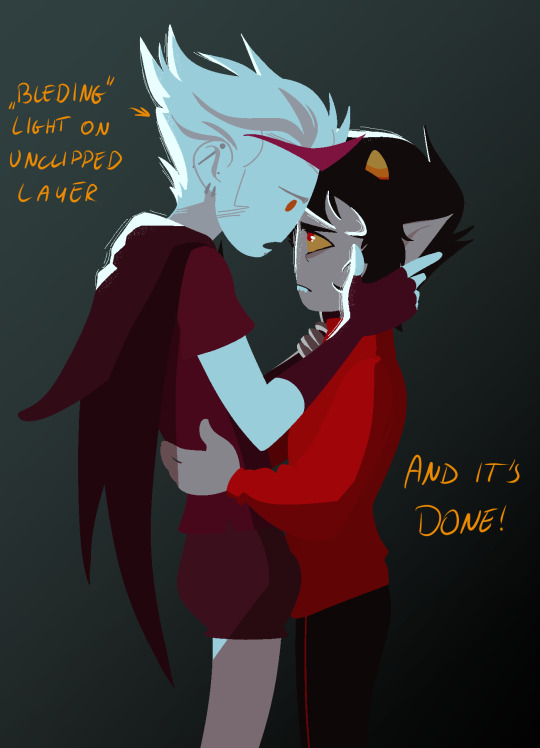
and then i do very simple shading, not thinking about lighting or anything, and once im done shading everything i merge it all down together and i clip on an OVERLAY layer on top, it's my bff... and i usually use a bright red or orange and use a soft airbrush to lightly glaze over the drawing in certain areas to make it more vibrant (i tend to base with very desaturated colors)
and then i merge everything together and clip on a MULTIPLY layer on top and usually use a color like a darker greyish blue or whatever depending on the environment and lighting that i've decided in my head, just to make the whole drawing darker, and then i use the eraser to erase out shapes in which i want there to be some light, and sometimes i use a hard brush like the nikko rull and sometimes i use a soft airbrush to softly remove some shadow and darkness or blend in harsh shapes. and for good measures i also mess around on another overlay layer.
and then i just add noise and mess with the color balance scales a little!
82 notes
·
View notes
Text
First post of the year let’s goooooo
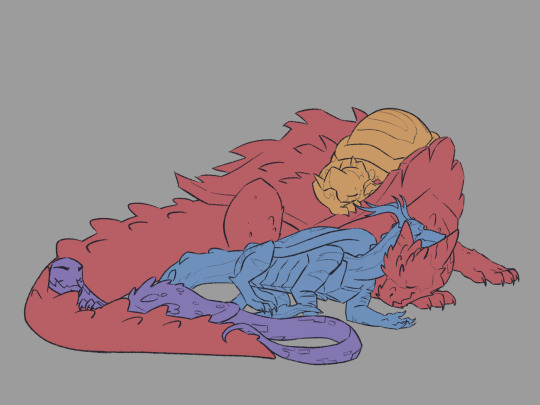
I once again offer fanart for the iconic Heroes that are Half-scaled by @nicoleisaboat-blog. Re-read it recently and thought y’know what’s been collecting digital dust for literal months now? Well now it’s at least outlined (might add color later, who knows)
I’ve wanted to draw a dragon turtle pile since the first chapter and sketched it out before it actually happened, so this is not completely accurate to the fic
I wanna draw either the nexus dragon fight or Raph with tusks next but who really knows when that’ll happen yk how it is
72 notes
·
View notes
Text
internet begging (womp womp)
hi!! i’m known as percival on here, i recently moved out due to family issues & while i am working, i am having a hard time.
my cashapp, paypal, and venmo are all s0uthsuns! if you dont have cashapp, but want one, if you send me a dm i can send an invite that will give me $5 at no cost to yourself !!!
right now it’s me and my grumpy baby, nivea


BUT I AM NOT ASKING MERELY FOR SPARE CHANGE!!!! i also draw, and write!- i don’t have many recent examples for art due to Procreate Issues, but here are some examples! from landscapes to full color meme pieces to traditional pen sketches, i’m willing to do anything, including nsfw (includes writing.) i am not averse to creating kink/fetish art as long as you’re clear that’s what it is.
$5 mecha, heavy armor, or furry sketch (i don’t have a lot of experience, hence the low cost).
$10 fountain pen or digital sketch
$15 sketch sheet, +5 to add flat colors
$35 for fully colored art, +10 for a detailed background or extra characters.
again, my cashapp, venmo, and paypal are s0uthsuns - if you want art, please include your tumblr user as a note on payment and dm me!!

101 notes
·
View notes
Note
Hiya! Hope this message finds u well :3 I absolutely love your art; found you from insta! Quick question also; I’m not sure if you’ve answered this before, but which brushes do you use for ur digital art? I love the textures they’re so crunchy (endearing)!! Have a lovely day!! :D
hello!! here's a little brush tour ft. this half rendered martin.
also, a great app for ipad artists who really want to dig into texture is art set 4. i swear by it and i've been using it for about two years. none of my more recent art uses it, but that's just because i'm experimenting with my process rn

so here's a list of my most used brushes lately, and there will be links to all of them at the bottom of this post.
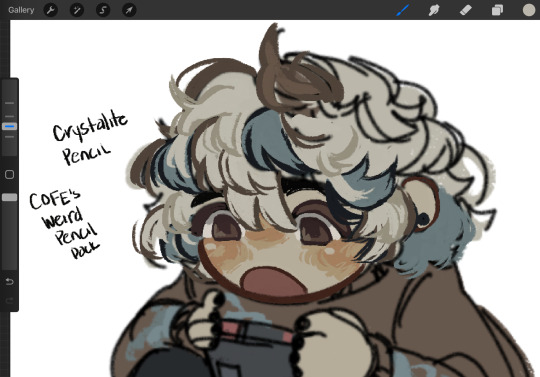
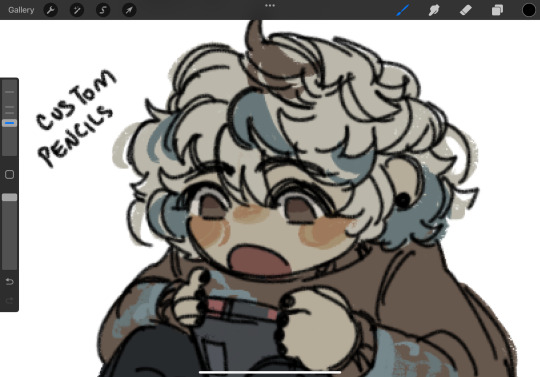
the two labeled "custom pencil" are both my own personal modified pencils (both sourced from the 6b pencil) but the narinder pencil and the vanilla 6b pencil are both very similar to them. i use these two for sketching and flat color specifically, and if you do specifically want these two brushes then i'd be happy to upload them somewhere for you to download, but they're not really necessary for texture
i also use G&B halftone brushes sometimes! but i greatly prefer the RSCO sample pack, and i cannot find the link to the G&B brushes no matter how hard i google, and pretty much any halftone brush set will do the same job
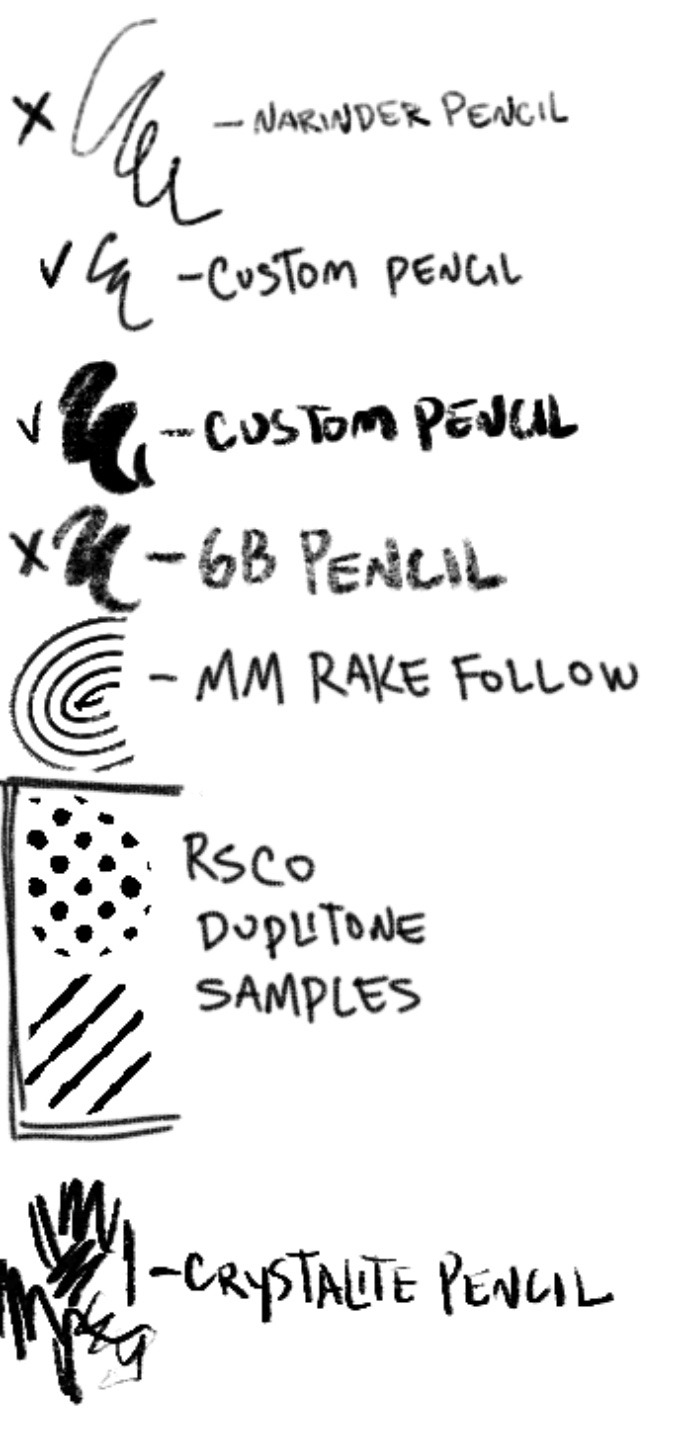
and here's what they look like in practice!
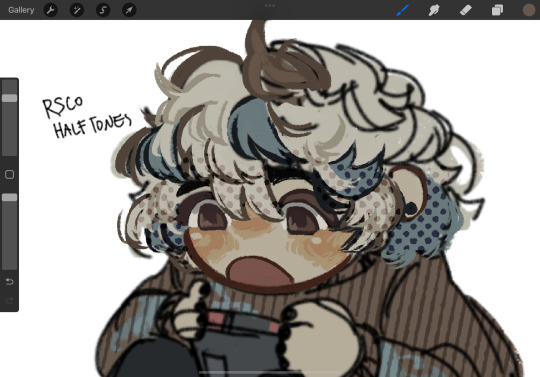
(i like to set these halftones to color burn. color burn is my most used blending mode, even for shading)
and then i hit "copy all," paste, and duplicate it. so you should have two layers of just your entire canvas. then import a paper texture
i'm partial to the set i'll link down below, my favorite is #5. you should absolutely check out the rest of the free texture packs on their website if you're wanting to diversify your texture process btw, all of their stuff is fantastic.
to use that texture, your layers should look like this!
on the layer set to the linear burn, i also like to go into the adjustments menu and bump up the brightness until all of the colors are at similar values to what they were before. and the normal layer on top is just to control the intensity/opacity of the paper texture!
after all of that, sometimes i'll go in with brushes like MM rake follow, or more from COFE's weird pencils, on top of all of those layers for finishing touches.
definitely play around with it, try new free brushes all of the time (i heavily recommended subscribing to Manero. they have a lot of free stuff and it's all fantastic) and see what works for you <3
here are the links to the brushes in this post, as well as some extras! some of them are paid and some of them are completely free. + it wasn't mentioned here, but i use the tatyworks linen fabric brush for blending! for any of the paid brushes, i'll try to link some free alternatives
paid brushes:
alternatives to paid brushes:
free brushes:
extra goodies:
#procreate art#procreate brushes#art tutorial#artists on tumblr#digital art#digital artist#art recommendations#art resources
40 notes
·
View notes
Text

ngl im not like, lineless art specialist, honestly i went lineless fairly recently (like lets say may 2023 when i started drawing art for homestuck), before that i was making art with lineart only, so take my process with a grain of salt lmfao but i hope it clears out some things!
lets dissect the recent dirkkri art ive made:
i start out with sketch, as you usually do. depending on how im feeling or how complex the pose/background is, i make it more or less detailed. for more basic poses i might even stick to a simple gesture drawing and go straight into laying out the colors, it really varies a lot. it might even change in the further process, like how i moved dirks shades from his head to be sticking out slightly from behind his arm, clipped to his shirt, because i didnt like how busy the area around the faces looked
one advice i can give is to not spend too much time on the sketch. its job is to guide the laying out of flat colors and thats it! dont make it too fancy, dont get lost in the details - you can add those later on when youre doing the flats. its fine if the sketch is messy, youll fix it in later stages of the process!
next i do the flat colors! i tackle it one thing at a time - for example with dirks head i started on separate layers with the general shape of his face, then added his facial features, then i drew the hair, then added his neck, the crown, and lastly his piercings. i then merged them all together - you dont need to leave it all separate, best way is to group things together and merge so you dont get lost with all the layers (like how kankris arm on the front is one layer including his sweater sleeve and his hand).
i highly recommend naming your layers - im a little on and off with it myself, but seriously it makes your life easier later on when you spot a mistake and have to shuffle through bazilion layers to find it lmfao, especially when your drawing includes multiple things that overlay on top of each other like in this example. dont be like me and take a second to name them asksks

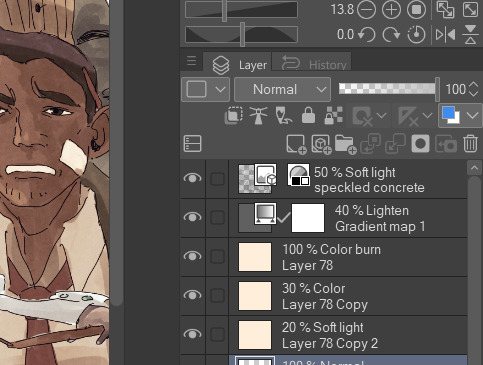
next to the rendering! i sometimes completely ditch this one, just leaving the flats as they are, but when i want a drawing to have more oomph i have some more steps to the process. its pretty simple - shadow, gradient map and highlight layer on clipping masks connected to the flats. in this one i used light gray for shadows (first layer to generally darken the drawing, second for defining shadows). same with highlights - one color.
the real star of the show is the gradient map, seriously, its a goddamn miracle worker. in krita you can add one by clicking on the plus sign to add a new layer and choose "add filter layer", then in the menu open the "map" category and here should be the option of adding gradient map. you can do it on your flats, but its destructive, and on a separate layer you can always change it if you dont like it later on. mess with the colors and tadah! it now looks fancy as shit and makes people think you know color theory!

last but not least you can add some bleeding light on a separate layer that isnt clipped to the flats to give it more dreamy appearence! i also added an example of how my layers looked in a group at the end of the drawing process.
and thats it! hope it helps, and have fun drawing!
#ask#drawing process#lineless art#art tips#art process#digital art#hope its at least somehow understandable im really sleepy rn#god i hope i didnt make any spelling mistakes LMFAO#artists on tumblr
62 notes
·
View notes
Note
what brushes do you use to drawww, btw your art is so cool i am actively consuming
I use the Procreate app to draw, so I mostly use the base brushes it comes with, aside from a few extras I've downloaded. I've switched around a lot, and I'm still learning and experimenting, so it depends, but here are the ones I've been using most recently:
The main one I've been using for lineart is the Studio Pen, 'cause I like how variable the line width can be. That's the one I used for these:


These are all pretty much just made with that brush, actually. In that last one I believe I used a different brush for smudging the light layer a bit at the edges, but I'm pretty sure it was just the regular Procreate watercolor paint brush I use. Speaking of the watercolor brush, that's the one I used for these:

In the first one, I did the main color blocks and lineart with the studio pen, then did layers over the top with the watercolor brush to add more color variation and light. In the second picture I was using the procreate watercolor paint brush for the colors, and a brush I downloaded called "Trisketched Ink Brush Rough" for the lines. I like to use that latter brush for looser, sketchy stuff. (It's the one I used for all the Dazai Knitting AU comics!) Ah, and speaking of sketches, I also use the Procreate 6B Pencil whenever I just want to scribble something out, because it's very light and wobbly so I don't worry about neatness when I'm using it.
I use it for initial comic page layout, like this!


Although, I also sometimes use the Studio Pen for that, depending on how I'm feeling. You can see the red underlayer I was drawing the lineart over in this WIP, for example, and I just decided I wanted to use the studio pen for both the undersketch and the lineart.

Of course, there's other brushes that I've used as well, but these have been my main ones lately. :D If there's anything I've drawn in particular that you'd like more of an explanation of, I'd be happy to go over what I did!
106 notes
·
View notes
Text
Current digital art process!
Acting on @shkika 's request because making my redraw for this post actually ended up giving me more confidence in my digital art process! As such, I'm gonna use it as a reference. And if this walkthrough of sorts turns out nice, I might do it again as my process evolves!
I started off with a quick sketch of sorts, trying to focus both on movement and volume, and get the general idea of where each element is located. I edit the image dimensions and placement of things a lot in this phase, as my ideas often tend to change once I actually begin drawing them. In this case, as I got it down, I decided I wanted it to look like some cheesy animal motivational poster, so that influenced where the text was.
From there, I began to clean and sometimes edit the sketch, mainly by thickening the lines to make the shapes more definite, and erasing what wasn't necessary and interfered with other parts. Volume is one of my biggest focuses in my drawings, so I try my best to get the volume of each character at least hinted at with the lines. This is something that will probably remain in my process for a while, as I quite dislike doing separate lineart and like the messy, sketchy feel anyway.

I also wanna mention, in addition to having references and such in other windows, I've recently begun having a second mini window of my current drawing off to the side so I can see what it looks like overall more easily, regardless of how much I zoom in on and flip the main window. It's quite helpful!
For reference, this is what the final sketch looked like:
Then, I went on to add the flat colors. Another tip: I almost always set my sketch layer to "Lumi & Shade" because I think it makes the line colors a lot richer, but since it's based on what colors are underneath, it colors the lines a lot more individually than changing the sketch color as a whole. Here's some comparison to a version without the effect (left):

Then, I add some shading using a (really nice) marker brush. This is honestly one of my favorite parts of the process, just trying to carve out all the volumes, especially since I usually use a pretty blue color for shadows!
Sometimes, I honestly just leave drawings finished at this step, because I adore the sketchy look so much, and because I really don't like the tediousness of more realistic rendering in the painting process; from what I've seen/experienced, it often involves having to basically paint the entire image over again, which I've realized I find REALLY boring (and is also why I clean the sketch instead of making a new lineart layer). As such, one of my hopes is to reach a point where I could almost completely avoid having to clean up the image in a traditional painting method, instead being able to lay down lines and colors so well that they convey nearly all the volume necessary on their own, still have that sketchy appeal, yet also look finished and professional.
Alas, I did do a bit of clean up on this image, but I think it still turned out alright!

Here's the finished drawing! I'll have to practice with this process a bit more to truly solidify it as my digital go-to, but nonetheless, I think this came out adorable! Thanks again shkika for the ask, and thanks to @mintscampi for the sweet prompt! I hope you guys like it!
#art#artwork#artists on tumbr#digital#digital art#digital artwork#painting#digital painting#process#painting process#art process#tutorial#fanart#rain world#slugcat#rw slugcat#slugpup#artificer#rw artificer#quetzalli draws#quetzalli's notes
88 notes
·
View notes
Note
would you consider dropping some tips on how you color? your art always has such a nice feeling to it
Thank you so much, and yes, absolutely!
So... I have been agonizing over how to answer this question for over a week because I tend to make a lot of my major decisions based on what looks and feels good to me in the moment. It’s sort of hard to explain. Then I started getting philosophical with it (“how does one color? How do I explain aesthetic?”), and I started rambling, and had to cut the answer way, way, way down lol.
But here’s what I can help with right now. I think the most important part of how I color is my tools and what they allow me to do. These are currently my favorite brushes to use:

From top to bottom, I use Kyle T’s Gouache for just about everything. A lot of my recent pieces are done entirely in that– I love the chunky texture and how the pressure mimics traditional gouache. It’s great for children’s book illustrations, and filling linework, and realistic portraits. She is my soft wife and I love her.
I practically never use the default hard round. Ignore that.
The roller brush is another one I use for painting. It was my go-to before KT’s gouache, so you’ll find it a lot in my older work (and as a big texture thing in my current works). The “Sampled Tip” below that one I usually use for children’s book styled illustrations. It’s like a really dense, waxy crayon, so it’s fun for textured lines and details.
I always paint in my own shadows and highlights, but I like to use the soft round if I want to blow the shadow or highlight out. It’s for extra large areas.
And finally my pencil. I use it for sketching as well as linework, if I plan on doing a linework-centric piece. I don’t think there’s much of a difference between the two there… one is probably smoother than the other.
______________
The reason why I like textured, pressure-sensitive brushes so much is because they’re important to how I paint. When I blend, I don’t use a blender brush or a smudge tool. What I do is layer two colors– lightly– then use the eyedropper to select the color between them and continue painting with it. That’s probably the key to most of my work. I’ve gotten pretty fast at it, so I’m constantly selecting colors from the painting and reusing it throughout my painting.
I still use the color-wheel to hand-pick what I think will look best, though. This is probably going to be a really frustrating answer, but I choose color palettes based on basic color/lighting theory combined with personal aesthetic preference. It can take some studying (of both theory and other artists’ work). If you’re ever looking for a really great reference on the former subjects, I highly recommend Color and Light by James Gurny. Even if you’re not into watercolor or dinosaurs or realism, the guy is a master at explaining all that different stuff in depth.
Shape and negative space are also pretty important to me, but that's a whole other thing. And as a side-note, I recommend following more children’s book illustrators. Their work may look simple, but a lot of intention goes into how they use color, shape, space, and texture.
Also, on texture, I hand-draw most of mine. I love to add little scratches and drops and splashes when the painting is almost over. It's one of my favorite things to do :')
____
Now, the other most important tip:
Once I’m happy with the sketch/linework, and once I’ve laid down the basic colors of my piece, I do a Really Terrible Thing. I become a graphic designer’s worst nightmare and collapse everything onto one layer.
Then I paint directly on top of it, linework and all.
I do this for a lot of reasons, but mostly because 1) my tiny brain is overwhelmed by the clutter of too many layers, and 2) it forces me to approach a piece as if it was traditional media– a process which I find a lot more comfortable and rewarding. I paint right on top of the base colors, and right on top of the linework, effectively redoing and cleaning up what I already have there. Even if I'm working with a blank background, I'll paint a new blank one on top because it gives the feeling of a more unified piece, if that makes sense.
Basically, I approach my drawings as if I’m using traditional media. I like chunky brushes, utilizing (what I personally think are) interesting color combinations and textures, and smashing everything down onto one page so I can just paint.
Anyway, please let me know if there’s anything specific you’d like me to go into detail on, any pieces of mine you’d like to know how exactly I went about it, etc etc etc. I’m happy to answer ^^
113 notes
·
View notes
Note
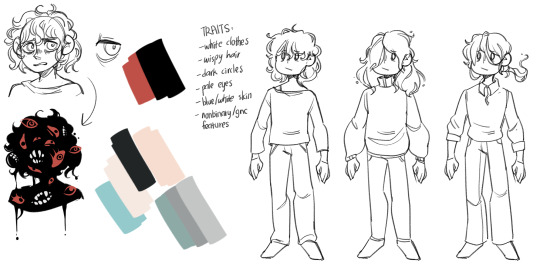
How do you organise the process of creating a character? like, to me its too confusing, i dont know what i do first because there are TOO MANY THINGS TO DO, like backstory, personality, looks, what they like, so what would be the “steps” to make them?
(Since @isabellaswork asked the same thing recently I'm tagging you here, hope that's okay!) Omg I'm flattered I'm the person you'd wanna ask such a big question ;v;!!? Honestly the process is different for everyone, but I'll give it a go <3 This is how my process usually goes:
Personality first, backstory later. Flesh out the concept of the character before deciding their origin story if that makes sense.
Build a moodboard for your character! The more ideas the better!
Time for visuals! Sketch out multiple iterations, looking at the moodboard for inspiration. Colors go last.
Finalize! Once you've got your final sketch + colors, draw a proper illustration and see if you vibe with the design. Repeat previous steps if necessary <3
Extra: Since you've got the design and story down, add some fun facts. This is where interests, likes and dislikes go!
I'll use my VN characters as examples below in case someone wants it in more detail! Mychael (Mushroom Oasis) and Alma (Lift Your Spirits spoilers!! + horror imagery) process ideation under cut:
Usually I start with personality first. Because for me, when you first meet someone, you see what they're like in the present; their past doesn't matter as much until you get to know them. I can decide the backstory later so it doesn't limit the personalities I'm playing around with. Of course I must have gotten the idea from somewhere so these two things work in tandem most of the time.
Then it's just a matter of how they look!
After deciding on personality traits, I start by collecting references from everywhere, even the smallest of things. I think of how I want them to look plus how they would dress. Anything goes at this stage, so just go buck-wild gathering ideas!
Here's a moodboard for Mychael:

This one was for Alma, from their normal self to their monstrous self:

Then it's time for drawing and doodles. As I sketch, I look back at the moodboard I've made and pick out things I like, while drawing things really loose. Copy paste if I need to!
I've shared the ones for Mychael here, here and here! Here's some sketches for Alma from last year:
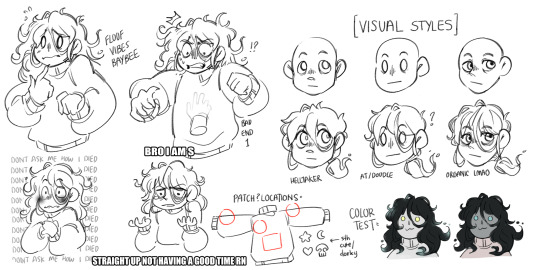
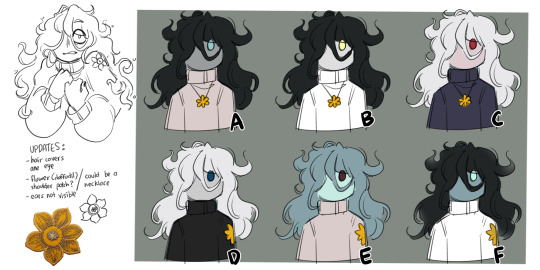
This part takes the longest but is always the most fun! Don't feel limited by what you had initially, just test out ideas! Here are the final designs!
Mychael(s):


Alma(s):


Then once I'm happy with the design I can flesh out the backstory as much as I like!!! so long as it fits the presentation of the character in current time. Of course this process can differ when you already have a story in mind and need characters to carry out the plot, but I'm definitely not big-brain enough to make an all-out story like that </3 I just enjoy designing characters visually haha
Oh and just for fun, I like to sprinkle in some extra (but kinda unnecessary) background info. It can be the most mundane thing but it gives them more life (to me at least!) Maybe they drink flat orange soda, or enjoy riding trains at night, or hate the smell of french fries, or think apples are disgusting etcetcetc.
Of course there's like, tips for professional character designing like silhouette, shapes, proportions but I assume this ask was for a more casual approach <3 That's all I could think of if I were to describe my process,,, I hope that answers your question!
To recap:
Start with personality traits and decide backstory later. Or work them together as one. It's more concept than visuals at this stage.
Assemble a moodboard for inspiration. The more ideas the better! Look up anything that might relate to your character if it helps.
Sketch, sketch and sketch again! Keep things loose and free. I usually start from the face, to clothes to accessories. Colors go last.
Finalize! Put everything together in one rendered drawing, and see if you vibe with it. You can always go back to previous steps if you're still not happy with it.
And you're done! :-)
#mushroom oasis vn#lift your spirits vn#bts#cheea chatter#i rambled so much so i hope the TLDR helps fhjds#q
158 notes
·
View notes
Text
Okay can I talk?
eric belonging to @night-light-artz
Patches @eve-pie
Okay for the image above I was doing a “mock” warrior cat book. I miss the old covers but anyway
I kinda feel my art is…boring. I mean it just feels that way. Sometimes I feel I rush myself to get things done, and to be honest I hate having to rush myself. I look back at my recent post and they just fall FLAT. Flat as in the colors are just boring as heck. Lineart? I don’t really like. Not only that but everything feels so unpolished
My anatomy/details
I hate the fact I miss crucial details of my chat starts or even other people characters. I mean, HAVE YOU SEEN HOW I DONT EVEN ADD SILKY’s ANTLERS 99% of the time? That bothers me. And I see other people add them and I’m just “well damn I’m so lazy I can’t even add antlers on my own fucking character”.
Not to mention the poses. Everything feels so stiff with me. So dang stiff that you may as well call my art wood and use it as a support beam. I hate how I don’t use references for my art. Maybe If I used them more and actually took my time stuff wouldn't look like your average horrific Netflix Original cartoon of some movie.
Backgrounds/minor objects.
Do not get me started. I hate all of them. They look so low effort. I mean, I know I can do better with them! But it seems like I worry about the main characters so much. In fact, I feel the background just falls flat or blends in too much with the characters that it looks. Messy. If I draw a cup, i'll skip over details and it will look awful! Which isnt good, as it shows im lacking severly.
Time
And for time I rush. I feel like I have to literally push things out by day’s end and well…it affects my art. Lately o just been so focus on the hour and time it just makes the art suffer. Even if no one else sees it I do. I love my painted style, but it takes quite some time. And forgive me but I hate just doing sketches to and posting it. I prefer my art to be colored in and all the way. Now im not saying i dont like it when other people sketch. That would be a dick-head move of me.
Some days I fear if I don’t post or read inboxes everyone is going to think I purely abandoned them. I try to focus on my page. but just giving them a sketch at the end well...it makes me feel as if I just dissapointed them. I think to myself and say "I could have done better than that. Why did you even do that in the first place {Name}. "
I have like so much on my agenda and plans and then i realize I can’t do it all in one day. Hell sometimes I just make one day spefically on one subject.
If that day was animation day; I focus on an animatic.
If a certain day is art day and I want to set up my commission page (which is so messy I deleted it) then that’s the settled day. But I feel like I’m going so slow. It's like I am running out of time, and time is just passing by as I look at my clock.
And I'm not blaming anyone it's just my stupid head that makes me feel this way. I know no one is trying to rush me. But head is like "Oh but what if- and why not-". It bothers me. It clouds my vision and i don't realize in reality...no one is saying the things my brain is saying. Sometimes I feel like I'm bothering people when i draw their charcaters so much and tag them. I fear they just say 'Aw great it's this one person again."Sometimes I feel I need to be MORE original. And some days i feel i just need to give up entirely. Some days I think posting everyday will aggervate folks. Sometimes I envy the attention of others, and when I see what they gain or what following I have i look back at myself and say "Well maybe if you did this better than MAYBE you people will be interested in ya". And damn do i slam my head in a wall. Everyone just seems so happy, and yet here I am fretting over if this fucking dog I drew looks remotely interesting. And I just feel it...blends in. Like what is there so special about my art?
MY BLOG
And for this blog, I don't know if I truly have an identity for myself. There's Silky, there is Minty and Syrup, there is Simon and there is Shrimpy. But who do they belong to? What roles do they even serve in this blog? I want them to be my identity. I don't want them being just some sort of character leech. They lack story, they lack purpose, they are thrown in tropes and gag. But what do they relate to? Nothing. Nothing at all. And yeah yeah I know im thinking to DEEP into this. But it's been on my mind so much. And hell call me crazy for talking about them if they are real, but they mean a lot to me. A LOT.
So I tried to make my art interesting here like, i tried referencing images space. I tried adding more anatomy to Snowy since I am tired of doing the usual standing up pose. I even wanted to make the background feel more detailed. I feel a bit better, but I still fear everything is too...eh...bland. Maybe it is just me.
Sorry for the ungodly word of text. I know I shouldn't vent here.
#vent post#artist on tumblr#super mario galaxy#eric velseb#patches bashful#silky silksong#welcome home#mario
31 notes
·
View notes
Text
Cady’s Cousin pt.3
*beep beep* you hear someone honking outside “that must be Damian” Cady says grabbing her backpack “oh ok I’ll be right there I left my headphones in my room” you say quickly going to your room to grab your headphones then running down stairs and getting in the backseat of Damian’s car. “Heyyy (y/n)” “hi Damian” “ok so we’re gonna pick up Janis then heading to the school and making sure you have your schedule then meet up with the rest of the group” Cady says buckling up in the front seat “sounds good to me” you say buckling up
You guys got to Janis’ house and Damian honked his horn. It took about 3 minutes before Janis clumsily stumbled out her front door and to the car “hi” Janis said with an awkward smile as you two made eye contact “hey” you said with a smile on your face as she sat next to you
You guys get to the school and Cady takes you straight to the office telling the others you’ll be back in a minute. “Hello excuse me miss?” Cady says trying to get the lady at the desk’s attention “oh hello dear do you need help with something?” The lady asks “yes my cousin in new here and I just wanted to make sure she has a schedule and that all of her credits transferred from her old school” “oh I can check that right now, what’s you name dear?” The lady asks you “(y/n), (y/n) heron” “ah yep you’re right there and all your credits seem to all be in order, would you like me to print out your schedule now?” “Yes please” Cady answers for you. The lady gives you your schedule and you and Cady head over to the rest of the group to hang out before school starts. “Hey we’re back” cady says enthusiastically “good morning here are your drinks” Regina says handing each of you your cups “thank you Regina” you say sitting down next to Janis who is sketching and drinking her coffee with headphones on not paying attention. You lean on her shoulder trying to get a glance at her sketchbook, accidentally starling her “AH OH MY GOD” “oh um sorry I didn’t mean to startle you” you say feeling really bad and scooting away a little “fuck sorry I didn’t mean to scream like that” she says taking off her headphones “it’s my fault, don’t apologize, I should’ve tapped you before invading your space” you say feeling like an idiot “it’s ok…do you want to see what I was drawing?” she asks hoping you’ll say yes “oooo yes I’d love to” you say scooting close to her again, she shows you some of her more recent projects. While you two were talking the rest of the group was observing you two from a small distance. “You guys are seeing this right?” Regina said with a small laugh “if you’re referring to Janis being a dorky lesbian then yes I see it” Damian says smiling a little “you know (y/n) isn’t normally this close with people, she normally keeps a decent amount of physical distance but this, this is definitely new” Cady adds to the conversation. You and Janis are practically in your own world, laughing and talking about her different art pieces and the inspiration behind them “wait so you’re telling me that you made this based off a Kids cartoon you were watching while high as fuck?” You say looking at a very colorful detailed drawing that had some embroidery on it “yeah and surprisingly I didn’t stab myself making it” Janis says laughing a bit then making eye contact with you for a few seconds before you both turned away, you looked at your hands and Janis looked up at the sky “Hey (Y/n) what classes did you get?” Regina asks and you hand her your schedule “ooo yay we all have the same home room, break, and lunch this year” Gretchen says looking over Regina’s shoulder at your schedule Gretchen already had everyone else’s schedule memorized since they all got their schedules over break. You and Janis join the rest of the group “Oh damn English first period, I’m so sorry for you” Damian says with a hand on your shoulder “I have English first period too, who’s her teacher?” Janis asks “Ms. Barnes? Is that the new teacher Ms. Norbury was talking about?” Cady asks Aaron “yeah, it’s actually her first year teaching from what I’ve heard” Aaron says
STUDENT: (Y/N) HERON. 12TH GRADE. SCHEDULE
HOMEROOM: ROOM 1802
(SHARON NORBURY)
PERIOD 1: ENGLISH 12 ROOM 708
(HAILEY BARNES)
PERIOD 2: STATISTICS A-B ROOM 370 (SHARON NORBURY)
BREAK: A
PERIOD 3: STUDY HALL 407
(BRIAN JOHNSON)
PERIOD 4: THEATER PERFORMANCE 1900
(LINDSEY CATER)
LUNCH: A
PERIOD 5: VISUAL ART ADVANCED 1706
(MAZELY JONES)
PERIOD 6: HISTORY 12 ROOM 1204
(HAROLD BAKER)
“Art and theater, that’s the gayest thing I’ve seen since Damian” Regina half joked “we literally have every other class together plus break and lunch, I guess you’ll be seeing me a lot” Janis said with a laugh “that’s honestly really cool, I’ll have someone fun in at least half my classes” you say with a wink
*ring* *ring* “well that’s the bell let’s head to homeroom” Cady says with a smile putting on her backpack and holding Regina’s hand while you all walk to class, you and Janis are in the back of the group walking close to each other but both focused on your phones, you’re texting your friend from back home and Janis is looking at what yarn to buy for her new project. Once you guys get to homeroom the group decided to sit together until they inevitable get separated for talking too much. “Good Morning class, happy Monday, My name is Mrs. Norbury and I will be your home room teacher this year, I was just informed we have a new student here from Florida so everyone please welcome (Y/N) and be kind to her” Mrs. Norbury says “thank you Mrs. Norbury” you say a little awkward Cady kindly puts her hand on your shoulder to comfort you. The class goes by pretty quickly. “So we’ll see you guys after this class, meet at the tree as usual?” Janis asks “yeah I’m so glad we all have A break and lunch this year” Cady says with a smile then gives you a hug “see you later (Y/N)” “bye cads, bye guys” you say before turning to Janis “follow me” Janis says sticking out her hand for you to grab and you do. You to get to class and sit next to each other in the back of the class. The teacher passes out a get to know you worksheet which you finish quickly then pull out your sketchbook to doodle. You’re doodling for like 10 minutes when you feel a light tap on your shoulder, it’s Janis you look at her a little confused then she shows you her sketchbook, it’s a small sketch of the friend group and to your surprise you see an in progress sketch of yourself. This causes you to blush a little, you’re not exactly sure why but you face definitely felt warm and there was definitely butterflies in your stomach “woah that’s really cool” you say quietly “thank you” Janis says turning away quickly, was Janis- no she couldn’t be blushing from such a simple compliment. The rest of class is pretty quiet with you two showing each other progress from your sketches. Class ended and you went to your next class saying good bye to Janis. Math went quickly and before you know it, it was break so you head to the tree from this morning to meet with the rest of the group. “So how’s everyone’s first day of senior year going so far?” Aaron asks “good, really chill” says Janis “for me it’s been going by really fast but it’s fun” you say “oh my goodness I can’t believe how easy today has been” Gretchen says with a sleepy Karen leaning on her “honestly a lot more boring than I expected” Regina says fixing her hair “I’m having an amazing day, that cute theater boy that I’ve been talking to has 4 classes with me” Damian says really happy “ooo ok Damian” you say hyping him up a bit “I am not having fun, I want to go home” Karen says leaning more into Gretchen “aw Karen what’s wrong?” Regina asks concerned “someone called her stupid because she asked what day it was when it was written on the board” Gretchen says holding Karen close “don’t listen to them Karen, they don’t know you, you’re incredibly smart and amazing, ok?” Janis says upset, Karen smiles a little very appreciative of Janis caring so much. You almost smile at how defensive Janis got for Karen seeing this caring side of her melted your heart in the best way. The break ended and you headed to study hall with Janis since none of your teachers were crazy enough to give you homework on the first day you and Janis talked quietly in the back about the different types of art she liked and how she does a lot of mixed media art. Every time you talk to Janis about art it feels like you two are the only two people on earth and like time stop. When the period ended she decided to walk you to theater since her class was in the same direction. Though you haven’t known her that long Janis made you feel really special, it was weird you felt like you didn’t need to put your walls up to protect yourself, you were just you. Exchanging goodbyes and saying you’d see each other at lunch. Theater was fun and easy, you played a name game
you played a name game so everyone could introduce themselves and then a few other games. The bell rang. Lunch time!
The cafeteria was honestly kind of chaotic but you ended up spotting Cady’s red hair very easily. You sat across from Cady knowing Regina would be siting next to her “hey cads” “hi (y/n) how were your classes?” “Good, how about yours?” “Eh pretty boring” Regina, Gretchen, and Karen come over giggling about something “I’m gonna go get cheese fries does anyone else want anything while I’m up?” Regina says “water please” you say and she gives you a nod “hmm i don’t know surprise me?” Cady says with a shrug. Regina leaves Gretchen and Karen follow as Damian and Aaron come over “no dude I’m telling you sports are way less complicated than that” Aaron says trying to convince Damian to watch some sport game with him “hey Damian where’s Janis?” You say a little worried “oh she’s in the art room she wanted to ask Ms. Jones if she had some yarn Janis could use” “oh ok…is she coming to lunch?” “Yeah she should be back in like 5? minutes” a few minutes later Regina, Karen, and Gretchen come to the table then Janis comes over and sits next to you taking one of your chips “Hey!” You say moving your chip bag away from her and she laughs “what you can’t share 1 chip with me?” Janis jokes “I can but you could’ve at least asked silly” you say laughing a bit “ok after school we should totally go to Regina’s house” Karen said “oh absolutely, my mom said that she misses you guys” Regina say.
Art class goes the same as all of the other classes you’ve had with Janis but this time you paint it’s really good quality paint especially since it’s from the school. You and Janis have been close all day. “Alright last class of the day, have fun” Janis says “you too, see you at Damian’s car?” You say “yeah see you later” she gives your hand a small squeeze then heads off to her class. You were definitely blushing from that, ugh this girl has only been your friend for 3 days but this felt different a good difference.
(Monday 2:00pm) fruit loops
Regina👛: y’all wanna go swimming? Today has been pretty warm and as you all know my pool is heated plus there’s a jacuzzi so like if you don’t want to go in the pool we could just chill
Aaron🧍♂️: I’m down I’m so glad you decided to keep swimsuits for everyone at your place
(Y/N): um I don’t have mine I’d be down to just go in my bra and the shorts I keep in my bag
Cads🦁: I have an extra one you can wear if you want (y/n)
Gretchen🌷: omg Regina that’s a great idea
Karen💕: 👙👙👙
Damian🌟: ooo absolutely I love a good swim at the George house
Gretchen🌷: Janis?
Damian🌟: she’s probably asleep or in the middle of a sketch with her phone on silent
(Monday 2:15pm) fruit loops
Janis👾: hey y’all sorry I was in the middle of a really good art jam but I’m totally down for a swim
Damian🌟: HA see I was right!!! do I know my best friend? or do I know my best friend?
Regina👛: ok ride arrangements for the ride to my house. Cady, Gretchen, and Karen in my car then the boys and single gays in Damian’s car
Janis👾: WTF BRO
(Y/N): damn 💀 no need to call us out like that
Bell rings and you head to Damian’s car. Aaron is already sitting in the front so you and Janis get in the back “let’s go queers it’s pool time” Damian pulls into Regina’s driveway shortly after Regina and everyone heads inside.
A/N: I couldn’t figure out how to end this one lol but here’s what I think their lunch table seating arrangement looks like also finally so cute Janis x reader moments lol ALSO LET ME KNOW IF YOU WANT TO BE TAGGED WHEN I POST NEW PARTS OF THE STORY IVE SEEN OTHER PEOPLE DO IT AND NOW I WANT TO LOL
#janis ‘imi’ike#regina george#cady heron#gretchen wieners#karen shetty#aaron samuels#damian hubbard#mean girls 2024#janis ‘imi’ike x reader
20 notes
·
View notes
Note
Dear Wasyago,
Strange, I have always thought it was spelled as Wasayago. But recently I've realized, I can't read very well.
I want to send appreciation today, to you.
You've taught me a lot about art. You've taught me a lot how to draw certain things, and you have opened my eyes to new perspective of art, ever since I started following you. Colours are brighter, I experiment more, I can see a specter of visuals that was previously hidden from me. It's like gaining shrimp colors.
Your art feels like an art classroom. There's sun pouring in from the windows, and there's tree leaves in front of them. Every time you come in you see different art projects. Paints add on to the tables, that will never scrub off again. There's dirty cups with paint water, and brushes, in the sink. It's lunch break, and there's people here. Some are just doing their math homework right before class, some are working on their sculpture, some are picking out paints, some are working on their new piece, on a fresh canvas. And it is so alive.
Your art feels so alive. Like the leaves, the people, the stains. It's really nice to see, every single time you post, how lovingly you bring a character into the world (My favorite so far is that one doodle of Modern au Gillion eating noodles, I have it in my favorites gallery).
I would like to see some unfinished, maybe forever to be so, doodles that you weren't especially proud of. We'll love it all.
Respectfully,
Marcus Bloodsmith
oh, thank you so much, this is so sweet qwq
im happy to know that you feel this way about my art, and im glad i could help you with some advice! it feels a bit weird to show unfinished or scrapped art under such a nice message, but yeah why not. and its funny that you mentioned the gillion eating noodles one, because its also one of the pieces that i really didn't like and didn't want to post hdgsh. i dont have that many unfinished drawings left because i delete or redraw most of them, but i have a couple that might be fun to share... and i guess it's gonna be a long post bc i wanna tell a little about each one or at least name them.
there's this art of chip, the first time i properly tried to figure out a way to draw him back when i just started listening. redrew this piece later, kept the sketch on the left, but the right one i changed completely because i didn't like the vibe this one has.
there's this attempt at redesigning caspian after i found out he was a water genasi, plus the first version of that art of caspian, pretzel and gill. this design didn't feel "caspian" enough, it looked too soft and kind where i wanted him to be more layed back and chill and sarcastic and with a bit of an edge. redrew both pieces later. the underwater drawing also has an unfinished background in this version, i added some fishies later so it didn't feel that empty.
some random sketch of gillion to show off how the lightning scars look on his face and neck. i quite like it, but it didn't really fit in the post with three proper drawings and one sketch so i decided to scrap it.
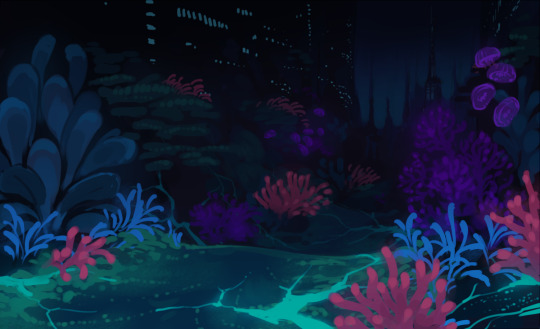
there's this drawing where i tried to figure out how the capital of the undersea looked like. i really didn't know where i was going with it and didn't have a good idea when i started drawing, so its a mess of things with nothing to really focus on. i tried to add a character on it later to breathe some life into it, but it didn't work out since i didn't focus it on the character from the beginning. plus i don't like how the colors turned out, and the entire concept of the environment feels weak and boring to me. i still want to draw more concepts of the undersea and try a couple other ideas, but probably at a later date...
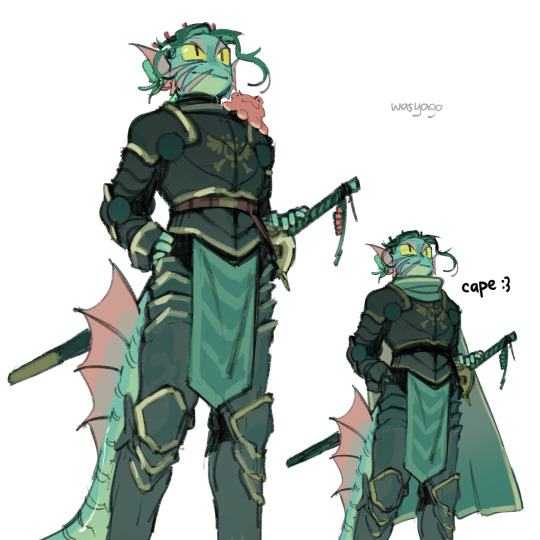
the first version of whatever try it was to design gill's armor. (fun fact, i have more armor designs scheduled for tomorrow). this one i redrew almost immediately, i really didn't like how it turned out and how the legs were cut off and it looked so messy with no real accent point or personality. plus the smaller copy of the drawing in the corner just didn't look good. im not exactly proud of the redrawn version either (that's why i did another one yesterday lol), but im glad i redrew it anyway, it looks a lot better than this one.
the first sketch of that one gillion drawing. i couldn't figure out the colors for it for so long and wanted to drop the idea entirely. but i left it to sit for a couple hours and eventually got the motivation to come back to it and finish it. for most of the illustration pieces i did for jrwi there were multiple versions, where i just didn't like the first one and redrew the whole thing with a different composition and colors. didn't save any of those drawings tho...

this drawing of jay but with green wings and a slightly different color shirt. it was actually the first version of this drawing, and i changed the colors to blue later. wanted to post both of them side by side but then decided against it. that's why this drawing survived and was properly saved and not just deleted.
more recent attempts at designing the chaingel. i like the concept, and the pose in the second sketch is pretty badass, but the execution is just not there. it doesn't feel right, doesn't have the right kind of vibe that this character gives off. so im sure i will try and draw her later when i figure out what's missing and how to show her personality in the way it feels in my head. but these two sketches were never going to see the light of day, so now they're here.
aand this is it, this is everything that wasn't deleted in the past month for one or another reason. i feel like im more chill with deleting and redrawing things, so a lot of initial sketches and concepts never get saved or seen by anyone. im also on mobile so i can attach only ten files lol. not that it matters, the last two were just random figure drawings for warm up, not much to talk about.
142 notes
·
View notes
Note
Is there a genre/story you want to do for your future webcomic?
I think your use of color is fantastic! Do you often rough in colors before finishing your lines? Was peeking at the wip you posted, and was curious about your process(👀👀👀)
my planned comic story, if I ever end up working on it, is gonna be fantasy, horror, tragedy!
These three are my main characters:


And Maheloas is currently getting a redesign because I want him to be more asymmetrical but jfc its hard. I'm capital S Struggling.
And thank you so much!
Hm my progress really depends on how serious I take the drawing I work on and how easy it is for me to draw in that moment!
For example for that one og trilogy AA fanart I did recently I only did this very rough sketch here:

and then I went into the lineart already without doing a clean sketch. Or I guess in this case my clean sketch is the lineart lol.
So for this drawing I didnt do any color blocking at all!

I then colored everything in. I usually just pick whatever color feels right so during this step I usually dont even fix much at all unless its super off.
And then I start adding effect layers.
For this one the amount of layers I put on top is very limited as I wasn't trying to do any crazy mood setting so this is what I did:

I usually put a light beige color on top of my drawing and then try out various layer settings and copy and paste it and then I play around a little with gradient maps, this purple to orange one being my favourite. Then at the very end I add a paper like texture on top and put it on 50% soft light to get that grainy look.
Since you asked about me doing the color blocking in my wip, I usually do that when I draw something that is more out of my comfort zone to establish the shapes or when my sketch is becoming too incomprehensible for me so I need something to tell things apart.
I hope this was helpful and thank you for the interest in my progress! :]
27 notes
·
View notes
Text
I recently got an ask about how I made my Vere cosplay, so I thought I'd write an (overly descriptive) explanation about what I did! Note that I have very minimal sewing and cosplay experience, so it's quite possible that there are many better ways to achieve the same look.
If you're interested in recieving the pattern that I used, please DM me, and I'll send you the files. Note that the pattern is only made to my measurements(I am very tall and small chested) and I have also altered the pattern after working with it some, though not altered the PDF.
Some of my explanations won't be the most clear, I'm happy to explain more in the comments or dms- I'm just limited on the number of pictures:)
Below the readmore because u guys this is going to be a bit exhaustively long :>
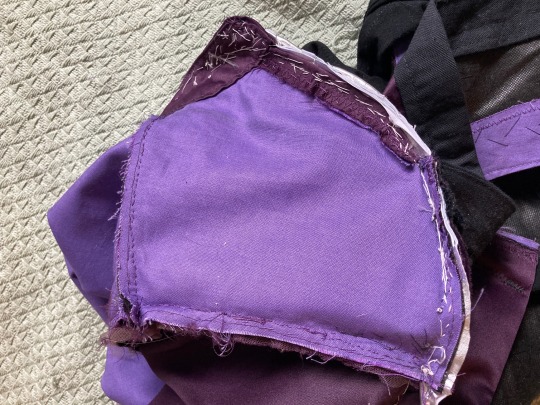
The pattern pieces for the top

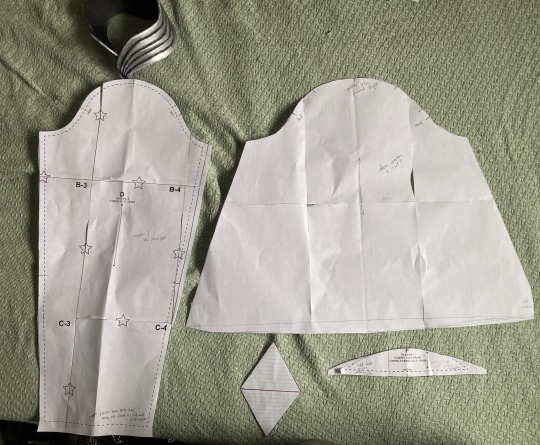
I got a pattern after commissioning someone on Fiverr for about $60 dollars (let me know if you want their contact info). They were not very interested in reference photos and instead wanted me to sketch the garment I needed. I made a mock-up in a day after receiving the pattern files (took me about 8-10 hours lol). I requested a few edits from the pattern maker and recieved a second pattern. From there, I made multiple mockups and edited the PDF pattern to:
- shorten the smallest sleeve
- increase the curve of the front shirt edge
- add an unofficial collar band to increase collar height
- change the angle of the piping seam to enter the armhole at much more of a slanted angle
- increase the height and shape of the side waist openings (they are still lower than is accurate).
- add a sleeve gusset bc I couldn't move my arms (the sleeves are still tough, I'd recommend altering the dark purple sleeves if you make this)
- making the floatly sleeves way more voluminous.
Here are some photos of the top. I bought a crotch snap bodysuit premade and cut it after someone helped me pin the top to it. This is to help keep the top "tucked in" to the belt without bunching, while still allowing you to go to the bathroom. There need to be snaps because I taped the top to my skin, so you don't want to pull the top off your shoulders as you would a romper.
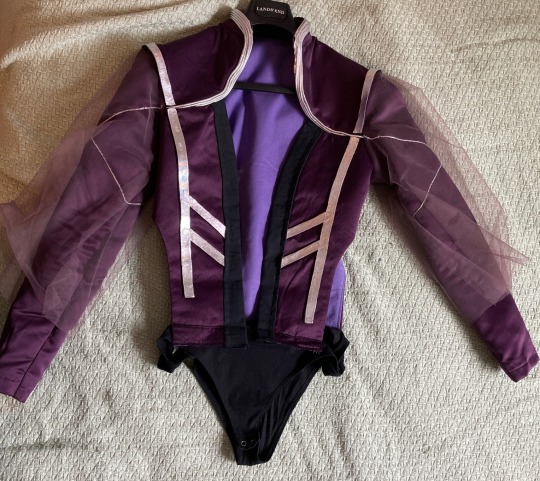

Ok, now let's see where the pattern pieces go to the shirt:


Fabric
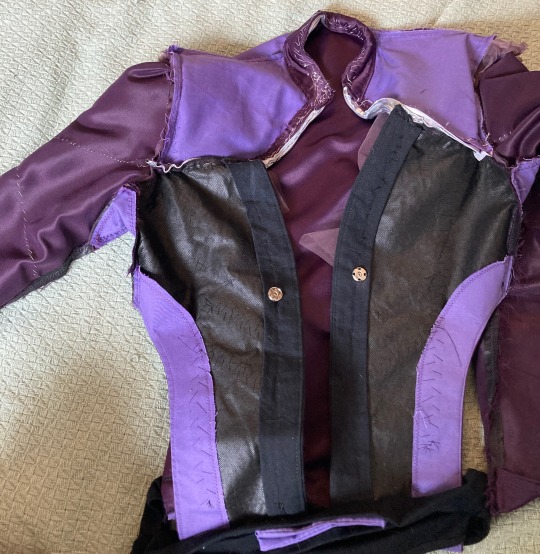
I used a satin fabric for this top. I chose this primarily because it looked the closest to the right color that I could find (rather than being interested in the sheen). I'd say that it kinda sucked to work with because it frays exceptionally easily, though it does look pretty. The lilac fabric is a cotton fabric that I used throughout this project to add weight and stability - the color doesn't matter. I also used a medium weight black fabric (?), Silver pleather, and lightweight interfacing.
- back of the garment was purple satin underlined with lilac cotton
- front (orange) piece was purple satin with lightweight iron on interfacing
- collar (blue) was purple satin with the lightweight interfacing not in the seam allowances.
- front (red) piece was purple satin, iron on interfacing, and underlined lilac cotton.
- black boarder on the front (green) was a thick black fabric that was in a discount bin. Highly recommend you use a thin black cotton because the thickness of this fabric gave me a lot of trouble. Interfaced the center of these pieces.
- facings for the side opening (front and back of garment) were made from the lilac fabric and interfaced with lightweight interfacing EXCEPT for the seam allowance.
- tiny sleeve (yellow) was interfaced to give it structure, but not in the seam allowances
- I really struggled with the tension on my machine so I never sewed the satin alone. On the long, dark purple sleeves I added iron on interfacing ONLY to the seam allowance to give the seam stability so I could sew it.
- the silver piping around the collar and glued onto the front is made from a silver pleather. On one hand, this sucked to work with because my strategy involves sewing through ~10 layers of it at least, which is very hard(thimble needed). BUT, If you don't use silver pleather, I'd say your silver fabric MUST NOT FRAY for you to use the techniques I used.
STEPS TO CONSTRUCT (~30-40 hours).
You definitely need to make a mock-up unless you are very experienced. I made about 4-6 (would alter one sleeve but not bother changing the other, etc).
1. Cut all pieces except for facings, black boarder, and floaty sleeves out of purple satin.
2. Cut cotton support fabric for the following pieces - back, red, gussets, side facings (4 total)
4. Cut black boarder/facing (4 total).
3. Cut and iron on interfacing - center of collar, red (not seam allowance), orange (not seam allowance), tiny sleeve (not seam alloance), black boarder/facing- only needed on the outside ones(not seam allowance). Interfacing for the side facings. If you have issues with sewing the satin, also iron on interfacing on the seam allowances, and add it to purple satin that is alone (the long sleeves).
4. Baste all underlining fabric to the purple satin by hand (back, sleeve gusset, red).
5. Stay stitch in the seam allowance all pieces
6. Zigzag stitch all pieces.
7. Lay the lilac side facing on top of the right side of front orange piece, interfacing of the facing touching the right side of the fabric. Sew together along the inner curve. Notch the seam allowance here so it can bend easier. Flip facing to the wrong side of the garment. Iron flat. Pull the notches to the facing side and understitch. Iron again. Sew the top and bottom of the facing edges into the seam allowance of the side seam of the garment and the hem of the garment so they don't flop as much. Do the same thing on the the second orange piece (mirrored). Then do this twice, once for each side curve on the back piece.
8. Yayyy now it's time to attach the black edge. Choose your prettiest of the two of each mirrored piece to be the outside ones. Hem the longer edge of all 4 black facing pieces. Lay the facing, right side facing up, on top of the right side of the orange piece along the front hem. Sew directly on top of your hemming stitches so it is attached about an inch in. Try to not go out of the hem stitches at all. Then, lay a second facing on TOP of the facing u just sewed, wrong side facing up. Sew along the edge through all three layers. Notch this seam. Flip the top facing to the inside of the garment and iron flat. Understitch the inside facing. Iron again. Sew along the black facings inside the seam allowance of the top edge of the orange piece. Below are my notes to myself about this if they would help you LMFAO.
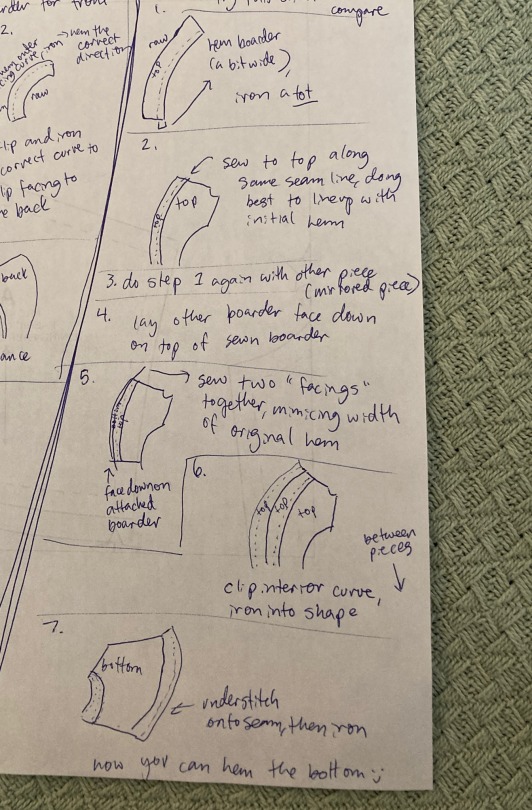
9. U can hem the orange piece now if you want to, I chose to not bc there is sooo much more stuff to do!!
10. Hand baste the red piece to your completed/with facings orange piece along the bottom edge of the red piece/top of orange. You're gonna have to rip this out later but you need to add the collar and measure the length of the piping that will go here and it needs to be attached to do this.
11. attach the back of the top at the shoulder seam. you can also pin or baste the side seams now under the arm hole but note that the size will be really different here with the sleeve gores later added. this turns it into a vest yayy its taking shape
12. iron all the seams u got going on
13. Hem the interior edge of the red pieces so that the collar can attach over it. Use a basting stitch bc you're going to have to undo part of this later 🙃
13. make the collar. tbh I'd recommend watching a tutorial for this, it is pretty similar to any men's dress shirt, especially a mandarin collar. sew the collar along the neckline of the garment.
14. Measure from the side seam under the arm, along the hem of red all along the back collar, to the other side seam under the other arm to see how long your piping needs to be. You can make it a bit longer than it needs to be. i chose to use piping because I couldn't find a silver cord that resembled this detail going around the collar of his shirt, and this seemed like the best solution. It would be far easier to use a silver cord if you can find it tho :). If you found cord that you liked, you could simply sew red to orange directly.
15. make the piping! This whole part is the worst part of the whole garment. You should have a thimble and strong handsewing needles. And probably pliers to pull the needle through. I cut long strips 4 of the silver pleather and bought 2 mm wide nylon cord. I then folded the strip around the cord and handsewed really close to the cord with white thread. You could machiene sew this but personally I found that it wasn't "tight" enough to the cord for me. Two of the piping strips you should cut most of the seam allowance off, the other two should be a normal amount of seam allowance on the piping.
16. Line up your 4 piping strips into a stack and measure across them to determine their width. You next want to create the ILLUSION of more piping. The way I did this was I took a wider strip of silver, the width of the 4 piping strips + one hypothetical extra piping on the top and one on the bottom and cut a strip this wide + lots of extra seam allowance that was about the length of the shirt collar. Then, I hemmed it deeply, so my hem stitches would be close to the center of the strip. There's NO cord in this piece. Then, I hand sewed this flat piece to the collar of the shirt.
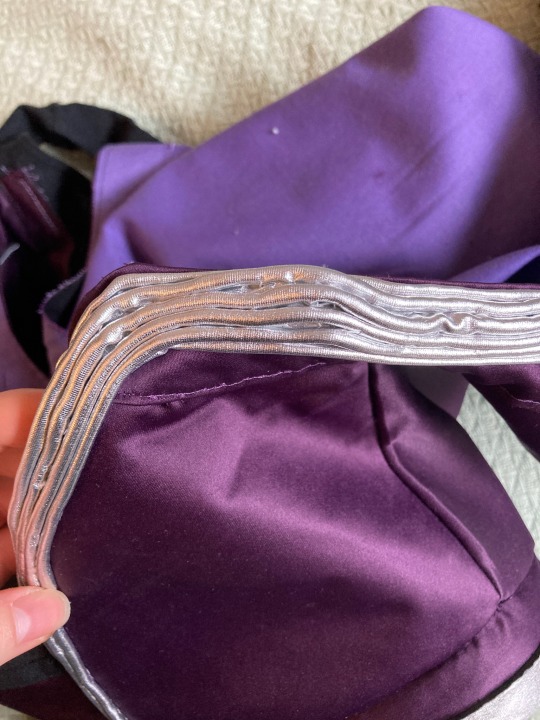
17. Next, I bent my piping strips in half and marked the center points on each with a pin. I took one with long seam allowance and laid it flat so the seam allowance lay facing right, and then laid the other piping with seam allowance overlapping the previous piping facing left. Then the piping with very small seam allowance goes on top of this. Diagram crossection below, with the circles representing the cord of the piping, and = representing the orientation of the seam allowance.
O O
O=====
======O
In this way, the piping can be sewn into a continuous strip that is sturdy, without the seam allowance showing. I handsewed the piping pieces together, working from the center, for about 5 inches of length, snaking sideways through the cording of the piping with white thread so it's joined into one continuous strip. Then, I began to handsew this piping to the collar on top of the silver flat fake piping that u already sewed there. Make sure the center of the piping goes to the center of the collar. From there, you alternate handsewing the piping to itself into one continuous strip, and then handsewing it to the collar.
18. As you work, you're going to have to sew it along the edge of the red piece once you're done with the collar. You can initially sew it to the hem that you established before on the red piece. However, when the red piece meets the orange piece (at the black fabric) you need to undo the hem of the red piece there and cut a slit in the fabric (visible below). This is because the hem of the red piece now needs to hang down and attach to the orange piece, so you need the material. Your piping here will go between the red and orange pieces. You also need to cut your basting stitches here so u can sew it for real. You should gradually and evenly spaced - end each line of piping along the top of the orange, so that by the time you're at the armhole, only one piping line is remaining. I chose the bottom silver line on the collar to be my longest piping strip, as this matches (more) of the reference photos). Rather than sew through all 12- 14 layers (...) I found it easier to do a stairstep method. I sewed my first piping strip to the red, then I sewed my second piping to the first piping(but NOT to the red), my third piping to the second, my fourth to the third, and my orange piece to the fourth. Throw in some stitches that bridge more layers as a failsafe and be diligent here bc the structure of the garment depends on it lol.
19. Fantastic ! U made it through the hardest part! Hem the long purple sleeves. Gather the top of the floaty sleeves. Sew the inner seams of the floaty sleeves. Sew the inner seams of the 2 long sleeves together. Leave the length of the V of the gusset unsewed at the top of the sleeve seam. Hem the edge of your tiny sleeves (yellow).
Now you need to attach the sleeves. I sewedthe gauze to half the gusset by hand first. Next I handsewed the gusset to both the long sleeve and the floaty sleeves, leaving the other V half of it unattached to later put into the side seam under the arm. Next I pinned all three sleeves into the armhole of the top. Tbh ... The size of the armhole seemed wrong so I needed to pleat the top of the of the long sleeve to make it fit (😐). Then I handsewed all three sleeves on each side into the arm hole, and then sewed the gusset into the side of the garment, and then finished the side of the top's seam (where the side facings meet) by hand too. I think it'd be possible to do this by machiene but with all the layers, gathering, and difficult corners from the gusset, it was way easier to handsew it imo. Now do the other sleeve wow so fun
20. Get a silver ribbon /string and handsew the sleeve decorations in place. I've found that piercing the silver cord tends to make it get ugly and split so instead I sewed the ends down and then went around the cord like belt with belt loops. Leave a tiny amount of give here so it doesn't strangle ur arm. Try and make the other sleeve the same lol.
21. Cut EVA foam (very thin mm foam) into LONG strip for the vertical silver detailing. Handsew the Eva foam to your top where the silver detailing is. Honestly I might wait to do this until your belt is done bc the position of the bottom half of these lines depends on where your belt sits. But, the purpose of the Eva foam is that it provides a solid base for your silver fabric to glue to that will bend with the garment well and the glue won't stiffen or distort your fabric. Afterwards you'll glue it to the foam with contact cement or fabric glue (needs to be able to flex).
22. Personally I sewed snaps that connect to the chest harness on the inner black boarder because 1) this allows a bit of the weight of the harness to be taken off of your neck/collar, and 2) allows your top to be held closer to your body (lower chance of flashing people). Make sure to only sew them to the interior black facing, not showing to the other side. I also sewed tacking stiches through the interior facing (hidden in the hem stitching) to hold the interior black facing down. My harness was waistband elastic, stabilized with cotton so it's not stretchy, with velcro attaching to itself through the ring. So each side of the harness at the ring is velcro folded back onto itself after being looked through the ring.
23. I also sewed the snap crotch thing to it. You need to wear the top and the body suit and have someone pin the top so that it's pulled somewhat taut by the bodysuit. The small section between the left and right side of the top (by the bellybutton) of the waistband of the bodysuit I stabilized with cotton again because you don't want that part getting stretched out and widening over time. If you're someone who maybe doesn't have boobs or doesn't care about flashing people, you could just sew it to some shorts. The idea here is to keep it held down AND be able to use the bathroom later WITHOUT pulling all ur fashion tape off in the stall and then reapplying it each time.
Look here for the part two (belt/skirt explanation).
#touchstarved#touchstarved cosplay#vere#touchstarved vere#cosplay#mine#personal#ask#touchstarved game
23 notes
·
View notes
Last Seen Blogs

coupleslist
Untitled
lmzkyle-blog
上海夫妻

costa-rica-travellers
Voyage au Costa Rica

sfgew345-blog
Untitled
teamiibo
are you guys going trick or treating