#Custom Cut Plastic Sheets
Text
A Quick Guide to Cleaning a Clear Acrylic Sheet
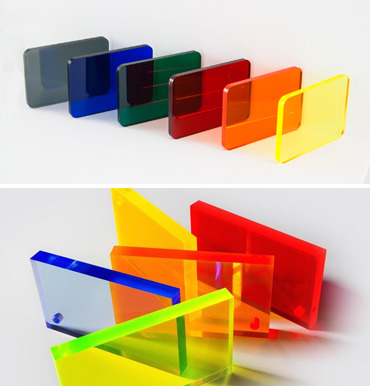
Keeping your clear acrylic sheets pristine and spotless not only maintains their visual appeal but also ensures their longevity. Whether you have acrylic plastic sheets in your windows, displays, or DIY projects, knowing the proper cleaning techniques can make all the difference.
In this quick guide, we'll walk you through the steps to achieve a sparkling clean acrylic surface effortlessly.
1. Gather the Right Tools
Make sure you have all of the necessary cleaning supplies before you begin. Grab a soft, lint-free microfiber cloth or a sponge and mild soap. Avoid using harsh chemicals or abrasive materials, as they can scratch or damage the acrylic.
2. Dusting Off
Begin by gently dusting off the acrylic sheet with a clean microfiber cloth or a feather duster. Removing loose dirt and debris prevents scratching during the cleaning process.
3. Preparing the Cleaning Solution
Mix a small amount of mild soap with water in a container. Ensure it's a gentle soap without any harsh chemicals or additives. Stir the mixture until a soapy solution develops.
4. Wiping Down the Acrylic
Dip the soft cloth or sponge into the soapy solution, wring out excess water, and carefully wipe down the acrylic surface. Use gentle, circular motions to clean the entire sheet. For stubborn stains or grime, apply a bit more pressure, but avoid excessive force.
5. Rinse and Dry
Once you've cleaned the acrylic sheet thoroughly, rinse off any soap residue with clean water. Make sure there are no traces of soap left on the surface. Finally, use a dry microfiber cloth to gently pat the acrylic dry.
6. Avoid Common Pitfalls
To prevent scratches, never use abrasive materials like scouring pads or rough sponges. Additionally, steer clear of ammonia-based cleaners, alcohol, or glass cleaners, as they can damage the acrylic's clarity.
Acrylic Plastic Sheet Suppliers
By following these straightforward steps, you can maintain the pristine appearance of your acrylic plastic sheets, whether they are custom cut plastic sheets in your DIY projects or acrylic windows in your home or business. You can get custom cut acrylic plastic sheets from R&T Plastic Fabricators and continue to elevate the aesthetics of your surroundings for years to come.
#Buy Acrylic Plastic Sheets#Custom Cut Plastic Sheets#Acrylic Plastic Sheet Suppliers#Plastic Sheet Fabrication
1 note
·
View note
Text

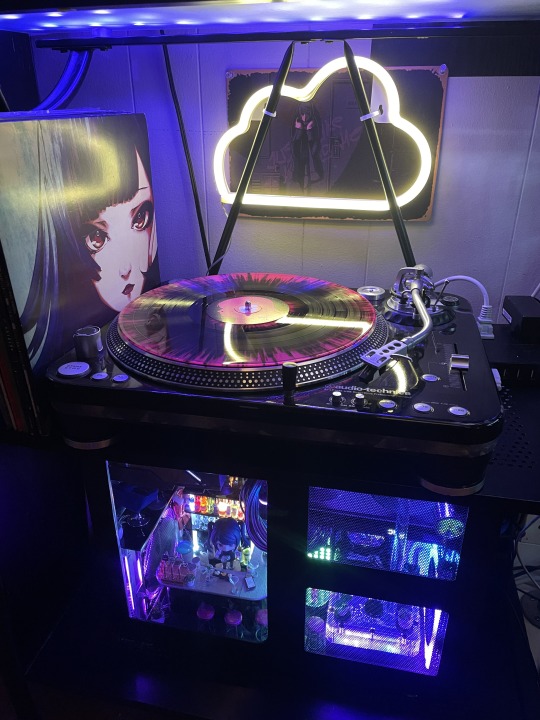


I built a miniature Va11 Hall-A Bar inside of my PC!!
Va11 Hall-A PC Parts & Build list
PC:
CPU : Intel I9 14900k
GPU: Intel Arc A770 16gb
Ram: Corsair Dominator 64gb 5600
Mobo: Maxsun Terminator Z790 D5 wifi
Hard drives M.2: Samsung 990 pro 2tb, Samsung 970 evo plus 1tb, CT 1tb, Adata 500gb
PSU: ROG Thor 850 P2
Cables: Cablemod.com custom shortened and sleeved
Water loop distro : EKWB FLT 120 reservoir + D5 pump
Water loop cpu block: ThermalTake Pacific Mx2 Ultra
Water loop radiators: Alphacool HPE 20 x 2
Water loop hardware: 15 Alphacool, 3 EKWB, 2 Alphacool soft, 2 granzon
Water loop tubes: EKWB Acrylic tube 14mm, Alphacool 13/10 soft
Air Cooling : ThermalTake Toughfan 120mm x 3 + Controller
Air Cooling : Noctua 40mm pwm server fan x 2 (non visible)
Additional RGB Control : Coolermaster controller
Case:
Lian Li PC V600, left side mount, released in 2006, I acquired it in 2015 from PC Recycle in sodo Seattle.
I had to track down a new foot, one had been missing since I acquired the case (ebay)
Mods:These are the case mods I did personally
Cut a hole for the cpu mounts in the Motherboard mount plate as this case was designed for older hardware
Cut two 120mm blowholes and added aluminum covers (Dremel)
Cut Front and rear windows into side panels (Dremel Max)
Moved PSU from vertical placement in the lower right side of the case in front of the CPU to horizontal placement in the top left in old drive bays.
The PSU bracket had to be cut to show the OLED on the side.
Modded the side panel rail slide to accommodate the PSU, I used the original aluminum stand the psu was on, cut in half and epoxied with JB weld.
Changed and moved Power/ Reset switch to the back of the case, shortened and spliced the cable
I cut and bent my own 14mm acrylic tubes (hobby miter, heat gun).
Cut and made two way mirror for the front panel
Plastic "truss" is both functional and aesthetic. It came from a Gunpla accessory kit and has two cables passing through it and it acts as the GPU support. I could only get red and had to paint it.
Notice that some logos are missing/ covered, I dislike having a case as an advertisement. The Rog eye on the PSU is mostly covered but iykyk, most of the word "Intel" on the ARC GPU, Two of the Thermaltake logos on the fan edges, the Paint on the Thermaltake Mx2 Ultra and Maxsun terminator heatsink. (I will eventually cover the visible SSD with a heat sink, cover the fan info on the rear and work a cover for the word "dominator"). the one logo explicitly unchanged is the LianLi case badge, if I think of a perfect replacement, maybe then.
Mod I did not do:
I did NOT shorten and sleeve my own cables, I used cable-mod.com. I am not confident in my ability to do this.
BAR:
"Bar Tiny" Re-ment sets from Japan, 17 sets involved.
I customized the color of the bar and chairs and shortened one table for the mezzanine. The whole bar, minus barback- is on a removable 7 inch piece of black acrylic for cleaning.
Jill Stingray Nendoroid
Jils Cat, it sleeps on the GPU
Jill Stool: Jill is glued to a cute doll stool to see over the bar
Jill Accessories non-Nendoroid: cellphone, purse, coat (ebay)
Dorothy Haze Nendoroid
will be added on release.
Bar Back:I made this myself
Black acrylic sheet, and frosted acrylic rods.
Doll Light power kit: 8 Led lights, 4 incandescent lights
USB Doll light power strip
Other Bar Accessories:
Overhead Hanging farmhouse light
trash, mop, broom, pan, mop bucket,
2 blue fuzzy chairs
Miniature plants
Miniature Microphone
Mini bottle Dom Perignon, an xmas gift from my friend nemo, it's
on the top shelf
Problems and changes:
1. ARGB, pretty pretty pain in the ass. 4 pieces of software........
2. The water loop was changed extensively as hardware came in and space limitations were discovered. The biggest change is that I originally planned to have one radiator on the front of the case, the tubes running over Jills head and to light the tubes as lighting for the bar, to do this the fan would have been in the case proper pushing the whole bar to far into the mobo, it didn't work, so the loop was moved to the top of the case and caused me to have one complex bent tube
Second, I had planned the loop to use one sideport on the distro, but space limitation moved both ports to the top causing the complex fittings setup in that corner.
3. The MOBO, sigh. This has been clearly the most challenging choice I made in this build, I really wanted it to work perfectly too, but I rolled those dice because: Aesthetic+function, the board I wanted (https://en.colorful.cn/en/home/product?mid=84&id=400d19bc-5655-49e1-b391-df00b60935ef) was to great a risk for the cost. This was a silver medal.
I generally dislike the design options I had in the Z790 series of the big board makers (I HATE big logos), especially the full ATX, there was one M that interested me, I should have picked it . This board has potential, but the BIOS is underdeveloped and compatibility has been problematic, I had to do a tricky outdated style BIOS update right from the box, and have had to reset the cmos a couple times. It skips BIOS on general boot and though stable, it will have to be addressed eventually, it doesn't have a proper sleep because of some issue between uefi & legacy. It may end up replaced, which will require a full build teardown.
the Turbo fan built into the board doesn't seem to function
Alos, the two argb connections on the mobo dont work, or I can't get them to recognize anything, necessitating the Coolermaster controller for the PSU and Distro. it is shoved behind the distro along with a Noctua 40mm
#va 11 hall a#va11ha11a#computer#pc#pcgamimg#sukeban#sukeban games#watercolor#watercooled#custompc#pc mods#jill stingray#fanart#cyberpunk art#futuristic#cyberpunk
120 notes
·
View notes
Text
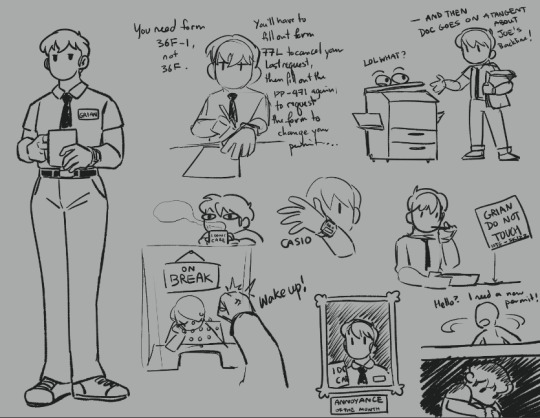
So I love Grian's new skin. I don't know why this is making me go nuts.
Image description below the cut.
[Image description]
A full body line drawing of Grian in his DHP uniform, holding a mug and looking bored. Next to the full body image, there are a multitude of little doodles of Grian in several different situations.
Left top scene: Grian dealing with a customer, looking bored and sliding a sheet of paper towards them. You are the pov of the customer. He is saying the following: "You need form 36F-1, not 36F. You'll have to fill out form 77L to cancel your last request, then fill our the PP-471 again, to request the form to change your permit..."
Right top scene: A doodle of Grian shooting the shit with Coppy the Copy Machine from tumblr of years past. Grian says: "-and then Doc goes on a tangent about Joe's backline!" and Coppy says, "LOL What?"
Middle left scene: Grian looking vacant, eyes unfocused, with a steaming mug that says "I don't care" on it.
Middle center scene: Grian showing off his CASIO watch.
Middle right scene: Grian eating Skizz's lunch. There is a note next to him that says "Grian Do Not Touch" with big letters, with "ISTG -Skizz" written in tiny letters at the bottom.
Bottom left scene: Grian sleeping in his seat behind the plastic glass wall. Above him there's a sign hanging that says "On Break". In the pov of an angry hermit knocking on the plastic glass.
Bottom middle scene: Grian in a framed portrait, holding his mug. It is titled "Annoyance of the Month"
Bottom right scene: An unknown hermit looking around, saying "Hello? I need a new permit!" while Grian hides under the desk pretending he's not there.
[End image description]
#grian#grian fanart#hermitcraft season 10#welcome to the DHP we're sometimes here to help#I don't know why I'm going feral on this bland ass design#maybe I just like bland things#also if you think you see some kind of intention behind his full body design#no you don't
92 notes
·
View notes
Text


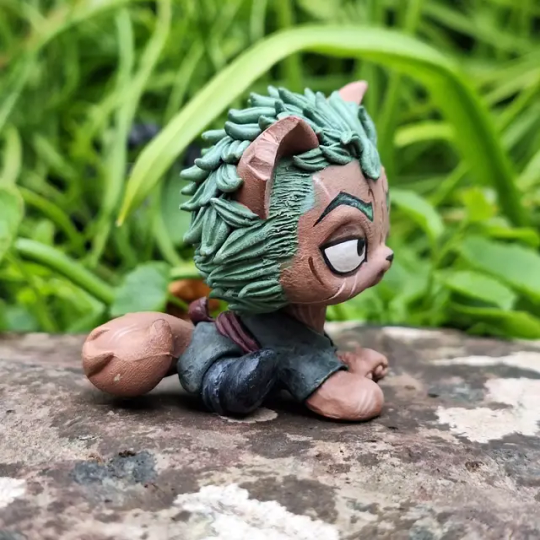

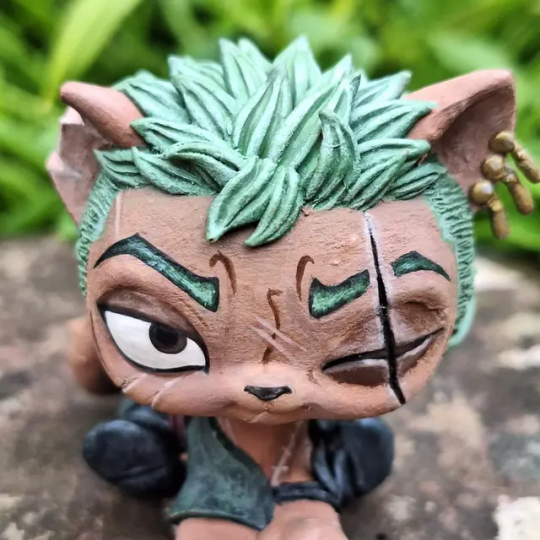


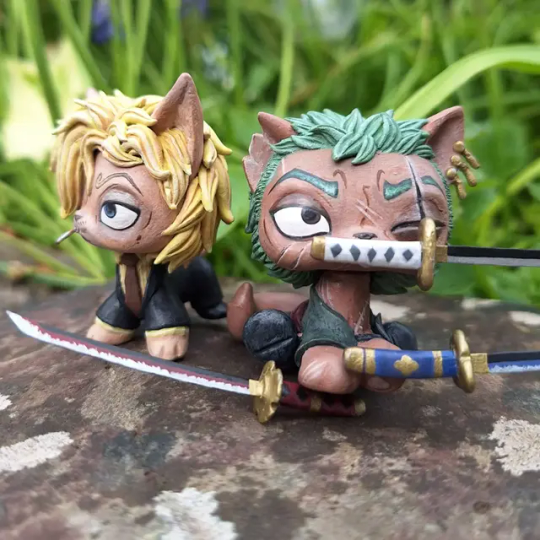
Roronoa Zoro ⚔️
He's made from a head swap between a G2 Persian Cat body and a fake short hair cat head with his clothes, hair, ear spike, earrings, and eye scar being made from Apoxie Sculpt. His sword handles are also made from Apoxie, with the blades being made from a thin sheet of plastic.
♤
I wanted Zoro to look bulker, then my other customes, and Sanji, so decided to build him of a Persian Cat base to give him more of a beefy look ( I had to cut off a lot of the fluff from the base after a few attempts at sculpting the clothes, though, as they weren't sitting right). Zoro's my joint first favourite character in One Piece, so I spent an ungodly amount of time tweeking his design until I was happy with him. I wish I could have made his face a little more angular, but that's me nit picking again. Overall, I really love how he came out :)))
#lps custom#zoro#zosan#lps art#lps#lps community#littlest pet shop#lps toys#handmade#ooak#one piece#making his swords killed me#i have never experienced so much rage making something in my life#and i kept losing the blade parts#which were the hardest bits to make#im just gonna let you visualise the range of emotions my face went through when i had to make more
112 notes
·
View notes
Text
red tulips — kim hongjoong

for : 1.5k milestone event ➖⟢ pairing : florist!hongjoong x gn!reader ➖⟢ genres : fluff ➖⟢ cw : not proofread/edited, kissing ➖⟢ wc : 0.6K ➖⟢ rating : pg-13

moodboard : hongjoong + flower shop + pastel blue/lavendar/pink

kim hongjoong has always felt like quite the enigma to you. his mystery lies in his lavender colored hair, always a pretty contrast with his dark eyes and serious manner. most days, he certainly looks like he belongs in his flower shop, especially when he puts on his soft smile that makes his customers hearts melt, and buy a few extra blooms they didn’t really need. but when he hired you to help him with the business end of things for his shop, he surprised you with his sharp and darker fashion, impeccable and fitting with his intelligent and down-to-earth personality. you guess that you were expecting someone different, someone maybe a bit naive, a grinning dreamer without much sense who needed someone like you; business-like, a slight workaholic who’s secretly craving for something far more lovely than what you had before.
you certainly found lovely, in his eyes and his firm and welcoming handshake. it surprised you that he was just about as business-like as you. he knew exactly what his small business needed—impressive, because most business owners without proper training take forever to realize that all they need is just a bit of focused help; like you. he’s definitely a dreamer, with all the ambition and sense to make things happen. your ideals and talents go together just as well as like lime juice on mangoes; intriguing and successful in making people come back for more. not just customers, but the two of you as well.
without saying a word about it, you both always find yourself lingering, even when your shift is over. at first, you never came in until midday, so you could be around for closing. but as your time in the flowershop goes from weeks to months, you’re coming in early in the morning several days a week.
there’s something magical about those mornings, when the sun is waking up with you, its bright and clear rays streaming into the wide windows of the shop and filtering through the plastic sheets and petals of new flower bunches ready to be made into masterpieces by hongjoong’s artist’s hands. it’s quiet, always, and you love to hear his shuffling footsteps in the back room or a soft sigh from his lips you’d miss otherwise.
that’s how you realize he’s got you wrapped around his finger and his fingers are clasped around your heart. the very heart you never thought you’d wear on your sleeve like this, much less give away without even knowing it until you’re waking up early just to hear a puff of air escape his lips.
and since you love him, you learn his language, clinging to his every word when he offhandedly explains the meaning behind flowers as he constructs a pretty new bouquet. he, on the other hand, doesn’t expect you to remember a thing about this silly little thing, just talking because you told him you like to listen to him talk. he thinks about that a lot.
it’s just that he doesn’t expect you to kiss him when he hands you a simple bouquet of red tulips. he tells you that the flowers are a token of his appreciation, a thanks for helping his small business become so successful in so short a time. but since you know better than that, you cut of his words with a gentle kiss that leaves him sputtering.
“i like you too,” you grin, holding the flowers pointedly up. for a moment, the flower-nerd part of his brain wonders if he should have started with something far more obscure in the language of flowers. he intended to build up to a verbal confession, but since you outpaced him without a second thought, he flicks aside any thought that isn’t about kissing you again. he presses his lips to yours, reaching his hand up to grab the bouquet and your sweet hand, pulling both you and the flowers closer until he decides to cast aside the blooms all together in favor of getting your body flush against his. he has plenty of spare red tulips.
#cromernet#ateez#ateez fluff#ateez x reader#ateez drabbles#hongjoong#kim hongjoon#ateez hongjoong fluff#hongjoong fluff#hongjoong drabble#hongjoong x reader#kim hongjoong fluff#ateez scenarios#hongjoong fanfic#ateez headcanons#ateez imagines#hongjoong comfort#ateez oneshot#hongjoong scenarios#ateez hurt/comfort#ateez comfort#hongjoong angst#ateez angst#hongjoong headcanons#ateez fic#ateez reactions
102 notes
·
View notes
Note
Do you have any tips or advice for running an artists booth at a convention? I'm thinking about doing it eventually and been wanting to hear from people who have done it before :^)
yeah!!! lemme rattle off a few things off the top a my head
also, pardon me 4 using amazon dot ca links for products that i mention. its just easy to find references that way (and often u can look up the brand and find their non-amazon store etc etc)
this got super long so im putting it under a cut!!
• join an artist alley group!! i'm in this artist alley discord and it is a fantastic place to get info about cons, table display ideas, manufacturer recommendations, etc. there are more than just this group out there and i think there are bigger ones but i personally really like this one ^u^ i make a ton of use of the display resources and manu recommendation channels!
• if you can afford it, be choosy about the events you apply to. there are a lot of cons out there that are fantastic, and a lot that aren't worth the trouble, and i don't necessarily mean small vs big cons. some of my fav events are smaller artist alleys local to me, and most of the artists i know avoid informa (fanexpo) like the plague. check out what other artists have to say about past events and keep an eye out for red flags: personally i find cons with really out of date/poorly advertised social medias and websites that have mismatched info are a warning sign of a mismanaged and not well attended event.
• you don't need a lot of fancy display stuff to start, those sorts of things you can build up over time. im a fan of getting a ton of my display stuff from the dollar store >:)
when you're ready and need the space to display a good amount of art the main thing you wanna pick up is definitely something that gives your table some verticality, whether that's a pvc pipe style setup, pegboards, or modular cube shelving (we all used to use these big heavy grid ones until the plastic sheet covered ones came out and now we all use those. theyre cuter and lighter and fit better on a table and come in more colours yayay. im sure some people still like the grid ones since they fit gridwall accessories tho) there are lots of other ways to display stuff but these r what i am most familiar with. definitely helps to look at youtube and pinterest and discord groups for display ideas!!
another thing you will want to start is a tablecloth. not every con has their tables already covered! there are those plastic picnic ones at dollar stores, and you can thrift bedsheets/fabric too.
• depending on the type of display and art you do you'll need some way to attach signs/prints/charms/etc to your display. i just moved from blu-tack to magnets but i used to use sewing clips (back when i used the grid cubes) and before then masking tape. all of them are okay and cool! except blu-tack. don't make the same mistakes as me it adds like 40 whole minutes to teardown and it leaves gross oil on the prints after some time. evil
• if you don't have business cards you can make a sign with a qr code that links to you/your shop! there are lots of qr code makers online that u can even customize with images and colours and stuff. there will be people that wanna know how to find you again after a con!
• these days a lot of people don't bring cash to conventions and it's pretty vital to bring some sort of card reader or other digital payment method. most of us use square - they recently made it so that the phone app can accept tap! so you don't need to jump for the expensive physical readers. i've also got a paypal dot me qr code and my etransfer email (i think this is a canadian thing) on a lil sign on the table so people have lots of payment options. usually over 50% of my con income comes from non-cash sales!
• make sure to bring change!! we've forgotten in the past and done okay but it's always handy to be able to make change for people. you'll want a secure place to put cash as well, whether it's a locked moneybox that you keep out of sight or a place on your person (friend of mine uses a fanny pack!) you never wanna leave your table completely unattended but especially when it comes to the moneybox. if it's a multi day con this is an item you mustn't leave at your table overnight.
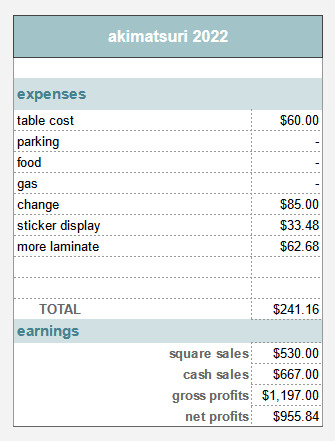
• keep count of your sales and expenses properly so that you can see how much you made at the end of the con. i really like spreadsheets but you can even just note it down in a book. here's a little example of one con for me:
• you'll want to make a checklist of stock and display stuff to bring, but don't forget to make a list of minor stuff like phone chargers and scissors and tape and glue and pens and paper. multiple types of tape and paper if possible. they don't feel super important until you're stuck because you forgot to make a price sign and have to get by with a sharpie and a napkin. don't let that be you!! dollar store sticky note pads are super useful for this type of thing.
• plan out your prices and do as much prep (counting, sign making, display planning, packing/sorting) as you can beforehand so that the event doesn't feel too stressful. make sure your merchandise is stored in an easily accessible way for you behind the table so you aren't scrambling or rummaging too much when people are asking for stuff!
• similarly, whatever you can leave out for people to just pick/grab themselves, the more of it you're likely to sell. things like stickers and charms are good for this - people like to touch stuff! and it makes it so you don't need to go fishing for items for people as frequently. generally i don't do this with more expensive items just to be safe.
• if you sell prints, people are gonna ask for sleeves to keep them safe, especially at outdoor events. sometimes people ask for sleeves/bags even if they dont buy anything. they're a good idea to have on hand and you can find em for pretty cheap online and for a bit more expensive at dollar stores (i use OPP bags. if you dont wanna use plastic you can always get paper bags/envelopes/glassine bags instead)
• a cushion for the chair is a good idea. lots of conventions have really uncomfy chairs. some folks even bring camping chairs instead!
• pack snacks/lunch/water/drinks/have lunch plans. if you have a table buddy that is able to run out for food that's always nice. you might be sitting but it uses a lot of energy to interface all day!! you'll be exhausted and hungry and it's gonna be important to get enough fuel for your brain to function properly. i genuinely would recommend juice/soda/coffee/energy dink alongside water and food if you wanna live, especially if its a multi day con. get good sleep on days between!
• if you're excited to do trades with other artists during the con, the general etiquette is to wait until later in the day/near the end when the crowds are winding down! it's always okay to ask if someone's doing trades, and don't be upset or press them if they aren't interested or have certain stuff they don't want to trade.
• speaking of con etiquette, depending on the type of vert you are (intro/extro) and or how much customer service experience you have, interfacing can be nervewracking. my general rule is that if they stop to look, i say Hello and let them browse. if they seem interested in my table i try and do some small talk. stuff like How are you/How's the event been for ya/compliments on their outfit/cosplay/merch they have on like pins etc are good! kids and old folks love this. as tiring as it is to do some of my favourite parts of cons is talking to nice people that like my art!! all the folks that say nice things about my work are what keep me drawing ;w; i keep my sketchbook with me to jot down/doodle nice and funny encounters just cus it makes me happy to look back on XD
• when it's teardown time try to put stuff away as neatly as you can. you might be tired and just wanna toss all your stuff into whatever it is you brought it in but i promise future you (especially next-con you) will be so thankful that you put all your price signs into one baggie etc etc.
• speaking of bringing and putting away merch - you'll need a way to get it all from your home/car to your table and back. lots of people use dollies and other types of utility cart (i can guarantee there are a bunch of those grandma grocery ones at your local thrift store!!) - i personally use a big luggage bag and a collapsible wagon, but back in the day we used to CARRY bin after bin of stuff from the car and back in multiple trips which i would NOT reccomend lol. not every convention hall is easily accessible or close to parking so not having to lift stuff if you can avoid it is gonna be vital.
73 notes
·
View notes
Text
Grailfinders #338: Taisui Xingjun

if I can say one nice thing about taisui xingjun, it’s that lasengle went out of their way to make him feel very cursed. sometimes waiting for a servant to pop up in their event gives you cool new abilities to work with that aren’t part of their in-game kit, and sometimes they show up at the last second, throw out a vague party buff on for the last fight, and then fall asleep immediately. this time’s the second one.
thankfully, taisui’s not all that difficult a build, at least on the surface. he’s a Divine Soul Sorcerer, and that’s it! though to be fair, that class alone is really kind of mashing together two classes as-is, so he’s still not that simple.
check out his build breakdown below the cut, or his character sheet over here!
next up: make sure to like, comment, subscribe, and turn on notifications to see this build first!
Ancestry & Background
if we were being more objective taisui’d probably be a custom lineage, but it’s our build and I want him to be able to turn into his big form at will, so he’s a Changeling. with that, he gets proficiency in performance and persuasion, and his plastic presentation makes him a Shapechanger as well, so he can turn into any small or medium race as long as they have the same number of limbs, and you can’t turn into anyone specific without having seen them first. on top of all that, you get bonuses of +2 Charisma and +1 Dexterity.
finally, your background. you literally just sit there the whole event until like three deus ex machinas pile on top of each other to summon you into a vaguely human body, so that sounds like the Book of Many Things’ new background, the Rewarded, to me. that nets you proficiency in Insight and Animal Handling, as well as the Lucky feat for literally free. why anyone would ever pick a different background ever again, I don’t know, but now you get three luck points a day, and you can spend them forcing a reroll on any d20 roll directly affecting you and pick the better option of the two. whomst’d’ve the fuck thought putting that on a background was balanced.
Ability Scores
your highest score is your Charisma, because you’re basically skating by on your good looks and hoping that’s enough to make people farm the ungodly number of Cons needed for all your ascensions and NP levels. it is, but that doesn’t mean I’m happy about it. second highest is your CON. yep, there’s a buncha them in there. third is Dexterity, because you don’t wear armor. like, at all. honestly this should probably be lower considering how easily you get eaten, but I’m trying to make a build that’ll survive level 1. after that comes your Intelligence, because the Con are quick studies at least when it comes to construction and video games, so they’re at least a little above average. that means your Strength is nothing to write home about- you’re a god, but you’re a kid, and your arms are kind of noodly. finally, we’re dumping Wisdom. as the Con you’re easily swayed, and as a god your tired ass isn’t helping anyone on watch duty.
Class Levels
1. as mentioned before, you’re a Divine Soul Sorcerer, which gives you Spells you cast using your Charisma. before we go into those, you also get Divine Magic, letting you pick spells from the cleric spell list as well as the sorcerer’s. you also get Inflict Wounds for free for your spooky shadow hands. I know taisui is technically true neutral, but his god form’s a god of curses and retribution, so I’m saying at the very least his powers are evil-leaning. speaking of, you’re Favored by the Gods, so if you fail a save or attack, you can add 2d4 to it once a short rest. whether being favored by this god is a good thing or not is anyone’s guess.
so then, spells! for cantrips, Blade Ward will keep your body in once piece for now, Morgan worked hard on that, while Chill Touch is another kind of spooky hand that prevents people from healing, which is pretty cursed in my book. you can also whip out your bell and Toll the Dead, dealing extra damage to injured targets, your you can curse someone with an Infestation, forcing them to move in a random direction if they fail a constitution save.
for leveled spells, Bane is a light cursing for a first level spell, forcing up to three creatures to make a charisma save. if they fail, every attack or save made for up to a minute gets a d4 taken away from it. we’re also giving you Mage Armor for +3 AC because we’re not that sadistic. even if taisui is.
oh, speaking of saves, you have proficiency in Constitution and Charisma saves, as well as Arcana and Religion. you kind of are a god, after all.
2. second level sorcerers become a font of magic! rn that just means u can cast another first level spell every day, like your new one, earth tremor! most of you is still down there, after all, just twitch a lil.
3. congrats! you survived long enough to get second level spells! now you can feed your party parts of yourself to aid them, giving them a bigger hp bar for the day! you also learn metamagic this level, so now your font of magic actually does stuff that’s important! you can spend your sorcery points to make a spell heightened, giving your target disadvantage to their save, or careful, automatically making the save for some of your friends! taisui’s got kind of a yin-yang thing going on between his feeding and his cursing, so this is the best of both worlds!
4. since ur kind of a nega-jupiter, you’re now a scion of the outer planes! yaaaay! since your god’s evil, you get resistance to necrotic damage, and you get chill touch again!
you can also cast mold earth to cover yourself up again, and you can cast wither and bloom! with this spell, every creature you choose takes necrotic damage, and one creature you choose can roll a hit die and gain hp back! it’s literally everything you do in a single spell!
5. fifth level, you have magical guidance, spend sorcery points to reroll checks, whatever! the important thing is now you can bestow curses! the phb gives some suggestions, but really you can do anything your dm lets you get away with!
6. sixth level divine souls have empowered healing, so whenever you or someone next to you heals someone, you can spend a sorcery point to reroll some of those dice, once a turn! i’m not sure if that works for life transference or not, but either way this spell makes feeding yourself to someone a lot more visceral. you take damage, and then someone else gets healed for twice the amount of damage you took!
7. you can now give urself an aura of purity, making friendly creatures in it immune to disease, resistant to poison damage, and they get advantage on saves against a buncha common status effects too!
8. at eighth level you get another ASI, so now you’re a Baleful Scion. that rounds up your Charisma and lets you pull people into the Grasp of Avarice- once a turn, you can add some necrotic damage to the damage you deal, which also heals you for that amount. your best healing spell so far uses your HP, so you need to fill that back up somehow.
you can also summon a Spirit of Death for an hour, making a floaty medium boy you can ride around on! you don’t even need to spend any actions commanding it or nothin’. it can only attack one creature at a time, but it’ll lock on to them and let you know where they are the whole time!
9. you can now make an insect plague! don’t misspell that, trust me. now you can make a 20’ radius sphere of locusts that obscure the whole place, and everything inside it has to make a constitution save or get piercing damage!
10. tenth level sorcerers have another kind of metamagic like extended, doubling the length of a spell you cast, up to an hour. you can also cast resistance to protect someone from a saving throw-related dangers.
speaking of saves, you can cast the most messed-up spell in the game, Contagion! if you hit your target, they have to make a constitution save at the end of each turn, working like death saves. after three successes, the spell ends. after three failures, you can curse them with a terrible disease for seven days.
11. at eleventh level, you can cast sixth level spells like Heroes’ Feast! after casting this, you can feed yourself to up to twelve creatures, curing them of all diseases and poisons, immunity to poison and being frightened, and they had advantage on all wisdom saves! on top of that, they gain extra HP, and all for a full day! just… maybe don’t tell them what the feast’s made of.
12. twelfth level, another ASI! bump up that Con for more Cons! it’s health, you’ll get more health. this is retroactive, remember, so you get an extra 12 HP this level.
13. thirteenth level sorcerers get seventh level spells, and its time to get real curses! with Divine Word you can hit any number of creatures within 30’ of you, forcing a charisma save on all of them. depending on how many HP they have, they’ll become deafened, blinded, stunned, or even straight up dead if they fail a charisma save. this also banishes any celestial, fey, or fiend if they’re not from around here, so that would make Dagon a real cakewalk. also, on the “instantly killing people” front, this gives you more than enough room to take out some poor bastard’s whole extended family.
14. your Angelic Form is a lot different than most people would expect, but you can still use your bonus action to fly around on your curse lump, with no limit on flight time!
15. eighth level spells! you can now Regenerate your allies by forcefeeding them a whole Con, giving them a healthy amount of HP immediately, with a trailing 1 HP per turn for an hour afterwards. two minutes into the spell any missing limbs grow back, though they can also instantly be reattached by just slappin ‘em back on if you got ‘em.
16. another ASI, another Con for more HP.
17. you can now use twinned metamagic, turning a single-target spell into one that hits two creatures!
speaking of single target spells, Power Word Kill’s a hell of one, ain’t it? if the chosen target has 100 HP or less, they die instantly! no saves, no nothin’.
18. you spent so much time putting Cons into other people, we almost forgot to get some Cons into you! with Unearthly Recovery, letting you spend a bonus action to regain half your HP once a day! big heal energy.
19. one last ASI before the build finishes! with the Tough feat, it’s like you ate two Cons at once, giving you an extra 38 HP now, plus another two next level.
20. at level twenty you get the sorcerer’s capstone, Sorcerous Restoration! every short rest, you get four extra sorcery point!
…yeah there’s a reason we usually multiclass.
Pros and Cons
Pros:
you have an amazing Con-stitution for a caster, giving you way more HP than most would expect of you. having a healer that doesn’t die easy is super helpful. this also means you have great con-centration. your more powerful spells don’t need it, but dropping a spell always hurts.
not only are you a great healer, you’re great at making other people heal too! you also have access to some strong defensive buffs like heroes’ feast, aura of purity, and resistance. also, being able to grow back limbs can be pretty useful!
you also dish out devastating debuffs, destroying enemy defenses with divine words, curses, and disease.
Cons:
yep, there’s a lotta them in there.
(but seriously, a lack of direct attacks drags fights out, the sorcerer capstone sucks)
34 notes
·
View notes
Text
Kitchen Witch Essentials
I want to preference this by saying your priorities of tools for your craft will vary as you get more experienced. If you get more into baking, you may choose to invest in a kitchen mixer. If your path goes more down drinks, you might want to get a French press. This list is for those starting out or looking to maintain general witchy cooking. Nothing on this list is mandatory, so don't feel like you need to go spend money just because it's on this list.
This list will also assume you have general kitchen stuff, like pots, pans, and knives. You may not have everything, but you have enough to cook.
Wooden Spoon
If for whatever reason you don't have a wooden spoon, and you want to do kitchen magic, I strongly recommend you go and get one. You can get them at any store that sells Kitchen Utensils, including the dollar store.
For some kitchen witches, the wooden spoon is like a magic wand. Allowing the witch to direct energy. Personally, I just enjoy using natural materials whenever I can. Also, it's just such a useful tool to have when cooking. You can stir your food on stove top, and since it's made of wood you don't need to worry about damaging non stick surfaces. If you're boiling pasta, stirring with a wooden spoon helps get rid of the foam overboil. You can also just leave the spoon over the pot to prevent pasta water overboiling. Baking bread? Flip the spoon around and use the handle to bring the dough together.
Some people choose to add sigils or other symbols onto their witchy spoons. If you decide to do this, please do not use paint or stain, as this can come off while cooking. Unless this will be a display only spoon, of course. Safest way is to laser burn a design. Check etsy for custom spoons.
Herbs/Spices you know the properties of
I'm sure you already have some non perishable Herbs or Spices in your pantry or spice rack. Black Pepper, Garlic powder, Cinnamon, Paprika, that kind of thing. I want you to pick one and deep dive into the history of that Herb/Spice. What it's been used for in the past, what are some common magical properties and associations; what do YOU associate with it. Write down the magical association, like protection, banish negativity, prosperity, ect. Start with one, work your way up to three. If you have trouble memorizing, keep a little cheat sheet near by.
Now when you add these seasonings, you know what energies you can add/attract with your food.
Mortar and Pestle
If you already have another way to grind spices, like a coffee grinder, this does not need to be a priority. And if you have arm or shoulder issues, I don't recommend using. The main benefit to using a mortar and pestle is the crushing style of grinding tends to release more aroma and flavor then the cutting style of a coffee grinder. If you plan to just use for dry spices, you won't need a very big or fancy one. 20 dollars should get you something small and solid.
Make sure you are getting one made of stone. I tried a wooden one and it's garbage. I use it to hold messy spoons. There are also metal ones, and while I've never tried one, I encourage caution. I worry about long term use stripping whatever coating is stopping it from rusting.
Jars
Glass Jars are so great to have in the kitchen. Leftover sauce? Put it in a jar. Suddenly made a jam? We got jars to put it in. Meal prep overnight oats? Jars are here for you! They're just great for storage. And you don't need to buy them. Lots of things come in jars; just give them a hot soapy soak, scrap the label off, wash and reuse. If you prefer mason jars, I recommend washing the lids by hand. The lids aren't meant to be reused for jarring, so they rust fairly quickly after a few washes. You can buy replacement lids, however.
Plastic Containers
Jars are great, but things get a little dicey when you want to put stuff in the freezer. Water likes to make sure everyone knows it's cold by puffing up bigger; like look at me, I'm freezing here! Which means, there's a chance your glass jar can shatter.
But freezing food is the best way to preserve food since you don't need to add anything like extra salt or sugar. So get some freezer safe containers. I love making batches of broth and stock, and freeze it for later. Or if we have a lot of leftovers, I'll freeze enough for a dinner another week, incase I don't have enough spoons to make dinner one evening. And don't worry, you can wash and reuse plastic containers too.
I'll also freeze food I notice is starting to go weird. If I buy a huge bag of baby spinach, but can't get through it all, I'll transfer it to a freezer bag. Adding frozen spinach to food as it cooks is one of the easiest ways to up your nutrients. You can also freeze other vegetables, just make sure you cut them up first.
Crock Pot/Slow Cooker
Every Witch Needs a Cauldron, and these are Electric Cauldrons. Prices vary mainly based on the size you want. There are different brands, different colors; you can even get some in the theme of your favorite fandom. But they all have the same 3 core settings: High, Low, and keep warm.
Slow cookers are....well, slow. Which is great for certain kinds of food that need to sit for a long time, like meats. But it's also great for Kitchen Witches with a lot going on. Non witches will "Set it and forget it" but it's a good idea to stir every once in a while. Which is where the magic comes in. So, if you're a scatter brained Witch, Like me, or have ADHD and have trouble focusing, an electric cauldron might be for you. Throw everything together in 15 minutes, then give it love and attention when you remember. Normally that happens when you start to smell the food.
Again, this is my preference. Some Kitchen Witches I know prefer to identify a specific pot as their cauldron. Some went and got an actual full size, cast iron cauldron; which is amazing but not feasible for most. I grew up using a slow cooker, so I'm very comfortable around one. But if it's not your thing; that's fine. Maybe your cauldron will be a rice cooker or a Boston Shaker.
#witch#kitchen witch#kitchen witchcraft#klickwitch#food and folklore#Food magic#magic#witchy#witch tips#pagan#February#kitchen magic#house witch
37 notes
·
View notes
Text

a bit anxious about posting this, but i wanted to show off my meeshell mermaid custom that i just finished!
i loved her design in the show, and was really dissapointed when the actual doll looked nothing like her, so i made my own !!
i also think mattel had a missed opportunity in giving meeshell a wheelchair instead of just having her magically able to walk on land even though she hadn't gone through her story yet!
more info about what i used/more rambling under the cut!
-i was not a big fan of the later ever after high face molds, so i used a legacy day ashlynn ella as a base! she had really similar eye makeup to meeshell, so it worked out great :)
-her face repaint just includes the stars around her eyes with glitter, purple eyebrows and a slightly bigger lip in that same color.
-i made her earrings and hair piece with floral wire and beads i got at michaels and a shell i had lying around.
-her hair is rerooted with a mix of 10mm curly blossom, ballet pink, and pink & silver tinsel from The Doll Planet Hair on etsy! i brushed it out a bit and cut it to length.
-her outfit is from the original meeshell doll with the top repainted with acrylic mixed with fabric medium. and for the little details painted on the plastic parts of her outfit, i used acrylic and some glitter paint.
-i made the mermaid fin using this no sew tutorial by TheDollBoy on youtube.
-her wheelchair is a barbie wheelchair with a shell pattern felt sheet and starfish that i got from michaels glued to the inside of the wheels.
-her hands are actually an extra pair of g1 lagoona blue hands that i had lying around, painted to match her skin tone! i also used a glitter topcoat over her face and body.
-the stand in the bottom middle picture is from the deluxe little mermaid halle bailey doll !
#meeshell mermaid#ever after high#doll#doll custom#eah#ever after high doll#ever after high custom#my art#image id in alt text#ihope the ids are okay let me know if i can do anything to improve!
117 notes
·
View notes
Text
…my current sketchbook is running out of pages. The replacement sketchbook I bought did Not handle watercolor very well. It did, however, have a flexible plastic spiral that was easy to remove, and I have an entire block of Thick Watercolor Paper just lying around because the sheets are too big.
thus, I have started Yet Another Project (cutting the big watercolor sheets into small pages to make my own sketchbook with Good Paper and the cover+spiral of the one I bought) (and customizing the cover while I’m at it)
#herearedragons speaks#herearedragons crafting#I should probably leave some of the non-watercolor paper in for sketching purposes#even cooler#I’m going to have a sketchbook with multiple paper types
20 notes
·
View notes
Note
Top 5 WORST fabrics
1. that fuckign. synthetic knit that some of the sport coats at work are made of. I don't know what it's called but I hate it. It's polyester with barely any stretch and is. so. DENSE. Worst thing to alter. Damn near impossible to get a pin or a hand sewing needle through, and sometimes it makes the machine skip stitches. A lot of the sport coats are half lined, and if you bring me one of those ones with the side seams pinned to take in, I will just take in the centre back seam instead because I DO NOT want to hand sew the lining back down to both entire side seams on that horrible impenetrable bullshit fabric.
Sometimes it has a woven looking pattern printed on it, as if to mock me.
Some of the shirts at work are made of a slightly softer version of the same stuff, and I once tried to mend a small hole in one of them using a zigzag stitch and it shredded the fabric and ruined the shirt. They had to go find the customer an identical replacement shirt, because the stupid fabric couldn't hold up to a few tightly spaced zig zags.
Bullshit, bullshit garbage fabric. I hate it, I hate it I hate it I hate it. Everyone should stop manufacturing it immediately. Stop making it and destroy the formulas so nobody can ever make it again. It's not even a particularly bad texture to touch, relatively speaking, it's just a nightmare to sew.
2. Faux fur. To be fair, there is some decently nice faux fur out there, but most of it is just such an icky plastic-y texture and it sheds so much. So so much, and then you're worried about breathing in floating fuzzies of plastic. And it can also be really hard to get a pin or needle through the base fabric, depending on what kind it is. I remember I had some scraps of white faux fur that I used for craft projects as a small child, and it was like that, and there was some kind of finishing (presumably to help glue the hairs in place) that made the back of the fabric all crusty.
It's the kind of thing that's awful to touch if your hand is even the slightest bit sweaty. I dislike polyester fleece for the same reason. No fleece sheets or pyjamas for me, ick!
3. Really loosely woven boucle. Who would invent a fabric that frays so gotdamn much? Look at this. (image source) Awful. Falls apart if you sneeze at it. Unpleasant texture, and not even nice to look at. (Yes I chose an ugly picture on purpose, but it's not a look I like even if it is in nice colours.)
Where's your structural integrity?? You can have weird lumpy fabric and still weave it decently tight! Especially if it's wool and you felt it a little bit.
I shortened a skirt for a co-worker and it was made of similar stuff, and I was worried I'd damage it because it was so loose and shifty.
What happens if you walk by a tree or something and snag a thread? Whole thread comes out and deforms a big patch of fabric? Well that's what you get for making all your threads just acquaintances instead of best friends.
(I hate poly chiffon for similar reasons.)
4. Poly/cotton blends, because they feel like a betrayal. You could have been 100% cotton but you aren't :( Could have been a nice comfy shirt or nightgown that could eventually be used for firestarters once it's too worn out, but no, can't use blends for kindling because the polyester part melts into nasty little black plastic blobs. Not like 100% cotton or linen, which burns nicely and leaves basically no ash.
And I hate pilling, horrible hell texture, and synthetics tend to pill way more.
5. Anything with glitter on it, because it's contagious. Small sequins are also bad (see blog post linked in poly chiffon line) but at least they're sewn on and only come off where you cut them.
I think we as a species have moved past the need to glue glitter onto fabric, because it does not stay glued. We have foil print, and metallic ink, and beading and rhinestones and metallic thread and all kinds of other ways to do the sparklyshiny. No more sticking glitter on things that might go in the wash.
Generally speaking I dislike synthetics and Bad textures, though everyone's opinion of bad textures is different. I'm also not fond of stretch knit, but it has its uses.
197 notes
·
View notes
Text

Thanks for all the love for yesterday's first chapter! 🥰
It's going well between them. 😅
Chapter 2
Zelda turned on her heel, walking with firm steps toward the stack of fabric she had prepared for the class: A selection of pastel colors for the bodies of the sand seals, some earth-colored woven fabrics for the Koroks, and the occasional patterned cut for highlights.
When she came back, Link angled the pattern in his hands, squinting through the plastic sheet. Then, he raised his hand again. "Ah, Ms. Zelda? This isn't going to work. The sand seal is cute and all, but I really need to sew the dress I mentioned.”
He put the pattern down and pushed it to the corner of his desk. “This was promoted as a sewing class for beginners, no? So it will surely be no problem to guide me through the process of putting a dress together.”
The nerve of this guy! Annoyed, Zelda sucked at the inside of her cheek and set her fabrics down. She was not going to let him ruin her class. If he needed a dress so badly, he surely knew a designer who could help him out and customize what he wanted. He was the one working for CeCe’s after all! Or he could just order one from Beedle’s like everyone else. Three different styles, colors, whatever. All of them size 6. Click, click, delivered. Skies, he could even have them wrapped in tissue paper if he paid a little extra!
She licked her lips and clasped her hands in front of her. "You booked our 'Sew a stuffed animal class'."
16 notes
·
View notes
Text


PC-Bot (2004) by White Box Robotics, Ottowa, Canada. The PC-Bot uses PC based hardware and a system of easily accessible trays to mount custom hardware. The 912 is designed from the start to be “cut, drilled, painted, accessorized, and modded!” while the 914 released in 2007 (second and subsequent images) is engineered almost entirely from industry standard PC hardware. “The 9-series robot isn't merely a cold conglomeration of sheet metal and electronics. It's a companion we've longed to know all our lives and we have deliberately engineered real emotion into the metal and the plastics in order to evoke a positive and energy-charged human response. At White Box, we understand - it’s about the turn of the wrench, the feel of the screwdriver in your hand… working with earthly elements - copper, steel, silver, lead, and oil that is this spectacular machine. It's about manipulating these materials in such a way to create quality of life at the end of a digital stream for a real person. We have opened the hardware and the software to you so that you can build this modern machine and watch it live, move, interact with the world. For just an intoxicating second it takes you somewhere else. We hope you feel shifted…suspended, briefly glancing twenty-five years into the future. Somehow you've had the privilege to build a machine that feels so miracously alive!”
37 notes
·
View notes
Text

This is my setup so far!
Things might change in the future but so far, I’m pretty happy with it!
Before anyone says anything I know a lot of the items I got were a bit extra and that cheaper alternatives are available but, this is one “big” tax splurge/birthday present!
I'm going to do my best to keep this up to date as things develop!
Cage/Perches
C&C Outdoor Large Cat Cage Enclosure - 4/5
So far I love this cage! With the set up pictured above, I actually ended up with extra panels to expand further in the future.
This cage offers a lot of versatility and would be great for odd shaped spaces or tight spaces that might require a little bit more creativity!
As far as durability goes, I would say that is pretty average for a C&C cage. With that being said... USE THE ZIP TIES! Or invest in additional wire cage supports or else the first time you move it... it will fall apart!
Pros
Weight - Light weight, easy to move and and tare down!
Price Point - Affordable and way cheaper than traditional bird cages of the same size!
Versatility/Customization - This is a build your own cage set! You can go wild and pretty much do whatever you want!
Add-ons - Because this is a C&C cage there are a lot of options for expansions and a lot of add-ons (ramps, doors, patios, etc) that can be bough!
Cons
Durability - So long as your using extra supports the durability isn't an issues. Without the supports... this is going to fall apart the first time you move it!
Bar Spacing - The bar spacing on this is large! 1.65" (4.1 cm). Because of the bar spacing your going to need to get a 2" Fender Washer in order to attach most standard bird accessories. An easy fix but something to be aware of!
Cleaning - Because this cages relies on joints there are plastic pieces that jut into the cage and run the risk of being pooped on. If they are pooped on... You will have to take apart a large chunk of the cage and remove the joint to clean it... It's a pain in the ass.
Corrugated Plastic Cage Liner Base 3/5
This works just as intended! It keeps what it needs to in and what it needs to out! It can be laid flat, and folded for storage if need be.
Pros
It works! Keeps poop and seed inside!
Cleaning - Easy to wipe down and poop doesn't seem to stick to the surface! Water and weatherproof is also a plus!
Cons
Price Point - I, admittedly, did not do my research before purchasing this base! This could have easily been made for about half the price from a local hardware or craft store with a sheet of Corrugated Plastic and either some hot glue or, if I wanted to get fancy, some Plastic Chicago Screws.
Cleaning - While the outside is easy enough to clean, corrugated plastic is hallow-ish on the insides and is IMPOSSIBLE to clean! To avoid dust build up you can use a length Rubber Edge Trim along the top! Make sure you check the with of your Corrugated Plastic before buying any trim.
Perch 4/5
It's a perch, it do what it do. Nothing super exciting.
Pros
It works as intended!
Cons
The shorter perch was NOT pink, lol. Not important to most people but it is important to notes that its defiantly more orange.
Lining/Hammock - 5/5 (I'm bias because I made them, lol!
The lining is simply two pieces of Anti-Pill Plush Fleece sewn to size! Anit-pill fleece is stain resistant, easy to clean and soft to the touch!
Pros
Price Point - Much cheaper then pre-made linings!
Reusable - Simply wash and reuse! No reoccurring monthly expense for something like puppy pads!
Customizable - Make them any color or all the colors!
Easy to Make - For real! Sewing a full bottom lining takes me about 30 mins from start to finish! If sewing isn't your think you could do it tie blanket style or simply cut a piece of fabric to size and call it good!
Food/Water
3 in 1 Cat Bowl - 5/5
I love this this feeder! Not only is it super cute but, it allows you to lock the bowls in place, preventing them form moving. The angled sides of the bowl also really help to keep seed where it should be! This is super easy to clean and the fact that it has two bowls and a gravity feed water dispenser makes it perfect for pigeons!
Pros
One stop shop - because of the two bowls and the separate water dish this works great for offering see, grit and water all separate!
Bowl Position - This feeder has a star shaped grid in the bottom that allows you to change the position of the bowls. This allows you to turn the bowl so the raised edge is facing the water dish preventing water from getting into your grit and feed!
Cons
Seeds under bowl - Because the bottom of the bowl holder is open if there are seeds under it the bowl becomes difficult to lock into place. Not a big deal but it can be annoying to deal with!
Water riser - The water dish has a white, circle riser that is open in the center. It's not a huge deal, Mango got use to it after his second attempt, and it's totally removable!
Toys/Enrichment
I'll make this part short and sweet, lol!
Mango doesn't care at all about anything but his Brick. Bitches love bricks.
10 PC Cat Toy set
Mirror
Doughnut Dog Toy
Cake Foraging Toy
Snuffle Mat
Brick
Nesting Pink Bed
Crinkle Paper
Paper Straws
Hay Feeder
7 notes
·
View notes
Note
YEAHHHH LMAOO that was the only time I've sent an ask on anon idk why I was so anxious that day LMAOOO
Tho I will say I've debated asking this one question to u so many times and everytime I wanna go on anon but then I realise it would not. Make any sense . If I was on anon so I've just refrained from asking lmaoo (which wow brain as soon as I typed this I've forgotten the question. Good job brain)
ANYWAYS MHMHMHM it's of a strawberry flower!! It's genuinely just such a gorgeous tatt I'd want it for myself even if it wasn't matching so I feel very comfortable getting it in the case we ever split up or anything <3
OOHHH THANK YOU YES PLS FEEL FREE TO GIVE ADVICE I AM ALWAYS LOOKING FOR MORE both for traveling solo in another country (I am Scared) and also tattoo after care?? Like. It's gonna be above my ankle how careful of socks/pants should I be :000
I mean if you ever wanna go on anon to ask me something that's totally fine I get it, and also if you're ever worried about asking me something just know that if I ever don't want to answer a question for any reason (ie: the answer isn't something I want to divulge publicly, I don't feel comfortable talking about that subject, I feel like I just don't have a good answer, etc.) I just won't answer it. it doesn't mean I'm going to hold a grudge against someone who asks me something I don't wanna answer. I get it, people are curious or have questions or whatever and that's fine! if I don't wanna answer I simply won't and that doesn't mean I'm upset or annoyed or anything like that
oooo a strawberry flower sounds so pretty!! I'm sure that's gonna look amazing
okay advice time for travel + tattoos under the cut bc it got long
oh yeah I was gonna say you're from canada right? I think going through customs is a bit easier for US/Canadian citizens traveling between the two countries, but still good luck with the lines. other advice I have for traveling in another country solo... while you might consider getting your currency exchanged, almost everyone and everywhere takes card these days so as long as you have a card that can be used internationally (I believe mastercard and visa are pretty much usable in every country, although I'm sure if it's just between the US and Canada most cards are fine, just make sure to check). but also if you do wanna do currency exchange, wait until you're in the US to do that or else you'll get ripped off. once you're in the US just go to an ATM and withdraw cash from your bank account, and it'll come out in US dollars without the additional fee you'd get from going to a currency exchange place
OKAY TATTOO TIPS
I think most tattoo artists these days use second skin after giving someone a tattoo. it's basically a sticky thin sheet of plastic that the artist will put on top of the tattoo after it's finished, and usually your artist will instruct you to leave it on anywhere from 24 hours to several days. any artist worth their salt will properly explain how long to keep it on for, what to expect and look out for, etc. the second skin will protect the tattoo so you won't have to worry about it rubbing against fabric in the initial few days after getting it. although I'll say taking that stuff off is a BITCH it's like peeling a bandaid off but so much worse
however, your artist might not use second skin. out of my five tattoos, only two of the artists I've been to used second skin which is apparently unusual because from what I've heard from tattoo artists is that it's pretty much standard at this point to use it. however because only my latter two tattoos used second skin, I didn't realize that I have reactions to second skin that make it not suitable for me to use. you might have a reaction as well and that's ok! for me at least my reaction wasn't anything bad, it's just that I noticed a lot of redness around the second skin and when I took it off (earlier than I was supposed to) it left marks around my tattoo that didn't go away for 6 months. so yeah in the future if I go to an artist and they want to use second skin, I'm going to refuse because I've healed 3 tattoos perfectly fine without it. so if your artist doesn't use second skin (and tbh even if they do because you'll need this once you take the second skin off) buy some aquaphor. your artist is probably going to instruct you to wash the tattoo with antibacterial soap 2-3 times a day, and afterwards you should put a thin layer of aquaphor on top of the tattoo to protect it and soothe any dryness or scabbing. it might seem annoying to wash a tattoo so many times a day, but trust me once it starts scabbing you're going to want to wash it because it itches and the aquaphor calms it down.
having the tattoo on your ankle might be tricky since it's too cold to wear shorts, and the hem of your pants might rub against it. try to wear pants that are looser around your ankles (no skinny jeans or leggings) so that the fabric doesn't irritate it. and try to wear socks that don't touch the tattoo.
above all though, your tattoo artist should be able to tell you everything I just told you. don't be afraid to ask them questions. they want your tattoo to heal nicely bc that's their work! and just in general don't be shy to talk to your artist. my first two tattoos aren't bad by any means, but I don't love them because I was too anxious to properly communicate with my artist about what I wanted. don't be afraid to ask them to change something in the design, or if they put the stencil on and you want a different placement tell them! your artist is there to work with you so just talk to them :)
okay that got so much longer than I meant it to hope that helps!!
8 notes
·
View notes
Text
How I Made C-53's Cube For My Cosplay

(cosplay)
This isn't going to be a full step-by-step guide or anything, just an overview to give an idea of all the materials and effort required for this specific cube so I skip a lot of details. If you do manage to use this as a guide to make the cube yourself I'd appreciate a credit (and would love to see it).
For anyone curious about my process: I worked on this for about two months in total. I started out with different materials and a different concept and ran into a lot of roadblocks, at least one short circuit and spent quite a bit of money. I had to learn basics of LEDs, programming them, circuitry, electronics etc and spent many hours not even making anything and just learning things to get an idea of what I will and won't be able to do (for example I couldn't program the LEDs myself because the additional cables and microcontroller board simply wouldn't have fit inside the cube but I had to learn a lot about it first to reach that conclusion). I'm not gonna share the previous versions but they all followed the basic general idea (blinking/"moving" LEDs inside an acrylic box) just executed worse.
The parts and tools I needed for the final cube:

and there is a German website that makes custom acrylic boxes so I chose a 105 x 105 x 105 mm box with the screws to hold it together (I like the screws for a more computer/technology look) :

The bluetooth controller came pre-programmed with exactly the light effect I wanted and I control it with my phone.
All the LED parts are connected/soldered together in this general layout:
After connecting everything I stuck the LED sheets to the plastic cube that I cut with an exactor knife to make space for the cables and connections based on how I personally could work best with it
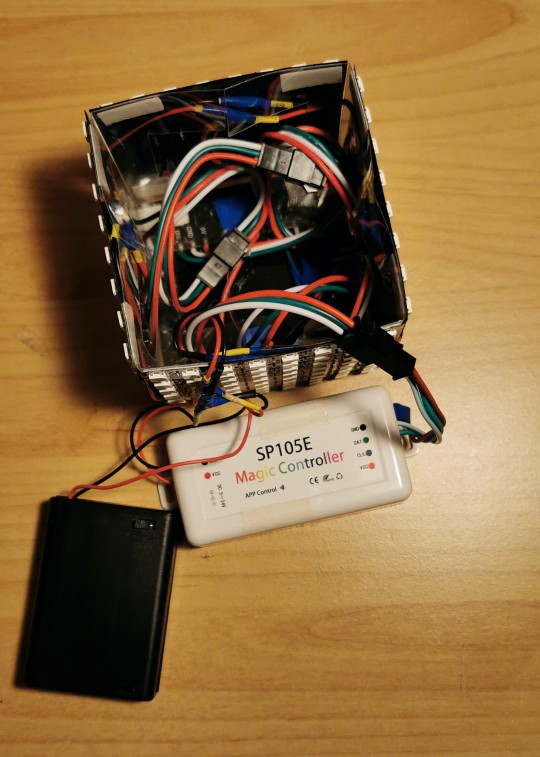
I sanded the acrylic box before assembling it to give it a frosted look and diffuse the light and for additional diffusion I made sheets with the polyester cotton by wrapping it in the clear packing tape so I can easily take it all out and put it back in
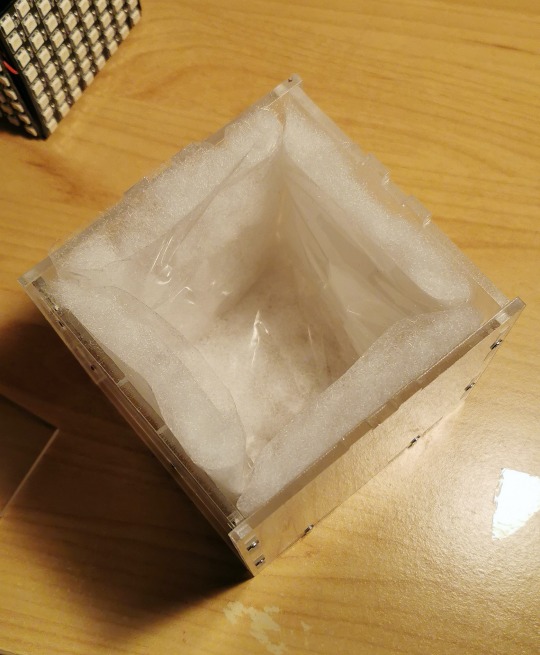
And it all fits together like this and the lid of the acrylic box becomes the bottom so it all rests on the battery pack and bluetooth controller so when turned around it gives the illusion of a free-floating cube inside the box


The final result is pretty much exactly what I had envisioned and I am unbelievably happy with it. All the hours and money that went into making this were absolutely worth it and if nothing else this showed me again how you truly can learn and do anything if you just bring enough curiosity, passion and confidence to a project.
Also a quick shoutout to Kamui Cosplay and their discord, without their resources (videos and books on LEDs) and the helpful people in the discord I never would've been able to make this!
#at least one person was interested so here#I'm just happy I can finally show off this project#I didn't wanna announce it bc I was worried I might never make it after all#I did spare you guys a lot of terrible cubes haha#also this eats through batteries mad fast lol#mission to zyxx#c-53#cosplay#prop making#led#leds
63 notes
·
View notes
Last Seen Blogs

lawevadingdatsu
party people fuck off


arms-and-arrows
kick names and take ass

rusame
RusAme

secretumsecretorium
lolUntitled