#rblk buttons
Text

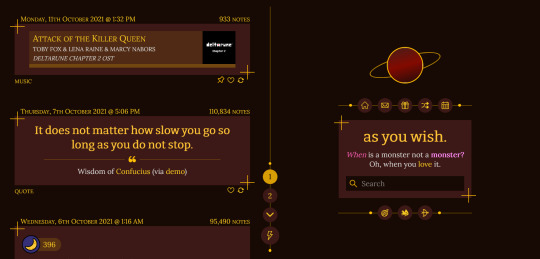
THEME 7: Unite
Syncs with your mobile theme colors and mimics the new in-dashboard blog view for a consistent look across platforms.
Static previews: index page, permalink | Code
Features:
Appearance options (show/hide header image/avatar/title/description, title font options, and background/text/accent colors) synchronize with mobile settings
Optional: Featured posts section, updates section, and blog member list in sidebar (require some HTML editing; see under the cut for instructions)
Unlimited custom links, plus a highlighted link under the title
Optional second palette
Customizable post width and font size
Optional search bar, like/reblog buttons, date/timestamps, tags (plus a show tags on click option), and Archive/Random links
Responsive
Supports new post types/pinned posts
And more!
For help, check my theme guide, or feel free to send me an ask. Theme credits and an HTML editing guide for the special sections are under the cut.
NOTE THAT ALL SECTIONS ARE DISABLED BY DEFAULT, TO AVOID HAVING EMPTY/UNEDITED SECTIONS. If you want a particular section to display, make sure you enable it in the Customize menu before making any changes, so that you can see it as it's being edited.
All of the below instructions assume that you've gone to your Customize page, then opened the "Edit HTML" menu.
Again, if you have trouble making your edits work, feel free to send me an ask or a DM for help.
Note for HTML beginners
Every bit of text or code is wrapped inside "tags", which have arrow brackets on either side. For example, a paragraph is placed inside <p> tags.
Every element has an "opening" and "closing" tag; the closing tag looks just like the opening tag, with a / after the opening bracket. The content inside one section is bracketed by these; for example, a paragraph would look like this:
<p>Text here!</p>
In the above line, <p> is the opening tag, and </p> is the closing tag. Tags of this sort can be placed inside each other:
<p>Some <span>special</span> text.</p>
Note that the "span" tags, both opening and closing, are both inside the "p" tags. You don't want a misordered set, like "<p>Some <span>special text.</p></span>". The opening tag nearest to the start should also have its closing tag nearest to the end.
It is extremely important that while editing the HTML for your theme, you make sure all opening tags have a matching closing tag. If you have a <div> tag, but no matching </div> tag, this might break the theme.
Featured posts
This section fetches the 3 most recent posts from a chosen tag on your blog. To select the tag:
Ctrl+F to "EDIT YOUR TAG HERE".
On that line, there will be a link inside quotation marks, ending in "tagged=featured".
Change featured to the tag of your choice; for example, "tagged=photo". This tag can include spaces, such as "tagged=my writing".
Save and ensure your posts show up as intended.
By default, the tagged posts are fetched from your blog, but you can change this so that the featured posts are from a different blog:
Ctrl+F to "EDIT YOUR TAG HERE".
On that line, there will be a link inside quotation marks, starting with "https://{Name}.tumblr.com".
Change {Name} to the blog username of your choice; for example, "https://starlightthemes.tumblr.com".
Save and ensure your posts show up as intended.
Be careful not to change any other parts of that section. The code for fetching the posts from blogs is easy to break.
Updates section
The updates section has two editable parts: the title, and the actual updates.
To edit the title:
Ctrl+F to "EDIT HERE: UPDATES".
Scroll a few lines down, until you find the line reading "Latest updates".
Change "Latest updates" to say whatever you want. Make sure the text stays inside the ... tags. For example, if you want the heading to read "My activity", that line of code should read "My activity".
To edit updates:
Ctrl+F to "EDIT HERE: UPDATES".
A little under this line, you'll see a template, with the outermost tags reading <div class="update">...<;/div>. If you're adding a new update, copy this template.
Scroll a few lines down, until you find the line reading "".
Now, for each update, paste the template once over (two updates are present for you to start with), and edit three things:
-> "3-LETTER MONTH HERE": The first three letters of the update month, e.g. "Jan".
-> "2-DIGIT DATE HERE": The two-digit version of the update date, e.g. "01" or "31".
-> "UPDATE TEXT HERE": The actual text that'll show up as the update.
Make sure that all the updates are separate- the starting and the ending of two updates shouldn't overlap.
Make sure all your updates are above the line reading """.
Save and make sure things look how you want them to.
Members list
To change the title of the members section:
Ctrl+F to "EDIT HERE: MEMBERS LIST".
Scroll a few lines down, until you find the line reading "Blog members".
Change "Blog members" to say whatever you want. Make sure the text stays inside the ... tags. For example, if you want the heading to read "The gang", that line of code should read "The gang".
Scroll further down, until you find the line that reads "{lang:Group members}". Again, change this to your chosen title, such as "The gang".
The actual members list can be customized in two ways. One, for group blogs, you can have it automatically fetch the blog members' main blog names/titles/icons. To do this, turn on "Members list" and turn off "Custom members list" in the main theme settings.
The other option is to manually add any group members and their icons/links. This will also allow you to add customized names and descriptions for each member. To use this option, turn on BOTH "Members list" and "Custom members list". Then:
Ctrl+F to "EDIT HERE: MEMBERS LIST".
A little under that, you'll see a template with the outermost tags reading <a class="member" href="//BLOGNAME.tumblr.com">.... If you're adding members, copy this template.
Scroll a few lines down, until you find the line reading "".
Now, for each member, paste the template (two members are present for you to start with) and edit three things:
-> "BLOGNAME": Next to "href" in the tag, and next to "src" in the tag. Change this to your member's username, such as "starlightthemes".
-> "MEMBER NAME": Takes the place of the username. This will show up in bold at the top.
-> "MEMBER DESCRIPTION": Takes the place of the blog title. This will show up at the bottom.
Make sure that all the members are separate- the starting and the ending of two members shouldn't overlap.
Make sure all your members are above the line reading """.
Save and make sure things look how you want them to.
Theme credits: Layout/design/icons by Tumblr, Style My Tooltips by malihu, featured posts by Fukuo, NPF photosets plugin by codematurgy, dark/light mode toggle by eggdesign, custom audio posts by annasthms, scroll to top script by Fabian Lins
Preview header image from Only Vector Backgrounds.
#code#theme#theme 7#theme hunter#free#custom width#sidebar#topbar#nav text#nav icons#pagination#unlimited links#header img#custom font size#unnested#responsive#npf#color mode#search#rblk buttons#timestamps#tags#group
2K notes
·
View notes
Text


THEME 5: Jupiter
Inspired by Sung Hyunjae and Seseong Guild from The S-Ranks That I Raised.
Static previews: index page, permalink | Code
Features:
Customizable icons, chosen from Cappuccicons: 1 blog-wide icon, and up to 8 individually customizable links (see under the cut for how to add custom links)
Text options: choose between upper/lowercase for special text, Google and Tumblr fonts, and font sizes
Appearance options: customizable post widths and sidebar width, and a variety of color options, including an (optional) light/dark mode toggle
Optional title/avatar/description, search bar, like/reblog buttons, date/timestamps, tags, and Archive/Random links
Responsive
Supports new post types/pinned posts
And more!
See more about how to customize this theme and theme credits under the cut. For additional help, feel free to send me an ask.
Image options
There are various options for avatar and background images. For avatars:
No avatar: Turn off "Show Avatar" and remove the LM Avatar image.
Single avatar on both light/dark modes: Turn on "Show Avatar" and upload a default avatar.
Different avatar on light and dark mode: Turn on "Show Avatar", upload a default avatar, and upload the LM Avatar image.
Avatar only on one color mode, but not both: Turn off "Show Avatar" and upload the LM Avatar image. (The avatar will only show on "light" mode.)
And similarly, for background images:
No background images: Remove the Background image and remove the LM Background image.
Single background image on both light/dark modes: Upload the Background image.
Different background image on light and dark mode: Upload the Background image and the LM Background image.
Background image only on one color mode, but not both: Remove the Background image and upload the LM Background image. (The background image will only show on "light" mode.)
Customization of icons in general
Icons are taken from Cappuccicons. To customize them, find an icon you like from the Cappuccicons page; then, insert the text name of that icon into an icon field, following the pattern of the pre-filled icons.
For example, the screenshots above use "flash-o" and "paw" for "Main Theme Icon". They're visible just under the navigation (and in place of the color mode toggle, if it's disabled).
Make sure NOT to include quotes around the name! Write flash-o and not "flash-o" in the relevant fields.
Customization of custom pages/navigation
For the navigation under the description box, you can choose to use either (1) the inbuilt Tumblr pages or (2) manually enter links using the fields provided in the theme options.
To use option 1, turn "Standard navigation icons" on., then add links using Tumblr's "add a page" option (see here for a guide).
This method technically allows for infinite links; however, I strongly recommend you have only 8 or fewer links, so that they don't overflow the sidebar.
All links will use the same icon, the one listed in the "Standard navigation icon" text field ("link" by default).
The text entered in "Show a link to this page" will appear as a tooltip on the link when it's hovered on.
To use option 2, turn "Standard navigation icons" off, and add links using the "Page # link/label/icon" fields in the Customize menu.
This method lets you add only up to 8 links, but you can give each one its own icon using the corresponding "Page # icon" field.
The text in "Page # label" will appear as a tooltip on the link when it's hovered on.
Navigation items only appear if the "Page # link" field is filled in.
Theme credits: Tippy tooltips by atomiks, Cappuccicons by Suiomi, custom like buttons by Demirev, NPF photosets plugin by codematurgy, dark/light mode toggle by eggdesign, custom audio posts by annasthms, scroll to top script by Fabian Lins
#code#theme#theme 5#theme hunter#free#custom width#sidebar#nav icons#pagination#u10 links#bg img#custom font size#tfont#gfont#unnested#responsive#npf#color mode#search#rblk buttons#timestamps#tags
1K notes
·
View notes
Text
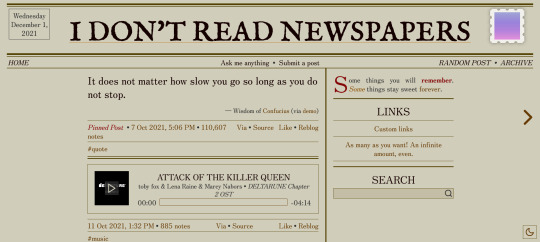

THEME 3: Newsprint
A simplistic, text-oriented theme inspired by newspapers.
Static previews: index page, permalink | Code
Features:
(Optional) Vintage newspaper-like styling: sepia filtering on images, a fancy description, and the current date displayed at the top
Custom colors for text and background, with optional light/dark modes (plus a special version of the theme offering glenthemes' post filtering plugin, that synchronizes with your selected colors)
Custom post sizes and sidebar positioning
Custom font sizes, with a choice between Tumblr and Google fonts for the main body and title, along with a default newspaper title font (see note 2)
Optional avatar/description, search bar, like/reblog buttons, tags, Archive/Random links, and timestamps
Responsive
Unlimited custom links
Supports new post types/pinned posts
And more!
Notes:
For how to add custom links/enable the theme for mobile, see my theme installation guide.
To use the default newspaper title font in the header, disable the "Use Tumblr fonts for title" toggle, then leave the "Google font for title" field empty.
Theme credits: Tippy tooltips by atomiks, Feather icons from Cole Bemis, custom like buttons by Demirev, NPF photosets fix and spoiler tags plugin by glenthemes, dark/light mode toggle by eggdesign, stamp patterning by orhanveli, custom audio posts by annasthms
#code#theme#theme 3#theme hunter#free#custom width#sidebar#nav text#pagination#unlimited links#custom font size#tfont#gfont#unnested#responsive#npf#color mode#search#rblk buttons#timestamps#tags#group#by request
855 notes
·
View notes
Text

THEME 6: Horizon
Inspired by Han Yoohyun and Haeyeon Guild from The S-Ranks That I Raised.
Static previews: index page, permalink | Code
Features:
Optional header image
Text options: choose between standard/uppercase/lowercase for special text, Google and Tumblr fonts, and font sizes
Appearance options: customizable post widths, and a variety of color options, including an (optional) light/dark mode toggle
Optional title/avatar/description, search bar, like/reblog buttons, date/timestamps, tags, and Archive/Random links
Responsive
Supports new post types/pinned posts
And more!
For help, check my theme guide, or feel free to send me an ask. Theme credits are under the cut.
Theme credits: Style My Tooltips by malihu, Cappuccicons by Suiomi, custom like buttons by Demirev, NPF photosets plugin by codematurgy, dark/light mode toggle by eggdesign, custom audio posts by annasthms, scroll to top script by Fabian Lins
#code#theme#theme 6#theme hunter#free#custom width#topbar#nav icons#pagination#unlimited links#header img#custom font size#tfont#gfont#unnested#responsive#npf#color mode#search#rblk buttons#timestamps#tags
85 notes
·
View notes
Link
I just added this listing on Poshmark: Hudson Blake Slim Straight Distressed Jeans 40x29.
0 notes
Link
I just added this listing on Poshmark: Hudson Blake Slim Straight Distressed Jeans 40x29.
0 notes
Link
I just added this listing on Poshmark: Hudson Blake Slim Straight Distressed Jeans 40x29.
0 notes
Link
I just added this listing on Poshmark: Hudson Blake Slim Straight Distressed Jeans 40x29.
0 notes
Link
I just added this listing on Poshmark: Hudson Blake Slim Straight Distressed Jeans 40x29.
0 notes
Link
I just added this listing on Poshmark: Hudson Blake Slim Straight Distressed Jeans 40x29.
0 notes
Link
I just added this listing on Poshmark: Hudson Blake Slim Straight Distressed Jeans 40x29.
0 notes
Link
I just added this listing on Poshmark: Hudson Blake Slim Straight Distressed Jeans 40x29.
0 notes
Link
I just added this listing on Poshmark: Hudson Blake Slim Straight Distressed Jeans 40x29.
0 notes
Last Seen Blogs
isanaakira
if u see me no u don't

scarymovies
manic pixie final girl
nd43kinks
Jack made a goddamn kink blog

comoignorarvpnnavegador
Untitled
cantsstop
Lacroix sweetie