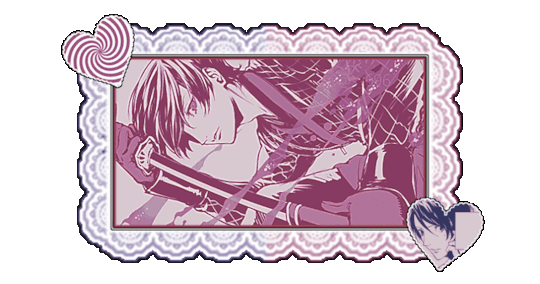
#magenta psd
Text
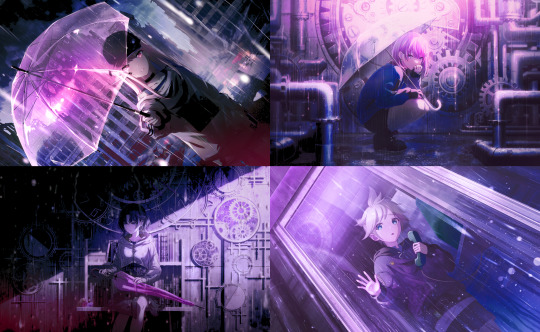

╰┈➤ kitty. a psd by ii-nandesu
info && rules in pinned ⌇ download link in source.
#my post ♡#psd#psds#free psd#free psds#psd download#free psd download#psd coloring#free psd coloring#psd filter#free psd filter#blue psd#pink psd#magenta psd#purple psd#violet psd#ii-nandesu#dailypsd#support content creators#akiyama mizuki#25 ji nightcord de
67 notes
·
View notes
Text
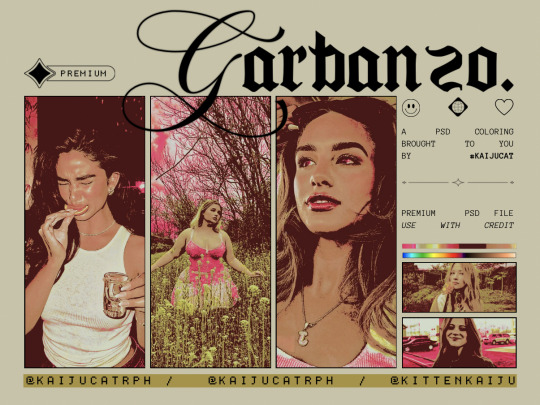
⟡ ◞ ˚ GARBAZNO! › a psd coloring.
A SPRING INSPIRED PSD BY #KAIJUCAT.
A POC-FRIENDLY PSD COLORING.
MADE IN PHOTOPEA.
ADJUSTMENT LAYERS INCLUDED.
HIGH CONTRAST, POPS OF LIME-GREEN AND MAGENTA.
CREDIT IS MANDATORY. TAG THIS BLOG!
LIKE & REBLOG IF YOU SAVE.
$1.75 – PURCHASE ON KO-FI OR PAYHIP!
#psd#psd coloring#kaijucatrph#my psds#mypsds#kaijucatedits#roleplay resources#kittenkaiju#roleplay psd#icon psd#rp resources#green psd#magenta psd#pinkpsds#pink psd#aesthetic psd#icon resources#icon psds#photopea psd#ps resources#rph#roleplay resource#roleplay commissions#roleplay community
6 notes
·
View notes
Text
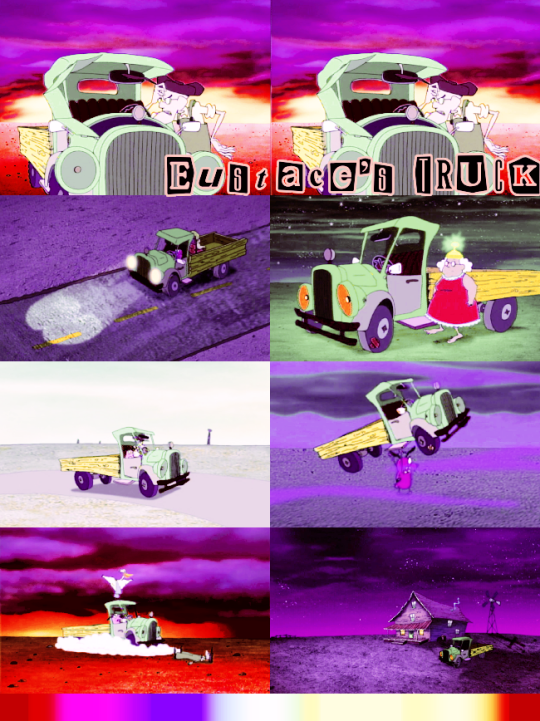
#EUSTACE'S TRUCK. A PSD COLORING BY ASH.
A psd coloring inspired by Eustace's Truck. You know the one. That truck from Courage the Cowardly Dog. The same one that gets married to a Duck God. Yeah, that Truck.
This coloring is people of color friendly. It focuses heavily on reds, purples, magentas, yellows, and greens. Blues become purple with this coloring. Reds are darkened. Cyans look white. Greens and yellows are pastel with this psd coloring.
If you download this psd, please like or reblog this post. If you decided to use this coloring, you must give me credit. You can do this by posting a link on your blog somewhere or reblogging this post.
You can download this psd via my deviant art for free or get the pay what you want version on payhip.. If you like what I do, please consider checking out my ko-fi.
deviant art. // ko-fi. // payhip.
#mine#my psd colorings#my psds#my psd#my psd coloring#psd#free psd coloring#free psd colorings#free psds#icon psds#coloring psd#poc friendly psd#purple psd#magenta psd#pastel psd#red psd#yellow psd#green psd#free psd#free resources#free rp resources#free roleplay resources#resources
5 notes
·
View notes
Text
PSD automatic ! ★ download
fav or reblog if you save/use
give proper credits by tagging me [@]
#psd download#free psd#psd photoshop#psd photopea#pink psd#psd pink#magenta psd#psd magenta#purple psd#psd purple#cute psd#soft psd#psd coloring#psd colouring#coloring#colouring#psd#psds#psd for icons#icons psd#icon psd#nhy6ck
4 notes
·
View notes
Photo
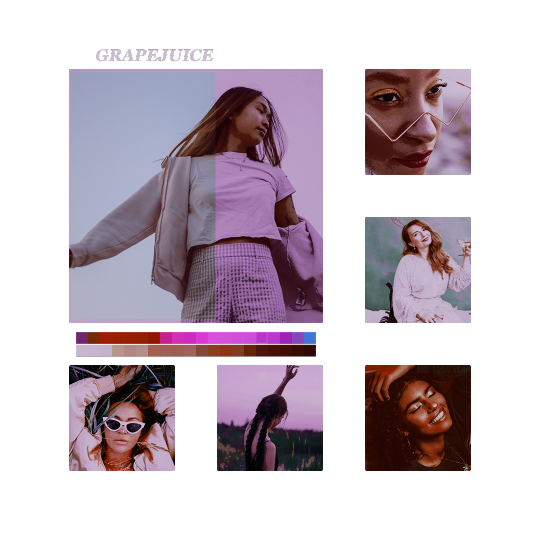
GRAPEJUICE - 1$
will not whitewash but can tomatowash in overly saturated scenes
please contact through dms if your interested in purchasing through paypal or get it on deviant art for 1$ 💕
8 notes
·
View notes
Photo

LILA COLORING PSD.
comes with one psd coloring heavily inspired by bringing out what’s already in an image and just enhancing it. very easy to edit as everything is tucked away in folders and labeled.
please make sure you credit me somewhere on your blog if using! if you just like the resource, please hit that reblog button so that it can be shared around. deviantart can be found in pinned.
deviantart (50 points) | message for paypal ($0.50 USD)
0 notes
Text

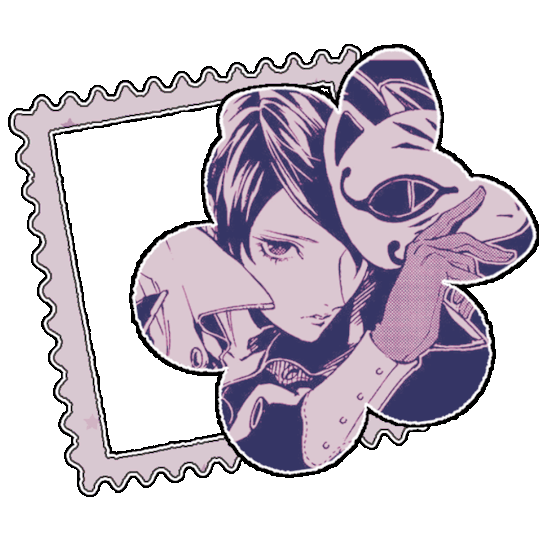
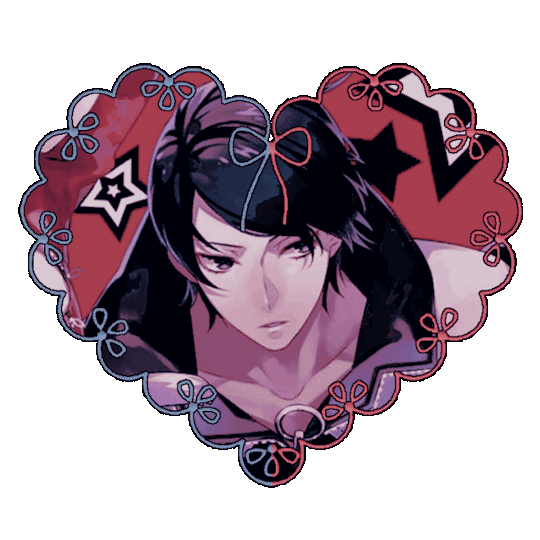

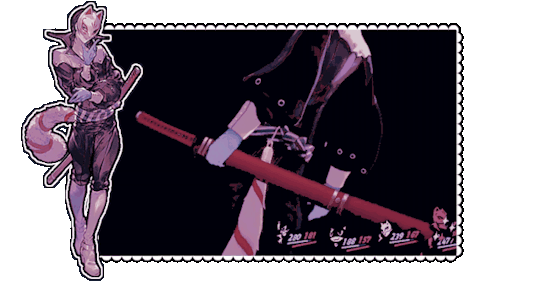


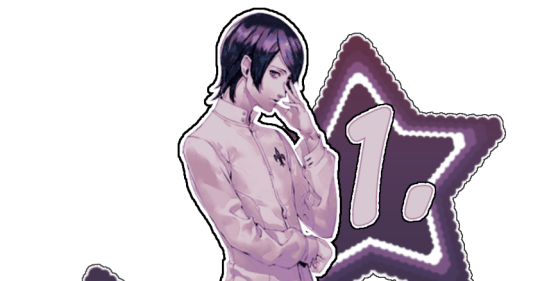
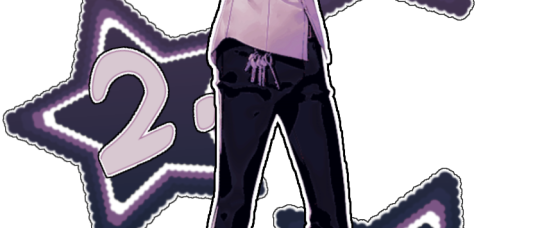


♡ # 𓂃 Yusuke Kitagawa Graphics !
❥ . ➶ winning event prize for @grayrvrse !
i swear i didn't mean to make him pink ,,,
#🎀 𓂃 edits.png◞#🌊 𓂃 requests.pdf◞#tw : gun#persona 5#p5#yusuke kitagawa#kitagawa yusuke#persona 4#persona 3#persona 4 golden#graphics#carrd#blue#red#psd#magenta#gradient map#layouts#p4 golden#rentry graphics#red graphics#rentry img#rentry stuff#rentry gif#rentry resources#rentry#rentry decor#carrd graphics#sntry#sntry graphics
178 notes
·
View notes
Photo

(122. city pop).psd coloring made by harupsds ©
This effect was made by me in photoshop cc and it works better on it. Before downloading read all the rules and follow them, be honest. Don't forget to leave your feedback or suggestion.
Like or reblog if you download and follow me for more content.
Don’t repost, reupload or put on pack/google drive.
Don’t claim as your own.
Don’t recreate, use as base or steal layers.
Adjust the layers or add new ones if needed.
Give me credit if you use it.
Free for personal/non-commercial use. Commercial use is NOT ALLOWED.
Before/After.
▸ Download
This is our work done with effort and time spent. Please do not copy do not violate, and do not sell it as if it were yours. The Preview was made by me, being my own. Please, if your photo is here, talk to me. It is not my intention to violate the copyright rules.
#dailypsd#dailyresources#allresources#makersleague#hisources#psd*#psds*#psd coloring*#psd#psds#psd coloring#image psd#psd download#psd for icon#for icon#photoshop resources#purple#pink#magenta#harupsds
50 notes
·
View notes
Photo


ㅤ ⠀⠀⠀⠀ . 。*◯ ⃝ ㅤ ︵ ⠀⠀⠀⠀⠀headers ⠀⠀ by ⠀⠀ saericons . ⠀⠀ !!
⠀⠀ ⠀ ⠀ ⠀⠀ ⠀ ⠀⠀ ⠀ ⟆⟆. ♡ ⠀⠀ ⠀⠀ like or reblog if u use.⠀⠀⠀⠀⠀ɞ
#headers#collage headers#headers 3#psd#collage headers psd#headers twitter#headers by me#green headers#pink headers#magenta headers#coral headers#grunge headers#elegant headers#white headers#black header#dark headers#twitter rp#edit rp#kpop rp#saericons#layouts psd
135 notes
·
View notes
Text
(^▽^)つ━━🟊 ˗ˏˋ ᴛʜᴇgeminis ˎˊ˗ 200 POINTS ᴏʀ 2.00 USD. according to my research, mainly yellow and pastel magenta tones are gemini colors thus i made a psd with those tones. ɴᴏᴛ ᴘᴏᴄ ғʀɪᴇɴᴅʟʏ. this psd will whitewash. don’t resell, share without consent, nor claim as your own. credit is not a must but it’d be very appreciated.
#i actually googled gemini characters from shows or movies#i only picked those who were gemini for real#cause there were some that were assumptions according to personalities#psds#rp icon psds#rp resources#yellow tones#magenta tones#resources#░ ⁞ 🎔 ⁽ psds ⁾
14 notes
·
View notes
Text
#𝐢𝐧𝐟𝐚𝐦𝐞𝐨𝐮𝐬 : a private, selective and mutually exclusive SAMANTHA ❝ SAM ❞ CARPENTER of the SCREAM FRANCHISE. haunted by pidge ( she / her, 24 )
a study in : the final girl, runs in the family, the bad seed, you can’t outrun your fate, you can run but you can’t hide, the water’s sweet but blood is thicker, from famous to infamous, nature vs. nurture, to truly love another person is to accept the work of loving them is worth the pain of losing them, the monster who used to live under my bed now lives inside my head, you can kill me but don’t you dare touch them & more.
blogroll. robin buckley. sophie walten. multi.
#𝐜𝐨𝐫𝐞 𝐟𝐨𝐮𝐫! ⁽ ᵖⁱⁿⁿᵉᵈ. ⁾#beta editor#credits :#icon coloring ⤻ psd.028 wait until dark by somresources#icon border template ⤻ gold leaf by jaynedits#carrd template ⤻ magenta ! by 000-carrds
3 notes
·
View notes
Text

News just in
Can you hear the little Nokia ring-ring?
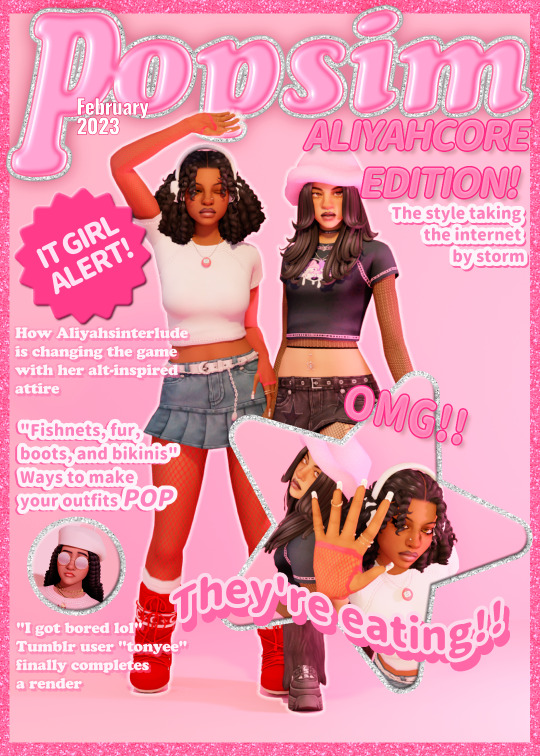
very proud to show yall my first official edit(s?)!! ive been absolutely OBSESSED with aliyahcore lately like WHAT'S BETTER THAN ALIYAHCORE??
@aliyahsinterlude is amazing and deserves the world!! anyways i made these renders and i love them so much like these pngs are my babies like?? also HUGE thank you and hugs to @magbay for the simspo and the popsim psd file + resources!! ur amazing!!
deadass this edit wouldn't exist without it!! /hj
links to cc and poses used under da cut!!
CC USED:
Keiara's CC:
GENETICS
Presets: EYES LIPS JAW & NOSE BAWDY
Sliders: A BUNCH OF THESE MOUTH SCALE BELLY CALF
Skin Details: SKINBLEND MISC DETAILS SPOTLIGHT ACNE REMOVE EA LASHES
Other: HAIR EYES(made nondefault) TEETH SKINTONE BROWS LASHES TATTOOS1 TATTOOS2
FIT
Clothes: TOP SKIRT BOOTS
Accessories: BELT FISHNET TOP RINGS EARMUFFS NAILS NECKLACE SOCKS NOSE PIERCING
Makeup: BLUSH GLOSS OVERLAY LINER LIPSTICK
Mikaela's CC:
GENETICS
Presets: EYES LIPS NOSE BAWDY
Sliders: A BUNCH OF THESE MOUTH SCALE BELLY CALF HIP
Skin Details: SKINBLEND SPOTLIGHT REMOVE EA LASHES
Other: HAIR EYES(made nondefault) TEETH SKINTONE BROWS LASHES
FIT
Clothes: TOP SKIRT SHOES
Accessories: ACC TOP RINGS (tsr warning) HAT NAILS NECKLACE(tsr warning) NOSE PIERCING(tsr warning) LEGWARMERS BELLY PIERCING LEGGINGS
Makeup: BLUSH GLOSS OVERLAY LINER LIPSTICK
POSES USED:
cover: 1&2 3&4
red: 1 2 3
magenta: 1 2 3
and as always tysm to the cc creators! *inhales*: @aharris00britney, @arethabee, @breezytrait, @cheesehair, @coupsim, @crypticsim, @daylifesims, @dream-girl, @evoxyr, @ghostputty, @hazelsnakes, @helgatisha, @hi-land, @ice-creamforbreakfast, @ikari-sims, @jius-sims, @kimoanasims, @kumikya, @lamatisse, @luumia, @madlensims, @magbay, @miikocc, @nsves, @obscurus-sims, @okruee, @pompurinsims, @roselipaofficial, @sadlydulcet, @sammi-xox, @saruin, @serenity-cc, @simandy, @simbience, @simkoos, @sloedancing, @solstice-sims, @trillyke, @twisted-cat, @uxji, @vibrantpixels
k ty for reading!! MWA!
#ts4#the sims 4#sims 4#ts4 render#sims 4 render#s4 render#ts4 edit#sims 4 edit#s4 edit#sims#aliyahcore#simblr#black simblr#i had so much fun making this#i wish i had a better top for keiara but OH WELL#tysm for helping me w this faith u a REAL1#now i can play sims w/o feeling guilty
1K notes
·
View notes
Text
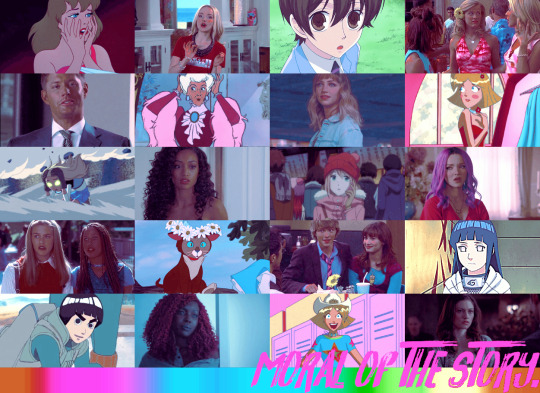
#MORAL OF THE STORY. // A PSD COLORING.
A people of color friendly psd that focuses heavily on magentas, blues, cyans, reds, and yellows. Blues and greens are vibrant with this coloring. Yellows and oranges are muted. Reds are darkened. This coloring also works well on animated scenes and manhwa images.
If you download this psd, please like or reblog this post. If you decided to use this coloring, you must give me credit. You can do this by posting a link on your blog somewhere or reblogging this post.
You can download this psd via my deviant art for free or purchase it on my payhip for 3.50 usd. If you like what I do, please consider checking out my ko-fi.
deviant art. // ko-fi. // payhip.
#mine#my psd#my psds#my psd coloring#my psd colorings#paid psd#paid content#paid resources#psd coloring#icon psd#coloring psd#coloring psds#psd colorings#pink psd#magenta psd#cyan psd#red psd#blue psd#yellow psd#green psd#orange psd#poc friendly psd
2 notes
·
View notes
Text
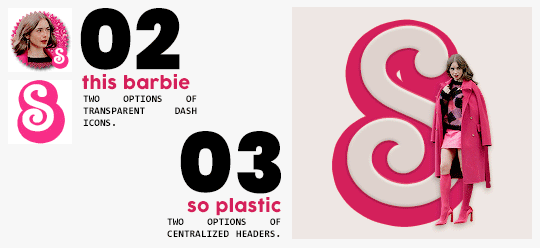
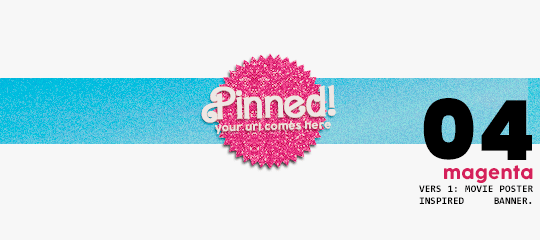
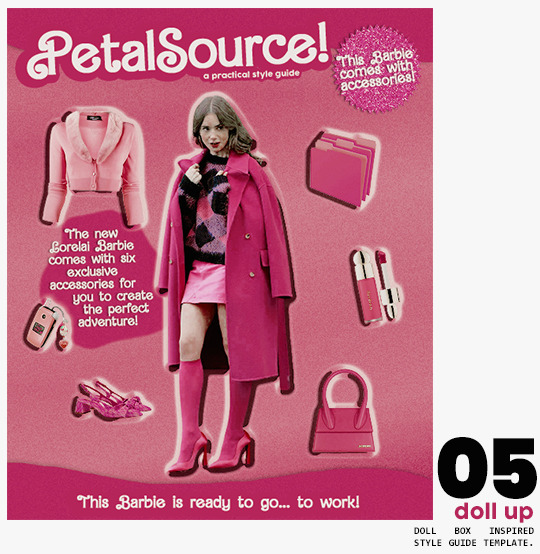
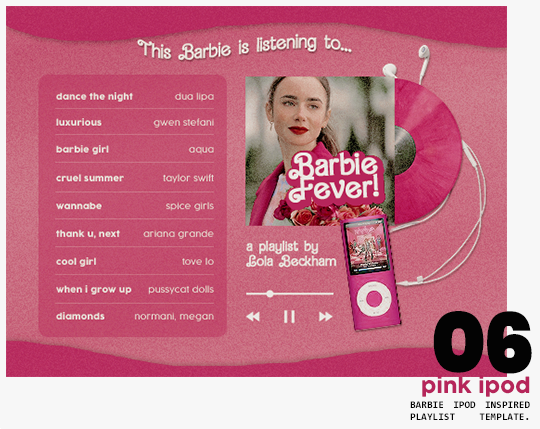
⋆ barbie fever . . . by petalsource .
. . . a complete blog makeover inspired by barbie .
hi, barbies! today, i bring you a complete makeover fully inspired by our favorite pink lady, barbie herself, to allow all of you to bring your own characters into her world in plastic!
feel free to tweak and adjust to your needs, add different background colors and overlays, but kindly do not claim as your own or use it for commercial purposes. feel free to tag me on your creations with this on #petalsource! seriously... i can't wait to see what comes of this!
💐 click the source link to get it as a package or individually on deviantart or payhip !
and . . . keep reading to find more details about the graphics, hq live previews and important tips to use the templates !
✩ about the items!
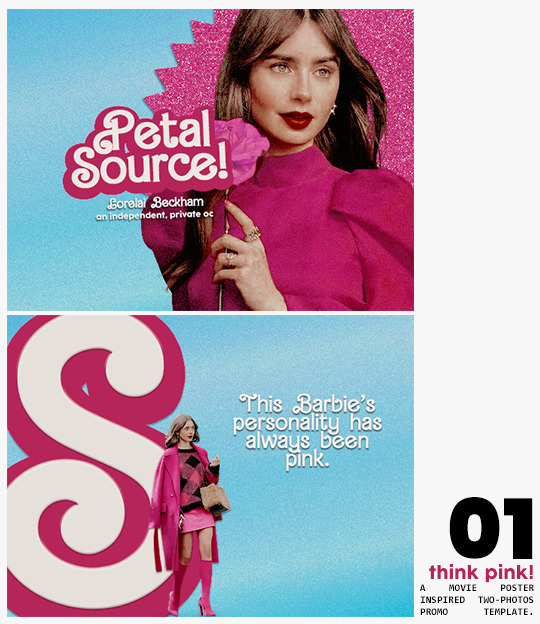
➷ think pink! -- a two-picture promo template inspired by the iconic 2023 movie posters. you'll need: two pngs of your faceclaim of choice, and the custom fonts (listed below). the glittery polygon of the first picture is available in 7 different glitter colors! high quality examples.
➷ this barbie -- two options of transparent dash icons; one matching the "initial" poster and one matching the "glittery polygon" poster. high quality examples.
➷ so plastic -- two options of centralized headers; one matching the "initial" poster and one matching the "glittery polygon" poster. to use it at its best quality, disable the "stretch header image" option when uploading the header. high quality examples.
➷ magenta -- version 1.0: pinned post (or miscellaneous) banner inspired by the 2023 barbie poster. version 2.0: pinned post (or miscellaneous) pair of banners mimmicking the layout of a barbie doll box. one banner goes on top of the postbox, insert pinned post or text, and the other banner goes on the bottom! high quality examples.
➷ doll up -- lookbook template inspired by the barbie doll box, featuring a "doll" picture and six customizable objects / accessories. you'll need: full body png of your faceclaim of choice, custom fonts (listed below), and 6 pngs of random objects or clothes to "come with" your doll. i've added a short tutorial down below on how to find and use some easily! high quality examples.
➷ pink ipod -- playlist template inspired by the barbie ipod, featuring a cover art and nine songs. high quality examples.
you can purchase all items as a package (deal price) or individually!
✩ important tips & useful information!
➷ needed fonts: bartex, cocogoose.
➷ object pngs + removing background of images: i found a super useful pinterest board with photos that can be used on your graphics: oxfordcommah's object pngs. additionally, the clothes png search on p*nterest is really diverse, and you can narrow your interests like "pink clothes png" or "vintage shoes png" and find a lot of options. once you found your images, go to remove.bg and paste their urls in there. it'll remove the background of those images for you and you can just paste them on your template and have fun!
➷ used coloring psds: the beautiful and super pink psds i used on the previews were not made by me and are NOT included in the downloads. in case you want to use them, they can be found here: dreams, 003.
➷ styles: the download includes two styles, one for a subtle drop shadow used in a few layers and one for the plastic box effect in the lookbook template. you can install them by opening the styles tab on photoshop > the four lines > load styles > find the barbie styles on your downloads!
➷ in case you have any questions, pop into my inbox or ims and i'll be happy to help you!
#template psd#template psds#barbie psd#character psd#character psds#𓂅 ♡ ⋆ 𝐦 ‚ templates .#i really really really hope you guys like this!!! i had so much fun doing it
275 notes
·
View notes
Photo

[Caption: a yellow and green gif of Alina from Shadow and Bone; the first gif of her looking away from Mal fades into her crying over him. End caption.]
TRANSITION TUTORIAL by v @shangs
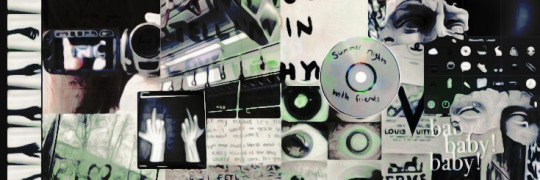
I got some questions about how I did the glitch effect in this set, and I think because the glitch sets with green and magenta/red and cyan protrusions like this one are more complex that the effect seems like it’s hard, but it’s deceptively simple! I’ll show you how to do transitions like this with an effect buffer in between, whether it’s a glitch effect or a light leak or anything else.
What you’ll need:
Photoshop with timeline (I use 2022)
A transition video for the effect
Preferably, a good knowledge of how to use the timeline for gifs
Two or more gifs
Tutorial under the cut!
I start out with my two gifs, sharpened, colored, on separate documents, and in timeline mode. The first thing you’re going to do is convert both of your gifs into Smart Objects, so that we don’t have to worry about all the coloring layers. Just select everything you have in the timeline, right click, and convert to Smart Object.
Now, right click on one of the gifs, select Duplicate Layer, and transfer it to the other gif’s PSD. Then just click File > Save as Copy, save the new PSD wherever you like, and close the first two PSDS, then open the copy. I recommend not saving your work in the first two PSDS with the single gifs so that if you have something you want to change, your gif isn’t locked into Smart Object Mode and you can go back to edit things.
Now, you have both your gifs on the same canvas in the same PSD. The timeline should look like this:

[Caption: A picture of the Photoshop timeline so the gifs’ boxes are in a stacked line.]
Now, drag the gif you want to go second or to ‘fade in,’ so to speak, onto the row of the first. Your gifs will automatically form a Video Group and the timeline will look like this:
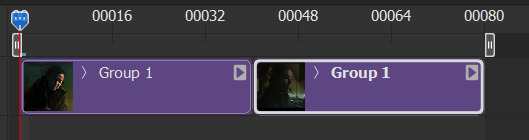
[Caption: A picture of the timeline with the gifs’ boxes side-by-side.]
Now your gifs will play sequentially! I’m lucky and for some reason this almost 80 frame gif didn’t even hit 10mb, but you may need to trim some frames off the ends later if the gif is too big.
Let’s switch gears and look at this unassuming little box in the corner of the timeline. The box with the white filled in triangle on the bottom holds Photoshop’s premade transition effects. You can do things like fade to black, crossfade, just fade between two gifs, and more.
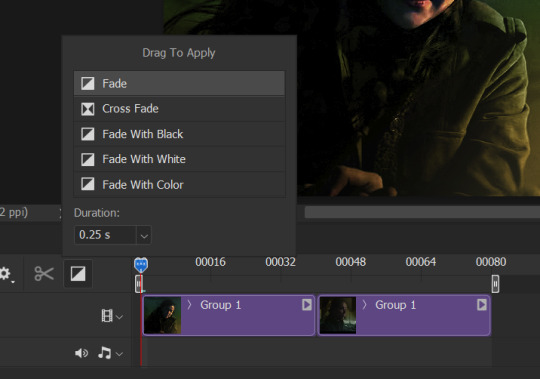
[Caption: A photo of the square on the timeline that has Photoshop’s transition effects.]
I like using the Cross Fade effect for my gifs with this method, but it’s entirely up to you what effects you apply! Some transitions may even work better without an effect. Experimentation is key.
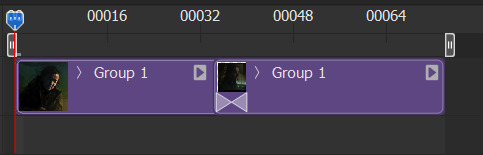
[Caption: A photo of the timeline with the triangles denoting the cross fade effect put between the gif boxes.]
I went ahead and applied the cross fade effect to my gif, and this is what it looks like on the timeline.
Now to add the gif effect! Make the gif however you would like. For this one I actually recommend just opening the video with File > Open as long as it’s small enough, and it’ll open as a blue box on the timeline and if you right click it you can change the speed. Regardless, what I do is just make the gif, sharpen and trim to my liking, then duplicate that layer onto my timeline (just make sure that, when you click the three lines on the timeline menu and go to Set Timeline Frame Rate, that the rate of this video is the same as the rate of your two gifs from before, or you might get some choppy frames). I then place the gif around the middle, where the transition happens - you have to scrub around to find the perfect place to put it but I like to have it so that the gif covers both ends of the transition.
To put it visually, here’s the timeline:

[Caption: A photo of the Photoshop timeline with the effect overlay stacked on top of the base gif.]
Your overlay gif should be outside the video group of your base gif.
I set the overlay to Screen and change the opacity. You can also add some color overlays - I actually went in with a gradient on top of the overlay, clipped it to the transition, and set it to Color so it wasn’t too bright of a white on my gif.
Save and export as normal - I like to take it back to frames mode before I save so I can keep the frame rate at 0.05 - and that’s all! A really simple way to get a sophisticated-looking transition.
Happy giffing!
#gif tutorial#completeresources#userphotoshop#resourcemarket#userrobin#arthurpendragonns#ughmerlin#usersameera#usercim#usertix#usermarsy#useraish#tuserlucie#userzesty#userfaiths#useraphrodite#userautie#edit help#tutorial
514 notes
·
View notes
Note
hi :) i love ur buffy gifs so much! they always look so nice!! would you be willing to do a coloring tutorial to show how you usually color btvs? or perhaps save the PSD the next time you gif buffy and share that?
oh i feel your pain!! and thank you so much <3
i colour each gif from scratch and don't save psds so i can't offer you something there but i've done up a buffy colouring tutorial here!!
Here's the uncoloured gif.

Step 1: The nice part about giffing Buffy is there is usually a grey or blueish grey pixel in the whites of her eyes that is perfect for a white point curves. I played around with different pixels on different points on the gif until I found one I liked.
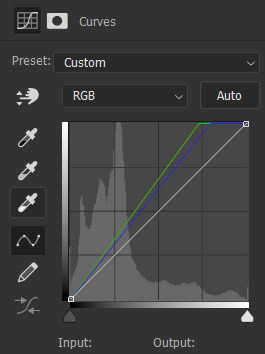
Step 2: I always like to do the brightening first so I added on Levels and Exposure layers. BTVS has weird highlights where its very prone to white or yellow/white patches so I try to use as little as Exposure as possible but I like the Gamma Correction part.
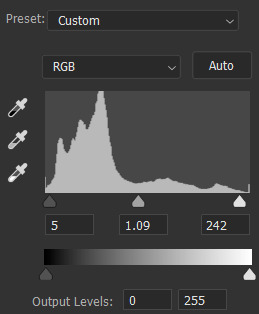


Step 3: Channel Mixer is a lifesaver for Buffy because it usually has such a warm tint. I pretty much only use the Red and Blue settings but it helps make the gif cooler without the effects on shadows and midtones like Colour Balance.


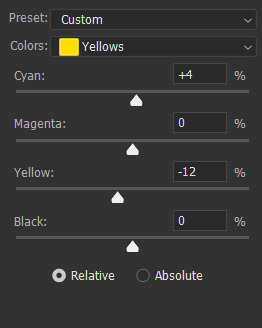
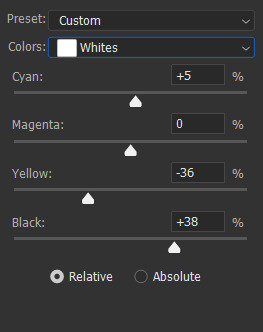
Step 4: Selective Colour is mostly just to fix skintones and background colours. I typically wind up adjusting the cyan and yellow sliders for the reds and blues until her hair and skin looked normal. Sometimes BTVS has magenta in the shadows on her face so I increased the yellow there (while it makes sense to actual reduce the magenta, I'm going to a natural skintone not green).
You can also see that there are some white spots on her shirt, right arm, and the right part of her face. On the white, I increased the blacks and reduced the yellows to fix the colour and reduce the brightness.


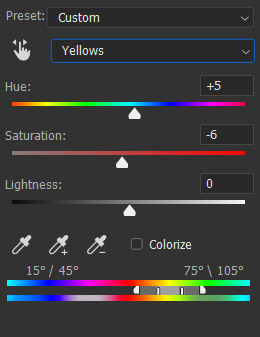
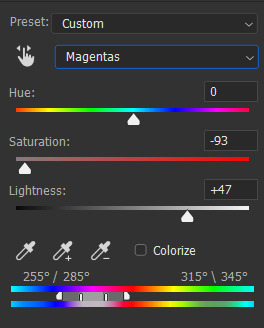
Step 5: Hue/Saturation doesn't make a hugely noticeable difference here but it's a good opportunity to make final tweaks to colours and reduce overall warmth saturation. My personal preference is to have lower red/yellow saturation so I lowered that and made slight Hue adjustments (the yellows were still a little red for my liking). There was also some magenta in her eyes and teeth so I completely lowered the saturation and upped the brightness to fix that.


Step 6: The gif is still a little dark for my liking so I threw on a final Levels layer to brighten up her face. Usually, I would use exposure but if I did that I would end up with some serious white patches.

And that's it!! Each Buffy gif is slightly different but I would suggest making the gifs cooler and increasing the brightness through Curves and Levels without using Exposure.
#gif tutorial#tutorial#tutorials#photoshop tutorial#coloring tutorial#hella's inbox#anonymous#hope it helps!!
63 notes
·
View notes
Last Seen Blogs


