#edit help
Photo

[Caption: a yellow and green gif of Alina from Shadow and Bone; the first gif of her looking away from Mal fades into her crying over him. End caption.]
TRANSITION TUTORIAL by v @shangs
I got some questions about how I did the glitch effect in this set, and I think because the glitch sets with green and magenta/red and cyan protrusions like this one are more complex that the effect seems like it’s hard, but it’s deceptively simple! I’ll show you how to do transitions like this with an effect buffer in between, whether it’s a glitch effect or a light leak or anything else.
What you’ll need:
Photoshop with timeline (I use 2022)
A transition video for the effect
Preferably, a good knowledge of how to use the timeline for gifs
Two or more gifs
Tutorial under the cut!
I start out with my two gifs, sharpened, colored, on separate documents, and in timeline mode. The first thing you’re going to do is convert both of your gifs into Smart Objects, so that we don’t have to worry about all the coloring layers. Just select everything you have in the timeline, right click, and convert to Smart Object.
Now, right click on one of the gifs, select Duplicate Layer, and transfer it to the other gif’s PSD. Then just click File > Save as Copy, save the new PSD wherever you like, and close the first two PSDS, then open the copy. I recommend not saving your work in the first two PSDS with the single gifs so that if you have something you want to change, your gif isn’t locked into Smart Object Mode and you can go back to edit things.
Now, you have both your gifs on the same canvas in the same PSD. The timeline should look like this:

[Caption: A picture of the Photoshop timeline so the gifs’ boxes are in a stacked line.]
Now, drag the gif you want to go second or to ‘fade in,’ so to speak, onto the row of the first. Your gifs will automatically form a Video Group and the timeline will look like this:
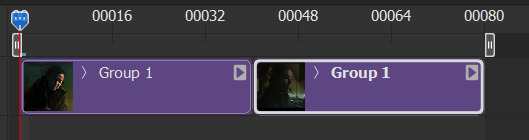
[Caption: A picture of the timeline with the gifs’ boxes side-by-side.]
Now your gifs will play sequentially! I’m lucky and for some reason this almost 80 frame gif didn’t even hit 10mb, but you may need to trim some frames off the ends later if the gif is too big.
Let’s switch gears and look at this unassuming little box in the corner of the timeline. The box with the white filled in triangle on the bottom holds Photoshop’s premade transition effects. You can do things like fade to black, crossfade, just fade between two gifs, and more.
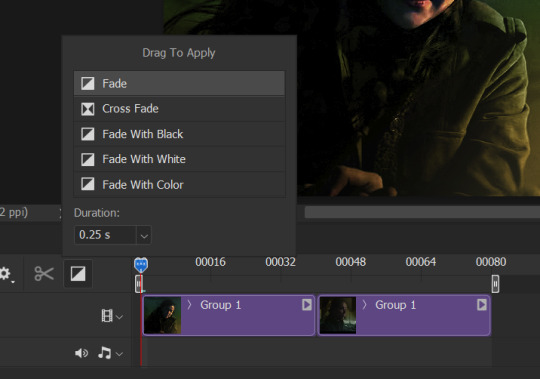
[Caption: A photo of the square on the timeline that has Photoshop’s transition effects.]
I like using the Cross Fade effect for my gifs with this method, but it’s entirely up to you what effects you apply! Some transitions may even work better without an effect. Experimentation is key.
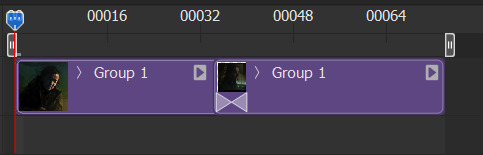
[Caption: A photo of the timeline with the triangles denoting the cross fade effect put between the gif boxes.]
I went ahead and applied the cross fade effect to my gif, and this is what it looks like on the timeline.
Now to add the gif effect! Make the gif however you would like. For this one I actually recommend just opening the video with File > Open as long as it’s small enough, and it’ll open as a blue box on the timeline and if you right click it you can change the speed. Regardless, what I do is just make the gif, sharpen and trim to my liking, then duplicate that layer onto my timeline (just make sure that, when you click the three lines on the timeline menu and go to Set Timeline Frame Rate, that the rate of this video is the same as the rate of your two gifs from before, or you might get some choppy frames). I then place the gif around the middle, where the transition happens - you have to scrub around to find the perfect place to put it but I like to have it so that the gif covers both ends of the transition.
To put it visually, here’s the timeline:

[Caption: A photo of the Photoshop timeline with the effect overlay stacked on top of the base gif.]
Your overlay gif should be outside the video group of your base gif.
I set the overlay to Screen and change the opacity. You can also add some color overlays - I actually went in with a gradient on top of the overlay, clipped it to the transition, and set it to Color so it wasn’t too bright of a white on my gif.
Save and export as normal - I like to take it back to frames mode before I save so I can keep the frame rate at 0.05 - and that’s all! A really simple way to get a sophisticated-looking transition.
Happy giffing!
#gif tutorial#completeresources#userphotoshop#resourcemarket#userrobin#arthurpendragonns#ughmerlin#usersameera#usercim#usertix#usermarsy#useraish#tuserlucie#userzesty#userfaiths#useraphrodite#userautie#edit help#tutorial
514 notes
·
View notes
Text

contrast - why it is important in editing
contrast is an element in any sort of design, from edits to artwork, and its importance doesn't waver regardless of what kind of design you are creating.
so why exactly is it important? it helps to not only organize the elements in your edit, but also to help distinguish the different parts. contrast helps draw your eyes to the more important aspects of the edit (typically the character). if everything blends together, then the edit stands out less.
its also important to note that contrast isn't *only* created using differing colors, however i will be explaining color contrast and how it can affect your edits in this post. contrast can also be created using size, texture, shape, etc.
the color contrast in different edits will differ depending on the theme you are going for, however no matter the theme of your edit you still want to be able to differ the focus point (your character) and your background. that tends to be harder in lower contrast edits because there is less of a difference in color values.
there is also issues when a lack of color contrast in an edit prevents visually impaired people from properly being able to see what you are creating.
so how can we go about implementing more contrast in lower contrast colorings? there are a few simple ways to do it. i'll be using kasumi as an example
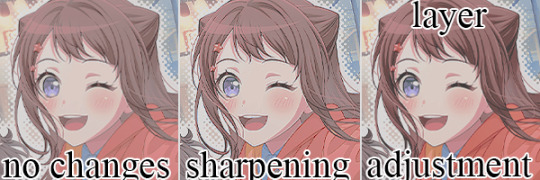
i've created a very low contrast psd and slapped it on kasumi. as you can see with the no changes version, the colors blend together very much because of the lack of color contrast.
the easiest way to fix this (and without changing the colors) would be to sharpen the image. this creates bolder lines on the character and helps kasumi stand out a bit more from the background.
another option would be to simply adjust the layers. on the third kasumi all i did was add two adjustment layers and i created a bit more contrast.
so whats the best solution to fixing the problem? well in my opinion, it'd be both sharpening *and* adjusting the layers.
it maintains that low color contrast look, while also still making it so you can see kasumi.
there are multiple ways to add contrast using new adjustment layers, here's an example of three i could think of off the top of my head. curves, b/c (brightness/contrast), and levels.
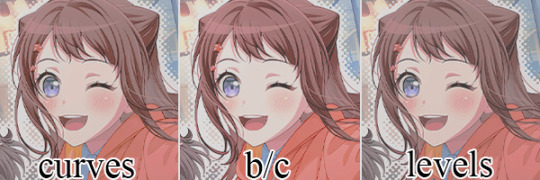
using curves can be either quite complicated or quite easy depending on your goal and understanding of it. for creating (or removing) contrast, its pretty easy!

by dragging the top pin to the left, you can easily create more contrast
by dragging the top pin down, you can remove contrast

by doing it in the middle you can create a sort of mix of both.
brightness/contrast is pretty straightforward, just up the contrast value using the contrast bar. usually when i up the contrast i tend to turn the brightness down a little bit as well.
using levels is also relatively straightforward! by adjusting this bar you can easily add or remove color contrast.

you can use just one of these methods, a new method, or mix them! anything works! experimentation is a part of editing, it helps you to learn what works best for you. my guide is not an end-all fact book for how you *need* to do things, but rather advice and tips to help you get better and to make your designs look more appealing.
remember that it's all in good fun! if you have any questions or comments about my post, feel free to send me an ask or toss it in the reblogs and i will answer the best i can. happy creating!
31 notes
·
View notes
Photo
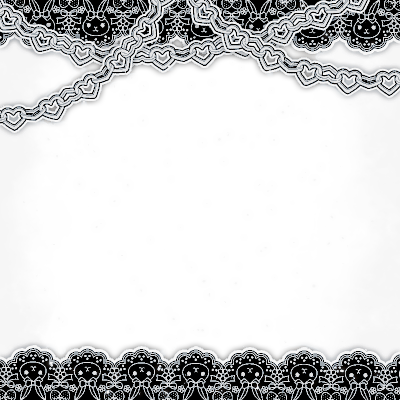
♡ Frames that I made ♡
rb/credit to use ♡ do not repost
#edit#frames#edit help#png#png frames#icon frames#icons#cute#aesthetic#what do i tag this#idk take it i spent all day on these for the hell of it just bc i could
139 notes
·
View notes
Note
hey tavros!! was wondering if you've got any advice for someone wanting to start their own edit blog?
i THINK i CAN HELP YOU! aS i DO BOTH PICTURE AND VIDEO EDITS!
mAKE GOOD USE OF TAGS! tHAT'LL CAUSE YOU TO HAVE A WIDER AUDIENCE OF PEOPLE WHO WILL SEE IT,
oCCASIONALLY REBLOG YOUR OLDER POSTS!
rEBLOG THEM ON YOUR MAIN/SIDE BLOGS! nO HARM IN PROMOTING YOURSELF,
sET YOUR BLOG'S FEATURED TAGS TO EDIT ONES, pLUS ANY FANDOMS YOU PLAN ON EDITING MOST!
sHARE A LINK TO YOUR BLOG WITH YOUR FRIENDS/IN dISCORD SELF-PROMO OR EDIT CHANNELS, iF YOU HAVE IT!
hOPE THIS HELPS! gOOD LUCK ON THE BLOG!! }:D
V
[I think I can help you! As I do both picture and video edits!]
[Make good use of tags! That'll cause you to have a wider audience of people who will see it.]
[Occasionally reblog your older posts!]
[Reblog them on your main/side blogs! No harm in promoting yourself.]
[Set your blog's featured tags to edit ones, plus any fandoms you plan on editing most!]
[Share a link to your blog with your friends/in Discord self-promo or edit channels, if you have it!]
[Hope this helps! Good luck on the blog!]

3 notes
·
View notes
Text
So, say you have access to a film or show on digital, is there a way to record the screen?
I've tried on Netflix and Amazon in the past, even just to do a screenshot, and it always comes out black/blank. I don't have high speed internet, so I can't just download or torrent something.
It would be nice to be able to make gifs or a wallpaper or something when I really want to and have time to do so. Downloading clips take forever and sometimes it's not even an entire scene or the quality isn't the greatest. 😭
#anyhoo in other words#i kinda really want to make a lemon gif set at some point#bullet train gif sets and whatnot#gif help#edit help#any help is appreciated#'cause while i'm super happy that there's a lot out there for tangerine#lemon just seems left out#and i can't let that go
6 notes
·
View notes
Text
AHHHDOAHFWOFHWKSF I NEED TO MAKE NEW REPKYCONS BUT PIXLR ISNT WORKINGKBOJK HEELLP

3 notes
·
View notes
Text
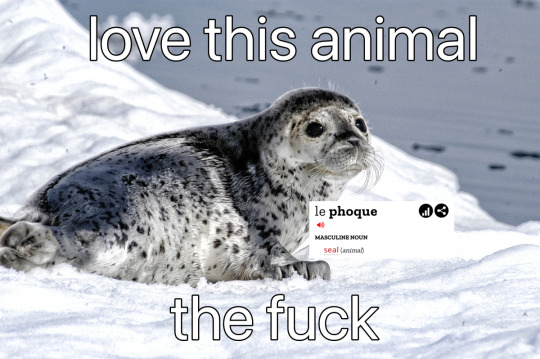
#hehe#seal meme#love this animal meme#seal#EDIT: OH FUCK THIS HAS OVER 1K NOTES. thats wild#2k#3k#that one clip of patrick looking under his house yelling WHO ARE YOU PEOPLE#sprout speaks#4k#5k#10k#15k#20k#25k#30k#35k#40k#45k#ok what big blog reblogged this. please god help me#50k
62K notes
·
View notes
Text
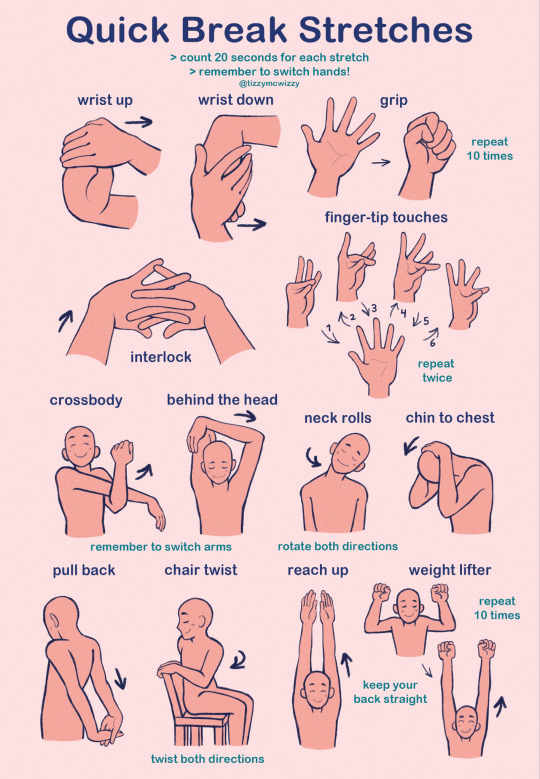
this is a poster i made for my call to action assignment in humanities! it's a bunch of basic and easy stretches for people who sit and work at a desk all day (me)
the idea is that you'd put the poster up above ur desk and do the stretches every 30 minutes or so,, the whole routine won't take more than about 6 minutes to complete and when done regularly it can prevent wrist, shoulder, neck and back pain! :)
all these stretches can be done while sitting (although i HIGHLY recommend you stand up and move around while taking a break from working)
you can get a free digital copy of this poster here on my gumroad!
and you can order a print/poster here from my inprnt!
#i mostly made this for me but i hope it can help other people too!#also thinking about maybe putting this on smth like gumroad so people can download a high quality pdf to print themselves#lmk if anyone would be interested in that 👀#my art#artists on tumblr#stretches#edit: this post popped off okay‚ also a lot of people expressed interest so i made a gumroad! maybe ill put other stuff there thatd be cool
64K notes
·
View notes
Text
I'm going to try and make a guide for gifmakers to deal with problems in the new editor, please answer and reblog for science!
based on what I see most I'm gonna be doing a bit of experimenting with the new editor so please feel free to add LOTS of details in the tags; I want to get a good idea of what people are experiencing!
#v.txt#edit help#i suppose i'm gonna tag with that lmao#tagging some mutuals to help get this poll out!#userrobin#arthurpendragonns#ughmerlin#tuserlucie#usermarsy#usernik#tuserabbie#usershreyu#userives#useryoshi#usersameera#uservalentina#usertix
178 notes
·
View notes
Text

gradient maps - literally just my thoughts
if you've been on editblr at all you're bound to know em. in this post i aim to share my personal thoughts and critiques on gradient maps, as well as possible ways to utilize them in your works
disclaimer that this post is *not* targeted towards anyone in any way, shape, or form! i'm simply stating my opinion. if this is how you like to edit that's perfectly okay, and you don't have to change that
i'll begin by explaining some issues i personally see with them.
i find that a lot of edits seem to just use the gradient map itself without any other changes. this becomes an issue when people are creating gradient map edits that have very low contrast as it prevents people who are visually impaired from being able to see your edits.

something as simple as changing the blending mode you use can easily help you use a gradient map much differently. in each blending mode variation i used only *one* layer and simply just changed the mode and level of opacity.
gradient maps can be *very* useful in edits, and using different blending modes with those gradient maps opens up opportunity to more interesting colorings. below i have examples of psd colorings ive made all using gradient maps in different ways
while it is undoubtedly true that not every editor uses photoshop or photopea or a program that has the kind of adjustment layers those programs use, most do have gradient maps. so it makes sense why a lot of editors would rely a lot on them.
some of the blending modes i personally find the most useful (and used myself in the above colorings) would be: divide, soft light, multiply, luminosity, and color.

with divide you have to make some... kind of ugly gradient maps. but when you switch the blending mode to divide and set down the opacity a bit it turns out looking really nice! with divide its important to note that your gradient map will be using the *inverted* colors of the color scheme you're going for. that is why the gradient maps will look strange
soft light is much more subtle in the way it colors your image, therefor the gradient map you use may want to be very dramatic in the colors it uses. the soft change in color is perfect for when you want a more subtle change to more closely bring the different colors of the edit together. if you want a more dramatic light, its sibling hard light can do that job for you.

i find multiply works better with darker colorings, i usually lower the opacity while using it as well. i tend to use a broader range of dark to light colors in the gradient map i'm using with multiply
luminosity can either have a very dramatic, or very subtle effect depending on the colors you use. i encourage you to play with this mode a lot! it can create some interesting effects that i don't really know how to describe
color does as it says it does! it changes the colors of the image to the colors on the layer. it doesn't change the saturation of the colors, however. it's essentially like if you hue-shifted them. you can use this to create very drastic changes in color, or to establish what colors you primarily want to be in your coloring
i don't really have much else to say other than to have fun with it! i just pointed out different ways to use gradient maps as a tool for your editing, if you decide to follow my advice or not is totally up to you. if you have any questions or comments feel free to shoot me an ask or throw it in the reblogs and i'll answer to the best of my ability. happy editing!
19 notes
·
View notes
Text
Ok but I couldn’t wait a whole nother season for him 💀

#jujutsu kaisen#choso hurrr down#jjk choso#jjk#jjk season 2#jjk season 3?#jujutsu kaisen choso#edit#fanart#one cherry#my art#anime#art#help#jjk manga#jjk anime#I have a problem#choso kamo#choso#pookie#actually jjk season 4 prob
18K notes
·
View notes
Text
9-1-1. 7.04 Buck, Bothered and Bewildered [details]
#911#911edit#911 abc#911 spoilers#evan buckley#tommy kinard#bucktommy#having so many emotions about buck's hand here. help#edited after posting bc the first one was too dark oops sry oops#beets.gif
9K notes
·
View notes
Text

post itself
false flags
trans/adjacent tags
accessibility features
tumblr live post (thanks for the link, @problemnyatic)
flashing / strobing / lights
unblockable flashing ad
buying ad free
staff @/macmanx guilt trip
list of staff + more issues
#post nuked bc proshippers started insulting people who rbed this and implied partyjockers attempted to Kill staff? it was getting old so#archive links still under the cut if you want and you can rb this from others if you want the og#hint: if you dislike this post or want to debunk parts of it the way to go about it isn't to call people who've rbed it 'disgusting little#fuck ups' that are 'spreading anti shipper lies'#note: this post is and was Not about ship discourse jesus fucking christ proshippers get a grip#also ace discoursers are here too? this isn't about you either?#edit 2: if you send me an anon regarding this post about how im policing discussion or 'don't really want it'#but then stop replying when i answer your ask#maybe that's. not helping discussion?#i nuked this post as people started making up false accusations to smear people staff sniped. aka accusing someone of IRL ATTEMPTED MURDERS.
39K notes
·
View notes
Text
‘Please don’t close CapCut or lock your screen’ please let me EXPORT MY VIDEO ITS BEEN FORTY FIVE MINUTES
#it’s ONE EDIT#I HAVE NEVER HAD THIS ISSUE#I am PISSED#TikTok and tumblr don’t let me upload the version I have#other videos work#what is happening#CapCut#rottmnt edit#edit help#CapCut help
0 notes
Text


can someone please get these hoes under control i'm BUSY
#gun cw#it's EVERY 5 HOURS AT LEAST#AND THEY STAY UP???? LIKE NONE OF THE ONES I'VE REPORTED HAVE BEEN DEACTIVATED#GO AWAY#anyways...#my art#edit: everyone who says i look like [insert anime guy here] has holes in their brain hope this helps some of u figure out what's wrong
95K notes
·
View notes
Text
Can anyone help me find a scene pack because youtube doesn't have what I'm looking for! HELP A SISTER OUT
0 notes
Last Seen Blogs

gravityfallsuponthedark
Until next time: 2021
sheerdawn
Juh
neuroticalien
Neuroticalien

okiedokigrapey
August
gaymerdad56
🏳️🌈👨👨👦