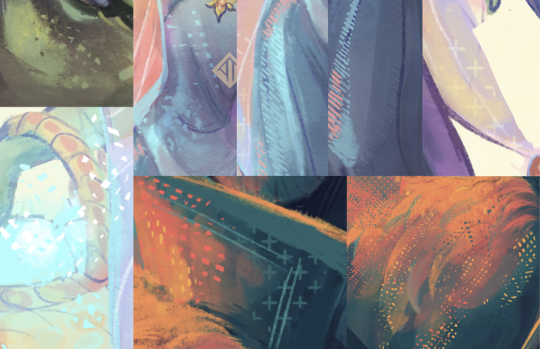
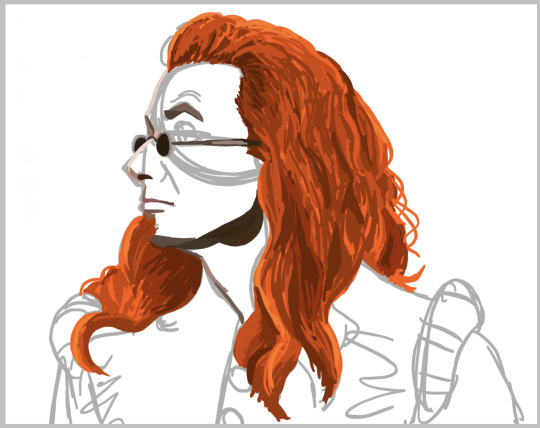
#just three layers from rough sketch to line/color
Photo

The duo reached the Gwanghwamun Station, and the very first one to arrive there, Jung Heewon, greeted them. She stood under the undamaged statues of King Sejong and Lee Sun-Shin, and waved her hand.
"Yoo Sangah-ssi!"
Out of the happiness at this reunion, they energetically hugged each other.
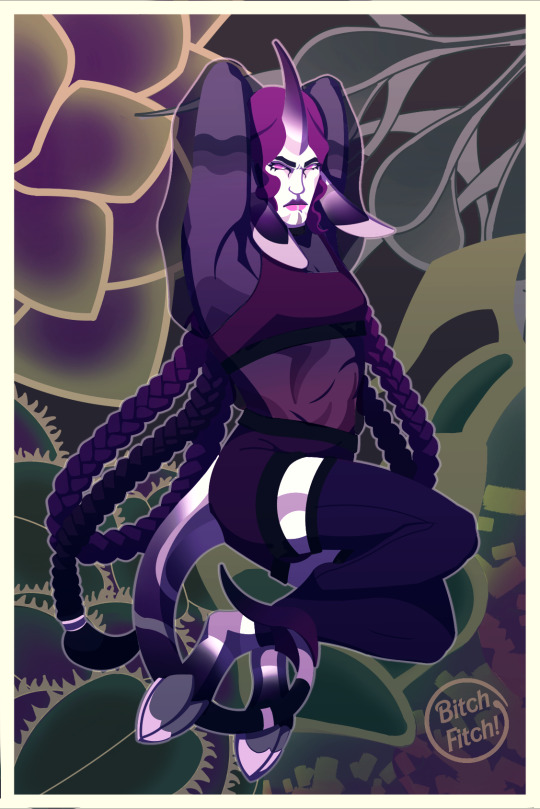
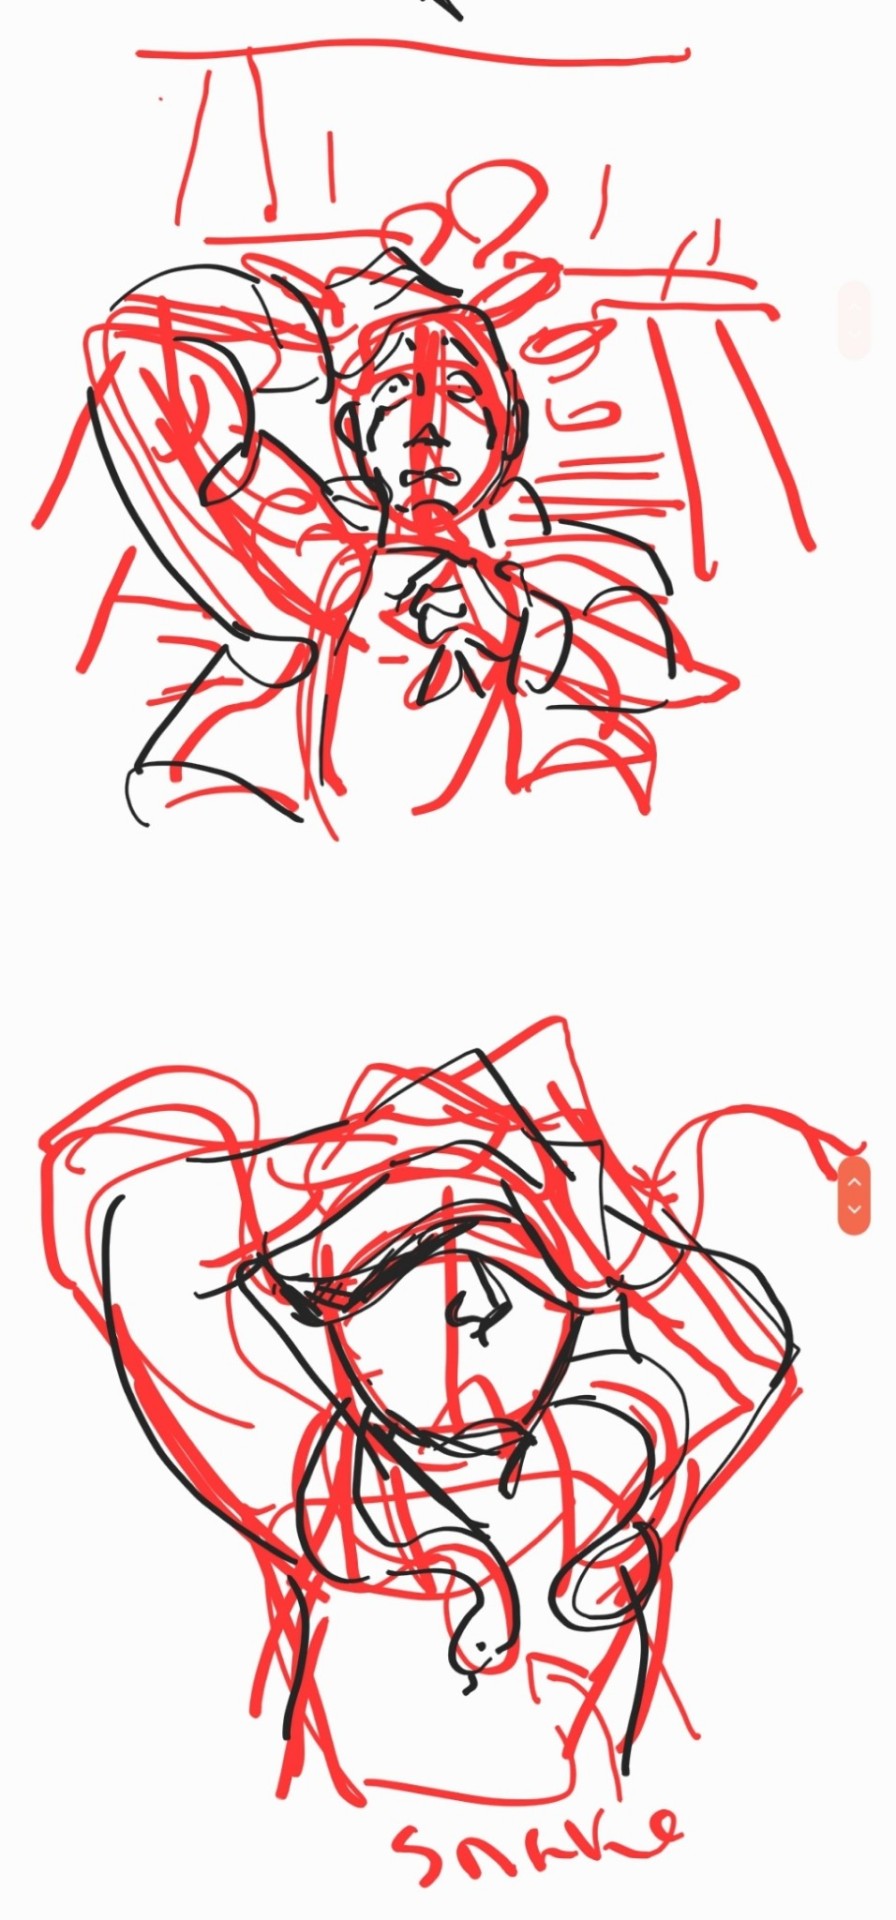
Hugtober Day 7/? - A Bit More Energetic Than Was Probably Implied but Readers’ Rights Amirite
[ID: A grey-toned piece of digital fanart depicting Yoo Sangah and Jung Heewon from Omniscient Reader’s Viewpoint. Jung Heewon grins widely as she catches Yoo Sangah in a hug, wrapping her arms around Yoo Sangah’s waist as she lifts her off the ground from the momentum of the hug. She is wearing a pale full-sleeved shirt and darker pants and shoes, as shown in her first appearance in the webtoon. Yoo Sangah beams down at Jung Heewon, clasping her arms around Jung Heewon’s neck as her feet dangle above the ground. She is dressed in the pale suit she wears at the beginning. /end ID.]
#orv#omniscient reader's viewpoint#yoo sangah#jung heewon#sanghee#EDIT: absolutely thinking of the wrong two characters with the first abbreviation lol sorry about that! hsy's loitering energy is too strong#these all just sound like real names there's got to be a better way to go about this skjdfsjkhsk#omniscient reader#orv fanart#kim dokja is standing somewhere off to the side with the spinning beach ball of death floating behind his eyes#my attempts at art#can't think of any snappy titles so you get the draft caption instead XD#weirdly enough this was among the easier ones to draw once I finally found a decent reference#just three layers from rough sketch to line/color#just don't look too closely at anything and it's fine sdkjhskhf#I love every leg of the hsy ysa jhw triangle#especially the entire triangle#and each of its corners individually as well#EDIT: COMPLETELY FORGOT THE IMAGE ID I AM SO SORRY#I K N E W I FORGOT SOMETHING I NEVER MANAGE TO POST ANYTHING THAT FAST#I was like huh it's weird that I'm not fixated on the clothes of whatever drawing I just threw out there#and then I realized#it's because I DIDN'T THINK ABOUT THEM
80 notes
·
View notes
Note
Can you give like, a "style guideline" for how you do the unique magic posters? It can be as rough or developed as you want, I'm just curious about your thought process
I'm not sure if I can explain it very well, but I'll try! there's definitely a skill to being able to explain The Process in a way that makes sense to other people, so apologies in advance if this just ends up a confusing mess of words!
since these are about each character's unique magic -- though some of them are. looser. than others -- that's a pretty obvious starting point. I try to stay away from a literal "here's a picture of them using their magic" and go for more of the tone and feeling of it. like...the ones I did for the twins don't really have anything to do their magic at all, because I decided it was more interesting to make it about their twinny-ness and their eyes, and having them bookend Azul. so...their magic got relegated to the background as the teeth/tails from the kanji, rather than anything relevant. :') but they look nice and creepy, which was more important to me!
I always start by doing a bunch of thumbnails to get the idea down and figure out what exactly I want to do. for these I go to colors straight off the final thumb instead of doing a tighter sketch; things tend to change a lot and get moved around and shapes and silhouettes get refined as I go, so I just try to get the idea and the important shapes down and worry about fixing my wonky anatomy later. the style is so flat and minimal that it's fun to lean into that, use a lot of symmetry and lack of depth to push the shapes a lot further than with lines! my only rules for it are that 1) the character should be prominent, and 2) facial features are in limited supply and only to be handed out when necessary (both eyes? don't be greedy). other than that it's anything goes!
here are the final thumbs I went with for each if you're interested! some of them stayed pretty close, and some of them still ended up changing a lot during painting:


once I feel good about that, I come up with two or three main colors + an accent color + a "black" and a "white". (I don't use pure black or white for these, I use dark and light shades of other colors. like for the poms, the "white" is a super pale green and the "black" is a super dark blue. it looks richer and blends better with the rest of the palette that way!) I try to use the same colors within the dorm groups (except for the scaras) to keep some internal consistency, but they don't have to be exact or anything.
color is something I tend to really struggle with so I like to have a palette to start with, even if I end up getting away from it. :x I don't restrict myself from adding more shades and colors as necessary, but I try to be mindful about it -- pops of contrasting color immediately become a focal point, so I don't want to overuse those and make it distracting. the little rimlighting highlights are in the "white" color, and just there for fun and to make things a little less 100% symmetrical for some of them! they're easy to overdo though so I try to use them sparingly.
the actual process of painting is mostly thinking about shapes and silhouettes. because there's no lines and no real depth, clarity is really important; a lot of it is making sure the shapes all look satisfying and there aren't any weird little messy areas or anything. and pretty much all of the fonts I go over to add bits too or change slightly, to make it less stock-looking and integrate it more! there's just a lot of trying different stuff and havin' fun, seeing what happy accidents happen. (like...the heart shape in the milk on Trey's was not planned, it came out kind of heart-shaped by accident and I went YESSSS PERFECT and cleaned it up to make it look more intentional. stuff like that!)
uhhh what else. I do everything with one brush (except for some of the little grungy font touchups on the twins), constantly check my values with an adjustment layer on top at 0% saturation, and horizontally flop the canvas to make sure it isn't looking weird or skewed. the paper textures are a final thing, they're a couple of paper layers on top set to soft light and are mostly the same across the board (just slightly adjusting for each) so they don't take a lot of thinking about. the nice thing about doing a series like this is I only have to figure out sizing/borders/etc once. >:)
so...yeah! I don't know if that all made sense or was satisfying, but that's the way I can think to express it! and if nothing else you can enjoy my stupid doodle of Rook making a weird clown face. 👍
#art#sketch#long post#twisted wonderland episode 6 spoilers#twisted wonderland book 6 spoilers#twisted wonderland episode 5 spoilers#twisted wonderland book 5 spoilers#i think eng players are past episode 4 so that's all?#what to tag this hmm#i have never known what i'm doing and that's not about to change#(i am aware i forgot a word in vil's but i fixed it in the final okay)
874 notes
·
View notes
Note
your art inspires me so much, i adore your use of color and texture and composition. i love love making art, getting drawn into a piece and layering and highlights and shadows and and and. but, i struggle quite deeply with subject matter, i feel, donno, like i don't think about the world in that way? everytime i see your art it evokes this visceral need to create but i just end up staring at a blank page. I admire so much art from afar but when I try I feel so overwhelmed with how to just, make the inspiration i get into art? i struggle with this in writing too, ideas are so few and far between and generally tend to be very vauge, like a smell or a color combination, or a collection of words. i dont know how to devolp it or explore it really. I did art in high school, and a year of architecture, and im struggling so much without having a brief to launch off of. feel free to ignore this if its too personal or familiar, but do you have any suggestions for me?
first of all, thank you so much!! and you sound like someone who has a deep interest in the process itself, which is super adrimable! i run into a lot of people who are more concerned with the output than the process and so they lack experimentation, so being process focused can lead to a lot of great possiblity!
As for ideas, it sounds silly when the idea is to generate insporation organically, but drawing from life and photos more was one of the steps to me being able to generate organically. i was for years, one of those ppl who draw a detailed character standing hands by side on a blank background. Learning more about how the figure moves from studying it was the 1# way to be able to organically draw poses the way i do. It’s hard to be like ‘use references!’ when finding refs is a whole other thing but sites like line of action have helped a lot bc i dont even have much choice in the ref lol!! My subject matter is based a lot on personal experience, i’m someone who has struggled with personal connection my whole life, i’m both autistic and have a case of social anxiety so severe i ended up permentantly stunting my development as a child bc i refused to interact with kids my age (oops) so a lot of my work about personal connection between trans and disabled people comes from a desire for close relationships with people who possess the same traits that made me feel undesirable for so long. I can’t also, tell you to generate a list of things about you and put those into your work because not everyone’s work is that personal and it’s not really something that can be forced, everytime a teacher told me to play into my other traumas i ended up hating the peice. i will say though, having a philosophy towards your work can do a lot. Journaling and writing down ideas, problems and aspirations as well as your attitude behind your work can sometimes help roadblocks. I also reccomend building up the process of making thumbnails and doodles and trying to generate ideas in very rough concept sketches rather than expecting to immediatly know what to do with a blank page. It adds more time and can also be frustrating, but it helps break down the blank page anxiety if you have a scrap sheet to try things out on before you go onto your final paper. another thing that helped my process is just always having a sketchbook and pencil on me. I don’t have to use it, but having my supplies with me often helps me be able to do quick sketches when im at coffee shops, doctors waiting rooms.. etc. It helps me be able to get any momentary inspiration down to work with later. the reality with rough Sketches is they do not need to be readable by anyone but yourself. it’s not just that they don’t have to look good, they could be three lines and a few notes if that’s what you need to be able to translate the vision to your head. A lot of my peices come from just wanting to draw certain perspectives or settings, and my sketches can be quite literally a grid sometimes. Again, this probably seems quite overwhelming. if your problem is generating ideas its tough to here ‘just draw!’ but it does help to build up a habit of sketching (even just circles and lines) and notetaking because it can help get the ideas flowing.
12 notes
·
View notes
Note
how do you paint on procreate? i try to get that kind of look but none of the brushes work for me that I’ve found :(
Hi anon! I do have a lot of painting done in different styles with procreate, so I'm not entirely sure which style are you asking after specifically, or what kind of effect are you aiming for, but I'll assume that it's one of my most recent paintings and try to get some general direction in!
Buckle up though, this is a LONG post. I will explain my process from the sketch phase, and you will soon see why I go to that length.
First, if you haven't seen it, there was this ask in which I answered what my common brushes are. No matter what style I end up with, these are still pretty much all the brushes I use, so it's a good starting point! It's also pretty much a TLDR for this post, so if you would prefer the short version, that ask is the answer I'd give you.
Now, to further details:
So my most recent procreate paintings are these three that I've done for Ashton, Anders and my OC Elowyn. I finished my Ashton painting but still waiting to finish my FCG one so that i can post both of them at the same time, so I'll still use my WIP for now!
Step 1: The starting points for these are pretty similar, I do my line sketch using the 6B pencil and put in some colors underneath that line layer:


This is the brainstorming phase, so I try to not rush it and just look for a combination with good contrast and the general style I want, even if you can still see how different they are from the final products. I make sure to get a good line work and composition, because they affect the later steps so much.
I use all 3 brushes for the color sketch, but prioritize Gouache for its delicious, delicious texture, and the semi-transparency would help retain some of the background color for that delicious, delicious color harmony and variation. 🌈 If I need stark contrast or color-blocking, Nikko Rull is the brush to go to. I'll use my 2 other sketches for example (note that even this one has some slight texture!):

(Edit: changed the second sketch bc I just rmbred that that one was done on PTS :))) )
Step 2: I use color correction to get the actual Hue, Saturation and Contrast that I want. I don't have the exact screencap to show (because I paint directly on my sketch layers), but here are what I can salvage from the screenshots I sent to my friends during the process:

(Changed nothing for the Anders piece in this phase tho, I loved the original colors already!)
These 2 are very messy steps, but extremely important for 2 reasons:
It gets my brain worked up to build a precise art direction for the finished result (Anders with the uncanny lighting that bleeds into the background as if he's surrounded by the Fade, Ashton with stark contrast that emphasizes the galaxy brain and showcases their killer cheekbones, and Elowyn with those soft, dreamy colors that don't rely as much on the shading as on how the different areas transition from one another)
It builds up the texture! If you're a beginner artist, I still recommend the flat brushes, so that you can quickly spot your mistakes and focus on the fundamentals. But, if you're closer to the intermediate level (I'd like to consider myself on the lower scale of intermediate technical skills) and want to add in some flare the same way I do, then yes, go for the rough edges, the messy blends and the unrefined line work. I think they give my painting more character and more life. There is already so much going on in this particular area, just from me trying to imagine my lighting, and those are all made with them brush edges:

And, yes, at this point everything is still all over the place, like where are the soft and hard edges??? Where is the focus??? Some of them is already there (esp in the Ashton piece), but the painting is still generally messy as hell. So! I try to refine it in the rendering.
Step 3: For this step, I'll give some tips on how I achieved certain effects you see in these 3 paintings.
So, any time I want to refine my soft edges and/or color gradients, Gouache is my guy:

Nikko Rull is the option I rarely go to, but it's very good for blocking out a large area of colors, so I use it a lot for background, or my other paintings that require a cleaner style. For this phase, if I need to add sharp edges, whether for shading or line work, I use my beloved 6B Pencil.
For refined linework:

To create sharp-edged shading, highlight and rim light, I work in thin lines alongside my Gouache. I keep it organic and rough, still (and added another painting for extra examples):
For the sparkly little effects that either work as literal sparkles or shading touch-up, I use all kinds of brushes from MiksKS's Pattern Brush Set, but my favorites are Crosshatching light and Diagonal hatches. Depending on how early you work these patterns in during your painting process, you will get different effects. I usually put them in last. Also, you can always change your brush setting to get the pattern size you want.
(Also +1, if you would prefer not to pay for these brushes, check out other free halftone brushes: https://www.decolore.net/halftone-brushes/ )
With Tumblr's 10-image limit, this is as much as I can share this time! If there are things you would like to know about in specific, let me know and I'll find the time to answer to the best of my abilities. I'm not confident enough to put out tutorials of any kinds, but if you want to know about how I do things the way I do, I'll always be glad to share what I know.
Have fun painting!
17 notes
·
View notes
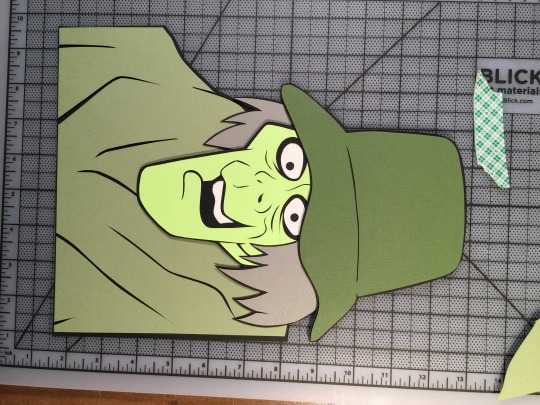
Photo
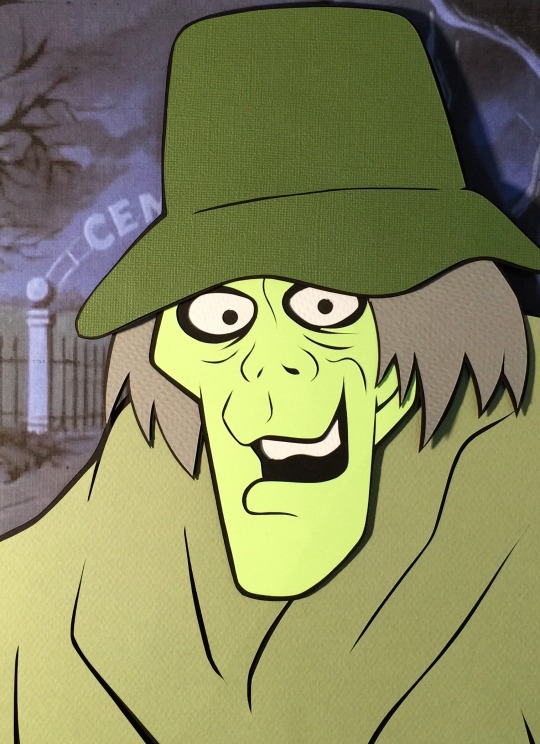
This is in response to the process ask I just received…
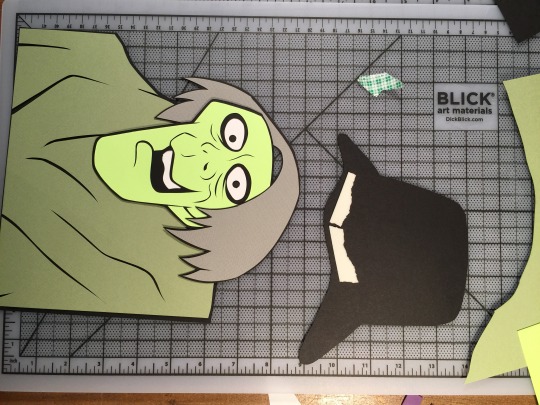
Above is the finished product of a creeper from Scooby Doo I made a whiles back. The character was designed by the wonderful Alex Toth. Toth is a great illustrator to try to mimic in cut-out form because he illustrated for animation and, as such, was very economical in his line use.
So the first step is that don’t use crisper. I’m sure the technology will improve with subsequent iterations, but from what I can tell the shapes it creates are really static.
What I prefer to do is draw the images in pencil or straight on with an exacto knife. I’m not the best at drawing, but often the groove of the paper will help in offering up a more confident looking line.
Then I’ll use black paper to stand in as the border lines. I’ll cut out the spaces the layer underneath, like the dude’s mouth and eyeballs.
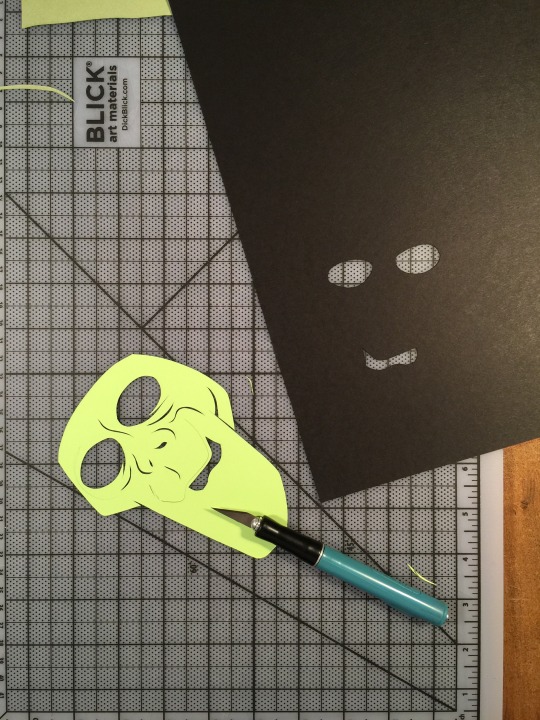
Some white paper taped to the opposite side works as the white of his eyes and teeth. Then I double side tape the piece to the paper, lining up the eyes and mouth and cut it out leaving a small margin between the green of his skin and the black of his facial outline.
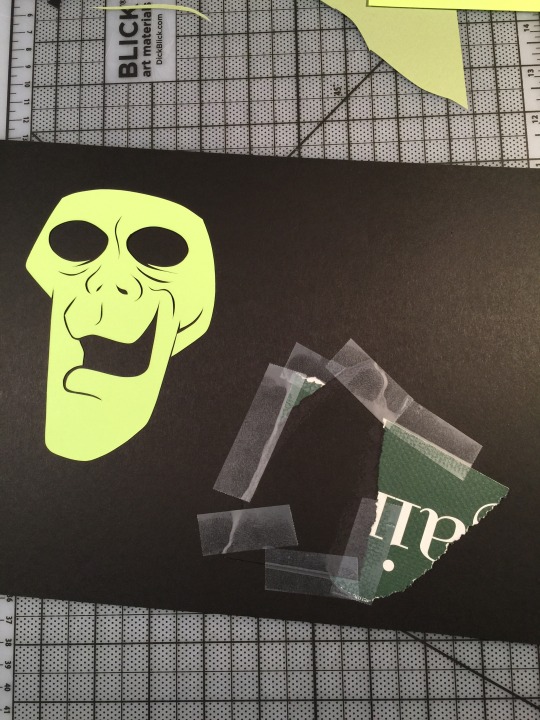
Now that you got the dude’s face, the rest is easy. I used a different color green for his cloak… sketched a rough outline of it and then cut. Double sided matting tape is good for an elevated three D kind of look. Again I leave a small margin between the boarder of the green and the black to create the illusion of an illustrated line.
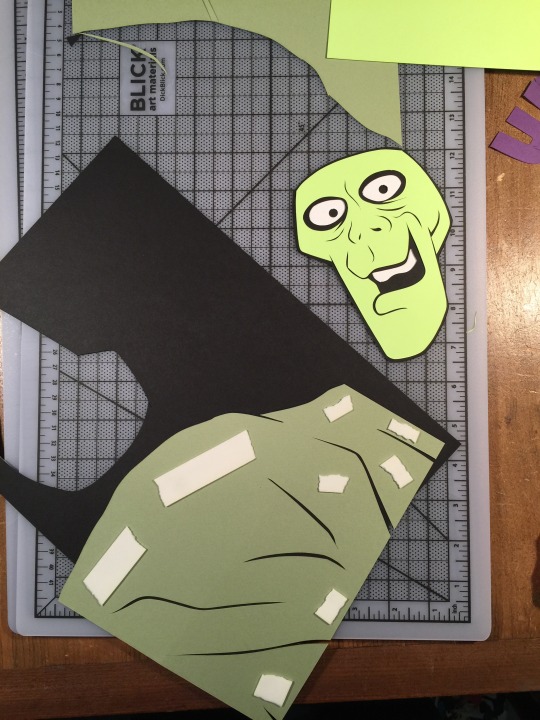
His hat and hair are just separate pieces I drew with a knife and then double sided taped to black paper. Knowing that his hat would cover much of the hair, I just drew what parts would show from the hat on either side of his head.
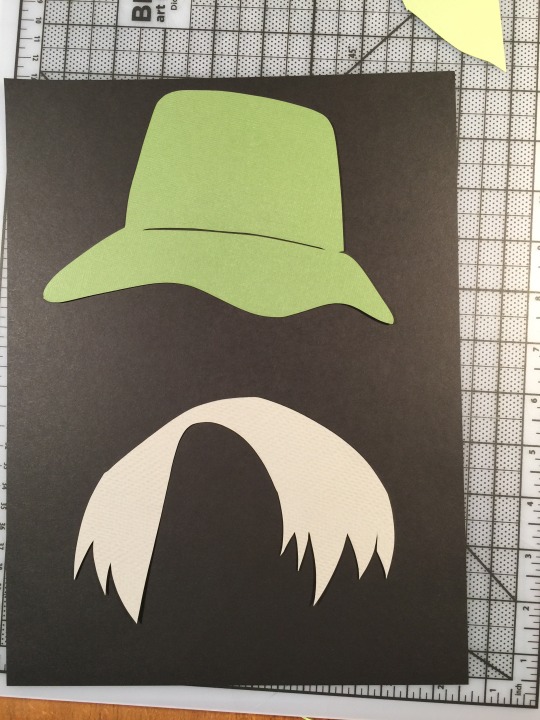
Again this takes some degree of drawing skill, but once you get used to it, the knife blade really helps in keeping the line looking confident and crisp.
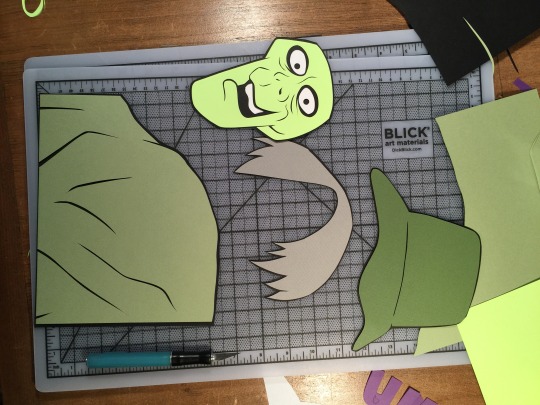
This is my favorite part. Will the individual piece cut out, it becomes a rudimentary puzzle to be put together
Again, I like the double sided mounting tape… it has like a foam basis that gives good lift off the paper, helping to create a quasi-3-D like effect.
Take your time taping the pieces together. It’s all about layering and making key choices of what parts are covered by the other pieces and which ones aren’t.
I use my iPhone to photograph it. A plain colored piece of paper works, or you can print out whatever background image you like. Something it helps to place a lego or eraser under the main piece to lift it off the background. This will cause a neat shadowing effect if you angle your light source.
I recommend starting off with simple, less detailed pieces and then moving on to more detail. I don’t fancy myself any great artist, but I often feel hand done things look better than computer assisted stuff. Maybe one day I’ll try out crisper, but for the time being I feel not her beats the meditative quality of working with one’s hands.
Please let me know if you have any further questions, good luck and be safe handling those exacto knives.
59 notes
·
View notes
Text
step-by-step comic page
@weremouse and I were talking yesterday about drawing comics, and the shortcuts and tricks that you end up figuring out to speed up the ordeal. I ended up breaking down one of my short-comic pages into the steps of my current process, and having done that I figured I’d post it here in case anyone else finds it useful!
everything under the cut, since this is pretty image heavy:
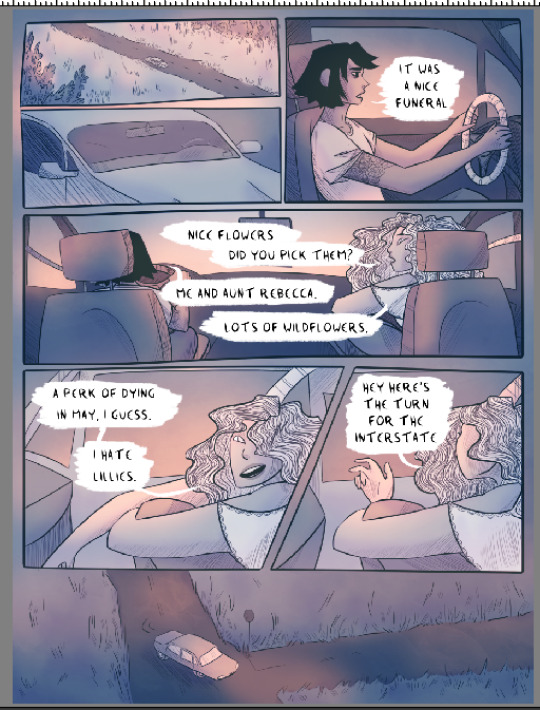
1. Panels! I freehand them these days, which saves a lot of time, and I like how it looks a bit softer and more dynamic, especially compared to the perfectly geometrical rectangles I used to do.

2. New layer for major lines, and a new layer for speech bubbles (I seem to have deleted the rough draft layer I was working on, but it was definitely there - no details, but I sketch out the panel layout/major shapes/speech bubbles beforehand and draw over that).

3. New layer for text, new layer for details like hair, tattoos, etc, and new layer for line shading (which is probably the single biggest step backwards I’ve taken in terms of saving time lmao)


4. And that’s the hard work! The rest is pretty easy. I color most of my short comics in greyscale and then add color later. Wouldn’t work nearly as nicely for full-color, but it’s a good quick way to color limited palette comics. First step is to pick a shade of grey for the overall background:
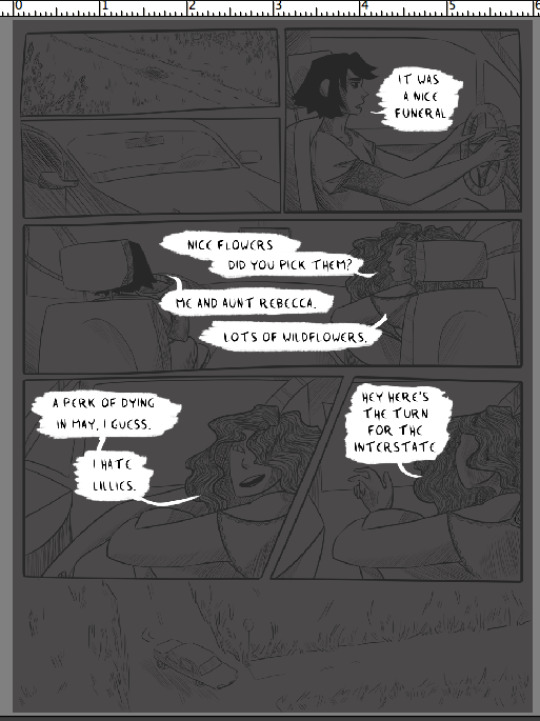
5. New layer, and block color the small panels. Use greys that contrast the background shade, either much lighter or much darker. (note - I didn’t color the car windows, since I wanted to shade what was ‘outside’ differently than the car interior. I also colored the road on this layer instead of the previous one, which was a mistake I just didn’t care enough to fix whoops).

6. New layer, color the people and any any other objects you want to shade/color separately from the background. Having the big panel background, small panel background, and people on three different layers makes it really easy to color them later.

7. Time to add color! I’ll break down the individual steps I used, but the tl:dr is that I make a couple different clipping mask layers attached to a layer of flat grey, and play around with color/opacity/layer settings with a big soft brush until I like how it looks. I use a lot of soft light and overlay! Anything on a clipping mask layer only affects the layer it’s clipped to, so you don’t have to worry about precision.
Once you’re happy with it, then do the same for the other two grey layers. Each grey layer ends up looking more or less like this:

I’ll use the people layer as the example - first clipping mask layer is set to soft light, at a low opacity, and I used purple with a soft brush to add some shadows.
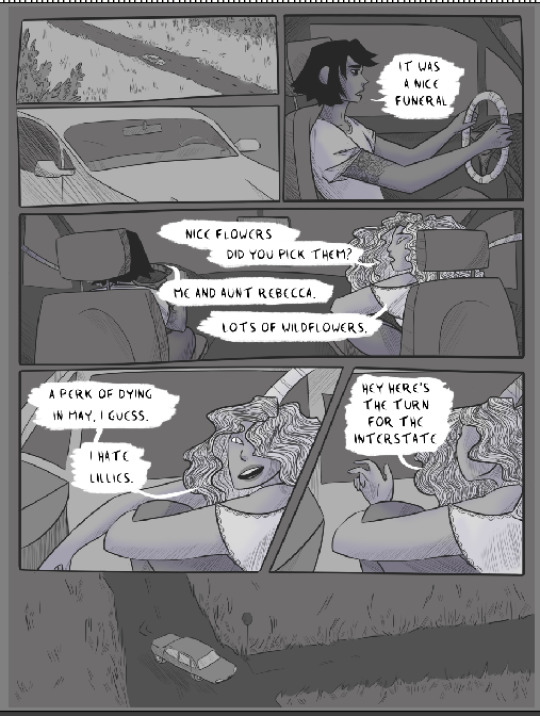
Next is another low-opacity soft light layer - yellow and purple, with a watercolor brush, to add a bit of texture. It’s very very faint on the people layer (you can barely see it, honestly) but recreating it for the background levels I turned up the opacity a bit more.

And the last clipping layer is set to high-opacity overlay, painting on pink with another big soft brush. I like how sharper shadows and highlights look but they take up a lot of time so I almost never do them in comics. And I like the kind of glowy look that less-exact soft round brushes add.

8. And that’s the people layer done! Because I wanted the same colors throughout, I did the same set of clipping masks for each of the other two grey layers. but this is also a really quick way to color something like my comic cursed - if you want the people to be one color and the background another, or the small panels to be a different color then the big panels, just add a clipping mask set to color/hue/overlay/whatever else works over the grey layer in question and fill it with the color you want.
anyway! here’s the small panels with the same treatment, and then the background with the same treatment.
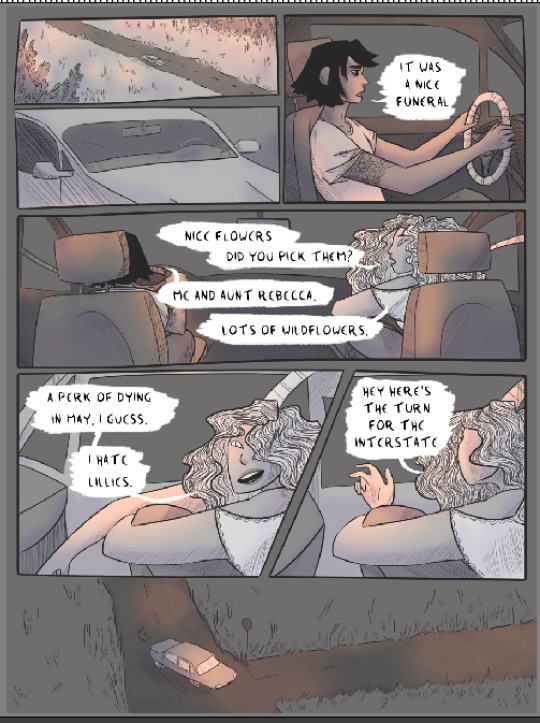
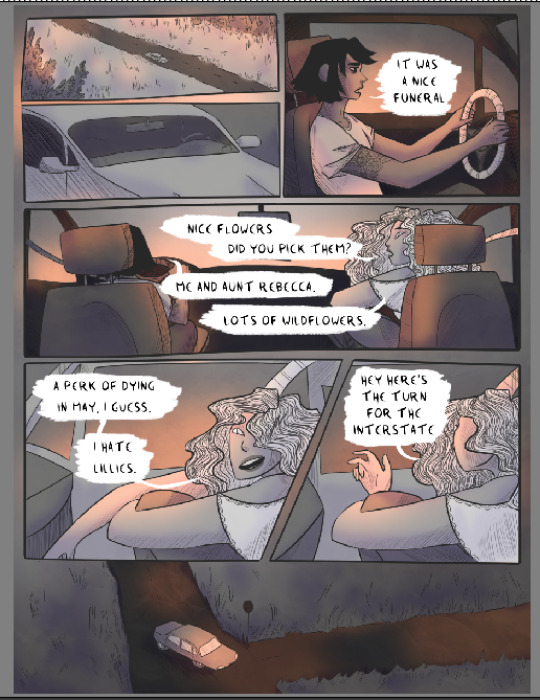
9. That’s highlights, shadows, and some basic color all set! The last thing is adding some additional soft light/overlay/etc layers on top of everything, filling them with different colors, and seeing what works. I want to get rid of the last of the grey, and unify the page’s color scheme a little more.
full disclosure: I have absolutely no idea what most of the layer settings actually DO. it’s a mystery. I’ll cycle through different settings with different colors and I am surprised pretty much every time by what happens.
What I ended up with for this comic was a layer of mid-opacity light grey, set to screen, which lightened the page a little:
Then above that a mid-opacity layer set to color burn, this one filled a pale blue. Now the remaining greys are more bluish, which is closer to what I wanted:
But still not quite the right atmosphere. So above that there’s a low-opacity vivid light layer, filled with the same purple I used for shadows. Now the color’s pretty much perfect.
But it looks a little dark, and the pink has been toned down by the cool-colored layers. So one final layer, on top of everything: soft light, full opacity, using a big soft round brush to add the same pink in places I want to be brighter.
And that’s the final page! The linework still takes a while, but I’ve pared coloring down to pretty much just clipping masks, haphazard soft brush application of colors, and dicking around with layer settings. I hope this is useful!
#long post#like. long#my art#process breakdown#i learned a LOT of shortcuts from seeing how other artists made comics#even if i didn't end up using them#understanding the options available has always been helpful!#so here's this
259 notes
·
View notes
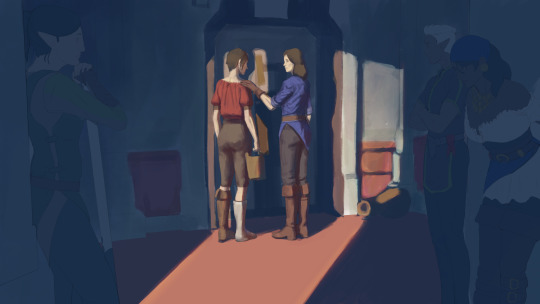
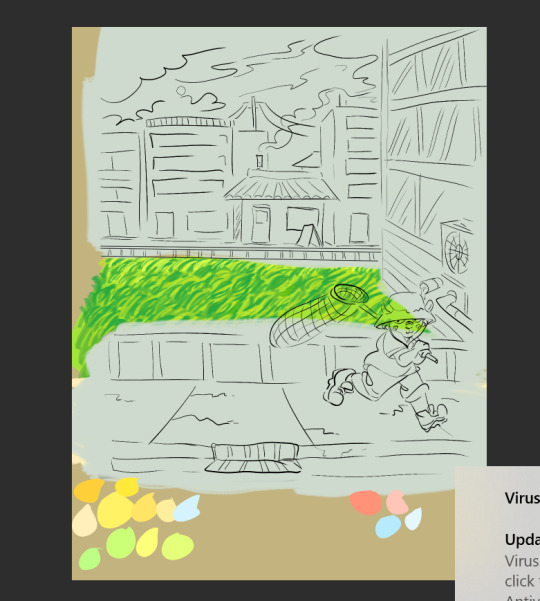
Photo
And here’s the breakdown for this piece!
Tons of ugly wips below the cut, you’ve been warned :)
This idea was the very first one I had for this series, before I planned it as a series. According to my records on discord I first started planning it on... August last year (ಠ_ಠ).
I had not found more environment game assets by then and neither had looked into ripping models myself, so I started modeling the room on Blender. I abandoned the idea because I wanted to focus on that DAOCtober thing. Love jumping from one idea to the next without finishing the first one :^)
DAOctober done and I wanted to return to this piece. I gained a ton of knowledge of Blender doing the renders for that month that I wanted to get more ambitious with this piece, but doing just one picture was not enough, that’s where this project was born.
-
The prompt for this one. Not all of the details made it in the end. A few I forgot to be honest. I was borderline burnt out and wanted to move to something else. In the end those missing details were not necessary I believe.
Writting this prompt definitely helped improve the initial idea.

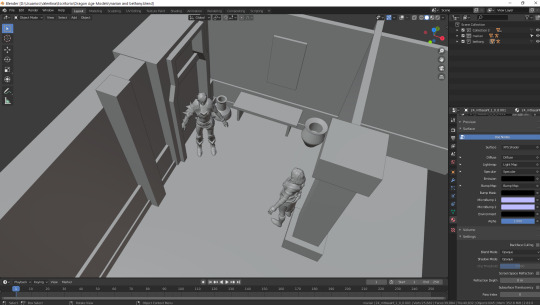
Sketch! It’s awful haha. Like in the previous one, the goal was simply to know where characters and objects were going to be placed on the floor, camera angle could be found later. I didn’t use the first 3D room for this because this is way faster and the revised idea required three more characters to be added.

Sketch done I proceeded to place and pose all required characters. Textures were placeholders I took from Quixel Megascans. Overall super rough. After shooting these I moved to the Entrance picture.
Then I came across environment assets as well as I learned to use ninjaripper to rip models and textures myself. And rebuilt the entire room and placed all the characters (at some point I wanted to include Aveline and Varric, but the scene was already too crowded and I bet that their Guard Captain and Viscount duties took them away at the end of the day).

After much fiddling I found a fitting camera angle and got to sketching.
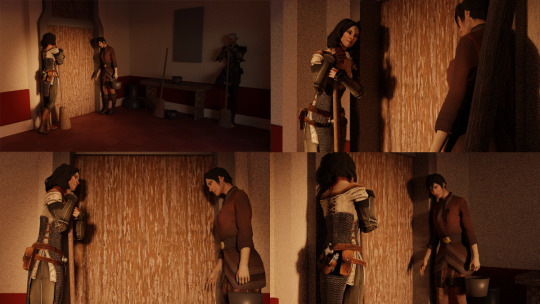
The composition ended up being static and rather symmetrical, which I think fits the solemn mood of the scene.


The (f)ugly stage of a painting lasts like 90% of the entire process, but I reached a point I considered the picture to be unsalvageable and abandoned it.

About two weeks later that I spent painting other things, I tried a different approach and it worked (for reference, the above painting I started by pretty much painting on top of the sketch, while this new I started by placing flat colors and then a layer of shadow on top). Huge fucking difference.
And it went pretty smoothly from there.
About 1/3 of my paintings go through this process, where I don’t know what the hell went wrong or how the f I can fix it, so I just scrap it altogether and start over. Don’t believe the sunk cost fallacy. Starting over is better.
This is the last wip shot I took before finishing it.

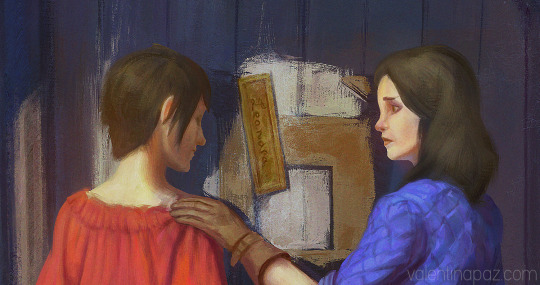
You’ll notice this first iteration had Marian gesturing to enter the room. But after much consideration I decided that it should be Bethany. As I thought it’d be more appropriate for each character.
The logic being Marian still feeling guilt over Leandra’s death (thanks game for making Leandra’s room always inaccesible and that one line of dialogue as an excuse to not enter it after her death), and well, everything.
Bethany’s Warden path is painful. Every encounter with her after the deep roads expedition feels like a kick in the guts. She resents her fate and her sister. She’s the one that dreamed of nobility and princes and that life was snatched right away from her. I’d like to think she also lowkey blames Marian for not saving Leandra.
So Marian would be carrying a heavy burden of regret and guilt, ruining her sister’s life and failing to save their mother.
But in the end Bethany comes around to her warden fate. She admits it wasn’t Marian’s fault, so giving her the agency to decide for both of them to finally move on and lift Marian’s burden of guilt, was to me, fitting.
And that’s it. Thanks for reading!
46 notes
·
View notes
Text
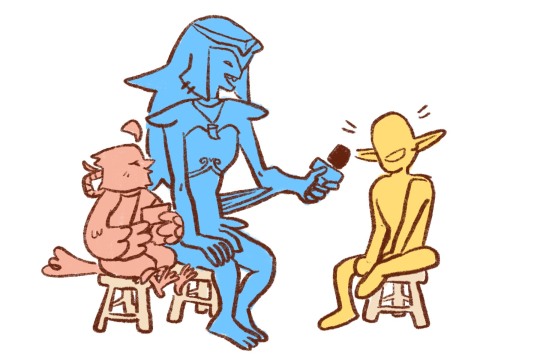
An Interview with Mr. Toshiyuki Toyonaga about Fire Emblem (Claude‘s Japanese VA), Pgs. 1 & 2
The gaming magazine scene is still a pretty big deal in Japan to this day. Admittedly... I only cared about them to collect the giant bonus posters. I always swore I would read the magazine, but with the hours in a day being so limited, I never did.
Until last November, that is!! I bought Nindori (Nintendo Dream) for a Zelda poster, and saw that the main article of the issue was... An interview with Claude’s Japanese VA!! Now that’s the real treasure!!
And as I read, it only got more and more interesting... turns out Mr. Toshiyuki Toyonaga has been a Fire Emblem fan since the very, very beginning, and has all the unique feelings towards FE of someone who is simultaneously a fan and a professional.
I’ve gone to hell and back slowly working my way through this translation. It just so happened to be at a really high level of Japanese. One of the fun things about being a translator is, you never really know exactly what’s going to be a challenge to translate for you. (Even kid’s books can use a bunch of words you don’t know and throw you in for a loop sometimes.)
And now, it’s finally ready to start posting!! Please enjoy it to your heart’s content!!
However... the interview doesn’t start until page 3, so everyone will have to wait until the next post before you can start to read it. ^^’ For now, enjoy some awesome commentary from Senri Kita, on her illustration for the promo card that came with this issue!
Pg. 1 (pg. 12 in the magazine)


Fire Emblem Cipher Finale Special Feature
Fire Emblem Party

This year marks the 30th anniversary of the Fire Emblem (FE) series. The release of the 22nd booster set in October is the grand finale of the TCG FE Cipher, and the promo card included with this magazine will also be the final one. As such, we included a special feature about Claude, the character featured on the card, and the history of Fire Emblem! Please enjoy this lavish party!

Voice Actor of Claude in “Three Houses”
An Interview with Mr. Toshiyuki Toyonaga
About Three Houses & the 30th Anniversary
Pg. 14 ->

Introduction of a Deck w/ the Promo Card + New Booster Set Information
Hero Research Lab
Pg. 22 ->
Promo Card
“Secret Dance Prodigy
Claude (Fodlan)”
Enclosed in the back of the magazine ->
-> The formal event outfit that Claude can be changed into if you purchase the DLC

Claude (Fodlan)※, from “FE Three Houses,” the latest release in the FE series. This card is part of a set with the other class leaders, Edelgard and Dimitri, who were included in previous issues. Because this is the finale, Claude is wearing formal clothing, and the card is holographic!
(above) The scene from “FE Three Houses” that is portrayed on the card. It is from the Officer’s Academy ball.
※Claude (Fodlan): Because there is another character with the same name in “Genealogy of the Holy War,” Claude is called “Claude of Fodlan” in FE Cipher. (T/N: This distinction does not apply in English, as Claud and Claude are spelled differently. Both are クロード in Japanese.)
Pg. 2 (pg. 13 in the magazine)


making
[rough sketch] The scene for this art is the ball, so I decided to use warm tones, and bring the entire piece together with an orange-gold color. I arranged the information that I wanted to convey (that Claude is drawing the hand to him) in such a way that it would not be covered by the card icons or frame.

[midway progress] I cleaned up the lines that I drew loosely on the rough draft. I also created different layers for the outline and the colors to make it easier to color when the time came.


[finished drawing] I adjusted Claude’s right hand to give it depth, then added another chandelier in the background. When I finished coloring the entire piece, I adjusted it to fit the color scheme I had first imagined. Finally, I added the glittering lights as a finishing touch.

comment
“There’s only one expression that Claude would have in an illustration on the dance floor at the ball!” I thought, and drew him winking. I thought it would be fun for it to seem like his dance was gradually pulling in the wallflowers, so I created that feeling. I left it up to imagination whose hand he is pulling (because everyone is wearing formal clothing that’s different from their casual outfits). I also studied all the art I had of him as closely as I possibly could to get his face just right. I wanted his personality to come out in the illustration, so I hope I got it right!
Senri Kita
An illustrator. She’s worked as a designer and pixel artist at several game development companies, and was the illustrator for FE: Path of Radiance (GameCube), as well as the pixel artist for Kirby: Squeak Squad (DS). Freelancer since 2006. For FE Cipher, she’s provided the art for many characters, including Ike (from Path of Radiance and Radiant Dawn) and Gatekeeper (from Three Houses), who’s always standing in his unique spot. She is an active creator of character art and other illustrations for the app game Fire Emblem Heroes.
#fire emblem#fe#fe16#three houses#claude#claude von reigen#toshiyuki toyonaga#nindori#nintendo#nintendo dream#switch#nintendo switch#japan#japanese#translation#claude va interview
28 notes
·
View notes
Note
Hi, sorry if this is weird/outta the blue but I just was wondering what your drawing process was, and if you've ever done a time lapse? also, is there a specific name/type of your drawing style? it's really unique and i want to see more of that digital style but don't know where to start!
Ooooh boy.
First, this isn't weird or out of the blue but forgive me, I'm a bit unprepared and fear my answers are going to be very underwhelming.
My process is typically getting a general idea of what I want, finding refs to help support my idea, and then getting to work drawing. I tend to draw a rough sausage skeleton to build the shapes I want, then refining the drawing from there with more layers (typically three layers of linework total. Super rough/gesture, rough/redline sketch, lines). Then I color in the base color (usually what the major colors will be) and then make clipping layers above that of flats, details, and effects respectively. Then I post and hope for the best!
I'm not sure if my style has a name, per se? I can tell you that bara, comic, and stylized art have really helped shape my style. I also follow a bevy of different artists and when I see them draw a way I kinda like, I see if and how that will work with my art, as your style is always evolving and influenced by the content you surround yourself with.
As for the time-lapse, no, I've never done a time-lapse. Honestly, I don't even know how to do anything like that though I have thought about finding out how to do so or possibly streaming a couple times a month, though the wifi in my building isn't all that great.
I hope this helped answer your questions or possibly gave some insight on how I get things done. Thank you for dropping the ask!
4 notes
·
View notes
Text


day 0, day1, and day 10
so 10 ish days of style exploration later ive got some Hashtag Thots.
I wanted to have a style that was quicker and easier to deliver on for art fight this year while still being pretty.
i wont lie, undeniably one of my bigest inspos was st-hedge here on tumblr, check em out,
but one of the biggest aspects of their style is that its very technical but a bit messy at the same time. with a fairly limited local value range. and they use the colored pencil approach to digital art to create pieces that are both very textured and atmospheric while still looking flat. i Adore this look.
and that was Definitely what i was trying to channel in these first three pieces


what i very quickly learned is that my brain just Does Not work that way. big clean shapes just arnt my thing,
piece number 3 is where i feel i was the closest, but i still didn't Quite get where i wanted to be. and at this point i was really frustrated with this whole process, which is why there was a sharp and sudden shift to this more shiny and plastic look

its passable. i stopped trying to do anything approaching color pencil work and shifted to more traditional cells and layer styles. and like, maybe with more refining this one could have worked but it just didn't really Speak to me.
this is the one i think im the happiest with result wise. we're still doing lineless at this point and its the nicest to look at, but theres a lot of places that just felt bad to work on. it was frustrating and i felt like i was fighting the style the entire time. beyond that its just boring. its too minimalist for my taste. and nothing is sharp enough but at the same time everything is Too sharp.
then i tried to do clean lines. and then i imeaditly gave up on that bc i hate doing line art.

then we wound up here. where i just used a cleaned up sketch for my lines with two layers of cel shading done in my rough sketching brush
theres still room for improvement but i think i finally have a direction. it has the grit and most of the simplicity i wanted from the start, while still keeping in line with my love of bold, dramatic/high contrast shading.
i think from here i might experiment with colored lines and top of sketch detailing. maybe ill start going more painterly with the shading to soften out areas,
anyways this was a fun experiment and i got two new boys out of it.
#god sometimes i forget how much art i shit out#ndsnsnsjsj#anyways thank you all for sticking with me through this#long post
15 notes
·
View notes
Note
What’s your process for your more realistic works? Do you happen to trace the reference picture and use many different layers for the colors? They look amazing! I’d love to see your process and I’m just asking because I’m trying to get started in digital art!
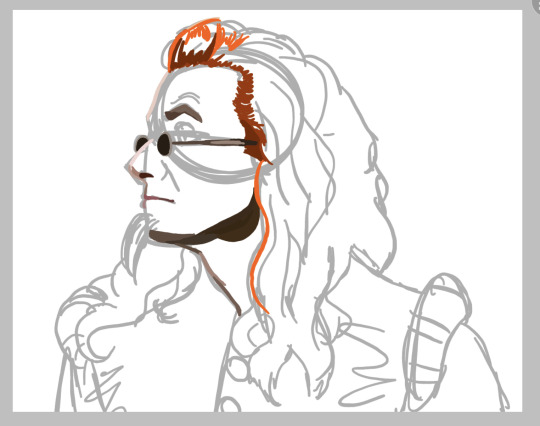
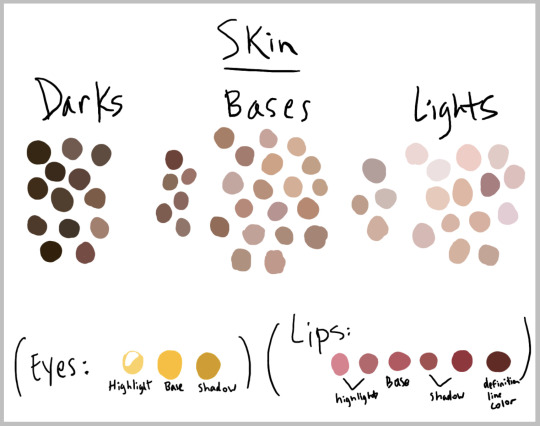
Okay, I’m bad at explaining how I draw, but I’ll give it a shot! I’ll go step by step (with images of my process) below, but to clarify: no, I don’t trace anything. I do often use references when I draw realistically (obviously) and yes, a lot of layers are involved, but I’ll explain that later :)
Say I’m using this photo as my reference (I am once again drawing Crowley):

1. Sketch Layer
I always start with a sketch layer. For me that means one layer at 32% opacity (idk why that’s just a comfortable transparency for me; you can probably do anywhere from 25-35% opacity, but it really doesn’t matter). Take a relatively thick brush (or thin, it doesn’t matter) and..... sketch a face. There are tips out there from other artists on how to draw faces, so I won’t go into that. This is my sketch:

It’s rough at the moment, which is fine. It takes practice to draw faces, so don’t be discouraged if it takes you a lot of tries to capture it! I’ve drawn David Tennant ~401 times; I have some Experience with his facial structure.
2. Color Layer (mostly hair)
So I end up having three color layers: skin, hair, and clothes. I start with the hair because I like to draw hair the most, but also because its a nice way to figure out where the face goes, and then draw the clothes where the skin and hair aren’t. I’m not super rigid about sticking to these layers and sometimes it only takes two layers because I’ll do the skin and hair on the same layer, which is what I started doing here:
As I continue, I’ll take out the sketch layer when I put the image on here, but for now I think it’s helpful to see that the colors don’t line up perfectly with the sketch. In terms of skin, I always do the outline first, which usually entails the darkest and lightest colors. David Tennant’s skin is light, yes, but I still end up using dark browns and even oranges when I shade darks, and pink/purple/white when I shade lights. This is where the reference helps a lot: deciding colors. Eventually you get a knack for it and don’t have to be too meticulous in studying pictures. As for hair, I end up using less than 10 colors for Crowley’s hair usually, but you could get away with only using 4 or 5, as long as you have a base color, at least one highlight color, and at least one shadow color. This picture has the hair color palette I’m using:

And here’s the finished hair!
I used more colors than I listed, as you can probably see if you look closer, but those are the essentials for this drawing. Hair can be scribbly. Again, you don’t have to conform entirely to the lines of the sketch; it’s just there as a guide.
3. Color Layer (skin)
It’s impossible to color palette and label every shade I used for the skin tone in this drawing, but I managed to group together colors to help you get an understanding of how the shading goes? Here’s the palette:
And as for actually drawing skin.... I always start with the dark colors myself (in this case, since there’s overhead natural lighting, which means it’s soft/ambient/not strictly from one point, the dark colors will be on the neck and lower face/under cheekbones and nose), but I also add in the light/highlight colors too; kinda a balance? Also, once you have the colors, the actual execution of putting them down can be as messy as you like. Here’s that, without the “base” colors of the face (or the eyes):
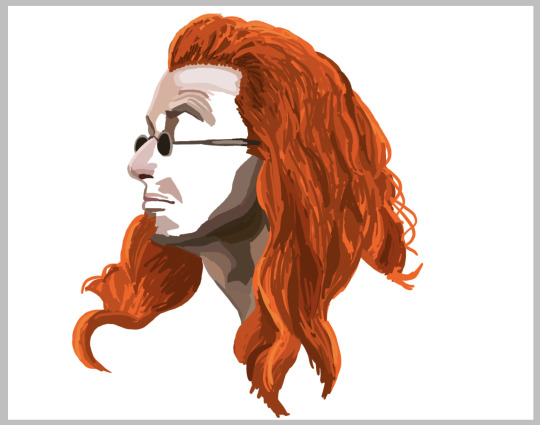
And here’s the whole face!! The majority of the colors are in the palette above, and you’ll probably notice that each group is its own color scheme that doesn’t necessarily match the others; the lights have a red/pink hue, the bases are more orange/purple due to David Tennant’s actual skin tone and the lighting, and the darks are, well, dark.

4. Clothes
Clothes are hard to draw (for me at least). I’m gonna re-open the sketch layer for this part so I don’t mess up his shoulders too badly, and I’m gonna make another basic color palette from looking at my reference.
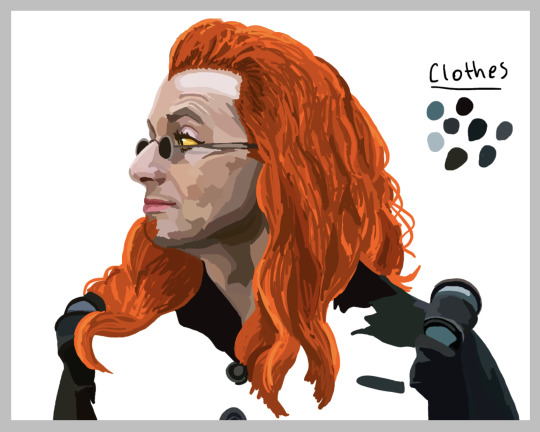
You can shade black with blues and greens, which also contrasts nicely with the warm colors of his hair and skin :) and since its black (or other dark colors) it was easy to fill in the rest!

Please remember my art process isn’t professional and that there are loads of other artists out there who are (in my opinion, better than I am) more experienced and have different techniques! This is the way that works for me. I hope you have a lovely day, and thank you for asking me about this!
#good omens#my art#fanart#crowley#finley cannot draw#ask#answered ask#anonymous ask#thanks anon!#thanks for the ask!#my art process#digital art#my actual art process#illustrated#like this is me drawing and taking screenshots#finley cannot tag#hamlet Crowley#I love his hair#I love him#anthony keysmash crowley#anthony janthony crowley#I wonder if he already had a middle name/initial at the hamlet scene#detailed art process#finley rambles#long post
24 notes
·
View notes
Text
the always wonderful shelley @shanheling tagged me to do this thank u so much!! i think that everyone i wanted to tag has already been tagged to do this but if you feel like doing this feel free to consider urself tagged by me!! im putting this under a readmore bc its long and i ramble a lot
the piece i was tagged to explain my process on is this oc piece! unfortunately i have a habit of deleting my original clip studio file once ive finished my art and saved it as a new png file, so i dont have the file to show the sketch and different stages of this piece. but I still can go through my general process and talk about how i did that piece!
1. planning
honestly i think about the art that i want to do a lot, and in this last year or so ive thought about the art i want to do more than ive been able to actually create and finish that art that i want to do. for my planning i tend to do a lot of different thumbnail sketches for the art im thinking of
these are some examples of thumbnails, a lot of times ill do thumbnails just on pencil and paper and with some of these theyre done quickly with my fingers on my phone note function on a day where i was feeling too bad to get up and draw on paper but still wanted to get the thumbnail ideas down. two of these are for the same songxiao piece that i still havent finished and i have more thumbnails digitally on clip studio for the same piece, i do a lot more thumbnails when a piece isnt working the way i want it to and theres times where ill completely scratch a thumbnail or a sketch and start over in order to do more thumbnails because i dont feel happy with some aspect of it.
two of these are small gouche painting thumbnails for two pieces i did maybe a month or so ago, i did the thumbnails and then tried to expand on them digitally and im wanting to do more thumbnail paintings like this in the future because it was fun
for the piece of my oc trio it was based off a series of ask prompts i got for a few different outfit prompt memes i had reblogged, so i based their outfits on the ones in the meme. when im drawing figures i tend to try and get the movement down in the poses when im sketching, i do several rough sketches of the pose before beginning to start setting down lines (if im doing lineart at all because sometimes i dont like doing lineart and do a more lineless painting kind of style). i really try to get my art to convey some kind of emotion, in the oc piece i wanted it to feel fun and like youre seeing three best friends while theyre out on the town having a fun night
2. creating
this is the only real example i have of a piece in the middle of being filled in and created, this piece is one that im really not very happy with & have had lying around for a while and ill probably scrap it and try to come at it from a different perspective at some point. but anyway it still shows what i do, i lay down a kind of neutral gray color underneath my final sketch/lineart if im doing lineart in that piece and then i start picking out the colors that i want for the piece and kind of setting out a pallette for myself. i dont do this color pallette thing 100% of the time but i do it really often, especially if im working on a commission or a larger piece where i know theres going to be a lot of colors or if its a piece where im not sure exactly what color scheme i want so laying out the colors together helps me kind of decide what kind of scheme i want. i am sooooo picky about my colors in my art i am genuinely obsessed with colors in art and there are times where i really have to stop myself from working on something forever just constantly adding more colors or putting little tiny changes and gradients in the colors.
after ive got the colors i want down i tend to try and block out parts of the piece with the base color for that section, and then i start to paint with the colors that i want to go on top of that base color from there.
once im satisfied with the colors/shading/rendering and everything ill go back and look over things and will fix things that look off or sometimes completely redo segments if they dont look right to me. when i was younger and mainly doing digital art using my phone and my fingers i would use a lot of filters and overlays on top of my art once i was done, and honestly im glad to not be doing that anymore because i dont think it made my art look any better. i do color adjustments and sometimes will put on a color overlay or a layer to emphasize the shadows and the light in the piece, but i try to keep those layers to a minimum and like i said before i have a tendency to obsess over the colors and ill spend a good amount of time in the color adjustment tool of clip studio and then ill just decide "actually it looks fine as it is" so yeah!
3. posting
i feel like i dont have a lot to say here gbfm i mean i honestly have a lot of thoughts about the relationship between artists and social media and how social media changes our views on art including our own art and how we can feel like we constantly need to be posting new art and just become content machines churning out new stuff. but ill save that rant for another time. i used to be really concerned about how many notes my art would get when i was younger, and i dont at all blame anyone who still is very concerned about that bc it sucks when u work hard on something youve created and then you dont get a lot of recognition for it, but honestly within the last two years or so i feel like ive begun to have a lot healthier relationship with posting my art. i really just post my art on my art blog, reblog it to my main blog, and then thats that yknow! i do really appreciate any and all support people give me, it means the world to me, but for me having the mentality where i dont need to post all the art i make and i dont need to be posting every day or every week or every month even has been a lot healthier for me because then im not constantly asking myself why didnt this get notes is my art awful??? and yeah i just kind of post it and my brain goes okay were done with that art we gotta make more
ive honestly been struggling a lot with art thru the pandemic and if youre reading this and have been struggling with creating in any way recently or even before the pandemic, please know theres no shame in having trouble creating and it doesnt make you bad at whatever it is u create!
thank you for reading this, feel free to consider urself tagged by me again if u want to do this!! love u all
6 notes
·
View notes
Text
Line


When it comes to the contents of line, on of my favorite examples is the line work used in the Demon slayer anime/manga. The line weight seems to change every now and then which gives it a calligraphy effect that really ads to what the artist is trying to portray. The setting takes place in imperial japan and they did their best to make the art look very historical that compares to to old Japanese paintings. The contour and explicit lines they used in these images really gives the rough feeling of how life was back then and I just think it’s really fascinating.
Glossary
Lines have both a direction and a length. Line means a mark, streak, stroke, slash,path, stripe, border, contour, striation, course, route, and track. Curved, bent, thick,wide, broken, vertical, horizontal, burred, or freehand, lines delineate shapes, forms,and spaces, volumes, edges, movement and patterns. Not only that -- lines create both2D and 3D objects and figures. Lines are awesome and powerful.
Contour Lines Contour lines indicate the edge around an object or the changes in volume within an object. Contour lines dramatize changes of plane within the form. The curve of a belt around the waist is a contour line.
Diagonal Lines Diagonal Lines are useful to draw the eye into a composition such as toward the vanishing points. Three common types of diagonals are 1) actual diagonal lines 2)objects placed diagonally in a scene 3) a diagonal line created by the viewpoint such as the Dutch tilt.
Dutch Tilt Dutch Tilt (known as a dutch angle, canted angle, or oblique angle) is a type of camera shot that has a noticeable tilt on the camera’s “x-axis.” The Dutch tilt camera technique was introduced by German Expressionists in the 1920s — so it's not actually Dutch.Directors often use a Dutch angle to signal to the viewer that something is wrong,disorienting, or unsettling
Explicit Lines Explicit means clear, direct, and obvious. If a drawing is easy to read it may be that the lines are explicit, clean, with efficient use of variety. There are explicit lines around the frame of the Dutch Tilt illustration.
Gesture Lines Gesture Lines capture motion, such as in an action pose when gesture drawings are used in storyboards. The figures at the head of the Rembrandt Elephant drawing show the quickly sketched human gestures responding to the elephant.
Implied Lines Implied lines in 3-D scenes a line in a scene that is not physically there but is suggested by points in the art.Implied lines suggest the edges of an object or planes within an object. The line may be broken such as a dotted line, it may be defined by value, color,or texture, or it may not be visible at all. With implied lines, our brain interprets that a line exists.
Line as Value Line As Value has a long history. Artists have used line drawings to create value, or shading, and to achieve the impression of volume. In this quick sketch of a live elephant Rembrandt used outline contour lines around the edges of the elephant and curved contour lines around the big legs and belly. Most of the lines are at the lower part of the elephant to show that the light source was from above.
Line of Action (Also see motion)Line of action is an imaginary line that extends through the main action of the figure.When you draw an action figure you can capture the line of action on one layer then draw the figure drawing on another layer.
Line Quality Line quality is the espressive essence of lines. Varying the line quality makes objects appear more 3-dimensional and exciting. Range in line quality heightens descriptive and3suggestive potential. A single line can change in darkness and width, can vanish all together to mentally reconnect later on an edge.
Line Weight Line weight refers to the thickness or thinness of a line.
Lost and Found Lines We don’t really need a strong contour line around every part of an object because our brain will fill in the blank where the edge disappears. When a line fades out and then restarts further along the edge it is called a lost and found line. There is a lost and found line at the top of Rembrandt’s elephant behind the head. There is a strong contour line of the skull of the elephant and a strong bulge of the back, but between the 2 curved shapes the line fades out, yet we still know that the elephant shape continues.
Psychic Lines Psychic lines are invisible. Psychic lines form between characters or between a gun and a target, or a hand pointing in a direction. There is no real line yet we feel a line. Eyes looking in a direction, especially characters looking at each other create a psychic line.
13 notes
·
View notes
Text
Meet the Creator!
Introducing: Zo or Hugremlin!
Commissions: Nope! Maybe in the future when I'm a bit more confident in my art style, but for now I'm happy to create for free.
Social Media: Instagram: https://www.instagram.com/hugremlin_doodles/
What's your artistic process like?
Sketch EVERYTHING. Anatomy, clothes, hair, background, if it's in the drawing I probably sketched it first. Then, line in black on a spartan layer, usually all of one thing at a time, like lining the whole body before moving to another layer to line the hair. Once lining is done, I color the inject on it's on layer below the lineart. If I shade I go above all the other layers and turn the layer opacity down, and cell shade. I'm usually listening to music throughout!
Tell us a little bit about yourself!
Art is my hobby! I like to draw fanart mostly, and whenever I find the time. I also write a little bit, but I dont post it much. My favorite color is purple, and I have two cats! Their names are Pippin and Gandalf, and they're big fluffy sweeties. I don't really have a favorite animal cause I love a lot of them, but cats is good to say in a pinch.
What kind of mediums do you like to use?
I draw with pencil and paper sometimes, and I also like to paint a little! My main method right now is digital, but it's nice to create something physical.
What got you into art? what inspires you to keep creating art?
I just have always been kind of doodley, and when I started getting into fandoms I would have cool ideas that I wanted to draw or I would just like the characters, so I would draw them! I started drawing semi-seriously on 7th grade, and I kept it close as a hobby ever since. (The improvement has been massive, it's really worth it to keep drawing)
What's your favorite/least favorite subjects to use in your art?
Faces are incredibly difficult. How do I draw eyes?? Mouths?? What's a nose look like from the front?? I try, but by golly I can't wait until I figure it out. Hands are also rough, but it feels like they're getting better with every drawing! It may be hard but I also love to draw all of these!!
What's the worst thing you had to draw?
A flip book in 8th grade cartooning, it took me a really long time and it came out a little wonky. The dang thing doesn't even flip well.
Is there something that you struggled with that made you grow as an artist?
God, anatomy. Three years ago all my characters were in the same pose, hands were nubs if I drew arms at all, legs went right up to the waist. Heads were circles. I think it was earlier this year or late 2019 when I finally started to add different face shapes and trying to sketch limbs properly. Definitely a big stepping stone.
If you have any fun stories about the pieces you made, please do share!
I once stayed up until 3 am working on some art for a school project, woke up at 5 and went to school, found out from my partner that he had gotten us a two day extension. We didn't end up using the drawings anyways. I wasnt very happy, but it makes a funny story now.
16 notes
·
View notes
Text
Heads or Tails : chapter one
Will Byers x Fem!OC
Hi friends, I don't think anyone actually read chapter zero, besides myself ofc, so I decided to post Chapter One today like I said I would :)
MADMAX AND THAT ASS
Mason pulled herself from a restless sleep, blinking away the gunk layered across her pupils and trying to swat away the sun streaming through the window. Slowly, she sat up and messed with the knots in her hair and she watched Max peacefully snore with her blanket half on her and half on the floor.
"Max," Mason called to her sister in hopes of waking her from her dreams. "Max. Dude!" Mason threw a stuffed animal -- a small, kind of deflated elephant her dad had got her years ago -- and nailed Max right in the nose.
"What the hell, Mase?"
"Get up, we have a one-way ticket to hell in about fifteen minutes." Mason threw her blankets off her legs and headed over to her and Max's shared wardrobe -- picking out a simple outfit that she hoped wouldnt get her taunted on her first day at school.
The twins juxtaposed each other: while Max wore her hair down, Mason tied it up with braids and and excessive use of hair clips, while Max liked baggy jeans and larger hoodies -- Mason preferred oddly patterned skirts with white shirts and denim jackets. Both girls only owned one pair of shoes: Max's were a red pair of converse they had found super cheap at a thrift store while Mason's were a weird off brand of keds that were fully white.
Mason walked out of the room, back to the bathroom, and shouted back to her sister, "and you better hurry your ass up, because I am not biking to school!"
"Whatever, dork!" Max slammed the door to their shared bedroom.
• ○ •
W
hen Billy parked the car, Max and Mason exited. Mason gazed around to see everyone staring at her new step-brothers ass and, while delighted it wasn't at her, her lip curled in disgust. She sped walked to catch up to her sister, who was slowly skating towards the Middle School across the parking lot.
"This is gonna be a total nightmare," Max scoffed glaring at everyone around them who dared to take a glance towards the Mayfield twins.
"Maybe" -- Mason shrugged -- "maybe not."
The girls continued their slow, torturous walk to school -- stopping at the front desk so that Mason could ask for their schedules. Assuming that their classes would be the same, Mason felt misery when she realized she would have to part from Max for art.
Max sighed, "Well, at least you dont have Drama with Mrs. Cockwit."
The girls looked at each other before their faces broke into smiles, Mason examined their schedules side by side once again. "Science," she said. "We should probably hurry and go find-"
"-That wont be a problem, Miss Mayfield." The twins turned suddenly to find a burly man behind them, the principal they assumed. Now, they're own personal tour guide. "I will be leading you to your first class, please the bell will ring shortly, so follow me."
They did, reluctantly, follow him to a wooden door where they could faintly hear the teacher teaching his wisdom to a class full of kid more likely than not to drop out of three years. They walked in, quickly as to avoid as much attention as possible. Though when Mason had looked up when passing the teachers desk, she realized that wasn't going to be easy.
"Ah, these must be our new students!" Mason's attention snapped to the teacher, she had realized on her schedule his name was Mr.Clarke.
"Indeed it is," the principal who had herded the two into the classroom confirmed,"All yours."
Mason rushed to follow Max to the back, yet they were stopped about as fast as Max could rolled her eyes.
"All right, hold up." Mr. Clark held put his hand to stop the two and smiled. "You dont get away that easy."
Mason barely muttered under her breath, not even enough for it to really reach her own ears. "One could hope."
Mr. Clark continued his introduction, as if the two girls weren't capable of saying their own names. Mason was more than capable of having a panic attack discretely, surely she could say her name to a classroom full of people. Wait a minute.
"Come on up, dont be shy. Dustin, drum roll." A kid in the front, who wore a hat and a dinosaur hoodie, closed his notebook and drummed his fingers against it. "Class," Mr. Clark began," please welcome, all the way from sunny California, the latest passengers to join us on our curiosity voyage, Mason and Maxine."
Mason swallowed and shuffled awkwardly, "Uh, I'm actually Mason and that's-"
"Max. Not Maxine," Max interrupted her sister, eager to sit down and hide away from the vulturous stares of the class.
"Oh, well, I'm sorry. Um, all aboard, Max and Mason."
The twins hurried past him, finding empty seats in the near back of the class -- Mason scoring one near the window. She pulled her notebook from her backpack and pulled one of her many colorful pens from the side pockets -- the only happiness she ever was given was from those pens.
She sat there for a moment, staring at the blank page in front of her and barely hearing Mr. Clarke lecturing the class. Not surprisingly, she also barely notices Max's elbow slowly shoving Mason's notebook off the desk.
"Dude" -- Mason barely caught the book before it fell and furrowed her brows -- "what the hell?" She dropped her voice to a whisper in Hope's of not getting in trouble on her first day at school for Max's mischief.
"Those guys upfront keep staring at us," Max whispered through her hair. Mason's eyes flickered up and, lo and behold, the four boys were, indeed, staring at them. Well...
"They arent staring at us," Mason corrected, "they're staring at you. "
"Why?"
"How the hell should I know?" Max turned to face forward, playing with her hands after her sister said that. Mason sighed," Don't worry, I have an idea."
Max nodded, trusting her sister,"Okay."
With that, Mason grabbed the top of her blue pen with her teeth and popped it off. She wrote the first thing that came to mind in big letters.
• ○ •
Mason walked into the art room, it was lined with floor to ceiling windows and every wall was a different color. The room was fairly empty, Mason assumed it was because art was pushed onto students as much as sports or academics.
She sighed and took a seat by the window. Some one pulled the stool beside her out and sat down. Mason looked over to find one of the boys who were staring at her sister. He smiled, a small smile that didn't really reach his eyes. He looked like he had a lot on his mind, way too much to deal with for a small boy his age.
"Hi, uh, I'm Will."
Mason returned his smile, her hands were shaking; she buried them in the pockets of her jacket.
"I don't think I need to introduce myself." Mason looked down at the table, he had his sketchbook out and she didn't -- she anxious that she was supposed to already have it out. Did anyone else have it out? Her eyes danced around the room, avoiding Will's beautiful brown ones the whole time.
He noticed her behaviour, and it barely seemed unusual until he realized her leg was bouncing quickly and her bottom lip was pulled tight between her teeth. When she released it from its death grip, he could see the scabs forming across the sensitive skin.
"You'd be right," he laughed, hoping to calm her down,"Mason, yeah? That's a pretty cool name."
"It's a boy's name." Mason ducked down below the table to retrieve her sketchbook from her back pack.
"It can't be a boy's name." Mason looked at him for the first time since he sat down next to her. He smiled goofily, she saw that it reached his eyes this time. Her heart leaped. "How can it be a boy's name if it's your name?"
Mason's lips parted and her leg stopped bouncing for a second, but her hands had exited her pockets and were bending the bottom corner of her sketchbook. "Well, I think my parents wanted a boy."
"Well, I think my mom wanted a dog." He spun a lock of his hair around his finger, "She got the shedding and, I offered to play fetch with her, but she thought that was weird."
Will felt pride swell in his chest, a smile broke out across his face after a sweet snippet of laughter fell from her lips.
Mason let her laughter die into a small smile and she glanced at him, "Hey, I'll, uh, I'll show you mine if you show me yours?"
Will glanced down at his sketch book anxiously, "O-Okay."
They grinned, exchanging books and looking through the other's masterpieces. Each other, carefully calculating their looks at each other to see the other's reaction towards their pride and joy.
• ○ •
"He seemed nice," Mason defended her new friend, despite Max's efforts to deter her away from him.
"No way, he's one of the creeps who stared at us." Max slammed her hand down onto the button and violently yanked the joystick.
"They were staring at you, and maybe they arent creeps maybe they just are curious about the new kids and are too scared to approach."
Max quickly diverted her attention from Dig Dug to Mason and back to Dig Dug before she died. "If that were true, they would've been looking at you too." Mason sighed loudly, laying her head against the side of the machine. "Now, dude, you're really killing my Dig Dug vibe."
"Whatever," Mason shover herself off the machine and turned to her sister, "I'm gonna get a soda, you want anything?"
"Grape and a snickers."
"Got it."
Mason walked away, her hands in her pockets jingling she change, she rubbed her fingers over the rough circles repeatedly to assure herself she had enough to pay for everything.
"What can I get for you," The guy behind the register asked. Mason's eyes dashed across the menu even though she already knew what she wanted.
"Uh, yeah, can I get a strawberry and a grapefruit fanta plus two snickers." She looked down at her pocket to pull out the change. "Oh, uh, please.m," Mason quickly added.
"No problem."
While she waited, Mason leaned against the counter and faced towards where Max was standing at the Dig Dug machine working her magic. Then, her eyes fell on the two boys from their science class."
"Oh, you've got to be shitting me."
As if they sensed her looking at them, the glanced behind them and their eyes widened -- busted.
"Position has been comprised! Fall out!" The curly haired boy shouted, Mason watched as they ran out the door. She sighed, shaking her head and turned towards the counter where the guy had set down her order.
"Thank you." She handed him the money and retreated back to Max. She sighed as she handed max her snickers and held onto the soda for when she finished the game she was playing.
"What's got your panties in a knot?" Max barely glanced at her, taking a giant bite of her snickers.
"Fuckin' creeps." Mason cracked the top of her strawberry soda and took a gulp.
#will byers x reader#will byers#stranger things#stranger things 3#stranger things 2#chapter one#will byers x oc#fanfiction#writing#mike wheeler#billy hargrove#eleven#madmax#max mayfield#dustin henderson#lucas sinclair#steve harrington#I love Mason#st2
20 notes
·
View notes
Note
📚 🌈 🌊 !!
📚 How many layers do you typically use?
Answered here! But since you asked for more, I’ll try to explain myself a little better.
The more, the better? Absolutely not. I’d say “use them sparingly,” make folders and rename them and if you’re sure about your work, merge them because manage them all after a certain number can be insane and even making you anxious and screw your workflow. So when I reply yesterday that I have some drawings with 40 layers, I meant that I created a new layer, and it was the #40, but not that I actually use 40 layers at the same time.
Create, copy, delete, hide... it’s the usual drill.
This is how a work in progress would look (I don’t have access to my computer right now, just the laptop and the iPad, and this is the only one I found on the iPad).

Folder 1: the sketch already merged. It usually consists of three layers. One for the super rough sketch, and one more for each character (assuming that it’s a couple, for example). Then, once I’m happy with the sketch, I merge them and keep working.
Folder 2: Lines o clean lineart. I usually use one layer per character as well just in case I have to delete or redraw something, leave the other alone, haha. There’s also a layer for the hair there (layer 7).
Folder 3: Colors. One layer for the skin (if the characters are not touching each other or have the same skin color, then I color both using the same layer. In this case, you can see that I used a layer per character. Same with clothes.
And background. In a finished work, it would probably be part of Folder 4.
From here, I’d add as many layers I need. For skin details like freckles, scars, etc. (that I’ll merge with the main layer once I’m happy with both), textures for the clothes (I’ll merge them two), different blending modes (multiply, overlay, color, screen, add glow, etc.). Effects and background (about three more layers.)
Everything I can merge, I’ll merge it.
Everyone knows what it works for oneself, but, I mean, if you can do it using 15 layers, don’t use 70. It’s just a waste of time. I also have to say that this is something that I learned over time, though. Trial and error approach, haha.
I hope it’s enough! And if not, you know that I’m always happy to help!
🌈 Do you use more warm or cold colors?
Answered here!
🌊 What’s the hardest thing for you to draw?
Answered here!
Thank you for asking!
10 notes
·
View notes
Last Seen Blogs
catraowlady
Huh Feelin' Good
jeanniedmikkelsen
A.BANSHEE
cosmiccolby-blog
katie
gazing-at-the-moon
hopeless romantic with an emphasis on hopeless
violentseas
infinite sadness.