#feel free to make the gifset version of this
Text

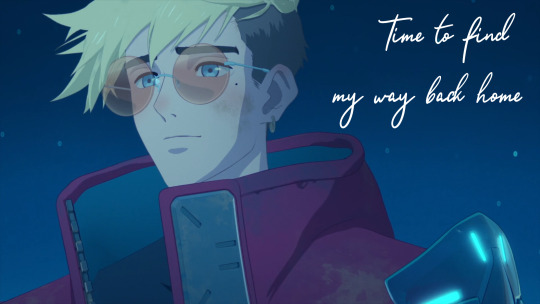


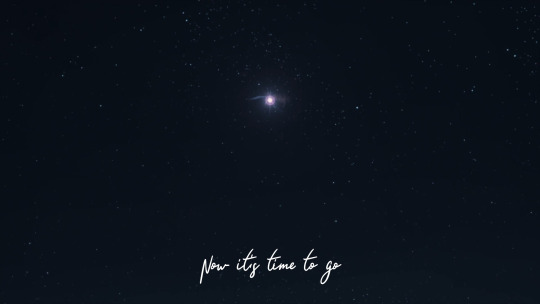
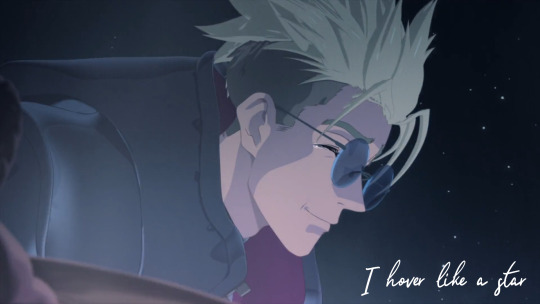
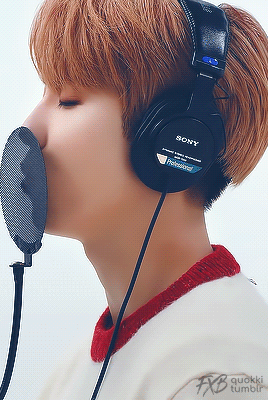
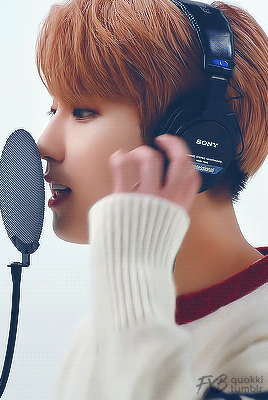
Star ~ Colde
#this song is a Vash song to me and since I cant make animatics or edits this is what I did#I had to make SOMETHING for this song so i compromised and did just the chorus but listen to the whole song if you can#feel free to make the gifset version of this#i would've done gifs if I knew how to get high quality gifs and edit them#im normal about Vash the Stampede#<- literally goes into a weeping session everytime she watches episode 12#trigun#trigun stampede#tristamp#vash the stampede#vash#trigun vash#might do another one if im feeling silly#Tek It has been blasting in my brain with a Trigun animatic that'll never be
23 notes
·
View notes
Text

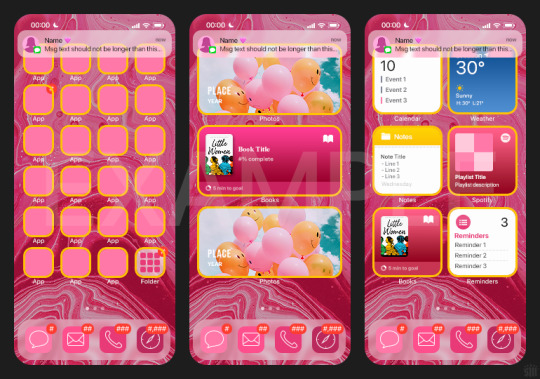
HOW TO: Make an iPhone Layout
+ Downloadable Template
Hi! I've gotten a few messages asking for a tutorial on my iPhone gifsets — but instead of only doing a tutorial (that would probably be triple the length this one already is), I decided to turn my layout into a template with all the bits and bobs! In the "tutorial" under the cut, I'll share everything you'll need, a free template download, and quickly go over how to use this template. :)
Disclaimer: This template uses Video Timeline and this tutorial assumes you have a basic to intermediate understanding of Photoshop.

PHASE 1: THE ASSETS
1.1 – Download fonts. These are the fonts used for all assets I've included in my template:
– SF Pro or SF Pro Display (Regular, Medium, Bold): Either version works, they look nearly identical. You can download directly from https://developer.apple.com/fonts/ or easily find it via Google
– Bebas Neue: Free on Google Fonts, Adobe Fonts, and dafont
– Times New Roman (Bold): Should be a default font in Photoshop

Make sure to download and install any of the fonts you don't already have before opening my template. That way, once you open the template file, all the settings (font size, weight, spacing, color, opacity, etc.) are as intended.
1.2 – Download my template.
Before you use my template, all I ask is that you don't claim or redistribute it as your own and that you give me proper credit in the caption of your post. Making these iPhone gifsets takes me a longgg time and turning this layout into a template took several hours too.
DOWNLOAD TEMPLATE VIA KO-FI ← This template is completely free to download (just enter $0), but if you feel inclined to tip me, I appreciate you! 💖

BTW this template also includes some of my frequently used icons!
NOTE: If, for some reason, you open the template and see the pop-up shown below, click "NO" — otherwise, the fonts will be all messed up:
And if you see this triangle with an exclamation point by a text layer, don't double-click it — it'll mess up the font as well:

PHASE 2: THE GIFS
I'm just going to briefly go over gif sizes and my recommendations. Also, keep in mind when grabbing your scenes, you'll want all of these gifs to be the same amount of frames.
2.1 – Background Gif: 540 x 540 px.
I recommend this size so you have a good amount of visibility for the gif behind the iPhone wallpaper. I also recommend making this black and white (or in my case, black and white with a slight blue tint — idk I just like the way it looks) so the wallpaper coloring can stand out.
2.2 – Wallpaper Gif: 230 (w) x 500 (h) px.
Keep in mind the very narrow dimensions of the wallpaper! And also keep in mind that you'll have a bunch of apps and widgets covering the image. I try to use wide shots (or layer my clips into looking like wide shots). Also, keep in mind your color scheme for your set and your character's aesthetic! I tend to focus on one or two colors for the wallpaper.
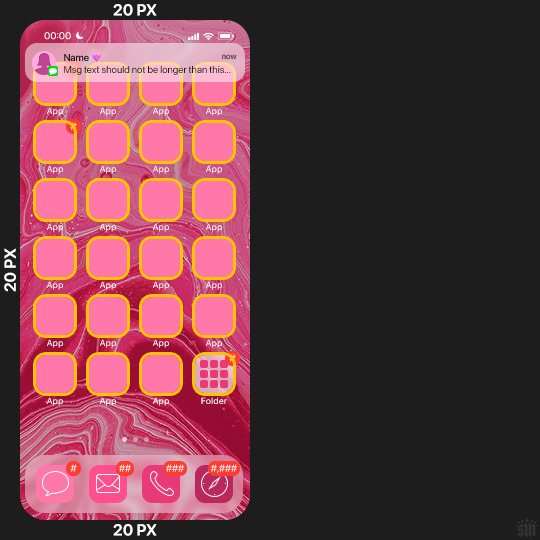
I usually position the wallpaper to the side with 20px bumpers, so there's lots of space to see the background:
2.3 – Large Photo Widget Gif: 201 (w) x 96 (h) px.
2.4 – Small Photo Widget Gif: 94 x 94 px.
PHASE 3: THE TEMPLATE – "IPHONE" FOLDER
In this section, I'll try to quickly walk you through how to use this template and some bits that may require extra instructions. I'll be going through each folder from top to bottom.
3.1 – Status Bar.
Time, Service, and WiFi are pretty self-explanatory. In the Battery folder, you can use the shape tool to adjust the shape layers labeled "Fill (Adjustable Shape!)" to customize the battery level.
3.2 – Message Notification.
Again, these are pretty self-explanatory. I've already masked the circle for the contact photo, so you can simply import any photo and use the transform tool to shrink it down. The circle is 24x24 px. If you don't want to use a photo, there's another folder called Default Initials.
If your message text can't fit the text box, the message should end with ellipses which is how iOS caps off long texts.
3.3 – Blurred Banner (IMPORTANT)
This folder is easy to miss because there's only one placeholder layer in there. On iPhones, the area behind a banner notification and the dock get blurred (including the wallpaper and any apps).
What to do: Make a duplicate of the apps in Row 1 and/or widgets that intersect the message banner, convert them all into one smart object, apply a Gaussian Blur filter (Radius: 3.0 pixels) on the smart object, and move the smart object into this masked folder!
(There's another masked folder in the Wallpaper folder for the dock which I'll go over in that section.)
3.4 – Apps
Turn off the yellow guide if you don't need it to keep things aligned and turn off layers you don't need by clicking the eye icon. Replace the "App" placeholder text with your app name, change the color or gradient of the square to compliment your color scheme, and add your custom app icon overlay!
If you can't find an app icon you need from the ones I provided, flaticon.com is a great resource. Also, if you can only find the filled version of an icon, check out this tutorial for how to make any text or shape into an outline.
Also, each app folder has 4 notification bubble options (1-4 digits). Again, you can toggle these on and off as you need!
3.5 – Big Widgets
I like using these when my wallpaper has A LOT of negative space to fill. I included the Photos and Books widgets in my template, but there are lots of widgets available on iPhones. You can check some of the other ones I've done here, or if you have an iPhone, simply try adding some widgets to your phone!
There are also widgets bigger than these, but they would take up half of the phone screen which is why I don't use them for these edits.
3.6 – Small Widgets
The only thing I'll say about these — because they're pretty straight forward — is there are a lot more weather themes than I included in my template. Also, if you set your character's phone to evening, the weather widget will show a dark background (sometimes with stars), so keep that in mind.
Speaking of, I've included Light Modes and Dark Modes for, I think, every applicable widget.
3.7 – Page Dots
These barely perceptible dots indicate that your character has more pages of apps than shown in your gifset (so if an anon tries to come at you, you can just say "it's on the next page of apps" /j /lh)
3.8 – Dock
Again, the dock has notification bubble options and I've included the default app designs, custom filled designs, and custom outlined designs for iMessage, Phone, Email, and Safari (there's also a FaceTime alternative if that's how your character rolls). These are usually the apps people keep in their Dock, but this is fully customizable too. So, if your character is, like, super obsessed with Candy Crush or something and needs it in thumb's reach — you can put it in the dock.
3.9 – Wallpaper
This whole folder is masked already to a 230x500 px rounded rectangle.
Inside, you'll find another "Blurred Portion" folder for the area behind the message banner notification and the dock.
What to do: Duplicate your gif layer and place it in this folder, remove any sharpening filters, and apply a Gaussian Blur filter (Radius: 3.0 px). Be sure to add any coloring/adjustment layers ABOVE this folder and your original sharpened gif layer.
PHASE 4: EXPORT
We made it!
I hope this template makes it super easy for you to recreate this layout! If you decide to try it out, feel free to tag me with #usernik.
If you notice anything wonky about the template, kindly let me know so I can fix it! And if you have any questions about how to use this template, please don't hesitate to send me a message! I just ask that you try to be specific in your question so I'm able to answer you the best I can!
#gif tutorial#completeresources#userpickles#usersmia#userabs#usertreena#alielook#userkosmos#usershreyu#userzaynab#tuserabbie#useryoshi#usersalty#tuserlucie#usernanda#userelio#userhella#usercats#gfx*#resource*
752 notes
·
View notes
Note
Hii you're so talented!! i wonder if you could explain how you did this gif effect with the squares? and do you have any tips on colouring because yours is always top notch <3333
heyy thank you so much 🥹 and of course! i've never really done a tutorial before but i'll try my best to explain it in a way that makes sense 😅

so i start off with making my two gifs seperatly and colouring them as i normally would, once i've done that i load both gifs into the same project and once i've done all that i started on the grid part:
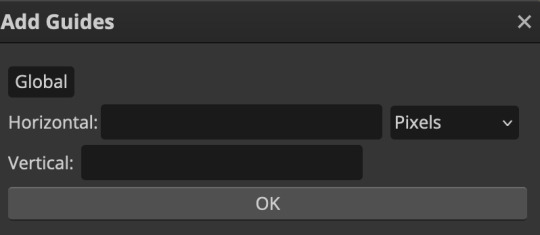
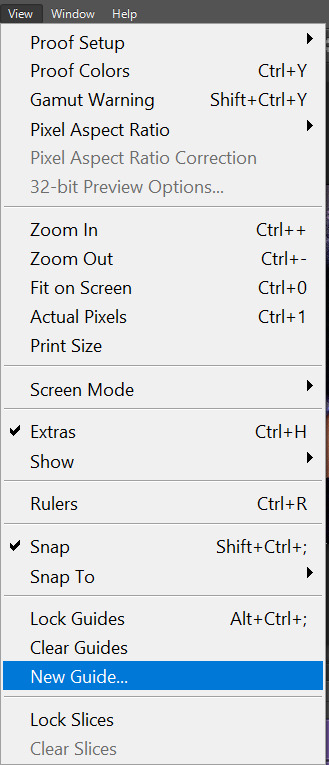
now go to view -> add guides and this window should pop up:
(it's was so daunting at first when i saw this i was like ????? and started putting in random numbers and was like oh that's how this works 🤣)
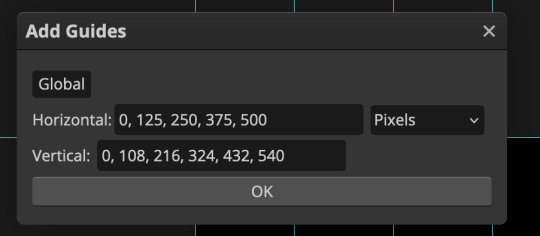
here's the settings i used for my gif which is 540px x 500px in size with 5 squares x 4 squares: (if you want more or less you just have to play around with it)
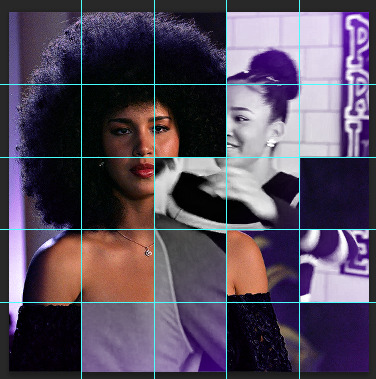
once you've done that it should look something like this:
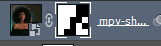
now the next part is really up to preference again: add a vector mask onto the gif that's above the other one like this: (ignore the name of my folder that is irrelevant 🤣)

and then i used the rectangle select tool (this is because the rectangle select should lock onto the grid squares making it easier to erase certain sections) + a black brush tool to erase the squares to show the other gif that's underneath (you can reposition both gifs to your liking which is what i did)
before & after:

so my vector mask looks like this afterwards

(you don't have to do the squares so close together like i did it was just how i liked it & because of the scenes i had chosen that mine turned out this way)
now onto the grid lines: i used the line tool with these settings

just like with the rectangle select tool the line tool should lock onto the grid line you want to redraw, do this for every line that you want/have for your grid & once you're done go to view -> clear guides and it should look something like this: (added a version with just a black background so it can be seen a little easier)

(i'm ngl idk why my lines ended up kinda faded and not white 🤣 i think it might be because i used a white fill instead of white stroke but it doesn't really matter to me because i got my ideal outcome anyway 🤣)
bonus step: you can stop here if you'd like but i wanted my lines to match my colouring & my intended typography so i put all my line layers into a folder and set the mode to difference & added a yellow fill layer with a clipping mask, like this:
and it should look like this:
you can also play around with the opacity of the lines too which is what i tried out but i prefered for my set the lines being at 100% opacity but it's really up to you with what you want to play around with
now once you're happy with everything merge those layers together (make sure they have the same amount of frames first before merging them) and either save as it is or add some typography like i did and you should end up with this:
for tips when it comes to colouring it really depends on what you're colouring, if you want to manipulate the colours as much as i do i recommend choosing a colour within the scene so you're not having to change too much, or finding scenes that have colours that can be manipulated more easy (any colour that aren't skin tones, unless you're working with red or yellow like i did here, i chose yellow because one of the outfits in the gif was yellow toned and it looked better with the gifset being yellow than my original colour which was blue), also looking for scenes were the people in it don't move as much also is a big help!
i hope this helps :) feel free to ask more questions if you didn't understand or want some more tips i honestly don't mind!
#replies#mrmalcolmslist#photopeablr#tutorials#photopea tutorials#completeresources#usergif#mine | tutorials#gif tutorial#photopea#resources#gif resources#gifmakerresource#i hope i didn't forget anything aksjdskds#photopea tutorial#tutorial#gif tutorials
123 notes
·
View notes
Photo
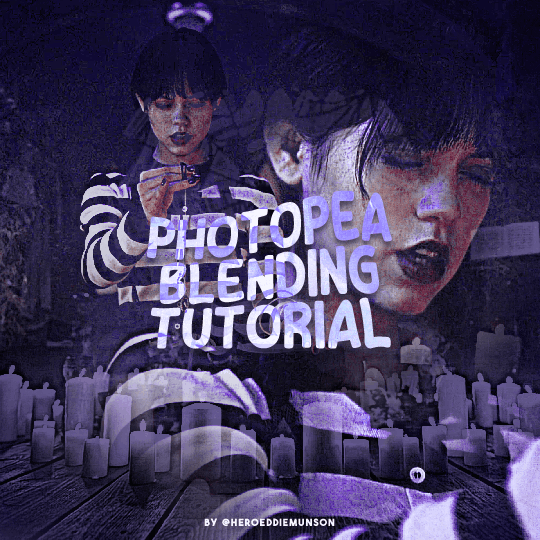
PHOTOPEA BLENDING TUTORIAL by kai @heroeddiemunson
howdy! i’m back with another tutorial for photopea :) nobody asked for this one, but i have noticed people who have reblogged my gifsets commenting on my blending, and i thought it’d be cool to have a tutorial on how i do it!
what you need:
photopea (basically photoshop in your browser, completely free!)
basic giffing knowledge, because i won’t cover it in this tutorial (other tutorials: tutorial by @benoitblanc, tutorial by @ashleysolsen)
decide what scenes you’re going to be blending; i don’t recommend blending more than three gifs together, just for the sake of being able to see what all your gifs are. for this tutorial, i will blending three gifs together. also make sure that all of your gifs are the same amount of frames as well, otherwise this blending tutorial won’t work!
step one: making your individual gifs
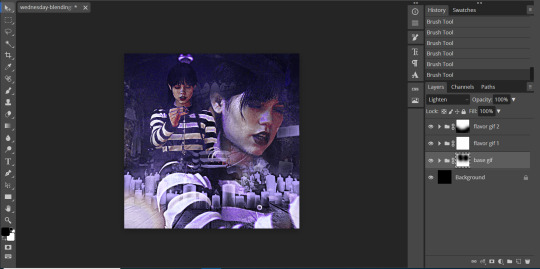
first thing’s first: you need to make the individual gifs you’re going to be blending. make sure when you’re cropping these gifs, you have a sort of understanding of what they will look like together; you can check this by right clicking on one gif, selecting duplicate to, and choosing the gif you’re going to be blending it with. on the other gif, you should have the duplicated version of the first gif on top. here’s what my work station looks like after i’ve duplicated two of my three gifs onto the third gif’s canvas:

now you can change the opacity of the gif(s) you have layered. here’s an example of what my three gifs may look like when they’re blended together (the middle gif is at 50% opacity, and the top gif is at 30% opacity):

since none of these gifs have been colored yet, it may be a little hard to see, so feel free to play around with the opacities of your gifs to make sure that you cropped them how you want them to be blended. i like my crops, so now i can color each of these gifs individually!
when i’m blending gifs, i like to think of them as my “base” and “flavor” gifs. “base” gifs i tend to keep simple, usually with some sort of color overlay on top of them to make the “flavor” gifs pop out more. below is what my “base” and “flavor” gifs look like individually before i’ve sharpened/blended them:

for my “base” gif, i colored it as normal, and then went to layer > new adjustment layer > gradient map; from here, i clicked the black to white gradient in the pop up, and then chose the white color and changed it to the color that i wanted (in this case, the hex code #b7a6ff). my “flavor” gifs are colored as i would color any other gif i’d make that isn’t blended.
save your psds of these gifs, sharpen, and go to file > export as > GIF. now you have the gifs you’re going to blend! great job! :)
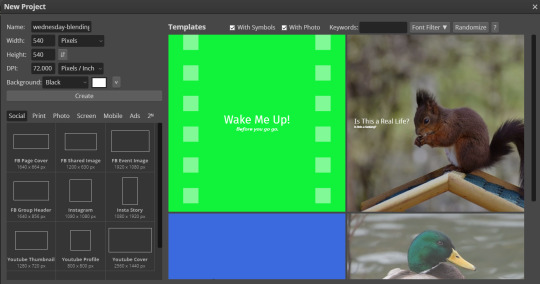
step two: making your blended gifs’ canvas
now that we have our gifs we’re going to blend, we have to have a “canvas” to put them on. to do this, go to file > new… and make a new canvas. make sure the canvas is the same size as your crops, and your background is set to black! below is what i did for the gifs i’m going to be blending:
now to put our gifs that we made onto this canvas! unfortunately, photopea doesn’t allow you to use the open & place feature for gifs, so we’ll have to go to file > open and open our gifs individually. similarly to what we did in step one, right click your gifs and select duplicate to and duplicate the gifs you will be blending into your new canvas.
now your canvas will look something like this:
and we can move on to the fun part, which is actually blending the gifs together!
step three: blending!
so, when blending gifs, there’s a lot of ways to do it. i’ve found that blending gifs is a lot of experimentation, since you’ll probably never find yourself blending two gifs the same way every time.
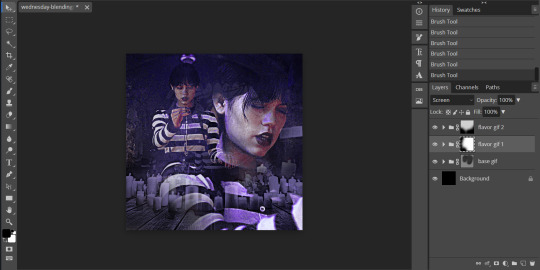
for now, let’s change the blending modes (drop down menu above the layers panel; it should say “pass through” right now) for each of the gifs, that we can actually see them as we blend them.
for my “base” gif, i always set the blending mode to “lighten” no matter what. but the fun thing about your flavor gifs is you actually have a fun choice of choosing either “lighten” or “screen”, depending on what you want the gif to look like. below i show the difference of what “lighten” or “screen” look like for each of my flavor gifs:

i personally really like what it looks like with my first “flavor” gif with the “screen” blending mode and the second “flavor” gif with the “lighten” blending mode, so that’s what i’ll be doing; but it always depends on your gifs that you’re blending and what you want it to look like, so do what works best for you!
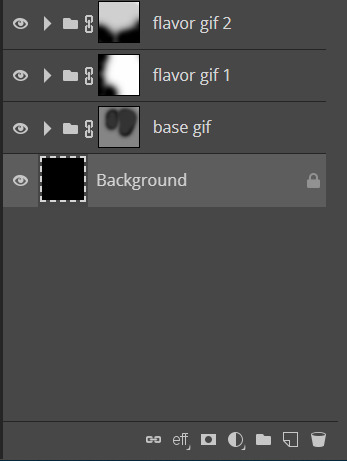
so as you could probably see from my screenshots or your own gifs, sometimes it gets a little hard to see your gifs. to fix this (and probably my favorite part of the blending process), select one of your gifs, and then look below your layer panel to click the “add raster mask” button (it looks like a little rectangle with a circle in the middle of it). do this same step for each of the gifs you will be blending, and your layers panel should look something like this (i’ve also highlighted the “add raster mask” button):

the raster masks are white, which means anything white is something you can see. using black with the brush tool gets rid of parts of the gif that may be visible. for example, this is what my gif looks like after playing around with getting rid of some of the stuff that was covering the parts of other gifs i wanted visible:
but to me, the black is a little too intense, as it gets rid of a lot of the gifs. but we’re in luck: the best thing about raster masks is that you can use various shades of grey to really blend your gifs together in unique ways by changing the colors in the bottom left corner. below i have a couple screenshots of what my blending for these gifs look like, as well as what my layers look like with the different shades of grey i used:
and now, our gif is almost finished! make sure to save your canvas as a psd, just so you don’t lose any of the work you’ve done.
step four: finishing touches
before we save this gif as a gif, i want to do some finishing touches. as we all know about me, i love myself some very colorful gifs, and i want the purple to stand out more in this gif. to do this, go to layer > add adjustment layer > gradient map and do like what we did for the “base” gif to make the same black to purple gradient we did before.
on the gradient map layer’s raster mask, use your brush tool like you used for erasing parts of your gif in order to erase part of this layer. i personally make my brush 1000px large and with 0% hardness into what i like to call my “big fluffy brush” (which makes no sense, because it isn’t fluffy, but it’s what i call it anyway). doing your best to center your brush in the middle of your gif and left clicking once should get rid of most of the gradient map’s color, but feel free to click again if you’d like. here’s what my gif looks like after two clicks of my big fluffy brush:

that doesn’t add much more color, but that’s okay, because it does add more contrast for us. go to layer > add fill layer > color fill and put in the color you have been using (in my case, that purple color). like the last layer, do your best to center your big fluffy brush and left click until you’re satisfied. here’s what my gif looks like after two clicks:

from here, i change the blending mode to “color”, and set the opacity at 50%. i then right click and choose duplicate layer, and with this new layer, change the blending mode again to “soft light” and set the opacity at 25%. now my gif looks like this:

now my gif is much more colorful! from here, i’ll add some typography and whatever else to my finishing touches before i once again save this psd so i don’t lose my progress. and now we can move to the final step!
step five: exporting
before we can export our gif, we have to combine our gifs together so they act as one singular blended gif rather than multiple separate gifs on one canvas. go to layer > animation > merge, and your individual gifs should be combined into one gif on your layers panel something like this:

and now, you can go to file > export as > GIF. make sure your gifs move together as you want them to, as well as that it’s until 10MB, and viola! congrats, you’ve just blended together a gif! :)
#photopea tutorial#photopea gif tutorial#completeresources#allresources#userars#userzesty#tusersai#dailyresources#gif tutorial#photopea#mystuff#mytutorials#hopefully i explained this good enough#feel free to send me asks if i said something confusing sjdhldsf
349 notes
·
View notes
Text
Full giffing process - tutorial (*≧ω≦*)
Due to little demand, i will be going thru my complete process for making gifs. so this will cover all the basics i hope! keep in mind this is just the way I personally do things! please feel free to send me asks or dms if you have any doubts or questions!
☆☆☆☆☆☆☆☆
DISCLAIMER: Everything I know about giffing, I've learned from other tutorials, including the VapourSynth Resources I'll be using in this tutorial so I'll leave links to those tutorials I've used here as well!
In Depth Giffing Tutorial (link here)
How to use VapourSynth (link here)
☆☆☆☆☆☆☆☆
(o´▽`o) I'm a windows user so idk if this works exactly the same on mac!
First things first, you will need:
☆ 4k video downloader (download it here!)
☆ Vapoursynth (download it here!)
☆ Photoshop (download it here! -64bit version only)
Okay! The first thing you need to do is make sure you're working with the highest quality material possible to ensure a decent looking gif!
I'd say the minimum quality needed for decent gifs is 1080px. But if you really want to gif that low quality 2 frame milisecond of your fave, i respect that
☆ lives / streams and tiktoks are typically not very high quality
☆ for stage performances such as music shows, ts/tp files are preferred but those can be really hard to get a hold of (this is a whole deeper level of giffing hell and more of an advanced class topic so nevermind this for now!)
☆ those occasional 4k facecams on youtube work fine tho!
☆ for mvs, variety shows etc, you can download the video with good quality from youtube using 4k video downloader
_(:3 」∠)_
Now let's talk about tumblr and it's pre-requisites for a good looking gif post :D
Tumblr can be sooooo annoying about gifs okay.... I find it's best to plan my whole set before I actually start doing anything but hey that's just me. Some things to keep in mind are: dimensions, file size, number of frames and post layout!
☆ Dimensions
You have 3 main options here and it's all about the width!
☆ 1 collumn: single gifs! these should be 540px wide
☆ 2 collumns: split that in half! 268px wide so there's a lil breathing space between the gifs!
☆ 3 collumns: 3's a party! 177px for each gif please
You can go crazy on the height but the width should mostly stick to one of those 3 unless you want tumblr to pull and squeeze your gif around like a piece of gum.
☆ File Size
This is really important because tumblr has a single image size limit of 10mb. Which means that every single gif you make has to be under that size or you won't be able to post it. The other thing about this is that the dimensions, number of frames and ammount of varying colors throughtout your gif will greatly impact on the final file size. Basically, the larger the dimensions and the more frames it has, the bigger the final file will be. Later on I will show you how to check your gif's final size before exporting it!
☆ Number of frames
This has more to do with the length of your gif, the longer it is, the bigger the final file will be. Typically gifs should be under 3 seconds long. So if you are making a set, try to break the moments you want to include in your set by increments of up to 2 - 3 seconds each, otherwise it might not fit all into one single gif. The number of frames is also extremely important when making combined gifs but that's for another tutorial.
☆ Post layout
If you want to make a cool looking gifset (where some gifs are larger in dimension than others, or when you want to have a single gif followed by a line of 2 gifs next to each other), then it might be worth it to plan out the layout before you start making the gifs. This way you ensure you won't have to remake gifs down the line because they don't fit together the way you wanted to.
☆ミ(o*・ω・)ノ
Timestamping
For this step, you will go through the video you want to gif from and you will just write down all the sections you want to use, down to the exact seconds. Example: 02:30 - 02:32.
(^◕ᴥ◕^)
VapourSynth (VS) - Clipping the video
I know VS can look pretty intimidating with it's bare coding and all but I promise it can be your friend. You just have to set it up correctly and pay close attention whenever you're using it. This software is a must for giffing, it will do all your cropping, resizing, sharpening and denoising for you, making sure your gifs look good. It is also indispensable when giffing ts/tp files because it deinterlaces those files so you can clip them.
First, let's set it up. This is the most annoying and difficult part of this tutorial so make sure you pay full attention to every single step!
☆ step 1) download a version of VS here (link).
☆ step 2) unzip the file on your desktop area.
☆ step 3) open the folder and find the file named "vapourscript (drop video file on me)" - make a shortcut of that file and move it to the desktop.
☆ step 4) find the folder named "gifs" - make a shortcut of that file and move it to the desktop.
☆ step 5) drag your video file you want to gif from and drop it on top of the "vapourscript (drop video file on me)" shortcut on your desktop.
☆ step 6) enter the timestamp input, in the first line it will be the starting of your timestamp, in hours format, then hit enter. in the second line enter how long your timestamps lasts, in seconds, also in hours format. then hit enter and let the code run.
☆ step 7) the resizer tab should now load on a web browser, then you will set the dimensions of your gif on the top left corner. you can also adjust the position of your gif within the video screen and zoom in if wanted.
☆ step 8) choose the preprocessor, denoise and sharpening options on the left and tick the boxes on. I usually just stick to the settings i'm using in my video down below.
☆ step 9) now in the VS box, go to file > load, choose the script saved in the gifs folder.
☆ step 10) copy the code from the resizer into the code in the vs screen, under the designated line.
☆ step 11) alter the code exactly like I did in my video down below. save it. this is now your default vs script for clipping your gifs. what you are doing by adding the hastag and the quotation marks is you're disabling those sections of the code. the reason you do that is in case you want to run the preview before exporting. this is because those lines involve some heavy graphic processing which can make the computer slow. I will talk about the script in more detail later on.
☆ step 12) i don't usually use this option but you can also preview your gif and set specific frames to start and end your gif. This is around the 4:30 mark in the video.
☆ step 13) time to export your clip! now you will temporarily remove the marks you added to disable the code and then go to script > encode video. in the popup box, you will select the option "export to MOV", then start so that you can use that video file in photoshop later.
☆ step 14) after you are done exporting, close the encoding box and then close vapoursynth, never agree to save the script when closing it, or that will override your default script.
☆ step 15) now you need to rename the encoded file for your gif. go to the gifs shortcut folder you created on your desktop, then go to output. this is the folder where VS will save all your encoded files. but everytime it saves the file with the same name so you need to come to this folder and change the name for every gif file you encode before you clip a new one, otherwise VS will just replace the previous clip with the new one you just finished.
Here's a detailed walk through of each step in this video tutorial:
youtube
IMPORTANT
After you are done processing your first clipped file, now you have your default script already built in VS, so whenever you run it to clip more videos, this script will already be in your VS screen. So now all you need to do whenever you want to clip more files (to make more gifs) is to adjust the dimensions, positioning and zoom of the video in the resizer screen and then change a few numbers in your script! then run encode to save the clipped file.
☆ To make new clips: go thru steps 5- 7, also do 8 if you want to mess with the denoise and sharpening filters again, but I don't really know much about how those work so I can't help you with this.
Now what you need to alter in the code, each time you are making a new gif:
after you run VS and change the settings in the resizer to what you want, you need to change the zoom numbers and the video positioning in the code.
you need to replace the numbers in the VS script on the left so they match the numbers in the resizer on the right.
Do step 12 if you want to set specific frames to clip. Then steps 13 - 15 and you are done! You need to do all this every single time you want to make a new gif.
Now let me talk a bit more about some of the lines in this script:
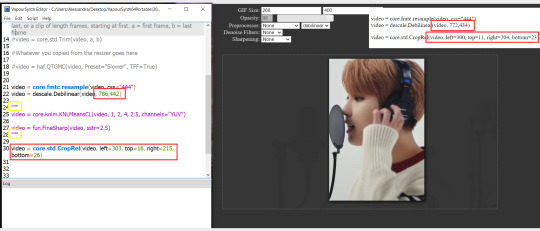
☆ line 14: #video = core.std.Trim(video, a, b)
this line is to set specific frames to trim your video section, your final encoded file will be only the frames inbetween the numbers you input here. a = first frame, b = last frame. you will need to run the preview option in VS in order to see every single frame of your clip and select your first and last frame. I usually do this in photoshop later instead so I don't bother with it on VS unless i'm making combined gifs, in which you need all the clips to have the exact same number of frames. the hashtag at the beginning of this line means that the script won't follow this command when executed. so if you want to include it, you need to remove the hashtag before encoding your file.
☆ line 18: #video = haf.QTGMC(video, Preset="Slower", TFF=True)
this line is for the preprocessor option in VS, that tool is mainly only used when giffing ts/tp files because you need to deinterlace them before you can use them on photoshop. so you will only need to remove the hashtag and enable it when giffing those types of files. when im giffing those files, i usually always keep it with this setting:

I don't really understand much about this so I never mess with it. If you want to know more, I believe there's more info about it in the tutuorials I linked at the beginning of my post.
☆ line 22: video = descale.Debilinear(video, 786,442)
this line is for the zoom of the video screen. you just need to match what you have in your VS script to what you end up with in your resizer.
☆ line 25: video = core.knlm.KNLMeansCL(video, 1, 2, 4, 2.5, channels="YUV")
this line is for the denoising filters, in my case I always use KNLM and this is what it's line looks like. I know you can change those numbers to change the filtering settings but I never messed with it so I'd usually just have it like that.
☆ line 27: video = fun.FineSharp(video, sstr=2.5)
this line is for the sharpening, in my case I always use FineSharp and this is what it's line looks like. I know you can change the number to change it's settings but I never messed with it so I'd usually just have it like that.
note: lines 25 and 27 (which have to do with denoise and sharpening) are the ones within quotation marks in your default script. I believe the quotations work in a similar way as the hashtag, in which the script only executes the lines when the quotations are removed. Which is what you do everytime you are about to encode your clip, otherwise they stay on. I think you should also remove them if you want to test how they affect your gif in the preview screen but i think these filters also require heavier graphic processing which my computer can't handle well so I never do that.
☆ line 30: video = core.std.CropRel(video, left=303, top=16, right=215, bottom=26)
this line is for the positioning of your video screen within the gif dimensions. you just need to match what you have in your VS script to what you end up with in your resizer.
ʕ •̀ o •́ ʔ
Photoshop (PS) - let's make a gif!
Now that we have clipped and preprocessed our video file, it's ready to go to photoshop!
☆ step 1) after you have opened PS, go to File > Import > Video Frames to Layers. Then choose the clipped file you created through VS.
PS should open a box like this:
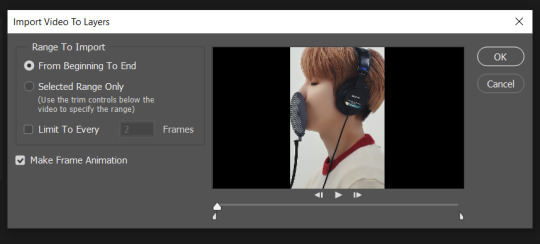
Keep those options ticked and hit OK
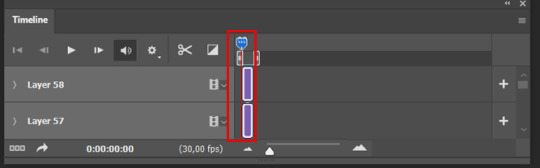
☆ step 2) now you need to go to Window > Timeline to bring up the timeline tool box. This window will always be necessary when making gifs. Let's take a look at it, I've marked down all the important buttons you will need:
timeline menu: there are several commands in here, you will need to use some of them later on.
convert to video / frame timeline
play controls to watch your gif
trash can to delete selected frames. (when deleting frames, first delete them here and then delete it's matching layers which are still there after deleting the frames)
frame delay time: this is where you set the time for how long that frame will be visible in your gif
☆ step 3) remember how I mentioned the preview option in VS and how i don't usually use it to trim the frames of my clip? That's because I usually do that at this step of the process, in PS. Notice how each frame is also a layer, and when a frame is selected, the matching layer has the eye symbol next to it turned on. So now you should play your gif and see if there are any frames you don't want to keep, then delete the frames and it's matching layers.
Since we applied sharpening filters back when we were clipping the video on VS, your clip should probably already look pretty decent even before the next steps, so steps 4 - 9 are optional. The coloring part of my video has been sped up.
☆ step 4) click on the timeline menu and select "Select all frames", then go to the select menu at the top of the PS screen and select "All layers". Now click on button 2 of the timeline at the bottom left, switching from the frame timeline to the video timeline.
☆ step 5) before you do anything else, make sure the blue holder is at the beginning of the track before you do anything else. Then go to Filter (at the top of PS) and select "Convert for smart filters". This will convert all the layers into one single layer.
☆ step 6) now make sure the layer is selected, then go to Filter > Sharpen > Smart Sharpen. A box will open with several options:
I usually keep the amount to around 30, I don't touch on radius and you can also mess with reduce noise if you think your gif is looking too sharp. Hit OK when you're done.
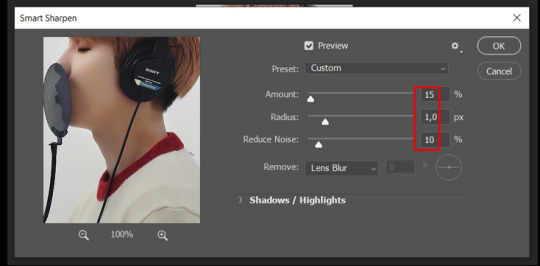
Since this is a filter applied to a smart object (the converted layer that contains all our layer - frames), this means you can turn this filter on or off as long as the layers are in the form of a smart object. You can also go back to it and alter it's settings (like I've done in my video down below)
☆ step 7) now while making sure the blue holder is still at the beginning of the track and the layer is selected, click on the timeline menu that i mentioned above. Then go to Convert Frames, then select Flatten frames into clips.
☆ step 8) again go to the timeline menu, Convert Frames, but now select Make Frames from Clips. Now click on the button at the bottom left of the timeline box, to convert the video timeline back into a frame animation. Then hit continue in the pop up box.
☆ step 9) now you are back to the frame timeline screen from before, but now the first frame is empty. You need to delete that first frame and then check the final frame because sometimes PS also creates another empty frame at the end at this point.
☆ step 10) PS also created a new layer under the layer 0, where the filter is still applied, you can delete this new layer as well. Now for organizational purposes, select all remaining layers (that contain your frames) and group them (you can see how in the video).
☆ step 11) This step is also optional, now I like to add the coloring to the gif. I have a separate tutorial exclusively on this topic. You can check it here:
☆ step 12) This is the time when I also add my signature. This is optional. You need to have the signature layer(s) on top of all the other layers. I usually have it in all black or all white, with lowered opacity of around 40%.
NOTE:
When adding elements (such as a signature) to a gif, it's important to always make sure you have the first frame selected, otherwise PS can move your newly added elements around the canvas on different and random frames. This also applies to anything in the layers pannel that has specific opacities. It's best to already add the elements with the final wanted opacity with the first frame selected.
Exporting + Delay time
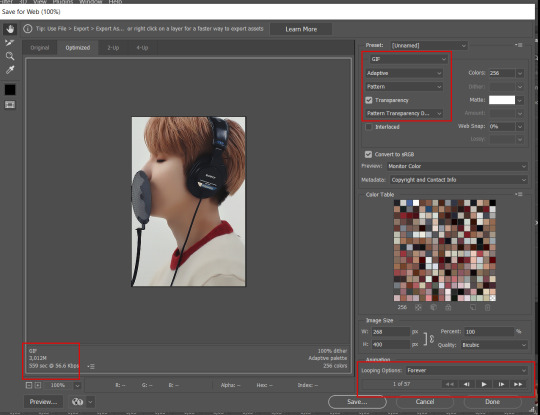
☆ step 13) To export: go to File > Export > Save for web (Legacy). PS will open this box:
First I just use the exporting screen to test the delay time of my gif, and to check the gif's final size.
About the size:
The final size is displayed at the bottom left. Remember it needs to be under 10mb. If it's above that, then you will have to go back and delete frames and test again until the size is within the limit.
About the delay time:
To test the delay time, hit that play button and the gif will play at it's default delay time. If it's too fast or too slow, you will hit cancel and change the delay time (at the next step).
For actual exporting:
The highlighted box at the top right of the screen is very relevant now. Make sure the first box has the GIF option selected. At the next box, you can select either perceptual, selective or adaptive. I usually like to use adaptive. At the next box you need to choose either diffusion or pattern. I like to use pattern. Tick the transparency box and then select either pattern or diffusion transparency dither.
Once you are satisfied with all aspects of your gif, hit save to export your final gif.
To fix the delay time:
After you have exited the export box, go back to your timeline, click on the menu button at the top right and select "Select all frames". Then, on any random frame, click at the small arrow next to the numbers under the frame. Select the option "Other". That will open a pop up box to alter the delay time. To test it again, use the export box explained above. Once you are satisfied, save your gif! I've also altered the delay time in my video to show you the process.
☆ step 14) After your gif is done and saved, I'd suggest to save your psd file if you added any coloring to it. This is so you can reuse the coloring later in other gifs without having to redo it all. This is useful if mking a set of gifs from the same moment / video.
Here's a detailed walk through of each PS step in this video tutorial:
youtube
I hope this tutorial is helpful! Feel free to send me any asks if you have doubts or need extra help! (つ≧▽≦)つ
175 notes
·
View notes
Text

Friends, time to get your high fives out of the crisper drawer.
Here's your card for this edition of the bingo. Remember, zero need to sign up, but if you want to share it with us so we can reblog and share the love, make sure to @ us by Monday, May 1.
Remember this, too: you don't have to complete the card! Any number of these things you can do will be a great high-five to whatever creator you want to shout-out or encourage. Just make sure you provide a link to whatever you're high-fiving about. (Except for 'message a creator', although if you want to brag about the cool person you messaged feel free to link to their work!)
Below the cut you'll find the usual list of definitions for each square in case you need any help or ideas, along with a black & white version of the card if you want to get creative and make it your own.
Here’s the way we’re defining the activities associated with each card. If any of this is confusing after you read it over, send us a message and we’ll help!
- ‘leave kudos on a fic’
This is the easiest one! Just go out and find a fic you like and leave a kudos on it, if you haven’t already. It’s a small gesture but it makes an author know that someone actually read their story!
- ‘reblog/retweet an art post’
Find any art post you like and share it! Here’s the catch: you need to interact with it a little. When you reblog/retweet, please tell the creator what you thought about the piece – you can add some tags, or reply to the post, or quote-retweet or add a comment, or anything! A simple “I love this!” is nice but some details are even better (“your linework is so good!” or “that shade of blue is perfect”). One thing to think about: a lot of art on Tumblr is reposted (like when a user posts another artist’s work from Pixiv, say), so it’s nice if you make an effort to interact with posts that are actually from the creator if you can. That way the artist will see your comment!
- ‘reblog/retweet a fic post’
Same as the above, but for fic! Again, tags/replies/comments are needed, preferably with a little detail. You don’t need to be super eloquent or leave a detailed review (although if you have time/energy, that would be appreciated!); a tag as simple as “that was really cute” or “great characterization!” will do. Like with the art posts, it’s nice if you reblog directly from the writer (if you can) – some fics are posted by AO3 feed bots and the like, so the author may not even know a reblog has happened.
- ‘reblog/retweet an edit’
Same as the above, but for edits! Edits can include a gif set, or a set of screencaps, or even a fanvid. And, again, some simple tags/replies are needed. “I love that song choice!” for a vid or “great coloring!” on a gifset can let people know their work is being appreciated.
- ‘comment on a fic’
Find a fic, on any fic-hosting site you like, and leave a comment. That’s it! Again, no need to leave a novel-length comment (unless you’re inspired!) – a sentence or two is all we’re asking for this square to be considered complete. This is a great opportunity to let a writer know how their piece made you feel, or what section you particularly liked.
- ‘message a creator’
‘Creator’ here can mean anyone who makes *anything* to do with fandom: art, edits, fic, meta, knitted sweaters with character faces on them – if they’ve made anything, they’re a creator, and now’s your chance to let them know they’re appreciated. Send a message (anonymous or not!) letting them know that you enjoyed their work!
- ‘make a rec post’
This is a chance to tell your fandom friends about something they need to see. You can rec a fic, a blog, a fan event, an artist, an author, that person who knits sweaters with character faces – any kind of fandom thing that you want to make sure people see. This doesn’t have to be long or complicated, but feel free to go into as much detail as you want! Just make your own post, on Tumblr or Twitter or wherever else seems best to you, and give that thing you loved a little fanfare.
- ‘interact with a meta post’
A little love for our analytical friends! Here, you can reblog/retweet any kind of meta post for your fandom, whether it’s a three sentence headcanon or an essay-length dissection of why Character X is the absolute best character in Fandom Y. It’s even better if you respond to the meta, whether that’s agreeing or (respectfully!) adding your own thoughts, but sharing it is the main thing here.
And here’s the non-decorated version, in case you feel like making it your own. Get creative, if you want!

201 notes
·
View notes
Note
hi! do u mind explaining how u did the square overlay in this set? thank u sm 🫶🏽
hi sorry for taking so long to answer. i hope this helps and makes sense (if you have any other questions feel free to ask or I could even send you the psd if you want). tutorial below the cut as it's image heavy :)
So basically I started with my 2 gifs at 540x540 pixels. This isn't essential, but I'll also note that when I crop the gifs I like to uncheck the "Delete Cropped Pixels" box so that I can move them around after cropping in case I don't like how it was cropped initially.
For this gifset I ended up putting the two gifs and their colourings in a group with clipping masks for the colouring layers (curves, vibrance, etc). Making the two gifs into smart objects would also work and would be my usual preferred method, but for this particular set it was easier to use the groups so I could keep the colouring of the you weren't a maybe speech.
Once the gifs are overlayed on top of each other only the top gif should be visible (as below)
To create the grid effect there are some tutorials for versions of photoshop which have a setting where you can just input the configuration you want (e.g 4x4) and it will draw up the guides for you. Here is the initial tutorial I saw showing how to do that and another one I found just now which outlines the exact same grid effect as in my set. This way is easier than the way I did it, but my photoshop doesn't have the option 😭
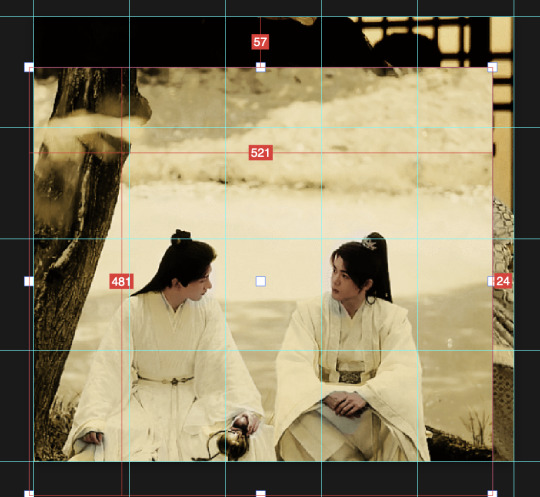
For mine I created a New Guide by following the menu path "View > New Guide"
This opens up a dialog box that looks like this

As the guide menu is in cm I doubled checked what the size of the canvas is in cm. A 540 x 540 px canvas comes to 19.05 cm. I wanted to draw a 4x4 guide, so to start I divided 19.05 by 4. This comes to 4.76, so I input this value into the box and clicked ok.

To draw the other lines I just added 4.76 to each previous line drawn so that the lines were even. The guides ended up being (4.76, 9.52 and 14.28). I then repeated the same numbers but with the Vertical orientation button selected.
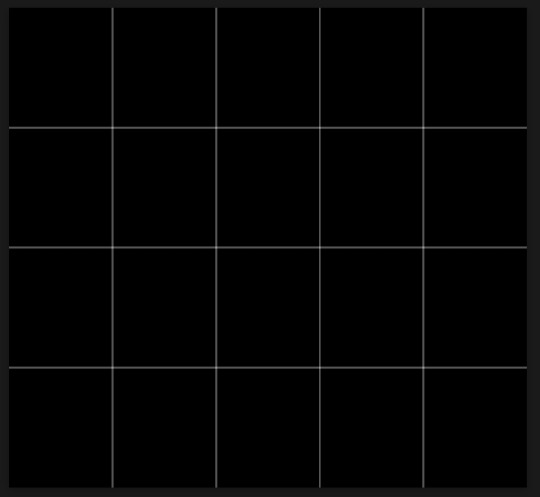
This gives you a guide which looks like this:

To start exposing the other gif I grabbed the rectangle select tool and started selecting the areas I wanted to mask. The tool should snap to the guides so it is fairly easy to stay within the squares.

Then I just masked over it with a black paintbrush

I continued on with this until I was happy with how it looked - this was my final result
And this is how my layer mask looked
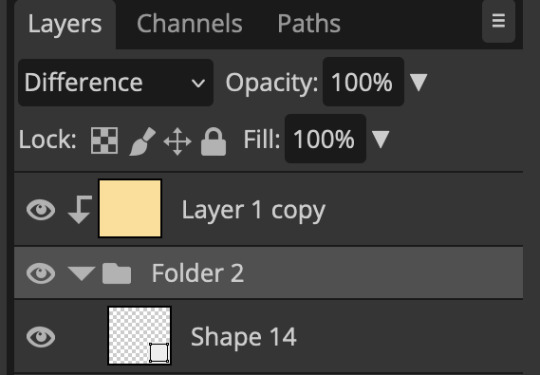
To draw the lines I then selected the line tool and set it to white and 2px. To draw them I held down the shift button, which allowed me to snap the line I'm drawing directly on top of the guides and continue with it as all one shape.
When you draw on top of the guides they go orange
I then toggled the guide off by pushing ctrl + ;
I checked to make sure all the boxes and lines were aligned properly and just cleaned up the gifs by using the selection box and masking until it was perfect (as I'm very type A)
I set the line layer to "Lighten" blending mode and an opacity of 70% as I thought it looked better.
Then I just added the text and moved it around how I pleased.
#asks#resources#tutorials#ps help#usergif#completeresources#allresources#i really hope this makes sense and helps :)
84 notes
·
View notes
Text
buddie poetry event! (911 hiatus version)📜✒️
hi! i'm @heartbeatdiaz and i love, love reading poetry and writing silly little poems myself! especially about these two gay firefighters. so, i thought it'd be fun to make a mini event for all poetry authors in the fandom.
the idea is, here's a list of 20 prompts for whatever day you like during hiatus as long as is from the 15 of august to the last day of october (you don't have to write for all of them— just if the inspiration strikes!) feel free to pick and choose whichever prompt brings you joy! and interpret it however you like! this is to celebrate creativity, after all.
these are the prompts!

(some extras!)
you can combine your poem with edit/gifset if you please or ask someone else to make an edit/gifset/drawing to compliment your piece.
there will be no signs ups! just tag the blog and use the #poemsbybuddie and i'll reblog your creation here!
your poem can be nsfw but make sure it's tagged properly
if you have any doubt or question, send an ask here or message the blog or me directly at @heartbeatdiaz
#buddie poetry#buddie poetry event#poetry#poemsbybuddie#buck x eddie#evan buckley#evan buck buckely#eddie diaz#buddie#911 poetry#911#911 abc#911 on abc#tv: 911#911 hiatus#911hiatus#911 event
54 notes
·
View notes
Text
...and yet he loved this thing
Hello, and welcome to The Devil’s Minion Week, which celebrates the relationship between Daniel Molloy and Armand in The Vampire Chronicles series, specifically from The Queen of the Damned. This chapter of the book, and the relationship it describes, is some of the best writing and characterisation in the whole series, and the layered, twisted, deeply romantic relationship that ensues is beloved by many fans.
To celebrate, this week is dedicated to quotes from the chapter, and fans are invited to make gifsets/photosets, artwork, fics or videos, that relate to, or are inspired by, each quote. This includes images from the recent TV version of Interview with the Vampire, as well as other onscreen appearances of both Daniel and Armand, as the aim is to appeal to both book and show fans. It runs from 10 o’clock in the morning of the 4th of September, to some time in the evening of the 10th of September (all times in Greenwich Mean Time).
You can submit your creation before then, or feel free to post it to your own account and tag @villaofthemysteries using the ‘and yet he loved this thing’/’the devil’s minion week’ tags, which we will track throughout.
The quotes for each day are below - you can use them directly, or relatively, or interpret them in a new and different way. The main idea is to have fun with them, and with the relationship in general, in whatever form that will take.
************************************************************************************************
Day 1 - I want it. I want to live forever. Daniel had sat up, climbed to his feet slowly, struggling to see Armand more clearly. A dim bulb burned somewhere far down the hall. I want to be with Louis and with you. Laughter, low, gentle. But contemptuous. "I see why he chose you for his confidant. You are naive and beautiful. But the beauty could be the only reason, you know."
Day 2 - Daniel was past all decision. Daniel lived only in two alternating states: misery and ecstasy, united by love. He never knew when he'd be given the blood. He never knew if things looked different because of it-the carnations staring at him from their vases, skyscrapers hideously visible like plants sprung up from steel seeds overnight-or because he was just going out of his mind.
Day 3 - “Armand [...] always knew where Daniel was. He could hear Daniel's call. The blood connected them, it had to-the precious tiny drinks of burning preternatural blood. Never enough to do more than awaken dreams in Daniel, and the thirst for eternity, to make the flowers in the wallpaper sing and dance. Whatever, Armand could always find him, of that he had no doubt."
Day 4 - “You came back to me because you wanted to, Daniel,” Armand always said calmly, face still and radiant, eyes full of love. "There is nothing for you now, Daniel, except me. You know that. Madness waits out there."
Day 5 - "Be alive, Daniel." A low whisper, like a kiss. "Let me tell you from my heart that life is better than death."
Day 6 - “… Let the demonic gods war with each other. This mortal has been to the top of the mountain where they cross swords. And he has come back. He has been turned away.”
Day 7 - “...the sight of Armand made him want to cry. Even in deep shadow, Armand's dark brown eyes were filled with a vibrant light. And the expression on his face, so loving. He reached out very carefully and touched Armand's eyelashes. He wanted to touch the tiny fine lines in Armand's lips. Armand kissed him. He began to tremble. The way it felt, the cool silky mouth, like a kiss of the brain, the electric purity of a thought!”
#the big damn quotes post#and yet he loved this thing#the devil's minion week#armand x daniel#the devil's minion#the vampire chronicles#interview with the vampire
69 notes
·
View notes
Text
Gifs I would like from The Witcher season 3
Listen, I would make them myself if I could, but I cannot so for anybody out there who’s willing:
Parallel of Tissaia calling Yennefer ‘Piglet’ and Yennefer calling Ciri ‘My Ugly One’
Parallel of Tissaia saying ‘Why? Why do you want a baby?’ in 1.05 and then ‘You finally did it. Became a mother’ in 3.03.
Parallel of Tissaia blasting Stregobor away from Yen in 2.03 and Yen blasting the big monster thingie away from Ciri in 3.01 (or blasting Francesca away from Ciri in 3.01)
Parallel of Tissaia saying ‘Please’ in 1.07 and Yen saying ‘Please’ in 3.03
Parallel of Yennefering saying ‘As if I’d trust anyone else with [Ciri]’ in 2.08 and then saying ‘If I could just talk to Tissaia’ in 3.01
The convo Vilgefortz and Tissaia have in 3.02 where all he talks about is how much Yen and Tissaia love each other
The convo Yen and Vilgefortz have in 3.04 where he tells her Tissaia will always protect her
Sabrina (all of her scenes, especially the ones where she’s annoying Yen)
Yennefer’s vehement refusal to leave Tissaia in ep 3.05
All of the times Yen looks at Tissaia’s lips (may need more than one gifset)
Tissaia greeting Yennefer at the Thanedd ball with the air kissing
Yennefer interacting with Tissaia and Vilgefortz at the ball like they’re her parents and she’s slightly embarassed by them
(Also I should say that if I’ve made any posts using shitty screencaps, please feel free to make gif versions of them!!)
#i can pay in reblogs and undying gratitude#tyvm in advance#yennaia#yennefer x tissaia#sabrina glevissig#the witcher#the witcher spoilers
54 notes
·
View notes
Text
Kira Appreciation Week 2023 Roundup
Thank you so much to everyone who participated in Kira Week 2023! And a very special thank you to @momentofmemory for all of her lovely promo gifs for this event. We loved seeing all of your incredible works celebrating Kira this year! We look forward to future events, and in the meantime we're always on the lookout for new Kira content, so if you missed the week but still want to show her some love, feel free to submit content any time!
All works are compiled below, organized by prompt, and the KiraWeek2023 Ao3 collection can be found here. If you created something for Kira week that we’ve missed, please send us an ask and we’ll add it to the list.
Day 1: You Came Back / Fav Scene / Kira + Kitsune Attributes
Kira 4x04 scene - gif set by @silent-snake7
Favorite Scenes (all of them) - moodboard by @softranswolves
Fav Scene - edit & meta/thoughts by @sammi-phoenix
You Came Back - fic by @nightstar-appreciation
Kira Returns - gifset by @momentofmemory
Home is a person - fic by @invisible-storyteller
Kitsune Attributes - moodboard & fic by @jjsstars
The Calm Before the Storm - edit by @hemlocksandfoxgloves
Day 2: There's a Reason You Kept It / Poetry, Lyrics, Quotes / Significant Objects
Kira's Tail - gifset by @momentofmemory
Kira + Fox Tails 1 - edit by @hemlocksandfoxgloves
Kira + Fox Tails 2 - edit by @hemlocksandfoxgloves
Lyrics + album [1989 (Taylor's Version)] - moodboard by @jjsstars
Kira Yukimura, Killer Vibe (lyrics) - moodboard by @thiamsxbitch
Day 3: They Did Something / Color/B&W / Kira + Villains
Colors - edit by @softranswolves
Color [warm tones] - moodboard by @jjsstars
Kira Yukimura as Everything in its Right Place by Radiohead - edit by @sammi-phoenix
Void!Kira - edit by @hemlocksandfoxgloves
Day 4: Trickster-or-Treat / Trickster!Kira / Nerd!Kira
Nerd!Kira - moodboard & ficlet by @jjsstars
Day 4, Lightning bolt - edit by @hemlocksandfoxgloves
Day 5: What if Wednesday / Dealer's Choice / Lie-Ability
What If Wednesday (AU) - moodboard by @jjsstars
No One Can Steal Your Thunder (Dealer's Choice) - edit by @equallyloyalandlethal
Kira Yukimura: a character study (Dealer's Choice) - edit by @letthestorieslive
Day 6: History Echoes / Back in Style / Something New
Something Old With Something New - edit by @hemlocksandfoxgloves (feat. i want you on top of me like cherry - fic by @thiamsxbitch)
Day 7: It’s Alright to Cry / Hurt & Comfort / Parallels
It's Alright to Cry - moodboard by @jjsstars
Alt 1: Have you ever heard of something called a Kitsune?
I'm a Kitsune (You know...a Japanese foc spirit) - moodboard by @sugareey-makes-stuff
Alt 2: I Printed It Out
The Birth of a Lacrosse Legend - gif set by @letthestorieslive
Alt 3: My Family and I Moved Here Three Weeks Ago
Kitsune Bonding - fic by @softranswolves
Kira's Childhood - moodboard & ficlet by @jjsstars
#kiraweek2023#teen wolf event#teen wolf#kira yukimura#arden cho#scira#lydira#yukimura family#allira#kira & derek#Kira & theo#malira
29 notes
·
View notes
Text

Rules and Guidelines
With the horny days of Kinktober nearly upon us, we’ve concocted a few vampire-friendly prompts for you to have fun with throughout the month.
This event is organized by and for Vampire Chronicles and AMC IWTV fans and we are open to any and all fan works: fanfiction, gifsets, edits, whatever makes your creative juices flow.
If you have any questions, please hop into our ask box. This is the first event we’re organizing together, so please be gentle with us!
♱♱♱♱♱♱♱♱♱♱♱♱♱♱♱♱
Rules and guidelines
This event is 18+ only since it is focused on NSFW content. Not all fills must be NSFW though, you can create whatever content you feel comfortable with. But as the perverts that we are, we highly encourage you to get dirty with it.
There is one prompt for each day for a total of 31 prompts + 6 extra dialogue prompts, but feel free to use more than one per creation and to mix and match to your heart's desire.
All versions of the characters are welcome, just be sure to specify which in your tags.
We are firm believers of “don't like don't read”, so be sure to curate your experience if there are some prompts that squick you.
Any kind of media is welcome. Options include, but are not limited to: fanfiction, fanart, fanvids, edits, podfics, edits etc. Whatever you feel inspired to create, we’re happy to have it.
This is a low-pressure event. If you fill one day, amazing! If you fill all of them, also amazing! We want this event to be a fun creative experience, so let that be your only goal.
Cross-posting with other events is welcome, just make sure you’re satisfying the requirements for this event.
You can share your work on any platform you like. If you make a post here on Tumblr or Twitter, tag us and we'll reblog you if your work is tagged correctly.
Reblogs will happen largely in the evening (CST/EST) so keep an eye out for that.
In your post please do the following:
Tag with #vfkinktober2023 and/or tag this blog @vampirefest
Please include:
Which Day/Prompt you have filled
Any relevant warnings or ratings to indicate if the fill is NSFW
*Tumblr automatically suppresses any posts with explicit tags. In light of that, we advise creators not to tag NSFW if the post itself is not explicit but only links to the explicit version on another site (AO3, Twitter etc.). But please be sure to give a warning in your post.
Any relevant tags and trigger warnings (we want to take care of our little community, so please tag appropriately)
You may also include the relationship you’re writing for but keep in mind we will reblog with the exact tag you use so ensure your ship name is correct.
If your post does not include the above information, we will either add it ourselves on the reblog or in some cases, message the creator for clarification before we reblog it.
Example of how reblogs will be tagged:
#vfkinktober2023 #day #[prompt being filled] #[type of content; fanart, fanfic etc.] #[trigger warnings that we get from your post] tw #[ship name or pairing]
AO3 collection
The Vampire Fest AO3 collection will be open from October 1st: You can find the collection here.
We’ll keep the collection open even after October ends for people who still want to add their works.
Instructions on how to add your works to the AO3 collection
To add your fics to the collection, simply go to [Edit Work] on AO3 and type VFkinktober in the [Post to Collections / Challenges] box that is located below [Summary] and [Notes] and it should pop up in the suggestion.
You can also head to the collection main page linked above and hit the [post to collection] button.
Happy Kinktober!!
#VFkinktober2023#kinktober 2023#fandom event#iwtv#interview with the vampire#tvc#the vampire chronicles#vampire chronicles#vc#writing event#prompt event#writing prompt#fanfiction#fanart#prompt list#low pressure
52 notes
·
View notes
Text
I'm going to be extremely busy with family all weekend (😭 pray 4 me) but I am going to be living in the "good job" moment from this week's My Personal Weatherman until I can get a minute to myself to watch my stories.
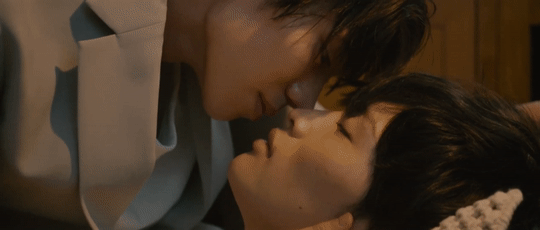
From this glorious Full gifset by @sololunes
The way Segasaki pauses and prioritizes affection and praise over sex, the way he checks in on Yoh's body language, the way he withholds the kiss to build anticipation but also to make sure he's understood this time, the way those words (yokudekimashita/よくできました) do mean good job/good work, but also imply a power dynamic [my understanding is it's usually said to kids, like by teachers or parents, or stamped on homework, or said by a boss to a subordinate--if you were going to say it to another peer at work for example, you'd say otsukaresama /お疲れ様 or with friends you might say the less formal versions otsukare or slang otsu おつ ; with the caveat that I only took one year of university Japanese 10 years ago so feel free to correct me!], and meant all of "you did the right thing" and "thank you for finding a way to express your needs and wants" and "I'm glad you're acknowledging that you are an active participant in this relationship and that you choose it"...
...yeah this is going to sustain me through the Drama lolol
#my personal weatherman#taikan yoho#twig talks#I'm going to miss you while my family drama unfolds over the next few days tumblr fam
43 notes
·
View notes
Text
A starter guide on Ubuntu-Linux, from a non-techie to other non-techies
Preamble (a.k.a. the story/rant before the recipe, feel free to skip or not as you wish)
Several years ago, I got a laptop for college purposes; it ran on Windows 10 with decent reliability for a few years, but then it started getting slower and slower, the bloatware (programs and apps that companies pre-install in your devices that you cannot remove) was just tremendously bothersome, my computer would start updating all of a sudden and be at it for hours, etc, etc.
And so my dad suggested I switched to Ubuntu (he had been using it for a few years himself at that point), and... I'm not going to lie to you. I was scared. Was it going to be too different? Wouldn't it require far more computer knowledge than what I already had? Wouldn't the learning curve be too steep? Wouldn't I be unable to do a lot of the stuff I used to do?
Years later my answer is: I don't miss Windows. The learning curve wasn't nearly as steep as I thought it would be. I got acclimated to the system within a couple weeks. There are parts of Ubuntu itself that aren't that up to date (mainly stuff about medium-advanced audio management, streaming through Discord, and semi-pro to pro levels of photo processing), but I have managed to work around most of it with little difficulty (the image processor I use for making gifsets is proprietary sofware --the code of it is not open for transformation by third parties-- but I can work with it mostly fine through a tool called Wine). If what you do with your computer is mainly internet surfing, document writing, listening to music and playing videos (and similar basic stuff) you are unlikely to have any problems working with Ubuntu. But the best, best, best part of it for me? No bloatware. No 8256754 attempts at getting my personal information or tracking me. My computer is fast, as fast as it was when I first got it (the couple times it broke in the last two years had nothing to do with software: it was first the hard drive, and then the fan). No computer deciding to update and leave me waiting whenever it wants. And honestly, that makes every little inconvenience I have faced in Ubuntu worth it, very much worth it.
Linux has a problem
And it is that a loud section of its userbase is made up by techies who have a very unrealistic notion about how much the average person knows about computers.
A few months ago there was a post making the rounds, where OP explained that you can put ubuntu in a pen drive and carry it with you (yes, it is possible and relatively easy to do) and there was a bunch of people in the notes explaining how much better it is to pick Linux Mint, or use a raspberri pi, as if people who don't know you can carry Ubuntu in a pen drive could understand what they are talking about.
My goal with this post is to explain some of the very basics in an accessible language. I will probably use inacurate and generalized language in it for the sake of explaining simply, and will focus on Ubuntu because it is what I know. If you are a Linux fan who loves Linux Mint or whichever other, go ahead and make your own post.
Definitions, yada, yada
So, what is Linux? in plain terms, it is an operating system (Windows and Mac are operating systems) with several variations called distributions. Think of it as Linux being like a family, and the distributions being the members of the family. Some """famous""" members of the Linux family are Ubuntu, Debian, and Red Hat. One of the main distinctive characteristics of Linux distributions at the basic level is that they are free software: it can be used, modified, and redistributed under certain conditions, by everyone.
Where do you get Ubuntu, and how to install it?
You go to www.ubuntu.com/download/desktop. There you will see two items: the first one is a "LTS" (long term support) and the other isn't. What is the difference?
Ubuntu releases a new version every six months, one in april and one in october. So, for example, the version released in april this year is Ubuntu 22.04, also named Jammy Jellyfish, and the one released in october, Ubuntu 22.10 is called Kinetic Kudu. Every two years, in april, a LTS version is released. Jammy Jellyfish is a LTS release. That means it has a 10 years stay, and is a stable, well tested and tweaked release.
What I'm saying here is, get the LTS release.
When you click download, you will see an ISO file of about 4gb. Save it to your hard drive, and get yourself a 4gb or bigger pen drive that is empty and you don't mean to use for anything else.
To install Ubuntu in that pen drive, follow the instructions here. They are short and simple, and the whole process shouldn't take more than half an hour (probably around 15-20 minutes).
Now that you are in possession of Ubuntu-on-a-stick, you can go ahead and reboot your pc, with the stick still connected. Usually the computer itself will recognize the system and open it, or ask you between the two options of system. This is not installing Ubuntu yet, but you need to be careful.
Next it will show you a menu with two options: to install Ubuntu, or to try it out. DO NOT CLICK ON INSTALL UBUNTU IF YOU STILL HAVE UNBACKED STUFF OR ARE UNSURE YOU WANT UBUNTU YET. It will format your hard drive and all of that will be lost. The try option, on the other hand, works from the stick and does not format your hard drive.
Try Ubuntu will allow you to see how the basic system would look upon installation, and it will also be what you'd use if you were carrying Ubuntu on a stick to use in other computers. You cannot really modify much there, but if you choose to install the system, it is very, very, very customizable. You can tweak it and add and change the position of menus, clock, desktop icons (At first I thought you couldn't have those because they don't appear there by default! But you can! You just need to add them yourself).
To install Ubuntu on your computer, follow the instructions here. The process, again, is described short and simple, it doesn't take long, and the thing itself guides you step by step.
It is possible to make a disk partition, and have Windows in one part of the hard drive, and Ubuntu on the other. I myself have never done this and don't know how it is done. But if you want to try that, there are many tutorials on the internet about how to do it, I just don't have a specific one to recommend.
A couple more things
Once your new system is up and running, and you are customizing it, there are a couple basic things to know that are helpful:
Between the programs that come with the system, there's one called terminal. Terminal allows you to write direct commands to your computer. For example, instead of opening a program from its icon, you can type the name of the program (for example, "VLC") in terminal, and it will open it.
Similarly, you have two ways to install programs: one, like windows, by downloading the package and opening it with double click, the other by writing in the terminal "sudo apt-get install [name of package]". Some packages will already be in the cloud in what is called repositories, and just by typing "sudo apt-get install [name of program]" terminal will download and install it for you.
Like Windows, Ubuntu will give you messages about updates being available; unlike windows, you can install those whenever you want, and they run on the background (you can use your pc while it updates).
Alternatively you can just update your computer whenever you want by opening terminal and writing "sudo apt update" and then "sudo apt upgrade". I myself do that every day.
There are a few programs like get-iplayer (to get stuff from BBC Sounds) and youtube-dl (to get stuff from YT) that work in terminal only.
Terminal is very cool and if you are like me it will make you feel like a hacker in a 90s spy movie.
www.askubuntu.com is a forum that has answers for everything you might face as a problem or challenge while using Ubuntu. It is great.
If you do give Ubuntu a try and have any relatively basic questions I can answer about it, feel free to shoot an ask or message me, and I will help if I can!
140 notes
·
View notes
Note
WIP tag game: Tell me about Touch Starved Roommates and A Late Visit please!
Touch Starved Roommates already answered here. :)
A Late Visit is the first fic I started writing for FF7R a while ago. I’ve been thinking about turning this story into a whole fic series where four characters are in a poly relationship together (I actually posted a little gifset about that on my side blog heh :)) and write different stories/versions about their relationship. This first part would be a smutty one-shot between Zack and Cloud.
I will ramble a little bit more about this idea under the cut and post a snippet of said story. If you’re curious about that, feel free to check it out. If not, then feel free to skip this altogether. :)
—
So, my idea here is that Cloud and Zack are old friends who used to be soldiers working under the same company. Then, Some really bad shit happened in that company, forcing them both to quit and look for work as mercenaries instead.
They both have girlfriends—Cloud’s with Tifa and Zack’s with Aerith—who also happen to be best friends with each other (possibly even girlfriends later).
So, Tifa and Aerith are out having a girls’ night, and the boys stay home. It's late at night and Cloud feels bored and lonely. So, he calls Zack, who's equally bored and lonely, and so Cloud rides his motorcycle to Zack’s and Aerith’s place to spend some quality time with an ‘old friend.’
The boys hang out and chill together, talk about work and girlfriends, and reminisce about the good old times. They drink some beer, a little bit of something hard and bitter as well, and as a result, start feeling tipsy. Because they’re old friends and went through some truly tough times together—could be some old, long-buried feelings still linger there under the surface... buried but not forgotten—and so, one thing leads to another. :)
And here’s that snippet that I promised:
—
There’s a silver barbell on Zack’s belly button. It glimmers with a small, clear diamond. Probably fake, but Cloud’s not an expert and doesn’t really care either. It looks very elegant on Zack… and incredibly hot.
The room temperature suddenly gets two or three degrees warmer. Cloud feels his brain short-circuit for a good long minute or so. His eyes go wide, and his mouth goes slack.
Zack clears his throat, drawing Cloud’s attention, and cocks his eyebrow. “Like it?” There’s a hint of smirk on Zack’s face, like he knows something that Cloud doesn’t. Bastard.
Cloud looks away, and he feels his face burn. It’s not polite to stare. Especially at a guy who’s his good friend, who Cloud totally didn't crush on in the army; who's still hot, if not even hotter now; and who's totally not taking advantage of his good looks by strutting around the house wearing that slutty crop top, showing off those killer abs and the belly button piercing. Not to mention those snug dark jeans that hug his muscular thighs and firm ass just right.
Zack's smug face isn't helping, and knowing him, he's probably drinking it all up, enjoying Cloud's embarrassment. After all, Zack was always the one who preened and loved the attention (he's basically a puppy), whereas Cloud's shy and awkward and hated having all eyes on him. He still does.
Cloud's mouth feels dry and his heart beats so fast, but he finally dares a glance at Zack again. Who's still very much smirking and even quirks an eyebrow at him. Idiot.
"Looks good on you," Cloud finally attempts, croaks a little, and then tries not to cringe about it. "When'd you take it exactly?"
Zack practically beams at that. “Oh, I don’t know, six months ago maybe?" The brunet replies. All casual, like it's no biggie. Like having your belly button pierced is the most common thing in the world. Cloud frowns.
“Okay, so... What prompted you to take it?” He asks gently, genuinely curious now. He’s always known Zack to make decisions in the heat of the moment. The guy's carefree like that; doesn't really care what other people think about him.
Until he wants attention and praise, that is.
Zack laughs and shakes his head. “Well, there was this one time I got a bit too drunk at Seventh Heaven, and we had this stupid bet with Reno-” Cloud instantly rolls his eyes at the mention of Reno, “-that whoever loses the drinking game has to get one body part pierced.”
Cloud grunts, incredulously. “And you lost to Reno, of all people?”
Zack could always hold his liquor better than Cloud—in fact, there had been a couple of instances where Zack had literally had to carry a passed-out Cloud over his shoulder all the way from a pub back to his own apartment.
Something that Cloud prefers very much not to think about right now or how strong Zack really is. It's not doing him any favors here.
“Weird, right? Thought it was gonna be a piece of cake ‘cause you know me and how much I can drink, and there's no way that scrawny little asshole could ever beat me, but believe me or not, Reno can really hold his liquor. Apparently,” Zack laughs nervously, rolling his blue eyes a little. Cloud still doesn't quite believe him.
Zack continues: “So, after Reno had me beat at that game and we were like, totally wasted and all, he tried to change the rules. 'Cause that's Reno fucking Sinclair, right? Like, sheesh, fuck that guy. Anyway, he was gonna try changing the rules so the winner can choose which body part you have to get pierced.”
Cloud instantly grimaces and scoffs. Knowing Reno, he’s not exactly surprised to hear that.
"And knowing Reno and his twisted little mind, he started going back and forth about whether I should get my nipple, or hells, my dick pierced." Cloud's eyes go wide, and he actually snorts a little. Zack fervently continues, "Which, I'm not gonna lie, made me really fucking nervous 'cause could you even imagine getting your dick pierced? Like, how painful it could be?"
Cloud shudders; his shoulders shake. Although he can't deny there's a certain appeal to it—like, he's really straining not to think about Zack's dick right now and how it would look pierced—still, the whole idea sounds extremely painful to him.
He offers his friend a sympathetic look instead. “So, what happened, then?”
“Well,” Zack smirks. He drapes one tanned, muscular arm over the backrest of the couch. Just behind Cloud’s head, which the blonde desperately tries to ignore. “Your girlfriend happened. You know how Tifa gets when she’s pissed, right?"
Cloud nods like it’s obvious. Of course he does—she’s his girlfriend, duh.
"Like, she just stared down at Reno with this kind of menacing look on her face that still gives me chills-” Cloud smiles; he knows exactly what Zack is talking about. “And she reminded him of some ‘agreement’ they have. I don’t know what that’s all about, and I’m not sure I even want to know, but Reno totally paled out. I’ve never seen him that freaked out or witnessed anyone shut his mouth as quickly as Tifa did, so it was kind of funny. So, there. All thanks to your wonderful girlfriend, my dick and nipples are still intact.”
Cloud smirks and hums at this. So very proud because that's his girl and he knows he can always count on her to do the right thing. He finally dares to peek at Zack's piercing again, still feels slight heat on his face and gives it a pointed look. “So, how’d you end up with that one?”
Zack kind of beams again and then looks down, almost shyly. “Ah. Well… it was Aerith’s suggestion, actually. She thought it would look good on me, so I took it. And then she said she likes it, so I haven’t taken it off yet.”
#replies#suometar#wip ask game#zakkura#clack#my writing#i've been thinking about this one a lot#but if i even manage to turn this into a series then. oh boy#there will be so much smut and i'm not very good at writing smut i think *cries*
5 notes
·
View notes
Text
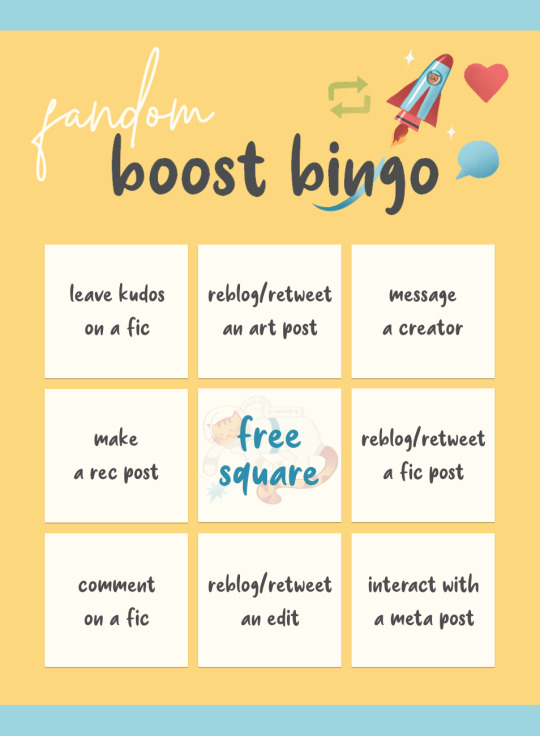
Friends, rev your high fives.
Here's the card we'll be using for this month's edition of our bingo! Grab it up and get going. Remember, zero need to sign up, but if you want to share it with us so we can reblog and share the love, make sure you do so by next Wednesday, November 2.
Below the cut: a list of definitions for each of the squares in case you need help or ideas (don't worry, those will be added to the FAQs post for easy reference), and a black & white version of the card, in case you just really don't like yellow.
☆ How do I fill my card? How is each square defined?
Here’s the way we’re defining the activities associated with each card. If any of this is confusing after you read it over, send us a message and we’ll help!
- ‘leave kudos on a fic’
This is the easiest one! Just go out and find a fic you like and leave a kudos on it, if you haven’t already. It’s a small gesture but it makes an author know that someone actually read their story!
- ‘reblog/retweet an art post’
Find any art post you like and share it! Here’s the catch: you need to interact with it a little. When you reblog/retweet, please tell the creator what you thought about the piece – you can add some tags, or reply to the post, or quote-retweet or add a comment, or anything! A simple “I love this!” is nice but some details are even better (“your linework is so good!” or “that shade of blue is perfect”). One thing to think about: a lot of art on Tumblr is reposted (like when a user posts another artist’s work from Pixiv, say), so it’s nice if you make an effort to interact with posts that are actually from the creator if you can. That way the artist will see your comment!
- ‘reblog/retweet a fic post’
Same as the above, but for fic! Again, tags/replies/comments are needed, preferably with a little detail. You don’t need to be super eloquent or leave a detailed review (although if you have time/energy, that would be appreciated!); a tag as simple as “that was really cute” or “great characterization!” will do. Like with the art posts, it’s nice if you reblog directly from the writer (if you can) – some fics are posted by AO3 feed bots and the like, so the author may not even know a reblog has happened.
- ‘reblog/retweet an edit’
Same as the above, but for edits! Edits can include a gif set, or a set of screencaps, or even a fanvid. And, again, some simple tags/replies are needed. “I love that song choice!” for a vid or “great coloring!” on a gifset can let people know their work is being appreciated.
- ‘comment on a fic’
Find a fic, on any fic-hosting site you like, and leave a comment. That’s it! Again, no need to leave a novel-length comment (unless you’re inspired!) – a sentence or two is all we’re asking for this square to be considered complete. This is a great opportunity to let a writer know how their piece made you feel, or what section you particularly liked.
- ‘message a creator’
‘Creator’ here can mean anyone who makes *anything* to do with fandom: art, edits, fic, meta, knitted sweaters with character faces on them – if they’ve made anything, they’re a creator, and now’s your chance to let them know they’re appreciated. Send a message (anonymous or not!) letting them know that you enjoyed their work!
- ‘make a rec post’
This is a chance to tell your fandom friends about something they need to see. You can rec a fic, a blog, a fan event, an artist, an author, that person who knits sweaters with character faces – any kind of fandom thing that you want to make sure people see. This doesn’t have to be long or complicated, but feel free to go into as much detail as you want! Just make your own post, on Tumblr or Twitter or wherever else seems best to you, and give that thing you loved a little fanfare.
- ‘interact with a meta post’
A little love for our analytical friends! Here, you can reblog/retweet any kind of meta post for your fandom, whether it’s a three sentence headcanon or an essay-length dissection of why Character X is the absolute best character in Fandom Y. It’s even better if you respond to the meta, whether that’s agreeing or (respectfully!) adding your own thoughts, but sharing it is the main thing here.
And here's the non-decorated version, in case you feel like making it your own. Get creative, if you want!

157 notes
·
View notes
Last Seen Blogs
mssethiii
Ms sethi

yandere-heaven-nyxie
Yandere~♡
data-panda
Data Panda
nninoxasaur
Nninoxasaur

peachyeviee
anime girly gal