#because the font is so big. it's like better. it's more readable and it plays nice with my theme. but i dunnoooooo
Text

#HEEEERE'S THE BIGGUN#everyone knows this guy from being the mailman in rescue team. and good on 'im for doing the job that no one else can#it's your game‚ pelipper! woooo!! cheering. clapping‚ even#see remember in wingull's tags when i was talking about it not having one thing it's super memorable for? pelipper is the beak. that bill#or whatever it is. is it a beak or a bill#it's a kangaroo pouch is what it is. for holding Mail………#i'm trying out the new post editor for this one. normally i use the “legacy post editor” or whatever they call it but i'm trying the new on#just for fun. and i'm not sure how i feel about it#it's kinda objectively better but the font for tags is way bigger. on the old one i could kinda intuit when i'm abt to hit the character li#it. ← like that. but here i can't quite tell. bc it makes it look like tags are able to be way longer bc it wraps twice instead of just onc#because the font is so big. it's like better. it's more readable and it plays nice with my theme. but i dunnoooooo#tumblr users are notoriously averse to change and i suppose i'm basically the same way#this isn't about pelipper. here's pelipper. enjoy pelipper#pelipper
314 notes
·
View notes
Text
gradient text tutorial
This tutorial is for @ladynephthyss but y’all can have it too xD
We’ll be adding text so the final gif looks like this:
This tutorial assumes basic knowledge of gif-making, Photoshop, and coloring. I’ve only described the text tutorial in this.
Tutorial under the cut:
Couple things to note beforehand:
There is a lot of trial and error involved when doing any sort of text, and this is no exception! You might have to play around with the colors and the settings before you find something that looks good and readable!
This tutorial is inspired by the difference text effect in these tutorials: one and two by @anya-chalotra (highly recommend checking those out!), just done a different way.
This text effect works better on big gifs (540px width) that have quite a bit of movement below the text so you get that effect.
Find fonts that have bold shapes or some width to them, so you can see the movement.
This is my starting gif, after sharpening and coloring.

First, I position my text where I want it. (this can be moved around later, I just like to get an idea). Remember what I said about fonts? Try to use ones that are thick for this effect so you can see the gradient/movement underneath the letters. I’m using Intro.
It doesn’t matter what color the text is at this stage, I just do white text so I can see it:
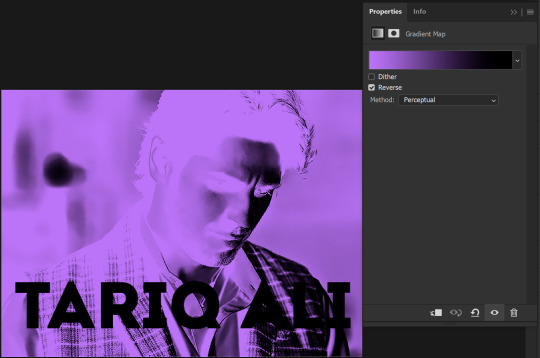
Then, add a gradient map in the color you want your text to be. For this one, I chose black and purple. The more contrast there is in your colors, the better it looks. You’ll be able to change this later though, if you don’t like the way it looks.
This is how it looks with the gradient map:
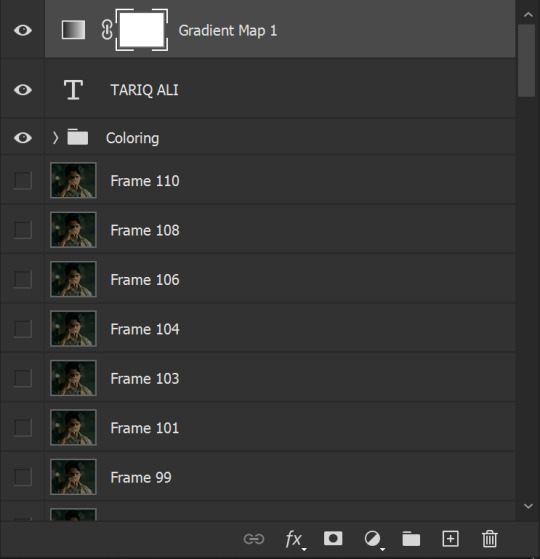
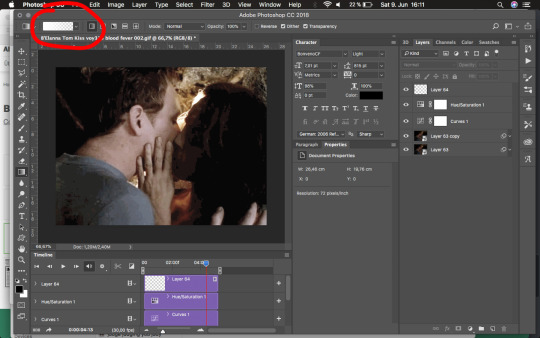
Now, we’re going to go over into our layers panel, and where we have the white box (the layer box), we’re going to select and delete that...
...so it looks like this:
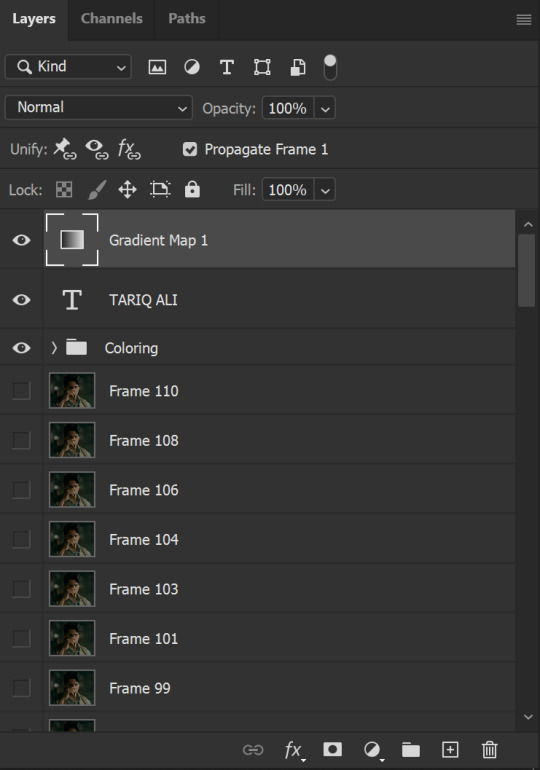
Then, while pressing Ctrl, we’re going to hover our mouse over the T in our text layer. Your cursor should show a white box with a dotted border. Press the T in the text with the specialized cursor, and you should get a dotted line all around the letters, like so:
(I’m not able to get a screenshot of the cursor for some reason but I hope the instruction made it clear!)
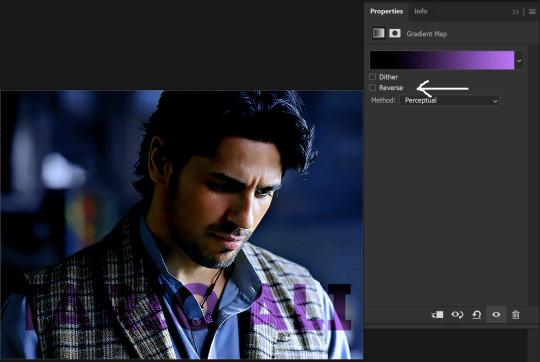
Then, make sure you have your gradient map layer selected, and press the layer mask button (shown by a white arrow in the below image - it looks like a white rectangle with a black circle in the middle.)
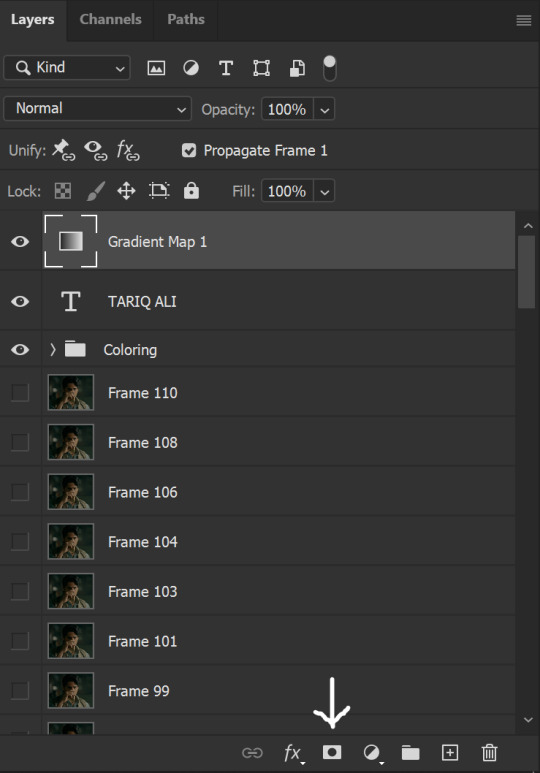
This is what it should look like:
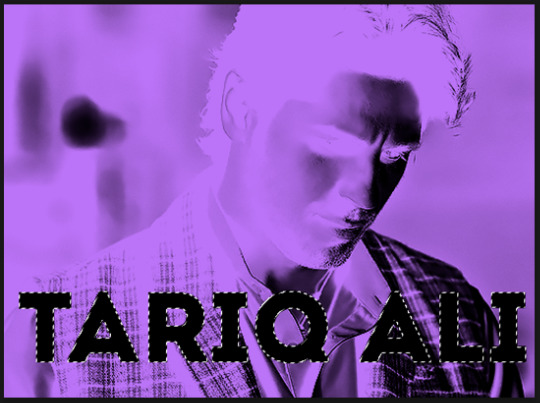
Right now, it’ll look like some solid color (which depends on your gradient). This is because we still have the text layer visible. Once we press the eye icon next to the actual text layer to hide it, you can see that this is what it looks like:

(You can also delete the text layer, but I don’t, just because if I decide to put these two words on two lines, or change their spacing or whatever, I don’t want to have to make a new layer. I can just edit that one before re-masking.)
As you play your gif, you’ll see that this is what the whole movement looks like:

You can see that the movement of him lifting the glass to drink his tea shows through the text, too. Almost like a weird color X-ray type thing, where the lighter color shows on darker shades of the gif, and the darker color shows on the lighter part of the gif.
Note: sometimes, depending on the way your gradient is made, you might get text that looks like the picture below. Just hit the reverse button (shown with a white arrow), and you should get the text looking like it does above.
This is the basic way to do it. Now, we can easily edit this, if we feel like there’s too much purple and not enough black. To do that, we go into the gradient, and change the slider positions of the colors. This is purely an aesthetic preference, but I’ll show you how to do it below:
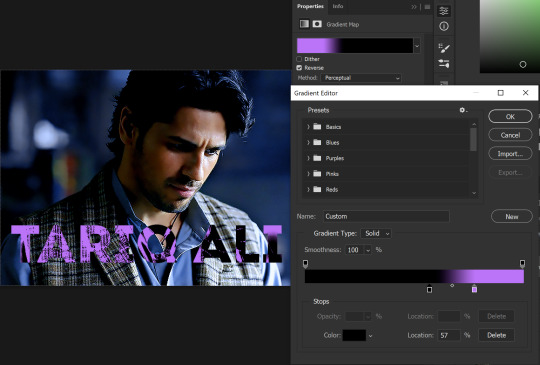
For example, I moved those sliders so there’s more black and less purple, and the gradient feels more like two colors only, instead of all the various hues of dark purple/gray-purple.
This is what the gif looks like:
In the gif before this one, the black was more of a muted gray. In the one directly above, you can see that it looks much more striking. So play around with that until you find something you like.
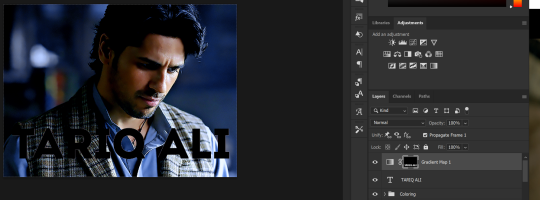
It still doesn’t look very visible to me, so I’m going to add a drop shadow underneath (again, this is a preference thing). You’d do it just like you would with a regular text layer. Right click the Gradient Map layer and select Blending Options. Add a drop shadow.
This is what mine looks like:
And that’s it! You can keep playing around with the whole thing until you’re happy with it. You can even keep changing the color, and the great thing about that is you’ll be able to preview it as you change it to see what works with your scene. For example, I tried white and black text here:
And that’s it! Feel free to drop me an ask if anything’s confusing! Happy giffing!
#zee's tutorials#tutorials#gif tutorial#typography#gradient text#photoshop tutorial#resources#ps help#dailyresources#completeresources#itsphotoshop#allresources#dailypsd#userisha#userdahlias#alielook
417 notes
·
View notes
Text
Understanding Web Accessibility Design + Tips on Improving Accessibility
A few days ago, I came across a video by Kevin Powell where he interviewed Ashlee Boyer about web accessibility. I was intrigued with the video and thought that I might as well share it with everyone. Do watch the video in case if you prefer to watching the video instead of reading this article.
I really recommend you to read this if you would like to understand more about web accessibility! I’ll share with you 4 tips on what are the things that you should be considering when it comes to web accessibility! This is also a reminder to myself for my future theme designs to always consider accessibility when it comes to designing a theme :)
Warning: Some visual aids may cause headache due to the awful color selections. Proceed with caution.

01. Understanding the Users.
If we want to talk about accessibility, we first need to understand the users. If we try to create themes that is so-called ‘accessible’ without knowing the end-users, then it is is like creating commercial products without knowing the customers. It will cause us to cast our net wide but unable to catch many fishes as the holes are just big.
So who are the users? While the list may not be exhaustive, here the list of the potential people who may be facing disability, falling under the scope of ‘users with disabilities’:
Color blind;
Actual blindness;
Low vision/photophobia;
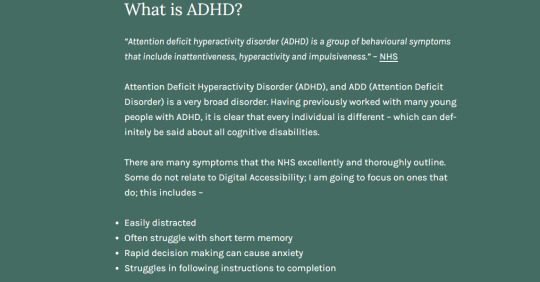
Migraine;
ADHD
Seizure.
When creating a theme, it is pertinent to always consider that there are users who will be viewing your blog or potentially using the theme. Hence, it is advisable to consider implementing theme designs that will ease these users. I personally think that while not all aesthetic designs are accessible, but all themes with accessibility are aesthetic (of course, it depends on the users preferences).

02. Color Contrast
Color contrast plays a huge role in theme designing. We need to always ensure that the color of the theme does not pain other people’s eye by giving unnecessarily pastel colors combination like this:
or even striking color combination as this:

(RIP eyes)
From these two prime examples, we can see just how important color contrast is. Poor color selections would lead to unreadability and may cause your eyes to strain. This may cause the users to quickly exit your blog (which kinda sucks because your content is 100 times better than the color selection 😐). We want people to view our blog safely, without straining anyone’s eyes. Therefore, all the more it is important for us to ensure that we select correct color combination and contrast.
This aspect is very important for those with low vision or photophobia/light sensitivity because it will hurt their eyes more. Here is a color chart where you can have more idea about suitable color contrast:

(source: visualdisplaylearninglog)
Please take note that the chart is not exhaustive. You can experiment it yourself to find the perfect balance between a good color contrast and maintaining the aesthetic. Here’s an example of the better version of pastel color contrast:

(color:#ffffc7; background-color:royalblue;)
TIPS: If you’re unsure if the color contrast is good or bad, try to ask other opinions about it? If majority replied that the color contrast that you’ve picked is eye straining, then it is one.
03. Having Text over Image
Sometimes, we want to spice our designs by adding text over the image. By image, it can be either the background or even the image. However, we need to ensure that the text and image compliment each others. Example of having a weird combination would be like this:
TIPS: Add an overlay between text and background. This will make your text to be more visible. Here is a very basic

(color:yellow; background-color: #264d00;)
The idea of creating an overlay is to increase readability of a theme. Hence, there’s no need for the users to zoom the website just to read the text!

04: Font-size
This is the most glaring issue when it comes to accessibility. It is important to note that irrespective if the theme is pleasing to the eyes or not, however, if the blog is unreadable, then users will not be interested in browsing the blog.
We need to start normalizing 16px/1rem as the default font size for the blog’s body. This is because 16px/1rem is a font size which is easier to read as to compare with other sizes. Take this as an example:
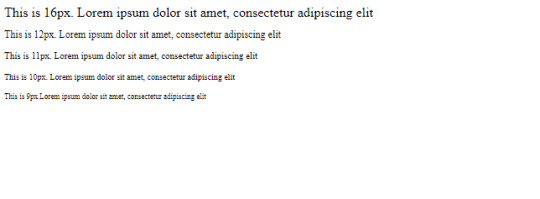
In my opinion, I think anything below 12px would be unreadable. From my experience, whenever I visit blogs with small font size, I often zoom in the blog so that I can read their content instead of looking at the theme. However, there will be users who will exit the blog just because the theme is unreadable.
TIPS:
Make sure the font-size, by default, would be 16px/1rem.
Line-height also plays a vital role when it comes to readability. Ideally, a good line-height would be somewhere from 1.5-2.0.
Make sure that your font-family is something that is easier to read and pleasing to your eyes (and the users’ eyes). I recommend if you use sans-serif instead as your default font. If you think that sans-serif is plain, try consider the fact that popular websites like YouTube, Amazon, Facebook, Tumblr, etc only use sans serif as their default family-font. This proves that sans-serif have a slight advantage in readability, comparing with other typefaces.
Make sure that every paragraph has gap between each of them as per below:
(source:lilianna11y)
How to do it in case if your theme does not have it?
Inside your code, search for p{.
Then, add margin-top:1rem; inside it.
Click [Update Preview] and [Save].
Done.

04. Alt Text
Alt text is important because it serves purpose for those who are blind to gain information from the image. Let’s normalize alt text when it comes to creating themes. There are users who care about the wellbeing of the blind people in gaining knowledge/entertainment. It would be useless for the users to add a lot of text alt if, from the first place, we do not add alt=“” inside the <img> tag.
Resources
Accessibility: Image Alt text best practices
text alternatives are about the purpose of the image, not about every little detail
Both resources are easy to understand and digest. I recommend if you read both of these articles.

7 notes
·
View notes
Note
Hii! Firstly, thank you for being here on Tumblr and for answering our questions😊. Secondly, I would like to ask you a question about the design of the book cover through Gimp: before being able to do it (moreover very well) have you by chance watched some tutorials? If yes, would you be able to share the link? Because personally I can't find any good ones on the internet. In any case, could you give me some tips on using Gimp? Thank so much! And congratulations for your self-published book!!
Thank you so much for the kind words, friend. unfortunately, I just kind of winged it!
To start, get the template and load that up: https://kdp.amazon.com/en_US/cover-templates / https://www.lulu.com/publishing-toolkit
Load that up, and then start adding the images and text on top of it as individual layers. Lower their opacity of those layers to see how things align with the guidelines of the template.
If yr using an image/photo/whatever: For the back, you might wanna blur/darken the image so the copy text is more readable. GIMP also has the ability to add drop shadow to text which would help with the small font. Also add a image of yrself beside the About the Author section! For the front, make the font rly big and bold so it's readable, or just put a strip of plain colour behind it like I did it mine.
I think the easiest thing to do is have a rly big image for the back and front. If what you have isn't big enough, try using an AI upscaler: https://icons8.com/upscaler / https://bigjpg.com/
Or just use plain colours! Less is more when it comes to design. If you look up the most popular modern / instapoetry books they're usually super minimalist.
Be rly careful about font choice too. It's much better to choose something plain instead of something that seems "interesting" or "unique" because it always just ends up looking tacky. I'd definitely try to aim for just using a single font for everything and then playing around with weight and italics with it.
I think that's all I have! 😅 I wish I could be more help but I just played around with stuff until I liked it.
17 notes
·
View notes
Note
Hello, Bas! This isn't a request (although I did want to say you're doing great ❤), but I had a question! How do you do the edits for the images you use in your posts? (Like the rules, pending requests, etc) I'm a noob and I'm genuinely amazed at how cool they look and was wondering if there was some hidden secret to it! Thank you as always for your hard work ❤❤❤

Thank you so much! ❤
There's no secret behind it to be honest and it's pretty simple. I'm using photoshop though (don't come @ me, I don't choose working tools, my boss does lol), but it uses very basic options that any graphic program should have.
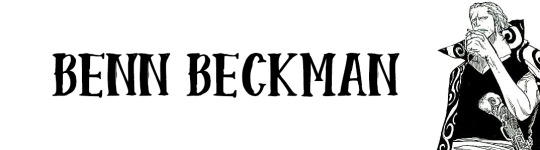
First, I look for a suitable panel in manga (absolutely do not go on site like this one that absolutely doesn't have One Piece manga in HQ, it's forbidden to check that link) and cut out what you need. You can use any select/cut tool available, I'm usually a lazy hoe and just use a white brush/eraser as you can see around Benn here.
Sometimes, especially if you experiment with levels the cut image can look a bit grainy. There's a way to fix it, here you have it explained better.

Then I slap simple white background underneath.

(Though, I'm using #f4f4f4 too, to make sure I erased everything I wanted.)
A little sprinkle of title/name/whatever I want. I usually place text somewhere more or less in the middle, but it depends on your vision tbh.
I'm not the best at lettering design (still learning), but there's a basic rule that whatever you want on banner needs to be readable for everyone, this included nd people and people with various problems with sight (as autistic astigmatic... yeah, it hurts to deal with various designs). Generally, I avoid the "handwritten" fonts unless I want to accent a single word OR the letters are clear and big enough on the banner. (Small handwritten texts are one of things I want to bite designers for.) Serifs for bigger texts, sans serifs for smaller texts since they're easier to be read.
I don't work with colors (1st I suck at it, 2nd I prefer monochromes, 3rd Oda's official art is one hell of chaotic shit to work with, this man slaps colors everywhere but inside lines lol), but you shouldn't use colors too contrastive because of eyestrain. Thus, why I don't use black & white.
Sometimes I use colors, especially very bright and sticking out, if I want to stress something. Case of one's purpose and sense of aesthetic.
(Font I used here is Start Today Sans with basic typography settings, btw. Sometimes I tweak letter width, kerning etc. Which I recommend to play with, sometimes the shape of font is perfect but letters are too little, too close to each other etc.)
Finally, to avoid said black & white eye yolo I slap some levels on top of everything.

So the final effect looks like this:

And that's it. Ironically, the most time consuming thing is finding that one right panel and cutting out what you want. As you can see, I'm not the biggest fan of those fancy, aesthetic banners and such - each extra addition, even if pretty and more interesting, is a distraction. And my goal is simply to show what's happening in post ^^"
6 notes
·
View notes
Photo

** Disclaimer ** - I am NOT a professional graphic designer, however I did work with many of them for different occasions and I have been designing my own things for over 10 years now. All the knowledge I have and share with you in this post was gathered by me over the course of 14 years.
I recently started my font series, where I shared my favourite fonts of different typefaces. People have been requesting to post my favourite font pairings and as much as I love to do that (and I also will, just scroll down to the end of the post to see them), I think it’s also important for you to understand, why they work together nicely and what you should look out for, if you plan on pairing typefaces yourself.
Understanding fonts and typefaces
There are so many to choose from nowadays. You have probably scrolled through the JUNGLE of fonts that you can find online nowadays, some are free, some aren’t and they all go by different category names:
Serif - Sans Serif - Script. All of them can also be Display fonts.
What do they mean?

A serif is a small line or a stroke attached to the end of a larger stroke. So all the little strokes that I circled in red. The most common serif font is probably Times New Roman, which I also used in the picture above (hence TNR).

Arial is a sans serif font, and also one of the most common ones. Sans serif is translated from french, sans meaning “without” - so it’s basically a font without the little strokes, much more clean and modern looking.

Now let’s move on to script fonts, which are more commonly known as handwritten or brushed fonts. Bombshell pro is a script font based on the looks of modern hand lettering.

Display fonts can be fonts from all the different typefaces above. They’re usually used in larger sizes for e.g. headlines or logos, instead of bodies of texts, like Times New Roman or Arial are mostly used for. Abril Display (I used it in a bold weight) is a display font, as well as a serif font.
Now that you know the differences between these typefaces, let’s dive into the different font weights.
Many serif, sans-serif and display fonts come in different weights (thin, light, normal/regular, bold, extra bold, black.. you name it). This is important as it plays a fundamental role in pairing fonts together.
Playing with different weights can help you underline the importance of the text you’re writing. I keep bolding phrases and words throughout this post, so you know to keep these in mind PLUS it’s easier to find the part of the post you are interested in. This also works for headlining on your graphics or gifsets!
Pairing different font weights
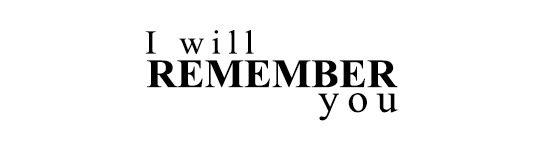
I will use the simple phrase “I will remember you” throughout the following part of this post.
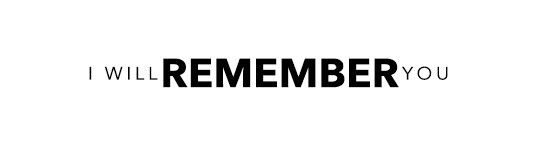
First you need to figure out what you want to highlight. Do you want to highlight, that you will REMEMBER them? Or do you want to highlight that you specifically remember THEM (in the phrase ‘you)? Lay it all out for yourself, so you know exactly what to do.
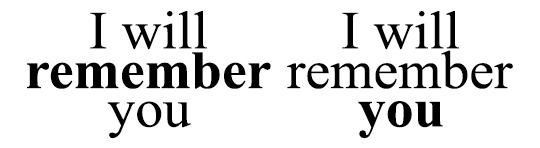

The difference with these two examples isn’t too big, as you might have noticed. I used the regular and bold types for these examples. However, fonts like Avenir or Helvetica come with thin or even ultra light versions and you have more to play around with.
Script fonts usually don’t come in different weights, however you can utilise Photoshop to apply its bold addition to the fonts. It usually doesn’t look too nice though, so be warned!

Also, script fonts are harder to pair with one another, because it’s easier to cause an ‘overload’ for our eyes with pairing them depending on their level of ... let’s call it fanciness.
Now, you can pair the different weights together like this, centred.. and boring.. or you can play around with different font sizes, weights, kerning (click here to find out what kerning is) and positions. It’s fun, I promise! Just make sure you don’t forget which word(s) you want to emphasise!
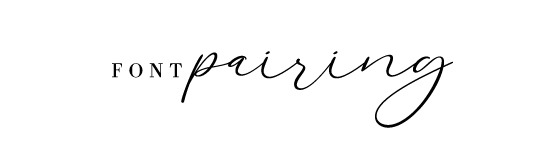
Pairing DIFFERENT FONTS with each other
Now here’s the part people have asked for haha.
The first thing I want you to understand is, that the less is merrier does apply in this case. I personally n e v e r pair more than three fonts together (and I only use three different fonts for an entire corporate design including a website), two usually work the best!
For two different fonts to work nicely together, you (again) have to think about what you want to emphasise and create some kind of hierachy. In order to create an appealing design, you need to catch the viewers attention to the word or phrase you want. Create a focal point, something the eye is immediately drawn to. And then you add to it with simplicity.
You really have to think about what you want to be seen first and what you want to be seen second (on the base of using two different fonts).
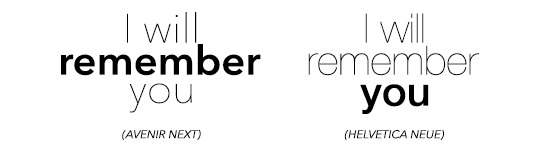
Take a look at the fonts you have chosen. Display and script fonts usually need to be a larger size to be readable or to make them look good, so you probably want to use that one as the top of your hierachy. Also fonts with a heavier font weight tend to work better as the leading font. To accompany your leading font, choose a thinner, more simplistic companion. Why? Because if you use two heavy fonts or two fancy fonts (script, black, brushed etc.), your eyes will have a hard time concentrating on who is more important.

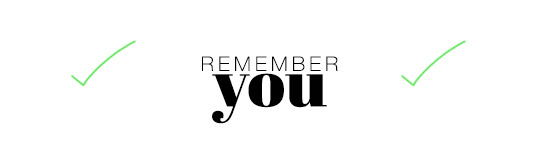
I hope this example helps you to understand what I mean.
In the first picture you see the whole thing as ONE block, because your eyes don’t know where the exact focal point lies. They don’t know which word they should concentrate on. The second one, however, gives your eyes clear instructions on where the importance of the quote/phrase lies.
Now how do you find out, if two fonts actually go together? Sometimes it’s also about the look of the whole design in general, if two fonts go well together or not. However, there are some things you can look for before you pair fonts:
Have a look at the weight, spacing/kerning, strokes in general and their width to figure out, if the two fonts you have chosen are different enough from each other, to actually pair well. Fonts that are too similar to each other have the same effect as shown above.
At the same time please also keep in mind, that they have to have some similarities, such as their general proportions and heights. If these parameters are too different, it might doesn’t look as good (there are some cases where you can make it work though, but you need to play around a little here).
If you made it this far, congratulations :D
This is not the ultimate guide to how you will always pick the right pairing of fonts, but it’s a start and something you can work on and evolve from! I hope it helped you. Feel free to message me, if you have any questions left. And now to what has been requested in the first place.
Here are some of my favourite font pairings:

(Avenir Next at kerning 200 + Abril Fatface)

(Avenir Next at kerning 200 + Sunbreath)
(Bodoni FLF at kerning 300 + Alberobello Script)

(Almondia at kerning 60 + Billy Ohio)

(Boysen at kerning 75 + Saturday Rock)
I hope you found this useful! :) Feel free to share!
#typography#typography tutorial#pairing fonts#font pairings#resources#userlexi#uservaleria#usersophy#annasuser#tuseralex#usernums#userauden#font series#tutorials#mine
870 notes
·
View notes
Text
Replies regarding book covers
silentstep on this post
I'm quite surprised to hear you say that the first image isn't dynamic! to me it feels very much so. either way I like it better as a book cover than the cornstalk, though I love the cornstalk photograph as a piece of art.
It is possible I have lost proper perspective, I’ve been looking at a LOT of dust storm images lately :D There are some that are more dramatic but generally they’re rights-managed or difficult to source because they’re used so often (which devalues the drama a bit anyway, honestly).
msbarrows on this post
Love the dust storm image, but I also think the corn would be usable if cropped to the upper right 2/3rds or so, with an off-center title in the white space. Also wondering if the first image would work better as a full wrap if it was flipped left-to-right, so the dust storm is on the front cover.
Yeah, people seem generally to feel that the dust storm image would work best if flipped. I’ll have to do some experimentation, but fortunately my old laptop with one of the last installation-not-cloud versions of Photoshop on it is still functional, so I can do quite a bit of remixing.
chromatographic on this post
Asthetically I like the first picture better but my inner goblin is yelling at me to choose the Corn.
WE CANNOT ALL BE @seananmcguire :D (What a world if we could.)
froofie on this post
Too bad you can't superimpose the giant corn into the dust cloud in the first photo, like a watermark or something.
I mean, in theory I suppose I could, I have the technology. I’ll try it out, but I think it might be too much...imagery, somehow.
ponderosa121 on this post
I’d try the corn if you were willing to do some cutouts on a big chunky yellow or red font. i think you could get a pretty striking look like Harlen Coben’s Run Away
I had a look, and that IS very compelling as a cover, although I’m not sure it’s an appropriate vibe for the material. I might play around with it though, I think I could get a real “sixties cover design for a book you have to read in high school” vibe going and I do love that aesthetic.
noriannbraindripshere on this post
The dust storm one would be easier to use I think, but oh I am so tempted to go full *graphic design is my passion* with the corn one... may do that for my Ao3 epub actually.
Feel free if you want to! I should say, there will be an epub version of the final draft for sale (usually pretty cheap, though I need to consult with Lulu on what they’re charging now), and there’s always a free PDF version, just so you know you’ll have some options.
drownedinlight on this post
I can see why you're having trouble -- I would say, not yet having the chance to fully read Six Harvests, if there isn't a storm similar to the dust storm in the picture, don't do that one, because people do judge books by covers, whatever others might say. If there is, it is more evocative than the corn stalk, though I do enjoy its tall eerieness
Well, there are three storms in the book, two of which hit the town, so there’s that at least. Actually, fun if irrelevant fact, this storm photo was taken on April 18th, 1935, which is four days after Black Sunday, the generally-felt worst storm of the Depression.
odense on this post
I love the dust storm one! it could go across the whole first spread, so you don't need to crop as much out :D I feel like it would totally handle a nice serif font, what are you setting the body with?? I like palatino linotype or georgia :)
I haven’t looked at fonts for the cover yet, but the body is being set with Garamond -- Garamond or Georgia are my go-tos but I’ve generally found Garamond is a little more readable, at least as printed by Lulu, which is my self-pub site.
Thank you to everyone who gave feedback! Looks like unless I see something I like better in the next day or two, it’ll be the dust storm, but I do think the corn would be workable too. I appreciate peoples’ thoughts!
#reply all#odense#drownedinlight#noriannbraindripshere#ponderosa121#froofie#chromatographic#msbarrows#silentstep
49 notes
·
View notes
Text
What happens after you get accepted by a publisher?
As some of you may know, I’m a professional editor who used to work as an in-house editor. I see many posts about how to query and stuff, but very little describing what happens after you sign the contract. Of course, this varies between publishing houses, but I’ve worked as an in-house editor in three publishing houses, and I will relate my experience with them.
I’m your primary contact person. I will send you the contract, signed by the publisher (my boss), and answer any questions you have before signing it and sending it back to me.
Then you probably won’t hear from me for a few weeks. I’m thoroughly reading through your manuscript, and usually simultaneously a few others as well. When I’m done, I will get back at you, to let you know if there’s any rewriting work to be done on your book. There usually is. In fact, over the years, I’ve only had one author whose book could be sent to the text editor straight away. So don’t take it as a bad sign.
Major rewritings can also happen before you sign your contract. This means we see your potential, and it’s big enough for me to invest my time in you (my salary costs money too), but you have to prove that you can rewrite it. See my other post on “What if your publisher asks for a complete rewrite” and some nuance and other nuance for more information on, well, complete rewrites.
I will never put you to work without helping you, and you can always call or email me if you’re stuck or if you don’t know what I want. In fact, I’d rather have you contact me than you trying to hide the fact that you will most probably miss your deadline.
After the rewrites have been done, what happens then? In the bigger publishing houses I worked at, a freelance editor corrects your grammar and spelling and stuff. They work on a sentence and word level. In the small publishing house, that was also done by me. That doesn’t change anything for you.
I will send you the manuscript with the corrections for you to approve. Usually, authors agree. If you don’t understand or don’t agree, just let me know and I can either explain it to you or see if you have a point.
Meanwhile, I will put the cover designer to work. I will tell them what kind of a book it is, which genre, which target audience. If I have ideas for similar covers they can use, I tell them as well, but usually I trust the designer to do their work. I think in words, they think in images. To each their strenght. If you have ideas for a cover, we will look at them. (But usually cover ideas by the author are not commercially interesting, and they end up liking the cover we designed better.)
I will send you some unfinished cover ideas, or sometimes the one cover we all agreed on. You usually have veto power, but authors rarely veto a cover (”It looks so real now!”) because our cover designers know their job ^-^ The cover needs to be approved by a lot of people: you, me, the publisher, the people from marketing, the salespeople... Negotiation about 14 conflicting opinions is part my job.
By now, you’re probably done with approving the corrections in your manuscript. I check it one last time and send it to the lay-out people.
The publisher decides on the format of your book (softcover/hardcover/fancy edition...), based on what is financially possible and commercially interesting.
The lay-out person sends me a sample, usually the first five pages. I print it to see if the font, margins, interline, readability... are okay. They usually are, and I give the lay-out person a “go!” to lay-out the entire book. A few hours later they send me your book in pdf.
I will now send it to a second freelance editor, whose job it is to check for typos and weird line breaks etc. They will send me their corrections and the lay-out person will take care of it.
I will send you your final, clean manuscript and you will beam with pride to see your book as a “real book”! ^-^ (Similar feelings as when I send you the first cover.)
I will have written a blurb, sometimes based on your query letter. Everyone who had to have an opinion on the cover will be consulted again for the blurb. I will send you the definitive version, but to be honest, in practice, you can’t change much about it, unless you have Good Reasons, because this is the version the 14-headed monster - I mean, committee of colleagues - agreed on.
The cover designer now makes a back and spine cover.
Now there is nothing else for you to approve, you’ve seen everything. I’ll send the covers and the text pdf to the printing house, confirm the publishing date and then we play the waiting game!
Next, my colleagues of the marketing devision can take over, or sometimes they take over earlier in the process, or sometimes they don’t consult you at all.
When your physical books arrive on my desk, you can be sure that I am as proud of you and your book as you are. After some happy unboxing and bothering my colleagues - “just LOOOK at this BABYYY!” - I will send you a few copies through the snail mail for you to unbox and bother people with. (At least, if this is stated in your contract. At the publishing houses I worked at, usually it said that an author gets 5 copies of each edition.)
We usually don’t organize and pay for a launch party, but if you want to have one, go ahead. For debutants, a launch party doesn’t help selling copies that wouldn’t have been sold anyway. Journalists don’t scour book launch parties, it’s usually the author’s friends and family who attend, and they were going to buy a copy anyway.
And then it’s time to keep your fingers crossed, hope for good sales, and start writing on your next book!
***
I hope this was helpful. Don’t hesitate to ask me any questions, and happy writing!
Follow me for more writing advice, or check out my other writing advice here. New topics to write advice about are also always welcome.
Tag list below the cut. If you like to be added to or removed from the list, let me know.
@writingwordsanddrawingpictures @thewordsweneversaid @writingwhithotchocolate @i-rove-rock-n-roll @maskedlady @no-time-like-write-now @timefire25 @black-lakritz-dragon @nzmayart @fandomrandomness-stuff @dangertoozmanykids101 @anaestheticdisaster @storytellingofravens @purpleshadows1989 @mathematicpony @i-don-t-know-words
#writing advice#writing tips#writing#publishing#publisher#writeblr#sanne#how to tell me a story#traditional publishing
552 notes
·
View notes
Text
Understanding How Web Design Impacts Your SEO
Whenever people hear the words “web design,” the first thing that typically crosses their minds is, “ah, that thing that makes a website look great.” While that observation is correct, it would be inaccurate and unfair to just put web design inside that box. Web design makes sites look aesthetically pleasing, and also creates quite an impact on their search engine optimization efforts, among other things.
Contents [hide]
1 You read that right: Web design impacts SEO, for better and for worse.
1.1 Looks
1.2 Navigation
1.3 Readability
1.4 Content quality
1.5 Pop-ups
1.6 Auto-plays
1.7 Responsiveness
1.8 User testing
1.8.1 Still want more great info on web design and SEO? Check this out!
YOU READ THAT RIGHT: WEB DESIGN IMPACTS SEO, FOR BETTER AND FOR WORSE.
Let’s assume that your optimization work on a website is exceptional, with numerous high-quality backlinks, meta titles and descriptions in place, and all other SEO tactics implemented for some time now. Has your site shown any significant improvement yet in terms of traffic and rankings in the search engine results pages or SERPs? If the answer is no, then there’s probably something wrong with the website. It could be any number of things, including your web design.
So how can web design issues affect your SEO? Let’s look at some of the ways.
LOOKS
Top notch optimization work on a website won’t do much for its traffic and rankings if it isn’t pleasant to look at in the first place. A site’s web designer may have used color combinations that are too loud or fonts that are inappropriate or too small. Sub-par graphic design could also turn people off.
Looks will always matter, regardless of what people say about how it’s not that important. A well-optimized website that’s designed gorgeously is sure to draw people in, while a well-optimized but poorly designed site isn’t likely to keep visitors around.
NAVIGATION
Good for you if your site is as pretty as it can be. And if it’s easy to navigate, visitors are more likely to stay and explore everything it has to offer, and that should give your SEO a boost.
The opposite is true if your site’s navigation structure is cluttered at best. If it doesn’t have a search feature that works or easy-to-find and clickable navigation elements, people who find your site probably won’t stay long because no one has the time to get lost inside any given website because of poor navigation.
Make adjustments to your web design to make it easier to navigate.
READABILITY
When your content is a pleasure to read not only because of its quality but also because the font you’re using is big enough to be readable, visitors will stick around.
That is why it’s puzzling that some webmasters use fonts that are too small or are in a color that makes them harder to see, much less read. Visitors aren’t going to waste their time trying to make out what your content is saying. They’ll just bounce off to another site, giving your SEO efforts another blow.
CONTENT QUALITY
People come to your site to get something out of your content. They may want more information about your company, are curious about the products or services you’re offering, or just want to entertain themselves with the content you provide. If your content does not do any of the above well, people will drop your site because no one wants to spend their precious time on garbage.
Bad spelling, ubiquitous typos, and horrible grammar also turn people off, so you need to shape up in that regard as well.
POP-UPS
Incorporating pop-ups into your web design is all right. They can be useful when you’re trying to encourage visitors to engage with your business more, on social media for example.
However, some webmasters overdo it when it comes to pop-ups, and that can annoy visitors to no end. In some cases, they pop up long before you can even open the content you want. Sometimes, users reach a page and just when they’re about to start reading, a pop-up appears and covers the entire thing.
Use pop-ups when you need to, but not to the point where it gets in the way of enjoying your site. Use it sparingly to annoy people less and make them stay longer.
AUTO-PLAYS
Another source of annoyance that drives people away is automatically-playing music or video. Few things are as enraging as wearing headphones while surfing the net then suffering a near-heart attack as loud music suddenly assaults your ears.
Incorporating audio or video to your web design is nice, but just don’t make it play automatically. Even for people who aren’t wearing headphones, it’s annoying when you have multiple tabs open, and you’re wondering where that sound is coming from. Do the opposite, and your visitors can just close your page and move to another site, probably your competitor’s.
RESPONSIVENESS
The world has gone mobile, and if your site isn’t responsive yet, then you are missing out on a lot of things.
Mobile users have very little tolerance for any site that does not display well on their devices. And when smartphone and tablet users readily close your page once your site’s mobile unfriendliness becomes apparent, you can kiss all that traffic and your chance at topping the SERPs goodbye. No amount of optimization work will be able to overcome your being virtually non-existent among mobile users.
Go for a responsive web design now if you want to get maximum results for your SEO efforts.
USER TESTING
A person can be the most renowned web designer in the world, and still fail to see any shortcomings in his or her work. That’s because we sometimes get too close to our work. We need fresh and independent eyes to assess our output, and that’s where user testing comes in.
You can hire companies that provide user testing services. If you don’t have the budget for it, you can ask for honest feedback or suggestions regarding the web design from members of your family or your close friends.
With the kind of impact web design has on SEO, webmasters should put the same amount of effort they give SEO on their web design.
Author: Originally Published at finepoint-design.com on Post March 15 2019 by Keith Hearn
1 note
·
View note
Text
Extensive Guide for Making Gifs
(On Mac and with Photoshop, but the process is basically the same on other platforms.)
Let’s make this gif together (I know it’s not the pretties, but it serves the purpose):

Prerequisites for this tutorial:
gif capture software, e.g. Giphy Capture
Photoshop
Let’s start with the basic. Capturing that gif from your screen.
(If you already know how to do that scroll down until you see a screenshot of photoshop.)
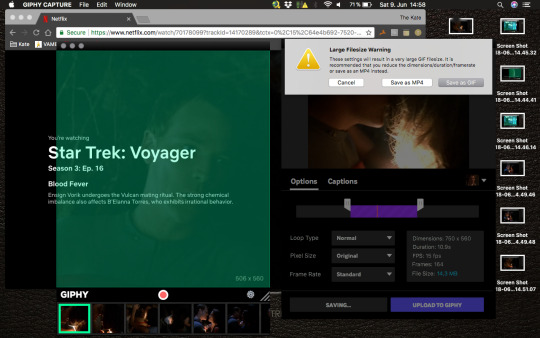
Open Giphy Capture and your video. (I’m grabbing from Netflix, so I’m using chrome to avoid the Netflix Blackscreen)
No need for fullscreen, a fullscreen gif will be too big anyway! Be aware that GC only records 30 seconds at a time. So move a few seconds before your scene - to allow leeway for moving your cursor and for any unwanted details to disappear from the screen (e.g. timeline bars etc.) Adjust the record frame to the size of the video. Start to record one or two seconds before your desired scene.

Stop video and recording when you’re done. Might take two or three tries to get there. don’t worry if it isn’t exact, record too much if you’re unsure. We’re gonna cut this down later.
Now, open your recorded gif by clicking on its icon. Adjust the section you want to export as a gif.

Don’t worry about being exact here either. Better be on the safe side and have a frame or two too many. We can delete frames later in Photoshop. You can also change here if you want it to be a normal loop, ping-pong (back and forth) or reverse, and adjust framerate and size. Don’t worry about the size, we can change that in PS later.
Export your gif. Ignore the file size warning if necessary and save as gif anyway.
Now, open your saved gif in Photoshop.

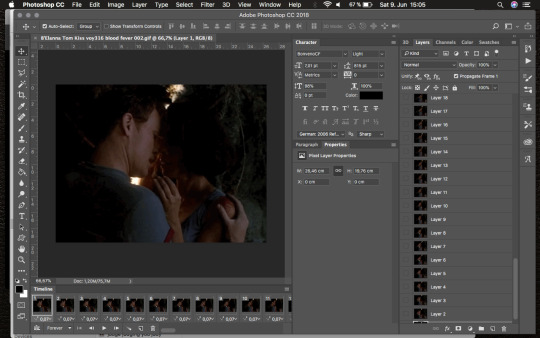
Look through the gif and delete frames in the beginning or end if you want. Do that in the frame section (timeline), NOT in the layer section. You’ll see why in a bit.

Play the gif every time you change something to make sure it’s what you want, and change things back if needed. (cmd + Z/alt+cmd+Z if more than one step back/shift+cmd+Z if step forward again)
Let’s say I want to remove the first 5 frames. Click on frame 1 and then hold shift and click frame 5. Voila, you selected the first 5 frames. Now delete.
Play gif. Not good? Cmd + Z and try again.
Let’s say we’re happy with your frames, but it’s playing too fast/slow. Select the frames you want slowed down. Let’s say all of them. Click the first frame, then hold shift and click the last frame. Now click on the little number under the frames, on any frame - it doesn’t matter as long as it’s one of those you selected (in case you didn’t select all of them)
Don’t slow down too much or it will look like a slideshow rather than a gif. You want it to still be smooth.
Check and revert if necessary, just as before. Let’s slow ours down to 0.1 seconds instead of 0.07s.

Now that looks fine. Let’s move on and improve the images.
For the sake of this tutorial I’m gonna delete some frames.
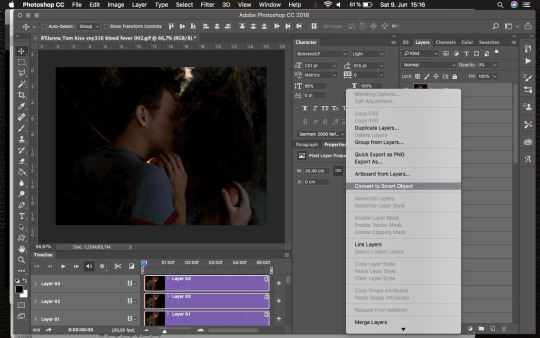
Now we convert the frames to a timeline.

We move over to the layers section now.
You’ll see that not all of them are visible. The invisible ones are those we deleted, so we can go ahead and delete those layers as well.

Now we selected all the layers and convert them into a smart object (Right click --> Convert into Smart Object)
Let’s sharpen our gif and see if that makes it look better. (Undo if you hate it, obviously.)
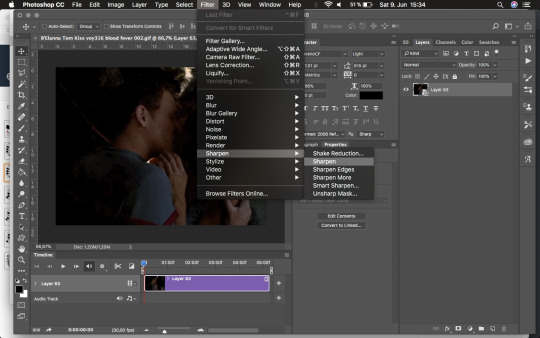
Since our gif is really dark I want to brighten it up.
Right click on layer and Duplicate Layer... (Or use cmd + J)
Set that layer to screen. You can repeat this step as often as you want, but beware, it’ll make your gif look awful at some point.


We can go one forever adding more screened layers, but it’s gonna look bad at some point.

Instead of adding another screen layer, let’s add an adjustment layer instead.
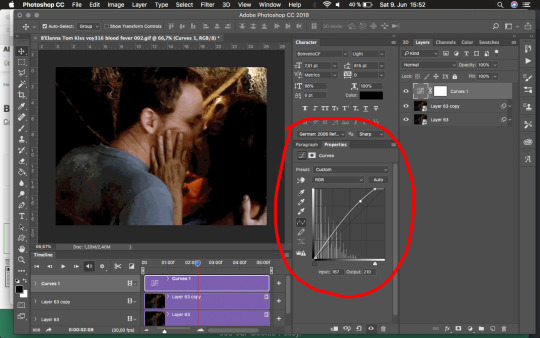
Go to Layer —> New Adjustment Layer —> Curves…
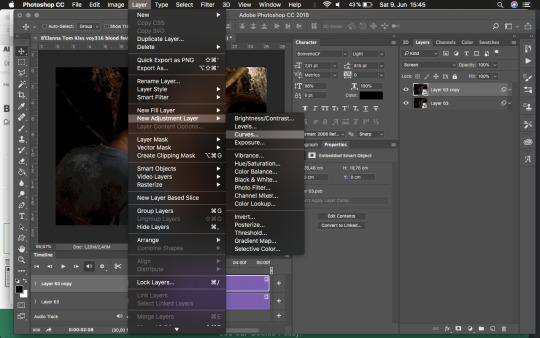
Adjust darkness and light until you’re satisfied. If you’re not happy later on, you can always go back into the layer and adjust it if needed. This goes for every adjustment layer.
From this point on you can basically add as many layers for as many effects as you need/want.
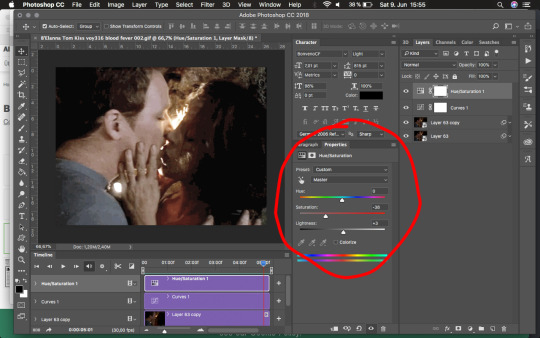
Let’s play a little with saturation.
Layer —> New Adjustment Layer —> Hue/Saturation
I’m lowering the saturation a bit because I want to add an orange glow…you know, create some sunlight streaming in…

I’m adding an empty layer now where I can add the orange glow effect.
Now, if you’ve moved in your timeline, the new layer will appear at your marker. You may have to move it back and adjust the length to the rest of your timeline.

Now let’s get some glow.
Got to the gradient tool in your toolbar (or just press G on your keyboard). This may be set to bucket fill tool, so you’ll have to right click to switch from bucket to gradient.
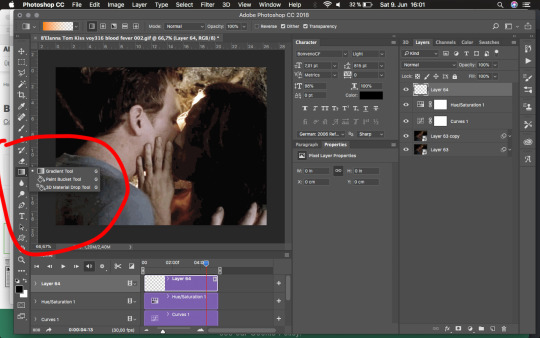
Then go to the gradient picker and click on that field at the top to choose your colour and variation.
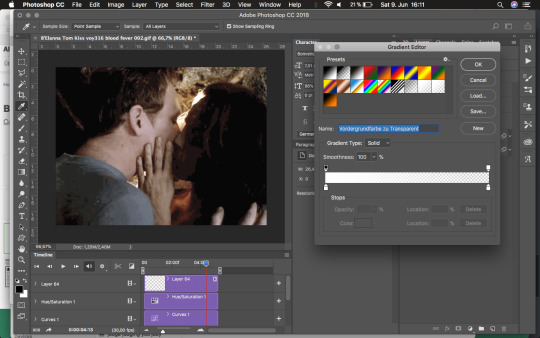
Pick the Foreground colour to transparent and change the foreground colour to what you want (orange here).
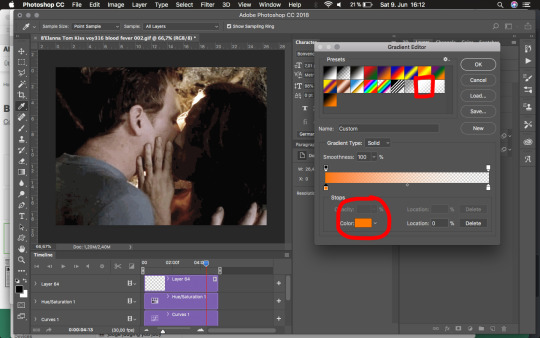
Now back to your image and drag that gradient.
Make sure you’re in your empty layer!
Start dragging from where you want the light to shine to the lower part of the image/gif. Don’t worry about being exact. We’ll adjust this anyway.


Now this looks horrible, so let’s adjust it.
Press cmd + T, that allows you to change the size and angle.

Let’s make it a lot bigger to diffuse the transition, and let’s also change the angle to where we want it. (move your cursor along the sides to any of the middle points until you get a curved cursor - that lets you rotate the layer.)

Then move it up a bit so the orange isn’t fully visible, but only a transparent glow over the image.
Play a little with the position, angle and size until you’re satisfied. Press enter or the accept button on top.

Now, I actually do not want such a blatant orange, so I’m setting my layer to “soft light”…it’s still too much for my taste so I’m going to lower the layer’s opacity a little.
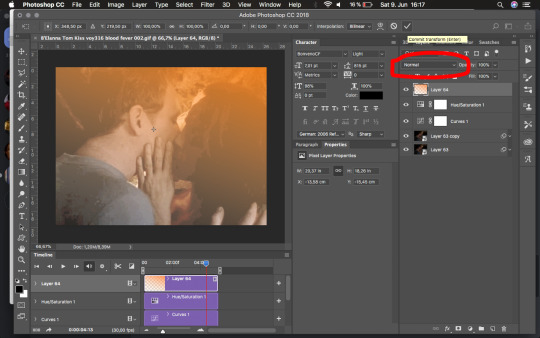

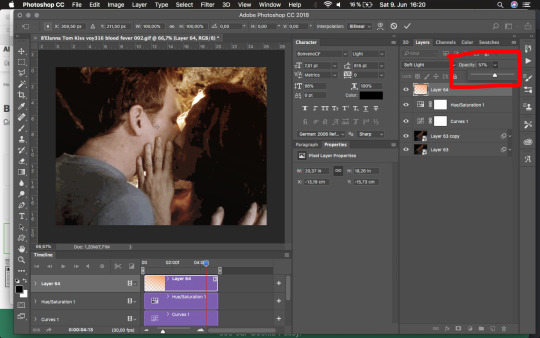
Now that looks fine, let’s check if we like the gif so far.
The quality of mine is terrible, obviously, it’s gonna look much better if the source video has better quality (and maybe other gif capture software can do this better. I think Giphy Capture lowers the image quality drastically.)
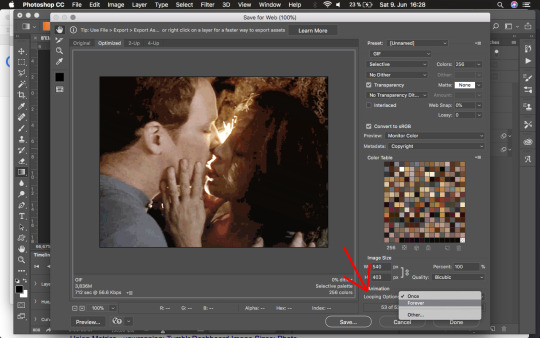
Anyway, let’s check the size of this gif. Go to File —> Export —> Save for Web (Legacy)

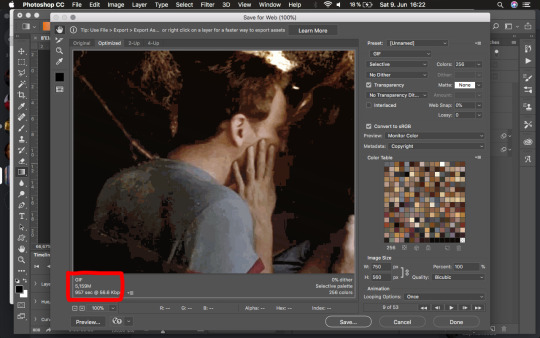
Now, mine is over 5M…that’s not gonna let you play it on tumblr, so we need to scale it down. We have an image of 750x650 pixels. A nice size, but tumblr won’t display that anyway. Close that tab.
Let’s scale the image down to what tumblr can display. Tumblr display pics with only 540 pixels in width anyway, so let’s scale it down to that (make sure the aspect ratio is locked or it’ll distort.) Set it to pixels and change the width to 540.


Checking size again —> Still 3.8M, so we need scale down or cut something. We don’t want to give up image quality just yet. (Make sure transparency is clicked, or the file will be bigger.)
We could crop the image to where we want the focus (obviously, that’ll make the image smaller again) Select part of your image and crop down to that.
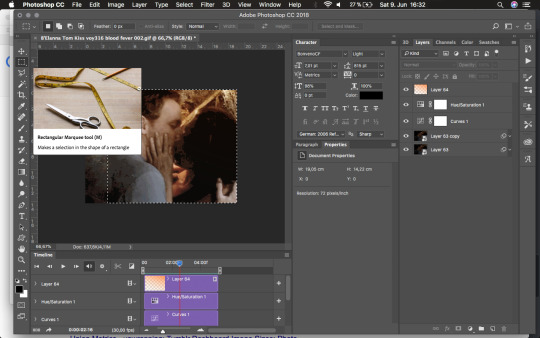

Check file size again —> mine is still over 3M —> I’m going in for the presets.
File —> Export —> Save for Web (Legacy)
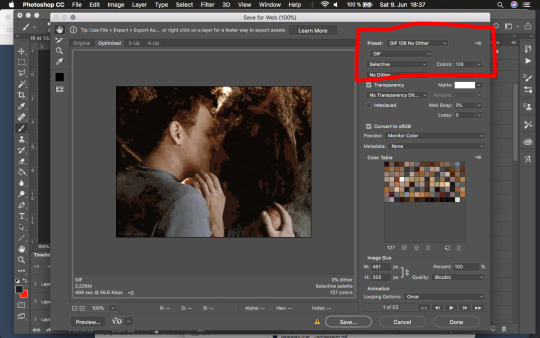
Then find the field for presets and choose “Gif 128 no Dither”, that drops our colours from 256 to 128…it’s barely noticeable in our case, but it may be in other cases, see if you like it.
What it does do here is drop the file size from over 3.8M down to 2.6M —> file size restriction for moving gifs on tumblr is 3MB, so it should be fine.
Now make sure that the Looping option is set on forever instead of the default “Once” —> go to Save… and save wherever you want.
Voilà, have fun with your gif.
PS: If you want to watermark your gif do that in a new layer. I watermark mine as follows:
Dependent on whether it’s a dark or bright gif I choose text in black or white. Choose a spot where it doesn’t ruin the gif but is still visible if necessary. I usually go for a corner and type with a small font.
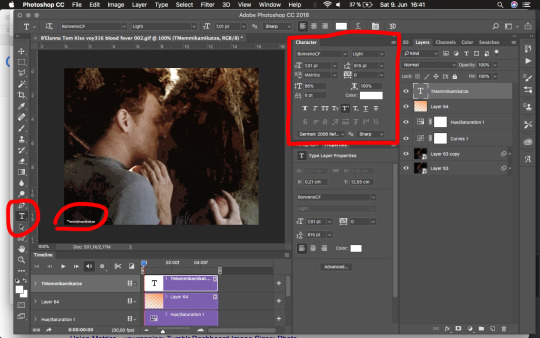
Lower transparency of the layer until it’s barely visible, but still readable. Remember to adjust the length of the clip in your timeline.
If you still have questions about the process don’t hesitate to reply to this post. I can always edit it to add certain info/screenshots of specific steps if necessary.
97 notes
·
View notes
Text
Protest Signs
In the aftermath of the political rally in my area, several pictures of accompanying a protest were uploaded to a local facebook event page. I personally was not able to attend due to work commitments, but I did notice something I've noted before around here. A lot of people don't know what makes a good protest sign.
What does a "Good" protest sign mean?
Easily readable and clear, concise message. Let's take a look at some examples:


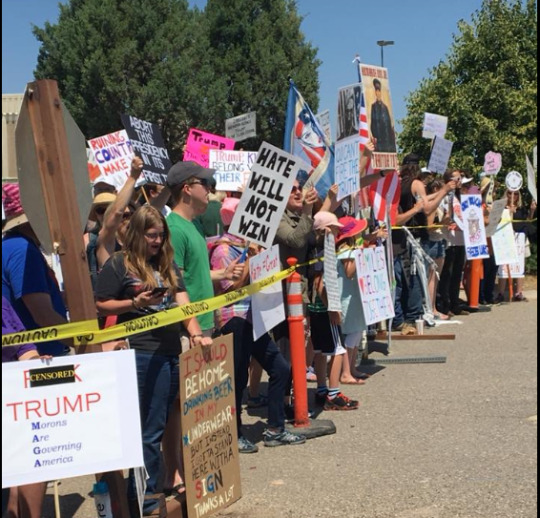
Which Signs stand out most? Which are the easiest to read?
Large signs with letters contrasting the sign background, and short, east to read messages; “LIES INSULT & HATE ARE NOT OUR VALUES”, “HATE WILL NOT WIN”, “COEXIST”, “YOU CAN’T FIRE THE TRUTH”.
All of these signs have a clear, concise message. That’s not to say the others have a bad message, but they’re a little hard to read, especially from a distance. For example, the “F***K TRUMP Morons Are Governing America” has a really thin font and a smaller sub-font, meaning their point is lost at a distance.”ABORT THIS PRESIDENCY IN ITS FIRST TERM” has a great, contrasting font, but it’s a little long. “FREE THE CHILDREN CLOSE THE TRUMP CONCENTRATION CAMPS” A great message, but with how wordy it is, precious signage real-estate is lost to an unreadable font. With protest signs, as in theater, you need to play to the back row, not the front row. Seasoned protesters have noted that seven words or fewer pack the most punch.
Always use the KISS Acronym:
Keep It Simple, Stupid
This is true of everything from graphic design to electrical engineering.
Let’s look at some more examples:


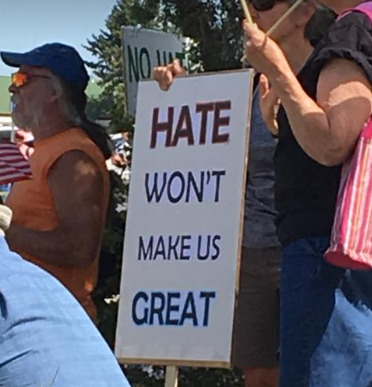
“HATE WONT MAKE US GREAT” “KEEP ABORTION LEGAL” “MR HATE LEAVE OUR STATE” All really clear, back-row legible, and easily read.
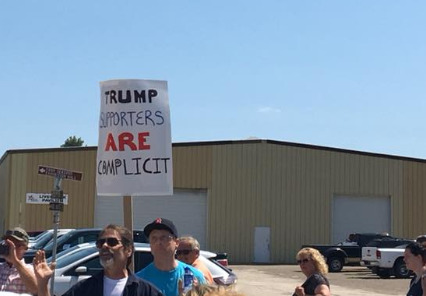
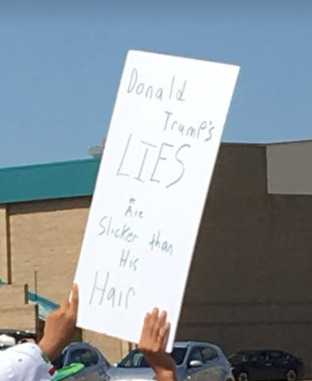
“TRUMP SUPPORTERS ARE COMPLICIT” While succinct, I could only clearly and easily read “TRUMP” and “ARE”. “I CAN’T BELIEVE I STILL HAVE TO PROTEST THIS SHIT” While on a nice, big sign, uses a lot of dark letters making “I CAN’T,” “I”, and “PROTEST” all that is clearly legible as opposed to the same sign used in Vancouver in 2015 that was a simple black and white sign. And the “DONALD TRUMP’S LIES ARE SLICKER THAN HIS HAIR” has a font that is too thin to read clearly.
On keeping a clear message:
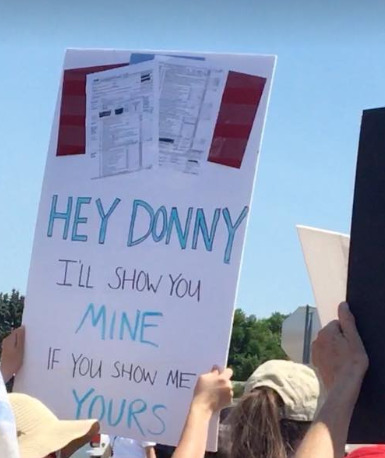
If I were standing 100 feet away, I wouldn’t have been able to see that those papers were tax return forms. Hell, it took me a minute to figure out what they were just looking at this picture. If you can’t see the content, the message could be lost on the people you’re trying to reach.

Again with needing a clear, concise message. While the reds and whites stand out on this cardboard, the thin black lines and the dark blues make it harder to read from a distance. Not only that, but the message is far too long for someone glancing at it to read. Honestly, the message in this signs works a little better for holding up as a counter-protest sign in front of a planned-parenthood. For the message to be more applicable in an anti-Trump rally, just adding “THANKS A LOT, TRUMP” would have made it a more effective protest sign.

The most common anti-Trump protest sign I’ve seen, which while i like the overall message behind it, the message can be a little muddied. To me, it can mean what I would like to think it means which is love is stronger and overcomes hate. But the fact that it brings in the PINO’s name into it twists the message a bit in my mind. It feels like its trying to say “Love Trump’s Hate” as in love the fact that you’re getting under his skin. On the other side, it feels like its trying to say “love the fact that trump hates everyone who is not a rich white male.” This feels very much like a “let’s eat grandpa” vs “let’s eat, grandpa” situation. I feel like “LOVE > HATE” or “LOVE NOT HATE/RACISM/BIGOTRY” would have been a little more effective.
I know I’ve sounded pretty negative about all of this, but I’m honestly not trying to be negative about it, so i give you my favorite sign of the protest:
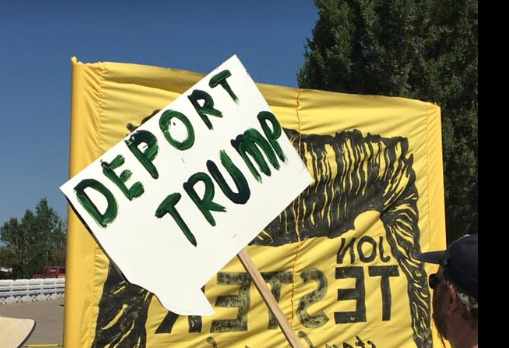
Because I was scrolling through these pictures thinking “I would write ‘TRUMP WHERE ARE YOUR PAPERS?’” Then I saw this.
This (quasi-rant) is NOT meant to say that these people did not try to make their voices heard. This is NOT to say “protesting is pointless”. This is NOT to say anything remotely negative about the contents of these signs. This is just a person mindlessly voicing my thoughts to the void on how to adequately convey the message you’re trying to get across so that the assholes you’re protesting will have your “insert witty sign message here” emblazoned in their mind for months.
Now go forth and make the truest voices of the nation heard!
#politics#government#fuck trump#protesting#protests#counter-protesting#counter protest#democrats#liberals#republicans#conservatives#libertarians#independants#rebel#resist#president cheeto#President In Name Only#not my president#PINO#antifa#anti ICE#drumpf#activism
1 note
·
View note
Note
Hi!
I was just wondering if you have a tutorial on how you created this effect in your gifset, it's something I'd like to try but have no idea where to start. Your set is so pretty! Any helps appreciated x
https://www.tumblr.com/tawaifeddiediaz/712911415428743168/ill-take-you-with-me-then-well-both-die-you?source=share
Hey Nonnie, thank you! This is super late, but I don't actually have the psd for this set anymore (I delete them as soon as I post them), so we're just gonna wing it with a gif I made the other day. I think this ask is about the text, but if it's anything else, just drop me another line and I'll get to it when I can!
I'm pretty sure I got this tutorial from the wonderful @eddiediaaz but I then turned it into Lazy Girl Hours :)) anywho, here we go!
We’ll be making this gif:

This tutorial assumes basic knowledge of gif-making, Photoshop, and coloring. I’ve only described the typography tutorial in this, but you can reach out if you have any questions.
Tutorial under the cut:
Couple things to note beforehand:
There is a lot of trial and error involved when doing any sort of effect, and this is no exception! You might have to play around with the colors and the settings before you find something that looks good and readable and that fits your set!
This text effect works better on big gifs (540px width).
For this, I find that a simple font works better than a fully-cursive one, but play around with what you like. The boxes may need some adjusting if you use a font with too many tall or tail letters (i.e. text where all the letters aren't on one uniform line - that's why capital letters work so well.)
Movement works really well with effects like these, but again, it depends on your gif + readability. If you have a blended gif, it may take a little more trial and error.
I work in frame animation for all my text effects, but this works just as well in timeline as well.
We’re going to start with this gif:

First, I like to put my text on the gif. You can obviously move this around later so don't worry too much about how it looks right now.
The dialogue is "Just don't feel it." "Feel" is one of those Big Words for this quote, so I'm going to emphasize it with cursive text.
I am using Moon for the sans serif text, and Santa Fe Spring for the cursive text. Keep both of these in white for now:
Next, we're going to use the rectangular marquee tool to draw our rectangles around the capital letters (we're not touching the cursive text right now). I just eyeball this, and then try to center it as much as possible.
(The rectangular marquee tool has a keyboard shortcut of M, and it's the second tool in that little toolbar on the left of most people's Photoshop.)
This is what that'll look like:

Next, we're going to go down to the icons at the bottom right of the layers panel and select the half-black half-white circle > Color Fill.... You should get a color dialogue box. Choose your color - I'm using #8d0000. Then, we're going to move that layer below the corresponding text layer, and set its blending mode to Difference. This is what that looks like (click the image for better quality):
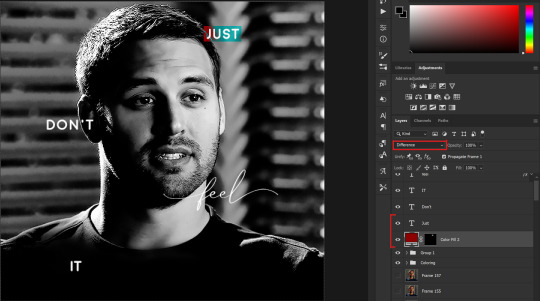
I'm going to repeat that with the other two boxes as well, using the same color. The boxes will look different with the Difference blending mode because of the shadows underneath.
For example, the box with "it" looks like a solid red square because it's against a completely black background, while the other two have some blue shading to them since there are some highlights behind them.
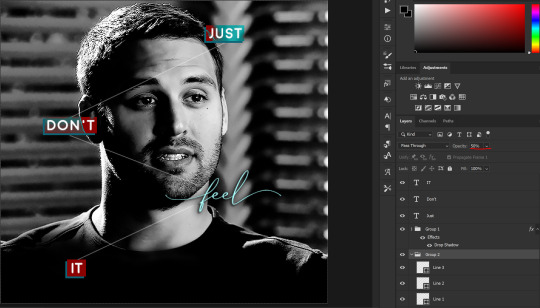
This is what my gif looks like now:
Next, I like to go The Lazy Girl™ route and put all three color-fill layers into one group underneath all the text layers. This just lets me edit the drop shadow of all three of them at the same time.
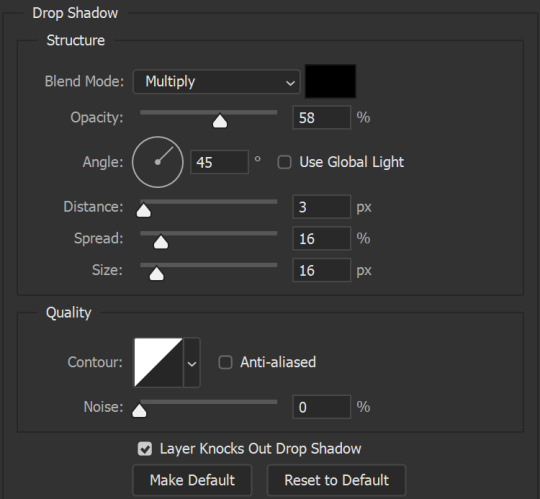
Right-click the group and open up the Blending Options. In Drop Shadow, these are the settings I'm using. The drop shadow color is #0c6477:

(Note: uncheck "Use Global Light" especially if you're working in frame animation to make sure all the drop shadow has the same angle on all frames.)
This is what my gif looks like now:
Now that we've finished that, time to move on to the cursive text.
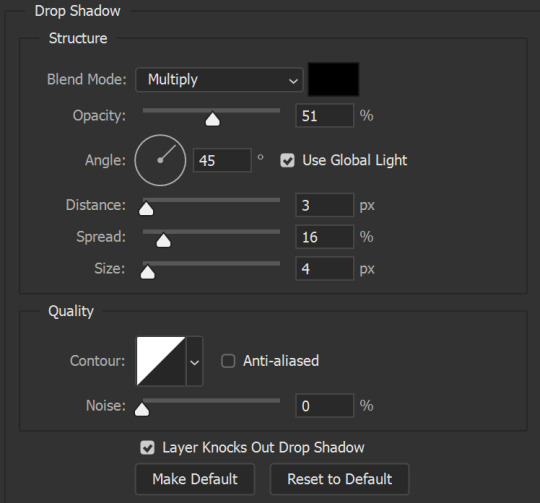
I usually match the cursive text to the palette of the rest of the text, and since the drop shadow is our "accent" color, so to speak, I'm going to use a lighter version of that color. I am also going to add a drop shadow for readability.
The color I used for the text is #acfffe and I actually ended up adding two drop shadows, just because I needed something subtle that doesn't overwhelm the text, especially since it's a delicate font. Here are the settings for both layers:
And here's what my gif looks like now:
Now, before we move on to the lines, just check the adjustment of all these text layers, see if there's anything you want to change. It's easier to change now than after the lines are added, since you'll most likely have to redraw them if you move the boxes after the fact.
To draw the lines, we're going to use the Line Tool. I just freehand all of this, and I try to go from center to center of the boxes when I can. It all depends on your angles.
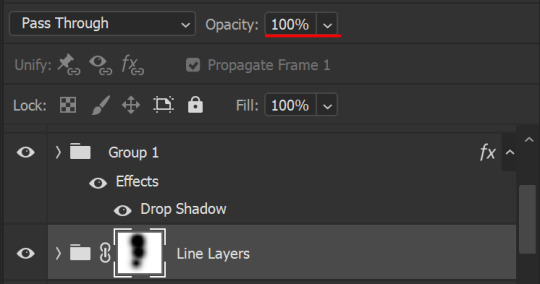
My lines are 2px thick, but you can change these depending on your preference. Here's what mine look like right now:

We're going to do the same lazy hack that we did for the color fill, and put all three line layers into a group. Move this group below the text layer and the color fill layers. The reason for this is so that the lines look like they're coming seamlessly from the box, rather than from on top of them or something.
Then, set the group to opacity 50%. I like more subtle, simple looks in my gifs, so I don't like super high opacities.
And that's it! This is our final gif:
Some final notes:
Absolutely play around with the blending modes of the color fill layers for this effect. These two gifs are the exact same color we've been using, just two different blending modes. You can see how drastically different they look. The first one is Linear Dodge (Add) and the second one is Vivid Light:
It can change how your gif looks in a BIG way, so play around with it, see what you like, especially if you don't really like the "two toned" thing going on.
Sometimes, I also like playing with the width and height of the text in the font settings, making it shorter and wider, or making it taller and more compact. You can play with the letter spacing as well. The world is your oyster, etc etc.
One other thing I've started doing is erasing the lines with a big brush, just to fade them from his face a little, like this:

To do that, use a layer mask on the line layer folder, and a brush that's 0% hardness, and at least 200px big. For this gif, I also changed the opacity of the lines back to 100% so the fading effect is a little more pronounced:
(this gif isn't the best example for this, but oh well. Anywho, hope this helps, Nonnie! Let me know if you have any questions.
Enjoy!
#zee's tutorials#tutorials#gif tutorial#photoshop tutorial#resources#dailyresources#completeresources#itsphotoshop#allresources#dailypsd#userisha#userdahlias#alielook#userabs#tuserheidi#userelio#userjaelyn#userisaiah#usermorgan#usergert#zee answers#im so pissed at myself for losing the tutorial the first time like you do not know how mad i am right now#i didn't even do anything tumblr just hates us all
188 notes
·
View notes
Text
Designing Front Packaging
Here, I will now be coming up a final design for the front of the label. I think it might be a little easier to do no as I have come up with a back design, but also because I have already started coming up with the main structure, so it now means I just have to add in the smaller details to the piece.
Below is showing the current stage that I’m at, as I created this a few days ago juts to see what my initial ideas looked like when recreating them digitally. It is very simple at the moment, but I’m planning on finalising the design. So from looking at this, I have got the repeat pattern in the background with the colour of this being the same as the logo. Then there is the strip going around, where it will then stop around the back after the circles. I also have this front design where its showing the logo and then another slightly bugger circle around this.
Now that I have relooked at the current state of my work, I will start to add some more elements in.

Before I started, I wanted to see what chocolate spread normally has on their packaging, so I searched up some images of the front of chocolate spread packaging. After comparing mine to theirs, I could I needed to add quite a lot more to my design as I didn't ever realise that I hadn't added to say it was chocolate spread. I think this was because I got so used to just seeing this same design all the time, that I forgot that others wouldn't know what the product actually is. But before I added this, I wanted to find a calories chart that is shown on the front labels of packaging. This is normally very small but is very clear rand easy to read as well. So I Googled something around the idea of ‘PNG calorie chart’, where it took me quite a while to find a suitable one that I was looking for, but managed to find one in the end. I then went to download it, where it all seemed fine, until I went to ‘file’, ‘place embedded’ where it would paste it with the checked background still there, even though this should have disappeared.
So to solve this problem, I had to retrace around the image. Below is showing where I have done this. Although I only did the main section of it as I thought to just retype the information in, where it would actually be calories for chocolate spread. By this I mean that the chart in the image was just a random one as it was very difficult to find any harts at all that were PNG’s. I then chose a font and started typing out the information to fit in the boxes.

Below is now showing the completed chart where I have also placed it into position on my design. As you can see, another thing I have changed from the first screenshot was the colour of the background, to which it is no longer the same colour as the logo. Instead it matches the same light green colour as the back label. I was obviously going to do this as I couldn't have two different shades of background colour on the same label as this would look very odd. Also, I much prefer this lighter, more vibrant shade as helps to make everything pop out.
As well as this, I have decreased the circle and logo in the centre as I felt this was just slightly too big. I think this develops a much more eye catching effect even though it is smaller.
Another thing that has changed is the type in the logo. I have changed the colour of it to white instead of black. This did also show in the previous post as well where I added a smaller version of the logo. I chose to do this as I think it accomplishes a much more modern look, where it stands out more as well. I have kept everything else the same, although I was thing about changing the black stroke. However, this looked very weird as it was almost too bright then.
Next, I tried adding the flavour name and the words ‘chocolate spread’ to the piece. In my hand drawn sketches of my initial ideas I thought to have this information going around this outer circle. So I gathered a font and tried this idea out. At the time, I thought this font looked quite interesting as it had this fun element to it, although not long after I realised that it didn't really work. I felt that the font didn't match anything that I already have on the design.
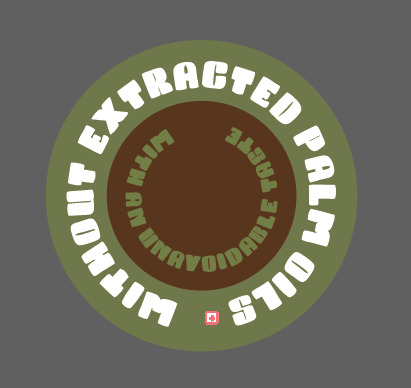
Then after looking at already existing chocolate spreads, I thought of having something to say that it doesn't contain palm oil just to clearly get the message across the viewers. I thought of placing this on the striped section through the centre.
As well as this, I thought of having it in the shape of a circle as I have this shape running through my packaging so it could work. So, I drew out a circle using the ‘ellipse tool’ and then copied and pasted this, where i then made it slightly smaller than the original. I chose for the outer circle to be the darker green from the outer circle near the logo and the smaller one to be the same colour as the dark brown from the logo. Next, I then got to the stage of typing something out, which I was going to wrap around these circles. I first thought of ‘without extracted palm oils’ as I was going to use this for my slogan at one point. I then thought of having another line saying how good the taste is, so I thought of ‘with an unavoidable taste’.
Although, when I got to the stage where I placed it onto my design, I found that it looked really ineffective, this was because of a few reason. One being that, I had to size it down meaning you couldn't really read it properly. But the other was just the shape as it didn't really fit in with the space that I placed it onto.
So overall, I got rid of this element and tried adding in other things instead.
As you can see below, a lot has changed since the last screenshot, where I managed to add in the important element in which was the words ‘chocolate spread’. I decided to move the whole strip and logo up a little bit so I could fit in another strip going around. I have chose to have this as the orange/light brown shade which is featured in the logo. I thought that having a colour that would brighten up the design but also compliment the green tones too, would work. I then chose for the type that has been placed on top of this colour to be the dark brown as I felt that this would contrast enough to be seen. As you can see the font that I have used for this is very thin, which I did choose on purpose. After getting rid of the previous font and type, I felt that a very thin one could achieve a really engaging look, where it should hopefully fit with the design as it isn't a fancy font.
This is now showing where I have rotated it around so that the whole word is on its side instead. I have wrote this in capitals as I feel it looks a little more tidier like this as otherwise the type is all different sizes and looks very messy.
Here, I am now going to experiment with the composition of how to arrange the chocolate spread phrase and the flavour name too as the two ideas that I have just tried really didn't go to plan at all. I’m hoping by playing around with these few elements, I can find an arrangement that works.
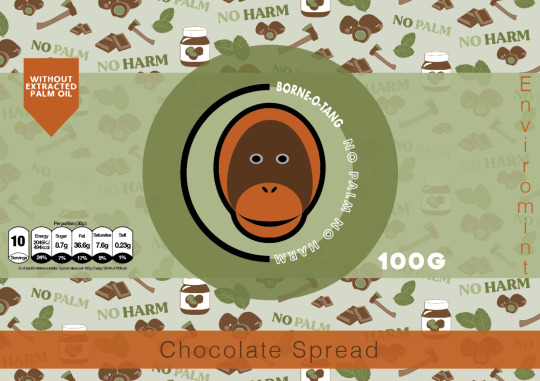
Below is presenting where I have thought to have both these two pieces of information together. I felt that instead of splitting them up around the design, it would be easier for the customer to read at first glance. Although, to make this look effective and show that these are two different pieces of information, I have changed the colour of the flavour name to white. I have also wrote this in capitols as well, although later on I did actually take this away so it was only capitals for the first letter of the word. This is because it doesn't need to be this bold and I would say it probably matches better being the same style as the words ‘chocolate spread’.
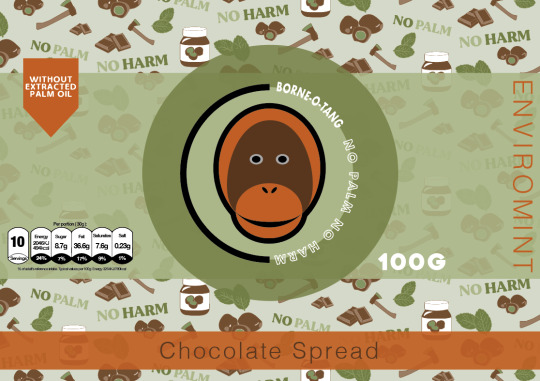
Next, I chose to try and separate them again just to see if I can make it look a little more effective than the first ones. So I have decided to make the extra strip smaller again so that its the same height as the type. I then drew another box using the ‘rectangle tool’ so that it fits around the flavour name ‘ENVIROMINT’. I didn't have it going the whole way around like the orange/light brown ones as I thought that there was no need to do so. This also just takes up more space, which is covering up the repeat pattern. As you can see this new box is in the darker colour as this then shows a contrast between the two concepts. After creating this, I could straight away see that the previous layout was a lot more tidier and visually pleasing, to which I felt having this random box placed above the main one, looks slightly odd. Also I don't really feel like there is any need to have it like this as the information was easily readable before and didn't need to be split up so much.

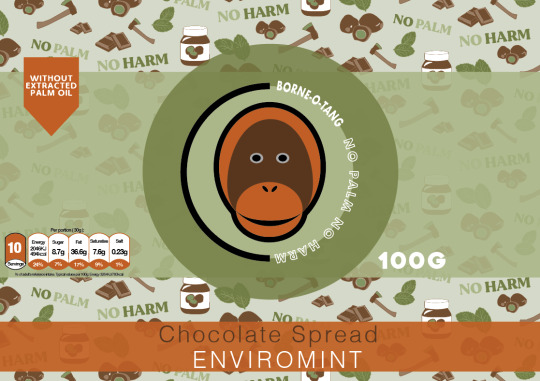
So I then went back to the idea of having both these pieces of information in the same rectangle shape. Although, I had the idea of switching around the colours so that instead of the box being the orange/light brown colour, I could try the dark brown instead. I felt that this colour could achieve an effect where this box doesn't standout as much as before as the colour isn't so bright. Doing this meant that I had to chnage the colour of the words ‘chocolate spread’ to the orange colour instead otherwise this wouldn't have shown up. From looking below, I think this colour blends in more with the other colours. When comparing the effects of both, I would say the white type standout more on this darker shade than the orange as there is more contrast between the two colours. However, I feel that on the orange rectangle, the whole shape is a lot more striking compared to the dark brown colour. To me, it makes more sense to go with the design that is going to make both of the concepts standout and not just one as the information is both important.

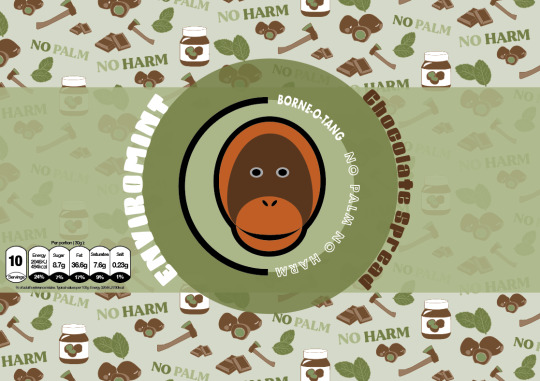
In the end, I chose to have this piece below as my final front label design as I think the orange rectangle and the orange icon in the top left corner match really well together, making the piece seem more connected. As well as this, the orange colour is more eye catching as there isn't as much of this colour compared to the dark brown. This is because this shade of colour has been shown all over the repeat pattern, meaning it could look really boring having even more of this colour.
I did say in my initial hand drawn designs that I would have some sections being where the label is transparent so you can see the brown chocolate spread in the jar. When it came to showing this, I wasn't sure how I was going to make this look effective as the mock ups I was be using are se through meaning they wont be the brown colour it should be for that product. Also, I don't know whether this would confuse the design as well. So in the end, I chose to not use this concept in my packaging although I was drawn to this idea as I thought it could look really engaging having a little section where it would juts be this. In my plan, I thought of having it where the circle and rectangle stop, so this would mean there would be a section on the top of the circle and bottom.

Overall, I’m really pleased with this outcome as I think its going to look really striking once I have designed all the chocolate spread flavours where the colours will match the flavour. This is what I will be doing next as once I have competed that task, I have done the labels for the jars, where I can then move onto my next step.
0 notes
Text
Why Web Accessibility is an Important Ingredient to your Content Curation Strategy
Content curation isn’t merely about plotting out various audiences or researching about your users’ interests. There’s a ton more to content curation. And web accessibility for all users is one of them. That means taking into consideration the 1 out of 6 visitors to your website with disability. Read on to find out why it is essential to do so.
Improves conversion and bounce rates
More than 71 percent of users with disabilities will leave a site that is not accessible to them. The result is an increase in bounce rates and an obvious loss of money-making opportunities on your website. In fact, an analysis by the UK government in 2016 found that websites lost a whopping £11 billion annually from bounce rates associated with people with disabilities.
As such, infusing elements accessibility into your content curation strategy can go a long way in helping you reduce bounce rates.
Leads to increased traffic to your website as a trusted source
Most people say that you have to earn trust. These words have never been more accurate. By making your website accessible, you show your users that you care for and appreciate them. It would be best if you used web accessibility to build trust with your users.
You can drive more traffic if your site is authoritative and accessible to all users. That overlaps with other suitable practices such as usability, SEO, and mobile web design.
It makes it easier for disabled persons to do business with you
At least 82 percent of disabled persons agree that they will spend more on an accessible site. That is regardless of the cost of services or the price tag behind products. That’s because they can do business with ease. They can also access the information on the site and make informed decisions.
An accessible website breaks the barriers of audio, visual content, and print using web technologies. Regardless of the type of disability that a user has, it will not hinder them from interacting with your website.
youtube
A strategic way to prevent ADA lawsuits against your site
While it’s easy to assume that only the government or big businesses need to make their websites more accessible, small businesses must fall in line too. It doesn’t matter whether you are running a charity website or a public or private one. The fact is failure to comply with the provisions of the ADA may land your business in trouble with the law.
Over 2000 cases of ADA lawsuits are reported yearly. To prevent your website from being a statistic, ensure that it’s ADA compliant. That will save you the headache of dealing with lawsuits and both time and money.
Gives your business a social impact
Running a business is not just about driving traffic and chasing leads. It’s also about making a difference in the community and those around you. And what better way to do that than to join the fight towards equal opportunities and access.
Your website can be an excellent place to start. That way, your users with disabilities can participate more actively in society.
How to make your website more accessible
youtube
Making your website accessible is not as challenging as it may first appear. With the right tips and tricks, you can improve accessibility for your site. Here are some of the steps that you should take.
Use descriptive link text
When curating your content, always ensure that you add descriptive texts to the links. Sure, adding color to it and underlying the links is important. But what about your audience with poor vision, color blindness, or those in poorly lit areas who can’t tell the link has color?
Descriptive texts like ‘Watch YouTube Video’ are easy to understand since they go straight to the point. Your audience does not have to wonder where the link is taking them. Plus, if your link requires the audience to download the link, you can let them know by clearly stating what they are to download.
Also, since most people use screen readers, avoid writing out the complete URL as the link text. It’s frustrating, looks clunky, and undoubtedly annoying (the screen reader will read it letter for letter).
Use simple language
One most valuable content curation strategy is using short, simple sentences. A lot of people only skim through content. So make it as skimmable as possible. If you have a problem with keeping your text short, you can use simplifying tools.
These tools replace complex vocabulary with simple ones and help you summarize your text. That way, anyone can understand your content, including people with cognitive impairment.
Format your content for access
Laying out your curated content in a clear and intuitive way can make it more accessible. That way, people can flow through it naturally and connect different sections of your content seamlessly. You can achieve all these by using simple formatting tips.
For instance, using straightforward and easy-to-read Non-Serif fonts can make a whole load of difference. Plus, you can use large, easy-to-click links that spell out the action the reader is taking by clicking.
Additionally, you can add as much color and contrast to your content. That way, people with limited vision or in low light won’t struggle to access it.
Source
Use clear hierarchy
If anyone in your audience uses screen readers (which is more than 4.4 million Americans), they depend on a clear hierarchy to understand the content. That’s why HTML tags in hierarchical headings that clearly show subheadings and titles are essential.
Make accessibility easy to find
When you add an accessibility feature to your website, the goal is to help users quickly navigate your site. But what use is it if they cannot find the feature? For instance, instead of having the accessibility page tacked away and only accessible when someone searches on Google, you can make it available on the main page.
Let users know where to go if they need to activate (or turn off) a specific feature. Ensure that the page spells out every single essential information.
Caption and transcript your videos

Source
Currently, video content is popular due to its engagement levels. However, a disabled user who is hard of hearing will have trouble accessing your content. No, subtitles don’t do the trick because the design was for people who can hear but are noisy or do not understand the language. It always leaves out some of the primary audio information like car honks, among others.
Captions, on the other hand, capture even the little audio details. That way, users can access the information better and completely. Transcripts also allow the same level of access without neglecting anything.
Simplify essential tools
Tools such as autocomplete for filling forms should not be too complicated. Instead, the user should only need to take the necessary steps to complete the action. For you to accomplish that level of functionality, you need to understand each user.
For instance, for a visually impaired user to access the tools on your site, you can include a reader. That way, they do not need to worry about typing. Even so, you may not get the tools right on the first go. But with more iterations and improvements, you can fix as many bugs as possible.
Enlarge the clickable areas
Some of the visitors to your site may have a combination of disabilities and may fail to navigate the site if everything is small. That is where the real challenge begins. The goal is to enlarge the size of your content and clickable links without making the site less adaptive.
You should ensure that your site is adaptive while increasing the hyperlinks’ size to cover more text. Users can then comfortably navigate the site regardless of their limitations, physical or otherwise.
Tag buttons, graphics and images
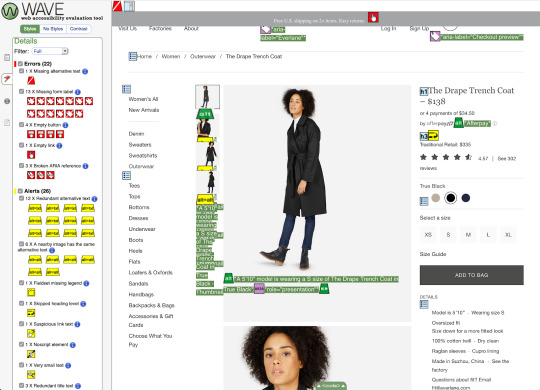
Source
A lot of users turn to voice assistance to navigate your site. However, for the visually impaired, voice assistance is crucial. Without it, they can’t access any of the necessary information. These users listen to every element on your site, and if you include untagged visual content, they will not know it’s there.
Allow them a chance at interacting with you by tagging your visual content like graphics and images. That can be the difference between a well-informed user and an unsatisfied one. Additionally, ensure that the captions are readable, clear, and concise.
Add turn off features on video and GIF content
Web accessibility encompasses all users. It would be best if you considered your epileptic users who are sensitive to flashing content. The last thing you want is your content triggering a seizure. Users should be able to access your content without worrying about getting an epileptic attack.
A turn off feature can allow users to turn off flashing and moving visual content while surfing the web. The autoplay video feature is also a no go. Let the user decide whether they want to play the video or not.
Create an inclusive user experience
At least 90 percent of users will refrain from going back to a website with poor customer experience. Nothing spells that out more than inaccessible websites. Creating an inclusive design for your website is taking accessibility to the next level. It entails coming up with a universal design that considers all users regardless of race, gender, and age.
Final thoughts
Web accessibility is vital and beneficial to your business. The more your site and content is available, the better chances at improving your conversion rates and driving traffic. Without forgetting the ADA compliance lawsuits, an accessible site is key to staying on the right side of the law.
The post Why Web Accessibility is an Important Ingredient to your Content Curation Strategy appeared first on Scoop.it Blog.
Why Web Accessibility is an Important Ingredient to your Content Curation Strategy published first on https://improfitninja.weebly.com/
0 notes
Text
Why Web Accessibility is an Important Ingredient to your Content Curation Strategy
Content curation isn’t merely about plotting out various audiences or researching about your users’ interests. There’s a ton more to content curation. And web accessibility for all users is one of them. That means taking into consideration the 1 out of 6 visitors to your website with disability. Read on to find out why it is essential to do so.
Improves conversion and bounce rates
More than 71 percent of users with disabilities will leave a site that is not accessible to them. The result is an increase in bounce rates and an obvious loss of money-making opportunities on your website. In fact, an analysis by the UK government in 2016 found that websites lost a whopping £11 billion annually from bounce rates associated with people with disabilities.
As such, infusing elements accessibility into your content curation strategy can go a long way in helping you reduce bounce rates.
Leads to increased traffic to your website as a trusted source
Most people say that you have to earn trust. These words have never been more accurate. By making your website accessible, you show your users that you care for and appreciate them. It would be best if you used web accessibility to build trust with your users.
You can drive more traffic if your site is authoritative and accessible to all users. That overlaps with other suitable practices such as usability, SEO, and mobile web design.
It makes it easier for disabled persons to do business with you
At least 82 percent of disabled persons agree that they will spend more on an accessible site. That is regardless of the cost of services or the price tag behind products. That’s because they can do business with ease. They can also access the information on the site and make informed decisions.
An accessible website breaks the barriers of audio, visual content, and print using web technologies. Regardless of the type of disability that a user has, it will not hinder them from interacting with your website.
youtube
A strategic way to prevent ADA lawsuits against your site
While it’s easy to assume that only the government or big businesses need to make their websites more accessible, small businesses must fall in line too. It doesn’t matter whether you are running a charity website or a public or private one. The fact is failure to comply with the provisions of the ADA may land your business in trouble with the law.
Over 2000 cases of ADA lawsuits are reported yearly. To prevent your website from being a statistic, ensure that it’s ADA compliant. That will save you the headache of dealing with lawsuits and both time and money.
Gives your business a social impact
Running a business is not just about driving traffic and chasing leads. It’s also about making a difference in the community and those around you. And what better way to do that than to join the fight towards equal opportunities and access.
Your website can be an excellent place to start. That way, your users with disabilities can participate more actively in society.
How to make your website more accessible
youtube
Making your website accessible is not as challenging as it may first appear. With the right tips and tricks, you can improve accessibility for your site. Here are some of the steps that you should take.
Use descriptive link text
When curating your content, always ensure that you add descriptive texts to the links. Sure, adding color to it and underlying the links is important. But what about your audience with poor vision, color blindness, or those in poorly lit areas who can’t tell the link has color?
Descriptive texts like ‘Watch YouTube Video’ are easy to understand since they go straight to the point. Your audience does not have to wonder where the link is taking them. Plus, if your link requires the audience to download the link, you can let them know by clearly stating what they are to download.
Also, since most people use screen readers, avoid writing out the complete URL as the link text. It’s frustrating, looks clunky, and undoubtedly annoying (the screen reader will read it letter for letter).
Use simple language
One most valuable content curation strategy is using short, simple sentences. A lot of people only skim through content. So make it as skimmable as possible. If you have a problem with keeping your text short, you can use simplifying tools.
These tools replace complex vocabulary with simple ones and help you summarize your text. That way, anyone can understand your content, including people with cognitive impairment.
Format your content for access
Laying out your curated content in a clear and intuitive way can make it more accessible. That way, people can flow through it naturally and connect different sections of your content seamlessly. You can achieve all these by using simple formatting tips.
For instance, using straightforward and easy-to-read Non-Serif fonts can make a whole load of difference. Plus, you can use large, easy-to-click links that spell out the action the reader is taking by clicking.
Additionally, you can add as much color and contrast to your content. That way, people with limited vision or in low light won’t struggle to access it.
Source
Use clear hierarchy
If anyone in your audience uses screen readers (which is more than 4.4 million Americans), they depend on a clear hierarchy to understand the content. That’s why HTML tags in hierarchical headings that clearly show subheadings and titles are essential.
Make accessibility easy to find
When you add an accessibility feature to your website, the goal is to help users quickly navigate your site. But what use is it if they cannot find the feature? For instance, instead of having the accessibility page tacked away and only accessible when someone searches on Google, you can make it available on the main page.
Let users know where to go if they need to activate (or turn off) a specific feature. Ensure that the page spells out every single essential information.
Caption and transcript your videos
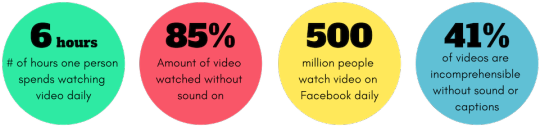
Source
Currently, video content is popular due to its engagement levels. However, a disabled user who is hard of hearing will have trouble accessing your content. No, subtitles don’t do the trick because the design was for people who can hear but are noisy or do not understand the language. It always leaves out some of the primary audio information like car honks, among others.
Captions, on the other hand, capture even the little audio details. That way, users can access the information better and completely. Transcripts also allow the same level of access without neglecting anything.
Simplify essential tools
Tools such as autocomplete for filling forms should not be too complicated. Instead, the user should only need to take the necessary steps to complete the action. For you to accomplish that level of functionality, you need to understand each user.
For instance, for a visually impaired user to access the tools on your site, you can include a reader. That way, they do not need to worry about typing. Even so, you may not get the tools right on the first go. But with more iterations and improvements, you can fix as many bugs as possible.
Enlarge the clickable areas
Some of the visitors to your site may have a combination of disabilities and may fail to navigate the site if everything is small. That is where the real challenge begins. The goal is to enlarge the size of your content and clickable links without making the site less adaptive.
You should ensure that your site is adaptive while increasing the hyperlinks’ size to cover more text. Users can then comfortably navigate the site regardless of their limitations, physical or otherwise.
Tag buttons, graphics and images

Source
A lot of users turn to voice assistance to navigate your site. However, for the visually impaired, voice assistance is crucial. Without it, they can’t access any of the necessary information. These users listen to every element on your site, and if you include untagged visual content, they will not know it’s there.
Allow them a chance at interacting with you by tagging your visual content like graphics and images. That can be the difference between a well-informed user and an unsatisfied one. Additionally, ensure that the captions are readable, clear, and concise.
Add turn off features on video and GIF content
Web accessibility encompasses all users. It would be best if you considered your epileptic users who are sensitive to flashing content. The last thing you want is your content triggering a seizure. Users should be able to access your content without worrying about getting an epileptic attack.
A turn off feature can allow users to turn off flashing and moving visual content while surfing the web. The autoplay video feature is also a no go. Let the user decide whether they want to play the video or not.
Create an inclusive user experience
At least 90 percent of users will refrain from going back to a website with poor customer experience. Nothing spells that out more than inaccessible websites. Creating an inclusive design for your website is taking accessibility to the next level. It entails coming up with a universal design that considers all users regardless of race, gender, and age.
Final thoughts
Web accessibility is vital and beneficial to your business. The more your site and content is available, the better chances at improving your conversion rates and driving traffic. Without forgetting the ADA compliance lawsuits, an accessible site is key to staying on the right side of the law.
The post Why Web Accessibility is an Important Ingredient to your Content Curation Strategy appeared first on Scoop.it Blog.
Why Web Accessibility is an Important Ingredient to your Content Curation Strategy published first on https://wabusinessapi.tumblr.com/
0 notes
Photo
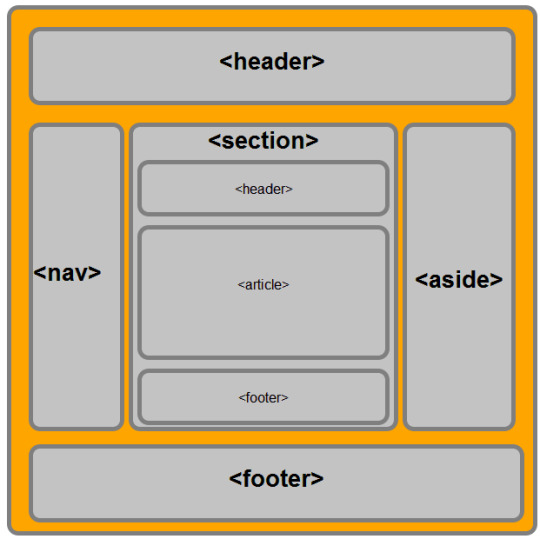
Semantic HTML
This last couple of weeks has all been about semantic HTML and the ability within HTML5 to focus on more readable and more maintainable code - improving SEO reach, improving accessibility, and making your code more consistent.
As a previous student of HTML4 and XHTML 1.0 I remember battling long pages filled with DIVs and SPANs and learning to read blocks of structured yet confusing code where the slightest bracket out of place caused inline havoc!
Delighted to see the big steps forward taken by the W3C in defining new “semantic” rules for elements and tags in HTML5 which make both programmatic navigation and content navigation more intuitive.
Semantic HTML tags provide very precise information to web crawlers/bots like Google to clearly understand which content is crucial, which is a subsidiary, which is given for navigation and many other things. It is imperative to make Google understand what roles the different parts of your web page is playing, and by adding Semantic HTML tags to your pages, you can explain this clearly to the algorithms reading your code.
CSS
Another benefit of making your code more legible and abstracting out common element usage is that it makes it allows for much more powerful, yet easier to implement, CSS functionality - the lipstick and eyeliner of modern website design!
Semantic tags give you a lot of styling options for your content. Maybe now you prefer your content displayed in the default browser style, but a few days later, you may decide to add a grey background and then, you want to define monospaced font family for your samples. You can quickly implement all these things with Semantic HTML markup which can be successfully applied to CSS.
What’s new?
HTML was originally created as a markup language to describe documents on the early internet. As the internet grew and was adopted by more people, its needs changed.
Where the internet was originally intended for sharing scientific documents, now people wanted to share other things as well. Very quickly, people started wanting to make the web look nicer.
Because the web was not initially built to be designed, programmers used different hacks to get things laid out in different ways. Rather than using the <table></table> to describe information using a table, programmers would use them to position other elements on a page.
As the use of visually designed layouts progressed, programmers started to use a generic “non-semantic” tag like <div>. They would often give these elements a class or id attribute to describe their purpose. For example, instead of <header> this was often written as <div class="header">.
As HTML5 is still relatively new, this use of non-semantic elements is still very common on websites today.
Elements such as <header>, <nav>, <section>, <article>, <aside>, and <footer> act more or less like <div> elements. They group other elements together into page sections. However where a <div> tag could contain any type of information, it is easy to identify what sort of information would go in a semantic <header> region.
Thumbs-up for Semantic HTML
Easier to read - as a web programmer you can be reading through hundreds or thousands of lines of code. The easier it is to read and understand that code, the easier it makes your job.
Greater accessibility - Search engines and assistive technologies (like screen readers for users with a sight impairment) are also able to better understand the context and content of your website, meaning a better experience for your users.
Consistency - When creating a header using non-semantic elements, different programmers might write this as <div class="header">, <div id="header">, <div class="head">, or simply <div>. There are so many ways that you can create a header element, and they all depend on the personal preference of the programmer. By creating a standard semantic element, it makes it easier for everyone.
Enjoying the transition from HTML4 to HTML5 and learning the new semantic representations of elements and tags. hasn’t been straightforward but it has been logical. I have not found expression yet where I wished they hadn’t changed it from HTML4 - in every case it seems to me to be a progression.
0 notes
Last Seen Blogs

moeyy-writes
Moeyy Writes

vmpirevnom
Ash✩
pasta19
lance defender

psylynt-p
love

coralenemyavenue
Untitled