#arrowroot thickener
Photo
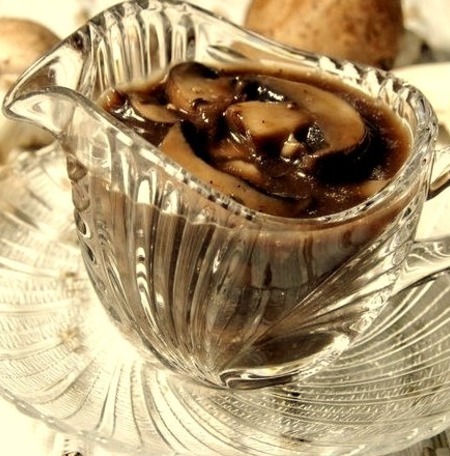
Sauces and Condiments - Mushroom Sauce Recipe
A sauce flavored with thyme is made from mushrooms, shallots, red wine, and beef broth and can be served with steak, hamburgers, or other foods. This has a very delicate texture thanks to the arrowroot thickener.
0 notes
Photo

Sauces and Condiments - Mushroom Sauce
A sauce flavored with thyme is made from mushrooms, shallots, red wine, and beef broth and can be served with steak, hamburgers, or other foods. This has a very delicate texture thanks to the arrowroot thickener.
0 notes
Photo

Recipe for Mushroom Sauce
A sauce flavored with thyme is made from mushrooms, shallots, red wine, and beef broth and can be served with steak, hamburgers, or other foods. This has a very delicate texture thanks to the arrowroot thickener. 1/2 cup chopped mushrooms, 2 cups fresh sliced mushrooms, 1 bay leaf, 1 tablespoon shallots minced, 1 tablespoon butter, 1/2 teaspoon dried thyme, freshly ground black pepper, 1/4 cup butter, salt to taste, 1/4 cup red wine, 2 cups beef broth, 1 tablespoon arrowroot powder
0 notes
Text
Okay homemade eggnog (lactose free) tastes like ice cream
...I still prefer it without booze in it, though maybe I should try it with whiskey and not rum.
Not this year, obviously. Just the nog and that with a tums.
12 notes
·
View notes
Text
mmmm chocolate cinnamon coconut cream pudding
#narrating my life#unclear if the tablespoon of arrowroot powder i had left did anything to thicken it#bc the coconut cream gets SOLID when cold#and the cinnamon was a last minute idea but it came put perfect#homemade pudding is so easy it's stupid
1 note
·
View note
Video
youtube
Nutritious Arrowroot Growing to Harvesting ,Uses Health Benefits , Ro...
#youtube#Arrowroot#Edible#Edible Underground Stem#Starchy Root#Rich In Fibre#Used as Substiture For Whaet Flour#Rich In Starch#Health Benefits#How to Grow Arroroot#Uses Of Arrowroot#Nutritiois Root#Used In Food Industry#Used As Thickener#Used As Stabilizer#Kooya
0 notes
Text

🍄🟫Reishi Mushroom Marshmallow Recipe!!🍄🟫
—3 tablespoons of gelatin
—1/2 cup of local honey
—1/2 cup of maple syrup
—1 cup of filtered water
—1 tsp Reishi mushroom powder
—1 tsp of marshmallow root powder
—1 tablespoon of vanilla paste or extract
—Arrowroot powder for dusting
* Line a square pan with parchment paper and lightly dust with arrowroot powder to prevent sticking.
* In the bowl of your stand mixer, bloom gelatin by combining it with 1/2 cup of water and letting it sit for 10 minutes.
* In a saucepan, mix honey, maple syrup, and remaining 1/2 cup of water. Heat the mixture over medium heat, stirring continuously until it’s steaming. Mix in the Reishi powder to activate its nutrients.
* With the mixer on low speed, slowly pour the syrup into the gelatin mixture. Gradually increase the speed of your mixer to high and continue to mix until the mixture starts to thicken (usually about 5-10 mins, depending on the mixer).
* With the mixer still on high, carefully add the vanilla paste and marshmallow root powder as soon as the mixture begins to thicken.
* Keep mixing on high until the mixture looks like marshmallow fluff (thick and fluffy).
* Pour the marshmallow mixture into the prepared pan, sprinkle the top with another light dusting of arrowroot powder, and cover with another sheet of parchment paper.
* Allow the marshmallows to set in the fridge for a few hours or overnight at room temperature.
* Once set, cut the marshmallows into your desired shapes and sizes. Dust the marshmallows with more arrowroot powder to prevent sticking.
* Enjoy in your hot drinks or as a treat!
20 notes
·
View notes
Text
Recipe: Stu Pickles' Chocolate Pudding
Stu Pickles' Chocolate Pudding
Have you lost control of your life? Is it two or three in the morning, and are you in your bathrobe, exhausted? Do you want chocolate pudding?

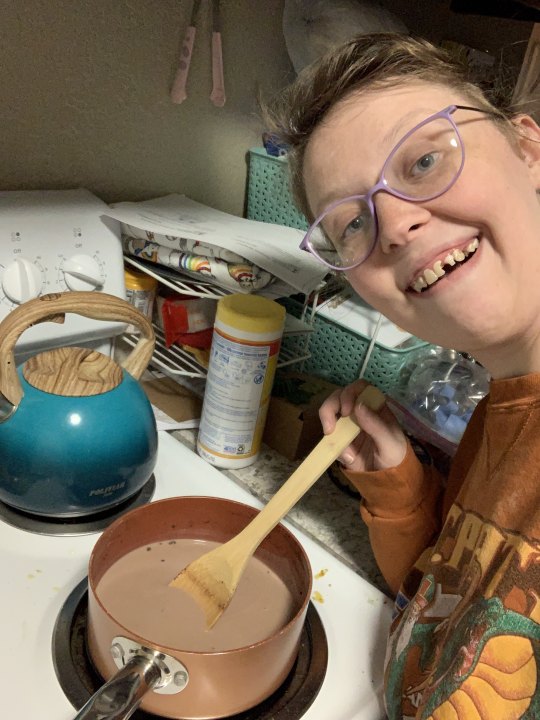
Behold. A chocolate pudding from basic ingredients you probably already have. Easy, quick low spoons - involves the stove and the fridge, time to chill, and that's it!
(Please ignore my messy, midnight stove).
Prep time: 15 minutes
Chill time: 1-2 hours
Serves: 4 (or just myself tbh)
Materials/Tools:
2 qt saucepan
Whisk and/or spoon to stir
Heat source (you can use a stove, a hot plate, or one of ways that your life is going up in flames around you)
Big bowl with lid (if no lid, cover with aluminum foil or saran wrap), ramekins, or something to contain pudding
An out-of-control life (optional)
Bathrobe (optional)
The knowledge that this pudding won't fix your life, but you'll feel better after you eat (optional)
Child who demanded pudding (optional)
Ingredients:
2 1/2 cup milk
1 tsp salt
3 tbsp corn starch
1/3 cup white sugar
1/3-ish cup of hot cocoa powder
2 tbsp cocoa powder
2 tsp vanilla extract
Substitution Tips:
To substitute milk, DO use a lactose-free, an almond milk, a coconut milk, a rice milk, or a soy milk. DO NOT use oat milk (ingredients risk separating). Color will be lighter than if using dairy milk.
If using unsweetened non-dairy milk, double sugar.
Cornstarch can be substituted with all-purpose flour - just double the amount and mix with small amount of water until smooth before adding to other ingredients.
For gluten-free pudding, you can use arrowroot or rice flour instead of cornstarch or wheat flour - just double the amount and add to dry ingredients.
Want it really chocolate-y? Use a couple of squirts of chocolate syrup.
If it's too thick for you, add more milk. If it's too thin for you, add more corn-starch and cocoa powder (or whatever substitutions).
Notes:
I add hot cocoa to my pudding in the form of ripped open Swiss Miss packs for that deliciously fudgy chocolate taste. This measurement isn't exact.
If your mixture seems too thick, add milk in by 1/4 cup accordingly.
Scrape the sides of the pan while stirring constantly.
It's actually harder to burn pudding than you think. Don't give yourself tennis elbow trying to stir the heck out of it, just keep it constant and consistent.
This says it feeds 4, but if you're like me, it actually is a single serving and maybe a bite for anyone else.
You don't have to chill it, you can eat it as soon as it won't set your mouth on fire.
Instructions:
Put on your bathrobe and wait to make at 2am if you want the Stu Pickles experience. Or make it in whatever you're wearing at any time of day.
Combine all dry ingredients in saucepan. Mix thoroughly to avoid lumps in pudding later.
Slowly stir in milk and vanilla.
Gently bring mix to slow boil over med-high heat, stirring constantly.
Cook at med-high temp until mix begins to thicken up. Keep stirring constantly. You should start to feel a drag as you scrape the sides and bottoms.
Yawn, but carry on.
Continue cooking for 3-4 minutes.
Remove from heat and pour into room-temp containers.
Let cool on the counter for 30 minutes, then chill in fridge for at least 1 hour.
Enjoy your delicious snack!
Optional: Take your life back and get some sleep.
If you make this, I would love to see pictures and get feedback on how it went for you, how substitutions went, etc, etc. Good luck!
53 notes
·
View notes
Text
Pie Baking Advice
People have a misconception that because glass is a poor conductor of heat it doesn’t make for a good pie pan. But throughout my many decades of baking, I’ve found that not to be the case.
Although metal pans conduct heat better, glass more than makes up for that because it is clear, so radiant energy can pass through the pan and help the crust bake. Metal and ceramic pans impede this.
That means that although glass takes slightly longer to reach the same temperature as the oven, it cooks crusts faster and darker. This is why many cookbooks suggest lowering the oven temperature by 25 degrees when using glass, so the filling can catch up.
The downside with glass, is that it’s more slippery than metal, making it easier for crusts to shrink and slouch, even when secured with pie weights.
Easy solution: Add a touch of baking powder to the dough. It helps the crust expand into the pie plate, which is good no matter what your pie pan is made of.
Personally, I like glass because I hate guesswork. I like to see I’m getting the color I want. But, you can make a great crust in any pan as long as you start with a good dough.
So how to choose a pan? If you want more control and don’t mind a little shrinking (or if you are comfortable experimenting with baking powder), go with glass. If you would rather give up control of the color for a neater shape without altering your dough recipe, choose metal. Ceramic pans make the prettiest presentation, though they are the slowest to bake.
Maybe the better question is: what is your pie priority?
Pre-Baking Dilemma
Should you, or should you not, bake a pie crust before you slip the filling into it?
The question stirs up such a quandary that Dorie Greenspan, a prominent cookbook author and one of the owners of a newly hatched New York cookie company called Beurre and Sel, can’t quite figure out how to answer it. “This is a big issue,” she said. “It’s huge. This is really a problem issue.”
Purely from the standpoint of flavor and color and texture, the simple answer is yes: pre-baking a crust crisps it up and helps prevent it from going soggy when it comes in contact with the filling.
Then you’re ready to pour in the filling (which, in the summer of Ms. Greenspan’s dreams, would be blueberries). You add a top crust before a follow-up stretch in the oven.
But here’s the catch: In spite of all that, Ms. Greenspan usually does not bake her crust in advance. To affix that top crust, you have to use a sleight-of-hand, moistening the rim of the pre-baked bottom crust and getting the raw dough of the top crust to stick to it. “Somehow it feels like a trick and un-American,” she said. “It’s not the way American pies are supposed to be made. I prefer it pre-baked, but I don’t do it.”
Maybe, she suggested, a touch of sogginess is not the end of the world. What she’ll sometimes do, before filling the bottom crust, is to sprinkle an absorbent layer of challah pieces or cake crumbs along its top, to sop up (theoretically) some of the liquid.
The Right Thickener
You want to cut nice, neat wedges of that summer pie. The pieces of fruit must nestle cozily and close, thickly bound, and not run off into a soupy puddle. Do you reach for flour to bolster the filling? Cornstarch? Arrowroot? Tapioca? Nothing?
Ron Silver, an owner of the TriBeCa restaurant Bubby’s who co-wrote “Bubby’s Homemade Pies” and has held a pie social with home bakers for the last 10 years, said his thinking on thickeners has evolved.
He started using just flour years ago when he tried to enter the Pillsbury Bake-Off. (He was disqualified from the competition for amateurs because he did his baking at Florent, where he was the breakfast cook.) But now he prefers something along the lines of a butter and flour roux.
“I toss the fruit with flour and then add melted butter,” he said. “It’s classic and the most flavorful.”
“When you have very juicy fruit like raspberries or cherries, instant tapioca is also good,” he said. Tapioca turns clear and glossy, does not impart a starchy flavor and adds interesting little gelatinous beads to the texture.
But for a fresh blueberry pie, Mr. Silver’s favorite, his choice is cornstarch. He cooks half the berries to make a thick sauce with sugar, lemon juice and the starch, which has first been dissolved in cold water. He then folds this mixture into the rest of the raw blueberries to fill a cooked pie shell. He does not bake the pie further, but lets it set for about two hours before serving.
You might get away with no thickener (just sugar and melted butter) especially with denser fruits like figs, stone fruit, apples and pears. But thickened or not, it’s important to wait two to three hours before cutting into the pie, allowing the filling time to settle so the juices released by the oven’s heat are reabsorbed.
Choosing the Fat for a Crust
As American as apple pie, the saying goes. But according to the food scientist Harold McGee, our national identity resides specifically in the crust.
“As a country,” he said, “we value a macroscopic discontinuousness in our pie crust.”
To translate: A pie crust that shatters into large crumbs and shards when you press your fork through it is good. A crust that crumbles into sand or needs to be sawed through is bad.
Fortunately, that patriotic, macroscopic discontinuousness can be achieved with flour, water and almost any cool, semisolid fat such as butter, lard, suet or vegetable shortening.
But which is best?
When Mr. McGee wrote his magisterial study “On Food and Cooking” in 1984, he came down in favor of vegetable shortening, because its consistent proportions of fat, water and air make it easier to produce flaky crusts. But since then he has modified that position, leaning toward the savor that butter and lard add. (Also, the hydrogenation process used to make vegetable shortening was later found to produce trans fats, which are unhealthy when consumed in large quantities.)
For a truly ideal pie crust, you would need a fat with the flavor of butter, the water content of lard and the temperature flexibility of vegetable shortening. When temperature is an issue, shortening is the clear winner. While a crust is being mixed and rolled, the butter needs to stay between 58 and 68 degrees to achieve the right texture: shortening works at anywhere from 53 to 85 degrees.
“The Fourth of July brings a hot kitchen and hot hands,” Mr. McGee said. He said that not only the fat but also the flour should be chilled until the last possible moment.
Lacking that fantasy fat, Mr. McGee said the proper choice is a matter of technical skill and personal preference. Sometimes the flavor of butter can be too aggressive: just as many chocolate cakes and banana breads are made with neutral oil to let the flavor of the main ingredient shine through, a plain crust made with vegetable shortening can be desirable.
#pie baking#baking#baking tips#traditional femininity#baking tools#femininity#traditional feminine#traditional values#traditionalism#traditional gender roles#traditional woman#traditional wife#women in the kitchen
14 notes
·
View notes
Text

Jjajangtteok
(Rice Cakes & Black Bean Sauce)
[[MORE]]
4 cups eggplant, chopped
1 pack (200 g) tempeh, sliced and chopped
1 kilo frozen tteok (Korean rice cakes)
1 tbsp olive oil
1 white onion, peeled and chopped
1 tsp ginger paste
1 tsp garlic paste
2 cups mushroom broth (or vegetable bouillon)
1/4 cup chunjang (Korean fermented black bean paste)
2 tbsp arrowroot starch (or cornstarch)
1/4 cup cold water
2 tbsp pure maple syrup
2 tbsp soy sauce
1 tbsp sesame oil
1/4 tsp black pepper
6 green onions, chopped
1/4 cup white sesame seeds
Place chopped eggplant in a large mixing bowl, Sprinkle generously with sea salt. Allow to sit and "sweat" for 30-60 minutes then rinse thoroughly.
Cook tempeh in air fryer. (Or pan-fry.) Set aside.
Bring a medium-sized pot of water to a boil. Place frozen tteok in boiling water. Cook for 3-5 minutes, until tteok floats to the surface. Remove from heat and drain. Set aside.
Heat oil in a large saucepan over medium-low heat. Sauté onion for several minutes. Add ginger and garlic paste and sauté for another minute or two. Stir in the eggplant, mushroom broth and chunjang. Turn heat to high. As soon as stew comes to a boil, reduce to low temperature and simmer, stirring occasionally, for ten minutes.
In a small glass bowl, whisk together the arrowroot starch and water. Slowly stir into stew and continue to cook for 2-3 minutes until stew begins to thicken. Stir in the cooked tempeh and tteok. Heat through for another minute or two.
Stir in the; maple syrup, soy sauce, sesame oil, and black pepper. Turn heat off.
Stir in the green onions and sesame seeds.
Serve.
#tteok#vegan tteok#jjajang#jjajangtteok#vegan korean#korean fusion#vegan korean fusion#vegan korean stew
6 notes
·
View notes
Text
So, as someone who's gluten intolerant, I get asked a LOT what foods I can eat.
I've also had people flat out tell me that foods that ARE safe for me to eat, aren't.
So, here's a handy little basic guide for all you people out there who don't know much about this, but are curious:
What Is Gluten?
Gluten is the name of a group of proteins often found in wheat, and some other grains. It's also the thing that makes your bread stick together and give that bready goodness, and help your foods stick together, like a kind of glue.
Foods That Contain Gluten:
Wheat
Wheat varieties and products like spelt, durum, semolina, couscous, farina, farrow, kamut, einekorn, wheat bran, wheat germ, emmer, seitan
Rye
Barley
Triticale
Malts (From barley)
Anything made with flour from the above grains.
Alcoholic beverages made with the above grains. (Most distilled drinks are fine, however, but that needs to be checked out on a case by case basis)
Crumbed and battered foods with the above grains.
Yeast, depending on source.
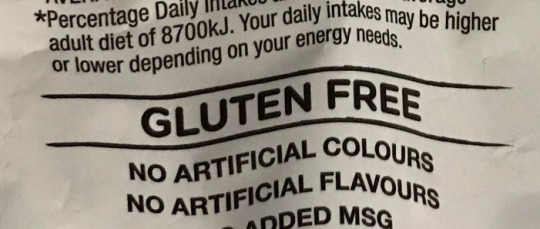
Foods That DON'T Contain Gluten:
Fresh fruits and vegetables.
Potatoes
Beans, seeds, legumes and nuts that are unprocessed.
Rice
Amaranth
Arrowroot
Buckwheat
Corn — cornmeal, grits and polenta labeled gluten-free
Flax
Hominy (corn)
Millet
Quinoa
Rice
Sorghum
Soy
Tapioca (cassava root)
Teff
Unprocessed meats. Like steak, chicken, pork...
Bacon.
Milk.
Foods That May Cause A Reaction:
Oats.
Yep, oats, while in themselves gluten free, (and apart from cross contamination issues, which can occur with all the above grains), have a protein called Avenin, which is similar to gluten, and can cause a reaction in some people like gluten would.
Seems easy enough to get around, right?
Wrong.
Remember I said above gluten acts like a glue?
Wheat flour is cheap.
Wheat flour is a very common thickener. I've personally seen it in ice cream, soups, stews, even soy sauce.
It's also used in a lot of corn or rice products, like crackers, tortillas, corn chips, noodles (yes, I've seen it in rice noodles), and sometimes the seasoning on potato chips. (There is nothing more infuriating than finding rice noodles containing wheat. It's just cost cutting, and stupid.)
Some of these products don't need wheat flour to hold them together, but wheat is cheap, and can bulk out other foods. It can also make sauces look better, and give a nice texture.
It's used in a lot of packet gravy mixes.
Barley is a commonly used flavouring. I've seen it in soups, stews, chocolate...
Yeasts can also contain wheat traces.
Even foods that don't have wheat as an ingredient, can contain traces.
A lot of processed foods have wheat in them. Again, cheap and glue.
Glucose syrup can be gluten free, depending on the source.
So basically, I have to read every label. Some products are gluten free, and then the company decides nah, and doesn't change the label (This has happened to me). Thankfully a lot of gluten free products label as such, so if you've seen foods you're sure are gluten free labelled that way, this is why. It encourages gluten free people to buy it, and the buyer doesn't have to read every freaking list of ingredients. Which is exhausting.
Things I've Had Ignorant People Argue With Me Over
You didn't think I was going to make a post like this without some humour in it, did you? Of course not! So here's the dishonour list, of conversations I've had.
"All potato chips contain gluten."
"Not the ones marked."
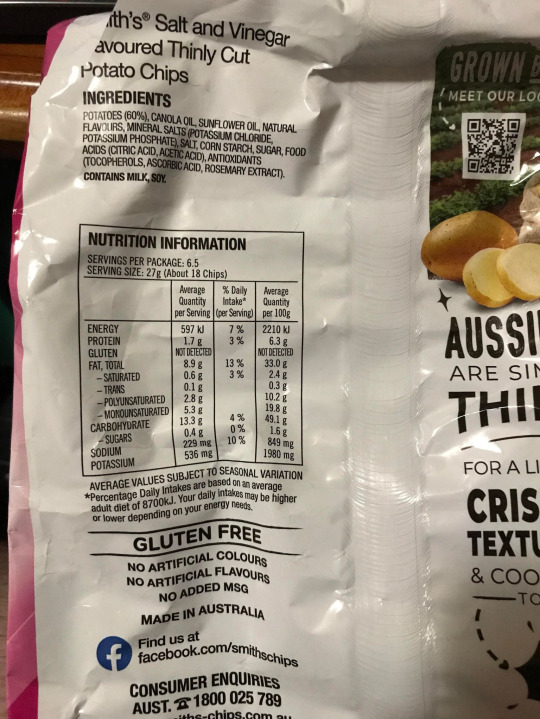
"Are you sure?"
"What if they're just saying it?"
"They won't."
"Are you sure?"
"They'd get fined and/or sued. All allergens have to be listed by law."
"Rice isn't gluten free."
"Yeah it is."
"Nope, all grains contain gluten."
"Not all grains. Trust me, rice is gluten free."
"No, it isn't."
"Ok, I've researched the shit out of this, are you telling me I'm wrong?"
"Rice isn't gluten free."

"Oh."
"Yeah. Listen to me next time."
"Are you sure that avocado is gluten free?"
-blinking in astonishment- "Yes."
"You're sure?"
"Yes!" -pause- "Do you want me to google it for you?"
"No, I'm good."
"Vegemite is gluten free, they don't need to bring a gluten free version out."
"It's the yeast."
"They're just doing it to charge more."
"...They're the same price..."
"Yeast is gluten free though."
-three linked articles later-
"Oh. Why did you just tell me that?"
"Because you were arguing with me again, and it's more fun this way."
"Gluten free is healthier."
-extended laughter- "Nope. There's a lot of additions to try and mimic what gluten does."
"But it's all natural ingredients."
"Where did you hear that?"
"Everyone knows it. Because gluten free people like to be healthier."
"Trust me, it's not true."
"Everyone says gluten free is healthier."
"They're full of bullshit."
Sources for this post:
5 notes
·
View notes
Text
Strawberry Cheesecake

Ingredients:
Cups
Metric
CHEESECAKE BISCUIT BASE:
▢200g / 7oz Arnott’s Marie crackers or other plain biscuit (Aus) or 28 Graham Cracker squares (Note 1)
▢120 g / 8 tbsp unsalted butter , melted
CHEESECAKE FILLING:
▢1 lb / 500g cream cheese , softened (Note 2)
▢2 tbsp plain flour (all purpose flour)
▢1 tsp vanilla extract
▢1/2 cup sour cream (full fat, sub sour cream)
▢1 1/2 cups caster sugar (superfine sugar)
▢Zest of 1 lemon
▢3 eggs , at room temperature
STRAWBERRY TOPPING FOR CHEESECAKE:
▢500g / 1 lb strawberries , half diced and half halved
▢2 tbsp lemon juice OR water (Note 3)
▢1/2 cup white sugar
▢1/2 tsp vanilla extract
▢1 1/2 tsp cornflour/cornstarch
▢2 tbsp water
👨🍳 🍲GET FREE EBOOK WITH 322 SOUTHERN RECIPES 👩🍳🍳
Instructions:
Preheat oven to 160C/320F (standard) or 140C/295F (fan/convection).
Get a 20cm/8″ springform cake tin. Turn the base UPSIDE DOWN (Note 4), butter lightly and place a square piece of parchment/baking paper on the base. Then clip into the springform pan – excess paper will stick out, see photos in post and video.
Butter and line the side of the pan.
CHEESECAKE BISCUIT BASE:
Break up biscuits roughly by hand and place in a food processor.
Blitz until fine crumbs (Note 5). Add butter, briefly blitz until dispersed and it resembles wet sand.
Pour into the prepared cake tin. Use a spatula to roughly spread it out over the base and up the walls.
Use something with a flat base and vertical edges (I used a measuring cup) to press the crumbs up the wall almost to the top of the sides, and flatten the base.
FILLING:
Use a mixer or beater to beat the cream cheese until just smooth, no longer than 20 seconds on speed 4. (You do not want to aerate cheesecake filling as it causes cracks when it bakes)
Add flour, beat for 5 seconds on speed 4 until just incorporated.
Add vanilla, sour cream, sugar and lemon zest. Beat until just combined (10 sec max, speed 5).
Add eggs one at a time, beat in between until just combined (5 sec each), and after the last one, beat just until the egg is fully incorporated.
Pour into prepared crust.
Bake for 55 minutes. The top should be a very light golden brown, not cracked, and near perfectly flat. It should jiggle slightly when you gently shake the pan.
Cool the cake in the oven with the door open 20 cm / 8″ (Note 6), then refrigerate for 4 hours+ in the pan.
Remove sides. Use overhang paper to slide cheesecake off the cake pan. Then slide the cheesecake off the paper.
STRAWBERRY TOPPING FOR CHEESECAKE:
Place chopped strawberries, vanilla, sugar and lemon juices in a saucepan. Stir then bring to simmer over medium heat.
Simmer for 10 minutes until strawberries breakdown.
Mix corn flour with water, then add into saucepan and stir.
Add halved strawberries and cook for 1 minute to soften.
Sauce should be syrupy – remove from stove and cool. Will thicken as it cools.
Once cool, stir. Adjust thickness to make it the right “oozing” consistency with a tiny touch of water (be careful!).
Spoon onto cheesecake so it’s covered with a single layer of strawberries. Flip strawberry halves so they are facedown. Refrigerate 2 hours+.
Slice and serve with remaining Strawberry Sauce!
Recipe Notes:
1. Biscuits: Any plain crackers will work fine here, you need 2 cups of crumbs.
Australia: Arnott’s Marie Crackers, Arrowroot and Nice are ideal, I’ve made it with all these.
US: Use 28 squares / 14 full sheets, yes I measured it with my last Graham Cracker packet I brought back from my last trip.
UK: Digestives are ideal, I LOVE digestives!
The crumb should be like wet sand so when pressed, it stays packed firmly, especially up the wall. It’s delicate when uncooked but once the filling is cooked, it becomes much more stable.
2. Cream Cheese – In the UK and some parts of Europe, block cream cheese isn’t available. If you can only get spreadable cream cheese in tubs (softer than block), skip the sour cream.
3. Lemon Juice or Water – Depends on sweetness of strawberries. If they aren’t that sweet, use water instead.
4. Inverted cake pan with overhang paper: The base of springform pans have a slight ridge. By inverting it, there is no ridge which makes it easier to slide the cheesecake on a serving platter without ruining the crust. There is no risk of batter leakage as the crust is thick enough to hold it all in.
5. Crumbs: OR crush in a zip lock bag using a rolling pin or large can.
6. Cool in oven: This helps stop the surface from cracking.
7. Strawberry topping should be like jam consistency, not a set jelly. It should ooze slightly when cut.
8. Different measures: Cups and spoons vary slightly between countries (US and CAN are different to most of the rest of the world). I have made this recipe using both US and Australian measures, using Australia Marie crackers and US Graham Crackers. The Graham Cracker crust is slightly crunchier because the biscuit doesn’t crush to a fine sand like Marie Crackers do. Both are delicious!
9. Make Ahead / Storage: Cake is at its best consumed within 4 days, after that I feel like it starts getting denser but still really fab, most people wouldn’t notice a difference! Ideal to top the day or or day before. After 2 to 3 days, the top does start to “sweat” but it’s not very noticeable.
......................................Keeping Reading......................
#recipe#baking#cooking#deliciuos#cake#dessert#strawberry shortcake#strawberry#strawberies#tasty dessert#cooking tips#dessert recipes
1 note
·
View note
Text
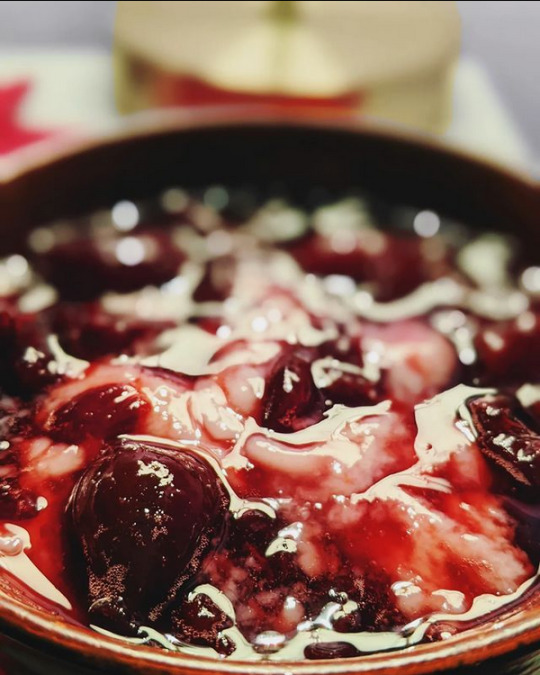
Vanilla Pudding and Cherries
PALEO PUDDING (modified from this recipe)
Ingredients
2 cups almond milk
¼ cup granulated sugar
2 tablespoons arrowroot starch
½ teaspoon vanilla extract
Pinch of salt
Instructions
In a small saucepan over medium heat, add the almond milk, arrowroot starch and sugar, and stir well to combine all the ingredients together.
Turn down the heat to a low simmer and start whisking lightly but constantly as the mixture heats. It’s important not to stop whisking in order to avoid any clumps.
After whisking for about 5-7 minutes, the mixture will thicken like pudding. Stir in the vanilla extract and pinch of salt, then divide the pudding equally into four cups or containers.
Place the containers in the fridge for at least one hour to allow the pudding to set and chill.
CHERRIES (improvised by me)
Ingredients
frozen cherries
granulated sugar
almond extract (optional)
Instructions
briefly blitz cherries in a blender/food processor
in a bowl, cover cherries and microwave 1 minute
spread sugar over cherries (as much as desired) and stir
stir in a few drops of almond extract (optional)
cover and refrigerate overnight
spoon onto bowl of pudding
4 notes
·
View notes
Note
Can you share the recipe you used for the chocolate cinnamon haupia 🥺🙏
hell yeah!! i kinda bullshitted the pudding recipe based off of a few other recipes + past experience, so here ya go!!
(i had previously opened an 18oz can of coconut cream and these measurements are based on that leftover amount of coconut. it made about... 1.75cups of pudding. if you have a full 18oz can, i'd say roughly double these amounts)
10oz coconut cream (regular coconut milk works just fine, but the cream is definitely nicer)
3/8 cup cocoa powder (better cocoa = better pudd)
1tbsp vanilla extract
1/2tsp salt
3/8 cup brown sugar (regular sugar is ok, i just always use brown sugar for everything)
1tbsp arrowroot powder (probably needed a bit more. or equivalent amount of cornstarch)
1.5tbsp (i think) cinnamon (i was a little overzealous with the cinnamon) (also if you have it maybe also include a pinch of nutmeg+allspice+clove here for a more well rounded spice)
dump the coconut cream into a small heavy-bottom saucepan. i used my little ramen pot—anything that will have even and consistent contact with the burner. heat on medium (4/10 heat). whisk a bit to even out the consistency, since the cream will probably be a bit separated.
add the cocoa powder. first 1/4 cup, then whisk until fully dispersed. it didn't look dark enough so i added another half a 1/4 cup. keep adding cocoa til it looks chocolatey!
add salt, 1/4 cup sugar, and a moderate pour of vanilla. whisk. keep gently whisking. taste it. is it sweet enough? if not add another 1/8 cup of sugar (or just another brown sugar clump lol)
keeeeeep whisking. add in your thickener (arrowroot/corn starch) and cinnamon. whisk more.
by now if your stove is decent, you'll be starting to boil a bit. keep whisking. never stop (gently!) whisking. lightly scrape the bottom of the pot with the whisk. a little down there will stick/burn, but that's okay. it cleans out after a soapy hot water soak well enough.
whisk for 2-5 minutes at that low boil. you might need to lower the heat a notch here, but don't let it get so cold it stops wanting to bubble the instant you stop stirring. corn starch will thicken faster than arrowroot during this phase.
kill the heat and pour into a bowl. scrape out every last drop with a spatula. lick the spatula. revel in your creation. seal bowl with lid/plastic wrap and refrigerate for a few hours until cold. placing the bowl in the fridge on top of/surrounded by ice packs will expedite this process (while also not disturbing your fridge's standing temp too much)
enjoy!!!
#i always always forget how easy making pudding is#it's just a lot of stirring#i tried to write this really detailed bc i dunno your cooking skills but also i feel like most recipies are extremely vague#and there's so much more to cooking than just dumping shit in a pot on high heat lol#and i wanna be the change i wanna see in the world of highly-explanatory recipe directions#and also writing recipes is really fun#recipes#replies#if you make it let me know!!!!#this is making me wanna share some of my otner recipes. should i become a foodie blog? XD
2 notes
·
View notes
Photo
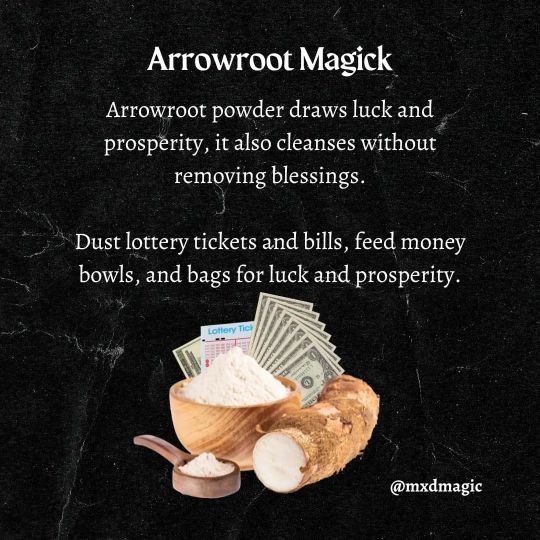
Arrowroot can also be used in cooking as a gluten-free thickening agent. 😋 #mxdmagick #arrowroot #arrowrootpowder #herbshop #apothecary #naturalmagick #kitchenwitch #moneybowl #herbalwitch (at mxdmagic) https://www.instagram.com/p/Cnj6gu7uNSG/?igshid=NGJjMDIxMWI=
#mxdmagick#arrowroot#arrowrootpowder#herbshop#apothecary#naturalmagick#kitchenwitch#moneybowl#herbalwitch
3 notes
·
View notes
Note
Thank you for the response! I already called them about what changed and they denied the recipes being different. What ingredients can you think of that usually help sauces have a more caramelized texture? I'm finding I tend to prefer the stickier sauces to the watery ones and want to try making more of my own.
I'm just that Kathy Bates "LIIEESSSSSSS" gif.
I wonder if they replaced something with a cheaper ingredient or if they switched to a straight up jarred sauce and don't want anyone to know ahaha.
Anyway to get a sauce thicker or sticker (Which isn't QUITE the same as caramelized) you have a couple options:
Cooking it down
Using a thickener like cornstarch or arrowroot (I don't have great results with flour personally)
I find cooking it down works better than thickeners, but sometimes I don't have or refuse to make time for that, and so cornstarch it is. But the cooking down will make it more like a sticky glaze--I also find balsamic vinegar adds a lot of that sweet-savory thickness that you might be looking for!
4 notes
·
View notes
Last Seen Blogs


kermit-coded
twice dead thrice living

spaghettibastard
XIBALBA

startheskelaton
LetsGetSpooky.inc

supergirlytreiner
Supergirlytreiner