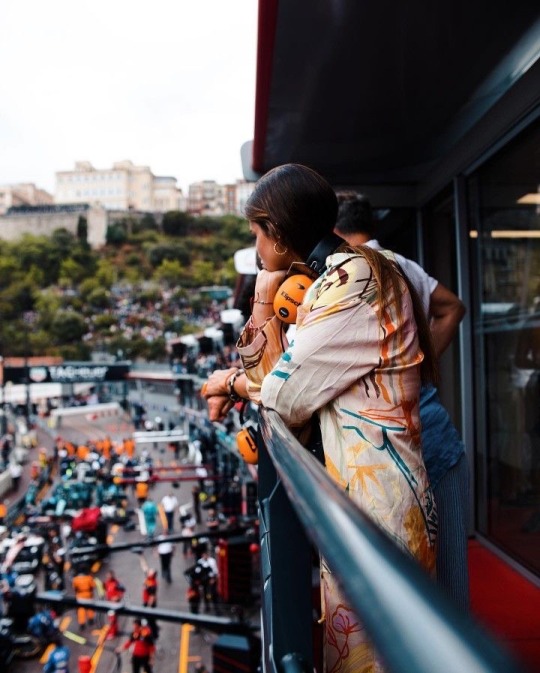
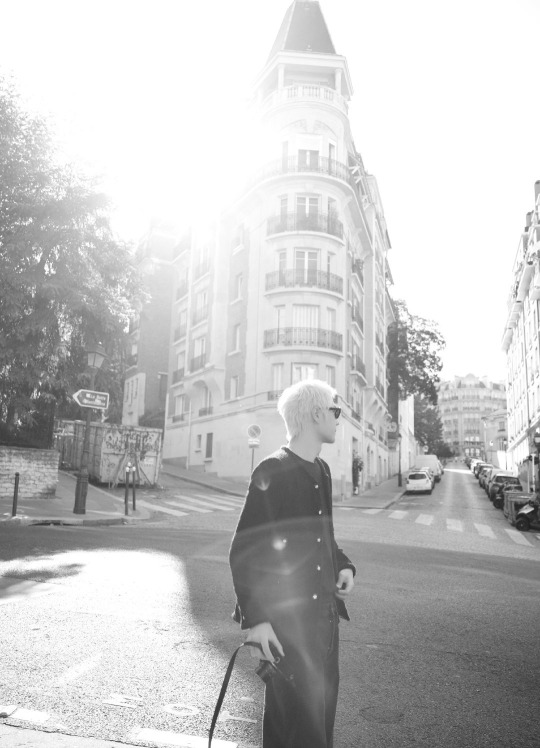
#and i really liked the b&w filter for this!
Text

horizon forbidden west | aloy 80/?
#horizon forbidden west#hfw#aloy#it was entirely by chance that this ended up in b&w#sometimes i quickly cycle through all the in-game filters to see if they change the light/color interestingly#and i really liked the b&w filter for this!#i haven't had much time to sit down and play anything lately :(#but i'm glad i was at least able to get this shot#hfw aloy
21 notes
·
View notes
Text


mama live in detroit
#so demure#gerard way#my chemical romance#mcr#return#mama#detroit#gif#edit#my post#eye strain#i just really like the high contrast b&w filter
429 notes
·
View notes
Text
🖤🖤S A M U E L🖤🖤
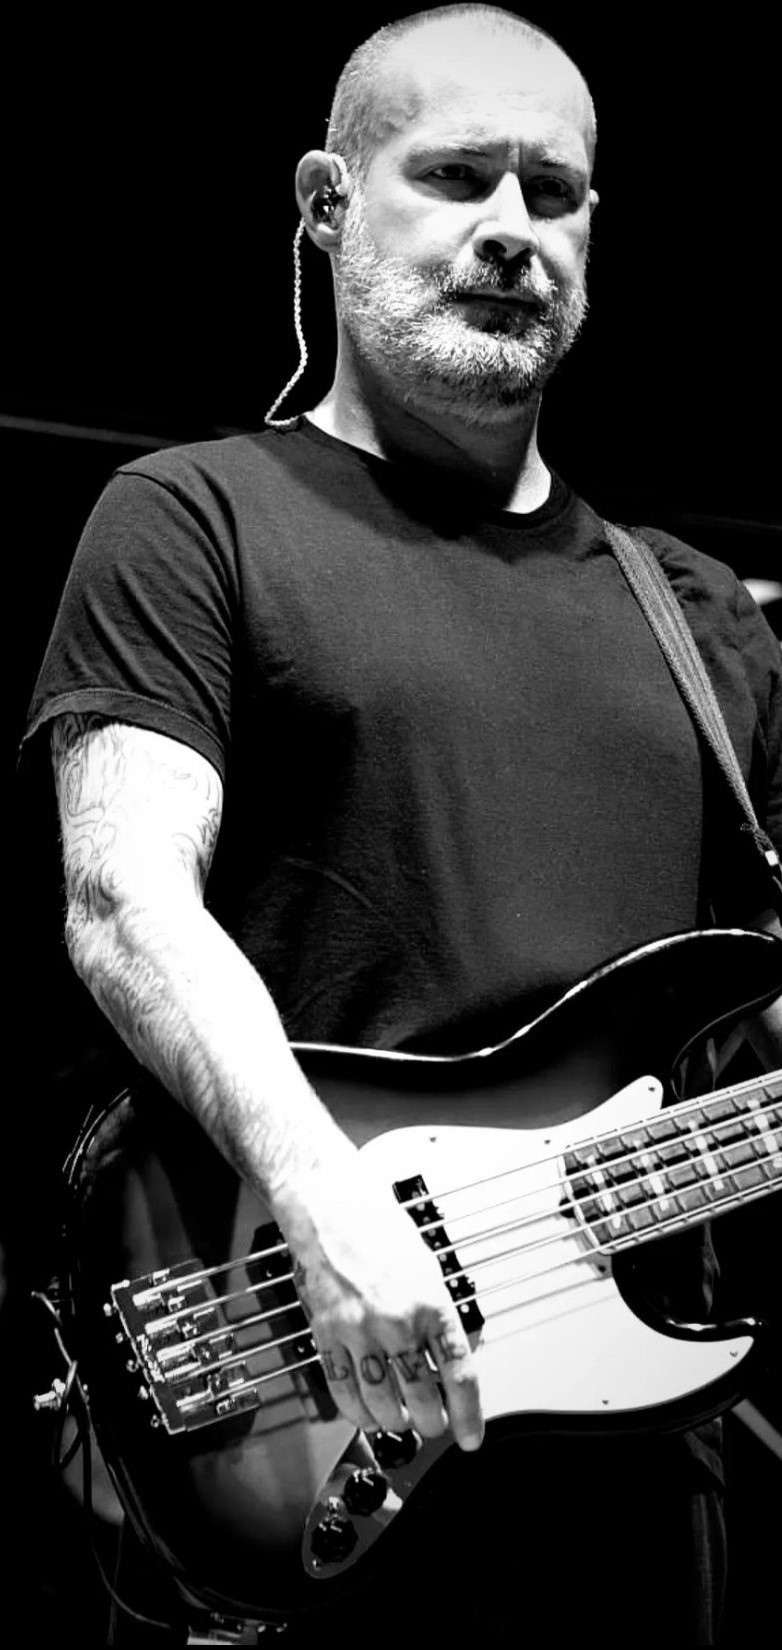
#who gave him the right to be this goddamn fine? huh? just who?#the man has aged like a fine wine#the white beard looks so sexy on him#and the b&w filter really just makes that bass look stunning I must say#Sam Rivers#Limp Bizkit#nu metal#SAM. I. AM.#Sammy Boy#Bass Boss#Catch me simpin' for Samuel on Sam Rivers Sunday#down the rabbit hole
14 notes
·
View notes
Text
.
#beyond everything else that h///y p////r game looks boring as hell#like yall are really hemming and hawing over not playing the antisemtic game written by a transphobe#and it looks generic as hell#the only appeal is 'you get to explore h*g//w*rts' which#i got that back in like 2007 with a couple tie ins#including a lego one which let you build the magic wizardy stuff and watch as they did magic wizardy stuff#this of course was back before jowling kowling was an out and out transphobe and also i was in middle school#but yeah that new game sure looks okay#like yep gonna plop down $70 whole dollars (which is fucked in its own right but thats a games industry thing)#to play this okay looking game that directly supports transphobia in the uk and is antisemtic besides#i am staking my moral worth on this#and do not talk to me about alternatives like piracy or buying second hand- i do not care#i honestly truly do not care if you are paid to play the game#its your time#just again outside of the ~controversy~ it looks so generic#and do not come into my inbox to explain to me- a nonbinary person who has a lot of family memory tied in this franchise- why you feel like#it should be okay for you to play it#trust me- this franchise is a source of pain for me in more ways than one#do not look to me for absolution#honestly i may filter the tags for it b/c im sick of hearing about it even being decried by allies#most of whom seem more invested in dunking on h///r p////r fans than actually helping trans people#heavily censored tag rant b/c lord knows i dont have the patience to deal with this hornets nest
2 notes
·
View notes
Text
almost done my 1st semester of nursing school and the program i'm in has me doing clinicals already so i've seen what it's gonna be like and i like it a lot!! i'm enjoying my job and i like what i'm learning and i feel like this is something i can be good at and i like helping people. obviously it's very early but i'm feeling confident in my career choices so far
but GOD i'm so fucking afraid of not liking my coworkers. like that post i just reblogged is TRUE those nurses EXIST and the last thing i want is to have to deal with them every fucking day
#mp#i also feel like when i laugh at ppl making fun of nurses im being like#'haha not me tho! im one of the GOOD ones :)'#i don't rlly know yet tho do i? i haven't really started WORKING as a nurse yet#i follow other nurses around or i'll spend the day taking care of one patient#idk what i'll be like when i'm working full-time as a nurse but i'm going in w a foundation of trying to help ppl. so at least theres' that#also not 2 b like ''and ignoring the abuse and racism'' but like even if i didnt have to worry abt possibly working w abusive racist nurses#the nurse aesthetic. like if u search up nurse gifts on redbubble. literally repulsive to me.#very 'she believed she chould so she did' in cursive font carved into a piece of wood#very girlboss white feminism. script font and corny girl power quotes. jokes abt wine. i HATE it#yesterday in clinical a man peed on me!! i don't want to wear a stupid 'keep calm im a nurse' t shirt!!!#i don't want to like. flower-crown-filter my job. i dont want to 'uwu im florence nightingale reincarnated' my job!!#i'm not some badass feminine caretaker bro i'm just a person doing my job!!!!#like ppl who make nursing their Identity are like. god it's so tacky#they're always so smug abt it too. they feel so superior bc their job is brutal. girl ur not some kind of saint bc u can put in an IV
1 note
·
View note
Text
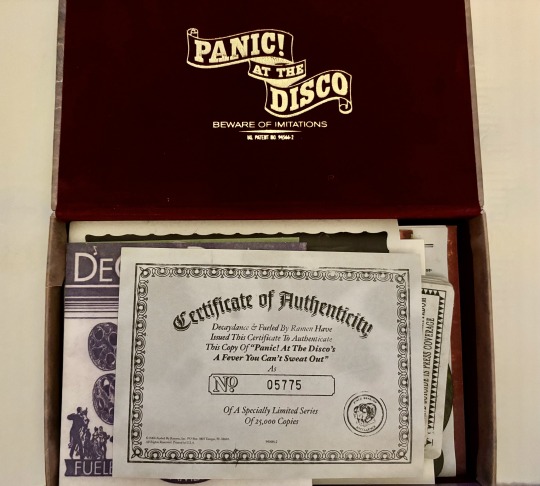
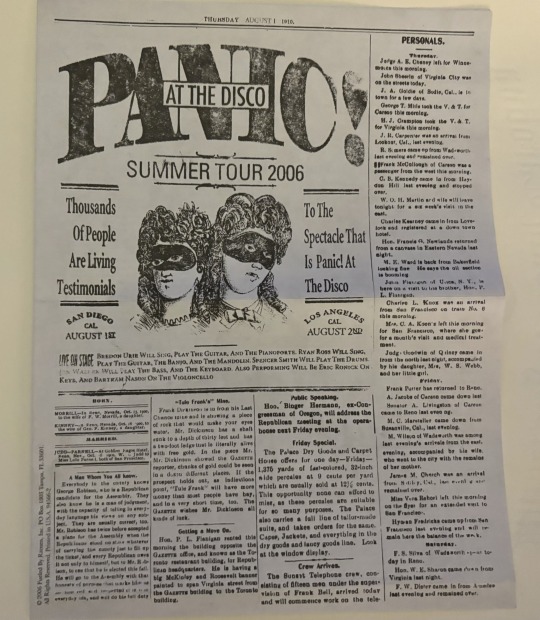
exploring panic!'s a fever you can't sweat out/live in denver boxset
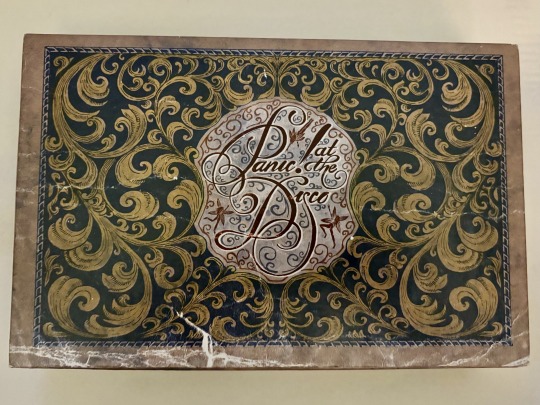
a couple of years ago, i managed to snag this for $150, which is still crazy to me, and it's definitely my favorite thing i've ever owned. i feel like i haven't seen many people detailing the contents of it, and since it's such a cool relic, i wanted to share this beauty with everyone.
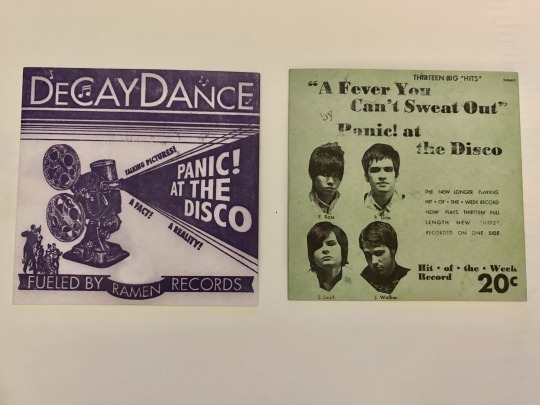
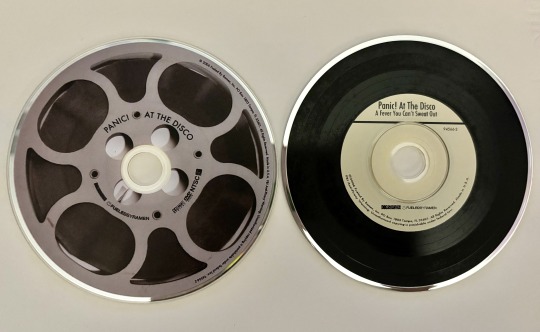
it comes with the live in denver dvd (left) and a fever you can't sweat out cd (right). the cover art and discs are SO fucking pretty and cool i'm so obsessed with them. i love how it really feeds into that 20s/30s theme they had going on this era.
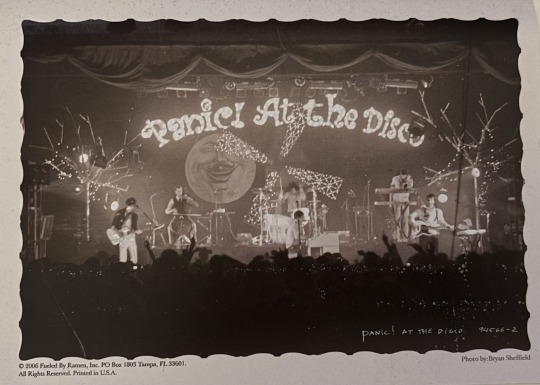
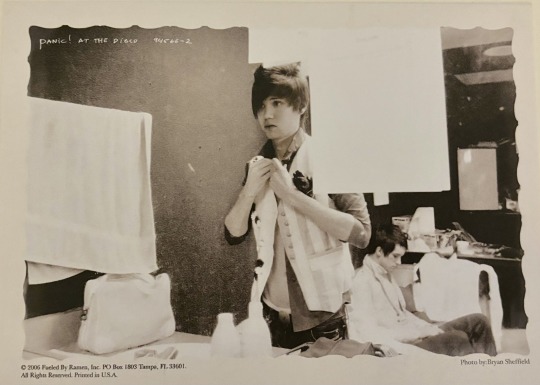

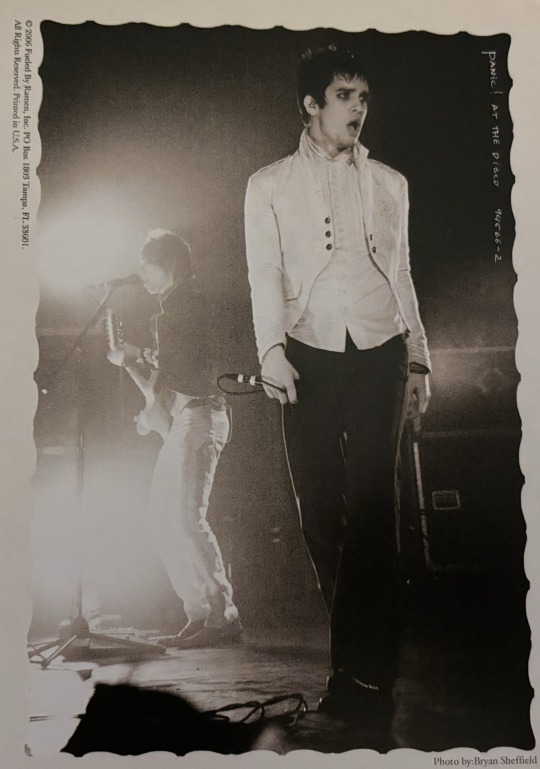
then it has these 4 photo cards which are all such beautiful photos. the first one especially is one of my all time favorite panic photos. the b&w filter also fits this era so well.
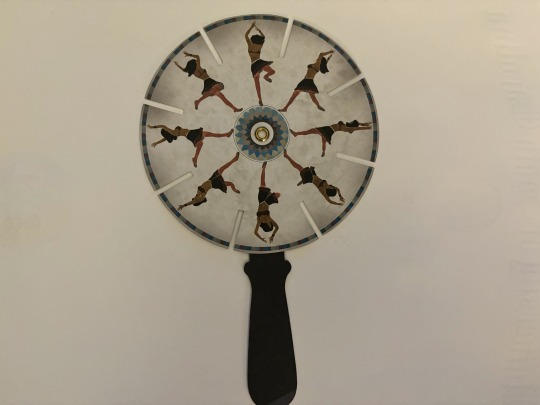
this is a phenakistiscope. you stand in front of a mirror and spin it around while looking through the cracks so it looks like the girl is dancing (instructions are included on the back).
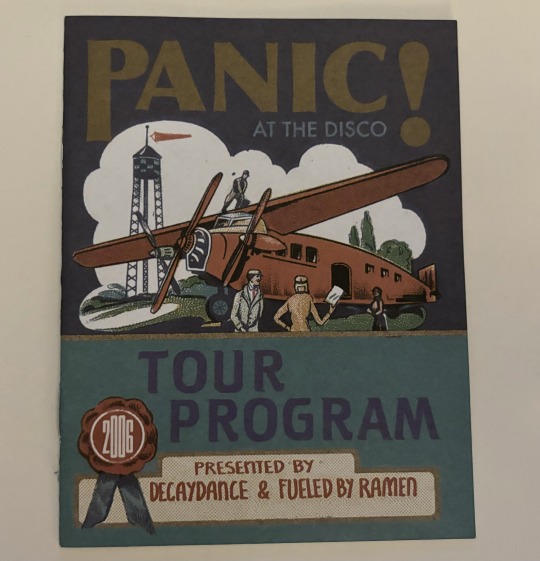
this is a tour program for the live in denver tour. it includes all the tour dates, as well as a guide to their discography. including pictures of the inside would exceed my image limit, so if anyone wants a post detailing this item, i'd be more than happy to post that!
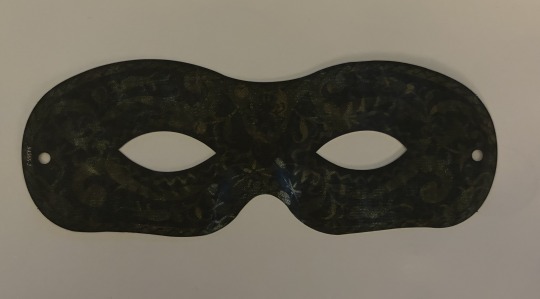
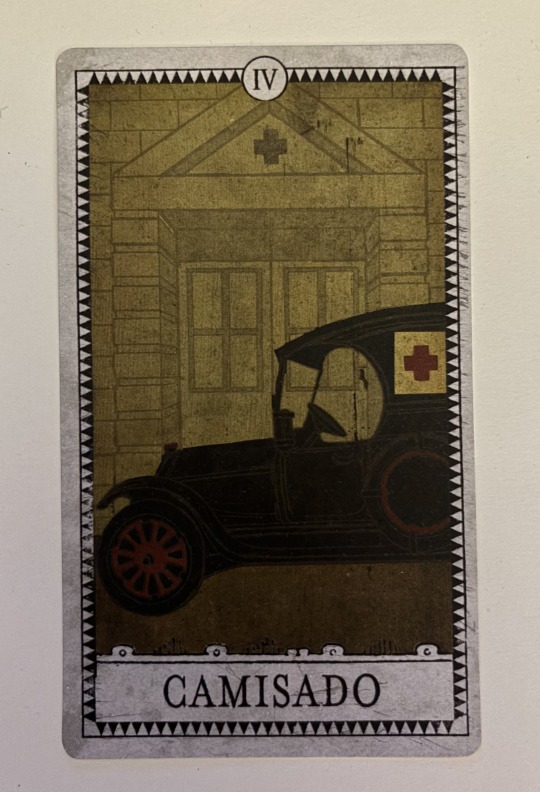
self explanatory but it's a mask reminiscent of the but it's better if you do music video.
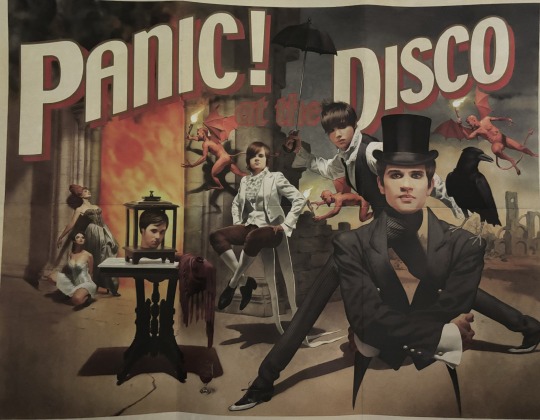
there's this SUPER cool poster that i'd love to hang up on my wall but i'm too scared to in case it ruins it. i'm actually so obsessed with this thing.
this is something else i can't include detailed pictures of due to the image limit, but honestly there isn't a lot of lore or super interesting stuff inside of it. however, i'd still be happy to detail it more in another post.
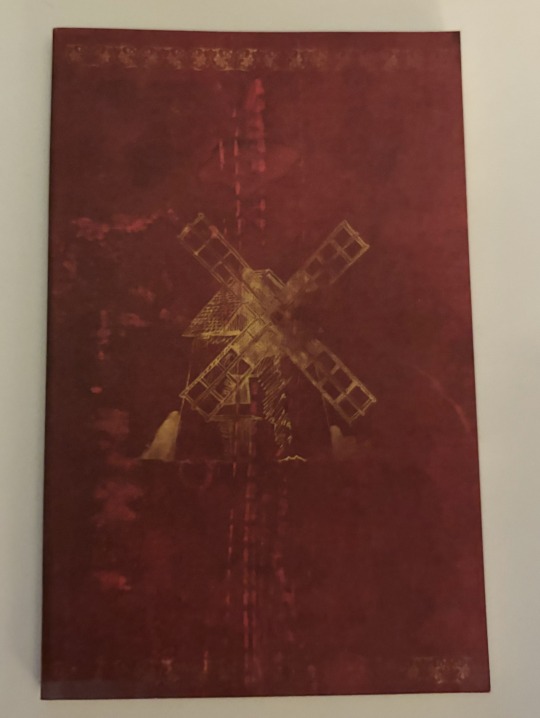
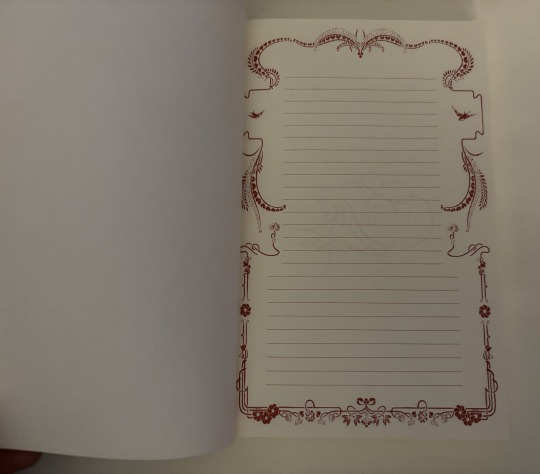
there's this GORGEOUS notebook that i'm also too scared to actually do anything with. it is actually quite a thick notebook. i looove the detail of the "PANIC!" barely visible in the middle of the pages.
now onto my absolute favorite part of this thing:
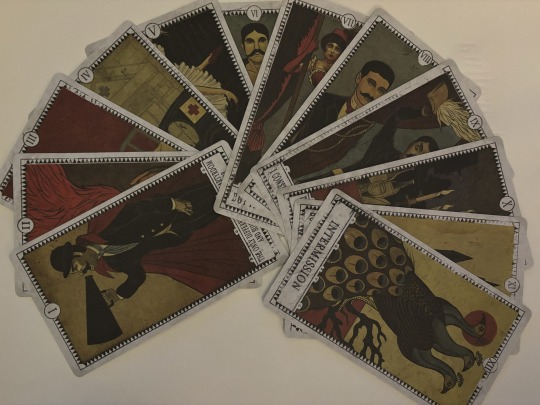
these cards for each song on fever are SO fucking cool and i love them so much. they're printed on really nice material too; they don't feel cheap and have this grainy feel to them too (idk how else to describe it) and it works so well. luckily i'm able to post individual pictures of each one.
so the back of all of them have the lyrics printed like that but i won't be able to post pictures of that for each one.

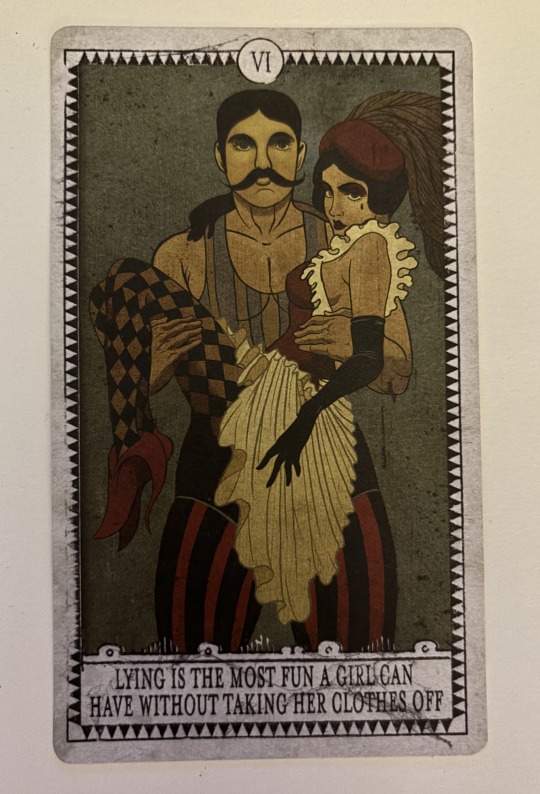
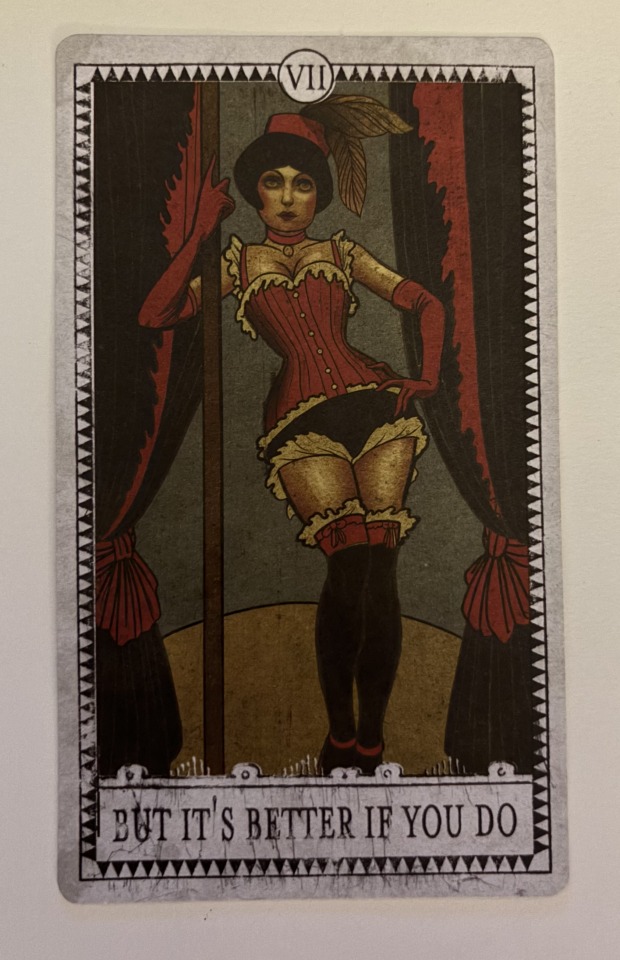
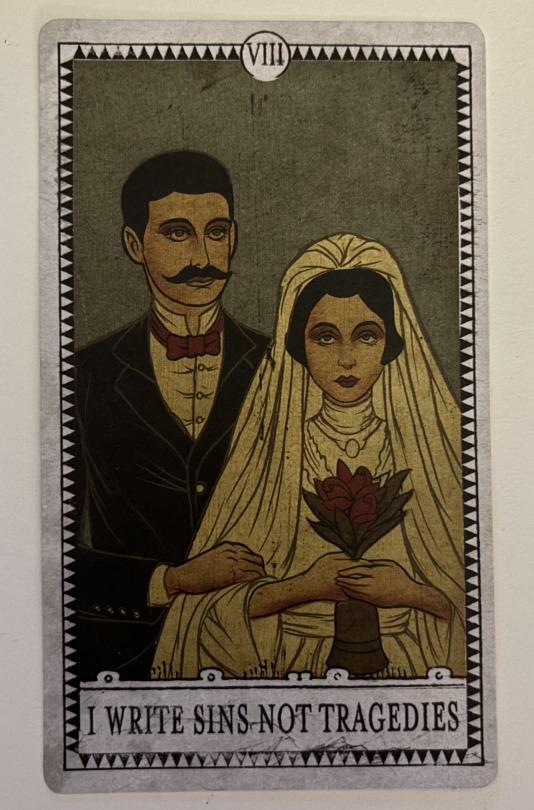

they just all encapsulate the theme of each song perfectly while also fitting so well with the aesthetic that they had this era. like my jaw dropped when i saw these for the first time. (side note: i'm not sure why they numbered intermission as number 12 when it should be 8 based on the album. i also don't know why they skipped introduction since they included intermission).
all in all, this is the coolest piece of merch a band has ever put out imo. like no one is doing it like this anymore. i'd been yearning for it since i was 14 so i'm so glad i was able to find it as such a steal of a price. i'll never shut up about owning it and if you're able to get your hands on it i cannot recommend it enough.
#panic! at the disco#panic at the disco#ryan ross#jon walker#spencer smith#brendon urie#patd#live in denver#a fever you can't sweat out#afycso#now i just need the pretty odd boxset and it will be complete#but thats consistently $400 so it's gonna be a while#sorry it took me so long to post this btw
752 notes
·
View notes
Text
three in a row | l. norris
part one / two / three
lando norris x sainz!reader
the landosainz saga
a/n: last part for the qatar gp! already very excited for the usa gp 🥰🥰
synopsis: lando wins p3 in qatar
face claim: sophia weber
—
ynsainzzz
Lusail Paddock

liked by oscarpiastri, landonorris and 698,555 others
ynsainzzz breakfast w this guy
tagged: landonorris, lando.jpg
view all 85,929 comments
landonorris Fish everywhere 😭 my girl hates me
ynsainzzz landonorris you had the chicken bento shut the hell up ab fish
carlossainz55 You took Lando out for Japanese? Should've have taken me out let's be honest
ynsainzzz carlossainz55 charles told me you were farting in your sleep so i said no chance
charles_leclerc ynsainzzz it's true
pierregasly Can you tell Lando to upload on lando.jpg again
ynsainzzz pierregasly tell him yourself peter landonorris
landonorris pierregasly download the Leica app and help me develop these pics then
pierregasly landonorris sorry, shouldn't have commented
charles_leclerc You have a camera too?
ynsainzzz charles_leclerc nah dude it's an iphone camera pic w a filter on. i've found my new passion
charles_leclerc ynsainzzz which is?
ynsainzzz charles_leclerc filter making. pay attention perceval
danielricciardo Did he finally try salmon?
ynsainzzz danielricciardo no😭 my plan backfired
danielricciardo ynsainzzz hard cheese mate
landonorris ynsainzzz THERE WAS A PLAN THIS WHOLE TIME?! AND YOU TOLD DANIEL? I feel betrayed
username this is so boyfriend of lando
username the manspread. lando's not a 12-year-old kid anymore😭
carlandoooo carlos would've loved to see this. lando in a japanese restaurant...
ynsainzzz's story

carlossainz55's story
landonorris


liked by oscarpiastri, ynsainzzz and 591,168 others
landonorris THREE PODIUMS IN A ROW BABY!
tagged: mclaren, ynsainzzz, oscarpiastri
view all 36,885 comments
ynsainzzz amor mío!!!! 🧡😭
landonorris ynsainzzz amorrrr!
ynsainzzz deserved this more than anything 🌟🌟
landonorris ynsainzzz I love you more than anything 🧡
ynsainzzz best run since lew 🙈
username ynsainzzz lewis' p20 to pole😭😭 p10 to p3 is a huge deal too! england and producing f1 drivers >>>
oscarpiastri Yes!!! 🏆🧡
carlossainz55 👏🏽👏🏽
username a papaya double podium again!!! mclaren fans are fed well and i love it! 🧡🧡
danielricciardo Yes team! 👏🏻
landonorris danielricciardo thanks baby😚
pierregasly Congrats bro! Good run! 👏🏻
landonorris pierregasly brotherrrr ❤️
maxverstappen1 Well done bro! ❤️
landonorris maxverstappen1 thanks Champ 🫡
lewishamilton Mega job 👍🏾
landonorris lewishamilton 🥹🥹
username P10 to P3 i feel like a proud mom 🥹
carlandoooo You are unreal!
ynsainzzz


liked by mclaren, charles_leclerc and 1,737,994 others
ynsainzzz 3 podiums, 3 lando unseens for the papaya girls n gays. 3 is the magic number. congratulations pet, mclaren and oscarpiastri 🧡🧡
tagged: landonorris
view all 47,838 comments
landonorris Why do I look like we just had an argument in the first pic?! Caught me there b
landonorris I love youuuu 😚😚🧡
ynsainzzz landonorris love you bebé
mclaren You are the best team player, Sainz Jr! 🫡🏆🧡
ynsainzzz mclaren love this team so much 🧡
oscarpiastri You got us here too!!! Love you Sainz 🧡
ynsainzzz oscarpiastri i love you osc!! 🥹🥹🧡
charles_leclerc How happy are you? Be honest
ynsainzzz charles_leclerc are you crazy?! SUPER
charles_leclerc ynsainzzz really? Wow you really bleed orange
ynsainzzz charles_leclerc i been telling all of you
username thank you goddess sainz for these pics 😭😭😭
m81aren4ever Lando's resting B face 💀
osc4ndo love these pics 🫶🏽🫶🏽
carlossainz55 Tell your bf to smile more
ynsainzzz carlossainz55 that's all he's ever done when you were his teammate, give it a rest
username ynsainzzz lmao real tho
pierregasly Aww guys 🥹
ynsainzzz pierregasly 🥹🥹
francisca.cgomes lando fan forever!! 🤍
ynsainzzz francisca.cgomes yeeeee
username i want something like lando and y/n have in the future
#lando norris#ln#ln4#lando norris x sister!reader#lando norris x you#lando norris x oc#lando norris x y/n#lando norris x reader#formula 1#f1#formula 1 social media au#formula 1 fic#f1 social media au#f1 x reader#f1 imagine#f1 fic#f1 fanfic
920 notes
·
View notes
Text


Neural Filters Tutorial for Gifmakers by @antoniosvivaldi
Hi everyone! In light of my blog’s 10th birthday, I’m delighted to reveal my highly anticipated gifmaking tutorial using Neural Filters - a very powerful collection of filters that really broadened my scope in gifmaking over the past 12 months.
Before I get into this tutorial, I want to thank @laurabenanti, @maines , @cobbbvanth, and @cal-kestis for their unconditional support over the course of my journey of investigating the Neural Filters & their valuable inputs on the rendering performance!
In this tutorial, I will outline what the Photoshop Neural Filters do and how I use them in my workflow - multiple examples will be provided for better clarity. Finally, I will talk about some known performance issues with the filters & some feasible workarounds.
Tutorial Structure:
Meet the Neural Filters: What they are and what they do
Why I use Neural Filters? How I use Neural Filters in my giffing workflow
Getting started: The giffing workflow in a nutshell and installing the Neural Filters
Applying Neural Filters onto your gif: Making use of the Neural Filters settings; with multiple examples
Testing your system: recommended if you’re using Neural Filters for the first time
Rendering performance: Common Neural Filters performance issues & workarounds
For quick reference, here are the examples that I will show in this tutorial:
Example 1: Image Enhancement | improving the image quality of gifs prepared from highly compressed video files
Example 2: Facial Enhancement | enhancing an individual's facial features
Example 3: Colour Manipulation | colourising B&W gifs for a colourful gifset
Example 4: Artistic effects | transforming landscapes & adding artistic effects onto your gifs
Example 5: Putting it all together | my usual giffing workflow using Neural Filters
What you need & need to know:
Software: Photoshop 2021 or later (recommended: 2023 or later)*
Hardware: 8GB of RAM; having a supported GPU is highly recommended*
Difficulty: Advanced (requires a lot of patience); knowledge in gifmaking and using video timeline assumed
Key concepts: Smart Layer / Smart Filters
Benchmarking your system: Neural Filters test files**
Supplementary materials: Tutorial Resources / Detailed findings on rendering gifs with Neural Filters + known issues***
*I primarily gif on an M2 Max MacBook Pro that's running Photoshop 2024, but I also have experiences gifmaking on few other Mac models from 2012 ~ 2023.
**Using Neural Filters can be resource intensive, so it’s helpful to run the test files yourself. I’ll outline some known performance issues with Neural Filters and workarounds later in the tutorial.
***This supplementary page contains additional Neural Filters benchmark tests and instructions, as well as more information on the rendering performance (for Apple Silicon-based devices) when subject to heavy Neural Filters gifmaking workflows
Tutorial under the cut. Like / Reblog this post if you find this tutorial helpful. Linking this post as an inspo link will also be greatly appreciated!
1. Meet the Neural Filters!
Neural Filters are powered by Adobe's machine learning engine known as Adobe Sensei. It is a non-destructive method to help streamline workflows that would've been difficult and/or tedious to do manually.
Here are the Neural Filters available in Photoshop 2024:


Skin Smoothing: Removes blemishes on the skin
Smart Portrait: This a cloud-based filter that allows you to change the mood, facial age, hair, etc using the sliders+
Makeup Transfer: Applies the makeup (from a reference image) to the eyes & mouth area of your image
Landscape Mixer: Transforms the landscape of your image (e.g. seasons & time of the day, etc), based on the landscape features of a reference image
Style Transfer: Applies artistic styles e.g. texturings (from a reference image) onto your image
Harmonisation: Applies the colour balance of your image based on the lighting of the background image+
Colour Transfer: Applies the colour scheme (of a reference image) onto your image
Colourise: Adds colours onto a B&W image
Super Zoom: Zoom / crop an image without losing resolution+
Depth Blur: Blurs the background of the image
JPEG Artefacts Removal: Removes artefacts caused by JPEG compression
Photo Restoration: Enhances image quality & facial details
+These three filters aren't used in my giffing workflow. The cloud-based nature of Smart Portrait leads to disjointed looking frames. For Harmonisation, applying this on a gif causes Neural Filter timeout error. Finally, Super Zoom does not currently support output as a Smart Filter
If you're running Photoshop 2021 or earlier version of Photoshop 2022, you will see a smaller selection of Neural Filters:


Things to be aware of:
You can apply up to six Neural Filters at the same time
Filters where you can use your own reference images: Makeup Transfer (portraits only), Landscape Mixer, Style Transfer (not available in Photoshop 2021), and Colour Transfer
Later iterations of Photoshop 2023 & newer: The first three default presets for Landscape Mixer and Colour Transfer are currently broken.
2. Why I use Neural Filters?
Here are my four main Neural Filters use cases in my gifmaking process. In each use case I'll list out the filters that I use:

Enhancing Image Quality:
Common wisdom is to find the highest quality video to gif from for a media release & avoid YouTube whenever possible. However for smaller / niche media (e.g. new & upcoming musical artists), prepping gifs from highly compressed YouTube videos is inevitable.
So how do I get around with this? I have found Neural Filters pretty handy when it comes to both correcting issues from video compression & enhancing details in gifs prepared from these highly compressed video files.
Filters used: JPEG Artefacts Removal / Photo Restoration
Facial Enhancement:
When I prepare gifs from highly compressed videos, something I like to do is to enhance the facial features. This is again useful when I make gifsets from compressed videos & want to fill up my final panel with a close-up shot.
Filters used: Skin Smoothing / Makeup Transfer / Photo Restoration (Facial Enhancement slider)
Colour Manipulation:
Neural Filters is a powerful way to do advanced colour manipulation - whether I want to quickly transform the colour scheme of a gif or transform a B&W clip into something colourful.
Filters used: Colourise / Colour Transfer
Artistic Effects:
This is one of my favourite things to do with Neural Filters! I enjoy using the filters to create artistic effects by feeding textures that I've downloaded as reference images. I also enjoy using these filters to transform the overall the atmosphere of my composite gifs. The gifsets where I've leveraged Neural Filters for artistic effects could be found under this tag on usergif.
Filters used: Landscape Mixer / Style Transfer / Depth Blur
How I use Neural Filters over different stages of my gifmaking workflow:
I want to outline how I use different Neural Filters throughout my gifmaking process. This can be roughly divided into two stages:
Stage I: Enhancement and/or Colourising | Takes place early in my gifmaking process. I process a large amount of component gifs by applying Neural Filters for enhancement purposes and adding some base colourings.++
Stage II: Artistic Effects & more Colour Manipulation | Takes place when I'm assembling my component gifs in the big PSD / PSB composition file that will be my final gif panel.
I will walk through this in more detail later in the tutorial.
++I personally like to keep the size of the component gifs in their original resolution (a mixture of 1080p & 4K), to get best possible results from the Neural Filters and have more flexibility later on in my workflow. I resize & sharpen these gifs after they're placed into my final PSD composition files in Tumblr dimensions.
3. Getting started
The essence is to output Neural Filters as a Smart Filter on the smart object when working with the Video Timeline interface. Your workflow will contain the following steps:
Prepare your gif
In the frame animation interface, set the frame delay to 0.03s and convert your gif to the Video Timeline
In the Video Timeline interface, go to Filter > Neural Filters and output to a Smart Filter
Flatten or render your gif (either approach is fine). To flatten your gif, play the "flatten" action from the gif prep action pack. To render your gif as a .mov file, go to File > Export > Render Video & use the following settings.

Setting up:
o.) To get started, prepare your gifs the usual way - whether you screencap or clip videos. You should see your prepared gif in the frame animation interface as follows:

Note: As mentioned earlier, I keep the gifs in their original resolution right now because working with a larger dimension document allows more flexibility later on in my workflow. I have also found that I get higher quality results working with more pixels. I eventually do my final sharpening & resizing when I fit all of my component gifs to a main PSD composition file (that's of Tumblr dimension).
i.) To use Smart Filters, convert your gif to a Smart Video Layer.
As an aside, I like to work with everything in 0.03s until I finish everything (then correct the frame delay to 0.05s when I upload my panels onto Tumblr).
For convenience, I use my own action pack to first set the frame delay to 0.03s (highlighted in yellow) and then convert to timeline (highlighted in red) to access the Video Timeline interface. To play an action, press the play button highlighted in green.

Once you've converted this gif to a Smart Video Layer, you'll see the Video Timeline interface as follows:

ii.) Select your gif (now as a Smart Layer) and go to Filter > Neural Filters

Installing Neural Filters:
Install the individual Neural Filters that you want to use. If the filter isn't installed, it will show a cloud symbol (highlighted in yellow). If the filter is already installed, it will show a toggle button (highlighted in green)

When you toggle this button, the Neural Filters preview window will look like this (where the toggle button next to the filter that you use turns blue)

4. Using Neural Filters
Once you have installed the Neural Filters that you want to use in your gif, you can toggle on a filter and play around with the sliders until you're satisfied. Here I'll walkthrough multiple concrete examples of how I use Neural Filters in my giffing process.
Example 1: Image enhancement | sample gifset
This is my typical Stage I Neural Filters gifmaking workflow. When giffing older or more niche media releases, my main concern is the video compression that leads to a lot of artefacts in the screencapped / video clipped gifs.
To fix the artefacts from compression, I go to Filter > Neural Filters, and toggle JPEG Artefacts Removal filter. Then I choose the strength of the filter (boxed in green), output this as a Smart Filter (boxed in yellow), and press OK (boxed in red).
Note: The filter has to be fully processed before you could press the OK button!

After applying the Neural Filters, you'll see "Neural Filters" under the Smart Filters property of the smart layer

Flatten / render your gif
Example 2: Facial enhancement | sample gifset
This is my routine use case during my Stage I Neural Filters gifmaking workflow. For musical artists (e.g. Maisie Peters), YouTube is often the only place where I'm able to find some videos to prepare gifs from. However even the highest resolution video available on YouTube is highly compressed.
Go to Filter > Neural Filters and toggle on Photo Restoration. If Photoshop recognises faces in the image, there will be a "Facial Enhancement" slider under the filter settings.

Play around with the Photo Enhancement & Facial Enhancement sliders. You can also expand the "Adjustment" menu make additional adjustments e.g. remove noises and reducing different types of artefacts.

Once you're happy with the results, press OK and then flatten / render your gif.
Example 3: Colour Manipulation | sample gifset
Want to make a colourful gifset but the source video is in B&W? This is where Colourise from Neural Filters comes in handy! This same colourising approach is also very helpful for colouring poor-lit scenes as detailed in this tutorial.
Here's a B&W gif that we want to colourise:

Highly recommended: add some adjustment layers onto the B&W gif to improve the contrast & depth. This will give you higher quality results when you colourise your gif.
Go to Filter > Neural Filters and toggle on Colourise.

Make sure "Auto colour image" is enabled.
Play around with further adjustments e.g. colour balance, until you're satisfied then press OK.
Important: When you colourise a gif, you need to double check that the resulting skin tone is accurate to real life. I personally go to Google Images and search up photoshoots of the individual / character that I'm giffing for quick reference.
Add additional adjustment layers until you're happy with the colouring of the skin tone.

Once you're happy with the additional adjustments, flatten / render your gif. And voila!

Note: For Colour Manipulation, I use Colourise in my Stage I workflow and Colour Transfer in my Stage II workflow to do other types of colour manipulations (e.g. transforming the colour scheme of the component gifs)
Example 4: Artistic Effects | sample gifset
This is where I use Neural Filters for the bulk of my Stage II workflow: the most enjoyable stage in my editing process!
Normally I would be working with my big composition files with multiple component gifs inside it. To begin the fun, drag a component gif (in PSD file) to the main PSD composition file.
Resize this gif in the composition file until you're happy with the placement

Duplicate this gif. Sharpen the bottom layer (highlighted in yellow), and then select the top layer (highlighted in green) & go to Filter > Neural Filters

I like to use Style Transfer and Landscape Mixer to create artistic effects from Neural Filters. In this particular example, I've chosen Landscape Mixer
Select a preset or feed a custom image to the filter (here I chose a texture that I've on my computer)

Play around with the different sliders e.g. time of the day / seasons
Important: uncheck "Harmonise Subject" & "Preserve Subject" - these two settings are known to cause performance issues when you render a multiframe smart object (e.g. for a gif)

Once you're happy with the artistic effect, press OK
To ensure you preserve the actual subject you want to gif (bc Preserve Subject is unchecked), add a layer mask onto the top layer (with Neural Filters) and mask out the facial region. You might need to play around with the Layer Mask Position keyframes or Rotoscope your subject in the process.
After you're happy with the masking, flatten / render this composition file and voila!

Example 5: Putting it all together | sample gifset
Let's recap on the Neural Filters gifmaking workflow and where Stage I and Stage II fit in my gifmaking process:
i. Preparing & enhancing the component gifs
Prepare all component gifs and convert them to smart layers
Stage I: Add base colourings & apply Photo Restoration / JPEG Artefacts Removal to enhance the gif's image quality
Flatten all of these component gifs and convert them back to Smart Video Layers (this process can take a lot of time)
Some of these enhanced gifs will be Rotoscoped so this is done before adding the gifs to the big PSD composition file
ii. Setting up the big PSD composition file
Make a separate PSD composition file (Ctrl / Cmmd + N) that's of Tumblr dimension (e.g. 540px in width)
Drag all of the component gifs used into this PSD composition file
Enable Video Timeline and trim the work area
In the composition file, resize / move the component gifs until you're happy with the placement & sharpen these gifs if you haven't already done so
Duplicate the layers that you want to use Neural Filters on
iii. Working with Neural Filters in the PSD composition file
Stage II: Neural Filters to create artistic effects / more colour manipulations!
Mask the smart layers with Neural Filters to both preserve the subject and avoid colouring issues from the filters
Flatten / render the PSD composition file: the more component gifs in your composition file, the longer the exporting will take. (I prefer to render the composition file into a .mov clip to prevent overriding a file that I've spent effort putting together.)
Note: In some of my layout gifsets (where I've heavily used Neural Filters in Stage II), the rendering time for the panel took more than 20 minutes. This is one of the rare instances where I was maxing out my computer's memory.
Useful things to take note of:
Important: If you're using Neural Filters for Colour Manipulation or Artistic Effects, you need to take a lot of care ensuring that the skin tone of nonwhite characters / individuals is accurately coloured
Use the Facial Enhancement slider from Photo Restoration in moderation, if you max out the slider value you risk oversharpening your gif later on in your gifmaking workflow
You will get higher quality results from Neural Filters by working with larger image dimensions: This gives Neural Filters more pixels to work with. You also get better quality results by feeding higher resolution reference images to the Neural Filters.
Makeup Transfer is more stable when the person / character has minimal motion in your gif
You might get unexpected results from Landscape Mixer if you feed a reference image that don't feature a distinctive landscape. This is not always a bad thing: for instance, I have used this texture as a reference image for Landscape Mixer, to create the shimmery effects as seen in this gifset
5. Testing your system
If this is the first time you're applying Neural Filters directly onto a gif, it will be helpful to test out your system yourself. This will help:
Gauge the expected rendering time that you'll need to wait for your gif to export, given specific Neural Filters that you've used
Identify potential performance issues when you render the gif: this is important and will determine whether you will need to fully playback your gif before flattening / rendering the file.
Understand how your system's resources are being utilised: Inputs from Windows PC users & Mac users alike are welcome!
About the Neural Filters test files:
Contains six distinct files, each using different Neural Filters
Two sizes of test files: one copy in full HD (1080p) and another copy downsized to 540px
One folder containing the flattened / rendered test files
How to use the Neural Filters test files:
What you need:
Photoshop 2022 or newer (recommended: 2023 or later)
Install the following Neural Filters: Landscape Mixer / Style Transfer / Colour Transfer / Colourise / Photo Restoration / Depth Blur
Recommended for some Apple Silicon-based MacBook Pro models: Enable High Power Mode
How to use the test files:
For optimal performance, close all background apps
Open a test file
Flatten the test file into frames (load this action pack & play the “flatten” action)
Take note of the time it takes until you’re directed to the frame animation interface
Compare the rendered frames to the expected results in this folder: check that all of the frames look the same. If they don't, you will need to fully playback the test file in full before flattening the file.†
Re-run the test file without the Neural Filters and take note of how long it takes before you're directed to the frame animation interface
Recommended: Take note of how your system is utilised during the rendering process (more info here for MacOS users)
†This is a performance issue known as flickering that I will discuss in the next section. If you come across this, you'll have to playback a gif where you've used Neural Filters (on the video timeline) in full, prior to flattening / rendering it.
Factors that could affect the rendering performance / time (more info):
The number of frames, dimension, and colour bit depth of your gif
If you use Neural Filters with facial recognition features, the rendering time will be affected by the number of characters / individuals in your gif
Most resource intensive filters (powered by largest machine learning models): Landscape Mixer / Photo Restoration (with Facial Enhancement) / and JPEG Artefacts Removal
Least resource intensive filters (smallest machine learning models): Colour Transfer / Colourise
The number of Neural Filters that you apply at once / The number of component gifs with Neural Filters in your PSD file
Your system: system memory, the GPU, and the architecture of the system's CPU+++
+++ Rendering a gif with Neural Filters demands a lot of system memory & GPU horsepower. Rendering will be faster & more reliable on newer computers, as these systems have CPU & GPU with more modern instruction sets that are geared towards machine learning-based tasks.
Additionally, the unified memory architecture of Apple Silicon M-series chips are found to be quite efficient at processing Neural Filters.
6. Performance issues & workarounds
Common Performance issues:
I will discuss several common issues related to rendering or exporting a multi-frame smart object (e.g. your composite gif) that uses Neural Filters below. This is commonly caused by insufficient system memory and/or the GPU.
Flickering frames: in the flattened / rendered file, Neural Filters aren't applied to some of the frames+-+
Scrambled frames: the frames in the flattened / rendered file isn't in order
Neural Filters exceeded the timeout limit error: this is normally a software related issue
Long export / rendering time: long rendering time is expected in heavy workflows
Laggy Photoshop / system interface: having to wait quite a long time to preview the next frame on the timeline
Issues with Landscape Mixer: Using the filter gives ill-defined defined results (Common in older systems)--
Workarounds:
Workarounds that could reduce unreliable rendering performance & long rendering time:
Close other apps running in the background
Work with smaller colour bit depth (i.e. 8-bit rather than 16-bit)
Downsize your gif before converting to the video timeline-+-
Try to keep the number of frames as low as possible
Avoid stacking multiple Neural Filters at once. Try applying & rendering the filters that you want one by one
Specific workarounds for specific issues:
How to resolve flickering frames: If you come across flickering, you will need to playback your gif on the video timeline in full to find the frames where the filter isn't applied. You will need to select all of the frames to allow Photoshop to reprocess these, before you render your gif.+-+
What to do if you come across Neural Filters timeout error? This is caused by several incompatible Neural Filters e.g. Harmonisation (both the filter itself and as a setting in Landscape Mixer), Scratch Reduction in Photo Restoration, and trying to stack multiple Neural Filters with facial recognition features.
If the timeout error is caused by stacking multiple filters, a feasible workaround is to apply the Neural Filters that you want to use one by one over multiple rendering sessions, rather all of them in one go.
+-+This is a very common issue for Apple Silicon-based Macs. Flickering happens when a gif with Neural Filters is rendered without being previously played back in the timeline.
This issue is likely related to the memory bandwidth & the GPU cores of the chips, because not all Apple Silicon-based Macs exhibit this behaviour (i.e. devices equipped with Max / Ultra M-series chips are mostly unaffected).
-- As mentioned in the supplementary page, Landscape Mixer requires a lot of GPU horsepower to be fully rendered. For older systems (pre-2017 builds), there are no workarounds other than to avoid using this filter.
-+- For smaller dimensions, the size of the machine learning models powering the filters play an outsized role in the rendering time (i.e. marginal reduction in rendering time when downsizing 1080p file to Tumblr dimensions). If you use filters powered by larger models e.g. Landscape Mixer and Photo Restoration, you will need to be very patient when exporting your gif.
7. More useful resources on using Neural Filters
Creating animations with Neural Filters effects | Max Novak
Using Neural Filters to colour correct by @edteachs
I hope this is helpful! If you have any questions or need any help related to the tutorial, feel free to send me an ask 💖
#photoshop tutorial#gif tutorial#dearindies#usernik#useryoshi#usershreyu#userisaiah#userroza#userrobin#userraffa#usercats#userriel#useralien#userjoeys#usertj#alielook#swearphil#*#my resources#my tutorials
388 notes
·
View notes
Text
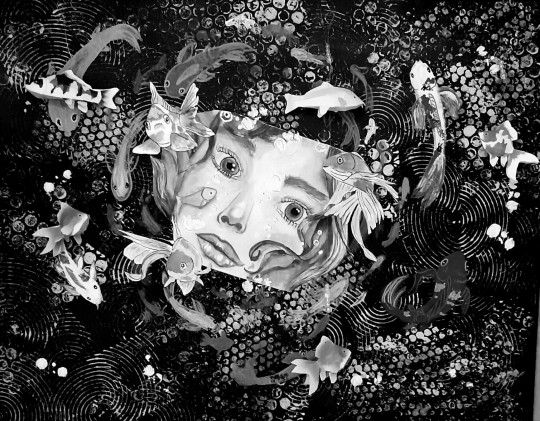
My latest mixed media piece, titled 'Confusing thoughts, slippery dreams'.
The face is watercolour, the background acrylics, the 3d fish are papercraft. I'm really pleased with the result.

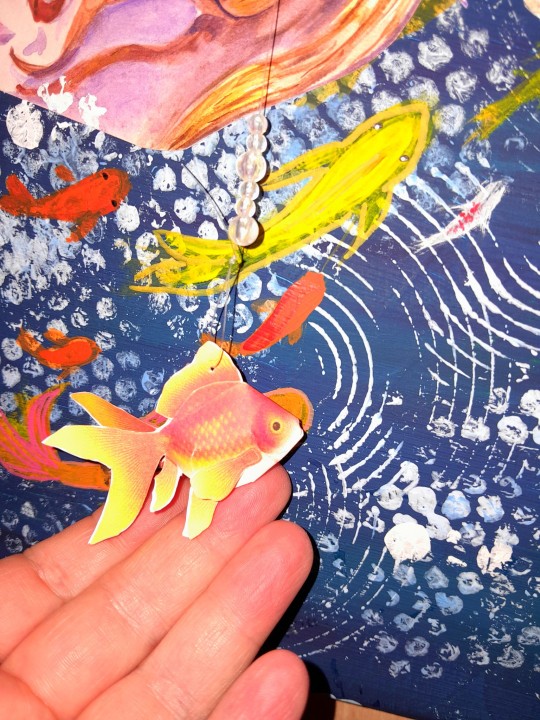

I also like the b&w filter over it.
#art#my art#mixed media#canvas#acrylics#art therapy#goldfish#portrait#watercolour#i'm proud of myself#and glad that the painting is finally out of my brain
155 notes
·
View notes
Text

spotted on the wall behind the white horse theater!!
Happy one year to Bolt in the Blue by @valeriianz ! Truly the best band au fics I've ever read, I am Endless' #2 fan forever (#1 is Hob, of course) 💙🎸✨
+ alt. colors for the flyer & other scans:
i love taking advantage of my art uni's massive (MASSIVE) scanners for literally anything i can. it's got the most gorgeous grit and scan banding that photoshop trickery cant replicate (though i try lol). so, yes, i literally printed out the b&w flyers, scanned them in, then added color and printed them again to stick on my wall haha.
when digitally adding color, i wanted it to really feel like black ink on colored paper instead of trying to print on color paper and then scan it again (i have done this before idk). i think the xerox-y look is pretty convincing! the green, pink, and purple are my personal favs.
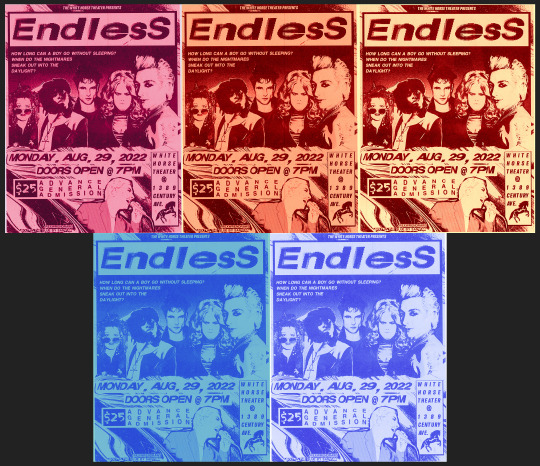
an irl friend suggest i try non-black-ink versions to see what i liked. i think they look cool but some of the text gets a bit lost. still, i like the pale yellow+red ink one. (this almost makes me want to try riso printing this to see what it'd look like 👀👀).

^ this is what the white horse metal barrier edit looked like before I added the Huji Cam filter lol. it wasn't feeling convincing enough like this, so i actually took a photo of my laptop screen with the filter and somehow that looked more real than the actual shot from the show lol. (also, because i've stared at this screenshot for so long, the orange/yellow June 12th poster? is everything on it a reference?? loll)
anyway, had a lot of fun making this!! feel free to print if you want!! READ THE FIC EVERYONE GO READ BOLT IN THE BLUE RIGHT NOW!!!!!!!!!!!!!!!!!!
#bolt in the blue#the sandman#dreamling#dream of the endless#morpheus#desire of the endless#despair of the endless#((it is SO hard to find pictures of donna thats not smiling haha i love her))#death of the endless#delirium of the endless#dc#rex draws#sorta. i dont have an editing tag on this blog hm#rex process#i was also going to try to edit hob/into the first pic but couldnt decide on a photo to use lol. hes there in spirit ofc#desire may be the biggest on the poster but morphy's centered in the white horse manip hehe see what i did there.. framing and symbolism wo#FEEL FREE TO PRINT BTW! use the b/w one!!!!! BUT LIKE DONT REPOST OFC#valeriianz
304 notes
·
View notes
Note
Hi, I'm sure you get this often but I really love your recent genshin artwork, do you think you could explain your painting process? I love the colouring effect in that piece especially. Thank you.
Thank you so much! I got a few messages like this from my previous piece (thank you guys for the staff pick & blaze btw, I really didn't expect all the support😭) so I thought I'd share a bit of my process below as thanks.
I always do my lineart first because it feels less daunting to me when applying colours. I will do some rough colours first so I can easily adjust it to my liking.
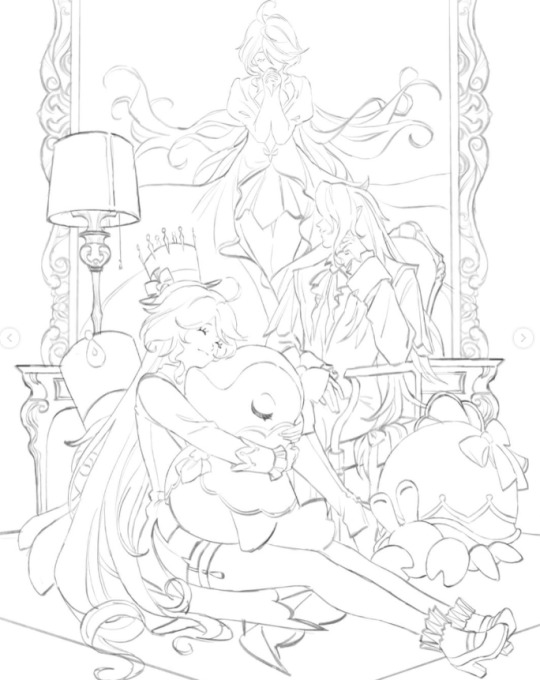

Next, I make sure to separate each character into different layers when I clean it up. I like to work one character or object at a time, it's less overwhelming for me that way, and I can use clipping masks for ease of rendering.

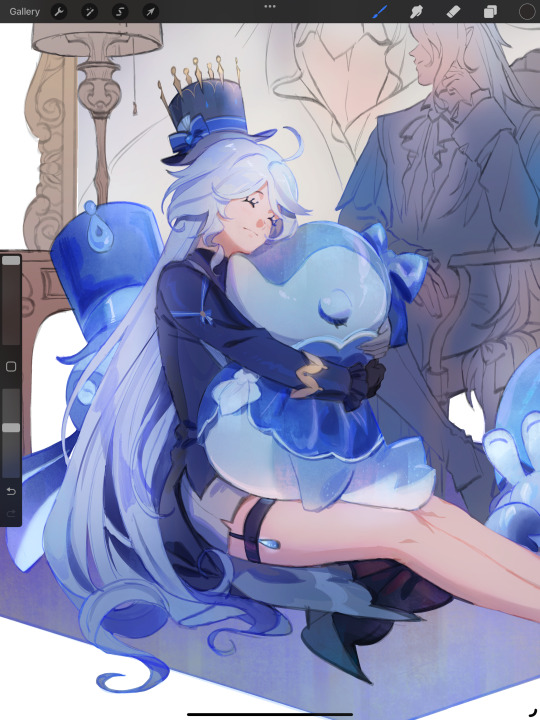
I'll usually apply some adjustment layers on top of the base layer for shadows and highlights. When I say base layer, I just mean a layer of the colour without any effects.
I like using 'hard light' for shadows, and 'screen' for highlights, but you can really use whatever clicks with you.
Rinse & repeat this process for every character in the illustration. Note that I make Furina the focus so everything behind her will be less rendered than the elements in front of them (Neuvillette is a lot less rendered compared to Furina, and the painting in the back barely has much shading).
Once I render out each asset in the illustration and add shadows & highlights to my liking, I then to merge foreground/ midground/ background elements so I can make the overall illustration clearer to read. I don't want it to feel messy or overcrowded, and I think it's easy to get tunnel-visioned in small details and lose the clarity of the entire illustration.
Make sure to zoom out constantly and make your illustration B&W to check the values to see if the drawing is clear.

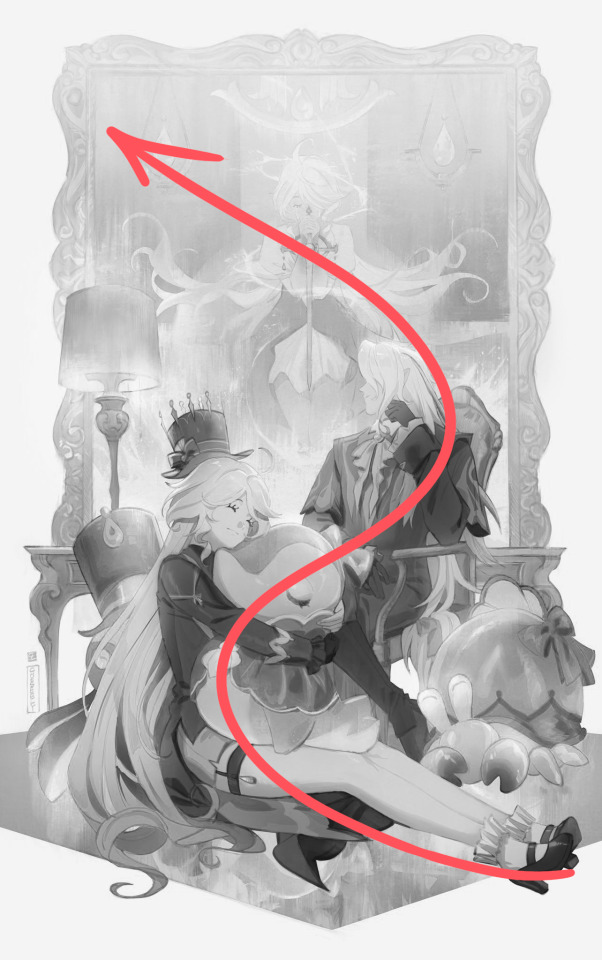
I created a simple S curve with the values for readability, and have the foreground elements have darker values & contrasts.
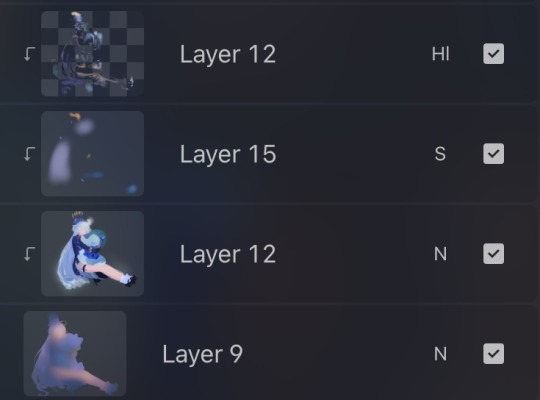
As for the BG, I wanted to add more textures into the drawing, particularly the painting in the back. Here's an image of it when I only added in the base colours.
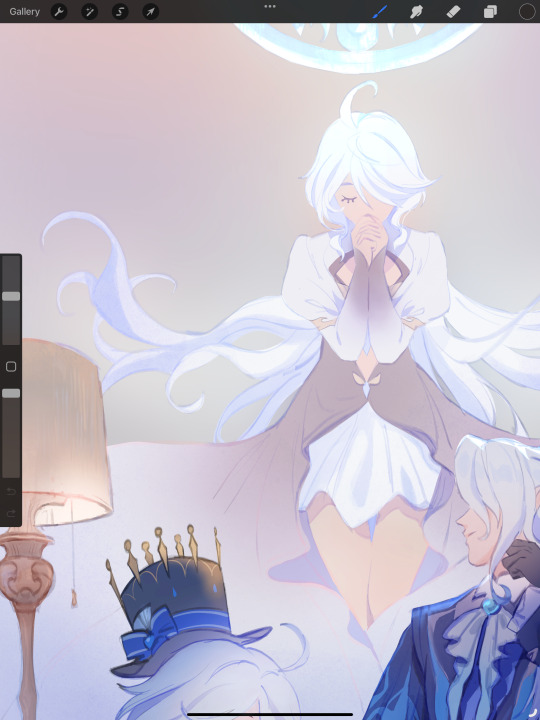
I use the smudge tool to create more texture once I fill in the base colours. Since I don't really 'paint' anything with the textures in, I just put in the base colours and take a textured brush to smudge it. However, over-smudging can lose the painterly texture I want, so I usually smudge vertically or horizontally in a single stroke to create a sense of movement.
Another thing to note is that I only textured the BG, I thought it would help it blend into the background a bit better. I usually wouldn't do this for the foreground because I want those elements to be clearer.
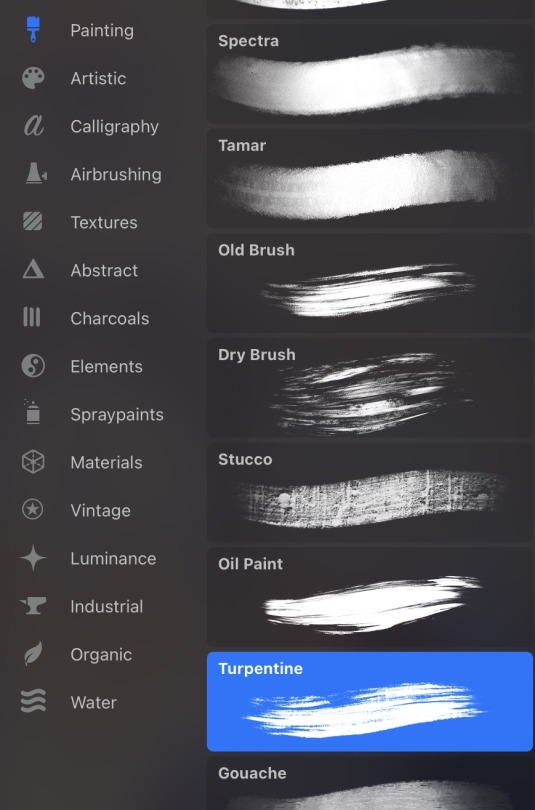
At the very end, I tend to spend a fair bit of time just fiddling with more adjustment layers, various filters (such as blur, or noise), or liquify small details to really finalize the piece. Just vibes...basically this is me

Anyway, I hope that was helpful & it made sense!! Feel free to message me if you have any other questions & I'll try my best to answer! I might've glazed over a lot since I didn't wanna make this too long.
207 notes
·
View notes
Note
I've been meaning to ask this question but never have. The quality of your photos is just amazing; not simply in the subject (the beautiful and stunning you) but the image quality, the lighting, and the colours.
My question is what do you use to take these photos? Is it a digital SLR, a phone app in particular you'd recommend, etc. And do you ever use post production to improve contrast, crop the frame, blur backgrounds, etc?
I mainly would like to say that I'm always seriously impressed with what you post here, and thanks!
Aww thank you!
I just use my phone. I find that the cameras on phones are such amazing quality nowadays, it's sufficient for what I need it for. Currently, I have a Galaxy S23 Ultra (sorry iPhone peeps, I'm an android girl 🤣🤷🏻♀️) and I just use the camera, no app.
We do have a few digital professional cameras, but my husband just likes to use those for landscape photos 🤣🏔🌄🏞
I have a pretty specific style and I think post-production is GOLD--but I don't mean filters and beautifying effects. I'm a stickler about framing, lighting, background (it makes me crazy to have a cluttered background), sharpness, and saturation. If it's b&w, then I tend to prefer high contrast. Shadow and light are just amazing props.
And the context. The story. The authenticity of the photo. That's all super important to me too.
I think attitude is important. I don't shoot unless I feel inspiration. I actually used to shoot a lot more, but since life has been very busy, I don't force it. I do it when it makes me happy or if an idea really needs to be played out to satisfy my curiosity/creativity.
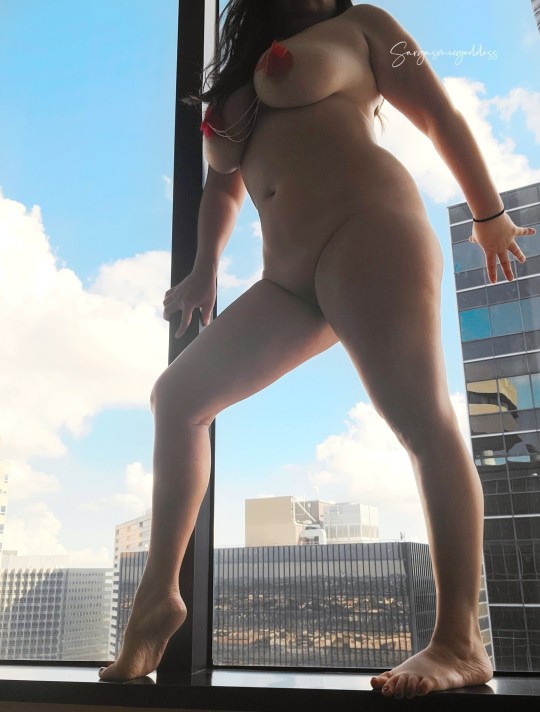
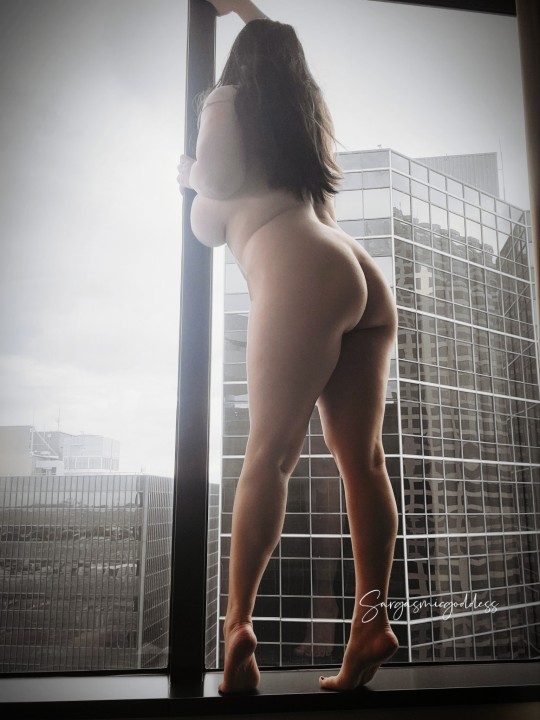
There's currently a beautifully edited shot that I'm mulling over posting for Halloween. It's full nudity, which I dont post much at all. But I usually will post full nudity when I just think the photo is stunning.....so we shall see 🤔
I sometimes wish I had a camera person because some shoots are just hard to frame and execute by yourself.
Here's an example of one of my favorite sets. The framing, lighting, background...just a favorite all around.
209 notes
·
View notes
Note
Hiiiii. Can i ask how do do yo take pics of your drawings? Like they look clear, without perspective distortions or cellphone shadows. Whenever i take pics of my doodles they end looking weird af. Thats why i shy from posting them
ok so I’ve found that a lamp is the best light source, you’ve got to angle everything a bit oddly to maximize success but it really is worth it. I have a lamp that can bend its neck, so I usually make it face out like so:
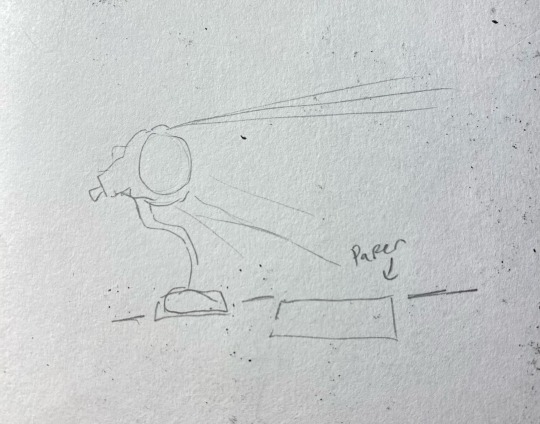
I found that having it face directly towards the paper creates too much glare and shadowing, so angling it to make the beam of light somewhat perpendicular to the paper creates a better spread of light and minimizes shadows.
Natural lighting works on occasion, but it’s not always available and I think it looks too blue for what I’m going for. Also a good amount of photo tuning helps make the art look better (like ye ol photo editing that comes built into your photos app, and Picsart is a good one too for extra zest)
Also! if you’re taking pictures of uncolored doodles definitely slap a b&w filter on there! I think it helps a ton with making the lighting look better.
Hopefully this was a bit helpful um good luck !!
#ask#there really is a lot of tweaking done in photo editing ngl#like color correction or just making things feel like they do when you look at it irl
83 notes
·
View notes
Text
Why Not Write Cryptography
I learned Python in high school in 2003. This was unusual at the time. We were part of a pilot project, testing new teaching materials. The official syllabus still expected us to use PASCAL. In order to satisfy the requirements, we had to learn PASCAL too, after Python. I don't know if PASCAL is still standard.
Some of the early Python programming lessons focused on cryptography. We didn't really learn anything about cryptography itself then, it was all just toy problems to demonstrate basic programming concepts like loops and recursion. Beginners can easily implement some old, outdated ciphers like Caesar, Vigenère, arbitrary 26-letter substitutions, transpositions, and so on.
The Vigenère cipher will be important. It goes like this: First, in order to work with letters, we assign numbers from 0 to 25 to the 26 letters of the alphabet, so A is 0, B is 1, C is 2 and so on. In the programs we wrote, we had to strip out all punctuation and spaces, write everything in uppercase and use the standard transliteration rules for Ä, Ö, Ü, and ß. That's just the encoding part. Now comes the encryption part. For every letter in the plain text, we add the next letter from the key, modulo 26, round robin style. The key is repeated after we get tot he end. Encrypting "HELLOWORLD" with the key "ABC" yields ["H"+"A", "E"+"B", "L"+"C", "L"+"A", "O"+"B", "W"+"C", "O"+"A", "R"+"B", "L"+"C", "D"+"A"], or "HFNLPYOLND". If this short example didn't click for you, you can look it up on Wikipedia and blame me for explaining it badly.
Then our teacher left in the middle of the school year, and a different one took over. He was unfamiliar with encryption algorithms. He took us through some of the exercises about breaking the Caesar cipher with statistics. Then he proclaimed, based on some back-of-the-envelope calculations, that a Vigenère cipher with a long enough key, with the length unknown to the attacker, is "basically uncrackable". You can't brute-force a 20-letter key, and there are no significant statistical patterns.
I told him this wasn't true. If you re-use a Vigenère key, it's like re-using a one time pad key. At the time I just had read the first chapters of Bruce Schneier's "Applied Cryptography", and some pop history books about cold war spy stuff. I knew about the problem with re-using a one-time pad. A one time pad is the same as if your Vigenère key is as long as the message, so there is no way to make any inferences from one letter of the encrypted message to another letter of the plain text. This is mathematically proven to be completely uncrackable, as long as you use the key only one time, hence the name. Re-use of one-time pads actually happened during the cold war. Spy agencies communicated through number stations and one-time pads, but at some point, the Soviets either killed some of their cryptographers in a purge, or they messed up their book-keeping, and they re-used some of their keys. The Americans could decrypt the messages.
Here is how: If you have message $A$ and message $B$, and you re-use the key $K$, then an attacker can take the encrypted messages $A+K$ and $B+K$, and subtract them. That creates $(A+K) - (B+K) = A - B + K - K = A - B$. If you re-use a one-time pad, the attacker can just filter the key out and calculate the difference between two plaintexts.
My teacher didn't know that. He had done a quick back-of-the-envelope calculation about the time it would take to brute-force a 20 letter key, and the likelihood of accidentally arriving at something that would resemble the distribution of letters in the German language. In his mind, a 20 letter key or longer was impossible to crack. At the time, I wouldn't have known how to calculate that probability.
When I challenged his assertion that it would be "uncrackable", he created two messages that were written in German, and pasted them into the program we had been using in class, with a randomly generated key of undisclosed length. He gave me the encrypted output.
Instead of brute-forcing keys, I decided to apply what I knew about re-using one time pads. I wrote a program that takes some of the most common German words, and added them to sections of $(A-B)$. If a word was equal to a section of $B$, then this would generate a section of $A$. Then I used a large spellchecking dictionary to see if the section of $A$ generated by guessing a section of $B$ contained any valid German words. If yes, it would print the guessed word in $B$, the section of $A$, and the corresponding section of the key. There was only a little bit of key material that was common to multiple results, but that was enough to establish how long they key was. From there, I modified my program so that I could interactively try to guess words and it would decrypt the rest of the text based on my guess. The messages were two articles from the local newspaper.
When I showed the decrypted messages to my teacher the next week, got annoyed, and accused me of cheating. Had I installed a keylogger on his machine? Had I rigged his encryption program to leak key material? Had I exploited the old Python random number generator that isn't really random enough for cryptography (but good enough for games and simulations)?
Then I explained my approach. My teacher insisted that this solution didn't count, because it relied on guessing words. It would never have worked on random numeric data. I was just lucky that the messages were written in a language I speak. I could have cheated by using a search engine to find the newspaper articles on the web.
Now the lesson you should take away from this is not that I am smart and teachers are sore losers.
Lesson one: Everybody can build an encryption scheme or security system that he himself can't defeat. That doesn't mean others can't defeat it. You can also create an secret alphabet to protect your teenage diary from your kid sister. It's not practical to use that as an encryption scheme for banking. Something that works for your diary will in all likelihood be inappropriate for online banking, never mind state secrets. You never know if a teenage diary won't be stolen by a determined thief who thinks it holds the secret to a Bitcoin wallet passphrase, or if someone is re-using his banking password in your online game.
Lesson two: When you build a security system, you often accidentally design around an "intended attack". If you build a lock to be especially pick-proof, a burglar can still kick in the door, or break a window. Or maybe a new variation of the old "slide a piece of paper under the door and push the key through" trick works. Non-security experts are especially susceptible to this. Experts in one domain are often blind to attacks/exploits that make use of a different domain. It's like the physicist who saw a magic show and thought it must be powerful magnets at work, when it was actually invisible ropes.
Lesson three: Sometimes a real world problem is a great toy problem, but the easy and didactic toy solution is a really bad real world solution. Encryption was a fun way to teach programming, not a good way to teach encryption. There are many problems like that, like 3D rendering, Chess AI, and neural networks, where the real-world solution is not just more sophisticated than the toy solution, but a completely different architecture with completely different data structures. My own interactive codebreaking program did not work like modern approaches works either.
Lesson four: Don't roll your own cryptography. Don't even implement a known encryption algorithm. Use a cryptography library. Chances are you are not Bruce Schneier or Dan J Bernstein. It's harder than you thought. Unless you are doing a toy programming project to teach programming, it's not a good idea. If you don't take this advice to heart, a teenager with something to prove, somebody much less knowledgeable but with more time on his hands, might cause you trouble.
345 notes
·
View notes
Text
Artshield
I was going to flop in bed and try to draw from there, but the sudden swarm of AI shit on another of my accounts fueled me with spite, so I'm writing this post NOW rather than tomorrow when I'll be more awake.
If you can't run Glaze/Nightshade because of the insane specs required for it, give a try to Artshield.
It's a web-based app that will let you load all the pics you want and protect them with a big, invisible watermark all over it. It also has a checker option to use after you've shielded your art, to be sure it worked.
Now, I'm terrible with math so I can't explain how it exactly work, but here's the explanation on their blog. If someone who's more math-savvy than me wants to add a simpler explanation to this post, please do!
While it can't poison AIs like Nightshade does, it's still a good solution if you can't run Glaze/Nightshade on your pc... like many of us, really. As I wrote on another post about Glaze, I have a pretty decent gaming pc that, while not being like high-end or anything (my GPU is a RTX 3060), suits my needs perfectly and runs all the games I'm interested in (Tekken 8's demo being the most recent thing).
Yet, in order to try Nightshade, I had to close all the apps I had running in the background, which were, in that moment, Opera and Discord. Only when I shut them down, it finally started. 10 minutes for the mid setting and the result was awful.
I tried WebGlaze (not Cara yet), and the results were also awful, given you can't control the strenght of the glazing much.
I understand it might be hard to develop this kind of technology, but I wish they would meet us halfway since the majority of people use old machines, laptops (a friend of mine tried running Glaze on hers and the fans started spinning like it was ready to fly) or even just tablets and phones, so those specs are hard to meet.
That's why I want to share Artshield, as a solution for those of you who can't run Glaze and Nightshade.
Artshield's only big limitation is that it won't work with white backgrounds, so try to add a color layer to your white background before shielding it. Same for B/W images.
Other tips I can suggest for trying to protect your works:
Post at the lowest resolution you can: I go for 72 DPI, keeping bigger sizes and high quality files only for Ko-Fi rewards and clients' files
Add a noise filter: I always do this because I like the paper-like, grainy feel it gives to my art, but I read once it might messes with AI's scrapers. While I don't know if this is still true, it's worth trying it
Don't forget a big visible watermark (aside from the Artshield one)!
Hope this will help other strugglin artists, I never see Artshield suggested around, especially in posts about Glaze and Nightshade, so I decided to write this one.
Go and shield your art!
#artshield#nightshade#glaze#protecting artworks#artists on tumblr#text post#text posts#useful#I hope
74 notes
·
View notes
Text
another piece of the clowning puzzle. lol. since wyb has decided to show off his camera 📷
part one of this cpn is here incase you are confused
now that we have a clearer and more HD look at the camera he is using, we have another spin on it that may or may not be true. lol. i mean that’s how cpns work anyway.
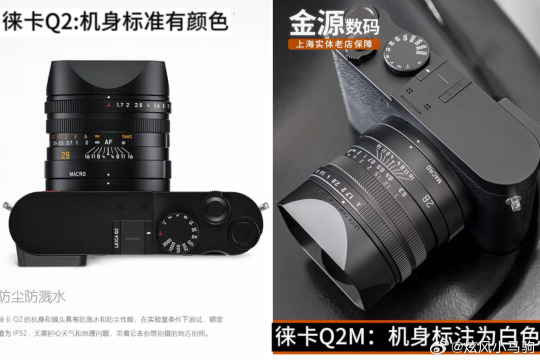
We thought that ZZ was using a Leica Q2 because we saw it posted 2 years ago. However, it turns out that there is actually another version of the Leica Q2, which is the Leica Q2 Monochrome. What is the difference between the two? A simple understanding is that Q2 is a color camera, while Q2M is a black and white camera. It is specially designed for people who like black and white images, and the one ZZ uses is Q2M. There are three clues that confirms this:
[1] From the appearance, there is no difference in structure between Q2 and Q2M, but the Q2 body is marked with red, orange and other numbers, while the Q2M is a black and white image, so all the markings on the body are complete. It's black and white. It can be seen from the previous photos taken by fans that although they are blurry, the markings on the body are all black and white.
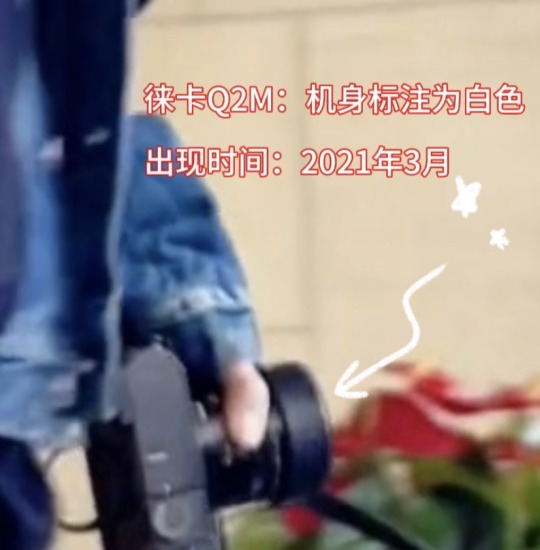
[2] The Leica Q2M was launched in November 2020, and the time when Zhan appeared with the Q2M and was photographed was in March 21 ( *He used Leica Q2 in 2019). In October 21, he released a photo in Oasis. There is a black and white image of the West Lake, which should be taken by Q2M.
[3] ZZ has always been a fan of black and white images, and has a lot of photography works.

Now as for Bobo, same with Q2, Leica M11 also has a Monochrome version. The concept is the same as Q2M. The M11m is a full-frame black and white back-illuminated sensor that deliberately omits color filters to improve the quality of black and white images to an unprecedented level. In other words, the Leica M11m is currently the latest and most powerful black and white image camera. Two clues for this:
[1] The moon in Bobo’s Mid-Autumn Festival is black and white, and the resolution is exactly the same as M11m.
[2] The latest photo just posted by YBO, there is no red mark next to the viewfinder of the camera in Bobo’s hand. The one with the red mark is the Leica M11, and the one without the red mark is the Leica M11m.

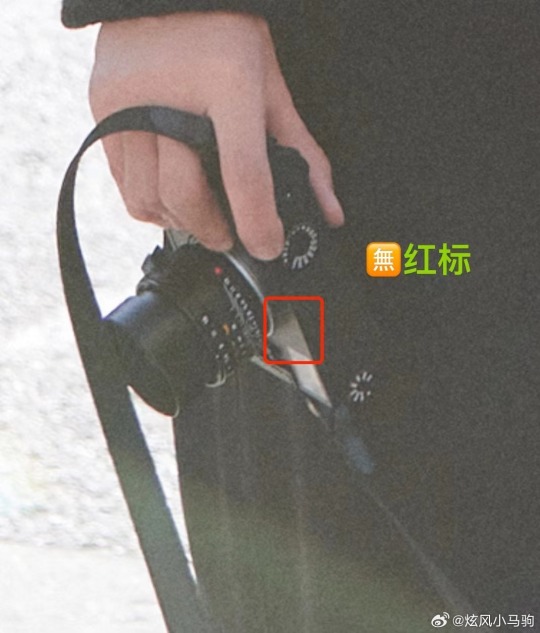
So yeah, They have matching b&w cameras. 🤍🖤
ZZ who used Leica in 2019, then switched to the b&w version of it after. That means he really knows his way around this camera. It makes sense that he will gift something from the same brand to WYB. He is probably interested in the whole B&W aesthetic too so it’s perfect for him.
source: 炫风小马驹
#i guess i’m not sleeping so im fuelling with candies lol#yizhan#bjyx#there is no science here i’m just clowning like i always do
77 notes
·
View notes
Last Seen Blogs

godsvictim-blog1
(—albatross;)
arcticflood
idk.

natydeath
Sem título

lowestflightfare-lff-2022
Manish Nigam
soaproll
✦ 𝐚𝐬 𝐚𝐛𝐨𝐯𝐞 𝐬𝐨 𝐛𝐞𝐥𝐨𝐰