#active dry yeast bread recipe
Text
The Role of Gut Flora in Weight Loss: An Evaluation of Bread Kvass from a Personal Perspective
In this blog post, I will delve into how the microorganisms in our gut influence our weight and provide a personal perspective on the method of using bread kvass.
The significance of gut health for overall well-being is increasingly under scrutiny in research. Particularly concerning weight loss, gut flora plays a crucial role. In this blog post, I will delve into how the microorganisms in our gut influence our weight and provide a personal perspective on the method of using bread kvass.
buy top rated Bread kvas
Gut Flora and Weight Loss: A Complex…

View On WordPress
#2023 recipes#3 kitchen#30 minutes recipes#5 recipes#5 star recipes#a simple recipe#active dry yeast bread recipe#active dry yeast recipes#active sour dough starter#active yeast#add herbs#add ingredients get recipes#alcohol drink recipes#alcohol drinks#alcohol mix drinks recipe#alcohol mixer drinks#alcohol recipes#all day recipes#all food recipes#all good recipes#all you can drink#any recipe#apples in a can#at home kitchen#bake bread recipe#baking dried fruit#baking homemade bread#baking with apples recipes#basic recipe for bread#basic recipes
0 notes
Text
#food#foodtok#tiktok#video#dessert#desserts#breakfast#Bread#active dry yeast#yeast#lemon poppy seed#lemon#lemon curd#poppy seed#poppy seeds#poppy seed roll recipe
71 notes
·
View notes
Text
Ka’ak Al-Quds Bread (click link for recipe)
INGREDIENTS
Yeast mixture:
2 cups Warm water
1 tbsp Active dry yeast
1 tbsp Sugar
Rest of dough ingredients:
5 1/2 cups All-purpose flour
1 tbsp Salt
1 tsp Baking powder
1/4 cup Olive oil
3 tbsp Powdered milk
1/4 – 1/2 cup Water if you feel like your dough is a bit dry, start with adding an extra 1/4 cup of water and go from there. The factors of where you live (the climate/altitude plays a big part in most bread recipes)
Topping:
1 cup Water
1 tbsp Pomegranate molasses
1 tbsp Honey
8 oz Sesame seeds
5K notes
·
View notes
Text
The Best Homemade Bread Recipe - For Beginners
Officially my favorite bread recipe. After some trial and error, this is what I've come up with.
Back when… I was a bread baker at our local country store. They taught me how to make bread and I’ve been making a lot of my own bread ever since.
But after much practice at home, this is my favorite bread recipe!
I’ve been using active dry yeast and it’s worked the best for us in our bread recipes.
Foamed Yeast Water
One of the tricks to making bread is letting the yeast water get foamy and…
View On WordPress
0 notes
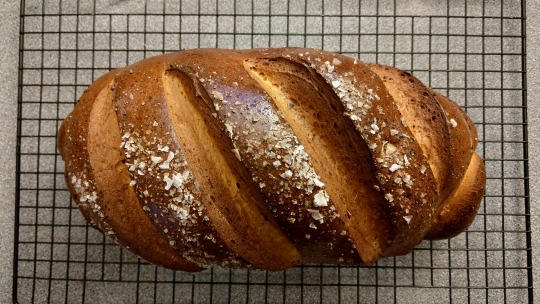
Text
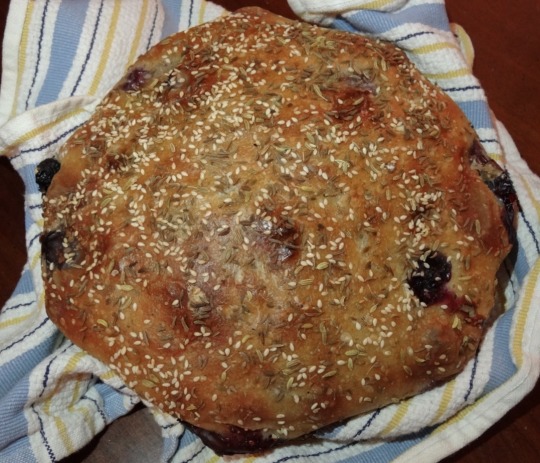
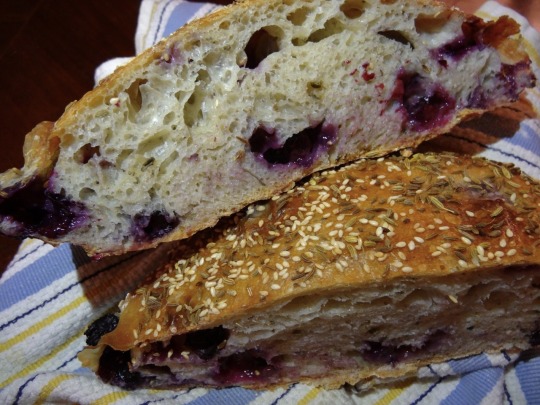
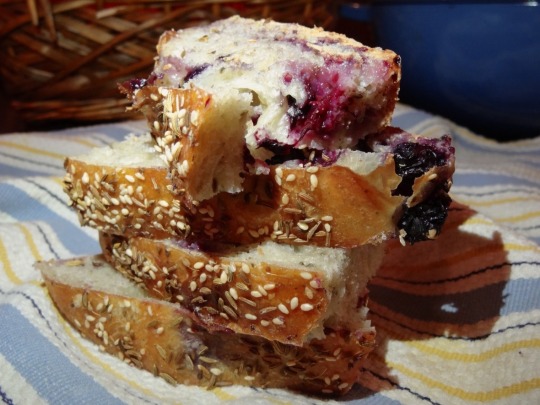
[ID: First image is of a golden brown boule studded with blueberries and covered with seeds; second image shows the boule cut in half to show a holely bread with blueberries throughout. End ID]
Rustic no-knead blueberry bread
This is a crusty, no-knead, sweet-savory bread that pairs blueberries with spices and herbs inspired by West Asian cooking. Fennel, anise, sesame, and mahlab powder are reminiscent of the دُقَّة كَعْك ("duqqa ka'k"; cake powder) used in pastries, while za'tar and caraway skew more savory.
The long rise yields a well-fermented dough with a robust flavor that stands up well against the sweetness and pungency of the fennel and aniseed. The result is a jammy, complex, aromatic boule.
This bread has an open, irregular crumb, great for slicing, toasting, dipping, or spreading. Try it with labna and honey, olive oil and za'tar, or a spreadable cheese. I've also made sandwiches with thick slices of this bread and fried, glazed tofu drizzled with tarator and topped with Iraqi mango pickles, to excellent effect.
Recipe under the cut!
Patreon | Paypal | Venmo
Makes one medium-sized boule.
Ingredients:
3 cups (360g) bread flour
2 tsp kosher salt
1/4 tsp dry active yeast
2 tsp mahlab powder (optional)
1 tsp fennel seed + 1 tsp aniseed, coarsely ground
About 1 2/3 cup water (room temperature)
1/2 cup firm fresh blueberries
1 Tbsp za’tar (wild thyme), crumbled
Additional fennel seeds, aniseed, caraway, and sesame, to top
Mahlab (محلب) powder is the ground-up pits of Mahleb cherries. It can be purchased at a halal or specialty spice store.
Za'tar (wild thyme) can be found in dried form at a halal grocery store. Note that the spice blend, which includes wild thyme, sumac, sesame seeds, and other spices, will also be labelled "za'tar." If you don't have or can't locate any of the herb itself, use any dried woody herb of your choice (e.g. rosemary, thyme, sage), chopped.
Instructions:
1. Making the dough. Measure flour into a large mixing bowl. Add salt, yeast, seeds, and thyme and stir to combine.
2. Gradually add water until a soft, sticky dough forms. You may need more or less than 1 2/3 cup.
3. Flatten dough in the bowl and top with some of the blueberries. Fold the dough to enclose the blueberries, add more blueberries on top, and fold again. Repeat until all blueberries are incorporated.
4. First rise. Shape dough into a ball and place in the bowl seam-side down. Pat the top of the dough with some olive oil and cover the bowl with a kitchen towel. Allow to rest at room temperature for 16-20 hours.
5. Shaping. Gently remove the dough from the bowl and allow it to deflate. Shape the boule by folding an edge in over the center, rotating the dough slightly, and repeating until you have gone all the way around.
6. Flip the ball over so the seam side is down. Place your hands on either side of the dough and then move them down towards the base of the boule, tucking some of the dough under and towards the seam, to tighten the top of the ball. Rotate the ball slightly and do this again, repeating until you've gone all the way around a couple times.
This is the basic method for shaping a boule, lightly adapted to avoid breaking any blueberries. If any of the blueberries start to pop out of the surface of the dough, just press them back in.
7. Second rise. Place your boule on a piece of parchment paper and cover with a kitchen towel. Allow to rise for 1-2 hours, until noticeably puffy.
8. Baking. Place a Dutch oven in your oven and preheat to 450 °F (230 °C). Remove the Dutch oven and place the boule, along with the parchment paper, inside. Put the lid on the Dutch oven and return it to the oven. Bake for 30 minutes.
9. Remove the Dutch oven's lid and bake bread for another 20 minutes, or until the crust is deeply golden brown.
To bake the bread without a Dutch oven, preheat a baking tray in the center of the oven, while preheating a skillet (rated to at least 450 °F) in the bottom; once preheated, transfer the bread and parchment paper to the tray, and pour a few cups of water in the skillet; bake for 30 minutes. Remove the skillet and bake another 20 minutes until golden brown.
Allow the bread to cool completely before cutting into it to avoid creating a mushy texture.
215 notes
·
View notes
Photo

Just out of the oven - a new recipe for a herb loaf which smells great, but is too hot to taste just yet.
Patience, patience... :->
The original recipe comes from one of @dduane‘s collection of comb-bound community cookbooks, being modified for use in Food & Cooking of the Middle Kingdoms.
This is the first time making it, and - Middle Kingdoms again - there are already a few substitutions to move further away from the Italian-influenced original. I’m sure there’ll be other changes before it finally goes onto the website, so treat the following recipe as a First Draft...
Ingredients:
1 cup warm water (110 degrees F/45 degrees C)
1 Tbsp white sugar
1 (1/4 ounce) package active dry yeast
3 cups bread flour
1/4 cup grated hard cheese (DD used Parmesan, though mature Cheddar or white Stilton would also work)
2 Tbsps oil (DD used pumpkin seed oil) ETA: thanks to me putting it away and not saying where, she couldn’t find it and used olive oil for this loaf
1 tsp salt
1/2 Tbsp each dried herbes de provence, thyme, chilli flakes, savory, tarragon
1/2 tsp garlic powder
1/2 tsp onion powder
Method:
Mix the warm water, sugar, and yeast together in a large bowl and wait until the mixture is foamy, about 5 minutes.
Stir 1 cup flour, all the cheese, oil, salt, herbs, garlic and onion powders into the yeast mixture, then gradually mix in the remaining flour until incorporated; the dough will be stiff.
Knead the dough on a lightly floured surface until smooth and silky, which should take 5 to 10 minutes (DD used a Kenwood stand mixer with dough hook, and kneading took 7 minutes at slow speed).
Place the dough into an oiled bowl and turn until the entire surface is coated, then cover with a damp dish towel and let it rise until doubled in volume, about 1 hour.
Punch the dough down to release excess air; shape into a loaf and place into a greased 5- x 9-inch loaf pan (DD rolled the dough into a sausage shape and put it on a baking sheet) then let it rise until doubled in volume, about 30 minutes.
Preheat the oven to 350 degrees F (175 degrees C).
Beat an egg and brush this wash onto the loaf, sprinkle on some herbs and Maldon salt, slash 3 or 4 times with a sharp knife or breadmaker’s lame and transfer at once to the oven.
Bake for 45-50 minutes until golden brown.
When done, remove from the pan or baking sheet and let cool on a wire rack for at least 15 minutes before slicing. (We’ve put ours in a bread bag and are leaving it overnight to let the crust soften a little; right now it’s so hard and brittle that slicing will cause a messy blizzard of fragments.)
669 notes
·
View notes
Text

Meticulous
B is for Bread
Ohstars Alphabet Prompts | G | 502 words | cw: grief
---
Eddie pulls his hair up into a tight bun and tugs the apron around his waist. It’s shorter on him than he remembers, the hem brushing against his upper thigh, but still long enough to cover the edge of the counter. It’s been too long.
He takes a moment to look at the counter in front of him. Eddie’s a chaotic man, his head filled with too many ideas at once that just spill into every aspect of his day-to-day life, but not here. Not with this. It’s as if putting on that apron quiets down his brain in a way his guitar and writing can’t, like his mind is some wild stallion that music can’t break enough to take to kiddy riding classes. Everything is laid out before him, organized within an inch of his life, to the point that Nancy Wheeler would probably ask him for tips on how he did it. That is if she ever found out about this.
Even though it’s the same bowls he had back at the trailer, the same utensils, the same pans, it all looks foreign in the same way it’s familiar. These are his mother’s things in a place she’ll never get to see, in a home he shares with a man she’ll never meet. He grips the edge of the counter, eyes squeezed shut, as he breathes deeply.
He doesn’t have to say anything to her to know she’s with him now.
When he opens his eyes, he gets to work. He combines his carefully measured ingredients together, starting with the dry ingredients before he slowly introduces the wet mixture together. He takes his time, making sure nothing gets spilled or added at the wrong time, as a dough forms at the base of the bowl. There’s not a recipe or a cookbook in front of him as he works, just the gentle words of his mother whispering in his mind as he lets the dough rise and then works it again.
While it rises for the final time, Eddie cleans the kitchen back up. He’s not usually this thorough, much to Steve’s chagrin, but there’s something about using his mother’s kitchen rags and humming along to her old records that makes him put in the extra effort. It’s a little pointless, since he’s not quite done yet, but his Momma would be proud.
Momma’s been gone longer than Eddie knew her. He’s baked this bread on her birthday every year more times than he made it with her. If he thinks too long on it, he can’t put it to words, can’t stomach the heaviness he feels or how unmoored it leaves him. It just means he has to take better care of the tools she left behind, to keep her here with him as long as he possibly can, and make sure he never forgets the original recipe. It’s stashed away in between the pages of a well-loved children’s book she used to read to him, along with a few pressed flowers from her hospital room, the last ones she ever saw.
Steve comes in as Eddie’s pulling the bread out from under the kitchen towel. He doesn’t say anything, just drops a kiss to the side of Eddie’s neck, squeezes his waist. He gets it. Steve holds Eddie as he braids the dough and puts the few loaves onto pans to bake. His touch activates something in Eddie, much like the yeast in his bread, but Steve doesn’t offer any kind words or condolences. There’s no need. Eddie can feel it.
Instead, Steve gently wipes away his tears and tightens his grip on Eddie’s waist. And once the bread is in the oven and the timer is set, he’ll gather Eddie in his arms, sway to Dolly’s words in the middle of the kitchen, and let Eddie let go when he’s ready.
---
Thank you for beta reading @lady-lostmind!!!
Ao3 Link
#ohstars fic#stranger things#steddie#eddie munson#steddie fic#steve harrington#tw grief#ohstars posting challenge#alphabet prompts
39 notes
·
View notes
Text
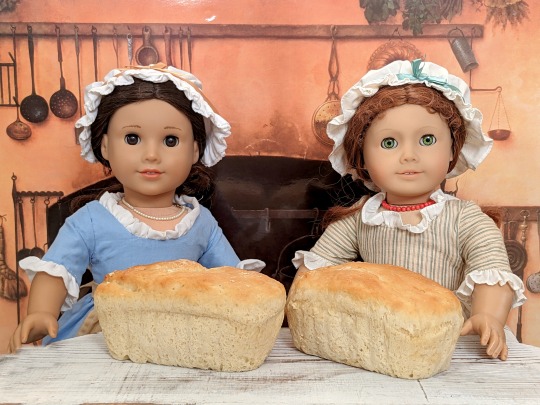

It's bread baking day at the Merriman household, and Felicity is happy to have her friend Elizabeth helping out with the tedious chore. Today they're making loaves of Sally Lunn bread, a soft and dense loaf rich with eggs and sugar, reminiscent of French brioche.
The recipe comes from Felicity's Cookbook, which I've owned for years and have used quite often. I made this bread for the very first time this week, and I was very happy with how it turned out. It's soft, flavorful, and doesn't require any kneading. As much I as I enjoyed it, I don't think it will ever be my go-to bread recipe, since it's so exceedingly rare for me to have eggs, milk, butter, and sugar in my kitchen all at the same time!
Unlike Felicity, I never learned to make bread when I was her age. When I grew up and moved out into my own place, I brought my childhood copy of Kirsten's Cookbook, and the recipe for whole wheat round bread was what got me started and helped me learn to make my own bread instead of buying it. I've been doing that ever since. I even taught my mom to make homemade bread, which had always intimidated her.
Felicity's Cookbook mentions that the origin of the name "Sally Lunn" is not known for certain. It might come from the French words "soleil-lune" which means "sun-moon", or "sol et lune" (sun and moon) due to the golden top (sun) and white interior (moon). I checked to see if this is still a mystery 30+ years after Pleasant Company published this book, and apparently it still is. The Sally Lunn Eating House in Bath, England claims that the recipe originated from a French Huguenot refugee named Solange Luyon, whose name was then Anglicized as Sally Lunn, but there's still no solid evidence of this being true either.
In the UK, Sally Lunn bread is usually made as buns, while in the American South it's a loaf made in a round or tube pan. I thought it would be cute to make it in doll-sized mini loaf pans so Felicity and Elizabeth could help.
The recipe is below the cut, with a few of my (experienced bread baker) adaptations.
Ingredients:
3/4 cup milk
1/4 cup warm water
1 package active dry yeast
6 tablespoons butter, softened
3 tablespoons sugar
2 eggs
3 cups flour
1 & 1/4 teaspoons salt
Shortening or butter to grease the pans
Here are the mini loaf pans I used. Or you can use just one standard sized tube pan or loaf pan, but the minis are cuter and in my experience the bread turns out better in small loaves.
Directions:
Measure the milk in a saucepan and warm it over medium low heat. Turn off the heat.
Measure the warm water into a small bowl. Add the yeast and stir. Then stir the warm milk into the yeast and water. Always use WARM water and milk only, NOT HOT liquids. Yeast is alive and temperatures above 140F will kill the yeast.)
Measure the butter and sugar into a mixing bowl and beat them together with a hand mixer or whisk until they are creamy and soft.
Crack 1 egg into the mixing bowl and beat it into the butter and sugar mixture until it's well blended and creamy. Then do the same with the second egg.
Stir in about 1/3 of the yeast and milk mixture into into the butter and sugar mixture, then add the salt and 1 cup of flour.
Once these are all mixed together, do the same with the second cup of flour and another 1/3 of the yeast mixture. Then do the same with the last cup of flour and last 1/3 of the yeast mixture. Mix it all together until it's soft dough with no lumps. If it feels too dry to mix, add one or two tablespoons of milk until it's soft and mixable.
Scoop 1/3 of the batter into each of your three greased mini loaf pan. Or into the single pan.
Cover the pan(s) and let the dough rise for about an hour in a warm place. On the kitchen counter is fine. Or set it in the oven but do not turn the oven on. Don't put it in the fridge or anywhere cold.
After an hour, turn on the oven and pre-heat it to 350 degrees.
Bake for about 20-25 minutes if you're making three small loaves. Keep a close eye on them and take them out once the tops are a nice golden brown, like in my pictures. If you're making a single loaf in a single pan, it will take closer to 45 minutes to bake. Keep an eye on that as well and take it out the moment the top is golden brown.
Let the bread cool off for a few minutes. It will continue to cook on the inside as it cools, so let that happen before cutting a slice with a serrated bread knife.
30 notes
·
View notes
Text
Low-Spoons Bread Recipe
Hallo friends! Yesterday I was singing the praises of bread-baking, which I know is something a lot of people find scary and intimidating. But fear not! I promise it’s easier than you think, and with this Bread Lore you too can bake delicious loaves whenever you want! If you are confused or have questions, please let me know and I will try to help!
I love this recipe/method, which comes from the book “Artisan Bread In Five Minutes A Day” by Jeff Hertzberg and Zoe Francois. Does it sound kind of gimmicky? Yes! Does it work? Friend, this recipe is a solid 30% of how I fed myself during grad school. It’s also one of the few things I can consistently make since I got cursed with ME/CFS in February. If I can stagger into the kitchen and use a measuring cup, I can make bread.
This is a no-knead dough that keeps in the fridge for up to a week. Over the course of the week, whenever you want bread you can tear off a hunk of dough and bake it! I find this recipe makes approximately two big loaves, a cookie sheet’s worth of focaccia, four personal pizzas, or eight dinner rolls.
You Will Need:
Flour (all-purpose)
Active Dry Yeast (available in jars and packets in the baking aisle)
Salt (table salt is fine)
Water
Measuring cups & spoons
A big mixing bowl
A lid for the mixing bowl, or some aluminum foil to cover it
To Make The Dough
Get out your big mixing bowl.
Add 3 cups of lukewarm water. It should feel warm, not hot, if you put a drop on the inside of your wrist. If you use very hot water, you could kill the yeast. If you use cold/cool water, the recipe will work but it will take longer to rise.
Stir in 1 tablespoon of table salt OR 1 1/2 tablespoons of sea or kosher salt. Table salt has much finer grains, so you get a lot more salt per spoon than you do with coarse-grained salts.
Stir in 1 1/2 tablespoons (2 packets) of yeast.
Now add 6 1/2 cups of flour. To measure the flour, use a big spoon to scoop in into the cup and then level off the top with the flat side of a bread knife. This keeps the flour from being too tightly packed, which will throw off your measurements.
Mix it all up with a wooden spoon until all the flour is incorporated.
Congrats! You have made dough!
Now cover the bowl with its lid or with a lid of aluminum foil. At this point, you can put it in the fridge until you’re ready to bake! If you want to bake imminently, you can also let it rise at room temperature for two hours (though it is easier to work with if it’s cold).
(Instructions for turning this dough into various Breads under the cut!)
To Bake a Focaccia (easiest & extremely delicious)
Preheat the oven to 450 degrees
Use olive oil to grease a cookie sheet or a large cast-iron skillet
Oil your hands. Tear off a chunk of dough. About 1/3 of the recipe will fill a 12-inch skillet; when making it on a cookie sheet I usually use about half the dough, though you can use the whole thing if you’re baking for a crowd.
(This will make the bread Prettier but tbh it’s fine if you don’t do it) Fold the dough in on itself and stroke the surface like you are petting a small animal until it forms a smooth ball.
Press the dough into a sheet of relatively even thickness in your pan.
Let the dough rise for about 20 minutes while you wait for the oven to finish preheating.
When the oven is hot, poke the dough all over with clean fingers to make little dimpled hollows. Drizzle it with olive oil and sprinkle on some coarse salt, black pepper, and any herbs you want (I love rosemary and oregano!)
Bake for 20-30 minutes until golden brown
To Bake A Pizza
Preheat the oven to 450 degrees
Oil your hands. Tear off a chunk of dough (about 1/4 of the dough is a good size for a personal pizza).
Put the dough on an oiled countertop and use a rolling pin or empty bottle to roll it out as thinly as you can. If you feel like the dough is fighting you, let it relax for five minutes and then try again.
Transfer the round of dough to an oiled cookie sheet (you can use your hands to help stretch it out more thinly when you pick it up if you want)
Add your toppings of choice
Once the oven is hot, bake for 15-25 minutes until the crust is golden brown and cooked through and the toppings are bubbly
To Bake A Big Beautiful Boule (with steam!)
Note: For various Science Reasons, bread cooks much better when there is steam in the oven. A lot of recipes encourage you to bake inside a closed Dutch oven, but I find it difficult & scary to get the dough in there since you have to preheat the Dutch Oven as well. Another method (described here) is to have a roasting pan or skillet in the bottom of the oven and throw ice cubes (probably safest) or water (what I do) in there right as you put the bread in the oven. If you don’t do this your bread will still be fine! But you won’t get as nice a crust and your loaf may not expand as well. It’s up to you. Follow your heart.
Place a roasting pan, cookie sheet, or cast-iron skillet on the bottom rack of the oven. Preheat the oven to 450 degrees.
Dust your hands with flour. Tear off a chunk of dough (whatever size you want; I usually go with about half the recipe)
(This will make the bread Prettier but don’t stress about it) Continuing to dust with flour if things get sticky, fold the dough in on itself and stroke the surface like you are petting a small animal until it forms a smooth ball.
Place your Dough Orb onto a cookie sheet dusted with flour or cornmeal. Let it rise for 45 minutes.
When the oven is hot, dust your orb with more flour. Then use a bread knife to cut several deep slashes through the loaf. This will help it expand as it cooks! Plus it looks beautiful.
To use steam: Get about half a dozen ice cubes and put them in a measuring cup. Put your bread in the oven, then immediately pour the ice cubes onto the roasting pan you put on the lowest rack and shut the door. Don’t peek at the bread until at least 15 minutes have passed to keep the steam inside the oven.
Bake for about 30-40 minutes, until the crust is nice and dark and the loaf sounds hollow if you rap on the bottom
To Bake Dinner Rolls
Place a roasting pan, cookie sheet, or cast-iron skillet on the bottom rack of the oven. Preheat the oven to 450 degrees.
Dust your hands with flour. Divide the dough into eight equal portions.
For each portion of dough: Continuing to dust with flour if things get sticky, fold the dough in on itself and stroke the surface like you are petting a small animal until if forms a smooth ball. Place the roll onto a cookie sheet dusted with flour or cornmeal.
Let them rise for about 30 minutes.
When the oven is hot, dust your rolls with more flour. Then use a bread knife to make a deep slash through each roll.
To use steam: Get about half a dozen ice cubes and put them in a measuring cup. Put your bread in the oven, then immediately pour the ice cubes onto the roasting pan you put on the lowest rack and shut the door. Don’t peek at the bread until at least 15 minutes have passed to keep the steam inside the oven.
Bake for about 20 minutes, until the crust is nice and dark and a roll sounds hollow if you rap on the bottom
For extra deliciousness, brush the rolls with melted butter as soon as you take them out of the oven.
More Ideas
Try adding a handful of fresh or dried herbs when making the dough
Roll out small amounts of dough very thin and cook them in a hot skillet on the stovetop to make pitas
Make a filled bread by rolling dough out into a sheet and adding cheese, pesto, or another filling of your choice, then rolling the dough up in a spiral
Knead cheese, olives, or diced ham into the dough before shaping
Once you have a recipe that you’re comfortable with, bread is infinitely adaptable!
Happy baking!
297 notes
·
View notes
Text
so i’ve been baking bread pretty regularly since sayyyy april 2020. you know, when we were waiting for this whole kooky covid thing to die down in a few weeks, but in the meantime some people had taken the very rational step of buying out every store’s supply of EXTREMELY PERISHABLE goods, including the extremely sad 100 calorie sandwich rounds favored by my parents.
now me? I’d read enough zombie very serious survival books to have ventured to the co-op on March 10 to stock up on dry bulk ingredients, and I’d included yeast and bread flour among the necessities - not because I thought that they’d ever get used, really, it just seemed practical if things got a lot worse than anticipated. And then? Well. You know.
So I joined the club of the tens of thousands of americans who had always viewed leavened dough with a healthy skepticism and the deep sense that these things were best left to the professionals. With the circumstances now unimaginably altered, we were now very cautiously dumping yeast into bowls of warm water, all the while doubting that this would actually work. So, obviously, that sense of accomplishment I felt when, after all the proofing and kneading and rising and punching down and rising again and venting and egg washing and etc etc etc, I actually pulled two relatively respectable loaves of bread out of the oven? Fucking intoxicating.
I’ve gotten medium good at bread over the intervening years, insofar as I can produce a sandwich loaf without needing to find a recipe, I’m pretty comfortable with adding cheese or garlic or raisins and nuts or whatever if I’m feeling like an Interesting Bread, i’ve forced a few loaves of sourdough into existence (though both I and the dough were kicking and screaming the whole way), and I recieved the ultimate tool of convenience for my birthday last year, when my parents gave me the dutch oven that finally permitted me to finally skip kneading altogether (if I so desired).
Except like.,. I didn’t ask for a dutch oven. I actually asked for something much cheaper and by all accounts more convenient: A bread machine. When I did, though, my mom (who has baked precisely 0 loaves of bread in her life) said “oh, you don’t want a bread machine.”
“I don’t?” I asked, already halfway swayed by her confidence on the matter.
“oh, no, nobody ever actually uses bread machines, they just take up space on the counter.” my mom, a woman who owns two instapots, assured me.
I considered her reasoning, and very firmly replied with a defiant “oh, okay, yeah. that makes sense, and I guess I’ve gotten this far without one, so like, it’s silly to get one now.”
I know. I have a will of steel.
So like, another year has passed since that exchange, and a week or two ago i finally decided that since counter space is no longer at a premium at my new place, i could at least try out a cheap bread machine? I went on ebay, got an open box deal on a decent entry level model, and took it for a spin yesterday.
And, for what it’s worth, uhhhhhhh HOLY FUCKING SHIT IT COULD HAVE BEEN THIS LOW EFFORT THE WHOLE TIME?????
LIKE I COULD HAVE BEEN JUST DUMPING INGREDIENTS IN A PAN AND WALKING AWAY THIS WHOLE TIME?????!?!?!?
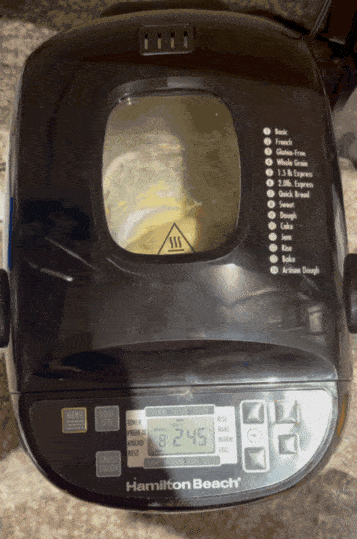
it’s making brioche for me right now. It’s almost too easy. I’m actively furious.
This feels exactly like the day I finally bought a game genie so i could get Mew to finish out my red dex. I’ve been grinding and learning helpful strats from youtube and there was a fucking cheat code that would have let me skip the bread making side quest while still gaining xp this whole goddamn time.
211 notes
·
View notes
Text
Beginner Dark Rye Sandwich Bread
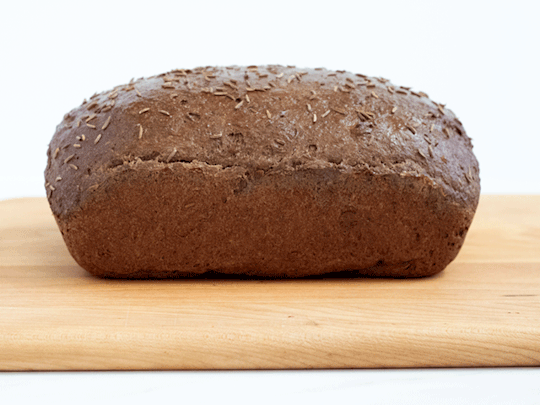
Check out my new Beginner Dark Rye Sandwich Bread Recipe!
For those in a rush, I’m re-posting the basic recipe here on my Tumblr. But if you want the full picture-by-picture instructions, nutritional information, and secrets to success you can go to my website.
Here’s what you’ll need…
Ingredients
17 Grams (1 Tablespoon) Dry Active Yeast
240 Grams (1 Cup) Warm Water
70 Grams (1/4 Cup) Molasses
150 Grams (1 1/2 Cups) Rye Flour
360 Grams (3 Cups) All-Purpose Flour or Bread Flour*
25 Grams (1/4 Cup) Dutch Cocoa Powder**
13 Grams (2 1/4 Teaspoons) Fine Sea Salt
7 Grams (1 Tablespoon) Caraway Seeds, Plus More for Sprinkling
60 Grams (1/4 Cup) Butter, Melted
1 Egg
This loaf also has an optional egg wash if you want to top it with caraway seeds:
1 Egg
1 Tablespoon Water
Additional Equipment
Standing Mixer with Dough Hook
Measuring Cups and Spoons
Kitchen Scale
Large Container with Lid
9.5-inch by 5-inch Baking Pan
Baking Brush
Wire Cooling Rack
Probe Thermometer
Oven Mitts
Instructions
In the bowl of a standing mixer, combine the warm water, molasses, and active dry yeast. Stir until all the grains dissolve. Let sit until foamy, about 10 to 15 minutes.
In a separate mixing bowl, whisk together your flours, Dutch cocoa powder, salt, and caraway seed.
With your dough hook attachment, set your mixer to low and pour in your dry ingredients. Gradually add the melted butter and egg. Mix until the dough pulls away from the sides of the bowl.
Shape your dough into a round and transfer to a lightly greased container. Cover and let your dough rise until double in size, about 1 hour to 1 1/2 hours.
Shape your dough into a sandwich loaf and transfer to a lightly greased 9-inch by 5-inch bread pan. Cover and let rise until dough is above the lip of the pan, about 45 minutes to 1 hour.
Preheat your oven to 375 degrees Fahrenheit (190 degrees Celsius).
Beat together the egg with 1 tablespoon of water to create an egg wash. Brush the egg wash mixture over the top of the bread. Sprinkle with caraway seeds.
Bake your bread for 20 minutes. Tent with aluminum foil, and then bake another 20 to 25 minutes until internal temperature reads between 195° and 200° Fahrenheit (90° and 93° Celsius). Bottom will sound hollow when thumped.
Turn out loaf onto a wire cooling rack. Let cool completely before slicing and serving.
Enjoy
#bread#bread recipes#yummy#yummy food#tasty#tasty food#yumminess#tasty recipes#bake from scratch#Rye#Rye Bread#Rye Flour#Rye Sandwich Bread#Dark Rye#Dark Rye Bread#Dark Rye Sandwich Bread
12 notes
·
View notes
Note
I want to get in to beaking bread, could you share the recipe?
Absolutely!
Disclaimer: This is going to be a kind of "choose your own adventure" type of recipe in order to make it as accessible and beginner-friendly as possible. Also, I'm not an expert by any means! This is what works for me, but questions and suggestions in the notes are welcome :)
Ingredients:
4 3/4 c. (594g) All-purpose flour, plus a little extra
2 1/2 tsp (7g) Instant yeast or active dry yeast
2 c. (472 mL) Warm water, about 100°F/38°C
2 tsp (12g) Salt
2 tsp (9g) Sugar (or maple syrup or honey) plus a pinch more
1 tsp (5g) Oil - I like to use olive oil
Equipment:
Small bowl or cup
Large bowl
Cloth, plastic wrap, or lid for large bowl
Wooden spoon or spatula for mixing
Parchment paper
Dutch oven (or a baking sheet and a large, metal, oven-safe pot)
Knife (the sharper the better)
Cooling rack
Food scale, if you're using the metric measurements
Instructions:
Part 1: Combine the Ingredients
Add 1/2 c. (118g) of warm water to a small bowl or cup. Add a pinch of sugar and your yeast, stir gently until combined. Let rest for about 5 minutes until the yeast mixture gets bubbly. This indicates that your yeast is alive and ready to go!
In a large bowl, whisk together the flour, salt, and sugar
Create a well in the center of your flour mix, and pour in the yeast mixture, the remaining 1 1/2 c. (354g) of water, and the oil. Mix together until you get a shaggy ball of dough. It should be a little sticky, but if it's too sticky, add more flour.
Part 2: Kneading
This step is optional. I find that kneading gives it a chewier texture and keeps the loaf from getting crumbly for longer, but the no-knead method is still delicious and easier. Skip to Part 3 if so desired.
I suck at kneading so I use my handy dandy stand mixer. But you can knead by hand if you want, or you can opt to not knead it at all! You're looking for a nice smooth, stretchy ball of dough.
Part 3: Rise
Lightly grease the inside of your bowl. Put your dough back into the bowl and cover with a lid or a damp cloth or plastic wrap and let rest in a warm location.
I like to put mine in the oven--make sure it's turned off, and make sure everyone you share the kitchen with knows there's dough having a little nap in the oven. Not everyone checks to make sure the oven is empty before turning it on, ya know?
Let rise until the dough has doubled in size and there are tiny bubbles on the surface. Time will vary--if you're using instant yeast, this will likely take 1-2 hours. If you opted for active dry, the rise time will be longer, anywhere from 3-6 hours. If you did the no-knead, method, it may take even longer than that. You could even leave it overnight if you want!
Part 4: Preheating and Shaping
This bread is meant to be baked in a Dutch oven. Dutch ovens trap steam, which helps create a nice crust. But if you don't have a one, don't fret! You can place your loaf on baking sheet, and then place a metal pot over the loaf for the same effect.
When your dough is done rising, take your dough out of the oven and then preheat the oven to 450°F 230°C. Add your Dutch oven or sheet and pot to the oven to allow them to heat up.
Punch down the dough to get rid of the air bubbles, and then place the dough on a lightly-floured surface. Pull the edges of the dough in toward the center. You should see the shape becoming more spherical and feel the surface getting tighter. Here's a quick visual: https://www.youtube.com/watch?v=IWA0RAAsBHg
Transfer your beautiful dough baby to a sheet of parchment paper. Gently flour the surface of the loaf, and then use your knife to score the top. (Don't go too deep!)
Part 5: Baking and Cooling
When the oven is heated, remove your Dutch oven and transfer your dough and parchment paper inside. Make sure the parchment paper is completely inside to prevent it from burning.
Bake for 30 minutes. After this time, remove the Dutch oven lid and let your loaf bake for 10-15 more minutes until the crust is nice and golden brown
Transfer the loaf to the cooling rack and let it cool for at least an hour before cutting into it. I know it's tempting to dig in right away, but I promise it's worth it.
Your bread should be good for about a week. I like to store mine in tin foil or in a large zip lock bag. To keep your crust nice and crispy, don't wrap it up until it's completely cool.
Enjoy!

56 notes
·
View notes
Text
Pane di Pasqua
11 ingredients
Refrigerated
1 Egg
3 Eggs, large
6 Eggs, raw
Baking & Spices
2 1/4 tsp Active dry yeast
4 1/2 cups All purpose flour
1/4 tsp Salt
1/2 cup Sugar
1 tsp Vanilla
Dairy
1/2 cup Butter, unsalted
1 cup Milk
Other
sprinkles for decorating

6 notes
·
View notes
Text
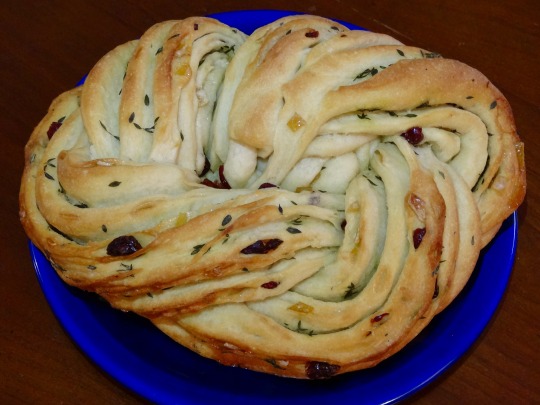
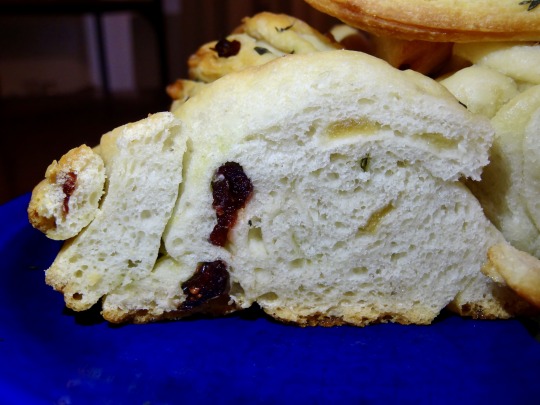
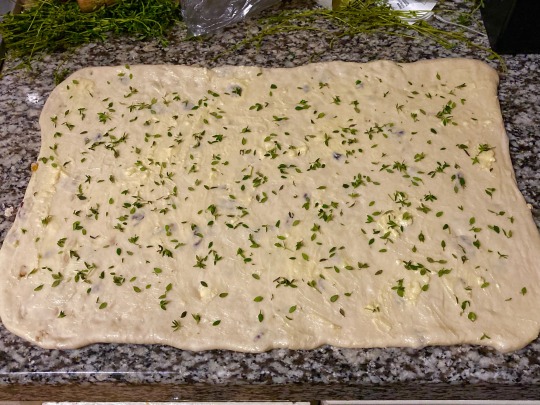
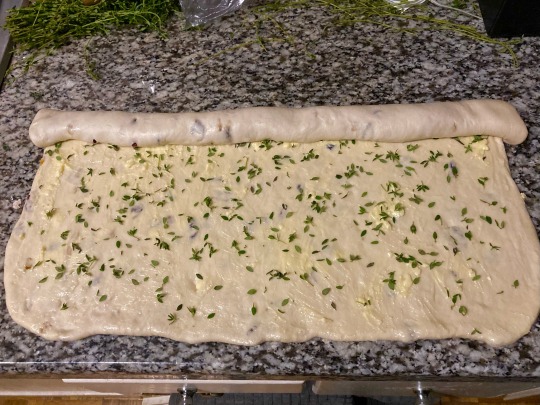
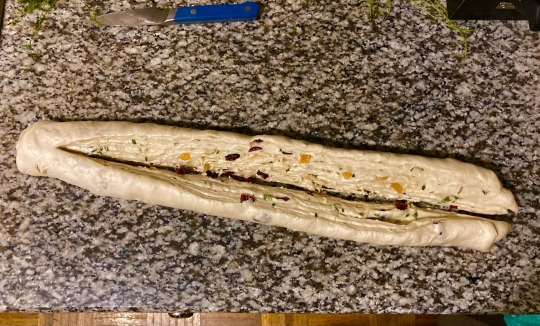
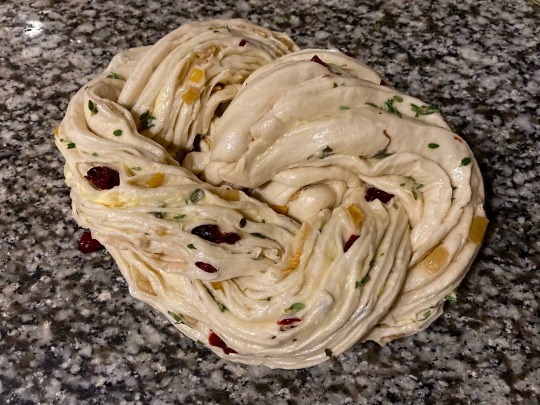
[ID: First image is circular loaf of bread with multiple groups of lines circling in towards the center; second image is a cross-section of the same loaf, showing cranberries. End ID]
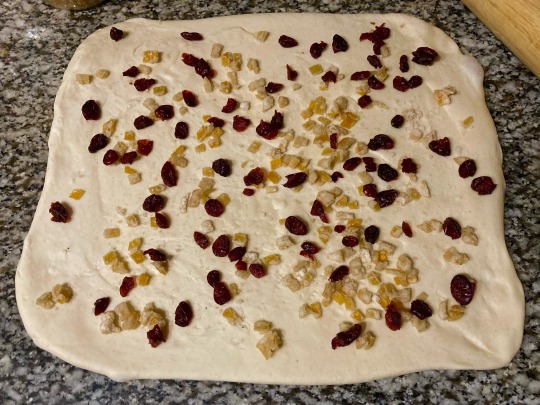
Braided loaf with candied orange peel, cranberries, and thyme
This is an unenriched bread with a well-developed crust and a tight crumb. Inclusions of candied orange peel and cranberry add sweetness and tartness, which thyme backs up with a hint of woodsy complexity. The loaf itself is a showstopper, with the sugar surrounding the translucent orange peel glistening at the surface, and the vibrant contrast of cranberry and thyme swirling throughout the braided wreath.
This recipe and technique can be combined with any other combination of dried fruit, nut, or woodsy herb you can imagine.
Recipe under the cut!
Patreon | Paypal | Venmo
Ingredients:
Makes one large loaf.
3 1/2 cups (540g) bread flour
2 tsp active dry yeast
2 tsp table salt
About 1 1/4 cup (355mL) water
1/3 cup (65g) dried cranberries (sweetened or unsweetened, to taste)
1/3 cup (65) candied orange peel, diced (or mixed peel)
4 Tbsp non-dairy margarine, softened
2 Tbsp fresh thyme
Instructions:
1. Mix flour, yeast, and salt in a large mixing bowl. Add water until dough comes together into a soft, non-sticky dough.
2. Knead the dough for 5-10 minutes, until smooth and elastic.
3. Place dough in a clean, lightly oiled bowl and cover. Allow to rise until doubled in size, 1-2 hours.
4. Roll dough out into a rectangle of about 12 x 16" (30 x 40cm) and sprinkle orange peel and cranberries over the surface. Fold the dough in thirds like an envelope, pressing to seal around the inclusions.
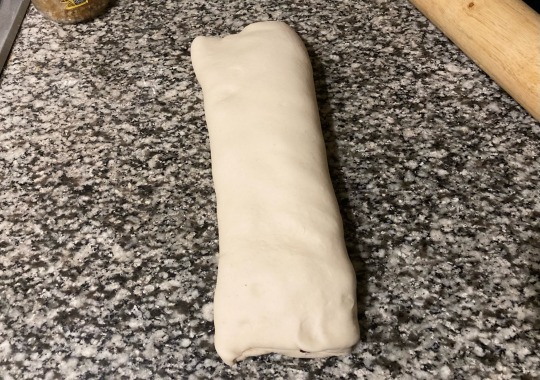
5. Roll dough out again into a rectangle about the same size as before. Spread the surface of the dough with softened margarine, then top with thyme.
6. Roll dough up tightly, starting from the long side.
7. Using a sharp knife, cut the dough log in half lengthwise, leaving a small piece together at one end.
9. Twist the two halves of the dough together so that the pleats formed by rolling and cutting the dough face upwards.
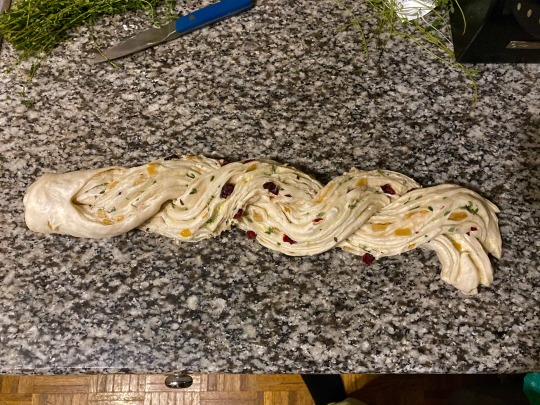
9. Form the twisted rope into a circle or knot, pressing the two ends ogether to seal.
10. Transfer to a prepared baking sheet and cover. Allow to rise another 45 minutes, or until noticeably puffy.
11. Bake in the middle of the oven at 350 °F (175 °C) for 20-25 minutes, until the top is golden brown.
12. Cover the top of the dough with aluminum foil and continue cooking another 30-40 minutes, until the dough is fully cooked and the loaf sounds hollow when the bottom is tapped on.
13. Allow the loaf to cool in the open, turned-off oven, for the best crust.
92 notes
·
View notes
Text
I just broke into tears because I lost my challah recipe I've been using for five years. It was the first bread recipe I made successfully and my most used recipe. BUT I FOUND IT.
Behold, the challah recipe I will never lose again, source here
Ingredients
2 ½ cups warm water (110 degrees F/45 degrees C)
1 tablespoon active dry yeast
½ cup honey
4 tablespoons vegetable oil
3 eggs, divided
1 tablespoon salt
8 cups unbleached all-purpose flour
1 tablespoon poppy seeds (Optional)
Directions
Gather all ingredients.
Pour warm water into a large bowl; sprinkle yeast over water. Let stand until yeast softens and begins to form a creamy foam, about 5 minutes.
Beat in honey, oil, 2 eggs, and salt. Add flour, 1 cup at a time, beating after each addition until dough has pulled together.
Place dough in a large, lightly-oiled bowl and turn to coat.
Turn it out onto a lightly floured surface and knead until smooth and elastic.
Cover with a towel and let rise in a warm place until doubled in volume, about 1 ½ hours.
Punch down dough and turn onto a lightly floured surface. Divide in half and knead each half for 5 minutes or so, adding flour as needed to keep it from getting sticky.
Divide each half into thirds and roll into a long snake about 1 ½ inches in diameter.
Pinch the ends of the three snakes together firmly and braid from middle. Either leave as a braid or form into a round braided loaf by bringing ends together, curving the braid into a circle, and pinching ends together.
Beat the remaining egg and brush a generous amount over each braid; sprinkle with poppy seeds.
Grease two baking trays and place the finished braid or round on each. Cover with a towel and let rise for about 1 hour. Preheat the oven to 375 degrees F (190 degrees C).
Bake in preheated oven until golden brown, about 40 minutes. Cool on a wire rack for at least one hour before slicing.
#i love this recipe because if you fuck up the eggs and add them all at once it still works.#also the tb and cups being the only measurements#anyway#recipe#challah
9 notes
·
View notes
Text
Here, have the only gluten free/wheat free bread that has worked for me so far.
I found this on the back of a flour back, but it works with bob’s red mill flour too, but it typically goes for an hour instead of 45 min.
It’s a bit bland, so I like to add Italian herbs, a bit of onion powder, nutritional yeast, whatever I’m feeling at the time. I’ve flung both garlic and olives into it and it’s worked out great.
It sticks together, it’s nice and fluffy, it tastes like bread, and it can slice pretty thinly if need be.
Here’s a picture of the recipe:
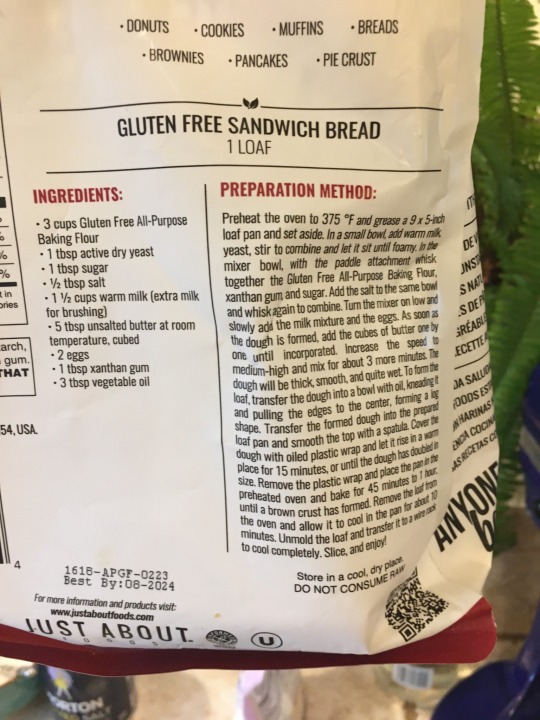
And a rough transcript:
Ingredients:
-Gluten free/wheat free flour, active dry yeast, Sugar, salt, warm milk, room temperature cubed butter, eggs, xanthan gum, vegetable oil (or olive, it doesn’t matter)
1- preheat oven to 375F and grease 9x5 bread pan. Set aside.
2- in small bowl, add 1 1/2 cups of warm milk. As 1tbsp of yeast. Mix and set aside till foamy.
3- in mixer with paddle attachment, as three cups flour, 1tbsp xanthan gum, and 1tbsp of sugar. Mix and add 1/2 tbsp of salt.
4- turn mixer on low and slowly add milk mixture and two eggs. As soon as dough is formed, add 5tbsp of cubed room temp butter one by one.
5- as soon as butter is incorporated, turn mixer on medium high for 3 min. Dough will be thick, smooth and very wet.
6- scoop dough into oiled bowl and shape into a vague loaf shape. Plonk in loaf pan and use a spatula to smooth over top.
7- take some plastic wrap, spread a tiny bit of oil on it so it doesn’t stick to the dough and cover the pan. Let sit for 15 min or until dough has risen to double its size.
8- remove plastic wrap and bake for 45 min to 1 hour. (Bob’s red mill usually takes an hour for me and my oven is very hot if that helps). Once the time is up, take it out and tap it to see if it sounds hollow. If it doesn’t, it needs to to for a couple more minutes. If it does, take it out and let it sit for 10 min.
- take it out, put it on a wire wrack (or an upside down sieve or colander honestly) and let it cool completely. Then go to town on your bread.
#gluten free#wheat free#bread recipe#bread#she’s not dairy free and I haven’t tried substituting becaude I’m scared of the unholy monstrosity it might produce#none of my nondairy loaves have worked so far
8 notes
·
View notes
Last Seen Blogs

ampersandd7
huh? ...wha??

lovieebby
pro slut

atelier-animato
管楽アンサンブル

norwayxo
anya

botanischer-garten-erlangen
Shaman_healing