#YAY i have alt text on my posts now >:]
Text
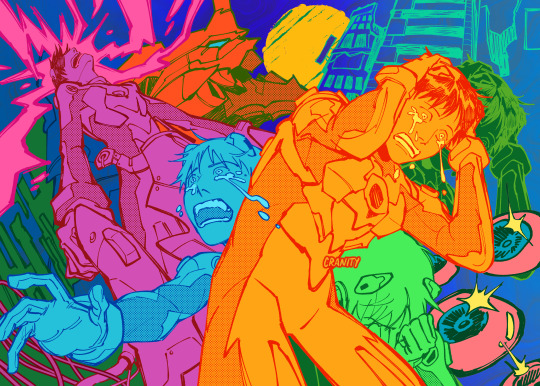
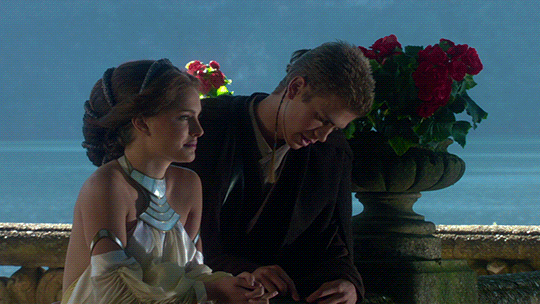
Congratulations, Shinji!
#YAY i have alt text on my posts now >:]#also this was for @andythelemon's Megumi Ogata fanbook!#shinji ikari#neon genesis evangelion#my art
4K notes
·
View notes
Text

I'M HOME AND I HAVE MY NEW WEIGHED BLANKET AND I'M GOING TO SLEEP WITH IT TONIGHT AND I'M AO EXCITED TO FIND OUT HOW IT FEELS
#i wanted a weighted blanket for literally years and i finally had enough noney for it#it got here a few days ago but i wasnt home#and now i am#and i have this blanket#happy happy happy#alt text#yay me!#hopefully that'll help my insomnia#i have a doctor's appointment next week about ny insomnia and I'm so glad thia came before the appointment#cause now I'll be able to say if that helps me or not#this post got me to 100 posts yo
5 notes
·
View notes
Text
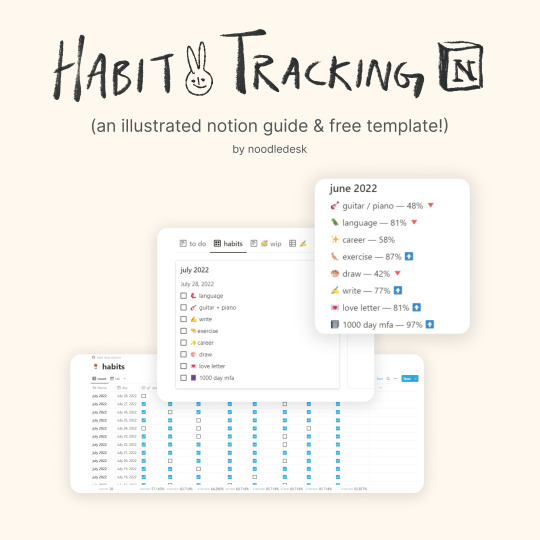


update: FREE habit tracker template (with new progress bars!)🌱💗💞
i've received a few questions about how i track habits, which honestly changes often, but i thought i'd share how i do it right now.
other posts that may interest you: making a dashboard in notion (with template) | my notion tag | my other free notion templates
this is a pretty low-maintenance and simple way of tracking habits, while still using the wonderful database feature. i hope it helps you ✨😋
post text in alt text and also under the cut:
title: how i track my habits on notion (an illustrated guide + free template)
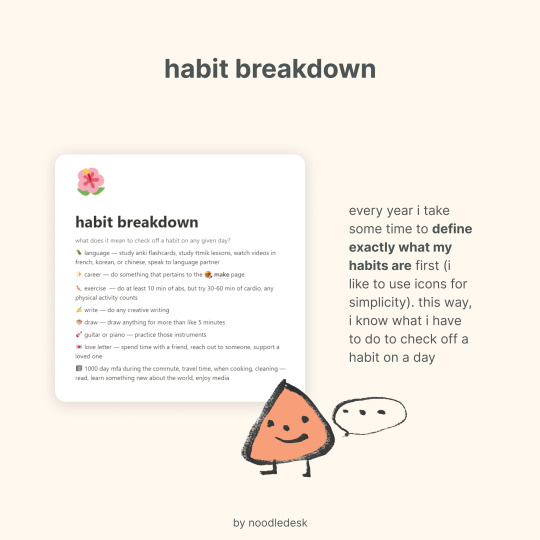
habit breakdown: every year i take some time to define exactly what my habits are first (i like to use icons for simplicity). this way, i know what i have to do to check off a habit on a day
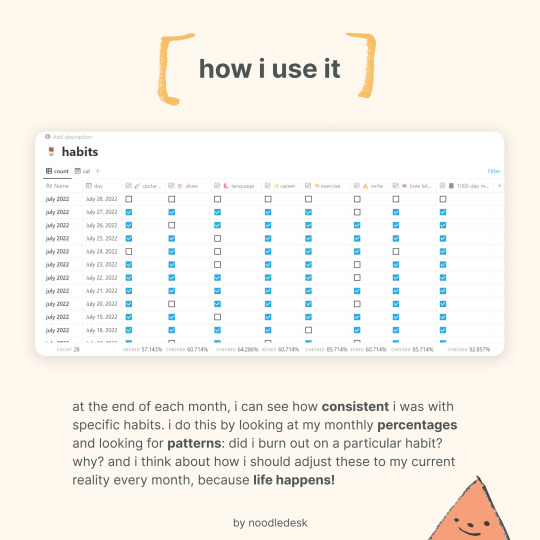
how i use it: every day, my dashboard has a habits section that updates daily. when i practice the habit, i just check it off. this refreshes automatically so it’s convenient.
how i use it: at the end of each month, i can see how consistent i was with specific habits. i do this by looking at my monthly percentages and looking for patterns: did i burn out on a particular habit? why? and i think about how i should adjust these to my current reality every month, because life happens!
how i use it: then i jot down these numbers so i have a general idea of whether or not i’m being consistent with the intentions i set at the beginning of the month. i ask myself, why or why not? and then i make adjustments to my new interests and priorities.
benefits
benefits — an easy habit tracker helps you see what you’re doing each day so you have an idea of what you want to practice more, practice less, and gives you a better idea of how your habits are affecting your wellbeing, instead of just relying on vibes, which can make you hard on yourself.
encouragement — checking it off gives me a sense of accomplishment. i had a tendency of thinking i wasn’t ‘doing enough’ each month, but when i write things down, i have concrete proof that i did things that were important to me. you also get to look back on your month and be like, look at all these things i did for myself! and have a little celebration :)
how it works: calendar view: of course i’ve created a template for you to use (yay!), but it’s worth learning how i set up the template so you can adjust it to your needs. basically, each habit is a property, and each page corresponds to a day, which has all the habits on it like a checklist. every month i duplicate the page each day for a month (it sounds cumbersome, but actually only takes about a minute total). this allows me to review every month if i want to keep my habits the same, set habit intentions each month so i can reflect and consider, what habits should i continue? what should i stop? it keeps it flexible. also, if you’re going on vacation, need a break, or anything comes up, you can take days off and that way your statistics won’t be skewed by stretches of time where you aren’t planning to practice your habits.
tip: hold alt + drag your mouse to duplicate pages super quickly for this step
how it works: count page: all you have to do here is filter the date to the interval you’d like to see your habits summarized in. i keep mine as calculated per month, but you can set your interval for a week or year or something more specific.
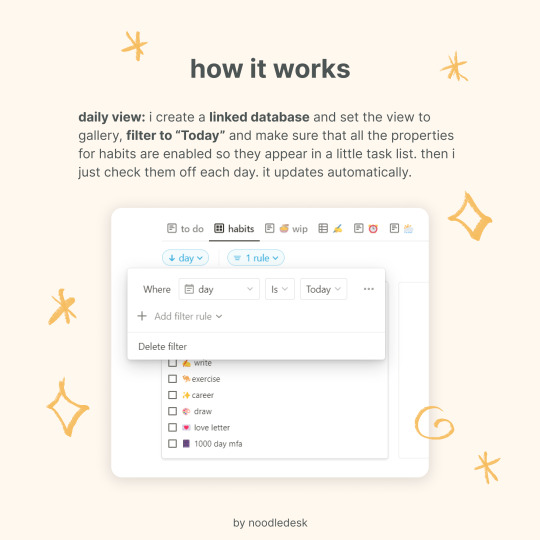
how it works: daily view: i create a linked database and set the view to gallery, filter to “Today” and make sure that all the properties for habits are enabled so they appear in a little task list. then i just check them off each day. it updates automatically.
closing: and that’s it! for me, simple is best. i change how i track stuff all the time, but for now, this works just fine. i hope it can help you too.
#study#productivity#notion#notion template#habits#tips#advice#organization#time management#studyspo#graphic design#mine
854 notes
·
View notes
Note
Hey, i was wondering if you could give some tips on how to write image IDs?
I've been starting to add them to the alt text of my image selfposts but i feel like im not doing them properly and since you have the update accounts and write them often i thought that you could give some good advice about it
Also here's some other halloween candy for you lmao

[Image ID:
A photo of a long white ceramic serving plate topped with slices of cake with a light and dark swirled pattern in the cross section. The slices are laid out like tipped over dominos bricks.
End ID]
Yay! Marmorkuchen!
But about image IDs. I tend to go from big to small in the description. Describe the most banel basic ass shit first, like “Is this a photo, is it art, if so what kind? Digital? Photograph or scan of a manual drawing? Is this an infographic?” From then you can describe the general topics, themes and layout of whatever it is you’re describing. You also have to consider whether you’re writing this ID for people who are familiar with the contents (fanart) or if it’s gonna be for people who don’t. Deciding the level of detail is a personal choice but mostly influenced by what amount of detail is necessary for this to be a functional image ID. You wouldn’t describe the font that something is written in unless it matters for example!
You can also decide what writing style best fits the ID. i tend to write full, dense sentences to get as much info in without the ID running too long but I also write in full sentences and following grammar rules. Sometimes a note taking style works better if there’s lots of disjointed things you can’t fit well into nice sentences!
And if you’re describing multiple things or a series of things in one post you can describe key elements in more detail once and then refer to them more simply for the rest of the ID!
I normally avoid putting IDs in alt text because they can be harder to access for people and have a much shorter character limit. Also try to always surround your ID with some form of ID start and end indicators and keep the ID, if in the body of the text, as close to the image as possible!
As an example, say you’re got a 4 panel comic, I’d describe it like this (gonna make smth up as an example) if I was writing a description for an audience who isn’t necessarily super familiar with the material.
[Image ID:
A 4 panel comic of a made up scene in Just Roll With It Riptide. It is drawn digitally and fully coloured. The scene takes place on a ship, presumably the one the show is set on, called the Albatross.
Panel One: Jay, a woman with long ginger hair wearing a blue jacket over a white blouse, catches Gillion, a turquoise skinned Triton with green hair, fish fins and wearing a black sleeveless turtleneck shirt, sneaking around the ship. Gillion is carrying a brown sack over his shoulder and sneaking. A speech bubble from Jay reads: “Gillion, what are you doing?”
Panel 2: Gillion is turned towards Jay, looking sheepish. You can see that the bag he’s carrying is filled with gold, which is leaking a little trail of coins behind him. Now that you can see Gillion’s entire body you can see he also has a tail and a flask of water tied around his waist, containing a small cute pink frog-octopus hybrid, which is know as Pretzel. Gillion: “Nothing Jay! I am merely, uh, relieving the ship of an unnecessary load so we can sail faster!”
Panel 3: Jay and Gillion stare at each other, Jay is unimpressed. Pretzel, peaking out of the flask at Gillion’s hip, starts collecting coins from where they leak out of the bag. Jay: “Gillion if you throw any more gold overboard as taxes I’m throwing you overboard to lighten our load.” “You” is written in italics for emphasis.
Panel 4: Gillion starts sprinting towards the edge of the ship, indicated through a running pose and blur lines, with Jay giving chase. Her eyes are in glowing red and a targeting reticule is superimposed over one of her eyes, as though she was locking in on her target (Gillion). A stream of gold sprays everywhere from the speed of the chase and Pretzel goes flying with it.
End ID]
#friendly visitors#anyone else feel free to add on this was just everything I could think off from the top of my head#and also now I really wanna see this jrwi comic I made up as an example
10 notes
·
View notes
Text
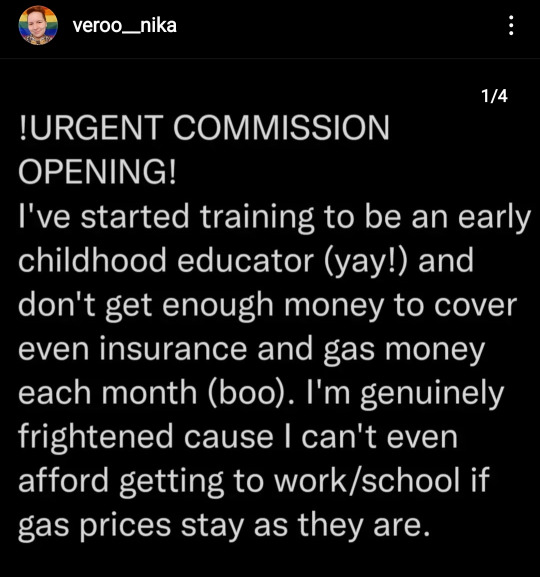
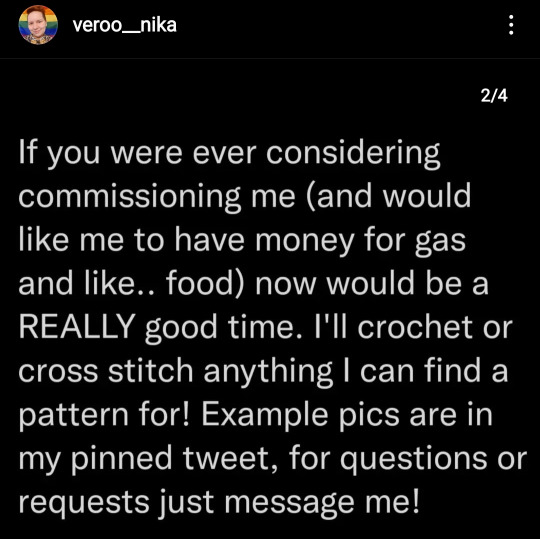
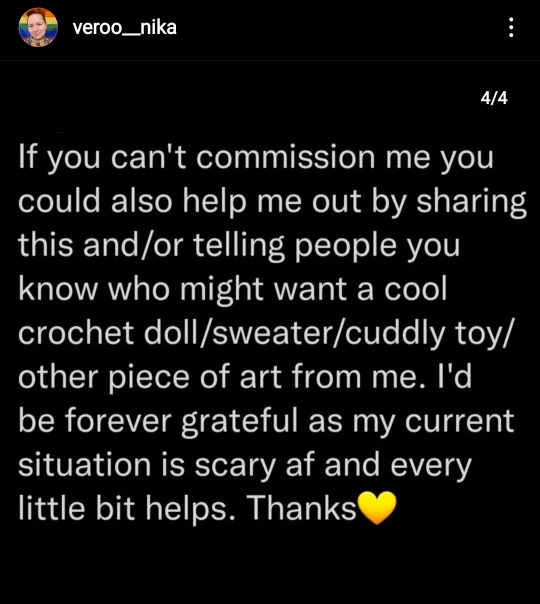
!URGENT COMMISSION OPENING!
(not mine, but a good friend's who isn't on tumblr, so I have their permission to repost this here)

some examples of her work:

(image descriptions under the cut, alt text available.)
links to their Instagram and Twitter, where you can contact them, and both of which have more examples of her (absolutely amazing) works!
reblogs welcome and very much appreciated 🧡
[image IDs: first four pictures are screenshots of 4 panels of an Instagram post by veroo_nika, with white on black text reading '!URGENT COMMISSION OPENING! I've started training to be an early childhood educator (yay!) and don't get enough money to cover even insurance and gas money each month (boo). I'm genuinely frightened cause I can't even afford getting to work/school if gas prices stay as they are.
If you were ever considering commissioning me (and would like me to have money for gas and like.. food) now would be a REALLY good time. I'll crochet or cross stitch anything I can find a pattern for! Example pics are in my pinned tweet, for questions or requests just message me!
My rates: Material costs + 12€ per hour worked + shipping from Germany
I use Paypal and I will ship wherever (but be aware that shipping to outside the EU can get pricey)
If you can't commission me you could also help me out by sharing this and/or telling people you know who might want a cool crochet doll/sweater/cuddly toy/other piece of art from me. I'd be forever grateful as my current situation is scary af and every little bit helps. Thanks 💛'
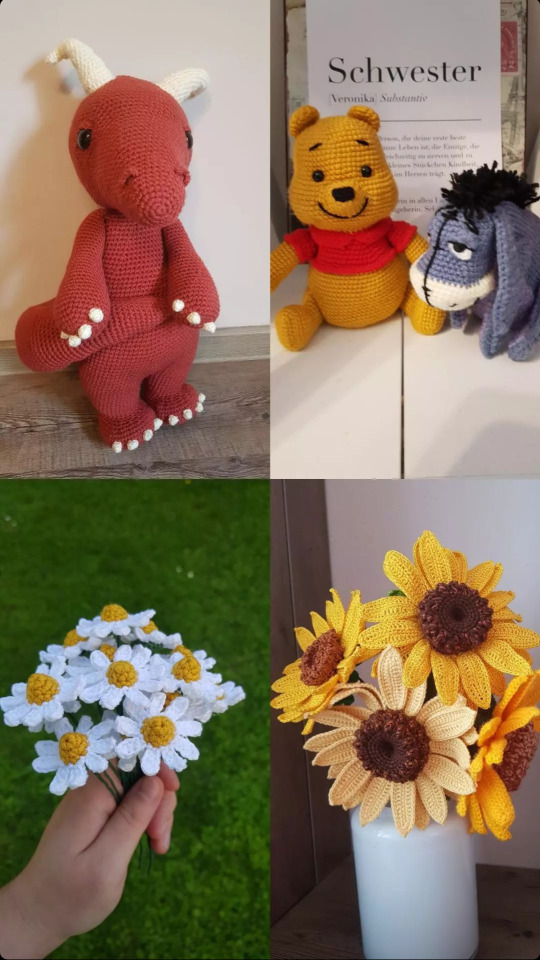
the next two pictures are collages of 4 pictures each, depicting various crocheted works, as follows:
first collage is of a plush red dragon holding it's tail, Winnie the pooh and Eeyore sitting next to each other, a bouquet of crocheted daisies, a bouquet of sunflowers in a vase.
second collage is of a green skinned humanoid holding a baby cow, Hamid from the 'Rusty Quill Gaming' podcast with his arms spread, a cream coloured dreamcatcher, a pair of sunflower earrings.
end image IDs]
#commissions open#open commissions#crochet#cross stitch#emergency commissions#crochet commission#cross stitch commission#sunflowers#daisies#rusty quill gaming#rqg#rqg hamid#described#alt text available
11 notes
·
View notes
Note
how do you make your gifs?
i use photoshop :) and basically everything i do is a collection of tactics picked up from various tutorials. this is the tutorial i first followed, but i can give a brief overview of my current process (i can't tell if you're asking for a tutorial but i'll write one anyway) under the cut
first step is screen capping using kmplayer (free to download). screen capping is the best for high quality
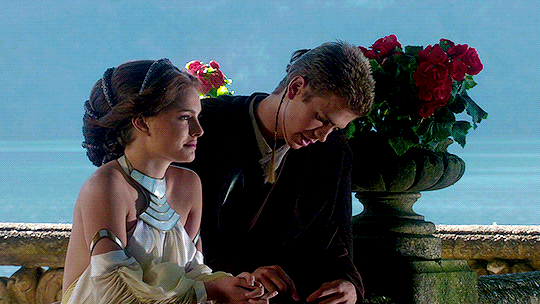
open video file (always 1080p or better), scrub to the scene you want to gif (i'll use aotc. for fun)
right click for this menu:

make sure you have these settings:

by default, frames will go to the 'capture' folder, but i find it useful to make a unique folder for each gif i make to access it easier
click start and then play the video until the frames you want to gif have passed, stop frame extraction. simple enough
now, all the frames are in a folder and you can load them into photoshop
2. actually using photoshop
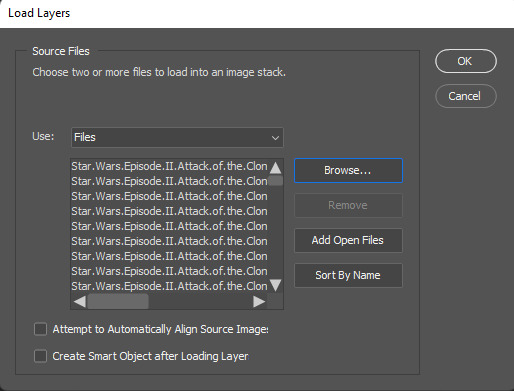
i always load my frames into a stack:
this takes a second, but i think it's worth it for high quality
with all layers selected, switch from the 'video' timeline to the frame-by-frame timeline, using the icon in the bottom left corner of the window
from:
to:

right now, all the frames are in the opposite order. go to the three bars in the upper right hand corner of the timeline
first, make frames from layers

then, select all frames (again using the three horizontal lines in the top right). finally, reverse the frames.
3. cropping, timing, image size
this is the step where you have to do all three.
cropping: you can crop however you want, but i usually use the photoshop presets like 16x9. just make sure all your layers are still selected.

it's also important to trim any frames that are extraneous or you don't want. for tumblr, i try to aim for at least less than 50 frames on any given gif. ~30 is what i prefer
timing: most people put gifs at a delay of 0.05 sec. between frames. with all FRAMES selected, click the drop down at the bottom of any frame, change the delay as you please (Custom delay)

image size: every post on the tumblr dashboard is 540px wide. when making gifsets, this is important to consider
with everything still selected, go Image -> Image Size... (ctrl+alt+i on pc)

from there, you could export and have a gif appropriate for tumblr, but you probably still want to do some coloring.
here's my gif with NO coloring:
4. sharpening & coloring
everything after this part is pretty subjective in terms of what's "best" to do. this is just my method!!
to color, i convert my frames into a smart object. with everything selected (frames and layers), i switch to the video timeline again
then Filter -> Convert for Smart Filters. now every frame is condensed into one layer! yay!
i have a sharpening action, but it's just Filter -> Sharpen -> Smart Sharpen...
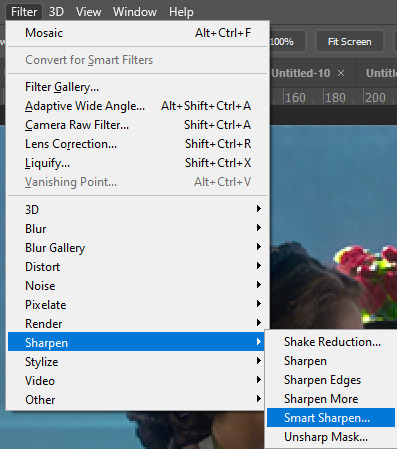
with these basic settings:

you can play around with these settings, though (FOR ANIMATION: set the opacity of this layer to ~30-40%). oversharpened gifs look low quality and unsharpened gifs look fuzzy
coloring is where you really get to have fun!! generally, my basic goal with any coloring layers is to brighten and balance colors.
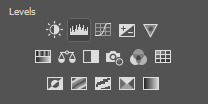
go to the Adjustments windows and add a curves layer.

selecting white and black points (if they exist) with the eyedroppers can help balance colors AND brighten the gif

gif now:

next, i use a Levels layer to add contrast
you can use white/black/grey points again, but i usually don't.

the left box can be from anywhere ~10-25 and the middle ~1.0-1.5
with levels:

from there, i use Color Balance and Selective Color layers to alter anything else.
in this gif, i think the midtones are too yellow, so i'll change that with a color balance layer. i'd also recommend playing with the shadow tones to shift the overall tone of the gif. never go too extreme with these values, it ruins quality
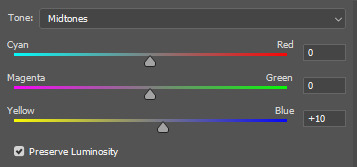
with these settings:
after that, i adjust any layers as needed!
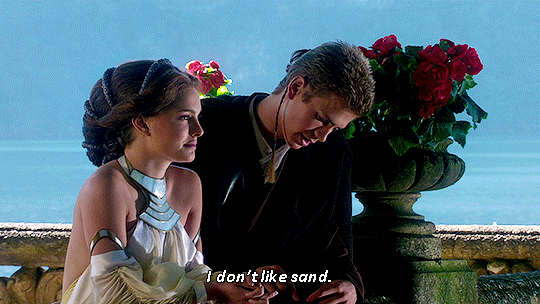
5. caption (worst part)
add a layer of text, the box should span the entire gif:


then, i use a stroke and drop shadow (triple click on text layer for blending options):


but, again, this is all up to you.
6: export
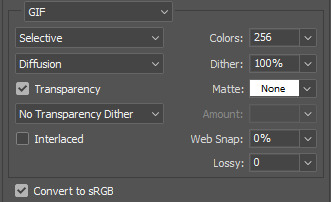
here are the settings i'm gonna use (File -> Save for Web):
finished gif:
7 notes
·
View notes
Text
ambiguousgrass pinned post wooo yippeee yay

a few things
-My name is grass ambiguousgrass
-pronouns- /it/beep/void/boo/grass/⭐️/🦝/🌱he/she/they
-if I have liked your art and not reblogged, it's in my queue! you'll see it there in a few days!
-link to art taglist
-i am always following and unfollowing people Im SORRY!! its not personal i just need my dashboard to be Better
more information under the cut if ur interested :3

Art
•this is an art blog! its few and far between but its there!!
•art requests are open!
•all of my art is tagged as grass does art linked here for your convenience ^_^
•If you'd like to be notified when I post a finished piece, interact in any way with the linked post here (rbs appreciated <3)
•you are welcome to use my art in any non-commercial way, as long as proper credit is given. (for example personal icons, print outs, banners, etc. are cool. selling it as stickers or claiming it as your own is not ok.)
•my main mediums are pen&ink, graphite pencil, colored pencils, watercolors, acrylic, clay, cardboard, and digitally i use procreate.
blog contents/fandoms
used to be a dsmp fan but I'm trying to distance myself from that. on account of the everything.
Now its just stuff?? i dont know.
maybe a little TMA here and there? I love the podcast but i have to take breaks from listening to it very often due to the disorders
Every day i get closer and closer to posting about doctor who so enjoy this who free era while it lasts. i might give up and make a side blog one day but who knows. haha. who
boun der ries
be nice to me
I block and unfollow liberally on account of I meticulously curate my dashboard forfun
- spam likes/rbs/etc are so very welcome! i may seem to be dead for a little while after due to my possum like swag but its ok
-mutuals can ask for my discord if you want but i don't talk much on there.
-feelfree to tag me on stuff. reblog chains. a funny video. art that id like. whatever!! I may not respond but thats just because that stuff gets buried in my notifs and i forgor about them
tagging system
grass yells into the void - original posts
grass reblogs - reblogs
the void yells back - asks
grass does art - my own art
grass queues things - queue
undescribed- posts i create or reblog without image description
fav -posts i like a lot
animals - creatures i like
food - food
c!clingyduo the world - cclingyposting
dr who- dr who
mlp- mlp
tma- tma
(any fandom i post about has a pretty straightforward tag for it in theory)
media types are tagged. (for example #video or #gif.) this is not super consistent, my apologies.
further tagging
as stated above, i tag posts that don't have ID as "undescribed."
the majority of my original posts have image descriptions in their alt texts, which I do myself.
we do not use a screenreader, so I am always willing to hear about ways I can improve the way i post things to make things more accessible.
I occasionally add image descriptions to things i reblog, but I don't do so often.
I have a pretty loose system for tagging potentially upsetting content, but if you ask me to tag a specific thing in a specific way I will do my best to uphold that.
original posts are tagged with as many different trigger tags as I can just to cover all the bases, but rbs are usually just tagged as the thing im warning for [for example- #spiders]
I may reblog posts reguarding political issues, and these will also be tagged as the thing im talking about for filtering purposes.
active sideblogs
@ambiguousseagrass criaturas del mar 🌊 🐠
@ambiguousgrassstims - stimboards nd the like
may be more at somepoitn. shrugs.
thats it bye bye
#tags I use a lot ->#grass yells into the void#grass reblogs art#fav#grass does art#grass' genloss tomfoolery#grass talks too much#animals#food#video#the void yells back#grass reblogs#grass queues things#c!clingyduo the world#gif
15 notes
·
View notes
Note
hiiii you're great at writing image descriptions is there any like tactic with which you've learnt that or are you just good at it? (I try to reblog described art only but sometimes there's none yet and I don't wanna fuck it up lmao)
firstly, thank you for the compliment <3 and yay for trying to reblog described art! luckily for all of us, there's no such thing as just being good at it, so hopefully some of these tips can be helpful to you!
some general things that i think help to keep in mind: a rough description is better than no description, focus on the goal (which for me is usually expressed something like "i'm trying to provide information about what's in the image to whoever is having trouble accessing the image"), and you can always ask for help!
1. writing rough descriptions
i really love this guide to alt text on tumblr, especially if you're starting out and writing shorter descriptions.
i like putting the most important info right up front and making the ID easily skimmable. i've started steering away from IDs like "ID: a digital pen-and-ink line drawing of a roller-skating person with red hair, a candy striper outfit, and android limbs and..." and towards writing more like "ID: drawing of sundry sidney..."
2. focus on the goal
focus on what information is important in an image. this differs, eg. someone's redesign of a character probably means you can focus on the details of clothes/appearance/etc, whereas in a reaction image or memey doodle you're probably okay just naming the character
for me, i try to get the character(s), any text/dialogue, and any action going on for fanart. i also try to get in major keywords with an eye to people who might use my plain text descriptions to blacklist things with new xkit, eg. [character] from [fandom]
3. asking for help
i have an open offer that you can send me posts and 99% of the time i'll write you a description that you can post or you can reblog from me, you don't even have to credit me! several other describers who will happily do the same, both on tumblr and on JD keplercryptid's discord. this is a very low pressure way to get any art described if you can't or don't want to describe it yourself
but also, if you're not sure what's important in an image, i've had a lot of luck messaging the original artist! just a quick message like "hiya! i just wanted to say i absolutely love your [sundry sidney art/warfare whitney cosplay/etc], it looks fantastic! i'm writing an image description for the image right now if that's okay, and i was wondering if [XYZ]" i've asked about things like "what pronouns should i use for your OC? is this person's hair in locs or braids? what material is [thing] made of? did you use markers or ink on this piece?" i've found lots of fanartists and cosplayers to be super chill and willing to talk about their art!
#i apologize for how long this ended up being#but tl;dr mad props to you for working on getting your blog more accessible!#a thought process that's been really helpful to me is 'what info am i a sighted person getting from this image? that needs to get into the#description'#you absolutely don't need to be a writer to write IDs but i think that journalism and museum writing have both helped me be like 'how do i#write this in a way that anyone would understand? what info is most important? what am i seeing first?'#and most of all good luck!! and welcome to the community of image describers we're pretty friendly <3#sola answered#sola said#accessibility#image descriptions#ginger canary
29 notes
·
View notes
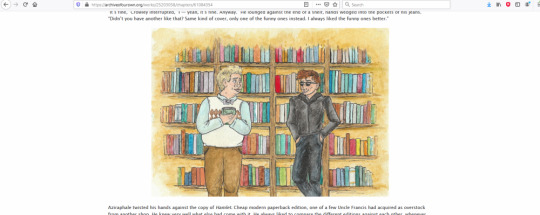
Text
How to center and nice-size an image in an AO3 fic using a work skin
Maybe someone can use this? In my fic for the DIWS Good Omens Mini Bang, I embedded some images from my wonderful illustrator. The centered images will never be wider than the text, no matter the screen size, but they also are never stretched larger than their native size (I resized ‘em to 800px wide in my trusty paint program for faster downloading). Here’s how one looks on my giant monitor and on my phone screen:

If you have never done AO3 skins before then I promise they are not actually scary! You have the option of doing relatively complicated things with them, but this thing is simple.
Anyway this is how I center my images.
Step one: make a skin.
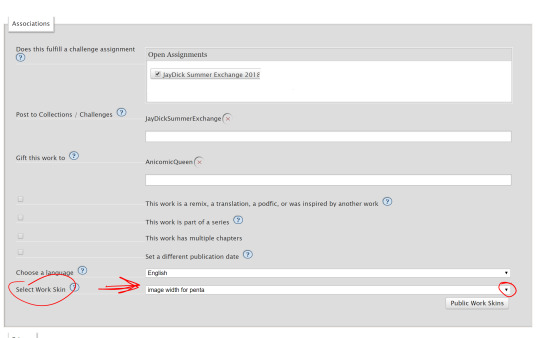
In your AO3 dashboard, click “Skins” in the menu (left or top of page, depending on if you’re on a big or small screen). This takes you to the Site Skins page, which are for if you want to make all of AO3 look different to just you. You want a Work Skin, though, which makes your fic look different to everyone, so click My Work Skins.

Click Create Work Skin in the top right and you’ll get an editor that’s similar to when you’re posting a fic! You only need to set two things. One, give it a title that makes sense to you (the title won’t be visible to people reading your fic). Two, paste some stuff into the big “CSS” box.
This is the stuff to paste:
.centered {
margin-left: auto;
margin-right: auto;
text-align: center;
}
.centered img {
max-width: 100% !important;
}
That was the stuff to paste! Just toss both of those two blobs in the big editor and click Submit. Now you have a skin!
Step two: use the skin in your work.
Open up the work you want to do this in. Find the Select Work Skin box (just under the Choose A Language box) and select the skin you just made. Yay! Sorry, the Homestuck and Undertale ones are just there for everyone and that’s how it is. (Nothing against Homestuck or Undertale. I just don’t like unneeded entries in lists.)
Step three: center your image.
This is the most complicated bit, only because I can’t give you an exact thing to copy-paste. But I can give you a basic template! Don’t try to paste this into Word or a similar word processing program. The quote marks could get turned into “smart quotes” (like the ones I typed there, just now -- see how the opening and closing quotes are different from each other?). If you need to save it off for later, Notepad or another very simple plain-text editor will be perfect, because it will keep the quotes as not smart quotes.
Find the spot in your AO3 work where you want the centered image to be. It would be between two blocks of text which are wrapped with <p> tags, so something like this...
Into that space, you’re gonna hit Enter a couple of times (which I’ve already done in the screenshot) and then paste this block:
<p class="centered">
<img src="BANANA" alt="ORANGE" />
</p>
That was the block to paste. Before you’re done, you need to change two things!
BANANA goes away. Inside the quote marks where BANANA used to be, you need to put the URL of your image. This URL must start with http or https (preferably https), or else it won’t work. I can’t give specific instructions on how to get this, because it depends on where the image is hosted! If it’s only on your computer, or attached to an email, it can’t be embedded. It has to have been put somewhere on the web, like Flickr, Photobucket, or Google Drive. It will work to embed from Tumblr, but I don’t trust Tumblr not to change everything up and bork all the old image URLs, thus breaking your embedded images on an arbitrary date in the future. (Any image host could theoretically do this, but -- well. We’re all familiar with Tumblr, right?)
ORANGE also goes away. Inside the quote marks where ORANGE used to be, you optionally can (I recommend you do!) put a brief (200 characters or fewer) description of the image. This is text which is invisible when viewing your fic in a normal browser -- it’s there for screen reader technologies, used by people who are blind or otherwise have trouble seeing a screen. Their screen reader software will literally read out to them, so that they can hear it with their human ears, the description you put here. Don’t start it with “image of” or “picture of”, because the screen reader tells the human that it’s an image already. Here is a pretty user-friendly guide on how to write alt text! If you’re more technically-inclined, the W3C has more involved docs. Remember, the screen reader is going to say out loud whatever you put here, so don’t make it super long, or else you’ll force people who are using screen readers to wait through the long description for your story to continue.
A finished version of the banana/orange block might look like this:
<p class="centered">
<img src="https://www.my-nifty-example-website.com/prettypicture.jpg" alt="Two dogs having a tea party wearing fancy hats" />
</p>
Step four: do it again if needed.
If you have more images to center in the same work, just repeat step 3 for each! Step 2 has to be done once per work. Step 1 might be done once ever (and then you just keep pulling that same skin into many works), or you might do it multiple times (if you want other changes in the skin that are special to only this one work). I do a different skin every time I have a fic that needs a skin, but that’s because I do extra fancy things that are different for each fic.
You never have to do either step 1 or step 2 more than once per work, even if it’s multi-chapter. In future chapters of the same fic, just do step 3 again.
Step five: preview and/or temporary draft is your friend
I am an IT professional with a (technically expired but work with me here) Microsoft certification in HTML5/CSS and seven years of writing this stuff for pay under my belt. Even I don’t post without previewing. Preview and saving as a draft without publishing are both your friends.
Some fun(?) notes
What you are doing here is using cascading style sheets. The AO3 skin is a very simple stylesheet, which is a series of rules that your readers’ browsers will use to apply to text in your story. There are standards that all your normal sort of browsers (Firefox, Chrome, Safari, Edge, Opera...) are supposed to follow when they see these rules, so that no matter which browser someone uses, a webpage will look as similar as possible.
A skin created from the above steps defines a class named “centered” and tells the browser how “centered” should look. Then, in your fic, if you apply the class named “centered” to something in the big editor -- like, say, the <p>aragraph tag that wraps around your image -- then the style from your skin will be applied.
The magic of cascading style sheets is that you can define your class exactly once and then use it many times. If you decide you want to change all the places you used it -- maybe you want every centered image in your 87-chapters-long heavily-illustrated fic to have a green border? -- you have to change exactly one place: your skin. The change will bubble down to every single place you used it.
Skins do not allow all the features of true CSS (no media queries; I am sad), and you can’t put comments in your skin (the editor strips them out). Browser-specific overrides also do not work (if you don’t know what this means, that’s okay, you have to go to extra work to try to use them in the first place). But they’re still pretty cool.
A lot of people will just put <center> tags around their thing, and use width=“100%” or some other number, but that is technically not standard HTML, hasn’t been for a very long time, and sooner or later Chrome is going to get clever and stop respecting it. (Google’s developers like to make Chrome very clever and change how it does things just because they feel like it. It makes my day job rather more difficult. Ask me about SameSite cookies!! Actually, don’t. Never ask me about that thing.)
For portrait-oriented illustrations -- taller than they are wide -- I like to float the image to the right of the text and have it take up no more than 50% of the width of the screen (as seen near the end of this chapter). But that is a more complicated thing than this one, and I am keeping it simple today. Maybe I’ll show how to do the nice floaty at some point.
For any-oriented illustrations, you could have a small resized version which links out to a larger version as a click-to-zoom thing. That is also a little more complicated, so it isn’t in this post.
Questions and clarifications welcome.
That is how to center and nice-size an image in an AO3 fic using a work skin! I hope you are having a good day.
#ineffablefool original post#man idk how i would even tag this thing#i'll worry about that later#not good omens#look you don't understand i love html and css this is fun for me#i don't get to do it very often at my job since they promoted me so i hafta get my kicks where i can
42 notes
·
View notes
Note
So it looks like we can do alt text on tumblr now! Yay! But my uncomfortableness comes from the idea that I have no idea how to tell if an image is accessible or not now. Am I missing something? Or do we just have to hope op tags it with “ID” “image description” or “accessible”?
yeah, unfortunately without using a screen reader there’s no way to tell. which is why i encourage people who add IDs in alt text to make note of that somewhere, preferably in the post itself but at least in the tags, etc.
i’ll keep writing out descriptions for those that don’t have them in the caption because alt text isn’t the be all end all of accessibility, and some people need image descriptions who don’t use screen readers. and i encourage people to put IDs in both places on original posts.
10 notes
·
View notes
Text
14 Days of BeChloe Valentines
DAY 06 - ZOOKEEPER FOR THE DAY - STACIE'S PLAN?
Prompt from Author: After posting Day 5, I realized that Valentine's Day was never mentioned. Oops, my bad. So, based on requests from FanFiction Users horsegurl03 and Rain Cloud (Guest) I have decided to add a second part which tells the story of Stacie's "plan" for Chloe to ask Beca out. Here is that story.
Chloe bit her lip and stared at Beca while she fed the red pandas.
"She's single," Stacie said, startling Chloe a bit.
"I'm sorry, what?" Chloe asked looking at Stacie.
"Beca," Stacie said. "She's single. And I think she might like you."
"Not likely," Chloe said sadly. "I mean she's Beca Mitchell. She can have anyone she wants."
"Funny thing," Stacie said. "I think she wants you."
Chloe pushed her glasses up on her nose and looked back over at Beca. "I, um, I do like her. But, I wouldn't even know how to ask her out. I mean, she's famous."
"Beca hasn't let her fame go to her head," Stacie said. "I've known her twelve years. She's shy, funny, and has the biggest heart in the world. If you're really interested, I can help you."
Chloe bit her bottom lip and looked over at Beca again. Beca saw her and gave her a smile. Chloe smiled back at Beca and turned to Stacie.
"What do I need to do?" Chloe asked.
~~2019 BeChloe Valentines - Day Six~~
"Thank you, Chloe," Bella said and hugged the redheaded tour guide. "I had so much fun."
"You are so welcome, Bella," Chloe said. "Happy Birthday."
"Thank you," Bella said. "Are you going to come to my house for my party? We're going to have cake?"
"Um, I, uh," Chloe stuttered and looked at Stacie.
"That's a great idea," Stacie said. "Why time do you get off?"
"About five-thirty," Chloe said.
"That's perfect," Stacie said. "Why don't you and Jessica come by when you get off? We're going to have a barbecue with cake and ice cream to celebrate."
Chloe was hesitant to accept. Stacie had said she would help her come up with a plan to ask Beca out. Could this be what she had in mind?
Chloe looked over at Stacie and saw the brunette smile and give her a small nod.
"Um, you know what?" Chloe said. "I'd love to. I'll, uh, want to go home and change first so I might not be there until close to six-thirty. Is that okay?"
"Perfect," Stacie said. "We'll see you around six-thirty."
"Yay," Bella squealed and clapped her hands. "Bring your bathing suit 'cause we're going to go swimming, too."
Thinking of possibly seeing Beca in a bikini caused a flush to creep up on Chloe's face. "I will definitely do that."
"Give me your number," Stacie said holding out her phone to Chloe. "I'll text you the address."
Chloe put in her contact info and handed the phone back to Stacie. Stacie immediately sent a text to the redhead with the address.
"Now, you have no excuse not to be there," Stacie said with a grin. "We'll have you and Beca going on a date before this night is over."
Chloe couldn't help the smile that grew on her face. "Thanks."
~~2019 BeChloe Valentines - Day Six~~
By the time Chloe and Jessica arrived at Beca's Chloe was nervous and more anxious than before.
"I don't know if I can do this, Jess," Chloe said as they sat in the driveway. "Maybe we should just go home. I'll text Stacie and tell her something came up."
"Oh, no, you don't," Jessica said. "I'm not giving up a chance to party with Beca Mitchell. Besides, Stacie, Beca's best friend, said Beca likes you. And I know you like her. I saw the way you two looked at each other." Jessica turned her body to face Chloe. "Chlo, you deserve this. Give it a chance. Worst case, you go out, and there's no spark. Best case, you go out and end up living here and invite your best friend, that would be me, over all the time."
Chloe laughed and said, "Okay. Let's do this."
The two girls grabbed their bag and walked to the front door. Chloe looked at the doorbell like it was going to ring itself. Jessica rolled her eyes and pressed the doorbell.
Stacie answered the door. "Chloe. Jessica. Welcome. Come on in."
Stacie stood aside as the two entered. "Everyone's in the kitchen or out back," Stacie said as she walked toward the back of the house.
"Chloe!" Bella yelled and ran to the redhead. Chloe knelt to hug the young girl. "I'm so glad you came."
"Thanks for inviting me," Chloe said.
"Hey, Bella," Jessica said. "Thanks for letting me come to your party."
"You're welcome," Bella said. "Would you like something to drink?"
"Well, aren't you the best hostess," Chloe said. "I don't want anything right now, thank you."
"I'd like some water," Jessica said. "If it's not too much trouble."
"Come on," Bella said, taking Jessica's hand. "Everything's outside."
"Remember, Bella," Stacie called as she walked away. "No pool until we are all out there."
"Okay, mommy," Bella said.
"Can I, uh, help with anything?" Chloe asked.
Stacie looked at Chloe and smiled. She motioned for Chloe to sit at the counter and Chloe took a seat.
"Relax," Stacie said as she continued to slice vegetables for the salad she was putting together. "It's all going to be fine."
Aubrey came inside and looked at Chloe.
"Chloe," Aubrey asked. "I'm glad you're here."
"Thanks," Chloe said softly.
"So, what's your story?" Aubrey asked. "How did you become a guide at the zoo?"
"Oh, I'm studying to be a vet," Chloe said. "My work schedule at the zoo allows me to make money while I attend veterinary school. Plus, the zoo vet lets me follow him around, so I also learn about taking care of the big animals."
"Are you okay, Chloe?" Stacie asked. "You look a little pale."
"I'm, uh, I'm fine," Chloe said looking around nervously.
"You're nervous about Beca, aren't you?" Aubrey asked. "You don't have to be. Jessica said you two were fans. If you know Beca the singer, then you know Beca. She doesn't put on a show just for her fans. She remains true to herself and what you see is what you get."
"Brey's right," Stacie said. "Don't put any pressure on yourself. Just be here for the party. If anything else should happen while you're here, then it happens. Don't sweat it."
"That's your plan?" Chloe asked Stacie. "Don't sweat it? Sorry, Stacie, but your plan sucks because I am so sweating it right now."
"Relax," Stacie said with a laugh. "Everything is going to work out. I promise."
"I'm sorry," Chloe said. "I am nervous. I mean, I don't usually like someone I just met like this. There's just something about Beca. I don't know how to explain it."
"We get it," Stacie said as she and Aubrey smiled. "We all met Beca in college. She was this brooding alt girl with, as Aubrey put it, ear monstrosities and too much eyeliner. But she became the best friend any of us could ever have. She moved from LA to Atlanta to help me when I became pregnant with Bella. I didn't ask her to; she just did it because she knew I needed her."
"Where's the food?" Fat Amy asked as she came through the back door. "Oh, hey, Red."
"Hey," Chloe said.
"Chloe!" Beca said as she came into the kitchen.
Chloe turned at the sound of Beca's voice, and her eyes nearly popped out of her head when she saw Beca. Beca was wearing a black bikini and carrying a sarong that she started placing around her middle.
"I'm glad you're here," Beca said as she finished tying the sarong. "Did you bring a swimsuit?"
Chloe just nodded. "Good," Beca said. "Stacie, I know Bella wants to get in the pool. Is it okay if I take her in while you finish up in here?"
"Sure, Becs," Stacie said.
"Can we have some appetizers or something?" Fat Amy asked.
"Here," Aubrey said handing Fat Amy a platter of vegetables and dip. "Take this, and we'll bring some other snacks out in a minute."
"Fine," Fat Amy said and left.
"So, Chloe," Beca said. "Did you want to change? I can show you where you can change if you'd like."
"Um, yes, please," Chloe said. "Oh, I should get Jessica so she can change too."
"I'll get her," Aubrey said and went to the back door. She called out for Jessica and Jessica came in.
"What's up?" Jessica asked.
"Beca's going to show us where we can change into our swimsuits," Chloe said.
"Okay," Jessica said and grabbed her bag.
"Follow me," Beca said. Chloe grabbed her bag, and she and Jessica followed Beca out of the kitchen.
"I like Chloe," Aubrey said. "I think she'll be good for Beca."
"I agree," Stacie said. "I just hope one of them gets over their awkwardness and asks the other out."
"I thought you had a plan," Aubrey said.
"Not really," Stacie said. "I just wanted to get Chloe to admit she wanted to go out with Beca and put them in the same room. I need to think of something fast before they go their separate ways."
"Why don't we invite Chloe and Jessica to our Valentine's Day girls brunch next week?" Aubrey suggested. "It's just the Bellas; I think they'll fit right in."
"That could work," Stacie said. "I'll ask Chloe about it."
~~2019 BeChloe Valentines - Day Six~~
Beca came into the kitchen after showing Jessica and Chloe to one of the bedrooms to change.
"I'm going to start the grill, and get the hamburger and hot dogs started," Bec said. "Did you want me to grill some chicken, too?"
"Yeah," Stacie said going to the refrigerator. She took out a plate of chicken and handed it to Beca. "Put some barbecue sauce on some."
"Got it," Beca said. "Hey, Brey, can you give me a hand getting this stuff outside?"
"Sure," Aubrey said and grabbed some stuff. The two friends went outside.
Stacie drained some potatoes and set them aside. She whipped up a dressing and then put together her potato salad. She heard Bella and Hannah squealing and smiled, knowing that Beca probably threw Bella into the pool.
Chloe and Jessica came back to the kitchen.
"Looking hot ladies," Stacie said.
Chloe blushed and Jessica said, "Thanks!"
"So, Brey and I were talking and we wanted to invite you two to our Bellas Valentine's Day brunch next week," Stacie said.
"On Valentine's Day?" Jessica asked.
"Yeah," Stacie said. "We all take the day off and meet up for brunch. That way, anyone with a significant other can still do something that night. We started it in college and have done it every year since. We usually meet at around eleven. What do you say?" Seeing Chloe's hesitation, she adds, "Beca will be there."
"I do have a date with my boyfriend that night," Jessica said and thought about it for a minute. "I'd love to do the brunch. I'll check on Monday to see if I can get the day off."
"It sounds like fun," Chloe said. "I don't usually work on Thursdays but I do have a class that ends at eleven. I'll just be a little late if that's okay.
"Perfect," Stacie said. "The Bellas are a really good bunch and you two will fit right in. Oh, and I hope you can sing because we always sing."
~~2019 BeChloe Valentines - Day Six~~
Later that night, CR and her wife left to get Micah home to bed. Fat Amy and Bumper left shortly after.
Bella and Hannah were having a sleepover and Stacie had put them to bed.
The rest of the party goers were sitting around the fire pit enjoying the evening. Beca was sitting next to Chloe and saw the redhead shiver.
"Are you cold?" Beca asked quietly.
"A little," Chloe said and rubbed her arms. "I should have thought to bring a sweatshirt or something."
"I'll be right back," Beca said and went into the house.
Chloe watched her walk away with a small smile on her lips.
"Like what you see, Chloe?" Stacie asked causing a few chuckles around the circle.
"Sorry," Chloe said and blushed. "There's just something about her."
"There certainly is," Aubrey said. "And if you decide to pursue something with her, you've got our blessing." Jesse and Stacie nodded in agreement. "All we can ask is that you don't hurt her."
"I wouldn't dream of it," Chloe said.
Jessica reached over and squeezed Chloe's shoulder. "Just let me know when I can give her the best friend speech, okay?"
"Okay," Chloe said and laughed.
"Do you two sing?" Jesse asked looking at Chloe and Jessica.
"Yeah," Jessica said and pulled out her phone. "This is us."
Jessica pulled up a song and turned the volume up as high as it would go. She hit play and the song Drive started and everyone's eyes widened.
They sat listening and Stacie smiled. "Damn, you both have great voices."
The song ended and Jessica put her phone away. "Thanks. Ooo, Chloe, sing that David Guetta song Titanium. She is really good with that song."
"That's one of Beca's favorite songs," Stacie said. "Go ahead, Chloe. We'd love to hear it."
"Um, okay," Chloe said and cleared her throat.
You shout it out
But I can't hear a word you say
I'm talking loud not saying much
I'm criticized but all your bullets ricochet
You shoot me down, but I get up
Chloe was singing so softly that everyone was straining to hear her.
"A little louder, Chloe," Jessica urged and Chloe increased her volume.
I'm bulletproof nothing to lose
Fire away, fire away
Ricochet, you take your aim
Fire away, fire away
You shoot me down but I won't fall, I am titanium
You shoot me down but I won't fall
I am titanium, I am titanium, I am titanium, I am titanium
Cut me down
But it's you who has further to fall
Ghost town, haunted love
Raise your voice, sticks and stones may break my bones
I'm talking loud not saying much
Chloe blushed when she saw Beca walking toward them. She sat next to Chloe and Chloe was surprised when Beca started singing with her.
Chloe faltered just a bit but Beca continued to sing. Chloe picked the song back up again and they continued singing together without missing another beat; their voices blending really well.
I'm bulletproof nothing to lose
Fire away, fire away
Ricochet, you take your aim
Fire away, fire away
You shoot me down but I won't fall
Stacie couldn't keep the smile off her face as she watched her best friend sing with Chloe. She was even more determined to get those two to go out.
I am titanium
You shoot me down but I won't fall
I am titanium, I am titanium
Jessica smiled and watched her best friend as she became more confident and held her own quite well with Beca. She was glad that she had found someone she was comfortable enough to sing with.
Stone-hard, machine gun
Firing at the ones who run
Stone-hard, thus bulletproof glass
You shoot me down but I won't fall, I am titanium
You shoot me down but I won't fall, I am titanium
You shoot me down but I won't fall, I am titanium
You shoot me down but I won't fall, I am titanium
I am titanium
The two held the last note and when they were done, the small group clapped and cheered. Chloe blushed and looked at Beca and Beca was smiling at her.
"That was great, Chloe," Beca said. "You have a great voice."
"Thank you," Chloe said.
"I, uh, got you a hoodie," Beca said holding it out to Chloe. "You know, because you, um, said you were cold."
"Thanks," Chloe said and Beca helped her put it on.
The two were unaware that all eyes were watching them.
About an hour later Jessica yawned which in turn caused Chloe to yawn. They both apologized and said something about going home
"Stay here," Beca said quickly. "We have plenty of room and you really shouldn't be driving if you're tired."
"I don't know," Chloe said.
"Come on, Chloe," Jessica urged. "Let's stay. We can go home in the morning."
"If you're sure it's no trouble," Chloe said looking between Beca and Stacie.
"No trouble at all," Stacie said. "Come on; we should all call it a night."
Everyone got up and headed for the house. Beca grabbed Chloe's arm to stop her.
"Um, Chloe," Beca said and swallowed nervously. "Do you think you might want to go out sometime? Um, with me."
Chloe smiled and said softly, "I'd love to."
"Great," Beca said with a toothy grin. "We'll talk about it tomorrow. Okay?"
Chloe nodded and Beca took her hand and led her into the house.
~~2019 BeChloe Valentines - Day Six~~
Beca was sleeping soundly when two small bodies jumped on her. "Arrggghh!"
Beca sat up and stared into the eyes of Bella Conrad and Hannah Swanson.
"Don't you have mothers you can bother?" Beca asked her voice raspy from just waking up.
"They're sleeping," Bella said. "And we're hungry."
"So, why did I get the pleasure of being awakened to feed you?"
"Because we love you the best?" Hannah said with a cheesy grin.
"It's a good thing I love you, too," Beca said. "Now, get off me so I can get up."
Bella and Hannah climbed off Beca and waited for her to get out of the bed. Beca got up and Bella jumped on her back. Hannah took Beca's hand.
"Thank you, Aunt Beca," Hannah said looking up at her.
"You're welcome, munchkin," Beca said.
The three made their way downstairs and Beca heard someone in the kitchen.
"Good, Stace, you're-" Beca stopped talking when she saw that it was Chloe and not Stacie who was up.
Beca walked over and let Bella climb off her back and onto the stool at the counter. Beca picked Hannah up and set her down next to Bella.
"Did I wake you?" Chloe asked. "I'm sorry. I woke up and couldn't get back to sleep. I made coffee. I hope you don't mind."
Beca just blinked and then walked over and hugged Chloe. "Bless you."
Chloe giggled and hugged Beca back. Beca pulled out of the hug and grabbed some coffee cups and two bowls.
"Would you like some cereal?" Beca asked Chloe.
~~2019 BeChloe Valentines - Day Six~~
An hour later, Hannah and Bella were curled up on the sofa watching a movie, while Beca and Chloe were still sitting at the kitchen counter talking.
"Are you busy tonight?" Beca asked. "I know it's short notice, but I thought maybe we could go to dinner tonight. For our date."
"It just so happens I have no plans for this evening," Chloe said. "Although I don't want to be out too late. I have an early class tomorrow."
"I promise I won't keep you out late," Beca said.
"Good," Chloe said. "It's a date."
"Yes!" Beca hissed and gave a fist pump.
Chloe bit her lip to keep from laughing. Beca saw this and blushed.
"Sorry," Beca said. "I'm just really excited for our date."
"Date?" Stacie asked as she came into the kitchen. "What date? Oh, my God. You two are going on a date?"
"Yep," Beca said and Chloe nodded.
"I'm so happy for you, Becs," Stacie said and grabbed Beca in a hug. "I'm happy for you both."
"Thanks, Stace," Beca said. "And, um, thanks for inviting Chloe here. It was fun getting to know her. And, I can't wait to get to know her much better."
"I like the sound of that," Chloe said.
~~2019 BeChloe Valentines - Day Six~~
That night, Beca and Chloe had their first date. Beca kept it low key so the paparazzi wouldn't bother them. Except for a few fans who asked for autographs they were left alone.
Beca had such a great time with Chloe that she decided it was best to have that discussion with Chloe before they were too deep into a relationship. Beca had been hurt before because the girl she was dating couldn't handle her jealousy and was constantly arguing with Beca about it.
"I've had a really nice time tonight," Beca said as she was driving Chloe home from dinner. "I, um, wanted to talk to you about us, or I mean if we become an us."
"If you're worried about the paparazzi and stuff," Chloe said. "Please don't. I won't lie, I'll probably get jealous once in a while but I already feel like I can trust you. And that trust will only grow as our relationship develops. I promise if something is bothering me, I will tell you and we can talk about it. We'll work it out together."
A tear came to Beca's eye. "Wow," she said not knowing what else to say except, "Thank you."
Beca took Chloe's hand and squeezed it. She then held onto it for the rest of the drive to Chloe's place.
Beca pulled up in front of Chloe's building and parked. She turned in her seat so she could look over at Chloe.
"I really want to see you again," Beca said.
"I really want to see you again, too," Chloe said softly as she faced Beca.
"Let me walk you upstairs," Beca said and she made her way out of the car. She hurried around to open Chloe's door for her.
"Thank you," Chloe said as she stepped out.
Beca took Chloe's hand as they walked into the building. They were quiet as Beca rode the elevator to Chloe's floor and then walked her to her door.
"This is me," Chloe said. "I'd invite you in-"
"That's okay," Beca said cutting her off. "We both have early mornings tomorrow."
Beca looked in Chloe's eyes and they both leaned in and kissed. Beca put her hands on Chloe's hips and held her in place. Chloe put her hands on Beca's arms nears the elbows.
Beca pulled back from the kiss and smiled.
"I'm going to be busy since I'm taking Thursday off for our Bellas brunch," Beca said. "So, I won't be able to see you until then."
"Oh, that's fine," Chloe said. "I'll be busy with classes and studying."
Beca gave Chloe another quick kiss. "I'll see you on Thursday."
Chloe nodded and opened the door. Beca waited until Chloe was inside and had closed the door before she left and made her way home.
~~2019 BeChloe Valentines - Day Six~~
A few days later and it was time for the Bellas Valentine's Day brunch. Beca had been thinking about Chloe since their date. She's known the redhead for less than a week and she already knew that she was going to be someone special in her life.
Beca knew Chloe was going to be late because of her class. She had come to a decision the night before and she was nervous, hoping that Chloe wouldn't think it was too soon.
"Hey, Beca," Jessica said as she arrived at the restaurant.
"Oh, hey, Jessica," Beca said. "Chloe's still coming, right?"
"She'll be here," Jessica said. "I'm surprised your ears haven't been burning. All she's talked about this week is you and your date."
"Really?" Beca said with a smile. "Good."
The rest of the girls arrive and everyone spent a few minutes hugging and greeting each other. Jessica was introduced to the girls and they ordered drinks.
Beca kept her eye on the entrance and jumped up as soon as she saw Chloe enter.
"Chloe must be here," Stacie said with a laugh.
Beca didn't care, she hurried over to Chloe and pulled her into a hug. She pulled back and kissed Chloe on the cheek.
"First, Happy Valentine's Day," Beca said.
"Happy Valentine's Day," Chloe said.
"Can I, um, talk to you?" Beca asked causing Chloe to look concerned. "It's not bad, I swear."
"Um, okay," Chloe said.
Beca led Chloe over to a quiet corner and took both of Chloe's hands in hers.
"Chloe," Beca said looking her in the eye. "I know you'll think this is too soon, but I was wondering if you would want to be my girlfriend?"
Beca swallowed and kept her eyes on Chloe's face. She saw surprise and then something else.
"Yes," Chloe squealed and pulled Beca to her in a hug.
"Yes?" Beca said.
"Yes," Chloe said. "I don't think it's too soon and I can't think of anything better than to become your girlfriend on Valentine's Day."
Beca pulled back with a smile and kissed Chloe. Chloe kissed her back and suddenly Beca wasn't kissing her anymore. Chloe opened her eyes to see CR and Stacie laughing as they dragged a struggling Beca to their table.
Chloe laughed and thought, I love these girls.
Song used: Titanium by David Guetta and Sia
98 notes
·
View notes
Text
Artists, how to make your images automatically resize on AO3 to make you and your audience happy
Based on this post <-- great post, I just wanted to make it EVEN MORE image heavy
Ok, have you guys ever have this problem on AO3:

Me too! And now I CAN HELP!!! Here is am image heavy guide to make a VERY SIMPLE work skin for your AO3 works! (source)
Step 1: Login to AO3 and go to the “Skins” link on your dashboard navigation bar.

Step 2: Click on “my work skins” and then “create work skin”


Step 3: Paste this into the text box:
#workskin img { max-width:500px!important; }
(note: you can change the max width to be more or less than 500px depending on your needs)

(Note that I pasted it in as one line, and AO3 automatically added spaces and returns after I hit submit.)
Step 4: Give it a unique title and hit submit.

Step 5: Edit your work and select the work skin you just created under “Select work skin”.
Step 6: Make sure your image html looks like this:
<img src=“URL” alt=“description” width=100%>
If you’re in the rich text view, make sure you click over to the html view.

You don’t want to have height and width specified because if you do, the work skin will mess up your proportions, making it looked stretched. Also, if you have width set to 100%, then your image will resize to the width of the browser window if the browser is smaller than the max-width.
Step 7: Save your work!

Yay! Victory!
Caveat: my expertise in this area is VERY LOW, but this worked for me and I have inexpertly guided one (1) person through it, so I will do my best to help if you need it, and also I will update if I learn more/get corrected.
#jaydick summer exchange#despite the fact that I used a voltron image in this example#artists#technical help#image posting#ao3 html
46 notes
·
View notes
Text
Because my inadequate tagging system has bothered me for quite some time, I have now gone through the exciting task of checking all the ~3000 posts on this blog for their tags.
Here’s what’s new:
Magical girls - a general tag for stuff like discussing magical girl tropes, putting magical girls into places where you don’t usually see them etc.
The troubled life of a magical girl - magical girl problems.
Responses - asks and replies.
Quality content - my favourite stuff.
First impressions
Review I guess - added to any closing thoughts of a series.
Ranking
Hehe - I found this funny.
Confessions
Adapted costume - new outfit design based on a canonical one.
Alt hair - alternative hairstyles.
Games
Manga
Henshin
Super form
Magical trinkets - transformation items and such.
Mascots
Witches
Scenery - includes rooms and other backgrounds.
Plants
Families
Kimono
Pajamas
Time skip - characters depicted at a different age than usual.
Background magical girls - unnamed or otherwise irrelevant side characters.
Parody magical girls
Show within a show - magical girls who are fictive in the series itself.
Side character magical girls - magical girl as a side character in a non-magical girl series.
Dark magical girls
Magical girl au - drawing a magical girl form to a character who is not a magical girl.
Series specific OCs:
Precure (only designs based on the canon seasons)
Sailor Moon
Tokyo Mew Mew
Also:
Yay <3 Fuwa Fuwa Precure loses the heart in the tag since I see it causing some issues with the search.
“Tsunagaru Puzzlun” becomes the go-to tag for the game over alternative spellings.
“Merch” becomes “stuff” so I can put drawings of cool items and handmade items not for sale in the same category.
“Julio” becomes “Pikario”. I remember having art of him sitting in my drafts for weeks or even months because I couldn’t be bothered to check which name I had used for tagging him, and in the end the result was a mess of different options anyway.
Ramble ramble added to all of my text posts.
6 notes
·
View notes
Text
A Lightweight Masonry Solution
Back in May, I learned about Firefox adding masonry to CSS grid. Masonry layouts are something I’ve been wanting to do on my own from scratch for a very long time, but have never known where to start. So, naturally, I checked the demo and then I had a lightbulb moment when I understood how this new proposed CSS feature works.
Support is obviously limited to Firefox for now (and, even there, only behind a flag), but it still offered me enough of a starting point for a JavaScript implementation that would cover browsers that currently lack support.
The way Firefox implements masonry in CSS is by setting either grid-template-rows (as in the example) or grid-template-columns to a value of masonry.
My approach was to use this for supporting browsers (which, again, means just Firefox for now) and create a JavaScript fallback for the rest. Let’s look at how this works using the particular case of an image grid.
First, enable the flag
In order to do this, we go to about:config in Firefox and search for “masonry.” This brings up the layout.css.grid-template-masonry-value.enabled flag, which we enable by double clicking its value from false (the default) to true.

Making sure we can test this feature.
Let’s start with some markup
The HTML structure looks something like this:
<section class="grid--masonry"> <img src="black_cat.jpg" alt="black cat" /> <!-- more such images following --> </section>
Now, let’s apply some styles
The first thing we do is make the top-level element a CSS grid container. Next, we define a maximum width for our images, let’s say 10em. We also want these images to shrink to whatever space is available for the grid’s content-box if the viewport becomes too narrow to accommodate for a single 10em column grid, so the value we actually set is Min(10em, 100%). Since responsivity is important these days, we don’t bother with a fixed number of columns, but instead auto-fit as many columns of this width as we can:
$w: Min(10em, 100%); .grid--masonry { display: grid; grid-template-columns: repeat(auto-fit, $w); > * { width: $w; } }
Note that we’ve used Min() and not min() in order to avoid a Sass conflict.
CodePen Embed Fallback
Well, that’s a grid!
Not a very pretty one though, so let’s force its content to be in the middle horizontally, then add a grid-gap and padding that are both equal to a spacing value ($s). We also set a background to make it easier on the eyes.
$s: .5em; /* masonry grid styles */ .grid--masonry { /* same styles as before */ justify-content: center; grid-gap: $s; padding: $s } /* prettifying styles */ html { background: #555 }
CodePen Embed Fallback
Having prettified the grid a bit, we turn to doing the same for the grid items, which are the images. Let’s apply a filter so they all look a bit more uniform, while giving a little additional flair with slightly rounded corners and a box-shadow.
img { border-radius: 4px; box-shadow: 2px 2px 5px rgba(#000, .7); filter: sepia(1); }
CodePen Embed Fallback
The only thing we need to do now for browsers that support masonry is to declare it:
.grid--masonry { /* same styles as before */ grid-template-rows: masonry; }
While this won’t work in most browsers, it produces the desired result in Firefox with the flag enabled as explained earlier.

grid-template-rows: masonry working in Firefox with the flag enabled (Demo).
But what about the other browsers? That’s where we need a…
JavaScript fallback
In order to be economical with the JavaScript the browser has to run, we first check if there are any .grid--masonry elements on that page and whether the browser has understood and applied the masonry value for grid-template-rows. Note that this is a generic approach that assumes we may have multiple such grids on a page.
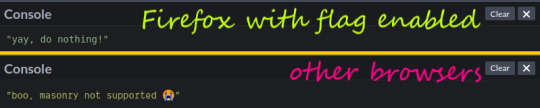
let grids = [...document.querySelectorAll('.grid--masonry')]; if(grids.length && getComputedStyle(grids[0]).gridTemplateRows !== 'masonry') { console.log('boo, masonry not supported 😭') } else console.log('yay, do nothing!')
Support test (live).
If the new masonry feature is not supported, we then get the row-gap and the grid items for every masonry grid, then set a number of columns (which is initially 0 for each grid).
let grids = [...document.querySelectorAll('.grid--masonry')]; if(grids.length && getComputedStyle(grids[0]).gridTemplateRows !== 'masonry') { grids = grids.map(grid => ({ _el: grid, gap: parseFloat(getComputedStyle(grid).gridRowGap), items: [...grid.childNodes].filter(c => c.nodeType === 1), ncol: 0 })); grids.forEach(grid => console.log(`grid items: ${grid.items.length}; grid gap: ${grid.gap}px`)) }
Note that we need to make sure the child nodes are element nodes (which means they have a nodeType of 1). Otherwise, we can end up with text nodes consisting of carriage returns in the array of items.

Checking we got the correct number of items and gap (live).
Before proceeding further, we have to ensure the page has loaded and the elements aren’t still moving around. Once we’ve handled that, we take each grid and read its current number of columns. If this is different from the value we already have, then we update the old value and rearrange the grid items.
if(grids.length && getComputedStyle(grids[0]).gridTemplateRows !== 'masonry') { grids = grids.map(/* same as before */); function layout() { grids.forEach(grid => { /* get the post-resize/ load number of columns */ let ncol = getComputedStyle(grid._el).gridTemplateColumns.split(' ').length; if(grid.ncol !== ncol) { grid.ncol = ncol; console.log('rearrange grid items') } }); } addEventListener('load', e => { layout(); /* initial load */ addEventListener('resize', layout, false) }, false); }
Note that calling the layout() function is something we need to do both on the initial load and on resize.

When we need to rearrange grid items (live).
To rearrange the grid items, the first step is to remove the top margin on all of them (this may have been set to a non-zero value to achieve the masonry effect before the current resize).
If the viewport is narrow enough that we only have one column, we’re done!
Otherwise, we skip the first ncol items and we loop through the rest. For each item considered, we compute the position of the bottom edge of the item above and the current position of its top edge. This allows us to compute how much we need to move it vertically such that its top edge is one grid gap below the bottom edge of the item above.
/* if the number of columns has changed */ if(grid.ncol !== ncol) { /* update number of columns */ grid.ncol = ncol; /* revert to initial positioning, no margin */ grid.items.forEach(c => c.style.removeProperty('margin-top')); /* if we have more than one column */ if(grid.ncol > 1) { grid.items.slice(ncol).forEach((c, i) => { let prev_fin = grid.items[i].getBoundingClientRect().bottom /* bottom edge of item above */, curr_ini = c.getBoundingClientRect().top /* top edge of current item */; c.style.marginTop = `${prev_fin + grid.gap - curr_ini}px` }) } }
We now have a working, cross-browser solution!
CodePen Embed Fallback
A couple of minor improvements
A more realistic structure
In a real world scenario, we’re more likely to have each image wrapped in a link to its full size so that the big image opens in a lightbox (or we navigate to it as a fallback).
<section class='grid--masonry'> <a href='black_cat_large.jpg'> <img src='black_cat_small.jpg' alt='black cat'/> </a> <!-- and so on, more thumbnails following the first --> </section>
This means we also need to alter the CSS a bit. While we don’t need to explicitly set a width on the grid items anymore — as they’re now links — we do need to set align-self: start on them because, unlike images, they stretch to cover the entire row height by default, which will throw off our algorithm.
.grid--masonry > * { align-self: start; } img { display: block; /* avoid weird extra space at the bottom */ width: 100%; /* same styles as before */ }
CodePen Embed Fallback
Making the first element stretch across the grid
We can also make the first item stretch horizontally across the entire grid (which means we should probably also limit its height and make sure the image doesn’t overflow or get distorted):
.grid--masonry > :first-child { grid-column: 1/ -1; max-height: 29vh; } img { max-height: inherit; object-fit: cover; /* same styles as before */ }
We also need to exclude this stretched item by adding another filter criterion when we get the list of grid items:
grids = grids.map(grid => ({ _el: grid, gap: parseFloat(getComputedStyle(grid).gridRowGap), items: [...grid.childNodes].filter(c => c.nodeType === 1 && +getComputedStyle(c).gridColumnEnd !== -1 ), ncol: 0 }));
CodePen Embed Fallback
Handling grid items with variable aspect ratios
Let’s say we want to use this solution for something like a blog. We keep the exact same JS and almost the exact same masonry-specific CSS – we only change the maximum width a column may have and drop the max-height restriction for the first item.
As it can be seen from the demo below, our solution also works perfectly in this case where we have a grid of blog posts:
CodePen Embed Fallback
You can also resize the viewport to see how it behaves in this case.
However, if we want the width of the columns to be somewhat flexible, for example, something like this:
$w: minmax(Min(20em, 100%), 1fr)
Then we have a problem on resize:
The changing width of the grid items combined with the fact that the text content is different for each means that when a certain threshold is crossed, we may get a different number of text lines for a grid item (thus changing the height), but not for the others. And if the number of columns doesn’t change, then the vertical offsets don’t get recomputed and we end up with either overlaps or bigger gaps.
In order to fix this, we need to also recompute the offsets whenever at least one item’s height changes for the current grid. This means we need to also need to test if more than zero items of the current grid have changed their height. And then we need to reset this value at the end of the if block so that we don’t rearrange the items needlessly next time around.
if(grid.ncol !== ncol || grid.mod) { /* same as before */ grid.mod = 0 }
Alright, but how do we change this grid.mod value? My first idea was to use a ResizeObserver:
if(grids.length && getComputedStyle(grids[0]).gridTemplateRows !== 'masonry') { let o = new ResizeObserver(entries => { entries.forEach(entry => { grids.find(grid => grid._el === entry.target.parentElement).mod = 1 }); }); /* same as before */ addEventListener('load', e => { /* same as before */ grids.forEach(grid => { grid.items.forEach(c => o.observe(c)) }) }, false) }
This does the job of rearranging the grid items when necessary even if the number of grid columns doesn’t change. But it also makes even having that if condition pointless!
This is because it changes grid.mod to 1 whenever the height or the width of at least one item changes. The height of an item changes due to the text reflow, caused by the width changing. But the change in width happens every time we resize the viewport and doesn’t necessarily trigger a change in height.
This is why I eventually decided on storing the previous item heights and checking whether they have changed on resize to determine whether grid.mod remains 0 or not:
function layout() { grids.forEach(grid => { grid.items.forEach(c => { let new_h = c.getBoundingClientRect().height; if(new_h !== +c.dataset.h) { c.dataset.h = new_h; grid.mod++ } }); /* same as before */ }) }
CodePen Embed Fallback
That’s it! We now have a nice lightweight solution. The minified JavaScript is under 800 bytes, while the strictly masonry-related styles are under 300 bytes.
But, but, but…
What about browser support?
Well, @supports just so happens to have better browser support than any of the newer CSS features used here, so we can put the nice stuff inside it and have a basic, non-masonry grid for non-supporting browsers. This version works all the way back to IE9.
The result in Internet Explorer
It may not look the same, but it looks decent and it’s perfectly functional. Supporting a browser doesn’t mean replicating all the visual candy for it. It means the page works and doesn’t look broken or horrible.
What about the no JavaScript case?
Well, we can apply the fancy styles only if the root element has a js class which we add via JavaScript! Otherwise, we get a basic grid where all the items have the same size.

The no JavaScript result (Demo).
The post A Lightweight Masonry Solution appeared first on CSS-Tricks.
You can support CSS-Tricks by being an MVP Supporter.
A Lightweight Masonry Solution published first on https://deskbysnafu.tumblr.com/
0 notes
Text
Updated gif-making tutorial:
making and using actions to make hq gifs quickly and efficiently, watermarking, adding text/subtitle, sharpening, coloring for natural base coloring on videos
I do not use .ts files for kpop performances (just .mp4 720 or 1080), nor do I use topaz to sharpen.
You will need:
A computer (I use a PC so the hot keys i’ve listed aren’t the same as on macs)
A video editing program that can split your video into smaller sections (DVDvideosoft’s free studio is what I use, but anything similar will do)
Photoshop CS6 extended or a more recent version (you need to have the video timeline function)
a half hour or an hour to make your first set with all the actions specific to your blog url, afterwards full 4-8 piece gifsets should take around 15 minutes or less to make (if your computer is cooperating lol)
We will make actions to:
watermark
convert to timeline and smart object
add a text box with stroke and drop shadow for both 268px and 540px wide gifs for w/e font you want to use
video used // link to finished gifset // there are some images to help in the tutorial, you can ask if you have any questions!!
Result:

my sharpening action (directions in tutorial)
download
Full tutorial under the cut
after the first run of the tutorial where you make your actions, your process should be:
Cut your video into a clip short enough to import into photoshop
Import your frames
Split your frames into multiple documents, one for each gif in the set
crop and resize your gifs
Color your gifs
watermark (action)
convert to video timeline and smart object (action)
add text (action)
sharpen (action)
save for web
1. Cut your video into a clip short enough to import into photoshop:
For most youtube videos which are either 24fps or 29fps you can import up to 15 seconds at a time, for those that are 60fps the limit is around 7 seconds
2. Import your frames:
If you’re making gifs from a performance or a short drama scene, it’s faster to import all of your frames onto one document at once and then copy the frames on to multiple separate documents for the multiple gifs in the set
file -> import -> video frames to layers
make sure that the “Make Frame Animation” option is checked
3. Split your frames into multiple documents, one for each gif in the set
select the frames you want for your first gif (click first frame you want -> hold shift and click the last frame you want)
copy frames (go to the drop down menu for the timeline window -> copy frames)
duplicate any layer from the first document onto a new separate document (right click any layer -> duplicate layer -> document: new -> name the document “[your gifset name] [gif number]”
create frame animation on your new document (timeline window -> create frame animation) (if it says create video timeline instead, use the dropdown menu next to the button to change it to frame animation)
paste the frames onto this new document (timeline drop down menu -> paste frames -> replace frames)
change your frames’ timing (select all frames -> click the time under one of the individual frames -> other -> put your time) for 24 or 29 fps video I use .06; for 60fps I use .03
delete the frames from the original document, repeat for the next gif within the remaining frames on your original document

4. crop and resize your gifs
select the crop tool
chose your dimensions
crop all your gifs to the same dimension ratio
resize your gifs (ctrl + alt + i) for 3 columns it’s 177,178,177; for 2 columns it’s 268px, for 1 column it’s 540px
5. Color your gifs
I usually color to make everything as neutral as possible before doing anything specific so this is just telling how to make a neutral coloring.
make a curves layer on top of all your other layers (layer -> new adjustment layer -> curves)
color adjust for black click the black eyedropper on the curves layer and then find a spot on your gif that should be black and click it (if it becomes too dark, hold alt and click on a spot that comes up black until most of the image is now white) (image below)
color adjust for white do the same with the white eyedropper (if it’s too light, hold alt and click the white areas until the image is mostly black) (adobe’s tutorial to help you out if you need)
make a brightness/contrast layer (layer -> new adjustment layer -> brightness contrast) and add a little bit more contrast depending on your image
add vibrance (layer -> new adjustment layer -> vibrance/saturation) boost the vibrance slightly
(personal taste to make skin tone clearer and the whites of eyes brighter) make midtones warmer; highlights and shadows cooler (layer -> new adjustment layer -> color balance -> adjust layer according to your image)
brighten highlights and darken shadows (layer -> new adjustment layer -> selective color -> blacks: add black -> whites: subtract black)
group all your coloring layers together (select your coloring layers -> create group -> leave the name as “group 1″)
duplicate this group onto all of your open gif documents (right click -> duplicate group -> document: [your next gif file name] -> repeat for all)

6. watermark + recording your watermark action
people on tumblr suck, people on the internet suck, people on other websites suck, weheartit sucks, etc...... you want to have your url on the things you make so people don’t steal your work right?!! we’re gonna watermark EVERYTHING we make ever
(this is going to be the first action we make!! woo hoo!! you don’t want to have to be remaking this layer every time you make gifs do you)
making the action:
open your actions window (window -> actions)
create new actions set (click the icon that looks like a folder on the actions window -> name this set “gifs” or something else you’ll remember)
make sure you’re not on the first frame of your animation, any other will do
record new action (hit the circular icon on the actions menu -> name this action “watermark”)
select first frame of animation
create new text layer at the top left corner (click the text tool -> click the top left corner of your canvas)
type your url in an nice and easy to read font (I use myriad pro semibold italic at 9px height)
click the check on the text editing panel to finish making the layer
change the opacity to 30% in the layers panel
stop recording the action (click the square on the actions window)

using the action:
click the “watermark” action in your “gifs” action set
make sure you’ve selected your top layer (which should be your color group)
click the play button in the actions window (now your watermark is on your first gif)
duplicate this layer onto the rest of your gifs, always as the top layer
7: convert to timeline and smart object (action)
we’re gonna be making another action to this (yay less work for future us)
making the action:
before you make the action make sure you’re not on your first frame
record a new action, name it convert
select all layers (ctrl + alt + a)
deselect your watermark layer (ctrl + click the text layer named [your url])
select your first frame
convert to timeline (click the convert to video timeline icon at the bottom of the timeline window)
convert to smart object (right click your layers -> convert to smart object)
stop recording, you should be left with a timeline animation with two layers, one is the animation smart object which will now be named “group 1″ and the other is your watermark layer on top

using the action:
play the action (that’s all)
you should be left with a timeline animation with two layers, one is the animation smart object which will now be named “group 1″ and the other is your watermark layer on top
do this on every document for your gif set
8. adding text (action)
make the action for 268px gifs:
on a 268px wide document with a video timeline make a guide at 134px vertical (view -> new guide -> “134px” vertical)
start recording the action, name it “text 268″
create a new text layer on the guide at the top of the box, centered text, 12point font (I use myriad pro semibold italic with tracking at 50)
double click the layer, add stroke at 2px, add drop shadow
stop recording
make the action for 540 px gifs:
on a 540px wide document with a video timeline make a guide at 270px vertical (view -> new guide -> “270px” vertical)
start recording the action, name it “text 540″
create a new text layer on the guide at the top of the box, centered text, 12point font (I use myriad pro semibold italic with tracking at 50)
double click the layer, add stroke at 2px, add drop shadow
stop recording
using the actions:
use the appropriate sized action for what you’re making, play the action after steps 1-7 of your gif are done
use your text tool to put in the text for your gif
hold shift and click to slide the subtitle to the spot you want either at the top or bottom of your gif while keeping it centered
9: sharpening:
everyone sharpens differently, so you might want to change this up a bit and make a new sharpen action on your own, but this is mine [download]
there’s a low opacity motion blur layer in there so it adds a bit of softness to the edges
to use the one that I included a download of, select the smart object named “group 1″, return to the start of your video timeline, play the action on all the documents for your gifs
10. save for web
file -> save for web
set looping to forever
save all the gifs
these are my settings:

and you’re done!!!! boom post your super nice gifset with your watermarks so no one will steal it and it’s urs and u love it!!! yay!
#photoshop tutorial#itsphotoshop#yeahps#completeresources#gif tutorial#*tutorial#i'll make a quick template gif tutorial next week#and then one for my basic gfx bc ppl occasionally ask when i'm not being a lazy butt to make them LOL#ceohan
25 notes
·
View notes
Text

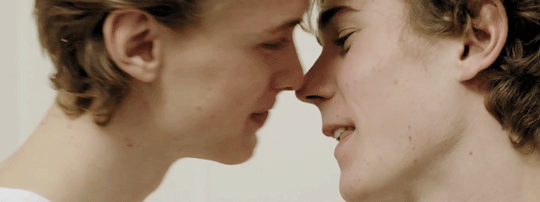
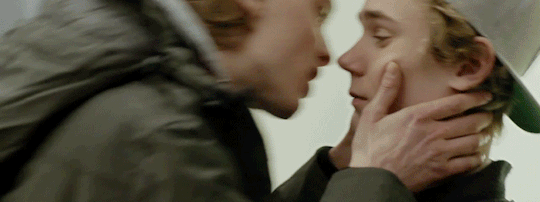
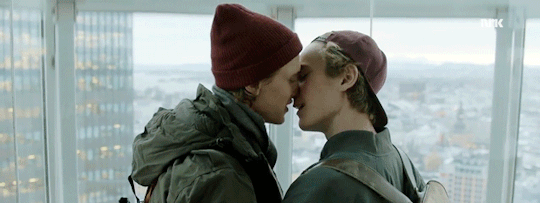

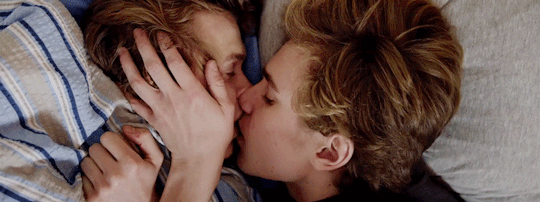

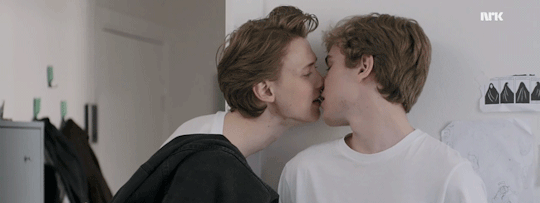
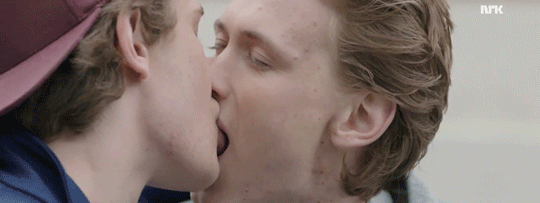
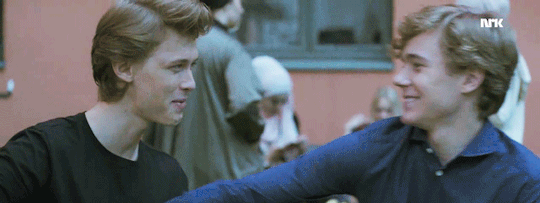
Dear Mutuals,
This gif set is for you.
I haven’t been online since Friday 23rd, which is quite poopy of me, since I haven’t answered your kind messages and reblogged your posts, which I really enjoy doing. I’ve had a self-induced SKAM hiatus. I feel really happy when I see a fellow mutual post a gif set, text post or a piece of art they’ve created for this wonderful SKAMily. I’ve just been in my emo state and closed myself off from tumblr and the world of SKAM (which you can see from my unupdated blog). I didn’t know how the reaction of it all ending would be here on tumblr, and since my cat has started to refuse being a cuddly ball of fluff in which I bury all my tears in, I didn’t have anyone to be around with physically (except for my cat and horse, but they don’t really understand when I go all emo on them) to help solve my many personal emotions that were raised with the last clip and all of the seasons of SKAM. But I’ve revived myself, and can see myself staying here on tumblr until the foreseeable future. I’ve made too many friends to just shut myself from tumblr for much longer, and I’d really like to continue being in touch with you all.
This gif set is each clip that Evak kissed<3 Sorry for not being online, sorry sorry sorry.
@br1skeby Faen Johanne, min Guru. I hope you know what you mean to me, so I’ll spare you a huuuugee multi-chapter piece of writing to show that (unless if you need a sudden boost of happiness, then dm me and I’ll be on it like a car bonnet)<3 Your writing metaphorically kills me each time you drop a new bomb ass chapter. I’m really happy I’m able to fangirl with you, be it over Evak, Yousana or Levi ;)
@beanievaltersen Hehe :3 As long as you’re happy with your new mattress, Evak and I am happy too :D You must know what you mean to me too, but we need to revive our crazy theories about what all the Skam Squads are up to! Also, it’s an absolute honour to beta-read your artistry works!! kdjfakd I have no chill about how much I love it!!!
@du-er-ikkealene Elise, you will forever be my soup-bro :D (I really hope you remember why I’mma call you that, if not, I’ll remind you!) Taakk tak tak tak for introducing me to Kensington! They, and you, have inspired me to make cool gif sets of their beautiful, meaningful lyrics, and you will also forever continue to put me in awe of all the various, creative names you make up for Noorhelm :P (Plus, ily)
@isakschili I’m now listening to Kent on a daily basis, thanks to you, crazy Swedish music-loving girl :* And you neeeeeed to drop the second chapter of your fic ASAP!! You can’t just leave me hanging on an ending like that-- you’ll end up making me even more mad for your fic than I already am ;) And, in my lil head, you’re my musician buddy! Once a musician buddy, always a musician buddy.
@julieseven Daaayyyyyaamnnnnnn Sue. You must also already know what you mean to me. But seriously tho... If you don’t, then open whatsapp later tonight, and you’ll find out fo sure then.
@levok I’m on the countdown for roasting the new US Skam with you! That’s the only reason as to why I’m probably going to watch it!! And you have contributed to me writing better Danish and thinking outside the box in regards to theories and all, which is really ace! Tak, tak tak tak!! And you’re a bloody wonderful person to talk to! You never fail to make me snort air out of my nose, which basically counts as a laugh.
@prinsenimittliv Tenna I promise I’m going to write that headcanon for you! I feel really bad that I’ve left it so long, but it’s given me more time to think about different angles I can take it from<3 For every beautiful piece of art you create, I will in return write you especially a headcanon! Alt for dig, girl! Plus, dayyYYYAAAmmmMMMMmmmmm your haircut looks hella fine! :*
@chillerhjemmeisak I keep on saying it, and I’ll say it again: GOOD LUCK ON YOUR A-LEVELS!!!! :D I promise you that with the power of The Biology Buddies, you will ace them! And that’s a promise! In an AU, we’re running around London in crazy Chris-inspired outfits.
@loooreleii Heyyy youu<3 I also hope you know how kind and sweet and funny and just all the lovely adjectives you are. Your artwork kills me (metaphorically) everytime! I’m so grateful that you share it with us<3 I really would like to keep in touch with you, also so that I can update you with how my new life in Germany will be (Update: I’VE FOUND A FAMILY TO LIVE WITH!!! IN STUTTGART, well not in Stuttgart, in a little town outside of it, but still!) Ich liebe dich<3 Plus, I’m buzzing with all sorts of ideas for the 5 different kisses drabble idea you gave me! Can’t wait to write it for you!
@asflowerpot1 You were the first person I spoke to on this crazy site! If you hadn’t reached out to me so that we could fangirl together, I probably would’ve stayed alone and quite in my own lil fangirl bubble :) I love how we can literally feel each other’s emotions through the use of caps lock and I just really connect with you! I look forward to continuing our crazy long messages and emo feels together!<3
@eivseank Diana, promise that you’ll remember this: Du. Er. Ikke. Alene. I will be there for you to share our happiness between us, and our sad times. Because that’s what friends do. Please, please remember that<3 I love our long messages about travelling the world and eating 100% cocoa chocolate! :P Make sure to sleep really well this summer, and to eat loads of ice-cream!!
@isaksredscarf Gael, you da BOMB!.com Thank you again, endlessly for bringing me into the skamfwn- it’s really boosted my confidence in writing, and everytime I published some little drabble, I always knew I could count on you to tell me how it was!<3 I’ve got an AO3 now, where I’m called tacha_bacha because I thought ‘mannentilminkardemomme’ would be quite long :P so, yay! This past week I’ve been slowly easing my way back into the wonderful, glorious SKAM world by reading and writing fic, which has definitely lifted my m00d by 110%, no doubt about it. Say ‘hi’ to your fuffy, adorable cat!
@sweetevak Ayo Emotional Overload, let’s keep sending dank memes of Honk vs. Cat in sunglasses :D Also, I’ll literally never let you forget that you were the one to get me into writing!! You’re a godess! (At least, you’re my writing godess). I miss when you’d send seriously cute lil headcanons of Evak- they were pure and sweet, and just what every single hc in this crazy world should be made of<3
I’m going on holiday to The Motherland (aka. Denmark) this Tuesday for 11 days with my friend who has never been, and I’m not bringing my laptop, so writing any drabble will be harder on my phone, but I will do it for you all!! Because I love writing for you and seeing your sweet reactions in the tags and comments. I’m also bringing a notepad along, so there will definitely be a lot of inspiration coming to me! I’ve already started thinking about writing an AU -whaaaaaaattt???? This is new territory for me, but I’m so excited to be doing it with all of you, both my beautiful mutuals and followers (AND BEAUTIFUL ANON, IF YOU’RE READING THIS THEN REMEMBER THAT YOU PHYSICALLY AND LITERALLY MAKE ME SMILE!!!!! WHICH IS ONE OF THE BEST EFFECTS ONE CAN HAVE ON A PERSON!)
Jeg elsker dere alle! Have a wonderful summer. I really look forward to reblogging EVERYTHING I see! *sends an infinite amount of kisses*
Love from,
Natacha :o)
#damn you are all so beautiful#I don't want to look at my activity log after my self-induced hiatus#it's going to be horrendous lol#my post#beautiful people#mutuals#br1skeby#beanievaltersen#isakschilli#julieseven#levok#du-er-ikkealene#prinsenimittliv#loooreleii#chillerhjemmeisak#asflowerpot1#eivseank#sweetevak#isaksredscarf#skamfwn#skam#gif set#evak#isak#even#s3#s4#skam s3#skam s4#kysser
82 notes
·
View notes
Last Seen Blogs
96packofcoloredpencils
THE LAMEST SHOW ON EARTH
candycoated-rage
ron

thecozyfrog
The Cozy Frog

mevius-r
題名未設定

solitudeisolement
Entre solitude et isolement…