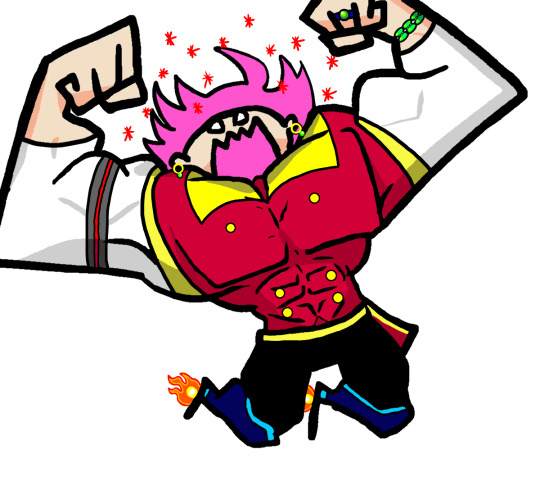
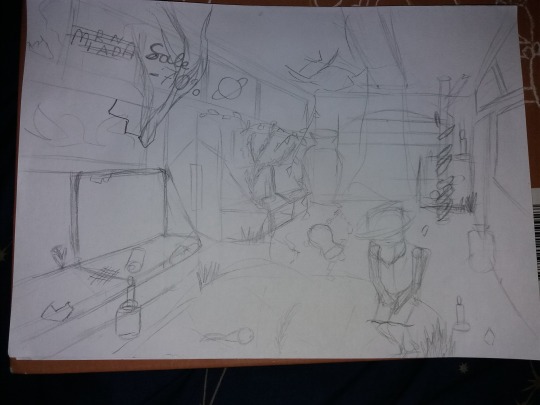
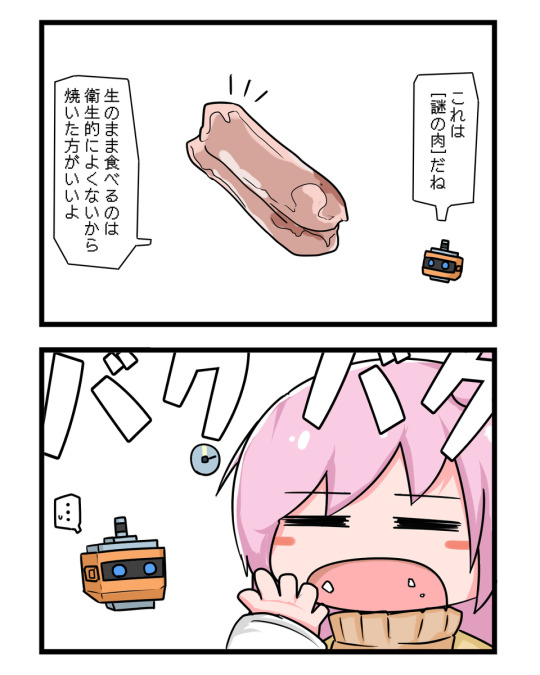
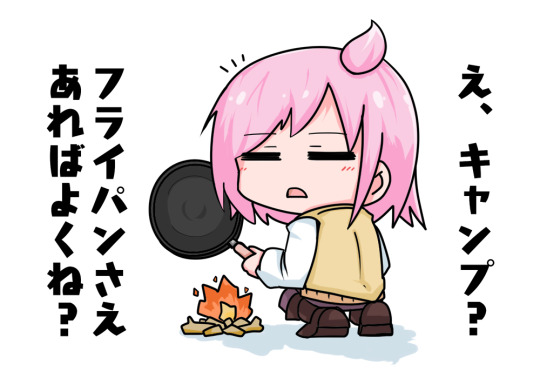
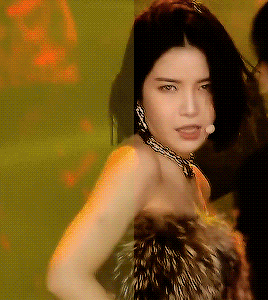
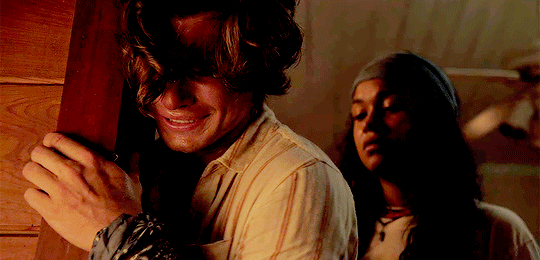
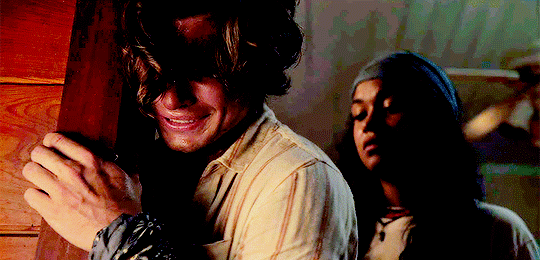
#I tried out gradient maps for the first time here and I don’t know how I feel about it
Text
OH ALSO as a fun little side project. ive been making a big google doc full of different artistic techniques by tearing apart clip studio paint’s settings to find niche opportunities and going on an odyssey through Youtube Search “Art Tutorial/Coloring Tutorial/How to Draw People/How to Draw Hair/How t”
It’s a passion project of mine, to make a collection of different methods of drawing because I realize a big plateau for artists is when they keep thinking “what do I want to draw” instead of “how do i want to draw.”
Honestly, it’s been pretty interesting so far! A couple tips that I’ve learned so far:
For watercolor (in clip studio paint), don’t rely on the brush’s watercolor edge. Seriously, you’ll get the edge every single time you make a brush stroke. INSTEAD go to layer settings -> border -> watercolor border so you can make a block of watercolor color and then adjust the border from there. You get much more control and can adjust blurriness, opacity, darkness, etc.
Holographic textures. I’m still looking into different ways of doing this, but gradient maps seem to be very popular. For those who dont know, gradient maps take a set greyscale tone and assign it a color (this color’s tone does not need to be equal to the grey tone).
Actually, on the topic of gradient maps. I only learned a few months ago that people color greyscale paintings using gradient maps, and that’s one of the methods used to make it not look god awfully muddy.
So I found this tutorial on Youtube about someone who shades by progressively making the shading change to a contrasting color and I. Am fascinated by that. Will get back to yall when I experiment with that. (For credit’s sake, the tutorial was made by @bluebescuits and can be found here, set to the beginning of that part of the video https://youtu.be/zZEF7SEh2S4?t=428)
COLOR JITTER. there are so many possibilities with this one. One thing I was doing back around artfight was selecting areas of light and using a HEAVILY color jittered brush to color it in. Then, select the shaded areas and do the same. Afterwards, I’d turn off the color jitter and just start rendering using whatever color I wanted. Usually, indigo/blue/purple colors would be used moreso for the darkest spots because they have a darker tone by default, and yellow/pink would be used for the lightest colors.
Because I’ve talked about color tone a few times, I feel like I need to include this Youtube tutorial, “HOW TO HYPERPOP (draw with saturated colors)”: https://youtu.be/NKV2VWWleBk It’s what originally inspired me to make this google doc, and absolutely exploits the tone-color relationship do make some REAL interesting art. I’d tag the creator, but I don’t think they have tumblr, but they’re badjaune on ig/twitter
ill get back to yall when i figure out how to do those parallel scribble/hatching painting look. i will crack the code on that one i want it so badly
ALSO this was the one i meant to add first and then almost forgot to add it. It’s fairly popular on tumblr but i don’t care it’s a very rad tutorial by @ratpunksdraw (found here https://www.tumblr.com/ratpunksdraw/689762046030577664/tutorial-under-cut-paper-textures-brushes?source=share ) which details how they make a quick frankly very good looking paper texture on their artwork + has image resources and i’ve tried this before for an artfight attack and it was fun as hell and not hard at all i would recommend this
#sketchmre tutorial#i GUESS#thats the tag now#for the 20 of my followers who draw#enjoy#i am investing way too much time into this#dwarfed only by the quite frankly embarrassing amount of time i spent researching stays and corsets so i could design undergarments for my d#nd party
8 notes
·
View notes
Note
1, 13 and 32 :D
Putting this under a read more because I simply cannot shut up 💕
What are your top 3 favorite sets you’ve made?
(In no particular order)
I’m cheating and using one for these 2 Viktor sets because they’re the same theme - this post season 3 set, this pre season 3 set. I’ve just always really loved the theme of “Viktor is the bomb” and I’ve saved that post-s3 set quote for so many years and I held off using it until after season 3 and was excited that it was still relevant. The colors in that set just make me happy and I’ve tried so many times to use it again and it never works the same. And for that pre season 3 set, I think that’s when I was really starting to teach myself blending? So I had so much fun making it. I just love giffing Viktor in general, I think there are so many themes to play with while editing that always really inspires me when I make something for him.
This "favorite TV show" gifset of TWD: World Beyond is one of my favorites because I think it's probably the first time I ever did a layout set? And it took me sooooo long to do it and I had to make so many decisions because I love every episode and every character so trying to make everything, everyone, every theme all fit together was so hard, but I was really happy and it makes me happy to look at it because the show is my comfort show. I also really tried to focus on the panel being about family, science/fighting, love, and growing up, which are very much the main themes of the shows so I was happy with it!!
My Luther set + a quote from The Chosen Ones. This is probably my favorite Luther set ever, because I read this book and I wrote down so many notes on it screaming “Luther, Luther, Luther,” so I always wanted to make a set with him ft. this book. I was very strategic on the scenes I used based on what I think about him in my own head but in particularly, the last 2 gifs are very important to me (’desire something’ over a shot of his smile fading after the kids that were looking up to him then started laughing at him after he made a fool of himself + the shot of him thinking he’s in a better place now that he’s away from his father yet he’s still just in the same cycle of being exploited. And “wasn’t sure he was capable of it” with shots of him thinking he’s finally free / alive but the next day he’s just full of shame and still sad... I hold these two gifs so close to my heart). Also, this is definitely the set that began my love story with the gradient map. I’m not too fond of the typography anymore but this quote will forever be my Luther quote. Also, I know Luther always wears blue and that’s probably what people associate him with, but for some reason I’ve never wanted to use blue for him... but I am so pleased with this particular blue/purple shade for him, so he’s allowed some blue now <3
Klaus + You Look Like Death. When I opened photoshop, it was supposed to be a Five gifset.... and then when I decided it was Klaus, it started off as dark green and purple, so I literally don’t know how I got here? But Klaus + vibrancy is something so personal and he deserved it, and I loved Robert’s foreword so much and it was so fitting after season 3, so I’m very very happy with how this turned out. He’s one of those characters that just has so many fun shots/scenes to work with and I definitely want to gif him more.
My recent Five set. This time when I opened photoshop I actually let it be about Five. He has sooo many aesthetically pleasing and tragic shots that it really is so fun to gif him and I’m glad I finally did. I’ve always appreciated Five as a character but ofc following you has made me love him even more, I love your love for Five 😌
This is my “I thought this was a top 5 not a top 3″ disclaimer because I’ve once again cheated when you asked me top anything, but <3 anyway this was so TUA heavy so honorable mentions for my father’s day set for my favorite TV dad ever, this Tracy set, this Luther set, this Alden set
Where or from whom did you learn how to gif?
I’m a professional graphic designer, so technically, I learned in college... but obviously my day job is very different than any kind of giffing I do on tumblr. My work giffing is pretty bland in comparison and I often work with static images rather than videos, so it’s such a change of pace to gif here. I started giffing on tumblr though basically out of spite because so many of my favorite characters are either hated for no reason or just minor characters who don’t get much love, and I was tired of not finding anything in their tags, so I started giffing. Most of the things I’ve learned have come from different tutorials on tumblr (and bless them all because I absolutely don’t ever know how to explain anything I do, so all my love to the people who can articulate it so well that other people can learn from them).
Also my friend @felixcarlucci and I kind of started learning how to gif alongside each other so we exchange a lot of helpful tips and I’ve learned a lot from him too!
What is your favorite tool/adjustment layer in Photoshop?
Selective color my beloved!!! I also really, really love gradient map and I’ve been relying on it so much lately... I cannot help myself (currently working on a Sloane set with gradient maps and the coloring scheme for her is just making me vibrate, I’m excited to finish it).
#answered#me getting home from work to nap vs. ranting to lizzie my beloved#ty for sending!!!!#jameszmaguire#number5theboy
1 note
·
View note
Text

Day 1: Favorite Character
Someone get this pig a coffee
Don’t expect finished drawing all month I don’t have the time management skills to do so lol
#technoblade fanart#technoblade#mcyt fanart#dsmptober#chewygutsdmsptober#I tried out gradient maps for the first time here and I don’t know how I feel about it#but I spend way too much time on this so it’s getting posted lmao#my hoard
13 notes
·
View notes
Photo
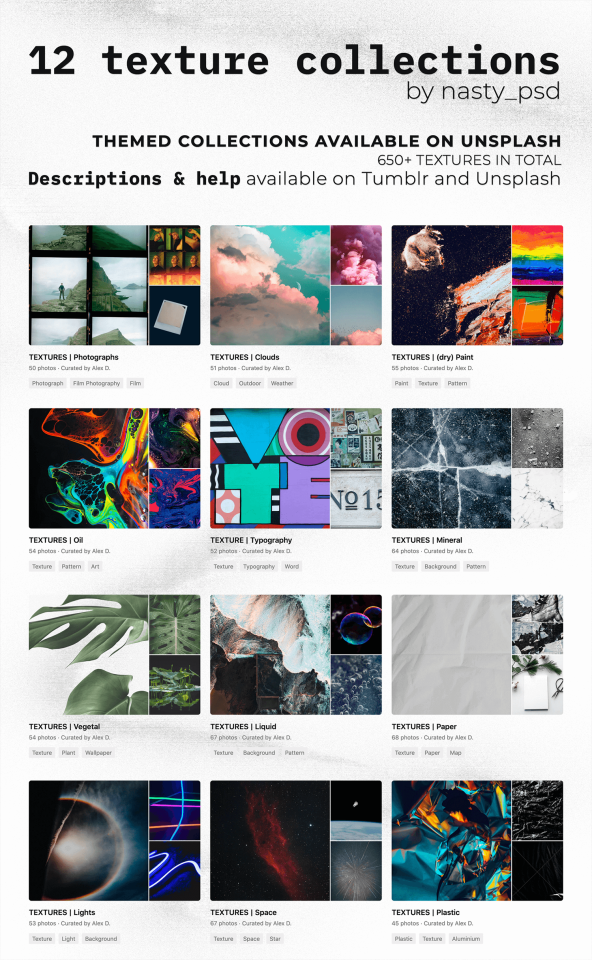
Texture Collections (unsplash.com)
Hey everyone ! Back at it again with the resources recs, with a whole bunch of textures this time 💚 All the pics are from Unsplash, so everything's free for personnal use, comes with instructions for professional use + with ways to thank the photographers 🥰
I've sorted these first 12 collections to show you the kinds of textures i like the best in my own edits & even professionnal works - with categories either being the medium that they're made with, or an abstract concept they fall under.
Click on the names below to access the collections, on the source to access all my collections, and on the read more for quick summaries of how/when i use these !
🎨 Links
1) Photographs | 2) Clouds | 3) (dry) Paints
4) Oil | 5) Typography | 6) Mineral
7) Vegetal | 8) Liquid | 9) Paper
10) Lights | 11) Space | 12) Plastic
Detailed descriptions & how to use under the cut !
(obviously, i do not claim ownership over any of these pictures)
1 - Photographs | link here
This collection gathers textures that aren’t the easiest to use, but please don’t be scared by them, the following .
How i use them : You can use the mockup type of pictures and “insert” your own pics of your friends, characters, etc - which means you must know how to create a basic mockup file (creating fake polaroids is a great way to learn or to train on your mockup skills by the way !).
For the scanned images of films, you can also paint over them to integrate your own pictures. What i prefer to do though, is to create a mask layer around the burnt areas with a soft-edge brush, and then copy and paste it onto my edits. It allows more room for creativity but requires quoi color correct the burnt areas so they fit perfectly onto your edit’s colour scheme.
2 - Clouds | link here
These one are simple ! I love them as background on edits, as overlays to bring out a little
How i use them : With layer modes, as colour palettes references, as backgrounds with a collage of pictures on top - you can go ham with these. They’re also perfect for complex photomanipulations as Unsplash photographers offer multiple sizes options when downloading their pics.
3 - (dry) Paints | link here
These paintings are not all necessarily "dry" paints, but rather artworks that show of their painting mediums' natural textures. They're "grungy" in an acrylic's or in a gouaches way. Some may be oils too but i'm not sure. The textures are created with brushes or painting knives, sometimes with spray paints.
How i use them : So, as they're pretty dense, i prefer them in backgrounds, or as barely visible overlays. Once again, they’re great for photomanipulations, but you might need to edit them a little so they’re usable or repurposable.
4 - Oil | link here
"Oil" is pretty straight forward : these are either oils (liquids with rainbow gradients/reflections) or very liquidy paints. The focus on this one is colours mixing with more or less of success, the "brutal" contrast between them, and the movement they create. (And also : ios background bubbles.)
How i use them : they make for perfect overlays, background, references for color palettes or bases for a dispersion filter. They’re complex though, and you might want to stay careful to not go overboard with them, as they can tend to make your edits unreadable.
5 - Typography | link here
Typography, yay ! It’s something many of us avoid in edits where it’s not a dire necessity - but growing as an adult into a graphic designer’s world, i learnt to love it. Every character has its own character (lmao geddit) personality, which can be of great support in your edits :)
How i use them : as background, as “overlays” in collages or to simply get the inspiration going. You could also reuse the quotes in your edits with different fonts, or the panels in you photomanipulations.
6 - Mineral | link here
Minerals & rocks are essential if you plan on editing complex stuff, like photomanipulations in the outer world, in space, or whatever your heart desires. That’s why i tried to gather as many diverse resources that fell under that category. For a finer research, i’d recommend finding one picture approximately resembling what you want, then checking out the recommended pics that will appear under the share & info buttons, or visiting the photographer’s profile as they may have multiple pictures of varying angles of the same object.
How i use them : The pics with perspective i’ll use as elements in photomanipulation, while the “flat” pics will be used as overlays in elements to bring out more textures - the possibilities are endless, what you want to do you will be able to !
7 - Vegetal | link here
These one aren’t especially complicated to use, but will require a little bit more work. Most of them are on plain background so it’s easier for you to cut them out and insert them in edits or photomanipulations. There’s tree, branches, mushrooms, leaves - everything i could think of that might be useful in edits.
How i use them : The “flat” textures could be used purely for “aesthetics” or to add textures in edits, but the “full objects” pictures are mainly there for photomanipulations purposes.
8 - Liquid | link here
Anything that has to deal with water, bodies of water, or overall liquids. Landscapes, also, that include lakes, seas, ocean, waterfalls, etc - always a need in photomanipulation.
How i use them : as always, it depends on the nature of the texture itself. If it’s flat, i could be used solely for aesthetics, or as a way to add texture to a plain surface in photomanipulation. When it has some perspective, or shows a complex scenery, they could be used in photomanipulations & edits of all kinds.
9 - Paper | link here
This collection has some of the most diverse pictures : it can be old papers with or without writing on it, sceneries of "blank" papers for you to put your edits on, or decorative pages/maps.
How i use them : For the "flat" textures : these are mainly for overlays (all over you finished edits sir it looks like it's printed) or in some cases, for mockups. For the pictures with a bit of "scenery" : these would be great for background, but absolutely perfect for mockups. For the pages with maps or texts on them, it can be used as your usual textures/background.
10 - Lights | link here
This collection includes every kind of body of water (or other liquids) i could find. You'll find waves, lakes, rained on windows, bubbles, watercolours, etc. Anything for your edits or photo manipulations.
How i use them : Most of them will look their best as overlays put on top of all your other layers (or not, depending on the nature of your edit obviously). They get also easily be animated for gif, or colour corrected to fit your aesthetic.
11 - Space | link here
A really specific collection ! This one will mainly be useful if you plain on editing space-ish photonapulations, moodboards, etc. Combined with the others collections, you could create a whole other worldy edit :)
How i use them : Mostly how they’re logically used. Stars textures will mainly be editing onto a sky (but could also be useful to create “grunge” textures”), planets will, etc. But always think creatively, and outside of the box ! For example, these circling stars could be used as the texture of a vinyl record.
12 - Plastic | link here
My personnal faves, the tricky & busy plastic textures. Plastic is a pretty broad name, and most of the pics aren’t technically plastic, but they have the same folds, turns & reflections.
How i use them : mostly with a dispersion filter (which makes everything awesome). They can be overlays, or blurred to create pretty interesting gradient textures. They could also be used as background in your collages - you can basically do what you want with these. They’re awesome.
bonus 13th for the curious ones - Urban & Cities | link here
Silly didn’t add the thirteenth collection on the preview, so here it is as a surprise ! This collection is the most diverse of them all, with lots of architectural elements, grungy walls textures, graffitis, etc.
How i use them : Mostly as background
That’s all for today, hope you’ll enjoy using these ! please give lots of love to these photographers, and see you soon 💚
#Resources#textures#photography#unsplash#unsplash collection#unsplash collections#nasty resources#nasty art
214 notes
·
View notes
Text
The Last Phoenotopia Blog Update
(Date 2021 MAR 01)
I debated how to open this blog post, but perhaps the main crux of this blog post is the best place to start. The blog is being retired.
The purpose of this blog was to be a "development" blog for Phoenotopia, and well, Phoenotopia's development is done. I'll still be doing bug fixes and maintenance on the PC and Switch versions, and playstation and xbox ports are underway (by a publisher). But I'm not going to be making any more major changes to the game. At some point, you put the paintbrush down and say it's done. Blemishes and all.
Recent Events
The game launched on Steam last month, and like any launch, it was hectic. Bugs Galore. This is our first commercial PC launch, so it was a real baptism by fire. Unlike Switch's one configuration, the PC has multiple configurations and factors to account for. The game needed to be able to handle multiple control schemes, screen resolutions, refresh rates, and more! I had a 60Hz monitor going into launch and didn't know anything about Hz (I do now). There was a troublesome stutter that some players were sensitive to that my whole team didn't notice since our eyes compensated it away. There were a few times where in fixing something at one party's behest, it introduced problems for another party. A few times, due to disorganization, I unwittingly rolled back a fix that was meant to be applied. For some, the game couldn't play at all (really glad Steam allows refunds).
It was messy. It was tiring. I.AM.BEAT.
I think the worst of it is over... I'll still be around to do the last updates and bug fixes, but I'm ultimately ready for what's next.
SO what is next?
What isn't next... is Phoenotopia 2. As you may have heard down the grapevine, the game couldn't be what you call successful. No one's earned even minimum wage on it.
Maybe there's hope in the game's long tail. A year or two down the line... maybe. I won't hold my breath though. At some point in the past few months, I finished processing (or grieving) and it's time to move on.
The game has at least earned enough for us to continue our modest operations. As long as we don't expand the team, and we don't take another monster six-year dev cycle like what Phoenotopia took, we can continue. We'll have to be smarter and faster. Perhaps the most valuable thing we gained from all this is experience.
The Experience
It is a dev blog. Here are some of the lessons I've accumulated from this game's development.
- Have a good menu design. Menus aren't just that in-between fluff before you get to the good stuff. Menus are KEY. Your menus need to be robust, expandable, and *understandable* (to you, the developer). Because once the game's out, you will invariably be asked to add more options. And if your menu design is bad, every time you have to add a new menu option, it becomes a whole new pain all over again. Support mouse from the get-go, etc.
- Focus on features that people will actually care about. For instance, I've never seen anyone praise the camera's zoom feature. In practice, people try that feature a few times and then never use it again. But that feature was a constant consideration factor for every level. Run through it multiple times to make sure the level didn't break, think about which zoom levels made sense, resize rooms because they worked at one zoom level but not the other, and so on.
- Don't do boxes that you can move around. Other 2D platformers avoid movable boxes because they're a huge headache to program and they really complicate the game space. Enemies need to respond to boxes you throw in their path and either navigate around or attack it. When you're moving the box, you have to worry about constantly changing your collision size and reconciling when the box gets snagged on the environment. The boxes were also a constant source of bugs because people can manipulate them to soft-lock themselves and more.
- More focused script. Phoenotopia's 100,000+ word script was panned more for being bloated than it was praised for being lengthy. Long scripts take a long time to write and make the game more unwieldy, increasing the costs of translation and upkeep. Every update we're addressing some textual error or mistranslation. There are some highly renowned games (e.g. Hyper Light Drifter) that do without a script at all!
- Be flashy! A bat and a lightsaber take the same amount of work to program, but the lightsaber will draw a lot more attention and interest.
- Slopes, surprisingly! Six years ago when I started, Unity was ill-equipped for 2D games. If you used the physics that Unity provided you'd have a really floaty character that wouldn't adhere to the slope when going downhill. There were a hundred different tutorials saying different things (use forces, use move position, use translation, etc). You can get rectangular collisions done in a day, but to do slopes took weeks. Meanwhile, games can actually get by fine without slopes. Most people won't even notice. Did you know the Phoenotopia flash game didn't have slopes? Neither does Hollow Knight or Rogue Legacy. You can save yourself a lot of work by avoiding slopes.
(big entities look weird on slopes. Bad slope!)
I could write enough little knowledge nuggets like this to fill a book! But I'd rather just make the next game.
So… what IS next?
As mentioned previously, it's not Phoenotopia 2. Pirate and I are mostly just tossing some ideas back and forth right now. We'll go silent for a year (or two). Our next game's scope will be more modest in some ways, more ambitious in others. It will definitely be more smartly designed. (There will be a map!)
We'll announce it when it's ready for the public. It might be necessary for us to do a kickstarter. I've tried to avoid kickstarters having been burnt on quite a few myself and also because I worry that mismanaging a kickstarter would earn the ire of backers.
But I did keep this blog regularly updated for six years. So I've gained some confidence in my abilities to at least manage a kickstarter well.
Is it really the last Phoenotopia Blog update though?
Okay, not really. There is some news that I'll need to announce, and this blog is one of the game's main outreach channels. Here are the events that will cause me to update the blog:
Announcing the launch of the xbox/playstation ports when they're ready
If a physical edition of the game happens
If a new language is getting introduced into the game (Korean is a high possibility)
When we're ready to talk about our next game
If (BIG IF) we begin development on a Phoenotopia sequel. I do want to do a sequel one day if we have the means and the demand is there.
Those updates will be more on a "when they happen" basis, rather than me reporting in every couple months.
Fan Art
As always, I'm very happy to see fanart of Phoenotopia. Major thanks again to Pimez for collecting all the artwork from the corners of the internet! Since this is the "last" blogpost, Sir Pimez can finally take a rest from collecting the fanart :P

ÆV made a series of pictures that tell a story. A Pooki is humanely sheared of its wool to create a hat. The Pooki is unharmed. Nice! Gotta love Gail’s expressions.
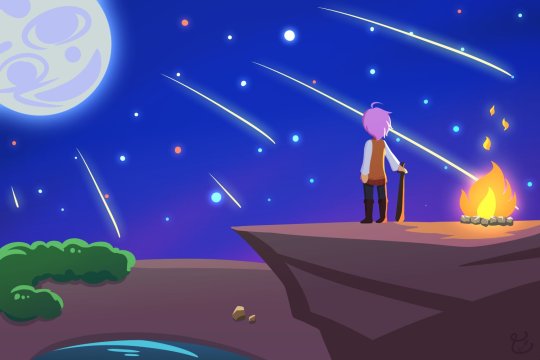
Amagoo Mazeru makes a stunning landscape shot of a full moon and shooting stars. It’s a sharp and clear vector art. I like the faint glow of the moon and the fire and the subtle gradient in the night sky. Very skillfully done!
Hah hah. I got a chuckle out of this one. I imagine this is how Gail's enemies see her by the end of the game. CaESar made this image based on TerminalMontage's famous youtube videos. Nailed it!
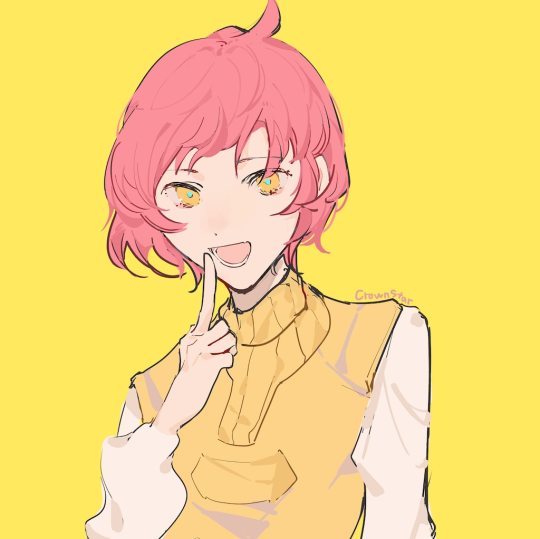
CrownStar drew two pictures of Gail. I'm a big player of JRPGs, so the first shot instantly reminded me of Persona 4's art style. (Hmmm... Phoeonotopia as a JRPG... there’s potential there...) Next, Birdy is shown carried off after her defeat. I really like Birdy's expression here - she just seems mildly uncomfortable.
There's a bit of a story behind the first image. As Firanka shares it, she wasn't able to defeat the Big Eye monster at the end of the flash game, so she believed a tall tale that what awaited after was a 6 armed Kobold boss. Hilarious! The second is a rendition of the lonely Anuri elder. A rare subject. The loneliness is portrayed well here. I feel lonely just looking at it!
Koo_chop draws the clash between Gail and Katash at the top of the towers. I really like this interpretation of the game's art style. It’s faithful to the in-game graphics. And the lighting, from the glow of Gail's bat, to Katash's sword, and the lightning in the background... Amazing!
Lime Hazard shows Gail with a salute pose. Very appropriate for this occasion. I also like how there's a slight tilt in the angle that Gail is portrayed. Those dynamic angles are always hard to get right, and Lime Hazard pulled it off very skillfully. See you next mission!
Lyoung0J with a digital painting of Gail posed sitting on a rock. I like how it almost seems like she was caught in a candid moment - she’s smiling, but also feeling self-conscious. Cute! The art style really pops, and I like how Gail is sporting what I call the old anime style nose.

MyUesrNameIsSh*t with a sketch of Gail performing a skillful slingshot. I like how Gail is depicted with her tongue out in a mischievous manner, the way all mischievous people with slingshots do.

Niitsu Kentaro returns with a 2021 Happy New Year picture. That happened didn't it? A New Year... Gail's pose gave me a chuckle with how she seems to be waving the bat around as casually as one would wave hello. And "Phoenotopiyear"... Well said! One day we'll have our Phoenotopiyear...


Ochan Nu breaks all records with a stunning NINE pictures in one session :O
There's so many goodies here. My favorite would be the one with Gail staring intently at the screen - it's like she's looking directly at you. You almost feel uncomfortable.
Next, there's an Animal Crossing villager dressed as Gail and sporting her pink hair. It even looks like a house Gail would live in. Gail is a connoisseur of the arts and likes Mona Lisa. Yes :)
There are various comics of Gail pointing out Gail's weird food habits. A picture of Fran looking really cool, and even Gail rocking a bathing suit. (bathing suit image linked here in case NSFW). Wow!
Pimez didn't just collect the arts, he creates them as well! This one, which he aptly named 'The Year 175' is a depiction of when the dragons invaded the towers as told by an elderly Daean woman. Great pixeling skills! I got a good chuckle from the ice dragon leaving with its stuff slung over its shoulder.
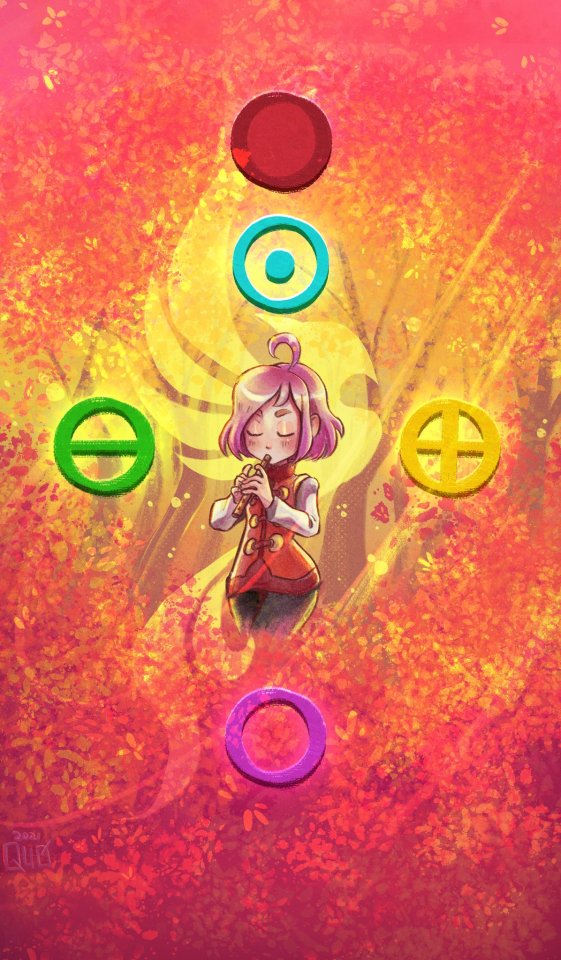
Quo made a stunning picture of Gail playing the flute surrounded by the 5 musical notes and the Phoenix logo behind her. The theme seems to be "fire" and it works really well. Gail herself looks awesome depicted in her red suit - it's like she's leading a marching band!
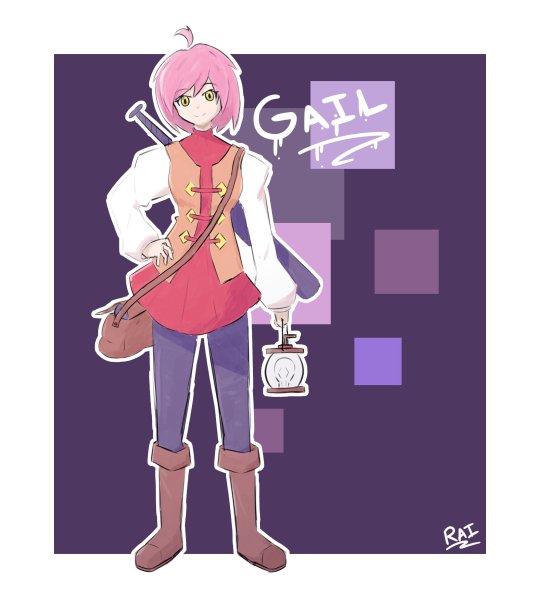
Rai Asuha depicts Gail in the late game with her red suit, and night star bat, and holding a lamp. She looks ready for adventure! I really like the white outline here and Gail's poofy shoulders here - the art style feels reminiscent of Final Fantasy Tactics.
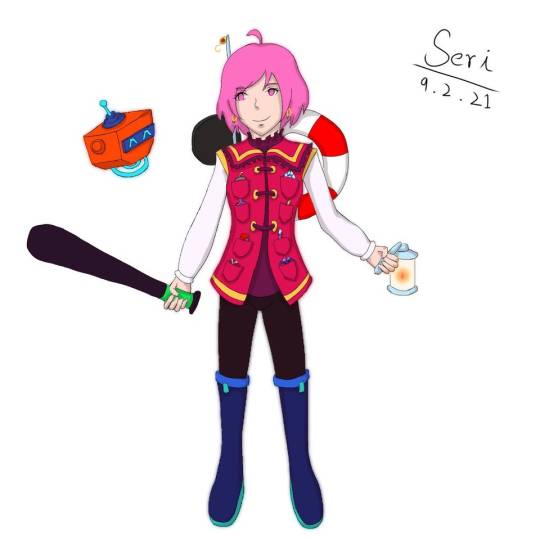
Seri also draws Gail bearing her late game equipment. Unique to Seri's drawing is how all of Gail's equipment is accessible from a pocket on her shirt. I also like how Gail is depicted with her lucky earrings - that accessory is often forgotten.
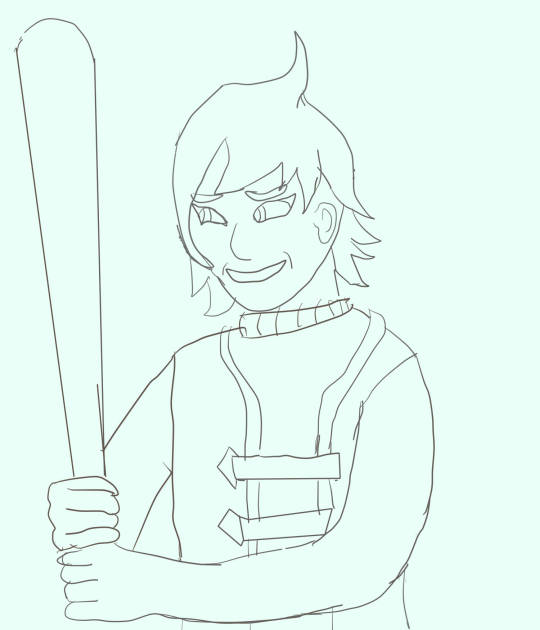
Treedude depicts Gail with a bat and wearing a funny smirk. She looks like she's ready to hurt someone!

Warotar returns with everyone's favorite Great Drake, Bubbles! It seems so happy to be featured!
I'm really grateful for all the fanart this game has received. From the bottom of my heart, thank you!
Closing Notes

Pirate drew a picture to mark the occasion. It shows Gail enjoying a hot chocolate with marshmallows and a pumpkin muffin. A rest well-earned...
Goodbye! Until next time!
95 notes
·
View notes
Photo


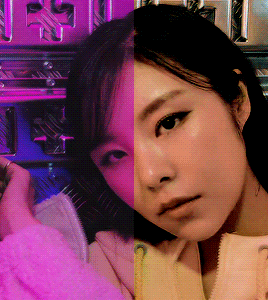

Choose gifs from your creations and do a split of before and after coloring (on the gifs above left is without coloring and right is with)
So this challenge has been going around and I wanted to do it because I thought it seemed fun, even though I wasn’t tagged to do it lol. I am however tagging to do this some of my lovely mutuals who are content creators: @moonbyulys @wheein @wheesuns @beallright 💖💖💖 (I’m sorry if you’ve already done it and if not there’s no pressure!! you don’t have to do it if you don’t want to 💕)
I also want to take this moment to thank content creators on here in general 💖 I feel like some people who aren’t content creators might think that giffing is really easy, when it isn’t, and it actually takes a lot of time
Even though I’ve been giffing for years, it wasn’t until recently that I’ve learned more about it, started using ts files and vapursynth (even if I can’t get the plugins to work on my pc :/) and started to be happier with my coloring. I know I still have a lot to figure out tho
These are the links for the gifsets of which the gifs above are from: 1 / 2 / 3 / 4 / 5 / 6 / 7 / 8
In case some of you want to know about how I made the gifs above, I explain a bit under the cut
About my coloring style, I guess it’s more towards a brighter and warmer look as opposed to a softer one
When coloring my main focus is always to try my best to get the skin tones right, so the person in the gif isn’t whitewashed. For that I use an unwhitewashed photo of the person and compare that to the gif I’m making - it still can be hard tho, and I’m always conflicted on whether or not the coloring is okay, if I overdid it etc. Even for some of the gifs above I’m not too happy, but uh, I tried
When I started giffing, at first I pretty much only used selective color and brightness, contrast, levels and curves. Recently tho I’ve been using channel mixer and, most importantly, the set black/grey/white point tool in curves and it helped me a lot - for example, the gif of wheein covered in magenta was colored using the set grey point tool; and the backgound of last one of hwasa is white because of the set white point tool; and I’m always using the set black point tool as it’s very useful to correct skin tones, specially with performances (in the first solar one, I used it to try to get her skin tone to not change as much in the gif, even with the flashing lights making her skin look too green/yellow - it’s still not perfect but I like it with it better than without it. but yeah that one was incredibly hard to color and at some point I just gave up). I also like to use gradient maps to fix the skin tones, specially if the original is too whitewashed. Also, with curves, I’ve been increasing the reds and decreasing the blues to get an overall warmer tone to the gif. Other than trying to fix the skin tones, I like to use selective color and sometimes hue to change a few colors and either make them pop out more or get one color to be prevelant (for example the moonbyul ones, one with green and the other with purple), which is supposed to make the gif look less grainy. Still, it’s not like I have any idea of what I’m doing shfks sometimes I even use 30 something adjustment layers
So this got too lengthy haha I’m sorry and thank you for reading this far 💕 have a great day/night!
#flashing /#challenge#tag game#gif game#idk how to tag this ??#aah i didn't want to sound braggy or crazy or smth but idk how that worked out.. i know my gifs still suck sdjffsd#the point of making this was actually bc i think comparing before and after coloring is the most satisfying part hahah#feel free to ignore this lmao
68 notes
·
View notes
Note
Hey, I really like your works! I'd love to have a drabble or a scenario with Juza, please. With a topic of confession, please. Would be nice if a bike ride would be included. Should I be more specific or that would be enough? Thank you in advance!
Thank you for liking my works, and more importantly, for your immense patience! I'm really really sorry that I only finished the story now, anon 😥 I had an immense writer's block + I dealt with a lot of problems. So if you saw me reblogging posts, it was one of my ways to cope with them.
Anyway, I assumed that the bike you're referring to is Juza's motorbike. You may correct me by all means.
I hope you enjoy reading this! ❤
Bathed in Purple and Orange | Juza Hyodo

Sitting on a bench near the convenience store, you swung your feet with a smile on your face. There were countless places that you and your friend can potentially go. They were usually food shops, but each of them has a different thing to offer. Nevertheless, those places always complimented his and your taste buds (literally and figuratively). You grinned. What adventure awaited both of you today?
Your ears perked up when you heard a familiar voice calling out to you. You looked at your side and saw your friend.
Your eyes widened at the view before you. Juza riding a motorbike amplified his manly and strong aura.
You jogged towards him, inspecting his new vehicle. While doing so, you sneaked in a few glances on Juza’s form. "You got a motorbike now. Congrats!"
"Thanks," Juza said through his helmet. "But sorry for bein' late."
You shook your head. "It's fine. Now that you have a motorbike, we can visit more places!"
You quickly opened your map app on your phone, searching for places that you two have yet to explore. Suddenly, Juza called your name.
You looked up, tilting your head. "What is it?"
Juza paused for a while before saying, "I wanna take you somewhere."
You blinked. "Eh?”
He looked down on the bricked floor. "'Is fine if you don't wanna."
You immediately shook your head. You would always take the opportunity to go with Juza. But more importantly, you felt that this place was something special to your friend; he rarely initiates to go somewhere without you knowing. Not that you mind, but it filled you with curiosity.
"I would love to go with you, Juza."
"Wear this." He offered you the spare helmet that sat on the passenger's seat.
"Thanks." You accepted the helmet. You put it on your head. With deft hands, you quickly locked the straps of your helmet under your chin.
"You can sit here." Juza patted the spot closely behind him.
You nodded, sitting at the spot. Then you blushed as you realized - you were one centimeter away from Juza's back. Your eyes traced the creases on his shirt. They convinced you (again) that a muscled body was waiting underneath the cloth. You had the urge to wrap your arms around him and lay your head on his muscular back. A warm feeling bloomed inside you. Then you furiously shook your head, gripping the seat until your knuckles turned white.
‘Control yourself, (First Name). Control.’
Juza looked at you over his shoulder. "You ready?"
"Y-yeah!” You shot him a sheepish smile.
Juza intently stared at you, making you clear your throat. He muttered an apology before saying, "Grip on me."
Your eyes widened. "What?”
Realizing what he said, Juza quickly whipped his head to the front to cover his blush. "You can, uh, use me as support. 's safer."
“Oh… Thanks, Juza,” you said as you shifted closer to him. Then you gently wrapped your arms around his torso. You tried to hold back from squealing as you felt his abs contracting.
"We'll go now." Juza stepped on the pedal, dashing off towards the road.
You tightened your grip on the man, burying your head on his back. With this speed, you could fall off at every moment.
Juza almost stepped on the breaks when he felt your arms tightening. He might have stumbled off the bike as he felt your breath on your back. His heart was thumping on his chest. One little movement of yours, he might explode. Juza deeply breathed before exhaling. He needed to calm down, or else both of you may be caught up in an accident.
"You okay, (First Name)?" Juza hoped that you did not notice the tremble in his voice.
You nodded. "I just can't open my eyes due to the speed!"
"Sorry ‘bout that." He slowly decreased the speed of his motorbike.
You slowly opened your eyes, letting out a gasp as you saw the scenery before you. The city looked glorious as the sun enveloped the buildings across with orange. The trees that danced with the wind looked more mesmerizing as the warm color highlighted their features. Overall, the scenery felt solemn, peaceful even. You unconsciously shifted closer to Juza, turning your head sideways to appreciate the beauty the sun gave you through out the ride.
Time seemed to flow fast; Juza already slowed down until the engine came to a stop.
"We're here," Juza said as he parked his motorbike on the side.
You unbuckled your helmet and landed down on the grass, resulting in a crunchy sound. You let out a breath as you saw the river. It flowed endlessly and calmly, with its waters reflecting the hues of the sunset. But what made the scene serene was the absence of vehicles that relentlessly honked. The bridge was far away from you two, after all.
You slowly walked until you reached the edge of the grass-filled land. Then you plopped yourself on the grass with your feet dangling.
"This is nice! It's a peaceful spot," you said as Juza sat beside you.
"Yeah." Then he faced forward, staring at the river. "...I always played catch with my little bro here.”
"He likes baseball, then?" He nodded at that.
You aimlessly swung your feet. "Now that we’re talking about him, what's your baby bro like?"
"He's very kind and caring. He also gets along with people. Kumon is... a ray of sunshine." A soft smile bloomed on his lips. His eyes became so gentle and filled with love, the piercing gaze he always has dissipated. "No... he may be the sun itself."
Your eyes softened. “You love him very much.”
"Yeah. Unlike me, everyone loves him. But for some reason, Kumon likes me a lot," Juza mumbled the last statement.
Your brows scrunched up. "You're such an admirable person, Juza. You always wanted to protect the people you love. It may be in a rough way, but your baby bro saw through that. That's why I understand why he likes you so much."
"And..." you breathed in. You wanted to point out every reason why you appreciated him - from his scarred hands to his love for sweets. You wanted to tell him that you will always be beside him, supporting him.
You wanted to say how precious he was for you even though he thought otherwise.
Your affection for this man beside you quickly filled your heart. You touched his arm, gently caressing its muscles with your thumb. Juza turned to you, a confused expression on his face. Before you could stop your lips, the words fluttered out of your mouth, "That's why I like you ever since - as a friend and as a man."
You felt Juza stiffen. Your heart rapidly pounded as you waited for his answer. Seconds of silence only passed, but it felt like your time sped up. It felt like Juza would not reply to you soon as he did not move an inch. You let go of his arm. Somehow, your eyes already knew the answer. You rapidly blinked for the tears not to slip, but the regret bubbling inside you let them escape. If you had controlled your emotions, this would not happen. You had created a horrible memory that ruined the sacredness of this place.
You sniffed. “Sorry.“
“No.” Juza scratched his head. “I just… didn't know how to react. ‘Is all.”
You wiped your eyes with your sleeve. “…I see.”
“But… I like you too,” he said in a voice barely above a whisper.
You blinked. Even though you did not hear it clearly, the tinge of pink appearing on his tan cheeks told you his answer. “You… like me too?”
He nodded with his eyes staring at anything other than you. But you did not mind. The relief made you exhale as if you trapped an excessive amount of air in your lungs.
Then silence surrounded both of you. It was not an awkward one; it was a silence that blended with the comfort of the scenery and the relief of knowing that the man you hold so much affection for liked you.
You locked your pinky finger with his pinky, not noticing how the pink on his cheeks darkened. As if the sun gave its blessing, it slowly set, bathing the both of you in gradients of purple and orange.
#a3!#a3! act! addict! actors!#a3! game#a3! x reader#juza hyodo#juza hyodo x reader#a3! imagines#a3! scenarios#a3! actor training game#aimee writes#aimee answers
72 notes
·
View notes
Note
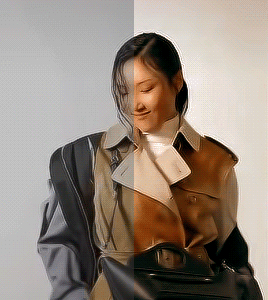
psst share your outer banks coloring secrets
ah, yes, one of the worst shows to color lmaoooo. i'll try to give some tips but im sure as anyone who has tried to color this show knows each scene is diff and has it's own flavor of awful yellow/green/red shading.
some tips on how to go from this to this......


............under the cut! (warning v long and idk if i'm the best at explaining things lmao)
so firstly, i use this psd i made ages ago for everything (alecbaenes was my url many moons ago i just am too lazy to change and reupload). usually i will go into each individual layer of that psd and see how they work with the scene, and will change the opacity or turn off the layer depending on what looks best. generally for obx, i will lower the opacity on the gradient map layer, as well as certain vibrancy/curves/levels layers, ones that make the gif brighter and more vibrant. i will usually bring back some vibrancy and brightness later but when im first getting the base coloring, some layers just heighten the yellow/red and we need to kinda bring that down before we make adjustments to get aspects like skin color more accurate.
so, just with my psd/adjustments made to the psd layers, the gif may looks something like this: (going to use this gif bc i made it more recently so i remember some of the stuff i did better, and is the most accurate to my current process--plus it sucks to color lmao)
ususally still way to red/yellow for my liking, both for the skin tones and to be able to manipulate the colors for a vibrant coloring! so the next step is to get colors as close to how they are normally. warning, you will have to make 345435354 adjustment layers and just keep tweaking and tweaking... and tweaking. sometimes i will have like 20+ adjustment layers at the end of the process. i usually put all my adjustments under my psd--i also always add a vibrance and brightness layer above. sometimes it helps to do final tweaks above the psd if you just cant get anything right bc of course the psd will change how colors normally look.
anyways, usually my base fixes will be some sort of combination of curves, levels, color balance, and selective color. so like, if the gif needs more depth/darkness, or is way too bright, i will bring the curve down or up respectively. levels, and also increasing the black selective color layer will also add depth. i will also use auto curve sometimes! the first image i have below i circled some of the extra tools i may use--auto for auto curves, the top black eyedropper you select the darker points in your gif and it will adjust based on that, the bottom one for the lightest--if i use those i will either use the black one only, or the black and then the white. the other three are examples of how my curve layers may look--i already have S curves in my psd, so when i do extra curve adjustments, it's just one single point, and i don't move it that much. same with levels, i dont make a super dramatic change, when it's under the psd it's enough to just move a bit to make a big difference. sometimes i'll also bring these layers to a lower opacity.
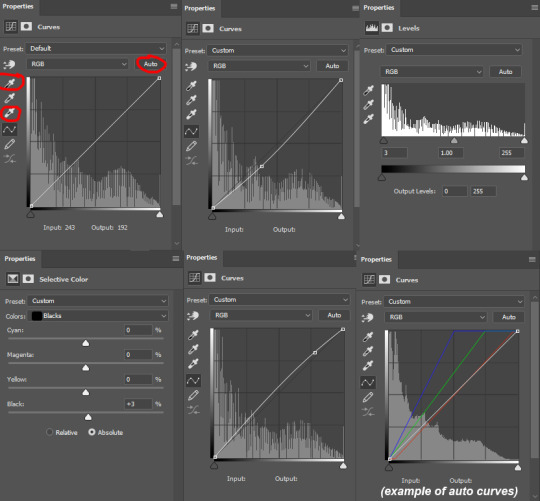
generally my first step is color balance though, especially if the gif seems mostly fine lighting wise. for obx, i usually shift it towards cyan and blue to cancel out the red tones. magenta and green depends, if its more green i may move towards magenta and vice versa, but usually i dont shift it that dramatically and often leave it alone. i will usually move the bottom bar towards blue, to soften the yellow tones. color balance helps shift the overall colors of the gif. notice that it's on mid tones in these pictures:
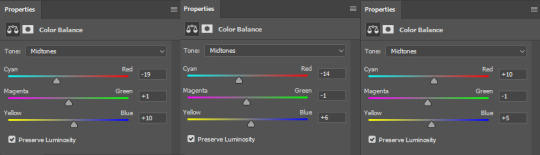
as you can see, i shift the cyan/red one more dramatically than the yellow/blue, and with magenta and green i usually just move it 1-3 points over. in the last one, i actually shifted towards red above my psd layer, because after all my adjustments i lost some of the red/warmth, so i brought back in red.
with color balance/curves, the gif may looks something like this
less of a completely red/yellow filter over everything! but still not great, their skin is too red, and overall still not the best base to try colorings. so next up is selective color, which can really help you fine tune things, but because of that.... SUUUUPER tedious. i will have 3495874 selective color layers and sometimes like 5 of them will be half canceling each other out just to get something okay. but this is a hobby i've chosen so we must suffer LKRGJRG. generally, my realm revolves around red, yellow, and at times magenta or neutral. if you think back to how we fixed some of the colors with color balance, kind of a similar principle, just with the individual colors. and lots of experimenting. so with color balance i would cancel out reds by making them more cyan--on the red selective color, im also gonna turn up the cyan. for yellow, i'm gonna make it more magenta, to make the yellow tones warmer. i will tweak the other tones too, just kinda experiment to see how changing it affects the gif, and then soon you will kind of intuitively know how to change the values based on whats going on in the gif lighting. magenta selective color helps for red values that are more pink, so make them more red or yellow based on what you need--i don't use this as much, hence i didnt have an example in the crop of psds i opened, but it's helpful sometimes. with neutral selective color, it usually affects the whole gif, so again, only minimal changes--usually i will bring the black levels down if it got to bright, or add just a tinge or yellow or cyan or whatever i need. here's some pics to show examples of what mine looked like for this gif:
there were many more, but i just chose a few. the '1' and '2' i wrote to demonstrate that these layers were sequential, how they balance each other, and how selective color can be a tedious balancing act-- the second example it's like basically the opposite but it balances it out. also, if you have two characters with different skin tones, or the lighting is different for them, etc, you can use layer masks to erase certain adjustments so it only affects one of the subjects. some of these tweaks will be inbetween me transforming the gif to be colorful, and noticing how the colors interact, etc. so between this i was also making it colorful and it's not exactly the finished product at this stage: but this is kind of what the gif would look like after all the adjustments just to get it looking... normalish:

not totally perfect but MUCH better, and also will look a little different when surrounded by the colors i want to turn it into. i have some stuff about how i color in this tag, i can do a lil other tutorial or smth if needed but bc i have limited photo space on the ask and already wrote so much i wont get super into it here. but for shows like obx, it helps to work with a group of colors that will work with the show--yellows/oranges are easier bc of all the yellow already found in the show. pinks can be harder because there is so much yellow in the show, but doable. greens are good because of all the green in the show, and thus blues are good because its easy to go from green to blue with selective color and stuff. thus, purples are good too because its easy to go from blue to purple! stuff like that makes it easier. some work with selective color, hue and saturation, gradients, and voila!

you can see how maybe some of the issues like it being still a little too yellow/greeny toned balances out with the surrounding colors.
also, a big part of it is just practice! i've been giffing for yeaaaaaars and with media that has just the most god awful lighting so i've gotten good at understanding what to do and sometimes i'm just on auto pilot.
hopefully that helped, i know it was long winded and it can be hard to explain/understand photoshop. if y'all want some more in depth explanation about a part of the process i can try, or with other examples!
8 notes
·
View notes
Text
Meeting Oikawa in Rio
Summary: Reader is a travelling photographer who encounters Tooru Oikawa in Brazil.
Words: 2.6k ( i went a little overboard I’m so sorry)
Warnings: none; strangers to friends to lovers kind of idea, slow burn, beach vibes, idk that’s mostly it
a/n: This is a request for the lovely @trash-revel!! 💖 I’m so sorry this took forever it’s probably filled with typos and grammatical errors! That said, I loved writing this 💗 Also, sorry if it’s a little too long, I felt a little too inspired! I tried to sprinkle a little bit of Portugese in it with the help of google translate (if anyone here speaks portugese I hope I didn’t butcher it and hopefully did it some justice).

As a travelling photographer, you were living like a nomad, always on the move without a home base to call your own. Instead of renting a house or an apartment, you usually stayed in hotels or airbnbs. Your goal was to travel the world and capture all of the beauty you could find in it… and little did you know that the most beautiful thing you were going to find was on your travels in Brazil.
You woke up early that day, unsure if you were actually on a healthy sleeping schedule or if it was the jet lag talking. You were enjoying your morning coffee out on the balcony of your airbnb in Rio as you watched the sunrise over the beach. The water of the ocean gently tumbled into waves onto the shore as it reflected the vibrant gradients of the morning sky. If you squinted hard enough, you could faintly see Christ the Redeemer in the distance on the mountain. After a yawn and a deep stretch, you decided that it was time for you to get ready for your daily adventure.
You prepared yourself for the unforgiving heat by slathering sunscreen all over your body and wearing loose-fitting clothes. As you got dressed, you could immediately feel the fabric cling to you from the humidity. You made a note to bring deodorant with you because you knew way too well that chafing was only inevitable on hot, humid days. You packed your bag with your camera lenses, a couple of water bottles, some snacks, an ice pack, sunscreen, and other things that will help you navigate your new temporary home. You finished off your look with a hat and your camera slung around your neck so you could have easy access if you see anything interesting to shoot.
After reading up on some of the attractions in Rio, you decided to visit Tijuca national park. You’ve been wanting to get out on your feet after an incredibly taxing, twenty-one-hour flight from Australia, plus there was no way you could pass up getting shots of all of the diverse flora and wildlife. Your plan was to hike as deeply into the forest as you could and then stop at the botanical garden to relax and do some sightseeing.
You sat at the bus stop, just minding your own business and intermittently reference the bus schedule on your phone, when a voice pulled you from your thoughts.
“Erm… perdão,” said a voice that was very much not from around here.
You peeked over to see a Japanese man, probably in his mid-twenties, trying to talk to an elderly man sitting on the bench at the bus stop.
“Este carro... uh... é para o lugar da árvore?” the Japanese man said tentatively, clearly struggling with the language barrier.
The elderly man blinked a few times, and responded with “Que?”
You were equally as confused. Based on the little bit of Portuguese that you knew, you were pretty sure he was asking for a car to drive him to a tree.
The Japanese man grew a bit frustrated and scratched the back of his neck. You could tell the poor guy was embarrassed, so you tried to see if you could help him out.
“Do you speak English?” You ask the Japanese man.
He locks eyes with you, and it hits you how handsome he is. His smile is disarming and his eyes are gentle. His physique is well-built like a professional athlete, and he was dressed like one too.
"I do," he responds. "Maybe you can help me. I'm looking for the bus that goes to Tijuca national park."
"You're in luck," you say, gesturing to the map on your phone. "That's where I'm headed."
You both boarded the bus, which was packed like sardines, and made some small talk along the way.
“Tooru Oikawa,” he says with an outstretched hand. “I’m a volleyball player.”
“(Y/n) (l/n),” you reply with your hand in his and give it a shake. “I’ve never met a professional athlete before.”
“It’s been a dream of mine since I was a kid,” he smiles and proudly runs his fingers through his tousled hair. “Are you a photographer? I just noticed your fancy camera.”
“Yeah,” you cradled your camera in your hand and fiddled around with the lens. “I wanted to check out the wildlife here and maybe try out some new techniques. I figured the national park would be a good place to start.”
“You know, shutterbug,” he says, striking a pose. “ I have some experience in front of cameras. Not to brag or anything, but I’ve been in a few local magazines back at home.”
You roll your eyes and chuckle; this man really is something else. He’s definitely charismatic and charming -- not to mention very handsome -- although there’s something else to him that you can’t put your finger on. There was something about his smile that just didn’t sit right with you. It reminds of you of how you were at family dinners; despite how much was on your mind, you just kept smiling to avoid rocking the boat. But, maybe it was just your imagination.
You arrive at your destination, depart the bus and find an uphill path that leads deeper into the forest. The two of you decide to walk together and continue to get to know each other. You tell him about how you were a travelling photographer and you had a lot of your works published in different magazines. You also tell him about your travels and all of the places you’ve visited.
“What’s one place you haven’t gone to yet?” He asks as he kicks a stray pebble. “Where do you plan on going once you’re done here?”
“Definitely Japan,” you say. “That’s up there on my list, especially the countryside. I just think the scenery there would be amazing to see in person.”
“I’m from the country, you know” he said with a wink. “Maybe we’ll have another fateful encounter there and I’ll show you around sometime~”
You can’t help but hide a blush from hinting at your cheeks.
Despite how flirtatious he is, he seems genuinely interested in you. And you’re equally impressed by him; the way he talks about his history with volleyball demonstrates his deep passion for the sport. He talks about volleyball as if he was knight preparing for battle; he goes into detail about strategies, formations, techniques, everything that makes a good volleyball player. He also goes into detail about his past rivals, although there was an edge to his voice when he talked about them. You decide to not pry too much on the subject.
“So what you’re saying is that you’re kind of a big deal,” you say.
“I mean,” he responds with a wink. “If you think so, then I won’t argue.”
That’s when a toucan flutters out from the bushes and nests into his hair. Oikawa panics and flails his arms, trying to shoo away the bird, but it seemed to have no intention of leaving his locks.
“Wait,” you say, steadying your camera in front of your eye. “Don’t move.”
The look on Oikawa’s face jumps from surprised, to angry, to embarrassed. He crosses his arms and pouts with red cheeks; it seems he was trying to make a good impression on you and the toucan sabotaged his plan. His pout slowly relaxes when he sees the look on your face; you were so mindful about the angle, the lens, and the lighting; it reminded him about how he is with volleyball. He also had to admit, you had a really cute smile; he simply smiles and accepts his defeat.
“Sorry,” you say, snapping a few more. “I’m almost done.”
“No no,” he says. “Take your time.”
That’s when you notice something different about him; this smile seemed totally different from how he was smiling when the two of you were on the bus. The way he smiled then seemed routine or rehearsed. This smile, however, was enough to make your chest flutter. You swear if more people saw a smile like this from him, the world would be a much better place.
“You better send me a copy of those,” he teases, sticking his tongue out at you. “Someday, people might pay good money for them.
“You know it,” you say with a giggle. Although, you couldn’t tell if he was complimenting your work or if he was just that full of himself.
You walk up to him and gently lift the toucan off his head and toss it into the air for it to fly away.
“Well, I hate to leave you like this,” he said, pulling out his earbuds from his pocket. “But I need to get my afternoon run in. I look forward to bumping into you again soon, shutterbug~”
With that, he jogged away, leaving you in a small cloud of dust. The nickname sticks with you and endears you more to him. You stand there with a smile on your face, as you hoped that this wouldn’t be your last encounter with him.
And it wasn’t. As a matter of fact, bumping into Oikawa became a near-daily occurrence for the two of you. You always took the same bus to the national park where he went for jogs and you went for photo ops. Although, the two of you eventually exchanged numbers and made plans to hang out somewhere else.
Every time you talk to Oikawa you always learn something new about him; you learn that his favourite food is milk bread, that his best friend, Iwaizumi, is taking sports science in college, and that he was captain of the volleyball team in his third year of high school. You tell him about your home country and what it was like growing up there, and how you’ve been pursuing photography since you got your first DSLR camera. You tell him about your favourite foods, your favourite music, and your favourite movies.
One evening, after Oikawa was done practice, the two of you decided to make plans to grab dinner and go for a walk on the beach. At dinner, the sun was still high enough in the sky that it wasn’t quite sunset, but it was low enough in the sky that the temperature started to cool off.
The more you think about it, the more it starts to feel more like a date.
“What kind of photos do you take?” he asks. “Now that I think about it, I don’t think you’ve shown me any of your work.”
You take out your phone to open up your digital portfolio and you hand it over to him. He scrolled through your gallery and saw various shots from nature, urban settings, and studios. He came across a folder in your gallery labelled ‘100 Strangers.’
“What’s this all about?” he asked, flipping through the images.
“Oh, that’s just a long-term project I’m working on,” you said. “My goal is to take portraits of 100 strangers that I meet in my travels and post little blurbs about them.”
“I’d offer to pose for a picture for you,” he says, leaning in as he rests his elbows on the table. “But it seems like we’re not really strangers to each other anymore.”
You can tell he’s flirting, but you don’t let him get away with it that easily. “I still have those shots of you and the toucan, you know.”
He flinches and hunches over in embarrassment. “You’re a meanie, shutterbug~”
“What?” you say as you take one last bite of your food. “I love that picture. It’s cute.”
He suppresses a grin as he digs his fork into his food. He tries to act nonchalant, but the blush on his cheeks betray him.
“So,” he says, bringing his food to his mouth. “You think I’m cute?”
A blush sneaks onto your cheeks and you avert your eyes from him. From the corner of your eye, you see him grin to himself in satisfaction. You avoid answering him entirely and just ask the waiter for the bill.
It’s now sunset and the two of you were walking on the beach. You decide to take off your sandals and just enjoy the feeling of the warm sand in between your toes. The breeze was perfect, and it was enough to take the edge off the humidity. You then take out your camera and start adjusting the settings on it. It was golden hour, after all.
You glance over at Oikawa, who ‘s just at the edge of the water and dipping his toes in. He looks out onto the horizon, where you could barely make out the silhouettes of the mountains, and takes in the balmy breeze. The wind swished through his hair elegantly, sweeping it just the right way that made it look effortlessly styled. You steadied your camera and snuck in a couple of shots.
He looks over his shoulder at you upon hearing the shutters and grinned. “Couldn’t resist a photoshoot of me, shutterbug?” He held up a peace sign and placed a hand on his hip, awaiting more shots from you.
After getting a few more shots in, you join him at the shore and dip your toes in, jumping at how surprisingly cold the water was.
“You didn’t answer my question, you know,” Oikawa says, turning to face you.
“Huh?” you chuckle nervously and tuck a few strands of hair behind your ear. “What question?”
“Do you think I’m cute?”
You hesitated and wiped your clammy palms on your shorts. You definitely developed feelings for Oikawa, and you were sure he felt the same way about you. The problem, though, is that you were hesitant to jump into a serious relationship, given all of the travelling that you do.
“I...” you murmur, nervously wiggling your toes into the sand. “Listen, I don’t want to get your hopes up. I travel a lot and I get so busy with work that I--”
“Hey,” he chuckles while scratching the back of his neck, trying to mask his disappointment. “It’s totally alright if you don’t think so, I just thought--”
“N-no it’s not that,” you blurt out. “I don’t want to jump into anything serious only to have it ruined when I eventually start travelling again. I really do like you, Tooru, but I don’t think that would be very fair to you.”
Suddenly, you found yourself merely inches away from him. He softly chuckles and places his hand underneath your chin to tilt your face up to meet his. You look up at him, your face hot from both nervousness and excitement.
“You put a lot of pressure on yourself, don’t you?” he says, as if he wasn’t one to talk. “Don’t worry about all of that stuff. How do you feel right now?”
You feel his fingers gently combing through the ends of your hair, sending tingling sensations all through your body. Your pulse quickens as he places a hand on the small of your back; he doesn’t go any further though.
“I…” you murmur, leaning in and placing your hands on his chest. “I think you’re really cute.”
He lets out a hearty chuckle and wraps both of his arms around you to pull you in closer to him.
“Well, that’s a relief,” he says, inching closer to you. “Because I think you’re very cute, shutterbug.”
You close your eyes and meet your lips with his. From that day forward, the two of you spent everyday together until you left for your next destination. You always kept in touch with one another through text, video chats, and voice calls. Even through the challenging times, the two of you wouldn’t have wanted to be with anyone else.
#oikawa x reader#oikawa#robos requests#tooru oikawa#haikyuu#haikyuu!!#haikyuu x reader#hq#hq!!#haikyu
53 notes
·
View notes
Text
Got tagged by @edwardsheeran (thank you ily 🤍) to take a look at what on god's earth i've posted this year and ok, there was quite a lot?? So this is druck-in-love - a year in review:
first creation and most recent creation of 2020: first this matteo set and latest this table tennis set
one of your favorite creations from 2020: vintage davenzi, david’s ig moodboard, ava being a mood
a creation you’re really proud of: my brain literally peaked here, also matteo knowing a spot, also david being a softie, whyyy are all these davenzi i guess i live in spring 2019
a new style you tried this year and a gifset that uses it: idk if this counts but with this nora set on the water i played with gradient maps and selective coloring and while i’ve been using them for a long time, i’ve figured out how to use them more effectively and i’d like to think it shows here. And also this another nora set, i feel like i did a few of these 10 gif sets where 5 are one color and other 5 are other color
a creation that took you forever: yall don’t even wanna know how long this davenzi valentine’s day edit took
your creation from 2020 that received the most notes: yalls went nuts when fatou’s season started, as u should. So that was for this blog, but the most notes i got this year was on my main for this timmy set, i think that’s like top3 sets i’ve ever made anywhere probably
a creation you think deserved more notes: david in blue, salt kiki, matteo’s brown jacket i can’t believe the disrispekt smh
a creation with a favorite scene/quote: fave quote probs fatou’s speech in the beginning of s5
a new fandom you joined and a creation you made for it: define a new fandom hjdhgjdg
a creation you made that breaks your heart: not necessarily break but always in my heart the only gen, actually heartbreaking tho is this big OUCH
a ‘simple’ creation that you really love: THIS and it deserved so much better soz
a creation that was inspired by another one (add both your creation and the one that inspired it!): my braincell sharing, and the one that inspired it
a favorite creation created by someone else: canon destiel reaction meme meets druck, absolutely godtier by @paularizeart, anything @bakkoush creates but wheew boi check this kieu my edit out and also this ava edit, and i really love this gorgeous amira fan art by @amirises . I do see amazing edits every day, there's so much talent in this fandom <3
some of your favorite content creators from the year: everyone i regularly rb from is a favorite 😌
and for good measure, another a couple more creations of yours that you love: faceless, matteo in ep 7, my brand, norajosh on the roof, bracelet, ava and fatou and the colorssss
If you clicked all these, wheew spare a hand in marriage?? 😳💍
I'm tagging @bakkoush @dana-song @naslostcontrol if you'd like, but no pressure 🌸🌺 happy new year, take care everyone!! 💫🎆💛
9 notes
·
View notes
Photo
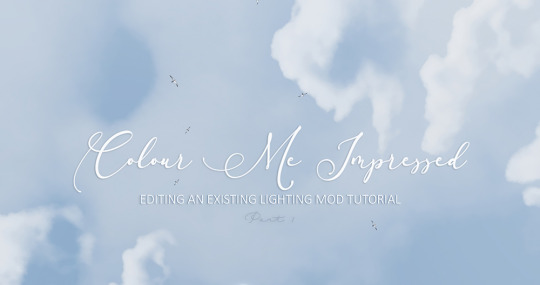


EDITING AN EXISTING LIGHTING MOD TUTORIAL
// part 1
If you are like me, you might have fallen in love with custom lighting mods and how pretty they make our games look. But there always seems to be something that irks me, be it how dark it is at certain times of the day or the water colour seems off, thus I learned how to edit one and here’s how you can do it too!
There are two ways of editing a lighting mod, one is by adjusting the RGB values in .ini files and the game adjusts the colour ramps for you (EA base game lighting works this way, I have never tried this method so cannot really say much about it other than here’s an old tutorial for it in case the lighting mod you want to edit has been created that way) or by taking the ini files into a photo editing program and editing each colour ramp manually by hand (EA travel and some other worlds lighting works this way, BrntWaffles and Awesims used this method with their lighting mods too). I have learned most of this by trial and error, piecing information together from different tutorials and through this MTS topic by Simsample and friends, but some of the posts/pictures it references to are long gone and it can be a little hard to follow. There’s some really important info buried in there though! I have shamelessly stolen a few pictures for this tutorial too as they are most helpful. I’m sorry, but I’m not sorry (ノдヽ)
Programs you need:
S3pe
Photoshop or Gimp (DDS plugins for Photoshop -> this and this, Gimp has this feature built in already)
Files you need:
An existing lighting mod .package file of your choise
Alternatively a custom world that has custom lighting in it that you want to use and convert into a standalone lighting mod
PoisonFrog’s Colour Ramp Designer .psd file, optional but extremely helpful and 100% recommended
PoisonFrog has created a file that has grouped each EA lighting file together based on which world or expansion they came from. You can use it to compare how the lighting differs from world to world or how the weather changes the colours of your world, you can also use it as a base to create a completely new one from scratch or just brutally smash different bits together. It also includes a helpful timeline layer so you can adjust your colours according to the time you want them to appear.
// Disclaimer: This tutorial goes through the basics and covers simple things such as editing cloud/water/sky colours. There is so much more to weather files than just colours, but this tutorial would end up far too heavy otherwise so I will leave out the INI file things such as cloud thickness, bloom, fog values etc, and we shall dive into those at a later date.
1. UNDERSTANDING THE FILES
1. Open your .package in S3pe.
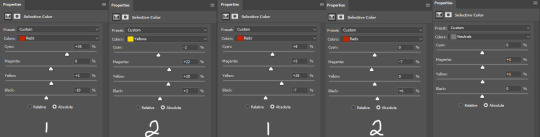
Within the .package there are INI and IMG files. Each INI has a corresponding partner IMG file as one controls the weather conditions (INI) and one controls the colours (IMG) that we see during that particular weather. I will call them siblings because well, they are related as the image shows. You can ignore the INI files for now as we are only changing colours. Lets say you want to change the water colour for your world, so this means you need to edit each and every IMG file and find the colour ramp that controls it. But if there is only a particular time of the day, lets say you feel the sky is too dark during the stormy weather, you would only edit the IMG file called S3_00B2D882_0076A684_E422CDDE7FE1F25F%%+_IMG.dds (instance number in S3pe would look like 0xE422CDDE7FE1F25F) as it’s the one controlling stormy weather colours.
2. Some mods might have neatly labeled file names, while other mods seem a bit more cryptic and it may take a little detective work to figure out which IMG file is the one you need (In the #2 picture I have opened 2 different lighting mods in S3pe to show the difference). If that’s the case, look at the last digits of IMG instance numbers and match it with the codes on the right side in picture #1 or scroll all the way to the bottom for codes in this tutorial. Right click the IMG.dds file(s) and Export to File, don’t change the IMG name as you need it to match its sibling INI file later! Save them to a folder somewhere.
3. Open your IMG.dds file in Photoshop or Gimp, if you get a pop up asking about mip maps just say no. You can also open PoisonFrog’s .psd file (It should work with the latest Gimp too) and copypaste your IMG.dds file over there so you can compare it against EA lighting or simply just for his helpful timeline layer.
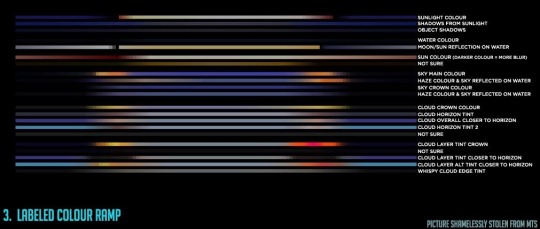
By default the IMG files come with no explanation as to what each colour ramp does, but you can use Awesim’s labeled ramp to help and identify the colour bar you need to edit. PoisonFrog also sort of.. But not quite explains them. His pictures are gone, but this may be helpful to someone?
// Photoshop Tip!
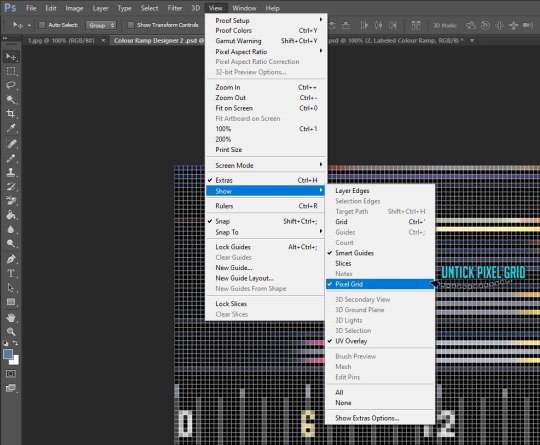
When you zoom in real close you might be facing a super annoying grid which makes it hard to see what you are doing! You can get rid of it by going to View -> Show -> Pixel Grid -> untick it and you can see clearly again.
2. EDITING THE FILES
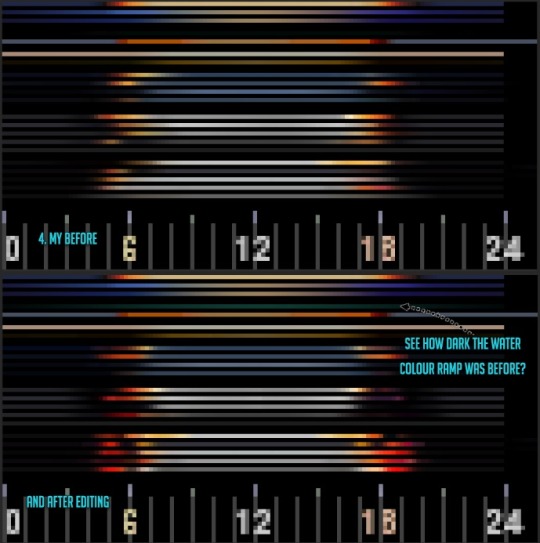
4. Once you have identified the ramp you need to edit, avoid drastic and sudden colour changes so the transition looks nice and tidy in game. This is particularly important with both ends of the ramp that they are consistent with each other, so once midnight comes and goes otherwise you get choppy disco like flashes of colour (If your world is a nonstop danger disco then go for it, otherwise keep it smooth). You can use selection tool to separate the ramp you want to edit, play with the hues/brightness/vibrance and see how it changes your ramp. Gradient tool is a good option too for mixing your own colours.
PoisonFrog’s .psd file is once again really nice for this as you can just yoink some other world’s colour ramp and copypaste it over the one you are editing. Or copypaste a small part of it, you don’t have to change the whole ramp if you have a specific time of the day that annoys you! You can also create your own groups within it, take apart other lighting mods and drop them in so you can mix and match their weather files.
5. Done with your colour tweaks? If you used the .psd file provided, copypaste your layer you were working on from there to over the original IMG.dds file. Make sure there are no extra layers floating around, merge everything together! Saving is a little different with Photoshop and Gimp, with Photoshop you can use Save As option while with Gimp you have to use Export As (Please correct me if I’m wrong with Gimp settings as I don’t really use it) to replace the original exported file. Copy the settings shown and make sure no mipmaps bit is ticked! If you have been saving as .psd or changed the file’s name, make sure the name is now EXACTLY as when you exported it earlier.
3. COMPILE THE FILES
6. Before continuing, you might want to make a backup save of your original lighting mod, so any changes you do to it that you might regret later can be reverted. Either way, open the lighting mod .package you exported your IMG files from earlier in S3pe again, hit Resource and Import from file to bring your edited IMG files in, replace and overwrite the old ones with your new ones (The old ones get crossed over and replaced only if you used the original names! If you have loads of IMG or UNKN files and nothing gets crossed over, your file names are incorrect!) and save.
7. Drop the .package in your Mods/Packages folder, make sure you have no other lighting mod in there. Boot the game and enjoy your new lighting mod! Alternatively if you are making your own world and you have a certain aesthetic for it, you can merge the package into your CAW map and that way whoever plays your world will also get to enjoy the unique lighting!
// OH NO!! If it’s looking funky, colours are way off or everythings gone spooky black, you haven’t used the right .dds settings while saving and/or your IMG.dds file names are wrong thus they are not linking correctly with their sibling INI files. Double check the settings/names and reimport them into your .package file.
Under the cut you can find all the .dds file names and instance numbers for easier use and access. It’s a long-ish list thus it’s hidden.
These are the file names you see in the very first image, but I figured the instance number might help you to identify them in S3pe easier. You can copypaste the INI and IMG names if you have accidentally renamed your file to something else.
Clear weather type
INI: S3_1F886EAD_00000000_967BC6C3B3808C00%%+_INI.ini
Instance number: 0x967BC6C3B3808C00
IMG: S3_00B2D882_0076A684_7529C26EE8E2A9E6%%+_IMG.dds
Instance number: 0x7529C26EE8E2A9E6
Partly cloudy
INI: S3_1F886EAD_00000000_560C0FD7012DA7F3%%+_INI.ini
Instance number: 0x560C0FD7012DA7F3
IMG: S3_00B2D882_0076A684_ECCBBCB773C02131%%+_IMG.dds
Instance number: 0xECCBBCB773C02131
Overcast
INI: S3_1F886EAD_00000000_8DEA7AE7631A026A%%+_INI.ini
Instance number: 0x8DEA7AE7631A026A
IMG: S3_00B2D882_0076A684_F0A86F660985BF20%%+_IMG.dds
Instance number: 0xF0A86F660985BF20
Stormy
INI: S3_1F886EAD_00000000_2C02B3532B64EB49%%+_INI.ini
Instance number: 0x2C02B3532B64EB49
IMG: S3_00B2D882_0076A684_E422CDDE7FE1F25F%%+_IMG.dds
Instance number: 0xE422CDDE7FE1F25F
Custom weather type
INI: S3_1F886EAD_00000000_FE1F6A95A24A604A%%+_INI.ini
Instance number: 0xFE1F6A95A24A604A
IMG: S3_00B2D882_0076A684_28C841C9462BCDE0%%+_IMG.dds
Instance number: 0x28C841C9462BCDE0
Let me know if you know a better way or I have made an error in this tutorial! I’m happy to answer questions too if you have any.
124 notes
·
View notes
Text
Ilandreline - A Compound Beginning
(( Previously: The Call ))
"There's a hole in the world, dear girl, and not the good kind. It leads to a place the living shouldn't be, and lets them get there in a way that shouldn't happen. I hate to send you off, but you're the only one I trust to be adaptable. Everyone else is too sure they understand everything to realize they're fools.
"The whole situation is a puzzle -- a deadly one. Examine the pieces, Lina, find the edges. See how they fit together, how this world connects. Learn the rules that govern there, figure out how to break them. Stay alive, too, and come back safely."
She'd never seen the older woman so uncertain. It warmed and scared her at once. "Is it really where the dead go?" The specifics of her family's cosmology were still hazy, and Ilandreline didn't know which had been verified versus assumed.
"Only some of them, child. Enough, I think, to make it difficult."
"Will I see family there?" The possibility was very mixed given the number of relatives she'd had to avoid in the interests of personal safety. Having to kill the already dead seemed… difficult, even -- or especially -- in the place where souls went.
"Not if they were sent off properly. The Great Dark calls us home, not some bizarre 'afterlife'."
"But isn't there a cycle of things?"
"Of course there is, but it's not that literal. We don't die, hang out a bit, and then come back. We become a part of the Endless Night, our souls rejoined to the very fabric of all creation. Perhaps pieces of us will once again be spun into a new person, but it will not be us."
Ilandreline considered for a moment, nodding only once she'd worked through the implications. Their gods were creatures of ending and dissolution; it made sense that souls gifted to them would not be returned in a recognizable form. She wondered what that might be like, to be unravelled to one's components. It was recycling on a cosmic level. Fascinating to think about, even if she had doubts about wanting it for herself. "I hadn't thought about that. Kinda neat. There aren't any papers on that already are there?"
Aurelaine chortled. "Not the kind you want. You'll have to gather the data yourself, I think. Good thing you'll be closer than any of us have ever been, eh? Should be enough to keep you from getting bored doing the rest of what I've asked."
"Good point." Someone else might've argued their commitment to family always came first, but she had no delusions on that front. Sure, she didn't want to disappoint her grandmother, and wouldn't have wanted to even if that wasn't an often fatal experience, but she needed mental stimulation to do her best work. Sounded like she'd have plenty. "I guess the only thing left to ask is how I'm getting there. I don't think anyone in Icecrown wants me there, and Orgrimmar's portal network isn't exactly open for tourists right now, so…" Ila trailed off, waiting patiently for the answer she was sure was coming.
"Ah, that. Yes. Well, I'm afraid you're going to have to do part of that work yourself." That was her self-amused smile showing now, not the happy one. "I've acquired a diagram of the circle used to tap into the breach atop Icecrown, but we'll need to know how to adapt our own paths to reach there."
That perked her up immediately. "Really?! That's wonderful! Where is it, I want to get started right away and-"
"Lina. I know you're excited but I need you to stop for a moment. Look at me." Granny Laine's gaze was at its most piercing. "This is extremely dangerous, all of it. Start to finish, none of this can be taken lightly. We can't afford to lose you. I can't afford to lose you, either. If something happens to you out there… you're on your own. You'll be beyond my reach. Understood?"
Solemnity draped itself over her enthusiasm, a damping force as efficient as a rubber grip on a wrench. She'd be more on her own than ever, possibly with no way back until she could make one. Ilandreline chewed her lip, running through the possibilities. Finally she nodded. "I understand. And I won't let you down."
"I know, dear girl, but I need more than that. I need you to promise you'll come back."
She grinned then, hiding the trepidation she felt behind the warm love she had for her grandmother. "I will, Granny. You have my word."
***
There were paths only a select few could walk, and of those even fewer did so safely. One such path was that of the Eldest's Apprentice. Another was found in certain shadows that were far deeper than they let on.
The latter was where Ilandreline's feet found themselves. She stared up at the peculiar tree, an imbricated mass formed by many trunks twisted into one. Oh. That's a metaphor, isn't it? The thought hadn't occurred to her before. Not much had, in fairness; she'd grown up with the old tree as a fixture of life. They'd all learned not to play near it if you ever wanted to come home again, but she hadn't connected that with why its fruit was reserved for very specific uses. At its base, veiled behind its gnarled roots, was the beginning of the darkest road.
She'd traveled it before, of course. There was no faster way to travel great distances unless you could make your own portals. Which she could have done if only she'd had the slightest sensitivity to the arcane. Not that she was bitter or anything but… Stop that, she chided herself. Sure, a portal was beyond her to create, but she knew more about planar geometries than anyone else in her family, probably more than most mages in the world. And after days of nonstop work, that knowledge had prepared her, brought her here.
Ilandreline couldn't stop herself from grinning at that. She'd started with only three knowns and had made a map. Where others would use portals already made, she had built her family's passage to the Shadowlands, a place none of them should ever end up. She'd drawn up the requirements for an activating charm and with the Eldest's backing had received a ring that would do the job. As far as she knew, no one had ever tried to map the void gradients of three coterminous planes, much less with the intent of using one to pass between the other two. Maybe she'd publish it someday, after scrubbing the specifics out entirely. The general solution wouldn't open her family to uncomfortable questions if she did it right.
"Here we go, I guess." It was more to herself than the small audience gathered to see her off. Still, she found herself looking back to take in what might be the last time she saw her home or family. Granny Laine was there, of course, radiating confidence and authority. Ilandreline's mother, Mellura'thel, stood to her left, coldly distant, possibly worried. And there was Von on the other side, the only one smiling, though she seemed uncertain if that was the right expression for the moment.
"Don't worry," she told them, struggling to project her normal confidence that everything would turn out fine, "I'll get this sorted soon enough. Just don't tear the gate down on me, okay? I don't want to have to revise the whole trail while I'm walking it."
Only Aurelaine responded, striding forward with an energy at odds with her venerable appearance. "Don't worry, child. So long as Darkness remains, so will we." She stopped very close to Ila, straightening up with visible effort to look her in the eye.
"I can see you're beginning to understand now," she spoke softly, barely loud enough for her granddaughter to hear. "You thought you'd started on your way already, but now you see this is it. You already know I trust you'll do what needs doing, just as you know I've demanded your safe return. But now I need to say just one more thing."
Aurelaine, Speaker of the Great Dark, architect of their family's faith and power, drew a small pouch from within her robes, pressing it into Ilandreline's hand. "I made these for you. Think of me when you eat them, and remember your dear old granny loves and misses you. You've always been my favourite, little Lina. Be safe."
The sudden sting of tears took her by surprise. She hurriedly stuff the bag of cookies into a pocket, blinking the wetness away before someone else might see. "I will. And I promise to make you proud. I'll-"
"That's enough, dear. You don't need to say anymore, and it'll just make it harder if you do." Her wrinkles and creases deepened until she was smiling. "Now stop dilly-dallying and get on your way. The rest of us have work to get back to."
Off-balance, Ilandreline failed to say anything at all. She did manage to return the wink, though. With a nod, the youngest of the assembled Glimmerbows turned away, putting one foot in front of the other until the darkness beneath the greatest voidplum tree swallowed her entirely.
4 notes
·
View notes
Note
hiiii! i just wanna say, i adore your art. second, im teaching myself to draw and while i can draw simple basics (mouths and sometimes eyes if im lucky), im still a beginner. ive watched many art videos and im still a bit confused on wtf im doing. so i just came here to ask if you had any words of wisdom for beginners? could be anything from what tablets to buy to simple mistakes to avoid. ive read some of the other posts here and have found it all extremely helpful so far! Thx for all you do!!
Hey there! Thank you so much!
I would put a read more but tumblr is broken. I’m trying to cover a lot of varied thoughts in little points, so if there’s anything you would like me to elaborate on or otherwise have questions on, feel free to shoot me an ask or dm me!
General
I think the biggest thing to remember is not to compare yourself extensively to others. A little bit of comparison is healthy... But too much will destroy your confidence, motivation, and take the fun out of art. Particularly if you are comparing yourself to someone older than you (life experience and coordination come into play here) or that has been drawing much longer (practice).
Additionally... If you’re not having fun (and you’re not getting paid to do it), don’t force yourself. If you find yourself being frustrated or bored with art, don’t force yourself to do it. That’s how you burn out and get art block! This applies to parts of a peice, too! If you don’t feel like drawing a face or a hand today? don’t force yourself to finish it. Come back to it later when you aren’t as frustrated or are getting better results. Even if its a week or a month from now. Honestly, at any given time I have probably ten headless bodies in my drafts. That’s okay! I just come back to them when I’m ready to do the face. And don’t be afraid to abandon something if it doesn’t feel right!
Something that also doesn’t get said enough.... take care of your body! I never knew when I started art, but artists are supposed to do warmup sketches and stretches and muscle exercises! I didn’t do any of this, and i went through a period of a few months where I was drawing for 5ish hours every single day. I developed carpal tunnel from it! So remember to take care of yourself. Take breaks, stretch, remember to eat.
Practice
Practice!!!! Even if its just for fifteen minutes every day. Or twice a week. But if art is something you really want to get good at, you have to put in the time and effort!! You can’t expect to draw an hour per month and be on the same level as someone who draws an hour a day!
I know I say this a lot but I think the biggest thing is just reference! If you don’t know what something looks like, look at a picture of it when you draw it! To go hand in hand with that, though, don’t just copy what you see! Learn from it and apply it! So take, for example, a shoe! pay attention to the way the heel is shaped, the location of the eyelets for the laces... how large the toe is, how steep the top! While you’re at it, look at other styles of shoes as well, and compare them! See what makes it look like a boot versus a trainer! And then the next time you draw it, hopefully you’ll remember all the things you learned the first time around!
I do lots of studies that serve no purpose other than to teach me things! I use referencing/studies to learn about color theory, shapes, and anatomy in a real environment. For example, hands or fabric folds! Oftentimes I’ll do them timed (20 or 45 minutes) so that I don’t fixate on perfecting things, just on the process itself and what I can learn from it. This also helps with getting better acclimated to your software and more coordinated with what you’re doing. Repetitive learning, like with playing sports.
I’ve realized a lot of people don’t quite understand what a study is? Basically you just look at a photo and try to replicate it so that you can learn about lighting or color theory or textures or anatomy or whatnot. So here’s an example of a timed study.
Additionally, don’t avoid!! We, as humans, have a tendency to avoid things that make us uncomfortable or are difficult. But it will make you a better artist in then end. When I first started, I absolutely hated doing fabric. I felt like I wasn’t good at it. So instead of avoiding drawing clothing, I sat down and did studies and sketches of different kinds of fabric. By the end of this learning period, I became comfortable with it and grew to enjoy it. These days, I adore sketching clothes, and it’s why my pants and shirts and things tend to be detailed instead of stylized in line art. If you don’t like drawing hands because you feel like you aren’t good at it? Sit down, look at a bunch of pictures of different hands, and practice it. By the end, you’ll be more comfortable, you’ll have learned something. Even if you feel like the drawings you ended up with aren’t good, you’ll still have learned, and that’s what matters!
Style
I worked on basics before I tried to develop a style. I made sure to start with a very realistic method at first, so that I could be sure I understood how fabric folds, anatomy, and realistic expressions worked before I tried to stylize them. I think in the long run this approach really paid off for me. It also allowed me to be conscientious of what elements I was absorbing into my artwork. I hear from so many artists that they started drawing when they were younger and into anime or cartoons or things like that, and tried to emulate it. Because those styles became so ingrained into their artistic skillset, it becomes near impossible to iron out those influences and get rid of them later. So starting with realism is a way to ingrain proper anatomy and other good practice into your artwork.
One way to develop style is to take a look at the artwork of someone you admire, and try to list out the things you like form their style - perhaps the thickness of their lines, or the way they do eyes. Do this with several artists, take all those little details you like and try them out! See if you enjoy using them in your own drawing process! Think of it like a grab bag or a pick-n-mix, sprinkling in the elements you like here and there to create something new and your own - not just copying another artists style word for word.
Don’t worry too much about it though; don’t allow yourself to become anxious or fixated on “achieving a style”. Its a natural ever evolving process that comes with time and practice. I know a lot of people get hung up on style, but just take it one day at a time!
Also try to keep in mind what style you’re going for as you begin drawing. And I don’t mean that like sailor moon vs. ghibli. I mean that as in, is this piece going to be a painting, a lineart, a lined painting, cell shading...? It will help you in the longrun if you narrow down the broad kind of style you use, and refine from there.
Workflow
My workflow for paintings is very different from my workflow for lineart and cell shading. A full tutorial on how I do paintings can be found here! A process video for how I cell shade can be found here!
Everyone is going to have a different method that works for them! You just have to experiment and find out how you like to draw! For me, personally, I use color blocking for painting (see the tutorial above) and a spine method for lineart. How the spine method works is that I will draw lines that represent the legs, arms, back, etc. so that I can determine the placement, length, and composition. From there, I’ll add a dark outline that actually shows the shapes of the body. Then, I’ll use thinner lines to add details. This is the method I’ve found that works for me. Another commonly used method that I’m sure you’ve seen is representing body parts with cylinders and cubes. There are lots of good tutorials out there on breaking down bodies into shapes like this!
Something that I do is if I’m not quite happy with a part of a drawing, I don’t just erase it. I duplicate the layer so that I always have the original copy, and then I make changes from there. Sometimes I can end up with five or six different versions of the same arm or face that i’ve made minor changes to. And then I compare and pick the one I like best, or condense all the parts I like from each version to make a “best” version.
Tools
Currently I use Procreate and the standard Ipad with Apple Pencil. Prior to March I was using a Wacom Bamboo Touch and Photoshop Elements 2008. I find its harder for me to do full paintings in procreate, but its made my life a million times easier for lineart and cell shading. The pen pressure is phenomenal, and I also adore that its wireless / active screen instead of plug in like the wacom. The programme itself is intuitive and easy to get the hang of; it simply lacks a lot of the neat tricks that photoshop has, like rendering (lens flares, for example), gradients, and gradient maps. Try testing out different trials of programmes... firealpaca, photoshop, autodesk, whatever it may be! What works for me may not work for you!
285 notes
·
View notes
Note
hi sam, how are you? hope everything is great! could you give me some tips to reach the coloring you did here: /post/188572378517/stop-smiling-in-front-of-men-dont-look-cute-in it's sooo lovely! i'm in love with it, as well as all of your colorings for melting me softly
hello! I’m doing great, thank you for asking nonnie ☺️ thank you for the compliments as well. funny because melting me softly really wanted me dead with coloring that show most of the time. it had a tendency to really wash everything in cyans and I detest that.
as I kind of just free-ball most of my colorings I will try my best to provide some tips for you!
that particular set that you made note of actually is pretty minimal with coloring. when I’m doing most of my regular sets I like to keep my coloring natural looking and so I’m usually just brightening, upping contrast, balancing out color tones and adjusting some hues.
this is what the original file looks like without any adjustments:

as you can see it’s kind of dull and flat. my most basic starting routine for any coloring usually involves the following adjustment layers: curves, selective coloring, brightness/contrast (levels exposure are applied if needed), color balance and gradient map are optional and usually used under my own discretion.
curves — okay so this is a super fun adjustment layer once you get the hang of it (and I admit even I don’t have it fully mastered). it can be used to fix general lighting along with adjusting color balances. in this case and in most cases where the coloring is pretty neutral or balanced you won’t really need to touch the color aspect. for this coloring I just used curves to help brighten the scene a bit. (note that you can always press the ‘auto’ button and see if that gets you somewhere you like before adjusting.) on the ‘RGB’ tab if you drag the line upwards you’ll get a brighter output and if you drag downwards you’ll get a darker output. contrast can be added by adding multiple points to the line and creating almost an ‘s-like’ shape of varying degrees.

selective coloring — so this is probably my favorite adjustment layer. I use it a lot, like a lot. it’s super helpful with bringing up certain colors you like/want and toning down some of the ones you’re not too crazy about. I usually start with reds and decrease the cyan bar (generally if you want any of the colors to stand out more you decrease cyan) I’m a big cyan anti most of the time lol. to give any color a bit more pop/contrast I usually up the black bar under that color. second the the reds I always usually put the blacks for the black to give more contrast.
for this coloring specifically these were my adjustments: [ red: cyan -6, black +13; yellow: black -9; cyan: cyan +19, magenta +23, yellow -4, black +4; magenta: cyan -9, black +8, black: black +2 ]

brightness/contrast, levels & exposure — as the name of the adjustment layers suggest, this is all about adding that additional ‘pop’ and brightness to your colorings! simply up the brightness to your liking and fiddle with the contrast bar as well. for levels if you move either of the bars at the two extremes closer to the center you’ll start to see dramatic lighting changes. the same can be said with adjusting the middle bar in either direction (to the left for a flatter/lighter look and the the right for a darker one) if you ever feel like you need a little more ‘umph’ I suggest adding an exposure layer! the ‘exposure’ bar will help add a lot of brightness at very minimal movement of the bar (I would suggest not moving it more than +1 for most sets). offset is super helpful when you really want pure blacks that are super dark. again it’s super sensitive and you really only need to move it a smidgen (ie: here it’s at -0.0003). gamma will usually adjust the overall darkness of the scene if you ever want to make the background a bit darker.

color balance & gradient map — these can be used with your personal preference! I use color balance a lot more than gradient map, but gradient map is always fun to experiment with. if I’m using gradient map I’m typically using #ffffff with #f4b0ae (or a similar shade) or #65797b and #f4b0ae (or a similar shade) and setting the layer to ‘multiply’ and adjusting the ‘fill’ and ‘opacity’ until it produces a result I like. also, try checking the ‘reverse’ option to see which version you like best (it tends to differ depending on the scene). for this coloring I went with the first pairing of colors at 16% fill. color balance can be used to correct any other color tones you want. in this case I put a little more yellow in.

and there you have it! like I mentioned earlier, this coloring is pretty minimal in it’s adjustments, but it follows most of my basic coloring principles applied. some of my other sets have more drastic coloring changes but that’s really just applying the above adjustment layers with more changes them or even more layers of them (most notably selective color).
I hope this helped you at least a little 😅 I tried to explain as best I could without going too detail-specific, so you could try and apply the techniques to a wide variety of sets. let me know if you (or anyone else) has any more questions!
17 notes
·
View notes
Text
Maya?? Maya!!
also Athenas lmao
finally i am free to work on this
boy i sure hope we don’t get more info soon *squints at Amara’s character trailer just around the corner*
tl;dr: athenas. wow. uhhh temple areas with the weird vault-shaped statue things might be a teleportation hub or something like a Stargate cuz, uh… they’re probably not Vaults. i mean. given what we know maybe they are Vaults but not like vaults with important stuff inside, just teleportation vaults. you know what im trying to say? i mean it’s not like the eridians had any spaceships we’ve seen. but they had to get around somehow.
also it’s possible the big temple area we see is on Athenas, is in that giant fucking pyramid in the background that i completely and totally did not notice for the longest time.
i also discuss Maya and her thoughtlock skill (if she gets her powers taken away from her) and if she’s gonna die or not. because she’s got the Cloud Kill legendary (’oh noo she ded’), an apprentice (let’s be real, the cliches aren’t looking great), and she seems to working beside rampagers in that giant temple area (also another reason i think it’s on athenas) and tbh i didn’t see her tattoos in either of those shots (but that could be cuz she’s so smoll). so that’s cool.
oh also the order of the impending storm was probably pretty respectable back in the day, since they can track sirens (maya’s assassin in son of crawmerax), and maybe that’s how maya figured out ava was gonna be a siren even tho she hasn’t manifested her powers yet. and Maya’s probably unearthing all this buried Siren/Vault knowledge and bringing the Academic District back into power while also protecting the Order from Maliwan. who’s still v sus.
wow we have a lot to go over
so to start, im taking a wild guess and saying the temple is on Athenas. why? because we really haven’t gotten a lot of looks at either of those areas too much (compared to promethea and eden-6) and the architecture lines up to me.
also i, an idiot, was all like ‘mannnn Athenas is super mountainy, that’s wild. love it’ and neglected to realize there’s literally a giant fucking pyramid in the background of a lot of shots
on the right
behind the tower
to the right of ava

on the left
so i feel really dumb right now for not noticing this sooner and writing it off as a mountain. It's literally the fuckin Vault symbol like. ~triangles~. i played skyrim i should know what mountains look like when they’re not 1 polygon
either way, if that’s not at least part of the temple, it’s definitely important. somehow.
but let’s talk about the temple. the parts we know.
let’s try to look out the windows of this wild place

see cause this looks like inside a mountain
so my first instinct was eden-6 because we see a volcano on there

i mean im under the assumption this is eden-6???

bc all the plants match up
… maybe there’s more than one temple?
oh god i don’t wanna separate these by temple that’s going to be IMPOSSIBLE
but yeah i guess it’s possible there’s one on Eden-6 and one on Athenas… dear god…
but yeah my first instinct for that was ‘inside a volcano’

possible mountain on the left there
very rocky all around. im assuming this is underground or smth?

it feels like we’re underground
so maybe it’s a thing where it just keeps going further down. iunno.
it’s hard to place exactly where this is going to be because of the whole ‘underground’ thing
the part that’s throwing me off the most is this
because this looks like Pandora bc of Elpis and the rocks
and it looks like we’re walking outside a temple with the same friggen tiles on the floor, which means it is possible that this is The Temple, but you think we’d know about a giant-ass temple just on pandora. especially with the big dig site
but then we see a super similar dig site (supposedly on promethea). so what the HELL
im almost inclined to believe this is some sort of Eridian teleportation system. i know, i know, we have Sanctuary-III so it’s pointless. but… will we always have Sanc-III throughout the story? yada yada orange/gray -> blue/yellow/red markings. you get the dealio by now.

to

when taken by the cult or smth.
idk it’s possible we won’t have sanc-III for the entire game (just like normal sanctuary in bl2, in that we’ll get it back eventually (or ill kill someone for taking my room decorations)) and then we’ll have to use this wicked eridian tech to move between planets with these gateways. sort of like a stargate…
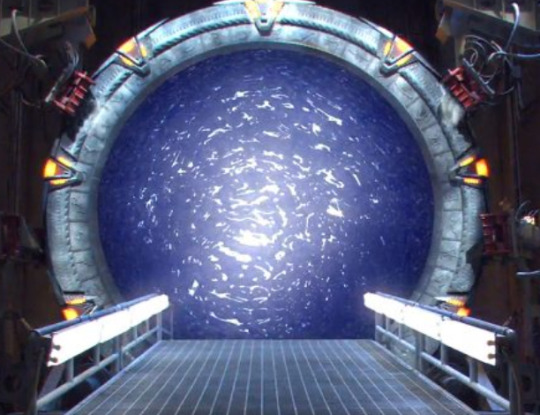
this thing is a stargate. I’ll call back to this in a hot second.
what kinda shit am i tripping on? i don’t really know. but given how it seems like these temples could be on ANY of the planets we see, im trying to figure out wtf the connection could be.
and give me this: we have never actually seen an eridian spacecraft, but we know they’ve traveled across the galaxy, putting vaults on different places. how in the fuck could they have done that if, you know, they didn’t have spaceships to travel through… space?
well we know they have the power of teleportation down pat. i mean down so hard they were able to create a ‘teleportation gland’ that allowed a giant vault monster to teleport at will. (now im wondering if lilith has one… hm.)
this blue thing (which… is the same color as siren stuff. okay. im sorry. i won’t get off topic this time. but it’s stewing in my gray matter)
and given that we know all the (okay, we only know for certain some) vaults open up into this other dimension (space place), would it be so hard to believe that they’re created links between planets using this dimension? i just… something isn’t right here and this seems like the most logical solution.

take a look at Eleseer. look at all those holograms of labeled planets. of galaxies and stars in the distance. it’s possible eleseer is like the Hub for this teleportation system (explaining why it’s always open) and explaining why it’s got all those weird planet holograms sitting around. could also explain why Moon = Key.
These aren’t Vaults, they wouldn’t show up on the Vault Map- explaining why we never saw this one on Pandora- these are like… gateways or something, iunno. name pending until sept. 13th i guess.
so why tf am i going off about this on a post about maya and athenas?

because i think athenas has a gateway in it too
yeah you should recognize that thing in the background!

that’s this place!!! from the behind closed doors demo!!
and it still
doesn’t look like a vault to me

it’s intact (also it looks like stairs…). all the Vaults we’ve seen are 100% not intact. they’re all chunky and in pieces (we’re gonna ignore eleseer and uhhhh all that business right now, but even thinking about how the sentinel tried to emulate a vault by spawning it in chunks and THEN assembling it)
chunky
im just saying there has to be a reason these vault-like shapes are intact. they’re either just statues/monuments or they have a purpose.
so why tf am i convinced they have a purpose?
bc we’ve seen one light up

taken straight from the void itself (seriously it’s like a gradient back there. which is weird.)
so there’s gotta be a reason it does this right? and if it’s not a Vault, because it’s on Pandora and the Crimson Raiders would have seen it on the Vault Map, then what the fuck is it?
welllllllll i just don’t know. but my best guess right now is some sort of teleportation system to travel between planets. if there are ‘temples’ on every planet then it would make sense that there is some way for eridians to travel btwn them.
personally i think there’s one on eden-6 (maybe in that volcano area??) and one on Athenas (cause we really haven’t seen a lot of athenas yet and… i dunno i just have a feeling). and there’s apparently one on Pandora (given we see it with elpis in the background) and possibly one on Promethea. i don’t know what that instagram video was trying to imply. i don’t wanna think too hard about it right now my brain hurts enough already as it is.
but uhhh i was gonna talk more about athenas than this
i promise this is gonna lead into maya

the academic district, with a Vault symbol on the door, to boot.
so this place is really interesting to me for a lot of reasons.
1. that vault symbol on the door
2. they’re flying flags with the vault symbol on it
3. giant pyramid in the back

it’s staggeringly huge
4. they have siren tattoos on the building in the back there. specifically, amara’s tattoos
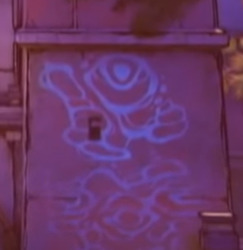

yeah. maybe this is Partali? a smaller area on Athenas, like Meridian is a city on Promethea, and this is Amara’s way of tagging her presence/an area under her protection as the Tiger
more shots of Athenas from the amd horizons e3 stream


it’s a very pretty planet
so if anything, this is the place we’re going to go to learn about Sirens.
and i don’t know how much the Order of the Impending Storm actually KNOWS about Sirens, because all we know about them from maya’s backstory is that they were assholes and using maya to keep the people scared and giving them money
also that they knew how to track sirens
that’s probably important…


“Maya, you’ll like this next dude. He’s a Siren tracker named Mordo Sophis, Father of Brother Stephen Sophis, that dude you ganked back on Athenas. And boy, oh boy, is he just itching for vengeance.”
who isn’t, mr. mordo, sir? get in line
anyway apparently the Order knows how to track Sirens. Which could explain how Maya has a Siren apprentice when Ava uhhh apparently hasn’t manifested her powers (or tattoos) yet. might also explain how they got their hands on Maya when she was a baby. cuz yeah… i got the feeling they stole her and killed her parents… just a feeling.
y’know if tannis didn’t kill that siren tracker dude maybe she could’ve learned something from him first. that could’ve been interesting.
anyway, idk. maybe at one point the Order was respectable and, like, didn’t force people into giving them money by using sirens as a scare tactic.
it looks like they have/had an academic district (which im sure maya is helping cultivate) focused on Sirens/Vaults.
and there’s a lot of importance on books this game
seriously

apparently
there’s

a
lot.
but let’s get back to this in a minute, because i do wanna talk about the name of the Order.
it’s full name is the Order of the Impending Storm.
I know while writing bl2 they probably didn’t know that they were gonna be building towards a war in tps, but it’s still interesting that they decided to bring them back into play now. because they 100% could have just left them as a background monastery that Maya came from and have maya refuse to return/start her own organization. but they made her specifically return there.
so does their name have significance now? i’d be willing to bet a yes. I mean, war is coming. Impending Storm sounds like it’d be a pretty fitting name for an organization that knew this. Especially because according to Maya’s cosplay guide, they worshipped her like a God (seriously lol are all Sirens worshipped as minor deities? most people know Sirens are Sirens right? like just people with magic powers..? hmmm)
And if Maya returned to learn more about Sirens, then isn’t it implied that the Order did, in fact, know more about Sirens than Maya did? hell, maybe even Tannis…
especially if the temple or eridian ruins are nearby. Say… In this giant pyramid…

so this doesn’t fit in with the aesthetic of Athenas at all. it’s almost like those are caution colors on the bottom strip there. warning you to not go inside. i don’t know if this was built by the eridians or by whoever is on Athenas to keep whatever’s inside… inside (cough Rampagers cough)
either way that pyramid is FUCKING HUGE
seriously, just compared to the academic district, it’s insanely big (that is the BASE in the background)

also guess who just realized this would be a hilarious joke by gearbox
to have pyramids built by ancient aliens. oh, you.

also, side note, there’s a crew challenge for moxxi in the academic district
i just have no idea how we’re getting up there…
oh but the Order. yeah i get the feeling they know A LOT about Sirens/Eridians. maybe even what’s about to go down. but maybe a majority of that was lost in the archives when some corrupts assholes came into power. and now Maya returned and is slowly but surely unarchiving everything we need to know about Sirens.
perhapith this book has some Siren-y knowledge within it? from someone who went into the temple on Athenas and… never came back out.
and I would bet Maya is waging war against Maliwan at the same time as she’s uncovering all this buried info (protecting the Order) because Maliwan is trying to get this info as well.
Seriously, anyone else notice Maliwan is SPREADING?? They’re not just on Promethea. they’re on Eden-6. They’re on Athenas. They’re even fuckin on Pandora in some trailers (although I would not trust any trailer with roses at this point. something’s really fucky. I will make a seperate post about that i think, once we get Amara’s and Fl4k’s trailers). I’m really suspicious that Maliwan has either joined the cult, or they’re going to become the main villains. which, y’know, given corporations are the big bad in borderlands always… that seems about right.
I wouldn’t even be surprised if Maya/the Order knows something about the Children of the Vault. Given that one pic of her holding a book with the CoV symbol on it.

that she seems to be passing on to Ava

I dunno. I don’t think Children of the Vault is a name that the cultists/Calypsos just HAPPENED to come up with. And I still don’t think that the broadcast easter egg is from the Calypsos. it doesn’t make sense. I know I went over this in-depth in the Promethea post but god damn it im going to do it again because i feel so strongly about this.
i feel like the cult stumbled upon this name and decided to adopt it as their own. or tried revive an old cult with the same name. and if they didn’t, why in the hell does the message say ‘Do Not Open the Vaults’? How do the twins know about Tannis by name?
i mean, okay, granted we don’t know exactly how she fixed the Vault Map and it could be that the twins know how she did it. Because I still haven’t been able to place that one shot of them walking outside the Recruitment Center

this one
and we know tannis fixes (??) the Vault Map in the recruitment center, so, maybe they saw it happen or there’s some sort of record in the vault map? that shows her fixing it and when they get to Promethea they send out that message?
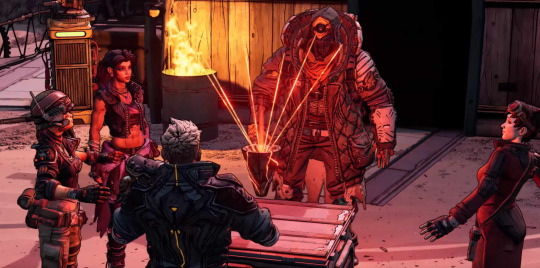
i meannn she seems pretty surprised it’s functioning, herself.
so maybe they come while/after tannis fixes the key/map to get it back and Lilith like alright everyone let’s book it to Ellie’s garage with the Map. she’ll help us get to Sanc-III.
and in that they see that she’s able to fix it (possibly with weird Siren/Destroyer/Slag/pickurpoison powers) and that’s how they know Tannis is not what she seems.
and maybe the twins just don’t want their cultists opening the vaults because they want to be the ones to open it.
Sure
BUT that’s boring sauce to theorize about because it’s all just there. I’m still partial to the idea that Children of the Vault is actually referring to Sirens tho. It would explain why Maya has a book with the symbol for the CoV on it and is offering it to Ava. Because why would Ava need a book about the Calypsos? who would WRITE a book about the Calypsos?? and make it look THAT old? like… c’mon.
At the very least, it’s an old name for a cult that got revived by the Calypso twins.
At the most, it’s the name for Sirens.
Or it’s the symbol for the Order of the Impending Storm, back when they were respectable. tho you think we’d see maya wearing the symbol somewhere in bl2, so maybe not. unless she took it off her clothes because they had her try to kill unarmed civilians.
I mean, why is the cult’s symbol the Vault symbol upside down, anyway? We know that the symbol for the Vaults in Eridian is the upside-down V in a circle, because Tannis tells us so in bl1. So why would a cult of people who believe the Vaults to be their birthright go around slapping what is essentially the opposite symbol everywhere?
i personally wouldn’t be surprised if that’s the symbol for Siren or something, given how closely intertwined they both seem to be to that alternate dimension.
regardless. let’s keep going
so let’s talk about Maya’s fate in BL3. Is she gonna die? is she not gonna die? i dunno. let’s discuss.
i personally would not be surprised if she does, but i’d be a little disappointed regardless. if any Siren is gonna die… Lilith is going to finish her character arc this game. not that I want her to die, but still. I get that they gotta keep the Siren cycle going.
sooo one big point in the ‘maya dies’ category:

“Oh noo she ded” i mean. that’s just mean, gearbox.
of course we don’t know if that’s talking specifically about Maya, could be talking about Tyreen, or a miniboss, or something. but i do think it’s interesting that it’s on maya’s legendary. plus uhhh given we had a death out of Roland in BL2, and in TPS 2 of those VHs died as well, I think it’s a given at least one BL2 VH isn’t gonna live to see the end of 3. as much as that actually physically pains me to type.
And… to tip the scales further to Maya, Zer0 has crew challenges, which probably means they won’t be biting the dust anytime soon, unless you wanna completely ruin doing all the crew challenges by beating the game before doing the assassination quests. which doesn’t seem like something they’re keen on doing, if Roland giving out side quests had anything to say about it. Of course there’s always the argument that someone will take over Zer0′s crew challenges if they die, but… who would? Rhys? maybe. i get the feeling he might be too busy with Atlas though. Lorelei..? … i don’t know her well enough to make a statement on that.

taken from K6′s awesome legendary loot vid
Back to the legendary. we know it’s hers based off the name ‘Cloud Kill’, which is one of her best skills (after the buff lol). It’s a corrosive only Maliwan smg (as far as i can tell. it doesn’t look like there’s the option to swap elements. so it’s cool to know uniques might throw out their manufacturer’s alternate firing modes). i’m gonna take a guess and say it mimics cloud kill by spawning a cloud on top of enemies that are shot with it. that could clean out an entire room in seconds, especially on Amara with Phasegrasp.
anyway i got more
so Ava is Maya’s apprentice, hmmmm?
well i dunno about you guys but whenever a character gets an apprentice/kid/whatever, it’s not good news for the character. and given that borderlands definitely doesn’t need children to keep the premise fresh, I’m a bit worried for Maya.
Ava must be important to the main story, or they could’ve taken her out or put Gaige in. The devs themselves said they only wanted to bring in characters that they knew had significant importance to the plot and so that characters wouldn’t feel shoehorned in.
so there’s a few ways things can go down with Ava, using apprentice stereotypes:
1) She takes over after Maya dies/has her powers stolen/is brainwashed and helps us bring Maya back by proving herself using the stuff she learned from Maya (or, the stuff she taught herself that Maya said wasn’t important)
1b) she inherits Maya’s powers and Maya trains her in the way of Phaselock
possibly maya handing over her class mod or smth
2) she’s evil and the cult is using her to get info and secretly hates maya or whatever
Given Ava is like… 12… I wanna believe she’s not evil. of course we don’t actually know if she’s 12 cause apparently the Siren lore got messed up knowing Angel had her powers manifest at 5. but that’s not canon until mentioned in-game, so fuck it: let’s believe Ava is 12 and not evil and is just Maya’s kickass Siren apprentice.
The apprentice Maya was able to find because the Order knew how to track Sirens/determine if someone is going to exhibit Siren powers.
yes, let’s go with that.
So… what’s gonna happen to Maya, then?
I personally believe she’s going to have her powers stolen and used against her. One major part of her powers is that she’s able to ‘Thoughtlock’, which basically brainwashes an enemy to fight for her.
That sounds like it would be insanely powerful in the hands of the Calypso twins, especially since Maya has gotten more powerful since bl2, and tbh I can’t see them wanting to pass it up. Of course it could also be story-breaking, but let’s say they can only have one person ever Thoughtlock-ed at a time and suddenly it’s a lot less troublesome.

so this scene makes me do a big thonk
(also, another reason im thinking this temple area is on Athenas is bc Maya’s there! plus there are triangles everywhere. Triangles… pyramids… iunno. just spitballing)
also idk if this is just cause she’s super teeny-tiny buuuut

im worried i can’t see maya’s tattoos
she’s also entirely focused on the player instead of… oh, idk, the giant rampager right next to her

and idk it looks almost like she’s holding a gun and aiming it at us?
which hey, i wouldn’t jump to conclusions right away because she does have a skill that allows her to heal allies by shooting them
but also… if she doesn’t have her siren powers, then that’d just be like… regular shooting, wouldn’t it? and if she DOES have her Siren powers, why in the hell is she not using them on the giant monster right next to her???
we see her again in the background of this shot

again… tattoos not 100% clear.
she also seems to be taking radiation damage from the rampager! which is good. but also she doesn’t seem to care that much about it.
we can also see her gun here
sorry it was kinda being obscured by the youtube progress bar
but uhhh it’s not looking good.
boy i really hope Maya doesn’t die
we also know it was hinted that Krieg might be making a return! from his voice actor’s twitter:
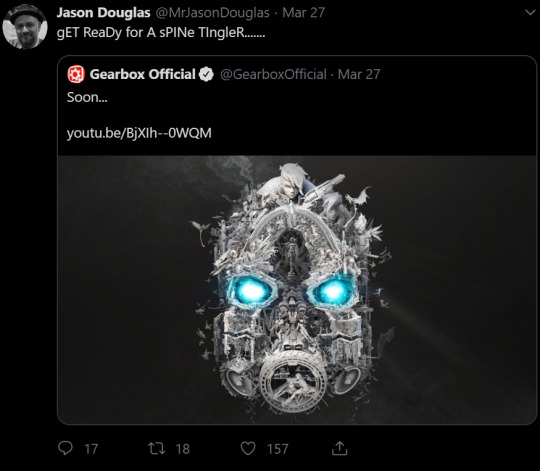
tho, he also soon made a tweet after that was all like “this doesn’t confirm nor deny that krieg is returning” which, yeah i get that.
either way, if Krieg is coming back, it’d be interesting to see what goes down with him, especially if Maya dies. or even if Maya’s ‘just’ in trouble, I could see him going absolutely apeshit.
maybe krieg will sacrifice himself to save maya, somehow. maybe he’s have a moment of pure lucidity and save her. maybe she’ll die and he’ll lose his mind and become a boss battle. maybe she’ll save him and they’ll live happily ever after ;w; who knows~
maybe ava will have heard about Krieg through Maya and will go to get him to try and help save her. that’d be really interesting to see- krieg smashing through a wall with Ava riding on his shoulder lol
anyway, holy shit im exhausted. i gotta wrap this up because it’s like 1am and i’ve been working on this post for like… 3 days straight now. ech.
if maya does die, it would be interesting to see is Ava inherits her powers after we kill the Calypsos. like, would the powers try to go back to their original host? would they see she’s dead and just find another Siren to give the powers to? i wonder if maya dying/being about to die would be enough of a traumatic experience for ava to unlock her siren powers.
ohh it’d be cool if Ava unlocked her siren powers and used them to save Maya from the cult/brainwashing/whatves
alright. im tired lmao
good night.
14 notes
·
View notes
Text
Shortest Day | Lowestoft to Lands End
On the morning Sunday 22nd of December 2019 I found myself watching the gradient of the grey sky gradually change at Ness Point signifying the sunrise on the shortest day of the year. I with a group of similarly minded nutters enthusiasts was about to embark on a ~430 mile ride to lands end to catch the sunset.
How I found myself there starts with a period of time just over a year in which I had gone from ‘L’ plates to a full license, bought a Versys 1000 and joined TVAM and iAM to gain an education in becoming an advanced rider. Which had result in me back in October attending a ‘Look Lean and Roll’ Course in happenstance with Bob Stammers an avid member of the IronButt association in the UK. Who upon hearing that I liked taking a long ride just to catch a sunrise asked what I was upto the weekend before Christmas, some might say I was foolish in replying I had nothing planned.
Some chatting about the details and joining the Iron Butt forum later and I was booking a hotel for the night before and after and working out my plan for the ride from Ness Point to Land’s End on the shortest day of the year. It looked like this; on the 21st ride from High Wycombe to the Premiere Inn at lowestoft avoiding motorways (168 miles), on 22nd ride to Ness Point, then to Lands End, then back to Premier Inn at Hayle (451 miles), 23rd Ride from Hayle to Dibden Purlieu on the Edge of the New forest (212 miles) to spend Christmas with Family. So a nice solid 800mile weekend, with a group of strangers, Bob being the only one I had met before and even him I had only met once...
The 21st came flying round and the day started with a bit of maintenance and getting loaded up before starting the journey to lowestoft in the afternoon. Unfortunately this journey did go quite to plan, when I got to around Stoke Mandeville a lady not paying full attention I suspect in the haze of pre Christmas prep tried to kill me, last minute lurching across the road towards a parking space in front of a shop just a split second before I was about to pass her going the other way. Luckily I had already slowed seeing her waiting to turn and managed to execute a swerve and stop not dissimilar to what you have to perform on your test. My pannier must have missed the front of her car by less than an inch, as I passed here looking in her driver window at the fear and apology in her face which was much to close for comfort.
After a brief moment of putting my heart back in my chest and unclenching I continued my journey, all was smooth until I got about half way and notice that my gear indicator appears to be stuck on 6th and misbehaving. I pulled over to try and see if a reset would clear it but to no avail, the bike up to this point in my ownership had been faultless. Not to worry its only a gear indicator I can ride without it and continued, nearing my destination I stopped to fill up at great Yarmouth not knowing what the petrol station situation near Ness Point would be like the next morning.
This was when the next issue would occur, upon leaving the petrol station I suffered a KIBS error on the dash, the bike then I assume in self diagnostics reset itself twice before I could find somewhere safe to pull over. Although I am glad this cleared the error, I do think that it is not the best firmware feature given that it was now dark and the in doing the reset it also turns off the lights which I was needless to say using at the time. Overall I managed to arrive safely at the Premiere in at Lowestoft get unloaded and comfortable before heading down for dinner where I got to meet a wonderful group of friendly and interesting like minded people before hitting the hay for a good nights sleep.
Early Morning Ness Point
The next morning a flurry of bikes headed down to Ness Point to begin what would turn out to be one of the best days riding I have had, the day was overcast breezy and not warm but there was an feeling of adventure and excitement as we started our respective journeys towards Lands End.
The challenge for this journey was going to be fuel versus time, I had chosen to follow the stock route offered by google maps M25, M3, A303, A30. The tank range on the Versys is good being 21 litres and normally averaging just below 50mpg with my heft on it and the panniers on and fully loaded. I know that I can get 200 miles out of a tank but I am not yet comfortable pushing my luck on the range.
Sunrise was at 08:06 and Sunset was set to be about 16:00, with google saying that the journey would take 7hours and 44minutes it was going to be tight. I knew I was going to need two fuel stops, some of the Iron Butt members can do this in record time by being organised and sequencing there steps but I am not quite there and figured it would take me 15 minutes a stop at best.
This meant i needed to make up some time, this is where the challenge begins, increasing speed means reducing fuel efficiency, you also don’t want to have to detour much to get find a fuel stop with good prices. In my head the night before I had done this maths and planned to try and make it onto the M3 before coming off somewhere near bracknell for fuel.
Th e journey began with most of the bike staying in a group, the roads back to the A1 were fantastic and the scenery beautiful. It was an excellent way to start the day with sweeping country roads and no traffic. The A1 though not my favourite road normally flew by with the cruise control coming in useful for large sections. At this point the bikes had split up with me not seeing another familiar bike until I made it onto the M25. It was at this point I started to get twitchy about fuel, looking back I probably could have made my planned stop off the M3 but nerves got the better of me. I dived of the M25 at the M4 heading London bound and pulling immediately off, I managed to find a petrol station within a mile or so and although trying to be quick this stop probably cost me 25 minutes.
Now with enough fuel to make it to the West Country I cracked on, for the most part the mile flew by only hitting a little traffic to filter through at stone henge. And then to practice my overtaking past in the Blackdown hills. Although not the cheapest I pulled off at the Exeter service for convenience also knowing that once filled up I would be able to to the rest of journey without a further stop. A quick sandwidge and some fuel later and I was back on the road, the A30 although once an interesting road for me has become a little dull having done it so much. It also didn’t help that there was an area of average 40 for a fair distance, though the cruise control and low speed did give me a chance to stretch my hands.
It was around Goss Moor when the storm that had been battering the west of the UK hit again, with a sudden bout of extremely sideways rain and gusting winds. I managed to keep cutting through it and as I got to blackwater the worst had passed and it was easing up, the section from carlands cross to blackwater being one of my favourite sections of road. Knowing I am now on the home straight I feel fresh all of a sudden, a little tired a little saddle sore but somehow fresh like the winds still hitting me.
The last section from Penzance to Lands End though a challenging piece of road especially with the mud and gravel in places I attack with gusto and make cracking progress even getting some overtakes in. Arriving a Lands End with time to spare not the first and not the last...

I walk round the side of the Lands End resort and I am greeted by the sheer power and beauty of nature, the wind pushing me side and rolling the waves into a foam. I walk and take some photos unable to find the rest of the group I resign myself to trying to get the best shots I can on the breathtaking life affirming scene in front of me.

With the resort being shut down for Christmas I realise I am able to ride the bike all the way to the front private carpark, where people are sat in there cars watching the beautiful sun gradually set light to the sky in front of them. The shot above was only just possible I had to dig the side stand into the gravel as the wind was so strong it risked pushing the bike over.

After finding the rest of the group we headed back to the hotel in Hayle for a warm shower a slap up meal and some drinks. Sitting in the bar waiting for a table the conversation was alive with tales of the ride at various stages, with stories of various similar rides and what was next on the calendar.
The next day I slept in had a late breakfast and then headed home, I had emailed Bournemouth Kawasaki on Saturday night and they phone me back Sunday morning. If I could they wanted to get the bike in that day so they could take a look the next day. Which was ideal for me as it was on route to my family destination, I did the ride back as a bit of a tank range eco test setting my target speed at around 68mph, resetting the trip saw the MPG over this journey up at 60. I dropped the bike in on route and they got it sorted over Christmas ready for me to collect at the start of Jan and on the same tank of fuel I did a further ride covering 230 miles on that tank and still no low fuel indicator.
Overall the weekend was a massive success, I saw so much of the country as I rode through it, I made new friends got to see a breathtaking sunset and try my best to capture it. Despite some minor issues the bike lapped up the miles and made this journey so enjoyable and so doable. Looking forward to doing the same next year...
#versys#landsend#lowestoft#nesspoint#shortestday#ironbutt#motorcycling#oberlix#nikon d200#versys 1000#35mm#bournemouth kawasaki
1 note
·
View note
Last Seen Blogs

deeznuts1994
Untitled

porterherry-blog
Untitled

sweet-blue09
Aaaaa Tired

picture-it-up
Picture it up

boy-fre3
Above all Smile!