#ts3 tutorial
Text
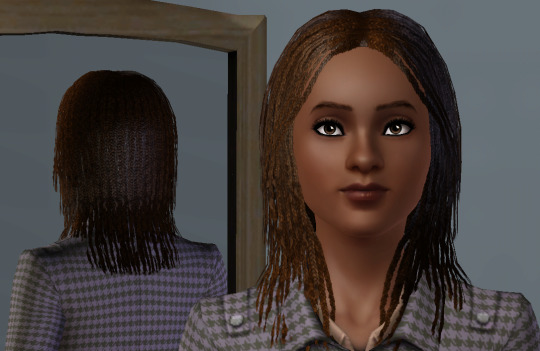
The Sims 3: How to Make your Sims not Ugly! Tips and Tricks for Pudding Face
youtube
Someone suggested a long time ago that I show how I make my sims, so here it is! In this video I basically just go over my personal process of making sims that look more realistic compared to the base game sims. Sliders, facial ratios, cc, and everything else can affect your sims' appearance.
♡ RESOURCES ♡
Download the face sliders I used in this video
Master controller integration (requires Master Controller)
Nosemasks Pack
Blush
Enjoy!
#tutorials#resources#ts3 help#the sims 3#ts3#ts3 tutorial#sims 3 tutorial#s3 tutorial#sims tutorial#ts3 video#Youtube
90 notes
·
View notes
Text
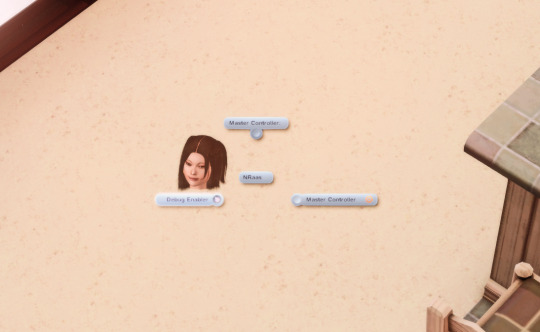
How to summon any (prop) item
I've actually been doing this a lot lately! While @omedapixel 's Debug Objects are a storyteller's help, It doesn't have every prop in it (which is totally understandable, since it's a lot).
However, recently I found out that Nraas can be really helpful for this! Let's say we want to summon a coffee cup...
Requirement:
Nraas Debug Enabler
Click on the ground > Debug Enabler...
2. Click "Options"
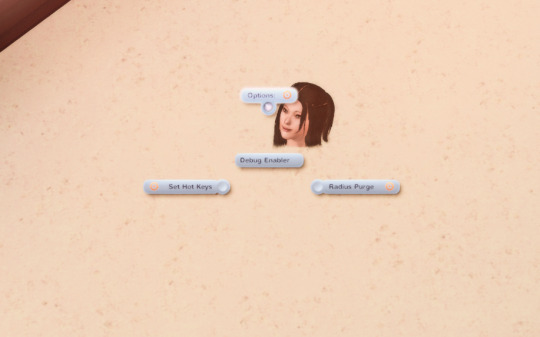
3. Click "Create Object" from the huge list (Should be the second option in the list)
4. Now you see this modal! Great! This is where the magic happens.
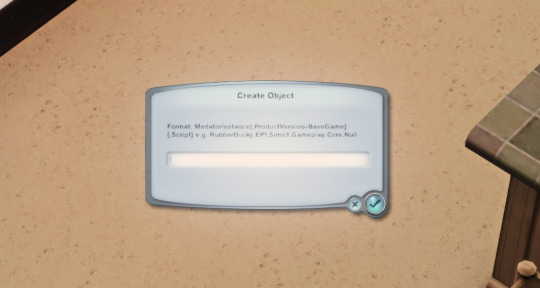
5. For demonstration, i'll type "CoffeeCup" in it.

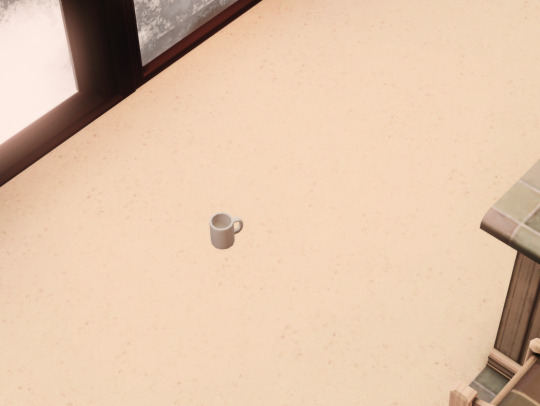
Voila!
"That's cool, but this looks really advanced!"
I've started a list of props you can copy/paste that I directly got either from EA's source code, or from particular packages. All tested, so IU know they work :)
I'll keep updating these too!
List of Prop Names
115 notes
·
View notes
Text
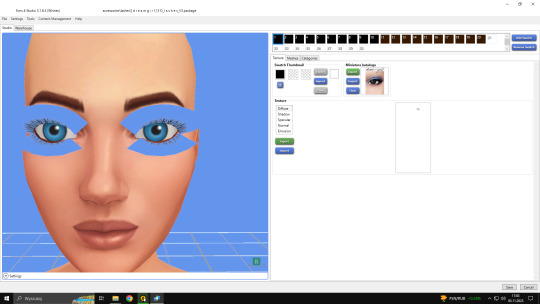
How To Convert Eyelashes
I was asked to make a tutorial on converting eyelashes. Well, here it is. Dirty, badly explained tutorial by Rollo. I'm assuming you know how to work with required programs, it won't teach you the basics, just a process of converting eyelashes from ts4 to ts3.
Requirements:
S4Studio
s3pe
TSR Workshop
Sims 3 Pack Multi-Extracter
These files (full credit goes to @gruesim)
Graphical program that works with .dds files
Let's go:
Open the desired lashes in S4Studio. Export diffuse of the ones you want to convert (you only need the black ones). You can also export the thumbnail. Close the program.
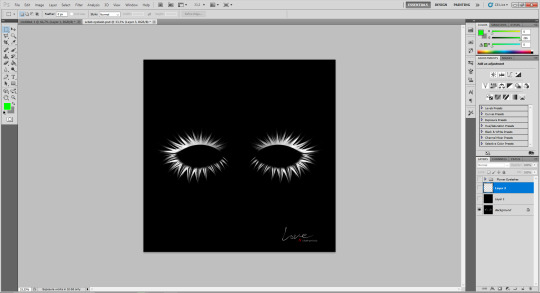
2. Unzip the folder that you downloaded from this tutorial. You will find a .dds files called "sclub eyelash". Open it up in the graphical program. Make a black layer above it and hide it for now.

3. Now open up your ts4 eyelashes file. Start from the upper eyelash, crop it and go to the sclub eyelash.
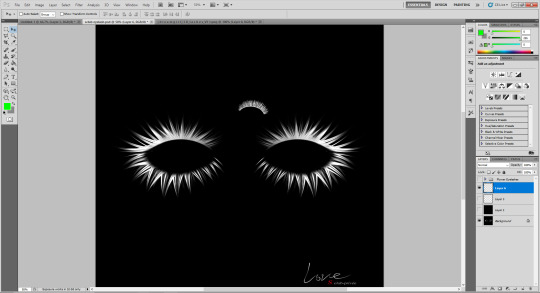
4. Paste it, click ctrl+i, it will make ts4 eyelash white.

5. This is the worst part. You have to make the ts4 eyelash fit to the sclub one as close as possible. Use every method possible!
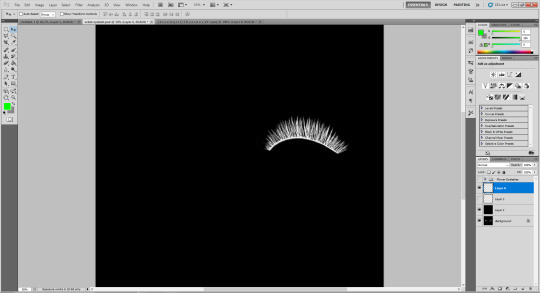
6. Unhide the black layer and see if your eyelash look alright. It may need some sharpening.
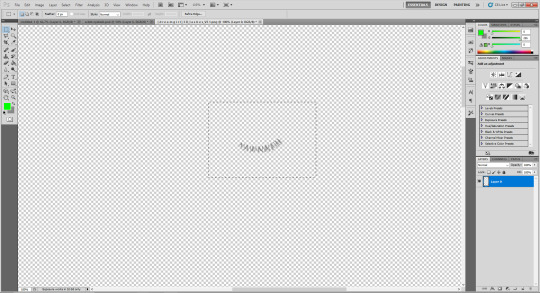
7. Now crop the bottom eyelash and follow the exact same steps as for the upper eyelash.
8. It should look more or less like this. Bottom eyelashes are always harder to adjust and may need even more sharpening.

9. Merge your upper and bottom eyelashes, duplicate the layer. Click ctrl+a, ctrl+t, then right mouse button and choose "Flip Horizontal".

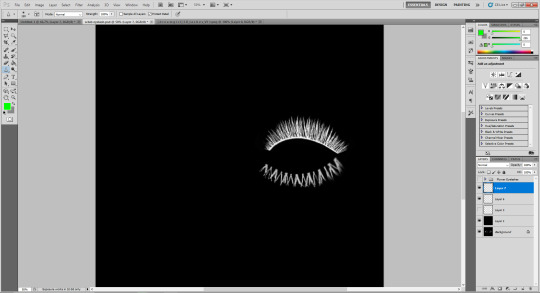
10. Voila. You should have a complete set of your new shiny eyelashes! Save them as .dds. You can close the program. We're moving to TSR Workshop.
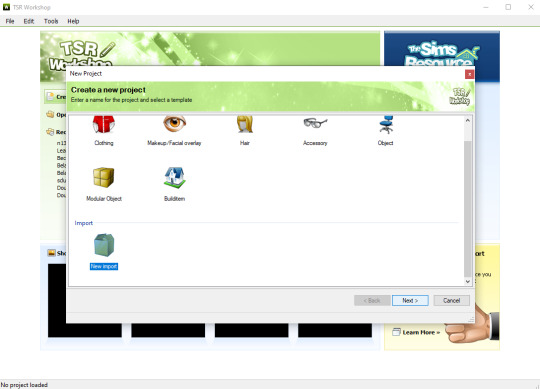
11. New Project -> New Import. Import Eyelashes AFBase from the downloaded folder.

12. Name your project, name your file and click "Next".

13. You should see this. Go to Texture tab and click "Edit" on the Transparency Map.
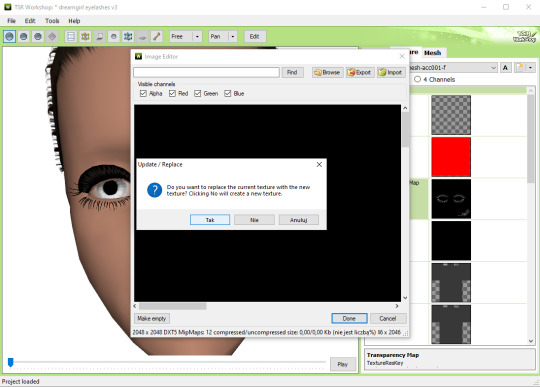
14. Import your eyelashes and click "Yes" when asked.
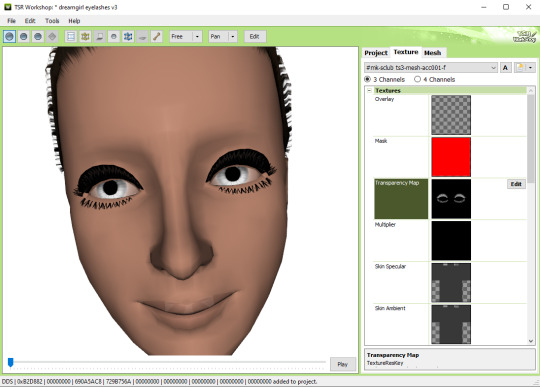
15. You should see your lashes, yay! But this is TSRW, they won't look exactly the same in game, as they look here. If you want a set of eyelashes, add more presets.
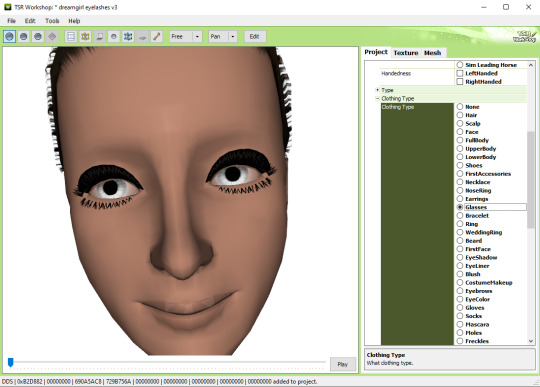
16. Now this is important. If you want to see your eyelashes in Accessories, go to Project tab, Clothing Type and change it from eyeliner to glasses. You also have to do this if you have more than one preset in one file. They won't show up in Eyeliner section. If you want to have set of eyelashes in Eyeliner category, you have to make each preset into seperate file. Also, eyelashes are recolorable ONLY in Accessories section. Don't forget to check Categories section to see which outfit has the eyelashes available.
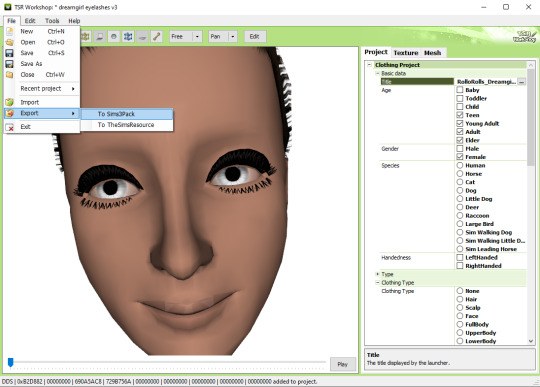
17. Now you're ready to export your file! Export -> To Sims3Pack. Use the Sims 3 Pack Multi-Extracter to convert your sims3pack to package file. We're moving to s3pe.
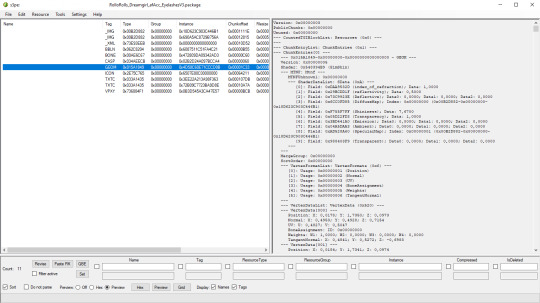
18. THESE STEPS ARE ESSENTIAL! Open up your shiny new package in s3pe. Click on the GEOM with the right mouse button.

19. Click Replace and choose AUID.simgeom from the downloaded folder. AUID is for adults, CUID for kids and PUID for toddlers. We have one more step to do.
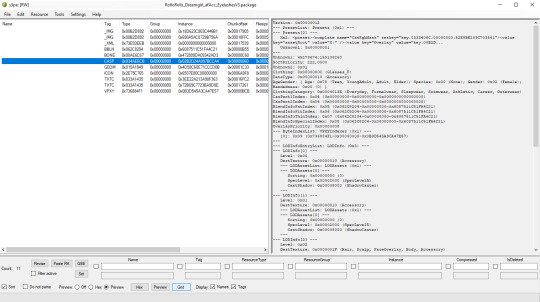
20. Now click on the CASP normally (left mouse button) and click Grid on the bottom of the program.
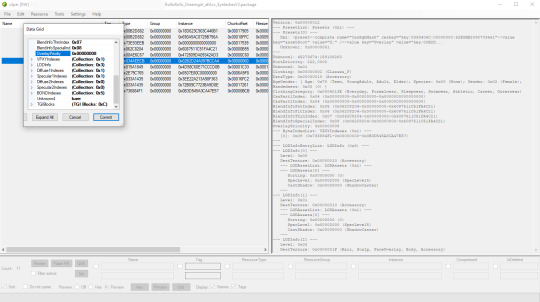
21. A small pop up window appears. Scroll to the very bottom and find a line called OverlayPriority.

22. Change the 8 to 2. This will make eyelashes not being visible through hair that's covering eyes.
23. Save your package. You're ready to test your converted eyelashes in game!

Here they are. Nothing fancy, it was a quick conversion :D They're also compatible with S-Club eyelash sliders ^^
Btw, you don't necessarily have to convert both upper and bottom eyelashes. You can have upper or bottom only. Play with the lenght, not all eyelashes have to be very long. Convert it for males, kids, toddlers. You just have to remember to change the options in TSRW and replace the correct .simgeom file in s3pe. There is a lot of possibilities and you'll probably get better in this than me :D
Good luck! ♥
139 notes
·
View notes
Text
Quickly converting painted-on textures (TS4 to TS3)
i don’t have much to say lol. if you convert clothes to the sims 3, you might find this useful: https://www.youtube.com/watch?v=wMlEVlv9vC0
youtube
i didn’t focus on this, but to make the bake work, you need to select the original mesh, then shift click the final one. should look like this:

works in newer blender versions too
you can also do this with pretty much any mesh, from accessories to objects, if you need to change the uv map and don’t wanna spend ages editing the texture in photoshop
if you have other textures (like normal/specular maps) you can transfer them in exactly the same way (bake them as diffuse too)
hell, it works for any game, not just sims 4
might make a proper tutorial if this isn’t descriptive enough and there’s demand for it — let me know if you need it
125 notes
·
View notes
Note
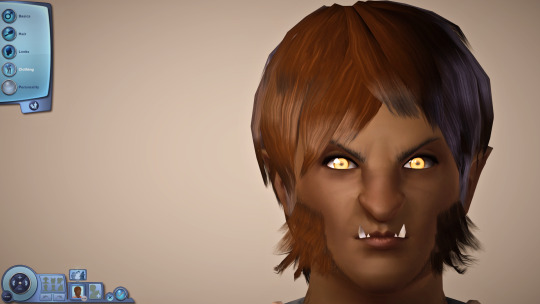
sorry to bother but how do you get your werewolf sims to not have the werewold sim face?
hello! no bother at all <3 and it's not that tricky! you just need to have a nude clothing category! ( also made this on my phone so sorry if it's messy )
for this little turorial, we will use randy. thank you randy for your contribution.

and now turn him into a wolf. you click on transform
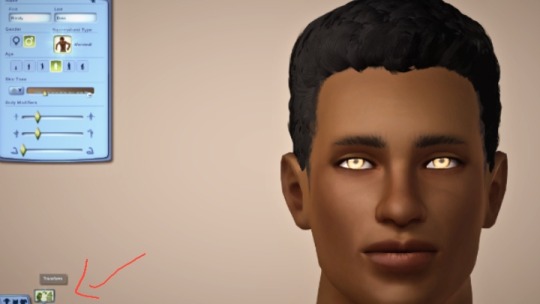
and here we see the ts3 werewolf. how stunning. we will fix that.
click on clothing ...
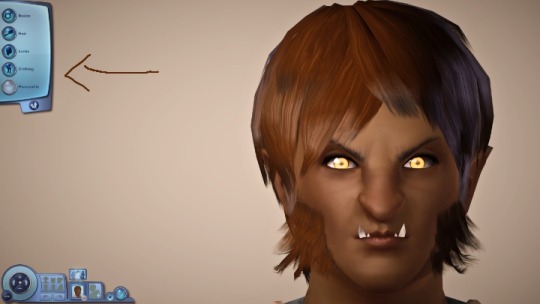
and then naked!
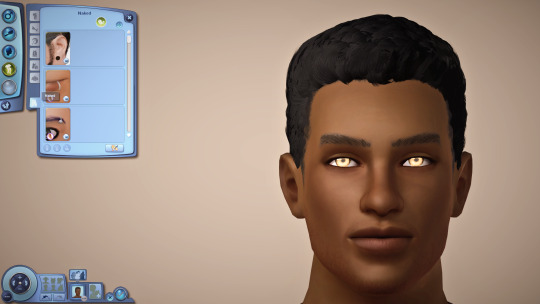
and now you will see randy is turned to his human form!
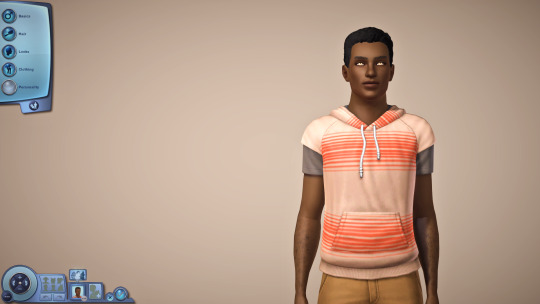
and then just edit him the way you want.

generally, I do keep the resemblance of the ts3 wolf but not too exaggerated lmao. but yeah, that's how you do it. hope this helps! 💕
also note: any changes you make for the wolf form doesn't affect the human form so if you like change their body and wanna keep it for the wolf form as well, you might have to redo it on the wolf form as well. and some makeup that you apply to the wolf form will disappear idk why lmao but yeah.
#ts3#the sims 3#ts3 cas#ts3 tutorial#idk how else to tag this#and im sure there tutorials for this out there already but hey#hope this helps anyway
263 notes
·
View notes
Photo

Have you wanted to make custom food for ts3, but the tutorials were too intimidating? Cause I did, and turns out it’s not as hard as I thought (just time consuming!)
A couple people have asked about making custom food, and I thought it might be fun to create some food together - the plan is to go step by step through the process and you can follow along, asking questions if needed! I’d love for more people to get into creating recipes, i want to see what you all can make!!
i’ll see how many people (if any lol) join the discord before i start. i really hope this will be helpful :) i’ve made a channel already that lists everything you’ll need!
JOIN THE DISCORD HERE
160 notes
·
View notes
Note
hey lovely. i was wondering if you could share the hex codes/the colours you use for nosemasks when you use them for darker skintones? i just saw your recent eye conversion post with a dark tone nosemask and i really struggle with getting a realistic skintone in ts3. if not, that's completely fine and thank you for reading :)
Hey! This was an interesting ask to receive xD That sim is not actually wearing a nosemask, that's just the nose on the skin she's wearing (weird out of context sentence). But when I do put nose masks on this is how I get them to match the skintone...
Ok so here is the skin with no makeup.
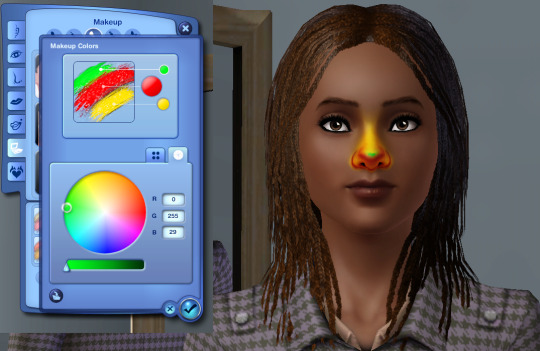
This is the nosemask I picked, the Poppy nosemask by Brntwaffles. I have filled the colours with RGB colours to show the Channels the nosemask has. The green is the Highlight Channel, the red is the Shading Channel and the yellow is the Base Channel.
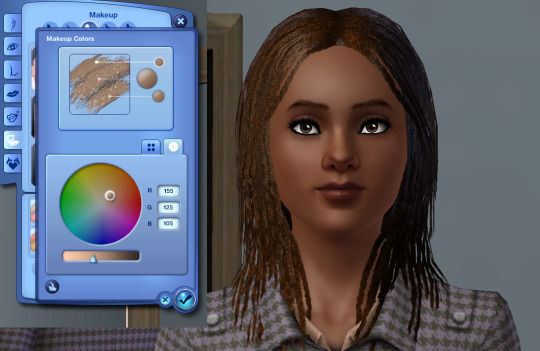
Now we want a fairly desaturated mid brown colour to match the skintone. (For lighter skin you want to go even more desaturated than this.) Depending on the undertone of the skin, more yellow or more red, we want to adjust the colour so it's either more yellow, so it's not too reddish, or more red toned so it doesn't look greenish.
I pay attention to the Base channel first to get that to match the skintone before adjusting the other channels. If you turn the sim to the side you can get different lighting to see if it is matching well.
I hope this mini tutorial helped you!
16 notes
·
View notes
Text
youtube
Hello, I made a thing! In this video I show you my entire converting process from start to finish, and I give some helpful tips and explain some things along the way. Hopefully someone finds this useful and feel free to ask me anything you'd like!
51 notes
·
View notes
Text
On fixing waist seams with Mesh Toolkit
I've had this conversation with a few people so far, and it's happening often enough that I felt like making a post would be useful.
If you come across the issue where using the most recent version of Mesh Toolkit (1.4.9) to make your morphs leaves you with tiny seams around the waist, which only appear when the sim moves, do not despair!
Why does it happen? When exporting, Milkshape rounds out the values of bones, which leads to tiny gaps that aren't big enough to see if you play zoomed out or don't animate the sim in TSRW, but do show up in animations. So it's not that you didn't assign bones properly — it's a software issue!
The main solution is to use Mesh Toolkit version 1.3.0 (which you can find in the same MTS link up there) to fix seams BUT there are a few additional tricks to this:
use a complementary mesh to the one you're fixing e.g if you're trying to fix a bottom, use a top as a reference for the seam fixing.
use EA meshes that you know work well i.e. no weird normals or broken bone assignments. In my experience, the nude ones work just fine. Clone them with S3OC and keep them as GEOMs.
apply the seam fix AFTER you've made all the changes to the mesh. Do NOT reimport the mesh into Milkshape once you've fixed the seams, or it'll be borked again upon exporting, and you'll have to fix them again. Once you've fixed the seams, import your mesh into TSRW and that's it.
In Mesh Toolkit v1.3.0, you can find the option under Bone Tools \ Match Bones at Seams. You can have both versions of Mesh Toolkit installed at once — you can even run them at the same time! (though I don't think you'll need to XD)
That's it! If you have more helpful tips that I haven't mentioned, share them in the comments and I'll add them to the post! 😊
55 notes
·
View notes
Text


Quick tutorial: Positioning a Posing Accessory
@poses-by-bee mentioned an accessory positioning project, and I thought I'd share some things that I figured out over the years.
Open a Blender posing project with a Sim rig. Import the prop into the project. Pose your Sim and use the move/rotate/scale commands to move the prop exactly where you want it. (I didn't do much posing in this example)
If you already made a pose you want to use: Save a backup!
Select the prop first and then the joint you want to assign it to, using Shift+Click. Click Pose / Parent / Bone (and then Bone again in the box that comes up). Now the prop should move with the bone it's assigned to. If necessary, make further adjustments to the pose, or assign the prop to another bone.
Then press Cntrl+A, Alt+R and Alt+G to select all joints and undo all the rotating and moving. The Sim will revert to the T-Pose. Now you have the prop exactly where you need it to convert as an accessory.
[the weird but easy way:] Click File / Export / Wavefront. Open Milkshape. Import the Wavefront, which should be the complete Sim in T-Pose with the prop. Delete the groups that make up the Sim until only the positioned prop is left. Export this as a Wavefront again and make it an accessory. Remember to assign the prop to the bone you chose in Blender!
[the hard way, but sometimes works better:] Take screenshots of the hand front, top and side. Open Milkshape, import a clothing item with arms, for the age-group you want the accessory for. Import your prop and move it exactly to this position. This method is mostly recommended for staffs or swords and the like. It has the advantage that it gives you a tsrw-object in Milkshape in this step already.
Of course there are more elegant ways for the last step, like deleting the Sim already in Blender. This is just what works most reliably for me. It is also possible to copy the positioned prop into a new Blender project, but it took me at least five attempts to get this to work.
When you have made your accessory, go back to the Blender project with the pose, delete the object prop and import your accessory with the ts3-tools in the sidebar. Check if it's still in the position it should be. If necessary adjust the pose or the accessory.
56 notes
·
View notes
Text
youtube
Sims 4t3 Clothing Tutorial: How to Convert Meshes That Are Half Painted-On Texture and Half 3D
So I made this post about a month ago wondering how to convert meshes that aren't fully 3D. Well it looks like I answered my own question! It basically just involves merging the vertices as well as welding the UV Map in blender. I hope this helps those who were wondering about this too!
@katsujiiccfinds @sims3tutorialhub @pis3update
(also tagging @elvgreen bc I know you were curious about this lol)
100 notes
·
View notes
Link
Sandy’s guide to Arsil's Generic Food Maker

119 notes
·
View notes
Note
Hi, I love the eyelashes you have converted to ts3 but I'd want to have them in the eyeliner category. Do you know how to convert them into eyeliners and if you do, could you explain it?
Hey :) I'm glad you like the eyelashes. Yes, I know how to change their category to eyeliner. It's quite tedious and repetetive process. That's why I never got myself to do it, lol. I'm okay with them being accessories. Also, changing category to eyeliner makes them uncolorable.
Anyway, what you need to do is to export each preset seperately, then import it to TSRW (each as new project!), change category to Eyeliner and export it. After that you need to follow the steps 18-23 from my tutorial for each package. Good luck! If you have any more questions, don't hesitate to ask!
21 notes
·
View notes
Text
How To Fix The Sims 3/Medieval On Newer Intel Processors
youtube
4 notes
·
View notes
Note
will there be a safe file coming for pine spring island?
As I said in the original post (under creator notes), I won’t create a population for PSV, even if it’s in a save file (or, I should say, especially if it’s a save file).
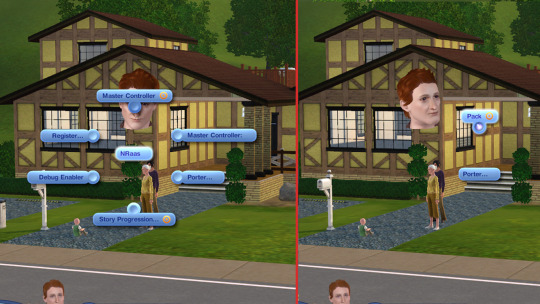
But -and maybe it can help you- here’s how I set up unpopulated worlds with the use of Nraas Porter (I have no idea how many simmers use this mod, but it's an amazing tool to quickly have a populated town ready to play). You can pack/unpack an entire population with a few clicks and have the benefit of maintaining the existing relationships between households.
Mini-tutorial time:
Let's say you want some of the population from Sunset Valley (SV) in Pine Spring Valley (PSV).
Load up a new game in Sunset Valley. Once you get in live mode, pause the game (extremely important), click on the roof / walls of any occupied house and choose Nraas -> Porter -> Pack.
2 The mod will open up a new window listing all the households in town
Choose which households you want to have in your new town. For PSV I'd say you can save up to 16 households which is okay, since Appaloosa Plains has 17 in total (16-18 households is the medium amount of households required for a normal gameplay in any world, regardless of the size of that world).
Also, DON'T choose NPC households like Alien Household or Mermaid Household. These will be generated by the game once you start playing in the new town.
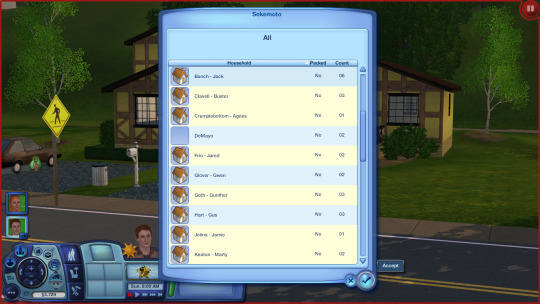
3. After you made you selection, a new window will pop up listing all the sims in the selected households (with names and portraits). Click "all" or select them individually. It’s good to pack up full households though.
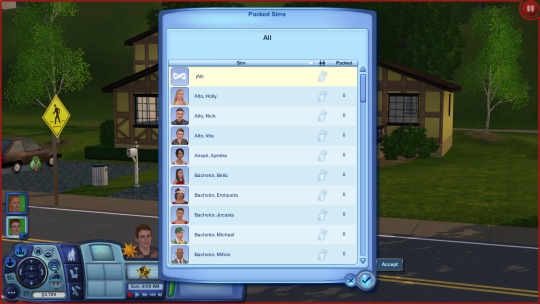
4. You’ll be asked to give a name to the new household. I named mine SV_simmies.

5. Now the mod will start packing up the selected households (for me it took about 5 minutes for the packing to be done, but depending on the size and number of the households the duration will vary).

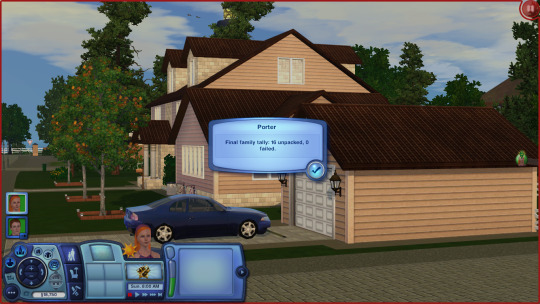
6. You'll get a message at the end saying that the process has been successful.

This is how the Porter’s saved household looks like in the library:

7. Load up Pine Spring Valley.
Move anyone in town, preferably on an empty lot so the houses will all be available for Nraas Porter to fill them up. The sim(s) you just moved in can be removed afterwards anyway.
Or you can move in the sims you want to play if you already have them, and in this case there’s no need to remove anyone.
8. Pause the game!!! Click on the roof / walls of any empty house and choose Nraas -> Porter -> Unpack and select your saved household from SV.

9. Wait for the unpacking to be done (usually. 1-3 minutes).
At the end you’ll get a pop up telling you how many households have been successfully moved in or failed (rarely the case, given that you have enough houses in the world).
You’ll also get notifications telling you which household moved into which house.

If needed, now you can “Anihilate” the sim(s) you first moved in or go in Edit Town, evict and then delete them (my most preferred method of removing them / haven’t encountered any issues so far).
* You should also check in Edit Town if the houses are suitable for the amount of sims in each individual household (I had a family of 6 being moved into a starter, for instance...repeatedly). Move them around by evicting and moving them into a new house. I’m saying this because if you use Nrass Story Progression they will be audited (if the option is enabled) and will require a proper house later, during gameplay.
** Another advantage of using Porter is that your packed population will stay in the library and can be used over and over again with new unpopulated worlds. Unless you delete it (the same as you would delete any other household saved via game, if anyone was wondering).
Additional tips for safe porting:
1. If you decide you want to move your population after a while of playing in a world to another one:
Sims across town will fill up their “pockets” with all kinds of things so it’s advisable to clean up their inventories after porting them. Not to mention that Porter will also save their fridge inventories (cooked food and ingredients), just like the game does for individual households. So you may end up with hundreds of eggs, tomatoes and apples in the world.
Under City Hall -> Master Controller -> Town -> Object Stats ->Inventory you’re going to see the current inventory of all the sims you’ve just ported. You can delete/flush from here things you don’t want. DO NOT DELETE THEIR PHONES!!!!!!!!! (it will lead to corruption). Additionally, the books and toys you’ll see in this list include the items from bookshelves, toy boxes as well as sims' pockets. The bookshelves will be replenished if you happen to delete the books, I’m not sure about the toys since I never delete them.

2. You might save households containing tombstones (like I did here with the Goths)
The tombstones will always be placed in the mausoleum upon porting so you can send one of your sims to the graveyard to get them out of the mausoleum and place them down or inside their inventory.
OR
Under City Hall -> Master Controller -> Town -> Manage the dead the mausoleum will open and this will allow you to retrieve the tombstones.
3. The house you clicked on to unpack your population will always retain the household’s name you gave it when saving via Porter, in my case: SV_simmies. You can check which household has been moved in there with NRaas MC or Edit Town and rename it accordingly.
To rename it with NRaas MC: click on the house and select NRaas->Master Controller->Change Name.
That’s about it.
Safe porting & happy simming!
49 notes
·
View notes
Text
How To Make Default Replacement Eyes - The Sims 3
What you will need:
Photo editing software that can edit DDS files.
S3PE.
Creating an eye default means editing three things; the sclera/face overlay (which is optional), the iris texture, and the alpha channel (allows for transparency).
I don’t know how to make an eye default from scratch so I use a pre-existing default as a base and just replace the files inside.
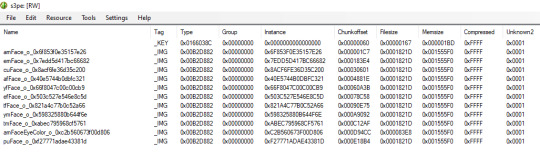
Looking inside an eye default file will look like this ⬆ . The am/af/em/efFace files are the overlay images containing the tonge, teeth, sclera and eyelashes which can all be changed. The amFaceEyeColor image is the iris texture itself which needs to be changed to make a new replacement.
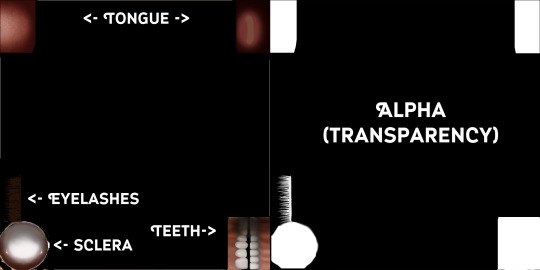
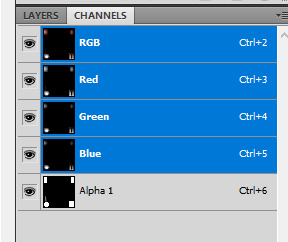
This is what the overlay file looks like. ⬆ On the left is the actual texture, which is what you will see when you first open the file. On the right is the Alpha which controls the transparency of the texture. You can see the Alpha channel when you switch the the Channels tab next to the Layers tab in photoshop.
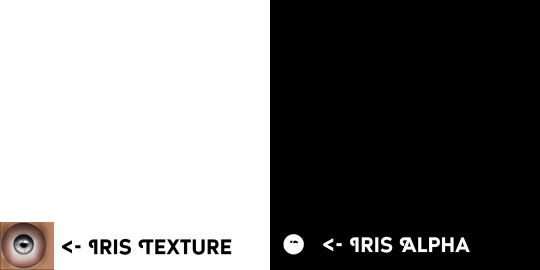
This is what the Iris texture looks like. ⬇ On the left is the Iris texture. On the right is the Iris Alpha; the white is visible and the black is invisible. So by painting the highlights on the alpha in black, by clicking on the alpha channel to edit it, you can make those parts unaffected by the colour wheel in CAS, so they remain white while the iris changes colour.
Let’s make a new eye from a royalty free photo I found on google.

Let’s cut the iris texture out of this photo so we can edit it. I use the Eliptical Marquee Tool to circle the iris, then the Transform Selection tool to more precisely cut it out, then Layer via Copy.
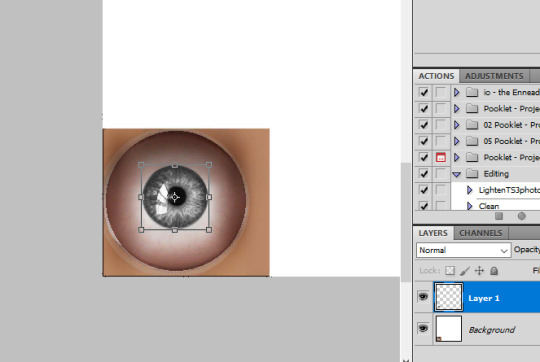
I then desaturate the eye, adjust the contrast/brightness to my liking, and then copy and paste the iris onto the DDS file we’re working with. Initially the iris may not be the same size as our base eye so you can transform and scale down the iris to fit. You can make this eye as big or as small as you like, but sticking to near the EA eye size will yield the best results.
Now duplicate your Iris layer and paint it white using the alpha lock to keep it within the selection of our iris.
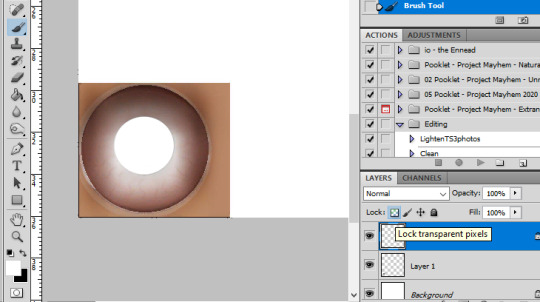
Now CTRL + A which will select our layer and CTRL + C to copy it. We will now switch over to the Channels tab to edit our Alpha layer. Once you have selected the Alpha layer in the channels tab we paint the entire layer black and paste our copied layer.
Now you should have a white circle where your iris texture is, to check this tick the small eye icon to the left of the RGB channel, This will show us what the game will read. i.e the white circle on the alpha will let our iris texture be visible.

We can see that the alpha is correct, now you can go in with a small black brush and paint over the catchlights you can now see because the RGB channels are visible.

Save as a pdf first so you can change things later if you’re unhappy with how it looks and then save as a DDS file that can be imported into the default eye file in S3PE.

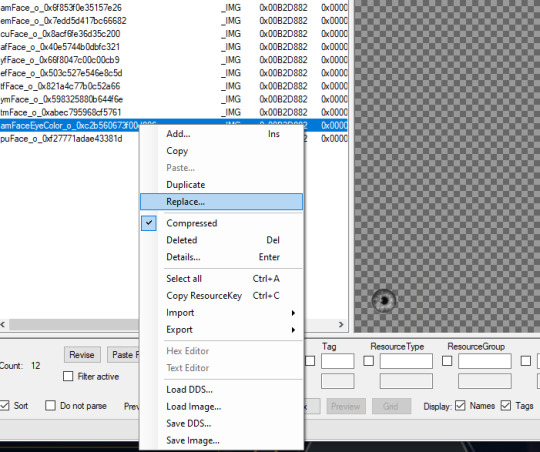
Finally open you default eye package using S3PE and replace the relevent files. Replace the amFaceEyeColor IMG file with our new DDS file containing only the iris.
And if you want, and you picked a base file with an overlay included, you can replace the overlay IMGs with your preferred sclera. If you like EA’s sclera you can pick a base file without an overlay.

Now save your package and run it through the compressorizorRedux. Your new default eyes are ready to be put in game!

33 notes
·
View notes
Last Seen Blogs

hafiesyatembam05
Untitled

profanada
Serendipia.
chumtoad-central
Everyone Loves Chumtoad

ambenatural
Ambe Natural

neep-neep-neep
neep