#sims tutorial
Text
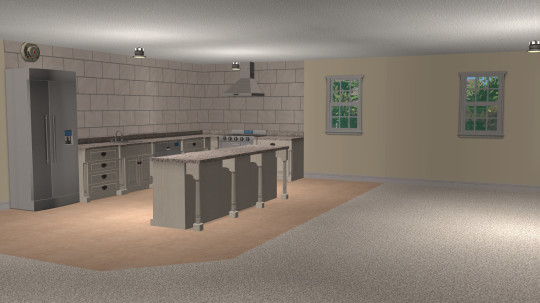
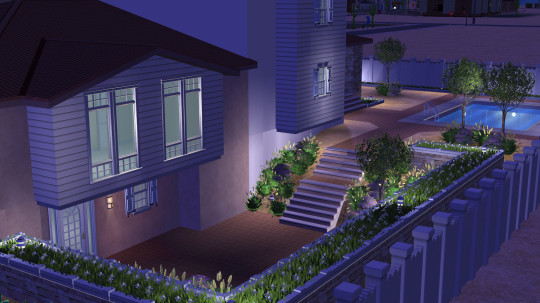
PXL'S Anatomy of Screenshots
So you want to take better screenshots? There are multiple factors to consider, and if you don't enjoy tweaking reshade settings for every image, my ultimate method may not be for you. That being said, there are tips and resources in this guide that are applicable to everyone and you can select to explore those that are useful to your specific situation.
Disclaimer: I am not claiming to be an expert, nor am I offering to provide troubleshooting on an individual basis. This is a general guide and if you are unfamiliar with any of the concepts, please use the mighty power of the internet to find tutorials. I promise everything that I have learned over the years has been published and documented a thousand times better than I ever could.
There are five factors to address:
Your computer's inherent capabilities
The game's limitations
The mods you're using
Reshade
Post Processing
Graphics Card Settings & Drivers:
Become familiar with your graphic options. If you don't have a dedicated graphics card (i.e. a desktop or gaming laptop, these features may be unavailable and you should skip.)
I have an AMD Radeon Pro card which is designed for workstation level systems. It's overkill for sims, but useful for 3D rendering and modelling work. I have changed the following settings for DirectX 9 applications:
anti-aliasing - enhance application settings
anisotropic filtering - enabled
anisotropic filtering level - 16x
texture filtering quality - high
surface format optimization - high
Consider overclocking your graphics card to unlock it's full potential. DO NOT pursue this venture unless you are ok with the risk of burning out your card prematurely. I use at present, overclocked Bootcamp Drivers from BootcampDrivers.com obviously, if you're not playing on an intel based mac through Bootcamp, this is irrelevant to you.
None of these settings are useful until you address the default games limitations, which leads nicely into the next factor.
Addressing The Sims 4's Graphic Limitations:
Everyone should be familiar at this point with lighting mods, 4k, textures, disabling ssao, etc. but, I'm still going to spell it out. None of this is new information and has been covered many a time by various players ad nauseum.
remove ugly blue toned lighting in the world by choosing a lighting mod from @softerhaze here
overhaul your graphics.cfg file (i use a custom blend with features specific to me), however @simp4sims has done a ridiculous amount of work in providing a simple to install file that can be found here - read through their tutorials!! they have provided an excellent oversight of exactly what this does and why it matters
improve the indoor lighting for your sims - previously i used @luumia's no blu, no glo - recently i switched to @northernsiberiawinds better in game lighting mod here, though i have tweaked some of the settings to suit my own personal preferences
i don't use the HQ mod, i don't find that it makes enough difference for the amount of effort it requires to convert CAS CC
It should go without saying, but tweaking your graphics config file is absolutely useless if you can't play TS4 at it's maximum in game graphic settings!
The Mods You're Using:
Now that you've put in all this work into getting the game ready to make use of quality mods where do you start? Well, the CC you install matters. Whatever your preference, whether it be maxis-match, alpha or somewhere in between, priority should be given to using items textured in 2k or 4k resolutions, and specific attention should be paid to using wall and flooring textures with bump maps, and or high quality resolutions (this is important later for reshade if you intend to learn about ray tracing).
I will separately post a guide to creators with crispy textures because that is it's own novel.
Reshade:
Phew. Still with me?
There are many many many reshade presets out there, most are alike, but none employ ray tracing, and that is because a) it needs to be manually adjusted for every screenshot, b) they are paid shaders, and c) this requires advanced knowledge of reshade and a decent enough graphics set up that won't overheat - games running native ray tracing recommend a minimum VRAM of 8GB (please note RAM and VRAM are not the same) - i therefore do not recommend pursuing this option if your system does not meet those minimum requirements.
Start here to understand what ray tracing for reshade is. In my opinion, the shaders are well worth the price of $5 for the amount of work that has gone into creating them by the talented Pascal Gilcher. That link is a comprehensive starting point into expanding your knowledge of reshade and it's capabilities.
I have always created my own reshade presets from scratch, and while the core colorization settings I utilize remain largely the same, using ray tracing and re-light means every screenshot needs to be manually adjusted (lights repositioned, bounce and AO factors adjusted, etc) before being captured. @pictureamoebae just published a very timely post discussing the re-light shader and you can read it here.
Post Processing
Reshade does 99.99% of the work that traditionally would be accomplished in a photo editing software like photoshop. Occasionally, I need to adjust exposure manually, add depth of field manually, or color correct. Beyond that I use it to scale images to fit the resolution and file size limits of various platforms. Conceptually this reduces the amount of uncontrolled loss encountered when platforms like tumblr auto compress files that are too large. In reality, tumblr still makes images crappy compared to how they appear in my file folder.
optimize your images for various social media platforms using this guide
fix exposure or colorization issues using a software like photoshop
I hope that this gives you a starting point into expanding your methodologies. My process is continuously evolving and I find this aspect of the game most entertaining. For others who don't enjoy this process, it's probably not worth it!
Thanks for reading ❤ PXL
273 notes
·
View notes
Text
A small cc fix tutorial
Have you ever used some eyeshadows and thought "Oh cute this would look great with a chunky eyeliner on top" only to find that the eyeliner goes *under* the eyeshadow? Well, guess what you can now fix that!
Get yourself to s3pe and go into the casp tag of your eyeshadows and eyeliners. A normal overlay priority for eyeliner (based on my research) should be:
OverlayPriority: 0x00000082
Whereas the eyeshadow should be:
OverlayPriority: 0x00000064
HOWEVER! If you want to use eyeshadows with the basegame eyeliners you would want to set your eyeshadow priority to something like 0x00000030 which actually worked in my testing. (whoa the base game eyeliners are useful now).
Of course you could also get @potatobuttcheek 's default basegame eyeliner replacements but be aware you will have to change the overlay priority on them to (82).
If you go through your makeup cc and you see an overlay priority for eyeliners and eyeshadows with different values than the above, especially if your eyeshadow has an overlay priority of (82) then that eyeshadow will go on top of your eyeliner (no bueno). Here's how to fix it!
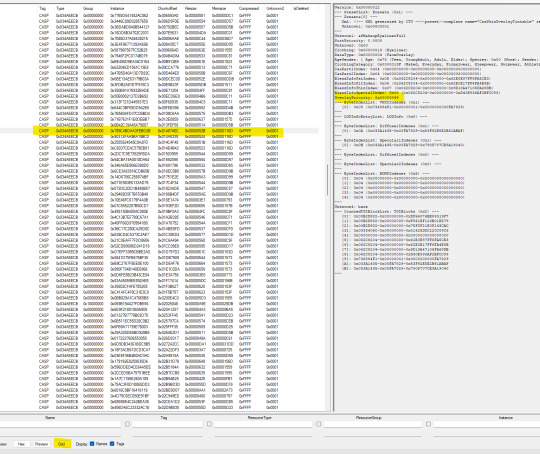
In this example the eyeliner has a value of 46 so it'll show up under the eyeshadow. Click on the Casp you want to change. Click Grid below which will bring up a window.

Simply change the values on the Overlay Priority then click Commit. That's it! Save your package (merged package in my case) and voilà!
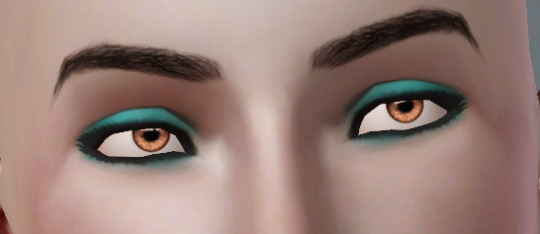
Here's a picture of Ariana (by @cozygirlsimmer) with a Praline eyeshadow that was always overriding eyeliners and the after using a Gosik eyeliner on top that was always buried behind eyeshadows.


Here is an eyeshadow (by @sehmulated) which has an overlay priority of 0x0000005A (same as blush) that I manually changed to 0x00000030 for testing with a base game eyeliner.
Now I'm off to download more makeup! Toodles!
132 notes
·
View notes
Text
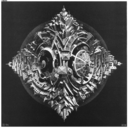
How I draw: Silver Metallic Buttons for Sims 2 Textures
As we all know, Sims 2 doesn't really appreciate large file sizes/dimensions for it's textures, so sometimes you have work very closely with the individual pixels. Here is how I draw buttons. Video is sped up so don't feel like you need to draw as fast as me!
Side note: this tutorial is created on the basis that you already know how to use the basic functions of Sims BodyShop to extract the texture file. There's plenty of tutorials out there explaining that so please don't ask me to clarify on that part. Anyway, on to the buttons...↓↓↓
What you need:
A PC
Digital Drawing app (like Photoshop, Krita etc)
A Graphics Tablet with pen - you could try this with a mouse but I wouldn't recommend!
And obviously Sims 2/Sims 2 BodyShop
First off, create a new layer - we don't want this button permanently stuck to our base texture. Then I get a standard hard edge brush (I use Krita as my drawing software, so just use whatever hard brush is available in your preferred software/app). Because I'm making relatively small buttons, I make my brush 7.09px in size. Select a mid to light grey colour as the base. Make a single circle.
Then decrease the brush size to be nice and small. As a comparison to my 7.09px circle, I decrease to 0.01px for this next step. Choose a slightly darker grey colour and lightly sketch in a 'semi-circular line' about 3/4 of the way around just in from the edge of the circle. By lightly sketching - and not pressing down hard, you'll get varying tones on each pixel to represent different reflections on the 'metal'.
Next choose a darker grey again, and lightly sketch around the similar area as the last colour, but don't be too fussy on hitting the same pixels - we want varying tonal values for our shadows.
Then choose white and lightly sketch the 'catch light' part of the button. This doesn't need to be right in the centre, in fact it's better if it's off to the side, or towards the top more. We're not always facing directly towards a light source so this creates a more realistic lighting effect. You'll see me select the same mid to light base grey I used just to lightly dust over the edges of the white area to soften it a tiny bit (only do this if your white edge is a little to crisp).
After that I go back and forth between a few different tones of grey to lightly sketch over the parts we haven't really drawn on yet. This just helps create some gradual shading that enhances the 'roundness' of our very flat, very 2D button texture.
Once you're happy with the shadowing (remember it looks somewhat janky this close up, but you can always zoom out to see if the button looks more smooth when further away), you can then make another layer, and drag it below your newly made button layer in the layer menu. Select a soft edge brush and increase the size to slightly wider than your buttons overall size (I chose 9.14px compared to my 7.09px button)
Choose black from the colour wheel/palette and lightly build up the shadow underneath the button, gradually increasing size and opacity until desired tone. If the colour of the 'garment' in this texture is light then keep the shadow to a minimum, if it's dark then the shadow needs to be deep enough to show up.
Zoom out and inspect how this button looks further out. If you're satisfied, then merge the button and shadow layers together, copy/paste it as many times as needed for the garment you're texturing and Voila! You made buttons for a Sims 2 Texture!!
Feel free to ask any questions below - I'm definitely no professional, especially in creating tutorials so I'm more than happy to clarify if something didn't make sense.
#sims tutorial#digital drawing#retexture#drawing tutorial#ts2#the sims 2#digital art tips#lraerosesims#lraerosesims-tutorials
86 notes
·
View notes
Text
The Sims 3: How to Make your Sims not Ugly! Tips and Tricks for Pudding Face
youtube
Someone suggested a long time ago that I show how I make my sims, so here it is! In this video I basically just go over my personal process of making sims that look more realistic compared to the base game sims. Sliders, facial ratios, cc, and everything else can affect your sims' appearance.
♡ RESOURCES ♡
Download the face sliders I used in this video
Master controller integration (requires Master Controller)
Nosemasks Pack
Blush
Enjoy!
#tutorials#resources#ts3 help#the sims 3#ts3#ts3 tutorial#sims 3 tutorial#s3 tutorial#sims tutorial#ts3 video#Youtube
90 notes
·
View notes
Text
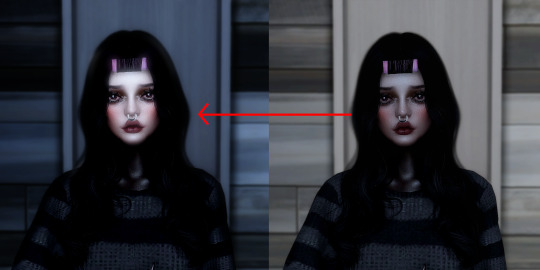
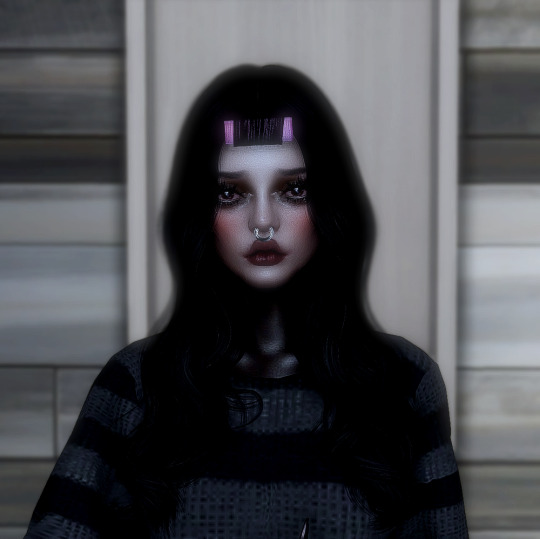
So I recently found a way to lighten up my sims whenever I take a screenie or do a render and it’s SUPER simple. I had to share! All you need is either gimp, photoshop, etc.
Here’s my original pic:
now we gonna enter gimp!
add a new layer (make sure it’s an alpha layer)
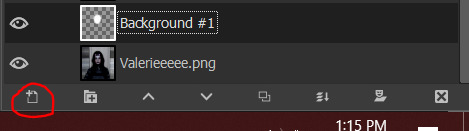
make sure the new layer is set to “soft light”

now go into paint

select a fuzzy brush and the color of your light. I chose white.
now paint over your sim’s face and/or body then go under filters -> blur -> gaussian blur (to your liking, I tend to go pretty high) and you’re done!
final pic is doing soft light on the background (color black and another layer is blue) and also gaussian blur on the background as well with erasing my sim so she’s unaffected.
#tutorial#gimp tutorial#ts4 tutorial#sims 4 tutorial#ts4 edit#ts4 screenshot#ts4 screenshots#sims 4 gimp#sims 4 tut#sims tutorial
136 notes
·
View notes
Text

Sims 4 | Hair Meshing Tutorial From Scratch | A step-by-step guide to make hair in TS4
okay so this is the meshing tutorial i was talking about!! In this video, I will be creating a hair from scratch (finished product) and bookmarks will be in the desc for the different sections of the video if you want to skip. This tutorial is mainly recommended for people who know their way around blender but I absolutely encourage beginners to do it aswell :D
Things you will need:
Blender 2.79
Sims 4 Studio
A photo-editing software (optional, if you want to edit textures)
CMAR's CAS tools (optional but good for checking the hair without going into the game yet)
Keep in mind that this tutorial focuses on Maxis Match-style/Clay hair.
It took me a few weeks to make this video, so I hope that I thoroughly explained! If you have any questions, send me an ask or a message.
Below the cut will be additional sources of info for cc making that helped me understand the workflow. Thank you all for the constant support!!
Consider donating to my ko-fi if you liked this tut!
Tekri's Guides
what is uv_1?
what are weight paints?
what is the bump/normal map?
what is the spec map?
what is vertex paint?
the foxbury institute
#sims4#sims tutorial#ts4#blender tutorial#sims#thesims4#the sims 4#thesims#sims 4 tutorial#simblr#tutorial#blender#tut#sims 4 cc tutorial#sims 4 cc hair tutorial#resources#my tuts
826 notes
·
View notes
Text
youtube
Speed Mesh #10 - Mya Hair:
Haven't uploaded a speed mesh in years, but when I saw a lot of interest in them I decided to give it another go! This hair is not currently available for download, it's part of a collection coming in September. Hope you find the speed mesh helpful - I included timestamps in the description so you can see what I'm doing in each part!
#r#youtube#ts4#s4#ts4cc#ts4mm#s4cc#s4mm#ts4 youtube#s4 youtube#ts4 speedmesh#ts4 mesh#ts4 tutorial#sims tutorial#maxismatch#sims4#thesims#Youtube
92 notes
·
View notes
Text
MySims Em*lation Tutorial
Are you like me and really nostalgic for the old Sims games? Then this tutorial is for you!
Note: these are for the Wii versions of the game which take a little bit more to do with configuring the wiimote. I am using my xbox one controller, but you can use a slew of other ones or just mouse and keyboard. Tutorial below the cut!!
Download the latest version of Dolphin here
Find a ROM of either or both games (I cannot link them cause my post and shit would probably be reported)
Load up Dolphin
For graphics and config, you shouldn't have to change too much unless your game is running oddly (due to a lower end pc/laptop)
Controllers: THIS PART IS SUPER IMPORTANT I recommend these settings
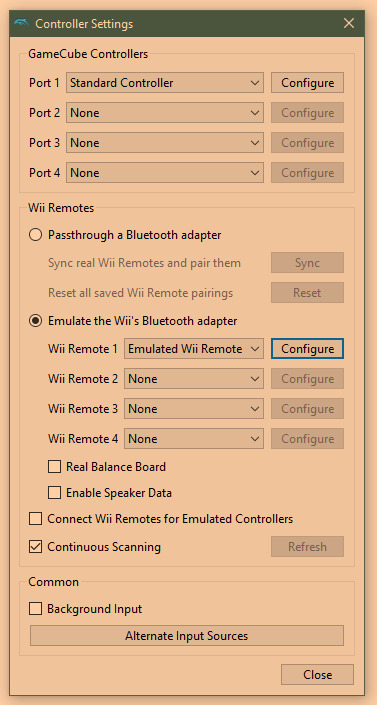
Click configure next to emulated Wii Remote (sorry it's dark flux was having a fit lmfao)
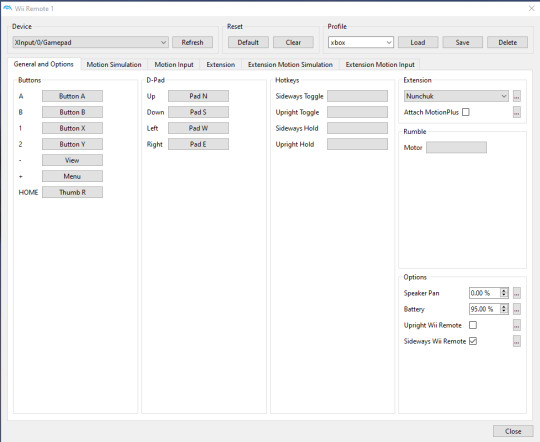
make sure you tick extension: nunchuck otherwise it won't work!
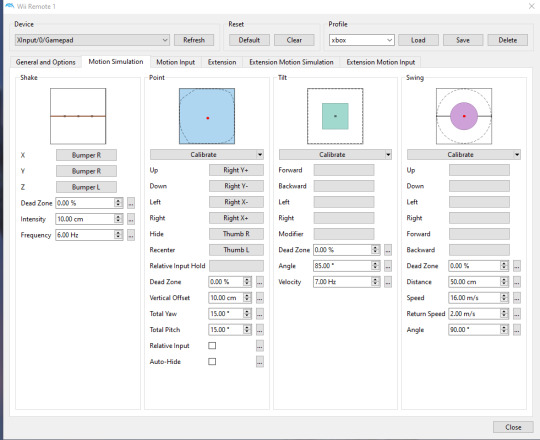
under motion simulation it's necessary to have something for shake (I used Rt bumper), and point. These settings are what work best for me! You'll click the little box and map it with your controller or m+k.
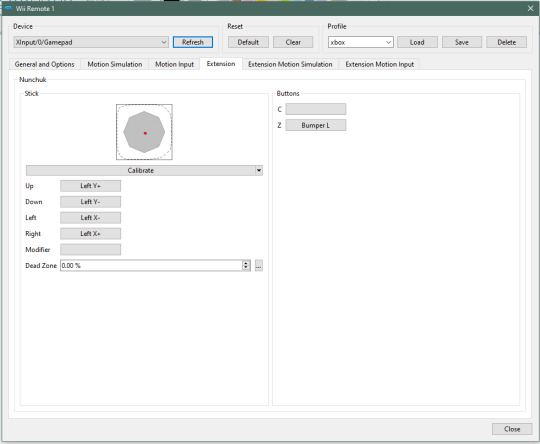
Under extension, this part with simulate the nunchuck so I found these settings worked best for me.
Now that everything is mapped, you should be able to load up your game and play!
You'll unzip the ROM and on Dolphin hit open and look for your downloaded game. Have any questions? My ask box is always open!!!
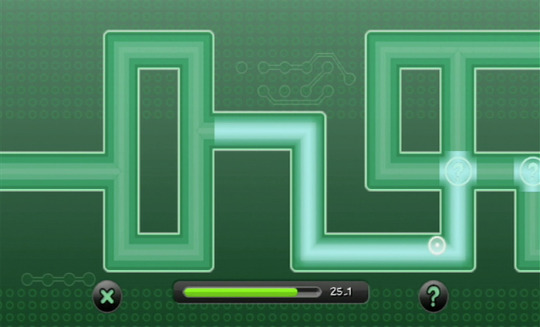
PLEASE NOTE: the hacking minigame in Agents is really difficult with controller, or for me it is cause I have shaky hands, so I went to my mouse and just used that for that portion.
You will go under here to just use it right quick then switch back to gamepad

And there you have it! I hope y'all find it helpful!
ALSO: you can take screenshots and they'll be in your folder like this 😁

#mysims#mysims agents#mysims kingdom#sims tutorial#emulating tutorial#reblogs are appreciated to spread the word 💕
93 notes
·
View notes
Text
Basic Sims Blender Render Tutorial
Rendering seems like an intimidating process to many, and a lot of Simmers feel like they're in the dark and lost about where to even begin with rendering. And gatekeeping definitely doesn't help anyone!
This no-frills tutorial's not entirely comprehensive and assumes that you know some basics of Blender (how to move around, and switch tabs, and use basic tools). It's also not an absolute, perfect tutorial. My shaders and techniques are not perfect at all, and there are many other creators who have way more advanced rendering skills than me, but these are the steps I take for my current renders and they work for beginners. It's also great because it prevents you having to go back into CAS and redoing the Blend setup each time if you want to keep making renders of the same Sim.
GOOGLE SLIDES TUTORIAL: https://docs.google.com/presentation/d/1qI84QstCfa7E-F6b7qzRPuHW_eou_N4d/edit?usp=sharing&ouid=109770128121660962892&rtpof=true&sd=true
Please let me know if anything's missing or confusing. I won't be able to help with every issue (as Blender brings forth many), but if you have a question about something you see in my tutorial in specific, feel free to shoot me a message! Also, if you are one of the more knowledgeable creators, def let me know if there's anything I can do to improve or something I should add to the tutorial.
Thank you to all my friends over the last two years who helped me learn how to render! And to the Simmers who aren't gatekeepers and find the same joy of sharing with the community as I do. I'm also grateful to Simsonico for their Youtube Tutorial, which I recommend viewing.
If you're hesitant about trying out renders, know that I was too. Renders allow for more creative compositions and item placements. They also create higher quality pictures than in-game. The only downsides are the time it takes to render and set up everything and the fact that pretty much all Blender scenes are atrociously perma-paywalled. This isn't an issue if you want to build your own scenes or greenscreen, though! I recommend trying at least a few times just to see how you feel.
#mydl#simblr#the sims 4#the sims#ts4#sims tutorial#blender tutorial#sims blender#ts4 tutorial#sims blender tutorial#sims#simscommunity
44 notes
·
View notes
Text
I've recently learned how to scrape websites that require a login. This took a lot of work and seemed to have very little documentation online so I decided to go ahead and write my own tutorial on how to do it.
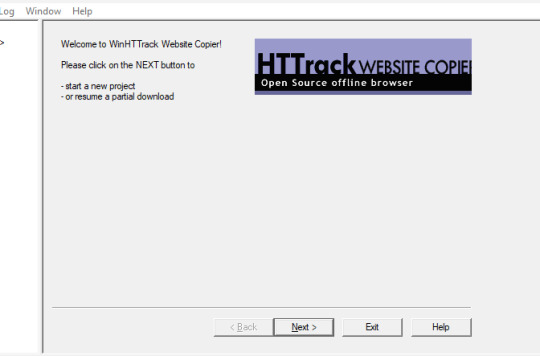
We're using HTTrack as I think that Cyotek does basically the same thing but it's just more complicated. Plus, I'm more familiar with HTTrack and I like the way it works.
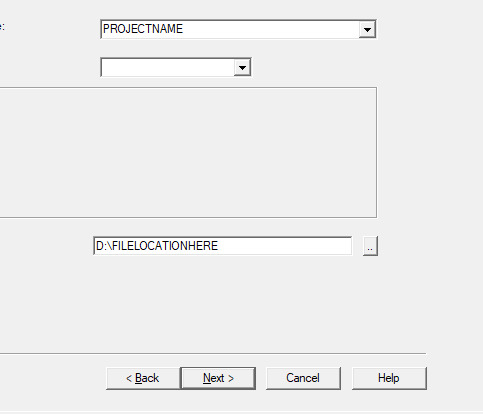
So first thing you'll do is give your project a name. This name is what the file that stores your scrape information will be called. If you need to come back to this later, you'll find that file.
Also, be sure to pick a good file-location for your scrape. It's a pain to have to restart a scrape (even if it's not from scratch) because you ran out of room on a drive. I have a secondary drive, so I'll put my scrape data there.
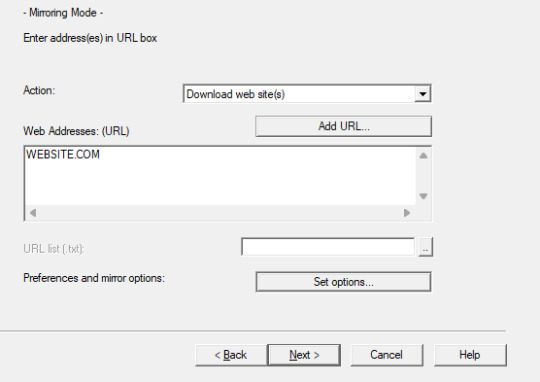
Next you'll put in your WEBSITE NAME and you'll hit "SET OPTIONS..."

This is where things get a little bit complicated. So when the window pops up you'll hit 'browser ID' in the tabs menu up top. You'll see this screen.
What you're doing here is giving the program the cookies that you're using to log in. You'll need two things. You'll need your cookie and the ID of your browser. To do this you'll need to go to the website you plan to scrape and log in.
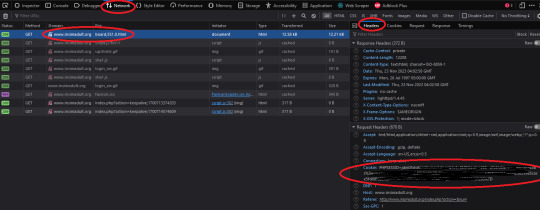
Once you're logged in press F12. You'll see a page pop up at the bottom of your screen on Firefox. I believe that for chrome it's on the side. I'll be using Firefox for this demonstration but everything is located in basically the same place so if you don't have Firefox don't worry.
So you'll need to click on some link within the website. You should see the area below be populated by items. Click on one and then click 'header' and then scroll down until you see cookies and browser id. Just copy those and put those into the corresponding text boxes in HTTrack! Be sure to add "Cookies: " before you paste your cookie text. Also make sure you have ONE space between the colon and the cookie.
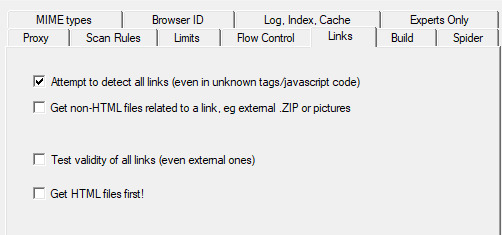
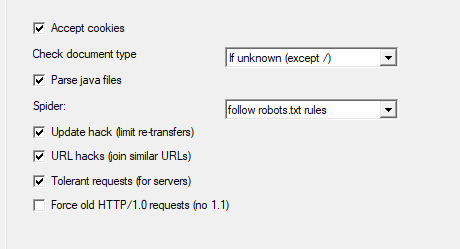
Next we're going to make two stops and make sure that we hit a few more smaller options before we add the rule set. First, we'll make a stop at LINKS and click GET NON-HTML LINKS and next we'll go and find the page where we turn on "TOLERANT REQUESTS", turn on "ACCEPT COOKIES" and select "DO NOT FOLLOW ROBOTS.TXT"
This will make sure that you're not overloading the servers, that you're getting everything from the scrape and NOT just pages, and that you're not following the websites indexing bot rules for Googlebots. Basically you want to get the pages that the website tells Google not to index!
Okay, last section. This part is a little difficult so be sure to read carefully!
So when I first started trying to do this, I kept having an issue where I kept getting logged out. I worked for hours until I realized that it's because the scraper was clicking "log out' to scrape the information and logging itself out! I tried to exclude the link by simply adding it to an exclude list but then I realized that wasn't enough.
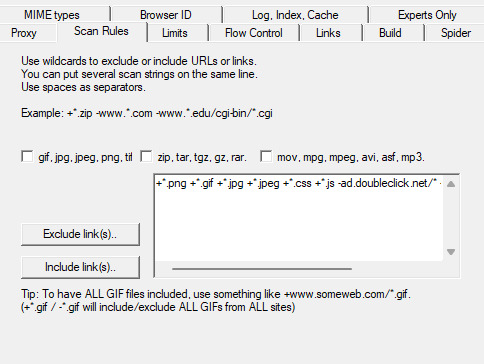
So instead, I decided to only download certain files. So I'm going to show you how to do that. First I want to show you the two buttons over to the side. These will help you add rules. However, once you get good at this you'll be able to write your own by hand or copy and past a rule set that you like from a text file. That's what I did!

Here is my pre-written rule set. Basically this just tells the downloader that I want ALL images, I want any item that includes the following keyword, and the -* means that I want NOTHING ELSE. The 'attach' means that I'll get all .zip files and images that are attached since the website that I'm scraping has attachments with the word 'attach' in the URL.
It would probably be a good time to look at your website and find out what key words are important if you haven't already. You can base your rule set off of mine if you want!
WARNING: It is VERY important that you add -* at the END of the list or else it will basically ignore ALL of your rules. And anything added AFTER it will ALSO be ignored.

Good to go!

And you're scraping! I was using INSIMADULT as my test.
There are a few notes to keep in mind: This may take up to several days. You'll want to leave your computer on. Also, if you need to restart a scrape from a saved file, it still has to re-verify ALL of those links that it already downloaded. It's faster that starting from scratch but it still takes a while. It's better to just let it do it's thing all in one go.
Also, if you need to cancel a scrape but want all the data that is in the process of being added already then ONLY press cancel ONCE. If you press it twice it keeps all the temp files. Like I said, it's better to let it do its thing but if you need to stop it, only press cancel once. That way it can finish up the URLs already scanned before it closes.
39 notes
·
View notes
Text
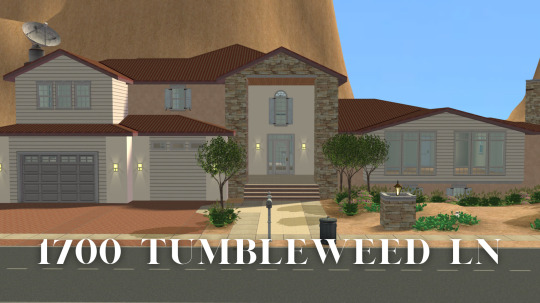


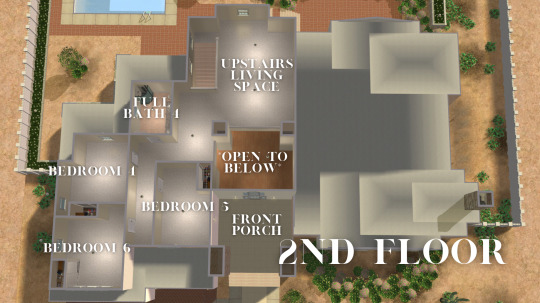


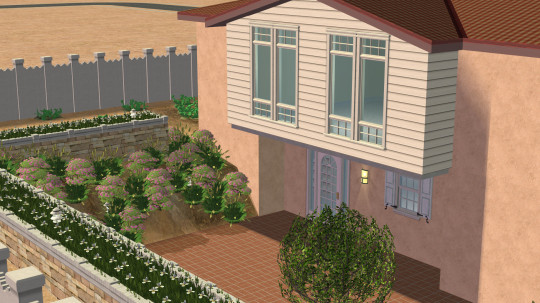
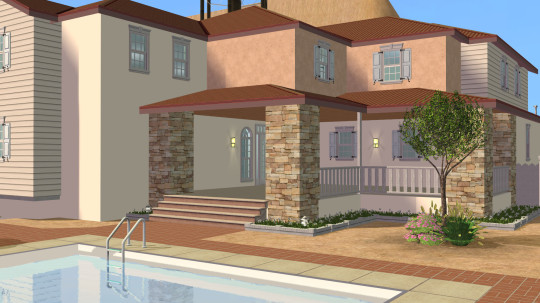


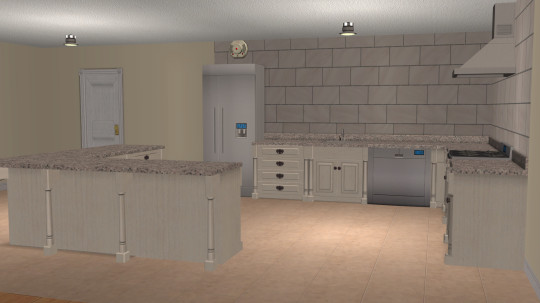


1700 Tumbleweed Ln - CC-free | 6 bed | 4.5 bath | 173,310 simoleons
Watch the build tutorial!
MediaFire
ModTheSims
#extraayogurt#ts2#sims 2#the sims 2#ts2 builds#youtube#sims 2 speed build#sims no cc#sims houses#sims speed build#sims tutorial
32 notes
·
View notes
Text
Small guide on CAS Poses
Last updated: 25. July 23
This will be a tutorial on how you can organize your CAS poses. I will give you an overview of which traits have which animations and I will show you how you can change the trait the CAS pose replaces.
━━━━━━ ・❪ ☾ ❫ ・ ━━━━━━
Q: What are CAS poses?
A: CAS poses are used to take pretty screenshots in CAS. They replace the normal animations that play when you select any trait.
This works for all ages of Sims and also pets, but it does not work for occult forms, as you cannot change traits while in occult form.
Pose by @catsblob

Which CAS traits use which animations
First I will be listing all CAS traits with the name of their animation from Sims4 Studio. Some traits share the same animation, therefore you can't have animations for all of them.
You can find the Google spreadsheet here: https://docs.google.com/spreadsheets/d/1eYwZzo_tBA-vhxFXz4ANd0n075Ls_cEbfiQlaM0QNtU/edit?usp=sharing
━━━━━━ ・❪ ☾ ❫ ・ ━━━━━━
How to organize your CAS poses
I wrote down the name of the CAS traits in front to make sure i don't use the same ones multiple times and kept the original name of the CC.
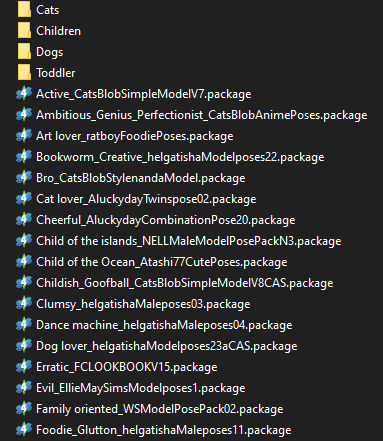
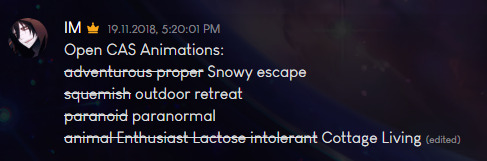
It's also nice to write down which traits you still can use for CAS poses (I crossed the traits out as I don't own the packs yet):
━━━━━━ ・❪ ☾ ❫ ・ ━━━━━━
How to change which CAS trait poses use
Most pose creators offer 1 or 2 CAS traits for their CAS poses, but if you already have poses installed for those, you can easily change that to any other CAS trait.
Requirements:
S4 Studio
The CAS pose you want
The trait you want to use
1. Download and install S4 Studio
2. Download the poses you want
3. Open up your downloaded pose and go into the warehouse tab.
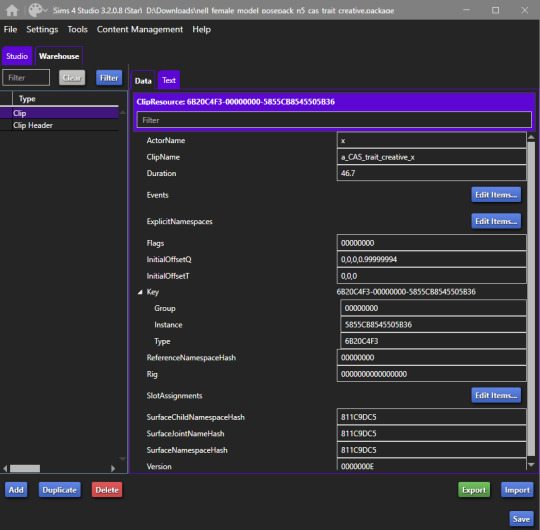
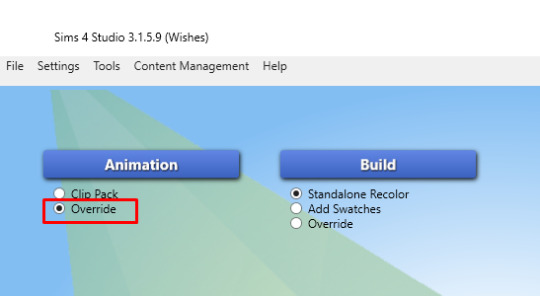
4. Open a second S4 Studio, select “Override” under “Animation” in the main menu.
5. Select the animation name according to the spreadsheet of which trait you want to replace. I will just use the trait "Proper" for adults, so I select "a_CAS_trait_proper_x"
6. Save the file as whatever, you only need it for values and not the file itself. This is your Source. Then also go into the warehouse tab.
7. Now you need to copy over the values in "ClipName" and "Key-Instance" from the source file to the animation you want to change the traits in. They text after "Key" will change automatically later.
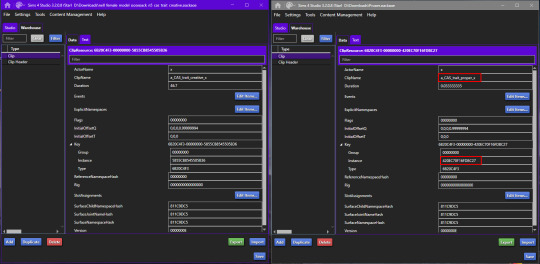
8. Now do that for both Types "Clip" and "Clip Header".
9. The Warehouse should now look exactly the same for both files.
10. Rename the animation files to however you organize your animations. I will add "Proper_" as a prefix for my package (see "How to organize your CAS poses" above).
11. Done!
━━━━━━ ・❪ ☾ ❫ ・ ━━━━━━
Bonus: My favorite CAS pose creators
@catsblob @helgatisha @nell-le @ratboysims @roselipaofficial @a-luckyday
━━━━━━ ・❪ ☾ ❫ ・ ━━━━━━
@maxismatchccworld @sssvitlanz @emilyccfinds
#sims 4#s4 studio#sims 4 tutorial#sims 4 cas poses#sims 4 cas poses tutorial#s4tutorial#s4guide#sims4#ts4#s4#sims tutorial#yorututorials
293 notes
·
View notes
Text
youtube
How to import Blender 2.8/2.9/3.0+ projects into Sims 4 Studio when making animations/poses for The Sims 4
...
I have a new tutorial out which explains how I use Blender versions other than 2.7/2.76 with Sims 4 Studio for animations and poses.
Watch it here!
#the sims#sims 4#the sims 4#ts4#sims 4 tutorial#tutorial#sims tutorial#ts4 blender tutorial#whatthesims#Youtube
97 notes
·
View notes
Text
Find me on YouTube at L'Rae Rose
15 notes
·
View notes
Note
Happy Holiday Ilenia, I hope you have a wonderful December and up coming new year. I want to thank you for all custom content I requested, you are the greatest :3, and I would like to ask you regarding motives. I want to know how to change your custom drinks motives (Ex: Starbucks Frap bottles can add energy). I have no idea which instance can add energy, or should I import or replace BHAV? Thank you Ilenia ^^
In the "Interaction - Drink" BHAV (Instance 4098) search for the last line (28) named "Sub - Dec Pts & Inc Fatness".
Click on it and choose "Insert via True" on the right panel (special buttons box must be ticked).
Set the new line like this "Op Code 0x0002 Expression (My motive 0x0005 (Energy) += Literal 0x0005)".
Commit and Save.
This will increase the energy of 5 points everytime the sims take a sip, you can change the value as you want of course.
If you don't know how to set the line you can simple click on the new line (as written in point 3) and click on the (") symbol on the panel on the right and paste this code 0500050000030E07000A000000FF0000
Then click commit and save.
7 notes
·
View notes
Text
Updated No Seams Tutorial

I found a much easier way to get rid of seams on your sims in blender that won’t make your sims look weird afterwards. I know sometimes subdivide + increase smoothness can make sims rip at the seams. Plus if you’re like me, you’ll notice in solid mode your sim will look weird and bumpy and have to smooth that out in sculpt mode. I found a much easier solution!
First:

when ripping your sim, select Clean DAE mesh. This will get rid of the leg seams. The neck is still somewhat noticeable so that is where I’m be focusing on today.
After this, you still need to do steps 1 to 7 from this tutorial.
Once you’ve done step 1 through 7, you will remain in edit mode. Press a to select all vertices, press F3 and type in “Shade smooth”!

and you’re done! if anything, it looks more like a shadow. If it bothers you, you can go into sculpt mode and gently smooth it out which will take you less than 5 seconds to do (in the preview pic of this tut is what it looks like slightly smoothed out with sculpt)!
As always, lemme know if you have any questions. I’m happy to help!
#blender tutorial#tutorial#ts4 blender#ts4 render#ts4 edit#ts4 tutorial#sims tutorial#the sims tutorial#sims 4 blender#sims tut
239 notes
·
View notes
Last Seen Blogs

artritaperez
Rita Perez
pkollective
the pkollective.

aroshanatureproducts
Arosha Nature Products
les-teknographes-blog
LES TEKNOGRAPHES

domonicriley
Domonic Riley