#I should make more gifs at this width because the size limit is just
Text
#RWBY#Ruby Rose#Blake Belladonna#rwby spoilers#I kept meaning to make this and then forgetting#It's very cute that Blake and Ruby both mimed Yang's long hair#I should make more gifs at this width because the size limit is just#So much more manageable lmao
1K notes
·
View notes
Text
photopea gif tutorial!
i recently started learning the craft of gifmaking with the free software photopea. when i first started, i had to piece together several different tutorials as well as extrapolate from some photoshop tutorials because-- no one uses photopea.
but they should! it's free! it can run in your browser! it can do most everything photoshop can do and you don't have to deal with adobe or torrenting. so i'm making a tutorial of my photopea gifmaking process because that's what i needed a couple months ago, and i hope it can be of use to some others. let's go!
1: PREPARING
source the scene you want to gif. it's best to download your video when you can, but screen recording can work in a pinch. this is the video downloader software i use.
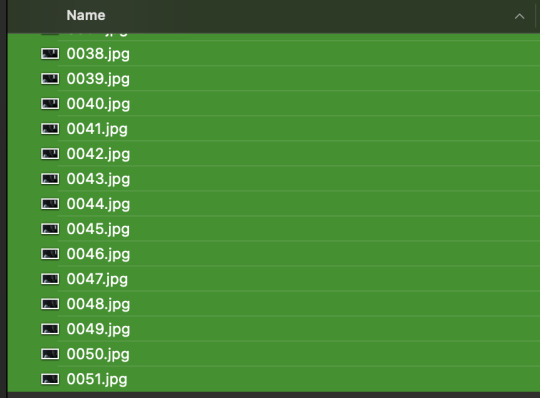
once the source video is downloaded, i like to pick out the specific moments i'm going to gif and save them as their own files-- this makes future steps easier. an individual gif shouldn't be more than 4ish seconds, so limit your selections to about that. name your files in a way that makes sense to you:

2: CONVERTING TO .JPG
i like to convert my video clips to .jpg format. it is possible to load video clips directly into photopea, but unless it is a very short <30fps clip, it is likely to freeze or crash in my experience. i use this website as it downloads a higher framerate (~25fps) than others i've used.
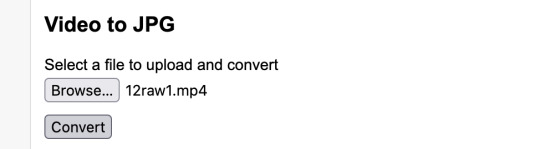
convert your video files and download the .zip folder containing your frames. make sure to unzip them and name them something helpful if you need to.
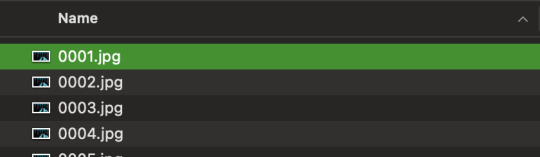
3: OPENING YOUR FRAMES IN PHOTOPEA
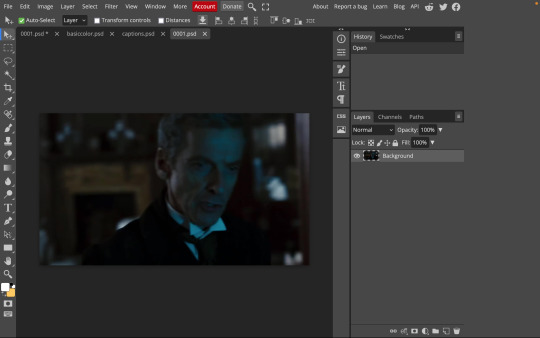
photopea looks like this when you open it:

select "open from computer" and select only the first frame of your first gif:
your environment should look like this (ignore the other projects i have open, you should just have 0001.psd or similar):
go to file> open and place, and select ALL of the rest of the frames from your first clip:
they'll load in one by one, and your environment should look like this:
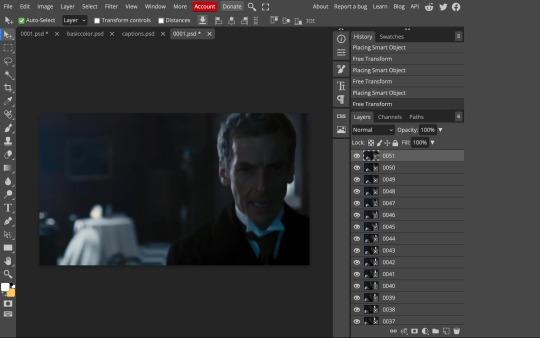
notice how all the frames have a little square in the corner? that means they are smart objects, and we need them to not be for our purposes. select all of your frames, right click, and choose rasterize:

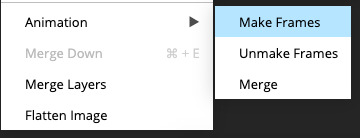
in order to make the series of jpgs move as a gif upon download, select all of your frames and go to layer> animation> make frames:
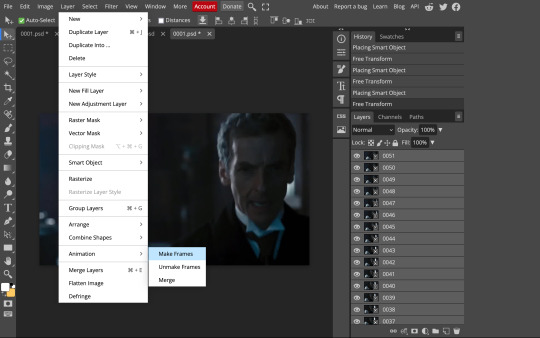
all your layer names should now start with _a_. you can really do this at any point in the process so it's not a big deal if you forget at the beginning.
finally, you want to limit the frames in individual gifs to around 50 or less. if you find you have more, delete some frames off of the beginning or end by right clicking and selecting delete.
4: CROPPING AND RESIZING
select the crop tool on the left hand panel:

at the top bar, select fixed size:

gifs on tumblr are limited to 540px wide for single column gifs, 268px for two columns, and 178px for three columns. the height is up to you; i like to use 350px height with the 540px width.
enter your values into the W and H fields and do not press enter yet. drag the cropped area to where you want it to be-- try to line up the top and bottom edges so as not to lose too much of your image. once you're satisfied with the selection, press enter. your gif is now cropped and resized to tumblr standards.
5: SHARPENING
(if you are working with low-qual video, check out this tutorial by @hellboys before sharpening. basically filter> filter gallery > grain, select soft and play with the settings. then proceed!)
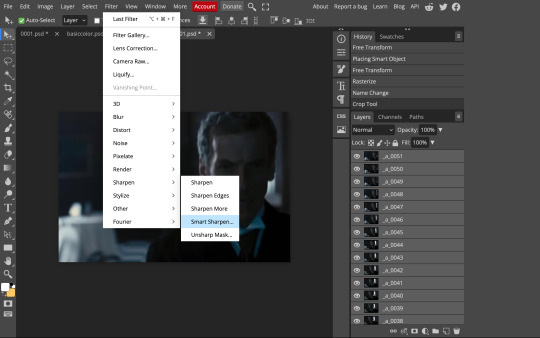
still making sure all of your layers are selected, navigate to filter> sharpen > smart sharpen:
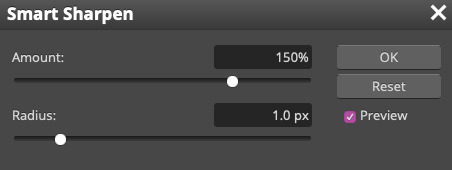
you should see this dialog box:
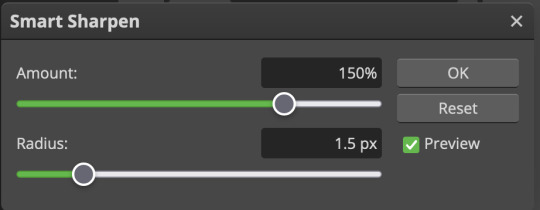
these are the settings i like to use, but you can play around to see what you like. here's the before and after of my sharpening settings:
the difference will be more noticeable once we complete the next step-- brightening and coloring.
6: BRIGHTENING & COLORING
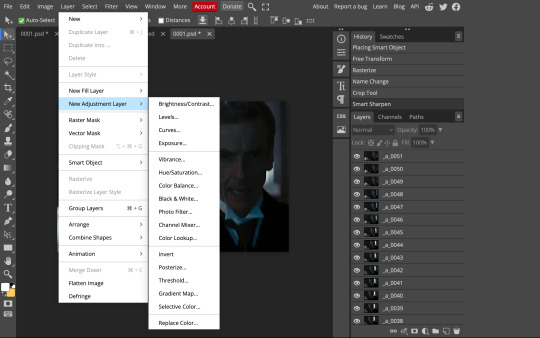
navigate to layer > new adjustment layer:
at any time, you can edit your adjustment layers by clicking this button in the right hand panel:

for each edit you make to your gif, you will add a new adjustment layer. always make sure they're at the top of your layer stack. i like to start with adjusting the brightness and exposure, which are both pretty straightforward.
additionally ,you can select a curves adjustment layer, choose the RGB channel, and drag the curve just slightly upwards to further brighten your gif, like so:
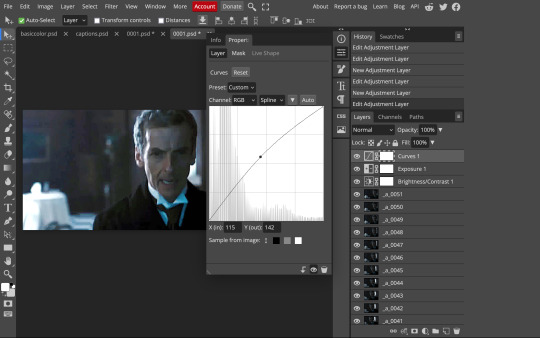
here's a before and after:
now for coloring-- i mostly use the saturation/vibrance, curves, color balance, and selective color adjustment layers. just play around with all of these until you find a style you like. i like my gifs to look really bright and colorful, so i push the saturation and try to draw out warmer tones in the color balance:
7: CAPTIONS
the font i like to use for captions is arial bold italic. you can download it (or any font of your choosing) from pretty much any free font website. if you choose to download a font not in photopea, go to file> open and select your font; it will now show up in the list of fonts.
navigate to the text button in the left hand panel:

and type in the captions for your gif. i make the font size 20 for 540px gifs.
next, while only your text layer is selected, navigate to layer> layer style > blending options:
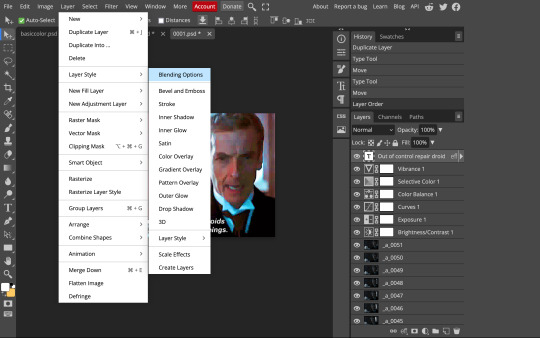
click on drop shadow, and play around with the settings until you get something you like. here's mine:

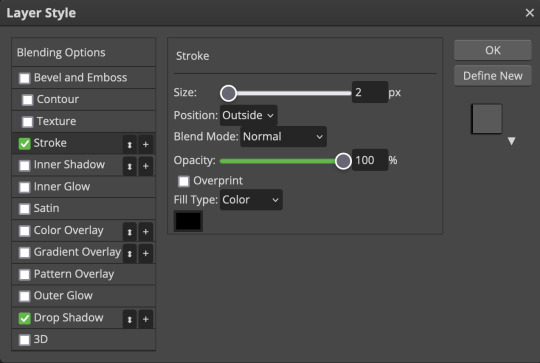
next, click on stroke and do the same thing:
when you're done, make sure your text is your top-most layer.
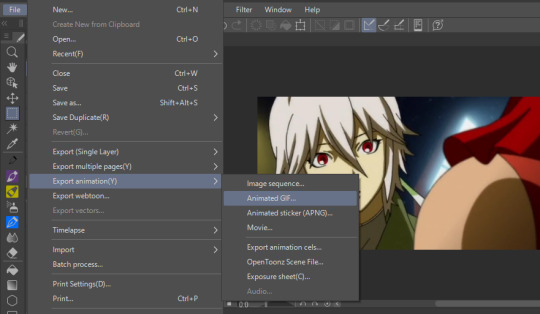
8: EXPORTING
you're done! head to file> export as> GIF. you'll be prompted with a dialog that looks like this, with your gif playing (you can also do these steps without saving if you want a preview of your gif during editing):
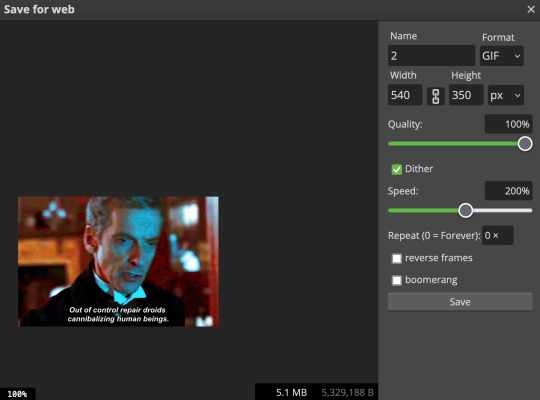
the only thing you should need to adjust is speed. this is the main difference between photopea and photoshop. the only way to specifically adjust the delay in photopea is to manually enter "_05" (or whatever amount of delay) at the end of every layer name. if you're like me you'll agree that is simply too much and settle for the speed slider.
i don't really know what logic governs the speed slider. it doesn't seem to be consistent across gifs, so play with it until it looks right. i've had it on 200% lately which seems insane but looks visually normal.
once the speed is adjusted, hit save and you're done! here's a final before and after of all the work:
BONUS: SAVING .PSD PRESETS
did you think manually creating and editing all those adjustment layers was a lot of work? here's how to streamline it for next time.
at the very bottom of your screen, below your layers, select the icon that looks like a folder (third from the right).
it will create another layer called folder 1. drag your adjustment layers into this folder, making sure they stay in the same order. your layers should look like this when you're done:
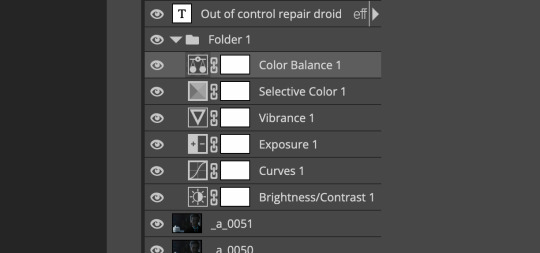
ONLY ONCE YOU HAVE SAVED YOUR GIF, delete all other layers that are not in the folder. then select file> save as PSD. save it somewhere convenient.
next time you're making gifs, after you've cropped and sharpened your frames, select file > open and choose your .psd file. it will open as another project. select the layer that says folder 1, and drag it to whatever project you're working on at the top bar. voila! your adjustment layers are applied to your new gif!
i still like to play with the settings, as coloring and brightness needs will differ from gif to gif.
thanks for reading! here's the gifset i made while making this tutorial :-)
#milk post#gif tutorial#doctor who#photopea#i can't tell if i went too detailed or not enough lol. tag me if you use this i want to see ppl's gifs!!
208 notes
·
View notes
Text
Full giffing process - tutorial (*≧ω≦*)
Due to little demand, i will be going thru my complete process for making gifs. so this will cover all the basics i hope! keep in mind this is just the way I personally do things! please feel free to send me asks or dms if you have any doubts or questions!
☆☆☆☆☆☆☆☆
DISCLAIMER: Everything I know about giffing, I've learned from other tutorials, including the VapourSynth Resources I'll be using in this tutorial so I'll leave links to those tutorials I've used here as well!
In Depth Giffing Tutorial (link here)
How to use VapourSynth (link here)
☆☆☆☆☆☆☆☆
(o´▽`o) I'm a windows user so idk if this works exactly the same on mac!
First things first, you will need:
☆ 4k video downloader (download it here!)
☆ Vapoursynth (download it here!)
☆ Photoshop (download it here! -64bit version only)
Okay! The first thing you need to do is make sure you're working with the highest quality material possible to ensure a decent looking gif!
I'd say the minimum quality needed for decent gifs is 1080px. But if you really want to gif that low quality 2 frame milisecond of your fave, i respect that
☆ lives / streams and tiktoks are typically not very high quality
☆ for stage performances such as music shows, ts/tp files are preferred but those can be really hard to get a hold of (this is a whole deeper level of giffing hell and more of an advanced class topic so nevermind this for now!)
☆ those occasional 4k facecams on youtube work fine tho!
☆ for mvs, variety shows etc, you can download the video with good quality from youtube using 4k video downloader
_(:3 」∠)_
Now let's talk about tumblr and it's pre-requisites for a good looking gif post :D
Tumblr can be sooooo annoying about gifs okay.... I find it's best to plan my whole set before I actually start doing anything but hey that's just me. Some things to keep in mind are: dimensions, file size, number of frames and post layout!
☆ Dimensions
You have 3 main options here and it's all about the width!
☆ 1 collumn: single gifs! these should be 540px wide
☆ 2 collumns: split that in half! 268px wide so there's a lil breathing space between the gifs!
☆ 3 collumns: 3's a party! 177px for each gif please
You can go crazy on the height but the width should mostly stick to one of those 3 unless you want tumblr to pull and squeeze your gif around like a piece of gum.
☆ File Size
This is really important because tumblr has a single image size limit of 10mb. Which means that every single gif you make has to be under that size or you won't be able to post it. The other thing about this is that the dimensions, number of frames and ammount of varying colors throughtout your gif will greatly impact on the final file size. Basically, the larger the dimensions and the more frames it has, the bigger the final file will be. Later on I will show you how to check your gif's final size before exporting it!
☆ Number of frames
This has more to do with the length of your gif, the longer it is, the bigger the final file will be. Typically gifs should be under 3 seconds long. So if you are making a set, try to break the moments you want to include in your set by increments of up to 2 - 3 seconds each, otherwise it might not fit all into one single gif. The number of frames is also extremely important when making combined gifs but that's for another tutorial.
☆ Post layout
If you want to make a cool looking gifset (where some gifs are larger in dimension than others, or when you want to have a single gif followed by a line of 2 gifs next to each other), then it might be worth it to plan out the layout before you start making the gifs. This way you ensure you won't have to remake gifs down the line because they don't fit together the way you wanted to.
☆ミ(o*・ω・)ノ
Timestamping
For this step, you will go through the video you want to gif from and you will just write down all the sections you want to use, down to the exact seconds. Example: 02:30 - 02:32.
(^◕ᴥ◕^)
VapourSynth (VS) - Clipping the video
I know VS can look pretty intimidating with it's bare coding and all but I promise it can be your friend. You just have to set it up correctly and pay close attention whenever you're using it. This software is a must for giffing, it will do all your cropping, resizing, sharpening and denoising for you, making sure your gifs look good. It is also indispensable when giffing ts/tp files because it deinterlaces those files so you can clip them.
First, let's set it up. This is the most annoying and difficult part of this tutorial so make sure you pay full attention to every single step!
☆ step 1) download a version of VS here (link).
☆ step 2) unzip the file on your desktop area.
☆ step 3) open the folder and find the file named "vapourscript (drop video file on me)" - make a shortcut of that file and move it to the desktop.
☆ step 4) find the folder named "gifs" - make a shortcut of that file and move it to the desktop.
☆ step 5) drag your video file you want to gif from and drop it on top of the "vapourscript (drop video file on me)" shortcut on your desktop.
☆ step 6) enter the timestamp input, in the first line it will be the starting of your timestamp, in hours format, then hit enter. in the second line enter how long your timestamps lasts, in seconds, also in hours format. then hit enter and let the code run.
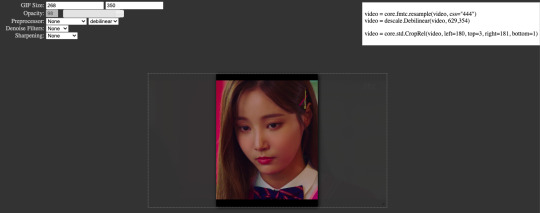
☆ step 7) the resizer tab should now load on a web browser, then you will set the dimensions of your gif on the top left corner. you can also adjust the position of your gif within the video screen and zoom in if wanted.
☆ step 8) choose the preprocessor, denoise and sharpening options on the left and tick the boxes on. I usually just stick to the settings i'm using in my video down below.
☆ step 9) now in the VS box, go to file > load, choose the script saved in the gifs folder.
☆ step 10) copy the code from the resizer into the code in the vs screen, under the designated line.
☆ step 11) alter the code exactly like I did in my video down below. save it. this is now your default vs script for clipping your gifs. what you are doing by adding the hastag and the quotation marks is you're disabling those sections of the code. the reason you do that is in case you want to run the preview before exporting. this is because those lines involve some heavy graphic processing which can make the computer slow. I will talk about the script in more detail later on.
☆ step 12) i don't usually use this option but you can also preview your gif and set specific frames to start and end your gif. This is around the 4:30 mark in the video.
☆ step 13) time to export your clip! now you will temporarily remove the marks you added to disable the code and then go to script > encode video. in the popup box, you will select the option "export to MOV", then start so that you can use that video file in photoshop later.
☆ step 14) after you are done exporting, close the encoding box and then close vapoursynth, never agree to save the script when closing it, or that will override your default script.
☆ step 15) now you need to rename the encoded file for your gif. go to the gifs shortcut folder you created on your desktop, then go to output. this is the folder where VS will save all your encoded files. but everytime it saves the file with the same name so you need to come to this folder and change the name for every gif file you encode before you clip a new one, otherwise VS will just replace the previous clip with the new one you just finished.
Here's a detailed walk through of each step in this video tutorial:
youtube
IMPORTANT
After you are done processing your first clipped file, now you have your default script already built in VS, so whenever you run it to clip more videos, this script will already be in your VS screen. So now all you need to do whenever you want to clip more files (to make more gifs) is to adjust the dimensions, positioning and zoom of the video in the resizer screen and then change a few numbers in your script! then run encode to save the clipped file.
☆ To make new clips: go thru steps 5- 7, also do 8 if you want to mess with the denoise and sharpening filters again, but I don't really know much about how those work so I can't help you with this.
Now what you need to alter in the code, each time you are making a new gif:
after you run VS and change the settings in the resizer to what you want, you need to change the zoom numbers and the video positioning in the code.
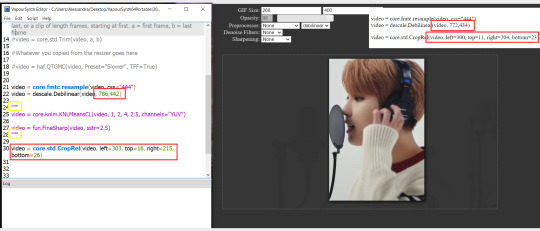
you need to replace the numbers in the VS script on the left so they match the numbers in the resizer on the right.
Do step 12 if you want to set specific frames to clip. Then steps 13 - 15 and you are done! You need to do all this every single time you want to make a new gif.
Now let me talk a bit more about some of the lines in this script:
☆ line 14: #video = core.std.Trim(video, a, b)
this line is to set specific frames to trim your video section, your final encoded file will be only the frames inbetween the numbers you input here. a = first frame, b = last frame. you will need to run the preview option in VS in order to see every single frame of your clip and select your first and last frame. I usually do this in photoshop later instead so I don't bother with it on VS unless i'm making combined gifs, in which you need all the clips to have the exact same number of frames. the hashtag at the beginning of this line means that the script won't follow this command when executed. so if you want to include it, you need to remove the hashtag before encoding your file.
☆ line 18: #video = haf.QTGMC(video, Preset="Slower", TFF=True)
this line is for the preprocessor option in VS, that tool is mainly only used when giffing ts/tp files because you need to deinterlace them before you can use them on photoshop. so you will only need to remove the hashtag and enable it when giffing those types of files. when im giffing those files, i usually always keep it with this setting:

I don't really understand much about this so I never mess with it. If you want to know more, I believe there's more info about it in the tutuorials I linked at the beginning of my post.
☆ line 22: video = descale.Debilinear(video, 786,442)
this line is for the zoom of the video screen. you just need to match what you have in your VS script to what you end up with in your resizer.
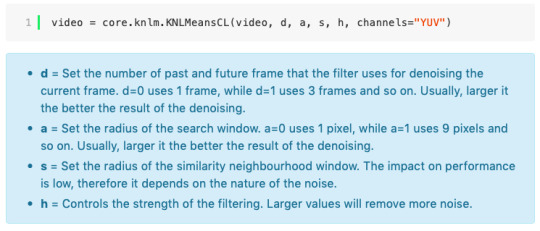
☆ line 25: video = core.knlm.KNLMeansCL(video, 1, 2, 4, 2.5, channels="YUV")
this line is for the denoising filters, in my case I always use KNLM and this is what it's line looks like. I know you can change those numbers to change the filtering settings but I never messed with it so I'd usually just have it like that.
☆ line 27: video = fun.FineSharp(video, sstr=2.5)
this line is for the sharpening, in my case I always use FineSharp and this is what it's line looks like. I know you can change the number to change it's settings but I never messed with it so I'd usually just have it like that.
note: lines 25 and 27 (which have to do with denoise and sharpening) are the ones within quotation marks in your default script. I believe the quotations work in a similar way as the hashtag, in which the script only executes the lines when the quotations are removed. Which is what you do everytime you are about to encode your clip, otherwise they stay on. I think you should also remove them if you want to test how they affect your gif in the preview screen but i think these filters also require heavier graphic processing which my computer can't handle well so I never do that.
☆ line 30: video = core.std.CropRel(video, left=303, top=16, right=215, bottom=26)
this line is for the positioning of your video screen within the gif dimensions. you just need to match what you have in your VS script to what you end up with in your resizer.
ʕ •̀ o •́ ʔ
Photoshop (PS) - let's make a gif!
Now that we have clipped and preprocessed our video file, it's ready to go to photoshop!
☆ step 1) after you have opened PS, go to File > Import > Video Frames to Layers. Then choose the clipped file you created through VS.
PS should open a box like this:
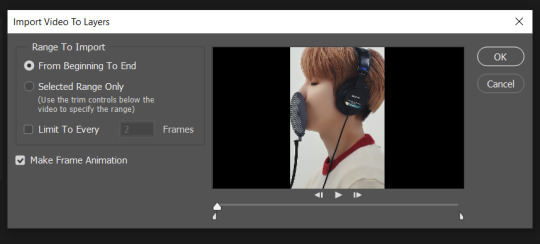
Keep those options ticked and hit OK
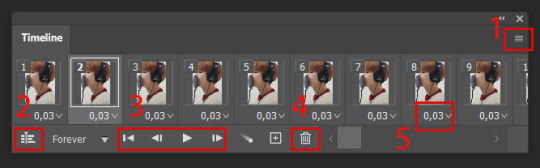
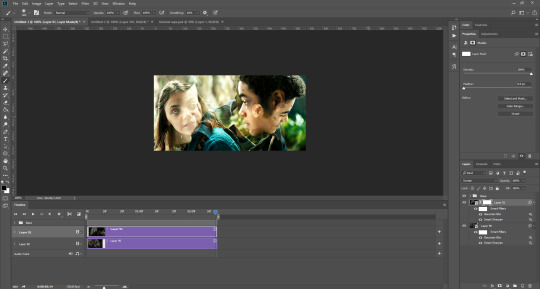
☆ step 2) now you need to go to Window > Timeline to bring up the timeline tool box. This window will always be necessary when making gifs. Let's take a look at it, I've marked down all the important buttons you will need:
timeline menu: there are several commands in here, you will need to use some of them later on.
convert to video / frame timeline
play controls to watch your gif
trash can to delete selected frames. (when deleting frames, first delete them here and then delete it's matching layers which are still there after deleting the frames)
frame delay time: this is where you set the time for how long that frame will be visible in your gif
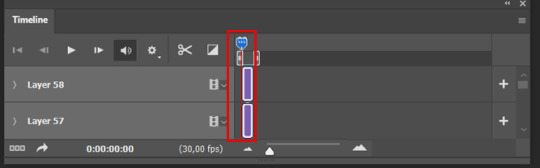
☆ step 3) remember how I mentioned the preview option in VS and how i don't usually use it to trim the frames of my clip? That's because I usually do that at this step of the process, in PS. Notice how each frame is also a layer, and when a frame is selected, the matching layer has the eye symbol next to it turned on. So now you should play your gif and see if there are any frames you don't want to keep, then delete the frames and it's matching layers.
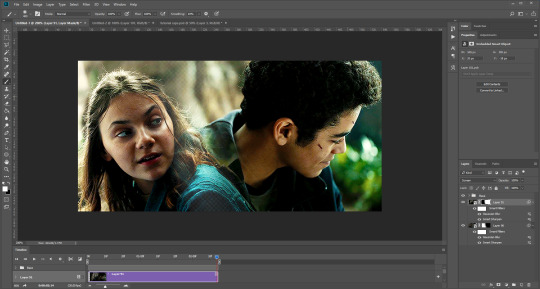
Since we applied sharpening filters back when we were clipping the video on VS, your clip should probably already look pretty decent even before the next steps, so steps 4 - 9 are optional. The coloring part of my video has been sped up.
☆ step 4) click on the timeline menu and select "Select all frames", then go to the select menu at the top of the PS screen and select "All layers". Now click on button 2 of the timeline at the bottom left, switching from the frame timeline to the video timeline.
☆ step 5) before you do anything else, make sure the blue holder is at the beginning of the track before you do anything else. Then go to Filter (at the top of PS) and select "Convert for smart filters". This will convert all the layers into one single layer.
☆ step 6) now make sure the layer is selected, then go to Filter > Sharpen > Smart Sharpen. A box will open with several options:
I usually keep the amount to around 30, I don't touch on radius and you can also mess with reduce noise if you think your gif is looking too sharp. Hit OK when you're done.
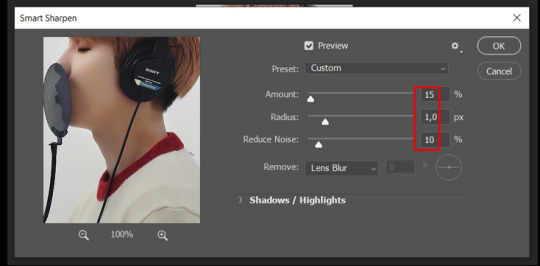
Since this is a filter applied to a smart object (the converted layer that contains all our layer - frames), this means you can turn this filter on or off as long as the layers are in the form of a smart object. You can also go back to it and alter it's settings (like I've done in my video down below)
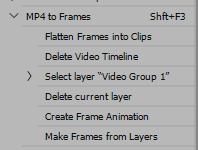
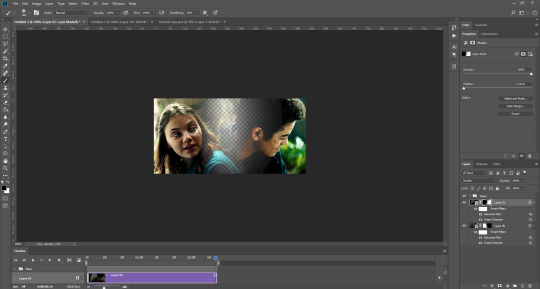
☆ step 7) now while making sure the blue holder is still at the beginning of the track and the layer is selected, click on the timeline menu that i mentioned above. Then go to Convert Frames, then select Flatten frames into clips.
☆ step 8) again go to the timeline menu, Convert Frames, but now select Make Frames from Clips. Now click on the button at the bottom left of the timeline box, to convert the video timeline back into a frame animation. Then hit continue in the pop up box.
☆ step 9) now you are back to the frame timeline screen from before, but now the first frame is empty. You need to delete that first frame and then check the final frame because sometimes PS also creates another empty frame at the end at this point.
☆ step 10) PS also created a new layer under the layer 0, where the filter is still applied, you can delete this new layer as well. Now for organizational purposes, select all remaining layers (that contain your frames) and group them (you can see how in the video).
☆ step 11) This step is also optional, now I like to add the coloring to the gif. I have a separate tutorial exclusively on this topic. You can check it here:
☆ step 12) This is the time when I also add my signature. This is optional. You need to have the signature layer(s) on top of all the other layers. I usually have it in all black or all white, with lowered opacity of around 40%.
NOTE:
When adding elements (such as a signature) to a gif, it's important to always make sure you have the first frame selected, otherwise PS can move your newly added elements around the canvas on different and random frames. This also applies to anything in the layers pannel that has specific opacities. It's best to already add the elements with the final wanted opacity with the first frame selected.
Exporting + Delay time
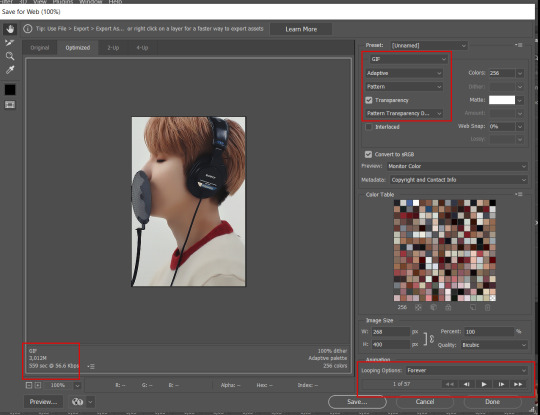
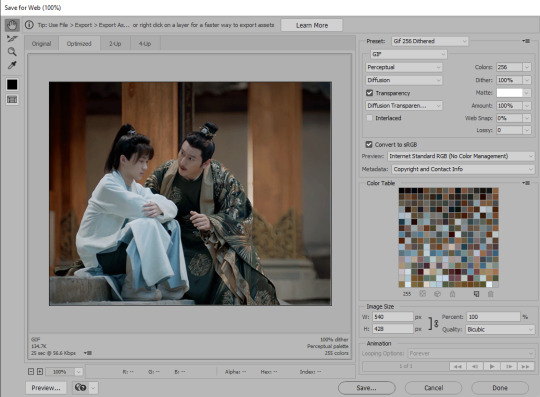
☆ step 13) To export: go to File > Export > Save for web (Legacy). PS will open this box:
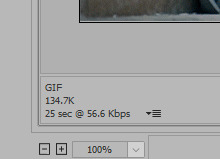
First I just use the exporting screen to test the delay time of my gif, and to check the gif's final size.
About the size:
The final size is displayed at the bottom left. Remember it needs to be under 10mb. If it's above that, then you will have to go back and delete frames and test again until the size is within the limit.
About the delay time:
To test the delay time, hit that play button and the gif will play at it's default delay time. If it's too fast or too slow, you will hit cancel and change the delay time (at the next step).
For actual exporting:
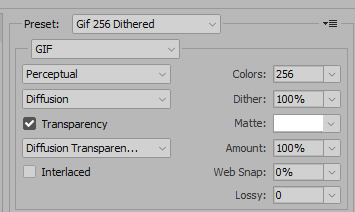
The highlighted box at the top right of the screen is very relevant now. Make sure the first box has the GIF option selected. At the next box, you can select either perceptual, selective or adaptive. I usually like to use adaptive. At the next box you need to choose either diffusion or pattern. I like to use pattern. Tick the transparency box and then select either pattern or diffusion transparency dither.
Once you are satisfied with all aspects of your gif, hit save to export your final gif.
To fix the delay time:
After you have exited the export box, go back to your timeline, click on the menu button at the top right and select "Select all frames". Then, on any random frame, click at the small arrow next to the numbers under the frame. Select the option "Other". That will open a pop up box to alter the delay time. To test it again, use the export box explained above. Once you are satisfied, save your gif! I've also altered the delay time in my video to show you the process.
☆ step 14) After your gif is done and saved, I'd suggest to save your psd file if you added any coloring to it. This is so you can reuse the coloring later in other gifs without having to redo it all. This is useful if mking a set of gifs from the same moment / video.
Here's a detailed walk through of each PS step in this video tutorial:
youtube
I hope this tutorial is helpful! Feel free to send me any asks if you have doubts or need extra help! (つ≧▽≦)つ
175 notes
·
View notes
Note
I think you've gotten a few questions about your process ( apologies! ) But I saw you use CSP to make these gifs - do you cut up the frames from your recordings to do that? Is there a particular way you go about that? I'm interested in making gifs and was a bit curious 🤧♥️ but if you cannot share such secrets I understand!
All right, this finally convinced me to make a guide and I hope this was helpful!! Feel free to send in any questions.
First off, PRO has a frame limit of 24 so your gifs will run very short. EX has no frame limit and right now there's a free trial for users until the 24th.
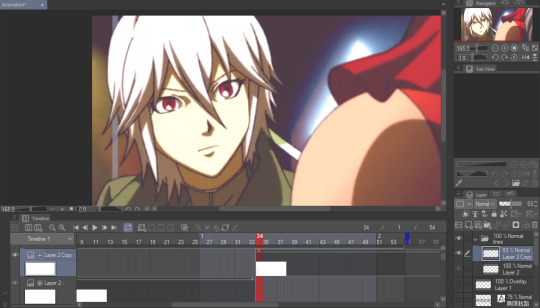
Make a new canvas that's an Animation. For my gifs, I use a 540 width and adjust the height later. Go to Window and turn on the Timeline so you can see all the cells.
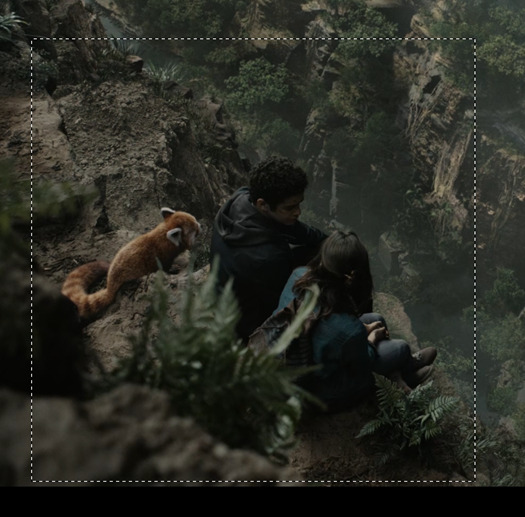
I trim my game recordings into short clips of what I want to gif. Then I insert them like this as MP4 files:

The red line is the current frame you're looking at. The blue lines mark the gif duration at whatever starting and ending frames you choose.
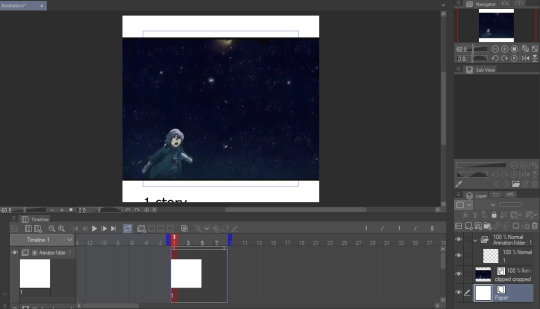
Whatever is inside the blue box will appear as the gif. Personally, I don't like using this and end up fixing the canvas size later. But let's get to actually making our gif first.
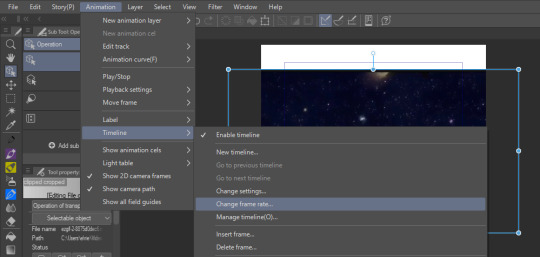
I like to make my gifs 30 FPS or less and I'll be changing it to 25 FPS from here:
Click on your clip on the Timeline. For this example, I didn't trim my clip exactly where I want it to start so I'll drag it to left where the frame number turns negative and I end up going 4 frames back (or you can just move the first blue line 4 frames ahead):
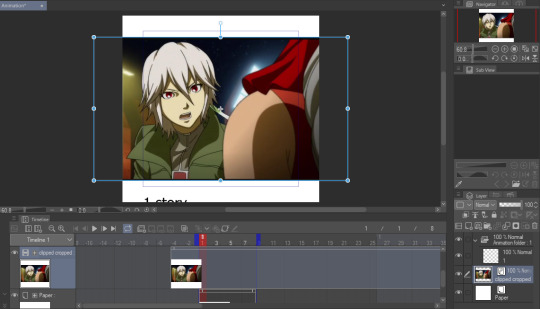
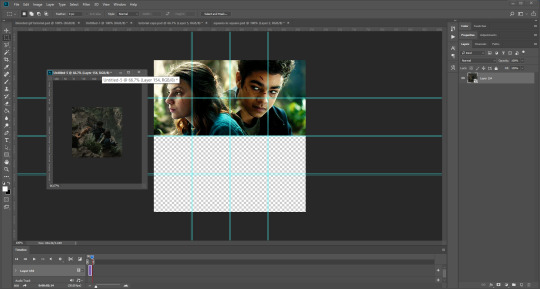
Then I drag the second blue line to where I want my gif to end. Since I want to make the height shorter, I go to Change Canvas Size and fix the dimensions (you can still resize and adjust your clip around too):
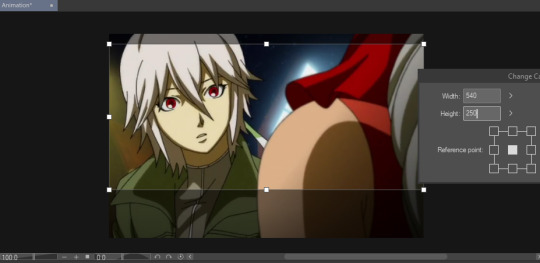
The blue box is gone and we can just use the canvas itself to fit the gif. I ended up adjusting it again and now we just need to save it!
I'm already fine with everything so I won't change the numbers. Make sure the Loop Count is set to Unlimited:

Choose where to save it and wait for it to export. Let's take a look at our finished gif:

Notice how pixelated some of the areas are? That's because we didn't export it with Dithering on so let's redo it:

Look at how much better it looks! Make sure to turn this on or it can make your gifs look way worse.

And that's the basics! If you want to put a color filter, make a new layer and put it above your clip. I use the bucket tool with the color i want and change the opacity and layer type:

And here it is! If your color filter only showed up partway on the gif, that means your layer wasn't present on all your frames so go to the Timeline and drag it to cover the entire length.
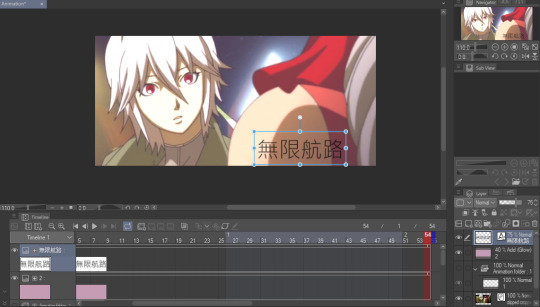
If you want to add a watermark or words, start making a text above your color filter and you can also change the opacity:
You can also add images on the gif with your brushes. Make a new layer above the color filter and apply them:
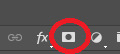
If you want to fix the colors more, right click your clip layer and it'll make a new layer above with the adjusted colors:

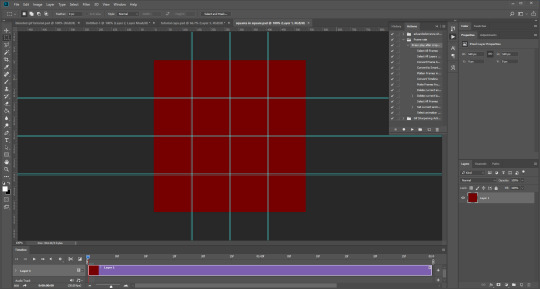
You can also do the 3D white bar effect. I make a new folder above all my layers with a bunch of colored lines. You'll need to erase whatever shows in front of the object and I decrease the opacity to make it easier, then change the color to white. You can adjust which frames each bar will appear by dragging the ends of the Timeline length (arrows will appear). As shown below, I was able to use the same line in frames 1-33 before making a new one at frame 24.
With 2 bars:
And that's all I wanted to cover! There's many editing guides that you can also apply to CSP so don't hesitate to try them out. As I mentioned earlier, you should only use CSP to make gifs if you already have it and don't have better programs to use. I hope this guide helped you out :)
43 notes
·
View notes
Note
Hi there! I saw the screen recording you did for the Aemond gifset (superb work, by the way) and I was wondering if you would be open into doing a step-by-step tutorial on how you played with the colors (what was the graph on the right side of the window?) and how you manipulated the color palette when saving the gifs? No pressure! Was just curious :) Thank you!
Hi there, nonny! Step by step below the cut here.
I don't keep the psd files of my gifs, mostly because I don't have the storage space to do that, so I've made a different gifset of the same scene, so it should be much the same, if not better.
I believe this:

is the graph you were asking about? This is the histogram. I don't believe it has any practical usage in gifmaking. If any other gifmaker here has a different opinion, please share it. (I'm doing a photography degree, photoshop is my next unit so I'll know more about it soon)
Right, step by step. Hold your horses, this is long:
Step 1: get the clip. Some gifmakers use screen caps to make gifs. I do not know how to make them or how to use them and I find my own method works. If another gifmaker could add on how you make your screen caps, and if it is better than my own method, please add it. 😊
Where you get the clip from is a question. YouTube, somewhere else... as long as it's saved as a MP4 file on you computer/laptop, it doesn't matter. What does matter is the quality of your clips. A lot of people use 4K (super high quality) clips. I find those to be slow and arduous and may have been responsible for the fall of my old, decrepit laptop. HD or UHD are likely enough for some decent quality.
Step 2: Get the clip in the software (I use Adobe Photoshop. For some softwares, you might have to clip the clip i.e. make it shorter before just dumping it in) In Photoshop go to File > Import > Video Frames to Layers and a window will come up. Move the sliders until you have approximately what you want (don't worry about being exact. Just as long as you have what you need.) (Don't forget to click Limit to every 2 frames)
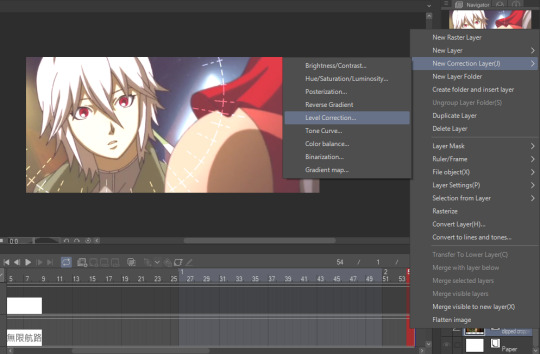
Step 3: Once the clip has opened and your ready to start, crop out any black/white edges. Then cut out the frames you don't want

Step 4: We are now ready to begin editing!! 🥳🥳🥳 Editing tends to just be a huge pile of trial and error. I have an order to things, but I often have to go back and adjust my first layers later.
I like to start with the Brightness/Contrast, for obvious reasons (I like to SEE what I'm doing *cough cough* HBO *cough cough*
The I adjust the Hue/Saturation, where I reduce the saturation of each individual colour. That reduction tends to be useful when I make further adjustments in effort to 'fix' as much of the shit colour grading as I can.
The next step is a combination of a Photo Filter (set to the default warming filter) and a Vibrance adjustment layer.
Next the where most of the magic happens. The Colour Balance allows me to adjust the colours in the shadows, midtones and highlights. The aim of this is to attempt to restore some colour. It can look a little weird when editing.
Finally is the Levels. This is a final brightness edit where I add most of my contrast.
Video featuring both sets here. Pause as needed to see the adjustments
Then, change the frame delay to 0.1, or whatever suits your fancy, but 0.1 is the most natural. Then, Click the button in the bottom left corner of the timeline which Converts to Video Timeline, then select all the layers, right click and Convert for Smart Filters.
After this is sharpening, cropping and then exporting. Either File > Export > Save for Web (Legacy) or Alt + Shift + Ctrl + S
Here I change the size. (Usually adjust the height to 540px. Width depends on how I've cropped it. I my source clip excluding black edges was in the ratio 16:9, 540px is usually half that)
If you are uploading gifs to Tumblr, keep an eye of the file size. Tumblr doesn't allow for file sizes about 10MB, although for me it's always been more like 9.5MB. If that number is too high and you have made the gif as short as possible (no more the 50 frames if possible) and you have reduced the size (my limit tends to be about 480px height dependant on my crop ratio), then you change the number of the colours from 256 to NO LESS THAN 200. (lower than this may considerably reduce your quality)
Then you press Undo or Ctrl + Z a few times until you have all of your frames again and then repeat.
And all that can take half an hour or more. Hope this answers the question as well.
14 notes
·
View notes
Text
Tutorial: Making a Gif in Photoshop
(Pinboard of all my Masterposts) (Tutorials Masterpost)
Here’s a beginner’s guide to making gifs in photoshop. I’m going with the assumption that 1. you have Photoshop (I do this in Photoshop CC 2021 at the moment, but this isn’t new functionality, so other recent versions should work similarly.) and 2. You want to be able to upload your gifs on Tumblr.
Note: When I name a menu in bold followed by this arrow thingy --> I am telling you what to select from that menu. If I have two arrow thingies, it’s two menu selections deep. Etc.
Super Basic Stuff
1. Capture a video clip in MP4 format (or another Photoshop-friendly format; I use MP4). There are a lot of ways to do this--google it and you’ll find options.
2. Drag the video clip into your photoshop session.
3. Image Menu-->Image Size-->width 540 pixels, with whatever height the aspect ratio assigns. Tumblr compresses your gifs to 540, so doing it yourself is the best way to avoid icky artifacts. Fun fact: iPad retina displays throw white flashing pixel artifacts that other displays don’t, so you may be making beautiful gifs that secretly look incredibly shitty on an iPad. I learned this the hard way when I got an iPad and looked at some of my posts. I learned the 540px resize tip from the good folks in Tumblr’s pixel art community, which fixes about 95 percent of my gifs. *bows down to pixel artists*
4. File Menu-->Export-->Export for Web. These are my settings.
The settings in the top right control the quality of the gif.
These can be changed around once you get the hang of things, but since this is the super basic version, these are settings I can vouch for. This gets me nice looking gifs without a lot of artifacts. Ignore the preset name; that’s what I call the preset I made for this. On your screen it’ll say “custom” unless you save your own preset. It will remember your settings even if you don’t save a preset.
The size of the gif is at the bottom left. For tumblr, this has to be under 10 meg. UNDER 10 meg, if you make a beautiful gif and save it at 10.0 mb tumblr is very likely to reject it and make you re-save it a few bytes smaller, thanks to rounding.
If it’s too big, just cancel and go to step 5.
5. Window menu-->Timeline. In the timeline, you can trim your video by dragging the ends in, or by cutting with the scissors icon and deleting the extra bit. The controls in the timeline are fairly intuitive and limited to just what’s useful unlike premiere pro cough cough.
6. There’s a context menu in the right upper corner of the timeline window. Select that and choose “set timeline frame rate” to speed the whole video up or down. Higher numbers mean more frames overall and a bigger, slower gif. Lower numbers mean fewer frames and smaller, faster gif.
Slightly Less Basic Stuff
(after the cut)
You can convert your video to individual frames by exporting your gif and re-opening the gif, but you’re going to lose quality when you re-save so that’s not ideal. Better is to create a frame animation in the timeline. That has several steps. I’ve recorded an action for it that looks like this:
1. Timeline Context Menu-->Convert-->Flatten Frames into Clips. This will make layers out of the individual frames in your timeline video.
2. Timeline Context Menu-->Delete Timeline. This clears the timeline so you can use the layers to make frames.
3. Window Menu-->Layers. Hopefully you already have the layers window open all the time, because it’s a fundamental part of photoshop workflow, but if not, do this to open it.
4. At the bottom of the layers window there is a weird unhelpful video group with a single layer in it, shown in picture. Select it, hit the delete key, and chose “delete group and contents.” Otherwise this will become an annoying blank frame, as I recall.

5. In the middle of the currently-empty timeline window is a button that says “create video timeline” with a dropdown next to it.
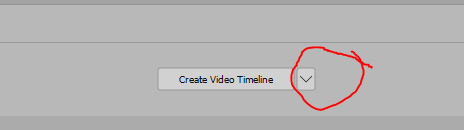
Click the dropdown to change the button to “create frame animation,” and then click that. This will create an animation with a single frame.
6. Timeline Context Menu-->Make Frames from Layers. This puts all of your layers into your timeline. Whew! You see why I made an action for these steps.
7. Now you can delete frames from the ends or middle of your animation by selecting them and using the trash can icon on the timeline. Don’t hit “delete” as that will delete the associated layer, potentially, and cause you a headache while you figure out what happened. With a normal aspect ratio for your frame and 540 horizontal pixel width, you should be able to fit around 100 frames into a <10mb gif. It does vary a lot depending on what’s going on in the scene & how much each frame changes from the one before it. And aspect ratio makes a huge difference - big square gifs are beautiful, but can’t fit nearly as many frames into the <10mb limit.
8. If you changed your frame rate and want to introduce a delay between frames, go to Timeline Context Menu-->Select all Frames. This will grab all the frames so you can apply a delay to all of them at once. While they’re selected, choose the delay dropdown from any frame and it will apply to all of them.

If a gif feels like it’s going too fast, I apply a delay of anywhere from 0.04 to 0.07 (using the “other...” option from the dropdown--all of the default delays are too much). That’s when my gif has a frame rate somewhere between 15 and 30 fps. Try some different settings and save the results out. Note: Always check your speed by loading the gif into a draft on Tumblr, since different previewers play things at different speeds, which is super annoying.
9. When you’re satisfied or want to test, repeat step 4 of the Super Basic Stuff section.
Fun with Layers
1. The order of the frames is the opposite of the order of the layers, which doesn’t matter for basic stuff, but when you start messing with adding text, layer effects, etc, this will definitely matter. You can reverse the order of the layers by selecting all of them in the layers window (NOT the frames in the timeline), and then: Layer Menu --> Arrange --> Reverse.
2. To put text on top of the whole sequence, choose the top layer in your layer window and click “text” to add your text. You can change your font, color, and size as much as you want, but you can’t drag your text around after you create it because it will (usually) only move on the current frame. So if you don’t like where it ends up, delete the text layer and try again. I usually keep text centered and add spaces to either end to put it where I want it.
3. To add text in the middle of the sequence, use the timeline to select the frame where you want the text to appear. Then go look at the layers stack; scroll up and down until you see the visible/selected layer. This corresponds to your current frame. Stick your text layer on top of that layer and -- if your arranged your frame order correctly in step 1 -- the text should appear part way through your sequence. For this gif, each “eye contact” is a separate text layer placed a little further down the layer stack.

4. To make text disappear partway through an animation, go to the timeline and select all the frames where you DON’T want the text. Keep them selected, go to your text layer in the layers menu, and hit the eyeball to make it invisible. That should make it invisible just for the selected frames. For this gif, I put all the text layers at the top but changed the visibility for each one to limit it to a particular set of frames.
5. To change the brightness of your gifs, select your top layer and go to Layers Menu -->New Adjustment Layer-->Brightness/Contrast. Adjustment layers let you make non-destructive modifications, and they affect all the layers below them so you can change the whole gif at one time.
6. To change the color balance, I like to use: Layers Menu -->New Adjustment Layer-->Selective Color. Within the Selective Color controls, choose “neutrals” and give it some tweaks. As you get the hang of it, you can do a lot more with this, but basic adjustments to the neutrals setting will make a big difference.
7. I use the BW adjustment layer to make black & white gifs - it has more options than simply desaturating - and I use a levels adjustment layer for more nuanced contrast changes than you get with brightness contrast. Hue/Saturation is good for resaturating flashback scenes.
8. Any time you like the effect of an adjustment layer, save it (or a group of them) to a new document by going to the Layers Context Menu-->Duplicate Layers and then choose “New document” in the dialog window. Save your new doc, which will just be the adjustment layer(s). Then you can use these layers on other gifs, rather than constantly recreating your tweaks. When you’re giffing a whole show like I am, you find yourself making the same adjustments over and over anyway, so this is a time saver.
All right, that’s all for now! Other tutorials are linked up at my Tutorials Masterpost. It’s small but it’s growing!
124 notes
·
View notes
Photo
💜 HOW TO MAKE A GIF WITH PHOTOPEA 💜
Hey everyone! I recently got asked to do a tutorial on how I make my gifs. I know that many people (such as myself) don’t have access to Photoshop for various reasons but they’d like to get into gif making. When I started making gifs, I only had a free trial of Photoshop, but when that ran out, I had to find another way to make gifs. Enter Photopea! A free, web-based software that you can use anywhere and that works just like Photoshop!
In this tutorial, I’ll teach you how to make a basic gif like the one I did above. I use a macbook air, but it should be doable on a regular pc too!
If you found this helpful, feel free to share it with your friends! The tutorial can be found under the cut below 💜
THINGS YOU’LL NEED
A browser (I switch between Safari and Chrome, more about this later)
A screencapping software (like MPlayer OSX Extended) or, alternatively, a presentation program like Keynote or Powerpoint.
A program to screenrecord or a program that let’s you download from YouTube
Lots of patience bc gifs are annoying little shits <3
1. GETTING A VIDEO BY SCREENRECORDING
First things first, you need to have the clip you want make a gif out of. There are plenty of ways that you can get them. I’ve seen some gifmakers say that they torrent entire movies and gif from that. The way I do is I screenrecord the part I want to gif directly from where I’m watching the movie or show (like Disney+ or Netflix [or something like 123movies if you’re a pirate 🏴☠️)]). That way, I don’t have to download the entire movie and I have just the part that I want.
To screenrecord, I use my macbook’s built-in program called Screenshot.
Open the program by pressing ctrl + command + 5 on your keyboard and you get these funny little buttons.
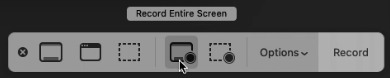
Click on the button that says record entire screen. The program is now recording your screen. Play the scene and make sure you expand the video into full screen so you get a full resolution. When you’re done, click the stop button that is at the top right of your screen (next to the wifi and battery symbols.)

If you don’t have Mac, I suggest you look into how to screenrecord on your computer, as I don’t know how other operating systems work. Sorry!
1B. GETTING A VIDEO FROM YOUTUBE WITH CLIPGRAB
Another way you can get videos is from Youtube. I use a program called ClipGrab for this. Download and open the program. You’ll get this window

Simply paste the link and chose the highest quality, then click ‘grab this clip!’. Done!
2. SCREENCAPPING
After we’ve obtained the clip we wanted, we can do this two ways. The first way is to use the program MPlayer OSX Extended. Here’s a tutorial on how to set it up, make sure you do this if it’s your first time using the program. Make sure that you have a special screenshot folder!
Open MPlayer, then go to file > open and find the video of the scene you screenrecorded or downloaded. MPlayer will now play the video. Use the left and right keys (< and >) to go go backwards or forwards 1 minute, but try not to move around too much because the software crashes if you do. If that happens, just click the reopen button when the popup comes on, and reload the video again.
When you’ve gotten to the point you want in the video, press the command + shift + s buttons at the same time and the program will now take a screencap of every single frame until you stop.
If everything goes smoothly, you should find all your frames in your screenshot folder that you’ve made before when setting up the program!
2B. USING A PRESENTATION SOFTWARE TO MAKE A GIF
If you want to skip the screencapping part and you want to have a fully completed gif, you can do the second option. That’s what I used to do before I got MPlayer. In my experience, it’s a really fast way to make a gif, but the quality isn’t really good.
Here’s a tutorial on how to turn a slide into a gif in Keynote.
Here’s a similar tutorial on how to make a gif on PowerPoint.
Basically, you make sure that the size of your presentation is the same as your video, and that you make sure to export one slide into a gif. Also make sure that you export in the highest quality!
3. LOADING THE FRAMES IN PHOTOPEA
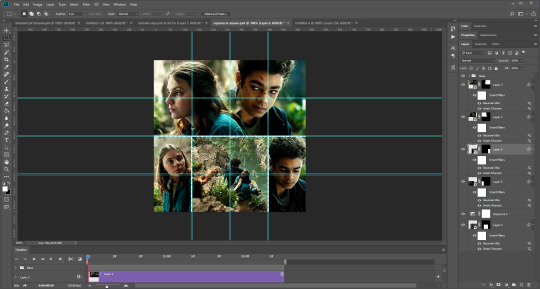
Finally, we can start giffing! As I said at the start, Photopea can be used anywhere, but I switch between Safari and Chrome. The reason why is that if I upload the frames in Chrome, the frames will be out of order. In Safari, that doesn’t happen, but the downside is that once I start editing, Safari will reload the page because it takes up too much memory.
So, first I go to photopea.com on Safari. I click New Project and put in the same dimensions as the screencaps (in my case, they are 1440x900 px). You’ll get an empty project.
Then click file > open & place and select your screenshots. Wait until Photopea has loaded all the frames, then, at the speed of light, quickly click file > save as psd before Safari reloads! You’ll find it in your folder where all your downloads are.
Next, I open Chrome (I use the incognito window because I have adblock on my usual Chrome, the program won’t work as usual if you have it enabled) and I click Open From Computer, locate your saved .psd file that you saved from Safari.
Now, you’ll see all the frames as individual layers. Select everything by clicking on the first layer, then golding the shift button and clicking on the last layer. Press command + G to group the frames into a folder. Here’s how everything should look after you’ve grouped the layers.
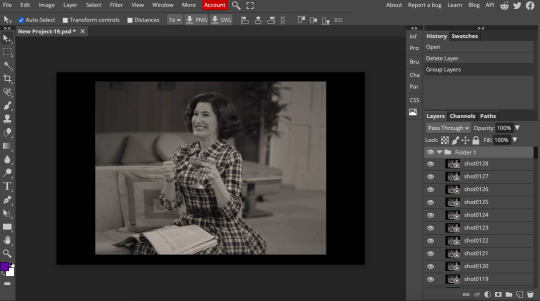
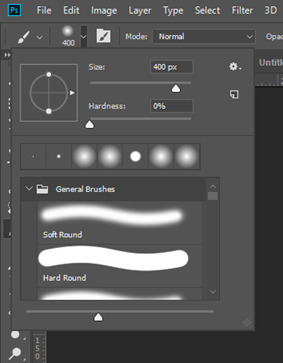
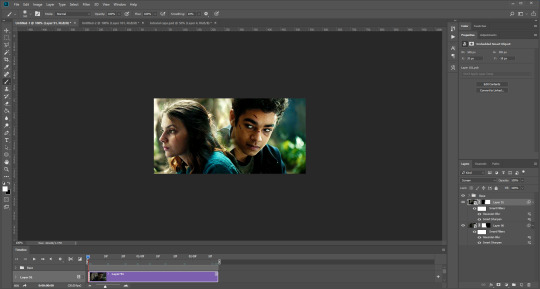
^^ See how Agnes approves! Agnes things you’re going a great job!
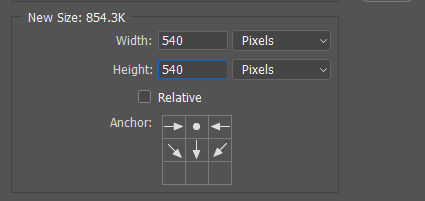
Now, it’s time to crop the gif and get rid of the black borders. Making sure that the folder is selected, click on the crop tool (or press C) and click on Fixed Size

W is Width and H is Height, write in your sizing here. Tumblr’s max width is 540, so I put the width as such. For the height, I use 405. Then you just drag the corners until you’ve selected the part that you want, like this
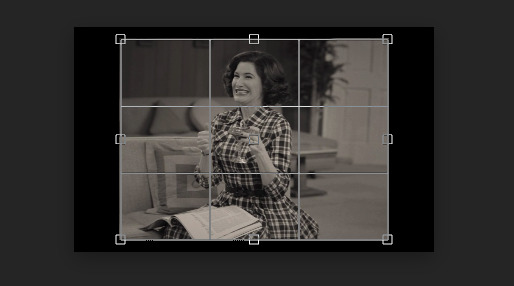
Press enter and the image will be sized down 540x405 px.
Now, our gif looks like this after cropping!
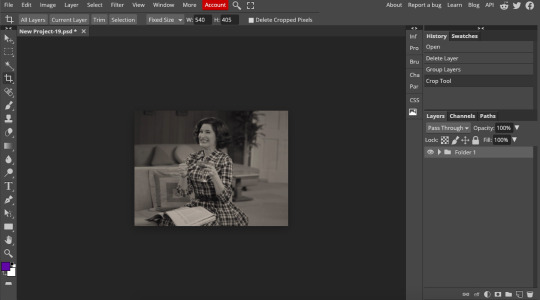
Open the folder so you can see all the layers. Select all your layers and right click on them, then click rasterize.
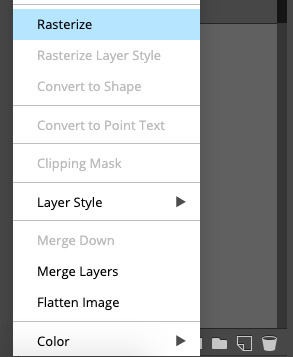
Then, go to layer > animation > make frames. You’ll now see that each layer begins with _a_ - this is crucial because this is how Photopea knows that the layers are part of a gif. If your layers don’t begin with _a_, then it will not play as a gif
If you instead already have a gif done, all you have to do instead is simply click open from computer when you first open Photopea and load your already finished gif and it’ll have the _a_ at the start of every layer. You won’t have to go through the steps of loading your frames into a new project to make your gif as it’s already done and in a folder :) Just start cropping once you load it
You can preview your work by going to file > export as > gif. Make sure to change the speed in the preview window until your gif plays the way you want it! I put my speed at 500%
4. SHARPENING
Hooray, we now have our gif! But to make it look a little nicer, it’s good to sharpen it. I always use Smart Sharpen when I sharpen my gifs, and many other gifmakers use that too. It’s really good :D
To sharpen your gif, again, make sure that all your layers are selected. Go to filter > sharpen > smart sharpen. I use two different settings for my gifs, it really depends on the gif.
Setting 1 (which is the default setting)
Setting 2
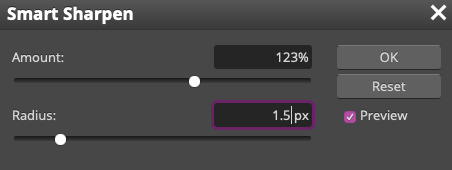
Again, it depends on the gif, play around until it looks good to you!
Here’s our gif after sharpening it
I ended up deleting the last few layers as the gif got bigger than 10mb (that’s Tumblr’s file limit, it your file is bigger than 10mb, it won’t upload). I also added a gradient map and it made the file size smaller, more about that in the next segment!
5. COLORING
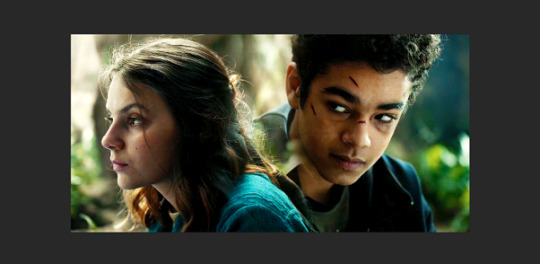
Here’s the fun part! Now we get to play around with the gif, making it brighter and look Extra Nice™! Since this is a black and white scene, I make sure that the blacks and the whites really pop.
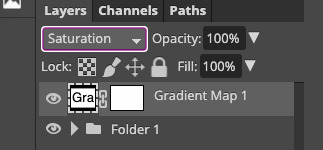
Notice how in the original scene it’s not actually b&w, it has a slight sepia tint to it. I want to remove this, so I add a gradient map by clicking on the white square with a black circle (I want to point out that we’ll be clicking on this button a lot in this step)

and I change the blending mode to Saturation
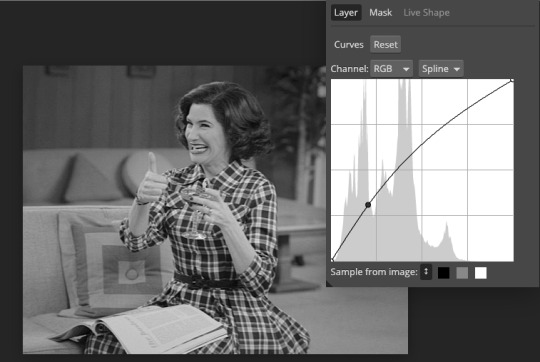
Then I add a curves layer using these settings
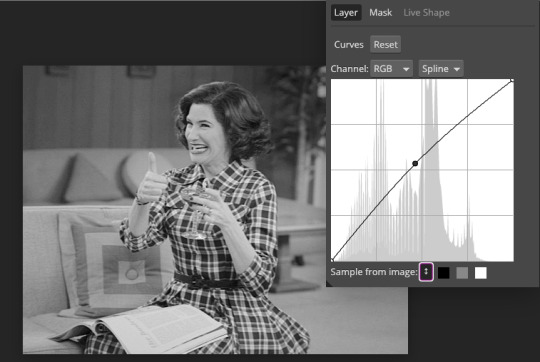
Then a second curves layer
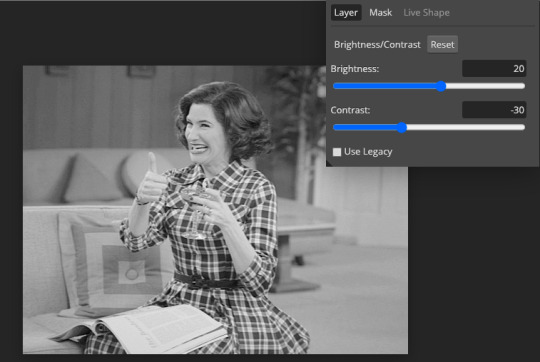
Brightness/contrast
Then my favourite! Selective color! First layer, I deepen up the blacks
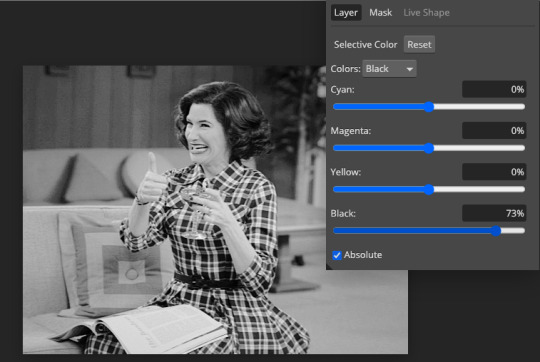
Then another selective color layer, this time the whites
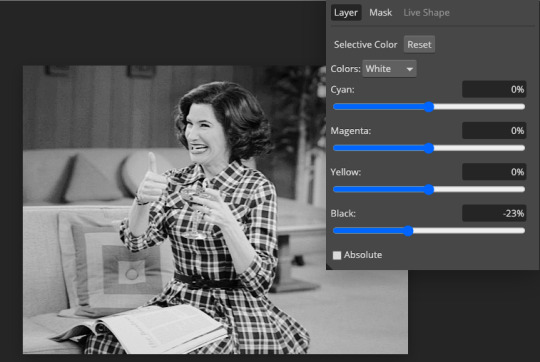
Lastly the neutrals

Here we have the final results!
Wasn’t this a gas! I hope this helped you out, let me know if you want to know anything else about gifmaking, I’m happy to help! Also, sorry if I wasn’t very clear, I’m bad at explaining 🙈
MORE RESOURCES:
Here are some other tutorials that are really helpful in making gifs. These users use Photoshop, but you can still use their tips most of the time in Photopea too, you just need to play around and see what works for you!
Gifmaking for beginners by @chloezhao (this one saved my life)
Pale coloring tutorial by @itsphotoshop
Two-Toned Gif Background by @clubgif
Text with white outline tutorial by @anya-chalotra
#resources#tutorial#gif tutorial#photopea#photoshop tutorial#photopea tutorial#tuserfran#userlaur#userlaura#usermirna#(tagging mutuals if you wanna share :P)#my tutorials
979 notes
·
View notes
Photo

Requested by @tennant!
For this tutorial you will need:
Some basic gif-making knowledge (see my last tutorial!)
I’ll be using CC 2017 to do this, but as long as you have the timeline option, this will work for you! 🥰
So, in a sort of part two to my other gif tutorial, (https://luke-patterson.tumblr.com/post/636980573506813952/) this is a slightly more advanced part of gif-making. But I promise it’s easy when you know how!
Assuming you followed the last one, you’ll already know how to make your gifs into a smart object, so we’ll start there!
PART ONE: BLENDING
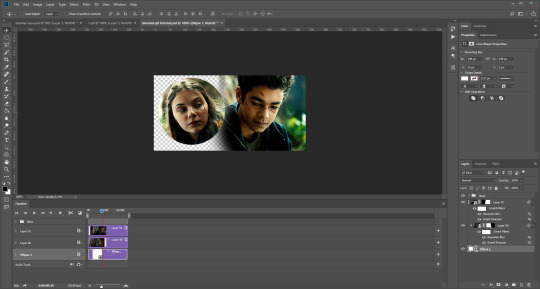
Drag both of your gifs into the same file. For this to work, your gifs have to be the same number of frames, or at least cropped to the same length in the timeline window, otherwise one will loop before the other, and it will mess up the loop of the gif. (For when we get to the multiple gif part, I recommend having between 60-80 frames, so it stays under tumblr’s 10 MB limit.) As this tutorial uses smart layers, they can both be sharpened as well.
(I made this gif 540 px by 268 px, because I’m going to add more to it later. But we’ll cover that further down in part two!)
Honestly, I find it so much easier to put my colouring on top of both/all the gifs, and then clip individual layers down onto a specific gif, if that one needs more of its own colouring. That way, the extra layers don’t interfere with the other gif(s). It’s so much less confusing visually for me than having lots of groups with their own colourings, and it makes moving the gifs around simpler.

Position them side by side, one on top of the other. Obviously, you can play around with the positioning: this may be easier to do once they are blended, especially as some gifs may be smaller and you need to try them in different places. For example, this is a screenshot of a Lyra/Will set I made in the past, with three blended gifs of different sizes:
Add a layer mask to both of your gifs. You might not need to edit both, but I usually do, as I like to balance how much one gif blends into another! Using the brush tool (set to black, when you’ve clicked on the layer mask), we want the brush to be very big, and very soft.
The bigger the brush, the more seamless the blending will be! By painting parts of the top gif away, the other gif will start to appear underneath. It’s not always necessary, but I usually like to set my top gif to ‘screen’ as well. This helps the gifs merge into one another even more, especially if you have one gif which is darker than the other!
As you can see, by setting it to screen, the top gif has already started to look blended. Then, you can start to paint. As the brush is so big, you might end up painting away too much of the gifs, like so:
I usually go back and forth, switching between black to remove parts of the gif, and white to add it back (always painting on the layer masks). Sometimes, you might need to make the brush slightly smaller, just to fill in tiny gaps.
Another thing you can do is to add a solid black colour underneath all your gifs, just to fill in any spaces. (Sometimes, I do this on top of gifs too, to create spaces where I want blended gifs to go, like in my current header!):


Anyway, back to the original gif. My blended gif is now pretty much how I want it to be, except Lyra is quite far to the left, and Will is taking up a lot of the screen:
So I’m going to see how they look at the start of the gif, to determine how far right I need to move them both to get them mostly in the middle:

And that’s it! Now you can export them [file > export > save for web (legacy)] and you’ll have to change the timing back to 0.05, or use the action I introduced to do this in my last tutorial.
PART TWO: MULTIPLE GIFS
To put more gifs underneath this one I’ve made, I expanded my canvas. Go to image > canvas size. Make sure you click the little ball to the top in the anchor section, so the canvas expands underneath your gif. If you leave it in the centre, it will simply expand from the middle, or the left, right, etc.
Next, we need to remove the black line at the bottom of the gif.
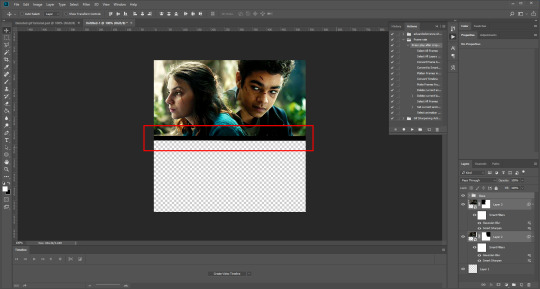
You want to select the space for cropping using the rectangular marquee tool, so in this case, 540 px by 268 px. The tumblr spacing is 4px between each gif in a set, so however many gifs you want, you have to account for 4px less pixels inside your one gif, to give the illusion there are multiple (unless you want them to touch).
For example, (there’s a little maths here: forgive me!) two gifs of equal size, placed side by side, must be 268px in width or length, because (268 x 2) + 4 = 540. (There is one 4px gap in between). For four gifs, it would be (132 x 4) + 12 = 540. (For the three, 4px gaps). For three gifs of equal size, it’s a bit different. These must be 177px, 178px, and 177px, to ensure there is 8px of space left over (two gaps).

Then, make sure the colour white is the primary colour selected on the paint pad (this is vital) and (in this case), the layer mask from before when we blended, is selected. Press ctrl (command on mac), shift, and i to invert your highlighted area (or select > inverse) and then simply delete the excess line, (either using the delete button on windows, or fn + delete on mac, I think!) Then, do this again for the other gif.
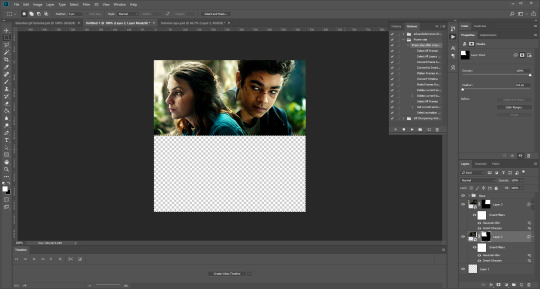
And voilà! It’s gone. You can also paint it out (using the black colour as the primary colour to erase), but I would still recommend highlighting the outline of the area you want to erase, using the marquee tool, so that you can paint it out in a straight line, and don’t paint into your gif and erase parts of that by accident.

Now to add in the other gifs! To do this, I use guides, but you can also use lines at a size of 4px, to map out the spaces in between gifs. If you go with lines, just make sure you delete the shapes after. With guides, they are not actually ‘in’ your gif, so you don’t have to remove them before you save. However, guides only work for straight lines, so gifs with other shapes will need to be made using lines, (but I will touch on that at the end!)
I actually have a few psds saved with guides already on, so that I don’t have to draw them out every time. If I was making a set with three gifs in a row, this would be different, but I usually stick to two or four (or three with one big square/rectangle, and two little squares), so this is my most used psd. The guides are set at: 132 px & 136 px, 268 px & 272 px, and 404 px & 408 px, both horizontally and vertically!
I have a red colour underneath just because I find it easier to see the lines between gifs this way - if you do the same, just remember to turn it off before you save your gif, otherwise it will have the colour red instead of mimicking the transparency between gifs.
Now, make a second gif! I decided to have a square in the middle as you can see in the title, and then two rectangles either side.
Then you want to resize it, in this case to 268 px by 268 px, and drag it across into your main file, or go to layer > duplicate layer, and move it that way. Don’t worry, when you move it, it will show the whole gif as if you haven’t cropped it. The reason I crop and resize it beforehand, is so that I can ensure it will be the correct size when I remove the excess parts of the gifs I don’t want, (rather than making it 268px including the black line for example, which would be wrong.)
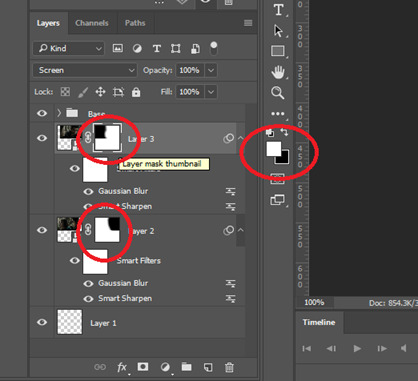
Then, as before, position the gif where you want it to go, and highlight the area you want to be in the gif. Whilst this is selected, (again ensure white is the primary colour on your paint pad), click the layer mask:
Then the excess around the gif should be gone! (Making a gif of a gif tutorial... meta, lmao.) This way, if you decide you want to change the shape of the gif, or move it slightly, you can just paint parts in and out, or delete the layer mask, move the gif, and reapply it!
You can then sharpen and adjust your colouring to the gif as needed! Next, go ahead and repeat this process for your other gifs. Selecting the area, adding a mask, and sharpening. By the end, you should have something that looks like this:
PART THREE: OTHER SHAPES
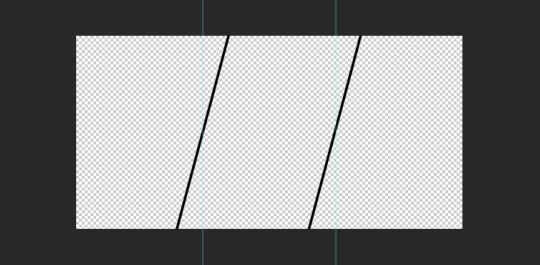
If you want to use other shapes (which I haven’t tried myself until now, but I can talk you through some thoughts!) You can use the line tool. So, for example you could make a layer with the lines at 4px, merge it, and then at the end delete it from your gif to leave the gaps transparent:
To make a gif any shape you want, choose a shape (either use the shape tool, or get a png of it), and using a clipping mask. Make sure your gif is above the shape layer, then right-click the gif layer, and select create clipping mask to clip it down:
OR you could use a circle, and then delete the circle to make it look transparent:
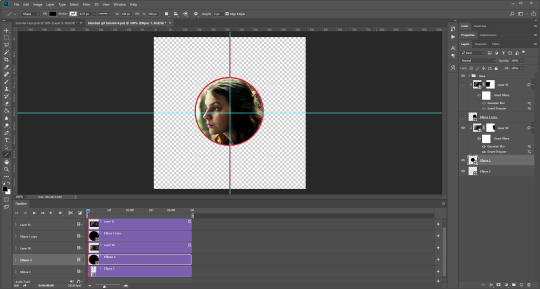
The best way to select items which are not rectangular, (so you can’t use the marquee tool), is to use the pen tool. Click around your gif so that it’s got a border of what you want selected. Once you have outlined your gif, right-click and choose make selection:
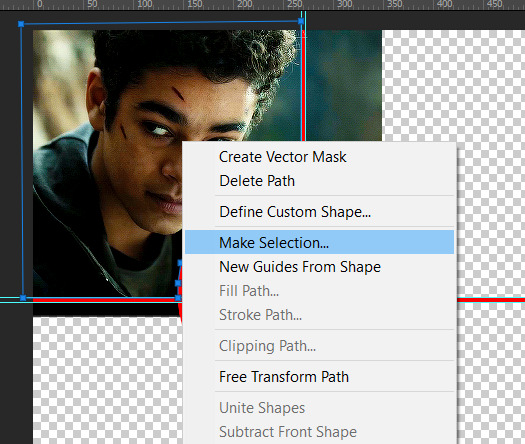
Then set the feather radius to 0, and then the area you want should be highlighted in the same way as with the marquee tool above, so you can add a layer mask, etc. However, as the pen tool is not always that accurate, there is a little white gap here where it’s not a perfect circle.
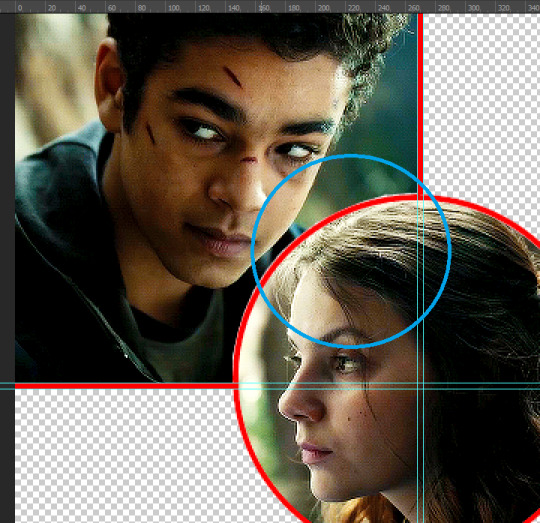
A way to overcome this could be to make all the gifs you want, and then simply add one on top with a white 4px border, so it gives the illusion of being transparent! (As I have done above, but save it as white rather than red!)
If I find a better way to do this in the future, I will update this tutorial. I hope this is helpful, and thank you for reading 🥰💖
#gif tutorial#tutorial*#completeresources#yeahps#chaoticresources#allresources#mikesmom#usertom#usersmile#heavensentnetwork#if there's any mistakes pls let me know#i am so tired rn fjghfjhgfjgh
693 notes
·
View notes
Photo
I've recently been asked by several lovely and curious souls to break down this Witcher set, so I thought I’d go ahead and put together a proper tutorial for everyone. All you need is Photoshop and basic giffing knowledge, preferably using the timeline. This isn't necessarily simple, but I would say it's one of the simpler things I've done—somewhere between easy and medium difficulty, maybe.
I. MAKE YOUR BASE GIF
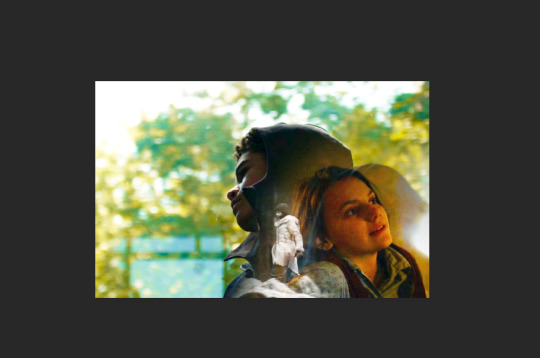
To start, we’re going to be making our base/background gif, which is 540x540. You can color it any way you’d like, but I picked black and white for that particular set because I didn’t want the final product to be too ‘busy’. I wanted to keep the attention on a pop of color at the center instead, which ended up being the second gif and the text.
As a quick sidenote:
Since the gif is so big, I would recommend using at least 1080p footage. I’d recommend always using 1080p footage regardless, but I wouldn’t call it 100% necessary unless you’re making larger (540px, as opposed to 268px or 177px) gifs.
Keeping in mind that the second gif and text will be going in the center of the gif, you’ll want to align the subject/s accordingly. For example, I kept Geralt and Jaskier and Yennefer mostly to the left or right.

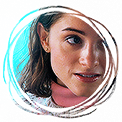
Here is the base gif I'll be using:

And here is a tutorial on how I make my black and white gifs if you’d like to get the same grain effect.
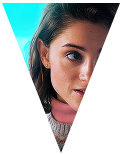
II. MAKE YOUR [SHAPE] GIF
Next is the gif for the shape. Sizing is up to you and ultimately depends on the shape you choose. For me, I know I want an isosceles triangle, so the height of my gif is going to be slightly bigger than the width. My dimensions in the original set were 118x150, so I’ll be making my gif 122x154. You want to oversize here since we’ll be trimming the edges off later on.
After sharpening and coloring, this is what my gif looks like:

III. GROUP YOUR LAYERS
Sounds simple, right? And it is, but it’s as pivotal as it is easy. Maybe it’s dramatic of me to say that I live and breathe by this step, but I kind of do live and breathe by this step. It’s the same technique from this tutorial, and it’s a pivotal step in my blending process also.
Having said that, let’s put all your layers in a group. Do this for both gifs!
CTRL + A or Select > All
Layer > Layer Mask > Reveal Selection

IV. CUT OUT YOUR SHAPE
You can go about this a couple of different ways, but regardless, it’s as simple as editing your layer mask. No, really. It’s why I love grouping layers and slapping a layer mask on. It makes life so much easier in the long run.
➥ PHOTOSHOP’S CUSTOM SHAPE TOOL
The Custom Shape tool on Photoshop has all the basic shapes you need. Triangles, circles (even though you could just use the round selection tool), stars, and even all the playing suits.
Go ahead and pick a shape to add to your canvas if you haven’t already. Don’t worry too much about the dimensions; you can manually input a specific width and height at the top. Rotate it if you need to (I’ll be rotating my triangle 180° so that it’s upside down) or leave it as is, but when you have it sized the way you’d like, center it and then merge it with a new layer. This way, we can right click on the layer thumbnail and select ‘Select Pixels’.

Next, click on the group layer mask. Invert your selection [SHIFT + CTRL + I or Select > Inverse] and then invert that part of the mask [CTRL + I or Image > Adjustments > Inverse]. Your gif should now be shaped accordingly.
➥ B&W TEXTURES AND VECTORS/PNGs
Alternatively, if you don’t want to limit yourself to basic shapes, you can use a texture or png of anything at all. An instrument, a specific symbol, something abstract, maybe even a flower—it can be literally anything, so long as it’s pure black and pure white. (If you aren’t familiar with how layer masks work, white is what shows and black is what’s hidden. Anything in between and what you get is partially or not all the way transparent, which will look wonky when the smaller gif goes on top of the base gif.)
For example, here’s an icon template by @argetnallison:

Select your image (CTRL + A or Select > All) and copy it.
Go back to your gif. Press ALT and click on the group layer mask at the same time. This will pull up your layer mask.
Paste your image onto the layer mask.
Et voila, as the French and magicians and... other various individuals including myself say.
➥ PAINT BRUSHES
If you’re like me and have a bunch of custom brush sets downloaded, brushes are another way to get fun shapes. If you don’t have any downloaded but are interested in trying it out for yourself, DeviantArt and Brusheezy are the best (or at least my favorite) places to look for them.
It’s the same steps as above, but painting instead of pasting.
V. FINISHING TOUCHES
Now that you’re probably sick of me going on and on about shapes this and shapes that—we get it, Ava, there are shapes, get on with it—it’s time to drag the gif shape onto the base.
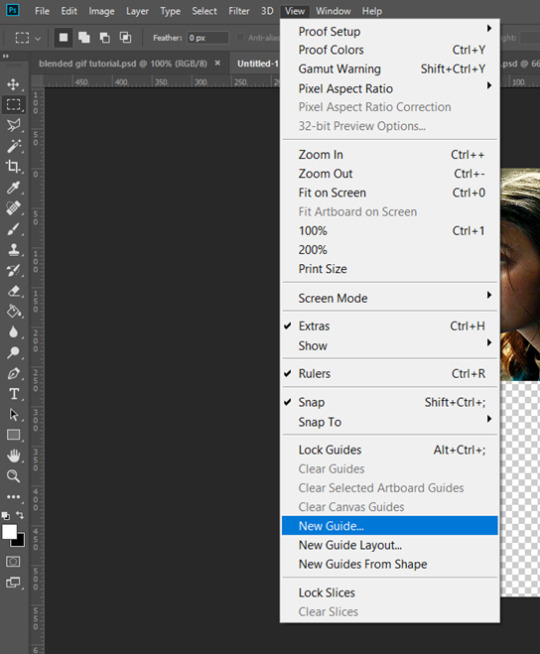
To center, because I am admittedly border-obsessive when it comes to things being perfectly 100% centered, I set guides [View > New Guide] in the middle. It’s your width and height divided by two, so I have a vertical guide at 270 and a horizontal guide at 270.
For a “3D” (I don’t know what else to call it, other than “well, I just thought it looked neat”) effect, I added a gradient with the same exact layer mask as my gif shape and positioned it underneath and slightly below the gif.
All that’s left is to add text (I wrote a mini tutorial on gradient text here if you’re interested) and we’re finally done!
You can also do this with more than one shape, like here:

Or make the shape full-scale, like here:
Happy editing!
#completeresources#allresources#yeahps#itsphotoshop#resources#tutorials#ps asks#mine*#as always feel free to reach out if any of this is confusing#i'm sleep deprived so i feel like the chances of that are pretty likely
1K notes
·
View notes
Text
COMPREHENSIVE GIFFING TUTORIAL (vapoursynth + ps cc 2018)
+ some tips and tricks on color correction, blending and subtitles
You guys asked for it, so here we are! This is by no means the gold standard to giffing. Rather, this is simply my process and my own preferences. Take it as you will. Additionally since I use a mac some of my controls/panels may look different than what you would see for windows users.
DOWNLOADING YOUR SOURCE
This step is extremely important to the quality of your gifset. If you want high-quality gifs I would recommend giffing sources in 1080p whenever possible (especially if you’re going for larger dimensions). You may get away with 720p for smaller gifs. For kdramas, your go-to source would be dr*maday or torrents. (you can search my faq tag if you’d like to know specifics on finding and downloading torrents).
IMPORTING + PROCESSING YOUR FILES WITH VAPOURSYNTH (VS)
Please note that this tutorial does not cover basic installation and set-up of vs. If you would like to know how to download and set-up vapoursynth (it works for both mac and pc) along with some of it’s basics you can find more information at: https://hackmd.io/@nibreon/vapoursynth-book/%2F%40nibreon%2Fvapoursynth-book
Once you’ve identified what portion of your video you’d like to gif, simply drag your video file into VS. Specify the start time and duration of the clip you’d like to import. Typically you’ll be aiming for ~3-8 second clip depending on how big your gifs will be. I am very lazy when it comes to importing. The less of it I have to do, the better. Therefore, I often import clips that are 10-15 seconds long, sometimes even up to 20 seconds. I wouldn’t recommend going over 15 seconds most of the time though, because this will usually bring you over the 500 frames photoshop allows you to import at once. (when I do go over, I will sometimes import the processed VS file into PS in segments). You can also choose to import the VS output as segments if you want all your gifs on separate canvases. (I'll go into more detail on this later)
Once you’ve imported the clip into VS your screen should roughly look like this once the resizer pops up:
In the top left is where you will be applying your cropping, sharpening and denoising filters. Cropping: Keep in mind the Tumblr dimensions: 540px for full-width gifs and 268px for half size gifs, 177/178/177px for 3 gifs across. The height is completely up to your own preference. Usually I work in 540x300px. Once you edit those parameters you can drag/resize your video file to fit your new canvas. Sharpening + Denoising: You can choose to skip this if you would rather sharpen in ps. I personally do all my cropping, denoising and sharpening in vs. I use finesharp and KNML for sharpening and denoising respectively. Once you select those two filters from their drop down menus, be sure the select the checkbox as well. You should now notice 2 additional lines of code in the top right box. The line that reads: video = core.knlm.KNLMeansCL(video, 0, 6, 4, 1.2, channels="YUV") is where you will adjust your denoising parameters. You will only be adjusting those 4 numbers. I usually use: 0, 1, 0, 1.2. Now find the line that reads: video = hnw.FineSharp(video, sstr=0.22). These are your sharpening parameters. once again we’re only adjusting the number at the end. I typically use somewhere between 0.33-0.55. Depending on the quality of your source and preferences these parameters may change.
Here is a breakdown of the KNML parameters (source: @/nibreon HackMD):
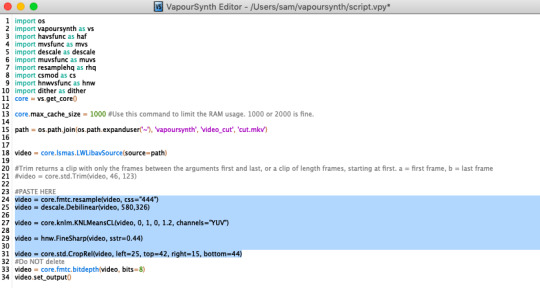
Once you have finalized your parameters, copy all the code in that top right box and paste it into your vapoursynth editor. Note: you can ‘inactivate’ certain lines of code by adding the # symbol at the start the line. That line of code will then be greyed-out. This is what your code should now look like (the highlighted section is the part I just copy and pasted):
If you would like to preview your filters and see if you need to make any adjustments, simply navigate to the top bar and select script > preview. If you like what you see, great! If not, you can adjust the parameters directly in the editor until you see a result you’re happy with. Once you’re happy you can move onto the final step in vs: processing.
Processing: Once again, navigate to the top bar and select script > encode video. Another window should pop up. Make sure you set ‘header’ to ‘Y4M’ then click ‘start’. Patiently wait for that to finish processing. The longer your clip is and the more filters you add, the longer it will take.
IMPORTING YOUR CLIP INTO PHOTOSHOP (PS)
Now you’re done with the vapoursynth section! Not too hard, right? I use the timeline method when I gif. To import your video file into ps navigate to file > import > video frames to layers. Here you can use the sliders to further specify what range you would like to import. Make sure the ‘make frame animation’ box is checked. To optimize smoothness of your gif, avoid checking the ‘limit to every _ frames’ box. Hit ‘OK’ and wait for the frames to import. Depending on the size of your clip, ps may notify you that you are importing a large file and it may take a long time to process, simply say ‘ok’ to this. UNLESS you get a message saying it will limit to 500 frames. This means your clips contained more than 500 frames and you should select a smaller section to avoid cutting out any critical parts. (Note: you can always go back and repeat this process to select a smaller range of frames from the same video clip until you’ve imported all the frames you need).
Timing: You can adjust the timing of your gifs before converting to timeline. Select all the frames (Navigate to the icon with the 4 bars at the bottom right of you screen. Select “select all frames”). Click the drop down next to the timing of any of the frames. Select ‘other’ and input a your preferred timing. I personally use ‘0.04′ but I've seen people use anywhere from 0.4-0.8ms. Also as a note: when you convert your gif to timeline it has a tendency to mess up your timing so even if you input 0.04 or 0.05 it won’t actually be that timing later. If you want the true frame rate you can set your timing right before saving. You can also adjust timing at the end. (see export/saving gif section for more info)
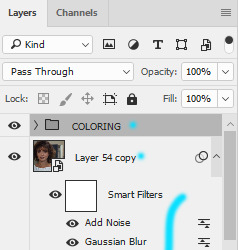
Now the next part can be tedious and for that reason I’ve created numerous actions to speed up this process. But for the sake of this tutorial I will walk you through the steps. At the bottom of your screen is your timeline. As you can see, it defaults to frames, but we want to convert this into a smart object so that all your coloring/edits are made to all of the layers. To do this: 1) Navigate to the icon with the 4 bars at the bottom right of you screen. Select “select all frames” 2) Now select all your layers in your layer panel. On mac you can use cmd + option + A as a shortcut. 3) Back to the icon with the 4 bars, select “convert to video timeline” 4) Right click on all layers (which should still all be selected) and find “convert to smart object”
(Aside: Actions) actions are SUPER helpful to streamlining your giffing process. you can find actions people have made available on resource blogs like itsphotoshop OR you can choose to make your own custom actions. To do this, all you need to do is locate your action panel. Then from the controls at the bottom of the panel select the one that looks like a sheet of paper to “create a new action” Once you’ve named it and hit ‘ok’ the record icon should now be red. PS will now basically ‘record’ whatever you do. To stop recording hit the square icon. Now whenever you want ps to execute the same set of steps you just did, you can locate the action you just made and ‘play’ it by selecting the triangle icon. I highly recommend making an action for the steps I just outlined above to convert your gif into a smart object timeline. It will make your process much faster and more painless.
COLORING
Now the fun part! I focus on emphasizing the colors already present in the video source or getting rid of some less-than desirable overtones when I color. It gives the gif a natural look, but makes everything pop a little more. We will be working with selective color, curves, levels, and brightness/contrast mostly. This is the original gif I will be using to demonstrate coloring:
Curves: I always start with curves. The first curve layer I use to set a desirable black point. To do this, locate the top dropper icon from the curves panel and select the darkest point of your image. This will set that section to “true black” Feel free to play around with this until you find a desirable outcome. Now add another curves layer. This one we will be using to adjust the brightness/contrast. First, I always start off with ‘auto’ and see where that takes me. If you like the outcome, great! If you don’t play around with the different curve points until you get an outcome you like.

Selective Color: This adjustment layer will be your best friend. For me, I will typically work with reds, yellows, and black. If the source has a lot of blue/cyan I will use those too. Basically look at your source and determine which base colors you’d like to emphasize/alter. For blacks I usually up the black by +1-5 depending on the source. For reds, it also depends on the source. But I will typically either decrease cyan (to make red stand out more) or increase cyan (to make the red not look so overexposed). You want to be careful here. Overexposing the red can make your skin tones look like red tomatoes! And for my content base, where most of the actors are of asian descent, we should be emphasizing the yellows and NOT the reds (see aside on color correction + skin tones for more info). After altering the reds to my liking, I do the same process for the yellows. To bring back natural skin tones and color, you will likely want to darken the yellows, expose them a bit more and maybe even up the yellow slider. A common rule of thumb: if you want to make any of the colors less exposed, increase the cyan. If you want to increase exposure on any of the colors, decrease the cyan. If you want a color to appear more strongly or prominently, increase the black. The magentas and yellows I use more to adjust hues. You can add multiple selective color layers to further emphasize your changes.
Levels: Now we will work on the lighting some more. This creates more contrast and depth to your gif, often making them look ‘crisper’ To emphasize the bright parts, move the right-hand slider to the left. The emphasize the dark parts, move the left-hand slider to the right. You may also choose to move the middle slider to adjust more neutral lighting. Do so until you find a setting to your liking.
Miscellaneous: Depending on your gif you may need to play with other adjustment layers. Some other ones I often use are the brightness/contrast and exposure to adjust lighting and add more dimension to the gif. For additional color correction I use color balance and to a lesser extent hue/saturation and vibrance.
(Aside: Color correction + skin tones): We are anti-whitewashing and anti-redwashing when it comes to asian media. Like I mentioned earlier, natural asian skin tones have yellow undertones, not red/pink. Therefore when you’re bringing in color you should be mindful of this delicate balance. Adding more red does NOT equal un-whiteashing. Be VERY careful how you balance the yellows with selective color/hues/color balance.
^^ Here is an example of what I mean by overexposing the reds. Poor seungho is looking as sunburnt as a cherry tomato. Note: if your original source is already overexposed with red, fix it! You can do this by applying the same basic principles I explained earlier. Try upping the cyan on the reds in selective color, or shifting the color balance to favor cyan over red with the color balance adjustment layer. You may also choose to favor the yellow over blue.
^^ Now this is straight-up whitewashing. This is what happens when you are not careful with your correction of yellow. I’m not saying you can’t touch the yellow slider or get rid of some yellow form the overall image (because sometimes it is very much needed), but you should be very mindful how your corrections can affect skin tones. If you decide to decrease saturation of yellows, or decrease yellow in the selective color section of the reds, do so with caution. If your reds are looking too pink, add some yellow in the red selective color, up the yellow and black of the yellow selective color.
^^ If you hit that happy medium, you can emphasize the natural skin tones without overexposure. Here the underlying tones are very much still in the yellow range.
(Aside: Blending): I will very briefly talk about how to blend two gifs together. First make sure you’ve imported both your gifs into ps and converted them into the timeline format. On one of the gifs, right click the gif layer in the layer panel > duplicate layer > select the canvas of the gif you’d like to blend the gif with. On the canvas you just copied your second gif to, you can now drag the two layers around the on the canvas to get your desired positioning. On the top gif apply a layer mask. This can be found in your layers panel at the bottom, and is indicated by the white rectangle with the circle. Next, make sure you select the mask in the layer panel (it will show up as a white rectangle on the layer you applied the mask). Grab your paintbrush tool and make sure your color is set to black. Now you can effectively ‘erase’ the part of the top gif you don’t want to show anymore. I recommend setting your brush hardness to 0% to get a smoother transition. You can also play with the opacity settings. If you want to add back in a part you erased, just switch to a white paintbrush and you will be able to undo what you had just ‘erased’ with the black. When you merge the gifs, they will play the same number of frames. This means your blended gif length is limited by the gif with the fewer number of frames. You can move around your timeline layer and shorten the included portion by dragging either end of the timeline layer in until you get both gifs to play the parts you want.
CAPTIONS/SUBTITLES
I often get asked about my subtitle font/styling settings. Personally I find the best fonts for subtitles are calibri and arial. I use calibri with the following settings: 12-14px, bold italic plus faux bold, 1px black stroke (optional: drop shadow set to ‘multiply’ at around 85% opacity), and tracking (VA) set to 75. If you would like your subtitles to fade-in or fade-out you can apply the ‘fade effect’. Locate the b/w square icon in your timeline panel. Select fade and drag it onto your text layer in your timeline. You can then right click on the wedge shape to adjust your fade duration. I usually use 0.35s. If you drag and drop the effect towards the beginning of your text you can get the fade-in effect. To get the fade-out, simply drag and drop your fade towards the end of your text layer.
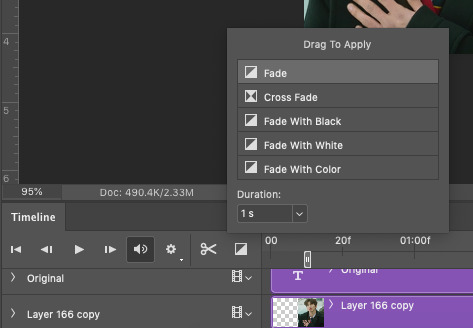
SAVING/EXPORTING YOUR GIF
We’ve reached the final stretch! If you need to adjust your frame rate timing: you will need to revert your timeline to frames. To do this: 1) Navigate to the icon of 4 bars at the right of your timeline panel. Select convert frames > flatten frames into clips. 2) Navigate to the icon of 4 bars at the right of your timeline panel. Select convert frames > convert to frame animation > when promoted hit ’ok’. If at this point you see more than one frame in your timeline panel, delete the frames until only one is left. In the example below I would delete the first frame by hitting the trash icon from the timeline panel.

If there is only one frame, leave it as is. 3) Navigate to the icon of 4 bars at the right of your timeline panel. Select ‘make frames from layers’ You will most likely need to delete the first frame in your timeline panel (it won’t have your coloring). Sometimes ps adds in some ‘blank’ frames as well, delete those too. Now you can adjust your timing.
Once your timing is set: When you’re saving your gif, just keep in mind it must be under 10mb. Navigate to file > export > save for web. When it comes to your save settings I typically use either selective diffusion or adaptive diffusion. I also also occasionally use adaptive pattern (I find this is best for dark scenes without a lot of contrast). Set colors to 256, quality to bicubic and looping options to forever. If you want to preview your gif, hit the preview button in the bottom left. Otherwise, go ahead a hit ‘save’ and you’re DONE!
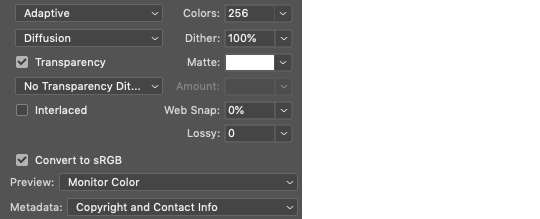
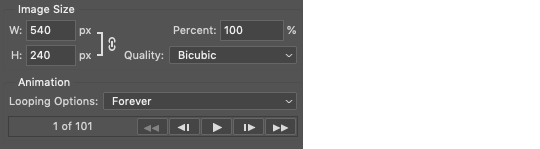
ADDITIONAL RESOURCES
Feel free to check out my ‘ps things’ tag for more photoshop stuff/mini tutorials. Additionally @/nibreon and the hackmd site I linked previously are your best resources for vs questions. If you would like to see my giffing process in motion feel free to check out this video. It’s sped up but you can slow down the playback. Additionally be sure to check out resource blogs like itsphotoshop for more helpful tutorials and resources.
If you reached the end of this beast, kudos to you! I hope this helps and never be afraid to reach out with any questions.
526 notes
·
View notes
Note
Hi! I don't know if this is an annoying/difficult question, sorry if it is, but do you have any advice at all for modelling sims based off real people? Your sims are SO crazy good. When I try to make them they end up looking... eh... Vaguely like the person? But there's a huge gap between that and some kind of 'spark' some simmers seem to manage to capture.
Hello! Definitely not annoying. Difficult, as in how difficult it is to answer? Maybe. I'm gonna go off on a couple of tangents. But I'm gonna try my best to explain the process. Which isn't really much of one sorry.
There's a handful of tutorials and tips out there regarding reference photos and like... proportions and all that so I won't cover that.
I use that as a general guide of course, but mostly I just save some photos of the person at various angles and focus on one feature or two at a time. Literally going back and forth between reference photo and my game. I think if you try to get everything at the same time, it really makes it easy to get frustrated with whatever your sim looks like at the moment. Making sims in general is a combination of a LOT of things depending on your style.
I can point out ALL the flaws with my sims based on real people. In my experience, it’s about getting the defining features of a person close enough to the real thing so that it resembles them. I don't think you need a complete copy to get the point across, however i do think some people and features are harder to emulate than others. I've been working on some sims for YEARS, and they still don't work out lol
and take a look at this progression on my sim based on Z4ne H0ltz starting back in 2015!
that first screenshot:
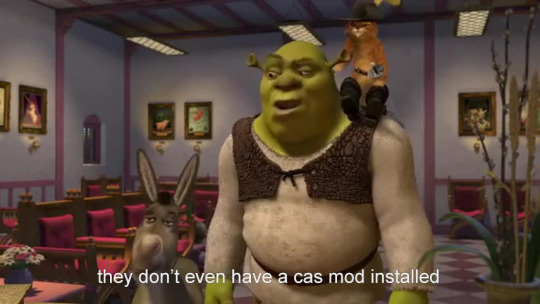
Personally, I get a little lost if I work on a sim too much all at once. I find some time away makes me less tired and frustrated. Just pace yourself :)
Also if you need any help, shoot me a message here or on discord. I promise I don't judge or anything.. it's sims who cares lol
TO START...
I suggest starting with the head and its shape. Starting off with a game-generated sim, the first slider I get to is head width. It's usually too dang wide for my tastes. And then adjusting the general position of the the features. You can always change things later, so you don't have to know exactly what you're going to do, but as I've mentioned before, sculpting sims up in CAS is just practice with sliders!
Also in the long run, you may want to use Pu+Chi House's Smooth Face Normals slider! I attempt to explain and show what it does here. I've uploaded the slider here: https://simfileshare.net/download/984204/
This is gonna be a doozy sorry in advance if the read more doesn't work
SLIDERS SLIDERS SLIDERS
Big sliders like Pu+Chi House’s face shape sliders dramatically change the face shape, and it could save you a lot of time! I highly suggest using these to get rid of the weird large jaw sims can get.
Play with different sliders and how they interact with one another!
Example: jaw width and Cheek Fullness affect the same area. if you need a wide jaw and don’t want cheek distortion, you can use cheek fullness, lower the jaw width slider and then edit the cheekbones from there
Knowing what sliders move what and how it can work to your advantage is key! I cover this in my reply post about noses.
For visual reference:
I start out with my nose but I want the nostrils to sit further on the outside
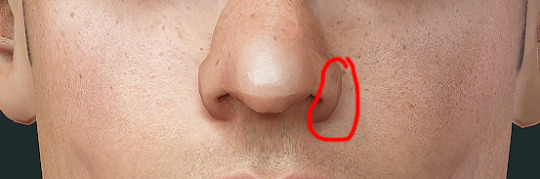
so i go in and use the nose width slider and raise it to widen the lower nose:

Then lower the nostril scale slider

Comparison:

as you can see, i kind of achieved what I wanted, but also widened the nose tip too! Welp, that takes another slider I have, Tip Width. And I'll adjust that accordingly! It's really just a matter of what you're going for and what you're going to have to compensate for as a result!
That said, our community has made some awesome sliders that open up so many possibilities and even eliminate the need to do that multi-slider tango. I wouldn't even know where to begin (wish I wanted to make videos because I could talk for an hour about sliders)
For example @pitheinfinite made sliders that can make sims look better and more realistic, I'm jealous at what they've achieved!
They have their Inner Corner to Nose slider that moves an area of the sim's face hat make eyebags and the shadows and lines appear farther out from the inner eye. It saves you from having to use cheek sliders to mimic the effect and thus ruining the face shape you have going
It's truly an INDISPENSABLE slider. One of many!
Since I make sliders, I usually just make some to specifically fix whatever issue I'm having. Granted they're made with general function in mind, which makes my cheater-y way of making things happen more useful in the future. I have about 50 experimental unfinished sliders in my game and can tell you that all my current sims use them for some reason or other. So I'm not working with nothing, I guess?
EYE SPY 👁
The best way to really get nice accurate looking sims is the eyes.
Pay attention to the slant of the eye, the shape and position of the upper and lower eyelids. you can use the game’s Eyelid Height slider, and AWT’s Eyelid width and height sliders (and many more)
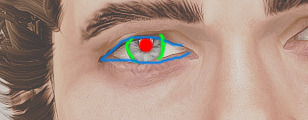
and especially where the iris (green) sits relative to the eyelid. getting that shape and eyeball positioned correctly really makes a HUGE difference
I do suggest Bloom’s Eye slider (left and right) that rotate the eyes left and right. That along with their Lazy eye sliders can give your sims a less symmetric face and position the eyes to be FAR more accurate and realistic than the default.
I also recommend their vertical sliders (Eye lift or drop) to help with eye positioning.
I can't stress the importance of the right contacts or eyes for your sims. Of course it all depends on how you make your sims's eyes and all that.
Take the last sim i posted about. It took forever and a half to find the right contacts that didn't need severe or intense editing to capture the same vibe the person he's based on. The problem is pretty persistent for me, and I am just speaking for myself when I say this is necessary. Iris size, shading, recolorability, detail, catch lights, and pupil position are things to consider for your play style and preferences.
In addition to seeing what eyes will do the trick, I do edit the catch lights in the screenshots to give the eyes a different emotion or look. (I use defaults that get rid of the game-generated catch lights, and supernatural eye glow.) It's nice when that's all it is and I don't have to go in and photoshop things in and out to make them look human lmao
Perfect, schmerfect
And just know that as long as you have the same vibe or look going on it doesn't need to be perfect! Things will evolve over time, and you can change and perfect things as you go along, but close is better than trying to achieve an exact replica. We are working with the limitations of sliders and the optimized meshes they work on! So yeah there might be jagged bits or the profile might not exactly match and some things might not be accurate, but that's okay! Considering what sims look like at their default, you should be proud!
I use the same mf eyebrows on all my sims basically and I tell myself they're just placeholders (yeah, right), but I manage to make them work with what I have!
Sliders, Makeup, and Skins, oh my!
a good base skin is critical, but not the end of the world if you pick the wrong one. They determine kind of definition and types of features highlighted on a sim 100000% and you might lose a feature you like or dislike when you change them! Feel free to switch up between skins you have to find the best fit.
Makeup can be a game-changer though!!! Any details you can add and help make your sim look the most like the person you're basing them off can go MILES.
In some cases, I've actually gotten really interesting results trying to get my sculpt as close as possible to real life references so the makeup makes a difference but don't define the features by themselves. Still, though, I utilize makeup up a LOT. [remember that if you use Nraas, you can layer makeup. Right-clicking makeup will also remove it if it's applied :)]
Here's the last sim i posted about when removing makeup:

no nosemasks really replicates the face-claim's nose (too shiny at the lower part) but it'll do 🤷♀️
Freckles, eyebags, highlighters, face shadows, pores, nosemasks, etc are all great!!
The way you move your sliders WILL effect how these look, so don't rely on makeup that adds super-specific detail or goes over an area you know is a jumbled mess because of sliders!
I do have a mess of recommendations and wcifs for skins and makeup. replies tag | wcif tag
[also I love compiling wcif cc lists for my sims it's great]
Finally, I appreciate your comment about my sims, mainly because I know they're not ever really exact copies or as close as I want to be to their real life counterparts, so thanks!! I've seen fellow simmers get really good results without messing as much as I do and I love when people can make really good maxis match likenesses because it's just so damn cool! It's truly a talent.
I'm not one of those lucky few, but I like to try my way at it anyway. After what feels like some good progress I'll post a pic here. Even after doing this forever I don't feel like I'm an expert or can get good results in a shorter amount of time, but it's just fun to see the progression (or regression) of how my sims look.
63 notes
·
View notes
Photo

Hey guys! I got an ask wondering how I make my gifs and some people have asked me how I color my gifs, so here you go!
We’re going to be making this:

You’ll need:
VLC Media Player
Photoshop with working Import Video Frames to Layers function and timeline. I use Photoshop 2020, but any older versions with these functions will work!
A high-quality video (preferably 1080p)
Tutorial under the cut!
PART ONE: MAKING YOUR GIFS
You’re going to want to open up your video in VLC Media Player and open it to around a few seconds before your scene appears. If you’re giffing from a small YouTube video you can ignore this step, but for movies and TV, you’ll want to use VLC to extract the tiny part of it you want.
Pause it before your scene and click View >> Advanced Controls.
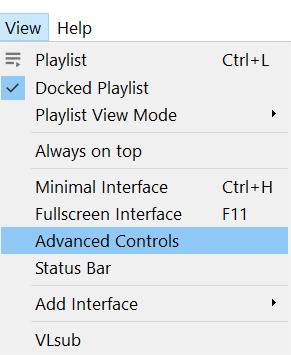
Above the play button, you should see a bunch of new controls. Focus on the red button I circled below:

Click this button and press play. VLC records are a little bit off, so this is why you want to be a few seconds before your scene actually starts so you catch it all! When your scene has played, press the button again. You’ve now recorded your scene and you can record as many scenes as you like for a full gifset.
You can find your recorded videos in the Videos folder. It’ll be named something like vlc-record-a bunch of letters and numbers.
Now that you have your scenes, it’s time to open Photoshop! When Photoshop has loaded, go to File >> Import >> Video Frames to Layers, which is a bit down to the bottom. It’ll prompt you to select a video; click on the video you just recorded, and a screen like this will pop up:
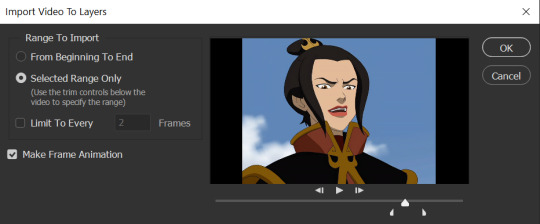
Use the white sliders to select the parameters of your scene. I would recommend going a little bit more on both sides so you catch your whole scene.
TIP: Make sure you do NOT select the button that says “Limit to Every 2 Frames,” because that will make your gifs look choppy and ugly. Love yourself!
Once your frames have loaded, you might not see them on Photoshop the way mine looks. If that’s the case, make sure you go to Window >> Timeline so you can see the frames!
Delete the extra frames in your gif that you don’t need by selecting the frames you want to delete and pressing the trash can button, circled below:
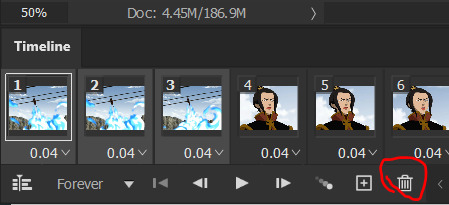
Now that you’ve done that, it’s time to crop. For this particular gif, I’m going for a full-width one, so the width I chose is 540px and I chose a height of 290px. Click on the crop tool and make sure your crop settings are at W x H x Resolution, or you won’t be able to input specific dimensions the way I’ve done here:

Position the crop tool where you want your gif to be:
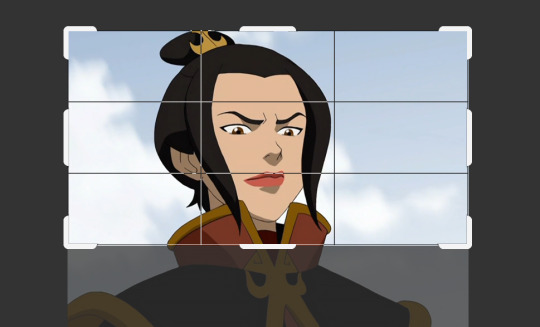
And now that your gif is all cropped and sized, it’s time to sharpen! I have a pretty specific sharpening process that I’ll outline in detail here, but I have an action for this purpose so as to save time. I’m just making this part of the tutorial so you know what you’re meant to do in Photoshop.
First, go ahead and click the three little bars at the right edge of the Timeline/Frames tab and hit Convert to Video Timeline.
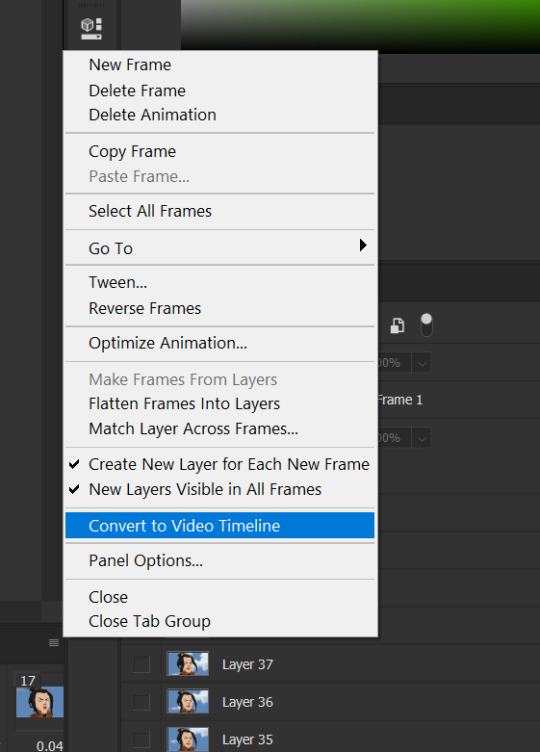
Now, your timeline should look like this:

Go to Select >> All Layers, and right-click on one of the layers in the Layers tab once they’ve all been selected. Select Convert to Smart Object. This allows us to sharpen the entire gif at once as opposed to by frame! Your timeline should now look like this, with all the little purple parts condensed into one:

It’s time to sharpen! Go to Filter >> Sharpen >> Smart Sharpen. I do two passes with the Sharpening tool; here are my settings for both:

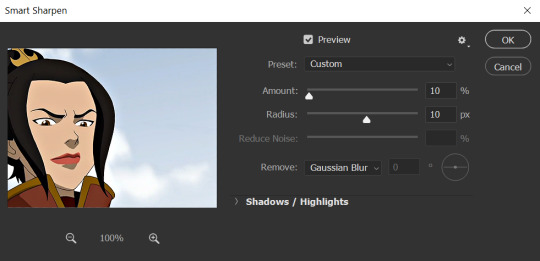
It’s not too apparent in the pictures, but it does make a difference. Don’t worry about your gifs looking too sharp; I use this action on every single one of my gifs and it always works like a charm.
Now that our gifs are nice and sharp, it’s time to take them back to frames. This is because of a glitch in Photoshop that makes gifs saved in Smart Object form much faster than they would be in frames. Click on the small bars on the right of the timeline again and select Convert Frames >> Flatten Frames into Clips.
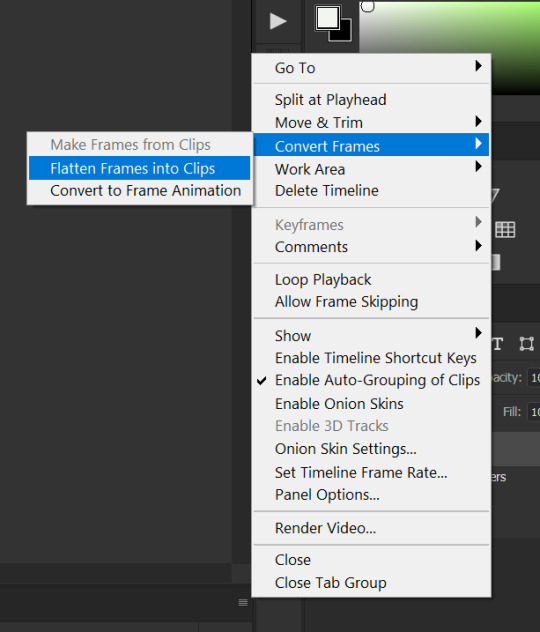
Your gif should have all those little clips that we had before we converted it into a Smart Object.
Then, go to Convert Frames >> Convert to Frame Animation.

Your gif should be back in frames again, but it’s all one frame. Don’t worry; we’re going to fix that by clicking Make Frames from Layers from the menu with the three little bars again.

Now all your frames should be back! We’re going to set the speed of the gif now. Hit those three little bars again and click Select All Frames. Now click on the little triangle under any frame and click Other, and a little popup will appear. I always set my gifs to a speed of 0.05.
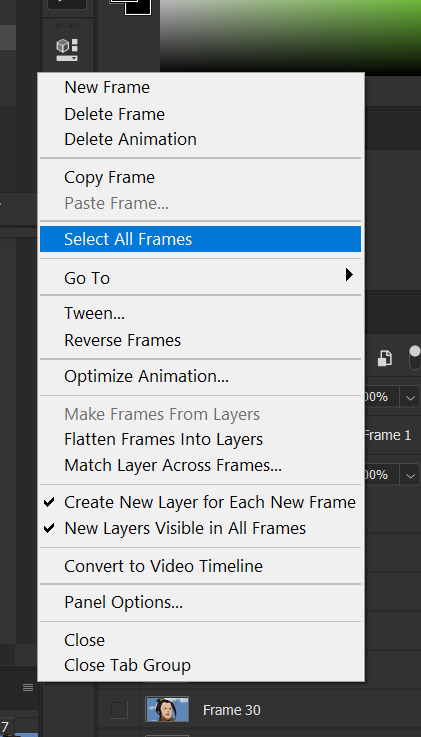

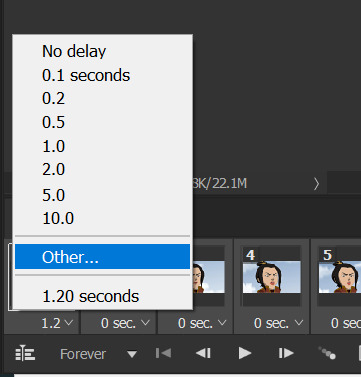
At this point, I save my gifs as a .PSD file. You can delete these PSDS after you’ve posted your gifset (I usually do to save space!), but it helps to have them so you can edit your gifs later if you want. Hit Ctrl+S, and now the screen to save it should pop up. Make sure you save it as a PSD file and not something else.

Now you have a gif that you can color! Which brings us to…
PART TWO: COLORING, ADDING SUBTITLES, AND SAVING YOUR GIFS
I do run a pale blog so this is going to be a pale coloring tutorial. You can check some popular resource blogs to see if they have any tutorials for colorful gifs!
I start out by making a group with the little folder below the layers tab; I title it “coloring.” (Not pictured: I added a layer mask and painted one black dot over it so I could reference the original!)

I always start out with a Curves layer; here are my settings:
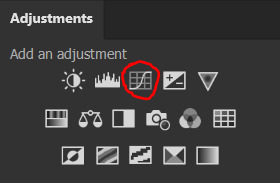
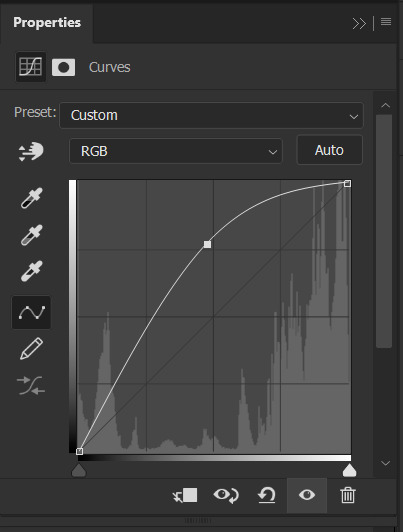
The gif at this point:
Next, I decrease saturation using the Hue/Saturation adjustment:
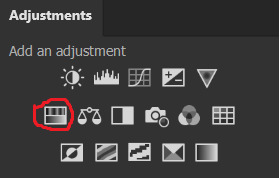

After this, I add a black and white Gradient Map layer and set it to blend mode Exclusion at 10% Opacity.


Then, (not pictured), I add a Selective Color layer and reduce blacks in Whites and Neutrals while increasing them in Blacks.
To make the background pale, I added a Hue/Sat layer, applying 100% Lightness to the Cyan and Blue channels and adding color to Azula’s skin by saturating the Yellows.

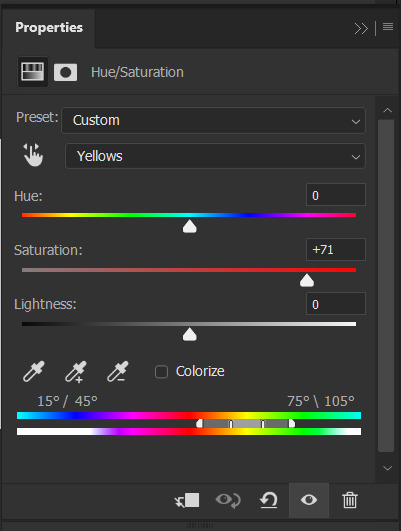
Here’s the gif after those adjustments:

Now I’m going to restore color to Azula’s skin following my own tutorial, so I’m not going to go into those details here. However, here’s the gif after all this. It’s not totally the same as Azula’s skin, but going any pinker makes the gif look awkward and oversaturated, which isn’t a good look:

After some minor adjustments and removal of the layer mask:

Now for subtitles!
Use the Text tool and make a rectangle at the bottom of your gif where subtitles go. I use Arial Rounded MT Bold, with Regular style, at 3.36pt and Sharp anti-aliasing.


Create a rectangle at the bottom of the gif where subtitles go and type in your text; then right-click on the text layer and select Blending Options and check Stroke, and these are my settings:

Now your subtitles are all ready! I’d recommend duplicating one frame of the gif and then duplicating the text layer onto a new canvas and saving it as a PSD so your settings and placement are always consistent across your gifsets!
Time to save your gif. Here are my settings, circled ones important:
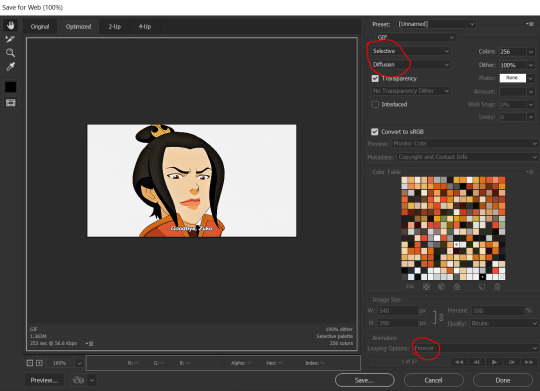
I’ve seen gifmakers use Adaptive+Pattern but I personally think that looks grainier and the pattern is really obvious; in my opinion Selective+Diffusion looks smoother, but it’s all up to you! Experiment with what you think looks best.
Make sure your gifs are set to loop Forever or they’ll only loop a limited amount.
Here’s your finished gif!
I hope this tutorial was helpful! Please reblog this if you learned something, and I hope you have a wonderful day. Happy gifmaking ❤
#allresources#chaoticresources#yeahps#biresources#resourcemarket#useradeela#usermaira#userdanisaur#userchelsea#tuserivy#*mine#resources#tutorial
408 notes
·
View notes
Text
Basic Giffing Tutorial
How I make gifs for a simple scene + coloring + captions under the cut:

I’ll show you how to make this ^^^ gif (including the sharpening, coloring and captioning process).
Okay let’s start with what you need to do this: A version of photoshop with timeline (I use photoshop 2020 but probably any version will work, the program layout might just look a bit different), HD videos to gif from (preferably 1080p, especially for making big gifs, but 720p is also okay if you can’t get anything better, I just recommend making smaller gifs with it), some kind of video player that lets you trim clips in it (I use Quicktime Player because it’s the default for Macs)
1. Start with a video clip of the scene you want to gif. I usually download full episodes and clip scenes from the episode. My computer is a MacBook Pro and the default video player is Quicktime so I just trim my clips directly in that. In Quicktime you can just press CMD+T and it’ll give you trimming options. Most people use the screencapping method to make gifs, but it requires extra software and that’s not how I learned, so I’m going to tell you how to gif straight from video clips. I have no idea if there’s a difference in quality or ease between the two methods, but if you find that my way is too difficult then there are plenty of tutorials on how to do it via screencapping too like this one.
2. Open the clip in Photoshop. Just hit CMD+O and then select the video you want to gif from (or go to File > Open). Then, in the Timeline window at the bottom, scrub through the video and trim it (with the little scissor icon to the left) at the first frame of the scene/shot you want to gif and the last frame. Delete the excess clips. Before the next part, I usually crop off the black borders that some videos have if their original aspect ratio isn’t 16:9 (which most aren’t). For TV shows from Netflix, for example, the aspect ratio is usually 2:1 (or 540:270) so if you set the crop ratio to this you can get rid of exactly the black, no more and no less. I have several preset crop ratios (540:270 for TV shows, 540:225 for most movies, etc.). You can do further cropping after you have made and colored the gif, but getting rid of borders before converting the video to frames makes this easier. If your video does not have these black borders to begin with, ignore this part.
3. Convert video to frames. In the upper right hand corner of the Timeline window there is an icon that is four small lines stacked on each other (time line menu). When you click on it, a drop down menu will appear. In this menu select “Convert Frames > Flatten Frames into Clips.” Then click the button in the lower left hand corner (three small rectangles next to each other; frame animation button) that says “Convert to frame animation” when you hover over it.

After, it should look like either of these. Sometimes, if you crop the video before you start the process, it gives you two frames like in the image on the right above. If this happens, delete the frame with the shorter time stamp on it (as indicated by the number at the bottom). Next, click the dropdown menu in the timeline window again and select “Make Frames From Layers.” It will then turn into multiple frames, as shown below:

Delete the first frame (it will have a number under it, while the rest of the frames say “0 sec”), then use “select all frames” from the dropdown menu so that they are all highlighted and click “0 sec > other” and set the frame delay to “.06 seconds.” Scroll down to the bottom of the layers channel window and click and delete “Video Group 1″ then scroll back to the to top of the window and select all the layers by holding Shift and clicking on the top layer. Click the icon in the lower left hand corner that says “Convert to Video Timeline (video timeline button) and the frames should convert to long purple bars stacked vertically on top of each other. Then, under the “Filters” drop down menu at the top of the screen, select “Convert for Smart Filters.” This converts the layers to a smart object, turning the stack of bars a single purple bar and a single layer in the layers channel. When you press play in the timeline window, the image should move and play through like a video. If it doesn’t, you missed a step. It should now look like this (the left is the timeline window; the right is the layers window):
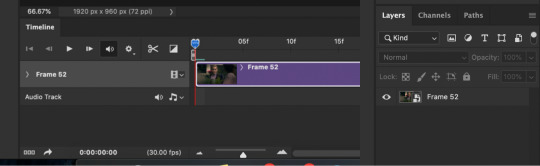
This seems like a lengthy process, but I have compiled most of these steps into a few Actions. With the actions (starting at step 3 of this tutorial) you use “Part1″, delete the frame with the shorter time stamp on it (if needed), “make frames from layers,” delete the first frame and Video Group 1, select all frames in Timeline and change frame delay to .06 seconds, select all layers in the Layers window, then use "Part2″. I assign my actions to function keys so all I have to do is use a few keyboard shortcuts ( i.e. Part1 is F1, Part2 is F2, etc.). This makes the whole process much quicker. Here is a link to download the actions I created for this process. Once you get the hang of using the actions, it all goes pretty fast. Also, when using the actions you might get messages like this:
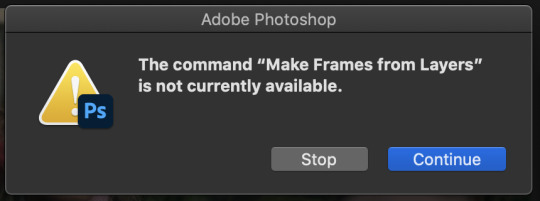
Just click stop and keep going with the instructions.
4. Duplicate the frame in the layers window and set the top layer to screen using the drop down menu in the window (it’s the second from the top and should say “Normal” to begin with. That changes the scene from this:

to this:

5. Make coloring adjustments. Everyone colors gifs in their own ways, so you absolutely don’t have to follow what I do. This is just the basics of how I color:
I always start with Levels (some people use curves, some people use both, I never learned how to use curves though). Under the levels adjustment menu, I start by using the black point dropper and select the darkest part of the image. Sometimes it takes a bit of clicking around with the dropper to find what works. Depending on the scene (colors, lighting, etc.) I also move the sliders if needed. There’s no real formula to it, I just do everything by sight, changing things until it looks good to me. For this gif, I selected a dark part of Jamie’s hair with the black point dropper. Then I did some minor adjustments with the sliders on the graph. If you’re coloring a darker scene, the sliders are very useful for brightening the scene, but this is a fairly well lit scene so not much is needed. This is the scene with Levels added:
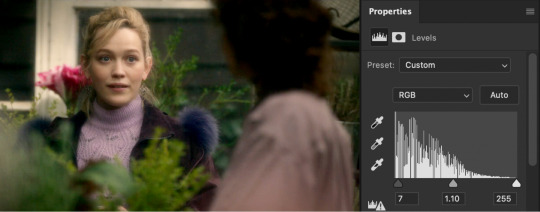
Next, I usually use color balance to fix the color changes that Levels made. This looks too yellow to me now, so I use the yellow-blue slider to add in blue. You’ll have to play around with what looks best for whatever scene you’re giffing, but I’ve found that most scenes I add blue and sometime add red or cyan, but rarely use the magenta-green slider. With color balance added:

Next I use a series of selective color layer. Make a new layer for every different color adjustment you make, it makes it easier to edit if you make a mistake or want to make changes later. I always start with Black, usually just adding a little to Cyan, Magenta, and Yellow so that it increases the contrast of the whole scene.

From there, you have to pick out what colors you want to accent or correct. You get better at this the more you do it. In this scene, I want to accent the green of the plants and the purple of their clothes. Normally I would do Red next to adjust skin tone, but because I want to increase the green in the picture, I’m going to start with Yellow. This will make skin tones look too yellow-green, but you can correct this with a Red Selective Color layer. The Yellow layer made the plants greener, but the Red returned the proper color to Dani’s skin.


I keep adding more selective color layers to bring out more color in the scene.
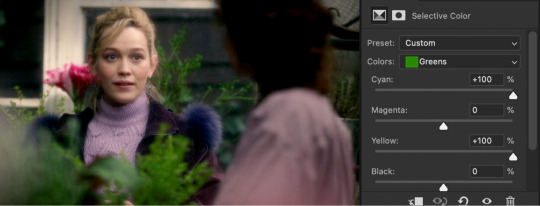

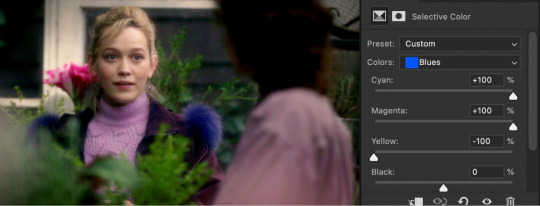
To make it even more vibrant, I use several Hue/Saturation layers to increase the saturation of certain colors.


Sometimes I also add a Vibrance layer, but for this scene it wasn’t needed. Lastly, I usually add a Brightness/Contrast layer. I prefer to get contrast out of deepening the blacks in the scene rather than use the contrast setting in this adjustment layer, but sometimes I do use it. Most of the time I just increase the brightness a little, depending on the lighting in the scene.

Really, coloring is all about just messing with different settings until things look right to you. I’m still learning new things every time I make a new gif. There are tons of other adjustments available that I haven’t even tried out, so feel free to mess around with them. Note: The more adjustment layers you add, the more the quality might decrease. I do try to do minimal adjustments normally, but I wanted to make this coloring fairly vibrant so it has a lot more layers.
If you are making multiple gifs from the same scene, repeat the process of Steps 1-4 and then copy the adjustment layers from the first gif to each subsequent gif. I normally group all the adjustment layers together (select the layers and press CMD+G) which makes it easier to copy the layers to another PSD.
6. Crop and resize the gif. You can crop your gifs any way you want. I’m in the habit of making rather large gifs (which is thankfully now possible due to the 10mb size limit) and most of my gifs are cropped at ratios of 3:2, 4:3, or 1:1. For longer scenes I usually use 16:9. Crop your gif at whatever ratio you want and then resize it. For Tumblr, there are specific dimensions that gifs have to be for them to format properly in posts. For “large” gifs (one per row), they must be 540px wide. Height does not matter. For smaller gifs they have to be either 268px (two per row) or 177px (three per row). Resize the gif by either using CMD+OPTION+I or going to the “Image” dropdown menu at the top of the screen and clicking on “Image Size” If you already cropped at your desired ratio, just change the width to 540, 268, or 177, according to the size gifs you want.
7. Sharpen the gif. After you have cropped and resized the gif as desired, you need to sharpen it. Because of the method I used in the beginning (duplicating the layers and setting the top to screen), you will have to add a Sharpening filter and a Gaussian Blur filter. Select the top layer of the gif (not the top coloring layer) and click on the “Filter” dropdown menu at the top then select “Sharpen > Smart Sharpen” These are my sharpening settings (if you’ve ever giffed before, or looked at other tutorials, you’ll notice this is sharper than most people would use. That’s because you also have to slightly blur the layer below it, which dilutes it to a proper sharpness):
Next, select the lower layer of the gif and go back the the “Filter” menu and select “Blur > Gaussian Blur” and set the radius to “1.0 pixels.”
These sharpening and blur settings are also actions I’ve created. If you download the action I listed before, assign them to function keys and you will just have to select the appropriate layer and use the function key to do the work. Additionally, learning the keyboard shortcuts speeds along the process.
8. Export/save the gif. Go to “File > Export > Save for Web (Legacy)” or CMD+OPTION+SHIFT+S. These are my save settings (I actually have no idea what any of these things mean... I’ve never changed any of them).
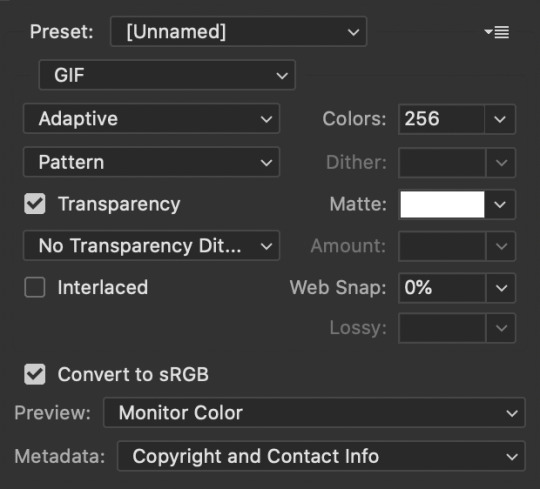
The important thing really is that you make sure that under looping options near the bottom (not shown in this screenshot) it says “Forever,” not “Once.” And also check how big the file is in the bottom left corner:
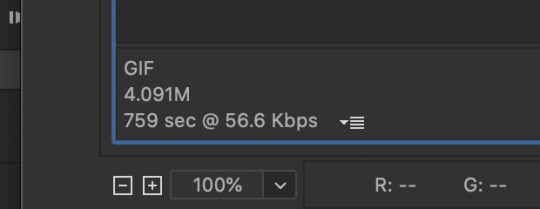
As long as the number under GIF is less than 10M, you’re good to go. Then save the file and name it.
9. Caption the gif (if needed). You can either do this in the PSD you already had open to create the gif or you can open the gif you just saved and caption it there. I find it easier to add captions directly in the current PSD. When it comes to captions, it’s really based on your own preferences. I’ve seen people use all different fonts, sizes, colors, and placements for captions. Some fonts I can recommend are: Myriad Pro, Calibri, Arial Rounded MT Bold, and Keep Calm.

There are plenty of others too. The main thing is that they normally look best when they are bolded and italicized. I have been using Keep Calm for my captions lately. I also add Stroke and Drop Shadow to the text (my text settings are also included in my Actions):

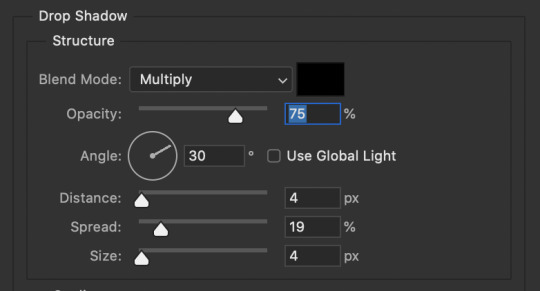
Just make sure the text is centered and has a good margin from the bottom.

This is what it looks like with those effects ( font: Keep Calm; size: 13; tracking: -25).
Anyway, that’s my basic process for gifmaking and coloring. I hope this gives you some kind of foundation to work off of. Just keep experimenting with different techniques and you’ll keep getting better. Read other people’s tutorials and tips and try them out to see what you like and works for you.
#if you're seeing this now i dont make gifs like this anymore#if you ask i'll make an updated tutorial#riah.txt
223 notes
·
View notes
Text
HOW TO USE THE MBL ANYTAUR BASE - PART ONE
These instructions will be structured around a main narrative--someone who has everything they need for best results, and for whom everything goes right--with digressions for what to do when things go wrong at each step.
Pictured: gryphoranguAnytaur.
WHAT YOU NEED (WANT):
- A fully weight-painted taur model .fbx. *If you have a quad instead, see “I HAVE A QUAD INSTEAD” **If you’re modeling from scratch, see “I’M MODELING FROM SCRATCH”
- CATS Blender plugin, just in case. (We’ll be using its assign rest pose function, if we need to.)
- A Unity 2019.whatever.it.is project, with the latest VRChat Avatars 3.0 SDK.
- Pumkin’s Avatar Tools package (THIS IS SO IMPORTANT). ***If this tool is unavailable, see “I DON’T HAVE PUMKIN’S AVATAR TOOLS, OR IT ISN’T WORKING FOR ME NO MATTER WHAT I DO”
Open MakeYoursInHere.blend. Find the Humanoid hips on the base Anytaur, but DON’T touch them--just find them. Turn on Isometric view and import your taur .fbx; scale and move your model until its Humanoid hips (you know, the bone below its spine, in the Humanoid torso up front), or Humanoid hip-ish-area, matches the Anytaur’s, and the legs are long enough to put your feet ALMOST on the floor (same as the Anytaur is fine). You don’t want to leave so much clearance it’s obvious you’re hovering, but you do want your taur’s (mesh) feet to be raised very slightly above the floor. This makes it easier to avoid clipping. *If you CAN’T STAND having your feet clip into the floor at all, you may wish to pursue using Final IK to run your taur limbs instead, but that’s the opposite hookup method from this tutorial!
When you’re positioned and sized, select your taur and put its wings into a flat T-pose, like the Anytaur’s, and its arms into an A-pose, at the same angles as the Anytaur’s. Apply this pose as your rest pose with CATS, or look up how to do it without CATS if you don’t have CATS. Then select the Anytaur, and, WORKING ISOMETRICALLY AND SYMMETRICALLY (symmetry has been preserved within the Humanoid armature, so you can work normally), you may move the spine, chest, neck, and head around to match the scales and angles of your taur’s existing armature. Again, make sure nothing you do alters the hips--OR interrupts the hierarchy!
If you have Dynamic Bone rigging on the Humanoid torso chain (like for fur or accessories), you may separate the bones out from your taur’s armature at this stage and join and parent them to the Anytaur’s. Same with anything wiggly you have on the arms, next, too.
Once the Anytaur’s Humanoid torso chain matches yours, select the either the left or right WHOLE ENTIRE Anytaur arm, including shoulder. View it isometrically, and shift it in xyz and scale it until it matches your taur’s arm. DO NOT rotate ANYTHING in ANY WAY! *If you have changed the angles in the Humanoid arms or legs, see “I CHANGED IMPORTANT BONE ANGLES IN BLENDER. :(”
You may rotate and reposition the fingerbones freely, though!
Now that both taur armature Humanoid upper bodies match, go into Pose Mode on the Anytaur and find RRA.spacer, off the Humanoid hips. Grab it and rotate it; the Anytaur’s taurbody’s back should respond dramatically. You’ll be toning this behavior down later in Unity, but I’ve recreated it here in Blender to help with weight painting. Try to understand what you’re looking at in the Anytaur’s hind torso chain. Hind.spine is one huge bone to make an optional Dynamic Bones-based-sit work correctly; hind.chest ends wherever is necessary for the “hinge” of that sit. We WILL NOT be going over how to implement sit in this tutorial, but since you’re looking, you might as well know why it’s like that. The .tinybones are because Dynamic Bones needs at least two transforms in a row to operate, and when I had ONLY two, I got stupid bugs preventing the butt collider from showing up in hind.hind.tinybone, so with this setup, Dynamic Bones gets THREE transforms, and the collider on hind.hind.tinybone definitely shows up. Unless you specifically commed your artist for it or they worked with this base in mind, you won’t have a BEND bone, and will need to paint your own, but you should already have hind.hips to start with! There are bone constraints in the hind thighs for weight painting purposes, again--you’re advised to leave them until you’re satisfied with the BEND/hind.hips torso chain action you get on your own taur.
NOW:
Go into Object mode, select the Anytaur’s mesh, and delete it. *If your taur IS NOT weight painted, see “I’M MODELING FROM SCRATCH.” Then select your taur’s mesh and duplicate it. Then, shift-select the Anytaur armature, and parent the duplicate to it with empty groups.
You could go to your duplicate’s vertex groups and start finding and renaming them to match the Anytaur’s armature as best you can at this point, but first, I recommend you fit the Anytaur armature to your taur!

Using your original as a reference, BUT ALSO taking at least a glance at a real animal’s skeletal reference (especially for shoulder length and angle), work isometrically from the sides and front--symmetry has been preserved in all the taurbody legs, lucky you! Rotate the Anytaur’s taurbody bones pair by pair (of bones, left-right) until they’re all angled right to fit your mesh. You may wish to grab and hide anything that’s getting in your way, if you haven’t already, like the zillions of wing and utility bones, and the Humanoid legs (shortcut in edit mode is “h” with a bone selected.) When you’re finished from the side, select the taurbody foreleg chains, switch to viewing isometrically from the front, and shift them in X until they mostly match the width-apart of your forelegs. For the forelegs, I’d prioritize matching the feet to the feet over matching the width of your taurbody shoulders. DO NOT ROTATE ANYTHING--they must stay straight-up-and-down from the front! Do the same for the hindleg chains, though unless you intend to individually articulate your hind beans, you may wish to split the difference between matching the feet versus matching the width of the hind hips above, or just match the hips width and ignore the hind feet, like I did on the Anytaur--If you noticed before deleting it, the hindpaws are quite far outside the hind foot armature--that’s about the limit I’d ever recommend you deviate, though. I just started to get some weird behavior on hindpaw twist at that distance (but I did get to enjoy having my hindlegs always look a little extra jaunty because of how they were modelled “at rest” around the bones here). If you’re lucky, your artist just has those hindlegs straight up and down lol so you won’t have to make any decisions.
You may add/graft on extra bones out of your old armature if you’ve got them (floof bones, etc), SO LONG AS YOU DON’T DELETE, REPARENT, OR RENAME ANYTHING ALREADY THERE, OR OTHERWISE BREAK THE ANYTAUR HIERARCHY.
The twist bones don’t like being moved, sometimes, so make sure to check on them specifically and fix them if they’ve gotten skewed by grabbing just their left/right heads or tails at a time and shifting them in x.
Don’t forget to fit your toes! They don’t have to be straight up and down, just have them fit your toes. You don’t have to use EVERY beanbone either, there’s a final (FINAL--do NOT do it until you’re SO SURE you’re finished) optimization pass in Unity where we’ll delete any bones that didn’t get used. You could probably just graft your old toebones on, here (but DON’T do that with anything but the toes! We’ll need the leg chain transforms to all be named in PRECISELY this way or nothing will work AT ALL later. Working this way around, renaming your vertex groups to the Anytaur armature, allows you to check your work here in Blender AND not ruin anything silently before we move to Unity).
The Anytaur armature should now be fit to your taur! Well, except for wings--SYMMETRY IS BROKEN IN THE WINGS, I’M SO SORRY, so if you need them, handle them by scaling left/right pairs of the bones’ heads and tails in and out in X from the isometric front and top views, and moving left-right pairs freely together with g + zy shortcuts. If you have dragon wings with extra wing fingers, graft yours from your old armature onto the Anytaur wingfingers. Just shrink the Anytaur wingfingers way down first; they’ll act as control bones. If you have feathery wings, look at the weight painting “zones” of influence that already exist in them. You’ll likely want to rename and/or merge your weight paint vertex groups to use only the (wing upper arm, forearm, and hand, obviously, but also the) first, the fifth, and the tenth feathers, OR--if you have a bunch of existing dynamic rigging, graft your wing surface rigging bones ONTO (parent them to) the first, fifth, or tenth feathers as appropriate. Only use the individual feather rigging if you HAVE (or are making!) individual feathers, it will look weird if your wings are a solid surface (each of the bones is going to roll quite a bit). Basically, the fifth and tenth feathers are rigged to “smooth out” the wing-arm action... hopefully the effect looks okay. If it winds up looking weird later you can reparent your (YOUR) bones directly to the appropriate Anytaur wing-arm bones instead.
Oh, and tails. Do whatever with the tail. The Anytaur tail comes with six bones and limited but ready-to-go rotation constraint rigging, but it isn’t Dynamic Bones compatible, so you’ll probably just want to keep the rigging in the tailbase bone in Unity later, because it’s important for finishing the harmonious “feel” of the movement of your hind hips, and capturing all of your Humanoid hip motions. You can make it really small and not weight paint it if you want, though, so it’s at the base of your tail as a control bone. Do match the next five Anytaur tail bones to the rest of your tail, then feel free to add (or graft on) however many more you need. If you graft your entire old tail on instead of the existing one, you’ll NEED to rename it to match/replace the Anytaur tail in the hierarchy EXACTLY, taking into account whether you kept the first tailbone as a tiny control bone or not! Pumkin’s Avatar Tools, at least as I’ve used it, will FAIL on EVERYTHING DOWNSTREAM OF THE FIRST BREAK... so watch out.
Okay... NOW the Anytaur armature has been fitted.
Use Pose Mode to pose your original model and then your Anytaur duplicate, into a pose suitable for weight painting (or for referencing, in your original). Now, begin the process of renaming/recovering your original vertex groups...
Using your original as a reference as necessary, rename each corresponding old-naming vertex group in Your New Anytaur(tm) to match the naming of the new taurbody bones. Since some preserve symmetry and some do not, especially in the wings, just copy-paste each of the bone names out of the Anytaur hierarchy and into your old vertex groups’ names. Every time you find a match, the fixed mesh should leap up and stick to the right bone!
But maybe you have multiple vertex groups that all need to be collapsed onto one Anytaur bone, because the Anytaur rig is so different. In that case, use the VERTEX WEIGHT MIX MODIFIER. Important: this modifier HAS to be first in the list of modifiers, or it won’t work! It’s to the left in the modifiers list, under the wrench icon for “modifiers”. The first slot is the vertex group you’re adding more influences into (it should be an Anytaur one, like hind.spine). The second slot is where you put the group from your original model you want to add. After you put those, you change the dropdown mix method to addition. Rather than applying each modifier as you go, I recommend you duplicate them as needed and get them all ready and moved above your Armature modifier. Then look them over a few times once you think you’ve captured everything, then apply them one after the other when you’re sure it’s all there. There should be a big, immediate improvement in your Anytaur(’s taurbody torso chain, you’re probably doing this for stuff in the taurbody’s torso chain) after this step.
Once you’ve figured out somewhere for all of your preexisting vertex groups to go, and you can freely pose your Anytaur without leaving any vertices behind, it’s time to WEIGHT PAINT TWO THINGS.
You’ll need to grab the RRA.spacer animation-rig-style control bone (off the Humanoid hips) in Pose mode, rotate it a little (A LITTLE) from the side isometrically, then find the vertex group for the BEND bone and start painting on weight at either full strength 1 yolo (valid) or around .4. Your back should begin to either raise or dip, depending on which way you rotated RRA.spacer. Don’t do too finicky of a job yet, because BEND doesn’t work alone, it operates in conjunction with hind.hips. Find and switch to hind.hips, and add or blur some weight forward into the lower back and belly, just, probably the whole taurbody tube. You want to balance the action of hind.hips and BEND until you get a strong but reasonable-looking response in your taurbody. Moderate the action you get by trying out the levels function on your hind.spine group (though levels is a little bugged currently--click back and forth between the viewport and the hind.spine vertex group a couple times so it doesn’t bump you back to the vertex group you were on previously). Give levels a value less than one to turn it down and free up the action in your BEND and hind.hips, or turn it up somewhat to damp them down if they’re just too freaky/rubbery/bendy. If you’re working with everything way up bright red at one you do risk getting lost in the sauce somewhat, so I recommend toning your hind.spine down to a firm green and working with red in your hind.hips and BEND that you then blur out as necessary.
Once you can grab RRA.spacer and get an amusing but like... coherent... and goodlooking... response from your torso chain, at least to moderate/reasonable movements :p, add twist bone weight painting to your taurbody thighs if you haven’t already! That’s where the hind thigh twistbones get the top halves of the thighs up to the butt--make sure they’re well-positioned up there, with their heads matching the regular thighbones’ heads, and that they reach the halfway point on the regular thigh bones--and the regular thigh bones get the bottom half of the thigh to the knee.
ONE NEAT TIP: to prevent butt crunch, move the heads of your thighbones down to the level of the “crease of your buttcheek” (but maintain the same angle as they’re supposed to have; the head of the thighbone should still be ALONG the original thighbone’s line). When your thighs hinge from THERE, they won’t vanish your butt and leave your crotch poking out into the wind when you crouch or sit! However, after moving your thigh bones’ heads, you’ll need to revisit the isometric front view and grab the tails of your twist bones, then move them back into alignment with x. If your leg chain is still properly straight up and down, you can just zoom in and move their tips to touch the dotted line.
Your Anytaur should now be FULLY WEIGHTED to its armature!! Now it’s time to GET THIS BEAST INTO UNITY.
23 notes
·
View notes
Text
a gif tutorial!
welcome back to this episode of nobody asked for this but im doing it anyway! just kidding. like three people asked for this. so here’s how i make gifs!:
edit as of 20 august 2022: i don’t make gifs like this anymore and tbh this old tutorial makes me cringe! sure, it’ll work just fine, but there’s a few things i’d tweak in this post even for beginner gifmakers. if anybody out there wants an updated gif tutorial, send me an ask! <3

note: this post is for someone who’s just starting to use photoshop for gifs! i hope i can help someone who was just as lost as i was when i first started lol. if you’re experienced already, please bear with me! use photoshop cc. there's definitely other ways to make gifs! before i used photoshop, i used this site or gifski and a bunch of different photo editing apps to play with the coloring. also, gimp is a good gif making app thats a bit like photoshop (and free!) but i believe you have to edit each single frame. nobody wants to do that.
ok. so you need a video of the shot you want to gif. as HD as you can possibly get! you can download the movies if you really search, but all i do is search for scene packs on youtube or something. most people have a link in the description where you can download the packs. if not, i just screen record. i find most of my scene packs here. if there's something i cant find, all the movies are here. some movies are better quality, but this is the best i’ve got tbh. LOL.
making the basic gif:
now say i have the shot i need! i need to convert the video to layers. i go to file > import > video frames to layers
the window that comes up gives you the option to limit to every 2 frames. i like to check that box just because it compresses the file. click ok!
when i’m in, i click window and check that each of these are checked. (color, layers, properties, timeline, application frame, options, tools)
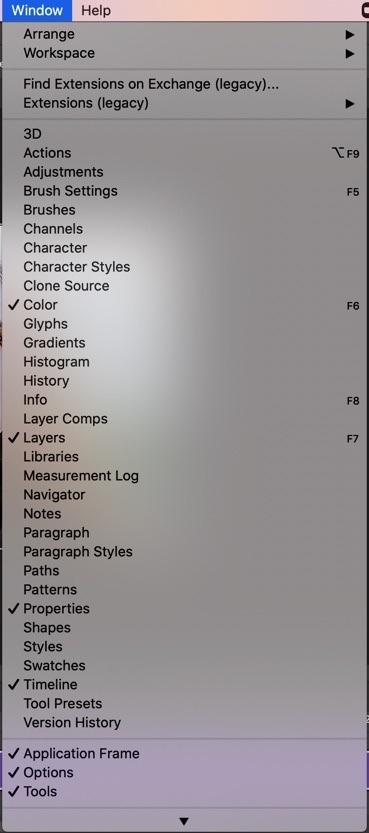
now i resize the image so the file is small enough for tumblr! go to image > image size > width >780. you can go even smaller, but it ruins the quality a lil bit.
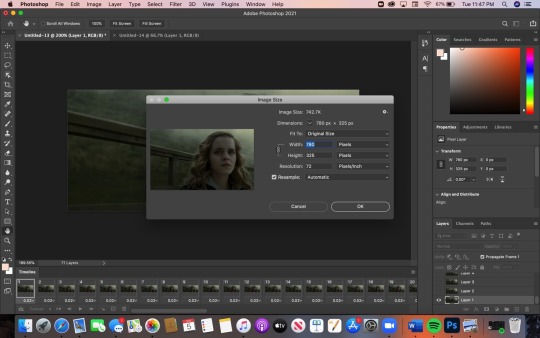
click ok! then i take the crop tool (the 5th down on the toolbar on the left of the screen) and crop to the size i want.
now you could go to file > export > save for web (legacy) > preview and just take it like that! this is the basic gif that we have:
isn't she cute!
coloring!
she is cute, but she’d be cuter in better lighting and if i neutralized that god-awful green tint that just comes with the hbp movie, but that’s a different conversation. so here's how i color my gifs!
note: before we start, make sure all your coloring layers are ABOVE YOUR TOP LAYER. or else you wanna have to color each layer individually. but omg you don’t wanna do that. all you need to do is click the top layer (on the right!) for me, i have 71 layers, so i just click the 71st layer. then all your layers should automatically go to the top.
i click the adjustments tab (still on the right!) first go to the curves feature. (i actually learned this trick from a coloring tutorial from @astoria-malfoy!) i click the white point dropper

and click on one of the lightest points on the image. here, i clicked on the whites of the sky in the top right. you can play around with whatever you think is best. the lighting and color will neutralize significantly!
then go balance it out even more, i create another layer of curves (by going to the adjustments tab again > curves), select the black point dropper (two icons above the white point dropper that i just used!) and click on one of the darkest points of the image. here, i clicked on the shadows in hermione’s hair.
from there, i add more layers that adjust the color. i usually add brightness, vibrance, saturation. i use the selective color feature a lot. this one takes some getting used to, but my goodness, it’s a life saver for coloring.
sharpening!
once satisfied with the coloring, i like to sharpen! there are a few different ways to do this, but this is how i like to do it:
click this lil guy in the corner: convert to video timeline
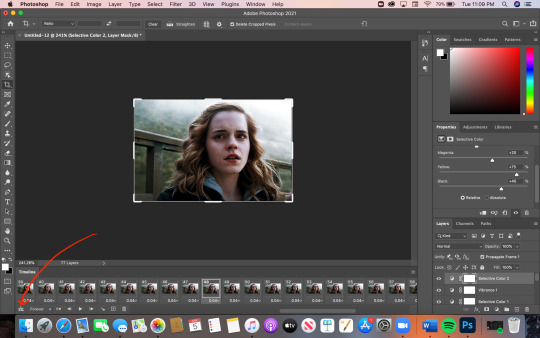
then select all your layers on the right (click the very top layer [mine is vibrance] > shift and hold > click layer 1)
then click filter (at the very top of your screen) > convert for smart filters
then click filter again > sharpen > smart sharpen

and this window should pop up. i like my settings this way. i like to sharpen my gifs like a mf knife
amount: 500
i’ve found that i like my radius around 0.4 — 0.7, depending on the quality of the video that i downloaded. if it’s not really good quality, i usually leave the sharpness low so that it doesn’t highlight the crazy pixels 😭
reduce noise: 10
remove: gaussian blur
then click ok!
the sharpness might look funky in photoshop but i promise it’ll look better once you have it in your browser and all.
now all i need to do is go to file > export > save to web (legacy) and check that the file size is under 10MB. tumblr doesn’t support files bigger than 10MB!
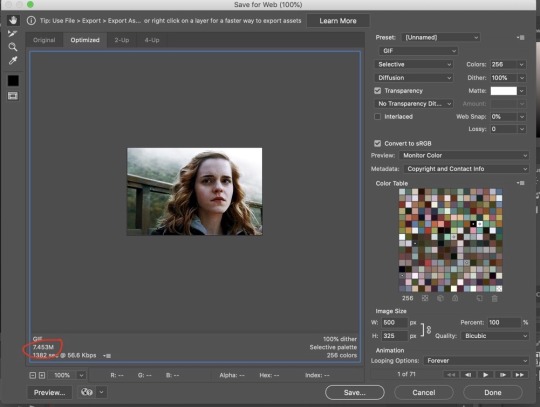
mine is only 7.453MB, so i’m good!
time to see it in all its glory! i just click preview (right there under the file size!) and bam. look at you. you just made a gif! here’s another cute lil before & after just bc wow! you did that! look at that!
you did it and im so proud of you!
if anyone tries my way and has questions, feel free to send an ask or message me! cause i might have missed something along the way 😭 i really hope this helps someone! if you learned how to make a gif (or learned anything at all tbh) from this post, tag me in your edits! i track #andromedaa-tonks! or send me an ask and link me to your gifs :D
love u mwah
110 notes
·
View notes
Text

i’ve been asked to make a gif tutorial so here it is! i tend to over explain and go on tangents so i’m going to try to keep this as understandable as possible lol
so first you need to download your video. i use 4k video downloader.
when you open photoshop the first thing you’ll do is go file --> import --> video frames to layers and it will bring up your finder to locate the video you’re going to be giffing.
once you select the video, this screen will come up:
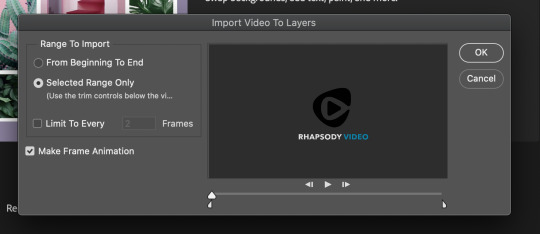
make sure you’ve selected ‘selected range only’ and then you’re going to use the two cursers on the bottom to select the portion of the video you want to gif. this won’t really work if the video is over like. 40 minutes long. because you can’t select a small enough number of frames. so keep that in mind. if i’m giffing something like lotms or a full length show i’ll open the video in imovie and cut it down so that this step works. if you have further questions on how this works i can try to answer them but i think it’s just trial and error for this part the first couple times you do it. once you’ve selected the range of the video that you want, hit ‘ok’.
once your frames/layers open in photoshop, you wanna click on ‘window’ and make sure you have these selected:

your next step is to go through the frames on the bottom of the screen and choose which ones you want to be your gif. usually importing them will give you more frames than you need so you’ll want to trim a bit off each end.
you can press ‘play’ here and it will scroll through the frames automatically for you so you can see what the gif will look like in motion
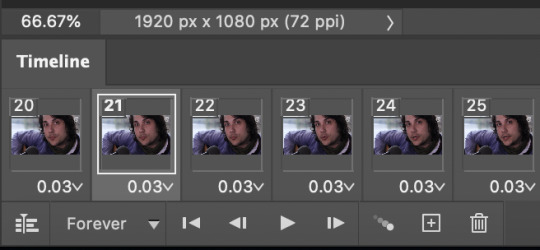
it depends on the size of your gif but i tend to go for 80-85 frames. if you have too many your gif can end up being too big for tumblr. 8mb is the size limit. this is another thing that tends to be trial and error but yea i go for about that many, try to stay under 100.
next step is to delete the layers that you don’t need, because deleting the frames when you’re trimming the gif down doesn’t delete the corresponding layers. when you select a frame, the corresponding layer on the right will have an eye next to it.

like this ^ select your first frame, find the eye in the layers, and delete all of the layers that come before that. do the same with the last frame in the gif and delete all the layers that come after it. click + shift will select as many at a time as you want, to make this easier.
at the far right of your timeline (the frames) on the bottom of the screen there’s an icon thats 4 lines which you can see below:
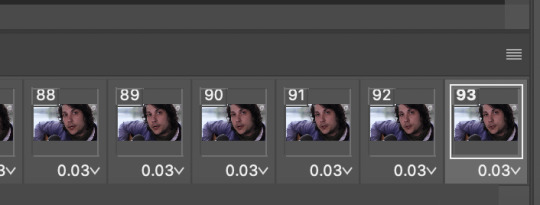
click this and select ‘select all frames’
then go to the top of your screen where it says ‘select’ and select ‘all layers’
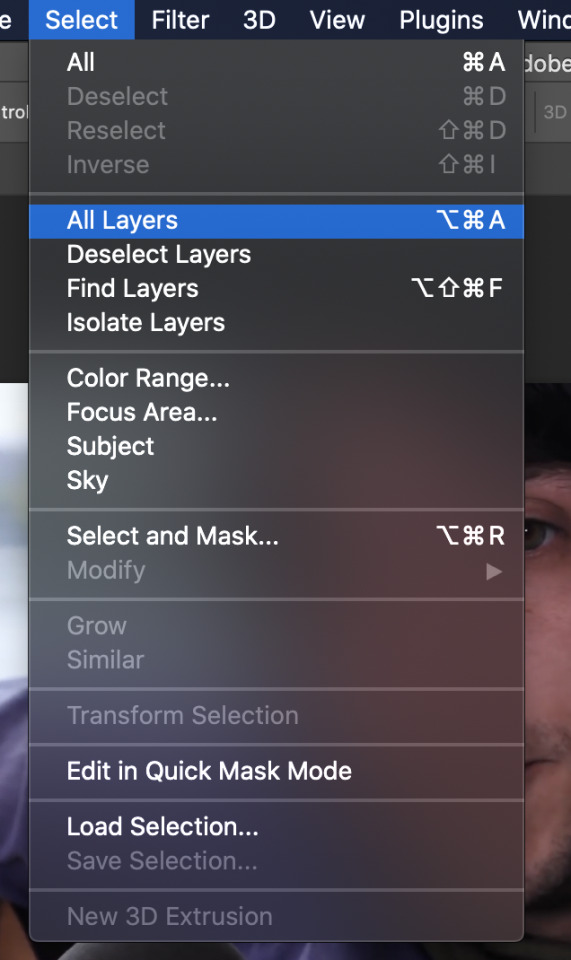
once everything is selected you need to change the framerate/delay. you see where it says ‘0.03′ underneath each frame? a lot of videos will be 0.04 in which case i would click on the framerate, select ‘other’ and type in ‘0.07′. that tends to work well. this video is 0.03 so i’m going to change it to 0.06 instead. that’s just a personal preference. if you don’t do this step, the gif will be too fast. if you don’t have all of the frames selected when you do this part, it will only change the selected frame so make sure they’re all selected before you do this.


so now it’s changed.
next you need to convert to video timeline. that’s the icon on the far left on the bottom here:
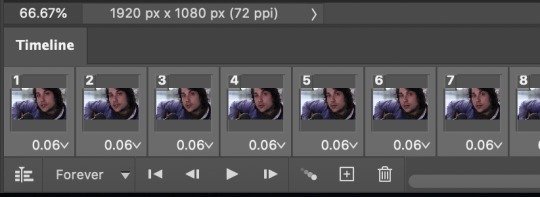
the one before ‘forever’. once you’ve done that, you need to right click on your layers (which should still be selected) and select ‘convert to smart object’.
now for all intents and purposes you have a gif! but you still need to edit it a bit.
first you should crop it if it needs cropping. i’m not going to crop the one i’m making but it’s pretty self explanatory, just select the crop tool and pick one of the preselected crop ratios. you can preview them all by clicking on them.
after that you’re going to go to the top bar and go: image --> image size
you need to resize your gif for tumblr. tumblr’s post width is 540 pixels. if you’re doing two gifs side by side they would both be 270.
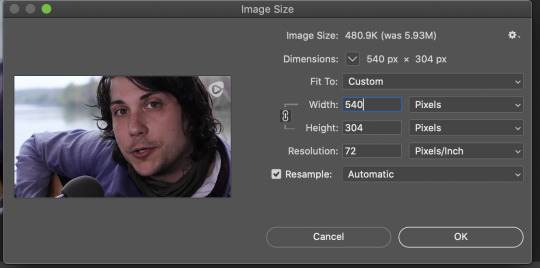
the height will automatically adjust itself.
now your gif is going to look like it’s really small but you’ll just go to the percentage above the timeline and change it to either 100% or 200%. it’s usually 100% to view it at full size but my new macbook has more pixels or something? so i have to set it to 200% to view it at full size.
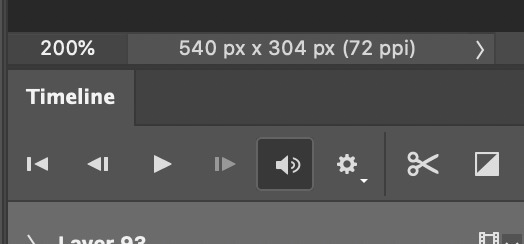
you can see here how i changed it ^
now you have a properly sized gif and any changes you make are personal preference. usually you’ll want to sharpen it. i use a sharpening action that i downloaded from a friend but you can also do smart sharpen. i would look up good sharpening settings because i don’t know them personally because i use an action. you can find the sharpening stuff through the ‘filter’ dropdown.
and then the last step i do is coloring. coloring isn’t necessary but it makes your gifs look better. coloring is personal preference though and it’s just about playing around with settings. i usually use brightness/contrast, vibrance, hue/saturation, selective color, and color balance. you can also download coloring PSDs from the internet which is like premade coloring layers that you can open in photoshop.
this is what my gif looks like without any coloring and i’ll show you the finished product at the end when i save it
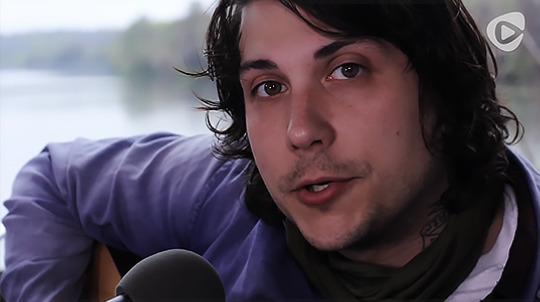
so one you’re happy with your gif you’re going to go: file --> export --> save for web (legacy)
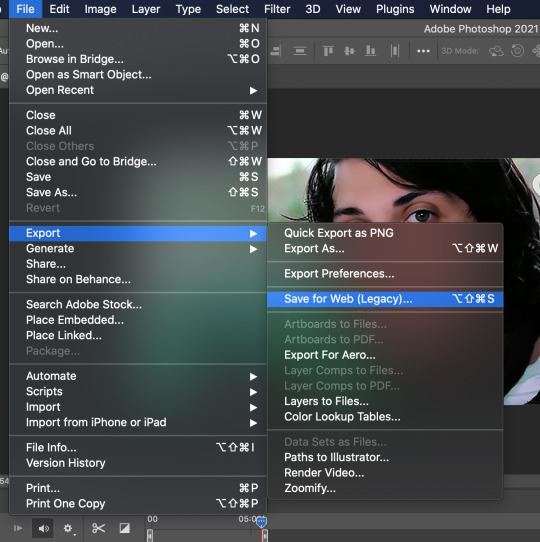
depending on how your computer wants to operate, this can take a while. while it’s buffering i hit ‘escape’ and it takes me to the save page without the wait.
these are my save settings:
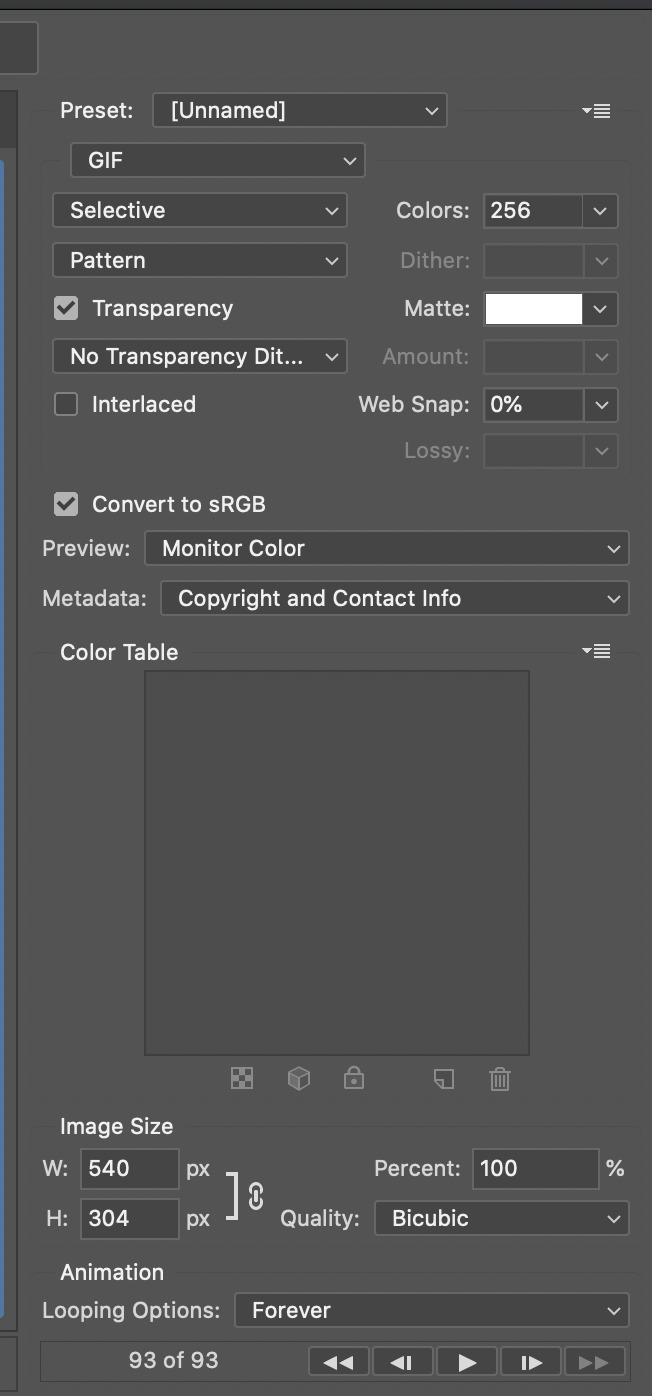
but before you hit save you want to ‘preview’ on the bottom left. this will open your gif and show you what it will look like on the web and it also tells you how big your gif is.
look for this:
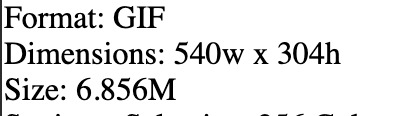
if it’s under 8mb you’re good to post it on tumblr so close out and go back to photoshop and save it! i think saving is self explanatory
and you’re done! here’s the gif i made for this tutorial:

if any of this was confusing or not clear i’m happy to try and explain better!
31 notes
·
View notes
Last Seen Blogs

leemetalsblog
Sem título

reniiiwhite19
ReniiiWhite

vasavigroup
Untitled

thalassatea
Thala

muitosobremim
1993