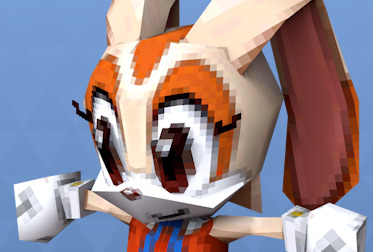
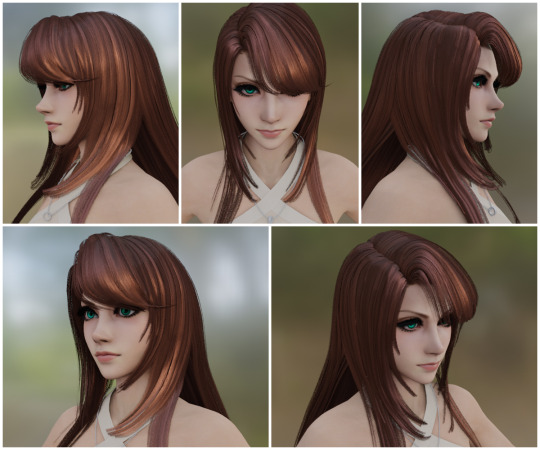
#I had to learn how to use blender from scratch for this
Text

Link!
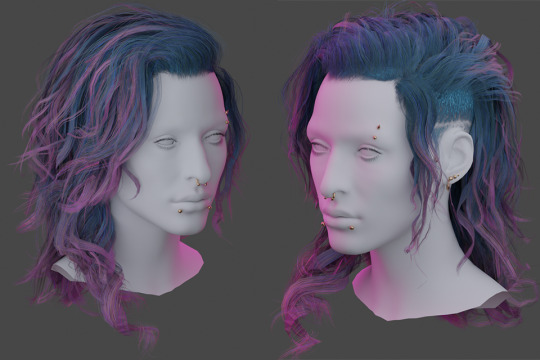
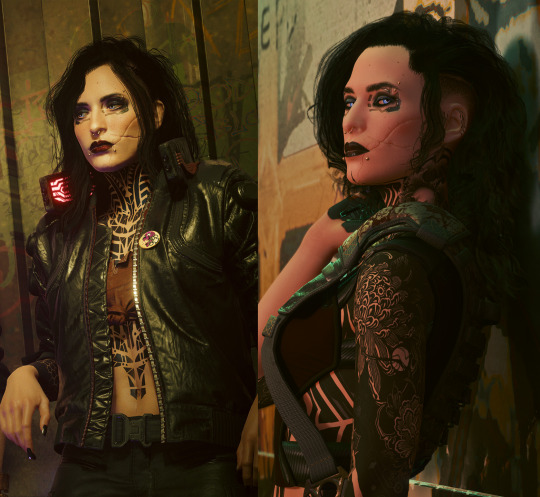
Artfight attack on the wonderful @dragonherder2030 !

that's how the story board looked! Despite the numerous ups and downs I loved making this. It was my dream to make a PMV someday and I think making this for someone who isn't myself helped me find the motivation to stick with the project to the end
#I had to learn how to use blender from scratch for this#Blender is so much better than lightworks#really#I love blender#Actually while I was drawing Cressa and Luu for this#I rembered how much fun I had with drawing Luu#so I'm probably going to draw him again in the future!#I love that guy#I have to say I got proficient at drawing scorpions#or at least better than I was before#this was really a big step out of my comfort zone but I learned so much from this#I'm really glad I made this#and I had to make this to defend myself#I still not over that sculpture#I want Calico in my room#art fight#team werewolves#Youtube#cinnamon's doodles
17 notes
·
View notes
Text

Morph Madness!
Fixing Exploding Morphs
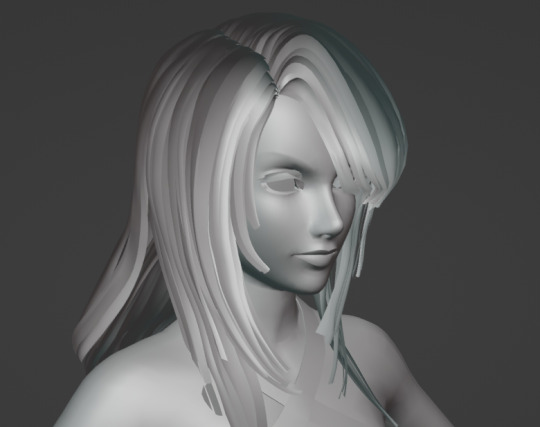
Marik's Egyptian Choker is currently in production. It is the first accessory I've made that involves assignment to more than one bone and morphs for fat, fit and thin states. So there is a learning curve, and it is during that learning curve that interesting and unexpected things can happen.
As with my other content, I'm making the choker fit sims of all ages and genders--that's 8 different bodies.
Adding fat, fit and thin morphs multiples this number to 27 different bodies.
I'm also making 3 levels of detail for each of these. The number comes to 81 different bodies, 81 different bodies for which I need to tightly fit a cylinder around the neck and avoid clipping.
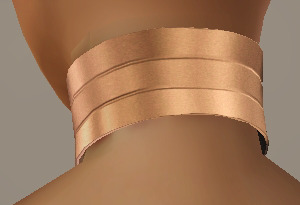
That's a lot of work. I can see why most custom content creators stick with one age, gender and detail level. At least, they did in the past. Our tools are getting better day by day, and that may partly be because of creative, ambitious and somewhat obsessive people like me.
There are usually multiple ways to solve the same problem. Some ways are faster than others. This I've learned from working in Blender3D. You can navigate to a button with your mouse or hit the keyboard shortcut. You can use proportional editing to fiddle around with a mesh or you can use a combination of modifiers.
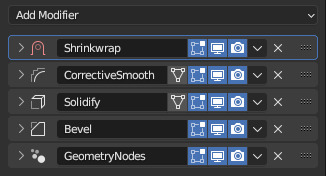
If I am going to be creating 81 chokers, I don't want to be fiddling around on each one of them for an hour. I need something automated, repeatable and non-destructive so I can make adjustments later without having to start over from the beginning. I need to work smart rather than just work hard.
This is where modifiers and geometry nodes come in. After you develop a stack to work with one body, the same process pretty much works for the others as well. That is how it became easier for me to model each of the 81 chokers from scratch rather than to use proportional editing to fit a copy from one body to the next.
But I was about to confront an explosive problem…
Anyone who has worked with morphs before probably knows where this story is headed. There is a good reason to copy the base mesh and then use proportional editing to refit it to the fat, fit and thin bodies. That reason has to do with vertex index numbers.
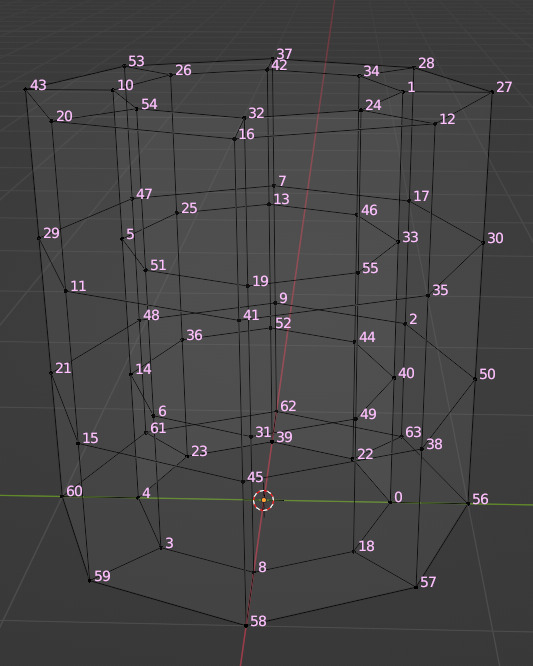
You see, every vertex in your mesh has a number assigned to it so that the computer can keep track of it. Normally, the order of these numbers doesn't really matter much. I had never even thought about them before I loaded my base mesh and morphs into TSRW, touched those sliders to drag between morph states, and watched my mesh disintegrate into a mess of jagged, black fangs.
A morph is made up of directions for each vertex in a mesh on where to go if the sim is fat or thin or fit. The vertex index number determines which vertex gets which set of directions. If the vertices of your base mesh are numbered differently than the vertices of your morph, the wrong directions are sent to the vertices, and they end up going everywhere but the right places.
It is morph madness!
When a base mesh is copied and then the vertices are just nudged around with proportional editing, the numbering remains the same. When you make each morph from scratch, the numbering varies widely.
How, then, could I get each one of those 81 meshes to be numbered in exactly the same way?
Their structures and UV maps were the same, but their size and proportions varied a lot from body to body. Furthermore, I'd used the Edge Split modifier to sharpen edges, which results in disconnected geometry and double vertices.
Sorting the elements with native functions did not yield uniform results because of the varying proportions.
The Blender Add-On by bartoszstyperek called Copy Verts Ids presented a possible solution, but it was bewildered by the disconnected geometry and gave unpredictable results.
Fix your SHAPE KEYS! - Blender 2.8 tutorial by Danny Mac 3D
I had an idea of how I wanted the vertices to be numbered, ascending along one edge ring at a time, but short of selecting one vertex at a time and sending it to the end of the stack with the native Sort Elements > Selected function, there was no way to do this.
Of course, selecting 27,216 vertices one-at-a-time was even more unacceptable to me than the idea of fiddling with 81 meshes in proportional editing mode.
So… I decided to learn how to script an Add-On for Blender and create the tool I needed myself.
A week and 447 polished lines of code later, I had this satisfying button to press that would fix my problem.

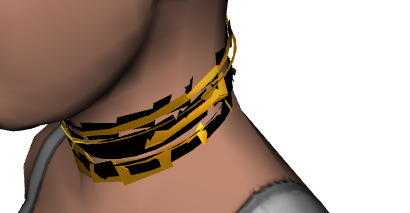
Here are the index numbers before and after pressing that wonderful button.
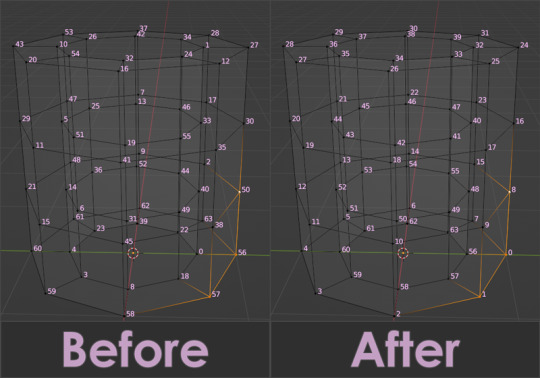
My morphs are not exploding anymore, and I am so happy I didn't give up on this project or give myself carpal tunnel syndrome with hours of fiddling.
Marik's Egyptian Choker is coming along nicely now. I haven't avoided fiddling entirely, but now it only involves resizing to fix clipping issues during animation.
Unfortunately, I'll have to push the release date to next month, but now, I have developed my first Blender Add-On and maybe, after a bit more testing, it could be as useful to other creators in the community as its been to me.
See more of my work: Check out my archive.
Join me on my journey: Follow me on tumblr.
Support my creative life: Buy me a coffee on KoFi.
#exploding#morph#mesh#sims 3#cc#custom content#tutorial#C:O#SallyCompaq122#mod the sims#cc creator#art process#blender#3d#add on#shape keys#sort#vertex#index#blendercommunity
68 notes
·
View notes
Note
hey! im learning blender and I am guessing ur vtuber model was made with blender and the effects were made in unity? (correct me if im wrong) , since im a new beginner I wanted to ask do you have any resources or anything you can link or recommend to get good at rigging your oc into blender/modeling etc, because I notice your an artist mainly I never saw 3d models you've made before and seeing it now is so cool! did you practice a lot behind the scenes? Im just amazed how good you got so fast at the program! I want to also rig an oc of mine in vrchat but i guess i wanna find out what ur process was!
I just made her with unity yes! I'm not smart enough for blender yet..
SO, I actually use a base called deira! I've slowly learnt over the months (Since last Oct) how to mess around with VR models, sorry if it's a bit disappointing it wasn't made by scratch!! But I'd argue added assets and clothing is scratch enough LOL
Here where all the assets I've used that's on Pastel!
Hair
Wings
Sweater
Leg warmers
I have had help from my friend Khai on how to do these so she was the one that mainly taught me BUT tutoriels by Snipps Avatar Box has been really helpful for me! They're short, simple and get to the point
So all I did was use the deria base, attach all the clothes to her and add 50 glowing emissions everywhere LOL
The next thing I gotta learn is how to make clothing toggles
But I'm not sure if this was helpful but I hope maybe it was by 1% !!
17 notes
·
View notes
Note
I never learned because nobody ever taught me, so how do you make scratch gravy?
There are obviously a million variations, but the two I do consistently are these.
If you have pan drippings from, say, a roasted chicken, use those to make a roux by adding roughly an equal amount of flour to the fat. Stir for minute, add stock and whisk the fuck out of it. Season to taste.
When you have braising liquid from a roast, keep all the mirepoix veggies and garlic cloves in there, and blend. I use an immersion blender because it's easy, but a stand blender or food processor work equally well. I also prefer a cornstarch slurry to thicken, here. Make sure it's all incorporated before dumping in -- no lumps. Bring to boil to activate the cornstarch. Season to taste.
If you do get lumps in either one, you weren't whisking hard enough, but that's easily fixed with a mesh strainer.
Homemade gravy is one of life's great gifts. I had some of last night's on toast this morning for breakfast.
26 notes
·
View notes
Note
Hi!! How did you learn to make maxis match clothes? I would like to start doing it uwu
Hi !
So to be fair I don't remember exactly how I went about starting making CC at the very beginning except from reading tutorials and downloading Sims4Studio but here are the steps I more or less followed in my CC making journey.
First off I was already quite used to some picture editing softwares (namely Gimp and Photoshop) which definitely helped so I would recommend familiarising yourself with one of these.
Then comes the gateway drug to CC creation that are ✨recolors✨. For those you just need S4S and a picture editing software of your choice. Recolors can be quite simple : maybe you just want to change an item's color or add patterns to it. But with a little more editing/drawing skills you can also remove/add some details to the diffuse texture.
Here is a link to a short tutorial for a simple recolor using gimp by @smubuh
To keep the maxis match aesthetic the easiest way to go is to be a 🙌scavenger🙌 : you want to add buttons / belts / lace / embroidery / whatever to your texture ? Steal it from an other Sims 4 item ! Just look at your CAS and BB in game as a catalogue of all the details and textures you could frankenstein onto your project.
Maybe you'll be content with making recolors forever but if like me you start wanting to make something with a shape that doesn't already exist in game or in the CC world out there, you will have to deal with mesh. (the mesh is the 3D shape of the item as opposed to the 2D texture that is applied onto it)
Meshing has a steeper learning curve than recoloring for sure so arm yourself with as much calm and patience as you can muster. First you'll need to download Blender, I recommend downloading the same Blender version as the one used in the tutorial you choose to follow because if you're anything like me you'll get lost otherwise. Also use a mouse, the scroll wheel makes moving around in blender so much easier than using a laptop touch pad like I did at the start 🤡.
And now that you have blender and a mouse time to mess around with meshes and for that like everyone I started (and honestly I mostly still stick to it nowadays) by frankenmeshing. Sticking to the frankenstein/scavenger theme from earlier, this is quite similar to what I described with scavenging textures, except this time we're combining meshes aka shapes : see a collar you like on that blouse, a sleeve you like on that dress ? Bam put them together !
For example here is a handydandy frankenmesh tutorial by @deetron-sims
Outside of frankenmeshing other ways to tranform meshes are to inflate and stretch parts of it (want a bigger skirt ? a shorter jacket ? the O key is your friend). And if you want to go beyond what I have you can also learn how to create meshes from scratch.
That being said dealing with meshes is full of surprises (mostly bad ones unfortunately), since you may have to deal with distorted weights, UV1 and whatever else, so it involved a lot of trouble shooting and trial & error. Being part of the S4S forum or the Creator Musing discord can be very helpful when you're at a loss (but always google and search for yourself before going around asking people).
Finally it's important to keep in mind that it takes time to learn how to make CC so don't be too hard on yourself and take breaks when it gets too frustrating. Personally it took me many months to graduate from recolors to frankesmeshing, I had to give up and try again many times before I finally got what I wanted.
Here are some more tutorials and resources :
@myshunosun made this great post about Maxis matched CC : Tips: components of creating Maxis Match objects for The Sims 4
@powluna has great video tutorials for beginners, especially this well rounded one that goes in details throught all of CAS CC creation (from the use of S4S all the way to blender) with neat little chapters so you can watch only the parts that you're focusing on at a time
S4S forum in addition to the S4S software itself this forum provides plenty of tutorials and a CC creator community
The Creator Musing discord is also full of links to various tutorials and resources (and once again a community of peers)
Specifically for Blender :
@ravasheencc's Resources Archive, I remember especially her Blender Basics Video being quite helpful when I was starting out
@surely-sims's Edutainment Lives which you can find on her twitch, mainly focused on Build&Buy CC
PS : I didn't mention the normal/bump map and the specular map because they are very much optional. I honestly didn't use these until a few months ago and even now I don't bother with them most times
13 notes
·
View notes
Note
would you ever go more into the process of how you made your music videos? like... i saw your "what i use to animate" in the faqs, but i'm insanely interested in any behind the scenes commentary you might have on the whole production of that. do you have anything you care to share about it all? like if there were certain programs you had to learn for them, or certain programs you COULDN'T use for them? i'd love to hear it all!
I didn't learn any programs specifically for Mixed Messages. That one started out as a funny little project for my own entertainment - that's why the line quality was so sketch and shitty, especially in the original half that I posted by itself. Had I known it'll be an official vid, I would have definitely tried to keep it cleaner from the get-go!
I started Red Flags with the intent of drawing every character in vector so that if I decide to animate anything else (or have time) I can do it without destroying quality.
I did have to learn to use ToonBoom Harmony for RF, and I wanted to for years so YAY! Obviously I'm no pro and I'm sure there were better ways of doing certain things but at least I have a grip on it now. I also used it a little for the dancing animation in MM, you can probably tell by the difference in line quality.
I learned some Blender from @cameronaugust last year, but most of the 3D assets for RF were made by him. It's really useful to know at least basic hard surface modeling though!!
Beside that, I almost always have to look up tutorials or plugins for certain effects I want to produce in AE. Particles, simulations, scripted stuff, etc.
Oh and I didn't make storyboards because TIME, I just put all my shitty storyboard doodles in an animatic from scratch. They look like trash and I changed at least 3 scenes entirely to save production time or make it more interesting.
#if you're in complete charge of your project you should not have scenes you don't want to draw/animate#is my motto#literally no one is making you#I mean obv it's good to push one's self#but make it fun also#personal#text#long post#sorry for the rant thank you for asking#art advice
118 notes
·
View notes
Text
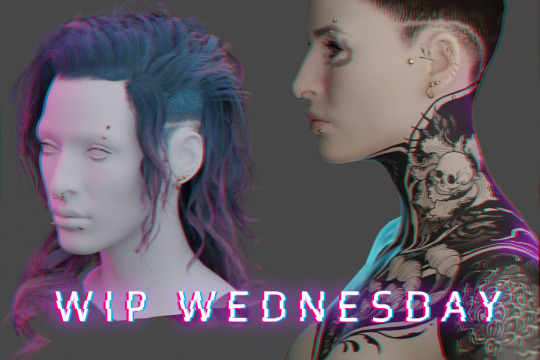
WIP WEDNESDAY - 21/06/23
(I mean it’s technically Friday now between timezones and spoons but have this otherwise I’ll keep forgetting) My first WIP Wednesday! Thanks @theviridianbunny for the tag! I’ve been really getting stuck into modding - as well as falling into my usual mod habit of ‘start like six project at once and end up with a million WIP files' but I guess I’ll talk about the major ones.
Graphic design is my passion ...
(Long) rambling about mods I'm making + things I've learned below the cut~
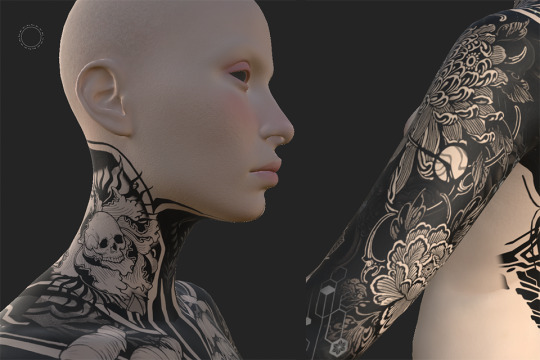
My V’s tatt project is still ongoing, and I’ve (somewhat begrudgingly) been trying out Substance Painter to work on bits of it, mainly polishing seams between UV maps. It’s definitely got a lot of benefits, especially for graphic placement in really tricky areas (like anywhere in the entire head mesh region for example) but I still think a lot of the heavy work will still be done in Photoshop so I’ll probably be writing up both experiences with them when I do that tutorial I keep hinting at for complex tatt work. I’ve started drafting a tumblr tutorial but I wonder if that’s the best format, maybe a PDF? Google doc? Github wikis look cool? (tho I think I need to pay for that) - if y’all got suggestions for tutorial formats pls let me know!
As for the other arguably overly-ambitious-project-where-I-bit-off-more-than-I-could-chew ...
H A I R.
Hair has been the bane of my existence for about the past week( ... weeks? Maybe two?), most of it involving cursing, a lot of reverse-engineering game meshes and smashing my head against blender. But if not already evident from my monowire post - I am a stubborn bitch with too much time on my hands so even though there were at least two moments where I wanted to curl up on the floor under my desk and just stay there - we got there.
This all started because my favourite hair mod which I cannot split from my V’s identity was acting funky and the shape of it had been altered since a physics update. It wasn’t her anymore. So I needed new hair. I tried editing the existing hair. I tried importing the old hair mesh. I tried so many things and they didn’t work out one way or they threw a million errors or there were an obnoxious amount of verts.
I even tried looking for replacement mod hair. None of them fit, all of them felt too ‘clean’ for my V. So I just concluded: FINE. I’ll make my own damn hair. From scratch. At least then I’ll actually KNOW what’s going on with the mesh, right?
Problem with hair is tutorials are very limited in respect to Cyberpunk, so I had to learn a lot of this by myself and looking at other processes used for building game hair. I’ve had a previous stint in game design at uni but it was very introductory and more broad-strokes concepts not specific stuff like what ‘real time hair’ is and how you actually go about placing hair-cards (there’s a million different ways btw) but after another 3 days smashing my head against blender I finally got shit to work to a satisfactory level using hair tools for blender and the particle hair grooming system (not the 3.5 blender system, maybe more on that at some point).
Putting together the hair cards I was 120% convinced this was going to blow up in my face, primarily through vert count. But this hair tool plugin? Alarmingly efficient. I was frequently checking my work against Alt's hair mesh (one I was planning on rigging to) and here's the final-ish stats -

This is with only Alt's hair mesh selected (no cap) and then only my mesh(s - lots of layering to build it up), and by comparison I felt I'd built up the density of a chinchilla. This is not a brag, this is mostly genuine confusion over how efficient this plugin is, all I did was smack around hair curves. It did all the UV mapping junk on the fly.
Although structurally complete, I still consider this a WIP (yes I know there's a reeeeal fun vert funkiness in that second render, it's been fixed) since I'm having to go back and fine-tune some of the UV's the plugins mapped that I'm not happy with and generally figuring out my density problem because if anything, after putting it in-game it felt too dense.
Because yes, somehow I got it in game.
WITH. PHYSICS.
This may have driven me absolutely up the wall between having to learn blender from scratch then what the heck real time hair is and how that works etc. etc. but ... god, seeing her move back from the mirror and just feeling that instant catharsis of 'IT'S HER!' made it so. Damn. Worth it.
It looks too thick - this might be because I chucked in the 'doubled' feature Wolvenkit comes with because I hadn't spent any time doing backfaces. But it also might be because it's black? That's going to need investigating.
The physics need a lot of work too, I did a pretty rushed weight painting job last night on a merged version of the mesh because I was worried whether it was even viable and I'd already dumped an insane amount of hours into this between trying to salvage the old hair and building a new one (with some more bells and whistles. Mainly - curly). That wasn't without it's issues -
This almost fucking cracked me, given this was one of the issues I was experiencing before trying to fix an existing mesh mod. Turns out I was just being dumb and forgetting to export the armature, which I'd thought I wasn't supposed to do after having blender throw a bunch of errors on other hair attempts. I gave it a try after one last shot and boom. Worked. (I dunno what those errors were about man but now I know armature? very important).
Will I release this hair? no damn clue, depends on if I can get it to a level I feel is 'releasable'. I already know what I'm calling it though - Venatrix her side-handle I've decided on.
I look forward to adapting it into maybe a comb-back version, as well as a tied up version, so I can show off both her undercut + have the option of NOT hiding every damn tatt I've obsessed over placing on her neck haha.
In other news -
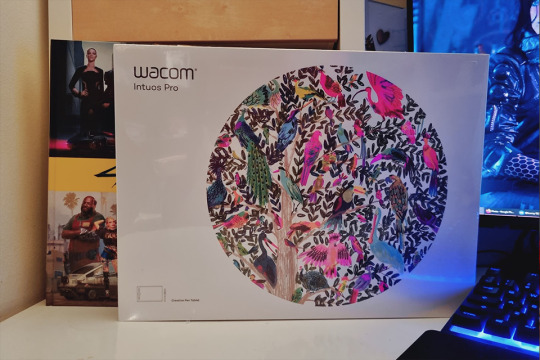
My much-needed wacom tablet replacement arrived (as well as other things I was looking forward to 👀) meaning my Wacom Cintiq, workhorse of ten years can finally enjoy her retirement. Her controls were getting funky, she had a few dead pixels but man. I'm convinced they won't make them like her ever again. Either way she's done unfortunately - upgrading my monitor to 2k made this painfully obvious. I don't think it's even running in full HD, it's that old. And with Phantom Liberty coming out this year? I'm probably going to need a new videocard and DVI compatibility isn't really a thing anymore.
So for future I think I'll just stick to the basic tablet set up, invest in screens. Also now I FINALLY know what her hair is gonna look like and with the tablet here, I can get back to work on the tattoo bodysuit.
Anyways, that's it for now! (Jesus Christ did you really read all of this? If you did you're a fucking trooper). Sorry for the extended ramble but MAN I did a lot, I needed to yell.
Till next time Chooms! Thanks again @theviridianbunny for the tag~ <3
Oh shit wait, have the blender renders before I forget because hahah I figured out how to do that too lol -

#cyberpunk 2077#cyberpunk 2077 modding#my mods#wip wednesday#cyberpunk 2077 mods#kerytalk#god I am sorry this is a fucking essay but I had a lot to talk about I guess#one can do a lot in a week with nothing but the power of autistic hyperfocus and the love for one's OC blorbo ok
33 notes
·
View notes
Text


So...uh...yeah. I am currently going thru a life crisis at the moment due to a work related serious accident my husband was involved in this past Monday and it has been very stressful (I will be making a more in-depth post about all of this later today....I am too drained atm to do so) and is going to take a huge financial toll on us until he is healed and can return to work (4 to 6 weeks, approx.) since only he works as I am fighting for SSI Disability. But as a way to help manage my overwhelming stress and to take my mind off of things I have been playing around in Blender more and trying to really learn things. I have created my VERY first object "from scratch" (as until this I had only ever edited EA meshes and such) and my hope is to make this into a Deco tack trunk to share with you all...eventually. I am also "dabbling" into trying to make some custom Stall fronts! Though actually getting to the point when I can share these with everyone will likely be a while as there are more things I have to learn to actually take these things from Blender and into TS4 (idk how to do that...yet...but also have not made any attempt to learn that yet lol)
#sims 4 equestrian#sims 4 horses#equus sims#sims 4#ts4 equestrian#ts4 horses#equestrian#sims 4 horse cc#horses#the sims 4#ts4 cc wip#current wip#wip#my wips#work in progress#idk what im doing#halp#life in crisis
11 notes
·
View notes
Note
What inspired you to start up 3d modeling, and were there any guides out there that helped you get started? Also if you had one tip (or more) for beginners what would it be?
i was really into mmd as a teenager and wanted to make my ocs firstly, but my main push to from-scratch modeling instead of frankensteining models was that i wanted to put majima goro in different outfits and render them out in sfm or blender. those old men ruined my life.
however a lot of my early learning was just messing around in pmx editor for mmd models and messing around in metasequoia 4, so i dont really have a ton of direct tutorials for beginners wanting to get into 3d modeling. the only tip i can give is to not use the donut tutorial and instead id recommend this absolute complete beginners tutorial series.
one more thing i can say is that dont trust people on the internet when they act hyperbolic about how hard blender is to learn. like holy cow it isnt rocket science, but of course theres a little bit of a learning curve because like. its a new skill. of course its going to be hard. but screaming and crying about how overwhelming the blender ui looks without even bothering to look at a tutorial does nothing but discourage you AND other people wanting to get into this form of art. practice and exposure and GOOGLING makes perfect yknow
25 notes
·
View notes
Note

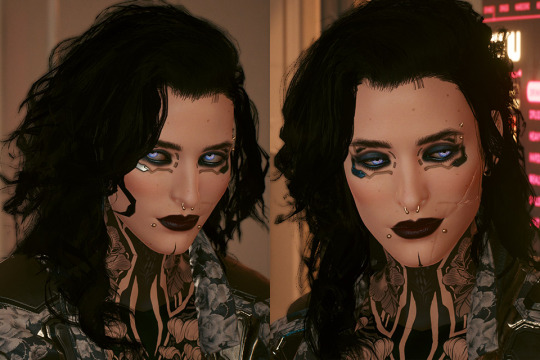
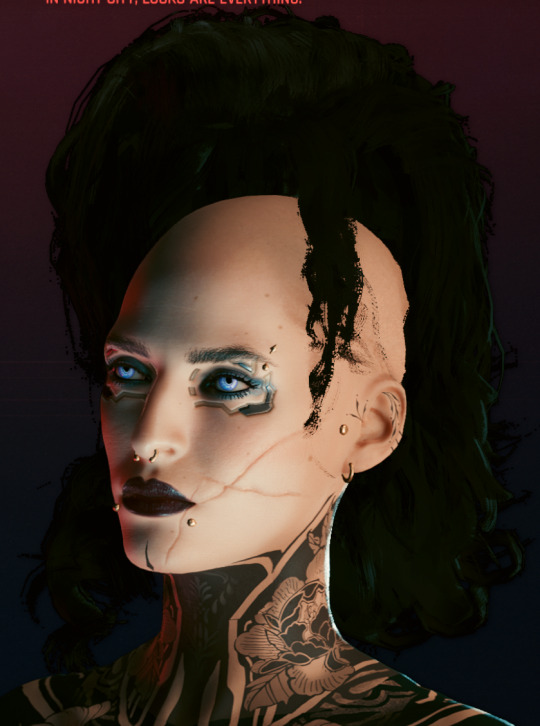
Hello I bring my OC Venatrix for viewing 👉👈
She's originally my Cyberpunk 2077 V that I played like ... a year ago? (leftmost, first pic) and was like the first one that actually 'clicked' for me visually as 'oh yeah this is my canon Streetkid origin V'. Fast forward to this year and I had started making tattoo mods in the sims and though 'huh what if I made her tattoo from scratch in cyberpunk though' and uuuuuuuuuh I kind of went off the modding deep end lol?
Like what started as really custom, meaningful tattoos for her (because I am a shit for symbolism so it had to happen) turned into custom eyes, custom lip texture, rebuilding her hair from scratch (and then going a but insane with making it curly actually) by myself with absolutely no knowledge of Blender or modding tools in the first place. I also ended up putting her in Baldur's Gate (no literally, that is the head mesh ported over lol) because honestly she's my third 'angry goth energy' OC and I'm just 'how about we just stick to the same one'. So yeah she's my modding blorbo I guess??
I am super thankful for her for that because I always wanted to be in the games industry, originally I studied game design before life and disability things 😦 ... but this has kind of given me some of that back, being able to see something I made and just go 'I DID THAT!' has been really nice and healing for me. (Like even comparing her to the 'old' version with other mods I'm just ... wow. I did so much.)
I don't care that she's technically a 'game' OC or whatever, all I know is I'm the most inspired I've been creatively in a long time and I'm pushing myself to learn things I always thought would be too hard and complicated for someone like me.
Instead I'm out here deconstructing Baldur's Gate 3's annoyingly complicated texture system and reconstructing it in blender just so I can have the option of doing 3D renders of my blorbos.
Like shit man! I've learned so much in only a few months and I am kind of hype about that! And it's all thanks to this beloved angry little goth ball of wrath (who I picture as a Tasmanian devil or something, just creature energy to me haha).
I will draw her ... someday. But pretty content with just learning all this new shit right now.
So uh that's Venatrix 🥺
YEAAHHHH!! bruhh I love Venatrix, and especially love seeing your modding journey and discussions. Literally hop on Tumblr and just wonder what cool stuff imma be seeing!
pov you see me react to a chipped-chimera post
I think in any case, seeing someone convert their oc into a 3d space is incredibly cool. ESPECIALLY that you changed the games model to fit her!! less gooo!!
Though I'm really glad that she's been helping you out, ocs are our little brain gremlins that I truthfully think are there to sort the clothes and do the chores while we're away. Sometimes they pick us up when we're not well enough to keep at it, we never really forget them either; so they're always vibing out.
I'm so glad to read this and honestly hyped for any and all Karlach/Ven 🤝 consider me interested, taggable, and yell-able about it
6 notes
·
View notes
Text
Disrupt
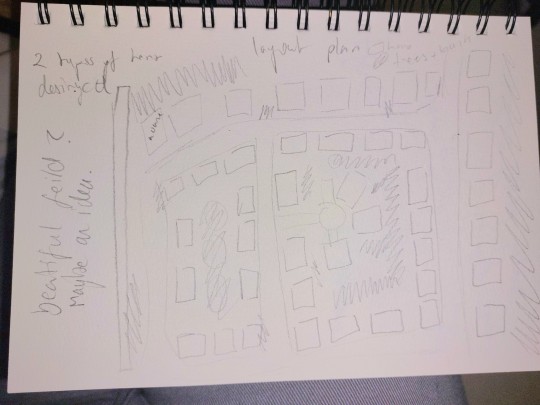
I had a really cool idea of instead of painting a simple of housing estate I would actually construct one from scratch! This idea came form my Poem which I am using as a primary source.
I started my doing the 3d proning workshop which we made a keychain and I learned how to use blender. I used blender to make my models. I made two houses on big one and one small one. I wanted the small one to almost look like when little monopoly house cause ei thought it would be fun. I kept to simplicity as this is my first time ever doing this.
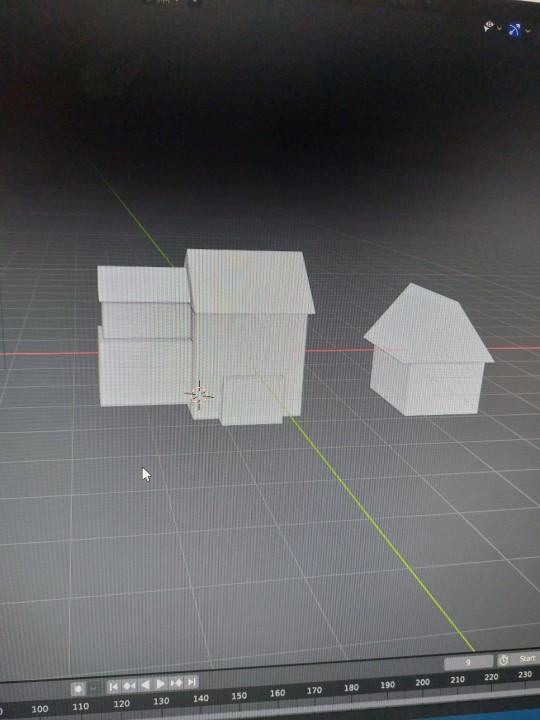
Houses in blender!!!
I also learned how to export the file into the 3d printer which wasn't that hard with the help of that as card. I also learned how to unload and load the machines filliments. I had some trouble but in the end I managed to start it getting printed! 44 little houses here I come!!

Plan is to try and get this done today or tomorrow. I will stick on the houses of a massive page and try to recreate this housing estate that I drew which I got inspiration from from other housing states around me!
2 notes
·
View notes
Text
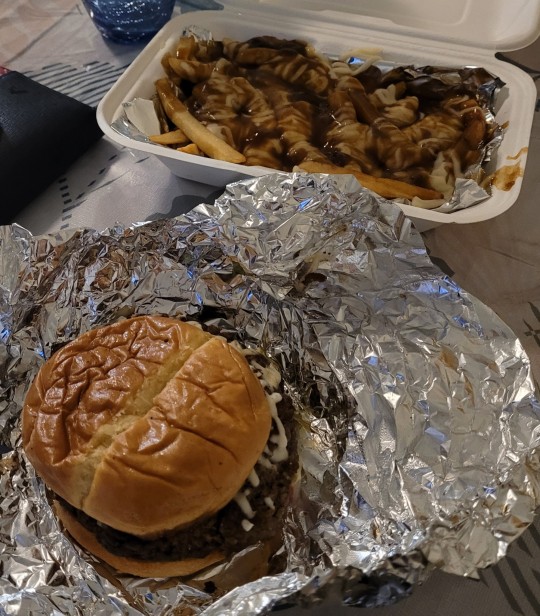


I feel like I've been on a hiatus for so long. The last couple of months I've been working on finding an apartment, getting an apartment, moving into said apartment and finally setting it up. It has been crazy, scary and amazing all at the time. The amount of stress I now see that I was going through, had me eating ramen EVERY. SINGLE. DAY. By ramen I mean.. Mr. Noodles with an egg, cheese, Chipotle and hot sauce. Don't get me wrong I LOVE this dish but ever since I moved out from my parents I've been eating more "proper" meals and I haven't touched ramen.
Though I don't have any "recipes" to share just yet.. here's some not so pretty pictures of some of the things I've been eating.
To start let's take a moment to appreciate my "celebration" meal for my first night in my apartment. It's take out but it was delicious nonetheless! Burger with the works and poutine. 🤤
I've thoroughly been enjoying breakfast meals lately. I was able to make waffle sticks with my waffle stick maker (FROM SCRATCH AHH) and have been heavily enjoying egg in the hole but decided to make French toast one day. Strawberries have been the fruit of choice for my meals as they were on sale.
I ran into some issues making a brocolli and cheese soup (I need to learn how to use an immersion blender) but the taste was *chefs kiss*! 😘 had my mama over for lunch and served her the soup and she also loved it! Excited to improvise more on the soup when I have more ingredients to work with (it's very green cause I also use spinach).
The strawberry crisp was probably my favorite thing to make! I served it with a side of ice cream and oh.. my... Lanta.. it was SO good. Definitely will be making again!
I've also had the privilege of having spaghetti, tacos, rice and hamburger etc over the past week and I am beyond satisfied. I said to my best friend just last night how it's funny that everything I've been making I love. This new found freedom is amazing!!
I look forward to growing this part of me and sharing my recipes with you guys!
5 notes
·
View notes
Text
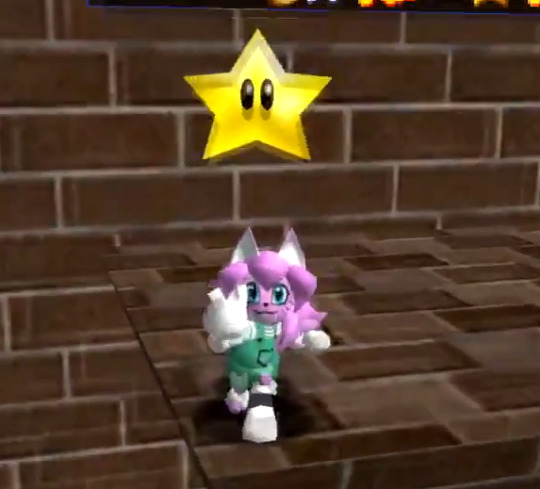
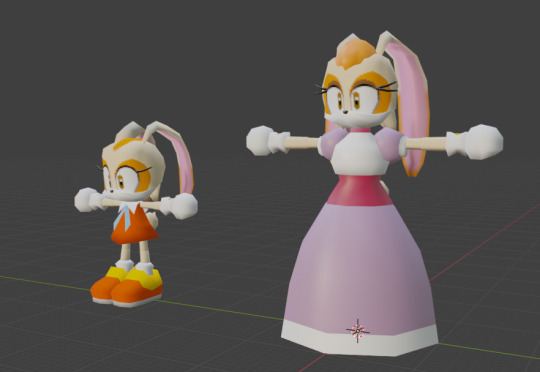
Road to Cream64 v1 Part 1: The Cream Herself

It's crazy to think this model is about 2 years old now. Course, it wasn't this way in the beginning.
When learning how to use blender, the only tool at the time for sm64 export was for v2.69, which was the last version before Blender updated its UI to the more user friendly one we know today. And so trying to fiddle with that, I did actually manage to make a Cream model for SM64, using her Heroes model as my base.
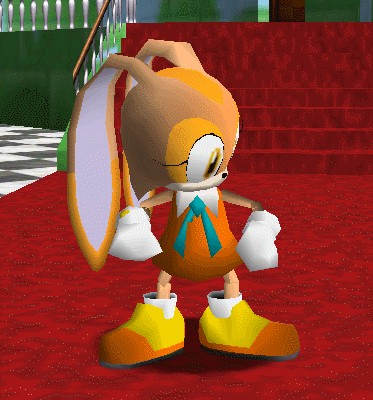
While yeah it did work (and this is after I had decimated most of the polygons to fit inside a normal sm64 rom, it didn't look right and I would just shelve the model for a few months, where I would be working on a small commission for someone. This would be around the time someone pointed the SM64 Decomp to me, which would end up making these future models go through much easier.
Fast64, the tool for importing and exporting SM64 (and OoT) assets through Blender finally got an update for v2.70, which helped me tremendously. With that said, I got to work on making a brand new Cream model from scratch, using a reference pic I found at some point. I always like to point it out that her head mesh is just a redone version from her Sonic Chronicles head model, with a new texture applied to it of course.
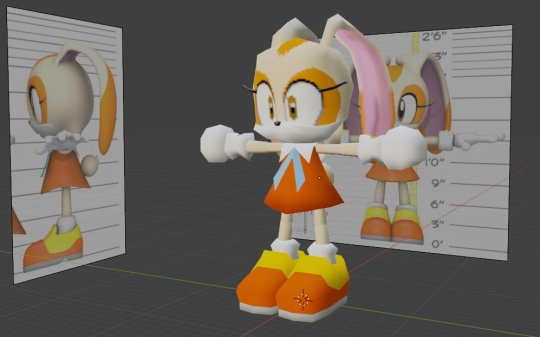
This would eventually be THE model from this point onward, with small changes to it made from time to time. And when finally exported:

She came out pretty much perfect, though I still had some work to be done. Eventually learning of "skinning" or attaching meshes from different bones to create a seamless bend and a few other things like the blinking also making the eyelash move.

Slowly but surely everything was coming into place, and this was just for the player model. There's still a whole lot to this hack than just Cream herself but in due time. I also messed around with the decomp a bit and made a version for my friend, @fudgernutter, with her character Kitten. Also around this time I just kind of messed around with the Source engine and TF2, importing my own models into the game, which would eventually be the same Cream model replacing the Demoman parrot misc.

Around summer 2020 is when I would get back into the groove of things for Cream 64, finally getting to the rest of the main cast and then eventually the small little things like Star Rings and stuff. But another post for that~
#super cream 64#sc64#romhack#super mario 64#cream the rabbit#blender#modeling#she smol#kitten lynn#road to cream 64
19 notes
·
View notes
Note
Hello what resources did you use to learn how to make cc hair? I want to start learning but I'm not quite sure where to start. Sorry if you have this answered before I couldn't find it!
youre good! to be completely clear, i am neurodivergent so i have had a lot of difficulties with it that stem from that fact. so i'll give my advice but it might be different for others.
if you want to make hair from scratch, it's best to start with frankenmeshing, or taking parts of pre-existing hairs and putting them together. when you're unfamiliar with 3D modeling/blender, beginning this way will teach you how modeling in blender works, as well as how the meshes are built specifically for the sims 4.
the first frankenmeshing tutorial i found that actually helped was this tutorial by sim live on youtube, it is in two parts: part one, part two. there are plenty of video/written tutorials out there, but this one is the only one where i've been able to understand and replicate the method on other, more unique projects.
from there, it's a matter of googling answers to your issues lol. most often results from stack exchange or the blender documentation will give the best answers. these are professionals that do it for a living so they know how to solve problems bc they know the software the best. but if you have a sims 4-style specific problem that you can't find an answer to, the sims 4 studio forums tends to have the most helpful answers and tutorials.
i feel like this is essentially just saying "you gotta figure it out" but for me that was the case for the most part, so i don't know what else to say :( i hope it was helpful anyways
3 notes
·
View notes
Text
Hi, folks! Today I have a couple sneak peeks of what's coming up soon here. First of all, damn, you really liked that Tattooer project, huh. Thank you so much for the interest and love, and I have to say, there's more coming soon! So that part of the process that involves removing the alpha channel and then adding it back using some actions in Photoshop? Yeah, forget about that. A really cool simmer here told me about a neat little trick with the most recent version of Blender that preserves the transparencies during the texture baking process, so expect an update on the entire project and tutorial in the coming days.
Obviously I've been working on new stuff to add and update to the Tattooer project while I was there, so here goes a sneak peek under the cut!
I was not happy at all with the first face tattooer thingy version I did, hence why it says it's experimental, so I had to make a new and improved version.

Surely that face does not look impressed, does she? Well, I decided to sit down for a few hours and put into practice what I've learned in this fantastic free masterclass on youtube remapping the Sims 2 face so it matches the Sims 4 face UV mapping. If you want to learn about UV mapping and unwrapping in Blender, I totally recommend watching that video, such a life changer! I've tested texture baking with this new version using a few S4 makeup cc and honestly, I'm quite happy with the results for now!
And finally, as a bonus, I came up with a new way to make our own tattoos from scratch, as easily as possible.
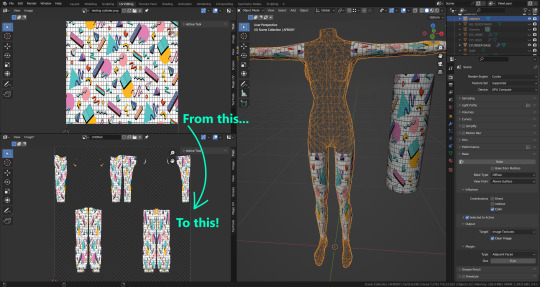
This one is focused on the arms and legs, which usually are the most problematic parts of the body to texture. Unfortunately this project will also require just a little bit more knowledge about how to use Blender, but I think it can still be really useful! It's basically a cylinder that automatically wraps around the arms and legs, kinda like a sleeve, and then you can just bake the texture from the cylinder directly into the Sim body. You could wrap that cylinder around other parts of the body, but don't expect it to look as good as around the arms and legs… So for those cases I will also add a square plane object that also adapts to the shape of the body. It works literally like those tattoos you could find inside those Cheetos chip bags back in the day lol. Want to know the coolest part about this? As you can see on the image, those objects' UV maps are extremely simple. No more messing around with that weird original S2 UV map, trying to stretch and match your texture to fit it in Photoshop. You can just slap your texture in, bake it, and it will mostly look good and seamless, just like that!
So yeah, this is what I've been working on these past couple weeks. I can't wait to properly share them all! Can't say exactly when it's going to happen, though. I've been pretty busy lately with my studies, and also got sick, yay. But oh well, let's just say "coming soon", at least for now.
6 notes
·
View notes
Text
While I'm still in my shadow ban era here, I figured I'd take a moment to share something I've been on the fence about sharing here anyway... hahaha!
Sort of FFIX related? It has Kuja and Sal in it, at the very least. 😅
Particularly Sal, though!
A little while back, I took the time to mix and match + sculpt and retexture both the Dissidia NT models of Tifa and Rinoa to entertain some idea of what Sal may look like in 3D!
I actually had a previous model that was a slightly modified Larxene bust with modified Rinoa hair that I used for Sal as a reference, no textures. I felt like building upon that one day and, well, here we are!

I just… wanted to see what they'd look like T-posing next to one another...!
The model is SO broken, so I won't be doing anything in full 3D soon, trust me. Haha!
Learning how relatively easy it is to sculpt out 3D forms in Blender has since inspired me to entertain the idea of building some refs for other characters from scratch, though! Like Mina and Branson, for example. 🤔
Their head shapes are very particular and it'd be nice to have some models to use as reference for them. Same with Survit! (Kuja's silver dragon, in my tales.)
Since I'd be using them as art refs, I'm not sure I'd stress myself out trying to map textures and all that for them as they'd be from scratch and probably a lot harder for me to figure out, but you never know with me...
Anywho, there's some... ah, what is this?
Behind the scenes sort of FFIX content, maybe? 🤔
FFIX adjacent stuff that I don't mind going under the radar. However, for the very select few who may see this... heyyy. Also, hope you're doing well! Drink water and stay classy. 😎👆👉 🥤
#Sal 🌌🎹#Tags aren't working right now#but I'll throw some in anyway!#filling the void 🌌#with#ffix#oc#plus a tiny bit of#kuja#content
10 notes
·
View notes
Last Seen Blogs

ultranocturnalll
are you faux real?
expressions-of-nature
expressions-of-nature

im-the-emvp
Untitled

without-ado
Welcome you!

discountcodeking-blog
Untitled