#Exporters Importer Directory
Photo
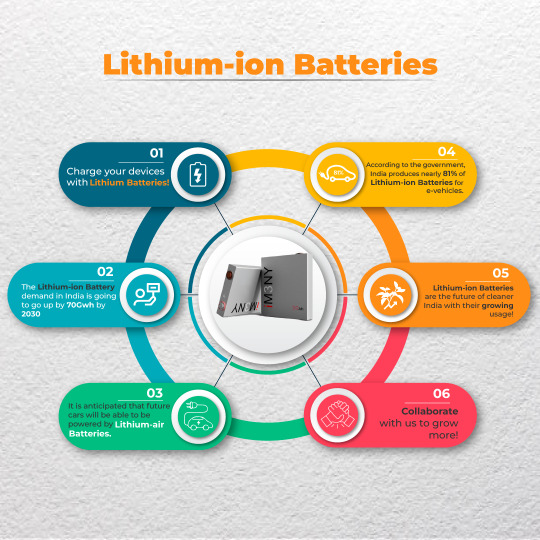
Lithium- Ion Batteries- Future of Energy
With the increasing demand and supply of 𝐋𝐢𝐭𝐡𝐢𝐮𝐦 𝐁𝐚𝐭𝐭𝐞𝐫𝐢𝐞𝐬, it has become one of the 𝒎𝒐𝒔𝒕 𝒕𝒓𝒂𝒅𝒆𝒅 𝒑𝒓𝒐𝒅𝒖𝒄𝒕 on our portal. 🤗
What are you waiting for join us today and avail 𝟏𝟎𝟎% 𝐅𝐫𝐞𝐞 𝐌𝐞𝐦𝐛𝐞𝐫𝐬𝐡𝐢𝐩💯
#b2b#b2b marketplace#lithium battery#lithium batteries#manufacturer#Exporters Business Directory India#Exporters Importer Directory#Free Suppliers Directory In India#B2b Online Marketplace In India#business listings#online marketplace#Go2bng#Business Network Gateway#Free Business Listings#Business E-Commerce
2 notes
·
View notes
Text
Importers List
TurkExim is the global bill of lading,import export shipments and importers database. Also you can find the latest and updated Türkiye (new name- old name Turkey) buyers and importers according to 12 digit hs codes.

#Importers almanac#Importers database#Purchasers#Buyers list#buyers directory#Buyers Database#importers directory#import data#export data#Shipment records#Turkey importers
1 note
·
View note
Text

The turkey importers directory serves as a comprehensive database containing detailed information about companies based in Turkey that engage in importing goods from around the world. It provides valuable insights for international traders, manufacturers, and exporters looking to establish or expand their presence in the Turkish market. By accessing this directory, businesses can identify potential partners, understand market trends, and tailor their strategies to meet the specific demands of the Turkish market. Whether seeking new business opportunities or aiming to enhance existing partnerships, the Turkey Importers Directory is an indispensable tool for navigating the complexities of global trade within Turkey.
#global trade data#export#import#international trade#trade data#trade market#global market#import data#import export data#custom data#turkey importers directory#turkey#import export data provider#export data
0 notes
Link
Navigating Turkey's dynamic commerce landscape demands adeptness. Situated at the crossroads of continents, Turkey is a vital trade hub. To thrive, leverage key resources like the turkey importers list and master trade regulations. Here are ten crucial insights.
#import#export#import data#export data#trade#trade data#turkey importers list#turkey exim data#turkey import export data bank#turkey importers directory#turkey port data#turkey#global trade data#import export data#import export data provider#import export business
0 notes
Text
Explore the significance of International Buyers Directories in global trade with Seair Exim Solutions. Discover how these directories can boost your international business and connect you with potential buyers worldwide.
#International Buyers#Find International Importers#Best International Buyers Directory#Export Import data#Imports data
0 notes
Text
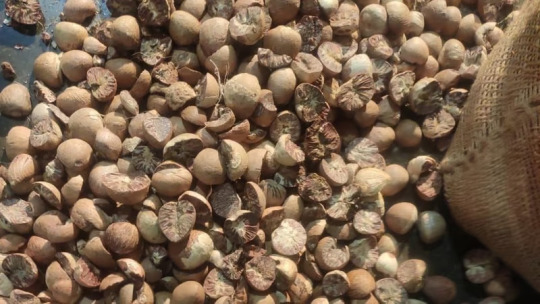
The Secret to Importing High-Quality Betel Nuts for Cheap: A Directory of the Top Exporters
Betel nuts are a popular chewable stimulant in many parts of Asia. They are typically wrapped in a betel leaf with lime paste and other ingredients, and chewed for their stimulating and euphoric effects. Betel nuts are also used in some traditional medicines and religious ceremonies.
Indonesia is the world's largest producer and exporter of betel nuts. Other major betel nut exporting countries include India, Sri Lanka, Thailand, China, Vietnam, and the Philippines.
If you are looking for a reliable betel nut exporter, there are a few things to keep in mind:
Quality: Make sure to choose an exporter that sells high-quality betel nuts. Betel nuts can vary in quality depending on the variety, growing conditions, and processing methods.
Price: Betel nut prices can vary depending on the quality of the nuts and the country of origin. It is important to compare prices from different exporters before you buy.
Reliability: Make sure to choose an exporter that is reliable and has a good track record. You can read reviews from other buyers to get an idea of the exporter's reputation.
Here is a directory of some of the leading betel nut exporters in the world:
Indonesia:
PT. Rezeki Mandiri Global
PT. Agro Future Indonesia
CV. Rezeki Mandiri
CV.GHI
PT. JKL
India:
M/s. ABCD
M/s. EFGH
M/s. IJKL
M/s. MNOP
M/s. PQRS
Sri Lanka:
AKEN LANKA PVT LTD.
ASHOK LANKA EXPORTS
BALAJI VENTURES LANKA PVT LTD.
BESPICE PVT LTD.
BEST DEAL EXPORTERS PVT LTD.
Thailand:
Thai Betel Nut Exporters Association
Thai Chamber of Commerce
Federation of Thai Industries
Thai Food Processors Association
Thailand Rice Exporters Association
China:
China Chamber of Commerce for Import and Export of Foodstuffs, Native Produce and Animal By-Products (CCCFNA)
China National Association of Grain Trade (CNAIT)
China Association for the Promotion of International Trade (CCPIT)
China Chamber of Commerce of Machinery and Electronics Importers and Exporters (CCCME)
China Food and Beverage Industry Association (CFBIA)
Vietnam:
Vietnam Chamber of Commerce and Industry (VCCI)
Vietnam Food Association (VFA)
Vietnam Association of Seafood Exporters and Producers (VASEP)
Vietnam National Coffee and Cocoa Association (VINACA)
Vietnam Cashew Association (VINACA)
Philippines:
Philippine Coconut Authority (PCA)
Philippine Chamber of Agriculture and Food Inc. (PCAFI)
Philippine Exporters Confederation Inc. (Philexport)
Philippine Chamber of Commerce and Industry (PCCI)
Federation of Philippine Industries (FPI)
Malaysia:
Malaysian Palm Oil Council (MPOC)
Malaysian Rubber Board (MRB)
Malaysian Cocoa Board (MCB)
Malaysian Timber Council (MTC)
Malaysian Pineapple Industry Board (MPIB)
Bangladesh:
Bangladesh Export Promotion Bureau (BEPB)
Federation of Bangladesh Chambers of Commerce and Industry (FBCCI)
Bangladesh Chamber of Industries (BCI)
Bangladesh Garment Manufacturers and Exporters Association (BGMEA)
Bangladesh Knitwear Manufacturers and Exporters Association (BKMEA)
Myanmar:
Myanmar Trade Promotion Organization (MTPO)
Myanmar Chamber of Commerce and Industry (UCCI)
Federation of Myanmar Chambers of Commerce and Industry (FMCCI)
Myanmar Rice Exporters Association (MREA)
Myanmar Timber Merchants Association (MTMA)
Papua New Guinea:
Papua New Guinea Investment Promotion Authority (IPPNG)
Papua New Guinea Chamber of Commerce and Industry (PNGCCI)
Manufacturers Council of PNG (MCPNG)
PNG Business Council (PNGCBC)
PNG Exporters Association (PNGEX)
Taiwan:
Taiwan Bureau of Foreign Trade (BOFT)
Chinese National Association of Industry and Commerce (CNAIC)
Taiwan Confederation of Industries (TCI)
Taiwan Electrical and Electronic Manufacturers Association (TEEMA)
Taiwan Textile Federation (TTF)
Conclusion
This is just a small sample of the many betel nut exporters around the world. When choosing an exporter, it is important to consider the quality of the nuts, the price, and the exporter's reputation. You can also contact the
#betel nut exporters directory#import betel nuts#buy betel nuts in bulk#wholesale betel nuts#betel nut suppliers#betel nut exporters near me#best betel nut exporters#cheap betel nut exporters#organic betel nut exporters#fair trade betel nut exporters#sustainable betel nut exporters
1 note
·
View note
Text
GUESS WHAT!!! a tutorial for rayman origins texture mods like how i made uglette

this is for origins only for now, ill make a separate post for legends later (but itd follow most of the same steps)
first of all. use rayman control panel, if you dont have it somehow then what are you waiting for?? make sure its updated to the latest update too (14.0.0.9 as of writing this) for improved modding support
updated on january 10 2024 for the dds portion
-
step 1: getting the textures
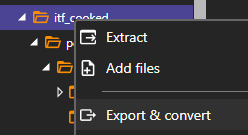
in control panel, click origins and then open the archive explorer

youll get a whole directory of a bunch of folders, what you need for the textures is just the itf_cooked folder. if you want all the textures just right click the folder, click export & convert, and convert them to png or something for convenience
if you converted all the images and dont need any things that arent images, just use windows search on the extracted folder to prune all the remaining .ckd files to save on space, but this isnt as necessary
you can also extract just the sprites you want to work with, or heck get them from spriters resource if you want, but still keep control panel in mind as you need the original directory of the files
if you want to replace the playable characters, their textures are are in the following folders
rayman sprites:
itf_cooked/pc/actor/playablecharacter/rayman/animation
globox sprites (you will also need mosquito sprites for him):
itf_cooked/pc/actor/playablecharacter/globox/animation
itf_cooked/pc/world/common/shooter/playablecharacter/shootermoskitoglob/animation
teensy sprites:
itf_cooked/pc/world/1_jungleworld/friendly/teensy/animation
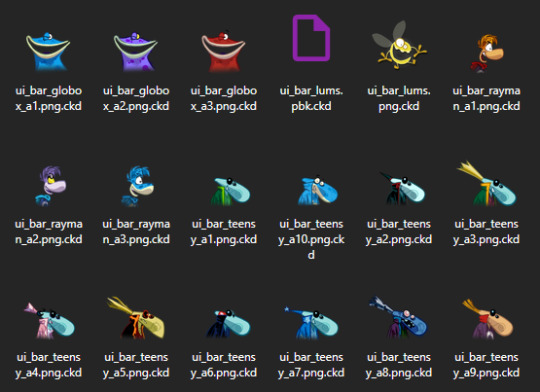
ui icons for everyone:
itf_cooked/pc/world/common/ui/ui_bar
-
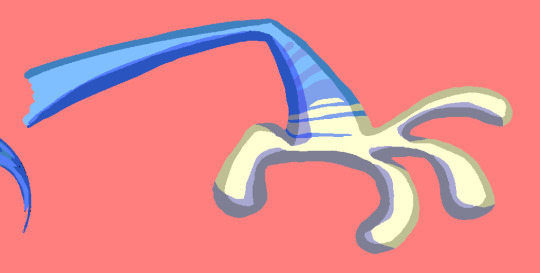
step 2: the art itself
once you have the original textures all you need to do is to edit them, or redraw them. this may be a tedious process though! what i did is painstakingly edit each original spritesheet to be 2x size, then aliased to put it into a format that i can easily work with and edit, i mostly did so with a whole bunch of magic wand usage and tweaks
i did finish all the templates for all playable characters, i will see if i can release them somehow eventually? but yeah for now figure out your own way to edit them for now
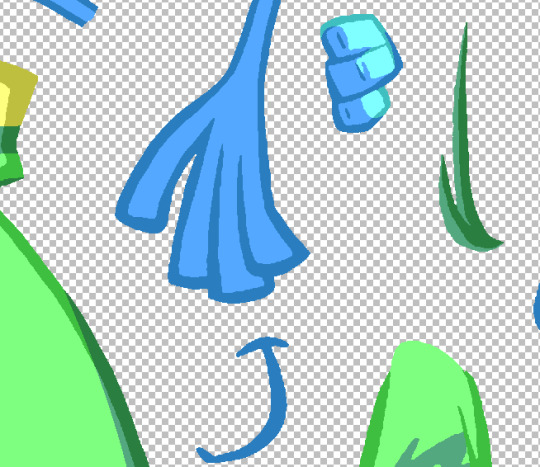
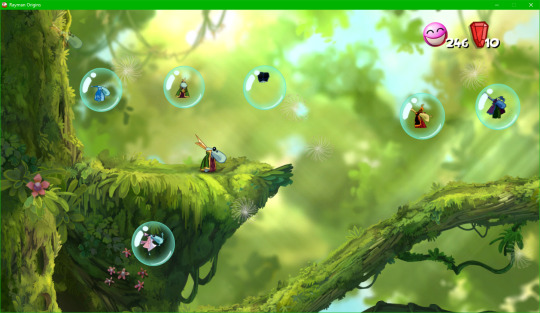
either way you can figure out some way to draw new art for them. save it in a folder separate from all the other assets obviously. here for example i made a more rayman 3-like grand mimimus. i also frankensteined an icon together

-
step 3: dds things
now that youve done the textures for the mod, duplicate them and save them as .dds files
this isnt necessary, as larger resolutions will also work (probably as long as the dimensions are still a power of 2), but you can resize the textures to the original resolution as well. i will be doing that personally
if you dont have a program that supports dds files, i just use paint.net. i provide a save configuration for it specifically, you can get it here if you need
this is updated!!! after much experimenting this one looks the best to me. the most important settings are outlined in orange, but try to match the rest too
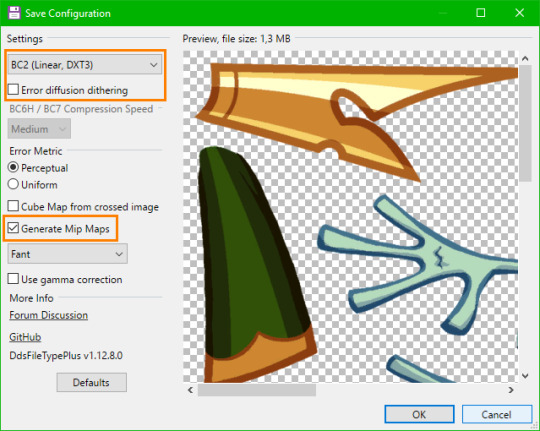
make sure you have generate mipmaps on specifically or else the sprite will end up pixelly

however some additional, more jpeg-y crust will be applied onto the sprite from the mipmaps themselves. so heres the technical part thats probably complicated... if you dont wanna bother with this try to copy the rest of my save configuration, i think it works the best here
i experimented a bit with what looked best and picked fant with no gamma correction, but you can try saving multiple dds files with different settings, viewing them with whatever lets you view the mipmaps themselves (windows image viewer does) and just picking which looks better at a smaller scale
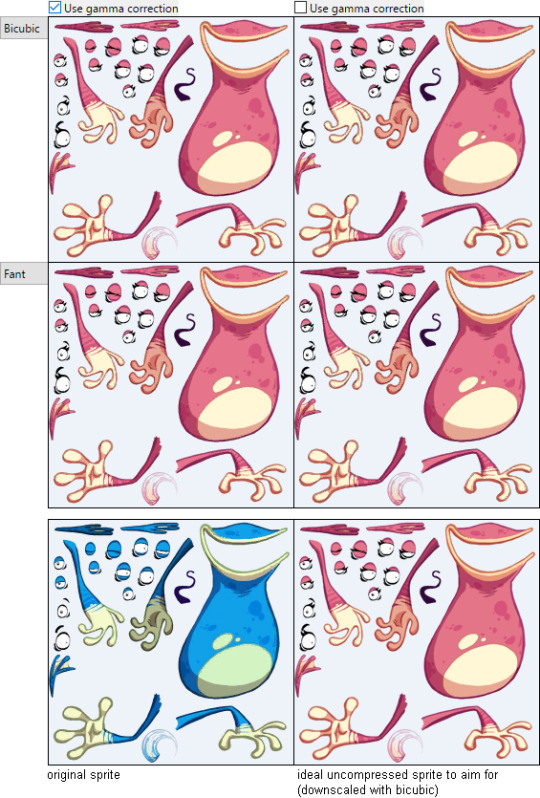
(to see the differences look closely at the eyes specifically, its probably hard without overlaying these one over another and directly comparing though)
one thing i can say is bicubic and fant are definitely the best for matching the original sprites' mipmaps, as theyre not too blurry (like bicubic smooth or bilinear) while remaining fairly good looking
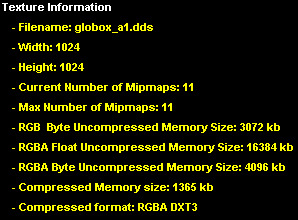
these are the original dds files' settings as viewed in dxt viewer. most of this doesnt seem to be applicable for the save settings but the compressed format is specifically dxt3 (which is also present in its header if you view it in hxd), so for the first save setting you probably have to pick BC2 (Linear, DXT3) as i have
TLDR: i know this is complicated, try to just copy the dds save configuration from the start of this step i guess???
-
step 4: renaming things
once you have done that, the weird thing you need to do is to rename the .dds into files that the game can actually read (even though theyre still dds files, and can be renamed back to .dds for them to function). for convenience you can just duplicate the files again
pay attention to the original file formats which you can see in control panel! as you can see, you should rename the majority of the extensions from .dds to .tga.ckd
windows will stop recognizing them, likely the same for the programs you use, but that shouldnt be a big deal. if you want, you can rename them back to .dds to make them usable
the important part here, dont miss it!!! is that all the ui icons are not tga.ckd, but png.ckd!!! even though theyre actually still dds files under the surface. just rename them correctly and pay attention to the right extension, or else the icon wont work
obviously make sure they have the same filename in general ALONGSIDE the extension
-
step 5: actually making the mod
now that you have the relevant files, click create mod in control panel

select the files module, and then make and select a folder to use as the mod folder, which should give you this result
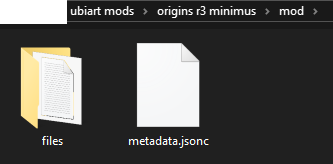
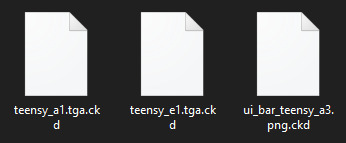
the files folder should have these two

you should create a GameData folder in added_files, after which the entire regular filepath follows, starting from bundle_PC.ipk, then itf_cooked, then so on. for example, these are (nearly) the full directories of my files
\mod\files\added_files\GameData\bundle_PC.ipk\itf_cooked\pc\world\1_jungleworld\friendly\teensy\animation\teensy_a1.tga.ckd
\mod\files\added_files\GameData\bundle_PC.ipk\itf_cooked\pc\world\1_jungleworld\friendly\teensy\animation\teensy_e1.tga.ckd
\mod\files\added_files\GameData\bundle_PC.ipk\itf_cooked\pc\world\common\ui\ui_bar\ui_bar_teensy_a3.png.ckd
obviously all the textures should have the same filename and the same file path as the textures theyre replacing
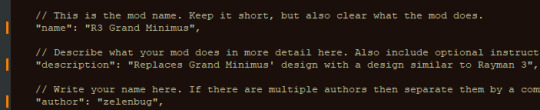
then go back to the base mod folder and edit the metadata.jsonc file in something like notepad++. the file itself has commented-in extensive instructions so just follow them
as the mod creator thingy says you can also optionally create a thumbnail
anyway once youve done all of that, select all the files in your mod folder and zip them. you cant just select the folder WITH the mod things and then zip that, as then control panel wont read it because the base of the zip directory doesnt have the metadata file

-
step 6: finally implementing the mod!!!
now that you have the zip ready, click the mod loader and select this in the lower left corner

navigate to your zip and select it. it should appear here under installed mods

make sure you press the checkmark to the left of it and then press the apply button in the lower right

after a short wait for the mods to apply you can go turn on the game and test it

and it should hopefully work !
also yeah ill release the minimus soon enough on gamebanana

if you want to make any further edits to the textures, youd have to resave them as .dds files again, and rename them to tga.ckd/png.ckd and such, then just replace them in the mod's directory (or add new files to it) and just zip it again. its fairly easy to work with i hope
this is overall kind of a complicated tutorial but its not too bad once you get the hang of it
20 notes
·
View notes
Text
How to Start a Podcast
Part 1
The second article Sydney kindly gave me is How to Start a Podcast by buzzsprout. Buzzsprout is also a hosting site, which you need when you start a podcast, so they have to know their stuff (according to the article, since 2009 they've helped three hundred thousand podcasts launch, which is impressive).
Buzzsprout breaks the process into ten actionable steps.
Develop a concept.
Define goals
Pick a theme/topic (they provide a whopping seventy-five in this article linked)
Find a niche
Name it (they have provided this article for further reading)
2. Choose a format
I didn't think about this before I read this article, but there are different ways to present podcasts- the article mentions interview, cohosted, scripted non-fiction, news, educational, and scripted fiction (and I will provide audio drama help as I conduct my own research and get information from podcasters about it).
The article goes over the 'optimal' podcast episode length, with some statistics, but the only thing that seems to be important they put in the first sentence: "Make your episodes as long as they need to be and no longer."
They also talk about an episode release schedule, with more stats.
3. Set up recording equipment
Of course they talk about microphones, including another article all about that aspect of podcasting, but apparently there are different types of microphones. I never knew that. They go somewhat in-depth about the different kinds, so I'll leave the technical reading to you.
4. Choose software
The article also talks about different software, from recording to editing. They give a few different options in the article, with links to each. I'm not sure if they get commissions based on how many people click through, so I'll leave you to go there to give them some love.
5. Record your first episode.
The article further breaks the process into smaller steps.
A) Write an outline (with further reading that includes templates)
B) Pick your recording room wisely
Before Sydney's post, I didn't know that sound travels different off of hard and soft surfaces, though I guess in retrospect I should have figured (echos in canyons, for example). I didn't realize it would make a big difference, but I guess it does.
C) Connect your equipment and set up your software
This is important- make sure you hit 'record' and everything's plugged in, folks.
D) Microphone technique
If you're going to speak into a microphone, learn to do it right.
E) Test different recording styles
Test for quality.
6. Edit
They provide an article for further reading. In the main article, they break it into broad steps.
A) Make sure the intro and outro are engaging
Hook the listener right away.
B) Edit for content, then everything else.
Start with big cuts, then move smaller.
C) Fade between tracks
Apparently, cutting audio can sometimes make clicks and pops in the recording. Who knew?
D) Create a punch list
I guess this is a to-do list.
Then when all that's done, you export it! They throw a bit of technical jargon at you (what the heck is an ID3 tag?) but thankfully, it seems to be fairly simple with this podcasting host site. I'm not sponsored by them, it just seems easy enough for beginners.
7. Create podcast artwork.
They also include five tips for that.
A) Visually communicate the subject
B) Design for a variety of sizes
C) Don't use too many words or fonts
D) Avoid 'podcast imagery' (microphones, for example)
E) Keep your brand consistent
They provide a few sites for people to create artwork, so that's cool.
8. Set up podcast hosting
To be honest, this confused the Hell out of me. But there are a few videos about it they linked at the end of the step, so feel free to read the full article and watch them.
9. Get listed in podcast directories
More technical stuff, but I guess that you need the last step- hosting- to actually get onto Spotify or Apple podcasts or any other site/app.
10. Launch and grow
The article goes over two ways to launch- grand and soft- and a few other things like imposter syndrome. It talks about seven marketing tips.
A) Tell friends and family
B) Create a buzzsprout ad
C) Post episodes on social media
D) Join groups and forums
E) Cross-promote with other podcasters
F) Overcast ads
G) Create a call to action
The article also recommends celebrating, and I'm always down for a celebration. Don't be embarrassed it's about your own achievements, or feel like it's needlessly self-congratulatory or self-centered. It seems like a ton of work, so give yourself some credit!
7 notes
·
View notes
Text
Common Mistakes in Import and Export Business (How to Avoid Them)
Common Mistakes in Import and Export Business (How to Avoid Them)
Import Export Industry is quite possibly the most prospering industry occupied with giving significant yields or benefits. The most common way of selling and buying products is not new, yet it is performed for quite a long time when shippers used to exchange their labor and products starting with one country and then onto the next.
The lone thing which has changed now in the realm of import and fare is the simplicity of working together, better vehicle the executives and openings at a bigger degree with great help from the public authority to advance the fare of labor and products starting with one country then onto the next country.
What are the normal missteps in the Import-Export business and how to stay away from them?
There is a portion of the normal slip-ups in the import send-out business. These have been examined beneath alongside the plans for how to keep away from them:
1. Marking a Contract without affirming the authenticity of the Seller or the Buyer
Large numbers of the little brokers and producers in India wish to extend their business worldwide by taking part in import send-out exchange, yet once in a while, they don't give a lot of significance to checking the unwavering quality of the merchant.
Because of such obliviousness, the organization may go into danger of implying themselves into more misfortunes. Many organizations attempt to draw and inveigle the merchant of exporters by giving phony organization profiles and item portfolios. Understanding the client is a right, be it on the homegrown market or the global market.
Checking the authenticity of the purchaser or vendor with legitimate government officials assists the business with limiting the dangerous factor and assists with expanding the benefit. Consequently, marking an agreement without affirming the authenticity of the merchant or purchaser should not be finished.
2. Absence of Import Export Knowledge
A typical disadvantage that the little and medium undertakings face is the origination that they can undoubtedly supply the items in the worldwide market without confronting any misfortunes. Be that as it may, the absence of information on the import trade guidelines would bring about incredible trouble than anticipated.
The International Chamber of Commerce (ICC) has carried out specific terms to ensure that the import send out business is performed flawlessly with fewer dangers and at a high overall revenue. It is a must to comprehend the import trade guidelines before venturing into the universe of worldwide business to be on a more secure side and keep away from the danger of punishments.
3. Incompetent Customs Broker increases the risk of losing money
The traditions intermediary plays out an obligation to ensure that every one of the organizations done in the import sends out industry cling to the severe standards and standards of the public authority of both the nations, i.e., the spot of the nation of both the merchant and the exporter.
An inept traditions representative would bring about making incredible misfortunes in the business if the reports are not checked and met with the legitimate standards on schedule.
Thus, it is important for organizations that take part in import send out the exchange to contact a solid traditions agent after the confirmation from the skilled position to ensure that every one of the necessities of the organizations is met effortlessly with problem-free documentation and a traditions merchant is completely mindful of all the administrative work which is needed to supply the items.
4. Understand the Regulations of the Country
Quite possibly the most widely recognized mix-ups in import send out business is that the exporter while providing the products to the far-off nations is feeling that anything can be provided to the unfamiliar nations. Nonetheless, in actuality, it isn't accurate. At a point when an item is associated with an Import Export exchange, certain nations have their standards which permit just a couple of items and limit the bringing in of different products from another country.
It is fundamental for the exporter to comprehend these standards which would assist him with saving a lot of cash and its items simultaneously.
5. Absence of Familiarity with Incoterms
Incoterms implies International Commercial Terms, which is probably the most straightforward term characterized by the International Chamber of Commerce (ICC) to make the fare of import of merchandise starting with one country and then onto the next simpler. The Incoterms utilizes shortenings like FAS-free of charge close by transport, FOB free of charge ready, FCA with the expectation of complimentary conveys, EXW for ex-works, and so on.
On the off chance that a business will participate in import send out exchange, know about these Incoterms as it would assist with defeating the dangers of taking care of products and giving a more secure approach to exchange with the assistance of legitimate documentation, in this way setting aside sufficient cash.
6. Protected Goods Imported or Supplied
The critical factor in the import send-out exchange which ensures that the products imported or provided will reach securely or on the other hand if any harm or misfortune happens is to protect the merchandise before it is dispatched, either from the shipper's side or from the transportation authority.
The protection of the merchandise is prudent throughout exchanging labour and products in an unfamiliar market to get the items which should be possible effectively through the documentation between the representative and the shipment organization. On the off chance that the products are not protected, it may bring about horrendous misfortunes for the merchandise just as the capital.
Conclusion
To be an effective provider or purchaser in the Import-Export Industry, the errors referenced above ought to stay away from. It does not just assist you with making an impression in the unfamiliar soil effectively yet additionally saves your organization in getting the dangers of losing cash and thus assists you with expanding the benefits.
#b2b business#Global Exporters#export#import#export import#export import business#Exporters Importer Directory#Free Export Import Directory In India
1 note
·
View note
Text
Angerey's ultimate Fmodel NSR Tutorial!!! (Models and Textures)
Do you want to extract files from No Straight Roads? This post is for you!
(audio tut link at bottom of the post)
This was for @gamebunny-advance, but anyone can use this!!
Installing Fmodel and setting up
Download Fmodel on this page.
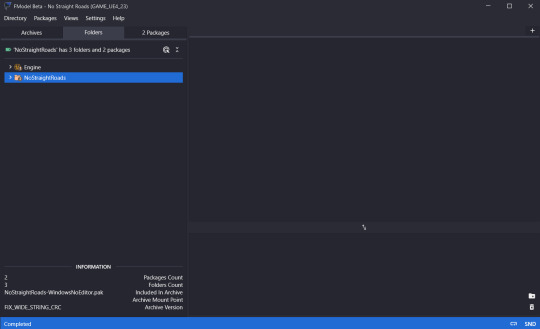
Once it's downloaded and installed, boot it up. You'll get this prompt once you open it, and it'll ask you to add a game directory. Press "Add undetected file".

Then, input C:\Program Files (x86)\Steam\steamapps\common\No Straight Roads as the directory, and name it "No Straight Roads".
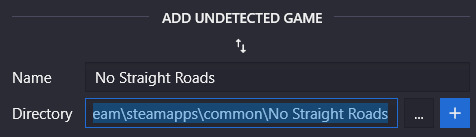
And Voila!
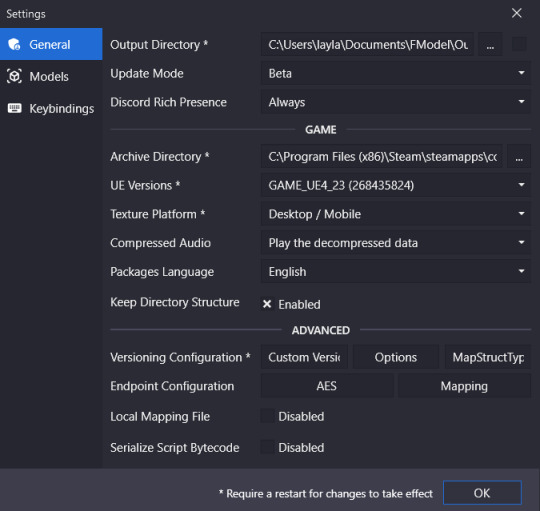
Next, you'll need a VERY important step for some of the views to work.
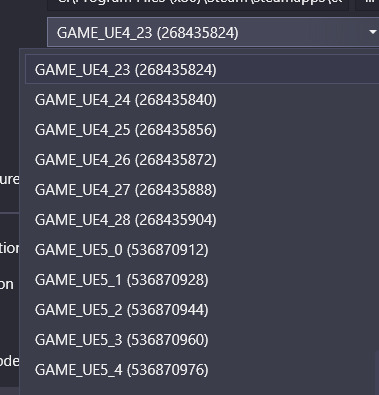
Go to the settings tab in the menu, and look at UE Versions. It should be set to UE4_23. If not, you may have some issues with exporting.
Now that that's out of the way, it's time for exporting!
Models
Viewing a model is actually pretty easy! Mayday will be our volunteer for this one.
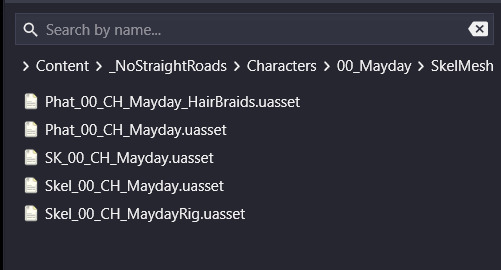
First, go to NoStraightRoads > Content > _NoStraightRoads > Characters > 00_Mayday > SkelMesh.
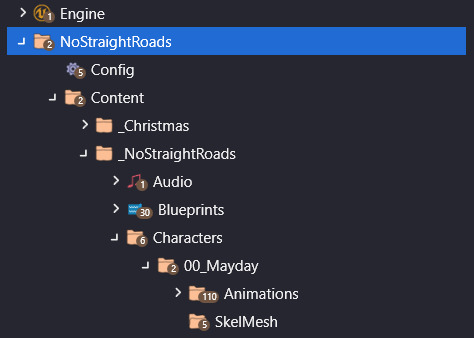
Upon opening it, you will see this:
To view her model, open SK_00_CH_Mayday, and ta-dah! There she is!
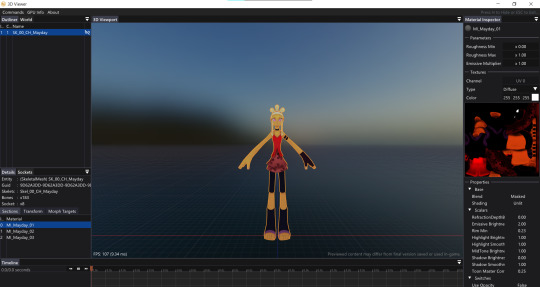
You can extract any of these files by saving the model as a psk asset, and open them on blender. (here is the add-on for opening psk assets on blender!)
As for the animations, I don't know how to view them, but you can extract them the same way if you want to play around with those. Sorry, I'm not super knowledgeable about game animation!
Textures
By far the easiest to get, and crucial for viewing models on blender, or seeing some pictures in clearer detail!
DJSS will be our example this time.
Go to NoStraightRoads > Content > _NoStraightRoads > Textures > Characters > 04_DjGalaxy
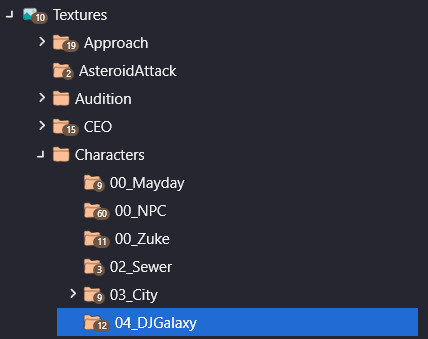
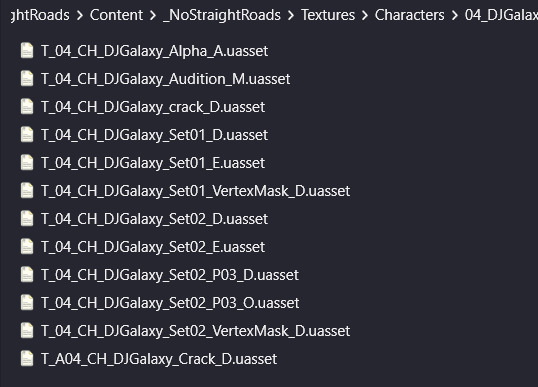
There! Select any file, and the texture will be pictured!
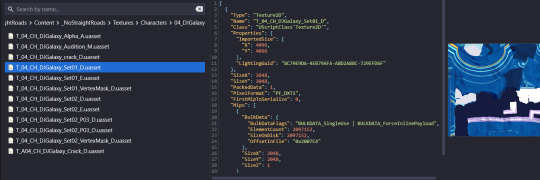
You can save it by right clicking and selecting save image.
There are TONS of textures to look through, so go crazy!
Audio file tutorial here!
14 notes
·
View notes
Text
In the complex realm of global trade, accessing accurate data is key to success. The Turkey Importers List and Import Export Data Bank offer vital insights for businesses seeking a competitive edge. Learn how savvy enterprises utilize these resources to drive profits and stay ahead in international trade. Explore the blog "How Savvy Businesses Profit from the Turkey Importers List" Now!
#export#global trade data#import#international trade#trade data#trade market#global market#import data#import export data#turkey importers list#turkey import export data bank#turkey importers directory#turkey import export data provider#turkey exim data#turkey#trade#market research
0 notes
Text
HOW 2 MOD MAD RAT DEAD ON SWITCH! PART 1: MUSIC!
If at any point you need more information or further assistance, drop me an ask or direct message! Even if it's something 'stupid' don't worry, I'll help :)
What you'll need:
A copy of the game in .nsp or .xci format
Switch Explorer
Sonic Audio Tools
VGAudio
Audacity (My recommendation, alternatives may work)
Switch explorer is used to extract the files from the game to be modded
Sonic audio tools is used to extract the .acb archives the songs (.hca files) are packed in, and to pack the files back in
VGAudio is used to convert the .hca files (the actual audio files) to .wav to be opened and edited in audacity, and to convert them back to .hca before being repacked
Lastly, audacity is used to edit the .wav files to put whatever you want into the files, completely replace it's contents or whatever, go wild
Did any of that make sense to you? no? Good, keep reading.
LET'S GET THIS SHOW ON THE ROAD!
I'll add like a pastebin link here later with every song's internal number so you can easily find the one you're looking for and extract it, too lazy right now tho :P
Open switch explorer, choose to load up your nsp/xci of the game (file > open) and navigate to data > sound
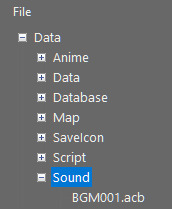
then, find the song you wish to edit and right click > extract file, then drop it in a good spot for later
Afterwards, open two file explorer windows, one in the sonic audio tools folder and the other where you extracted the .acb file. We do this so you can easily drag the .acb into the ACBeditor.exe found in the sonic audio tools folder:

this will produce a folder in the same directory as the .acb sharing its name, and inside you will find your .hca files:
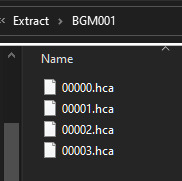
these are the actual audio files, but we can't edit them yet, because no program knows what to do with a .hca! First, we need to convert them to .wav files, so boot up VGAudio, click open file, pick the .hca file (you need to repeat this process for all 4+ files), choose to convert to WAVE and hit save file.
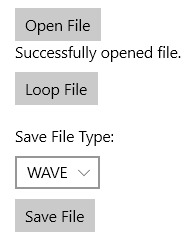
wherever you saved it, you now have a .wav of the audio file, feel free to give it a listen! If it's just silence, don't worry, some of the songs are like that.
Now these files require a little explanation, the one ending in 0 to 2 are all related to the song's into, opening, and cut scene loops, basically everything you stop hearing once you've started playing the level properly. The file ending in a 3 is the main loop, the part that plays so long as you keep playing through the level. In some rare cases, there will be even more files, or less! I haven't done enough of my own research yet, so you can come to your own conclusions on those, shouldn't be hard to figure out once you get how these work.
Anyways, now that that's outta the way, audacity time! Individually open, edit, and export each .wav you extracted, again as .wav (keep the file name the same!) using audacity, make any changes you want, import other files of any format into it on a new track and remove the original when you're done, whatever, but I recommend keeping the lenght (not filesize) of the audio file the same, idk if the game will have a stroke if it's too long or not long enough. (Also a lot of the song info like BPM is hardcoded so any old song won't work if you just drop it in here, stick to mad rat monday songs for your first edits like I did, those work the best, but do be ready to splice them to extend the main loop (file 3)) (also line it up properly, it can't be off beat from the original, you gotta find a point in the songs where the waveform is similar and use it to line it up exactly right)
This part's kinda all up to you, but I can provide some basic audacity tips specific to your situation if required. Or just general ones, if you can't wrap your head around audacity :P
once they're all edited, use VGAudio to reverse the process, open the .wav files and choose to convert to HCA, and save them, maybe backup the original .hca files instead of replacing them if you want to (i just added an 'og' to the start of the original file's name)
then, remove all the junk from the folder besides the new .hca files you made (or move them to another, identically named folder separately), and drag the folder into the same acbeditor.exe from the sonic audio tools folder, just like you did with the acb the first time. It will pack your folder back into an acb in the same directory as the folder you dragged in (it'll replace the original if you kept them all in the same directory, but don't worry you can just extract the file again if you need the original). Now, we set up the mod!
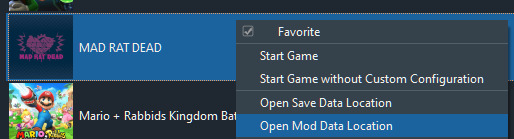
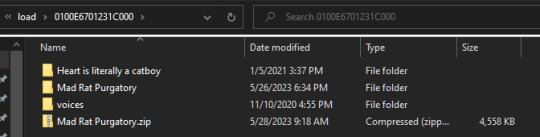
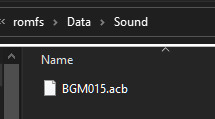
This part's easy, just make a new folder with the name of your mod, in there make one named romfs, in there make one named data, and in there make one named sound, then drop your new acb file into the sound folder. The mod's done! Drag it into the mod directory on your real switch (idk how that works I don't have a modded switch) or in yuzu right click mad rat dead, choose open mod directory and drop the mod folder in there. Then right click the game, hit properties, and the mod should show up with the name you chose for the top folder. Here's some screenshots for all that:
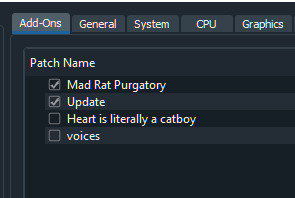
Tick the box to enable the mod and boot up the game! That's it!
If you need any more help, further assistance, suggestions, anything, just drop me an ask or DM, I'll respond in due time! Additionally, if you have any suggestions or requests for how to improve this guide, let me know with a reply!
Happy modding everyone!
16 notes
·
View notes
Text
Haven't done a computer status update in a little bit.
Raspberry Pi media server has been psuedo-retired. It's currently still functioning as a media server for a christmas display at my wife's work until the end of December.
It has been successfully replaced by the Dell Optiplex that I got from work. I was able to skip the process of building a migration script for the server (to allow files to be moved and refound via filename & hash), but only because I've been mapping storage outside the server's webroot via link files in the upload directory. So on the new HD the files are actually in the upload directory rather than linked to it. As far as the server knows they're in the same place.
I transferred the software between machines by making a new install of vogon on the optiplex and then importing a mysqldump of the existing install into it, bringing the user accounts, media data, and other configuration elements with it. I did end up changing the storage engine of the data and data_meta tables into innodb (from isam) and adding some additional indexing. There were some noticeable performance differences on the generated join queries between servers. We were looking at 7sec+ lookup times for searches in the audio module. I'm still not sure if it's a mariadb version difference between raspbian and ubuntu lts, if something got corrupted in the export/import process, or if it was some strange storage lookup difference between running the database off of a SETA Hard-Drive versus an SD card. I initially thought maybe it was a fragmentation issue, but the built in optimization processes didn't really impact it, but with the adjustments to the indexing we're regularly getting query times measured in microseconds versus seconds, so it's working pretty well now.
The x86 processor and the faster storage (without the power dropout issues) have really improved the experience. Especially with reading comic books.
If I haven't explained it before, the way the CBZ reader works is that it sends a file list from the archive to the browser, the browser requests an image, and the server extracts the image data into RAM, base64 encodes it, and sends it back to the browser. It's a process that is bottlenecked by both CPU and storage speeds, so it's noticeably snappier on the new machine, even if the CPU is over a decade old at this point.
I'm actually considering taking a crack at forking mozilla's pdf.js to work a similar way, sending a page of data at a time, to decrease transfer times and allow lower memory devices to open large PDFs without having to actually download the whole thing. I suspect that means I'm going to have to build smaller single page PDF files on the fly, which would mean coming up with some kind of solution for in document links. I'm still in the phase of deciding if it's enough of a problem to put effort into solving, so I haven't done enough research to know if it will be easy or difficult. It's always hard to tell in situations like this because just about every web reader project assumes downloading the whole file, and the question is do they do it this way because it's hard to sub-divide the format, or do they do it because full clientside logic can be demoed on github pages.
3 notes
·
View notes
Text
Tutorials: Making Certain Parts of a Texture Glow & Uploading to the Workshop
Programs required:
- Photopea (or other photo-editing tools).
- VTFedit
- Crowbar or Left 4 Dead 2 Authoring Tools. I recommend Crowbar as it's more user-friendly and deals with even-powered thumbnails.
- Notepad++. If you don't have this program NOW, you'll want to use it later for editing the VMT code. I'd do it now if I were you.
Intro: This is a super quick and easy tutorial for those who want to learn about making parts of a texture glow-in-the-dark. This doesn't teach how to make the glowing give off emission.
The second part of this tutorial is geared towards those who are modding for Source Engine only. Once you're done with the first part of the tutorial, feel free to keep practicing until you get the hang of it.
Games required: Any game that allows the textures to be edited and glows in the dark is cool.
Follow the steps very carefully below once you're ready to start.
I'll be using Source Engine, but I've seen @kingfalconcombos using this method when they're modding The Amazing Spider-Man 2 (PC) with ease.
1ST PART: MAKING PART OF A TEXTURE GLOW
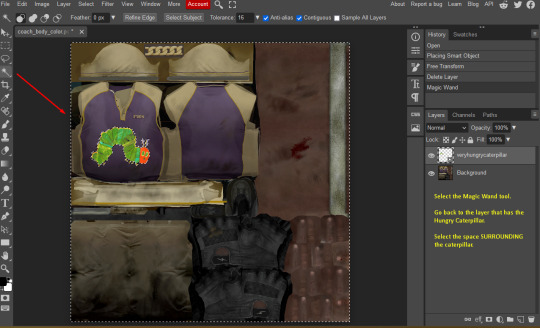
Open a texture that you want to edit. For this tutorial, we'll be using Coach's body texture.
This is in full resolution, so if you want to save it and open it in Photopea to follow along, go for it!

2. Once the texture is open in Photopea, use another image that you want to put an overlay of. For this tutorial, we'll use a very hungry caterpillar as an example.

3. In Photopea, click on Open and Paste. Put the caterpillar anywhere that you'd like to put him.
I'll put him here for now.

4. Select the space surrounding the hungry caterpillar.
5. Go to the Channels tab of Photopea. You must have the hungry caterpillar's layer selected. Not Coach's texture layer.
If you click on the wrong layer that doesn't have the hungry caterpillar, it will come out wonky.
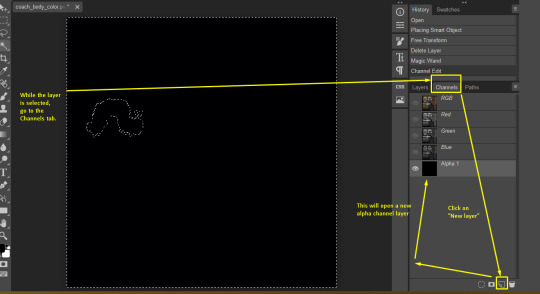

6. Once your selection is inverted to the item you want to glow, fill it with a white color.


A very helpful tip for remembering what parts will be seen or not when making glow-in-the-dark parts/textures.
White is visible, black is not.
This will help you know in the final result of which of them will be visible once it's rendered in any game. This also doesn't remove any color properties that the original glowing part has.
FINAL STEP
7. Export the image in the format needed. For Source Engine, you can export it as TGA since VTFedit will be used later to convert it into a file suitable for the Source Engine.
If you're using another engine other than the Source Engine - export it to the file format your game requires. I'm not sure how to resolve it if your engine for a different game doesn't accept it.
CONCLUSION
You're done with the tutorial of how to make certain parts of an image glow!
If you're using Source Engine, you'd continue the process of packing the texture and uploading it into a suitable VPK to put within the right directory for it to show in-game.
Let's take a look at how our hungry caterpillar appears on Coach's back!
2ND PART: UPLOADING TO SOURCE ENGINE
CONTINUE IF YOU WANT TO USE IN SOURCE ENGINE
If you want to use the texture in Source Engine, follow the steps as you would in creating a VPK to simply replace the texture.
This will teach you how to upload custom textures to Source Engine with more user-friendly tools.
9. Open VTFedit. Click on IMPORT to bring your picture of choice into the editor. Select the new image you should have saved in PNG, TGA, etc (formats) to upload.
10. Once the image is uploaded, it should look like this in the editor.

11. Go to File < Save As. This will save your file in a VTF format.
12. Before saving your file, remember that it must be the same name as the original file you opened it with. For Coach's texture, it'd be labeled as coach_body_color.
13. Create a file directory that mimics Left 4 Dead 2's game directory in which you found the file. For this tutorial, we'll be using:

materials < models < survivors < coach < DROP VTF HERE.
Once you saved your VTF in the folder, it should look like this.

14. Now that your new VTF file is saved, you'll need to create a VMT file.
Go back to VTFeditor, and then choose Tools < Create VMT
When the windows show up, *leave the Textures tab alone* as this is different from creating a custom texture.
Go to your Options tab.
15. What we want to do is to have the model cast a proper shadow with the whole body, not just parts of the glowing images having shadows only.
Within the Options tab of your new VMT, choose your shader as VertexlitGeneric NOT UnlitGeneric.
VertexlitGeneric makes the vertices of your vector glow. UnlitGeneric will make the whole object in question glow, and this is what we're trying to avoid.
Within the Surface 1 tab, you don't have to choose anything. You can choose to leave it blank, or you can choose one of the surfaces by default. Choosing a surface will determine what sound and type of particle damage will occur if you shoot it.
Within the checkboxes below, leave the Translucent property unchecked.
If you leave this checked, the rest of the object be rendered as transparent except for the glowing texture parts.
This is an example of what it should look like below:

16. Once you're done, click CREATE. A prompt will come up to ask where you want to save the VMT file. Place it in the same folder as your VTF file.

17. Now close VTFeditor. It won't be needed anymore after these steps.
18. If you're using Notepad++, now's the time to open the file. When you open the file, you'll only see two properties appear. This would be your file directory and you should ONLY be seeing $basetexture and $surfaceprop (if you chose one).
The newest value we're going to add is $selfillum with a value of "1".
Go to the end of either line of the codes, and then enter
$selfillum "1"
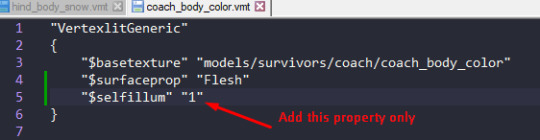
19. SAVE THE FILE.
20. You're done editing your VMT! Now all that's left is to create an addon out of your new VMT and VTF files.
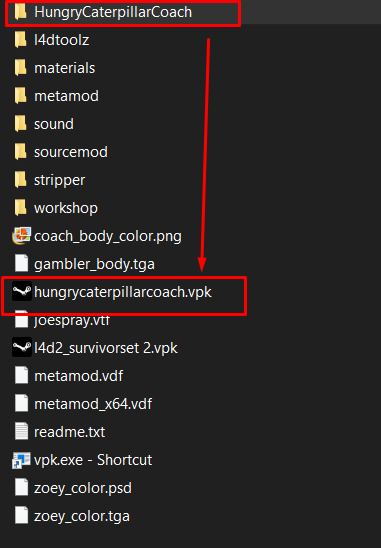
21. Go back to the Left 4 Dead 2 addon directory.
With your new folder, it should be structured as:
Addon Name < materials < models < survivors < coach < your VMT and VTF files
DRAG AND DROP your new addon folder to the VPK.EXE shortcut.
This will create an addon that'll be available to use in-game.

Voila! Here's a new addon to use.
FINAL THIRD PART: TESTING
Now that you have a new addon to test out, open the game.
Have the game load to a level where you can see Coach.
#photopea#photoshop#nicky's tutorials#tutorials#photo editing#nicky grimes#very hungry caterpillar#caterpillar#coach#coach left 4 dead 2#coach left 4 dead#coach l4d#coach l4d2#left 4 dead#left 4 dead 2#team fortress 2#portal#portal 2#amazing spider-man 2#amazing spiderman 2
4 notes
·
View notes
Text


▹❁Reader/Bruce Wayne❁◃?_
Character Storyboard
❁||♡commissioned by @oogaboogacore for a ducky patch on my Amazon wishlist♡||☆The ducky patch here☆||
#gotham#batman#gothamstimms#aesthetic#aestheitcs#gotham series#the batman#aesthetic board#oogaboogacore#ship aesthetic#story#story aesthetic#character aesthetic#tb bruce#bruce wayne#x reader#reader insert#commission#ao3 link#ao3 author#ao3 writer#a03 fanfic
6 notes
·
View notes
Text
Exporters Business Directory India
BNG- Business Network Gateway is India's biggest online b2b marketplace for the globally verified exporters, importers, manufacturers, wholesalers, buyers and suppliers. Searching for import export opportunities has never been easier before. BNG offers a one-stop solution to all your export and import needs. Whether you are an exporter or importer of goods, you can create a profile on our site, upload your product catalogue, get quotes from buyers across the world and also access a huge database of global manufacturers, exporters importer directory India.
#Exporters Importer Directory#Exporters Business Directory India#Manufacturer Business Directory India#b2bmarketplace#b2b#b2b business#free business listing sites
1 note
·
View note
Last Seen Blogs

peru-perusals
Paul’s Juniors Abroad Journal
discograpoll
discography brackets

fofugolun
Untitled

kfh-fiction
Untitled

goodcountdown
Passing Days