#t: reshade add-ons
Text


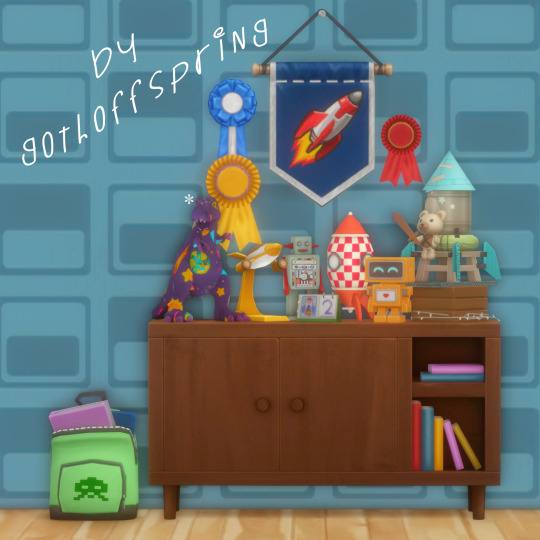
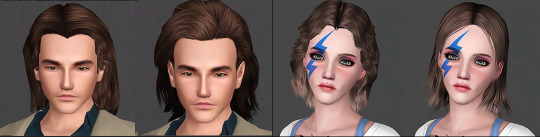
Hey y'all! Bringing you another extremely self indulgent recolor that I'm not sure anyone will get any use out of, but I'm quite happy with! I've used them a lot in my own game and I figured I'd share. It could be a fun little novelty decoration, or a super serious art piece, that decision is up to you! ✨
DETAILS:
This is a recolor of @jorgha-haq's T-Rex Statue. the mesh is included in the .package file, but you can get the original right here.
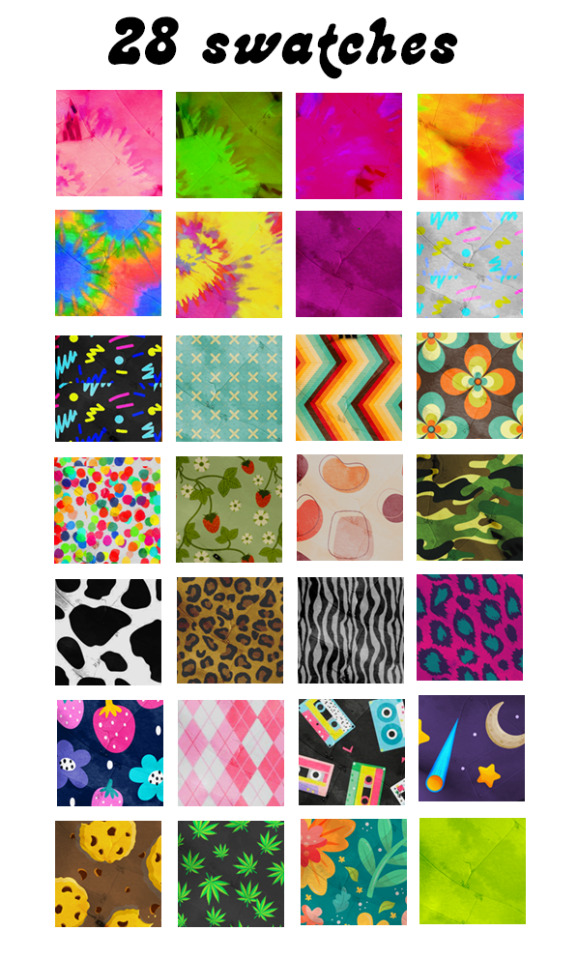
There are 28 swatches in total. I know! I kind of couldn't stop myself once I got going. There are tons of fun patterns, my personal favorites being the alien, cookie, and of course the obligatory stoner dino.
They are the original size in the above preview photos. They look.. okay sized up or down, but they look their best at their original size.
Priced at §50 and can be found in the decoration category. Catalog icon included.
There are definitely small imperfections here and there, but I had a lot of fun recoloring these and I think overall they came out looking pretty neat.
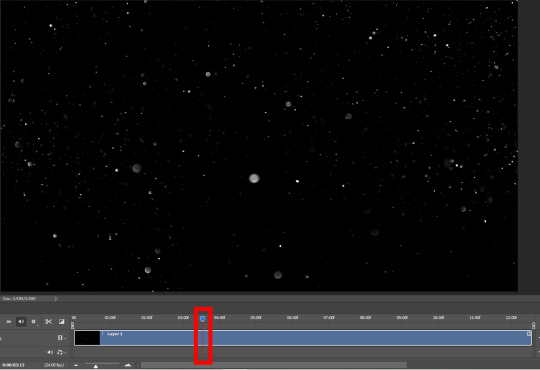
in game previews, unedited (reshade + edge smoothing off): 1 / 2
CREDITS:
thank you @jorgha-haq for the original mesh!
thanks to my favorite occult cc creator, @pyxiidis, for the eye texture I used on the alien recolor (I believe I grabbed it from the aloha add-ons)!
All patterns were sourced through vecteezy and colourlovers. All credit goes to the original pattern makers.
DL: SFS / MF
@maxismatchccworld @emilyccfinds @mmfinds 💖
#ts4#s4cc#ts4cc#maxis match#the sims 4#ts4 cc#the sims 4 custom content#mycc#and now i nap zzz#hi i love these i hope yall love em too ahh ;_; <3#my preview images look so nice if u open em in another window ugh tumblr#and the non edited in game previews look a liiiittle blurry bc i tried to resize them oops
989 notes
·
View notes
Note
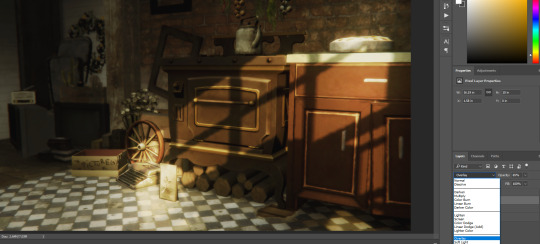
do you have any recommended gshade presets?
Almost all Reshade presets work with Gshade too! a little tip, with gshade you don't really need to worry about downloading anyone's recommended shaders, Gshade already has everything one needs in it. also if your game doesn't look like the reference photo's it's likely they edited them so don't let yourself get too frustrated. Any who, here are a couple of suggestions:
I would love it if y’all shared your suggestions in the comments, too! Ty💖
Ghibli waters and Comic-book are similar to my personal presets💖
here are some world overrides I also rec for more aesthetic: fluffy clouds / @apricotrush 's food & appliances are just lovely💕
︶︶︶︶︶︶︶︶︶︶︶︶︶︶︶︶︶︶︶︶
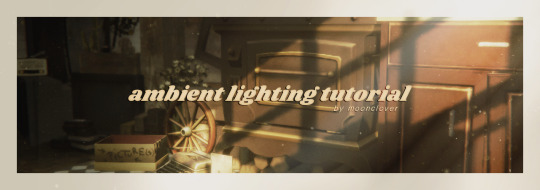
this is a little tutorial on a graphics overhaul, you don't need to do this!!! but I wanted to share this info incase some preset shaders don't show up quite right in somebody's game and/or someone wanted better graphics. big thanks to hazelminesims btw!
this page & link is in her recourses:
#I'm so sorry about all the tong clicks my mom was baking chocolate cake & it made my mouth salivate like a river!🙈#seyvia replies#anon ask#sims community#gshade#presets#simblr
13 notes
·
View notes
Text
Get to know you - Sims Style
Sorry, @puffkins2000, I totally forgot about that thing! Anyway, thank u for tagging me ❤ I really appreciate that you mention me as your fav creator ❤
Alpha CC or Maxis Match?
I use both, but in CASt I add more realistic textures for MM items if it's possible, detailed textures is really important for me. For hair I prefer now more realistic textures like @ifcasims or Plumblobs. Also I replace speculars to black in almost every item because I hate that shine.
Do you cheat your sims weight?
No, I don`t care about this.
Do you move objects?
I don`t build most of the time, but I use MOO for moving sims for photoshoots.
First Expansion/Game Pack/Stuff Pack?
I've always had an 🏴☠️ game with all packs 😋
Do you pronounce live mode like aLIVE or LIVing?
I don`t speak about sims in English, but I read this in my head as aLIVE.
Who’s your favorite sim that you’ve made?
Christhie (and her gf Ingrid ofc but I don`t have good new portrait of her):
Even if I actively use them as models for my CC, I still haven't created any special backstory for them. Only that they are girls that into nu and black metal but they are still love each other. That`s it. But they are my favorites anyway.
Which is your favorite EA hair color?
Huh? I think that question is here because it was a tag game for ts4 players?... I know that in ts3 exists hair color presets, but I don`t use standard ones.
Favorite EA hair?
I installed @maryjanesims3 defaults yesterday 😅 But actually I have some favs from store:

Also that BG long male hair that Gunther Goth have and SN and Decades middle length hairs:
credits for pics: @ifcasims and @blamseastore
Are you a CC creator?
Ofc, I love convert/create different items, it may be hard sometimes, but I really like it. But mostly I love create sims and play around in CAS.
Do you have any Simblr friends or a Sim Squad?
Almost half of my friends are from the sims community 😍 @agnelid @oddballik @sagasimsworld @avirein @you-will-never-find-me-anymore @vayorika @nectar-cellar
Do you have any sims merch?
No, I haven't.
How has your “Sims style” changed throughout your years of playing?
To be honest, it changes every day. But for example before I started this acc I preferred more maxis-match-ish style with simple matte hair textures and genetics and other stuff, because it was looking good in other people's screenshots. But after I understand that this style doesn`t suit my current aesthetic and now I use more realistic style. Also earlier I used less sliders and my sims faces was less diverse and also really really skinny no matter what their body type is. But my sims proportions have always tended to be realistic, I only liked the cartoon/anime-like style sims when I was much younger (like 10-13 smth).
Who’s your favorite CC creator?
This list will be huuugee, but I love creators that made high-quality CC and can fit my aesthetic. To be more specific: @sim-songs, @nemiga-sims-archive, @rollo-rolls, @simtanico, @rstarsims3, @ninaaposts, @satellite-sims, @polaesims, @murfeelee, @nightospheresims, @agnelid, @nectar-cellar, @ifcasims @vmsims23, @xiasimla, yesod/jesod/thorns-of-piece (I think it`s @grim-dreamer-cc now?...), @billsims-cc, @shushilda, @ziva-sims, @aroundthesims, @pitheinfinite, @martassimsbookcc, @aa6x7, Pink Dahlia, @thepathofnevermorecc, Wiktoria-Von-Frege (inactive), Aikea-Guinea and Gelydh (Inactive), @white-enamel-ts3 (inactive), Ephemera and Tifa (Inactive), @leahlillith (inactive for ts3) and many others.
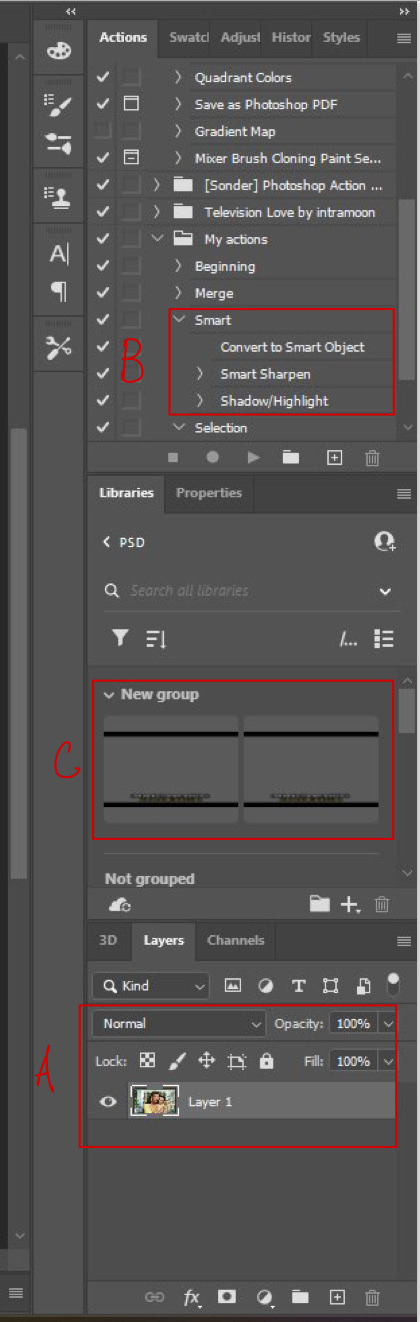
How do you edit your pictures?
I use Reshade with different presets (mostly by @erasabledinosaur or @intramoon), Photoshop CC 2017 (also installed Topaz Clean today) with these actions by @intramoon: SONDER, COLDWATER, BEAUTY QUEEN, LEAVING SALVATION. Also mess around in photoshop and/or use AI upscaler to make pics in better quality (I can turn on 4k HQ, but I always forgot about that). Sometimes I try something different but this is the base.
What expansion/gamepack is your favorite?
World adventures, Late night, Supernatural and Generations.
What a wall of text I wrote, I hope someone reads it to the end 😅
I don`t know who to tag actually \(〇_o)/ I really late to the party with that tag game.
31 notes
·
View notes
Text
answering asks.
answered all anon asks below the read more :-) other ones i'll answer privately tomorrow
UPLOADING SIMS:


hi thank you so much <3 i have some sims uploaded on this page, however i'm planning on sharing more, including townie make overs! i still have a couple of townie makeovers, sim models + sim requests to upload :)

hi! of course, that's completely fine! <3 i'm more honoured than anything :P. the only time i'd be more hesitant if it's a sim i'm actively posting a lot and the remade is like a carbon copy of the entire sim (clothing, hair and face, etc) but otherwise i don't mind at all.
HELP:
hi! i think some things changed after the infant update, so i'm honestly not sure 100% as i haven't checked it out yet, sorry! it's probably still pretty easy.
you just need to find the new default files + textures online or see if ts4 skiniator has been updated for the infant update to get the files and textures. then it's just a matter of editing the textures in a photo editing software of choice and importing them through sims 4 studio or skiniator.

@mycclibrary / hi, thank you so much! it's such a hassle to add more categories cause they all have their own custom thumbnail, so i'm unfortunately not planning on adding more, sorry.. it's really easy to duplicate it with sims 4 studio though! they just won't have thumbnails (unless you add them). here's a quick tutorial (in the comments) ^-^

after downloading them just extract the .zip. move the contents from 'mods' into your mods folder and move the contents from 'tray' into your 'tray' folder (that's in your the sims 4 folder, same place as the mods one). after that you'll find them in your in game library same as with other installed gallery sims :D
WCIF:

sorry rusty is from the gallery, i have no idea by which creator though :[
maddy from my short lived horse gameplay's hair > victoria hair
it's a reshade preset i'm still tweaking a bit. it doesn't look good in every setting so i don't wanna share it yet until it's been refined a bit :-)
hair from my citrine highlight preview!
sure! hairs from this post from left to right: marie | kevin | no7 | krista
OTHER.


T-T thank youuu. these sweet messages mean a lot to me, i'm happy you find use in my content <3
27 notes
·
View notes
Text
Mayhem Moondrop
WoL/OC tag meme! thanks @anneapocalypse for the tag!
Tagging in turn: @elizabethrobertajones, @tinygamertris, @gachabastard, @thesingingscorpio, @vitaecryptid, and @grahatiasravetower just in case you see this in a few months when you remember to log in again
(Choose whichever WoL/OC you want, do it more than once, ignore me entirely. what am I, a cop?)


B A S I C S
Name: Mayhem Moondrop
Nicknames: Mayhem is already a stage name and doesn't really need abbreviating. They will respond readily to whatever non-obscene epithets you choose to bestow, though.
Age: mid to late 20s at this point? 23 at the start of ARR
Nameday: 18th sun of the 4th astral moon
Race: Keeper of the Moon Miqo'te
Gender: No (agender)
Sexuality: Yes (pansexual and polyamorous)
Profession: Bard (actor, folklorist, and historian all in one word, what more do you need?)
P H Y S I C A L A S P E C T S
Hair: Black, currently worn short but growing it back out - they had to cut most of it off after nearly losing an ear at the edge of the universe.
Eyes: Silver - Moon Keeper eyes are slightly reflective
Skin: Grey
Tattoos/scars: I don't mod aside from reshade so until they give us a fashion accessory, you'll just have to imagine an Archon mark on their right cheek post-Endwalker. They have relatively few scars - the most prominent is along their scalp, mostly covered by the hair that's still growing back in from when it was left.
F A M I L Y
Parents: Their mother was a poacher-turned-bandit in the Black Shroud; she was killed by Wood Wailers when Mayhem was barely old enough to say their own name, and they don't remember anything about her, or the gang she traveled with. Father unknown, and considering how Keeper culture works, was likely never expected to participate in parenthood beyond the siring of a child anyway.
Siblings: Due to how Moon Keeper naming conventions work, Mayhem is aware based on their original name that they were not their mother's first "son". No siblings have ever come forward to be associated, and they've never been interested enough to go looking.
Grandparents: Under the circumstances, good luck. ¯\_(ツ)_/¯ Emotionally they sort of consider Jehantel to be their grandfather, although it's not something they've ever discussed outright.
In-laws and other: No in-laws, although Count Edmont would be perfectly willing to consider himself for the role even though they were never married to Haurchefant; Mayhem is polite but keeps their distance a little bit because they don't want to explain to him their opinion on the Fortemps family dramas. Post-Endwalker the adult Scions are involved in a polycule which technically would add Wilfsunn and Bloewyda (as Urianger's adoptive parents) to the potential in-law list (excellent) but might also add Matoya (terrifying), so we're just not going there. As far as other blood relatives, in theory Mayhem could go back to the Shroud and find their mother's clan in hopes of reaching out to find some, but they're not interested in participating in traditional Keeper culture (which is highly gendered), and none of those people came looking for them when they were getting raised in Gridania, so they don't feel like there's much point.
Pets: None; they're not really an animal person
S K I L L S
Abilities: They've always been good with a bow, which was how they got their start as a wagon guard for some traveling performers, and gradually invited to participate in performances as their interest became clear. Over time, they've started to learn a few other fighting styles: red mage for when they want to take center stage rather than play narrator, astrologian for when the path of the story needs a little help to get on the right track, and most recently warrior so that they can pick up where someone else left off. They trained a little with firearms when they were in Ishgard, since Stephanivien had access to the best practice shooting range that would actually welcome outsiders, but ultimately they prefer archery.
Hobbies: Reading, writing, crafting, performing. For all that their formal education was pretty basic and perfunctory, Mayhem is a deeply curious person and loves to learn, and to share the knowledge they've gained in turn. They have a knack for understanding how to connect to an audience and meet them where they're at in order to draw them into a story or an explanation. While they were with the performers they also learned to make and repair costumes, and have kept up the practice enough that they're now a fairly accomplished weaver. Naturally, as a bard, they also sing and dance, and relish the chance to get back up on the stage from time to time to put on a proper show.
T R A I T S
Most positive trait: I would say their curiosity. The drive to learn and keep learning, to never assume they know everything, has kept them humble and compassionate throughout their journey.
Most negative trait: Avoidance and deflection. They love learning about other people but they rarely talk about themself, and especially early in their journey they took a very long time to bond with others in a way that would actually make them want to stick around. It wasn't until near the end of Heavensward that "run away and change your name and try to never look back" stopped being an option in the back of their mind.
L I K E S
Colors: They usually default to green for clothing choices, but they really love vivid colors in general, especially in intricate patterns. Thavnair was a delight.
Smells: Subtle, natural smells, mostly - flowers on the breeze, the forest after a rain
Textures: Soft and fuzzy, squishy and comfortable. They like the subtle roughness of old paper, too.
Drinks: Usually favors cool and sweet and fruity. Still has a melancholy weakness for hot chocolate.
O T H E R D E T A I L S
Smokes: Nah, too much risk of messing with their voice
Drinks: Enthusiastically at social gatherings. Has been carried to bed more than once.
Drugs: Doesn't seek them out but is willing to partake if offered.
Mount Issuance: Their Grand Company mount has lived a pampered courier's life at the Rising Stones ever since the Scions moved in, and has most recently been transferred into Tataru's possession. Mischief, the black chocobo they consider their primary mount and companion, was a gift from Haurchefant, and is technically a little too big for them because Ishgard breeds chocobos meant for Elezen and Hyuran riders. They love her anyway.
Been Arrested: They've always managed to talk themselves out of trouble, aside from MSQ incidents.
#ffxiv#mayhem#warrior of light#meme#I have to run to a thing but I'll come back to re-read/edit this later maybe
5 notes
·
View notes
Note
Hi! Do you know some cyberpunk reshade presets? Thank you!

Hey Chooms,
Yeah, there are some by intramoon and one by Networksims so far. Keep in mind - both use some very heavy shaders that are quite CPU and RAM intense, especially if you play on a low-end PC. (min. 16 GB RAM and Intel 5 processor or higher would be better)
However, as you may know, you can always adjust the shaders to your liking. For my personal story I did adjust some reshade presets to my liking. Depending on your taste, preference, and setup, you can always use a lighter one and add the Tint Shade "Shader" (pick a color between blue/pink/ purple). You can easily make your own by using color shaders only.
Another tip: Change all Auto-LIghts for each Lot to the cool white swatch in your game. Make sure to dim the light to your liking. And I use Underworld mod by twistedmexi for the dark mood in Cyberpunk. As Cyberpunk is known to have a colder, and dark atmosphere and all those changes will make your shots look preem!
Check my tag #reshade and #resource for more tips. Would love to see some edits, may even a new story? Tag me if so! I follow the tag #ts4 cyberpunk just that you know!
See ya, choom! 😘
PS: I added a pic how I use it. I'm using currently okruees' kaleidoscope plus adding the tint shader and chromatic abbreviation, and I'm using one of the 30 custom luts as seen below by amoebae. This is an unedited in-game shot with my personal custom reshade set. May it helps a bit as inspiration.
18 notes
·
View notes
Note
Your pictures and screenshots are so pretty though! How do you do it? I love your blog btw!!
Thank you!! I really appreciate you saying that! I'm not totally sure if you want a tutorial or not. I can't give you a step-by-step run down, since it's different every time. but I can tell you a few of the things that I do the most often. If you want yours to look a bit like mine!
I editing software I use is Photoshop. But there are many alternatives like Pixlr, and Gimp.
Another big factor that plays into the coloring and depth of an edit is by using Reshade. I couldn't do anything without it.


before and after with just Reshade
Next I hop into Photoshop. and do the basics that I do for every edit. that's what I'll show you today.
I would first crop it, if that's what I needed to do. but for this one I won't.
Then I would make one duplicate layer of the image, and then a blank layer. That blank layer would be put on multiply.

I use these layers to add shading and highlights. First I use the blank layer use the eyedrop tool (shortcut: I) to select the color in the shadows. and draw them on. Next I use Dodge tool (shortcut: O) to add highlights in the t-zones of their faces, in their eyes, on their jewelry, and in their hair.


before and after
The next steps are one after the other. and Illustrated below with letters. I do it in that order.
A. I merge the layers for the shadow and highlights.
B. This next step uses an action that I made for my editing. but you can replicate it one by one on any editing software. The Action makes my life easier, by editing the photo with settings that I've specified. I sharpen the image with it, adding a few shadows and highlights. You will have to find a specific setting that works with your photos, as each Reshade is different. this is just what works for me.
C. Lastly I put all of my PSD settings into a folder. and then saved all of those settings into my library. So All I have to do now is drag and drop everything over the image. and in most cases, I could be done.
C (continued).

This is how the image looks right after I put the PSD on. As you can see this is how I get the Letterbox effect. and how I write the dialogue. but I remove that for edits, of course.

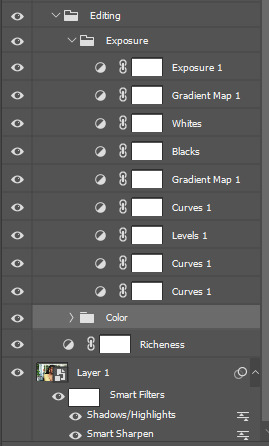
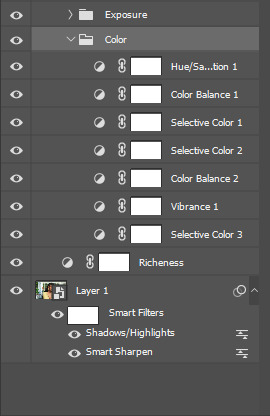
This is what my layers look like. It's all quite organized, But the editing folder is where the magic really happens.
Although the pictures of settings might not help that much. but I can tell you most of these are just subtle changes. but all together they make something great.
So this is the before:

And this is the after
So all of that to say, This is the main coloring and editing for all my edits. but most of them are different. To get the magazine covers, I use the devilliers magazine PSDs for the most part. While they aren't available on Patreon anymore. @lucky-content uploaded them all onto SimsFileShare. You can find them here!
Anyway, that was a lot, but I hope it helps you or someone else! If this wasn't what you meant send me another, and I'll figure it out!
7 notes
·
View notes
Photo
so @okelli said they wanted a more in depth tortilla so ya gorl is here to deliver. here you go. click this link. that's it. that's the tutorial.
ok i'm done trying to be funny. i've chucked this in here under a cut, but please keep in mind, this is not a professional tutorial. i am in no way an artist/professional/the be all and end all/guru/god; this is just my editing process. so you don't need to follow it exactly to the t. you're more than welcome to change any processes and do your own thing. i know there are some more technical and frankly better tutorials out there by other simblrs that go really into details and what have you which are really helpful (and i do encourage everyone to go check them out), but please keep criticisms close to your heart bc i reiterate; i have no fucking clue what i'm doing. but let's get started bc this bitch gon be long.
what you're going to need:
photoshop or some other editing program. i personally use ps cc 2019, however gimp will probably also work
reshade; however whatever version you use is up to you. again, i use 4.6.1.
google is your best friend and mine
a screenshot of your choosing w some slick lighting
a lot of patience
for images where the resolution isn’t clear, click here for full size.
step one:
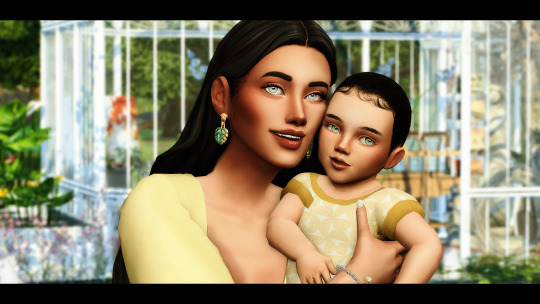
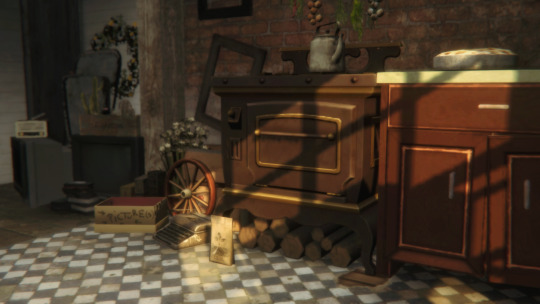
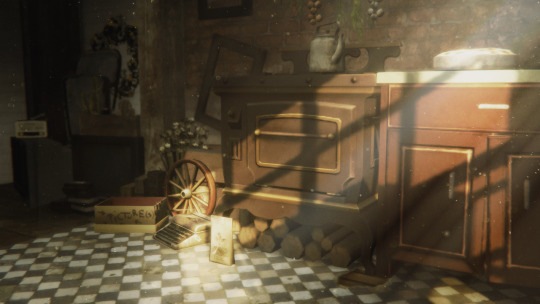
open up your screenshot in your editing program of choice. i have picked this screenshot for the purpose of the tutorial bc of the spicy lighting. also did i spend an hour building this for the purpose of this tutorial? i cannot confirm or deny these suspicions, but we're usin it ok. for this picture i used @intramoon‘s alethiology reshade preset bc it’s my fav atm. you can find it here.
step two:
apply your colourgrade. i used the sonder actions by again @intramoon bc this tutorial is sponsored by asia. i’m not going to go too in depth here, bc this differs from screenshot to screenshot. i’m only mentioning it bc it’s fairly important to the next step. adding the colourgrade turned my screenshot from what you see above to this.
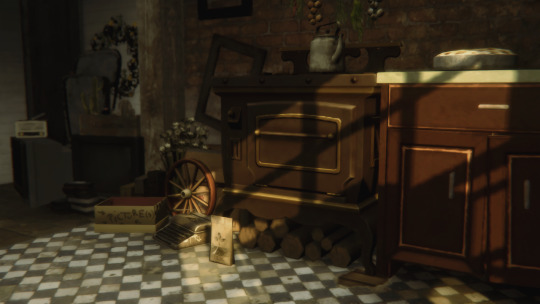
as you can see, the colours are now slightly more muted and there’s more of a green hue to it.
step three:
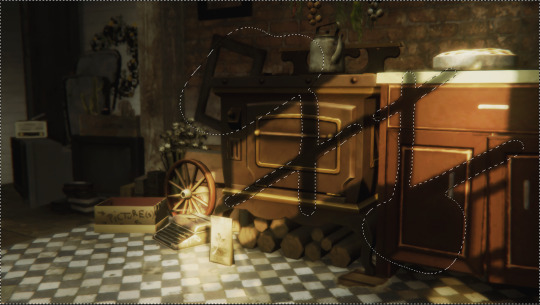
depending on the colour scheme you’re going for with the screenshot, you’re going to want to pick a colour that compliments it. since my screenshot is still quite warm toned, i chose #fff4d8 which is a pale yellow. you’re going to want to take this onto a soft brush (they come with photoshop so if you’re new to using ps, it’s a default, you don’t need to download anything). i’ll include a screenshot of what it looks like.
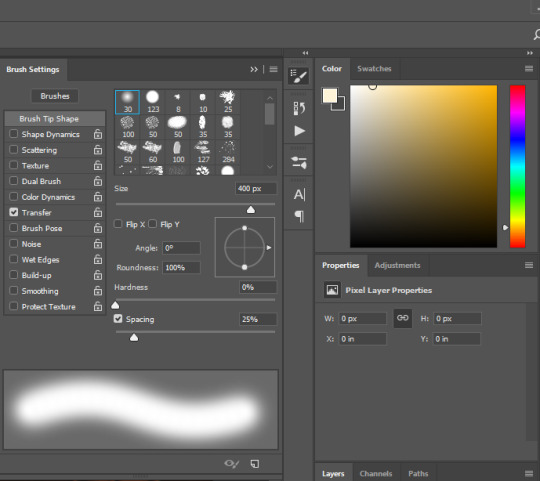
before painting anything, what you’re going to want to do is create a NEW layer. you can do this by either pressing shift + ctrl + n or by clicking layer in the menu bar up top, selecting new, and then new layer.
on your new layer, with the colour and brush selected, what you’re going to do is paint over the areas that are already highlited by ea lighting. for example, my screenshot ended up looking like this.
looks pretty messy, but that’s ok bc we’re going to change the blending mode to overlay as seen below. obviously this made the lighting look slightly too intense. dw this is not how we leave it.
i also change the opacity to suit the image. i set my opacity to 50% and this is what it ended up looking like.
i added in an extra step that i only use occasionally for this tutorial, and basically that extra step is going in with a soft WHITE brush and taking it to the areas that look extra glowy - i.e. the typewriter, the pie and the counter handle. this is what mine looked like. this needs to be again done on a new layer, so make sure you ctrl + shift + n or select a new layer in the menu bar.
again changing the layer to overlay, and changing the opacity. this is what my settings looked like.
again, please refer to the full size image folder, however for those lazy like me; opacity is at 65%
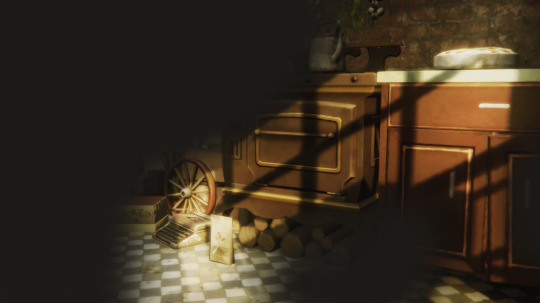
step four:
on your main layer of lighting overlay (if you didn’t add more like i did it should be your only one), you will want to add a layer mask. this can be done by clicking this little button here

once you’ve done that, it should add a white box on your layer and look like this

because the colour has lightened some of our shadows, and depending on how deep you want your shadows to be, you’re going to want to click onto the white layer mask and with a soft brush set to the colour black, you’re going to want to draw over the shadowed areas that you want to deepen again.
for reference these are the areas that i went over. and my layer mask now looks like this

step five:
creaTE A NEW LAYER!!!!!! this time we’re going in with shadows. pick a dark grey colour (or black, your choice. i prefer dark grey), i used #1c1a18 and paint over the areas where you want to deepen the shadows further again.
this is what mine looked like
set that to soft light and change your opacity (don’t use overlay this time, it’s too harsh on the picture).
my picture now looks like this:
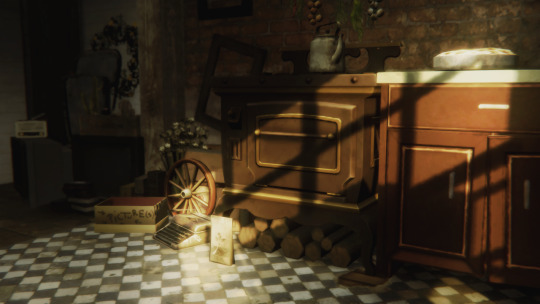
subtle changes make a world of difference.
step six:
FIND A LIGHT RAY!!!! i mentioned in the ask i published that i particularly like using this one i found on google, and i did use it for the purpose of this tutorial as well.
pop her on your picture and change the positioning. positioning can be changed by pressing ctrl + t and either flipping/rotating (which can be done by right clicking on the texture and selecting flip horizontal etc) and dragging the corners. if you’re dragging the corners to make the texture smaller, maKE SURE YOU’RE HOLDING SHIFT DOWN WHEN YOU’RE DRAGGING SO THE DIMENSIONS STAY THE SAME. with the positioning, make sure you’re putting the light areas of your texture where the light source is coming from. it’s really important to have a basic understanding of light and shadows. i flipped mine horizontally and made the texture smaller as well as rotated a little.
set her to screen and change you’re opacity.
boy i’m sounding like a broken record lmao, but my picture now looks like this.

starting to look kinda nice right?
step seven:
download this video. open it up in photoshop and make sure you have your timeline window on. if you don’t and don’t know how to change it, up the top, select WINDOW and make sure there is a tick next to timeline which is near the bottom of the drop down. once you’ve done that, click ANYWHERE along the little timeline that has shown up and it gives you a frame for the dust texture. it should look something like this. (the red is bc that little blue and red guy is important)
press ctrl + a on your keyboard to select all and copy that motherfucker. past her on your screenshot, set her to screen and play with her opacity again.
if you’re unhappy and feel like it’s too busy, you can go back and add a layer mask and using that same soft black brush, erase problematic areas the same way we did in step four. mine ended up looking like this.

NOW THIS PART IS OPTIONAL!!!!!
using the colour fill or paint bucket tool, i went in on another new layer with another pale yellow (#e4dcb1) and filled in the whole image. i set that to COLOUR and put it on a clipping mask RIGHT ABOVE the dust texture. you can add a clipping mask by right clicking and selecting set clipping mask. it now only applies to the layer directly below, which is our dust layer. i only did this because the white was too harsh (lol) and i wanted the dust to blend a little better with the surroundings.
finally step eight:
again optional, but if you like the vintage look like i do, select the layer with your screenshot and using the noise v2 action by @intramoon (hi again asia) in this set, add some noise. it creates a duplicate layer, which you can then play with the opacity of to set to your desired strength.
once you’ve done that, you’re basically done!!! this is what my screenshot ended up looking like by the very end.
that concludes our spicy lighting tutorial. i hope you were able to do better than i do on a good day. enjoy!!!!!! if there are any parts that you need clarification on, please feel free to yell at me and i’ll see if i can help lol
#ts4 tutorial#s4 tutorial#editing tutorial#the sims 4#s4#ts4#ts4 screenshot#s4 screenshot#ts4 edit#s4 edit#i tried#it's long#i got lazy#i'm sorry
812 notes
·
View notes
Note
Hiii would it be too much to ask for an editing tutorial for your story? It’s okay if not!! Love it so much already!!❤️
yesss editing is the part of the storytelling process i like the most! so i switch things up pretty frequently, so for this i'll cover the things i do for every post!
ok first thing is fix up the reshade weird bits - i normally take 2-3 photos for every picture, with different things in focus and mxao off/on. So we drag all those pics onto one image and layer them accordingly

thennnn we use a layer mask on the top layer to blend the images!!! using a black brush i paint over what i want shown from the other layers, normally its the edges of the hair or something else i want in focus!!
then we merge the layers and resize the image to 1280x720. then crop using a preset of 1280x800 i just like the size better
adjustment layers time!!!! always use adjustment layers they make life easier!! the one adjustment i always always use is a gradient map

something like this, then switch that layer mode into soft light and drop the opacity to 40%, it gives a nice dramatic boost

then from here i normally do curves, levels, and selective color, this really depends on the photo, so there's no exact settings for this
then i'll do a fun lil glow, duplicate your base layer and go to gaussian blur, blur it till its just like blobs
ok then do a levels adjustment layer, move the shadows up a bit so the image gets real dark.

merge that down and set the layer style to screen! then bring the opacity wayyyy down
ok lets add in some light, use the color picker on the light source and find its lightest point, then on a new layer get a biggg soft brush and paint in some blogs of light near the source. then set that layer to soft light and change up the opacity

lets add in some light!! take the color picker to a light source and pick it's brightest point. then on a new layer with a bigggg soft brush paint in some blobs of light, then change the layer style to soft light
if the sims face is visible i'll do some shadows and highlights. for the shadows, use the color picker and find the darkest part of the sims skintone. get a smaller soft brush and set the opacity to 10%, set the layer mode to multiply, and outline: nose, under eyebrows and lips, cheekbones, jawline, and hair framing the face.
for highlights, set your brush color to white and on an overlay layer, highlight the T zone, nose, upper lip, chin, cheeks, forehead. normally i'll add a gaussian blur of around 2pxls just to blend it out a bit
okie we are in the home stretch now. now i want to blur the background even more to make the sim pop. duplicate the og image and do a gaussian blur on the duplicate. now!!! use a layer mask, with a black brush and paint over the sim!!!!

always always ALWAYS use a layer mask!!! it's super easy to fix mistakes and really easy to use, i use them for the adjustment layers too if i only want to change the color of one part or if something is too strong. once i am satisfied, merge down that blur layer.
duplicate that first layer again cause it's time to sharpen and use some topaz clean: here are my settings
then, duplicate that layer and add noise!!!!! my settings are: 2.5, uniform, and monochromatic. this is all for my super basics of stuff i do for every photo. so then we merge/flatten

voila!!!! i am out of photo room but after this i add text and then we're done!!!
#WHEW#this was kinda fun#extras#long post#ask#tutorial#i normally do more steps than this but these are alllll my basics!!!
14 notes
·
View notes
Note
your sims photos are simply gorgeous!! i am in awe. would you ever consider making a post about your picture taking process? your posts are beautiful!
Thank you anon! Absolutely. Once I am in the game I will make a post about the progress visually but in all honesty it is not anything much. Important aspect is the lightning of the room that makes a massive difference.
The ones I use:
https://modthesims.info/download.php?t=92373
https://modthesims.info/d/91821/colored-ceiling-bulbs-with-colored-light-nl-ofb-pets.html
https://modthesims.info/d/49856/testers-wanted-maxis-studio-lamps.html
The second thing is OMSPs
https://modthesims.info/download.php?t=317716
And most important one is posing. I used to play with a lot of poseboxes before but now my style is to generate my own poses and face expressions with expansion boxes that has medium or no overlay (for smooth transition between different animations), medium overlay sitting talk hack, and medium overlay talk hack. The poseboxes were created by decorgal.
The videos below is by @theonlyexceptioncollab and she was the one to do them on medium overlay. You will find the download in the description but I definitely recommend watching her videos.
https://www.youtube.com/watch?v=0VKTbxXvnEk
https://www.youtube.com/watch?v=b_pSmk9O7Ac
https://www.youtube.com/watch?v=U0wKs9iPx4U
When I play with random animations, and if their expressions are too dramatic for me I also use custom modeling poses overlay hack, which you can find below. I only use face overlay feature from this.
https://modthesims.info/d/272312/custom-modeling-poses-overlay-hack-v2-w-face-overlays.html
I do not play with reshade anymore. I plan to install it in the upcoming future but for now I just use in game lights and features to add effect. My editing process is very simple also. I only ever change the colours or add a filter if needed, but I don't use photoshop, all pictures are from in-game purely.
PS. I highly recommend watching @herbalwhite video .
Hope that helps on some extent.
5 notes
·
View notes
Text
answering asks.
all anon asks answered below! about new cc eyes, infant cc updates, cc requests + townies.

hi! omg thank you T-T <3 !! i am going to make complete and sectorial heterochromia skindetail overlays, that's the only thing aside from vampires/werewolf eyes that i still need to do & then i'll upload them
thank you!!! ❤️ yes, toddlers to elders, and i'll update them for infants as soon as i can as well.

oh sorry to hear that! normally i do want to fulfill these kind of requests but personally i think adult sims look too young without it, cause they're supposed to in their 40s to 60s and most adults do have some wrinkles there.
i could make a simple overlay skin detail to cover them up if you want, but it'd be too much work to make an additional default version for my skins without the wrinkles.
and thank you for the kind words <3 !!
hey AHH thank you, you're too nice <3 🥹 fadia would 100% accept your proposal!! ily have a good day too!!
hi! i'm sorry, i made the original version like 1.5 years ago and the newer version of them that i uploaded i don't have the psd file for anymore.
i'm making a new version of the asteria eyes as i mentioned in my last post with which i'll include the .psd though, and i'll add the old catchlights to it as an alternative.
maybe in the future i will, but i have to reupload all the thumbnails per swatch and gender for each file by hand so it's just such an annoying process to add more categories for them (and i really dont feel like doing it currently sorry 😫). if you want to you can also do it yourself easily if you don't mind them not having thumbnails with this tutorial.
hello! thank you ^-^ if it's as easy as just enabling them for infants in sims 4 studio then yes i'll do it asap, otherwise it may take a little longer cause it isn't my priority since it's such old content and i want to update newer things first. the skin will probably

hi! yes and no lol, i have a few sims up for download under my download tag but there's only a few that are public.
hi~ i completely forgot i used that on her! i never uploaded that one, i think it's similar to my agave skin (one of the lower opacity swatches would look most like it i think).

hey! thank you haha!! i'm gonna update all my skins when i can, just depends on when skiniator & sims 4 studio updates since i rely on them for the default files and proper tags ^-^
i'm still tweaking it a little here and there, when it's done i'll upload it. this ask made me giggle cause idk if its accidental but it sounds like you're annoyed with me over this reshade preset i'm not uploading HAHA
25 notes
·
View notes
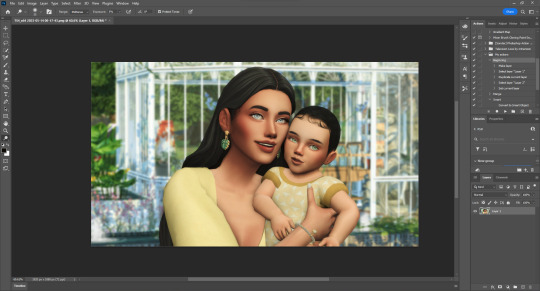
Photo

Hey guys! 😊 I’ve written this tutorial on how I edit my screenshots! It’s maybe a bit (a lot) more detailed than I originally intended, but I hope it gives you some new ideas/tips/tricks! 💗 (included below: how i fake reshade xD)

So I’m gonna start with this unedited screenshot of Felicia. 😁 I don’t use Reshade in my game, too much hassle. :P Instead, I use overlay textures and Photoshop actions to make my shots look pretty~ 😁
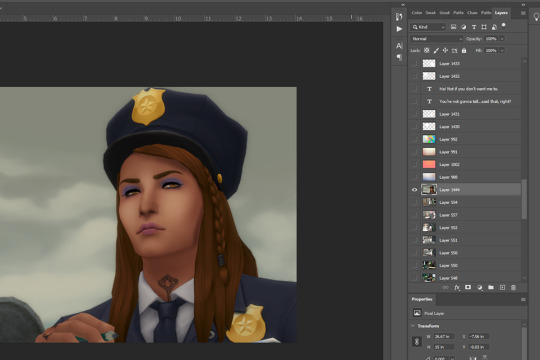
Here’s what that shot looks like after I’ve dragged it onto my echo_base.psd (the file I use for all my Winter Echo posts). I resize the shot only after bringing it onto the psd (but for this one, I’m leaving it at the original size). For Winter Echo panels, I use dimensions of 1011x608px at 72dpi.

Here’s what the shot looks like after I’ve turned on my four overlay texture layers above it. I have a large collection of these because I use them in my illustration work. Most of my textures I get from Adobe Stock (or make myself) but you can find a lot of great free ones on google images by using search terms like “gradient texture” or “overlay texture” (to get the best ones, change your image search settings: Tools > Size > Large). Here are the four I’m using for Winter Echo without their overlay effects applied:


And here are the specific overlay settings I’ve applied to each one:

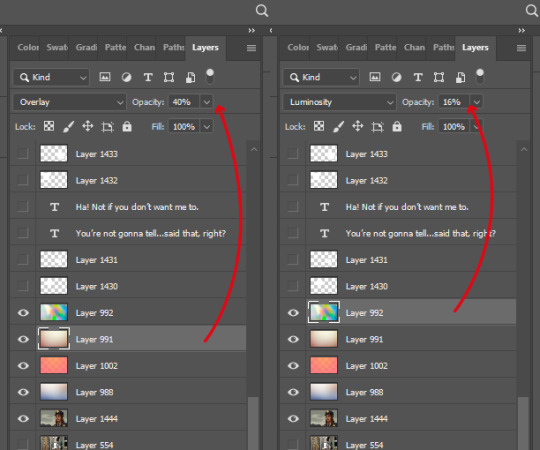
This requires a bit of trial and error! If you use this method you’ll probably end up mucking around with the overlay effects and opacity a lot because the results will vary according to the textures you’re using and the lighting in the shot underneath. These specific textures and their settings took me a while to settle on and I’ve used a variety of others in the past. 😊

This brings me to the Actions Panel! xD If you use a lot of lighting and colour adjustments on your shots, actions are a really good way to record them so you can apply identical effects to each shot. The shot above has had my “WE Indoor New” and “WE Colour Adjust” actions applied. But that doesn’t help you much, so here’s what I’ve actually recorded for those actions:
Photo Filter

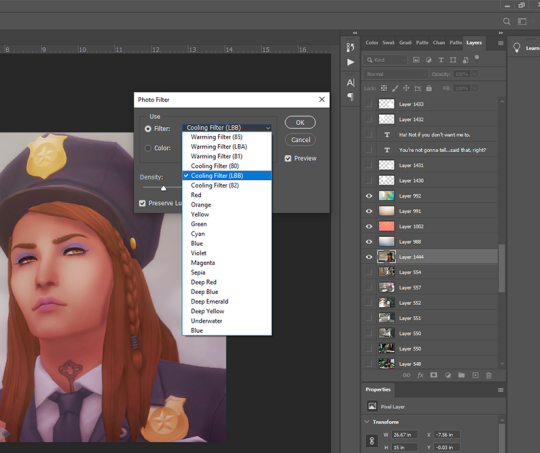
First step is always Photo Filter. Sims shots tend to come out a bit too warm imo, so I usually apply a Cooling filter (LBB is slightly purple).
Exposure
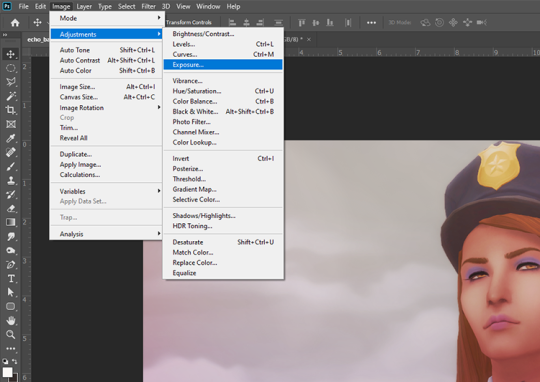
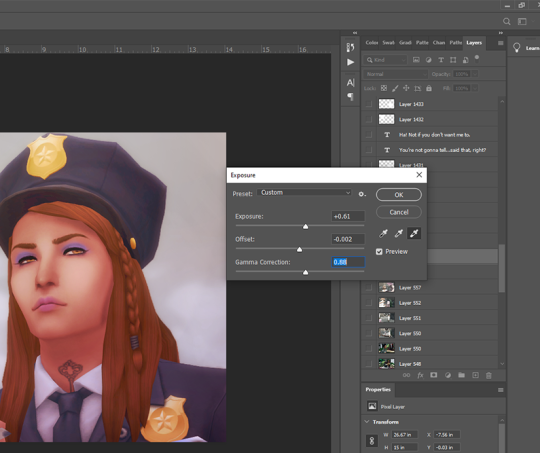
Exposure is a bitch to adjust because it will often have wildly different effects in different lighting. So I usually only adjust this a little, and let my textures do most of the lightening/brightening. You can get some very interesting effects with this though (e.g. I used to increase the offset a fair amount to make my shots look more dusty/soft).
Colour Balance

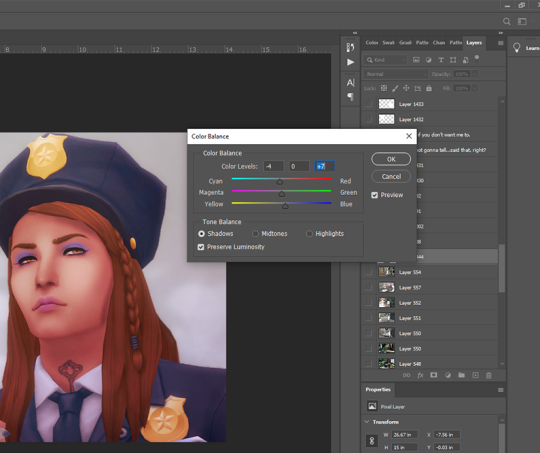
Again, my textures and photo filter are doing most of the work here, but I always add a bit more blue to shadows, and sometimes a bit of yellow to highlights just to take some redness out of skintones.
Levels

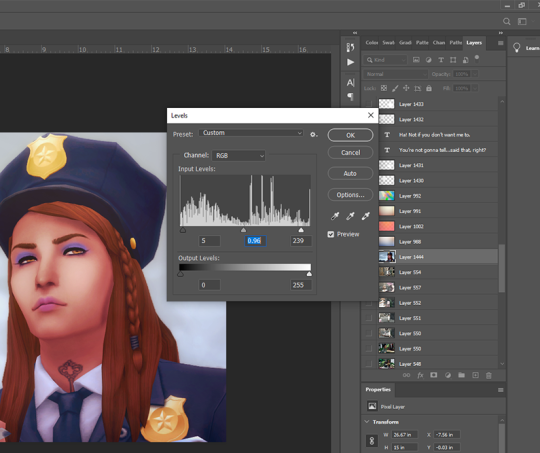
I use this instead of brightness/contrast. Just to make whites a little more white, and blacks a little more black, because sometimes my textures can make them a bit dull. Adjust as you like!
Noise

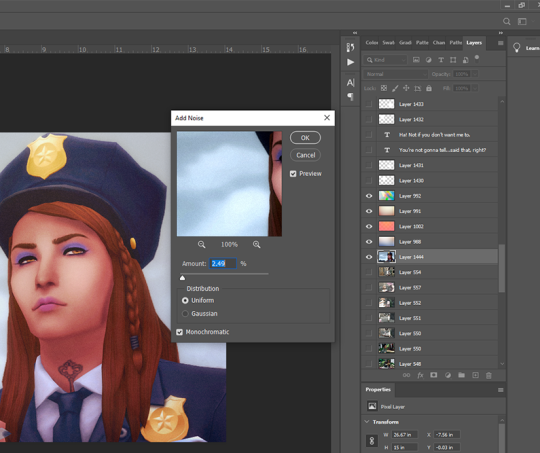
I used to use an overlay texture for this, but I like the consistency of Photoshop’s Noise effect. 😊 Don’t go nuts with this! A tiny bit of noise goes a long way. xD (and also, a higher noise level that looks good on a close up will make your wide angle shots look like a blurry mess, trust me 😅)
That’s all the effects I use in my recorded actions! Next step is...
Dodge & Burn
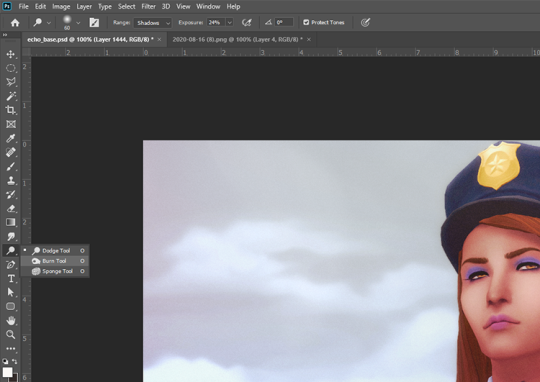
I only use this on shots that need a little extra depth, and only on faces/hair/clothing. Mostly I use the dodge tool on the T-zone of faces and the burn tool (with a large, soft brush) around the sides of faces. Keep the exposure very low to control how much shadow/highlight you’re adding. (You might also want to work on a duplicate layer for this step, in case you end up hating the result and wanna go back to the original xD)
That’s pretty much it for how I edit my shots! Obviously I haven’t gone into the tiny editing things like smoothing really angular edges, fixing clipping, etc or we’d be here all day. 😅 But here’s a little bit extra about how I make my speech bubbles:

I use Photoshop’s Rounded Rectangle tool on a new layer...


The corner radius can be adjusted in this panel. If you can’t see this panel, you can find it under Window > Properties.

Then I use the Polygonal Lasso tool (right-click on the Lasso tool to find the Polygonal Lasso) to draw a triangle on a new layer, and fill it with white.

I merge the two layers (the rounded rectangle layer & the triangle layer) and bring the opacity down to around 75-80% (depending on the shot in the background - if there’s a lot of detail behind the bubble, it needs to be more solid so the text stays readable). I’ve added text afterwards in this example but I always put the text in first, so I know how big the bubble needs to be and where to place it. I keep all these bubble and text layers in the psd until after they’re posted, so I can easily make edits as needed. 😊 (but I don’t keep them forever, because I’d have thousands of layers by now and the psd would take 10min to open 😅)
I hope that was all easy enough to follow!! If you have any questions at all about any of this stuff, or need help with Photoshop in general, please feel free to leave me a comment or shoot me a message! I’m always happy to help 😁💗
83 notes
·
View notes
Note
how do you take such amazing pictures in planet zoo? :)
I’m not doing anything too special.
I have ReShade installed, but all I really do with that is add a little bloom and DoF, I haven’t done much with the colours (maybe in one or two pictures I’ve added a LUT).
I use G to remove the HUD and T to activate the alternate camera control scheme, which makes composing shots a little easier. One thing I wish we had was control over fov (field of view). You can rename any renameable character (in Planco it was any guest, in Planzo it’s any staff member) with the name ‘tegidcam’ and it lets you zoom around effectively in first person mode with more control over fov, but as far as I’m aware you’re stuck at ground level - I could be wrong about that though, I haven’t tried it for ages, and not at all in Planzo.
The thing that makes the biggest impact is SRWE. It lets me use any aspect ratio I want, and I can hotsample, which means rendering the window at sizes far larger than fit on my monitor while I take a picture, resulting in a larger screenshot which looks clearer and more detailed than it would otherwise. It’s basically the lo-fi and accessible way of downsampling, if you’ve ever heard of that.
Planet Zoo also supports Ansel if you have an nvidia card and your drivers are up to date. You can take larger pictures using that method too. It doesn’t work well for me because of something weird going on with my PC, but I never get around to troubleshooting it because I have ReShade and SRWE instead, which I far prefer.
14 notes
·
View notes
Text
My Sims 4 Machinima Tutorial
There are quite a bit of Machinima Tutorials out there...
This one is how I make Sims Stories with all of my secrets.
A link to my Youtube with my current and upcoming Machinima
> https://www.youtube.com/channel/UCo3LncYd3IBVrmfn9t8ddTg
I will be addressing things such as:
RESHADE
FILMING
MODS
AND STORY
Reshade adds Filters to your Sims 4 and other games. It is a very nice program for recoloring and adding more depth to screenshots and footage.
You simply go to http://reshade.me/ and go to the latest download.
Once you download it, open setup.
It will present a little rectangular box, click on it and go to The Sims 4.exe in Program Files (x86) if you have the file, click on TS4_x64 instead of TS4.
Then it will ask you if your game runs on Direct3D 9 or Direct3D 10, I usually go with Direct3D 9.
It will then ask you if you want to download all filters, select YES.
Next make sure all of the boxes are checked next to the filters and hit OK.
Then load your game.
To open reshade is SHIFT+F2, you can change all of your settings through there. My Hotkey to enable the filters is F6 but you can change to anything as long as its easy to remember.
Voila! You have a pretty Sims 4 to your liking!
NOW With Recording Footage.
I use WINDOWS GAME RECORDER.. It lags much less than OBS [at least for me] The keys are ALT+WIN+R. You must have Windows 10 for this. If you do not, OBS depending would be fine I think or Fraps but it is not freeware.
I set up the cinematic camera, (my button is alt 6) and as the camera starts panning or moving, I start the game recorder and once the camera stops moving (or right before) I just hit the same key and turn the game recorder off. It leaves professional and clear footage for you to use.
The in game cinematic camera always starts out super fast, and goes back to that default every update. But there is an easy way to change that,
In Program Files (x86) Sims 4 Folder, in game/bin/res there is a file called Video Camera. You want to open that file [BACK THAT SH*T UP BEFORE YOU DO THIS, TRUST ME] and go down to
Default interpolator parameters] and change it to your liking. Mine looks like this. But the camera speed might be a little too slow for some.
[Default interpolator parameters]
DefaultInterpolatorType = Linear
DefaultInterpolatorTime = 21.0
[Camera 5 interpolator parameters]
InterpolatorType = Linear
InterpolatorTime = 21.0
[Camera 6 interpolator parameters]
InterpolatorType = Linear
InterpolatorTime = 21.0
Where Linear is placed, you can change that to other modes. But I would do research because I do not remember what they are at the moment.
MODS: I’m going to call out mods that don’t get as much attention as they should for Machinima. I will not go into much detail with Pose Player, Teleport Any Sim, etc. unless requested by an individual.
Five New Sliders!
http://modthesims.info/showthread.php?p=5469529#post5469529
[Scroll down to Tedw’s download, as Get Famous broke the original Mod.]
Five New Sliders is a cheat based height mod, which makes it easier to pose different height sims correctly with pose player. If you used a CAS slider, every time you would use a pose with Pose Player, you would have to go back into CAS to make the sims the same height so the pose would look like they’re suppose to. The cheats are [tallest to shortest]
Add_slider Height 100 - Add_Slider Height -100
And two sims of separate heights, when wanting to pose all you would have to press with both sims would be
Add_slider Height 0
And they’re back to normal size for the pose player.
Its so much easier than a CAS height slider.
UI Extensions: When you’re trying to get a base game pose and your sim starts flapping their arms because they have to pee. Personally that’s too extra for me.
http://modthesims.info/d/558548/ui-cheats-extension.html
You could always use TESTINGCHEATS TRUE and right click the mailbox to hit Disable Need Decay, BUT you with UI Extensions you can add ultimate money, you can get rid of moodlets simply and add relationship values by just typing in a number in the right box! Not to mention if you don’t use the cheat, you can just drag the sim needs to full. Great for Machinima!
FACE OVERLAY: No more cheek to cheek smiling
Self Explanatory.
https://www.dropbox.com/home?preview=mJuGsczoQCevxlLvRn1S_facialOverlay_happy_01_x.package
The Mod couldn’t be found anymore so I uploaded mine.
ARTWWURL MODS: Life Mod and Pregnancy Mega Mod
You can control a pregnancy, by pausing, by terminating, by impregnating (lol)
and the Life Mod you can delete a sim instantly out of the game, you can edit the in casfulledit mode at any time and much more to play around with.
AND LAST BUT NOT LEAST STORY:
Try to be original. I’m not telling you WHAT to write, but I’m telling you that writing the same story everyone else has is just failing you as a storyteller. Wow people with your skills, Don’t show them that you have the “Great” ability to write something that has already been written, script for script already and 20 times at that. There are so many things to create, ALSO if you’re stuck with story lines- google prompts to help you get inspiration. Trust me, you’re gifted... Teen Pregnancy Kidnap Abuse stories are a little tiring after a while.
2 notes
·
View notes
Last Seen Blogs
jaesqueso
Jae's Queso

cryptidclaw
Cryptid's WC Centric Blog

salud-bhip-store
Giancarlo Aguirre
salud-bhip-store
Giancarlo Aguirre

miamdujour
MIAM DU JOUR