#no i DONT want to use a tag that is my normal tag but i spelled it slightly wrong one time on every post fuck OFF
Text

the star you've longed for
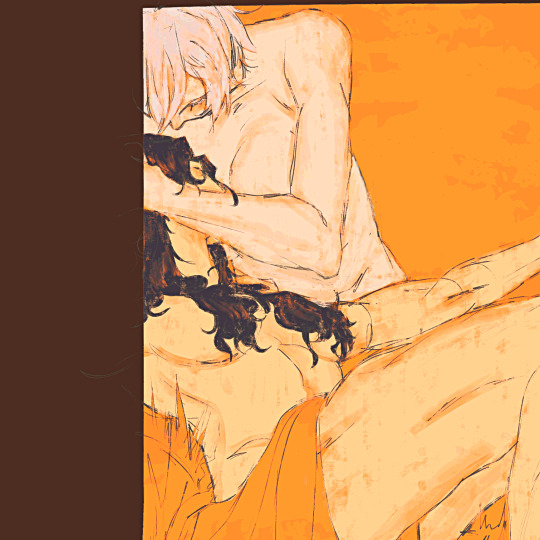
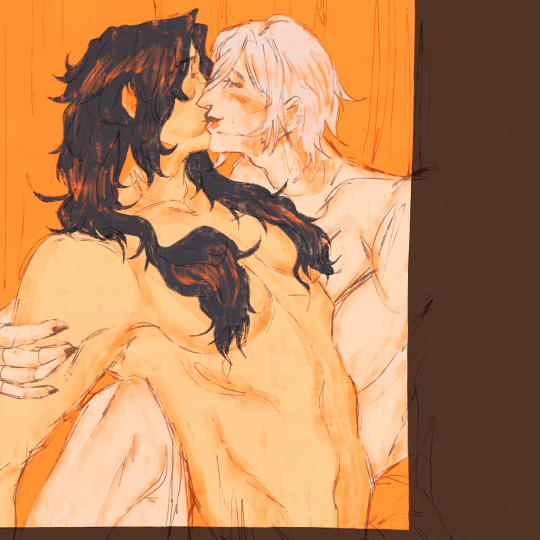
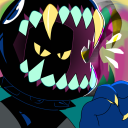
#PLEASE WATCH REVUE STARLIGHT!!!!!!💥💥💥💥💥#project sekai#revue starlight#pjsk#emu otori#nene kusanagi#emunene#prsk#proseka#yuri win. i make my fav pairing fight tothe death#HAPPY EMUNENE WEEK LOOOOOL#Can i be hinestni think this sucks it took way too long cause i forgot how to draw for a week#im seeing demons and stuff. i feel more normal now. Also you may recall emu has a big hammer for revstar#thats the bottom of it the gem thing all the weapons have hers is sharp#i remember seeing meta post abt how mahiru has a blunt weapon because she never actually aimed for the lead role#rather she only wanted to be by karen's side. so her weapon wasnt capable of cutting anything in the first place#Fastforward to the movie and well LOLLLLL#though i think its funny in the movie her mace is still mostly used for i timidation againstbhikari.. bc again shes not winning for a lead#revue starlight youre neat. maybe i like revstar.#<- has been insane for 4+ years#Needed their pose to be smth where nenes weapon isnt visible because I DONT KNOW WHAT WEAPON TO GIVE HER. OOMFS HELP. I NEED A NENE WEAPON.#i thought some sort of polearm/spear/halberd etc something with range but that can be ambitious#but i feel like smth with that much footwork needed doesnt suit her.. And she cant hsve a sniper i dont think thatwould fucking work#aruru gets pistols in the revue but aruru also is Ummm well shes uhhh. [screaming] [car crash]#throwing knives would be funny wouldnt it. Put that gamer aim to use#idk if the emunene week tag is on here but i'll donit anyways#emuneneweek2024#i remembered to switch which account this pists to for the first time in like 3 pists. so you get to see all my tags this time#rather than accidentally posting it to the wrong account and having to dekete and repost andngoing IM NOT WRITING ALL THAT AGAIN.
224 notes
·
View notes
Note
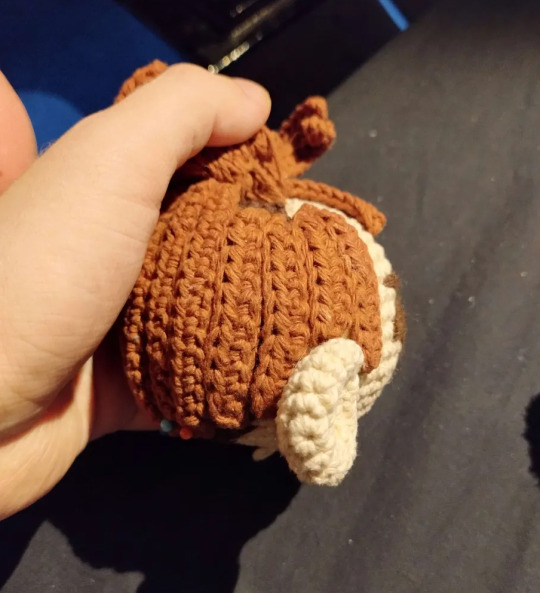
hey if you write a pattern for the chilchuck amigurumi I will buy it instantly
ive gotten multiple asks about this, so ill just answer them all here in one go.
i wrote down everything while i was working on it, but i theres some stuff that i would do diffrently and i also didnt take a lot of process pics so it wont be a full proper pattern for those reasons, but ill add all that i have under the cut!
i dont want any compensation, but if you wanna do me a favor you can donate to esims for gaza, unrwa, any of these gefundme's, or another trusted charity of your choice.
now to the pattern! i would love to see the results of anyone making a squeakychuck, feel free to tag or dm me :)
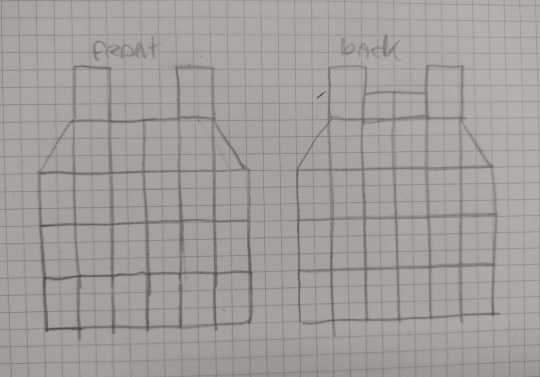
the dimensions of this depend on the size of ur squeaker and yarn, i had a 4ish cm squeaker and somewhat thick 4/8 cotton yarn (kinda 6/8ish thickness). depending on ur yarn and squeaker u might need to follow a different pattern for the body.
if youre using a different body base pattern, the tunic and blouse pattern are pretty easily adjustable. ill add some notes for that at those sections of the pattern. ill also link some videos i used at relevant sections.
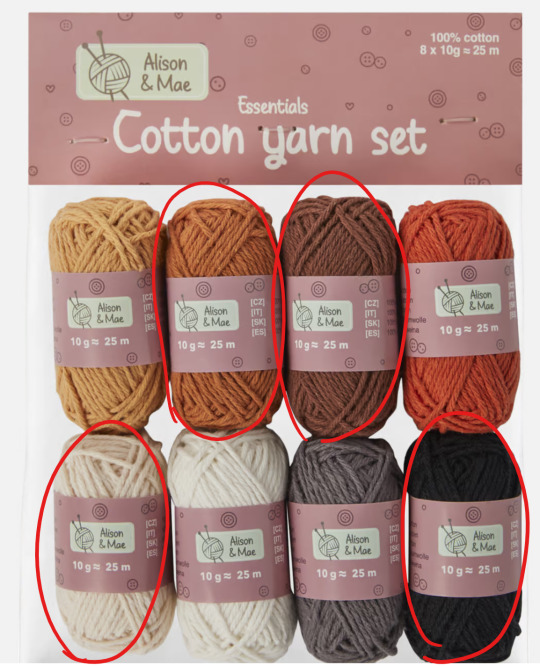
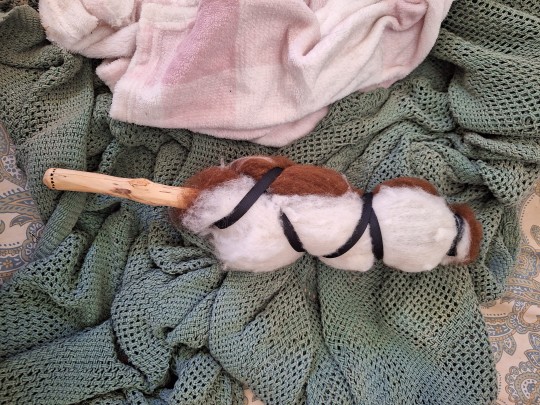
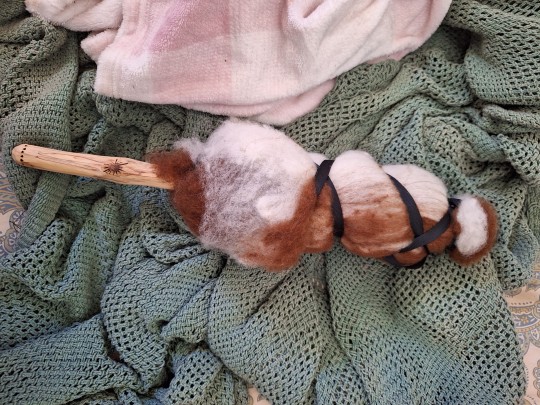
if theres an Action store near where u live, see pic below for the yarn i used for the skin, reddish brown, black and light brown. i got 3 of these but 2 packs was enough. the dark brown and creme were from my stash. i also got the squeaker from a donut dog toy from Action.
-
abreviations list (all in us terms):
mr = magic ring
sc = single crochet
hdc = half dubble crochet
slst = slipstitch
ch = chain
bobble = 5 double crochet in one stitch
BLO = back loop only
FLO = front loop only
what you need:
-skin color of choice yarn
-creme/white yarn (normal for body, thin for blouse)
-greyish creme (for boot flaps)
-black yarn
-dark brown yarn
-light brown yarn
-reddish brown yarn
-green yarn
-4 tiny buttons (for arm joints)
-cardboard (for shoe sole
-3.5mm hook
-squeaker
-needlefelt needle
-stuffing
-stitchmarker (optional, i always mark the first stitch of the round)
-
once again disclaimer, this is not a propper pattern, this is just what i wrote down while i was crochetting. it may not nessecarily be the best way to do it. i wanted most clothes to be removable, but you have to partially disassemble the doll if you want to remove them. if you dont like how something looks or works ur free to do whatever you want. big fan of fucking around and finding out personally.
if you have any questions feel free to dm me, might take me a while to reply though.
-
SQUEAKY CHUCK PATTERN 3.5mm hook
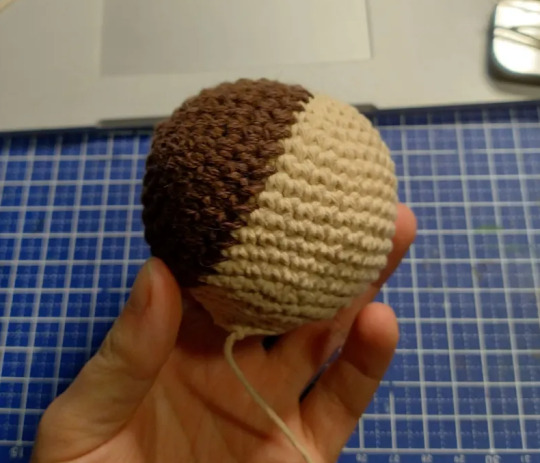
head (skin)
r1: sc 6 in mr
r2: (inc) x6
r3: (sc 1, inc) x6
r4: (sc 2, inc) x6
r5: (sc3, inc) x6
r6: (sc4, inc) x6
r7: (sc 5, inc) x6
r8-15 : sc 42
r16: (sc 5, dec) x6
r17: (sc 4, dec) x6
r18: (sc3, dec) x6
r19: (sc2, dec) x6
r20: (sc 1, dec) x6
r21: sc 12
slst, fasten off
ears x2 (skin)
r1: sc6 in mc
r2: (inc) x6
r3: (sc, inc) x6
r4-6: sc 18
r7: dec 9. slst fatsen off.
Body - leg up (skin, black, thick creme)
start with skin
r1: ch 6, inc in 2nd, sc 3, 4inc, sc 3, inc
r2: inc 2, sc 3, inc 4, sc 3, inc 2
r3: inc 3, sc 5, inc 6, sc 5, inc 3
r4: BLO sc in all
r5: sc 3, dec 2, sc 3, dec 2, sc 6, dec 2, sc 3, dec 2, sc 3
r6: sc 1, dec, sc 4, dec 6, sc 4, dec, sc 1.
r7: sc 6, dec 3, sc 6
stuff
-r8 dec, sc in all
change color to black [color change video]
r9-23: sc in all
1st leg: fasten off
2nd leg [joining legs video]:
r24: sc7, ch 1, sc join in 1st leg after last sc, sc13, sc1 in visible v loop of ch1, sc 7
r25: sc7, sc 1 in remaining v loop of ch1, sc21
r26-31: sc 28
r32: sc 7, change color to creme/white, slst 1, sc 20
r33-35: sc 29
r36: (sc 8, dec) x3
r37: (sc7, dec) x3
r38: (sc6, dec)x3
add squeaker
r39: sc21
r40: (sc 5, dec) x3
r41-42: sc18
r43: (sc 1, dec) x6
fasten off
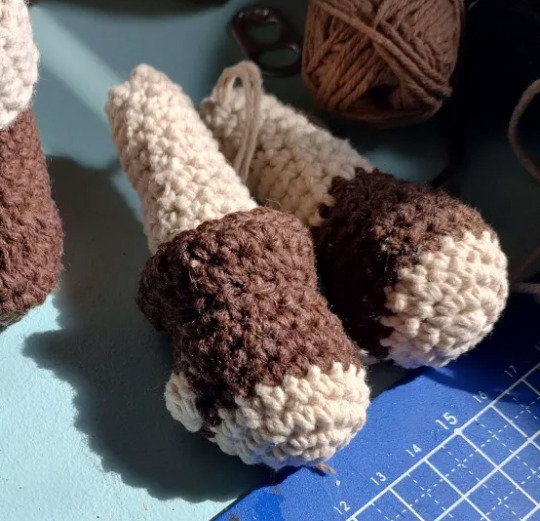
Arms (skin, dark brown)
i made the arms movable with button joints, but after looking at some videos i discovered that what i did is not called a button joint and i dont have a video explaining it, so i hope this drawing helps.
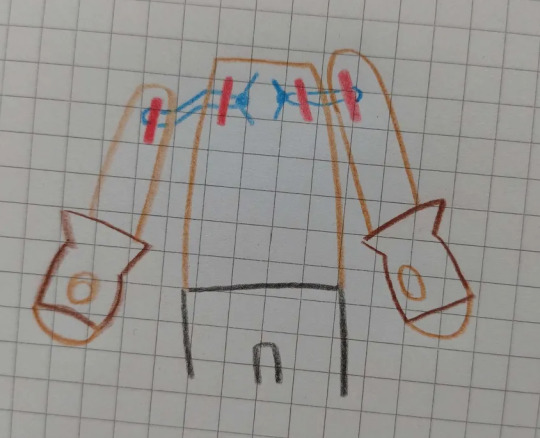
the red bits are the buttons inside of the arms and body, and the thread (blue for clarity, i matched it w the skin) should be pulled tight and finished off with a double or tripple knot inside the body.
or you could just sew on the arms that also works. but wait with doing that until youve finished the blouse as the hands dont fit through the sleeves. i have a seperate section on assembly at the end of the pattern.
start with skin
r1:sc6 in mc
r2: inc x6
r3(sc, inc)x6
r4 : sc 18
change color to brown
r5: sc 18
1st arm r6: sc 3, bobble, sc 14.
2nd arm r6.2: sc 14, boble, sc 3
[i matched the top loop to the bobble color but i think it would look better if u didnt]
r7: sc 18
r8: (sc 4, dec)x3
r9: (sc 3, dec)x3
r10 sc12
color switch to skin (you might want to do this a round earlier, i didnt initially plan on making the gloves flared, and this color change part can sometimes be seen and look kinda weird)
r11-14: sc 12
r15: (sc4, dec)x2
r16-19 : sc 10
r20: (sc3, dec)x2
r21: sc8
insert button joint
r28: (sc2, dec)x2
slst, sew shut
glove flare (dark brown)
r1: ch 15, slst join LONG TAIL
r2: (sc4, inc)x3
r3: sc4, inc, sc8, inc, sc 4
r4: sc 2, slst fasten off
sew 2 rows below thumb bobble
boots (light brown, dark brown, greyish creme) [video]
these are removable but they dont go on easily, so you gotta patiently massage the feet in there.
start with light brown
ch 7, start in 2nd from hook:
r1: sc 5, 3inc, sc 4, inc
r2: inc, sc 4, inc 3, sc 4, inc 2
r3: inc, sc 5, hdc inc 7, sc 5, inc 2
r4: slst fasten off. sew in holes/tails, fray ends for flat gluejob. trace onto cardboard for sole.
switch color to dark brown
r1: BLO join slst, BLO sc in all
r2-3: sc in all
glue in sole
r4: sc 8, dec 5, sc 12
r5: sc 7, dec 4, sc 10
r6: sc7, dec2, sc 10
r7-10: sc in all
switch color to greyish creme
r11-12: sc in all
r13: slst, FLO sc in all
r14-16: sc all
slst fasten off
flip the greyish creme flap over.
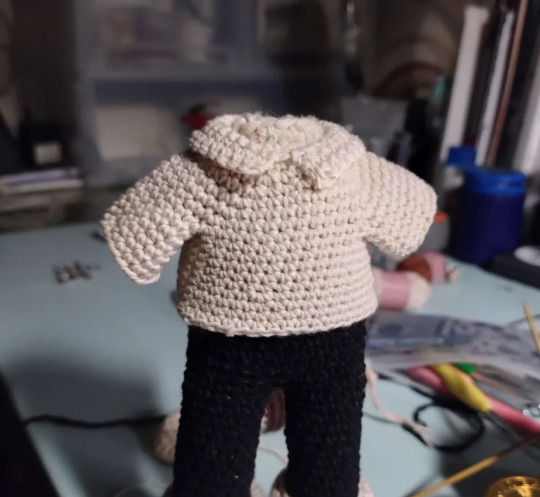
blouse (thinner creme)
this is a standard raglan pattern, if you need the whole thing bigger/smaller you need to have more/less chains at the beginning. this change also carries over to the collar. the increases are evenly spaced for me, and unless your doll has a very broad chest this shouldnt have to change.
if the arms need more space you need to either add more rows to the r3-7 part and/or add more chains in r8 (this part should fit pretty sugg around the body)
i was experimenting a bit w using BLO to minimize the gap where the sleeve and body seperate (r8). it worked p good but you can ignore it if you dont understand it and just sc in all.
r1: ch24, slst join.
r2: (sc 5, inc) x4
r3-7: inc in first of previous inc. last row should have 10 sc between increases.
r8: sc5, blo sc 1, ch 5, blo sc join in 1st of next inc, sc 11, blo sc1, ch5, blo sc join in 1st st of next inc, sc 5
r9: sc6, blo sc 1, sc 5, blo sc1, sc11, blo sc 1, sc 5, blo sc 1, sc 6
r10-13: sc in all (36)
r14: (sc8, inc)x4
r15: sc in all (40)
slst finish off
Sleeve
r1: join mid armpit, slst ,sc2, sc in the leftover bits from the BLO stitches, sc 1, sc in leftover BLO bits, sc2
r2-6: sc in all
collar
join left-middle front, sc 7, inc, sc8, inc, sc 7. turn
r2: sc7, inc, sc 10, inc, sc 7. turn
r3: sc8, inc, sc 10, inc, sc 8. turn
cuffs
r1: join mid body-facing side, FLO sc 20
r2-4: sc 20, slst fatsen off
Tunic (red brown) [tunesian entrelac crochet]
if you want to make this bigger i recommend keeping the same square layout, but making the squares bigger. its a bit of measuring and math to figure it out.
the tunic is made in tunesian crochet and i dont really know what written patterns for that look like so i hope this makes sense.
for a single square:
r1: ch4, start in 2nd back bump from hook. pull up a loop from ever back bump. you should have 4 loops on your hook total. simplestitch in all
r2-4: simplestitch in all.
r5: slst in all. fasten off
for the slanted parts i did the decrease by pulling through the middle 2 loops in one go on the back pass
this is how the full thing should look, its worked from bottom left to top right.
sew together the shoulders together, then sew in all of the ends
:) good luck
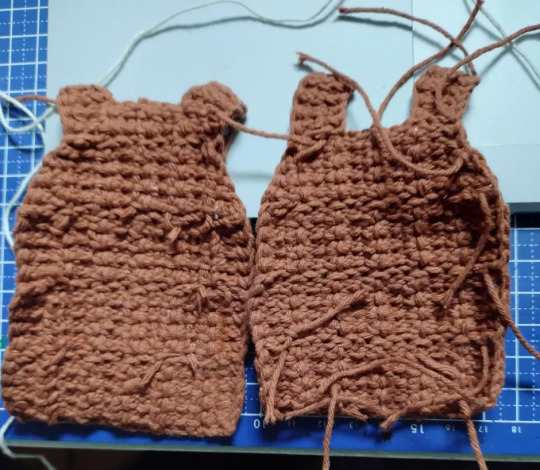
tunesian crochet has a tendancy to curl, so if you used cotton i def recommend blocking it
i defined the grid a little bit with a dark brown pencil.
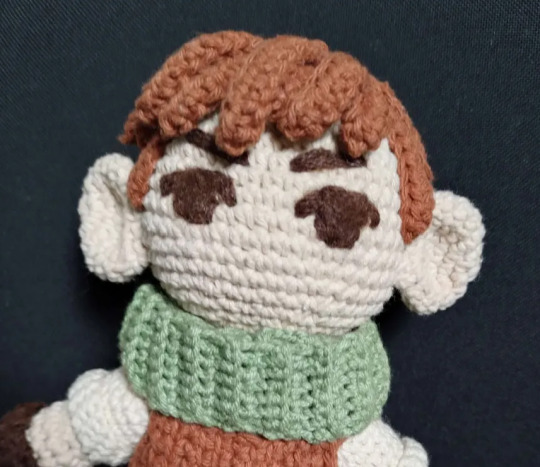
cowl (green)
BLO sc 7, repeat till desired lenght, then BLO slst join the last row to the first.
scalp undercut bit (dark brown)
r1: sc 6 in mr
r2: (inc) x6
r3: (sc 1, inc) x6
r4: (sc 2, inc) x6
r5: (sc3, inc) x6
r6: (sc 4, inc)x6
r7: sc36
sew on back of the head (recommend doing this before the ears and face, see end for more detailed assembly instructions)
hair (reddish brown) [hair video]
disclaimer, this is kind of a mess. the lenghts didnt line up the way i intended so i improvised by adding loose strands and spent a lot of time pinning every strand in place before glueing them down.
i used bison kit contact glue since its sturdy, transparant, flexible and waterproof. you can use hot glue as well, i just personally dont like it because its bulky.
r1: sc 21 in mc. join BLO slst
r2: ch 12, sc in 2nd from hook, gdc10, BLO slst join
r3: ch 12, sc in 2nd from hook, gdc10, BLO slst join
r4: ch13, sc in 2nd from hook, hdc 11, BLO slst join
r5: ch13, sc in 2nd from hook, hdc 11, BLO slst join
r6: ch 14, sc in 2nd from hook, hdc 12, BLO slst join
r7: ch16, sc in 2nd form hook, hdc 14, BLO slst join
r8: ch 18, sc in 2nd from hook, hdc 16, BLO slst join
r9: ch 18, sc in 2nd from hook, hdc 16, BLO slst join
r10: ch 14, sc in 2nd from hook, hdc 12, BLO slst join
r11: ch 12, sc in 2nd from hook, hdc 10, BLO slst join
r12: ch 10, sc in 2nd from hook, hdc 8, BLO slst join
from now on, join in the FLO's of previous round
r13: ch10, sc in 2nd from hook, hdc 8, FLO slst join
r14: ch10, sc in 2nd from hook, hdc 8 , FLO slst join
r15: ch12, sc in 2nd from hook, hdc 10 , FLO slst join
r16: ch12, sc in 2nd from hook, hdc 10 , FLO slst join
r17: ch14, sc in 2nd from hook, hdc 12 , FLO slst join
r18: ch16, sc in 2nd form hook, hdc 14, FLO slst join
r19: ch 18, sc in 2nd from hook, hdc 16, FLO slst join
r20: ch16, sc in 2nd form hook, hdc 14, FLO slst join
r21: ch14, sc in 2nd from hook, hdc 12 , FLO slst join
1x ch 6, sc in 2nd from hook, hdc 4
2x ch8, sc in 2nd from hook, hdc 6
2x ch 10, sc in 2nd from chain, hdc 8, slst in same, fasten off.
2x ch 12, sc in 2nd from chain, hdc 10, slst in same, fasten off.
3x ch14
pin all in place until it looks good, tie +glue loose strands first. then glue back pieces, crown, and lastly bangs/ top back layer. some of the lose strands go behind the ears, one is the left sideburn, and the rest is to cover up the crown. these pics are the best i can do as a guide, this was my first time doing this so i was struggling lol.
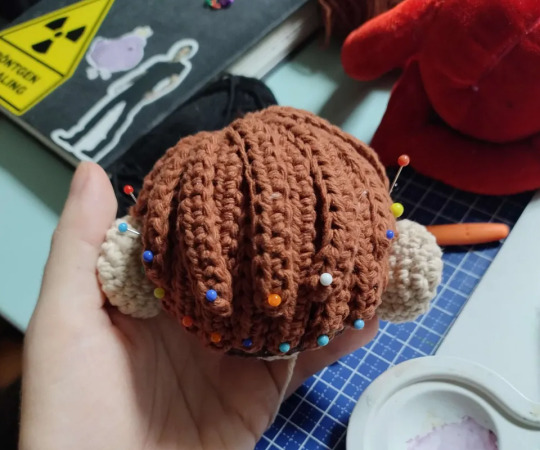
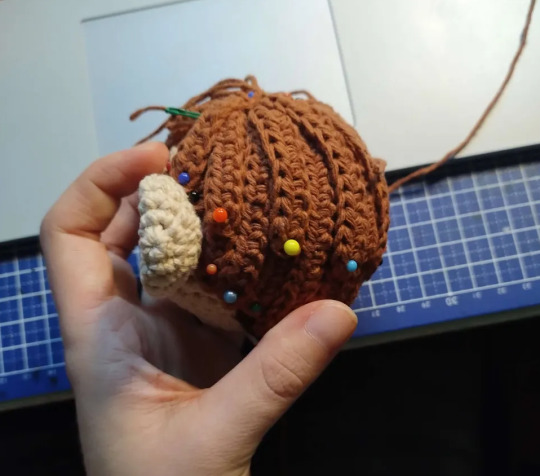
i didnt fully glue down the bangs and the top back layer bc i thought it would be fun if u could ruffle his hair, but my friend who i gave the plush to has significantly abused him (its been 2 days) and his hair is a mess so im gonna have to glue it down again lol. might as well do it all the first time if u plan on throwing him down the stairs or something.
Face
for eyes + eyebrows, embroider outline with dark brown, then needle felt [video] the inner parts w unraveled dark brown fluff. the dark brown i used was probably acrylic. cotton doesnt really work well for this.
Belt and pouch (dark brown)
the belt is a 3 strand basic friendship bracelet! [video]
sew together the ends and hide it with by sewing the pouch on top.
i didnt write down the pattern for the pouch, but from the top of my head its the same start as the squares for the tunic
r1-9: simple stitch in all
r10: simple stitch 1, decrease by putting your hook through 2 vertical bars when pulling up a loop, simple stitch edge 1.
r11: slst in all, finish with a long tail
use tail to sew together the sides, and sew the pouch onto the belt. use some yellow thread to make a button.
ASSEMBLY.
put on the blouse, put the arms in their place and finish the button joints.
put on the tunic, lace the sides with dark brown yarn, finish with a knot and hide the tails underneath the chest part of the tunic.
slide on the belt and boots.
sew the scalp undercut bit to the head
sew the ears to the head
tie + glue the loose hair strands behind the ears
glue the back of the hair
glue the back of the hair
glue the middle circle part of the hair
glue the top back layer and bangs
sew the head to the body
put on the cowl
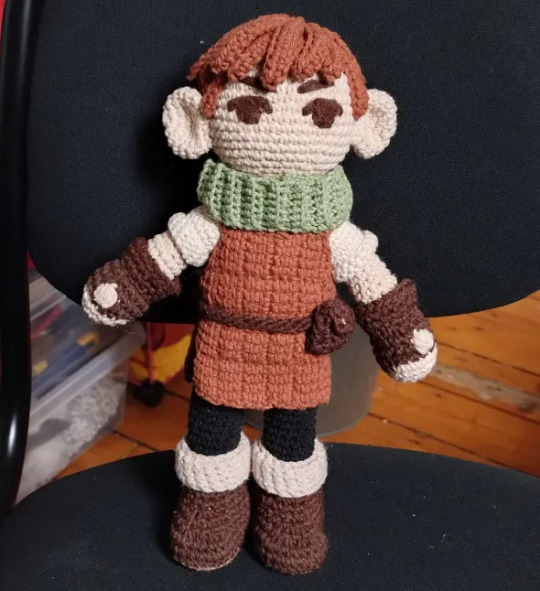
i hope this is somewhat clear, feel free to dm me is you have questions.
enjoy your squeakychuck :D
34 notes
·
View notes
Text
CHUNSIK MY BELOVEDDDDDD
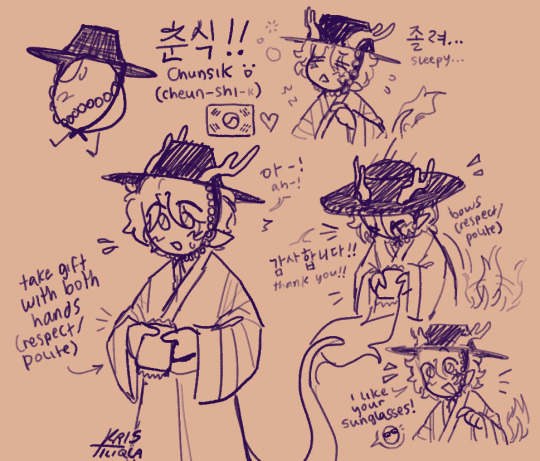
#im korean american and BRO#when i tell you that i was so fucking excited and happy#i actually cried bc i got emotional thinking about it all 😭#the language i hear everyday being shown to an international audience n shit :((( waaaahhh its so cool man#my culture as well :(( i was so fuckin happy (i shared so much random korean shit on my twt LOL)#i died when q said he had a surprise for acau and mentioned the eggs bro#like holy shit YES A KOREAN EGG 😭😭😭 ITS ALL I’VE EVER WANTED BRO#I USED TO PRAY 😭😭😭#i love chunsik sm he’s such a polite lil gentleman :(((#he dug tina n her horse out when she fell in a hole …#placed blocks when she missed a jump to a ladder …#and opened a fucking door for her 😭😭 he’s such a sweetheart#i love him sm u actually dont understand#anyway normal tags now LOL#qsmp#qsmp fanart#qsmp chunsik#chunsik fanart#chunsik the egg#qsmp korea#he is my everything 😭🫶
605 notes
·
View notes
Text
⚔️🦈
#twst#twisted wonderland#twst silver#floyd leech#suntails#adding tags retroactively bc i dont want to be too worrying. so ppl know my brother almost tried to . and i had to take care of it#and i got a 900 dollar medical bill today. and im unemployed. so it um. kinda broke the last straw. and twt has been miserable to touch#got in a small fight w my friend and i felt physically sick and ive been having little mini breakdowns like 3 times a day and im not used t#i dont get sad like this. i dont GET soul-crushingly upset. i dont get nervous. i normally j shut down and get thru stuff so im rly lost#sry for the vent i dont intend for it to act as such. i j wanted to give context for whats been going on bc a lot of ppl here r tumblr-Only#i rly liked this when i drew it bc i love silly meme outfits. i drew minions a lot when i was into hq so it felt like returning to my roots#im sure when i feel less empty ill be happy w this again
413 notes
·
View notes
Text
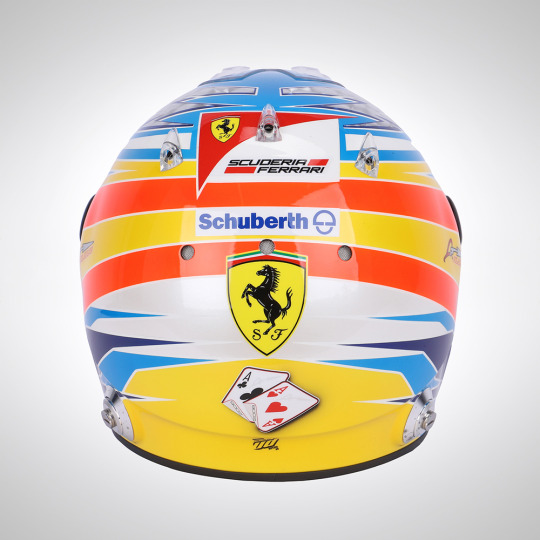
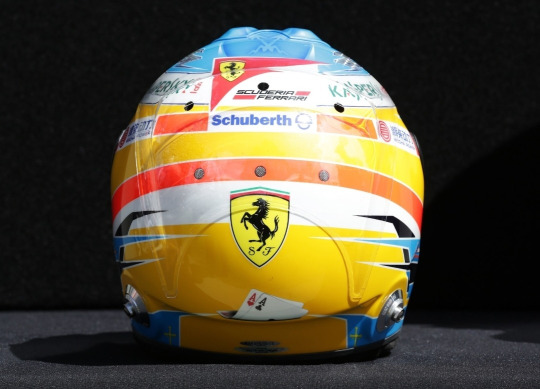
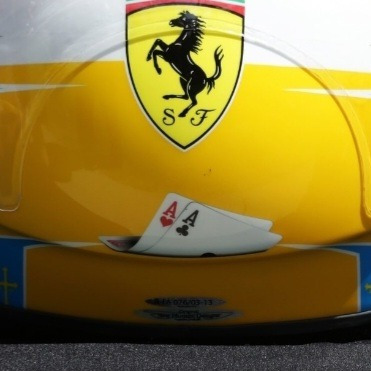
Fernando Alonso & His Relationship With Cards
I'm sure we're all familar with the cards on the back of Fernando's Vegas GP helmet by now, but did you know his relationship with cards goes a lot deeper?
I. Magic Tricks
You've probably seen or heard someone at least mention Fernando's propensity for card tricks. As far as I can tell he was doing them(publically) as far back as 2003 all the way to as recently as 2018. Even once performing a card trick, with a condom and a teddy bear(!??!?!??!!), in front of Valentino Rossi who said "How was that possible?"(x)
But how did this start? According to James Allen, "Fernando admits to having been heavily influenced by his grandfather, a mercurial figure, who taught him magic and card tricks, still one of his passions away from the race track."(x) And I'm not sure the validity of this one, because I couldn't find an actual source, but apparently he once said: "My parents are responsible for the two things I like doing most - driving and magic tricks. They bought me my first go-kart and a magician's kit."
In several interviews he described it as his hobby off track, and that he loved learning new tricks and surprising others in the garage with them! So clearly cards are pretty important to him both as a hobby but also to who he is as a person since they've been with him just as long as racing has.
II. Card Symbolism in His Helmets
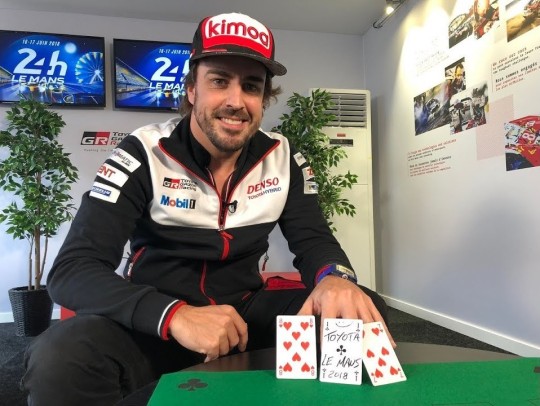
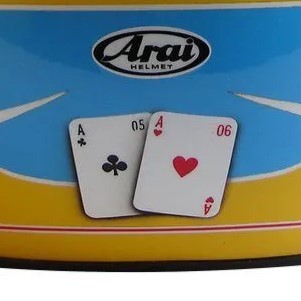
This is the reason I originally made this post, but I thought I should also explain the origins of his card fascination first. As I said, we probably all remember the cards on the back of his helmet in Vegas, but did you know that wasn't the first time he had cards on the back of his helmet?
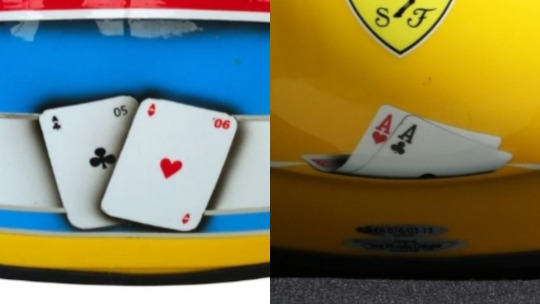
From 2008-2013, he used to have a pair of cards on the back of his helmets. The symbolisms of the cards themselves as well as the evolution of their design is really fascinating to me! Even more so with the recent development of the card choice in 2023.
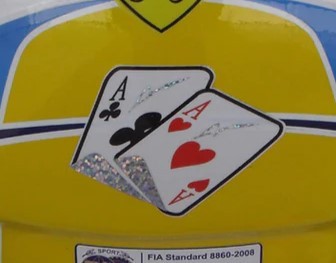
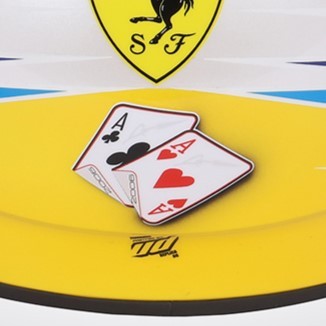
Fernando said he wanted to reference his two titles in some way on the back of his helmet and after his friend sent him several ideas, he decided on having two cards(an ace of clubs and an ace of hearts, sometimes pictured with 05 and 06 on them as well), saying: "I picked the cloverleaf [the ace of clubs - Ed] to give me luck, but the only pity is that it doesn't have four leaves!"(X)
2008.


Here's the very first appearance of the cards! They're displayed flat, with the 05 and 06 clearly visible
2009.

Very similar to 2008, but with a slightly different design, and they're maybe a bit more straight with less shadow?
2010.

This is the first major change! I was sad they didn't have the years on them anymore, but then I realized they're sparkly to match with his signature lightning bolts on the top of the helmet!!
2011.
Honestly I'm still somewhat unsure if this is the actual 2011 helmet? It's pretty difficult to find clear photos of the back of helmets from older seasons. It's easiest to find them on replica sites or auction sites so I'm not 100%? But anyways, I like that this has the championship years on the underside of the cards
2012.
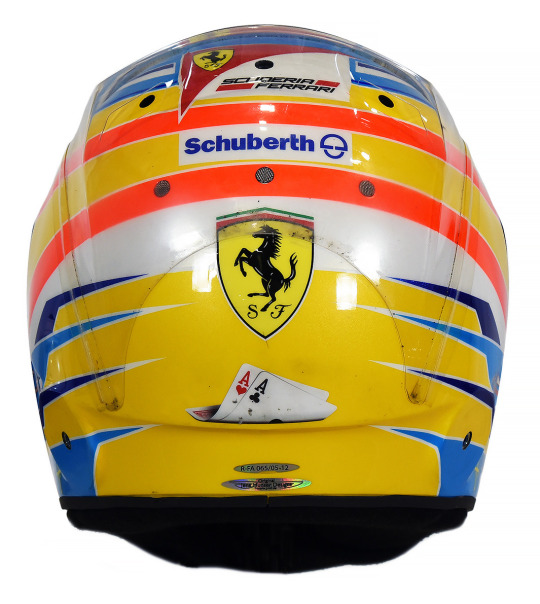

This is when I started getting weirdly emotional about the helmets. Do you see how they've progressed from being a centerpoint to being curled up and sad at the bottom of the helmet? Not listing the year anymore??
2013.
Same thoughts as 2012. And after this season, they cease to exist (just like his ferrari chair in the garage, WOAH CALLBACK), until cards make a reeappearance in his Vegas helmet, albeit in a different form
2013 Monaco(Honorable Mention):
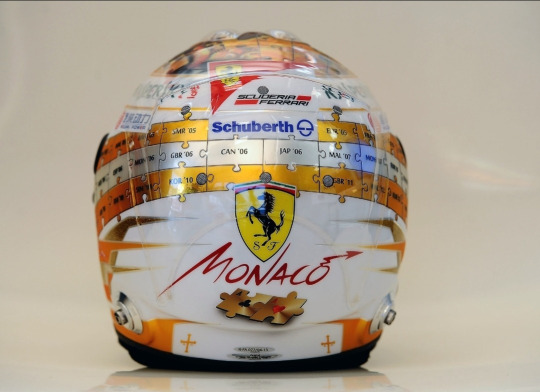
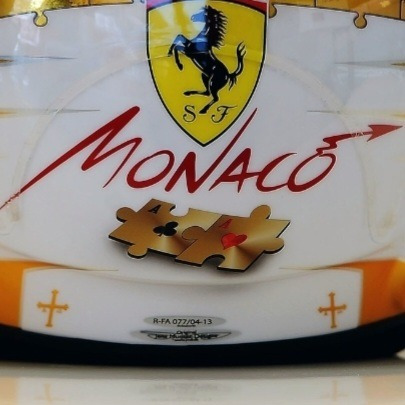
For some reason 2013 helmets were easier to find proper pictures of, so I happened to witness this absolute beauty. The creativity of this helmet genuinely blows me away??? Wanting to keep the card motif, but making sure to incorporate it into the rest of the puzzle piece design?? Mwah! There was another special 2013 helmet but they didn't change the cards at all so I really applaud this one
2023 Las Vegas(The Return of The King):
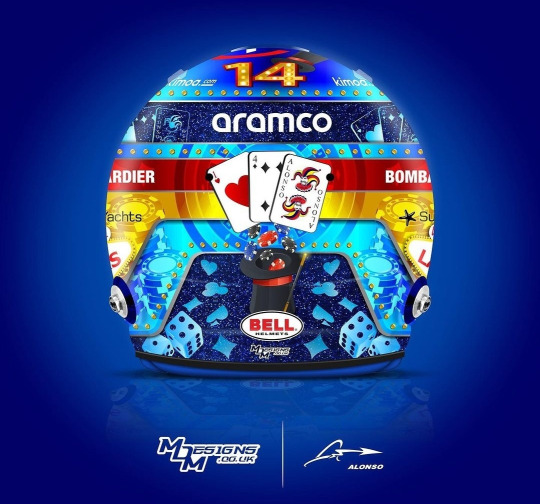
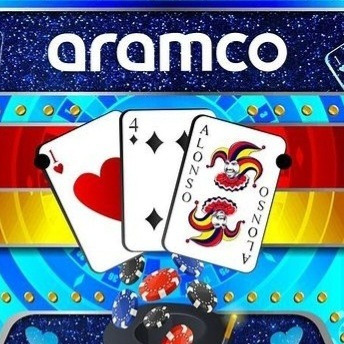
The magnificent return! But look! The cards are different cards! Instead of being two aces, it's now an ace of hearts, a four of hearts(his driver number of course!) and, the, now iconic, representation of himself as a Joker. I literally could not believe my eyes when this helmet was released and I saw the Joker card, what a fucking silly old man....I really wonder if he felt nostalgic having cards on his helmet again or if he didn't think about it all and was just like, "ah cards because Vegas!!!"
III. Why Does This Matter?
*The rest of the post was factual, this is moreso my personal thoughts on the symbolism of the cards/designs
This post spawned from me recently watching the 2010 Bahrain gp and noticing "hey wait a minute...are those CARDS ON THE BACK OF HIS HELMET!?" It's a really tiny detail that's unfortunately covered up by the HANS device pretty much whenever he's wearing the helmet, so it's really difficult to spot! But I became fascinated with the fact that he had cards on his helmet before that recent helmet, and now here we are!
There's something to me about how the design of the cards evolves over the course of six seasons from the cards being front and center to being smaller, more folded up and closer to the bottom of the helmet. As I said, the 2012-2013 ones genuinely made me depressed because it feels, symbolically, like his hopes for getting another Ace are becoming more and more unlikely and falling away until they eventually fall falt and fade away entirely after 2013 and disappear for basically a decade.
But when they return? They're not the same cards! Instead of representing Fernando's championships, they now represent him as a person, displaying his driver number and his persona of being a Joker!! Though I do think it's interesting he happened to keep the Ace of Hearts, even though he talked more about the Ace of Clubs before. I'm not sure it's actually this deep in reality, but I like to think that it's him not letting his championships(and the lack thereof) define him, but rather letting who he is as a person shine and be the centerpoint instead! But on a sadder note, as @suzuki-ecstar said to me, maybe the Aces aren't there anymore because he's lost all hope for a chance at a third Ace entirely :(

#yes its finals week and im up to my eyes in coursework but instead decided to spend like 5 hours researching and writing this post#nah bcs i actually genuinely put more work into this then I think I have all semester dsfjdskjg#that thing about him using a condom and teddy bear in a magic trick genuinely had me crying with laugher. actual tears rolling down my face#<- HOW!?!? WHAT WAS THE TRICK?? its literally inconceivable to me what he did. oh if only there were pics UGH#anyways!! this post was a lot of fun to make!! i really really love the symbolism and design of helmets so this was a rly fun project#and i also went down a lot of rabbitholes while make this and saw many very weird articles from yore#i feel like i make an equal amnt of deranged posts abt seb and nando but i dont know why nando is gifted w all my well researched projects#<- i.e. chair post. that was the same level of research as this one but at least this one i could find actual sources about....#idk theres smth about the extremely long history of nando's history that evokes research posts like this KLAJSLSKDJ#theres just so much that i dont think I ever really see people discussing! so i must create.#haha what was that joke tag i wanted to make abt my researched posts? I think:#normal posts that catie normally makes in a normal fashion#<- one day ill go back and actually tag posts w that. bcs the amtn of research compared to my actual schoolwork is so unwell#fernando alonso#fa14#f1#formula 1#catie.rambling.txt#we do a little bit of f1
280 notes
·
View notes
Text

look at them having a completely normal non-manipulative friendship what good friends they all are. look at those happy smiles and ignore the red lines im sure the red has no symbolism at all hahaha
#mishapen draws#qsmp#jaiden fanart#took a few days to figure out exactly what i wanted to do with this and im really happy with where it turned out :]#i normally dont put so much effort into a piece but i wanted a cool new banner#my fave detail is absolutely the little bits of red though#if you look very closely there's a little bit of red in the cucus smiles and eyes#(and a little bit of red on the arm behind cucurucho's back- hiding evidence)#and the red that emphasizes jaiden's smile is extra bright red#enjoy the island etc etc#i dont normally use texture backgrounds or leaf brushes but i totally get why people do holy crap they're SICK#the perfect lil bit of background noise hehe#i had a lot of trouble with the colours until i put a greyscale filter on everything and realized that jaiden's values blended her into#the bg. it got a whole lot easier when i paused to figure out the values and then added the colour#overall i think im happiest with jaiden's face though she just. she looks so happy#but that fucking red.....#okay tag ramble over godspeed nerds remember that if your colours look fucked up you may just need to experiment with the values
235 notes
·
View notes
Text
Why does tumblr automatically recommend least used tags first what is its fuckin damage
34 notes
·
View notes
Text

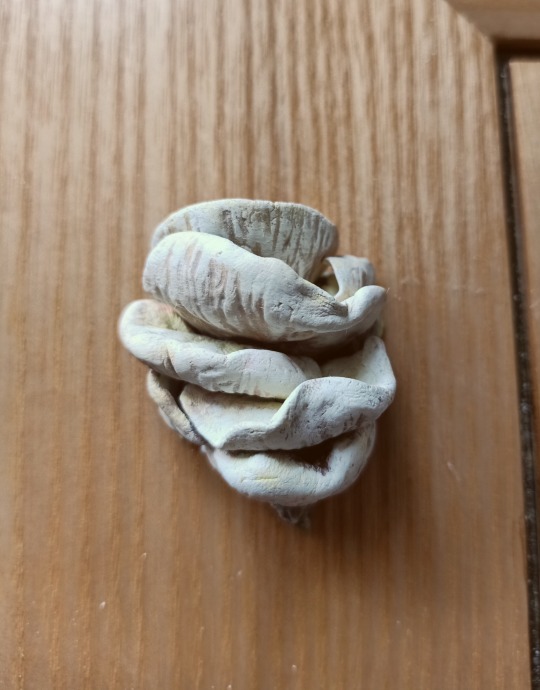
made a mushroom pin that's also the hardest object to photograph on earth. I still have a brick and a half of air dry clay left so I hope to make more :]
#bakuspecial#I dont think I have a craft tag lmao. well#really wanted to make the gills on these shrooms more uh. physical. but I did Not have the patience for it fskjdfhdj#next time hopefully I will have more.#also the matte spray is really cool... its cocomelon shit to me it really does dry matte......#the other pins in that first pic are from a saigon art shop and a prize for a queer art contest I placed in two years ago#I need a good way to display them lol. mostly so I dont lose them#need to make like a scroll of fabric or something to hang on the bookshelf#my vision for this thing is a nice wide brimmed hat thats earth toned and I paint it to look like a log#and figure out how to embroider moss on it. and then mushroom pins#its genuinely not my style at all lmao I just wanna try and make it#alright I should go to bed soon.... Im gettin another stretch of sleepin at normal human hours for a while. best to make use of it#have a good night lads! making some fucked up little things really is so fuckin good for ur brane n mind
76 notes
·
View notes
Note
Am I misunderstanding that post because a lot of fat fetishization Does dehumanize fat people I'm not sure i entirely understand your tag
thats basically what im saying. i absolutely agree that the fat fetish community enables dehumanisim + fatphobia and that is a problem which should be talked abt considering how rampant it is, and i dont like people using "oh those purity obsessed assholes just hate us for Loving Something Different" as a shield. fetishization is a specific term for that kind of dehumanization + objectification where someone is reduced to a pure sexual object instead of being viewed as like, a person, with their value only being filtered through the sexual pleasure other people get out of their bodies, and is often accompanied by massive amnts of fatphobia and a general intense disrespect for fat people ioutside of sexual contexts as well. and its something that is absolutely worth talking about especially from fat women who are most often the targets of this kind of treatment
but ive absolutely seen people take that conversation to mean "fetish = bad" and that is what annoys me. theres a difference between having a type, having a kink, and fetishization. and the way anyone who speaks affectionately or sexually about a fat person or fat bodies is immediately slapped with the label of DIRTY FETISHIT is something that comes from a well-meaning place, but more often then not just says "being attracted to fat people is Not Normal, and therefore impossible to do in a way that isn't fatphobic, therefore fat people should not be seen as sexually desirable". even if the intentions are good, the result ("fat people are not viable sexual interests") just contributes to the existing stigma around fat bodies.
#if you go into the tags of any of my posts or even the post we're refferring to rn#youll see tons of people goibg 'im nervous to express attraction to a fat person/character bcz i dont want to be called a fetishist'#like. this. well meaning effort to defend a marginalized people from fetishism is often just used to keep the concept of#fat people having sex as a dirty shameful freak thing that Normal People dont think about#which. obviously bad.#idk. theres nuance
39 notes
·
View notes
Text
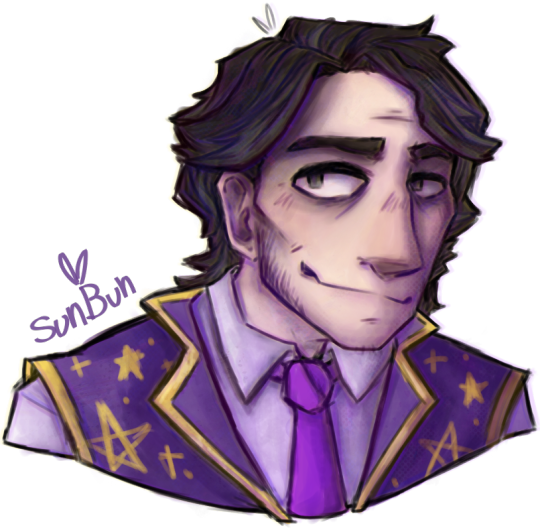
#worked up some silly shit#i uhhhhhh wanted to see if i could draw a face outside of my normal like. shit#and return back to my watercolor brushes and all the fun shit i used to do to my art#and who better than this fuckin thing#i dont really draw william! i really want to uhhh i just like#cant draw people very well and i dont tend to uhhhhh finish them#BUT IM REALLY EXCITED TO HAVE THIS DONE#IT DOESNT COME ACROSS IN THE TAGS#IM VERY VERY VERY EXCITED THAT I HAVE THIS DONE#AND I LOVE LOVE LOVE WORKING WITH SUBTLE TEXTURES#AND WATERCOLOR PENS#AND!! AND BRIGHT COLORS#AND FUNKY LINEART#i love love love doing shit in this style#how do people draw like shoulders#i'll never know....#fnaf#fnaf fandom#fnaf fanart#fnaf art#five nights at freddys#five nights at freddy's#fnaf william afton#my art#myart#fnaf purple guy#william afton#purple guy#the man behind the slaughter#is that an actual tag oh my god
21 notes
·
View notes
Text
dont worry guys he promised me he'll holler if he sees anything
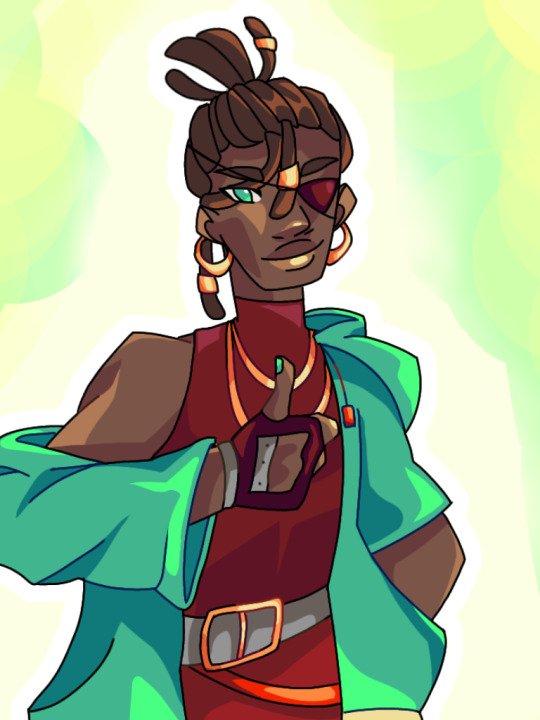
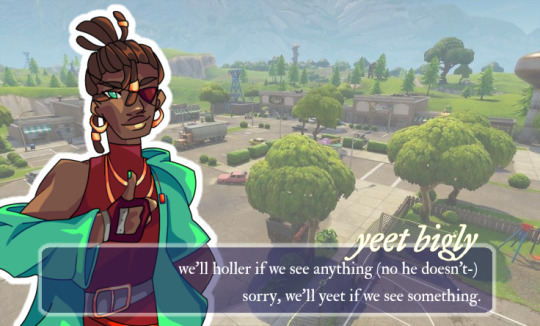
#this was so self indulgent i just wanted to try the monster prom artstyle#i was actually planning on drawing killa as well because i adore her but bro i cannot be bothered this took forever#anyways yeet bigly fans win!! im pretty sure this is the 5th post with the tag yeet bigly these past 7 days which is actually insane#ive gotten so used to no content at all about my boy that i feel personally flattered that people are posting about my silly#anyways if looks ok if u squint! just dont look at it too hard..#it looks questionable if u look at it hard☹️#urghh normal tags#dndads#dungeons and daddies#yeet bigly#we absolutely love to see it#shoutout to that one person who rolled a nat 20 and somehow turned yeet bigly into a disney princess this is for you bro#somehow..#i dont remember ur url☹️
123 notes
·
View notes
Text
tactful cropping..
#..because i seriously fucked up the anatomy BAD so instead of posting it in the same format that i have for the rest of them uhhhm. ummmmm#i just cropped it becuase oh man. did i fuck up.#listen im just still not over being so used to drawing people that are not . super muscley#so i basically have like a sketch and then i have to shrinkwrap it so it looks like a normal person because drawing big muscles is just wha#i automatically wanna do. and the way#ons#gureshinweek2023#gureshin#guren ichinose#shinya hiragi#my art#i originally wanted guren to be the one holding shinya in the other one but i kind of. well . gurens the one with the longer hair and i kin#needed that to cover...........#its not like i wouldnt paint that i just dont want it to be tagged as not safe for work just because its a chest so .#tactful covering too i suppose#tfem kissies
25 notes
·
View notes
Note
i think u should draw a tohri nishikikouji. person or bird idk same tohri. maybe give him a hat

he was so real for literally all of that
#my art#hatoful boyfriend#tohri nishikikouji#tohri.my man#i wanted 2 try and use some brushes i dont normally use to get a different texture#i dont think im about to switch to using them forever but it was fun ^_^#its been soo long sinc e i drew him i should draw him more#no idea whats going on with the hat i was imagining one of those floppy sunhats and. genuinely cannot tell whether it looks like one or not#anyways.YOU just got tohri nishikikoujid tag one of your friends to totally tohri nishikikouji th
37 notes
·
View notes
Text
Sorry for the uptick in system stuff Im lowkey struggling and need to see system positivity posts or I'll explode
#malik's rambles#okay i know my ass is gonna vent in tags rn so . tw for that !!#iwill never shut up i missed tumblr tags so much wow#itsnot their fault and like . like i dont want to blame them . but its so isolating being and living this way#ill always be grateful for them and I know its just my brain trying to cope and like !! its not their fault but this sucks so bad like wow#also doesnt help that besides how scared I am and how I just . wanna be normal . I feel like I sound insane to other people#it constantly feels like everyone is laughing at us and is just playing along with our “roleplay thing” because they dont wanna bother#and like !! im trying really really hard to be positive about it and just live as well as I can . all of us are !! but it makes me feel like#ridiculous . it feels like everyone'll laugh and think we're playing pretend. which shouldnt matter people will always be assholes !!#I dunno aough im rantingso hard rn . and masa2 wont share which is fine but imscared and worried and scared and aauahhggggggggg#ik the point of the disorder is to hide memories from me so i can function but like . man this suckss9 bad#okay enough of this . Imgonna watch monsters inc i love monsters inc
15 notes
·
View notes
Text

click for better quality!!
rosetail + bonus kits / request
name one thing better than a good story . ill wait . there isnt
#my art#do not copy trace or steal#rosetail#cinderpelt#brightheart#brackenfur#thornclaw#THIS ISNT MY FIRST TIME DRAWING THE FROSTFUR KITS TOGETHER but i think it got deleted with my old art blog#i kept all of the files of course but . i think ive improved a lot in terms of anatomy and design#BUT ANYWAY do you think the elders told kits/apprentices embarrassing stories about themselves to make them feel better about like. how#theyd do in their apprenticeship/as a young warrior#or just embarrassing stories to get them to laugh#LEADING TO THE POINT I WANT TO MAKE my grandma told me she met her life long best friend when they got into a fistfight in high school#idk who won but but ohh my god it was always my grandmas favorite story to tell and she loved her best friend so much#i dont think my grandma would mind me telling tumblr i think shed find it funny . i also was her favorite grandchild so i also get an extra#pass on that . and it was never up for debate either everyone on my dads side knew and when she passed and my grandpa brought her jewelry#up for us to come get he called for me first and said she wouldve wanted me to get first pick#WHICH SOUNDS LIKE I GOT MORE THAN I DID but i didnt i cant wear normal earrings and thats what she had a lot of#this is just me talking about my grandma at this point in the tags BUT its relevant (to me) and she was also a hoot
261 notes
·
View notes
Text


The colors of the copper on blackberry dye seem to have shifted from maroon to a very rich milk chocolate brown--which I will hardly complain about, since that's a hard brown to get. I do hope I get something more permanently reddish/purplish with alum--that's what I'll try next. I'm just waiting for the 9 pounds of raw fleece to arrive.
Last night I carded a lot of that blackberry dyed fleece and then put it on the blending board with about half of the white (which was the previous distaff dressing) as a little stripe to one side. Idk, just curious how it'll turn out and seemed more interesting to spin that way. Carding first definitely helps with consistency--both colors were willowed first and put on the blending board, but only the brown was carded as well, and it is much easier to keep smooth and least kind of even.

The one improvement of this phone camera over my old one is that it has a timer setting, so I can actually show where my hands normally are (sometimes anyway). Fairly comfortable although my distaff hand is starting to cramp. Might just be one of those days or might be too heavy for me, but the shape at least is good.
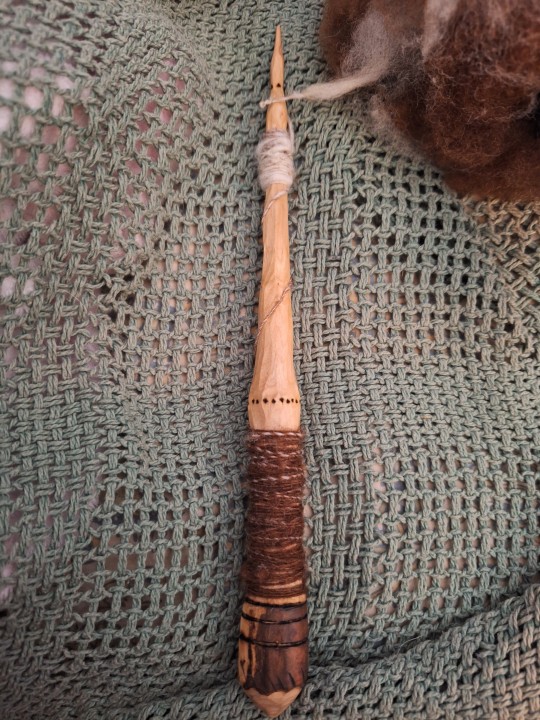
You can probably see that the white is still all over the place, but the brown is pretty even, just with lumps still on occasion. Also, the new height of this spindle means it's perfect for lap spinning rather than impossible to lap spin with, so I'm very happy about that.
#spinning#handspun yarn#distaff#supported spindle#id tag the breed name normally but i dont know what this stuff is (its some of the more aged wool i have in my stash lol)#natural dyeing#blackberry#if you are wondering what is up with the banners its an attempt at anti-radfeming my posts#since they insist on reblogging them and blocking seems to do nothing#hopefully they will be effective bc i love them and my fiance sent them to me ❤️#if not tho we'll phase into tasteful cock drawings#and if that doesnt work just straight up dick pics#its my blog and i love cock so thats not a problem for me and would actually probably improve morale#not jumping straight to it because im gonna assume most of the people who enjoy my fiber arts posts dont necessarily also want dicks#on their blog#but me not having to see radfem trash reblogging my experiments and research obviously takes priority#i use those terms loosely but hey i am writing it down. and trying to get answers to questions. so im pretty sure technically i am#conducting experiments and research at least on occasion#and now i have to go back to work. if anyone wants to mercy kill me on the way out the door id really appreciate it
47 notes
·
View notes
Last Seen Blogs

vanessanevada
VS Nevada
onetobeamup
head of the bus seat fan club
pleasemakemecool
Jean Marie
k1ng0k
im in pain
housethot
a cosmic disaster