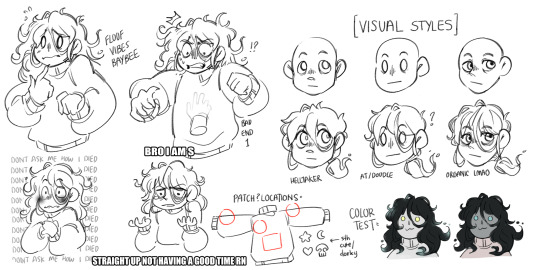
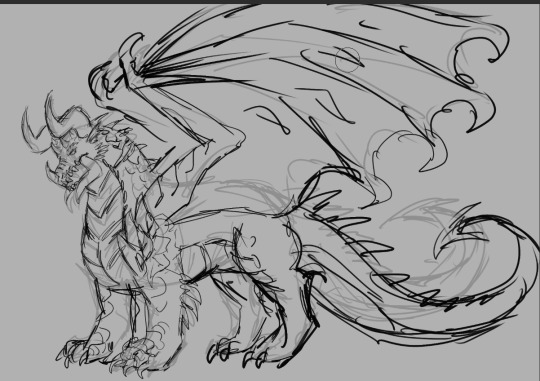
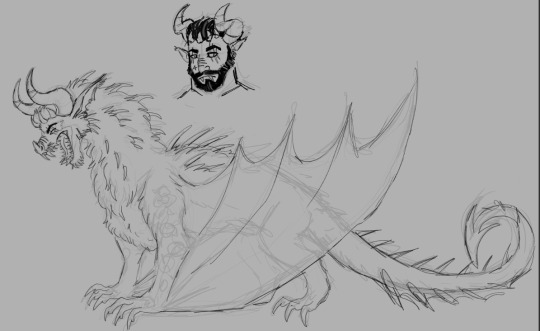
#maybe maybe MAYBE i'll get around to rendering like. one of these sketches but
Text

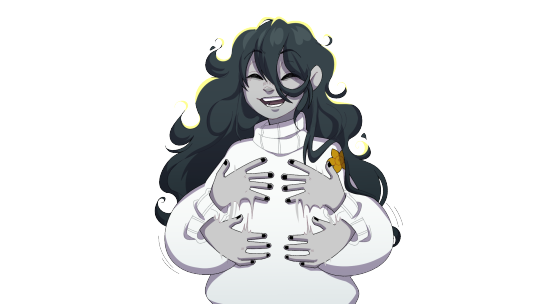
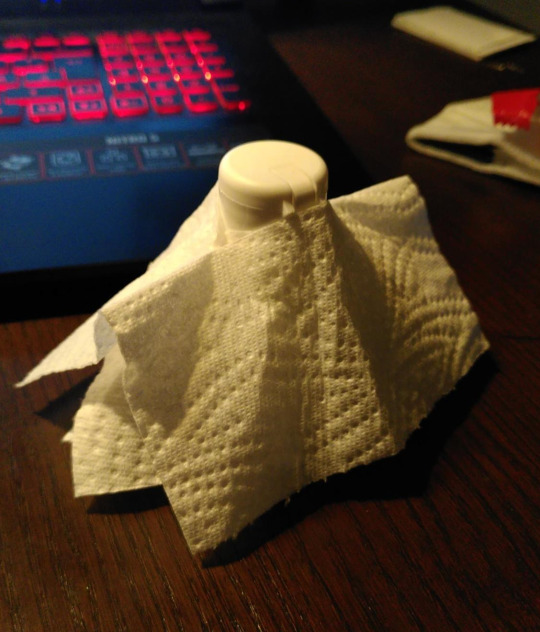
plush cow sketches that i don't think i'll have time to finish, but would like to share anyways :0]
seen earlier on patreon ☁️💕
#my art#furry#fursona#anthro#furry fandom#oc#cow#bovine#plush#plushie#sketch#doodle#traditional#oc: cow#i rlly wanted to focus on like#the texture. the weight of the fabric and the way it pulled#maybe maybe MAYBE i'll get around to rendering like. one of these sketches but#got a full queue and not a lot to post rn so#a lttle treat from my sketchbook many months ago for y#you*#:03#also YES that is a webkinz cow in the corner. of course it is.
389 notes
·
View notes
Note
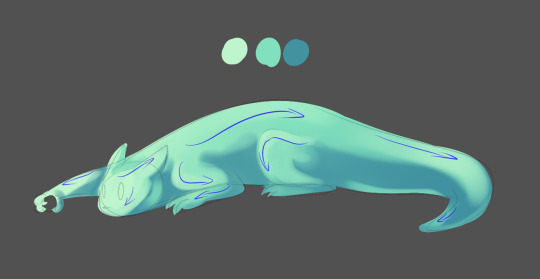
What’s your render process? It’s so pretty ^.^
Hehe thank you!!!
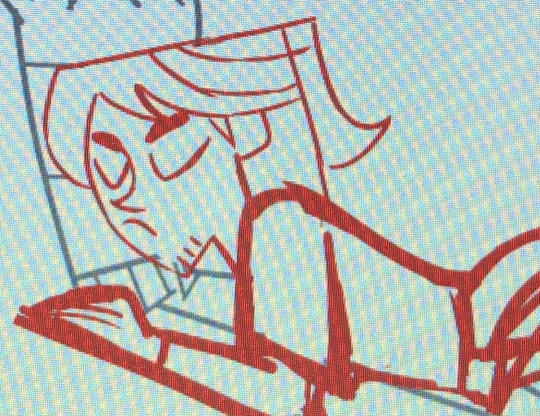
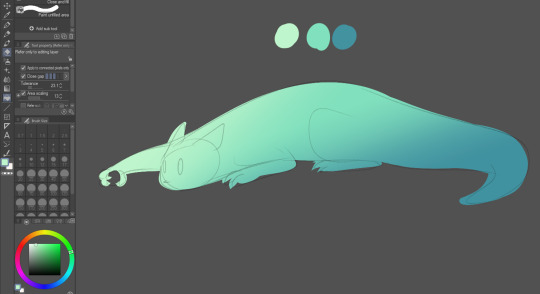
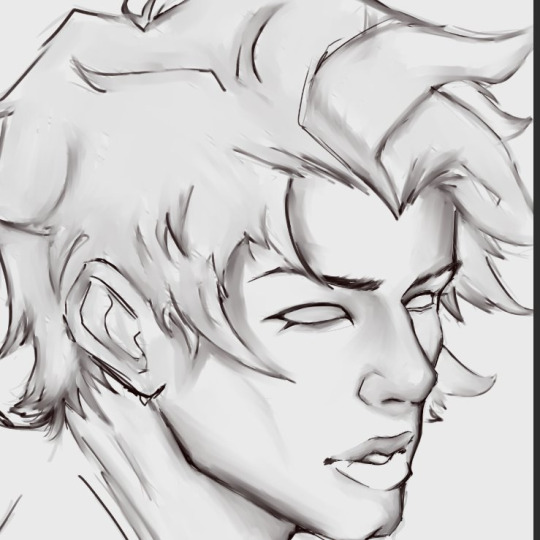
I'll use an out-of-context Night drawing to share the process XD
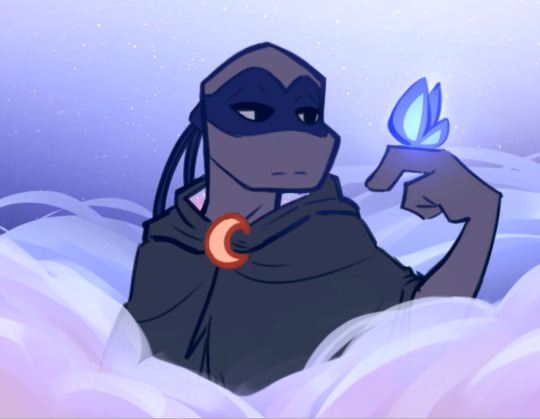
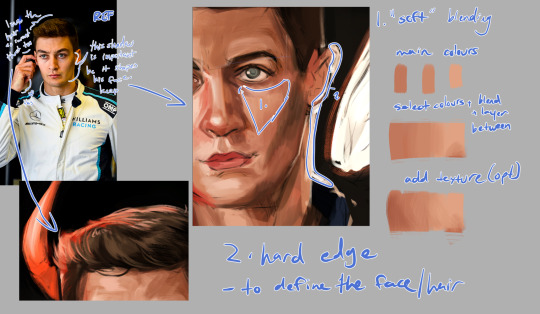
So first I'll make my sketch, line art, and then my flat colors. A lot of the time, I'll add in some gradients and subtle glow at this stage just to add in some more color variation for when rendering comes around. I also dont draw in all the details yet — like the string that'll be around his brooch later or his face marks. Whatever I feel like will get in the way of the painting process and will be easier to add in later, i leave out for now.
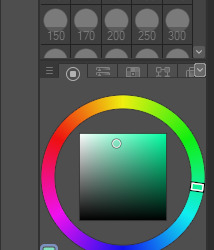
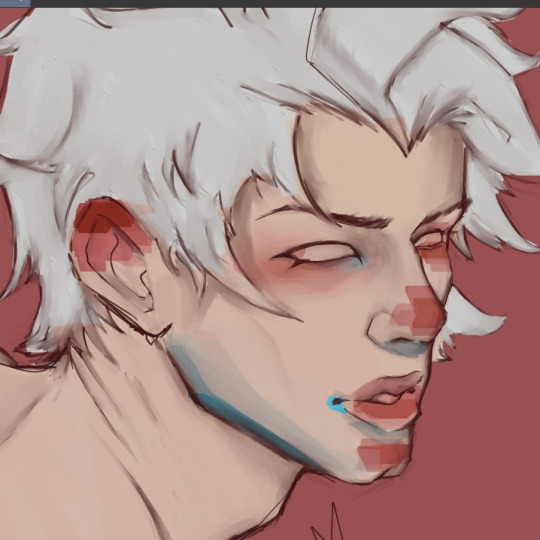
Now the ✨️ugly portion.✨️ For the lighting and shading, I use a paint brush. For the shadows, I'll usually pick them from the wheel myself, rather than using a Multiply layer. Then, for the lights, I'll almost always use a nice bright orange color on a Luminosity layer (note that this is on Paint Tool Sai — the equivalent to Luminosity is an Add layer on most other programs) and slap those on where I think the lights go.
Shit's really messy at this point djejejwj but that doesn't matter toooo much. 80% of the drawing comes from the next step, the painting. It doesn't matter much if ur lights and shadows are messy rn cause it's gonna get all cleaned up anyway aha.

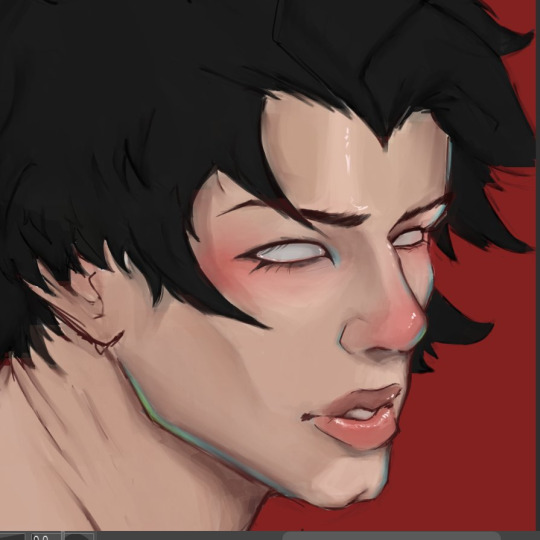
And now we're onto the painting, and this is the point where we merge everything down into one layer and start going ham :0. Usually, what I do is I take Paint Tool Sai's Water brush + Marker brush and start blending out all the colors and cleaning everything up. I color pick whatever part of the drawing I wanna clean up, then I'll blend it out and define the shapes until i feel satisfied with how it looks :DD this part of the drawing took around 2 to 3 hours maybe? Like I said, this is most of the drawing process aha
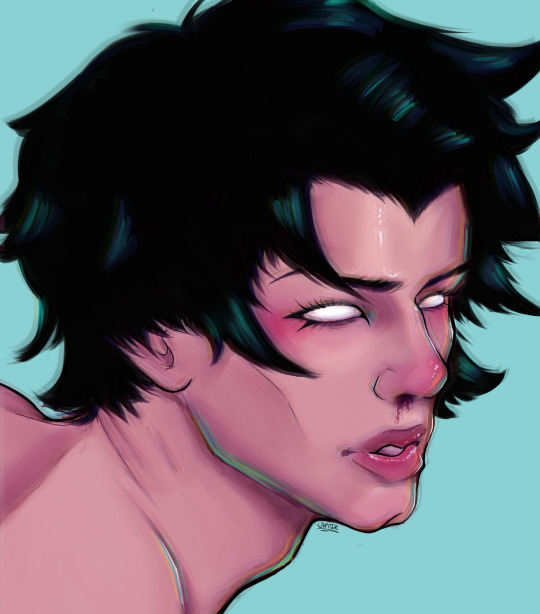
AND NOW THE BEST BIT, THE COLOR CORRECTION AND FINAL DETAILS !! This is where I make the glowy bits REALLY glow, and make the colors look a little more cohesive :0. Also, I up the contrast more, make them darks look darker and them lights look lighter >:D
And that's pretty much it, I think 🤔🤔 if there's anything anyone would like me to go into more detail with, I'm more than happy to answer :0 I like playing art teacher hehehehehe ❤️❤️✨️✨️
271 notes
·
View notes
Note
How do you organise the process of creating a character? like, to me its too confusing, i dont know what i do first because there are TOO MANY THINGS TO DO, like backstory, personality, looks, what they like, so what would be the “steps” to make them?
(Since @isabellaswork asked the same thing recently I'm tagging you here, hope that's okay!) Omg I'm flattered I'm the person you'd wanna ask such a big question ;v;!!? Honestly the process is different for everyone, but I'll give it a go <3 This is how my process usually goes:
Personality first, backstory later. Flesh out the concept of the character before deciding their origin story if that makes sense.
Build a moodboard for your character! The more ideas the better!
Time for visuals! Sketch out multiple iterations, looking at the moodboard for inspiration. Colors go last.
Finalize! Once you've got your final sketch + colors, draw a proper illustration and see if you vibe with the design. Repeat previous steps if necessary <3
Extra: Since you've got the design and story down, add some fun facts. This is where interests, likes and dislikes go!
I'll use my VN characters as examples below in case someone wants it in more detail! Mychael (Mushroom Oasis) and Alma (Lift Your Spirits spoilers!! + horror imagery) process ideation under cut:
Usually I start with personality first. Because for me, when you first meet someone, you see what they're like in the present; their past doesn't matter as much until you get to know them. I can decide the backstory later so it doesn't limit the personalities I'm playing around with. Of course I must have gotten the idea from somewhere so these two things work in tandem most of the time.
Then it's just a matter of how they look!
After deciding on personality traits, I start by collecting references from everywhere, even the smallest of things. I think of how I want them to look plus how they would dress. Anything goes at this stage, so just go buck-wild gathering ideas!
Here's a moodboard for Mychael:

This one was for Alma, from their normal self to their monstrous self:

Then it's time for drawing and doodles. As I sketch, I look back at the moodboard I've made and pick out things I like, while drawing things really loose. Copy paste if I need to!
I've shared the ones for Mychael here, here and here! Here's some sketches for Alma from last year:
This part takes the longest but is always the most fun! Don't feel limited by what you had initially, just test out ideas! Here are the final designs!
Mychael(s):


Alma(s):


Then once I'm happy with the design I can flesh out the backstory as much as I like!!! so long as it fits the presentation of the character in current time. Of course this process can differ when you already have a story in mind and need characters to carry out the plot, but I'm definitely not big-brain enough to make an all-out story like that </3 I just enjoy designing characters visually haha
Oh and just for fun, I like to sprinkle in some extra (but kinda unnecessary) background info. It can be the most mundane thing but it gives them more life (to me at least!) Maybe they drink flat orange soda, or enjoy riding trains at night, or hate the smell of french fries, or think apples are disgusting etcetcetc.
Of course there's like, tips for professional character designing like silhouette, shapes, proportions but I assume this ask was for a more casual approach <3 That's all I could think of if I were to describe my process,,, I hope that answers your question!
To recap:
Start with personality traits and decide backstory later. Or work them together as one. It's more concept than visuals at this stage.
Assemble a moodboard for inspiration. The more ideas the better! Look up anything that might relate to your character if it helps.
Sketch, sketch and sketch again! Keep things loose and free. I usually start from the face, to clothes to accessories. Colors go last.
Finalize! Put everything together in one rendered drawing, and see if you vibe with it. You can always go back to previous steps if you're still not happy with it.
And you're done! :-)
#mushroom oasis vn#lift your spirits vn#bts#cheea chatter#i rambled so much so i hope the TLDR helps fhjds#q
158 notes
·
View notes
Note
Hii me again. I'm not sure if I sent the ask I'm talking about on anon, so maybe that's why you didn't see it? It partially got answered with a recent ask you got anyway so no worries. I was just wondering if you use 3d in your process and if so, how? I've seen other illustrators use it to varying degrees and it seems like a really helpful tool to push your work.
Oh that's so weird! No I periodically go through my asks in chunks and I didn't see anything like that. I've had a few people in the past few months send me asks that looked like the second half of something else with no context, so maybe it's Tumblr fuckery. Sorry!!
I recommend learning Blender so you can help sculpt shapes and render lighting onto them in order to get the weirder/more complex shadows right. You can also apply colors onto the things you sculpt in order to see how the colors act in different lighting. It's pretty much an invaluable tool to me as it keeps me from having to problem-solve too much. I did a lot of digging around in my house to build references to photograph but it was just impractical to achieve the things I want to a lot of the time. I still do that, and you would not believe how many goofy photos I have of my husband in the poses you've seen me paint Astarion in lmao...
I do think that it needs to be used in moderation if you are a more beginner artist- I think that using 3D is DANGEROUSLY close to becoming a massive crutch for a newer artist and improper usage or over reliance on it can lead to stiffness or artificial looking colors. You need to be able to train your eye to create compelling compositions by bashing things together, and train your hand to replicate/add/subtract as needed from your references with an organic feel.
I will say this as a total committer of this crime myself in the past, it's VERY easy to tell when an artist relies too much on, for example, Clip Studio Paint posed models as bases for pieces without a good enough grasp on their fundamentals. And I also used to prickle when I saw more advanced artists warn of this, so I do think maybe it just has to run its course sometimes, because I know that using 3D for reference seems like an easy-button.
I've taken a lot of in-person classes for live figure drawing and painting, as well as just totally done drills, basically, on sketching and painting from life before relying too much on static imagery/3D/etc.
I often fret over every piece I do looking too stiff even still.
You have to do a LOT of the boring hard stuff the old fashioned way. And I regularly go back to it over and over when needed.
For example, I recently did a stupid amount of rose petal/flower studies deconstructing and painting ugly little paintings/doodles over and over because I know that I've been horribly weak at painting flowers for years (actively avoiding them). And I've been doing a lot of floral stuff lately due to that.
Whenever I start a new piece in new territory, I know it's going to mean several 3AM nighters where I have two other tabs open on Photoshop where I test out different textures or do a couple of studies. I'm working on a piece of my OC right now that has a lot of gore/medical instruments and I've been working on testing out different methods for shiny metal painting and some anatomical studies. I'll come to a snag in a painting and go "here we go" and work through it one piece at a time.
My Halsin piece, "Secret Spot" in the hot spring, was a massive undertaking with a lot of these moments. The Karlach x Dammon piece took 3 times longer than it should have due to me just having to go back and fix things knowing I could do better after doing some studies.
Ultimately I personally find art tutorials to be quite useless overall once you get to a certain point, unless they are teaching the use of a tool/software because you HAVE to figure out what works for you. And even then I use Blender like a monkey with a keyboard, I suspect, because I've just bruteforced through it, so I could probably use a tuneup from a good teacher on that haha.
I hope this helps some, and sorry if I overstepped if I sound preachy.
22 notes
·
View notes
Note
how do you make your oc screencap edits?? i also have a td oc and i dont really know where to start 😭
ok so!!! i use firealpaca which is just my usual drawing program. so i'll keep using it as a reference for my steps but of course im sure whatever similar program u use should have similar features
i'll be long winded for funsies as usual 💕
FINDING YOUR SCREENSHOTS
the key to decent td edits is to flat out trace screenshots whenever possible. stock pics will do, but of course itll be a lot more fun and less obvious if u use a screenshot from the show and put it into your new context
in terms of making your ocs, you will likely have to do what someone once called "frankensteining" your pics. this is where you use pics of other characters for their specific features and put them together since your oc doesnt have official screenshots to trace. this also absolutely comes in handy w canon characters! maybe you have a pose but u need them to be sitting. so try to stitch together two different pics to get what u need
it will look very scary but just trust the process. here is a random example i made using a dawn screenshot (where i removed the background), gwens eyes and eyebrows, and kittys hair

the sketching part is semi-optional. if you think you can freehand the lineart then go ahead but i assume your oc wont be a complete copy of something found in canon and therefore you will have to draw the newer/different features (such as the hair or the outfit) at least a little bit. and sometimes when i frankenstein the pics, my brain gets all overwhelmed so sketching makes me feel better jfbdjdnd
(in terms of my own oc, i screwed myself over bc his body type is so unique i gotta freehand it like all the time 😭
you can see i traced his head from his render (ALWAYS DO THIS BTW!!! TRACE CONSTANTLY), but then the body was freehanded using a canon pic as reference because tracing the pic wouldve been inaccurate)
THE LINEART
yes the iconic td thick, sharp, flat lineart. i achieve this by using a normal pen tool, turning off the pen pressure, and then turning up my pen stability to 40-60 (very high). you could use a curve tool if that works for you! but i would suggest against that for ALL of it bc the tool just wont respond well to rly drastic curves and such
the pen size varies on the pic. if the characters are close-up, itll likely be a bigger one. and then the characters' little details and facial features are usually a slightly but definitely noticeable smaller size. for the most part, ive had the bigger pen size at 13 while the details are around 9. or big size 10 and smaller size 7.
heres my technique:
as u can see, all of my lines go a bit too far. this is so that when im done drawing them, i can go back in and slowly erase where they meet and get them all sharp and pointy. this is just how i personally do it lmao. when it comes to facial features and other stuff that doesnt connect to anything, just get a close look at your reference to see how thick or how thin the edges get and do ur best to erase the edges to the point where they should be
THE COLORING
not much to it! the bucket tool is the best way to go. again just get a good look at your references just in case any parts have the lineart also colored in
THE BACKGROUND
you can find some generic td background pics on google or u could get them from the show and try to erase any character in the way lmao. if ur recreating something like, say, a dunc/ney scene w a different ship, then its very tedious but youll have to do your best to erase the canon characters and piece the background back together.
i like using the smudge tool a lot for this!!! just kinda pulling whats already there towards the characters. to save time, put your drawing visible on a top layer as you do this so that you dont have to edit the ENTIRE background, just what you need
THE RENDERING
ok so heres a big one imo. after youre done, youre gonna have to fuck up the quality at least a little. well not that u HAVE to but like..... to match the standard quality of a td screenshot? ive never seen a td screenshot in perfect hd quality outside of stock art. so u could blur ur drawing just a little bit. maybe add in the teeniest bit of chromatic aberration (just set it to 1 or -1). not ALL of them together but u do whatever u gotta do
my personal favorite is blurring just a little and then saving it as a jpeg (around 65-80%) so that its pretty crunchy and looks all the more real
obviously not a NECESSARY step but just something to point out. especially if ur background isnt the best quality so the characters have to match it
this one from yesterday i didnt even redraw topher bc i was lazy and he looks fine enough. i just put danny onto the pic to cover the other character. so i blurred danny a little bit and then saved it in a pretty low quality so that they match one another. look at those pixels. that crunch.
SO THE TLDR IS just trace and copy your references as close as possible. if you cant find a reference for your character, try finding another character w something close enough
26 notes
·
View notes
Note
do you have any tips for rendering for digital art?
Hello! Sorry for the late reply on this ask I was thinking about how to answer it. I guess I can give general tips about just painting/rendering but feel free to ask for specifics if you want!
For me, I think the most important things for rendering are making sure the values and edges/shapes of the shadows in any drawing look correct. Just roughly laying out colours/where the light/shadows are with a (usually) big brush size to start off. I can usually just eyeball my light and dark colours under my sketch but sometimes I don't feel like it so I'll use a 'multiply' layer on top and mess around with that (I'll just think of the approximate vibe of the colour/mood i want then work from there.

Anyways, for actually painting over top….it kinda feels like second nature to me now. I think about what shapes/interesting areas I want to keep in a work (to keep me excited about what I'm drawing) and also the ones that need to stay (for like…"realism", loosely). Then I layer on colour until most of the sketch is mostly hidden. I just try to slowly build up colour and blend until I'm happy, add texture along the way. If I feel like the values or colours are lacking I'll use an adjustment layer or multiply layer to fix problematic areas. I will try and layer with a big brush then move to a smaller one for details but most of the time I paint with whatever and fix as I go hahahah

Really just slowly building up until everything looks right or I get sleepy hahahah.
It's kinda hard to explain but here's a real time video to kinda see everything in action
youtube
other tips:
zoom out once in a while or have another window with the canvas open (navigator or just window > canvas > new window for other programs) just to check everything looks good
test new brushes and techniques just to keep things fresh
look at what other artists do and maybe try to integrate some of their techniques too
uhhh yeah thats about it
Again if you have anything in specific you wanna know feel free to ask ^_^
10 notes
·
View notes
Text
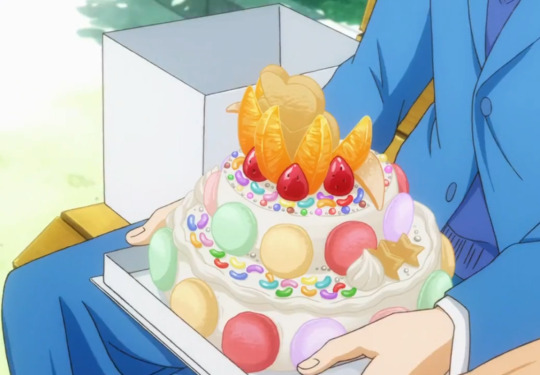
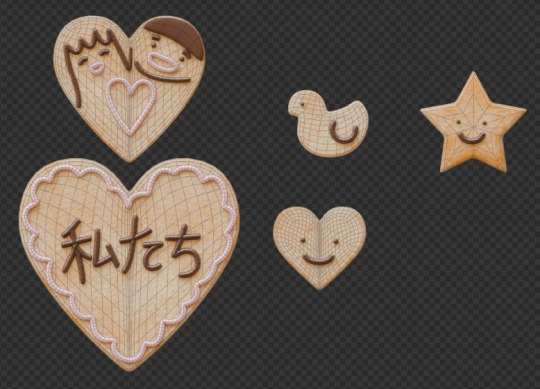
Process - Sunakawa Cake 🎂
A little breakdown of how I made my 3D recreation of the "thank you sunakawa" cake from Ore Monogatari ~

1. Collecting reference
Aside from referencing stills from the anime, I came across the official cake sketch from Madhouse's website! It was really helpful in identifying all the toppings on the cake and other details.
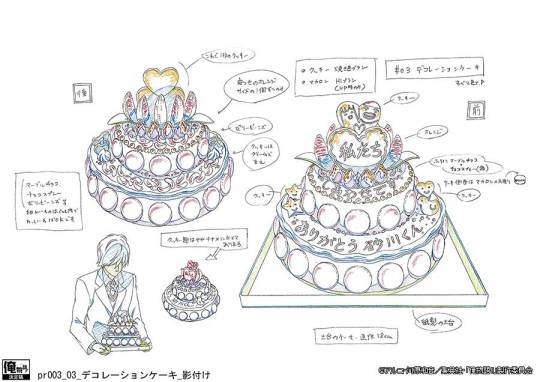
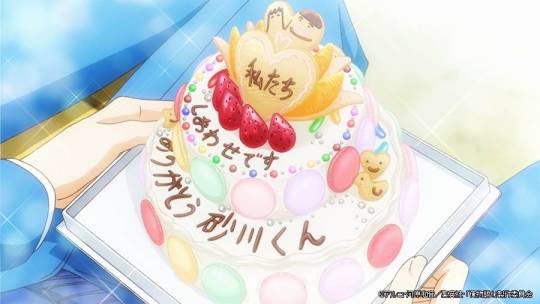
Next was collecting real-life references of all the ingredients I needed to make and taking notes of the shapes, textures and variety.
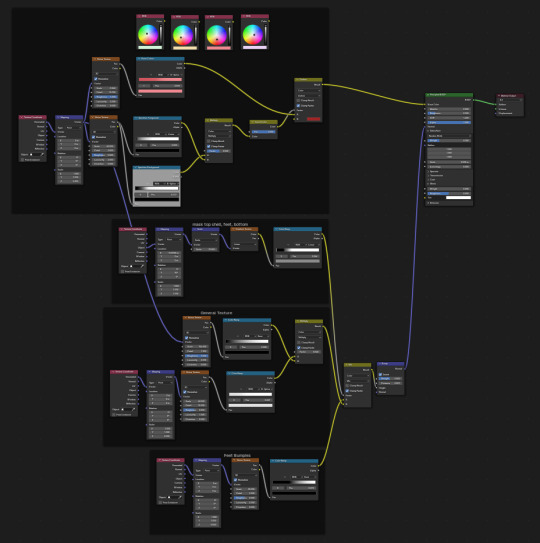
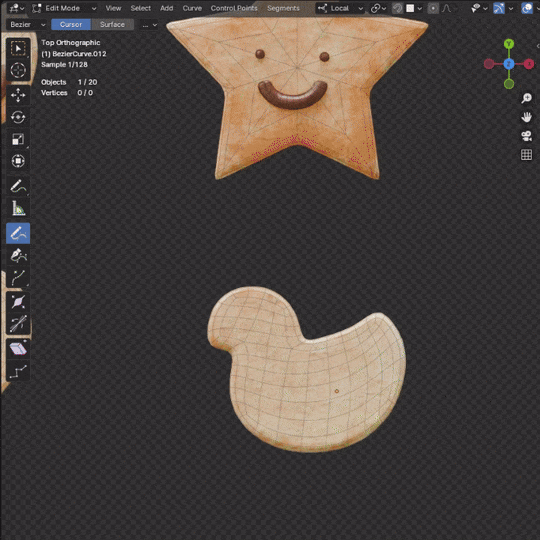
2. Modelling & Texturing
I go back and forth between modelling and texturing, and jump all over the place so I'll break things down based on the toppings/elements:
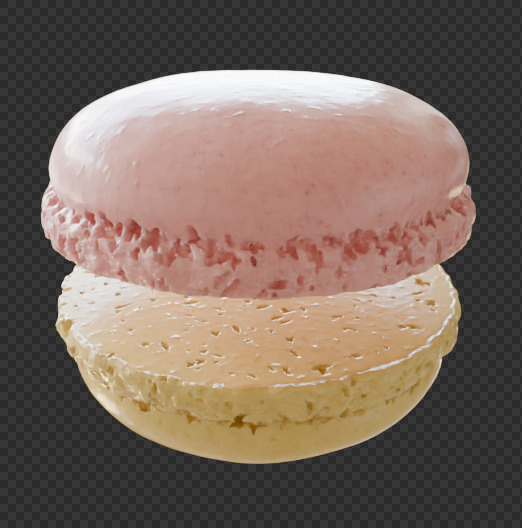
A. Macaron
I referenced Canosie Lab's macaron tutorial here, tweaking the process a little bit; using one mesh instead of two and using particles to distribute the boolean meshes. I ended up with LOTS of vertices, so I made a lower poly version of the macaron and used those to avoid bogging down the computer. As for the texture, I used Blender's procedural nodes, utilizing mostly the noise texture node.

Above: The first row are the lower poly versions of the macaron and the second row are the original meshes with around 200,000 vertices each o_o
B. Cookies
There's not much to it here; I just modeled the cookies and used procedural textures I've made for a previous project (I'll post that project soon!!!)
The icing is made using bezier curves with some bevel depth. I used the draw tool to draw on the cookies. I did the same for the writings on the cake.
C. Strawberries
I've previously made strawberries for another project so I just used those but baked them to a lower poly mesh first. I used Canosie Labs' strawberry tutorial as reference :) I initially used a scaled down version of the regular-sized strawbs, but decided to make a proper mini strawberry 🍓


Left: with scaled down regular strawberries, Right: proper mini strawberries.

I made them super shiny with lots of subsurface scattering to make them look juicy and gummy-like -- not the most realistic but I think they look cuter like this :>
D. Orange slices
The orange slices were the most challenging to make! Did a lot of trial and error to get that pulpy texture oranges have but I managed using a combination of voronoi nodes :") If you look at the pictures below, you can see how the orange looked in the beginning vs. at the end after I refined it some more.
They look fine from a distance but a little janky up close; maybe I'll do a breakdown one day once I figure out a proper node setup.

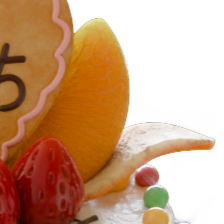
Above: before & after
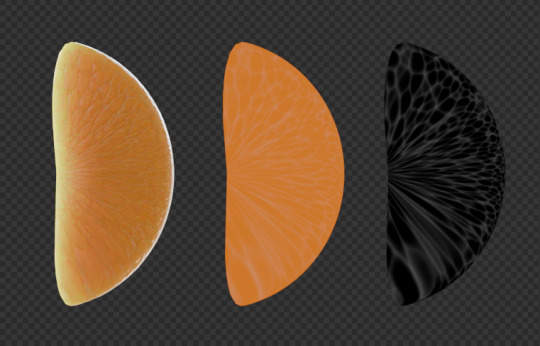
Left to right: rendered, colour only, B/W
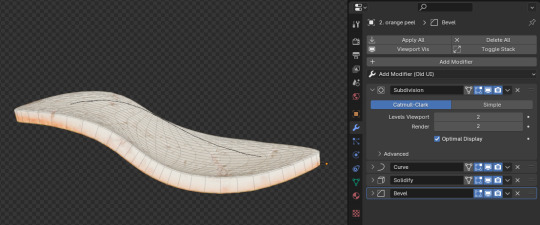
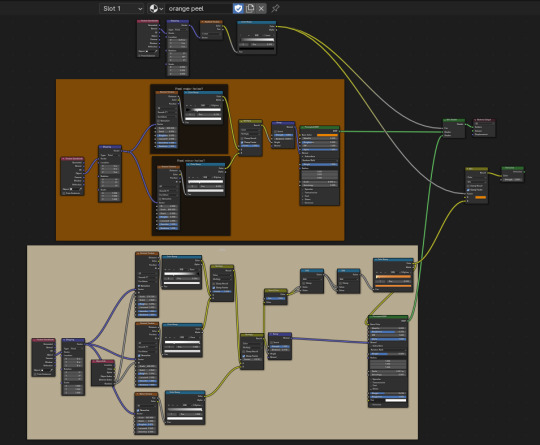
E. Orange peel
A simple plane with a solidify and curve modifier. What's most important here is the texture! I used two different shaders (one for the pith another for the peel) combined using a mask.
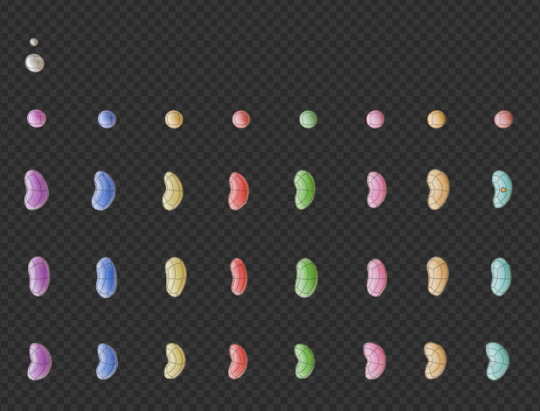
F. Jelly beans & choco marbles
A tweaked subdivided square for the jelly beans and subdivided icosphere for the choco marbles. The two use pretty much the same shaders but the jelly beans have more subsurface scattering.
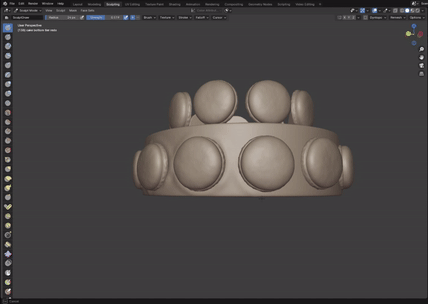
H. Cake
After placing all the toppings, I sculpted the cake (using the multires modifier) a little bit to model the cream that's displaced.

#ore monogatari#sunakawa makoto#process#3d modeling#artists on tumblr#blender#blender 3d#3d model#cake#b3d#3d art#3d render#3d#digital art
19 notes
·
View notes
Text
I've been doin skirt math
Or: how to seriously overthink a piece of cloth.
I have complained repeatedly about how the Venn diagram between goth fashion and fair trade/sustainable fashion mostly(1) being two circles which are not touching. But recently-ish I've gotten into sewing and I decided that I will finally take my destiny into my own hands.
I want to make a handkerchief skirt!

It's litcherally just two squares on top of each other with a round hole in it.
How hard could it be?
(1) = I'm sure there must be some, but they are few and far between. I am exaggerating for comedic effect.
Measuring!
I decide to make my skirt roughly 40-60 cm long, starting from my midriff, meaning the distance between the middle and the sides is 40 cm and from the middle to the corners is 60 cm.
Finished, it might look something like this:
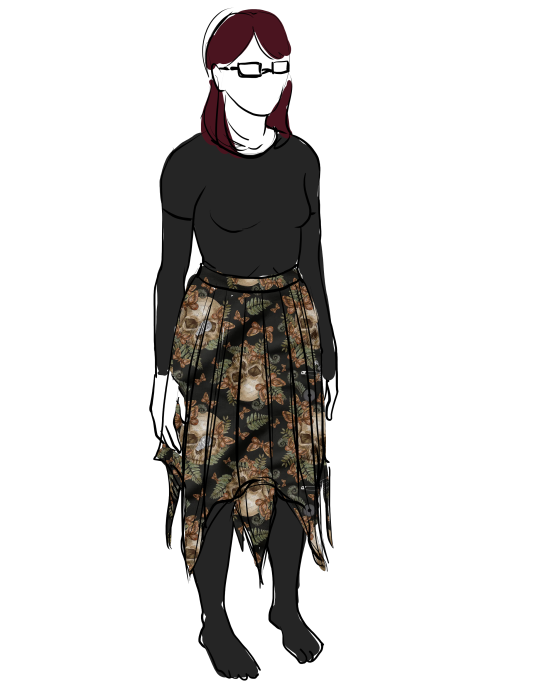
Behold, a rough rendering of the skullchicken's physical form.
Also: did you spot my first logical mistake in planning the cloth? :)
2. Planning
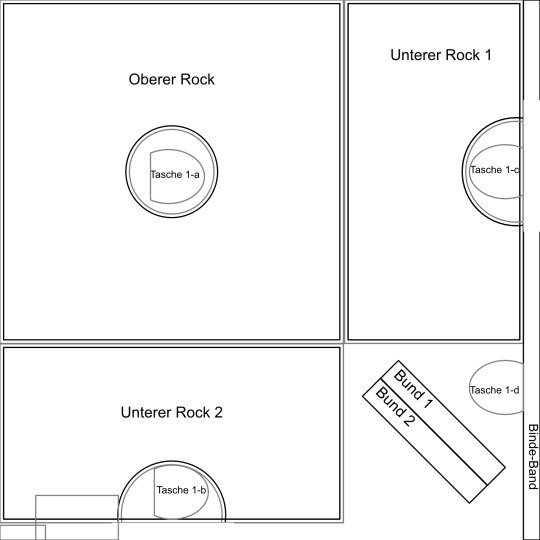
I plan out my pieces on a 150 cm/150 cm square, feeling real clever for dividing the second square like that. The diagonal rectangles are for the opening of the skirt and the long rectangle on the side for the tying band. I even have space for pockets! Amazing!
It's only when I want to draw in where I'll put the pockets in, do I realize that, uh, there isn't any space for them.
Cause you see, if you make a square with a hole in the middle, that means there will be a hole in the middle to subtract from your ultimate skirt length!
... my skirts a mini-skirt :c
Okay, back to the drawing board.
3. Measuring, again.
Alright! So I can fit it tightly on a 150 x 150 without the pockets and if I do some trickery with the opening, I miiiight get it all in - ah fuck, forgot about the tying band.
I could just do a 150 cm x 200 cm, but that would net me 50 euro just for the raw materials and a lot of leftovers.
I mean, I guess, but... yeesh.
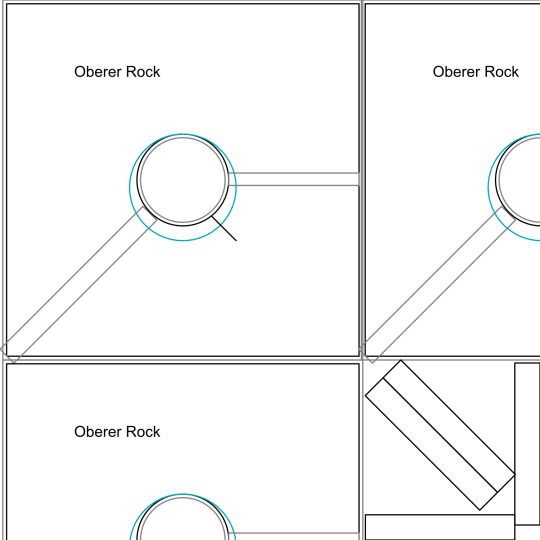
4. Panels, maybe?
So I figure, hey, how about I try to take out some of the circumference and just sew it out of panels? Let's do a quick sketch on a paper towel and tape it together:

Lookin mighty cute, saltshaker.
The proof of concept works. Sadly though:
It doesn't save enough cloth to get us back to a 150 cm x 150 cm piece. Darn.
And then it hits me.
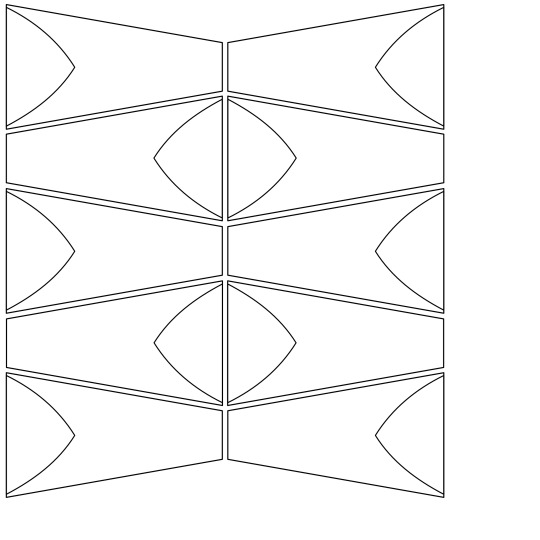
5. who needs a hole anyways?
If you think about it, the problem is the hole in the middle. But if you're putting on, say, a cloth with a slit as an opening, it would automatically become a round hole around your hip/midriff.
With a circle skirt, this would be a problem, since the resulting skirt would turn elliptical and crunch up weirdly.
... but a handkerchief-skirt already does that, kinda.
Hmm... not sure if it shakes out.
Pun aside: I'm not sure if I like this, since I can't quite tell if it'll look good when made of cotton instead of a literal handkerchief. It'll probably look symmetrical enough. I'll just have to use rectangles to keep the original measurements of 60 cm at the longest and 40 cm at the shortest.
I will however consult my mom about this, because I have learned that if there seems to be a really neat solution to a problem that no-one uses, that tends to mean there's a good reason not to use it.
... nevermind that I still can't get back to the 150 cm x 150 cm.

I might just have to die one of two deaths (pricey skirt or slightly less pricey shorter skirt *sigh*)
But in any case I feel I have learned a lot, so that's also valuable.
13 notes
·
View notes
Note
i found you through your work on skurry's thumbnails and i really admire your art! i was wondering if you have any tips for blending/shading in your painting style since i struggle with that and you're pretty good at it. have a good day!
Hey thanks! I can try explain the best I can without loosing myself in what I'm trying to explain or confusing you in the process XD
I will be honest, and this isn't me being modest it's a general self critique but I am not very good with colors? (or backgrounds lol)
It's still something I'm trying to get to get a bit of a better hang of as well as do so in the way I will enjoy it and not make it too complicated and so far the simple rendering style seems to work out for me personally. Maybe something else could sit with you better but that's the joy of exploring the steps and methods in art, right? :3
Details bellow~
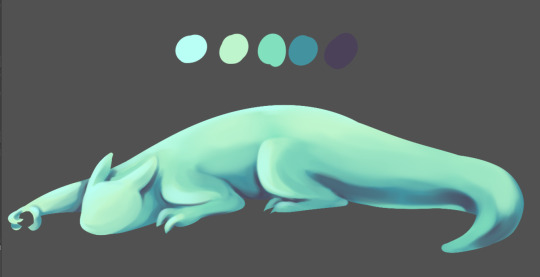
I'll try explain bellow what my general process is when making the slugcat paintings, as they seem to be the topic. I use different brushes for my other commissions and mix them around as I go but for slugcats specifically I used one brush (if not counting the pen tool I used to draw out and fill in the base color)
Detailed sketches help visualize the shape of what's being put down in base color but I'll use a simple one for this example:

With the base color in place, what I usually do is either:
-Lock the layer like in this example and work on that single base where all the shaping and color will go on this layer
-Create multiple layers of the base depending on what's closer to us or further (I used this for Gourmand and Spearmaster thumbnails), imagining segments like the arm closest to us as its own layer, then the body, then the back arm and so on, if the base shape has depth like that. (lock these as well)


The flat color then gets a gradient (gradient tool) that is worked with me shifting the hues and saturation on the color wheel to get more dark and colder shadow as well as warmer lighter highlight. You can play this in reverse and have cold highlights and warm shadows, depending what you feel like using for the piece
you can have the color palette somewhere visible if you want to reference these later on as you start to render shapes
Now, I have no way to personally explain shapes in detail so I will link a video on that, lighting and some more helpful stuff bellow the post.

What you have to think about is where the light is coming from. Based on the gradient made, here I kind of made it seem it's coming from the left upper corner or above the slugcat but how drastic it is will depend on stuff like what is actually around slugcat, where is it and how much light there is at all (if you look at the Artificer thumbnail, that is an example of little light but the source is also very dramatic red light of the ID drone thingy)
Note that you're allowed to make separate layer to make like a little guide I did above here on where the shadows will go and try base the render off of it.

This is the brush and its setting I'm using for slugcats. What's fun about this brush is that it's very soft but depending on the pressure means how much selected color it will apply to the area. (if you use paint tool SAI, the watercolor brush there applies this effect AND blending much better)
The brush works the way it blends depending where you set the tip and drag lightly. It took me a bit to get use to it but it will drag out the colors bellow it instead of applying color if not pressed too strong. You can use that to both add and blend colors BUT changing the size of the brush while doing so helps a ton.
What you mostly do next is "sculpt" the shape: You use darker color for depth and lighter to make things pop out.

You start of with most basic application on where the shadow and light are dropping by color picking the palette colors that were earlier applied for the gradient. The brush strokes should follow the shape itself (best way to think here is the same direction fur grows on cats and follow that haha)
COLOR PICK TOOL IS YOUR FRIEND~
You want to not just rely on the base palette colors but also color pick from shades and lights on the slugcat itself. Sometimes adding hues and tones between the already applied colors makes them feel more natural instead of using straight up shadow color. But this brush, as I mentioned earlier, is handy with blending stuff in, even if it's not super smooth.
Once you get the overall shadow and lighting done, you can start rendering with the same. What comes of the process is here is depending on how much time you want to spend shaping the look of the slugcat. I didn't had a lot of time but I got the gist of the slugcat down. Funny thing is that you can simplify this even more (and make it resemble cel shading haha)
What you can do after that is get more colors in, add more darker shadows and lighter highlights and like for this slugcat example, you can mix it up a bit. It's easier to stay consistent with colors but playing around by adding purples in blue shadows and light blues into warmer green highlights makes them pop out a bit more because now there are fresh colors in the mix.
(side note: You can use very dark and very light colors but it's prettier for the painting to not use any 100% black or white for anything like shading or highlights UNLESS you really want to have dramatic colors and negative space or such)

From this point on, you can basically adjust, shape, add, remove, work out the details etc. and mess around with how it looks. For practice purposes it's nice to keep it simple but trying to make more depth. I'm not the best at it, my work still feels rather flat but here is a tip that can help:
Adding a layer above all layers, coloring it black and setting the layer option to saturation will make you see the colors in values. If you feel like they're too close to each other and too flat you can return to the base layer and add more depth with values to them, then recheck with the black saturation layer again by turning it on and off as needed.

(as you can see from my example, I am missing more darker colors around the neck and back arm haha)

What you come up with at the end again depends on you, what tools you trust using and how far you want to go with it.
At the end, I usually do adjustments to colors if needed. Say, the quick fix I can do to make up for missing shadows is to use one of the tone correction option, tone curve AND/OR color balance.
I usually use and play around with any of these (and sometimes level correction but not as often)

I adjusted base color (color balance and tone curve) and the background (desaturate it in shue/saturation/luminosity)
So uhhh
this isn't really like a tip of a sort, I can't really properly advice how to render since it's about tool preference and the personal process but I hope this was a bit insightful!
Here are some helpful videos that go into detail I could not work out via words or this process because they are multiple separate subjects that can help you learn about rendering colors:
youtube
youtube
youtube
youtube
youtube
youtube
#ask#about art#there is a bit more that goes on for the thumbnails themselves#like stuff about composition etc.#but hope this basic gist of the process is helpful still#as well as the videos linked
36 notes
·
View notes
Note
hi!!!! so ik your focus is on audios (which are absolutely amazing btw) but i was wondering if you could maybe explain how you color/render your artwork? i’m new to digital art and have been struggling a bit. if not that’s totally okay!! i understand <3
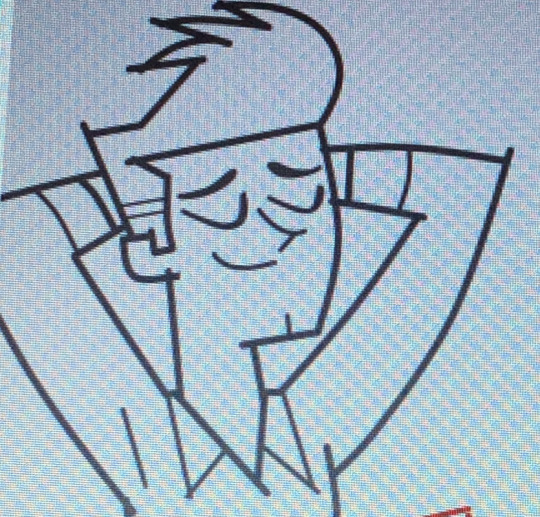
Hi! I totally can, though this is gonna get long lol. I tried going in depth? I'm not too great at explaining things so I'm 100% cool with clarifying things if needed. This isn't TLOU art, I was re watching Devilman Crybaby and sketched this out last night. I saw this ask right as I was about to start so the timing was perfect lol
I'm gonna try to go step by step? I haven't rendered digitally in a while, mostly just sketching. Also, this is kinds rushed, it's late, but it explains everything (I hope?)
1.After I do my sketch, I do a fuck ton of blending. It helps me build shadows/depth and I also just like the way it looks. (I also duplicated my sketch in case I mess up and can't go all the way back)
2. Ok, a lot happened, I zoned out, but I swear it's not a lot. I use a grey base on one layer. I clipped color layer to the grey base so that I wouldn't go out of the lines
I changed the line art color to a reddish-brown (which helps me with blending into the skin later) and I added the base color and certain tones.
This character is on the paler side, so a lot of the colors I'm gonna use are cool (blues, greens). And I'm gonna use a ton of red(bc blood flow, and a ton of blush is a stylistic choice for me).

Note: Instead of going straight in with a blending brush, I use transition colors. Blending brushes are good too, I used one for blending the initial sketch, but transitional colors just make everything flow a bit better than just blending two completely different colors. (Color pick between different shades/colors to blend, its tedious but it's what I do)


3. I created a multiply layer and deepened the shadows a bit using the same color as the base skin color, and I made a highlight layer as well (the opacity is pretty low on both the highlight and the shadow layer, you gotta mess around with it)
Has it felt like I've been rendering this entire time?? Absolutely. Have I? No.
I make the initial stages of my drawing all annoying so that when I get to the *checks notes* 8th layer, I can just do the fun stuff. I'm not done at all, but the rendering layer itself is pretty simple, I just add all the stuff that makes the drawing look less dull. Adding more pinkish color on the lips, nose and cheeks. Bringing back a lot of green and blue (that's just a style thing, also there is a 9th layer but thats just the little white highlights)
This definitely isn't the "correct" way to do this (there is no right way), but it's how I do it. I would show how I render hair but:
1.I have no clue what I'm doing when I do it, I just fuck around until it looks decent (even more so than I do with the skin)
and
2.My chair is hurting my butt
All in all, you just gotta practice a bunch and figure out what you like. Using pinterest and Youtube helps me a lot when I'm stuck or need a refresher💕
Again, please let me know if I need to explain something better, I'm not great at teaching stuff like this😅
I might finish this, I probably won't, but if I do, I'll post the full thing.
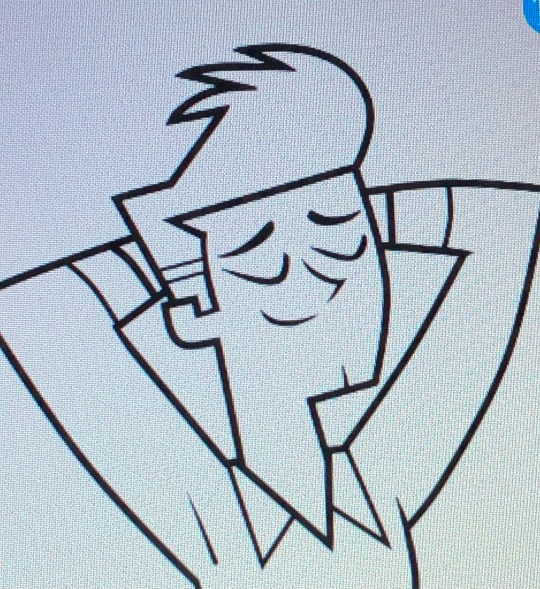
Update: I finished
23 notes
·
View notes
Text
Hollywood AU
With Oscars round the corner I wanted to explore a Movie Industry 'verse, featuring Screenplay writer Nanamin x Starlet Reader, with some messy Director Geto x Reader thrown into the mix cuz it's HOllywood so why not.
I don't have things fully fleshed out, this is only a drabble. It's just a fun little plot bunny I'm considering chasing down the rabbithole, so if you enjoy it, please leave some feedback! Thanks~

Nanami toes the line he's sketched in the sand - and you keep scuffing it. Because it is sand, not cement, as much as Nanami would like to believe that. The grains keep trickling through the hourglass, and his throat gets ever more parched around you.
He used to be able to call you to the side of a sound stage in between takes to murmur his corrections. Now he just scratches them out on a clipboard, cursing PAs and sticky notes that aren't at all adhesive.
"I miss you."
Glue floods his throat. Nanami glances at your reflection, eclipsed by a bevy of stylists coiling your locks into perfectly tight, period-accurate ringlets.
"Bunkering down in that cramped trailer, discussing stories. Have you seen Sangsoo's latest by the way?"
You catch sight of him in the mirror and smile, but someone tuts at you to "stay still". Nanami watches your lips go taut as the gloss swipes over, but he knows where to look. Sure enough, there's a matching shimmer in your gaze, locked in on his. Nanami swallows, his eyes dropping to the papers in his lap.
"Been too busy," he grunts.
"Right Now, Wrong Then remains my fav, but you should make your own assessment. I wouldn't mind seeing his new film twice. Maybe over the weekend, we could-"
"I'll be holed up with the rewrites. Studio's orders. I'm leaving your new lines here."
Nanami doesn't so much hear you sigh, as glimpse a small corner of the glass getting fogged up. He feels your stare slide from the rear view to his retreating silhouette as he turns and walks away from your pout, from the memory of a puff of air tickling his mouth.
Every day you seem more like a mirage, less an oasis.
But these are the desert dunes he's chosen to trek through, grounds ever shifting.
Framed by ink strands, jet stone irises cut across steepled ivory hands, with a gleam that renders the lamination of the page redundant.
[And would you like to address the rumours-?]
[Talent's drawn to talent. That's all.]
[The final say?]
[Your next soundbite - until another distraction from our craft comes along.]
The black and white portrait rustles, a splotch of darkness seeps over those eyes, coloured grey as the super-sized quote [DRAWN TO TALENT] is imprinted across the ravines of cheekbones and deep recesses of sockets, now thinned with text.
He's well aware of your history with Geto, the inaccuracies of the accounts on both sides, the way the two of you are the darlings of the gossip columns, as cyclical as the seasons and heroin chic coming back in vogue, appalling as it is.
"How's the fluff piece for our auteur extraordinaire? He opt for self-flagellating or self-fellating?"
So, trouble in paradise then, Nanami thinks.
He shrugs. "The box office'll be happy."
"Oh, hooraay. Praise be for the ultimate - nay, the only metric and arbiter of art."
"Nay?"
His tone is withering, but not enough to stop your belligerence from sprouting. Or spouting.
"Hey. Do you think I got where I am based on sheer luck, or looks?"
You're a few too many whiskey neats in.
"Clearly they weren't stumbling blocks," he says drily, gesturing for his refill. Normally you'd find his diplomacy coy. Now it's just tiresome.
"I expected more than this calibre of flattery from a BAFTA nominee," you sneer, fingers creeping along Nanami's taut wrist. He steadies his grip around his bourbon.
"I'm off the clock. You'll have to get your one-liners elsewhere. Union rules."
You lean in, the cloud of alcohol and your perfume shrouding Nanami.
"Such a stickler," you whisper, the taunt gusting warm and wet against his lips. Through the fog, just barely, Nanami telescopes in on the gleam of your maraschino-red mouth, the gimlet glint of your eyes.
Not chandeliers, but stalactites, the notion coalesces somehow, despite your distractions. Nanami's brain churns, scrambling for a deflective quip, only to short-circuit when he feels your other hand land on his thigh.
"You know, in these scenarios, the rulebook gets thrown out - if one even exists in the first place."
A rough palm clasps your hand, but your forehead brushes Nanami's.
"My point is, I don't give up. I always get what I want."
"Assuming you know what that is."
You freeze.
It's better this way, Nanami thinks, watching the shards twist in your eyes. There is still barely an inch between you and him, close enough for him to feel the breath and consequences you hold in the quiver of your lips. At arm's length, and a lifetime away.
At least like this, he has a front row seat to the fracturing story.
He was never meant to be the protagonist, let alone a hero.
"Are you really coming after me, or are you just trying to get away from Suguru?"
#nanami kento#nanami x you#nanami x reader#nanami kento x you#nanami kento x reader#kento x reader#kento x y/n#kento x you#geto suguru x reader#geto x you#geto x reader#suguru x reader#geto suguru x you#jjk#jjk x reader#jjk x you#sandsorghum
34 notes
·
View notes
Text
so @chihirolovebot 's sleep awake has been living rent free in my brain since i found it a week and a half ago, and i wanted to make my own Phys, and i'm actually proud of the results! i had a few ideas floating around my head, but every time is see Phys, my brain goes to Fizz, so that's the name i have on the character. idk if that's weird or not, but oh well.
here goes nothing:

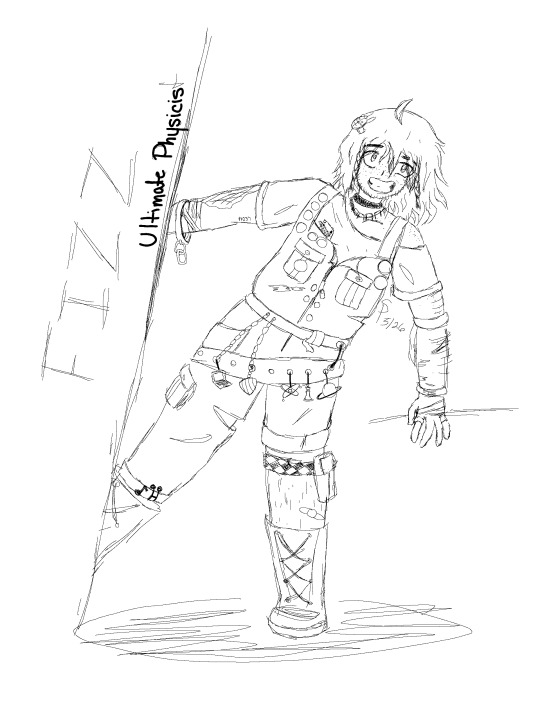
no rendering but only because i want to get this out and i'm impatient. maybe i'll post this with clean line art and rendering, and maybe even a proper background. also i imagine they have piercings, i just didn't draw them (rip).
and the original sketch which points out some of the details:
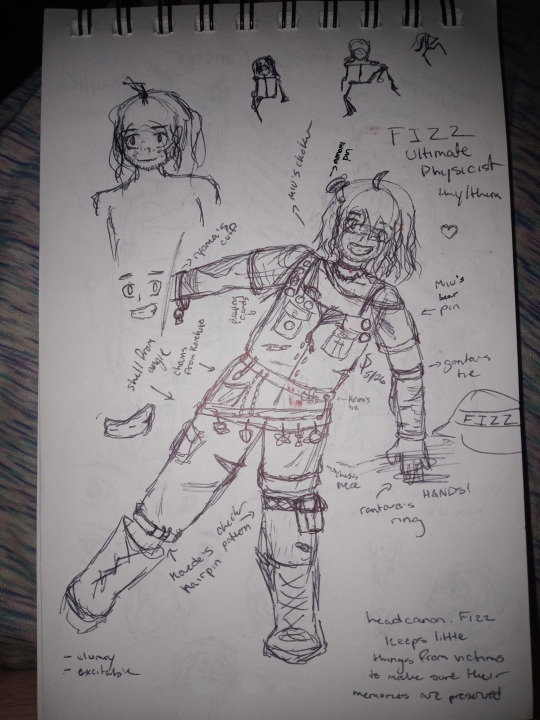
seriously, this has been living rent free in my brain for a week, and i'm in love with sleep awake. it's so thoughtful and all the characters feel like they could be canon. i adore the changes to the storyline too. i don't have enough words to describe how giddy this story makes me!!!
anywhore, before i end this, i have a few other sketches to share, that, idk, maybe people would like to see:


these ones focus on an idea that Fizz is the mastermind. the first one is just a general mastermind concept (with shoes being the bane of my existence), and the second one was like if Fizz was the mastermind and also had been a part of DICE and was maybe responsible for the tragedy we see in Ouma's motive video, and with Fizz being the mastermind, they purposely left out those memories from Ouma, or whatever, i'm talking out of my ass tbh.
and i just finished this little comic, but i'm not good at drawing comics... so... enjoy?:

it's not knowing how to draw Ouma for me.
anyway, physouma brainrot is real.
i really enjoy sleep awake, i just have a hard time communicating my enjoyment sometimes. great story!
#danganronpa#kokichi ouma#kokichi#sleep awake#🏚.sleep awake#drv3#yes i did fall in love with phys dont judge me 😭#im obsessed with physouma its a problem /pos#and also#the cowlick thingie is a must for all danganronpa protagonists and im glad so many other phys designs have them#good on us tbh#i just looked it up#its called an ahoge#cries#finished the sketches in time for my birthday so birthday phys post 😊#fizz the phys
10 notes
·
View notes
Text
The Carvings on the Dwarfs' Bed: Something you never thought about, but I did and now you're suffering with me.
Hi. Your resident Snow White enthusiast who doesn't ever stop thinking about the movie or the dwarfs. Ever. Because I've been obsessed with this movie since I was three and now it's your problem.
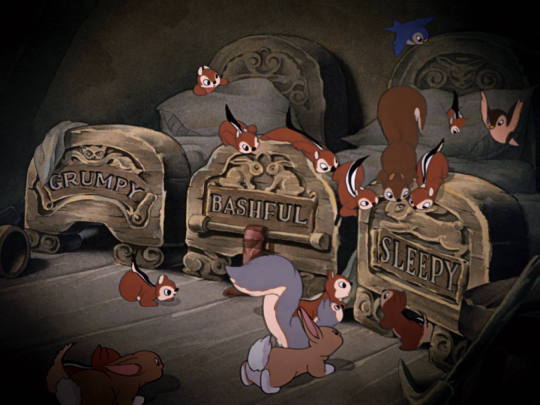
So I've been noticing recently that Doc's bed is against the wall. By itself. And it's kind of plain.

Kind of sad there. Doc's name carving isn't really decorated. There's a carving on his headboard but we'll get into that. So there's no side tables. There's a chair, possibly to serve as the missing side tables, a window where a candle is hanging out, and some tools. There's also Grumpy's bed. You also get another angle of Happy, Sneezy, and Dopey's bed.
But we've got other pictures.

Here's a more detailed sketch before we got the background done. Comparing Doc's bed to a few more reference pictures, he does have a carving on his headboard. It looks like an owl.
Three dwarfs have owls on their bed: Doc, Grumpy, and Happy. Doc has a smaller owl. It looks like a little owl. Yes, I just had to look. Grumpy and Happy have an owl that's a bit more familiar on carvings. It's got feathers that look like "ears". So maybe a horned owl or a screech owl.
But there is something I've noticed. While Happy does get two squirrels and a little heart over them, further renderings of his bed includes something else:

He gets a smiling sun.
So what does any of that mean? Well it can mean a lot of things:
They just really like woodland creatures and they're inspired by a lot of things around them.
OR
Doc, Grumpy, and Happy might be the oldest. Owls do symbolize wisdom and age so that might be why they have owls. But that's a theory. It's one I've maintained (they're the three leading the line) so I'll go with it.
The rest of the beds all have rabbits or in Bashful's case, a deer (a doe in particular).
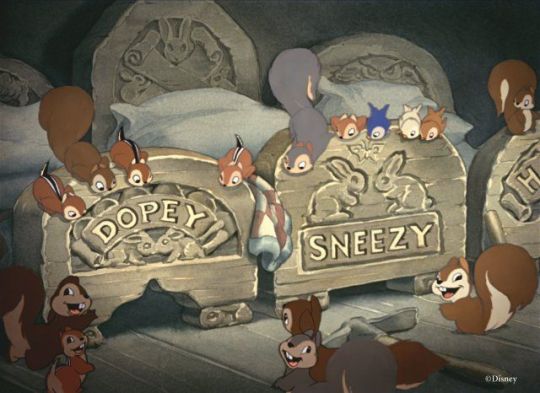
Sneezy has a rabbit on his headboard and the addition of a butterfly. I've seen a few other renderings where Dopey also gets a butterfly.
So what does any of this mean?
Absolutely nothing. They like their surroundings and they're picking their favorite animals!
OR
It's marking age. Happy sleeps on the end of Dopey and Sneezy. That's their "adult". Same with Grumpy being on the end of Bashful and Sleepy. That's their "adult". Doc in the center to oversee and the window has tools to serve as weapons just in case.
Thanks for coming to my TED talk on the dwarfs' beds and their carvings.
#the seven dwarfs#snow white and the seven dwarfs#snow white#just doc things#doc energy#long post#i can't believe i took hours to do this#you can steal this if it's relevant to you! please feel free to share! <3
11 notes
·
View notes
Note
Ask game: 2, 7, 22? :]
2. what's your favorite thing about your style
I absolutely love the way I render things and how colorful and vibrant my art is! And! How I try to make the background a real environment for the character featured in it, even if abstract. I know that's 3 things but I think i deserve a lil confidence boost for myself
7. show us a WIP
god I have so many abandoned art pieces and also just concept sketches to visualise ideas. I'll throw in a few here, this is a question that can be asked multiple times

old thorn sketches im still very fond off, especially that big headshot
attempt number 300 to create a behemoth form for thorn that im satisfied with, i dont know why it's so fucking hard. I am not 100 percent happy with this one either. I just want him to feel unique, massive and heavy with some bull and big cat influence. I also want to include tusks since in mythology the behemoth is often elephant like
Vampire demon lord Thorn AU because i love putting my favorite boy in different constumes. again not satisfied with this design. Also haven't rped it in a while so my muse for it is gone at the moment but maybe it will come back some day. This thorn is so fucking angsty and bitter you have no idea. Has so many huge walls around his heart
If you want to see more wips/unfinished graveyard pieces you guys will just have to send ask number 7 again
22. what inspires you?
In my childhood, the dragonology books were a huge passion and creative influence for me. Especially the illustrations by douglas carrel.
Another book illustrator that i was kinda obsessed with was chriss riddell, just love how detailed their illustrations are
Ghibli studio's style I always love. Just watching their movies is such a treat, I always feel so full of inspiration.
As for current inspirations? Honestly the artists I follow and the music i listen to. I always draw the best art when my spotify shuffle liked songs playlist has just the right flow and it fuels me! And when I see other artists share info on their characters or glimpses into their oc projects it makes me want to work on my characters!! And when my fav artists upload an art piece with such good shapes and colors and compositions?? Augh it makes me want to draw. Oh an animatics! I love watching animatics! Especially for musicals they are so fucking good and so many talented artists it fills me with joy. just gives me straight up shivers!!
Another thing that fuels me is the reactions of you guys and my friends! I want to share my characters and art and use them to engage with people. Get them interested in my world, inspire them, just engage with the community, get talking!
So yeah art is very important to me haha. Normally I get really mad when im in a dryspell like this but seeing how i drew 18 art pieces last month im cutting myself some slack haha, i deserve some rest after that, especially since my routine and energy levels are extremely wack right now, i need to recover.
Heck that turned out way longer and more passionate than i expected, I hope you didnt mind the ramble!
Feel free to send more questions owo
2 notes
·
View notes
Text
What Love can cause♡
Note : The story is based on imagination and is a pure fiction. Kind of yandere.
.
There he was, standing near the pole staring straight in her brown eyes, looking at her every moves, melting everytime she smiles, holding the urge to not cross the line, to not run to her and fall in her arms. It's the way she makes him fall for her everytime, he just can't deny the fact that he's already in love, and the love's becoming deeper and deeper everytime he looks at her. She made him realise what love can cause, what affect love can have on him, what her voice can do to him. For him she was what heaven looks like.
He had this view point of Love that she changed eventually, she changed it by just smiling at him. He thought of love as a choice, that you can't get attached to a person until you want, you can only fall for a person if you're willing to. It's all planned. It's a choice not a coincidence. But what happened to him was something out of control. He couldn't help but fall for her. And even if it's a choice which he used to believe then he loves what he chose.
The sight infront of him is making him eager to hold her, even if it's meant for one time, he wants her close. He wants to embrace her and hide her from the world, cuz he thinks that the people out there may hurt her, they may bring danger to her. And just the thought of her in a trouble sends shiver down his body.
He was reckless in the people's eyes and maybe his too. But she made him felt like a lover. A lover who can protect her, a lover who can take care of her. A lover who can make her feel butterflies in her stomach just like she did. The cold breeze in the mid October made her shiver, causing her to rub her arms by her palms. The wind caressing her red flushed cheeks and her squinting her eyes with a pure form of beauty. And all he could do was stand there admiring her from afar. But who knew that his love will slowly become his addiction without even him realising it.
"I'll make you mine soon, dear."
The moment she felt eyes on her, she looked behind her, finding no one there she starts sketching again. From some days the comfort this place used to give her seemed lost, she always felt a pair of eyes looking at her, she felt unsafe. Somehow she shrugged it off thinking it's just her overthinking self. She looked in front of her sighing heavily, the river looked so peaceful, the view alone made her forget about her worries, it relieved her stress. But again she felt uncomfortable, and this time she decided not to ignore it. Standing up from the bench she took all of her belongings and started to walk towards her house.
Walking down the street, she felt as if someone was following her, it made her shiver a little. She turned around still finding no one. Her worry started increasing with every step she took. Her heart started racing and she started to jog a little by feeling a shadow from behind. She could feel it, she could feel someone too close to her, she even started to feel a hot breath on her neck. Just as she thought about it, her whole life was rewinding in front of her teary eyes, she didn't want to die like this without even achieving her dreams.
Before she could fasten up her speed anymore, she felt a cloth pressing on her lower face. She tried to get out of the "still unknown person's" grip but she was already feeling drained by running too much. Tears running out of her eyes non stop, she started wiggling her legs but all in vain. Before the darkness appeared in front of her eyes, she saw his face too close to her trying to say something in her ears. She felt his words pierced through her skin before the chloroform rendered her unconscious.
"I'm gonna protect you from this dangerous world."
.
Tags : @gyucupid @shieunviya @m4rsluv @mini0o @loviefm @sweetsoogyu @whendidmythoughtsgocrazy @blovedhobi @mcadiary @tricssi @facepalmmylifeu @rainbowhyunnie @thelastyoungblood @talitinha05 @soobslvr @eachothersmoon @soqmiau
#blog#author#aesthetic#fiction#poets on tumblr#writersofinstagram#writers on tumblr#authors on tumblr#icons for tumblr#icons for instagram#icons for twitter#kpop icons#yandere#yandere stories#obsessed#fiction story#stories#kpop#txt icons#dark acadamia aesthetic#dark acamedia#dark aesthetic
18 notes
·
View notes
Note
Hello, I'm absolutely in love with your work, and most especially your use of color!
Apologizing in advance if you've answered this sort of question already, but do you have any particular methods of choosing/applying color to your pieces? I've struggled with choosing interesting colors/palettes alot personally and would love to know if you have any tips or anything about it!
Hello, thank you so much for the question!
I've been sent a similar ask before, but I also don't mind talking about art so your ask is more than welcome. Plus you touch on an interesting point! The way you apply color can be just as effective as the color itself. FUN.
The ask I linked above talks about how I choose color palettes, so check that out if you're interested~. I'll expand a little bit more down below since you got me thinking about stuff
(One note though: I primarily work digitally, and I might on purpose or accidentally frame my tips around that mindset.)
It's time for a list because I love lists so much:
If something breaks the rules of reality but looks COOLER or fits your style or theme or you just LIKE it more....maybe do it anyway. Why not? At least see what it would look like! (Make a new layer if you're working digitally, sketch it out on some scratch paper if you're going traditional) (this is especially good with color. I KNOW not many shadows are that shade of teal but it just looks good jerry, sorry!) (Light sources are good for this too)
You are not locked into anything, ESPECIALLY if you're working digitally. If you don't like how something looks, try first to figure out what WOULD make it look better and then give it a shot (I say to think about it a little bit first to try and prevent the sketch-delete-sketch-delete cycle, but....sometimes you NEED that cycle too. Even deleted art still lives in the memory of your hands and experience. It’s just trouble to get stuck there.)
When struggling with colors, look to simplify. Maybe do more pieces with JUST flat colors, see if that doesn’t help your palettes. You will find your renders more appealing if you start with a base you like, and even if you don’t like your renders…you’ll have a base you like, and that’s good enough! Flat color art is COOL. Knowing when NOT to add detail is just as masterful as knowing when and where to
When it comes to something you're struggling with, look to other artists. That's part of why I'm very happy to answer asks like this - it's good to remember you don't have to come up with every answer yourself. Even if you can't ask directly, there's a lot to learn just from...looking at art. What inspires you? What looks cool, or appealing? What solves a problem you've been struggling with?
For example, going back to color, you learn early in digital art that a purple/blue layer on multiply (or you know, other colors, but it's an example) can be a quick and easy way to do some shadows. and it is! I use it even today! But I never really liked it. So I started struggling with shadows. So I started looking to other art for inspiration. I've just always liked vibrant colors and watercolor as a medium, so...I started trying some things with that as my inspiration point.
I began applying shadows with watercolor brushes and wash brushes, I started using teal and aqua for shadows on top of a thicker magenta base. I started doing rim-lighting (boy oh boy rim-lighting). I started pushing and pulling colors, adding layers like with colored pencils. I started using more glow dodge layers, a separate layer for more opaque hard light and less opaque blooms; making pieces brighter instead of darker. I STARTED. Doing things I just LIKED more, and found out that hey…..some of it works. Some of it sticks.
There’s a lot of advice out there on how to overcome artblock; and while I know that isn’t the exact nature of this question, from my own experience I’ve usually found I hit an artblock when there is a specific THING I am struggling with (for a long time it was feet. Right now it’s shoulders, necks, and noses. For you, perhaps it’s color). Whenever I hit this point there are a few easy things I try and lately it’s been working out.
I start by stopping drawing. I go out and get inspired again. Reading, watching animation, going out and seeing nice scenery in some good lighting, looking at other artists’ work…I take my mind of my own stuff and refill it with Good Juice for Creatives
I wait. I wait until my hands itch and I just gotta draw again. I wait until I have at least ONE thing I know I want to draw or try (like a new brush or challenge or IDEA)
When I start drawing again, I take it easy. Sketching in the sketchbook, drawing fanart or oc’s, not trying to come up with too much from scratch. The break we took earlier at least gives me enough energy and want-to-draw to power through the struggle of any remaining artblock
When you’re learning…there can be a frustrating SLOWNESS to it. And with art, well. It’s tricky. You’re training your eyes, hands, and mind on something…almost completely subjective. That’s why I keep coming back to studying things you like! Not only does that make for a more enjoyable experience…well. When I was in college, my art teacher told us to “trust your gesture”.
When you are actively doing or studying art, you’re building a mental catalog. When you’re LIVING you’re doing this too! That’s where trust your gesture comes into play. You know colors you like when you see them. Trust the colors you like to be some of the colors you can use. Trust some of the things you like to be things you can learn from. A lot of art will come more naturally when you say “I know I can do it this way…but I WANT to do it this way”.
And that’s why so much of my art is Like That.
#chan says#replied#oh goodness it's long and i had too much cheesecake and also it's a monday and i'm alive so#i#rambled#sorry!! i hope this helps in....ANY way.#frankly you just asking questions like this is a good part of due diligence! to you and your art!! well done!!
25 notes
·
View notes
Last Seen Blogs

weact
WE ACT
rayven81194
Rayven
blanketfag
i want to be famous

azhaazzunasworld-blog
Untitled
e-regcanswim
jegulus lovechild