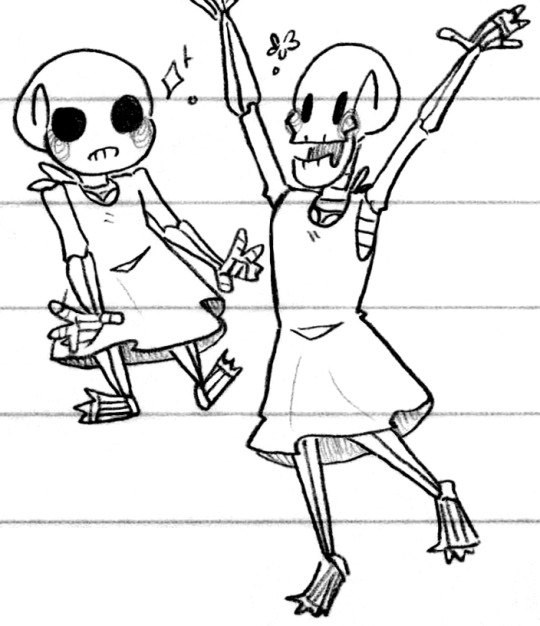
#i'm not even an artist lol
Text
Who would've known that 10 years after cooling down my obsession with Star Trek, I would return to the fandom!
So I made an artwork in celebration of this reunion ahaha

Based on Corpus Invictus' fic and verizonhorizon's prompt: "You know what would be really erotic for Vulcans? Henna hand art."
#i don't know anatomy and i never went to art school#spirk#star trek#star trek tos#spock x kirk#star trek art#my art#spock#kirk#I'm so sorry it's my first art in a while#i'm not even an artist lol#spirk art#k/s#spock art#kirk art#tos spock#tos spirk#tos kirk#space husbands#eldar of zemlya#vulcans#hennaart#fanfic illustration
272 notes
·
View notes
Text

We interrupt your regularly scheduled program to bring you: this guy
#atlas.art#artists on tumblr#mcyt#hermitcraft#hypnotizd#I'm gonna be so real with y'all right now. I don't even watch hypno#i'm just obsessed with this cunty little pose he's pulling in the new banner askjfshdhb#and i designed him a few months ago when I was drawing all those headshots of the hermits. so. y'know. might as well use it lol
1K notes
·
View notes
Text

a crossover absolutely nobody asked for!
#loki series#loki#hades game#hades 2#WORLDS i typo'd i'll fix that later#hades spoilers#?#Marvel#Mcu#marvel cinematic universe#my art#Mine#okay that feels weirdly possessive lol#okay i’m v aware these aren't even the same mythologies but I wanted to study the art style so!#procreate#digital art#artists on tumblr#loki season 2#loki season 2 spoilers#also the dialogue isn't great in my defence I'm very tired sorry 😭
486 notes
·
View notes
Photo


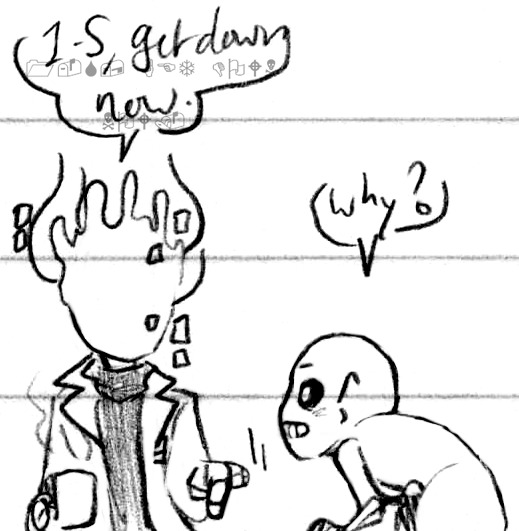


Good skeles, like you lots (Patreon)
#Doodles#Handplates#UT#Sans#Papyrus#Gaster#Finally a set mostly featuring the brothers! Yay!#I love their dynamic so muuuuch and they're both so cuuuuuute ahhhhhhh <3 <3#I made that first one based on some half-remembered doodles from my Very First time around drawing UT characters - going way back!#I never posted any of them - I do actually have some studies from back then from various artists including Zarla haha ♪#And I think the original sketches for the pixel bouncies I made of them? :0 There's a lot of good stuff back there! Been a while tho lol#Really tho I've just kinda been on a big-eyes-and-swirly-cheeks kick lately haha ♪ They suit it so well! Especially Sans#Very fun to put down strong lines about ♫#Hugging <3 Always hugging <3 <3#I'm really pleased with their hands there actually haha - Papyrus pulling Sans in and Sans' hand on his ribs not pushing just a little space#They're so cute <3 Even some of my first doodles of them were them giving little donk-pecks on their cheek or forehead#Y'know - since they don't have lips lol#Also probably not a shock but I've pulled out my own colour cube(s) to play with out of inspiration lol#I am So out of practice lol#Sleeping on each other - it is The Classic! I love Papyrus' little paw thing with his plated hand while he sleeps haha#I personally really like the inverted Soul look on Monsters but in Handplates they're right side up! What do!#There must be a happy medium to strike somewhere hmmm#Just put them sideways and upset Everyone lol#A silly little set with Gaster of the two ''flying'' - does that activity actually have a name? :0 I don't know it#Gaster is not about to have them playing anything that could end up with 1-s falling though - not that he'll listen lol#''Because I told you to!'' Lol#And finally trying on clothes in their house! Papyrus is getting weird vibes off this shirt with how it ties in the back and hangs loosely#I'm pretty sure? I've been drawing him with his scar but it can hard to tell even looking at it myself lol#I'm not exactly careful with the delineation of his neck bones so the line can get lost#Needs a shirt that will compliment a scarf or a cape for sure
523 notes
·
View notes
Text

#kirby#daily kirby#my art#digital#hal laboratory#nintendo#so like aliexpress used to have a terrible reputation in terms of like quality and truth in advertising and such right#but like. amazon and etsy are swamped with bootleggers and dropshippers now too#so I figured like. can't be any worse right?#besides I know how to double check descriptions and measurements and examine images critically#I've shopped shady sites before like back when banggood was the only place to get those cute diy miniature kits#(now you can get them at regular craft store chains which is Wild to me)#but I have never opened aliexpress because everyone was always just like 'Never Go There'#(but then again these days folks are doing massive temu hauls left and right)#(so clearly norms have changed even if common perception of aliexpress has not)#I open it up and I immediately find the rug I spent an entire day hunting for unsuccessfully earlier in the month.#and a ton of incredible bootleg kirbs.#and a style of hair clip I've been hunting for for *years*.#soooo I spent the entire day in a pastel fugue lol#(I have not spent any money yet but I'm probably gonna)#(so like I can't confirm that you're not gonna get scammed or whatever just like. use common sense.)#(don't trust sale prices read descriptions/reviews when available and try to avoid work stolen from independent artists)#(that's usually gonna be on printed stuff like phone cases and posters)#(and tbh I have no qualms with stolen official art as long as the quality is as advertised)#(but there's a big difference between stealing from Multinational Corporation and stealing from Some Guy)#anyway done rambling now <3
145 notes
·
View notes
Text
Me: I love drawing TFP Soundwave
Also me: BY THE PITS OF KAON, SOUNDWAVE, WHAT COLOR ARE YOU REALLY AND WHY IS IT NOT ANY OF THE ONES I HAVE
#can you tell i'm a traditional artist lol#i eventually settled on something but he made that process soooo complicated. so demanding. pretentious even.#why yes my dude we know you're superior. now stop rubbing it in. i'm trying to capture your likeness out of respect. why must you vex me so#at least you look really cool now. after all this tribulation. stop smirking behind your visor#sparrow speaks#traditional art#tfp soundwave#most superior soundwave
110 notes
·
View notes
Text
Baxter in *that* outfit from Good Omens
This was inspired by @meowzilla93 's post because I read it and could not get it out of my head. Rest assured 40 y/o Baxter is coming soon too!
I'm going to sleep bc it's now 4:30 in the morning, how time flies when you're conjuring up images of beautiful men having fun.
#disclaimer that i havent actually watched good omens yet even though i keep meaning to#so i hope i did the look justice#i think this is the right one (?) lol#either way baxer's swag is on full display so i'm happy#artists on tumblr#our life beginnings and always#olba#baxter ward#olba baxter#our life now and forever#olnf#olnf baxter#olba fanart#digital art#art archive
116 notes
·
View notes
Text
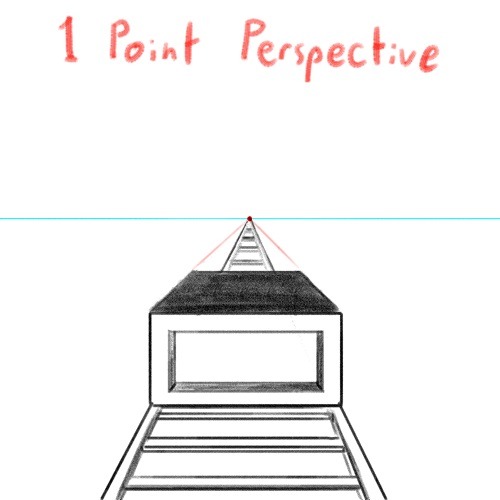
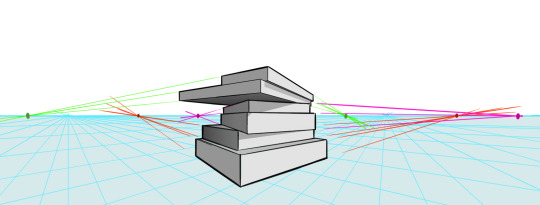
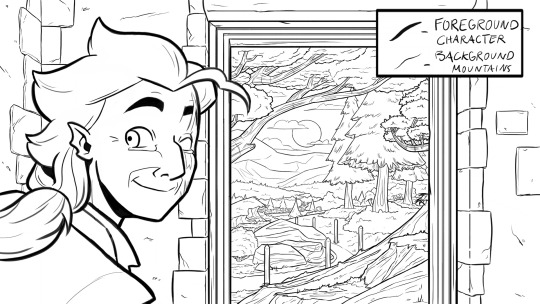
DRAWING BACKGROUNDS: TIPS AND TRICKS
So many people are afraid of drawing backgrounds and I think it's a shame, so here's some tips and tricks, because I'm not perfect at it myself but I think the hardest part is really just knowing where to start.
First off: Perspective
Yeah, yeah, that's the scary word. But I promise you, once you're familiar with the basics, backgrounds are a LOT less intimidating. Don't get discouraged if WHEN you have trouble with it. Even professional artists struggle with it. I promise you, screwing it up is good and normal. That's how you learn after all!
Now I'm not going to go into detail on how to do it here, because honestly there are a thousand and one free resources online and in libraries that can explain it far better than I ever could in a singular broad-strokes tumblr post. But I AM at least telling you you should familiarize yourself with these basics:
Important Terms:
Horizon Line: A horizontal line across your canvas, showing your viewer's eye level and providing a location for most of your vanishing points.
Vanishing Point: Integral to drawing in perspective. The sides of a 3D object get smaller as they become farther away from the viewer in space. This point is where the parallel lines of a side eventually meet.
The Basic Types of Perspective:
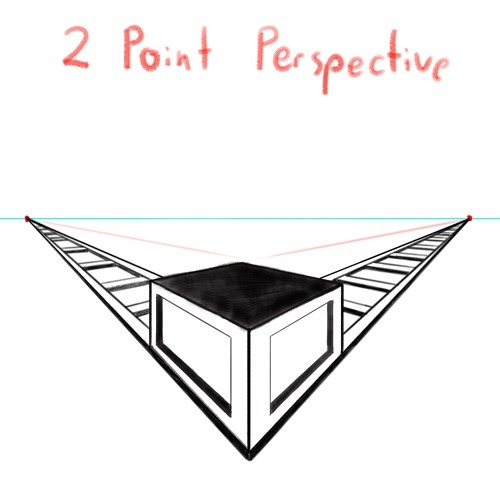
One Point Perspective: Good for drawing things that you're looking at straight on.
Two Point Perspective: Good for drawing things at an angle.
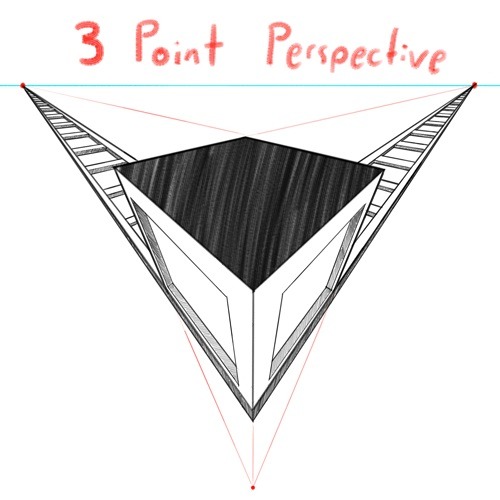
Three Point Perspective: Good for drawing things the viewer is looking up or down at, especially at an extreme angle.
[Click images for ALT descriptions]
And if you're comfortable with these and serious about improving your skills for use in storytelling, I also might suggest looking up:
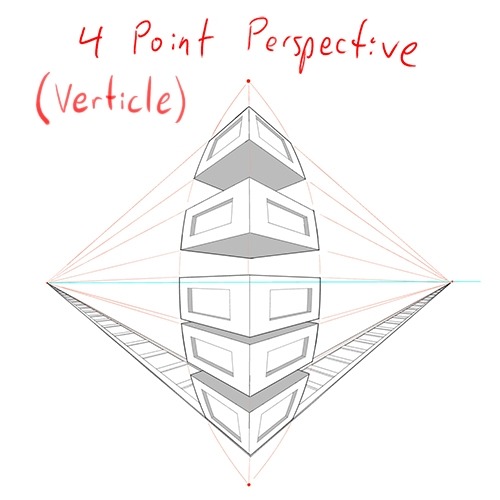
4 Point Perspective: Great for extra wide or tall shots and for camera tilts if you're doing an animation or animatic. I think some other names for this in animation include "banana pan" and "warp pan."
5 Point Perspective: Fish-eye lens. Good for all your angsty anime boy slipping into madness needs!

Some perspective tips I wish someone had told me earlier:
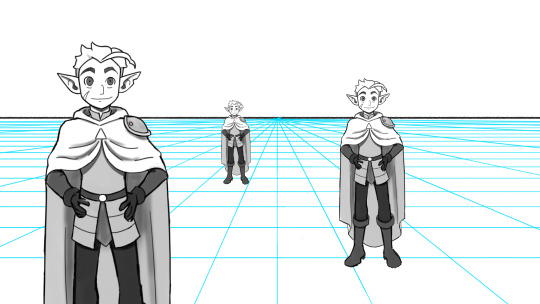
Objects' relation to the horizon line is constant.
A super helpful tip to remember when placing a character or object in space is that they will always (assuming they aren't changing in size or moving up or down) have the same relation to the horizon line no matter how far or close they are. If your horizon line is at shoulder height for your focus character in the foreground, any character of the same height in the background will still line up with the horizon line at the shoulders.
How to pick the distance between your vanishing points:
2 pt perspective uses 2 vanishing points, 3 pt uses 3, etc, etc, but how close should they be? Well, first of all, for anything that isn't one point perspective, one or more points will usually be off the canvas. Super annoying, I know, but the closer your vanishing points are, the more warped your drawing will become.
Second, a helpful thing to know is that choosing the distance between your points is basically the illustration equivalent of picking your camera lens! Photography buffs will know that wider (shorter focal length) lenses show more space and make the distance between foreground and background more dramatic, while longer focal length/telephoto lenses are flatter, and more focused and intimate. The same is true of vanishing points that are closer (shorter focal length) or farther apart (longer focal length).
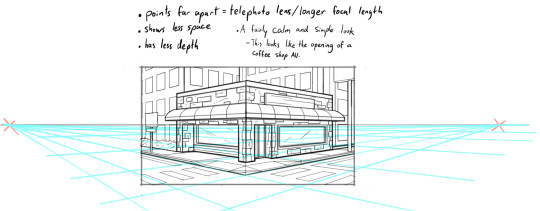
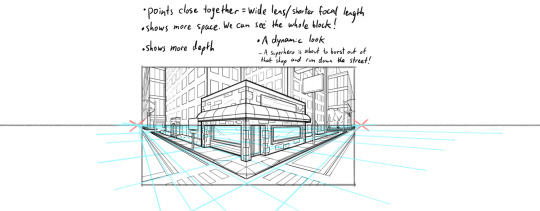
2 point/3 point/etc doesn't actually mean you're limited to that many points total on your page.
this one confused me a lot when I was getting started, lol. A lot of examples will show you drawings of nice, neat cities or something, in which all the buildings are facing the same way in order to demonstrate perspective drawing. But in real life, buildings don't all face the same direction. They're at all sorts of different angles. So how do I do that??? Answer: Just because you're drawing in 2 point perspective or whatever doesn't mean you... have to actually keep your 2 points in the same spot. You can move them around, just keep them the same distance apart, so you're not screwing up your camera lens.
Other Tips:
Use reference!
The instant you try to draw a house, you're going to forget every house you've ever seen. That's just how it goes. Buildings are complicated. Do yourself a favor and collect a few reference images first, buddy!
Consider details (like architectural style, amenities, and materials)
Your building will look more like a building when you keep in mind that buildings have gutters and door knobs and light switches and paneling and stuff, and aren't just boxes with roofs on them. Again: reference! You will forget electrical sockets and baseboards exist immediately. Art brains are dumb.
Use details and texture to fill in negative space
Giant stretches of blank space tend to be boring and distracting. Put a few suggestions of wood grain or something on that wall back there, bud, just don't overdo it.

Line weight
Darker, thicker lines draw more attention, look heavier, and look closer to the viewer than lighter, thinner lines do. Take advantage of this to draw the viewer's attention to your focal points, de-emphasize less important details, and imply depth. It's up to you to decide how you want to use this and what your style is, especially once you start getting into combining or replacing it with shading, values, and color, but a helpful rule of thumb is to try reserving your thickest lines for focal foreground characters and use thinner lines on backgrounds, especially details in the far distance.
Perspective guides
If you're drawing digitally, take full advantage of any perspective tools you have access to! A lot of art programs lately have begun adding perspective guide features that let you set up vanishing points and then literally guide your hand as you draw so you stay in perspective. Some of these include Procreate, Clip Studio Paint, and Adobe Fresco. (still sadly none in Photoshop as far as I'm aware, what the heck, Adobe!). Check through the settings of yours to see if it gives you any perspective guides or other similarly useful tools. They're 100% worth it! And for god's sake, if you've got any skew or perspective warp tools, draw your complicated shapes flat and then warp them instead of spending an hour on it! Don't make my mistakes!
#backgrounds#art tips#tutorial#art reference#drawing tips#perspective drawing#the owl house#hunter toh#doodle art#doodletext#rambling topic#yes i'm using my blorbo to demonstrate art tips what about it#this took longer than i meant it to lol. i got really into the examples#thank you for your patience guys#this turned out to be a GREAT exercise for me as an artist too actually. Trying to explain things is rlly good practice#I didn't even get into values and such. I can only ramble so much I'm afraid
828 notes
·
View notes
Text
I was drawing Rey and Kylo Ren to practice and explore my style on them....
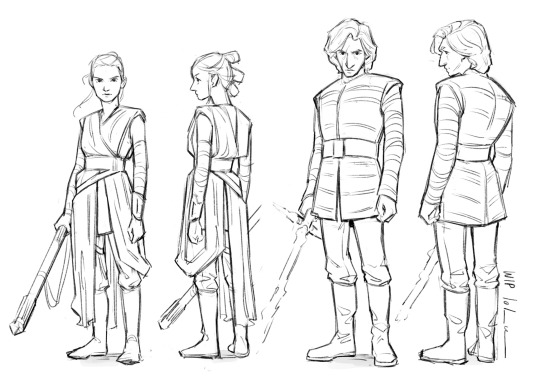
....and I noticed a very interesting tiny detail in Kylo's clothes.
Remember how in this shot it kinda looks like he's wearing a very short skirt, and it's slightly longer at his back?
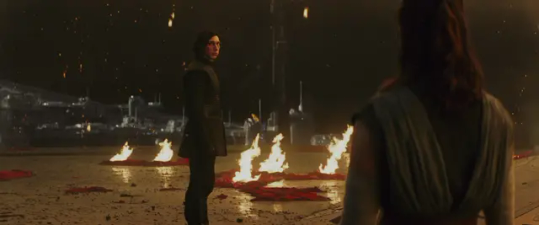
I wanted to replicate that, so I took a closer look at the direction of the fabric and the way it is tailored, and indeed....
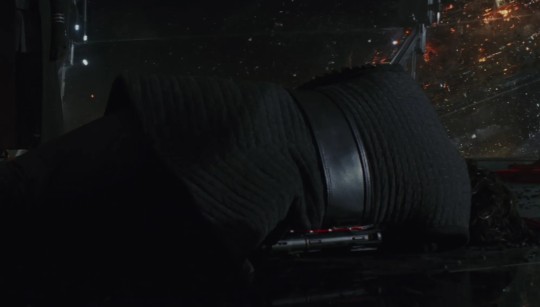
....the lines are not straight, like on his upper back, but are tailored at an angle and go down towards the middle.
You can also barely see it here if you zoom into the picture.
That's it. That's the post.
#a true fashion icon lol#is this detail even worth pointing out?#or worth its own post?#I was mindblown when I noticed#someone pls tell me I'm not the only one#come on#from artist to artist#have you ever found yourself drawing something and then going like#oh#oh that's how it works#fanart#rey#star wars tlj#the last jedi#kylo ren#gotta draw all characters at one point#god give me strength#wip#art wip
120 notes
·
View notes
Text

#Even I was surprised that I ship these two but ships are something that comes naturally#dungeon meshi#delicious dungeon#delicious in dungeon#artists on tumblr#senshi x marcille#Since I'm the only shipper I grant myself the right to name it#senshille#Yes I'm terrible at naming ships lol#Still they are senshille now lol#anime#manga#digital drawing#art#digital art#fanart
128 notes
·
View notes
Note
wow...... MANY artists take requests randomly. this isn't the original anon, I just saw your post&was blown away by how rude it was. this anon wasn't even rude. artists are always putting out informationals with like guides on how to speak to them&it's the so egotistical&rude&controlling. I literally won't commission random artists anymore&only my close friends bc of these rules that change artist to artist&don't apply to everyone. anon asked you a simple question&was extremely nice about it&you chose to be an asshole in response. y'all act like you're training rabid dogs or something. just, say no, don't answer, or block the anon. like I can't figure out what ticked you off so much about that. talking to ppl like shit won't help them. it will just make people afraid to speak to you at all. anyways lol you're losing a follower&a fan. maybe let your anger out at the gym or something before you take it out on someone asking an innocent question. they truly probably thought "the worst they could say is no" &you proved them wrong. exactly the reason I no longer commission art from artists who aren't my close friends. my anxiety is too high to deal with the anger&your need to control how other people talk to you(even when it's not mean&they're just asking an innocent question).
Good lordt
Mate, I said "no hard feelings just letting you know this ask came across as rude" after we had a bit of a giggle about how funny it is that they hadn't stumbled upon the specific kind of fanart they wanted to see when IMO it's extremely common in the fandom, and then pointed them to another artist who had already drawn what they wanted to see.
"Don't ask/hint at artists to draw you things for free" is not being rude or demanding or egotistical, it's just a firm boundary. It's not a minefield to navigate, and artists who accept random requests usually say so somewhere in their bio/about. I also think blocking the poor anon would've been way more harsh and unnecessary than letting them know how their behaviour was perceived, cuz if they keep doing it, some other artist is going to be way meaner about it.
#I'm really not trying to be mean here. but I think you saw yourself in that anon and are taking this personally#like I wasn't even angry! if you felt my response was unnecessary and don't want to follow me any more then I get that#but you're acting like I fully unleashed on them and I really didn't#I know it feels from your POV like my response was inconsiderate but my POV is that it's minorly inconsiderate-#of artists' time not to check if they currently take requests before asking for one. Neither their question nor my response were huge deals#original anon if you're out there I'm genuinely not angry at you. If you message me again I'd be happy to link you more trans zoro art#and if you frame this sort of thingas a question like 'have you ever drawn/seen XYZ art?' you're more likely to get a rly positive response#and start a discussion and possibly even bag some new art out of it lol! my advice is to trick us like with cheese under a box trap
118 notes
·
View notes
Text
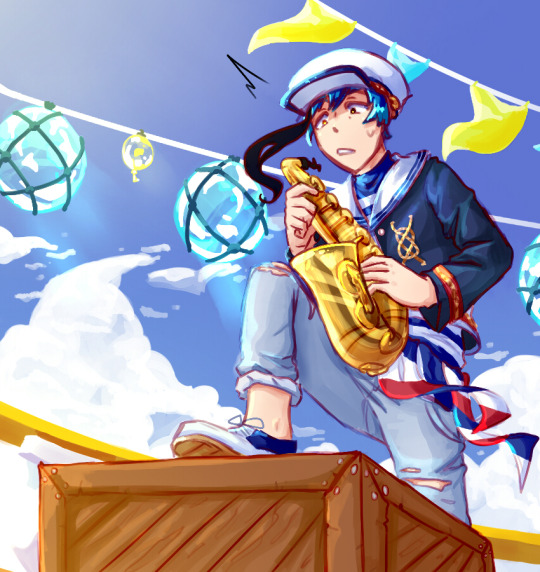
Huh-? Why's my sax's mouthpiece all messed up?
...
... Ah.
(wip progress + 'lineart' under read-more--)
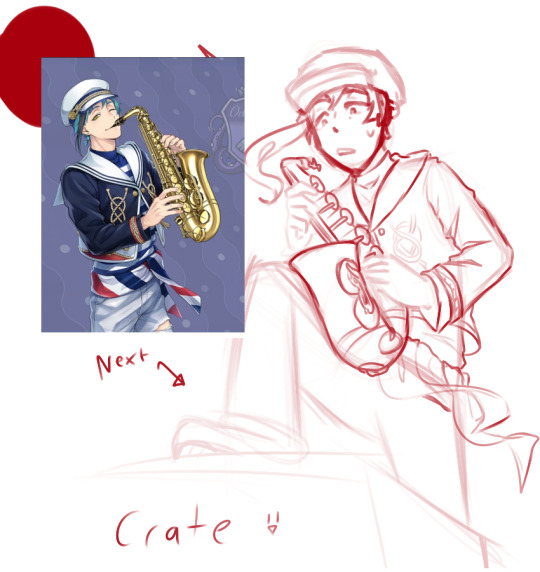
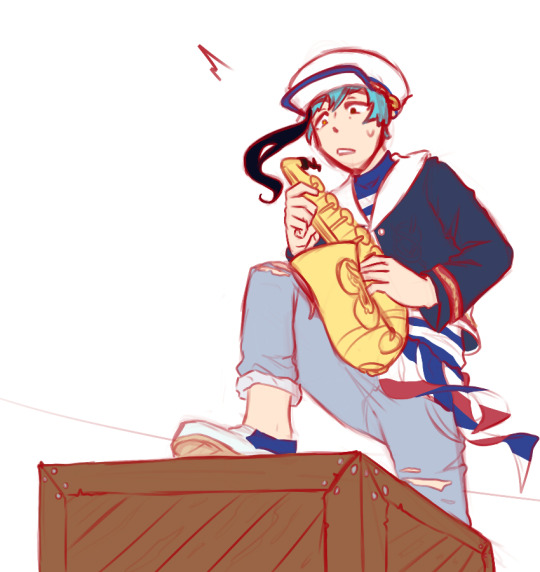
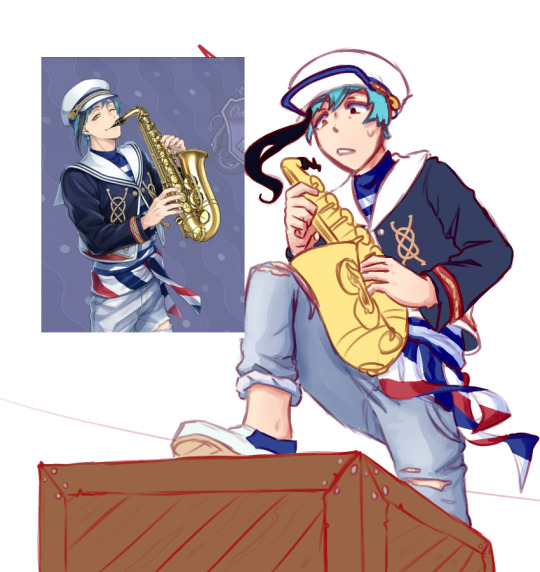
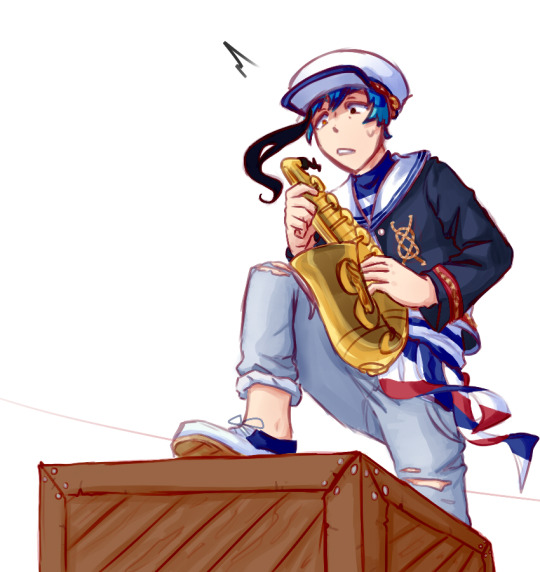
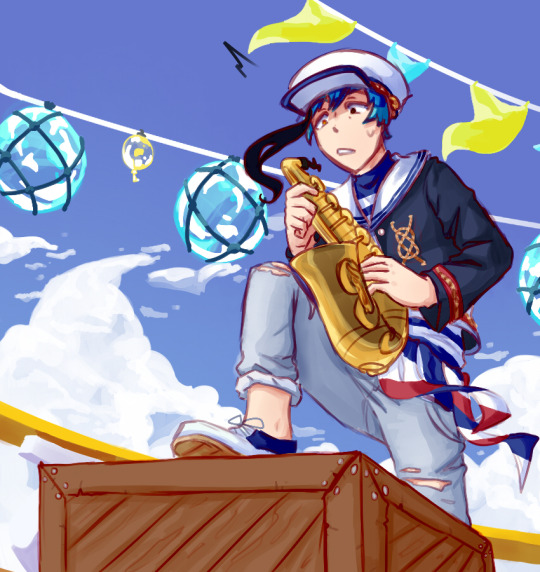
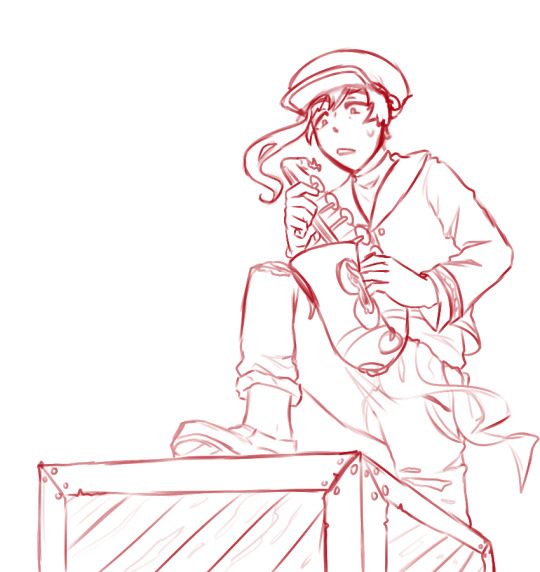
portfest outfits are so cool looking,,,
#twst#twisted wonderland#twisted wonderland port fest#floyd leech#art#ram's art#alright-! so i like port fest a lot-#mainly the aesthetics tbhhhhh#i'm biased i love water and aquatic themes and fish etc so its kinda obvious to me-#also!!! they play instruments!!!!!!!! look at them go!#unrelated never make me draw a saxophone again -#(i didn't even try and make this one 'realistic' because i . i cant draw a saxophone are u kidding me-#twst official artists show me your wayssss#also forgive the messy sketch extra underneath lol i am tireddddd#i just looked it up - high-end saxophone mouthpieces are made of something called ebonite-#apparently it's very durable - (though not. like SUPER tough like certain materials--)#I still think floyd could chew through anything if he tried hard enough so it's fineeee bitey boy 10/10#resin is used for less top tier saxophones - but he could definitely bite that easily too- win-win!#also also sorry rook i couldnt fit you in the sketch :[[[
202 notes
·
View notes
Text
I will be closing my Redbubble store at the end of the year, these are the only 3 illustrations left if anyone still wants to get anything (prints and other goodies like notebooks, tote bags, shirts, etc).
From now on my Inprnt store will be the only place where my art prints will be available.
#redbubble#inprnt#PSA#eleonor says stuff#art prints#I'm very sorry to everyone from Europe because getting things from inprnt is a pain (customs)#but redbubble pays MISERABLY to the artists#like literal cents sometimes lol even when YOU are paying upwards of 20 dollars/euros#inprnt pays artists much better#support living artists! the human kind of artists ❤
75 notes
·
View notes
Text

figured i'd do this again..bit early i guess..
#to cheer me up.. i feel bad atm.. these things don't even make me feel very good tho bc i'm such a narrative/sketch-based artist..#but Proper Beautiful Finished Pieces are what grab attention and look good at the end of the year all neatly lined up lol.....#so looking at a “yearly review” where i can only choose 'the best image of the month' (??) is like...What have i even been doing...#i did a month by month look back on twt for myself instead..but even that doesn't express the quantity of comic-based stuff..#that i do put a lot of time/heart into..but alas i feel bad bringing even them back..RTing/reblogging my own art simply feels bad lol..#AND WHY IS IT ALL B&W...trying to accept that i LIKE doing that and sketching and scribbling..not like i'm trying to like..Get Artist Job..#this year was so profoundly lonely at times bc i spent all my time drawing instead of socialising and trying to find friends....#please please please have achieved more of your dreams in the future so you can look back at 2023 and think..#It was good that happened so that it got me further to the future. Or whatever i guess.....................#regardless i did have a great amount of fun drawing and improving this year and dwelling deeply & heavily on witch hat atelier.#art-wise and emotionally....march july & september were the best months i think..AUGUST WAS SO WEIRD SUMMER IS SO EVIL ALWAYS.#thank you very much if you are reading this for enjoying & leaving nice tags & such like <3 i've realised how fulfilling that is to receive#really keeps me posting stuff here instead of keeping it all to myself in my head#i wish everyone in this world could have a safe and happy end of year. i wish living in this world were easier
69 notes
·
View notes
Last Seen Blogs

castlechurchbrewing-blog
Castle Church Brewing Community

alokkhandelwal
Untitled

capasclub-blog
Capas Club

sailor8818
OLDER MATURE MEN ONLY
cadelinhalways
crazy baby