#how to make flowers with cricut
Text
How to Make Flowers With Cricut: A Step-by-Step Tutorial
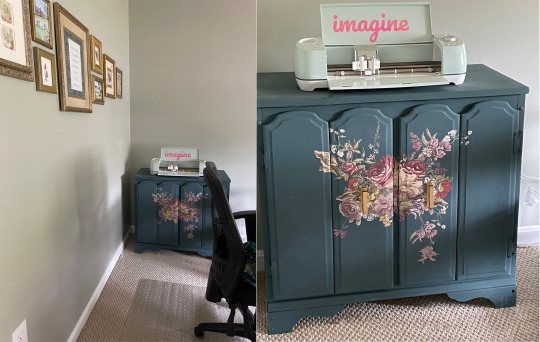
It’s been more than a year since I made a makeover in my room, and I am planning to make it more attractive. To do so, I am going to unbox the Cricut cutting machine that I had stored in my craft room. Currently, multiple ideas are running in my mind, but I want to make my room more calm to feel positive experiences. For that, I am going to decorate it with a customized flower made from the Cricut machine.
As an experienced DIYer, I create crafts regularly to keep myself updated on my crafting skills. I have done thousands of projects to decorate my home for festivals or casually. If you want to learn how to make flowers with Cricut, then you are in the right boat.
This tutorial explains the entire procedure for getting a child’s walk so that you can form a flower with a Cricut model.
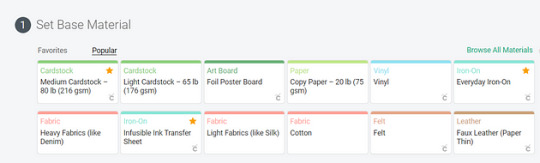
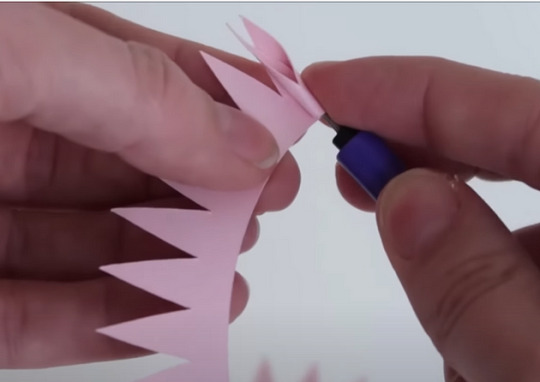
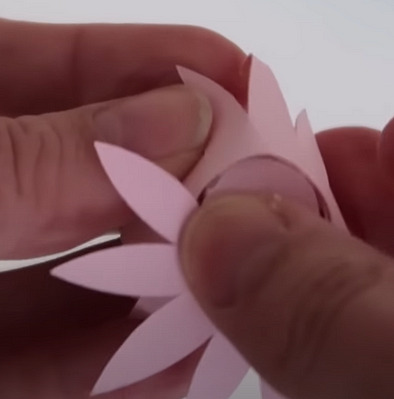
Step 1: Choose a Flower Design in the Cricut App

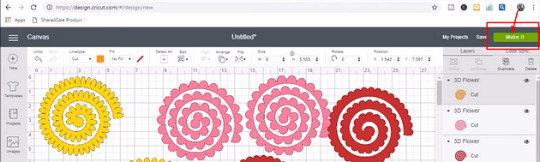
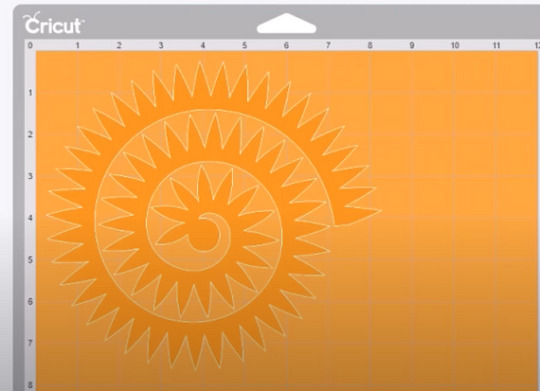
Step 2: Cut the Flower Shape With Your Cricut Machine

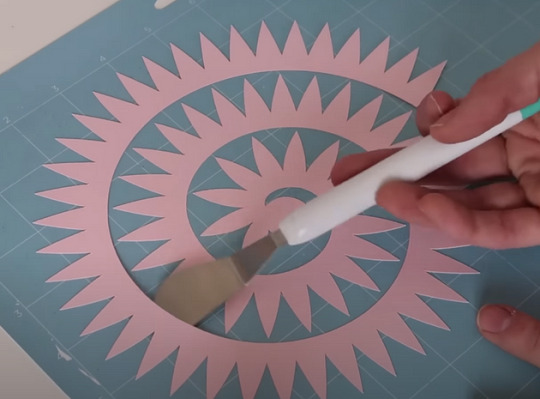
Step 3: Assemble Your Cricut Flowers

Conclusion
It doesn’t matter whether you are a pro crafter or a beginner; if you have the fire to learn something new, you must have found this blog beneficial. In the beginning, you will surely find it a little difficult to do this DIY project, but as time passes, you will become an expert. With the same process, you can make 3D paper flowers, rolled paper flowers, and so much more.
Frequently Asked Questions
Question: Which Cricut Supplies Do I Need to Make Flowers?
Answer: The list of crafting supplies that you need to have while making DIY flowers is as follows:
Cricut cutting machine
Design Space account
Cricut cutting mat
Compatible material
Quilling tool
Cricut glue gun
Strong adhesive glue
Question: Which Projects Can I Make With Cricut?
Answer: Cricut machines can not only cut various materials but also make the best projects out of them for various occasions. Some of the famous DIY projects that I can make out of this craft plotter are as follows:
Cards
Coasters
Keychains
Tote bags
Decals
Stickers
T-shirts and many more.
Question: How Can I Create Flowers With My Cricut Machine?
Answer: Read these steps as they will teach you the process using which you can create the DIY flowers:
First, download and install the Cricut app and create your account.
Second, choose a suitable flower template from the Images toolbar.
Third, change the size of your image and then tick the Make It option.
After that, choose the preferable material and load tools into the craft plotter.
Following this, remove the access material from the cutting mat.
Now, assemble all the materials using a glue gun, and you will get the final flowers.
Source: how to make flowers with cricut
Visit here For More Information: cricut.com/setup
Pinterest
Twitter
0 notes
Photo

How to Make Cricut Paper Flowers from the Flower Shoppe Cartridge -- Complete Step-by-Step Instructions for Assembly! #cricutmade #cricutdesignspace #diy #paperflowers #papercraft
0 notes
Text
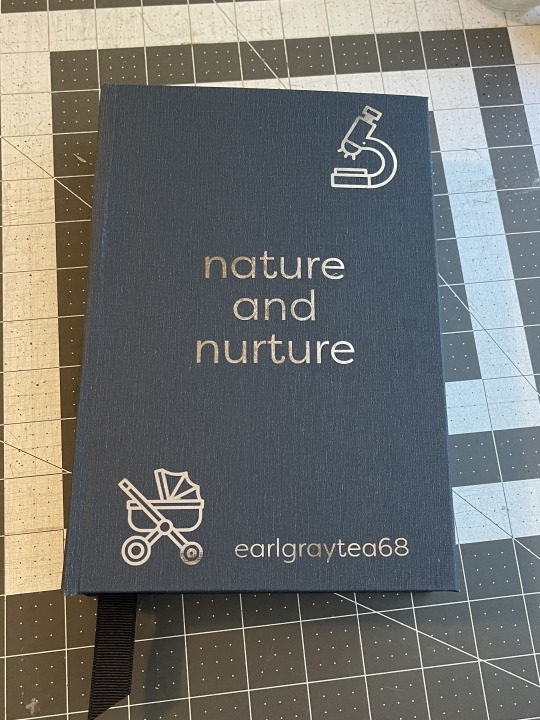
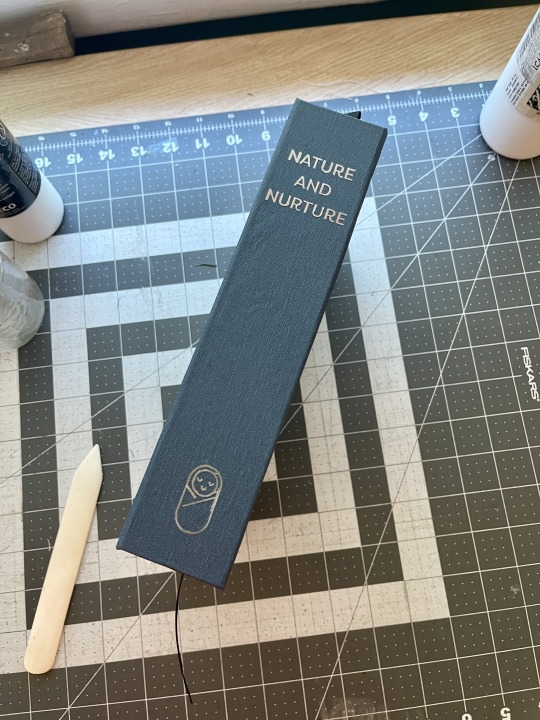
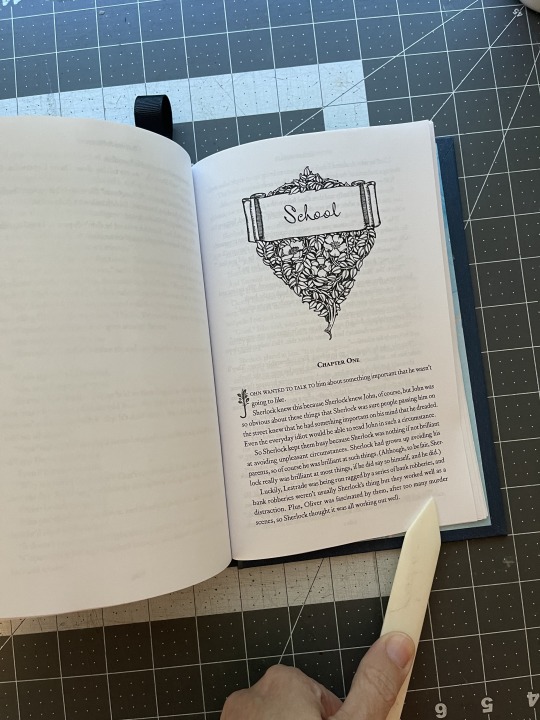
Bound: Nature and Nurture by @earlgreytea68


What an utterly fantastic fic! I'm happy with how the bind came out, but I have a few things I'd change if I did it again:
I wouldn't forget to put the ribbon in before the endbands
I would make the style more consistent. The chapter headings and the cover do not match at all.
I would be more careful when ironing the HTV on the spine
Not put a dang ampersand in the title on the header and the cover page. Argh.
I WOULD NOT MISSPELL THE AUTHOR'S NAME wow this is embarrassing
Also to note about this bind:
I was going to print the chapter pages in color. I used this lovely graphic and beautiful drop caps, but a 57 chapter fic when you don't have a color printer is maybe not the best choice. Half the sheets would have had color on them, and it would have cost a fortune to print.
I scavenged the end bands and the boards from a book I bought at a library sale. Just to see. I feel like the glue didn't stick as well to the smooth cover as it does to bare chipboard.
The HTV on the spine got messed up a little bit when I was ironing it on, but I was able to pick off the bits that were messed up and iron on a fresh set of lettering/graphic and you really can't even tell now! Whew. (Note to self: Cricut brand metallic htv has been the best of all the brands I've used as far as application goes.)
But all in all, I'm happy with it. It's just for me, after all, so it's okay if it's not perfect. That said, if I do this one again, I'd make a different cover that's more consistent with the chapter headers. (Like, if the author wants a copy?)
Bookcloth: Allure Bookcloth Indigo
Body Text: Corundum Text Light
Chapter Headings: MrKeningbeck Pro
Drop Caps: FLOWER
Inside title: FLOWER and MrKeningbeck Pro and Filson Pro
Cover: Filson Pro
All icons from The Noun Project
#fanbinding#ficbinding#bookbinding#sits bound#bbc sherlock#sherlock fic#earlgraytea68#nature and nurture
179 notes
·
View notes
Text
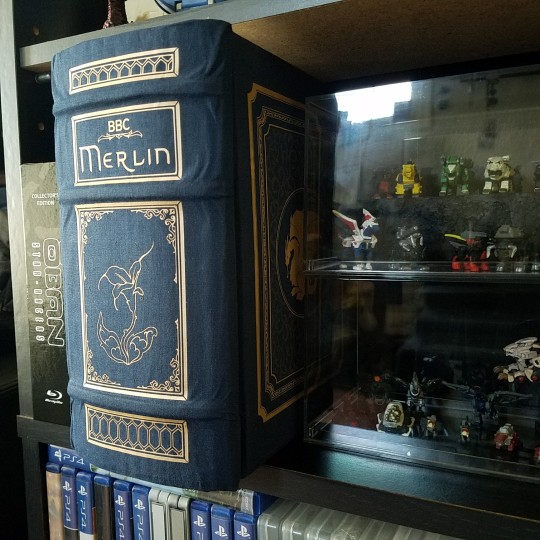
Its finally done!!!
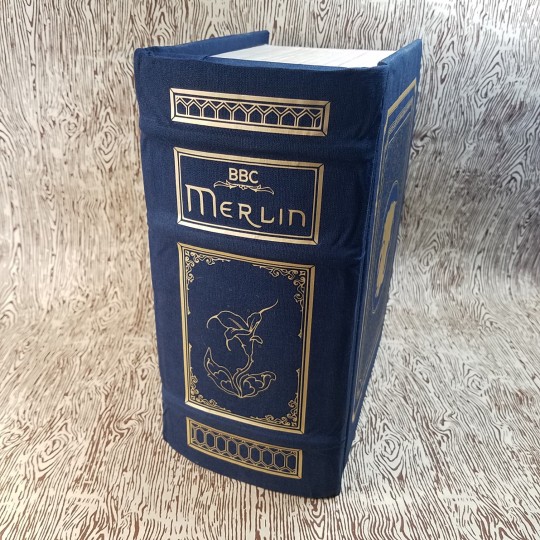
After getting back into BBC's Merlin recently (read: a couple months ago) I realized I no longer trusted streaming services to still have it available long term and managed to buy a complete DVD box set.
But because the slip case had quite a bit of wear to it (and due to some minor scopophobia) I made it a box that looks like a book!
(More rambling info & video under cut)
Materials:
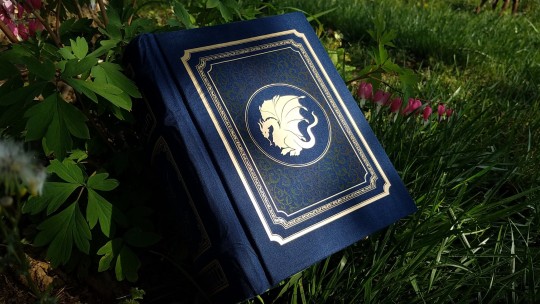
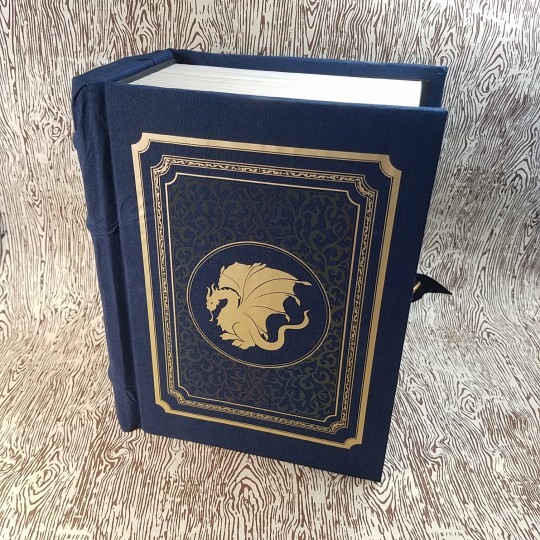
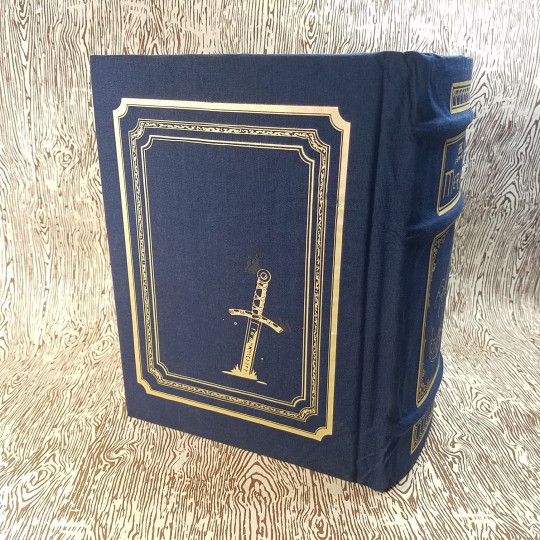
The base construction is cardboard and paper (used to cover the exposed cut edges and strengthen corners). The box's faux paper edge is a printed texture on cardstock that was then waxed. The interior is black cardstock with silver vinyl. The 'book case' is that same cardboard construction with faux raised bands (made with some scrap foam I had) wrapped in Cialux's night blue bookcloth (hence the minor wrinkles) with Cricut HTV in metallic gold and 'reflective rainbow'.
Design:
Cover: Obviously Pendragon logo had to go front and center, no argument on that one. (Also partially cause Merlin doesn't really have his own symbol to him? The triskelion just doesn't make sense to me because although Emyrs is a symbol for the druids, Merlin himself isn't a druid and I'd imagine would instead choose icons of Camelot and Arthur to represent himself besides.) ANYWAY-
Behind the crest, filligree containing a blade and the sidhe staff in that subtle reflective HTV that blends into the bookcloth exactly how I wanted until it catches the light (something something, hidden magic in the background something something).
(Appologies for the unsteady hands)
Spine: Mortaeus flower! Because it really felt like a turning point for the two (you've known each other... what a week? and you're going against your father to travel to some far off cave to get a flower?? that's some good as dnd-adventuring-party type shit I love it). Minor detail are the top and bottom shapes: pulled from some cool windows we see a lot in season one (I just think there' neat, okay?)
Back Cover: Excalibur with two butterflies cut from the blue-toned area of the rainbow HTV :)
And finally the Inside!: The cup of life! Because it felt just a little empty. I'm still tempted to put something small on the bottom left corner of the inside cover... maybe a crown? not sure yet

And that's everything! Thanks for reading! If anyone wants to make something similar for their own dvd set I'd be happy to share the .svg or .png file of the cut outs, just shoot me a message 👍
Before you go, wanna know the worst part about this project???
.
.
It doesn't even fit on my DVDs shelf :)))) It sticks out by about an inch and a half 😭So we maaay have to be relegated to the 'actual books' bookshelf...
#merlin#bbc merlin#loooove how this turned out besides the wrinkles and a fuck up I had around the flower#but thats what I get for trying to do raised bands with bookcloth like that i guess lol#(typically you'd do leather and not bookcloth (which has a paper backing) buuuuuut I don't have the kind of spare funds for that)#I think the construction of this whole think took about a month on and off?#but I'd been figuring out what I wanted the designs to be for a month or so previous to that#very happy to be done with this so I can finally put time back towards actual book/fan binding again haha#my art#my posts
48 notes
·
View notes
Text
The first batch of pictures for Amoré's character journal are here! Also I have been so super sick that I've literally had nothing to do but to work on this for like almost 2 weeks so...
The cover to cover tour officially starts here. All I can say about the front & back is that I lament my lack of experience with my Cricut when I made these decals. I only had 2 "fun" colors to work with at the time & I was still getting comfortable drawing in Procreate, so my silhouette art leaves a lot to be desired compared to some stuff I've made recently. I also found it's incredibly easy to burn this leather book.
But she's volume one, everything with her is a learning experience, & I realized as much as it helps to have a mini heat press for tight corners & small spaces, the cloth barrier they suggest you use between the vinyl & the iron tends to make things harder to press on this scale. So instead I gotta quickly tap straight on the transfer film & hope I don't burn anything around it :(´◦ω◦`):゚゚
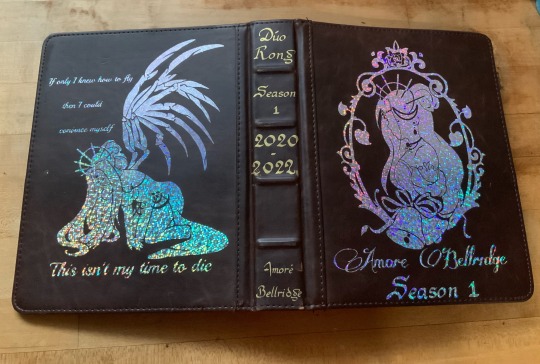
So at the risk of thoroughly exposing my inner theater kid, Amoré set the precedent with how I went forward creating campaign characters. I started off collecting 5 songs to make a mini story arc (almost like a show choir set list 🙃) that helps me figure out an outline for the kind of story I wanna give them.
Somehow Amoré ended up with a truly horrendous blend of rock & theatre. Absolutely incredibe. No wonder she's always such a dramatic bitch.
It was a lot easier to go in & add little decals around these lyrics. I'm definitely cursed with the Too Much™ gene, but I enjoy the little pops of color they give ✨ plus it justifies me hoarding all these vinyl scraps printing stuff this small lol.
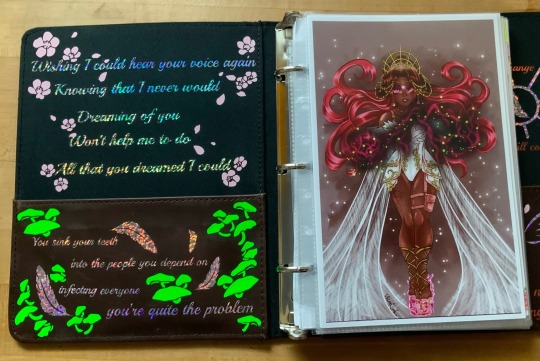
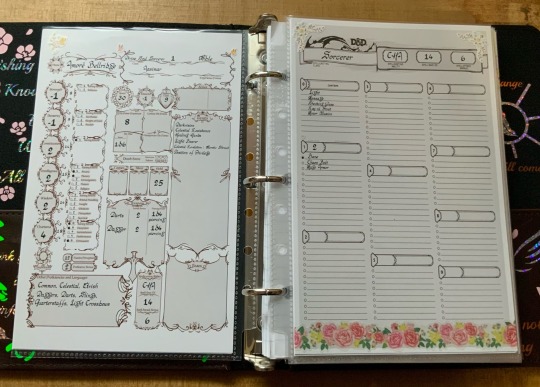
Stat sheet!
In all honesty, as my first character I had no fucking clue what I was doing when I placed these & if I could go back & change one thing I'd probably swap her Intelligence & her Wisdom. She’s definitely more people smart than book smart.
But everything else is...very accurate. She has all the upper body strength of a chicken nugget. Plus on top of the (already) negative I traded disadvantage on everything DEX for magic crystal shoes that can be periodically harvested. Just a way for her to carry around the family fortune without actually having to return to the vault✨
For something that started so average, her CON became a monster & always comes in clutch for her alcohol tolerance. I've played variations of her across a few different one shots & I always manage to roll well for anything alcohol related. The dice do respect a bit 🤣
Spells on the other hand, I floundered with a lot at first because we’re not a combat heavy game, but then I found Chaos Bolt & that was that. It’s essentially Amoré in spell form & I’ve had a ton of fun with it over the years. Also Mage Armor cuz my girl is SO DISTRESSINGLY SQUISHY.
Cantrips were more or less a bit of a toss up. Message was fun for the sheer idea of her using it to talk shit during social events without being caught. But aside from Light serving fun backstory purposes the other 3 are kinda just what looked fun ¯\_(ツ)_/¯ unless you count the idea that she would absolutely delight in zapping handshakes.
From there, I wanted to extend the world map made by our wonderful DM @cappierong into a full scroll. Ya know, for the aesthetic ✨

Our campaign started in Civania, where Amoré's main Estate is. I just wanted a quick mock up to reference, so I edited a preexisting picture I found that checked all the boxes (large, on a plateau, accessible only by bridge) and then absolutely smothered it in flowers.
But anyways... This is primarily where Diana & Amoré grew up together in their decade of backstory ✨
There was probably waaaay to much back & forth trying to keep the continuity between stuff I've already drawn & this big reference. But I think it turned out pretty ok? Not like if I make a mistake anyone will really know lol.
Scaling was also another big issue I had, & I moments where I thought something was too big I just kinda handwaved it away like "ehhhhh she's from a stupid rich family." But now I have a NEED to draw baby Diana & Amoré around like, the statue gardens or something cuz I feel like certain parts of this place are definitely ominous 👀 especially for children...

And lastly we have the back cover & the High Noble political relationship map! I normally have this closer to the front but for layout purposes it'll be here. I kinda feel like I need to do more for the decoration of it but I can’t think of anything else to add at the moment.
Sam if u read that no you didn't.

But now! Other than a family portrait that I've always wanted to draw, I think I'm ready to move onto the art for Season 1 : Arc 2. It's a pretty hefty amount of art in comparison to others, so I gotta get busy. Especially since I think I'm gonna have to draw a few comics *sobs*
If you made it this far, thanks so much for reading! I'm always excited to talk out our little idiots so thanks for indulging me ❀(*´▽`*)❀
#duo rong#dungeons and dragons#dnd character scrapbook#duo chronicles#amore bellridge#diana blackthorn if you squint#dnd#dnd character#dnd pc#dnd oc#character creation#character study(?)#dnd backstory#season 1#dnd art#dnd campaign#campaign art
34 notes
·
View notes
Text
player: Kostas Tsimikas
words: 914
request: Kostas Tsimikas - no pref - 500 - 900 - So Kos and her have been dating for a few months now but no one at the club knows. So when, at the club Christmas party, they end up under the mistletoe (I'm sure Robbo decorated every single doorway with it) and he's like "let's give them a show" and kisses her in a way that steals her breath away
A/N: a huge thank you to @percervall for the help with this one. I am blowing kisses at you, I couldn't have done this without you.

This year, things are being done a little differently at the club. Usually, menial tasks were delegated to anyone and everyone in order to get them accomplished and it doesn’t usually matter who does them, as long as they do. The design of the room and organising it was left to someone that the club paid and it was usually done to the incredibly high standard that you would expect. This year, the players have been tasked with something each.
Kos has the honour of placement cards. She watched him agonising over designs at home - wanting to make sure that the people he knew well enough had something that was tailored to them. He’d purchased a Cricut and made them this way, setting them all out across their dining room table to see how they looked laid out. He’d tweaked them, bought fancy pens and added small flourishes.
It wasn’t something that took over, but he certainly took pride in the ones he made and it showed as he gently laid them out on the carefully decorated tables. The room looks amazing, Virgil and Alisson had done an incredible job, though she does suspect their wives may have had a hand in helping. The colour scheme was spot on and certainly provided the perfect photo opportunity that the club would no doubt be taking.
Out of everything available, she expected Andy to be in charge of Secret Santa, or something fun. Upon finding out that he was in charge of flowers and in turn, mistletoe, she had mixed expectations of how it would end up. And yet, the bouquets that adorn the room and complete the tables are stunning. He walks around now, the usual “Robbo” grin upon his face as he interacts with everyone while wearing his flower crown of holly, berries, mistletoe and a few colour scheme flowers in there too. When he turns around, exposing his back to her, she notices a little sprig of mistletoe tucked in his back pocket for unsuspecting victims.
“He’s going to get us, you know.” She comments, holding her wine glass closer to her chest as she huddles close to Kostas who has approached her far too quickly for her liking. He scrambled through the crowd of people who had been filing in now for the past half an hour and the once empty room they’d entered is now bustling with people and music is now being played through the speakers.
“He doesn’t know. He won’t.” But deep down, Kostas knows that Andy knows. He’s seen the looks being thrown his way and he knows it’s a matter of time before they’re outed. It may not be tonight, but this was the start of it. Robbo would watch their reactions and slowly start to make little comments when they’re back in training. And Kostas knows he’ll struggle to hold it all together but Andy thrives on reactions and he’ll keep at it like a dog on a bone.
“You know what he’s like.”
“I do, and he won’t.”
He wants nothing more than to pull her closer to him by the small of her back, his hand snaking to her waist and press his lips to any part of her that she’ll let him - whether that be her hairline, her temple, the space between her eyebrow and eye, her cheek, nose or of course, her lips.
He tried to get as many kisses as he possibly could before they headed out in separate cars, not wanting to arouse any suspicion because despite the few blissful months of dating, it’s come at the cost of it being in secret. Kostas is certain that no-one at the club would have an issue with their relationship but he didn’t want it out there just yet and initially, she’d wholeheartedly agreed. She’d seen too many relationships collapse once it became public and yet, it was becoming harder to keep it a secret. Not because others were catching on but because neither of them wanted to stay away from one another any more.
“Well, looky what we have here.” Andy’s voice sounds behind them and they both groan in unison. “My favourite “non couple but are so a couple” couple.” he grins as Kostas shoots him a look. “Oh come on. If you keep giving me that look I’ll be forced to bring out the gentleman doth protests too much, methinks line.”
“So leave and we won’t have to give you that look,” she comments, giving Andy a little nudge with her elbow and a crooked smile.
“Oh it’s we now is it? You said that so naturally.” her smile falters and she realises too much has been said. She knows Robbo knows and the look that she spots on Kostas’ face confirms this.
“Fuck it,” her beautiful Greek boyfriend hisses, downing the rest of his drink before he moves quickly, swiping the mistletoe from behind Andy’s back and holds it above her head. “One of the team’s biggest gobshites isn’t going to stop so what do you say? Kiss me?”
“Where did you learn the word gobshite?” Robbo asks but his words are drowning out as she steps forward, toe to toe with her secret boyfriend. Her hands move to his waist and to his nape. When her head turns this way, his turns that way and they give a nervous chuckle to one another as they begin to lean in, noses rubbing together before their lips finally meet.
#kostas tsimikas x reader#kostas tsimikas imagine#kostas tsimikas one shot#kostas tsimikas blurb#kostas tsimikas drabble#kostas tsimikas fanfic#kostas tsimikas fanfiction#football imagine#football one shot#footballer imagine#footballer one shot#football blurb#football fanfiction#football fanfic#football drabble
32 notes
·
View notes
Text
Binderary 2023 Wrap-Up!
Binderary 2023 is over, and I come bearing some stats, thoughts, and a compiled list of my QOTD answers! :3
Stats:
Books planned: 7
Books completed: 7/7 (woohoo!)
Fandoms: 3 (Yuri on Ice, Harry Potter, and The Sandman)
Total word count: 340,654
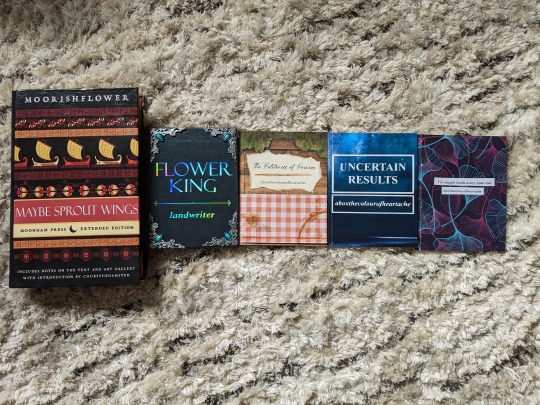
List of books (from left to right):
Maybe sprout wings by @moorishflower
Flower King by @landwriter
The Politeness of Princes by @aboxthecolourofheartache
Uncertain Results (also by Box!)
I'm caught inside every open eye (also also by Box :3)
Not pictured (on account of them being given away as gifts!):
My Immortal by Tara Gilesbie (aka xxxbloodyrists666xxx) (community typeset by @renegadepublishing)
Until My Feet Bleed and My Heart Aches by @kazliin (typesetting by @ziezie13 <3)
QOTD answers under the cut (and these are copied directly from our DW post, just with added tumblr @'s!)

1. What does Renegade mean to you?
Renegade has, in all honesty, probably changed the course of my life! That's not hyperbole--it's had such a huge influence on my hobbies, my friendships, my academic trajectory, even my career. I was still in undergrad when I found ASH's post on fanbinding, and I was very lost as to what the next steps would be. And like so many others experienced, the pandemic only made things even murkier and more isolating. Then I found ASH's manifesto in June 2020, worked up the courage to join the Discord in July 2020, and found a community of like-minded weirdos who were just as passionate (if not even more so!) about their favorite stories, and a craft that I fall a little bit more in love with every day (well, most days. fuckin printers man XD). I wrote my honors thesis thanks to Renegade; I've made lifelong friends thanks to Renegade; I have my current job, in a field I love, thanks to Renegade. (My first Rocky Horror Picture show at Havencon 2022? All thanks to Renegade :D) This really feels like my forever fandom home-- even when I jump around from fandom to fandom, there's always a wonderful and supportive community to fall back on. In short, I really love it here, I'm so pleased with what we've done so far, and I can't wait to see where we go! ❤️
2. Favorite Fic
As everyone else who answered this, this question is IMPOSSIBLE. However, if you put a gun to my head and told me to answer right now, I'd have to say Tell Me About the Big Bang (my binding of it here!) It's one of the fics that has touched me most deeply and which has probably had the greatest influence on my writing. It was one of the first fics I'd ever bound, and I really wanted to rebind it to see how far I've come!
3. One thing you'd like to learn more about
GOD SO MANY THINGS. Backing! Headband techniques. Chisel trimming. Edge gilding. Tiny books. More advanced Cricut techniques. More cohesive and professional-looking graphic design. This hobby is really a dozen hobbies in a trench coat, and there's so much to explore.
4. Paper!
For my textblocks, I use 20 lb. cream Hammermill paper! I order it in 11"x 17" and get it cut in half for short grain, like a lot of other folks at Renegade. Recently I've started experimenting with quarto-sized Legal (8.5"x 14")and fell in love. I also want to try a bunch of the other paper that folks have suggested (looking at @robins-egg-bindery Mohawk Via o.o). For my endpapers, I usually use scrapbook paper from those scrapbook paper packs you can get at Michaels and Joann's (and when they're on sale...WOOF)
5. Cloth!
DUO BOOKCLOTH MY BELOVED. God I wish I'd gotten in on the Renegade group order - but ah well. Big fan of making my own though! There are just so many options to choose from, so it really expands what you can do (again: a dozen hobbies and crafts in a trench coat)
6. The Glue War
LOVE me some PVA! I know that it gives you less time to do things, but I get impatient XD. Plus it's cheap and easy to find and ready to use right out of the bottle, which is great. I've tried my hand at making starch paste + PVA with very mixed (ha!) results, although I had a wonderful time with some methyl cell that @simply-sithel gifted me at Havencon last year <3 So mayhaps will have to buy more of that for a future project!
I also love my Cricut Explore 2, Charlotte! She holds up very well, although I think she's due for a blade refill soon. I've just been setting my pressure higher and higher LOL
7. Machines
Love my Epson ecotank! I recently bought it--for the first two years I was going to my local print shop because the quality was great and I had a discount card. Unfortunately the discount card eventually expired, so I decided to bite the bullet and get my own printer. I really love it! I didn't want to have to deal with laser and printing in color can get pricey--the cartridges are just so goddamn expensive, although I do think laser prints in higher quality. Mayhaps a future purchase, because I'd really like to experiment with foiling!
8. Favorite binding technique
Ooh this one is interesting! I know which part of the process I enjoy the most, which is sewing! Kettle stitch my beloved. ALTHOUGH I am a sucker for the French link too--it's just so pretty! And we just had a wonderful workshop put on last week by @queercore-curriculum on their...embroidered binding/long-stitch binding (??? I don't know if there's an official name for it yet), which I LOVE. Glueless bindings are SO cool and I would love to experiment more with them.
9. Your best tip/trick
Ooh! Hmmm...I'd say: never bind while you're super tired/hungry LOL. I've made many a preventable mistake very late at night because I wanted to get something cased in or glued before bed when I probably should've waited till morning XD That being said, on the flip side I think you should never be afraid to experiment! Go hog wild!!! Use those glitter pens!! Try out that fancy silk for your endbands!! Try that new binding style! And if you fuck up, remember that's okay too! These are handmade objects and those mistakes are proud proof of that, and of your journey as a fanbinder. Stick 'em in the channel on the Discord, laugh and (maybe cry a little XD) about it, and then keep going. tldr; ya live and learn!
10. Favorite Detail
Ooh, this one's hard! I love leaving little Easter eggs in my designs. I'd say my favorite is putting my maker's mark on things! My imprint is Moonham Press (a fun mix of my usernames, chubsthehamster and chubsonthemoon), and the logo includes a little crescent moon. I'd actually been binding for about two years when I finally made the imprint--I used to think that it was...idk, kind of weird to put myself in the book? Like I was taking away from the story inside it. But then I got to thinking--well, hey, I'm the one who made this book, right? If nothing else, putting my mark on it tells someone who may pick it up one day that I was connected to this story. Some conversations with some folks at Renegade during Havencon 2022 also helped me embrace this. So these days I put my imprint logo in the typesetting, and I also put it on the cover somewhere! My favorite spots are either on the spine, between the title and author name, or on the back cover, in the bottom left corner :D
11. Spines
Spines are the bane of my existence. Haha, jk. They're mostly just tedious, since they're one of the only parts of the process that still require precise measurement (I've cut templates for everything else by now, and I use my guillotine to cut boards, so that goes super fast). For my thicker books I use Bristol board; I actually still use the same sheets I bought in 2020 when I first started binding--I didn't know how much I would really need so I think I ordered four massive sheets which will probably last me for ten years LOL. For my thinner books, I use Davy board, which is a pain to cut but gives the book a really nice board feel. And for my paperbacks, the spine is just the cover, which I make out of kraft paper for the backing + the decorative paper (usually scrapbook paper or something I've designed and printed)
12. Mistakes/Fails
Ooh BOY are there many. My most recent was my experiment with making a hardback quarto letter. I made the hinge waaaaay too small so when I tested the case the textblock was sticking out of it LOL. But I've been pretty lucky--this is only the second case I've had to remake in my time as fanbinder *KNOCKS ON WOOD*, but my printer fuck-ups when I was trying to figure out how to print on legal sized paper (since my printer doesn't duplex) probably make up for the luck I've had in the case department XD. Casing in, though--I think I've had maaaaaybe...two or three case-ins where I was completely happy with the results. A large part of this is because my guillotine doesn't cut completely straight, so my squares are never even LOL. But hey, I'm not getting paid for this, and I'm having fun, so eh.
13. Process
Ooh, interesting! My process has remained largely unchanged--I think the only thing that has really changed is now the frequency at which I print. I used to print at a print shop, so I'd make typesets in large batches--usually two to four books, sometimes more (I think the most I've done at a time is five?), and I'd make a day out of it. Now that I have my printer at home though, I can do things in smaller batches! I can also test print things, so I've been able to get a lot more experimental with my books sizes and my covers. Everything else has remained largely the same--the first book I did I typeset in MS Word, but everything after that I've all done in Affinity Publisher. I typeset > print > bind > take pictures! I really like how different each step is (like I said, twelve different hobbies in a trench coat), so there's always something different to do if I get bored. My favorite parts are probably designing covers and sewing the signatures!
14. Storage solutions
OUGH. I have one of those rollaway drawer thingies for all my tools, a dozen scrapbook paper containers, several large baskets for my vinyl and cloth, a hanging stand for my larger sheets of decorative paper, a standing desk which holds my Cricut and printer (a few of the aforementioned vinyl baskets are under this desk too), another rollaway basket thingy that holds my printing paper and my press (also under the standing desk), another desk which holds both my two guillotines and cutting mats (and under that desk are all my scrapbook paper containers and Cricut mats), and a final third desk where I keep all my sewing stuff and where I do my typesetting and other sitting-down parts of the process. And of course my shelves for all my books! This doesn't really give a sense of where everything is, but it's actually fairly organized, and for the most part I know where everything is (except for my FUCKING bone folder god that thing is always ending up in places I do not remember putting it XD)
15. Your Workspace
Ah, see my answer to 14! I'll probably upload a photo here later XD
16. Dust jackets and covers
Oooh, I've never made a dust jacket before--I don't think my printer could handle the wonky paper size that it requires, but they look really cool and I'd maybe be up for making one someday! And covers! Both my greatest love and my greatest enemy. They're super fun to design, but this is one part of the process that always feels like an uphill battle for me! There are so many skilled and talented folks in Renegade with GORGEOUS covers, and it's always a mix of being incredibly inspired and getting some design envy--but either way it's very motivating to keep me out of my comfort zone and to always keep trying new things. I use decorative paper and scrapbook paper mostly for the base material (although I've begun experimenting with designing things digitally and printing them out on Epson matte presentation paper), and then the rest is fuck it, we ball. I usually design the cover last, so I have an entire typeset and title page already when I begin, which makes things a little easier since I have an already established aesthetic to work with. My font selection is kind of determined by how small the text for the title/author name is, since my Cricut isn't great at cutting super small sizes (Times New Roman, funnily enough, is one of the only fonts that it can do at smaller sizes LOL so a lot of the text on my covers/spines are in TNR). I'm excited to keep improving and experimenting in this area!
17. Published inspiration
Ooh!! This one's fun--when I first began making my Master pages in Affinity publisher, I literally grabbed the first few books I saw on my shelf and said 'alright, this looks good' and haven't looked back since LOL. Those books were Vintage's editions of Toni Morrison's novels, Picador's Gilead by Marilynne Robinson, Vintage's edition of Willa Cather's The Song of the Lark, Fall River's omnibus editions of Shakespeare and Sherlock Holmes's works, Penguin Classic's Deluxe edition of Jane Austen's novels, and a few others that I can't remember. I looked at all these books, found what they had in common (for example, a simple title page before the decorative title page, the use of a single graphic or design at the beginning of each chapter, etc.) and went with that! I don't usually take inspiration from specific books, EXCEPT for a project I'm currently working on which I'm super excited about :3 More TK here eheh (ADDITION 3/7: I was talking about Maybe sprout wings here LOL)
18. Illustrations
FANART MY BELOVED. I LOVE including fanart in my books, because it's such a lovely demonstration of the communal nature of these stories and it's so fun getting to collect all the pieces. For free use graphics my favorite sites are Adobe Stock images and Heritage Library. Heritage in particular has a beautiful selection of free vintage graphics packs that I've used for years now. And very occasionally, wingdings fonts will have something I really like XD
19. Favorite tool
Despite my gripes earlier about always misplacing it, I ADORE my bone folder. It's a funky lil dude and it makes all my edges nice and crisp! I can't wait for the retreat bone folder fufu :3 Also a very big fan of my guillotine, which despite its flaws makes my life a hell of a lot easier in the long run, as well as my presses, which were handmade by my dad and do their jobs very well (squiiiiiiish)
20. Favorite part of the binding process
Oooh, this one's fun! I really like the actual construction of the book--sewing sigs is always relaxing and has been one of my fave parts since the very beginning. Recently I've started to really enjoy designing covers, especially if there are a lot of physical elements (like layering scrapbook paper or playing around with Mod Podge).
I had the absolute privilege to hold @clovenhoofbindery's copy of Away Childish Things at Havencon last year. Literally every book Space makes I fall in love with, and her designs are a HUGE inspiration for me. Everything from the typesetting to cover design to physical construction--I lose my marbles every time.
21. Inspo: The binder that inspired you!
Ohhh this one's so hard! Literally every time I check the #show-off channel in the Discord I'm struck by so many beautiful books. I'm going to cheat and name a few people here, but this list is by no means comprehensive and doesn't even begin to cover everyone I could name.
Everything @pleasantboatpress binds is just so beautiful. Their color choices are always inspired and their headbands make me want to cry! Their bind of Unconditional in particular had me foaming at the mouth.
The quality of everything @zhalfirin-binds makes, likewise, always blows me away. Her books are so polished and professional, and her photos make me feel like I'm in a museum when I'm trawling her blog for inspo!
@simply-sithel's tiny books are literally the coolest things ever! I'm still working my way through the Binderary vids and I can't wait to get to hers. Six plays with form in mind-bending and truly innovative ways, and her blog is wonderland of tiny and fantastical book creatures.
@teleportbooks's binds are the definition of classy and refined. They're so good at designing their books according to the contents of the fic--their binding of Thirty-Three Lashes in particular is just the best design centered around fic content and title I've seen. Their designs always make me melt a little when I see them!
@no-name-publishing's endbands are to DIE for. Like fr I am in awe every time!!! And Kam's cover + title page designs are a huge source of inspo for me--forever in love with this bind of theirs, with the beautiful painted cover + matching endpapers T_T
And of course!!! I (and everyone else) wouldn't be here without our beloved leader, @armoredsuperheavy. He's the first binder that ever inspired me, and he continues to do so today!
22. Inspo: The fic that inspired you!
My original answer was also my answer for 27 ("First bind"), but I'm gonna say something a little different here! I usually know pretty quickly whether I'm interested in binding something, but very rarely has a fic gotten me hook, line, and sinker the way @that-banhus's King of Infinite Space did. Like, from the first line I was like "oh god I need to hold this one." And eventually I did! :3
23. Author spotlight: Someone you've bound
AHHHHHH this one is so hard too! I've bound a good number of authors over the years, many of whom are my dear friends, and to spotlight only a single one would be impossible. So I'm just going to poke @dodici12, whose killugon fic See You Upside Down is one of the best killugon reunion fics ever in my very humble hamster opinion. Hiiiii Tessa ilysm <333
24. Author spotlight: Someone you'd like to bind
OOOOOH. Many, many fics are in my queue. I'll keep them to myself for now, since I prefer to ask for author permission via DM, but atm I have my eye on a few Good Omens authors whose work I adore!
25. Favorite bind by you!
THIS ONE IS SO HARD AJLSKDJF. I love all my babies so much and I'm proud of what I was able to accomplish and what I learned from each of them. However, if you put a gun to my head and asked me to choose right now, I'd have to go with my most recent bind of Maybe sprout wings by @moorishflower. I'm really pleased with both its construction and particularly the curation of its contents, which includes the work of nearly a dozen people. It was my attempt at capturing the communal nature of fanfiction's creation and dispersal, and it was also my Big Project this Binderary. I'm ridiculously fond and proud of it!
26. Favorite bind by someone else!
THIS ONE IS SO HARD TOO HELP. Okay this is only one of my many many favorites, but dragging Space back out here again to say that her bind of Away Childish Things permanently altered my brain chemistry. Like, the cutout!!! The patronuses!!!! The title page cutout???? THE KEY??? Again, I held this book in my hands IN PERSON last year and I'm still not over it. The quality of the work is absolutely bonkers crazy incredible and I think about it Often.
27. First bind
The very first fic I ever bound was On Stranger Tides by @theroyalsavage. It's still one of my favorite fics ever today--it has the perfect blend of action/adventure, romance, humor, and fantasy. It gives me the good ol' "roaming the high seas with found family and magic and pirates" ache. It holds a very special place in my heart!
FINAL THOUGHTS
28. Latest bind
See 22! But for funsises, I'm also ridiculously fond of the binding before that, of @aboxthecolourofheartache's fic The Politeness of Princes, because I got to do lots of fun arts and crafty things with the cover!
This was my first year doing Binderary, and I had such a blast! It's so crazy seeing how far Renegade has come, from a little Discord for book shop chatting (ASH mentioned in one of the talks how it was just called, like, "Bookbinding Discord" at the beginning LOL) to now. We're well on our way to a proper organizational structure, with several yearly events, in-person meetups, and thousands of members all over the world. And we have so much more planned! It feels truly special, and I'm so grateful to everyone who makes this possible.
Okay!! That's all from me for today, folks. If you made it this far, thanks so much for reading! <3
97 notes
·
View notes
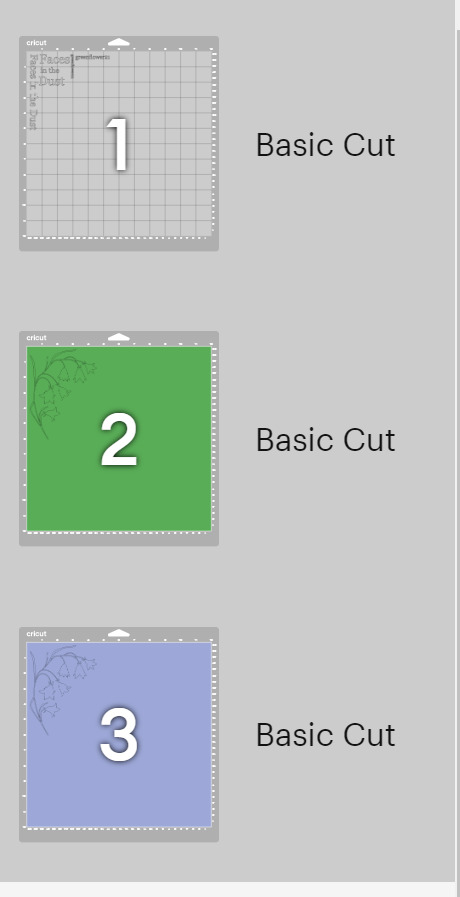
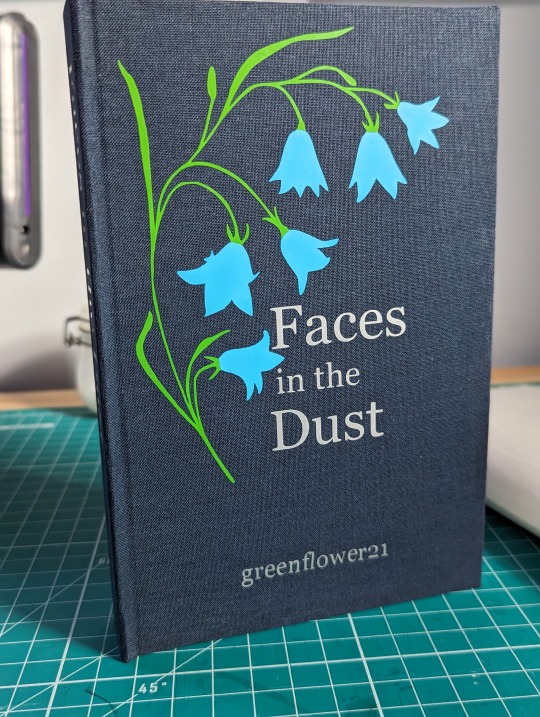
Note
Hi, just wanted to say your binding of "Faces In The Dust" looks gorgeous!!! Could I ask, how did you make the title + decoration and apply it to the front cover? :O
Hello!
The cover designs are cut from vinyl with a cricut machine.
In this book's case I used permanent vinyl. Which is essentially very sticky vinyl. There is also HTV(heat transfer vinyl) which you cut out and then adhere to the material via heat (such as an iron).
I tend to use cricut to design and then cut most of my covers. The cricut is a cutting (and other things) machine that has a digital design space I run on the computer to help me design covers.
I typically like to start by 'making the case' out of colored blocks in the space that are the size of my actual cover so I can know what things will look like when I put it all together. I also color my items to match as close as possible to the colors I plan to cut them from as well. I mostly do this because I have aphantasia so I need the literal imagery in order to see what the design will look like. These steps are by no means necessary and if you can visualize what you want then you can just add the images/text in however you like.
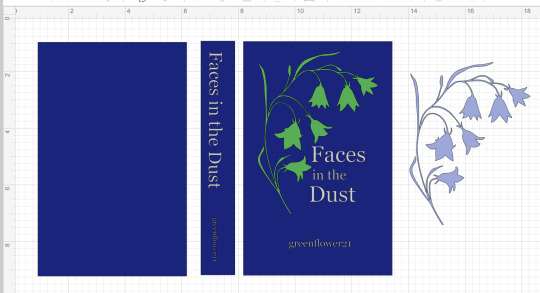
The vinyl is a plastic-y sheet or roll of vinyl in a given color. Because I wanted to have the flowers be one color(lavender) and the stem (green) another I needed to cut two sections and take the parts I wanted from each. I could have also edited the images so that each of the two only had the parts I wanted from it so it would only cut them. But it wasn't that much of a difference and if I just copy pasted a second one of the same image and changed the color then I would know they were the same size and everything would fit together.
Once the design is done I move to the cutting phase. The colors you pick determine which pieces are cut together.
You load each sheet of vinyl in on a mat and it cuts the image out. When it is done you cut out around the section you just cut the image on and then use tweezers to remove the vinyl you aren't using around the image. This is called weeding.
In the flowers & stem's case I also then used an exacto blade to cut off the flower heads from each of the cut outs so I could combine the two colors of vinyl to create my final version of the image.
Once it is all weeded you are ready to transfer it to the book case. You do this with transfer tape. It is a clear plastic sticky sheet that you place on your vinyl to 'pick it up' off of the backing it started out on.
Again in this instance to combine the colors I picked up the green vinyl on the tape and then lined up the purple flowers and pressed down to get them stuck to the tape as well. With it all now collected I placed the transfer tape on my book and pressed the vinyl into the case of the book. Smoothing it down with my bonefolder or anything else that helps make sure it is flat so it is really adhered and there are no air bubbles.
I do the same with all the titling and ta-da! A Book!
There are tons of ways you can title/design your book covers. I just got my hands on foil quills this past weekend so I hope to try making a cover with them in the not too distance future. Some folks I know use paint pens, or cut out stencils and use regular paint, or just free hand paint if you want to show off your skills of an artist.
Hope this was helpful and not too rambling.
Sorry I don't have pictures for all the steps, I can make a point to take pictures the next time I make a cover in cricut if that is something folks would want to have.
Feel free to reach out if you have any more questions.
40 notes
·
View notes
Text
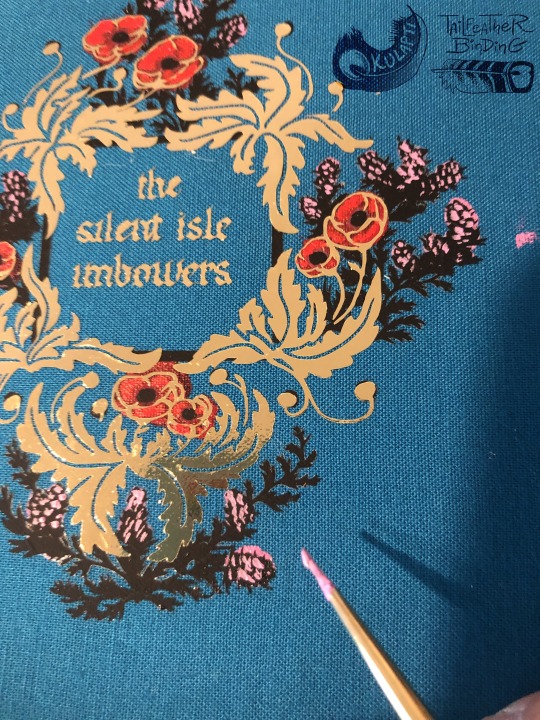


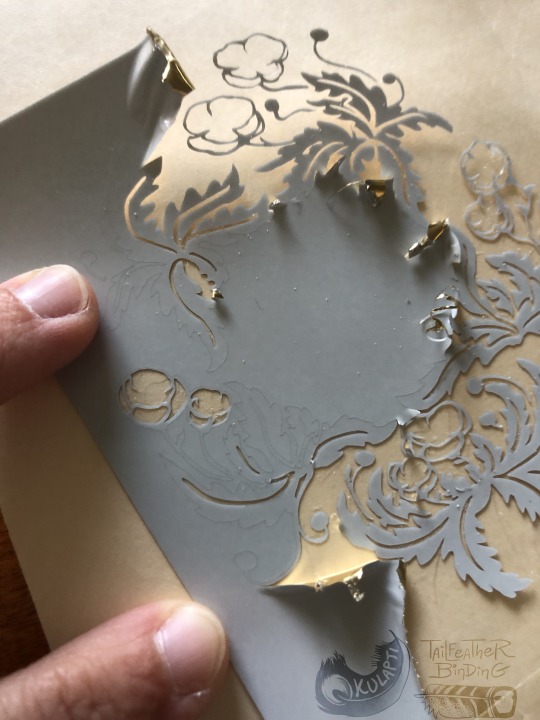

Cover construction for The silent isle imbowers, July-Aug 2023.
Finished binding here.
Materials shown: metallic gold and matte black heat transfer vinyl with cricut-cut designs, cricut-cut paper stencil, acrylic paint, bookcloth made of cotton + drawing paper backing + Lineco PVA glue. Calligraphy by quillingwords, flower art and cover construction by me.
————-General tips on how to make smth like this:
Steps in order were (1) have bookcloth, (2) cut and paint stencil, (3) cut and weed both HTV layers, (4) apply black HTV, (5) apply gold HTV, (6) add paint detail with paintbrush over the vinyl, (7) apply bookcloth to cover board.
This is not a beginner-friendly design LOL. Be like me and try most of the steps by themselves on other projects first.
I drew this design knowing how the sections would be layered, and which materials (and therefore colors) would go with each layer. Achieving a similar result with a premade design will likely require editing in a digital art program.
Test how your materials will layer before committing to a complex design. In this case I discovered that the type of bookcloth I made actually helps conceal the adhesive spread under the black HTV.
Layering HTV over small sections of acrylic paint works! Cannot confirm the result if you were to use large painted sections.
PSA This black layer with many very small pointy bits is at the extreme limit of what I think is possible to weed from machine-cut HTV. A different material might work better, and I got a lot faster at weeding the second copy than the first one, but some of this is just a technical limit. The gold section worked great but I would not recommend this for the black.
Layering HTV is much easier to do uniformly with a heat press! Check if your local library or maybe an art class studio has one you can use before doing smth like this with your iron.
Paper stencils are easy to make with the cricut but don’t try to use them for anything with small details. The above example is pushing it despite being very simple shapes. Stick-on stencils are better.
Tiny HTV design tip: designs with jagged sections and very thin lines are hardest to weed successfully. Smooth curves are much easier.
Scale all pieces of a stacked design on the same drawing program and within the same canvas in cricut so they layer precisely.
Cut tiny HTV designs with the washi paper setting on a cricut. I did not find this out myself but I can confirm the results! Using the HTV setting will cause the blade to catch on and pull up small sections of the design while cutting, ruining parts of the design.
—————-Tiny HTV design weeding tips:
For the love of cheese do not try anything this complicated the first time you use a cricut. or the second. you will cry
Seriously consider trying both HTV and cricut stencils before doing anything complicated like this. I wish I had at least attempted the black layer as a stick-on stencil.
This isn't a weeding tip but again you better cut this with a washi setting.
Use a very sharp weeding tool, good lighting, and consider a magnifying glass
Be prepared for this to take several hours, especially if you have never done a tiny piece before.
Important! The cricut does not perfectly cut out designs, leaving very small connected sections around the design at various locations. This is almost unnoticeable on large designs but can ruin tiny designs very easily. Be prepared to hold down the “keep” sections of the design with tweezers or a fingertip while pulling or trimming off some of the “remove” negative space.
Do NOT attempt to pull off all the negative space in a single piece. Either add dividing lines to your design for the machine to cut, or use a sharp tool to scrape them yourself. You are much less likely to accidentally remove part of your design if you weed the design in distinct sections.
#my art#bookbinding#work in progress#fanbinding#art tips#artists on tumblr#here there be fandom#long post#weeding the black layer was so. lol. I started the first one and was like I may have made a terrible mistake#renegade chat lighting candles for me#worth it!! also would hopefully come up with a more efficient stencil strategy instead next time!!#I normally post wip stuff on my side blog but figured this might be worth going on main#also the first wip photo looks neat so#only the vision of this fic being a Really Hecking Badass Book could sustain me thru 12 hours of weeding those black layers#my Learn Bookbinding Skills strategy is basically to choose an extremely ambitious project that excites me enough to keep me motivated#and then to just work on it for months because I am stubborn as all hell and genuinely find this fun instead of frustrating :D#tailfeather binding#id in alt text#described#update I have added ids!
44 notes
·
View notes
Note
tortillon, a sunday afternoon, and cricut for the ask game 〜↗
for rowan:
tortillon: does your OC "blend in" with the people around them? Physically? Metaphorically?
no </3 rowan is very much an outcast in his village. kind of, i guess. people talk to him and they depend on him somewhat, but he is just Not Welcome since they believe he brings bad luck. physically, the only thing that separates him from everyone else are the marks the god of the forest's magic left on him when they saved his life, that is, discolored hair and eyes, and "crack" lines around his nose/cheek, etc. metaphorically... he is the first forest's invasion, basically. the first forest claimed him, never got him, but technically he still belongs to it.
fantasy romance wip:
A Sunday Afternoon…: pick one "little moment" from this fic. How representative is it of the fic's tone and story as a whole?
this is actually one of my favorite scenes bc it is a little moment but it translates (imo) well what fantasy romance wip's setup is:
No one sees him. He avoids the street, making his way through the sleeping wooden houses until he reaches the woods. The smell of rain and winter is stronger here, the bony black trees rising around him like a mural of spiderwebs, the ground humid but hard, almost frozen over. The first forest inside his chest rattles against his ribcage in faint awareness - these woods belonged to them, a long time ago, and the roots under his feet remember their old masters. Their longing swells on the tip of his tongue, mixing with the first forest’s eternal, desperate hunger. He shivers.
The altar waits for him atop a small pile of stones, positioned almost carelessly by the trail as if forgotten by someone on their way to the village. It’s a small thing, a square of wood above rocks, the symbol of the god of the forest - curled antlers sprouting from a half mask, eyes nothing more than two holes roughly carved out with a knife - resting precariously above it. A few offerings are already placed at the altar’s base; Rowan recognizes Moira’s small cakes and Lorna’s flower crown, still looking fresh, and other, older offerings, untouched by anything other than time. The god never accepts them - they never did, not even before they saved Rowan’s life only to disappear never to be seen again - but that never stopped the villagers from offering a bit of what they had every week. For protection, and comfort. Reassurance.
“I brought you this,” Rowan whispers to the altar, placing a chunk of bread and cheese beside Moira’s cakes. His breakfast. He takes a deep breath. “Something is not right. I can feel it. I…” He pauses, mouth going dry, heart beating inexplicably fast. The stillness settles over him, anxious, waiting.
Hungry.
“Keep it away from the village,” he asks finally. “Keep Ada safe, if you are still out there.”
Rowan rolls his shoulders, swallowing past the mess of thorns in his throat, and waits. The woods’ eerie quiet is a hollow answer that sinks deep into his bones, a feast for the first forest hungering inside his chest.
There is no response.
aka the god of the forest is gone, ppl still believe in them, rowan very much wants them to show up and fix whatever the hell is going on, but gets no response. loifa (said god of the forest) quite literally plugged the phone off the wall, they are Not Here For it. they get pulled into it anyway.
Cricut: are there any characters you've had to "cut" from a story? Are there any moments/chapters/stories you've had to "cut" entirely?
for fantasy romance wip? nope. fantasy romance wip came into existence from the idea of "i will do what >>i<< want just the way >>i<< want and i don't care if anyone reads it, ever" so i'm not cutting anything from this story lol so far at least. i havent had a reason to, to be honest. i'm being very self indulgent. it does create some problems. i don't think the book will be very marketable (it's in the idea, i know). i call it fantasy romance wip and by the name it should be a queer romantasy but it is so old that it predates the popularity of "romantasy" as genre (or my knowledge of it, at least) and does not fit within its conventions that well. i dont know if i will even try to self publish it. time will tell!
so nope, nothing i like is getting cut from this story if i can help it
thank you so much for the ask!!
#i do keep coming up with the opposite problem#i dont have a middle bc i dont have Enough Content#lol#halfbit#fantasy romance wip#i just cant wait to write the scene where rowan realizes loifa has no idea who he is#my guy spent the last decade fretting over the god of the forest who saved his life#meanwhile said god of the forest couldnt care less#or rather#they are very good at pretending other people dont exist
2 notes
·
View notes
Text
7 Cricut Maker 3 Leather Projects to Enhance Your Style

Hey, are you looking for some unique Cricut Maker 3 leather projects? Look no further than this guide! In this post, I am going to tell you the best DIY projects that you can create with leather. About 3 weeks ago, I finished my Cricut leather projects. I have aimed to make a few projects so that I could write this blog diligently. But do you know what was the most difficult part of this project? Cutting intricate designs on leather. Yes, it might not be easy to cut, but they require patience during both cutting and weeding such designs.
Without any further delay, let’s get straight into this blog to find out the most amazing ideas for creating leather Cricut projects.
1. Bracelets
Do you love bracelets? If so, you must give it a shot! When I was looking for ideas for Cricut Maker 3 leather projects, it had been on my mind for a long time. Finally, I gave it a try and saw how beautiful it looked. If you have any friends you want to give this bracelet to, it would be great!
2. Hair Accessories
Do you want something for your hair? You might wonder what I can make for my hair or other beauty stuff. Well, this leather accessory is also made with leather. As you can see, it might look a little tedious, but it is a piece of cake. Start diving into your Crafting journey and create what you need the most.
I gave it a flower shape, and if you are a little bit familiar with Cricut Maker 3 Setup, then it is a breeze for Maker 3 to cut such designs.
3. Earrings
I love leather earrings, as they enhance my beauty and are easy to create. Beginners who are looking for the best Cricut Maker 3 leather projects should try them out! Why? Because they are really easy to make. I also wanted to make them a little unique, so I added some glittery effects. This is what I needed, and hence, I made them.
4. Keychains
If you want personalized keychains, then here I have something for you! Whether you are a novice crafter or a pro, this keychain is easy to make. All I did was add some texts with different font styles to my Design Space.
Finally, after finishing my design, I started my Cricut Maker 3 and cut all the words Daddy and Daniel to make keychains. I handed it to my dad, my brother, and my dinner.
5. Crossbody Bag
Today, everyone wants to use a body bag, and what if you have a personalized one? Sounds like a great idea, no? I created this simple bag for myself as I am not much into personalized stuff. But you can have one if you want. The process of making this bag is easier, and you will need iron-on vinyl to make such a beautiful crossbody bag.
6. Monogram Keyring
Looking for super easy-to-make Cricut Maker 3 leather projects? Here is the monogram keyring that is most widely useful, and it would be great if you could give it a shot! This is a great beginner project, and any beginner should try to make something unique. I also used paint to color it to make it look stunning! Lastly, you can see the result in the picture, like how elegant it looks.
7. Cord Organizers
Every one of us uses earphones or a charger, but sometimes managing those clumsy wires is boring and tedious. So, I decided to create something that could organize my cords or wires. Here, you go with leather cord organizers, which I created using my Cricut. There are many cuts that I had to make, and I preferred my Cricut Maker to cut them as they are faster and provide precise cuts, making them look professional rather than handmade.
FAQs
Can I cut leather with Cricut Maker 3?
Yes, leather can be easily cut with Cricut Maker 3. It can also cut other materials such as fabric, paper, and balsa wood without any problem. In order to cut the leather, you have to use a knife blade, and the thickness of the leather should be up to 2.4 mm or 3/32 mm thick. However, you have to use a clean cutting mat with a sharp blue edge for better results.
What are the essential Cricut tools for cutting leather?
There are some common tools that you can use to cut leather. They are as follows:
Utility knife: This sharp knife is considered a versatile tool for cutting your leather.
Rotary cutter: This is a tool that comes with a wheel-shaped blade. Ideal for long and straight cuts.
Leather shears: A kind of specialized scissors idea for cutting thick and tough leather.
Round knife: It is a popular tool that is most widely used for cutting leather.
How thick can I cut leather with Cricut Maker 3?
If you want to cut the leather on Cricut Maker 3, you can cut up to 7 oz thick. The best thing about the Maker 3 machine is that it cuts anything precisely. In addition, cutting the leather is a breeze. You will also have to use a knife blade for all these leather Cricut projects.
Wrapping Up
As you went through the 7 Cricut Maker 3 leather projects, you might have found them easy to make. The best thing about these leather projects is that they are beginner-friendly. So, you will not need to worry about the complexity of the projects; just turn on the Cricut Maker 3 and prepare the leather that you want to cut. After cutting, the result will be fantastic and will stand out!
For more information and visit: www.cricut.com/setup login
cricut.com/create
Cricut Design Space App
Source: Cricut Maker 3 Leather Projects
#Cricut Maker 3 leather projects#leather Cricut projects#cricut design space download#Cricut maker setup#cricut maker 3 setup#Cricut Design Space Login#Cricut Design Space App#Cricut New Machine Setup
2 notes
·
View notes
Text
3 Beautiful Ways to Use Pressed and Dried Flowers | DIY Crafts You’ll Actually Keep!
I started working with dried flowers and pressed botanicals a few years ago, and it has taught me a few things.
Delicate dried flowers can burn or disintegrate in epoxy resin.
Glossy Mod Podge however much we love it, can make you cry (and even ruin your floral project).
Depending on your project, pressed flowers MUST be chosen as carefully as you would choose fabric, paper, or paint colors.
So how can you still work with these lovely mediums and create long lasting, archival art that you can be proud of? Read more to learn about 3 of the most botanical-friendly crafts.
Framed Glass Art
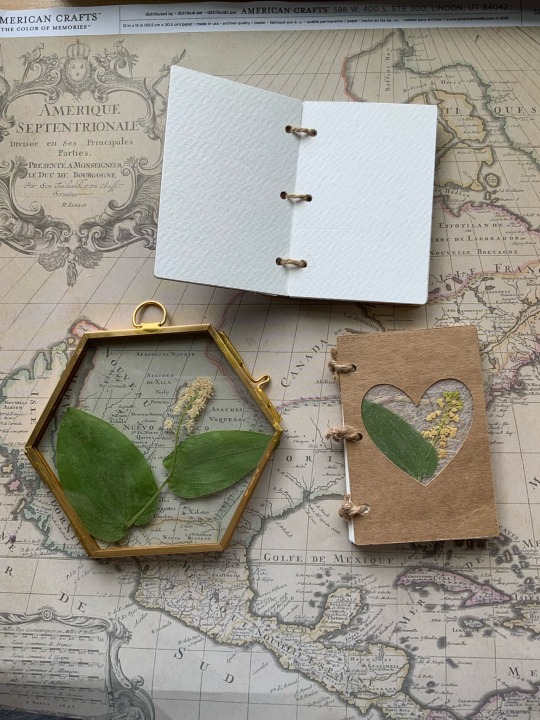
What you’ll need:
Double sided glass frame. (any size)I buy mine on Aliexpress or Amazon.
Clear glue, glossy mod podge, or a tape runner.
Pressed flowers
Scissors
How to make it:
Start by selecting your botanical specimens and arranging them in your frame. Use scissors to trim and refine your arrangement until it is to your liking.
Remove all of the flowers, and strategically place dots of clear glue on the inner glass. Wait until your glue becomes tacky. The time will depend on the type of glue that you’re using.
Tip: Test out the cure time by placing a few different sized glue dots on a plastic surface. See how long it takes for the glue to become more viscous and less runny.
Place the flowers onto the glass. Make sure to tack down all specimens with glue until they’re difficult to move. Allow the glue to dry completely before closing the glass frame.
Once dry, display your beautiful arrangement!
I love making smaller arrangements for office spaces and display shelves. These also make adorable secondary gifts in care packages.
Glass offers a more eco-friendly alternative to epoxy resin. Though I love working with resin, I’ve started to become more conscious and selective of my usage to creation ratio.
2. Floral Bookmarks
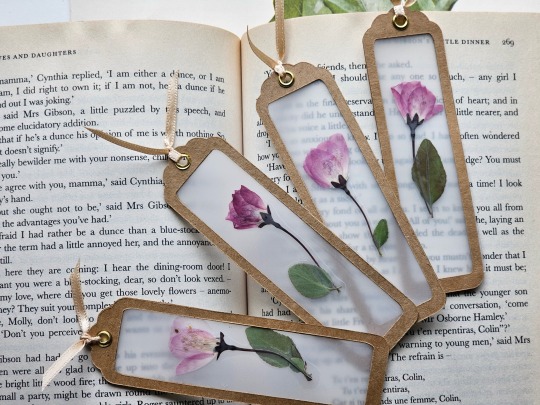
What you’ll need:
Pressed flowers. Preferably long stem flowers that press very flat such as fleabane and daisies. You can also use small flowers without stems.
Self or thermal laminating sheets.
Thermal laminator. (If using thermal lamination)
Scissors
Cricut Cutting Machine (highly recommended for a cleaner result) However, you can also create your own frames. Simply use two gift tags or rectangular pieces of paper. Measure and cut out another rectangle of your preferred size in the center of your paper. Use an X-Acto knife to make the cut out.
Kraft paper cardstock
Glue stick, or my personal recommendation, Kuretake Glue Pens. They will make less of a mess, and create a longer lasting bond on kraft paper.
How to make it:
If using a Cricut machine, start a new project in Cricut Design Space.
Search for “bookmark frame” in the “images” section.
Select a design you like the shape of. You can also create your own by “slicing” new shapes into existing templates.
Resize your design. Choose whatever size will accommodate the shape of your flowers.
Cut out your frames out on kraft paper.
Once you’ve cut out your design, remove half of the frames from the mat. Leave the other half on the mat. This will make keeping them flat easier once you’re ready to assemble everything.
Laminate your flowers. Be sure to use your frame as a guide to arrange them within the window. Leave an inch of space between each arrangement for cutting if you’re making more than one bookmark.
Cut around the flowers, leaving a bit of allowance for gluing them onto the frame. I never measure like I should. Just use the frame as guide to avoid cutting off too much laminating plastic. We will hide the ugly jagged cutting job later. 😅
Return to the mat and apply a generous layer of Kuretake glue to the entire surface of the frames still stuck to the Cricut mat.
Carefully place the laminated floral arrangement on the frame.
Apply another layer of glue around the edges of the lamination, and also on the other frame.
Place the second frame over one of the mat frames, and press down firmly. Tip: You can also place a book on top to keep them flat.
Let your bookmarks dry for about 20 minutes before adding your embellishments. I love using key charms, grommets, ribbons, or tassels.
Check out my inspo photos below! Get creative with decorating.
3. UV Resin Pendants
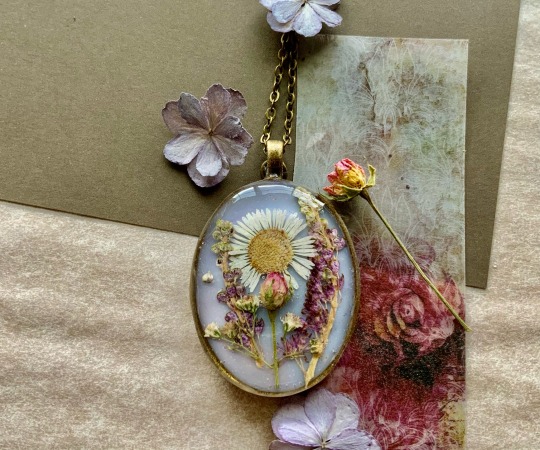
Before I started working with UV resin, I was told that it isn’t light fast. Which is true for most resins on the market. I’ve also heard that it yellows over time and that the UV light burns flowers.
These are all things that I’ve experienced working with flowers in UV resin. However, I’ve managed to make projects that have stayed glossy, clear, and beautiful for over 2 years now, and I want to share my tips and tricks!
Tip #1: USE a high quality UV resin such as the one from Counter Culture DIY.
Tip #2: AVOID using delicate flowers such as forget-me-nots, hydrangeas, larkspur, etc. If the petals are thin and delicate, they WILL become distorted or burn. Think florets, spaced petals, and small leaves.
Tip #3: USE opaque, strong, and VERY flat flowers such as pressed Violets, Chamomile, Fleabane daisies, Rosettes, Queen Anne’s Lace, and Baby’s Breath.
Tip #4: AVOID flowers with too many overlapping petals. These will trap air bubbles inside of your resin layers that tend to express during curing. They tend to cause very large holes and gaps.
What you’ll need:
Very high quality UV resin (My suggestion: Counter Culture DIY)
Cabochon bases or frame pendants
Barrier tape (if using a frame instead of cabochon base.)
Toothpicks to pop bubbles (I actually prefer using a sewing needle)
Light Curer such as a nail lamp. I use the Melody Susie 36W nail lamp from Amazon. Counter Culture DIY sells one specifically for their UV resin as well.
Pressed Flowers (My favorite seller on Etsy)
Optional: Colorants. I use mica powders, acrylic paints, and black and white resins from Counter Culture DIY (not sponsored, I wish!) These give your resin a background to stand out against.
Nitrile gloves
How to make it:
Start by applying a thin layer of UV resin to your base or taped frame. This will be the layer with color (if using pigments).
2. Pop any visible bubbles with a toothpick and cure the first layer for about 1-3 minutes.
3. Apply a thin dot of clear resin to the first cured layer. This will give your flowers something to stick to as you arrange them.
4. Once your flowers are arranged, apply a few strategic dots of resin around them to keep them in place. Cure the first thin layer without covering the flowers completely. Remember to pop bubbles!
5. Continue to add thin layers. Cure each layer for 1-3 minutes each. Repeat this process until your flowers are covered and your top coat has a domed appearance.
6. Finished! Avoid touching your project for several minutes until fully cooled. You don’t want fingerprints in your shiny top coat!
For more floral project ideas, check out my Pinterest below!
#pressed flowers#unique gifts#vintageinspired#art#home & lifestyle#floraldesign#fashion#books and literature#cottagecore#beauty#art tutorial#easy art#art ideas#artists on tumblr#books & libraries#floralart#handmade art#diy art#diy tutorial#journaling#inspo#writing#craftinspiration#my art#art supplies#artwork#floral#flowers#paper craft#diy ideas
3 notes
·
View notes
Text
Thursday Night
The mister has gone out to take some night photos of possibly creepy places, so I’m at home watching Dateline. I made big salads for dinner and then we ate coconut ice cream bars. Those two sentences sum up our Thursday night. This is retirement, folks. I actually spent a good fifteen minutes watching the sprinkler today. A couple of weeks ago we raked up the three inch layer of small landscape rocks that the previous owners used for their fire pit. It was right off of the patio, they hadn’t used any sort of weed cloth or barrier, and it was an awful, messy, weedy spot. Once we got the rocks up, Mickey spread some dirt and grass seed and now we’re babying that little patch to make sure the grass grows. That’s why I spent fifteen minutes watching the sprinkler today - that actually sounds better than I was watching grass grow.
I’ve been foofing up my little spot on the porch. It’s quickly becoming my favorite hangout. It’s shaded, hidden from the street, and has views of all the gardens. I found a cheap metal table that was sort of an ugly putty color, and painted it white and red.
I slapped a placemat on it and then added a little pot of lobelia.
Presto change-o!
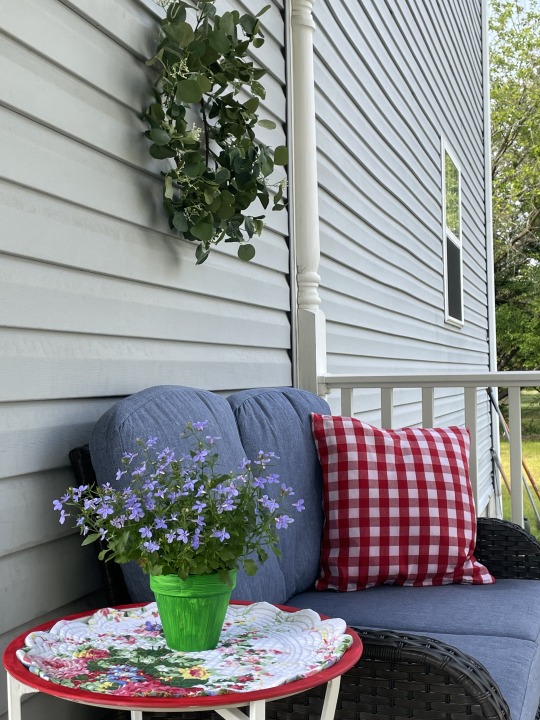
You know how much I love red gingham. If I can squeeze it in anywhere, I will. So I did.
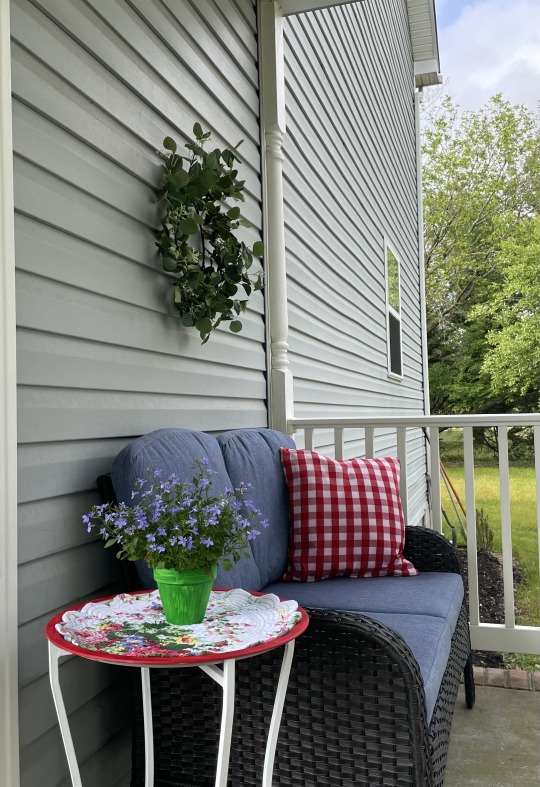
That wreath may need a birdie on it or something. I need a second pillow too. Maybe a pale green with roses?
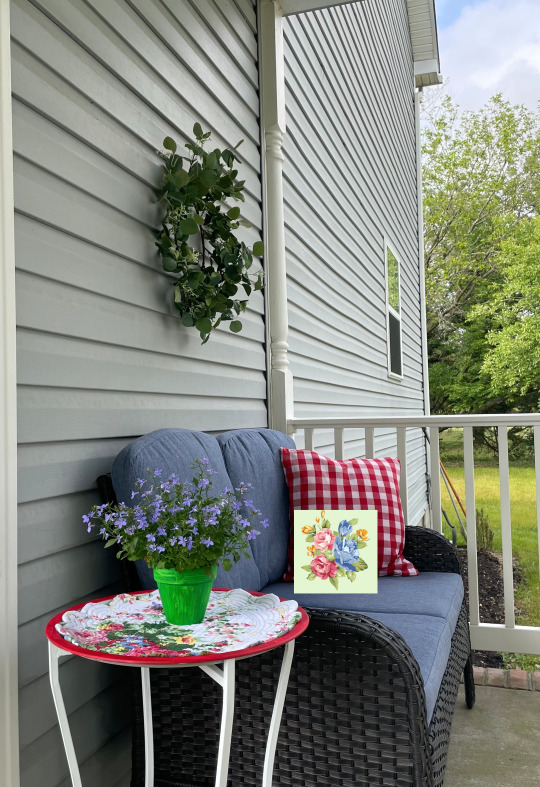
Eh, maybe not. I’ll dig around and see what I’ve got and go from there. Probably should have used red flowers in that pot, but lobelia is what I had. This is all subject to change but it’s a nice space for now. I love sitting out here in the morning, listening to the birds and contemplating the day. What’s that poem about birds singing despite the world being a wreck? I can’t think of it, but I appreciate their songs in a world gone mad.
We thought about driving over to Rehobeth Beach this week, it’s only about 45 minutes away and there’s a mile-long boardwalk where we could have lunch and check things out. The days got away from us and tomorrow is supposed to be rainy, maybe next week. We did snag tickets to see/hear David Sedaris at the BrowseAbout Bookstore there at the end of May. That’ll be fun. He’s always entertaining.
Aside from watching grass grow and painting anything that doesn’t run away from me, It’s just been cooking and cleaning. We did run a couple of errands earlier this week and made a pit stop at the Ridgely Pharmacy lunch counter for a sandwich. They have the best chicken salad in three counties. I finally worked my way through the delicious crabs our neighbor brought over. I used the last bit for breakfast. A toasted sandwich thin, a mound of crab, a little gouda and a generous sprinkle of Old Bay made my mouth very happy.
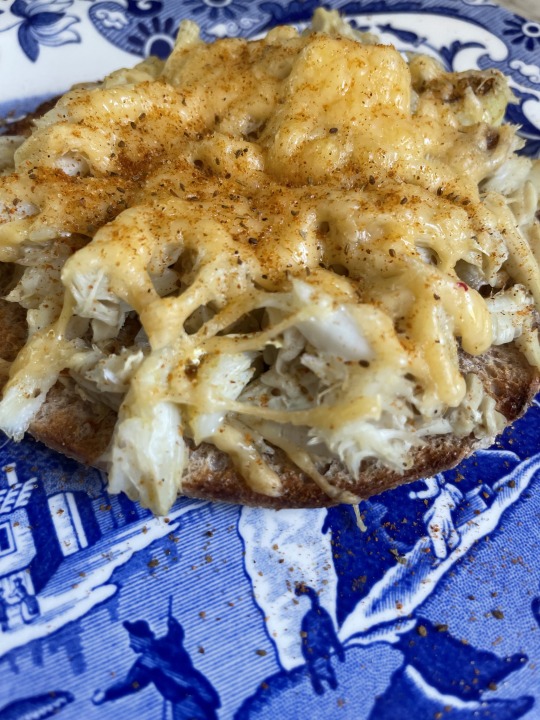
I don’t normally eat breakfast, but I’ll make an exception for crab.
I’m itching to get into my craft room and do something creative. I’m overdue. I’m hoping that tomorrow’s rain will give me the time at my desk that I’m craving. I haven’t touched clay or even paper for over a month. I get cranky when I don’t have that time. Mickey moved my cabinet into place for me and I put my Cricut on top which frees up loads more work space for me. I mostly use the Cricut to cut out my dead people, and I need to commune with them soon.
It’s a perfect fit for the space and the storage is wonderful. It’s calling to me. Pray for rain so I can play inside.
This blog post is a discombobulated bunch of nonsense. No one wants to read this boring stuff. I started this little corner of the web back in 2007. Can you believe it? It used to be a hoot. I had great material - kids, animals, my job in the school system. My stint with Clinique was blog-worthy too. The many, many years where I was on my own while the mister traveled every week - I got up to all sorts of hijinks that were worth writing about on Tumblr. Now we’re just a couple of old fogies who think it’s a big deal to stop for a chicken salad sandwich. Help. I’m five months from turning 60 and I want my life to be funny again. I’m staying busy making this house our own, but if I buy much more spray paint I’m sure I’ll be on some sort of DEA watchlist. If we’d moved somewhere that I could go to water aerobics or craft fairs, I’d have made friends by now and had some adventures. We’re almost at the one year anniversary of our move here and I’m still counting my once-a-week grocery haul as an outing. Help. I have no girlfriends to talk to (I just offended the cats by saying that), no one to meet for lunch. Where are the fun ladies of Denton? There’s no jazzercise or Zumba classes, where am I supposed to meet my people? The nicest person (and the most fun person) I’ve met so far is the program director for the Caroline County Arts Council. She’s an absolute delight. But she’s also very young and is busy with a young person’s life. I’m looking for someone with some mileage who knows how to talk about perennials and peri-menopause. Who am I kidding? Full blown menopause, I just liked the alliteration with perennials.
So there you have it, I’m home alone and watching Dateline, missing my sweet friends, and thinking that I’d better go take a bubble bath and lose myself in a good book. Tomorrow I hope I wake up to rain and spend my day creating some silliness. Maybe even something worth sharing here!
Until then, stay safe, stay well, and take good care.
XOXO,
Nancy
4 notes
·
View notes
Text
Who made that viral post about how 3d printers need to be made available to housewives and moms? Because I'm proud to announce I've learned that silhouette, the less trendy brand that makes cut machines like the cricut, has released a 3d printer with the same sort of price point and user friendliness as their cut machines. (About $300) The revolution has begun!
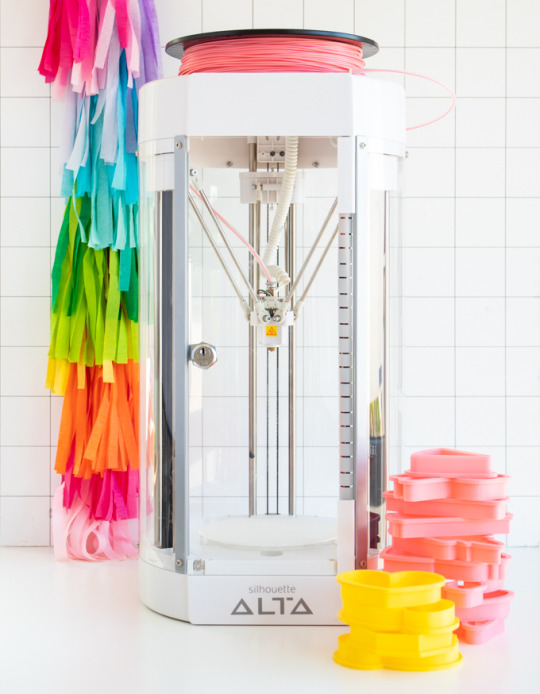
[a photo of a silhouette alta 3d printer displayed with pink filament loaded inside, next to a stack of pink and yellow 3d printed cookie cutters on one side and a rainbow crepe paper streamer on the other. ]
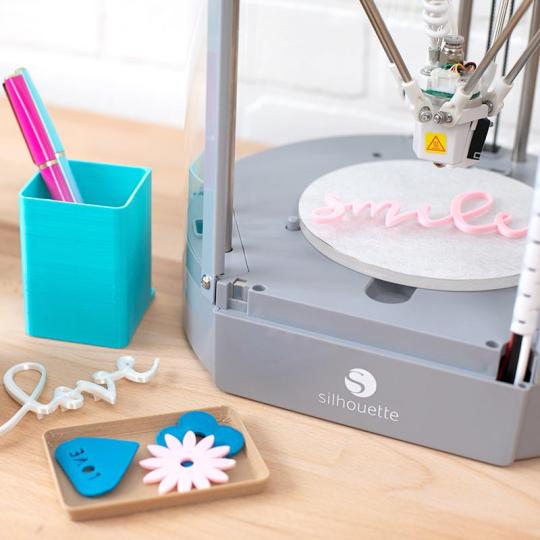
[a photo of a grey silhouette alta 3D printer displayed with the word "smile" printed on the print plate and a display of pen cups, trays, flowers, guitar picks, and the word "love" all 3d printed by the machine.]
#by the way if youre a young and struggling artist with digital skills#making and selling svgs to these gals seems like a decent side hustle#I imagine print models will be similar
17 notes
·
View notes
Text
How To Use Cricut Transfer Paper On Vinyl? [Step By Step Guide]
If you usually make Cricut or Silhouette projects, you will have to use transfer paper once in a while. Cricut transfer paper eases the process of getting the design from backing paper and transfer it to final project. If you don’t know how to use Cricut transfer paper on vinyl, this guide is for you. The cut vinyl appears as a big sticker that you need to remove from the backing paper and attach to your project. However, the vinyl is very thin and difficult to transfer using your hands. Plus, it gets more difficult with complicated designs.
Hence, if you are starting to make vinyl craft stickers, transfer paper will be useful for you. We will reveal the use of transfer paper with vinyl. The process is simple- cutting and weeding the vinyl, transferring the vinyl to the transfer paper, and then transferring the design onto the final project.
There are many vinyl projects to create. You can increase your business with a Cricut machine, permanent vinyl, and good-quality transfer tape. If you haven’t used transfer paper on vinyl, read this blog that describes a step-by-step guide.
What Is A Cricut Transfer Paper?
Cricut transfer paper looks like a paper roll or A4 sheet pack. You can also say transfer paper as transfer tape. You can print on transfer paper via an inkjet printer. For instance, printing a design onto a shirt. Transfer paper is sticky and transfers vinyl to the final material and can work on various materials such as mugs, glasses, cups, etc. It is a good tool to transfer the vinyl decal to the material you need to personalize.
Cricut transfer tape has two sides. The bottom side is the paper backing that you need to remove, and the sticky upper side is composed of a plastic film. The top sticky side is attached to the top of the vinyl. Crafters use mugs, cups, and tumblers using adhesive vinyl. However, if you are working with heat transfer vinyl, you won’t need transfer paper. For the vinyl projects that have to be frequently washed, such as cups and mugs, you should use permanent adhesive vinyl.
What Are The Types Of Transfer Tape?
Transfer paper is available as a regular and strong grip. The standard transfer paper is used for most projects and has a strong grip on glitter vinyl, as you need extra strength to grip the surface. If you have an issue lifting the vinyl from the backing sheet, use a strong grip transfer tape.
How To Use Cricut Transfer Paper On Vinyl?
First, cut the design from adhesive vinyl with your Cricut machine. After that, weed the excess vinyl in and around the design. When you only have the design you need to transfer, you need to peel off the transfer tape.
Follow the steps to use transfer tape on vinyl:
First, cut the transfer tape a little larger than your design. Before you get rid of transfer tape you should use it several times. Hence, take a little larger transfer tape for your project for proper adhesiveness.

Then, peel back the backing paper. Keep the paper backing to use later to stick to the transfer tape.
Place the transfer paper on your design and burn it down. You can use a scraper or an old gift card or a credit card.

You can either turn the piece, take off the backing paper, or lift the transfer tape. You need to fix the design on the tape.

Now your design is on the tape, and you can move it to your project.

Then, press the vinyl down and burnish it once again.
After that, peel back the transfer tape. Make sure that your project surface is stuck properly to vinyl. Remove the tape and burnish it a little more if it is still lifting.

What Kinds Of Projects Can You Make With Permanent Vinyl?
You can make many projects using permanent vinyl and transfer paper. You can put the design prints on glass, plastic, ceramic, or acrylic surfaces. It means that you can transfer designs on wine glasses, notebooks, flower vases, and many more.
FAQs
Why Use Cricut Transfer Paper For Vinyl?
Cricut transfer paper or tape is generally used to transfer the vinyl with designs to materials such as water bottles, mugs, and tumblers.
Do I Need To Mirror Vinyl While Using Transfer Paper?
In the case of permanent vinyl, there is no need to mirror the design on the Cricut Design Space. The design mirroring is necessary in the case of heat transfer vinyl.
Can I Use Any Type Of Vinyl With Transfer Tape?
The answer is no; you cannot use any type of vinyl with transfer tape. For heavy vinyl, such as glitter, you must use a high-tack transfer tape. But for standard vinyl like holographic, you should use a medium tack transfer tape.
Is Cricut Transfer Tape Reusable?
Yes, Cricut transfer tape is reusable. Once you finish the project, put a Teflon sheet or parchment paper on the transfer tape and save it to use later. Next time you can use it if it has enough adhesion for the transfer.
Which Side Of The Vinyl Should I Put On Transfer Tape?
The shiniest or top side of the vinyl should be put on the transfer tape. On the other hand, the sticky side of the transfer tape should stick to the top of the vinyl.
design cricut.com download
design.cricut.com/setup
#cricut.com design space#cricut.com setup mac#cricut.com setup download#design.cricut.com/setup#design cricut.com download#cricut setup#Cricut.com/setup#www.cricut.com/setup
1 note
·
View note
Text
Cricut Ideas: Get Inspired To Make Best Craft Projects
Looking for inspiration to start your projects using the Cricut cutting machines and devices? Then look no further; you are at the right place. This blog is hand-crafted to give you the best money-making Cricut Ideas. Every Cricut cutting machine and device can give you the best professional-looking results in no time.
Here, we have provided the steps to get started with the Cricut Ideas. Then you get to know what you can create with various Cricut machines, presses, and tools. So, keep reading to find out everything about Cricut ideas and much more.
Cricut Ideas: How To Get Started?
Before you look into all the Cricut Ideas, I have broken down the whole process of creation into a few simple steps. These steps are basic and will act as a mini guide before you embark on your journey of creating and selling crafts using your Cricut machines.
Step One:
If you have not yet purchased your Cricut cutting machine, then the first thing you need to do is get one. You can either buy it from famous stores like Walmart, or you can get it from famous online websites, including Amazon and Cricut’s very own online shop. I would recommend you do thorough research on the features that are offered by the machine you are opting for. Make sure that it matches your requirements. You can also buy important tools and add-on devices like a knife blade, heat press, scoring tools, and rotary blades.
Step Two:
Download the Cricut Design Space application on your system or mobile device. It has a library with many pre-designed projects, images, graphics, and fonts. It will not only inspire you to create beyond any limits but also save your time. Once you have your own Cricut ID and login credentials, you can join various Cricut communities on the app that will help you further.
Step Three:
Start creating your projects for yourself and selling your craftsmanship to earn some extra cash. You can host a sale in your backyard and really create a small business overnight. The Cricut machines are user-friendly and quick machines that can help you personalize stuff for your clients. Make sure to take as many pictures as possible to post your work online to gain popularity and a good client base.
Cricut Ideas: For Beginners
Here are some interesting Cricut ideas that you can get inspired from:
Make Greeting Cards/Invitation Cards/Drawn Cards/ Welcome Cards etc.
To make cards, be they real-life-looking drawn cards, invitation cards, adhesive vinyl cards, welcome cards, birthday cards, customized cards, or cards for any occasion, you will either need a Cricut Maker, Explore, or Joy machine. You can sell it to people who are looking for personalized gifts cards options. By adding a scoring stylus or wheel, you can customize the envelopes to go along with the cards. Cricut also has its own range of colorful pens that can be used to add beautiful aesthetics to your cards.
Create A Personalised Vase
Flowers are everyone’s favorite; people gift them to each other normally as well as on special occasions. A great companion of flowers is a beautiful vase. You can actually brighten up any corner of your home or workplace with a customized vase. You can use fonts, graphics, and designs that are already pre-made in your Cricut Design Space Application. Then cut them out using Cricut cutting machines. You will need adhesive vinyl as a base material to cut out designs that can easily stick to the surface of the vase.
Personalize Storage And Boxes To Organize
One of the best among all Cricut ideas is using your Cricut cutting machine to declutter and organize your home, craft room, workspace, or kitchen. You can organize many areas of your home by making stylish labels from adhesive vinyl. All you will have to do is cut the labels and, with the help of a tool, transfer them to your carts, boxes, bags, etc. For creating small labels, I would highly recommend the Cricut Joy machine. You can get many beautiful fonts on the Cricut Design Space application.
Make Customized Mugs
The best way to create customized mugs is by combining the technologies of your Cricut cutting machine, Cricut Mug Press, and Cricut Design Space. You can create a beautiful collection of mugs or sell customized mugs. The mug making is one of the best among all the Cricut ideas, as they are high-in-demand products. You can work with infusible inks or heat transfer vinyl.
Visit: cricut.com/setup
learn cricut.com/setup
cricut setup
www.cricut.com learn
Source: https://learn-cricut.com/cricut-ideas/
3 notes
·
View notes
Last Seen Blogs

maracujatangerine
Weird Writings

motivations-world
motivation

sprinkledfrostingfriend
Expose to dispose

raadasszerelem-teljes-film
VIDEA-HU » Ráadásszerelem (2023) » Teljes Film Magyarul HD

loveamoramouramore
L'Amour